

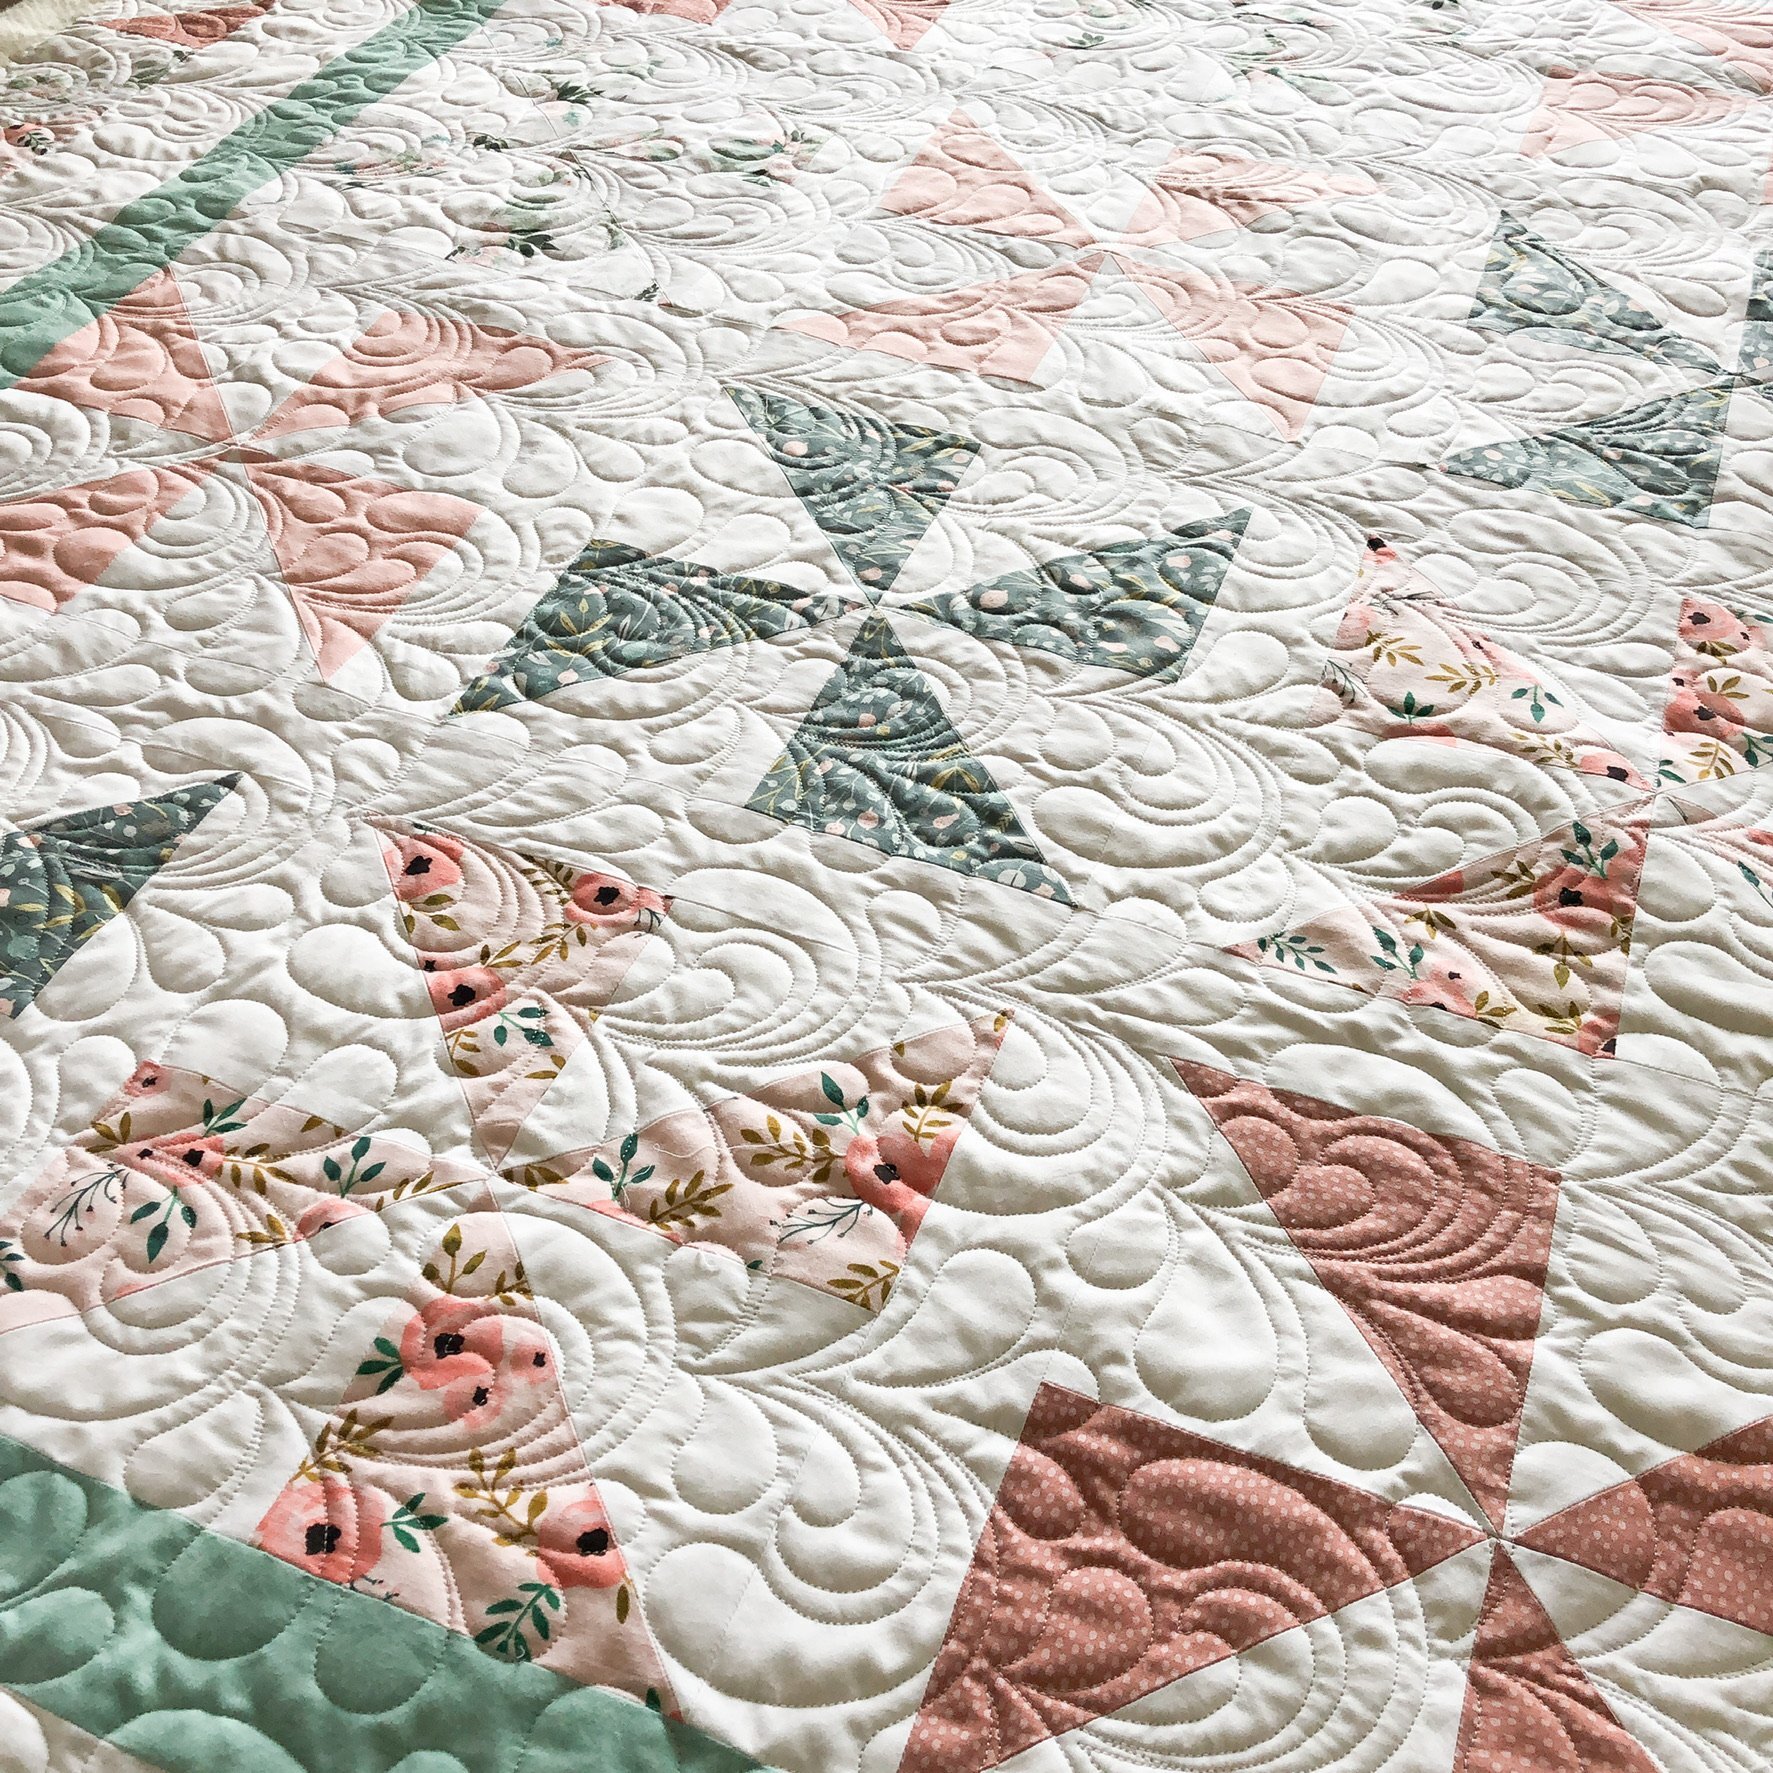
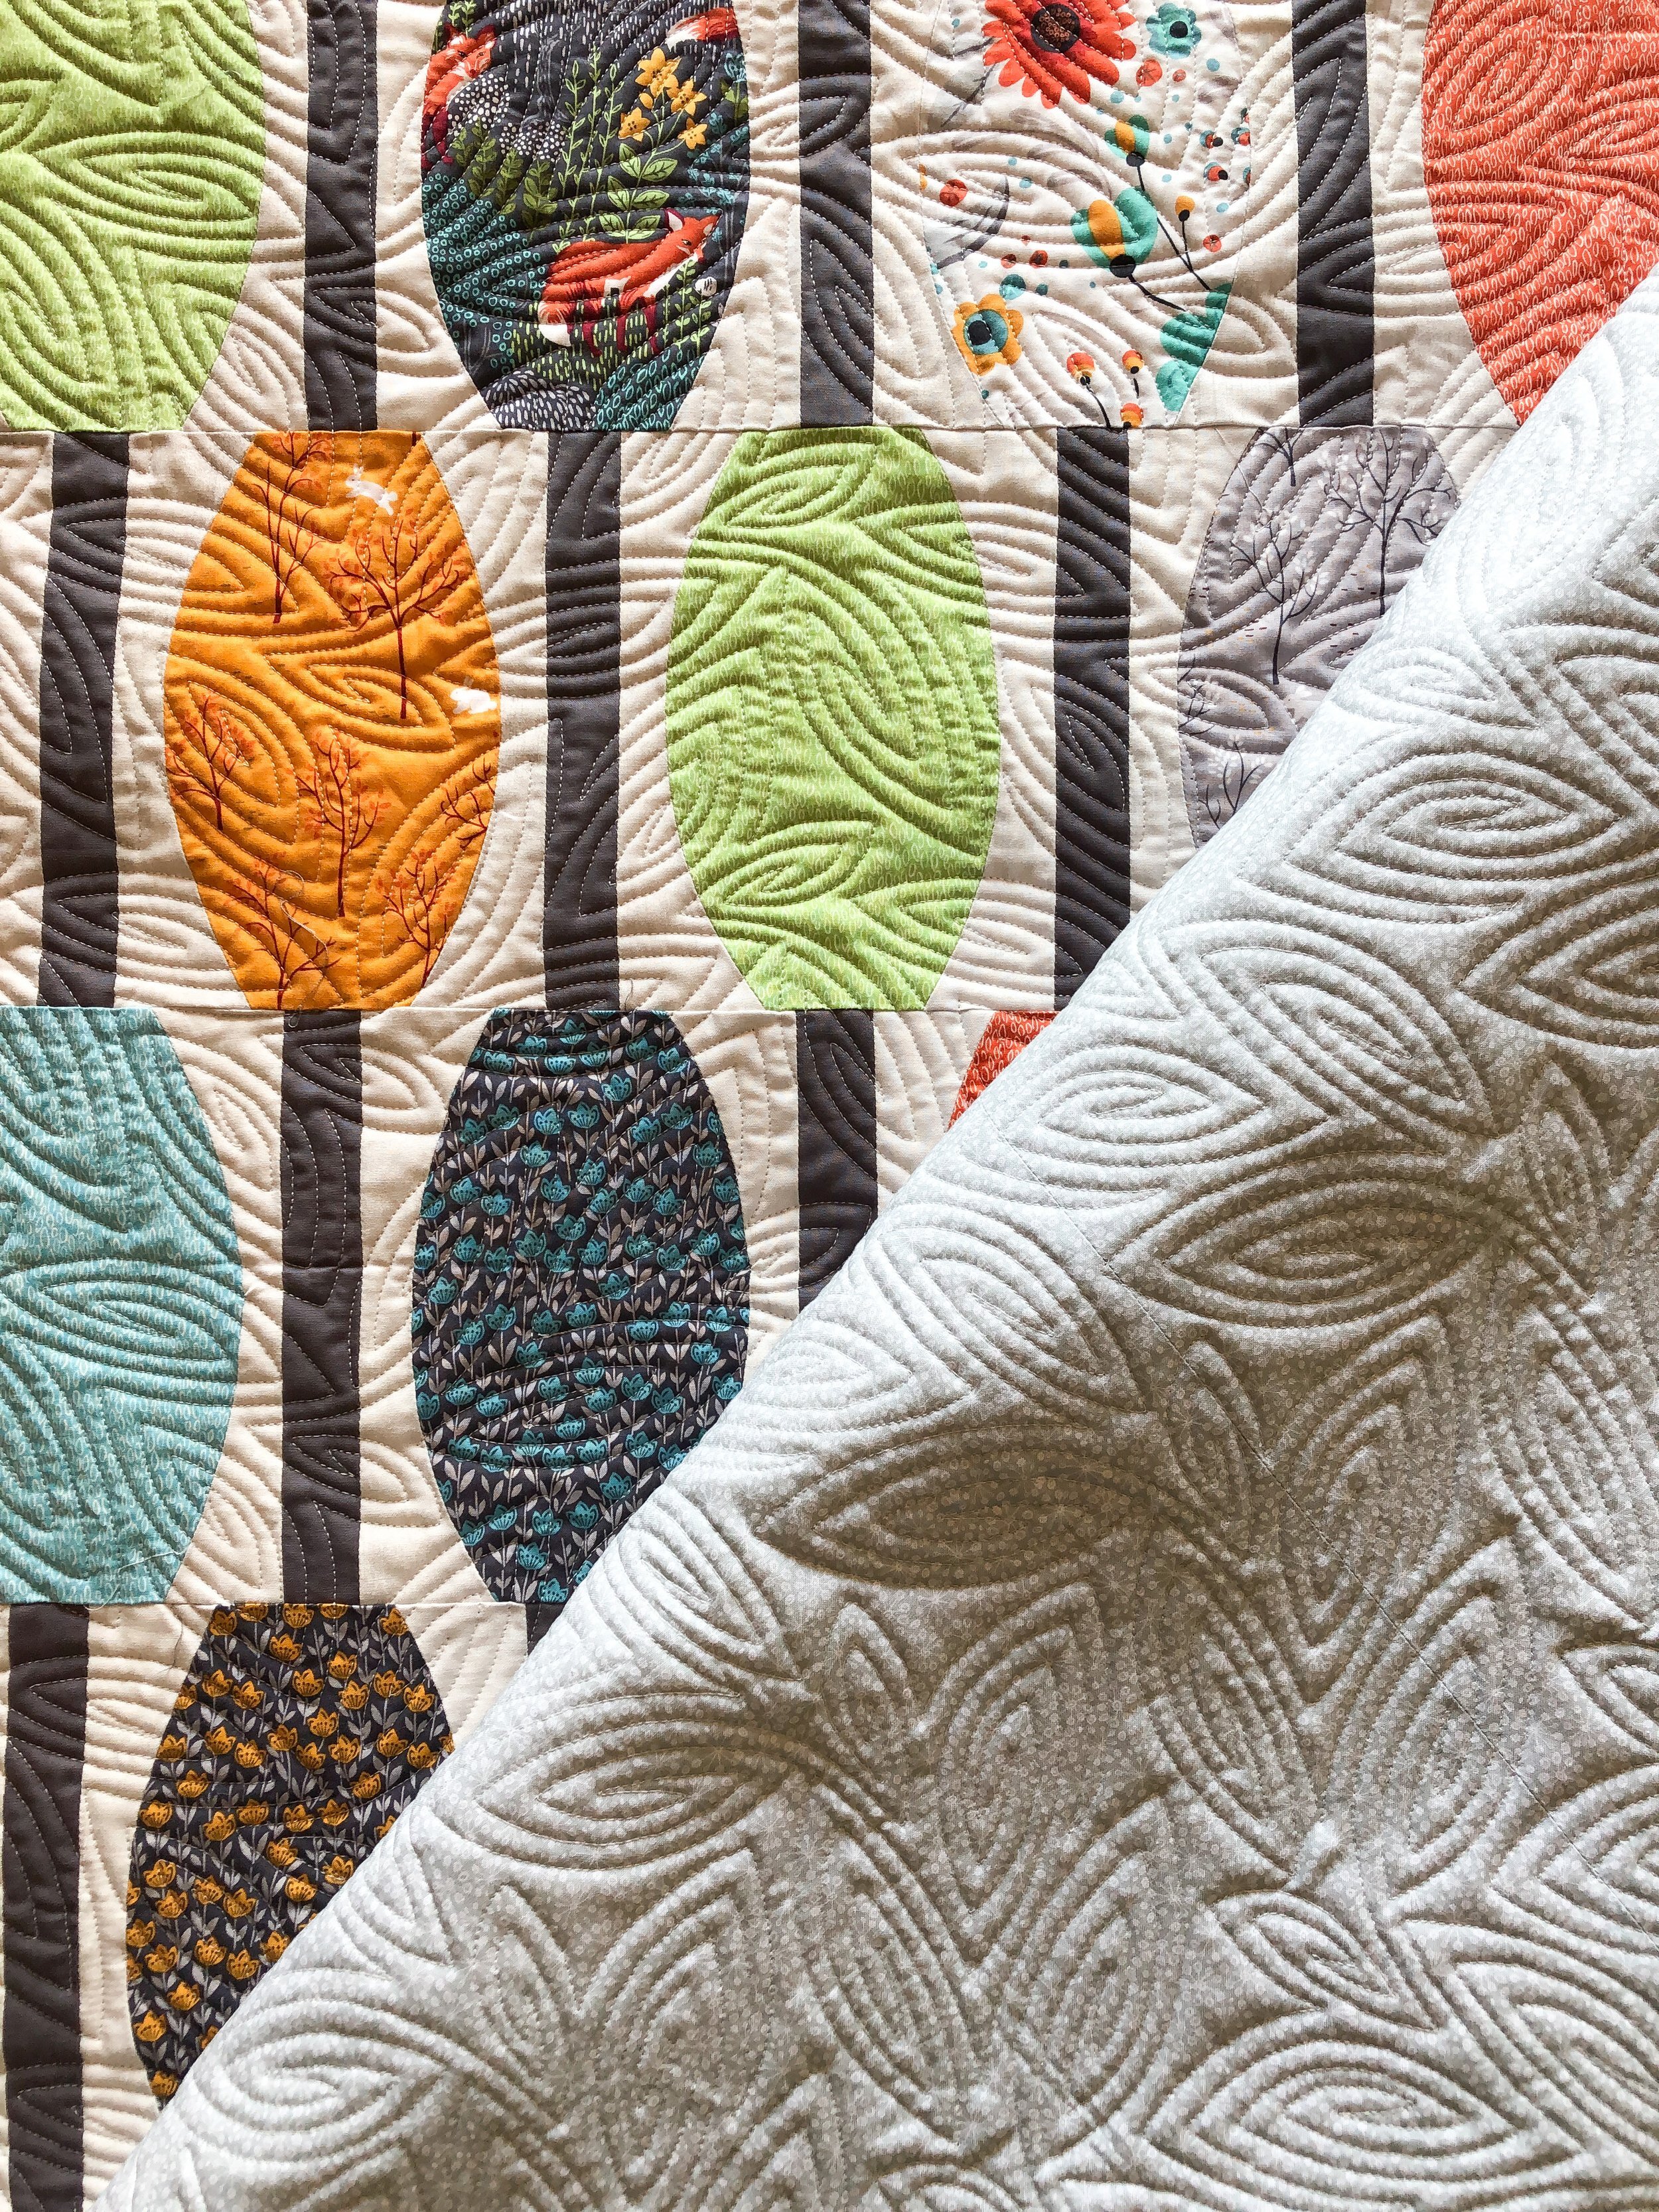
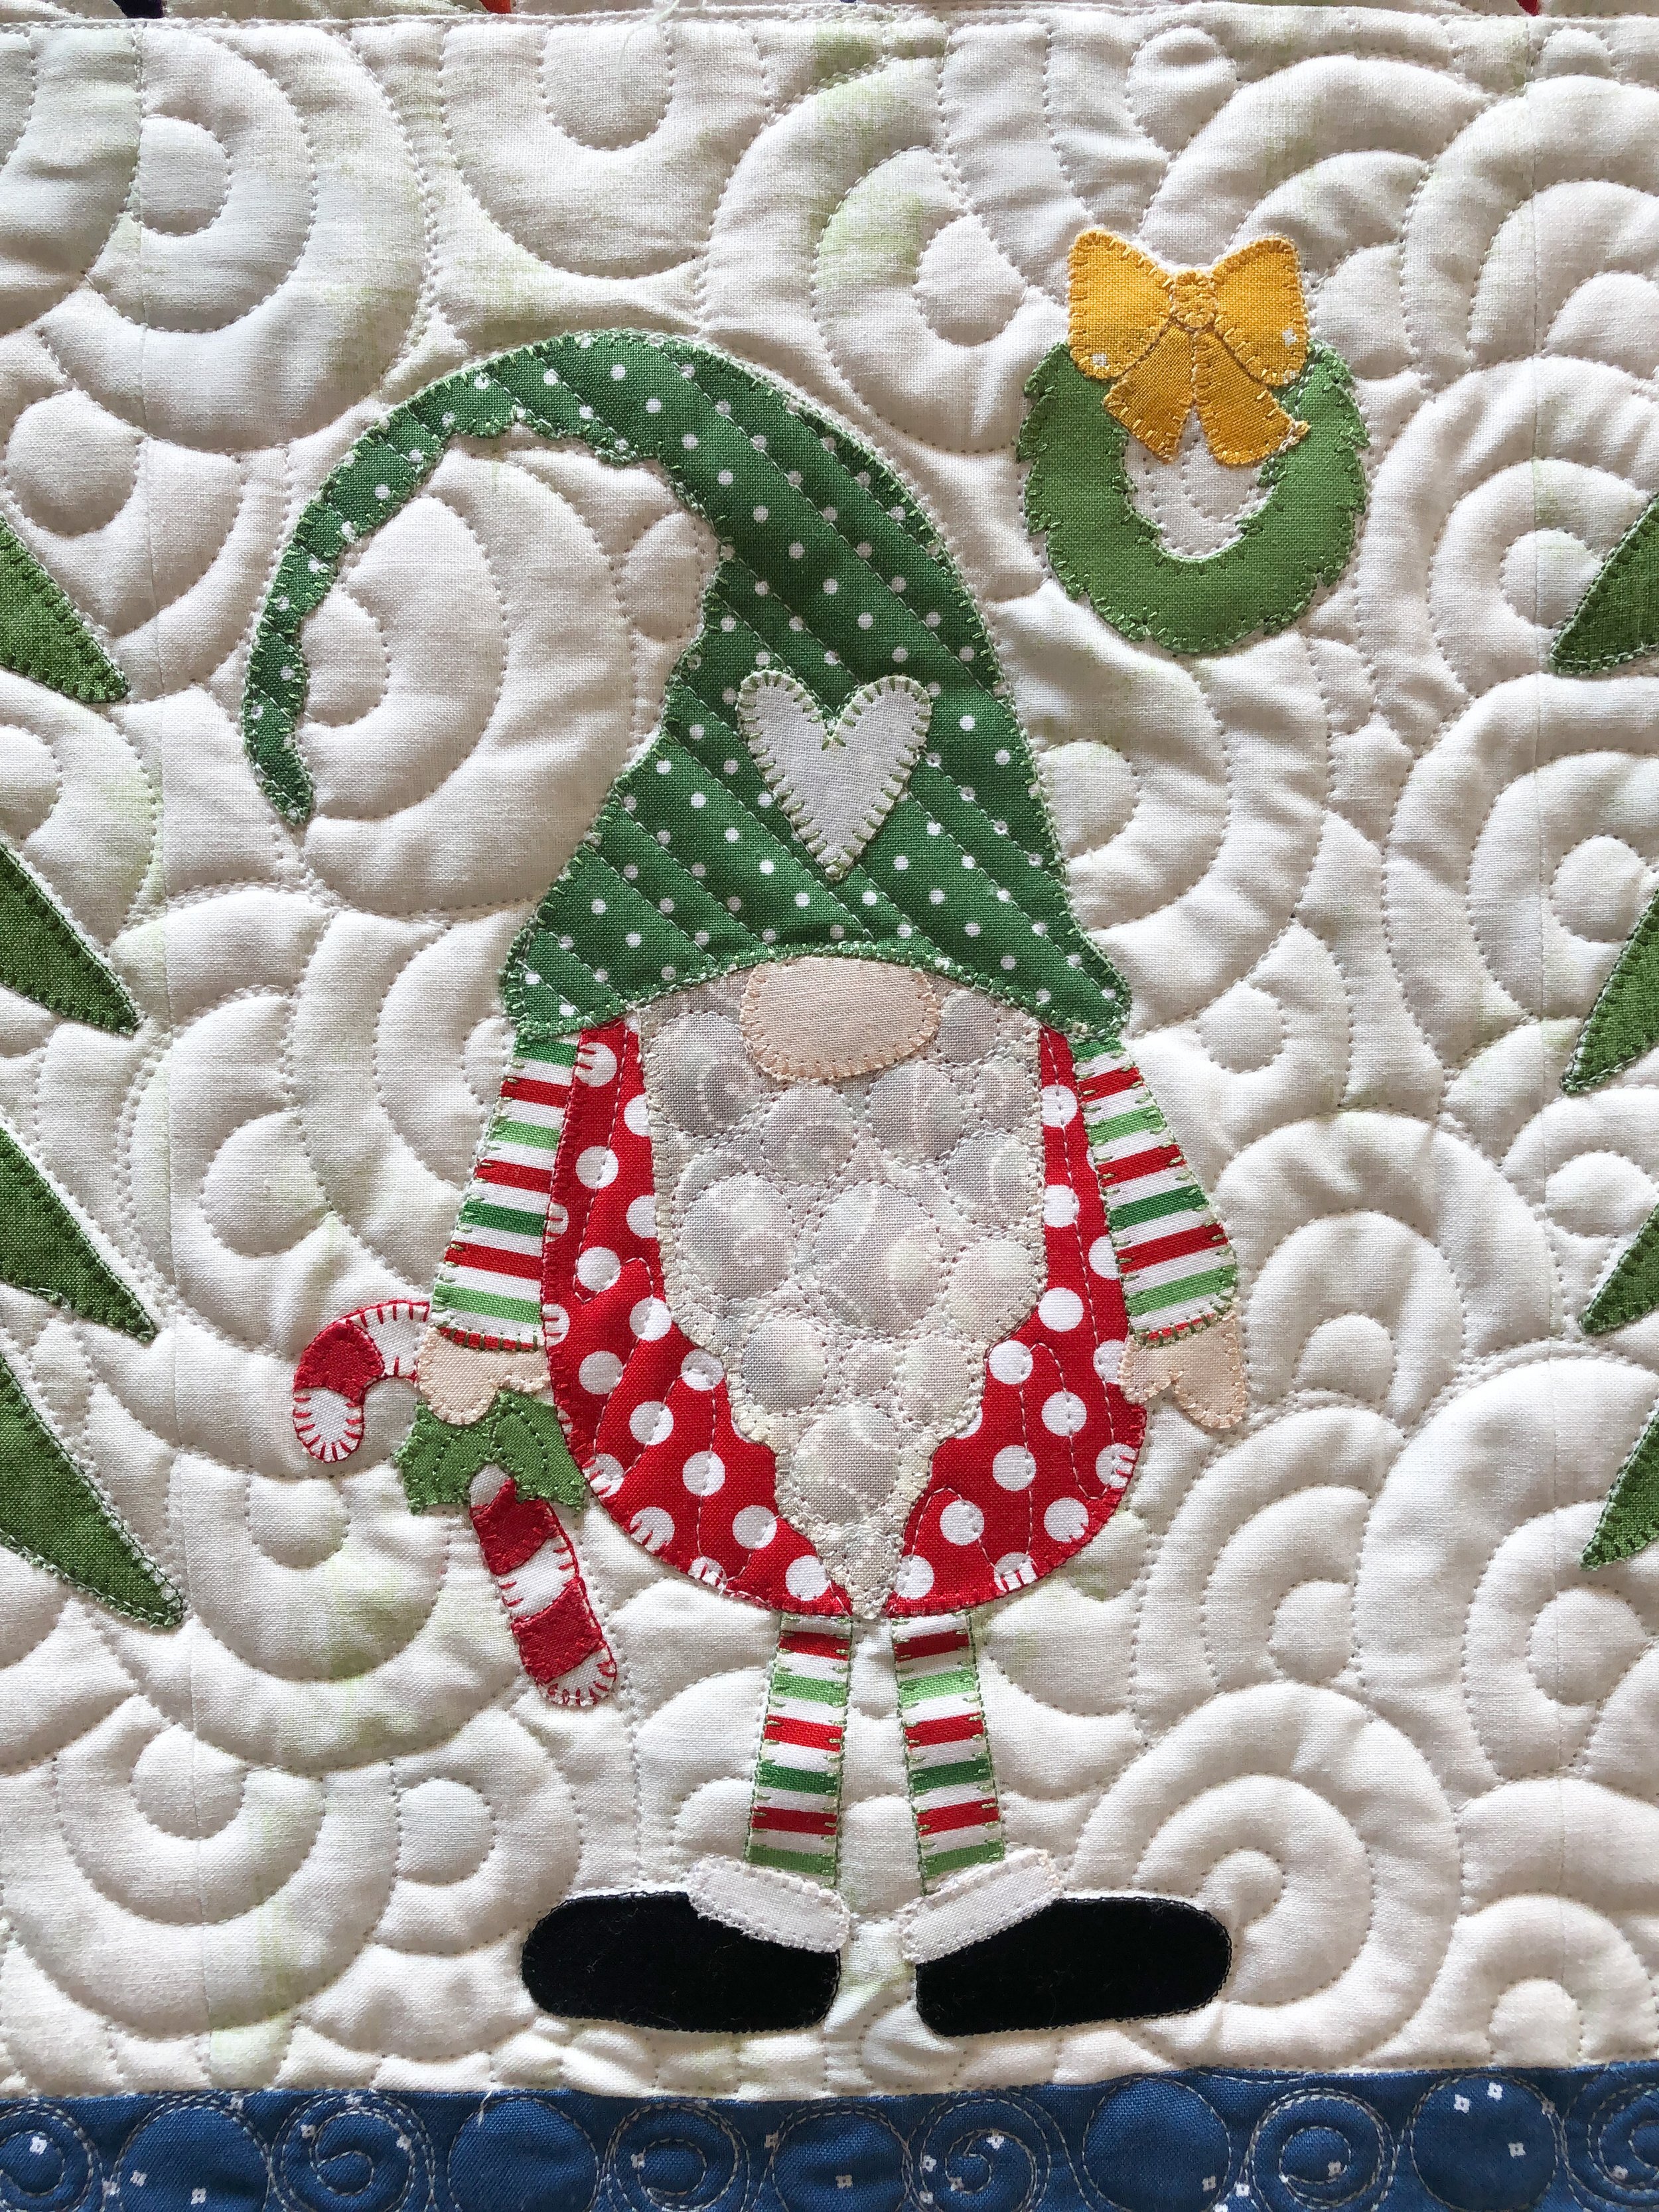
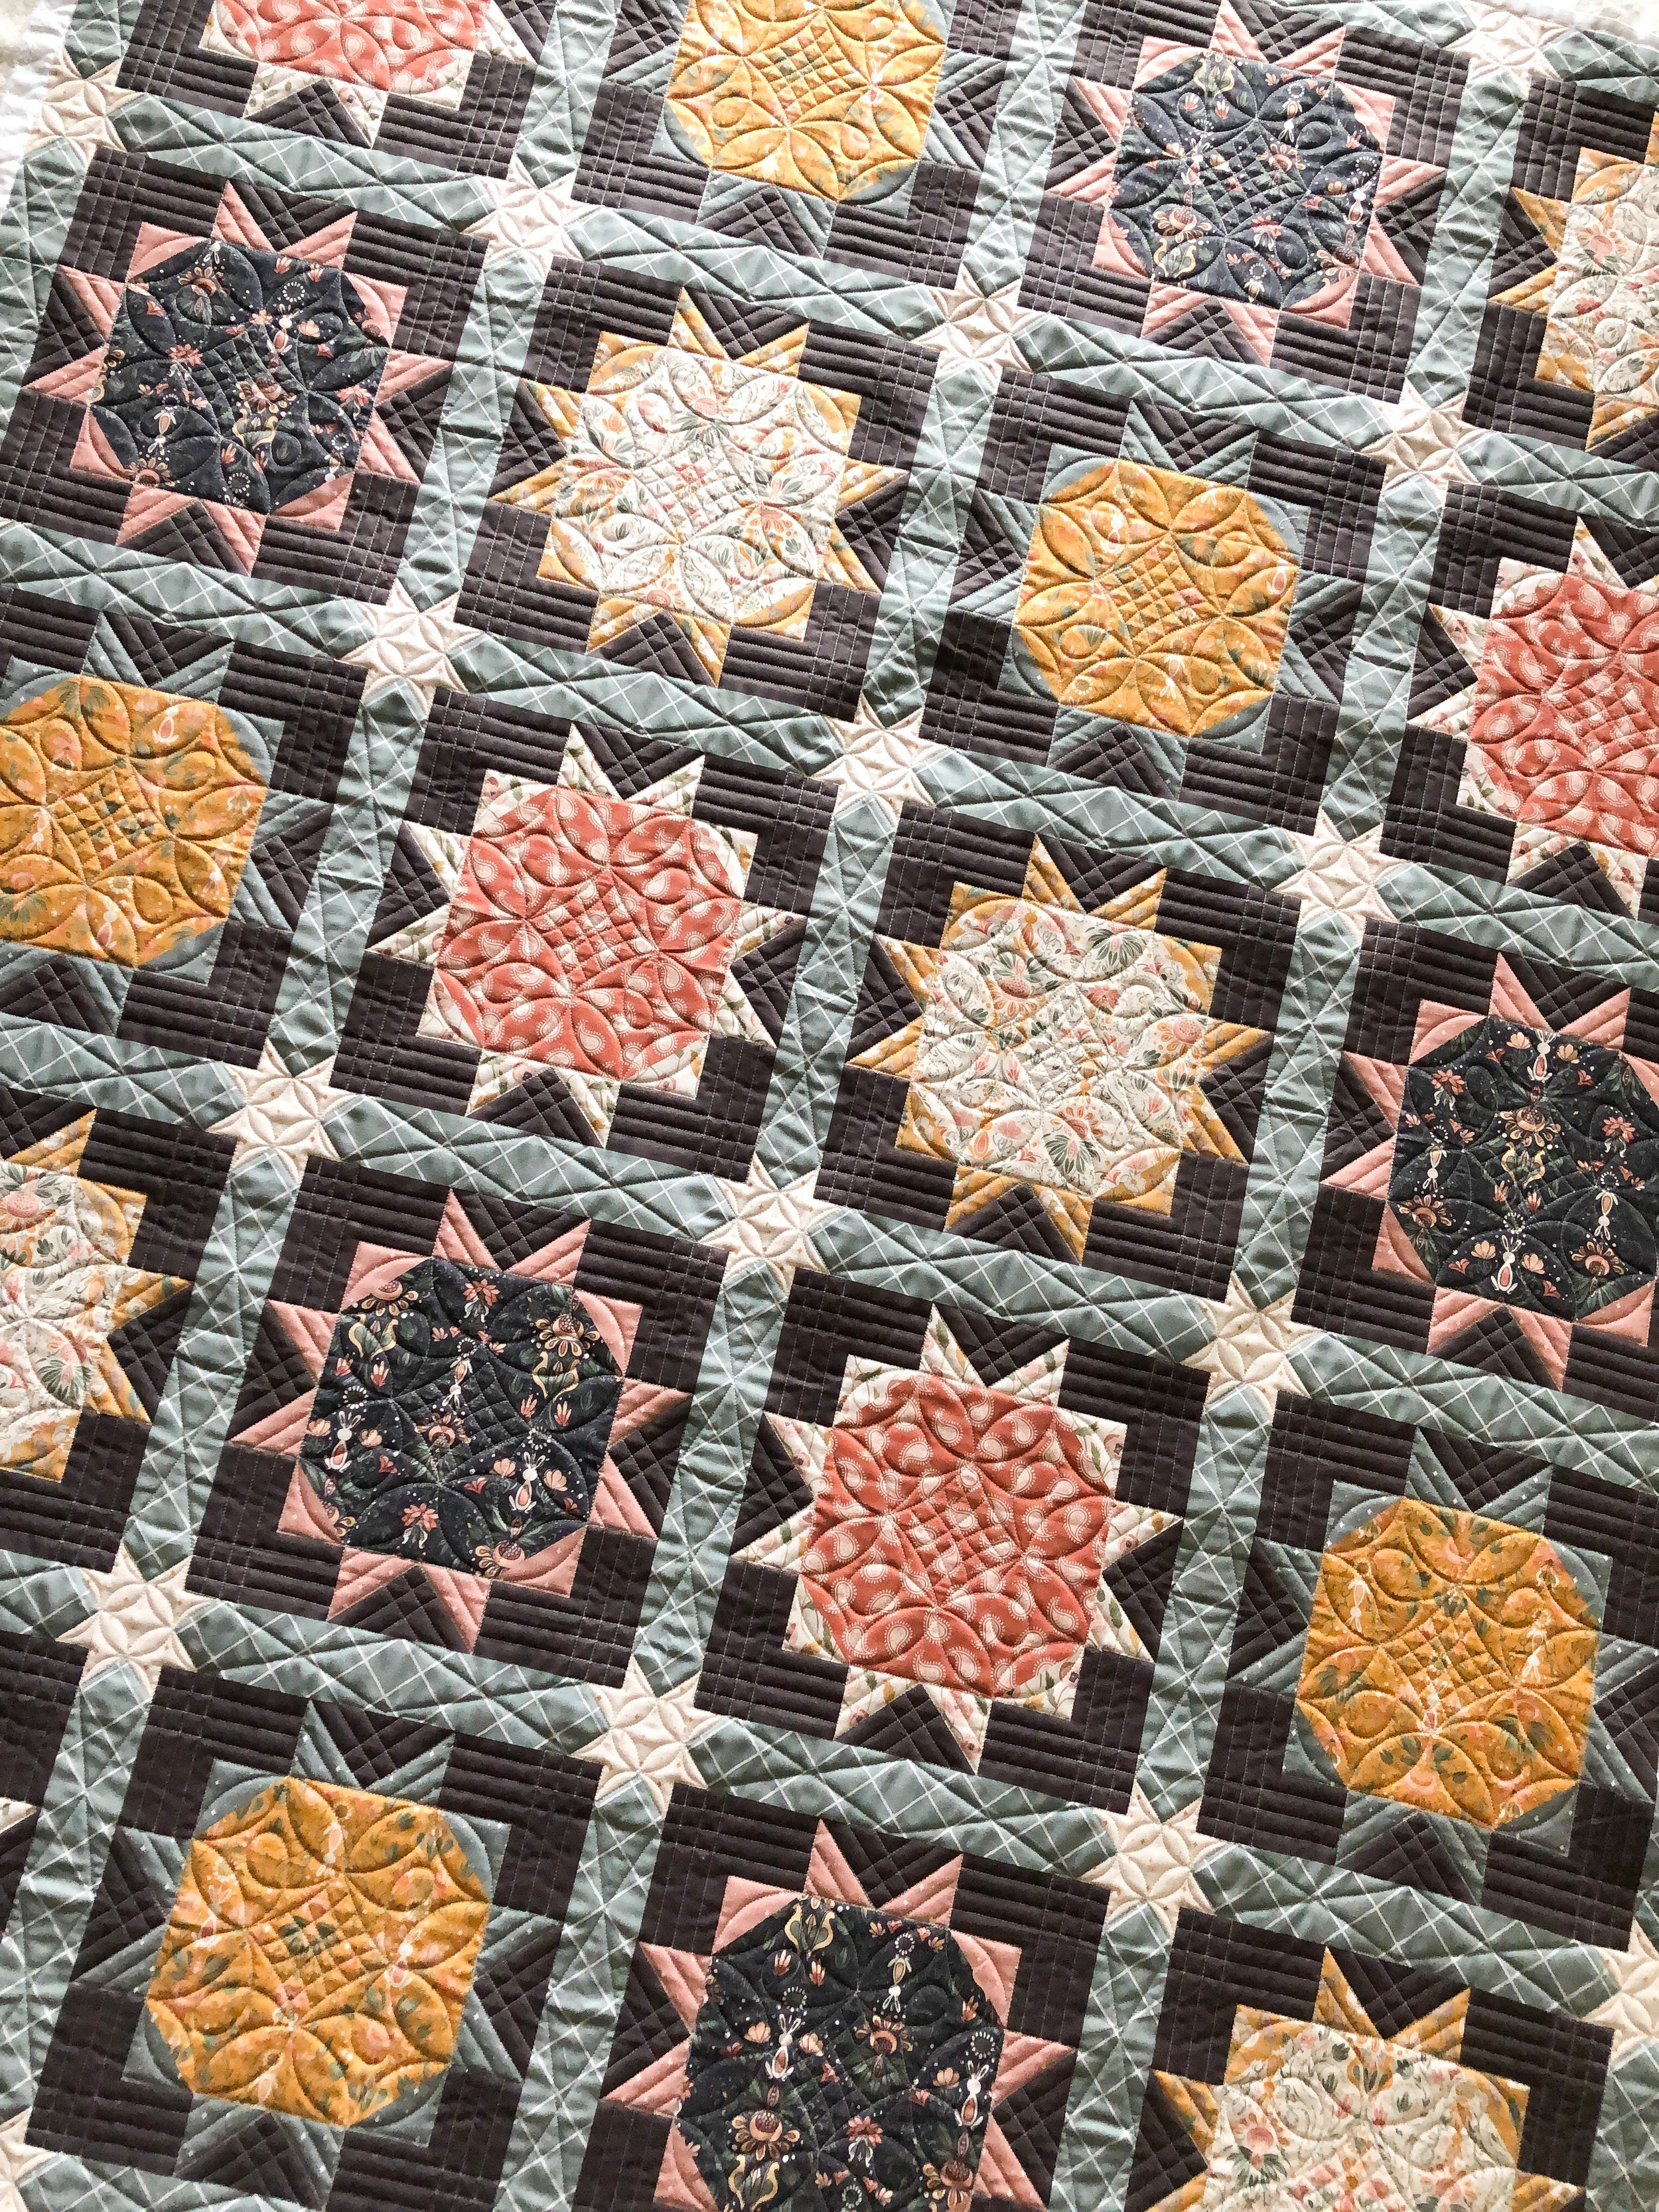
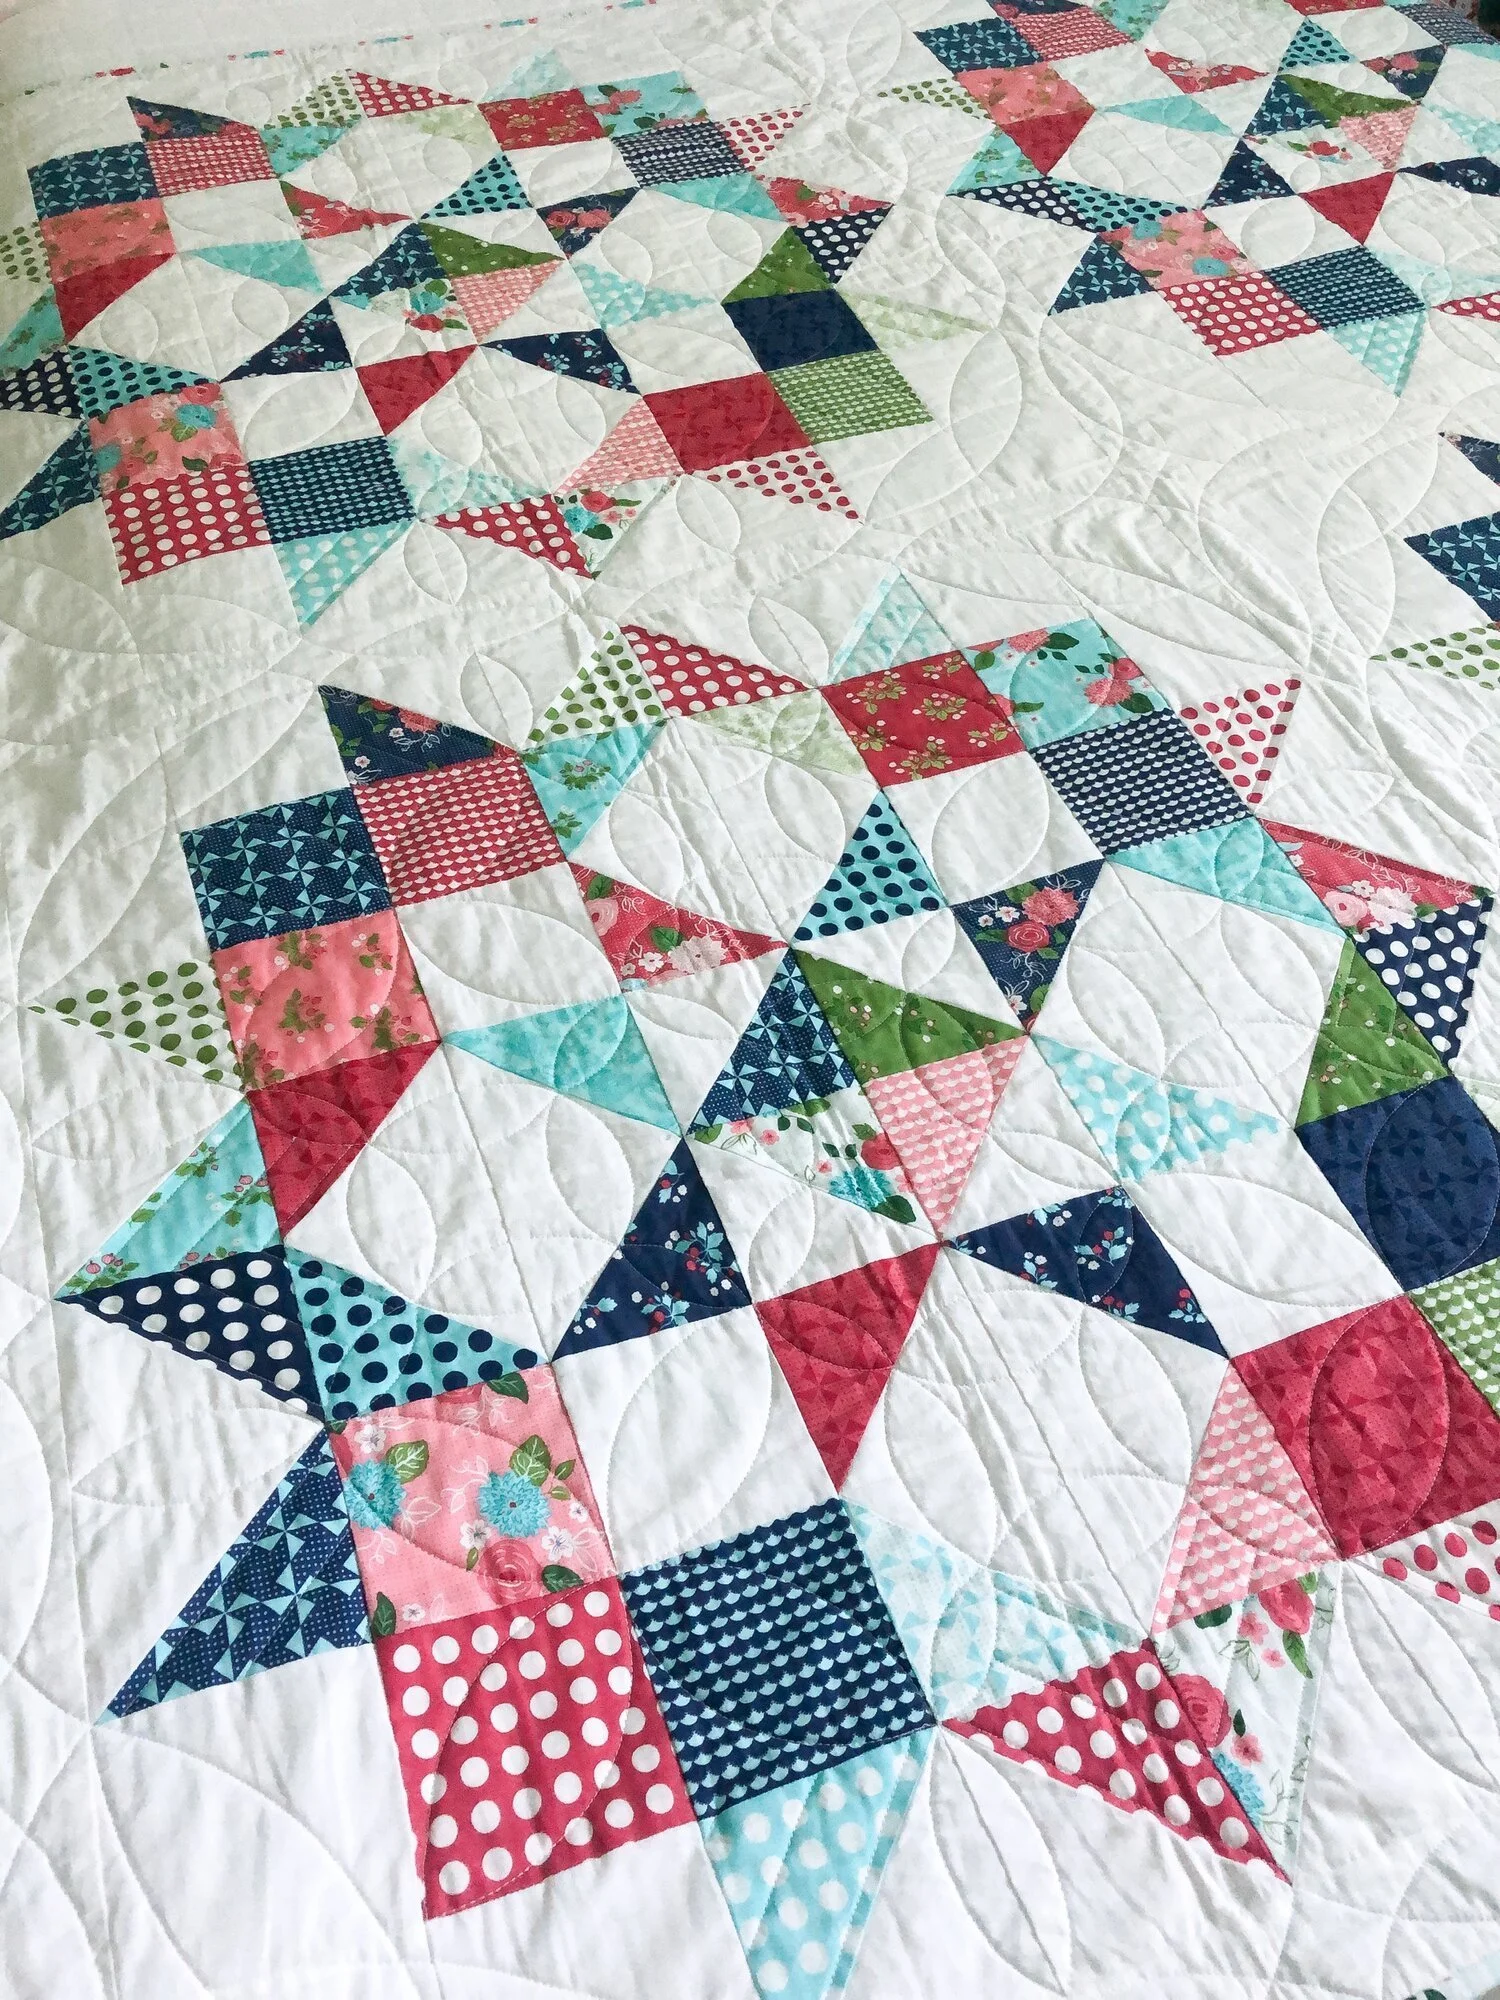
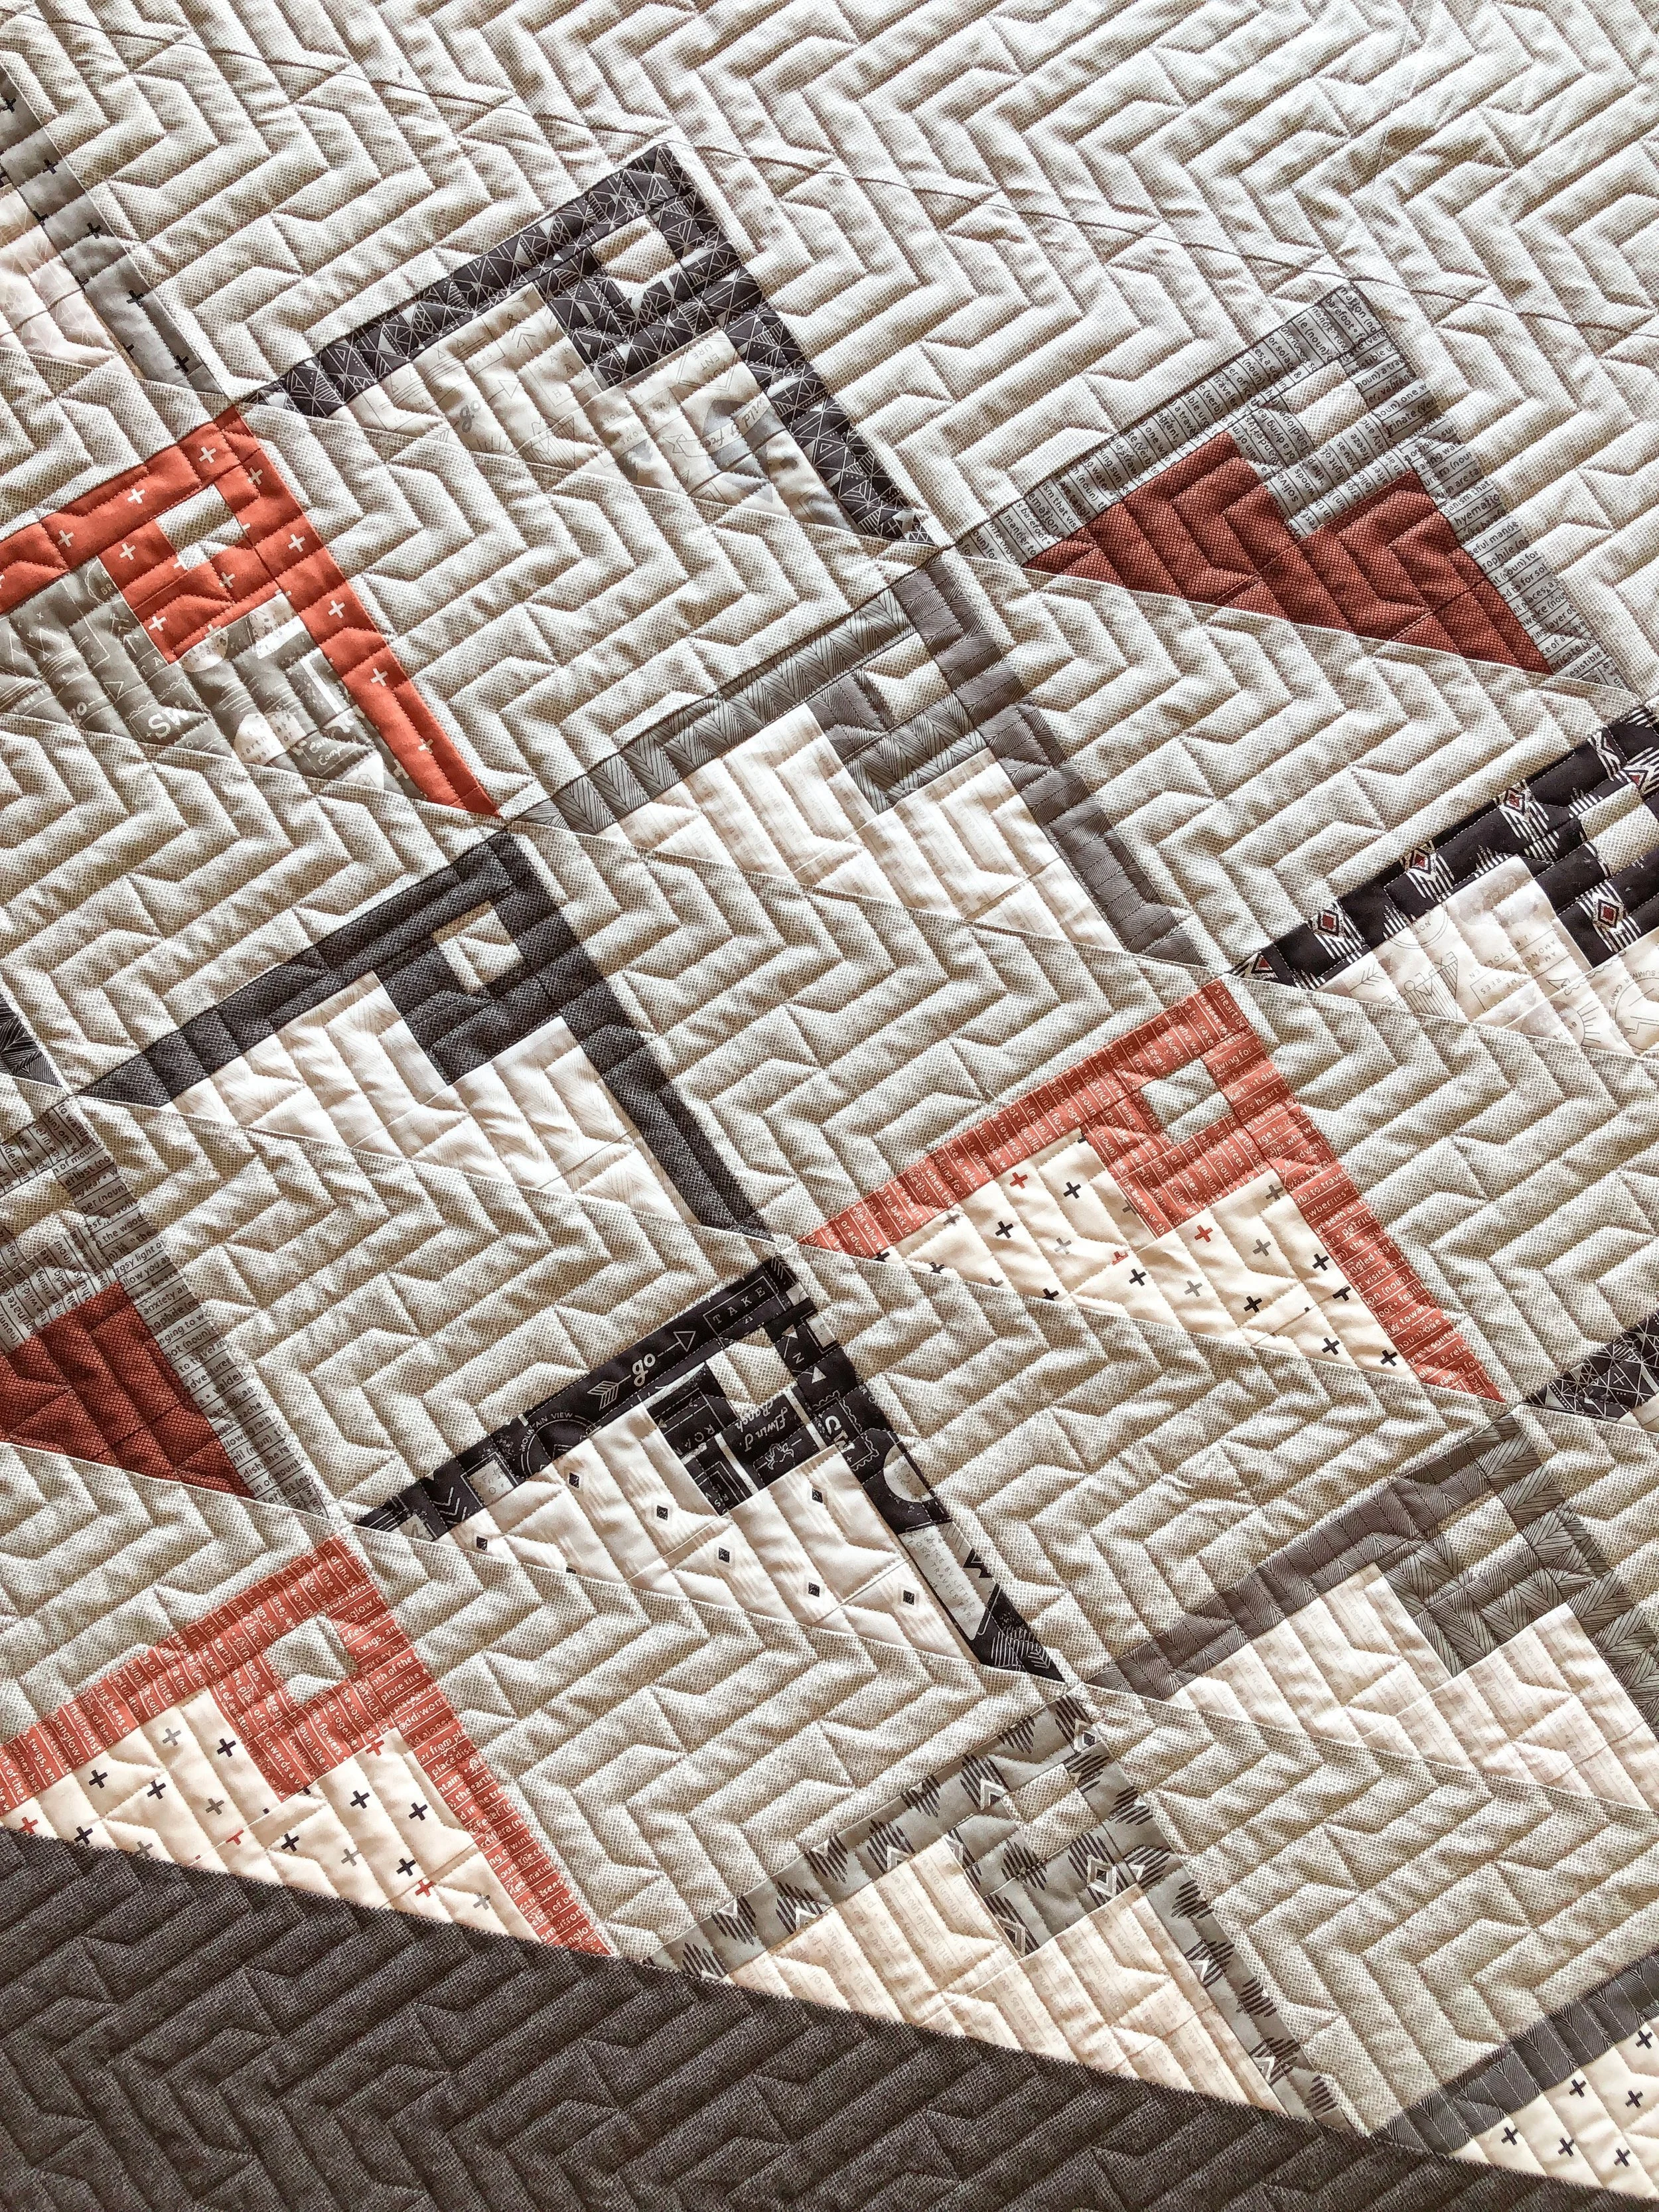
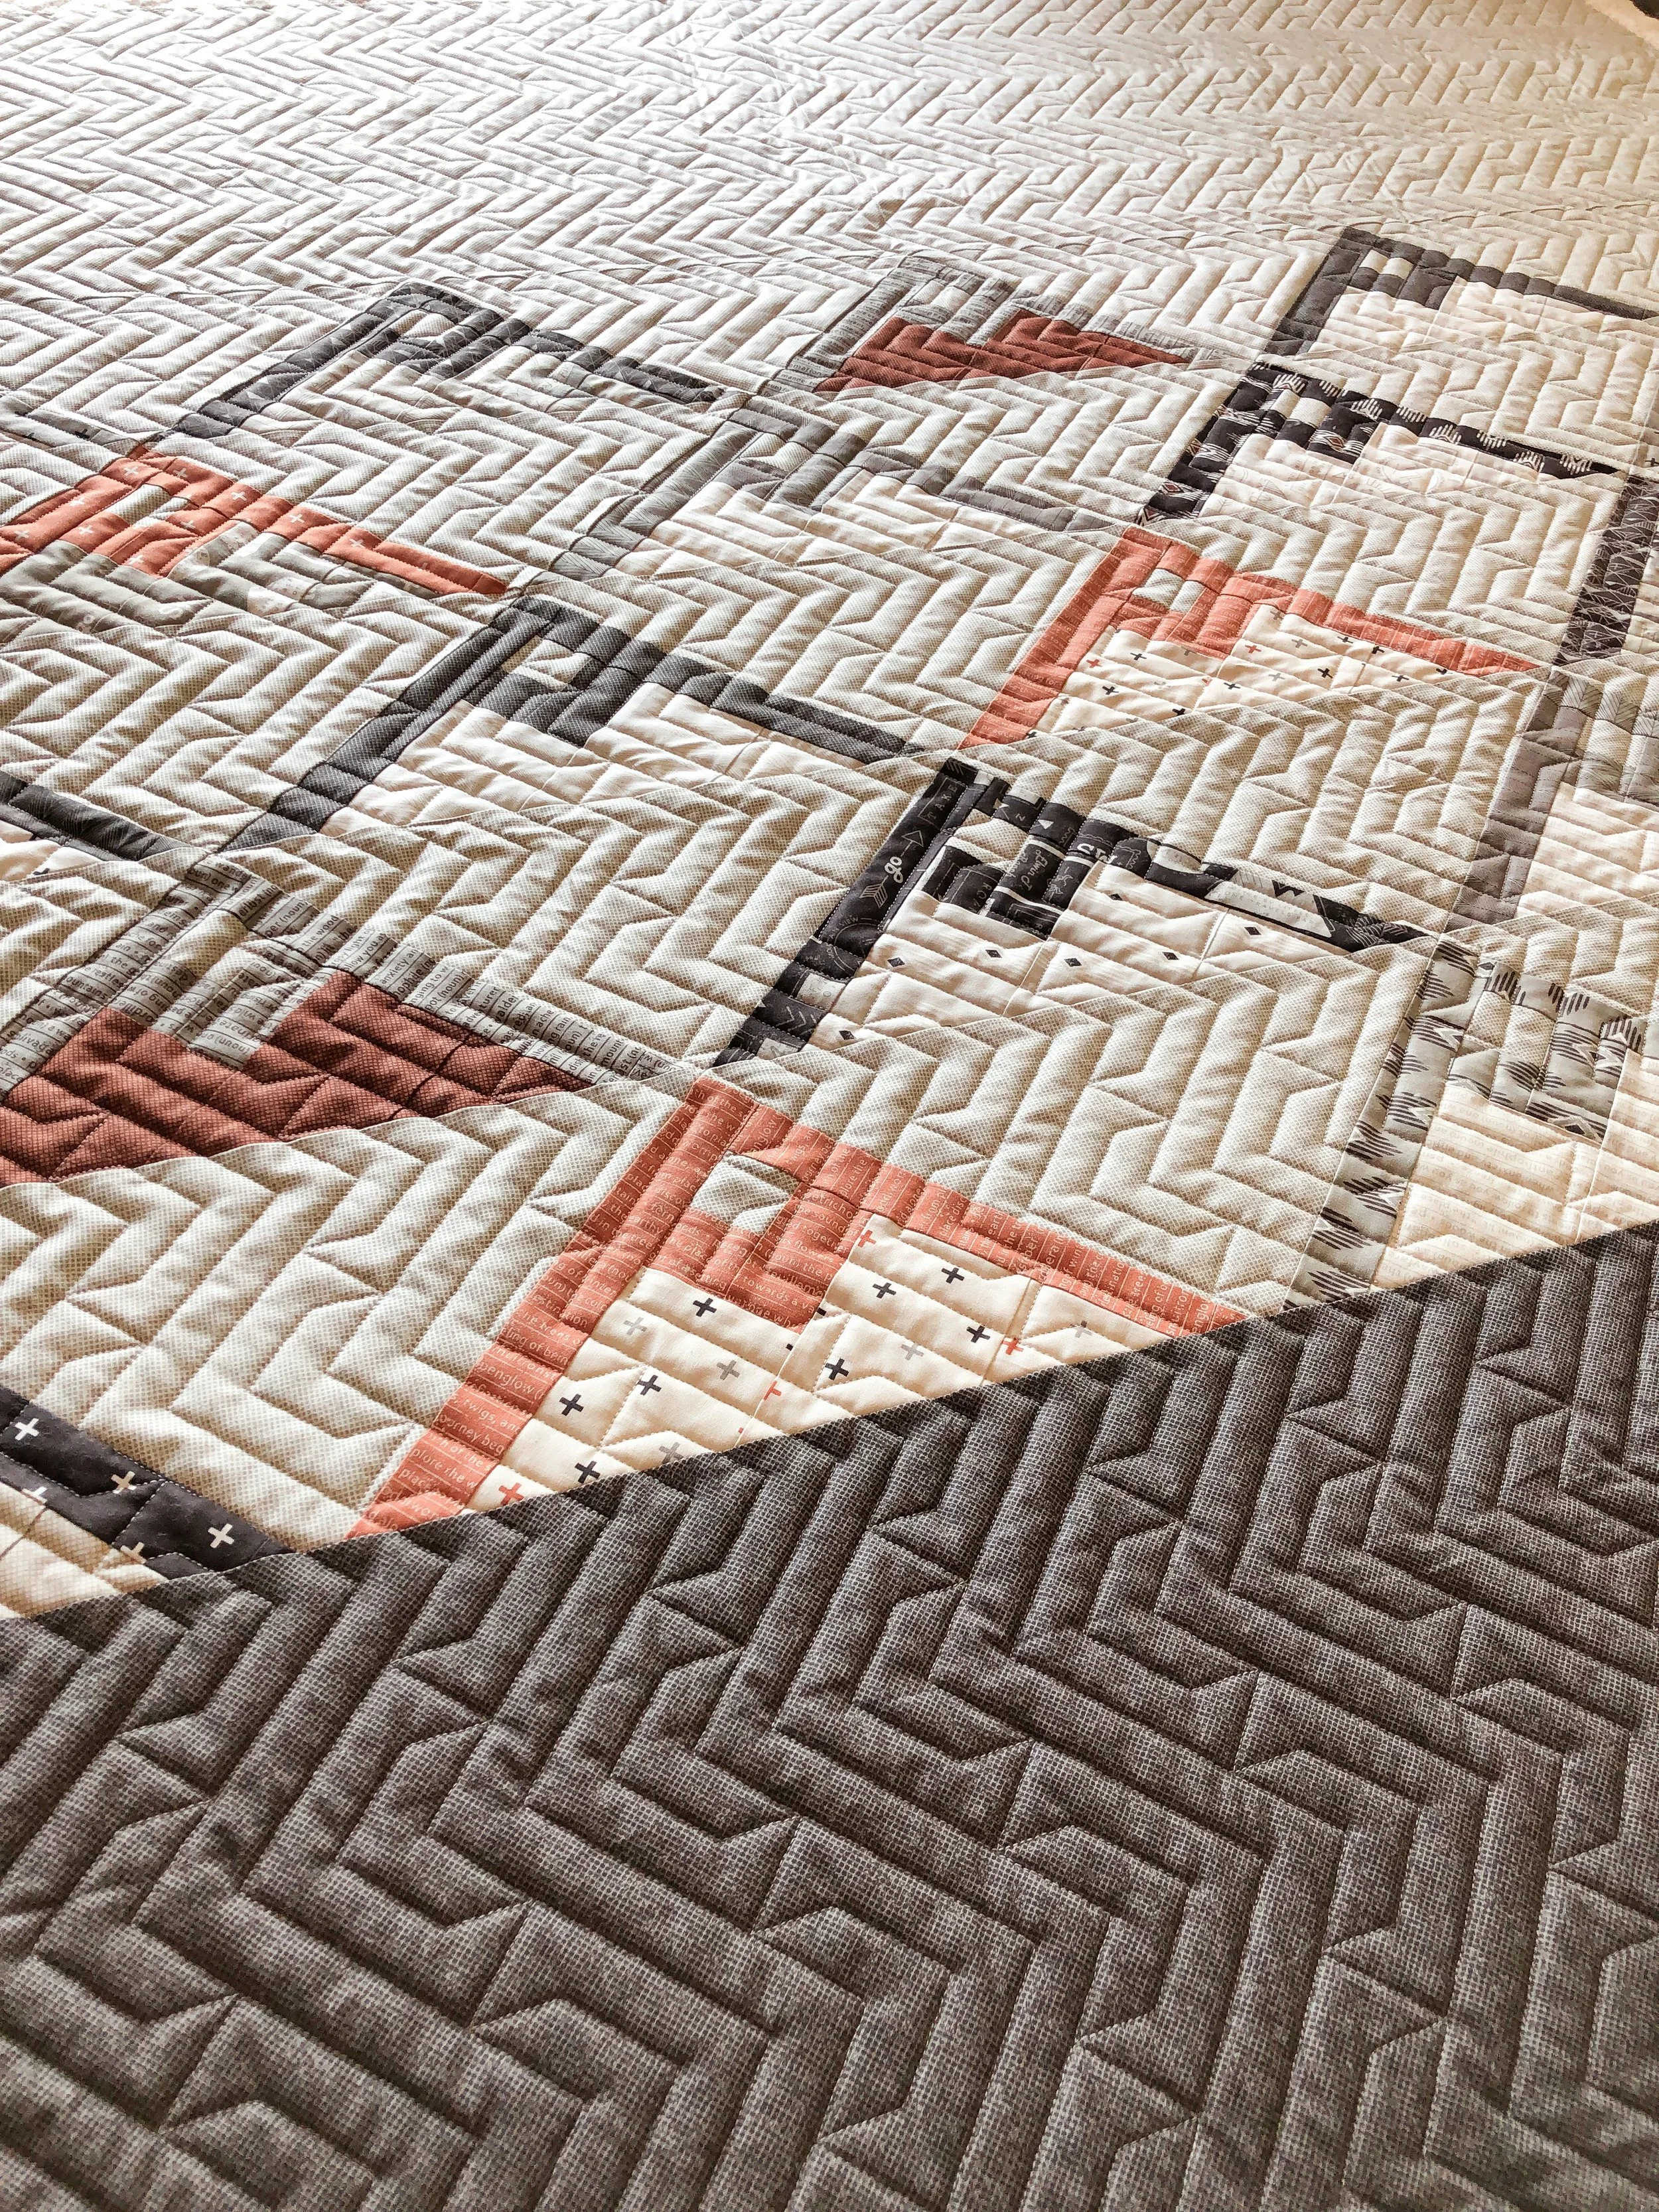
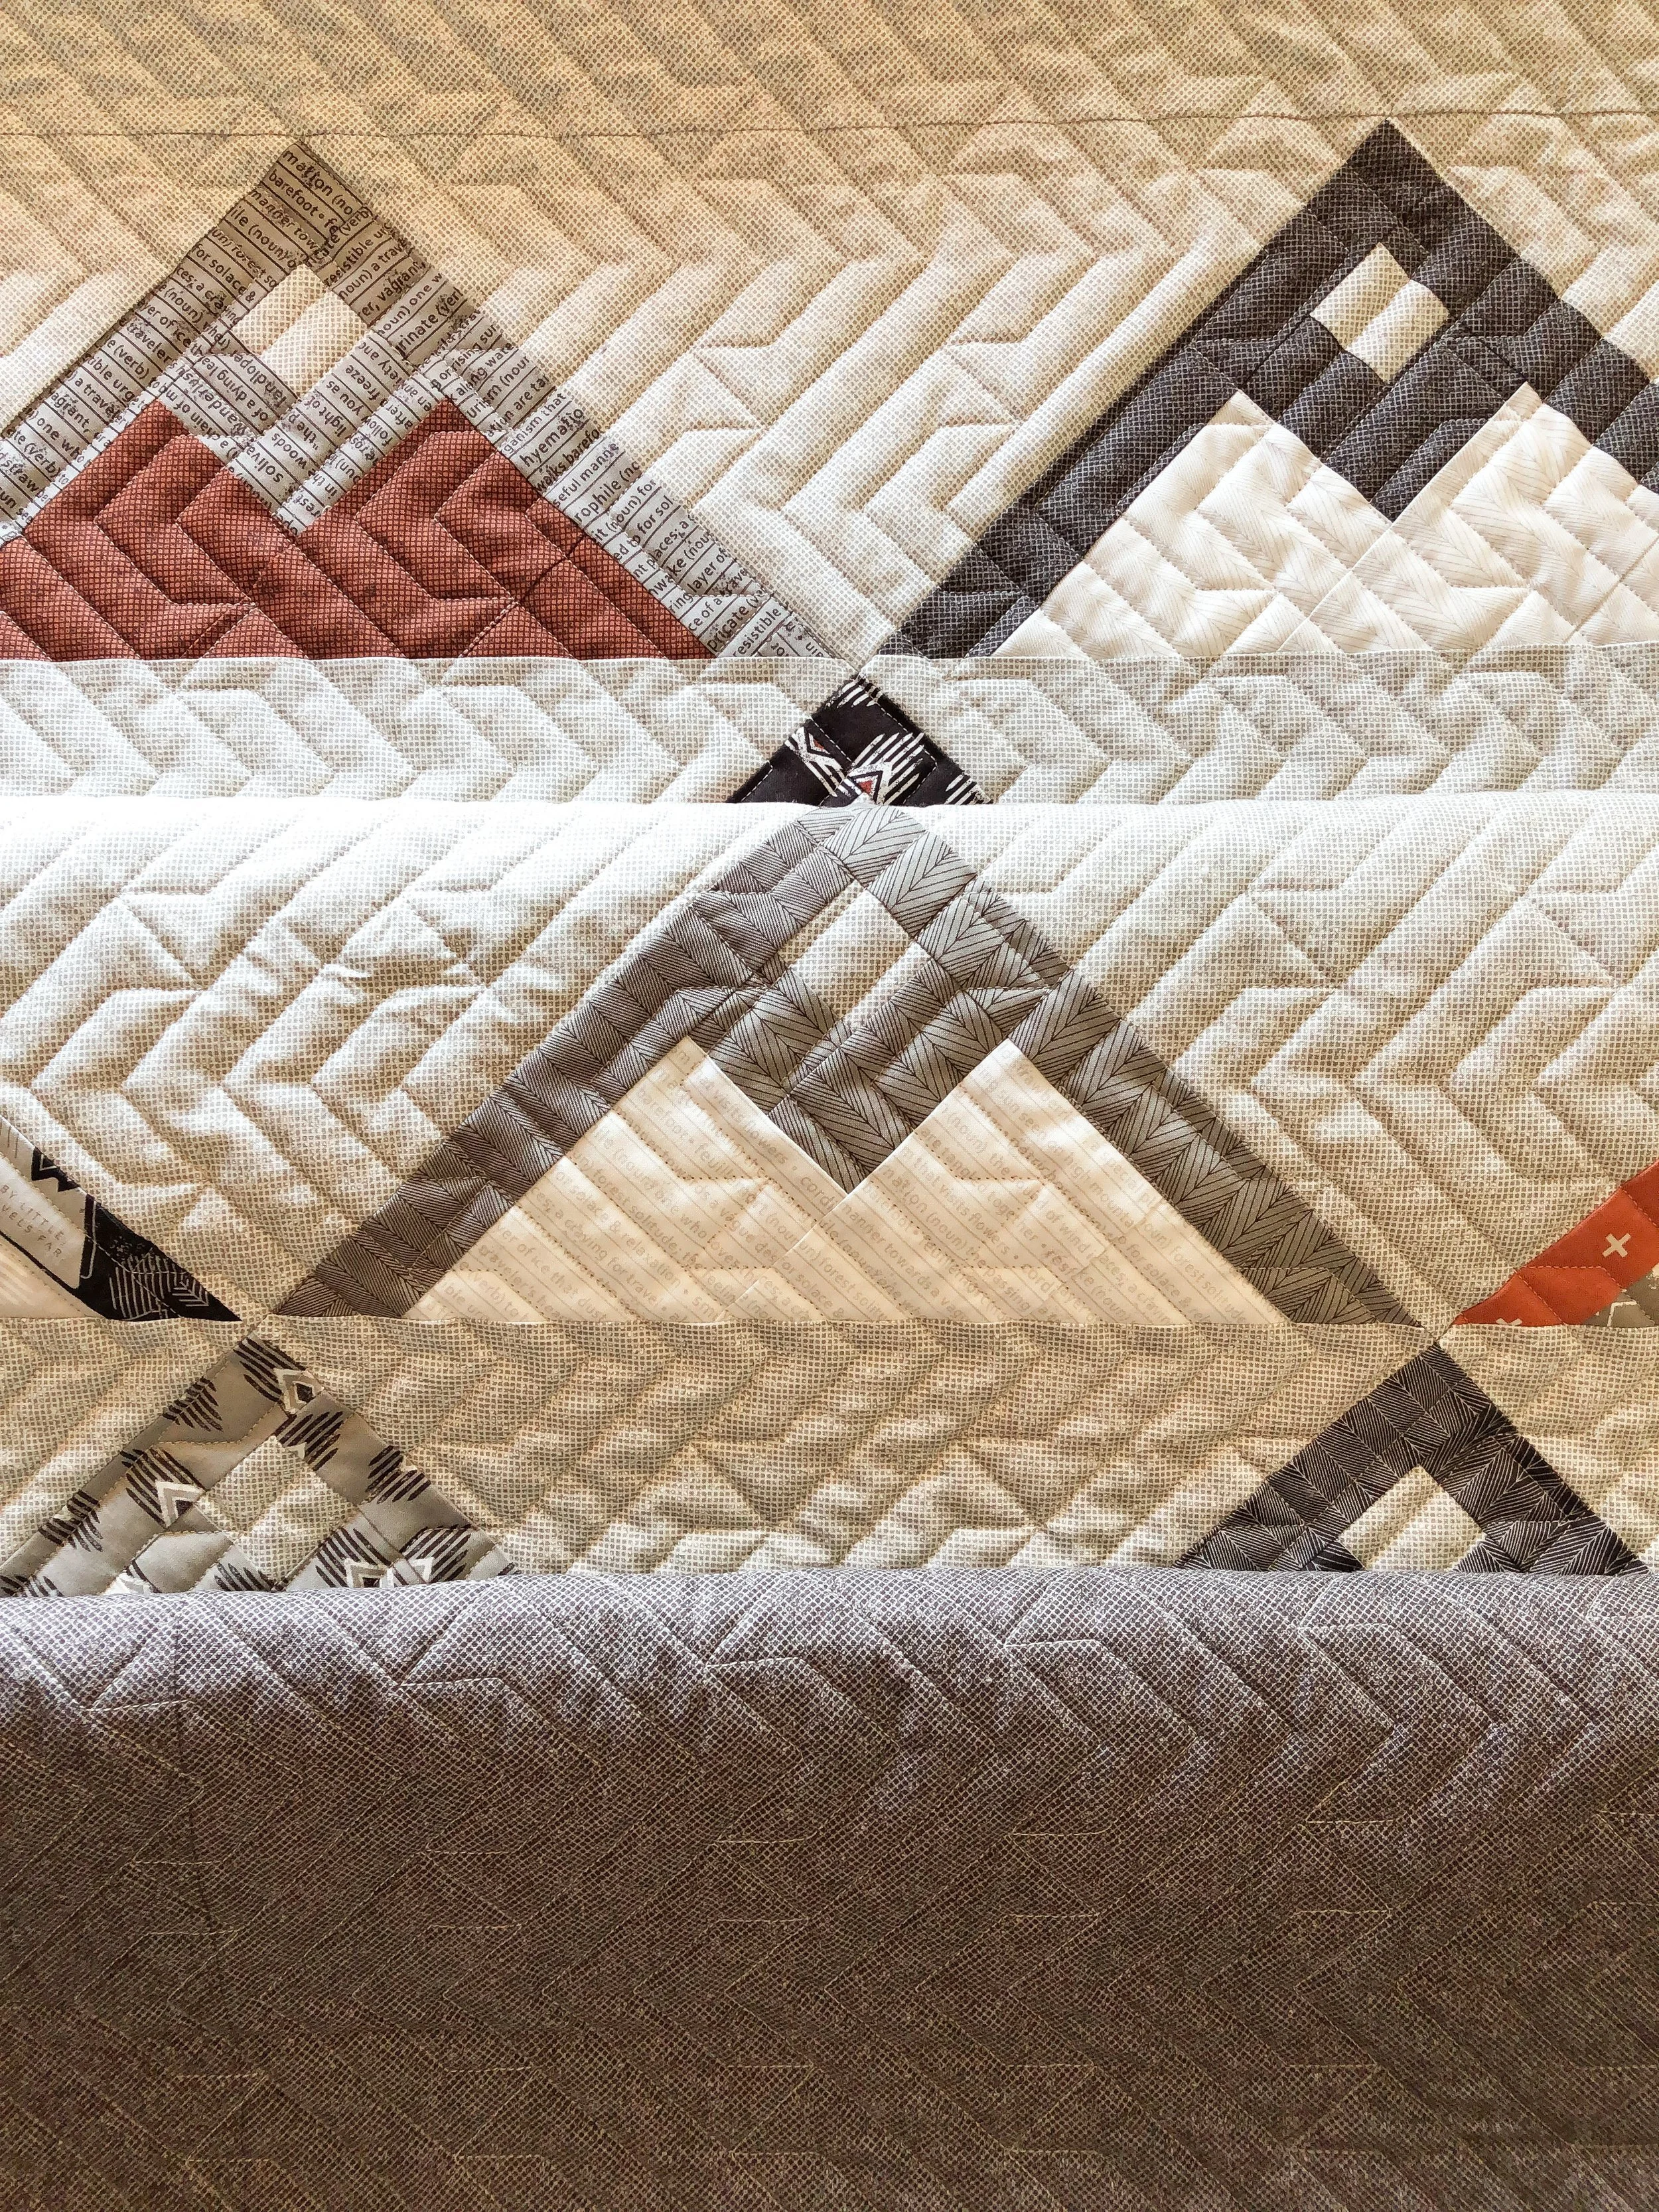
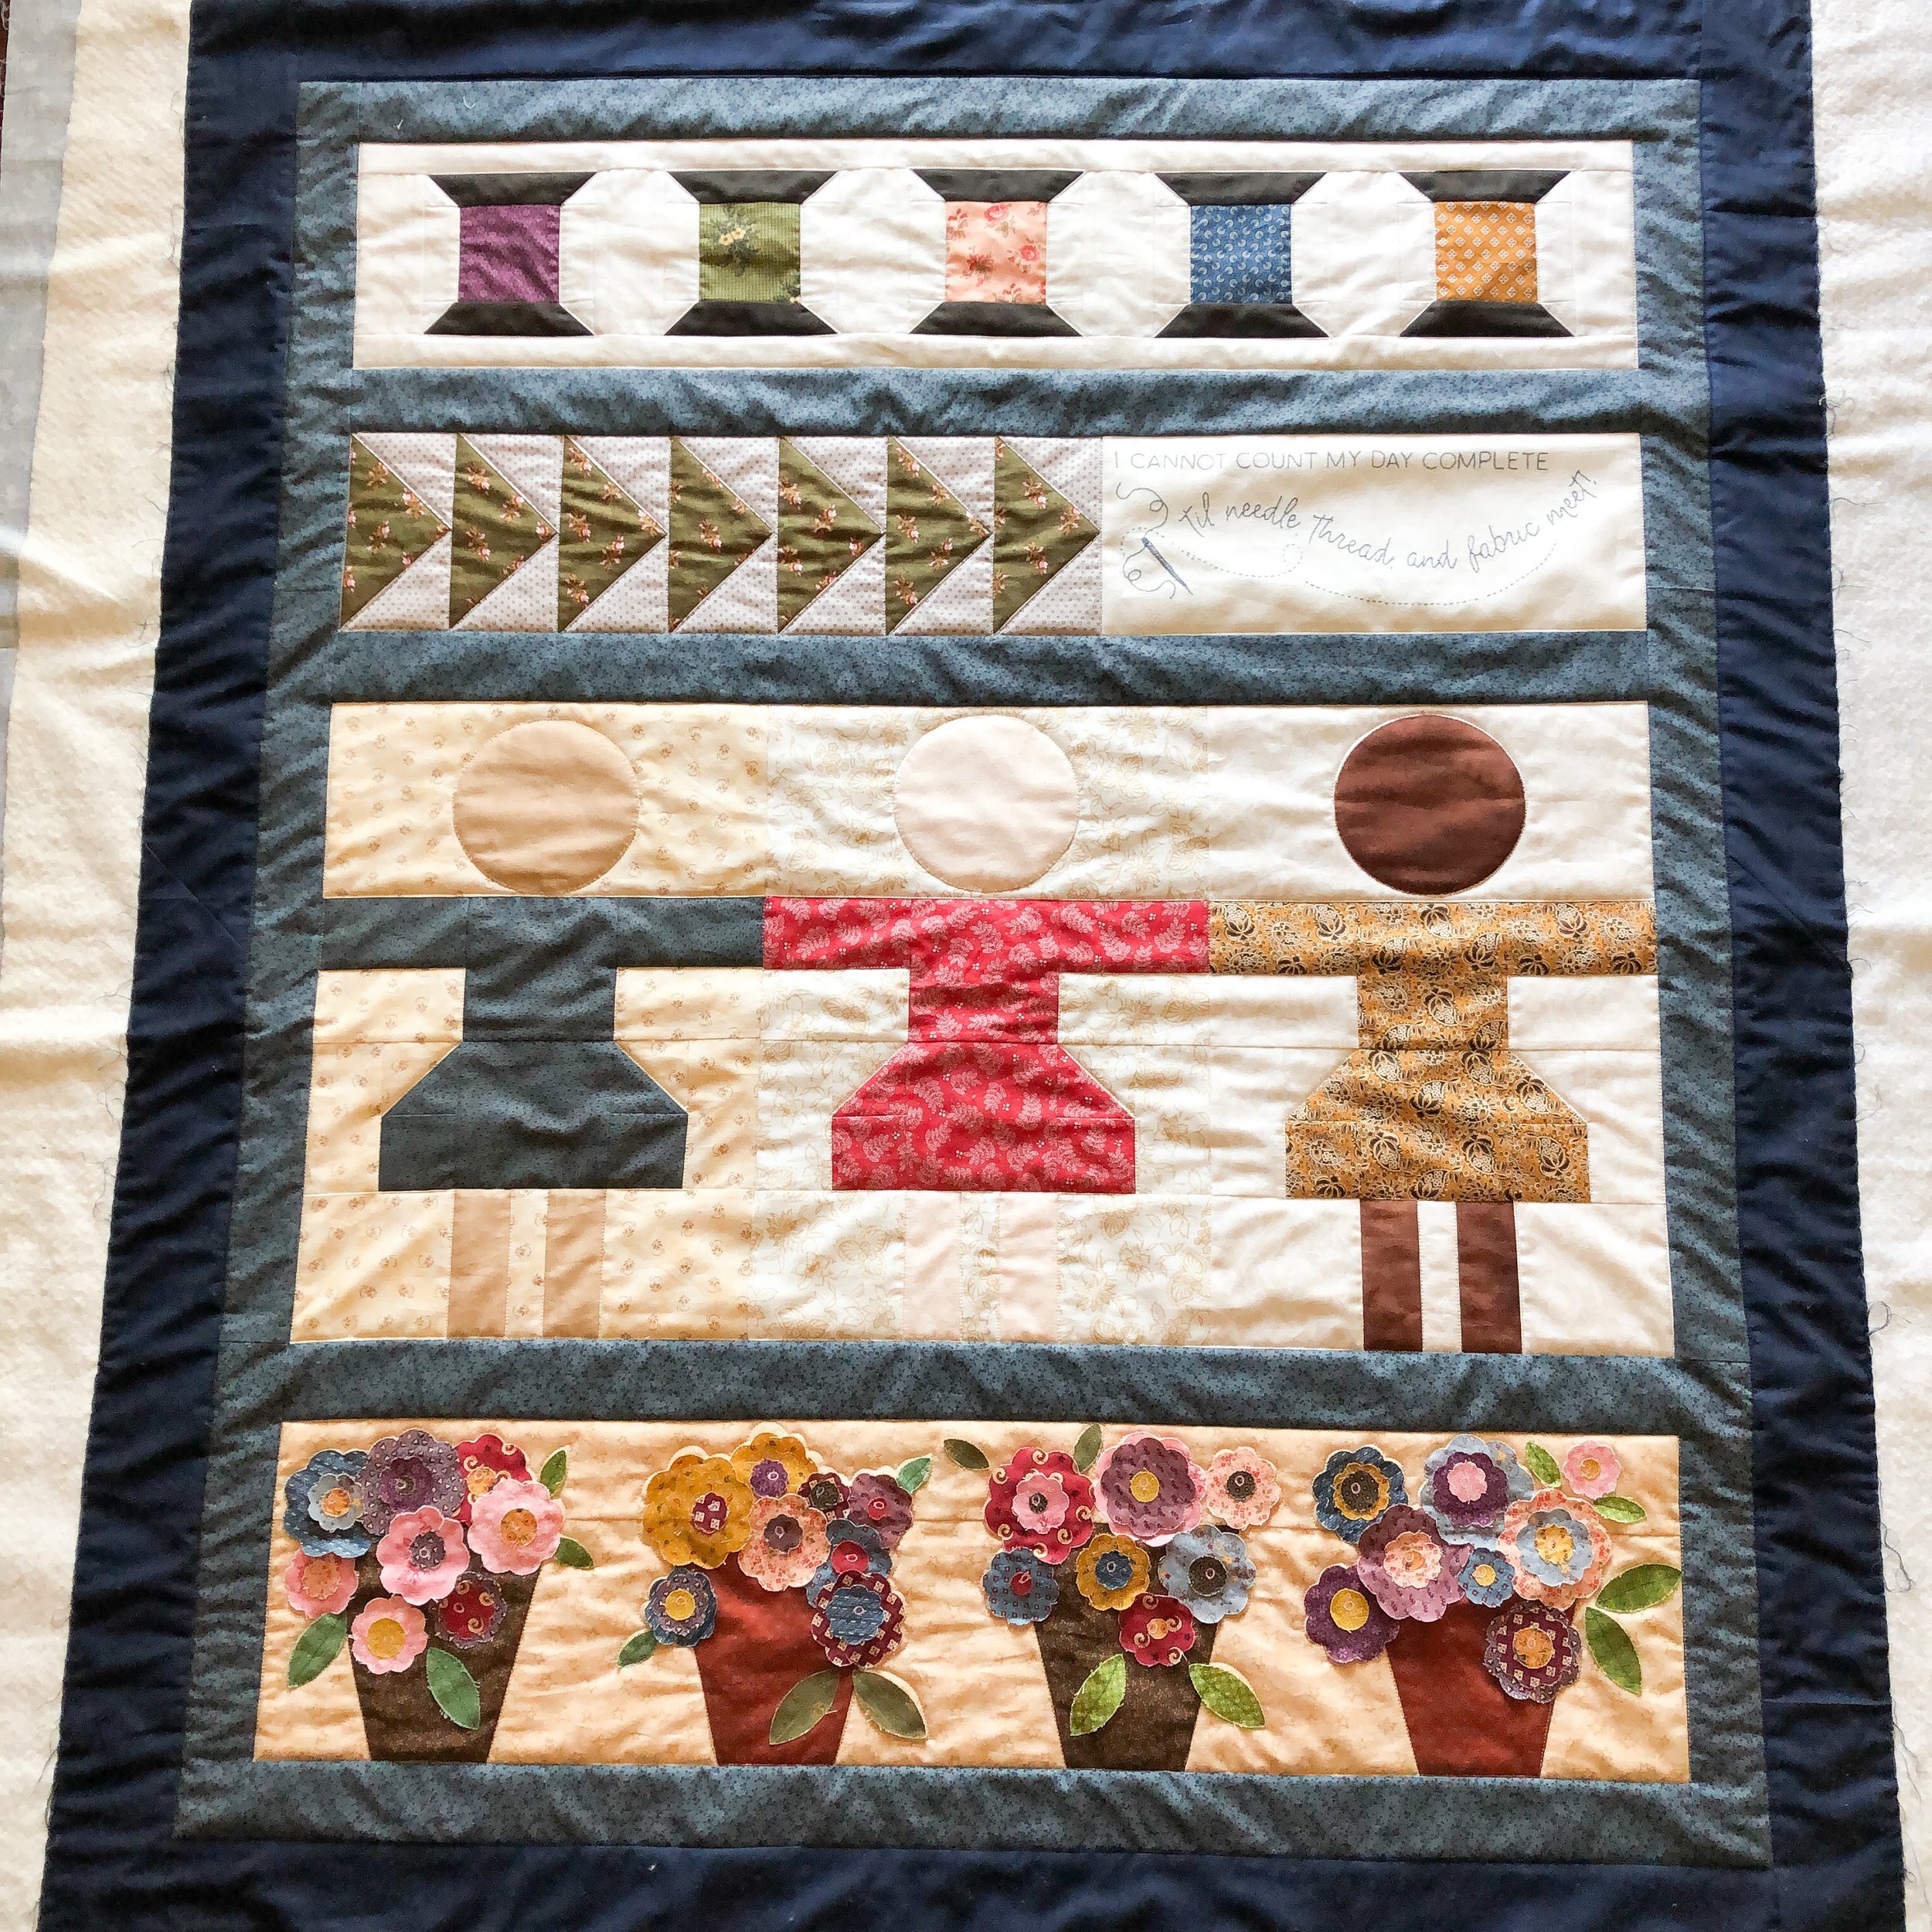
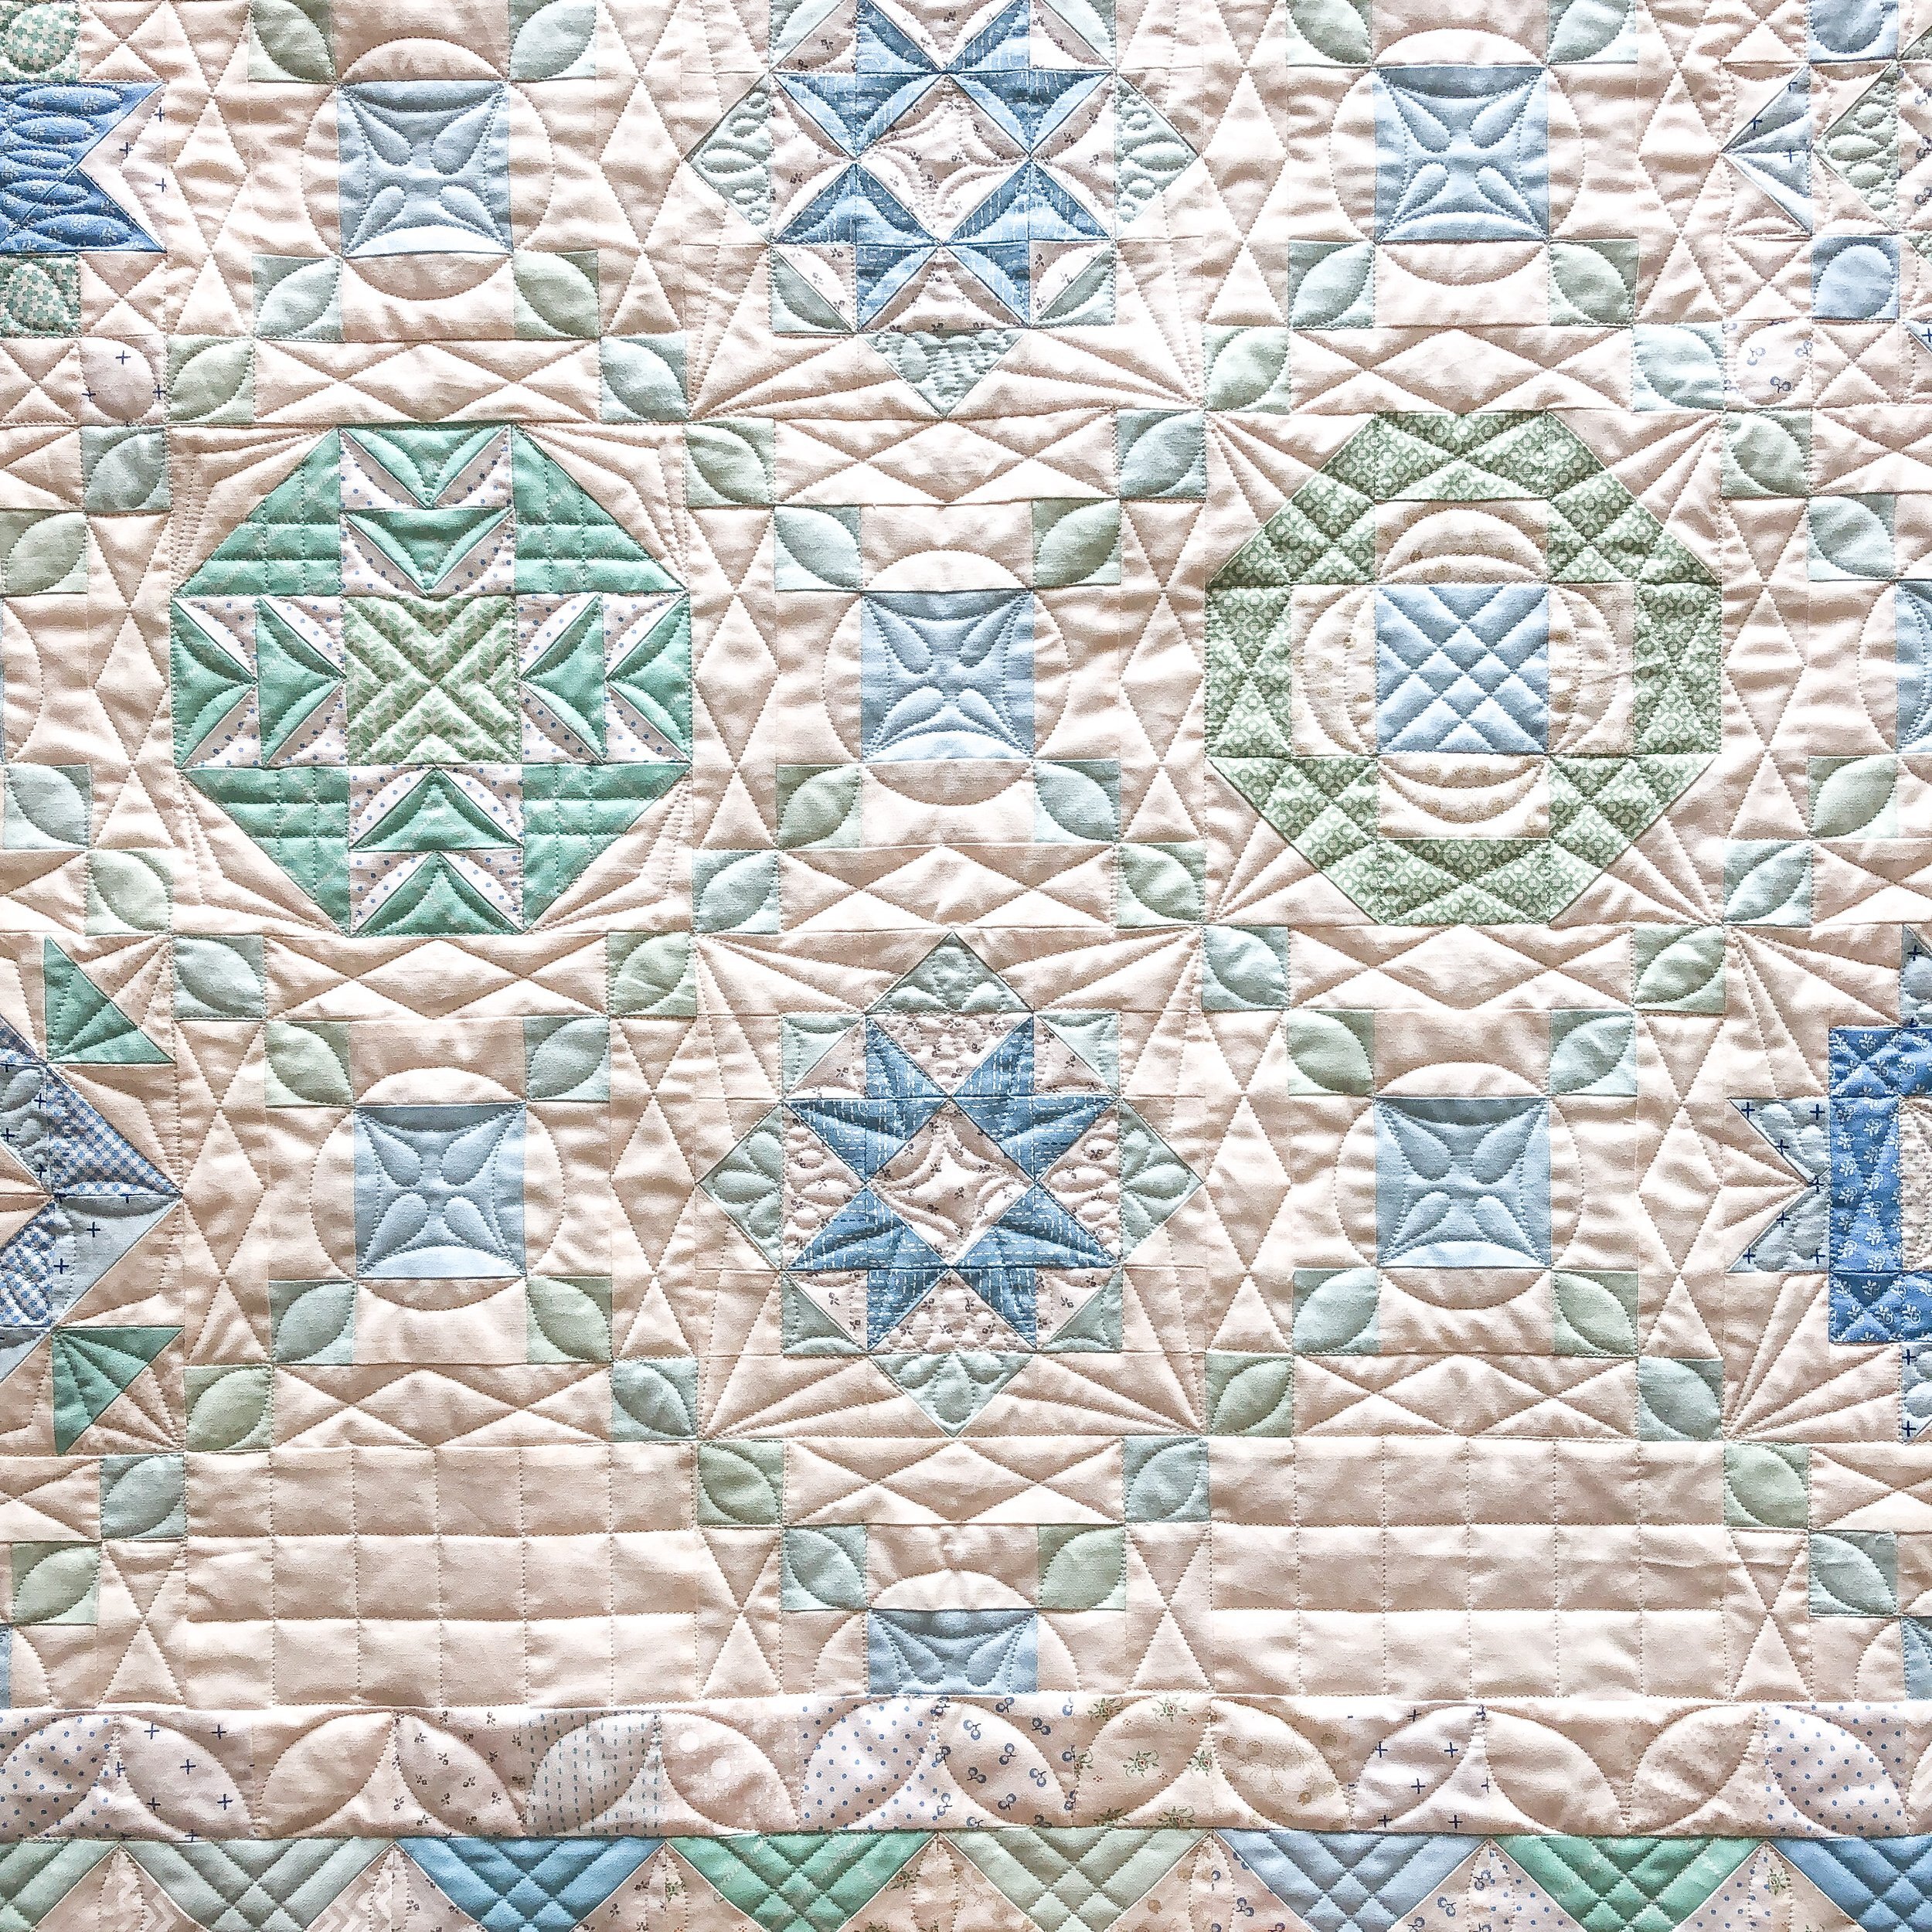
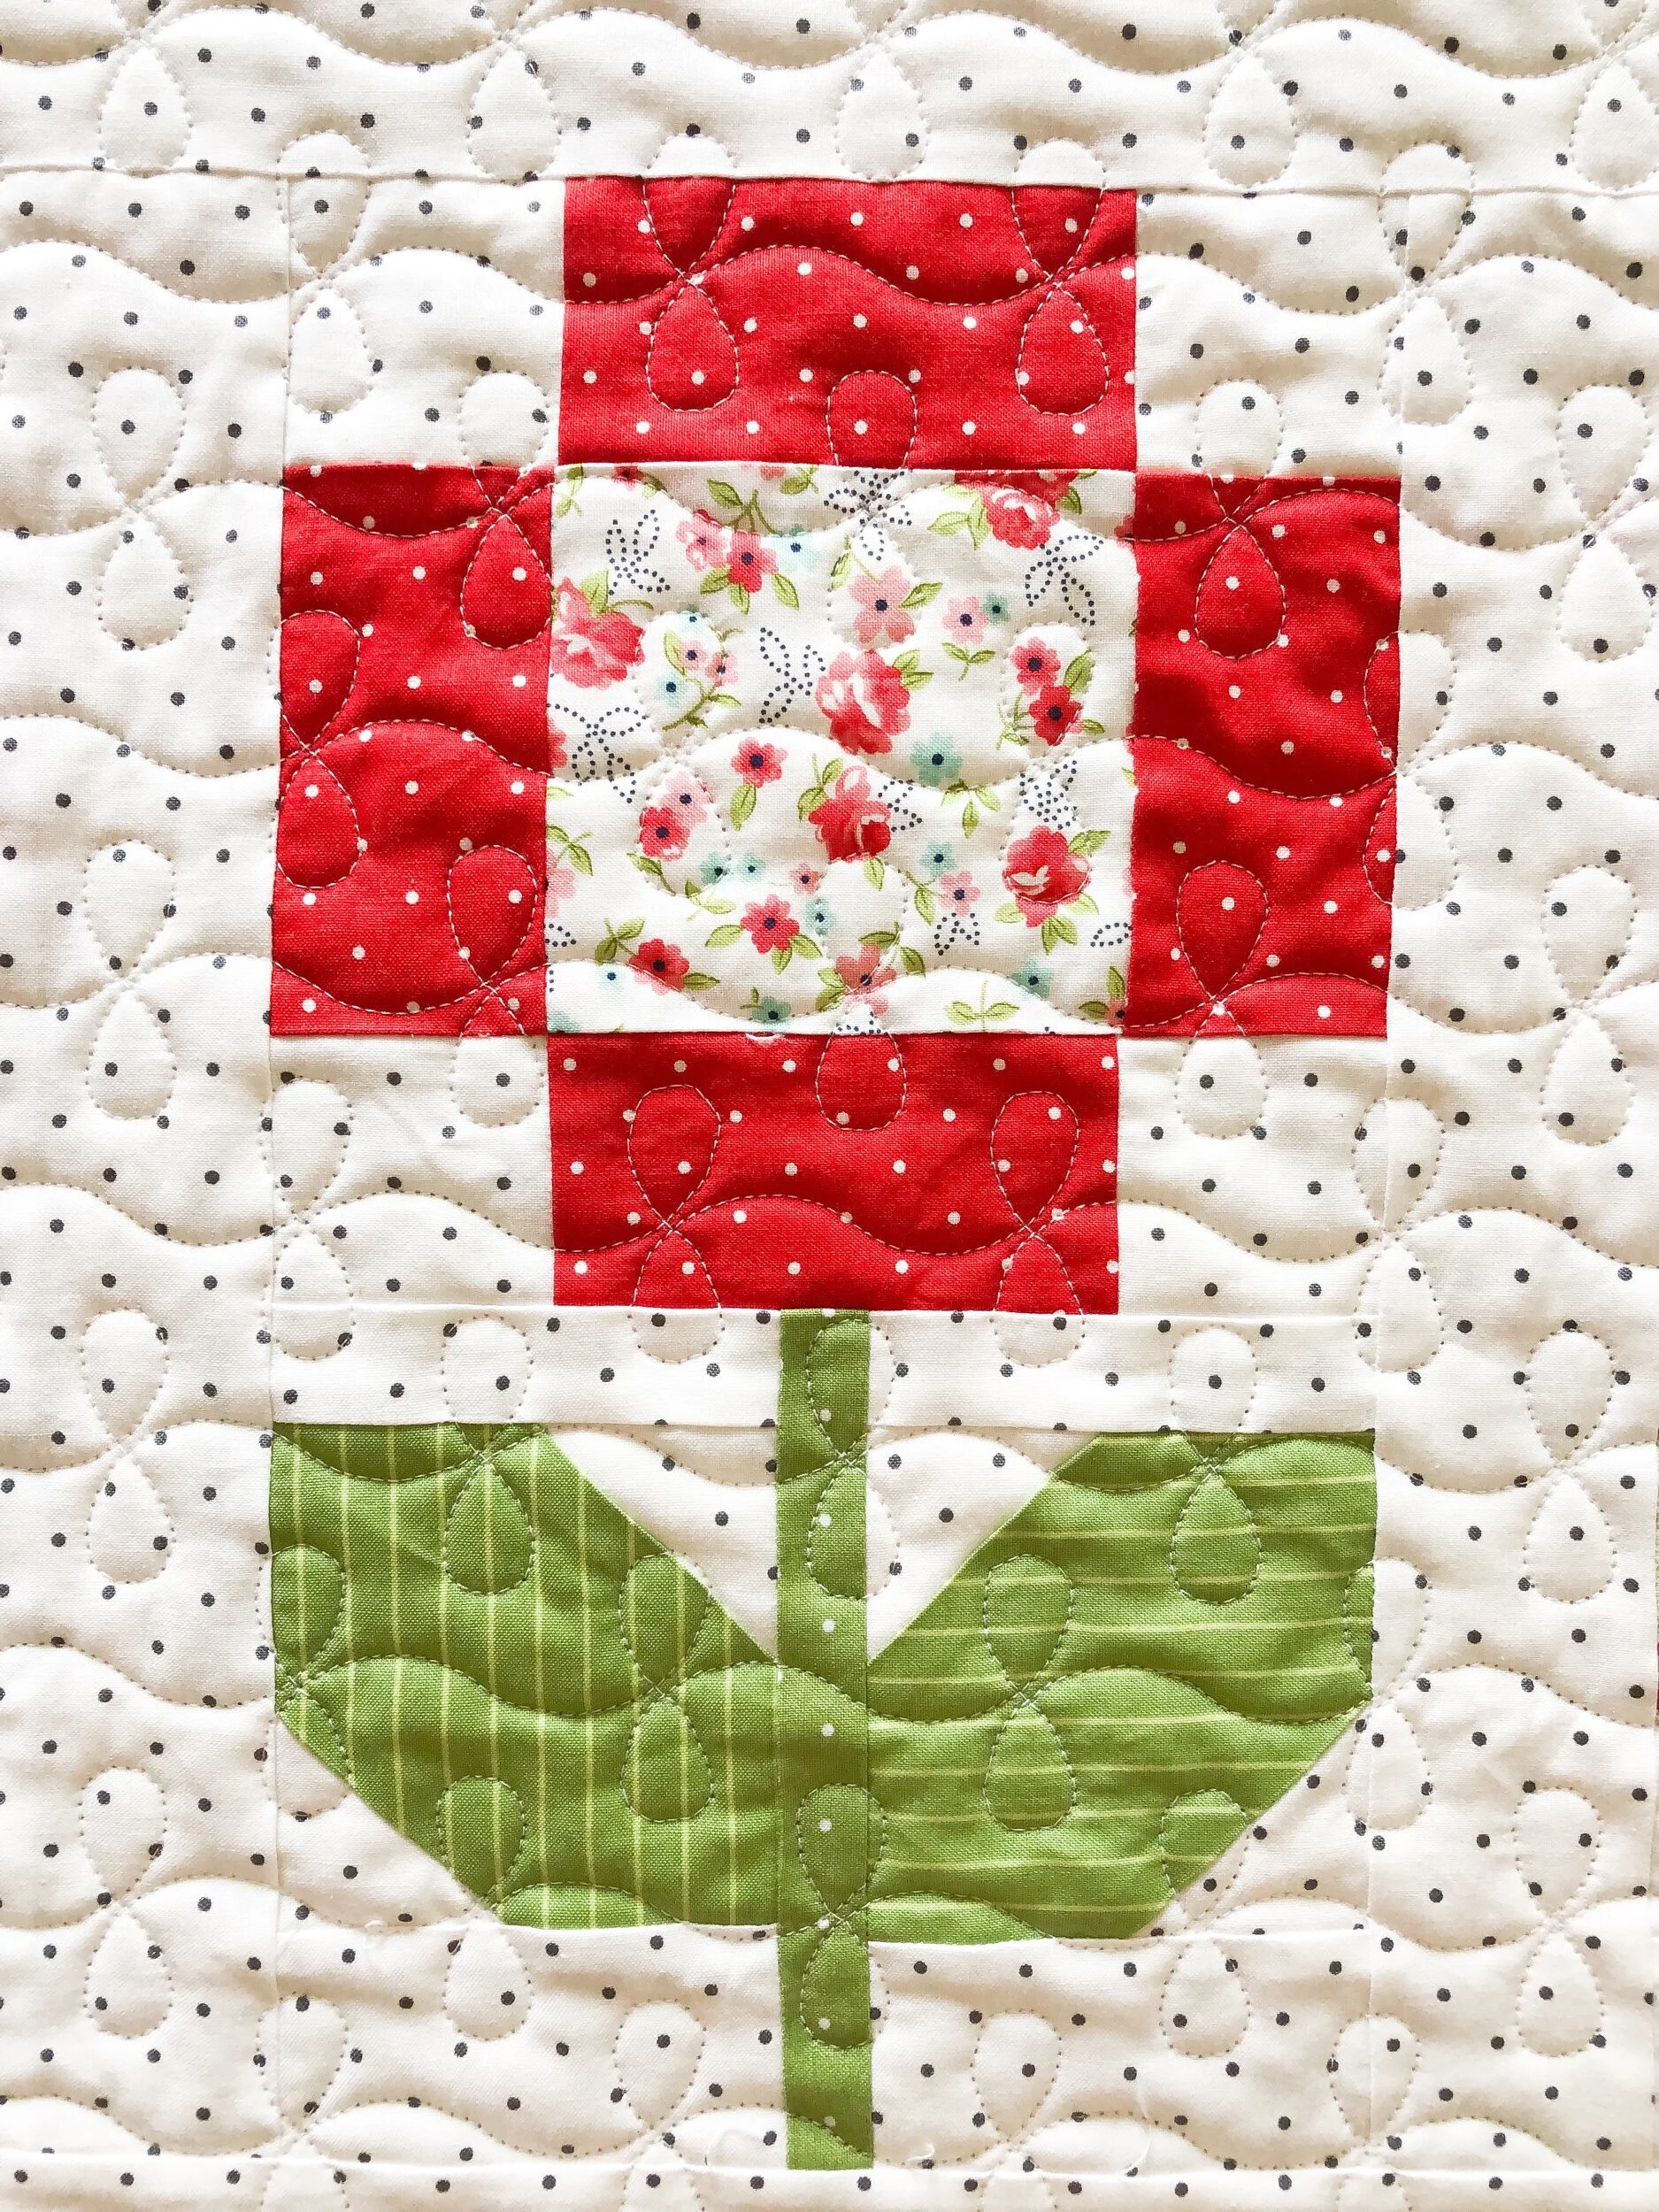
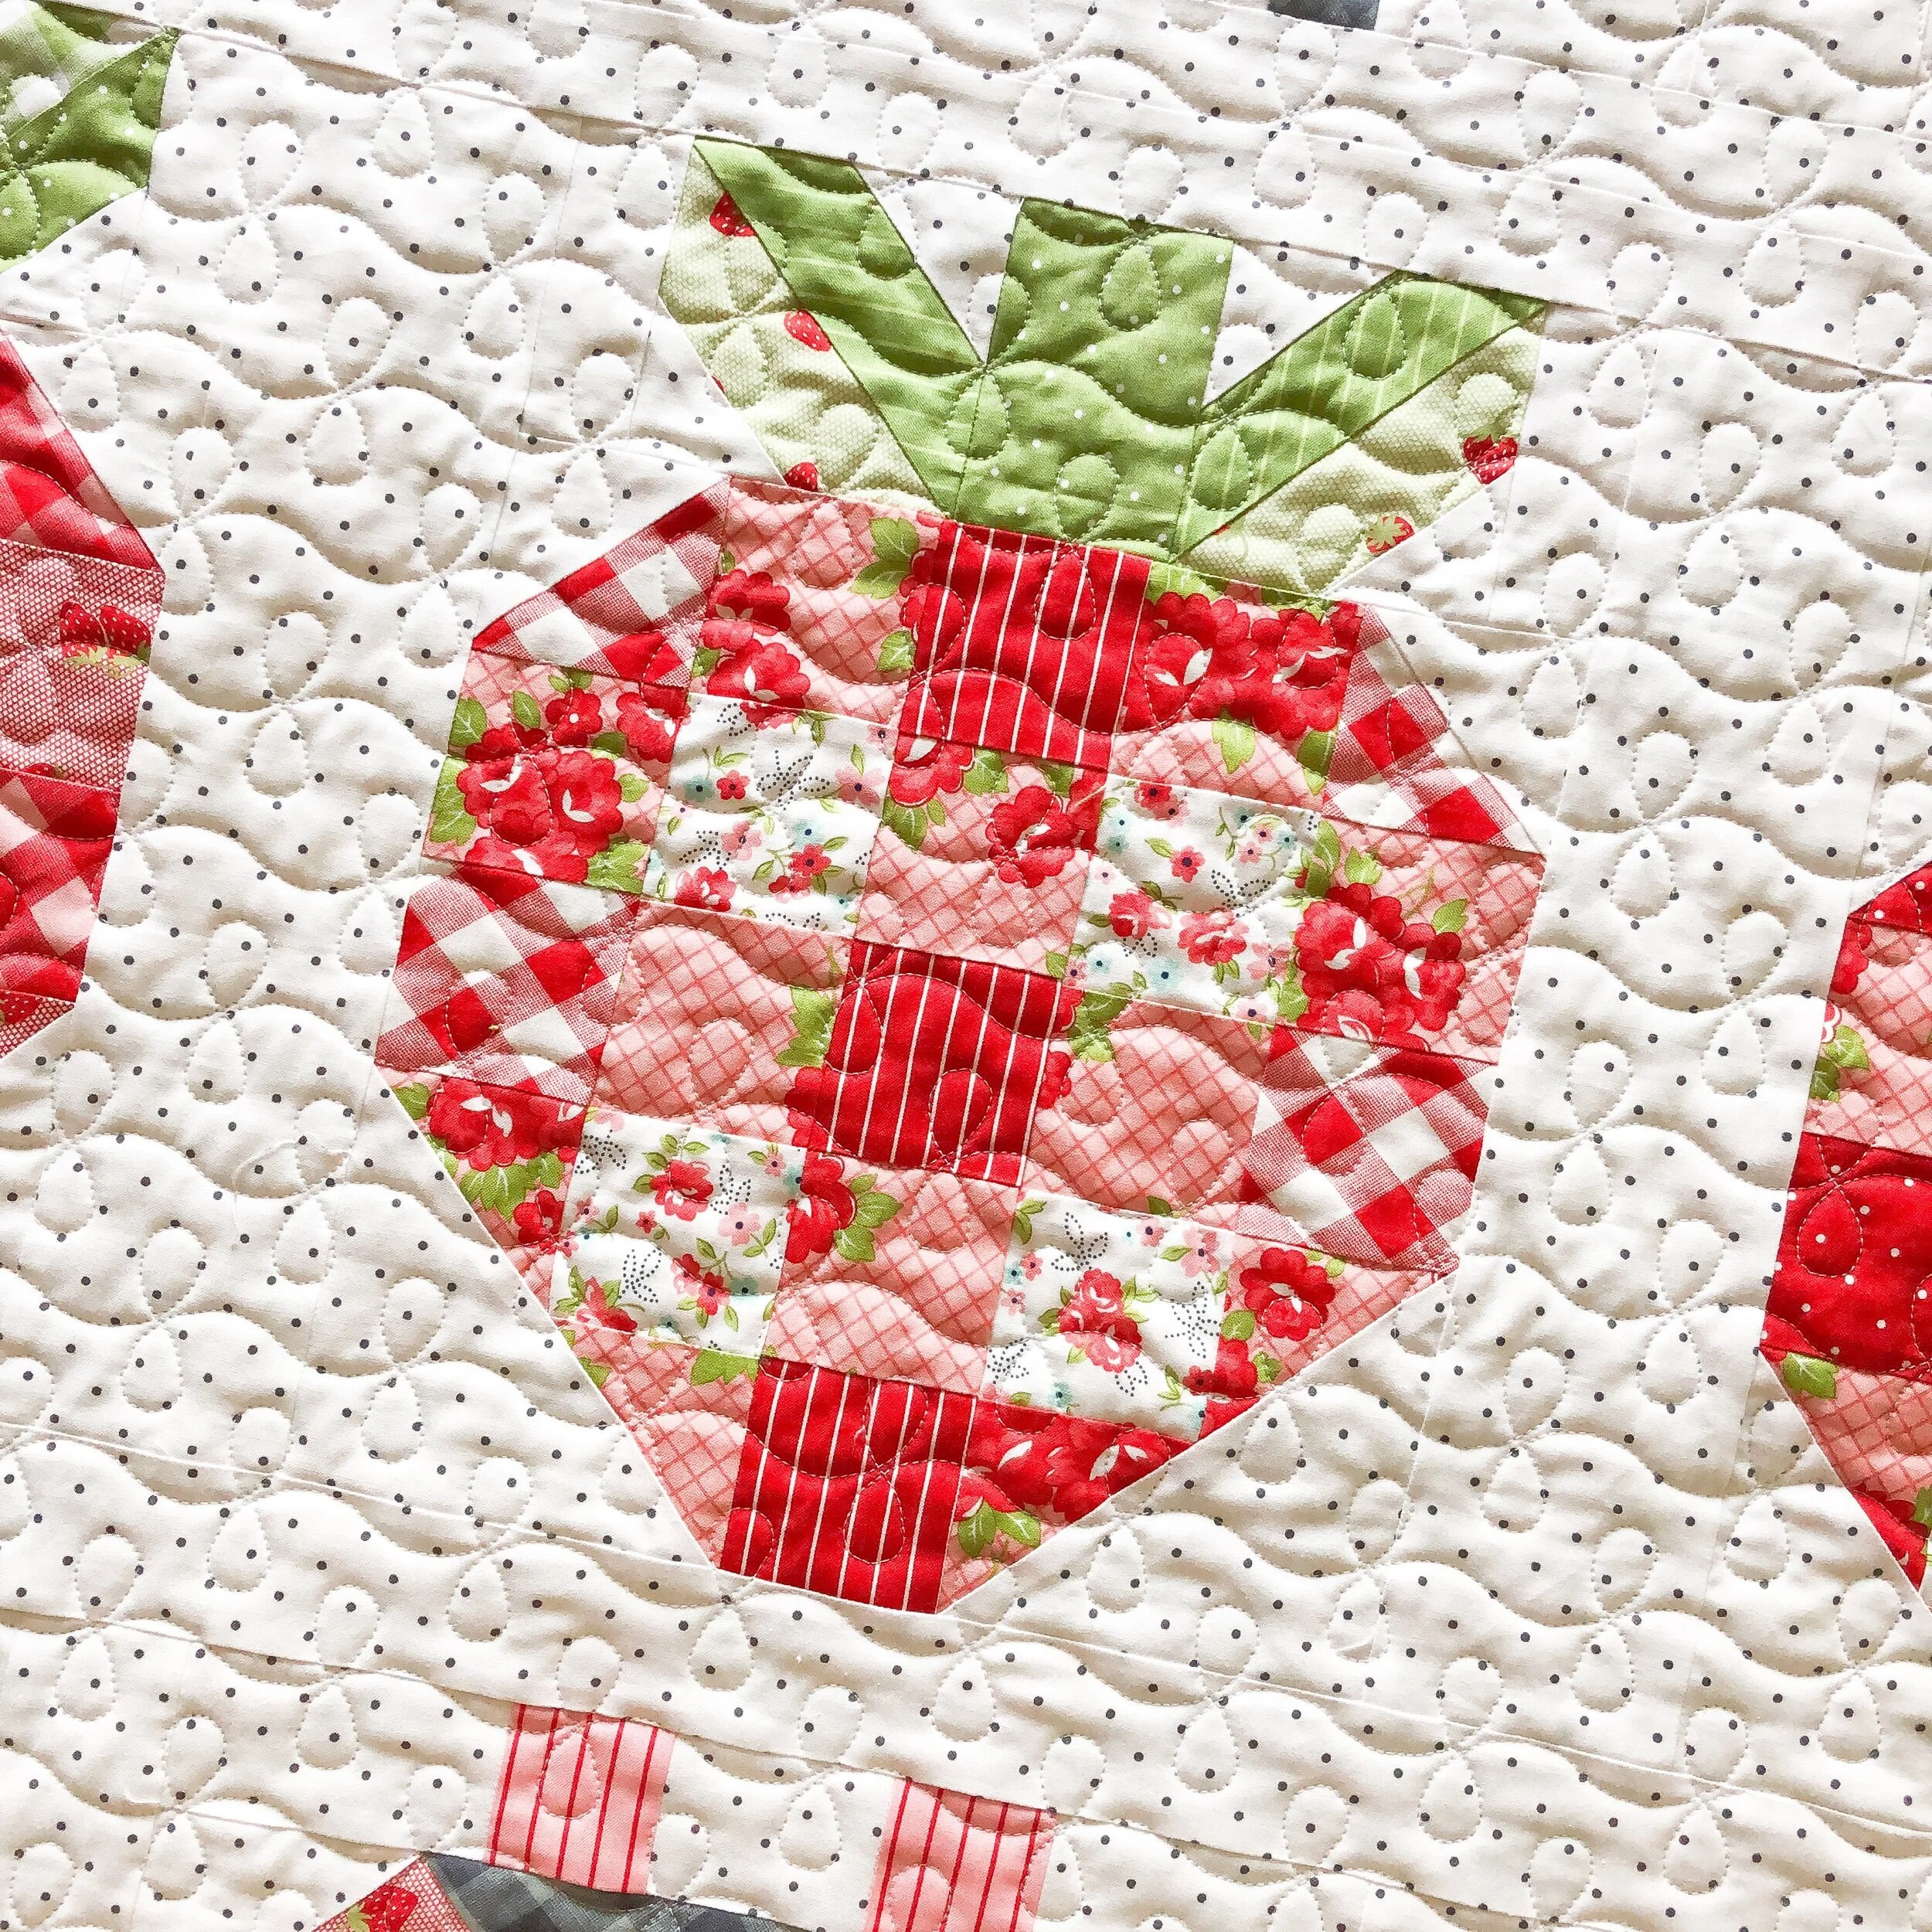
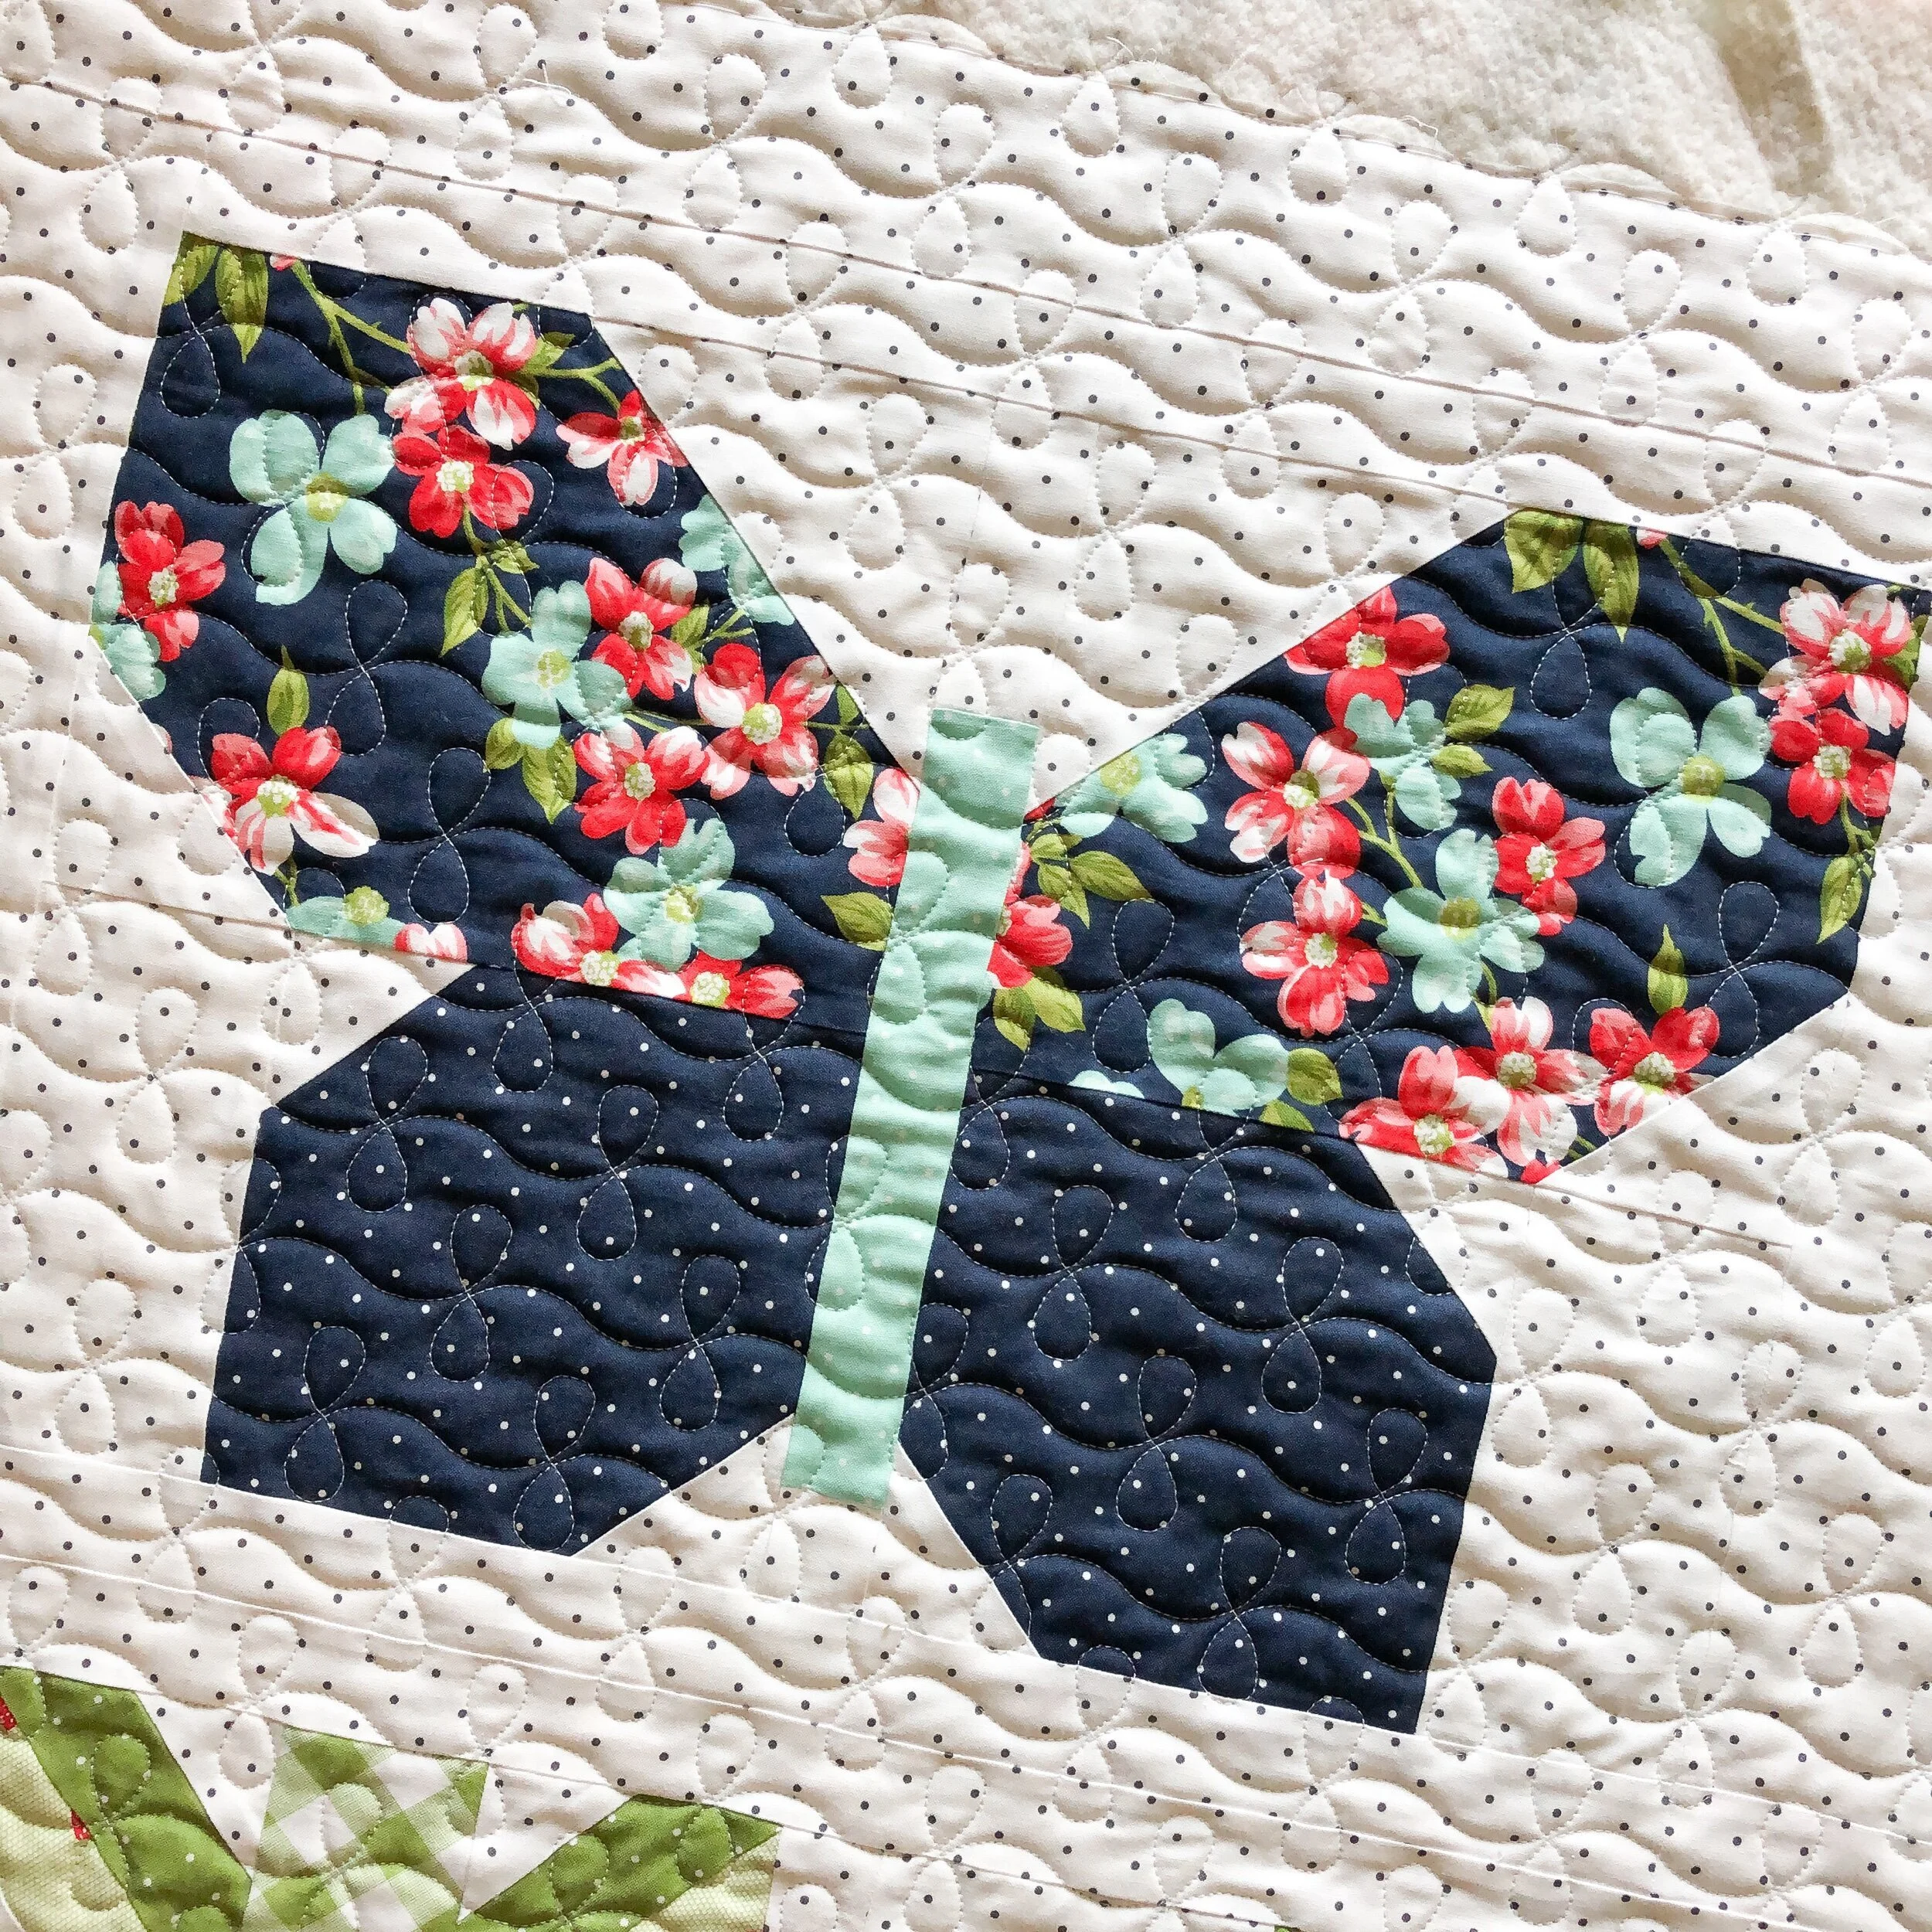
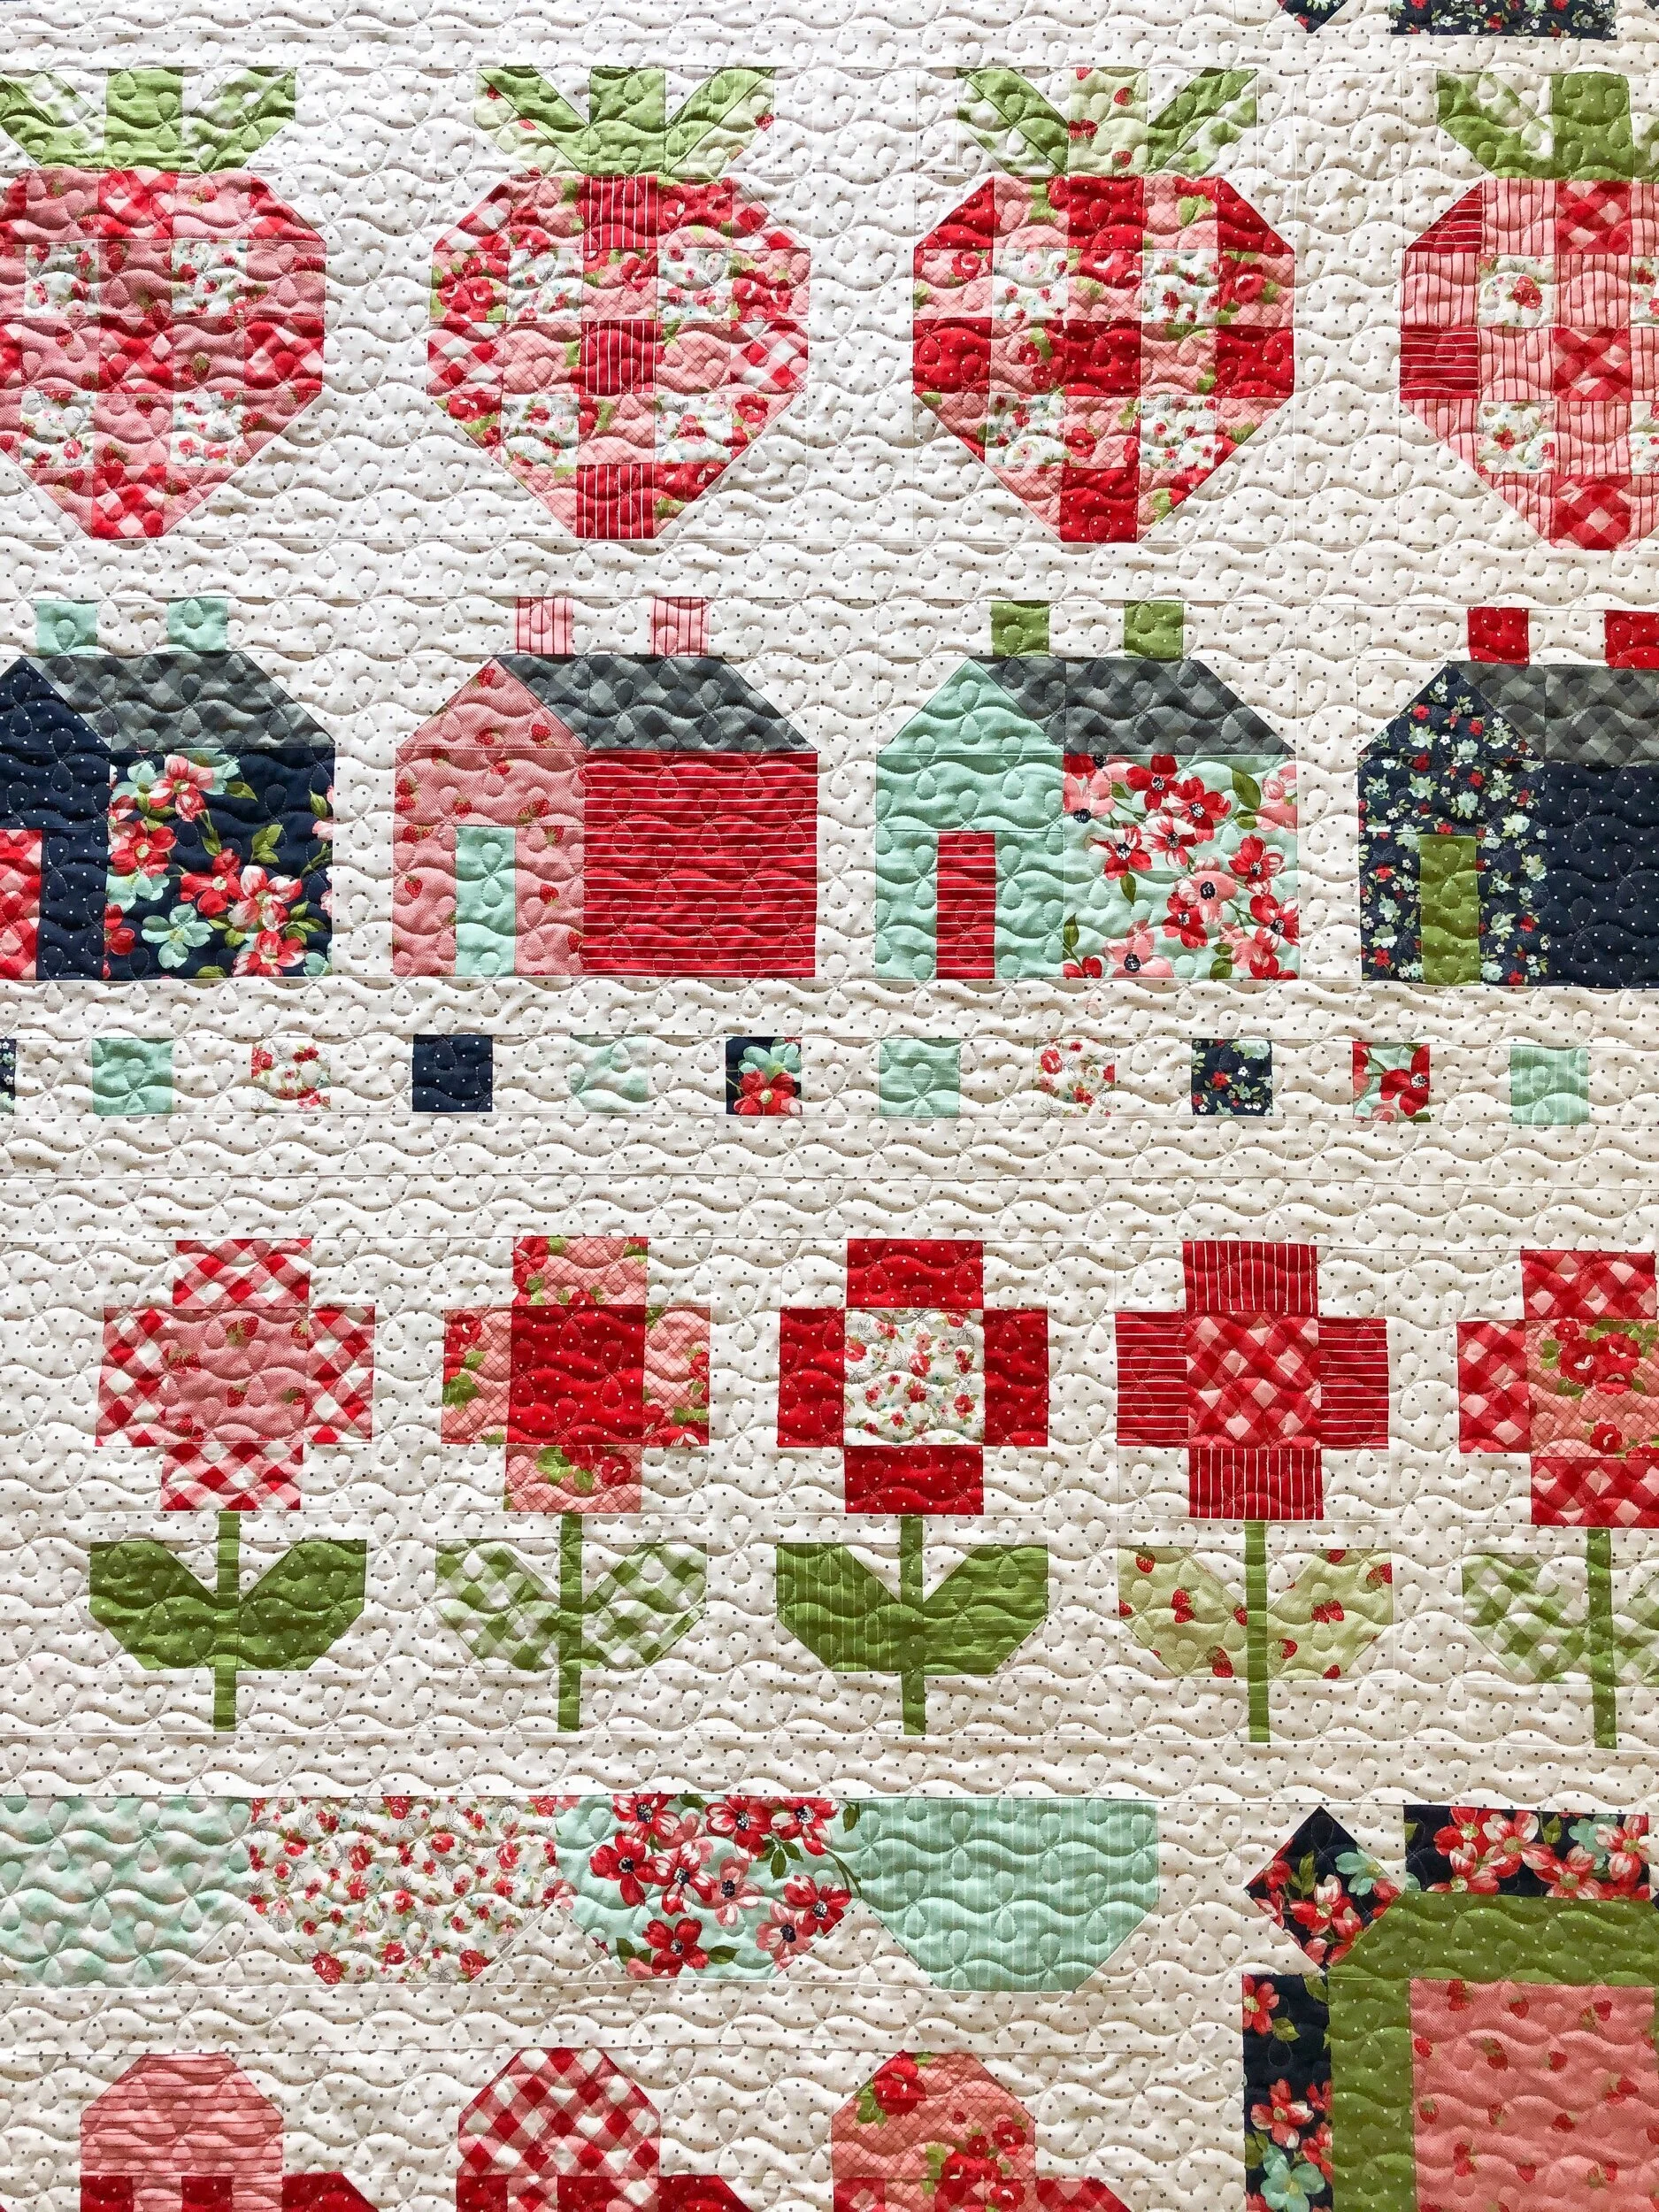
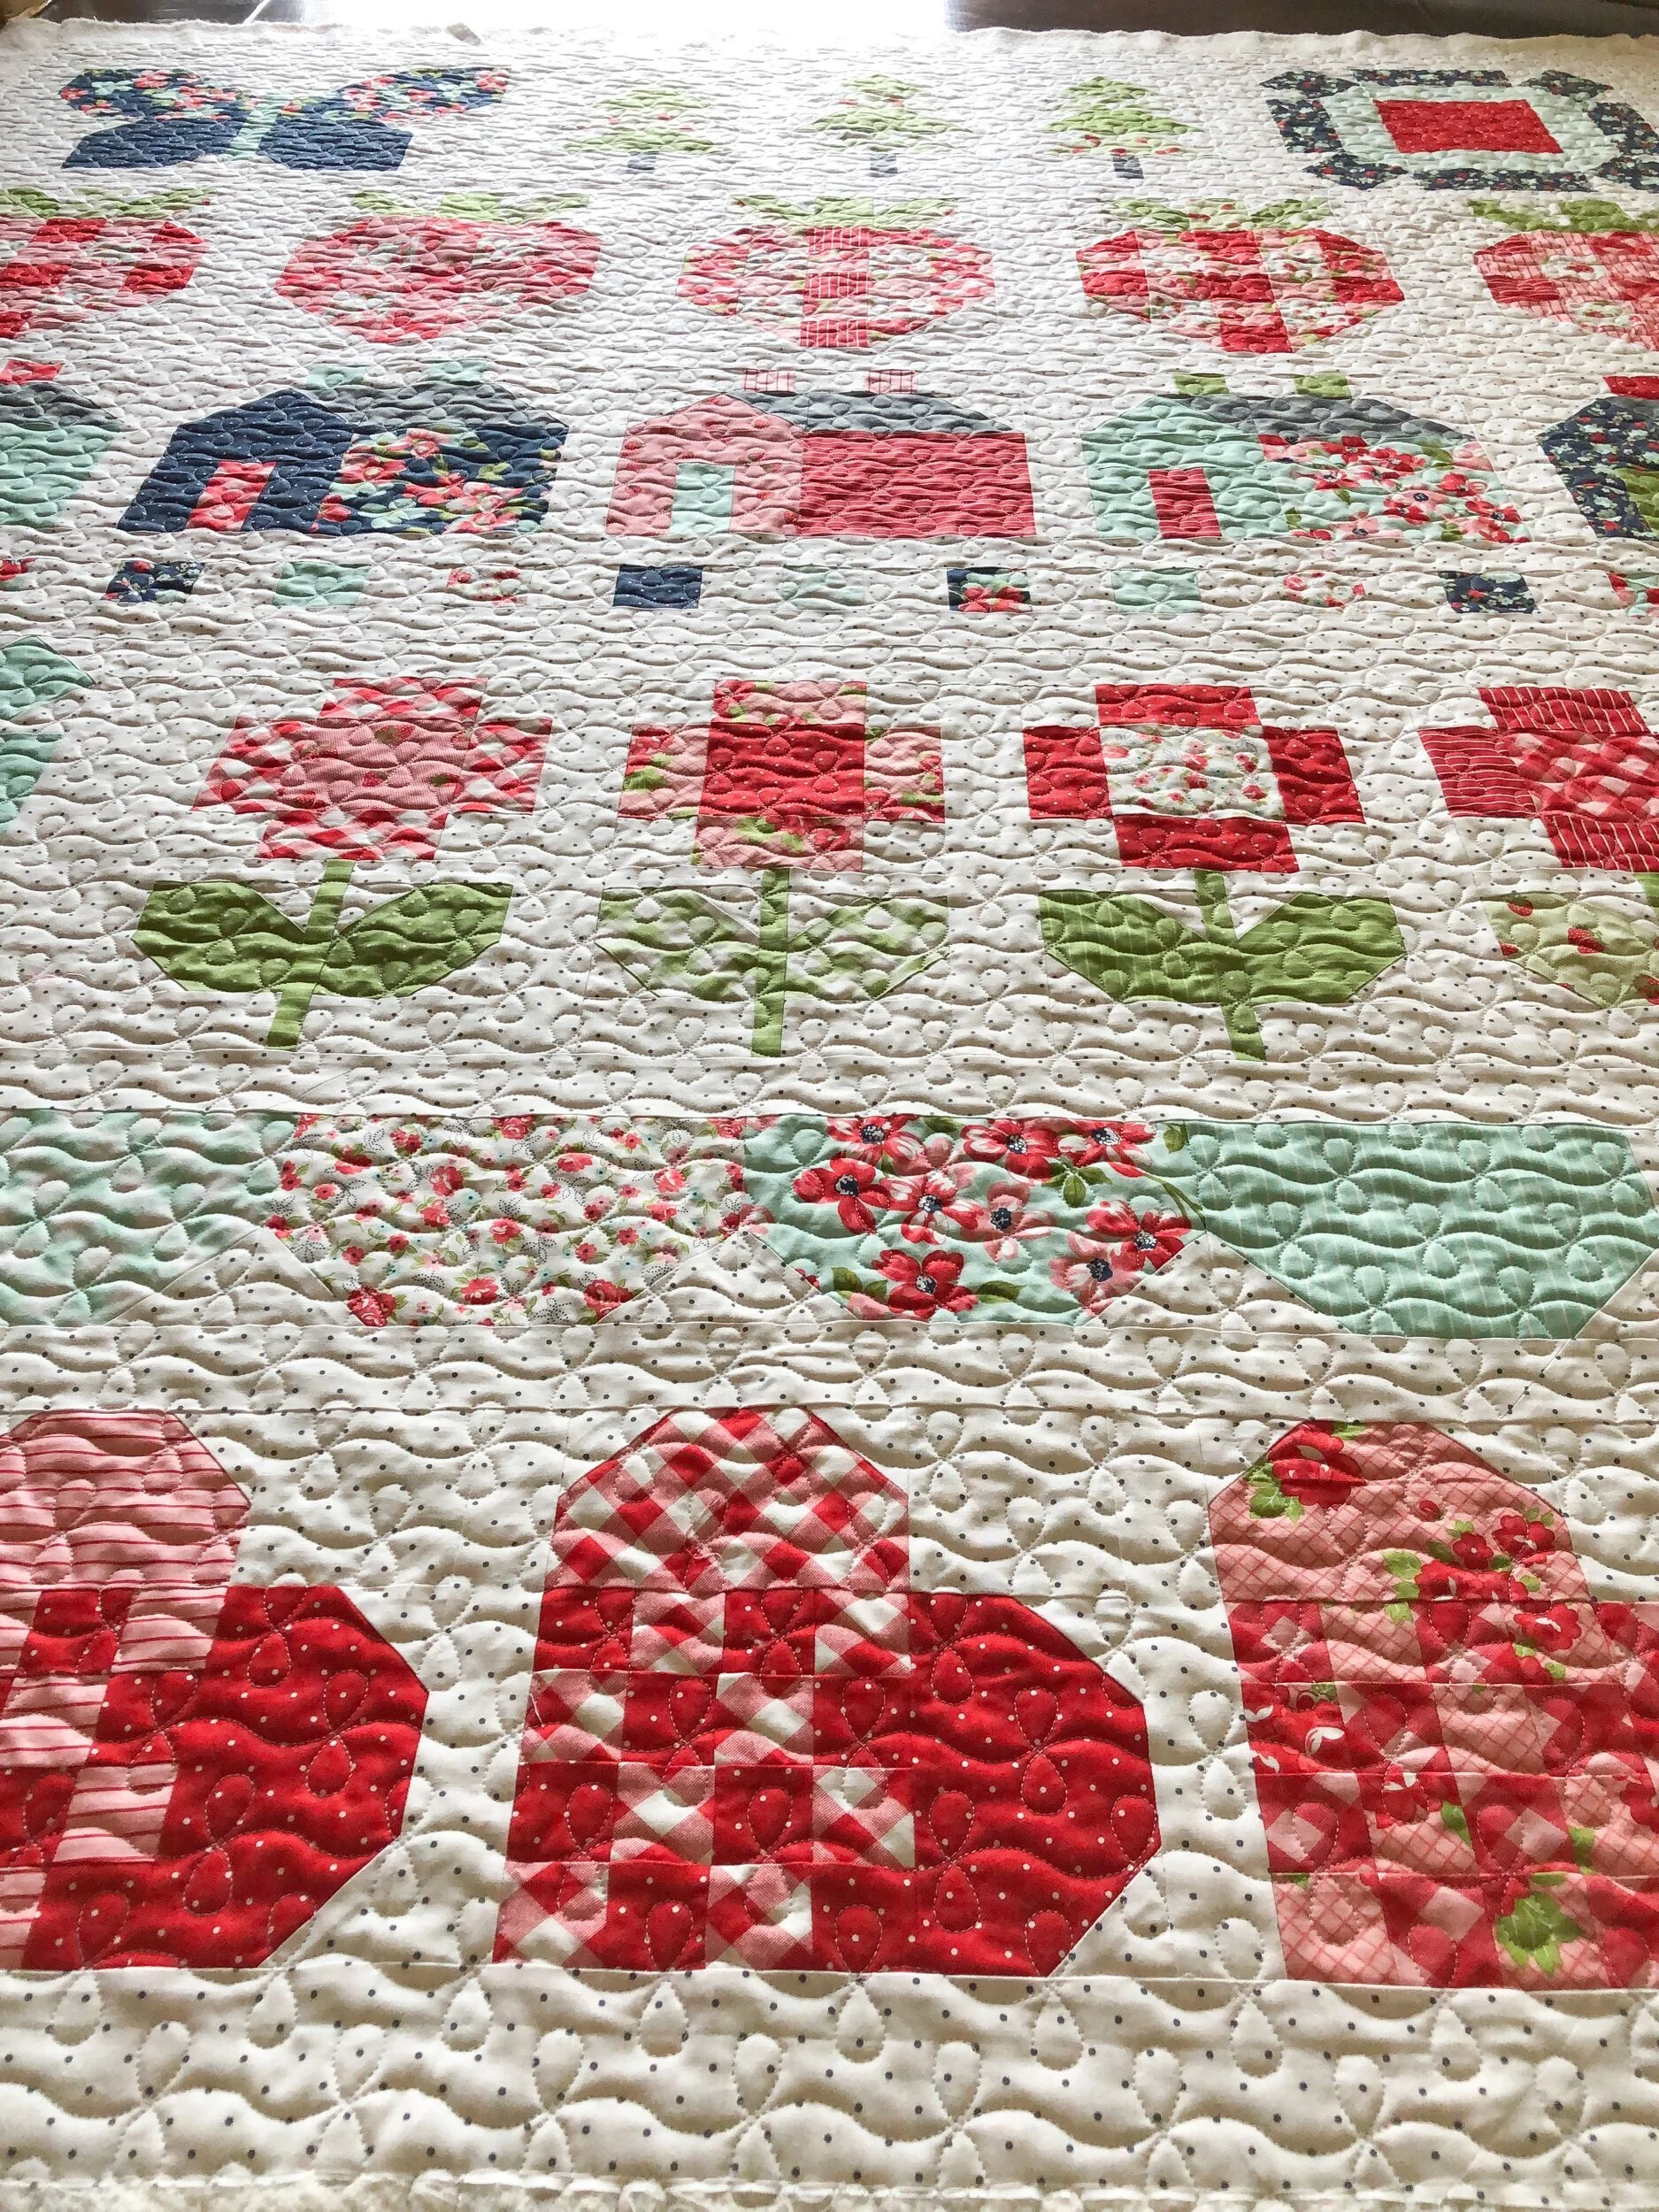
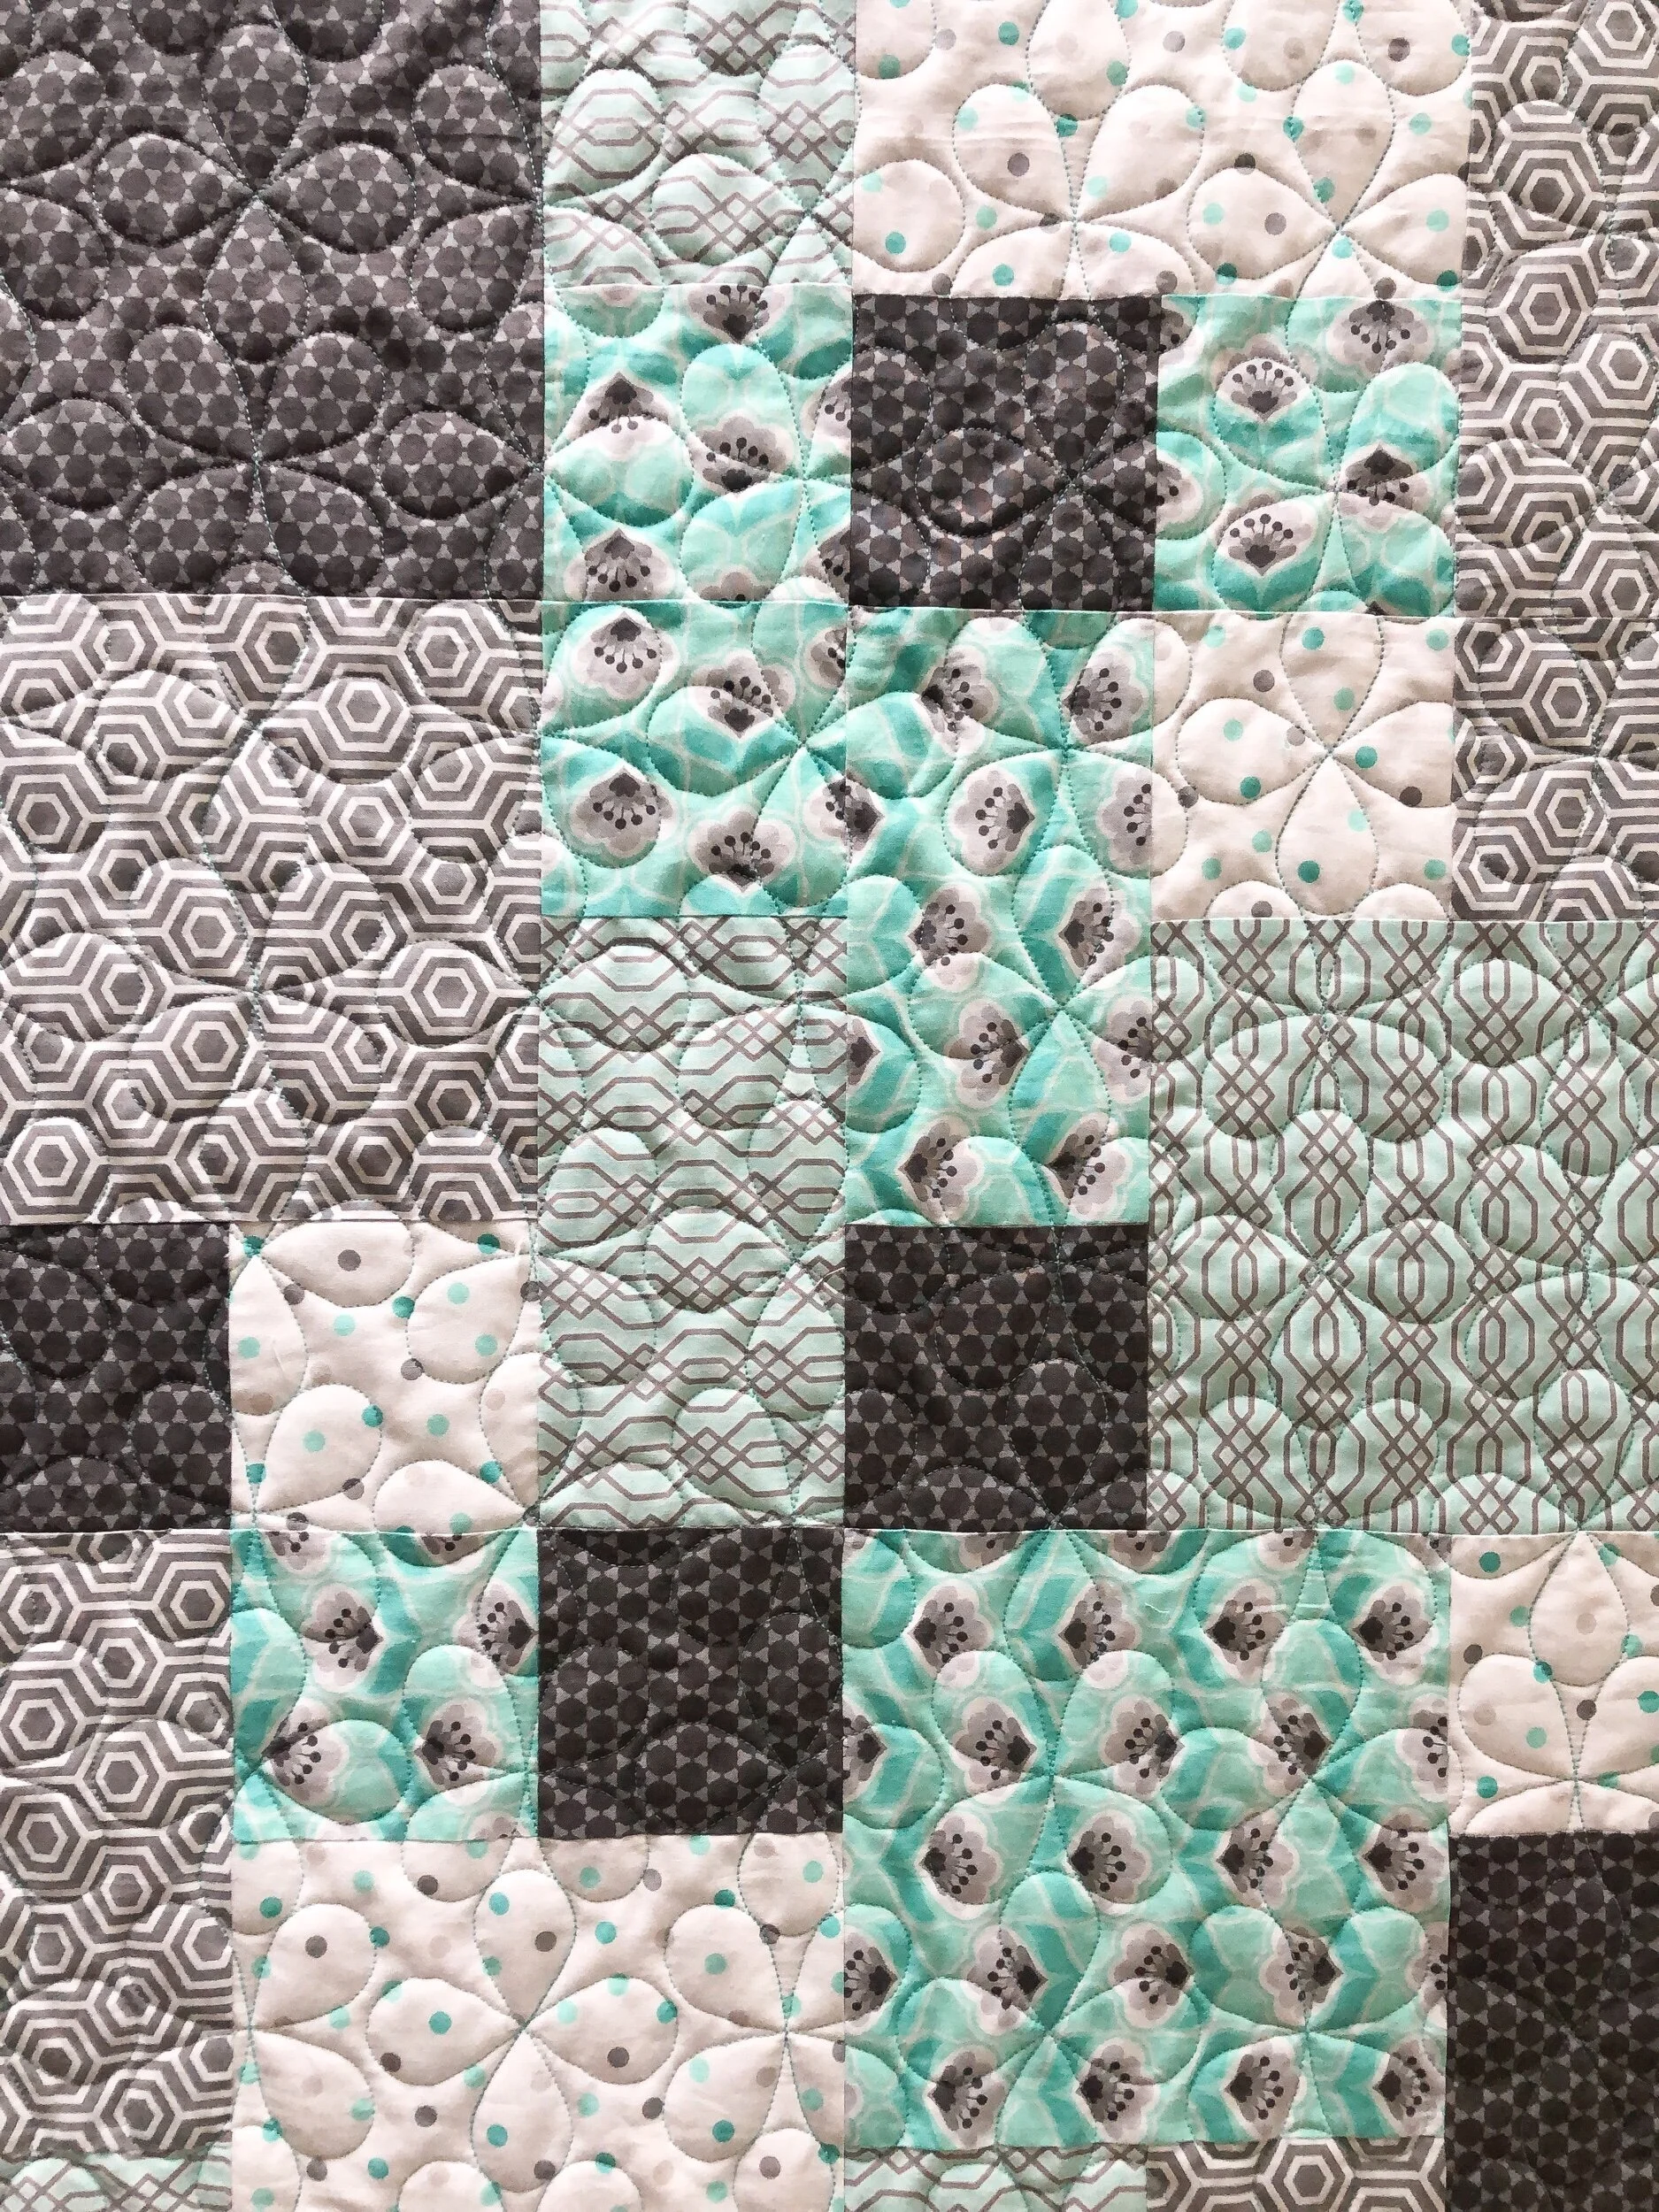
Barbara’s Berries Runner
Hi there Friends,
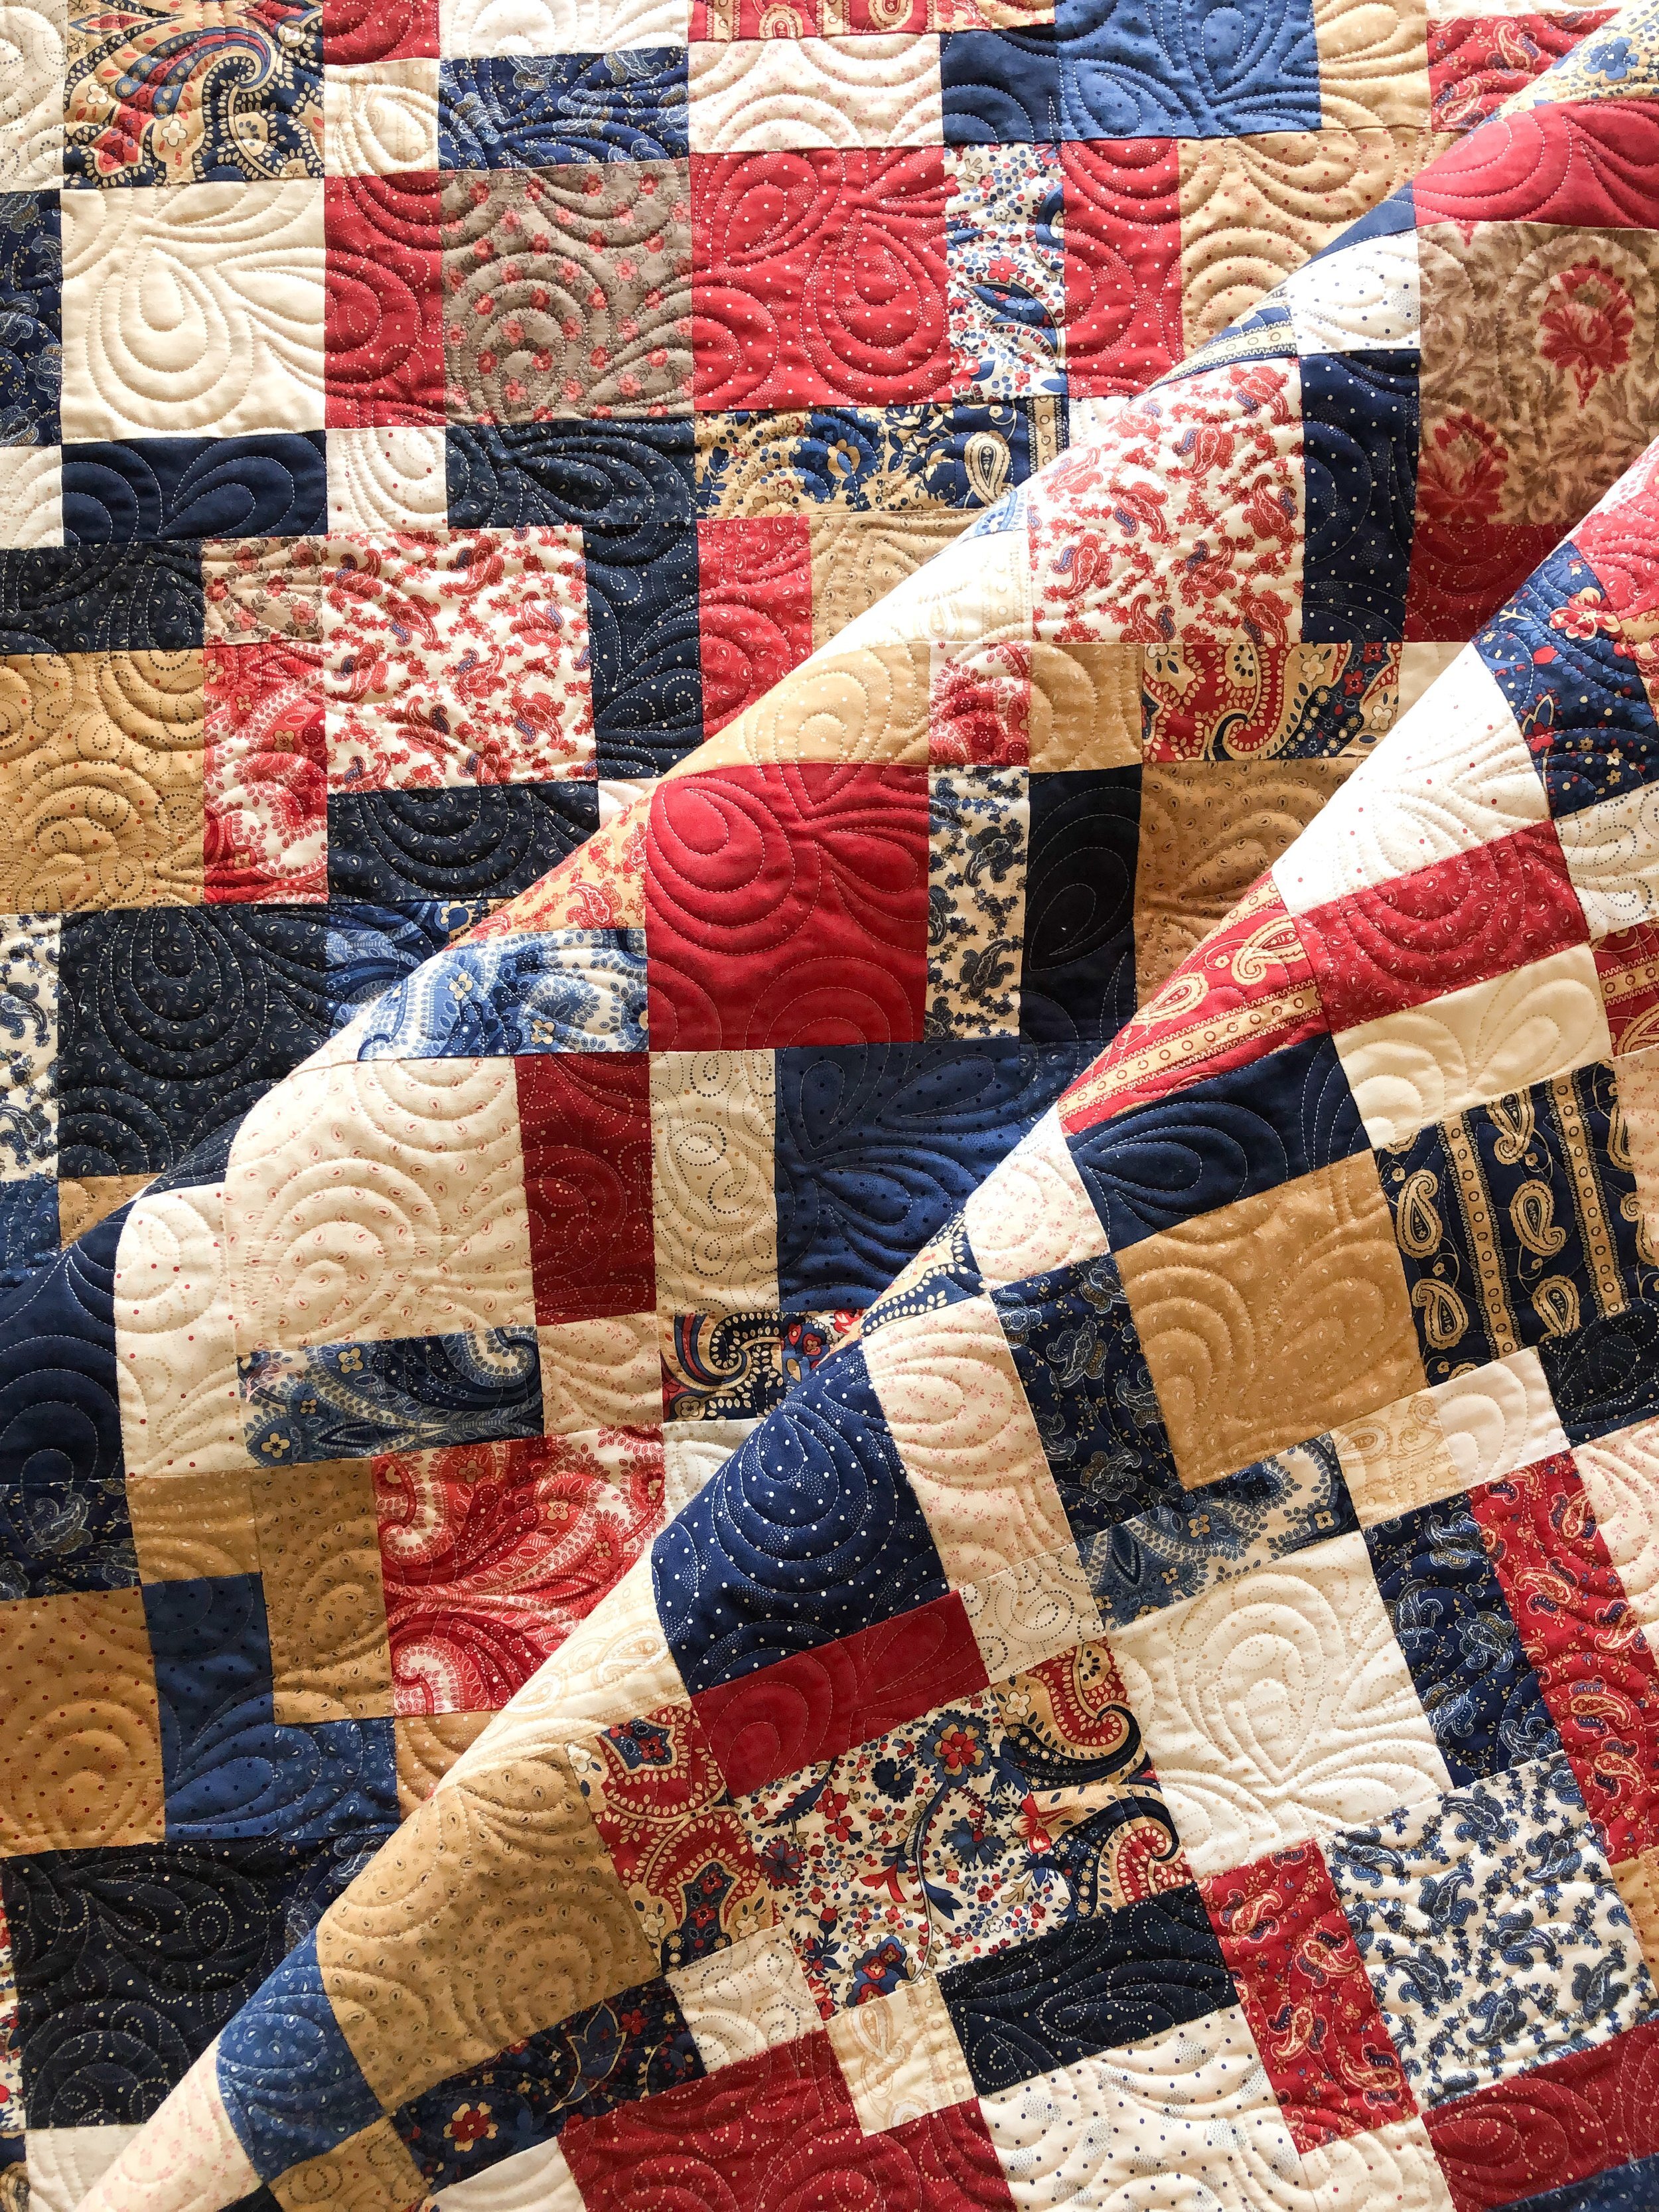
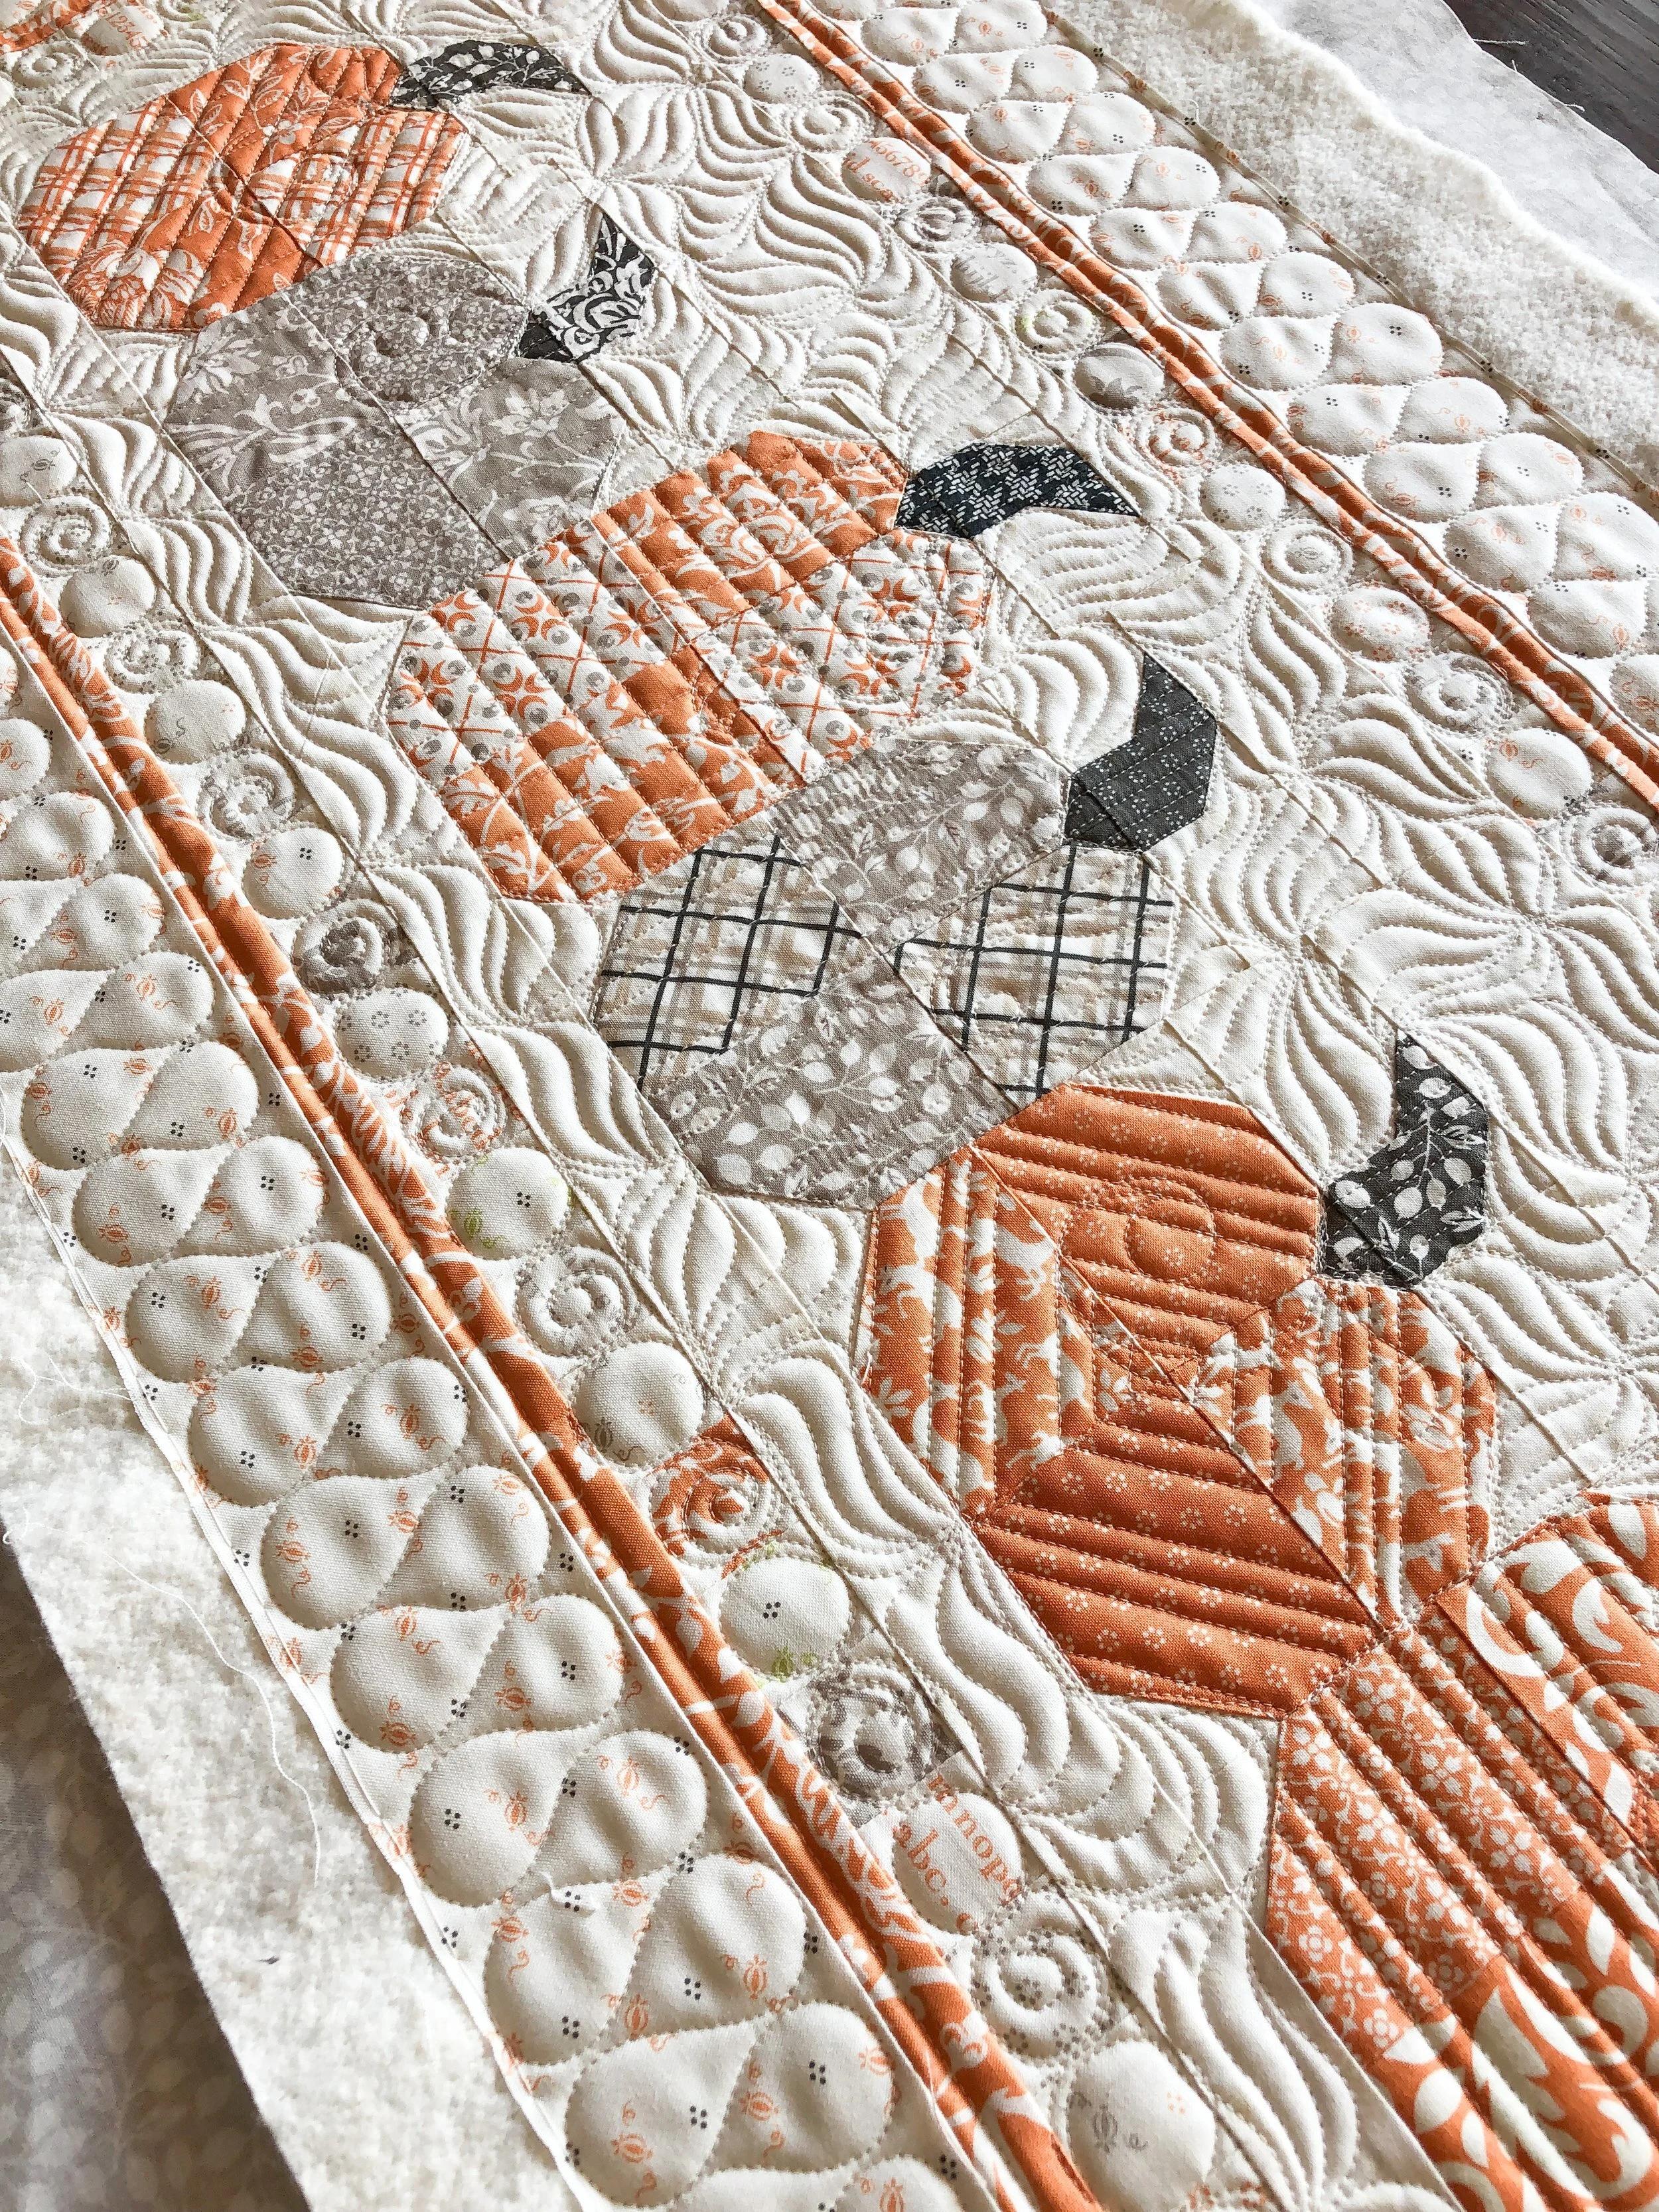
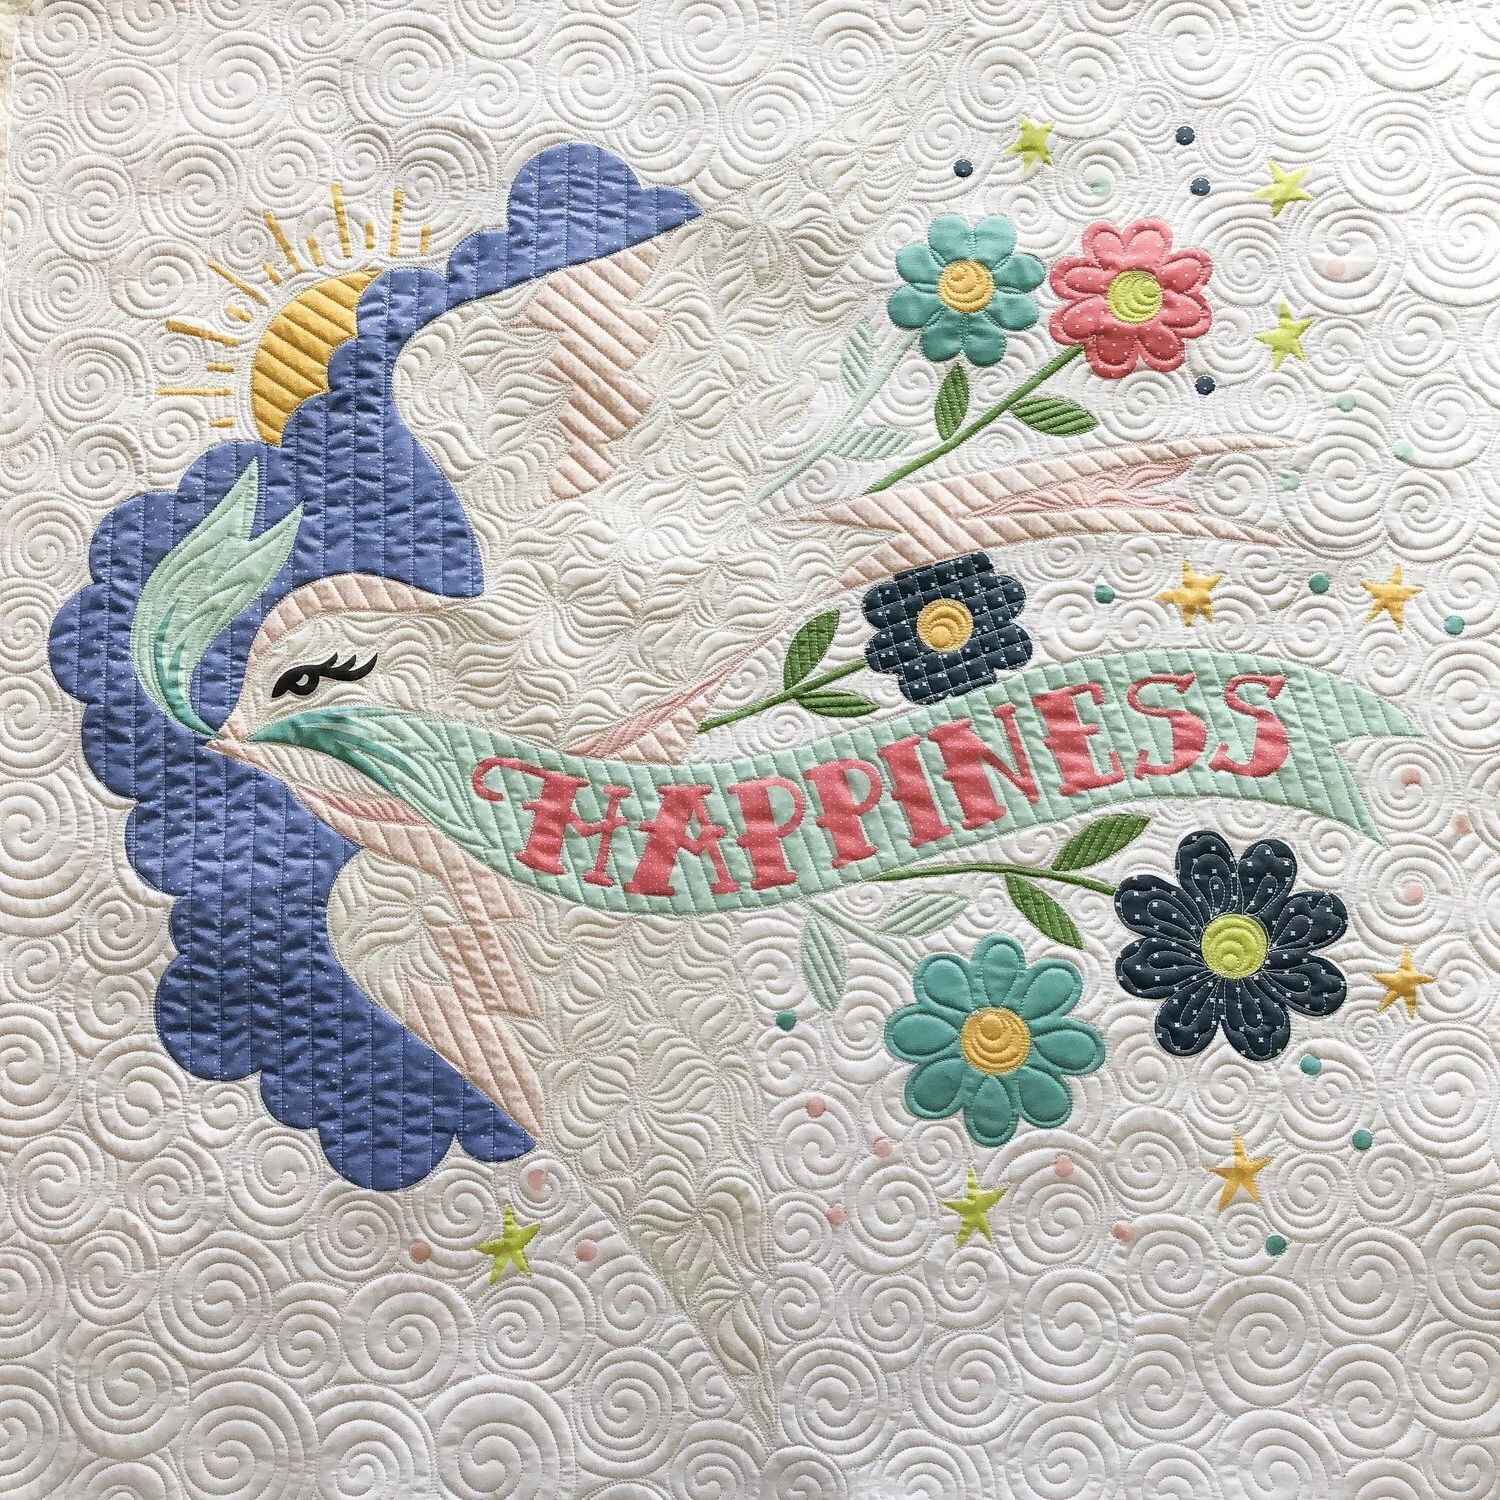
I’m back with more quilting, this one I did custom. Today it’s a table runner. Barbara did a beautiful job making it. The pattern is by Joanna from Fig Tree & Co and is called Berries. If you’re looking for some fun easy projects, that don’t take much fabric or time, check out some of Joanna’s other mini quilts or runners. Barbara also used Joanna’s fabrics.
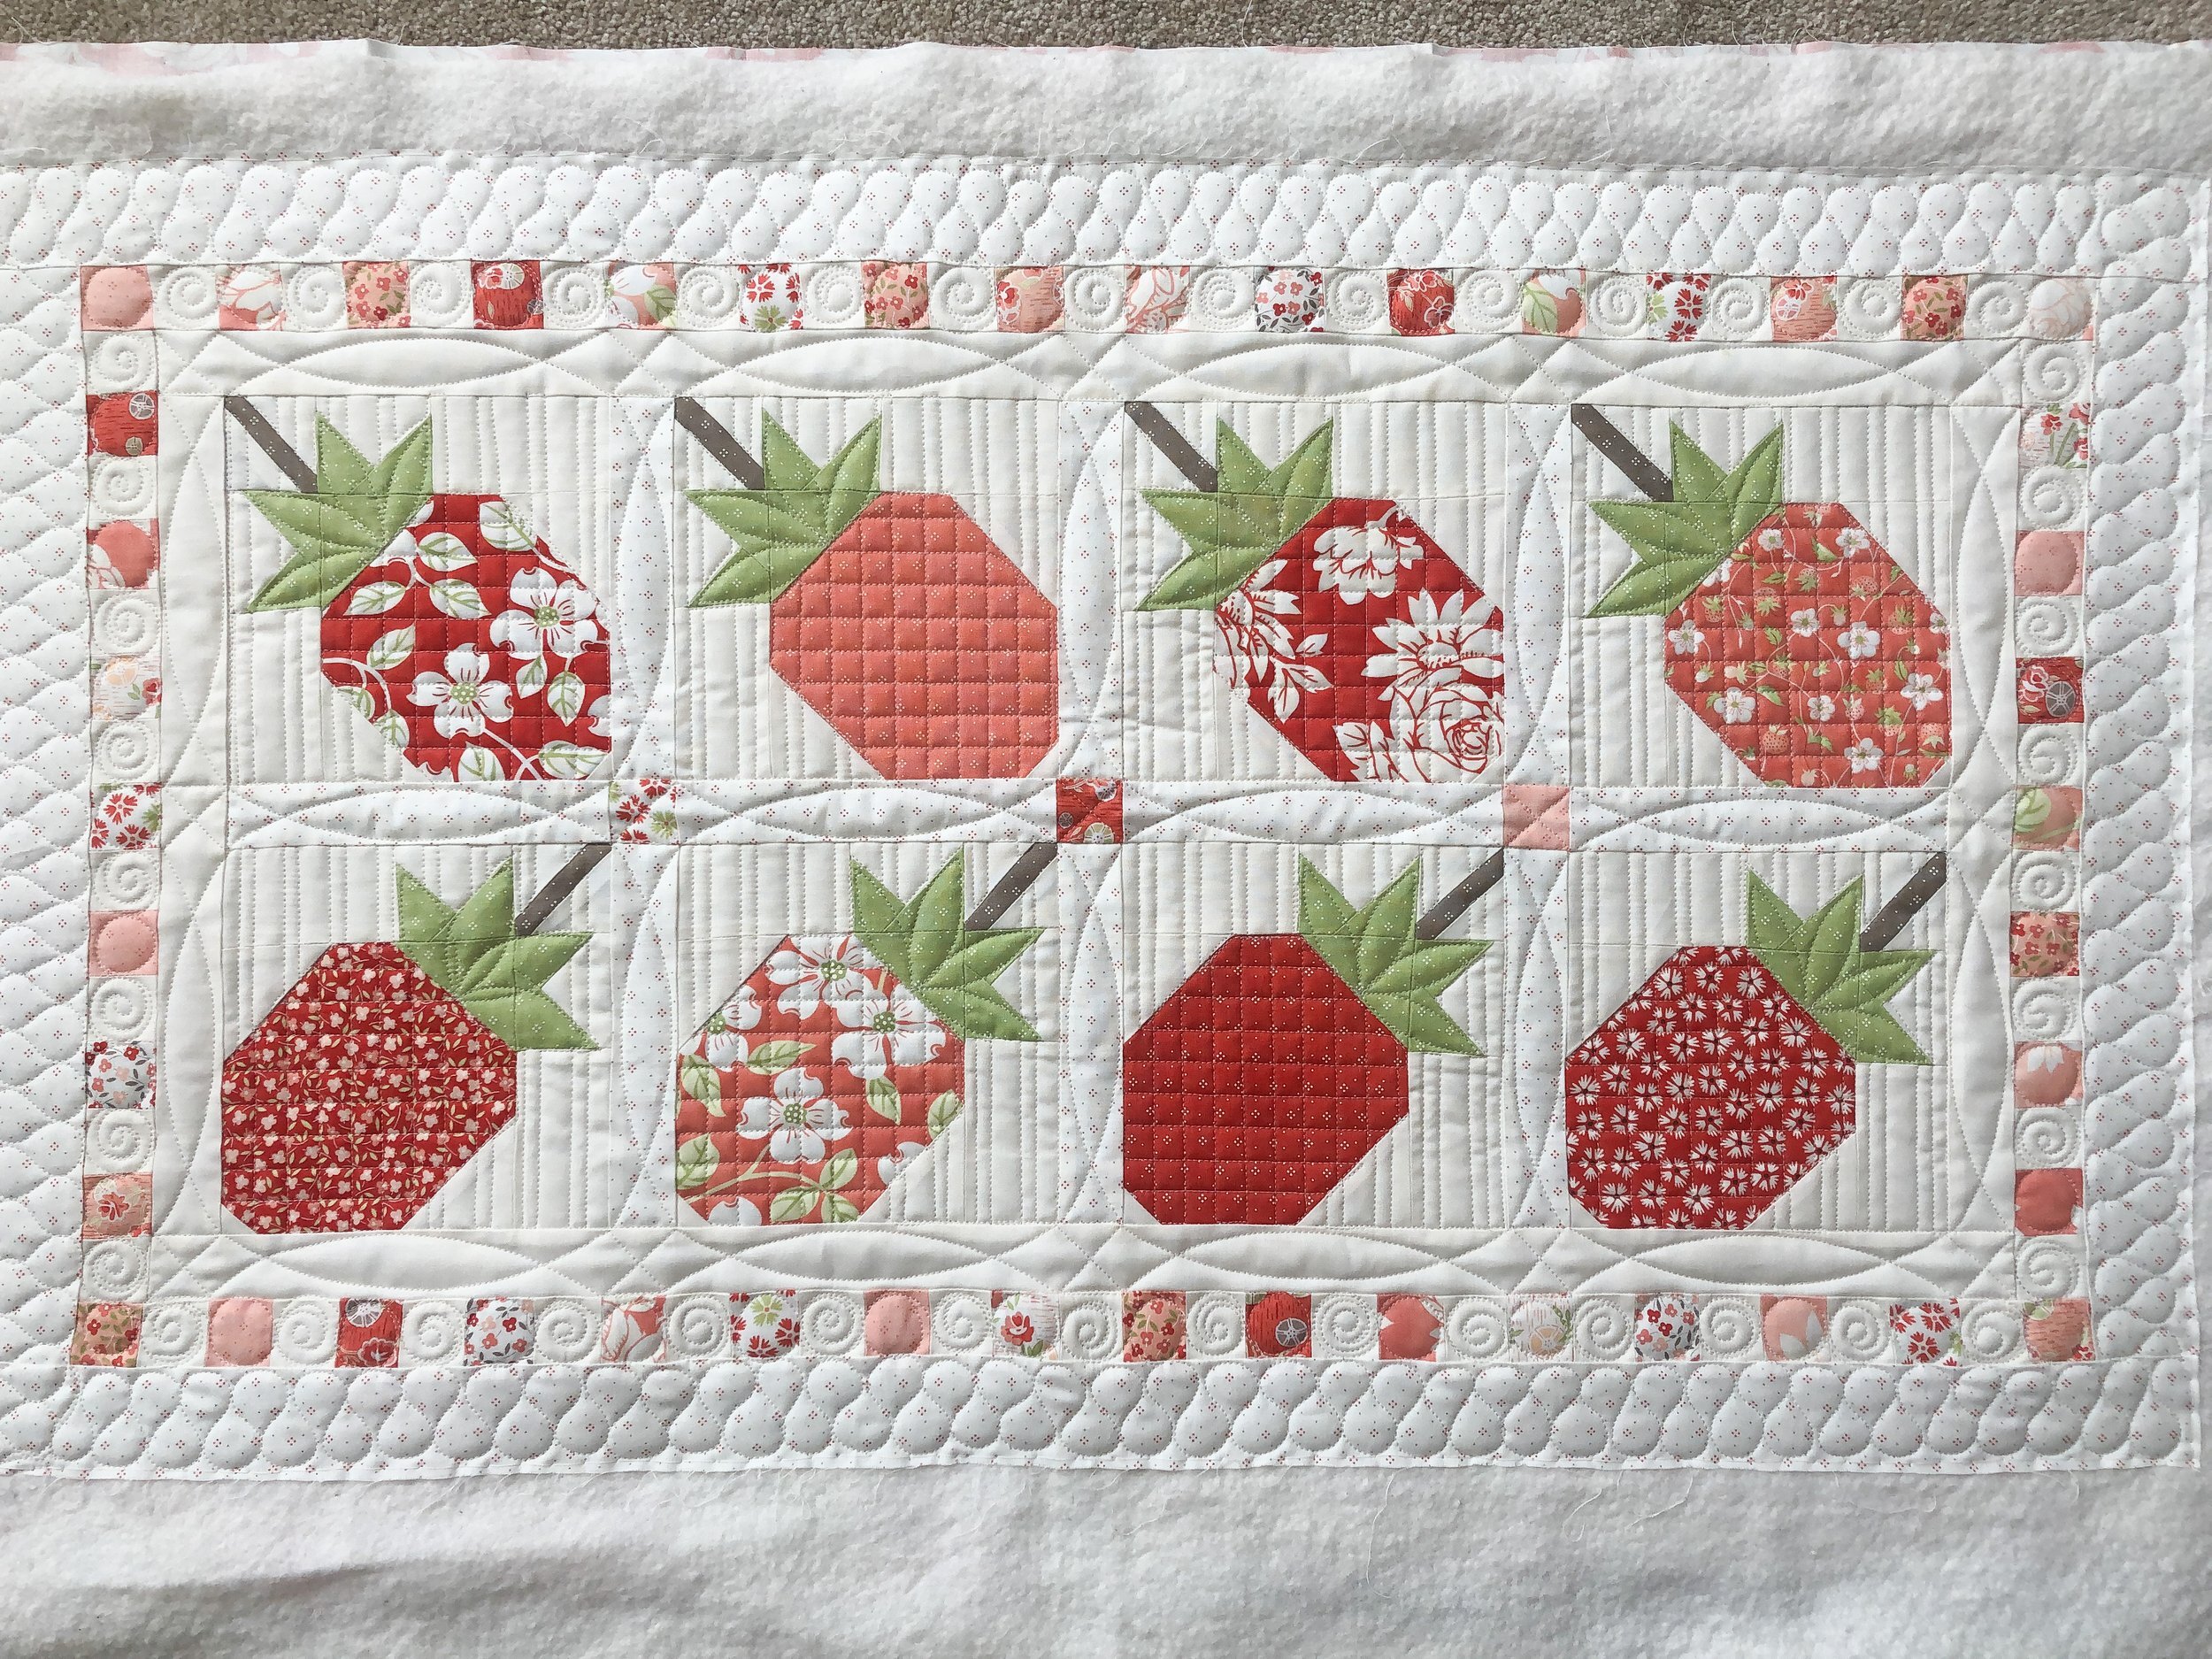
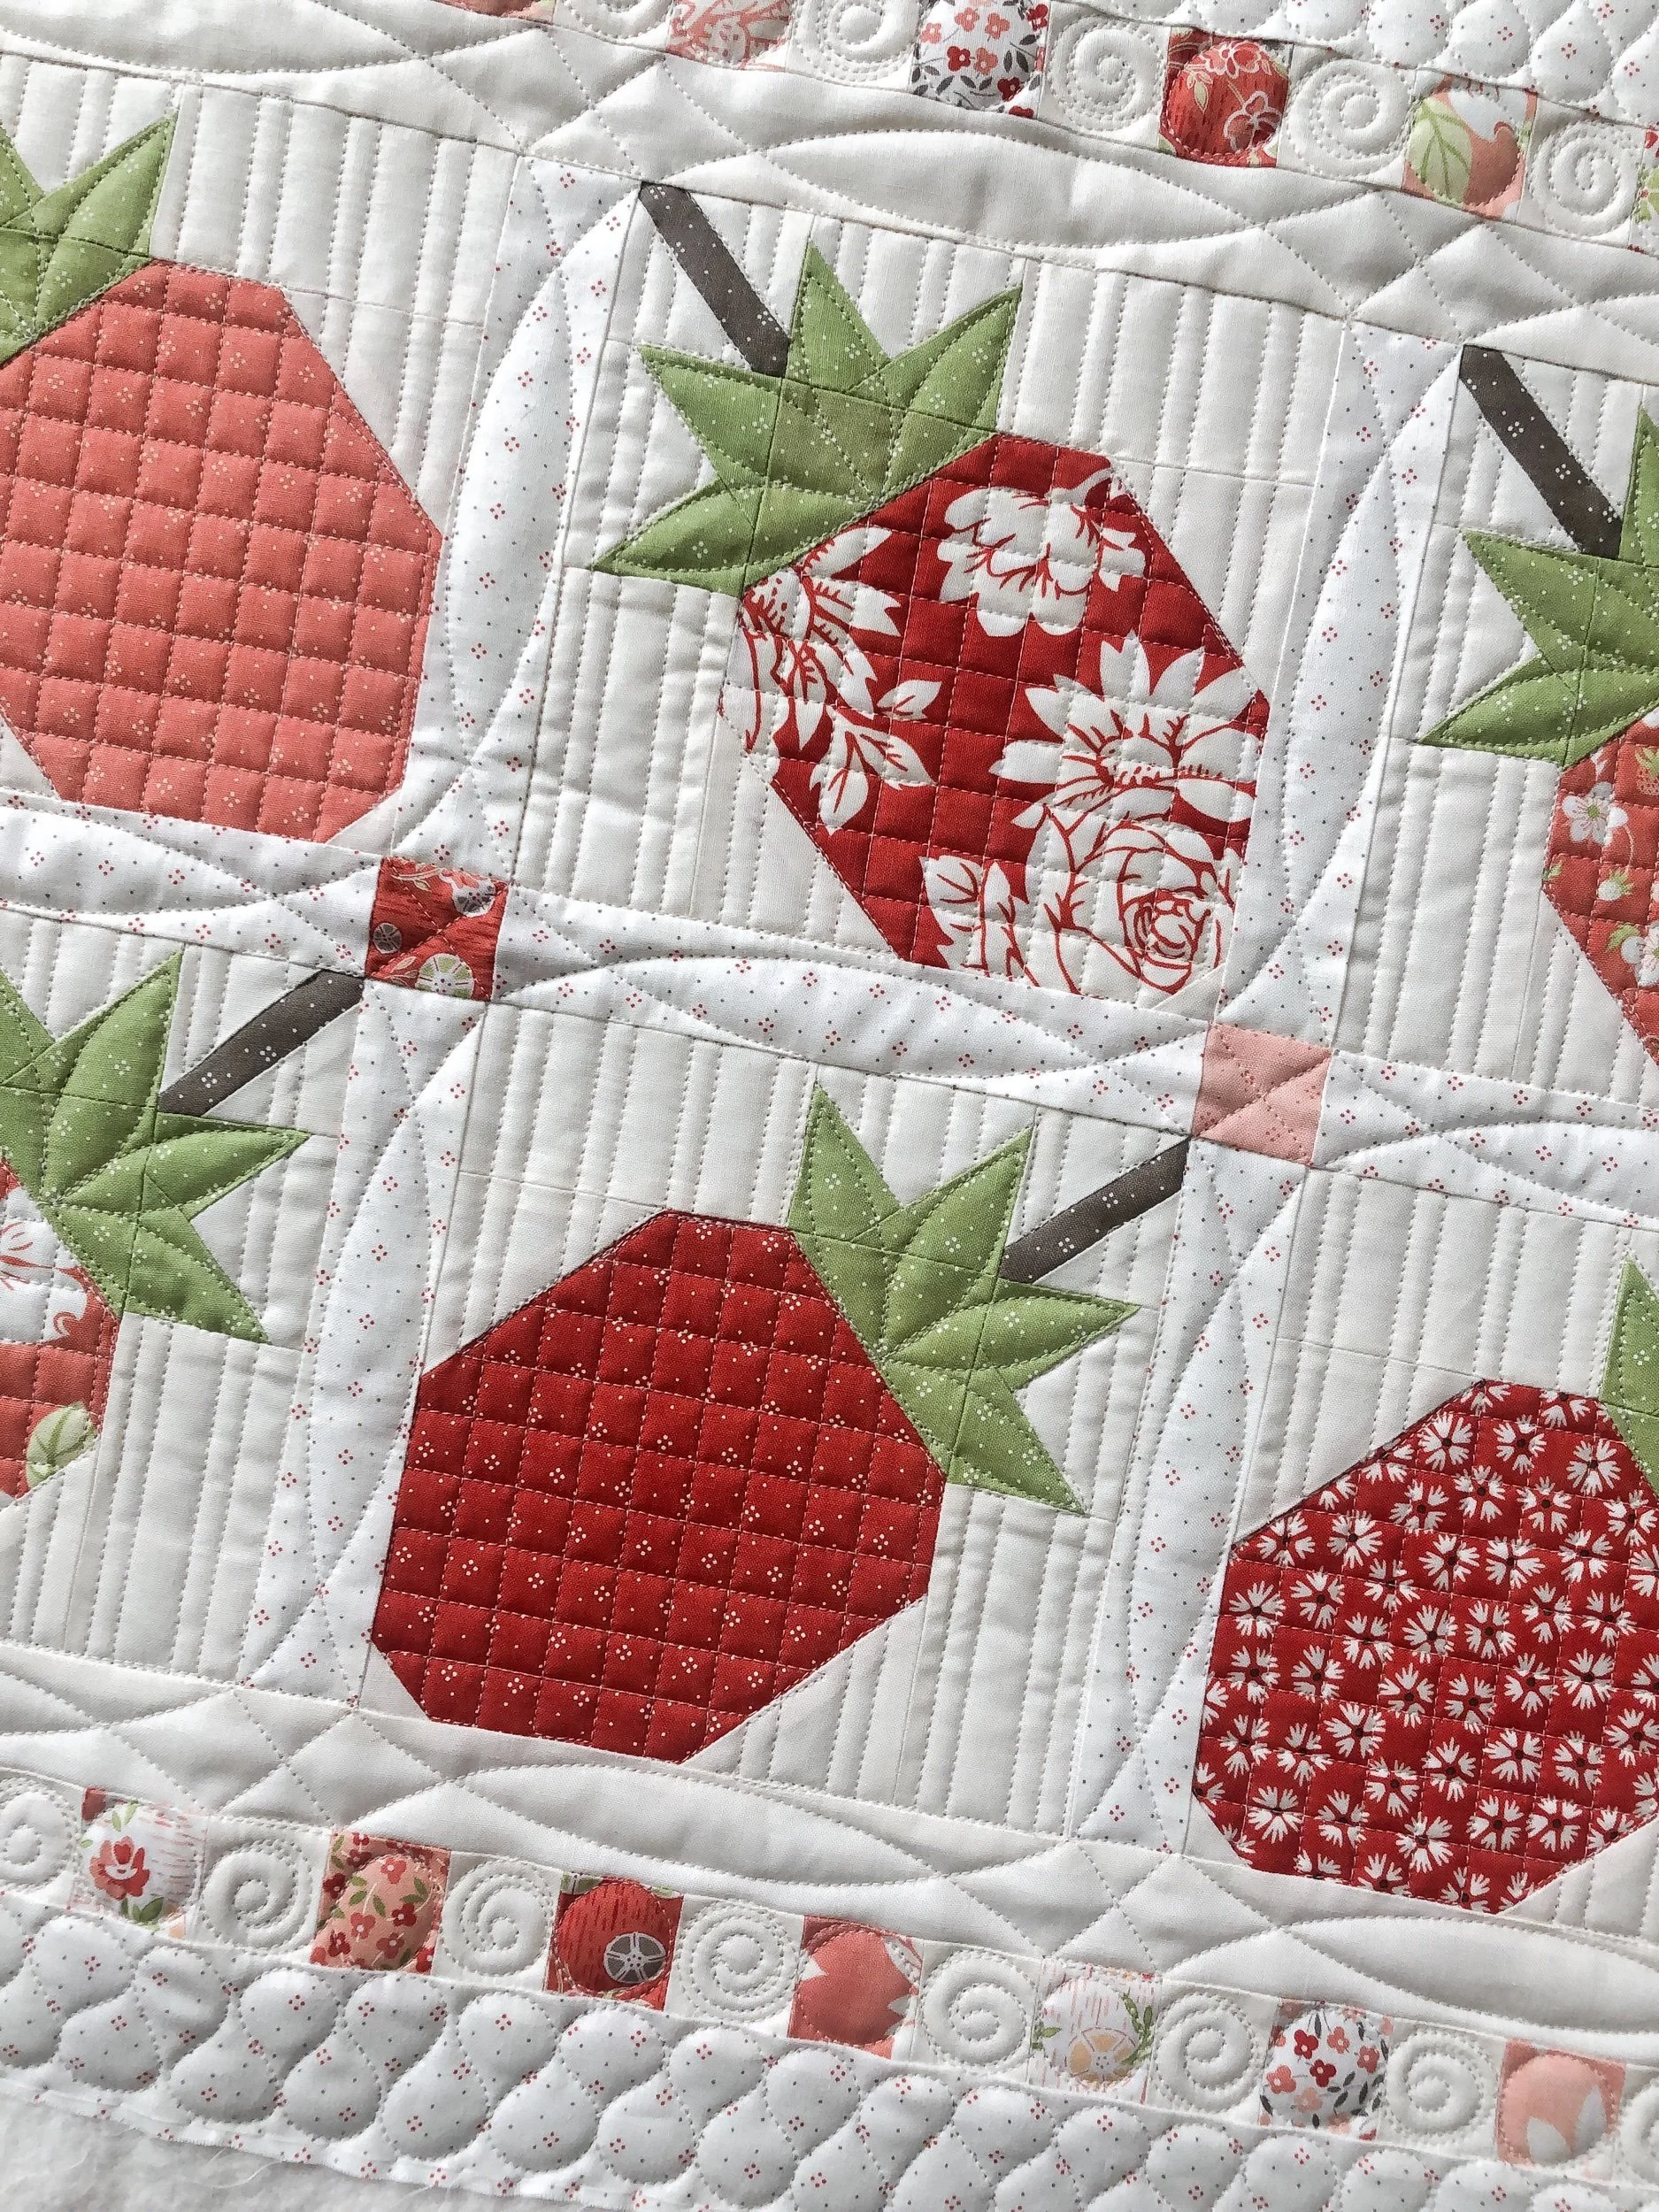
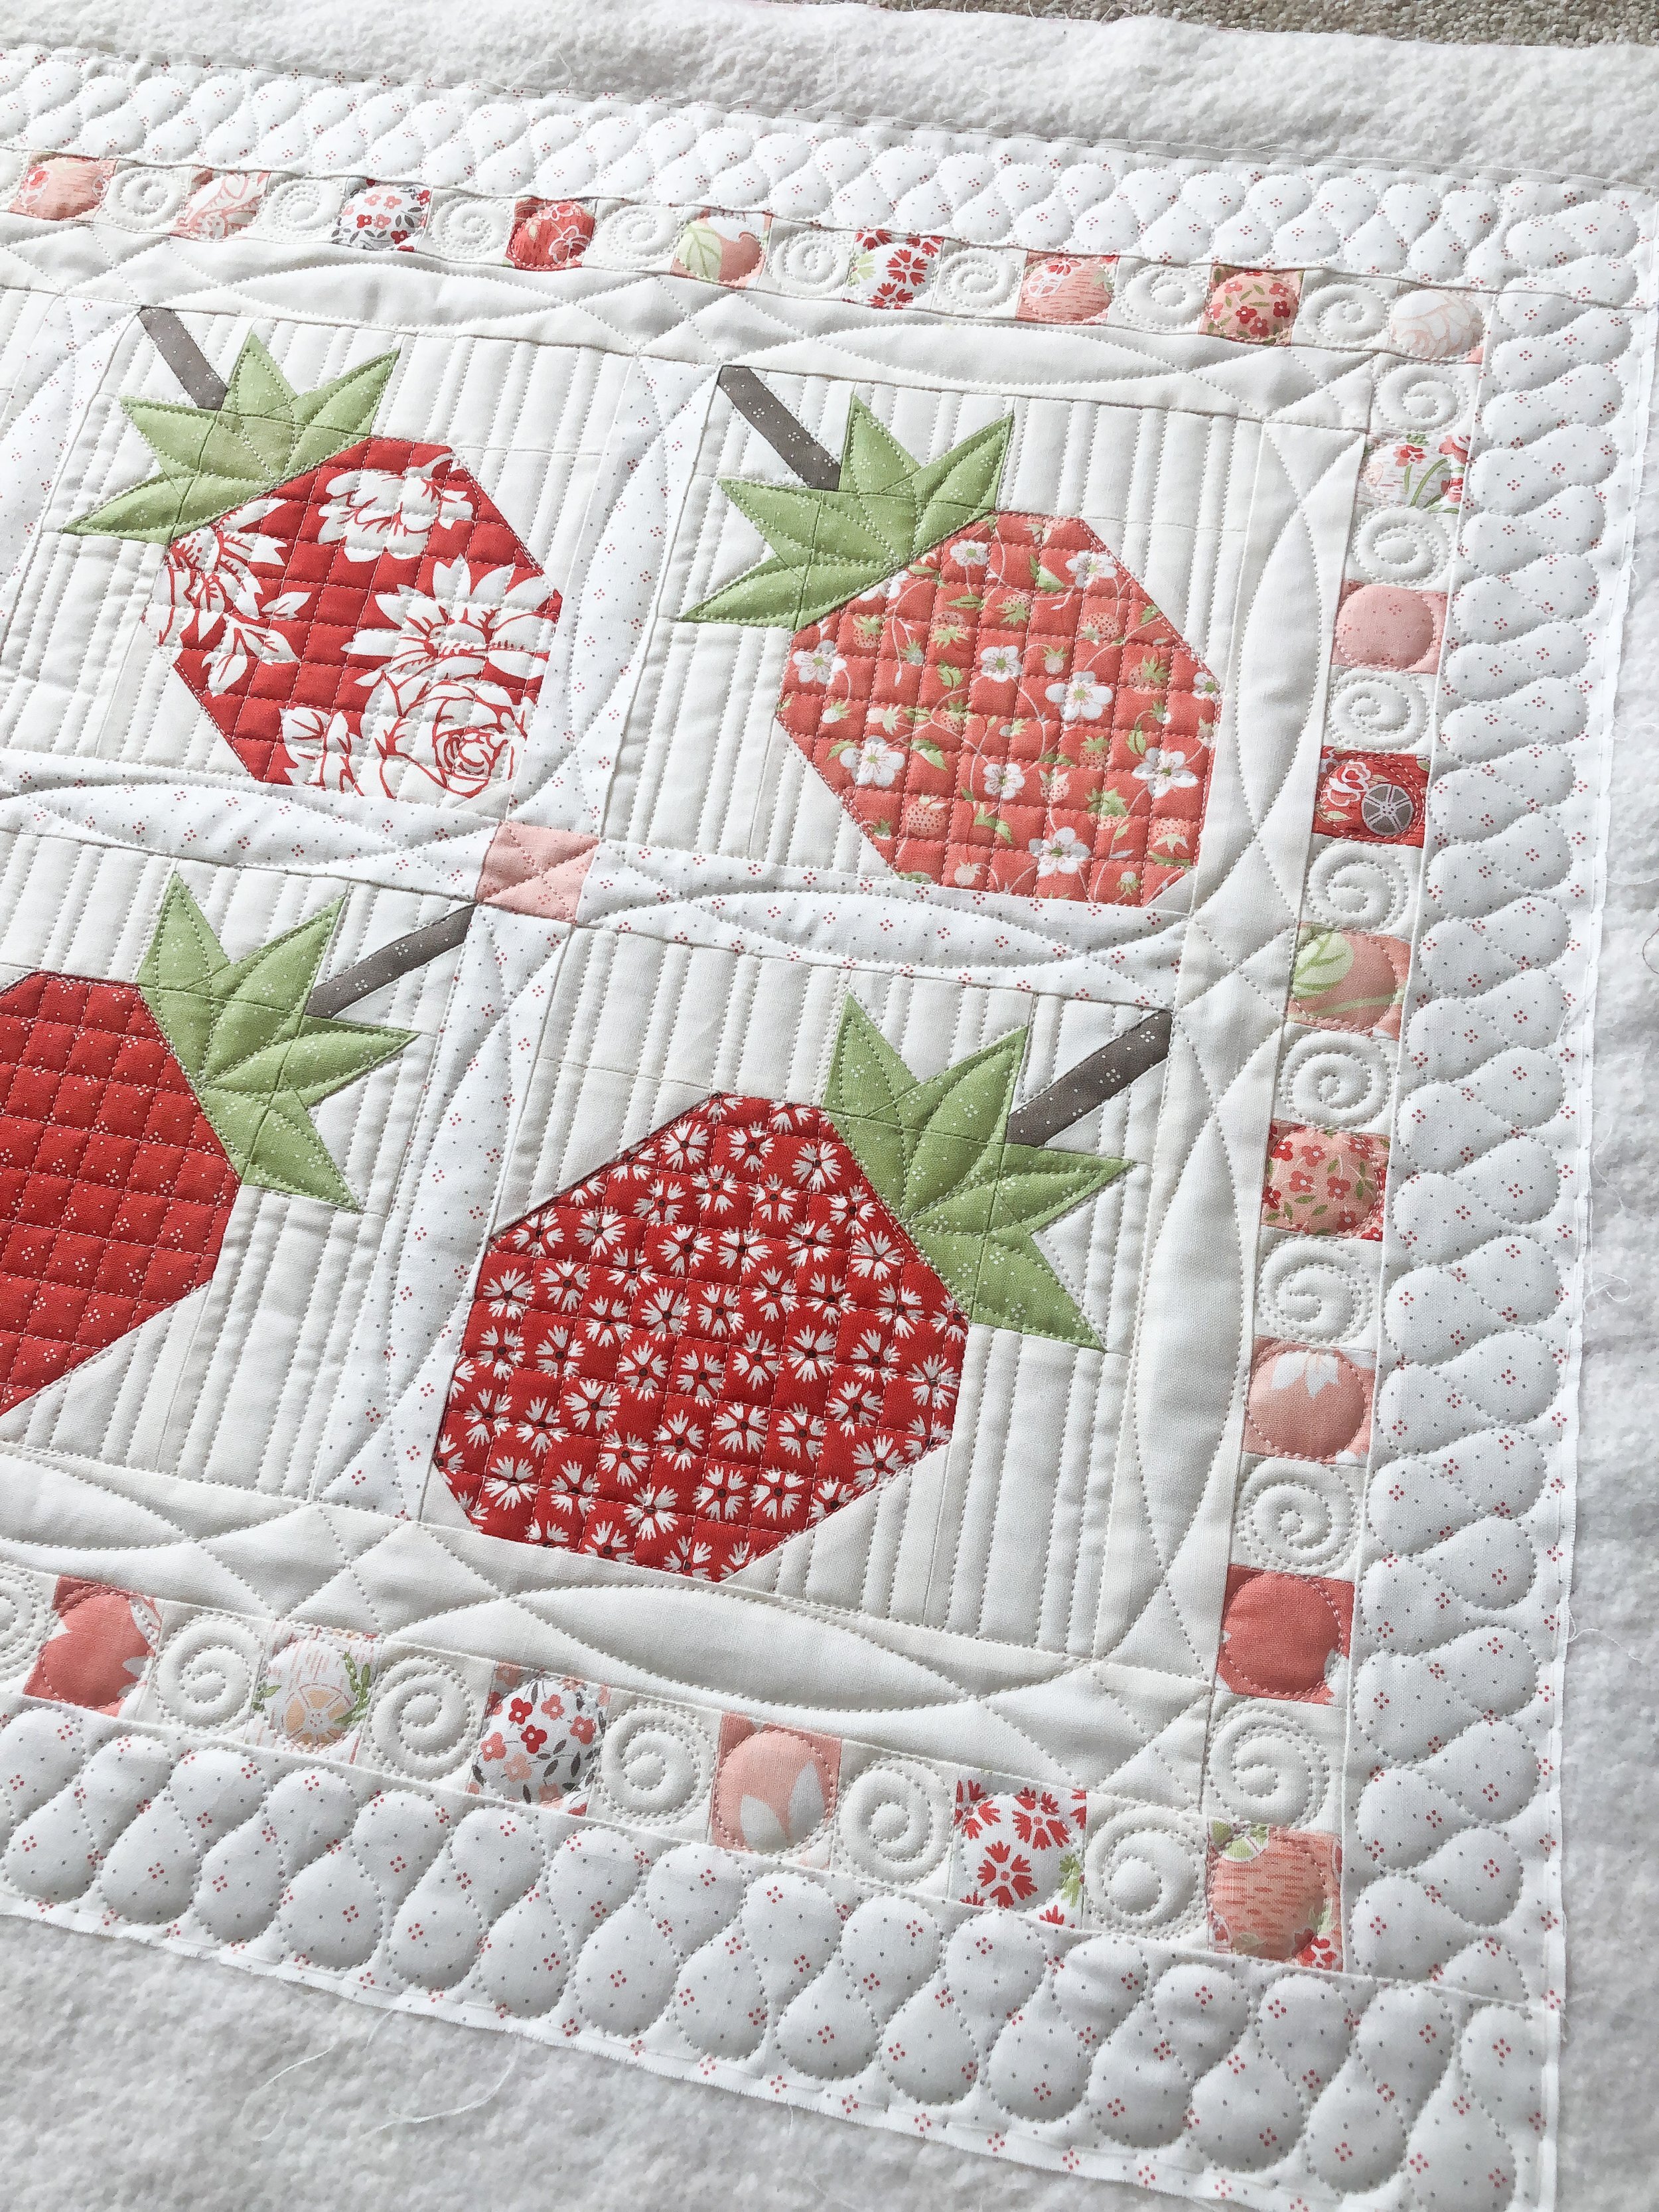
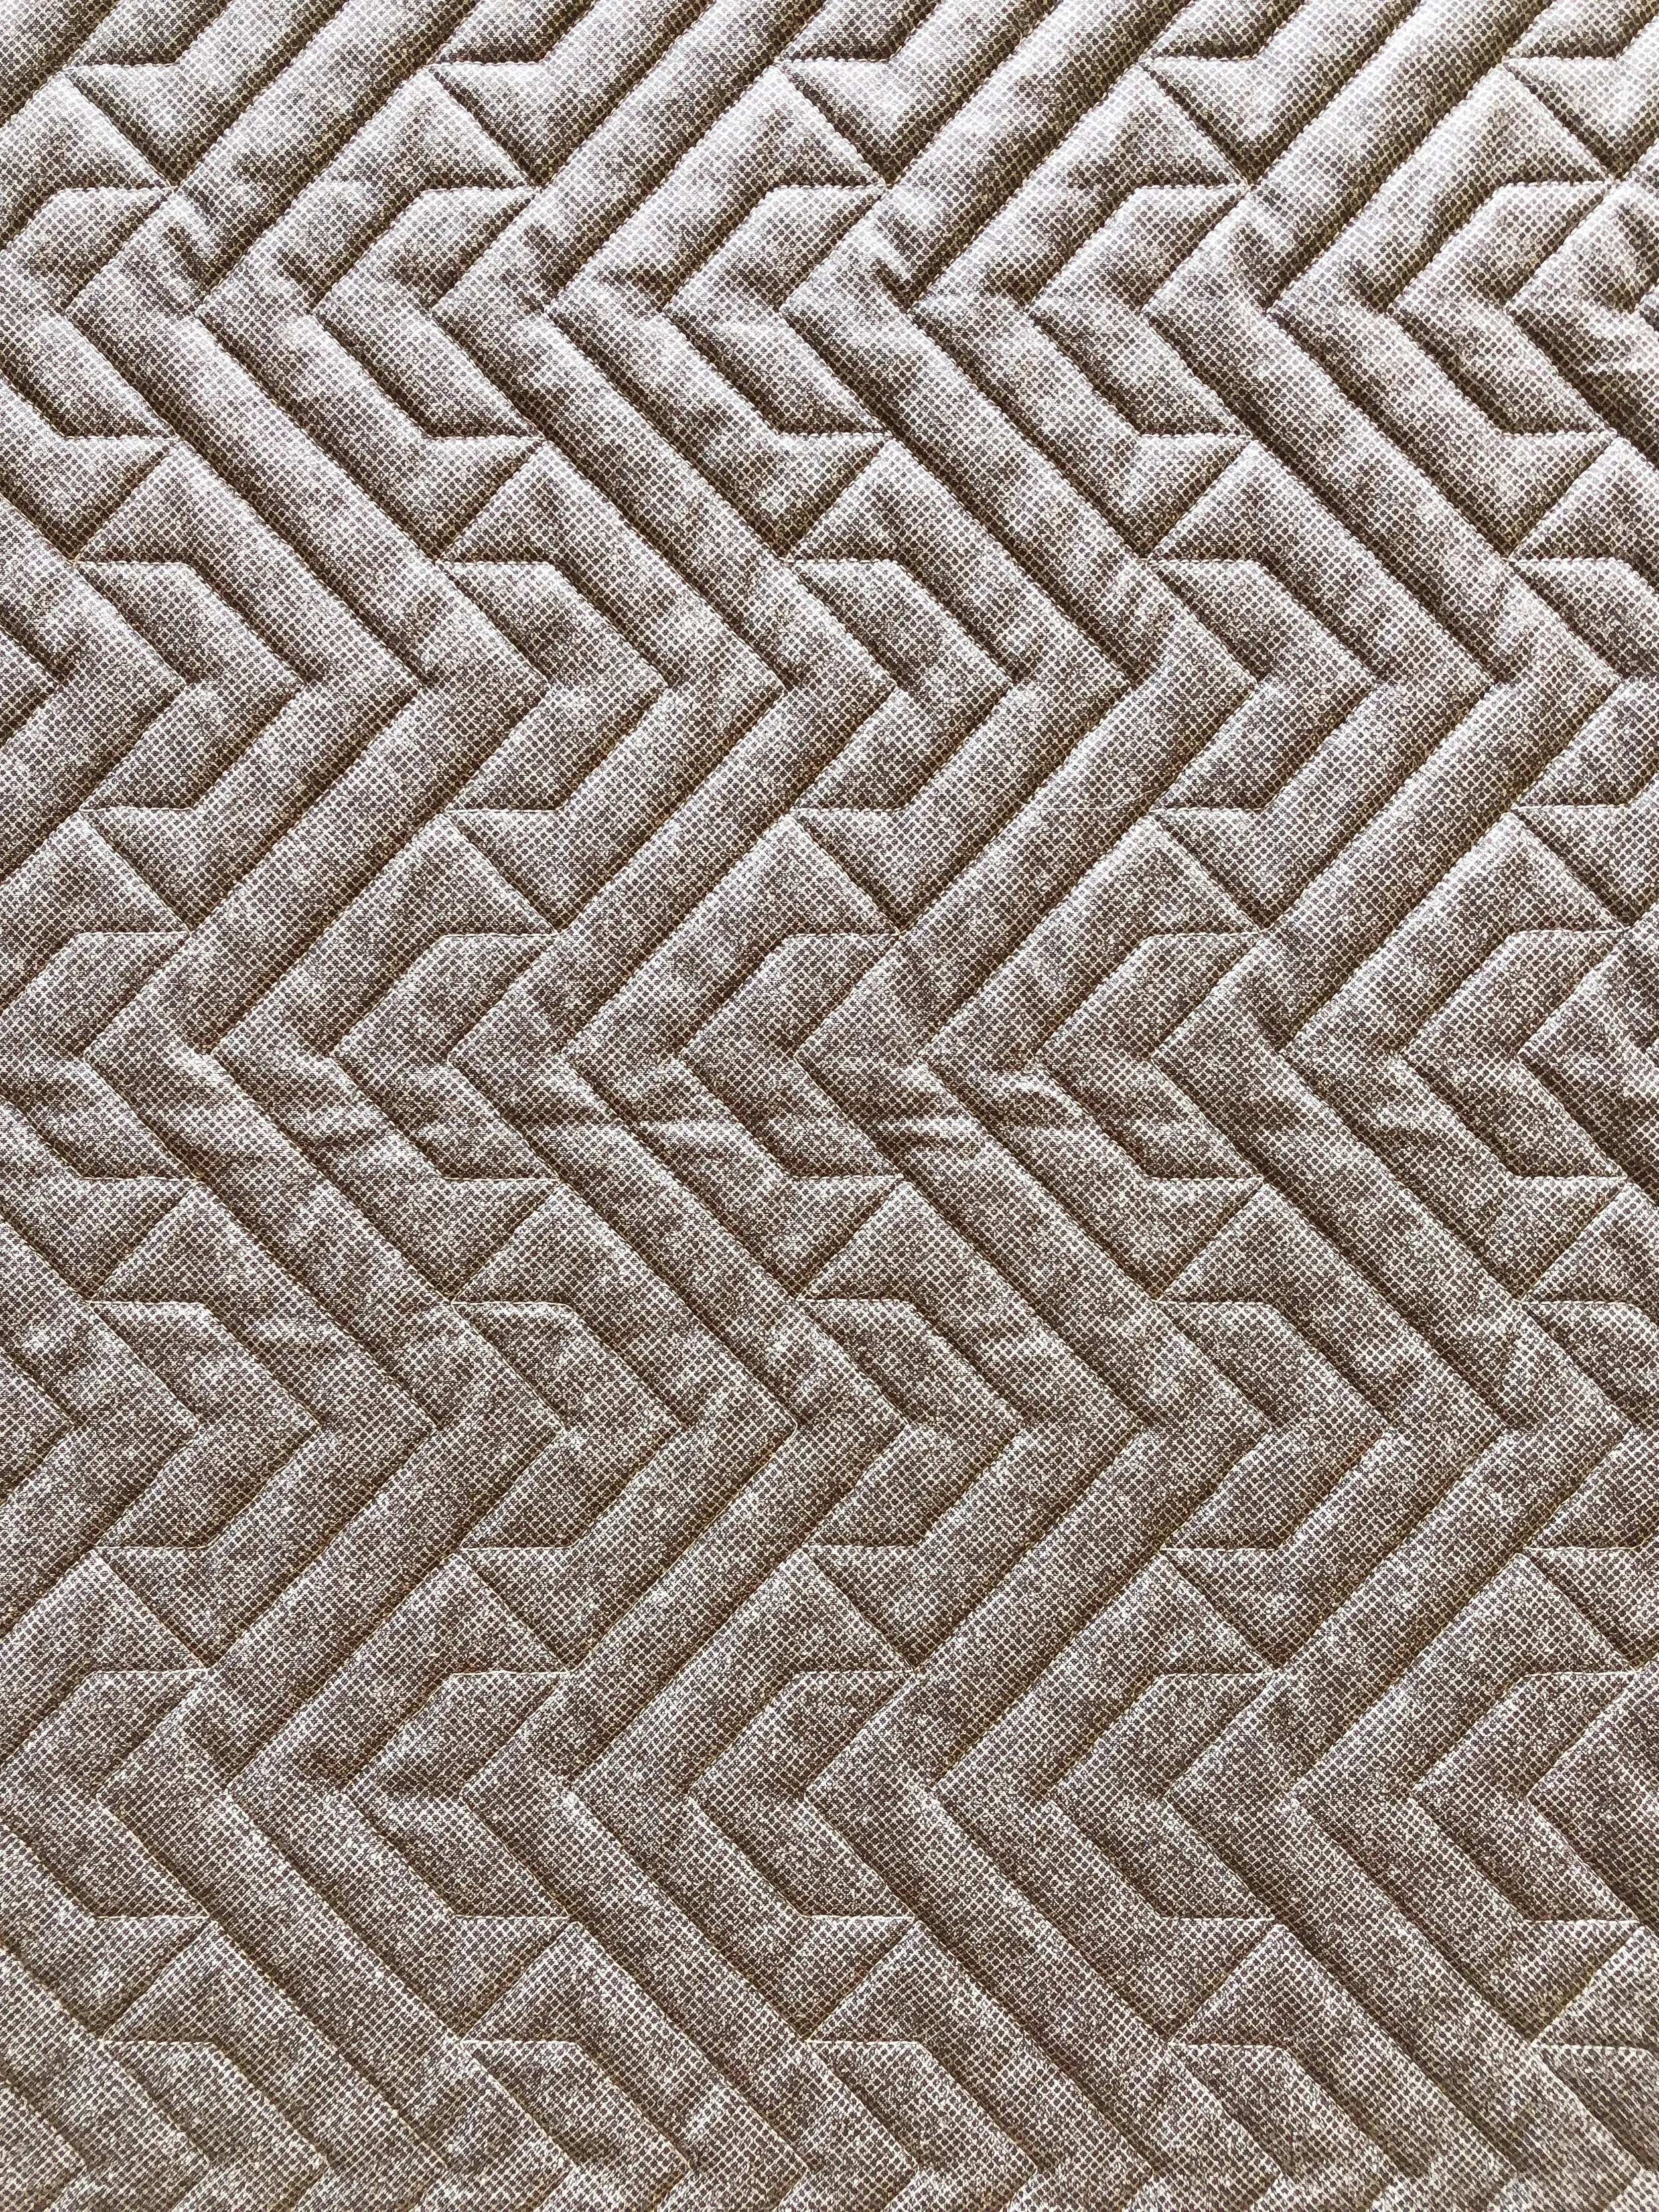
This was such a fun one to custom quilt. I started with the 1/2” grid in the berries, using the 8” Edge ruler from Linda at The Quilted Pineapple. The pinstripes in the background are the last thing that I quilted, which I used the same 8” Edge to quilt. The backgrounds behind the berries really stumped me. It took me awhile to figure out what to do. I didn’t want to quilt something dense and have it compete with the grid or curves that surround it. I think the simple vertical lines were a perfect choice.
I used a cream Omni thread from Superior Threads. The batting was a scrap leftover from another quilt.
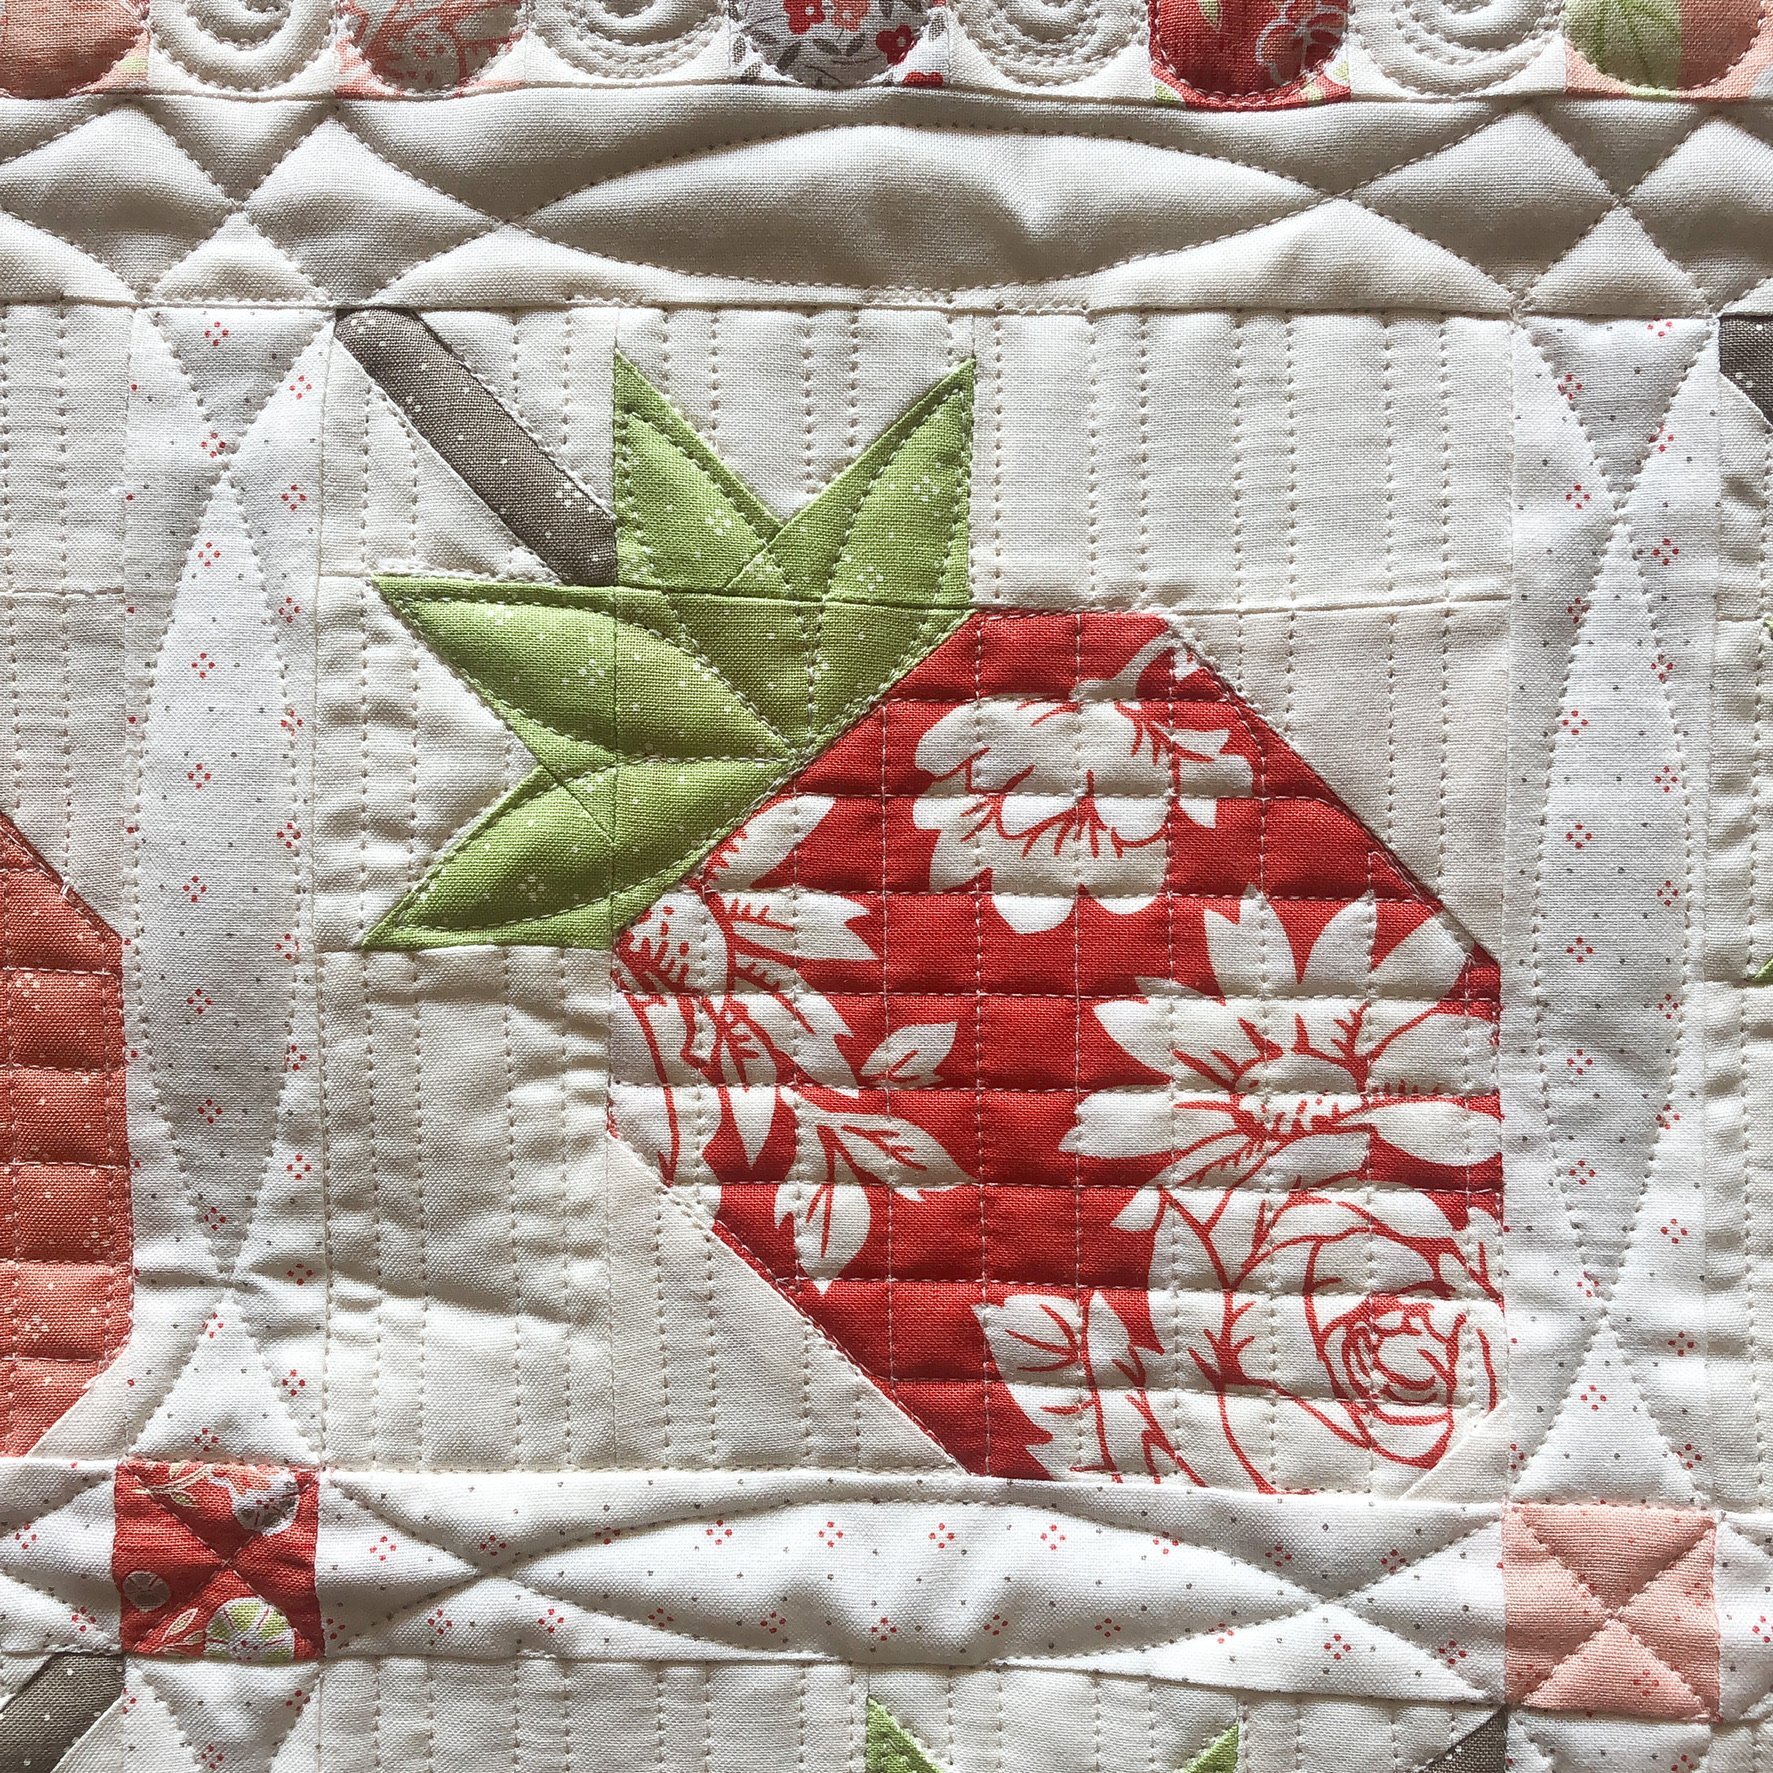
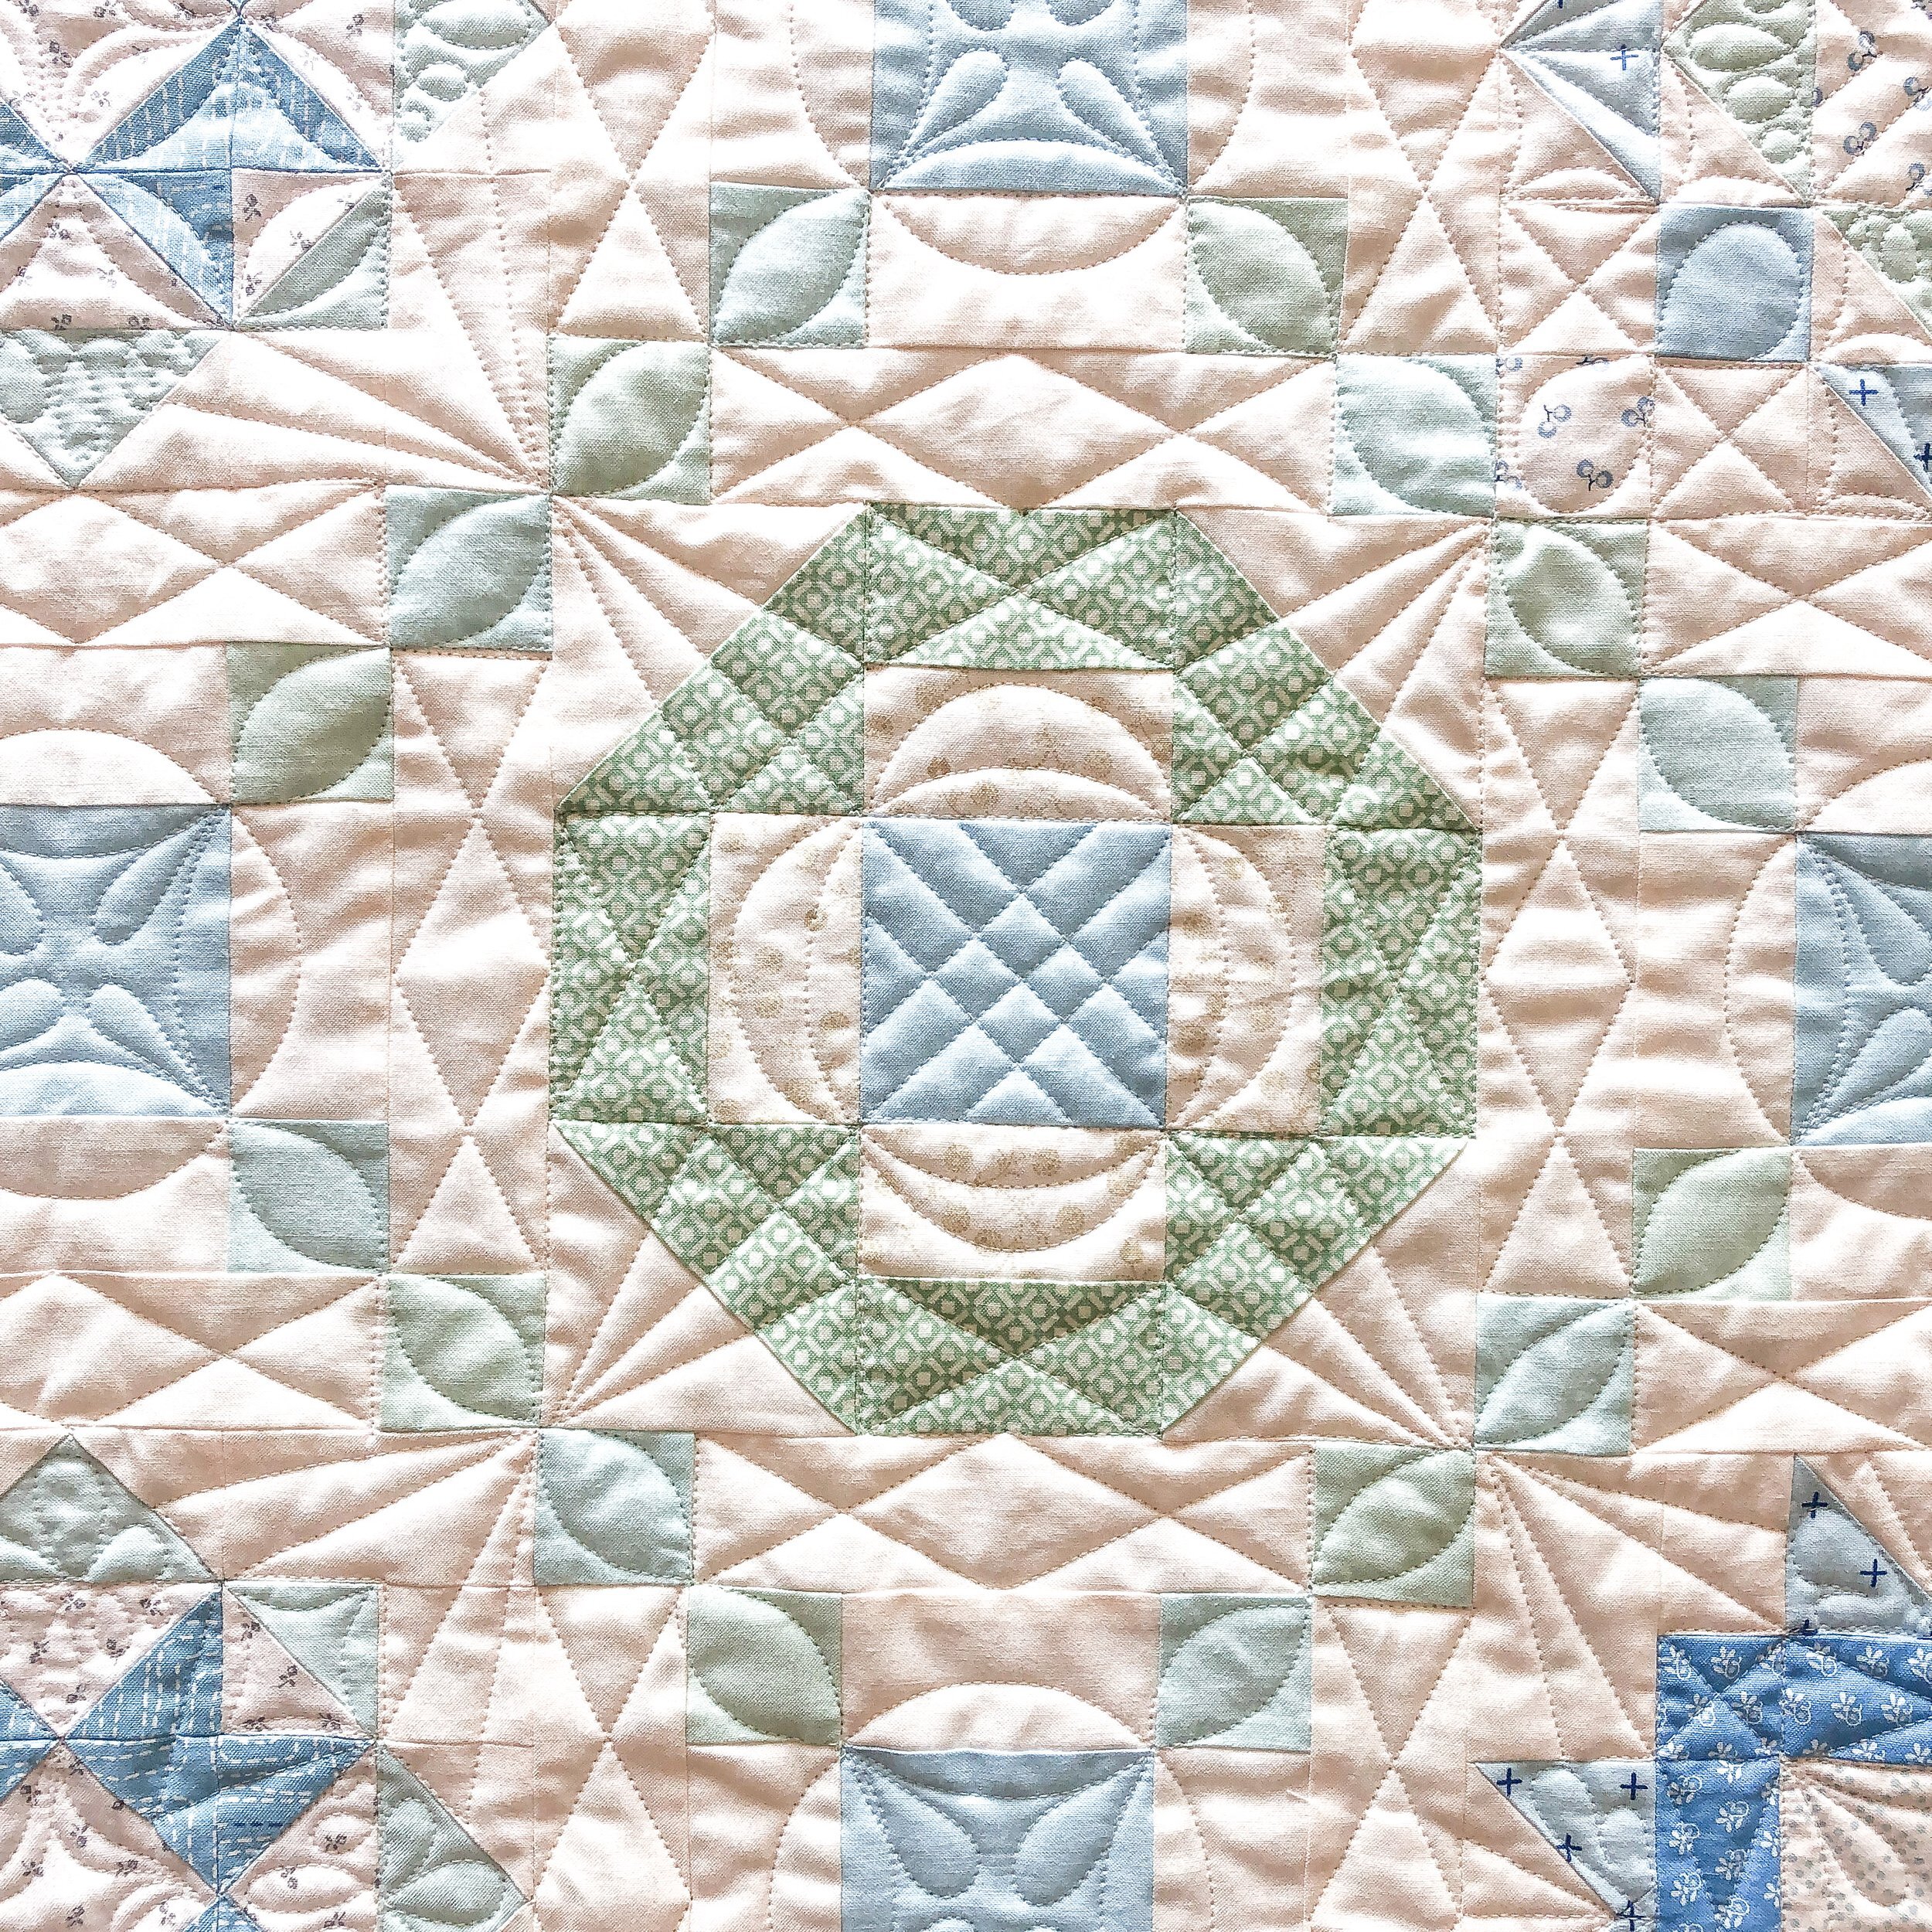
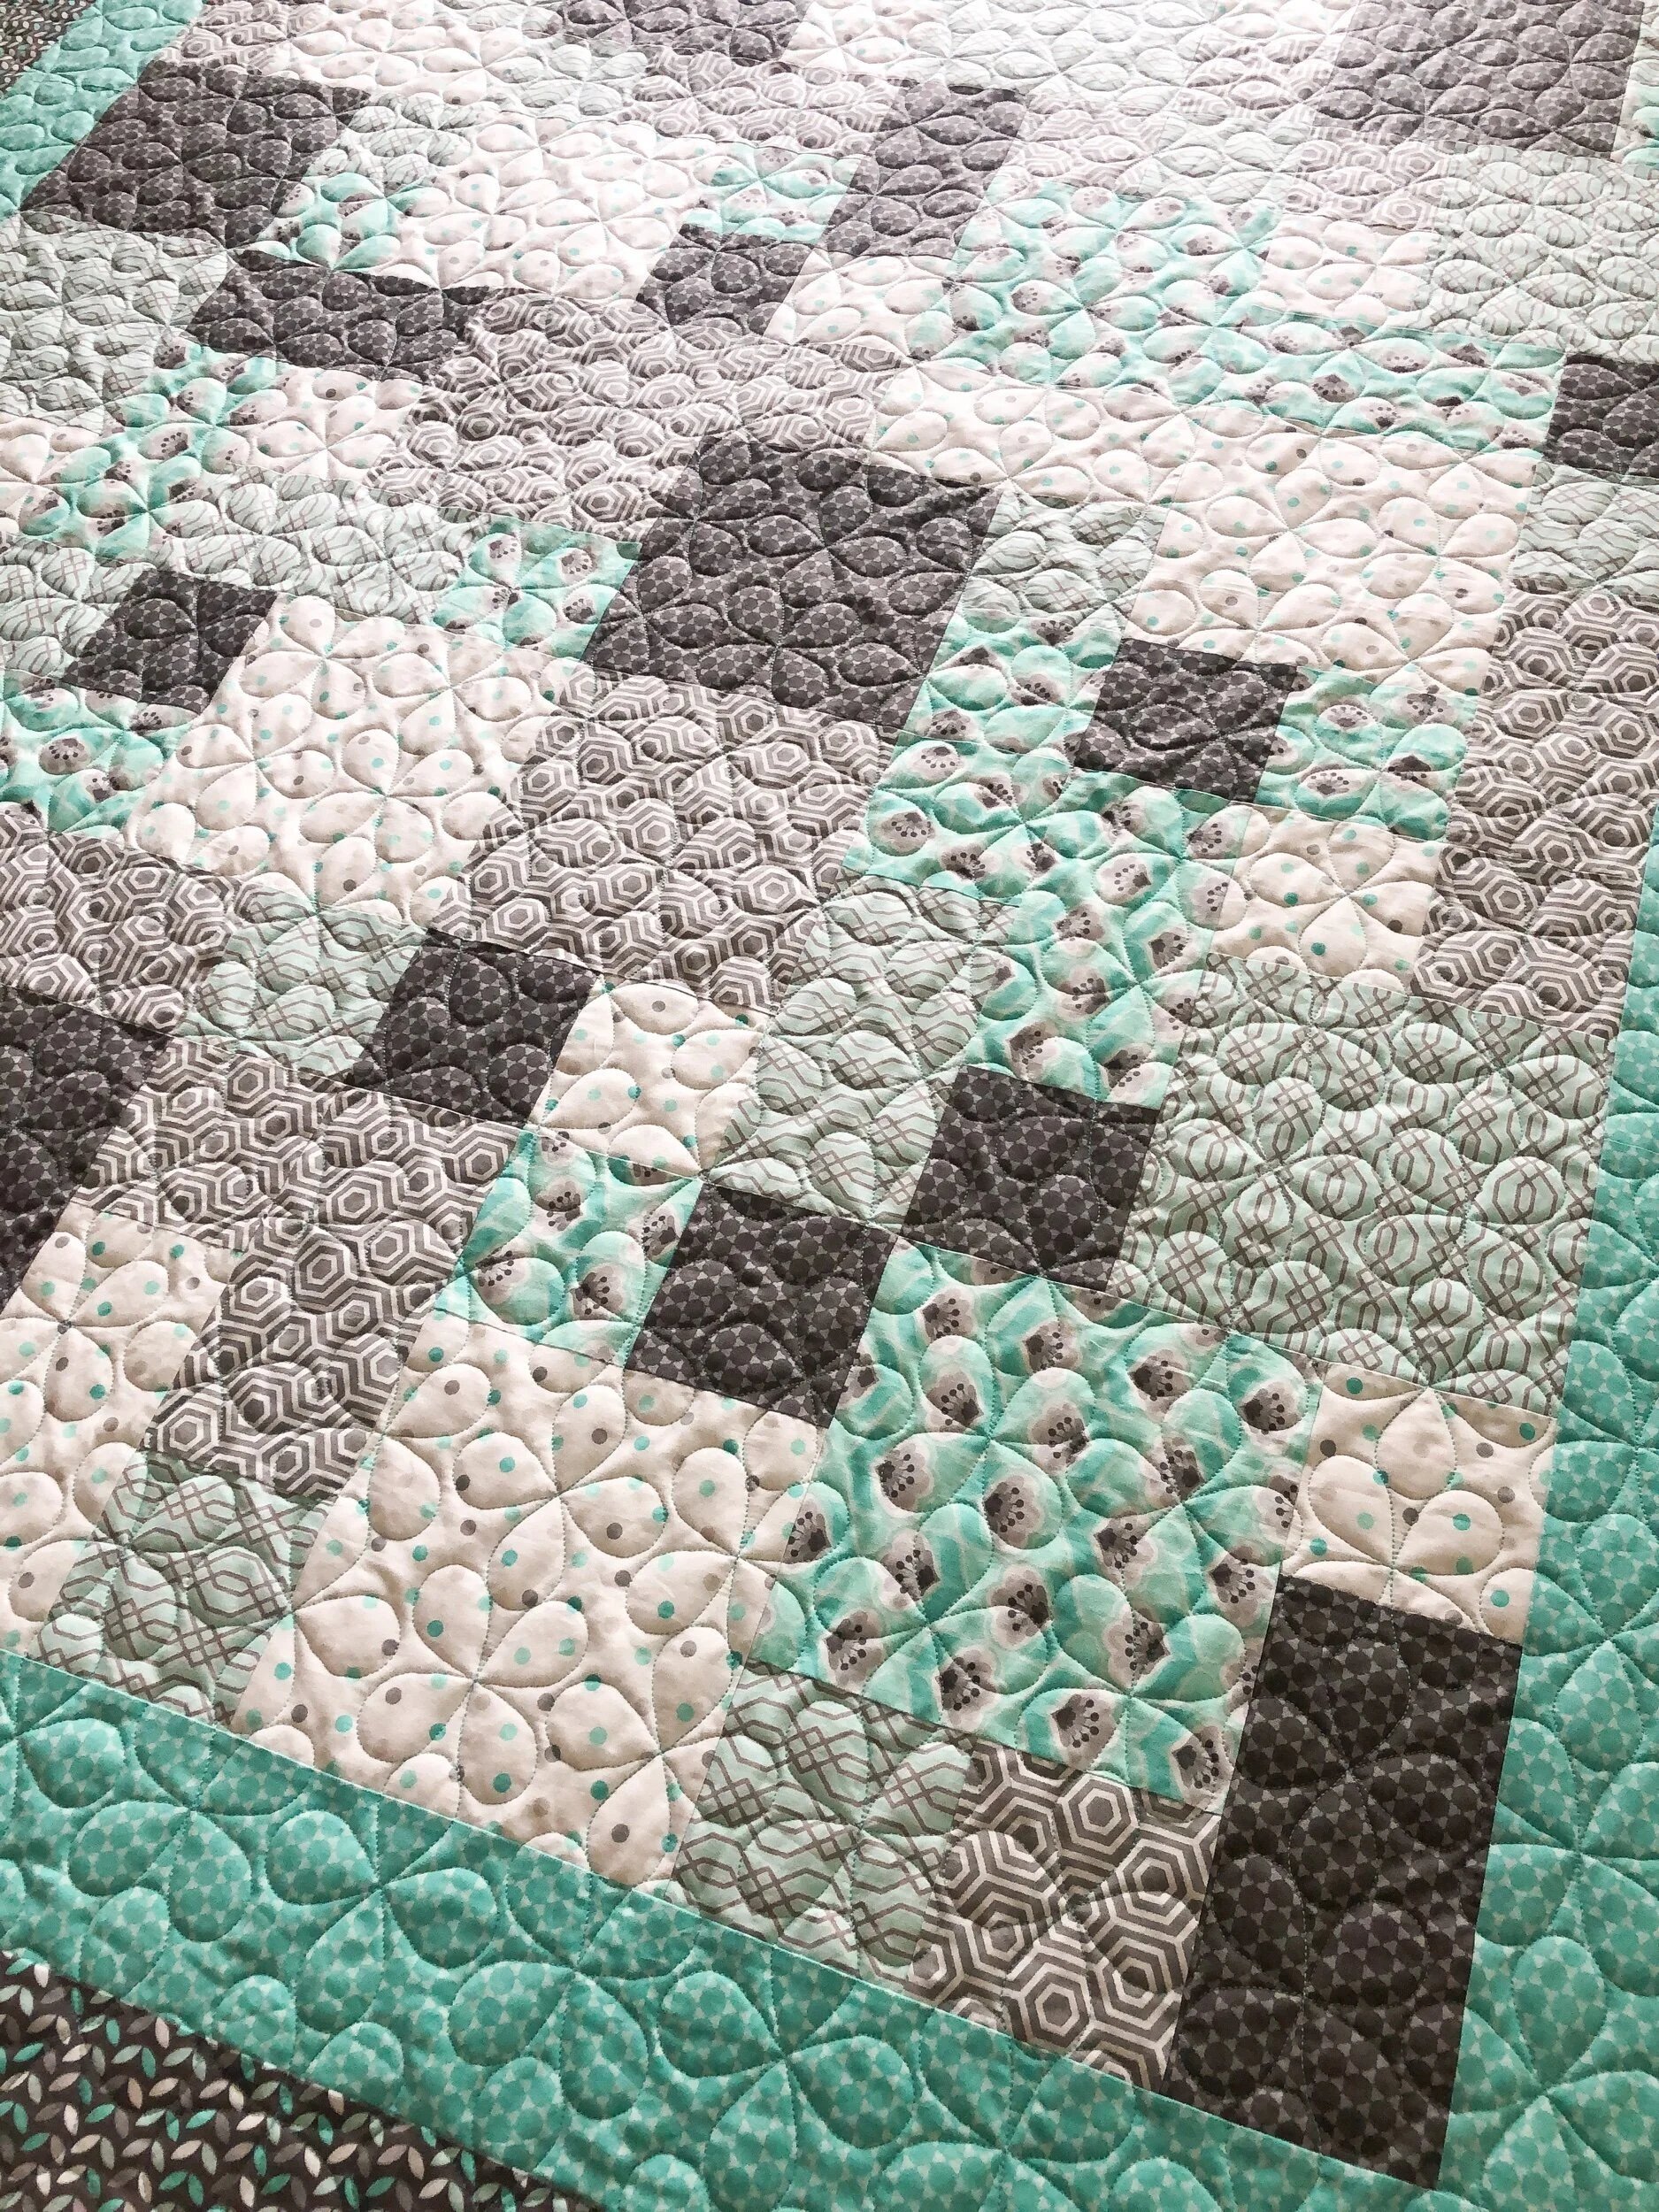
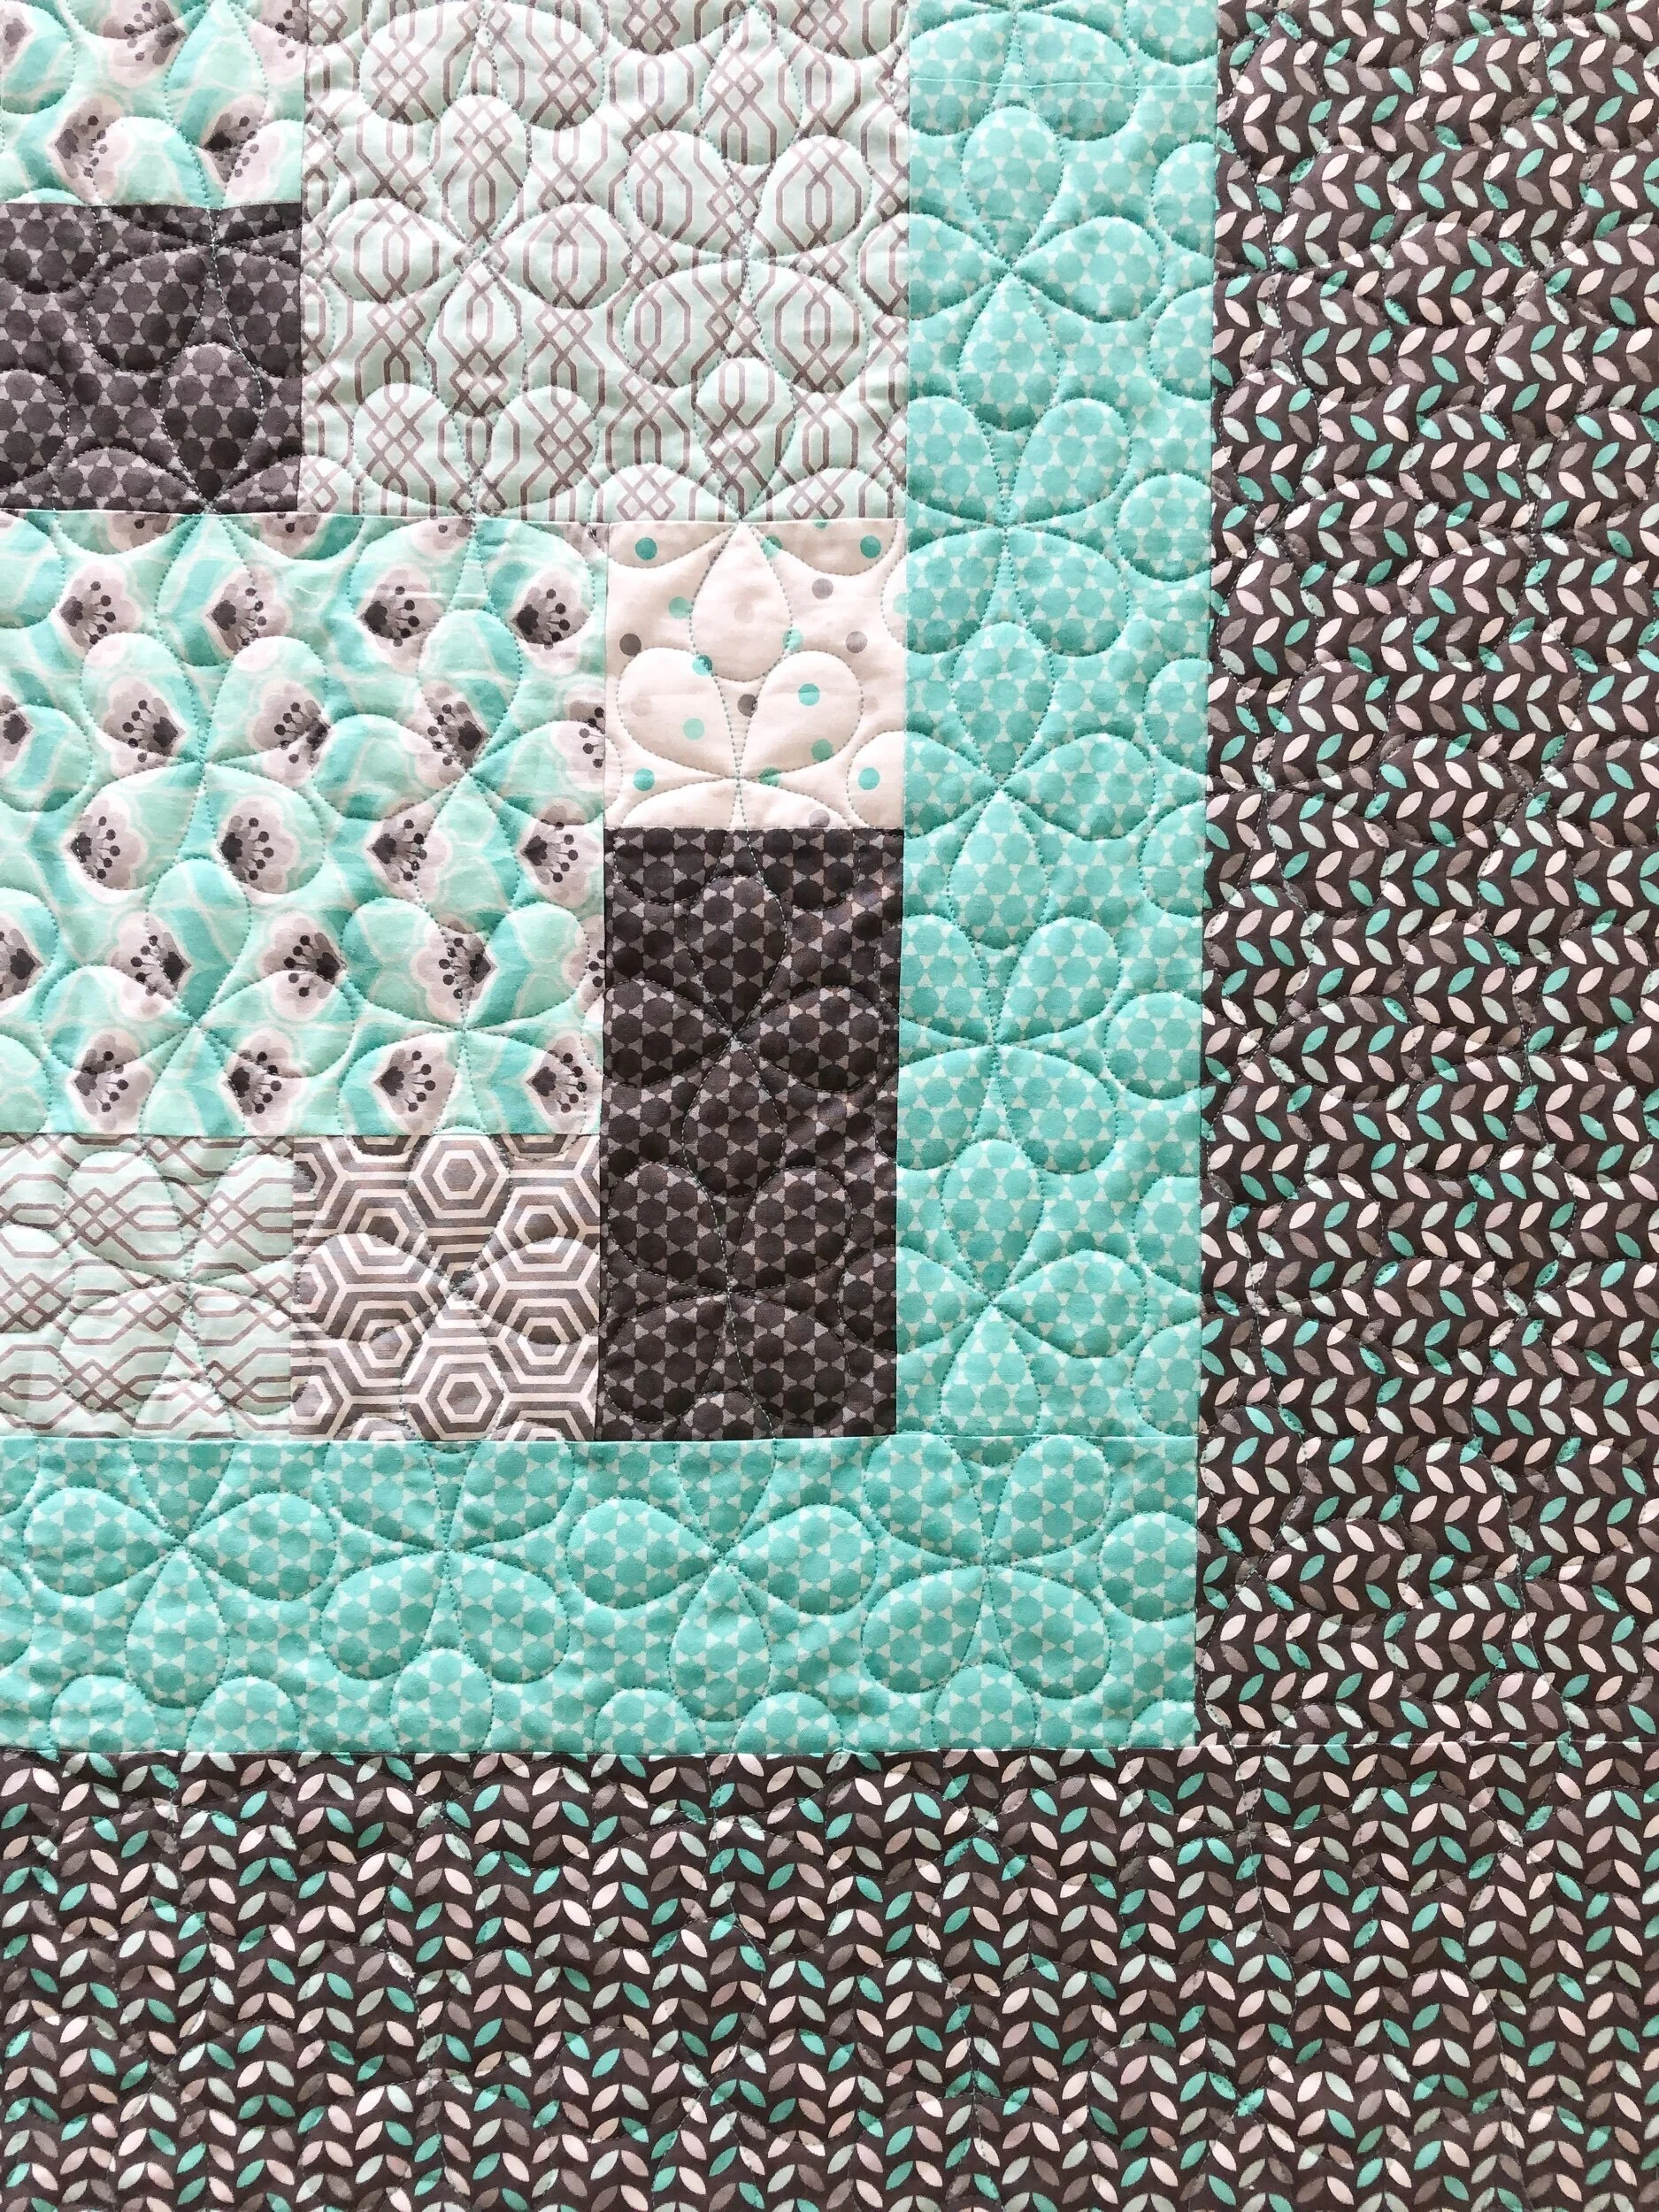
Look how cute that berry is!! I used two of my Circle2™ rulers to quilt these curves. I used the 4“ circle, which is pictured below, to quilt the curves in the green stems. I want to point out that the quilting is balanced because the scale in each part of the quilting is a little different. Differing sizes or scales, adds a different variety, but it’s important to vary the scale only a little bit. If I did something way too large or small, the size difference would stick out like a sore thumb. Just keep that in mind.
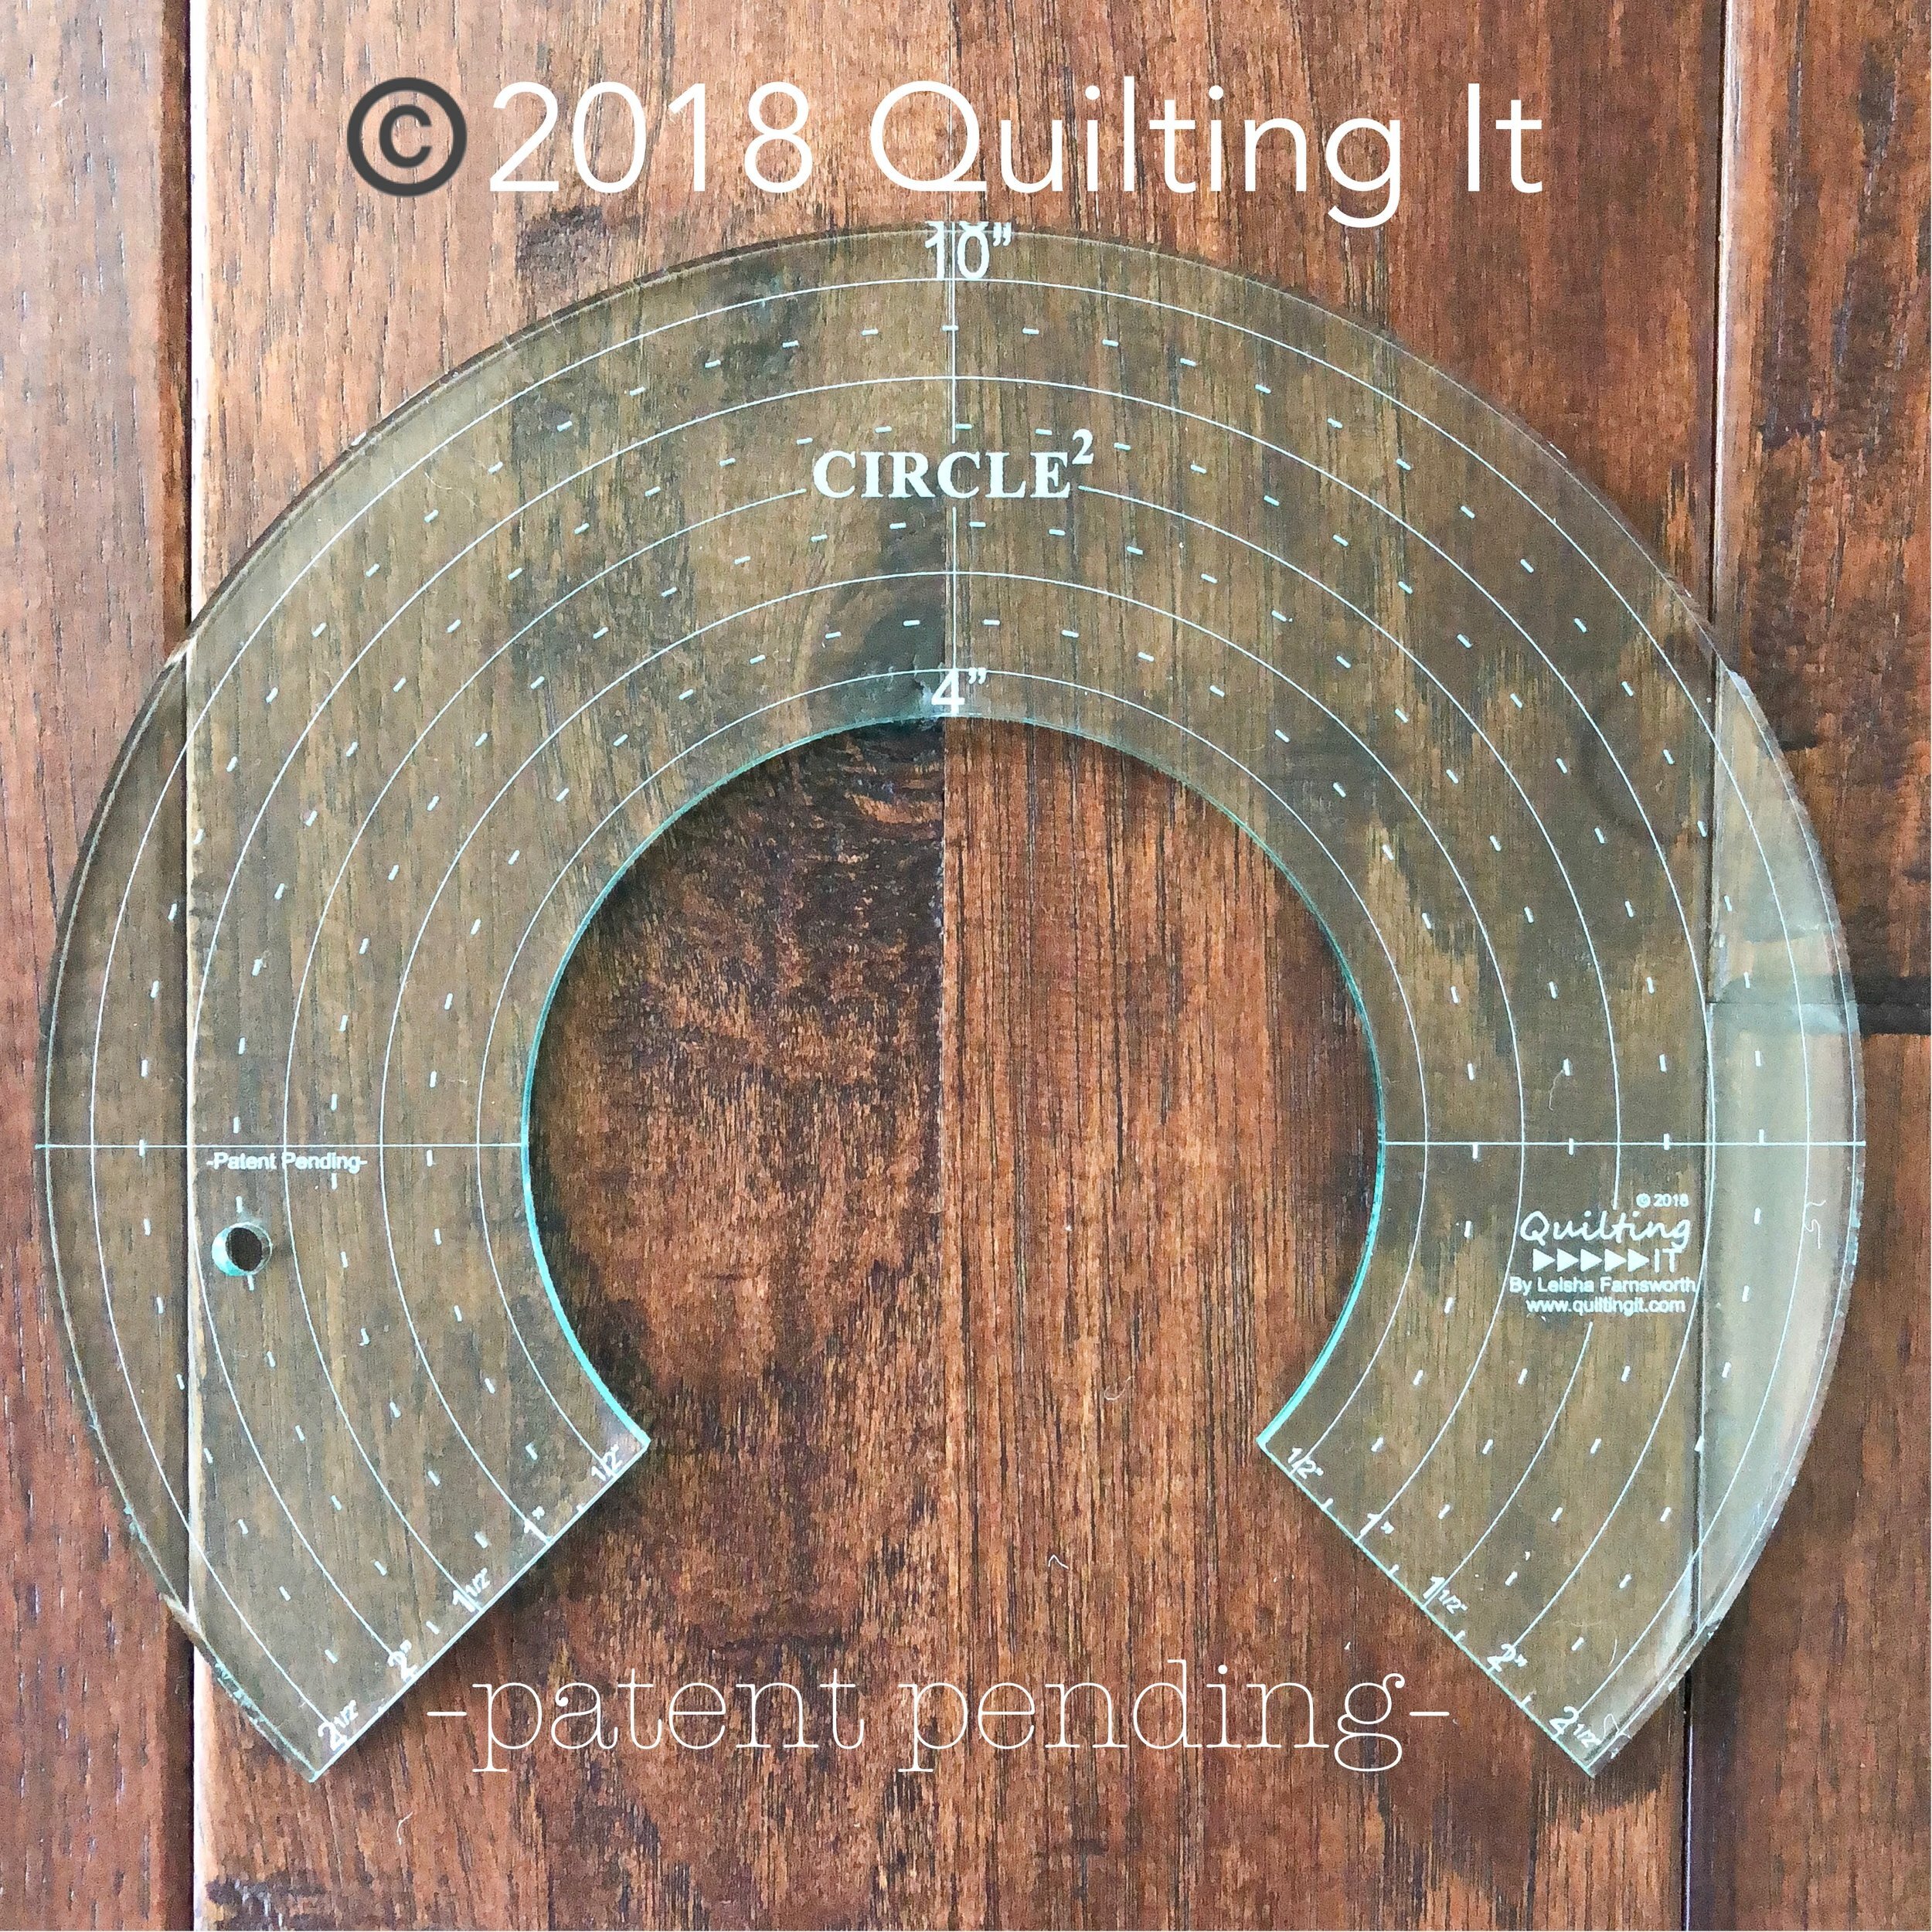
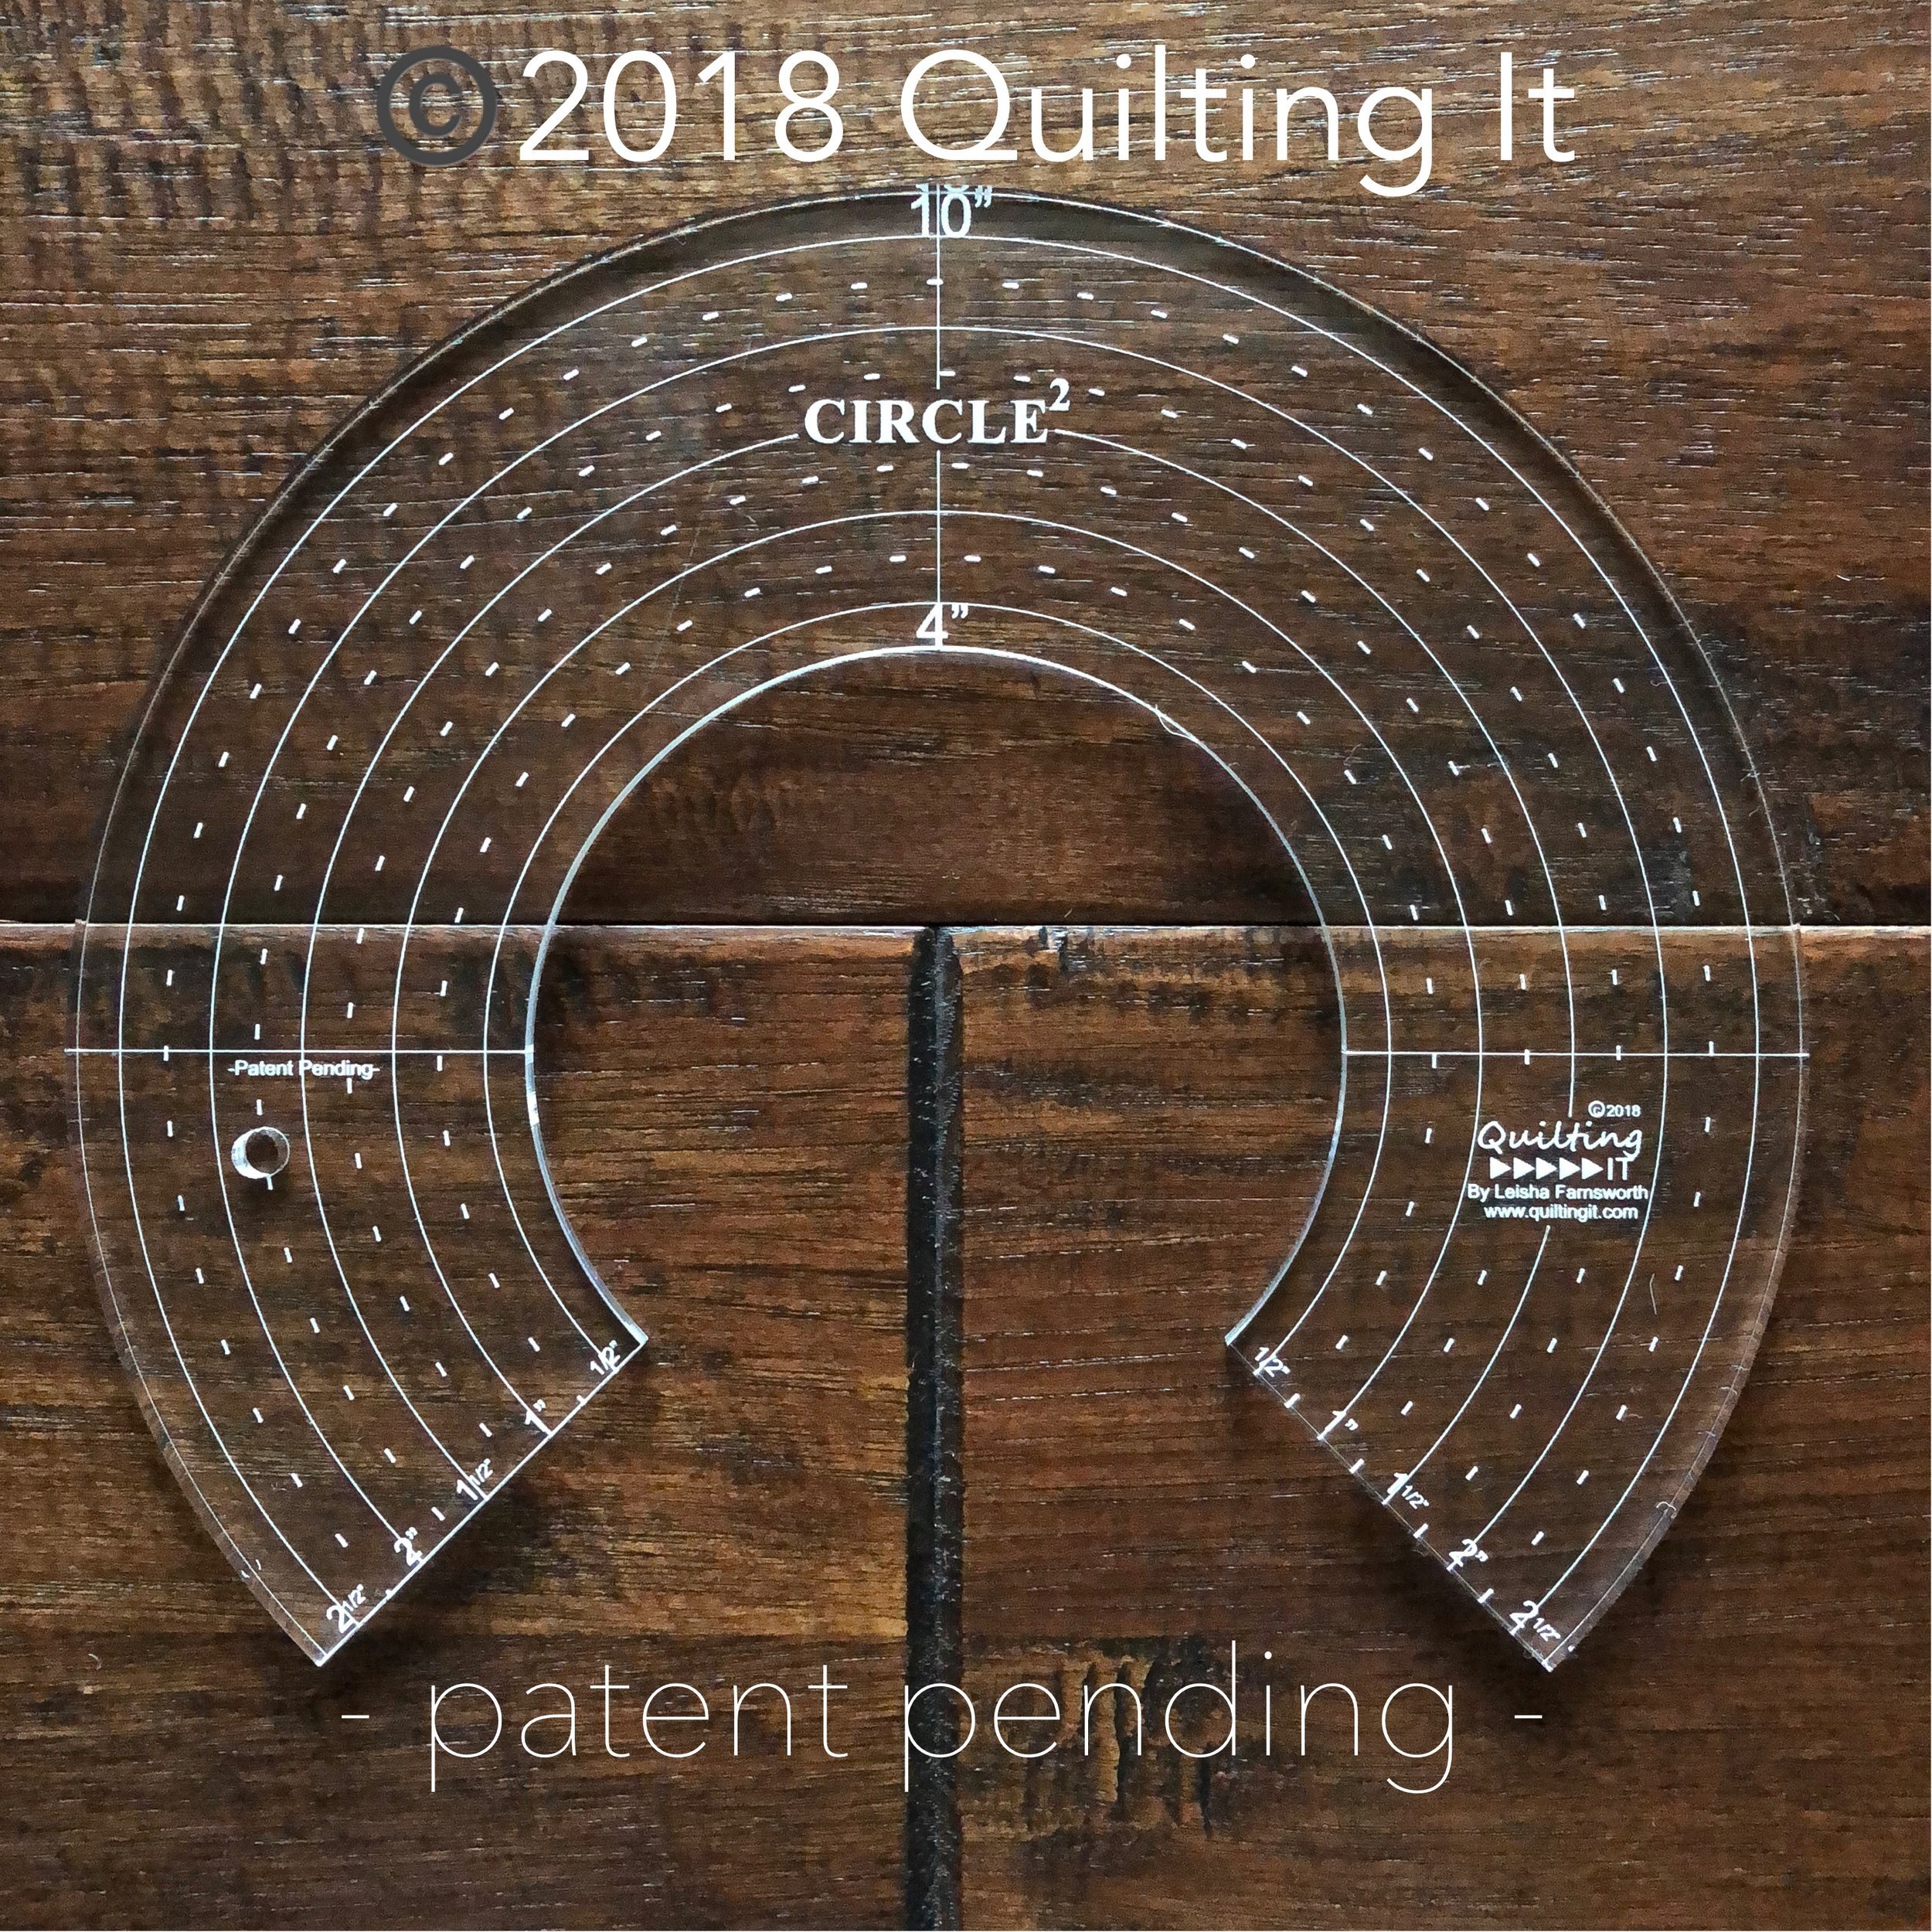
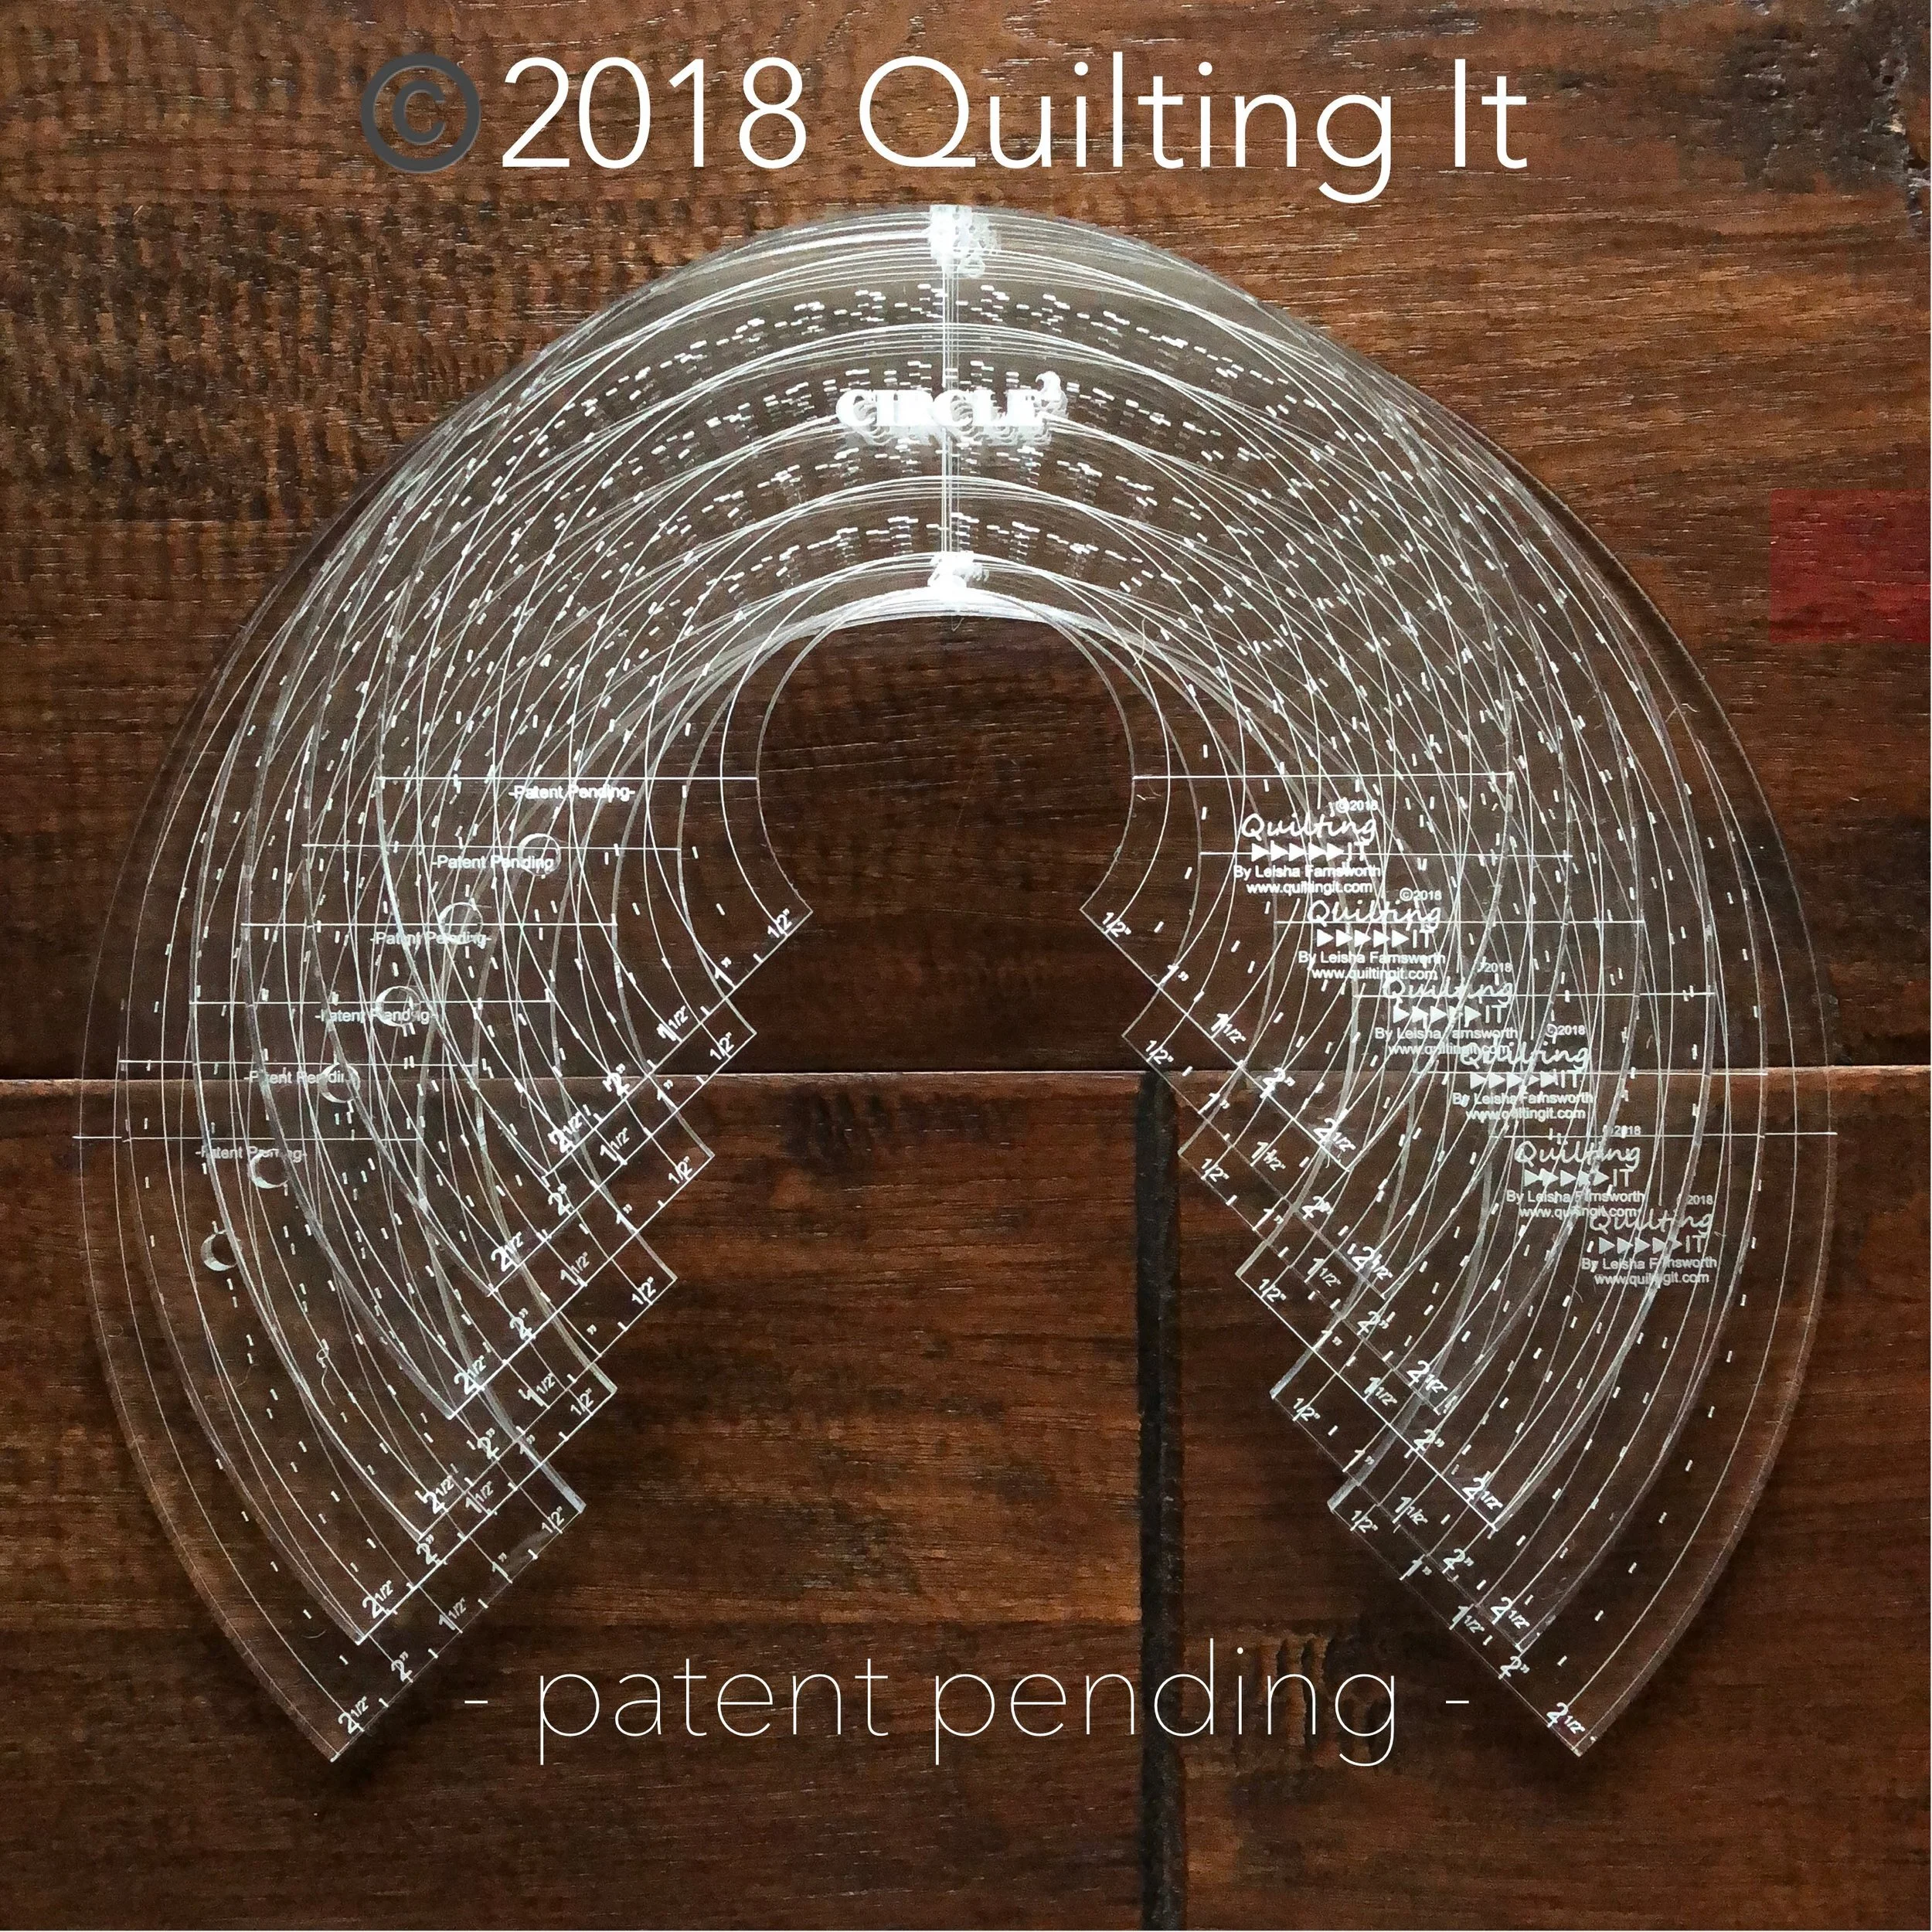
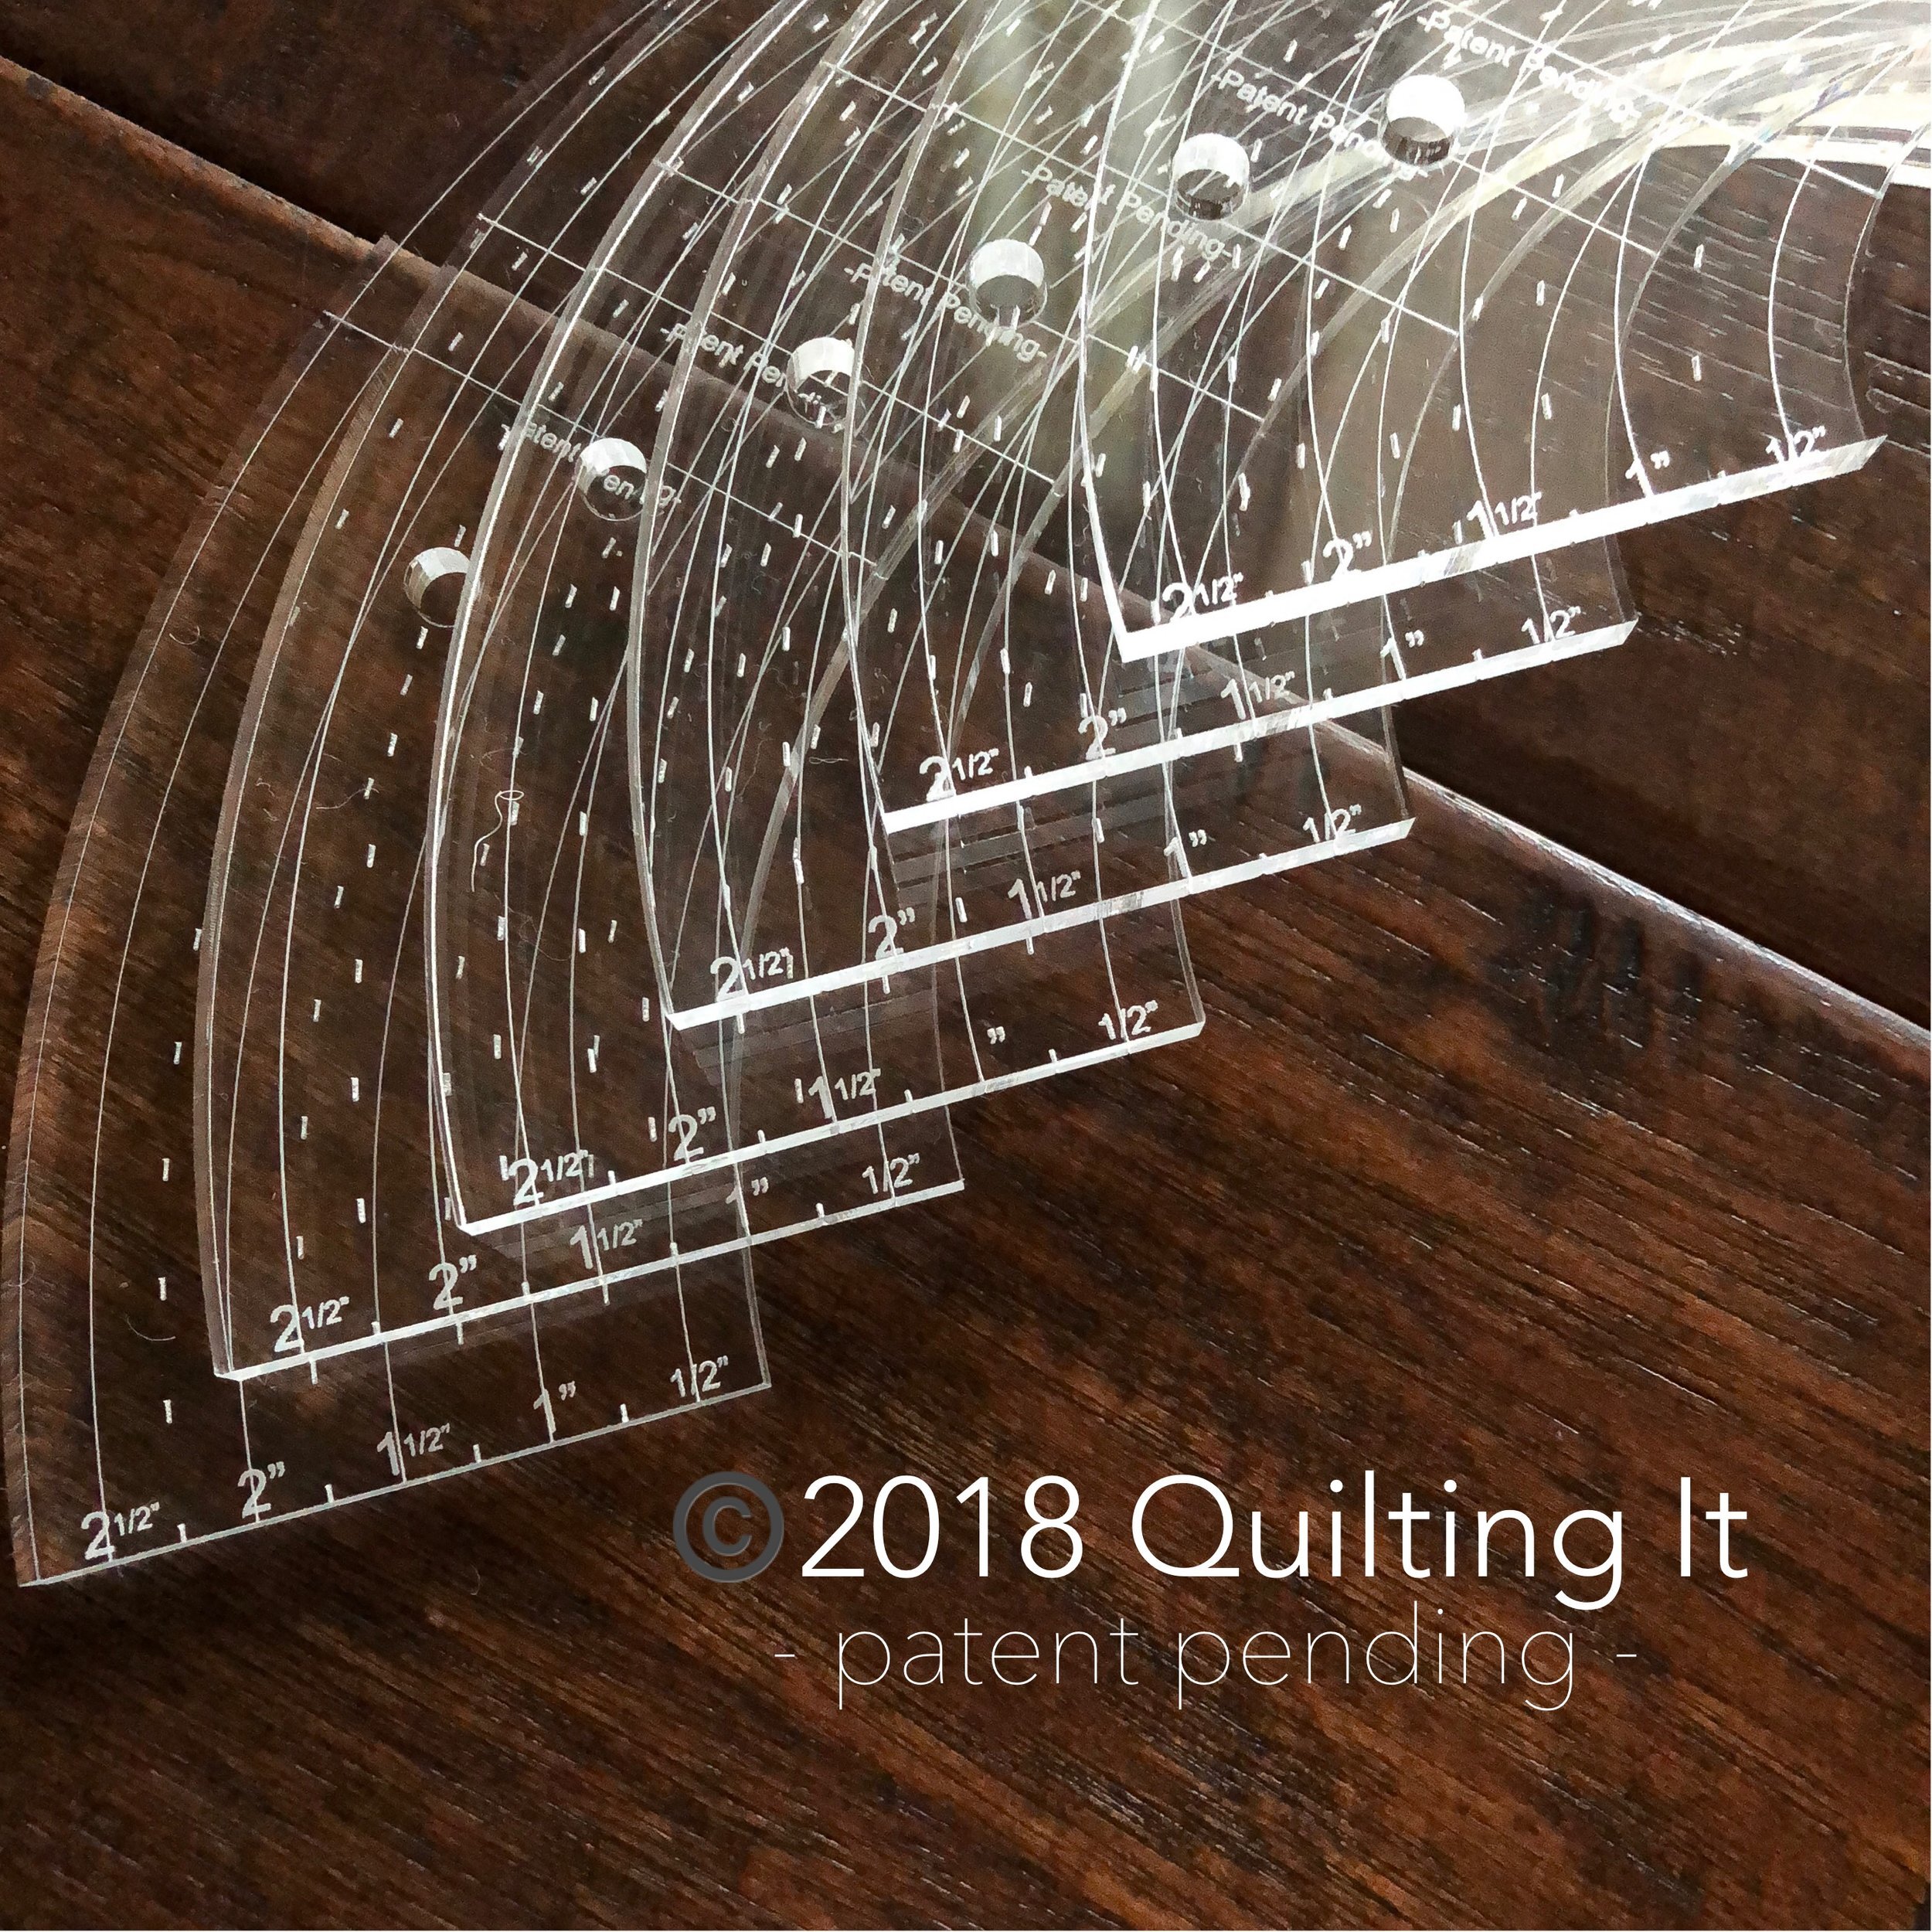
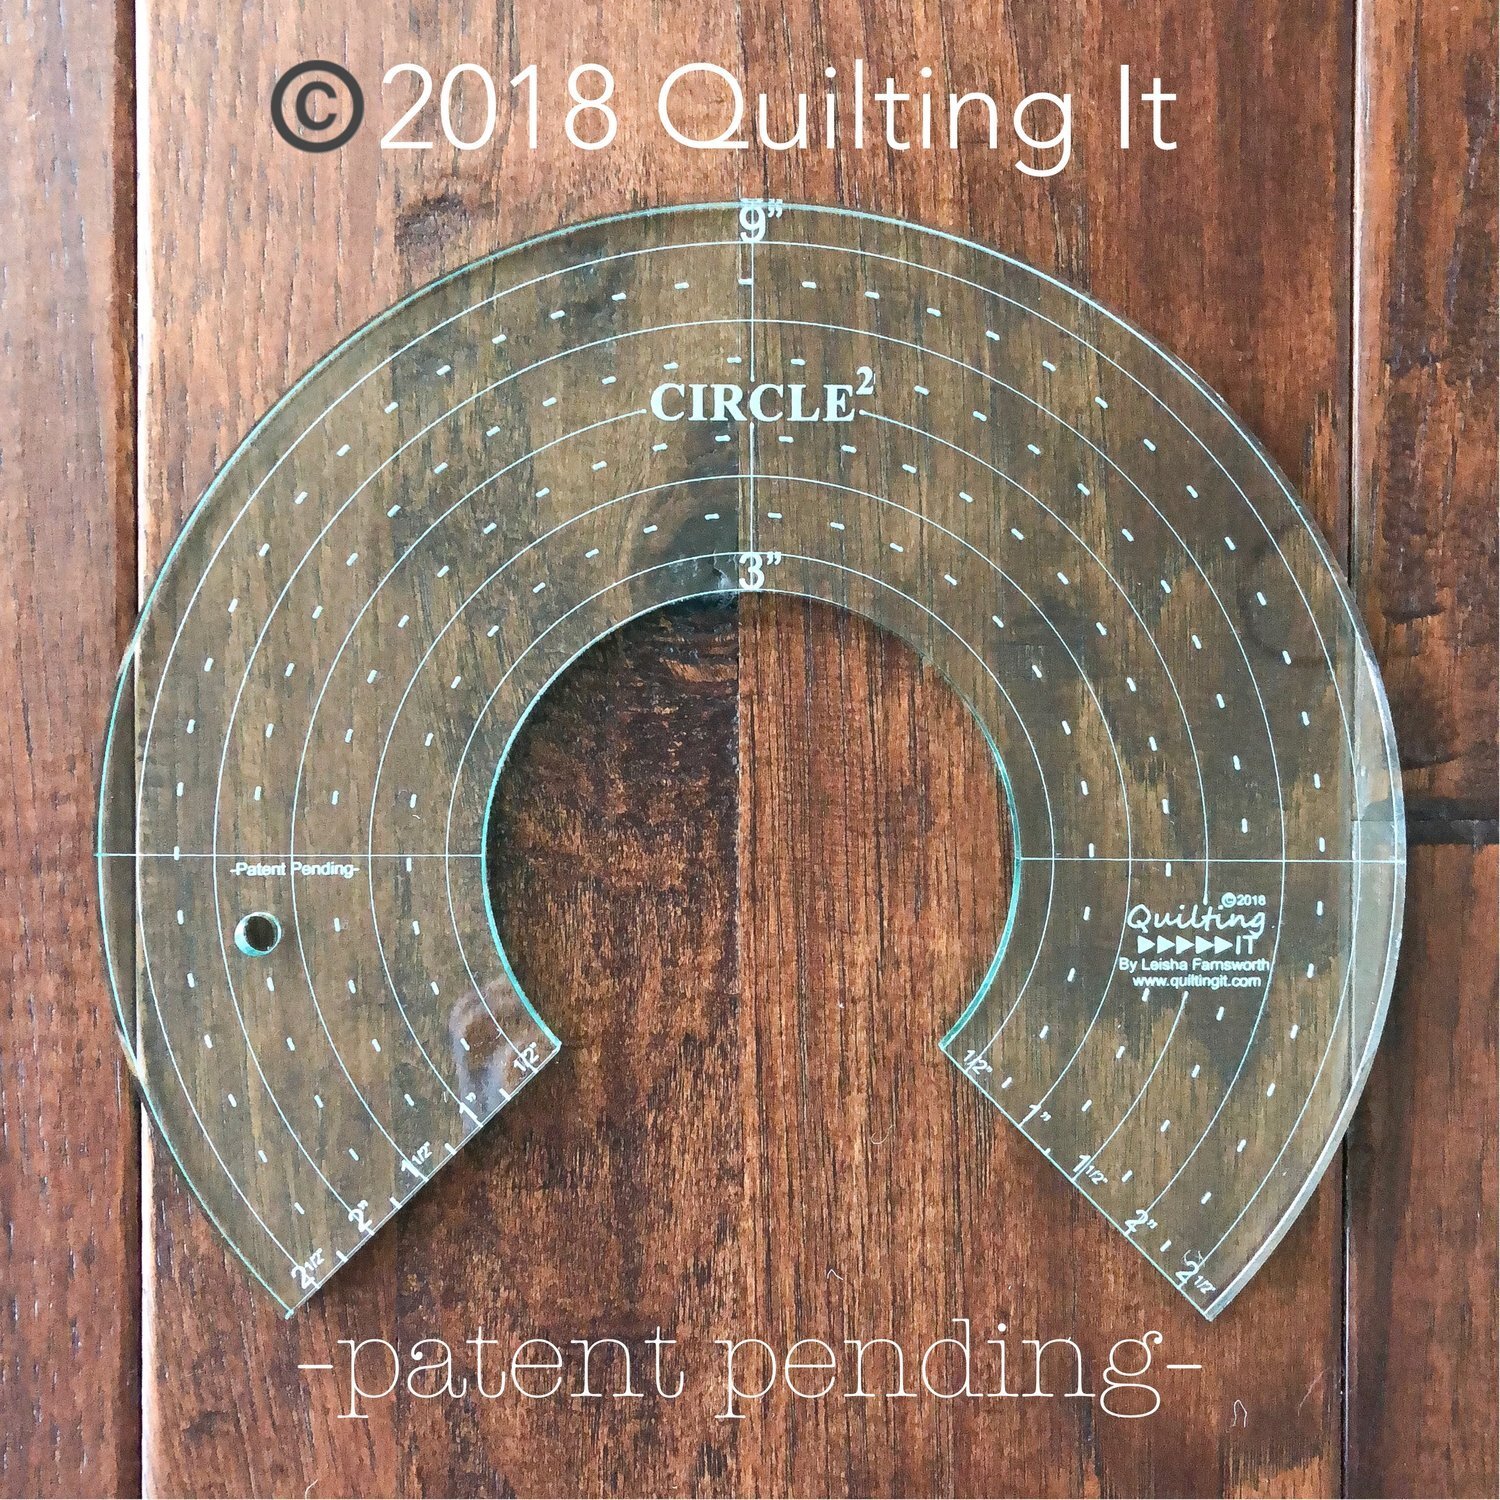
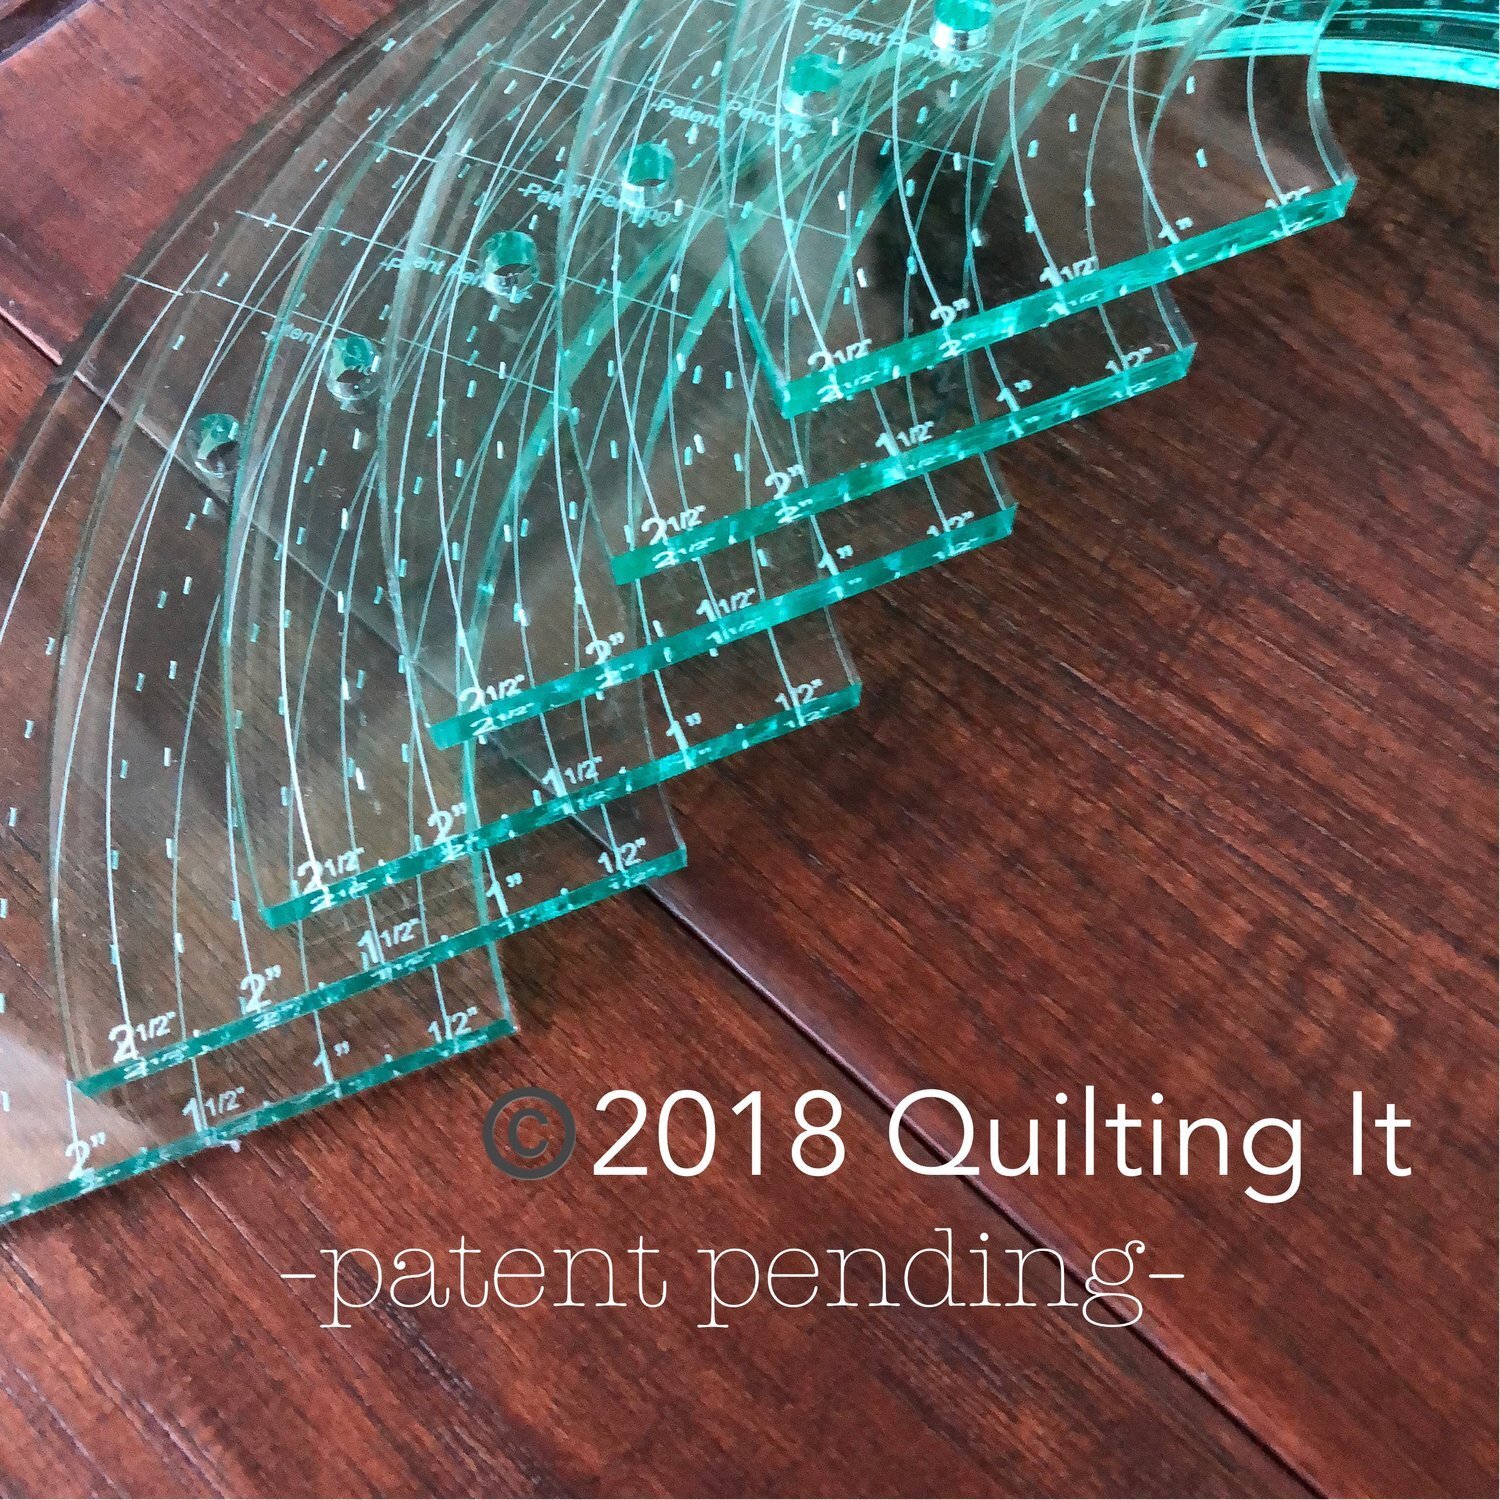
My rulers are called Circle2™ (circle squared) because there are 2 circles per ruler. My Circle2™ rulers are available in a set of 6 rulers, with the circles ranging in size from 2” up to 13”. I actually never would have guessed that I would have used the 4” circle and 11” circle on a table runner. It turned out great, because the curves fit the spots perfectly.
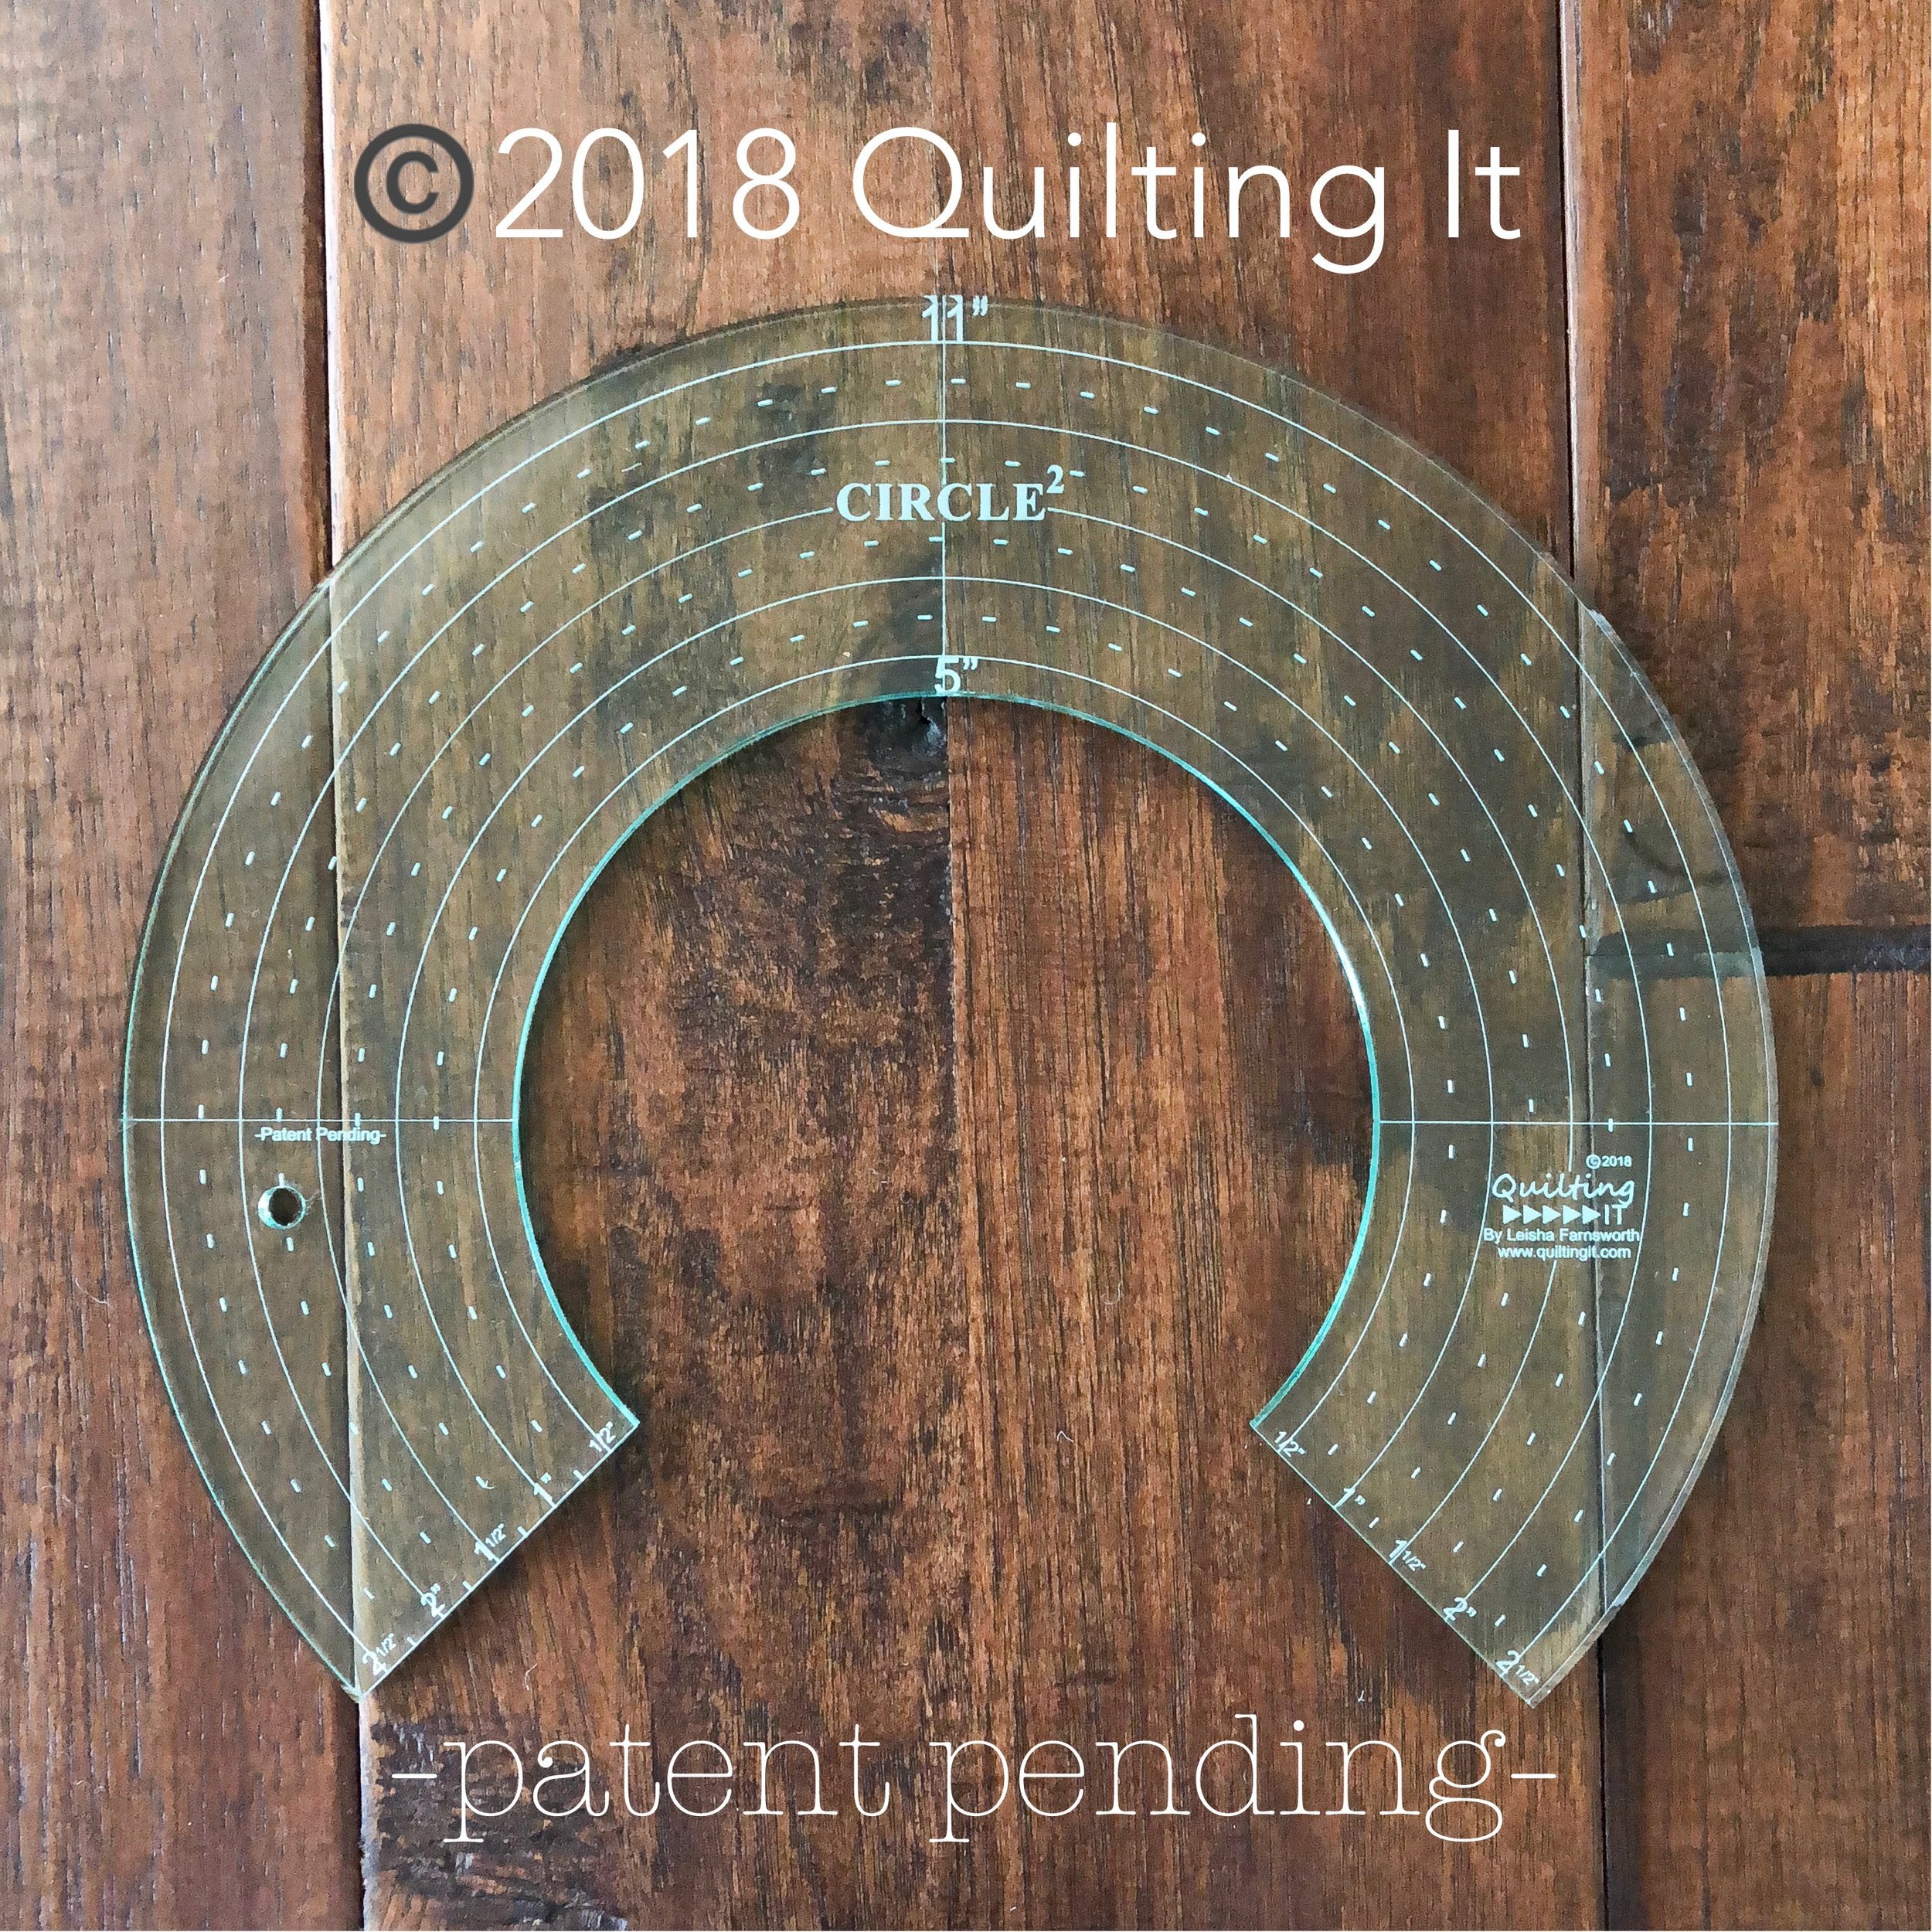
As you look at the picture below, notice the square’ish circle that is around all of the berry blocks. I quilted those curves with my 11” Circle2™ Ruler. For a more detailed look at my quilting thoughts, click this link to a Instagram video… https://www.instagram.com/tv/CT5q5jTpds1/?utm_medium=copy_link

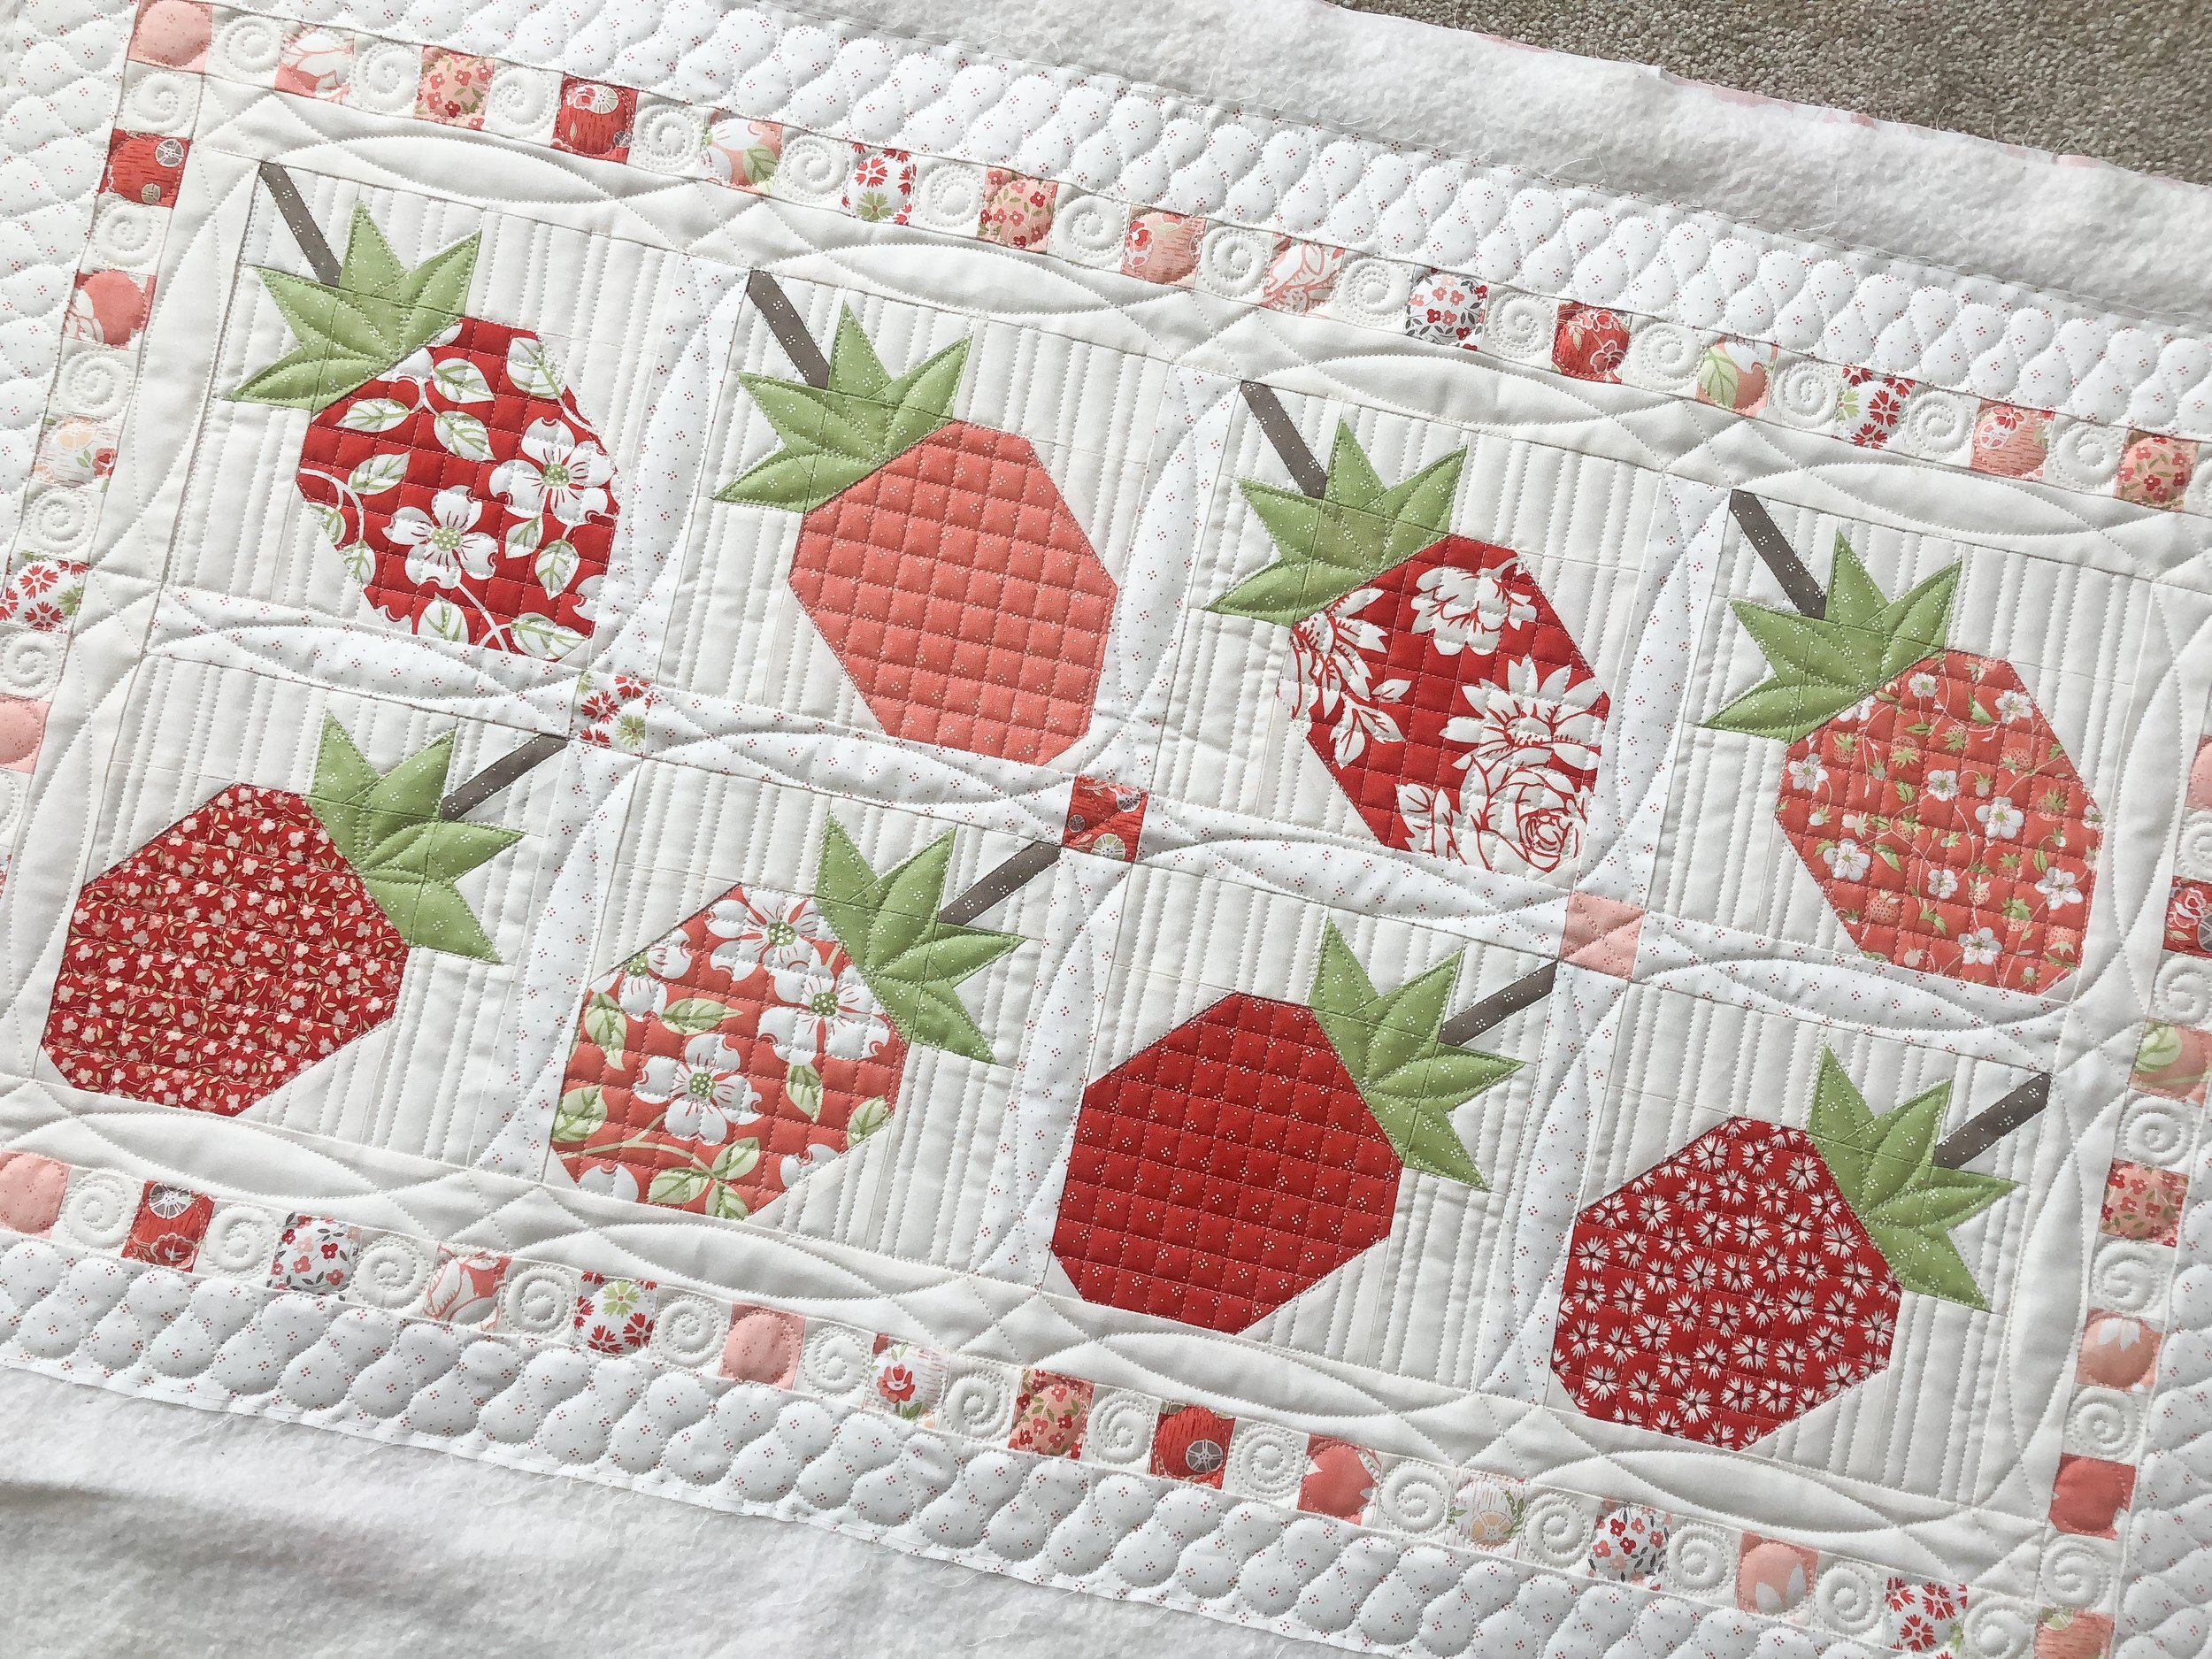
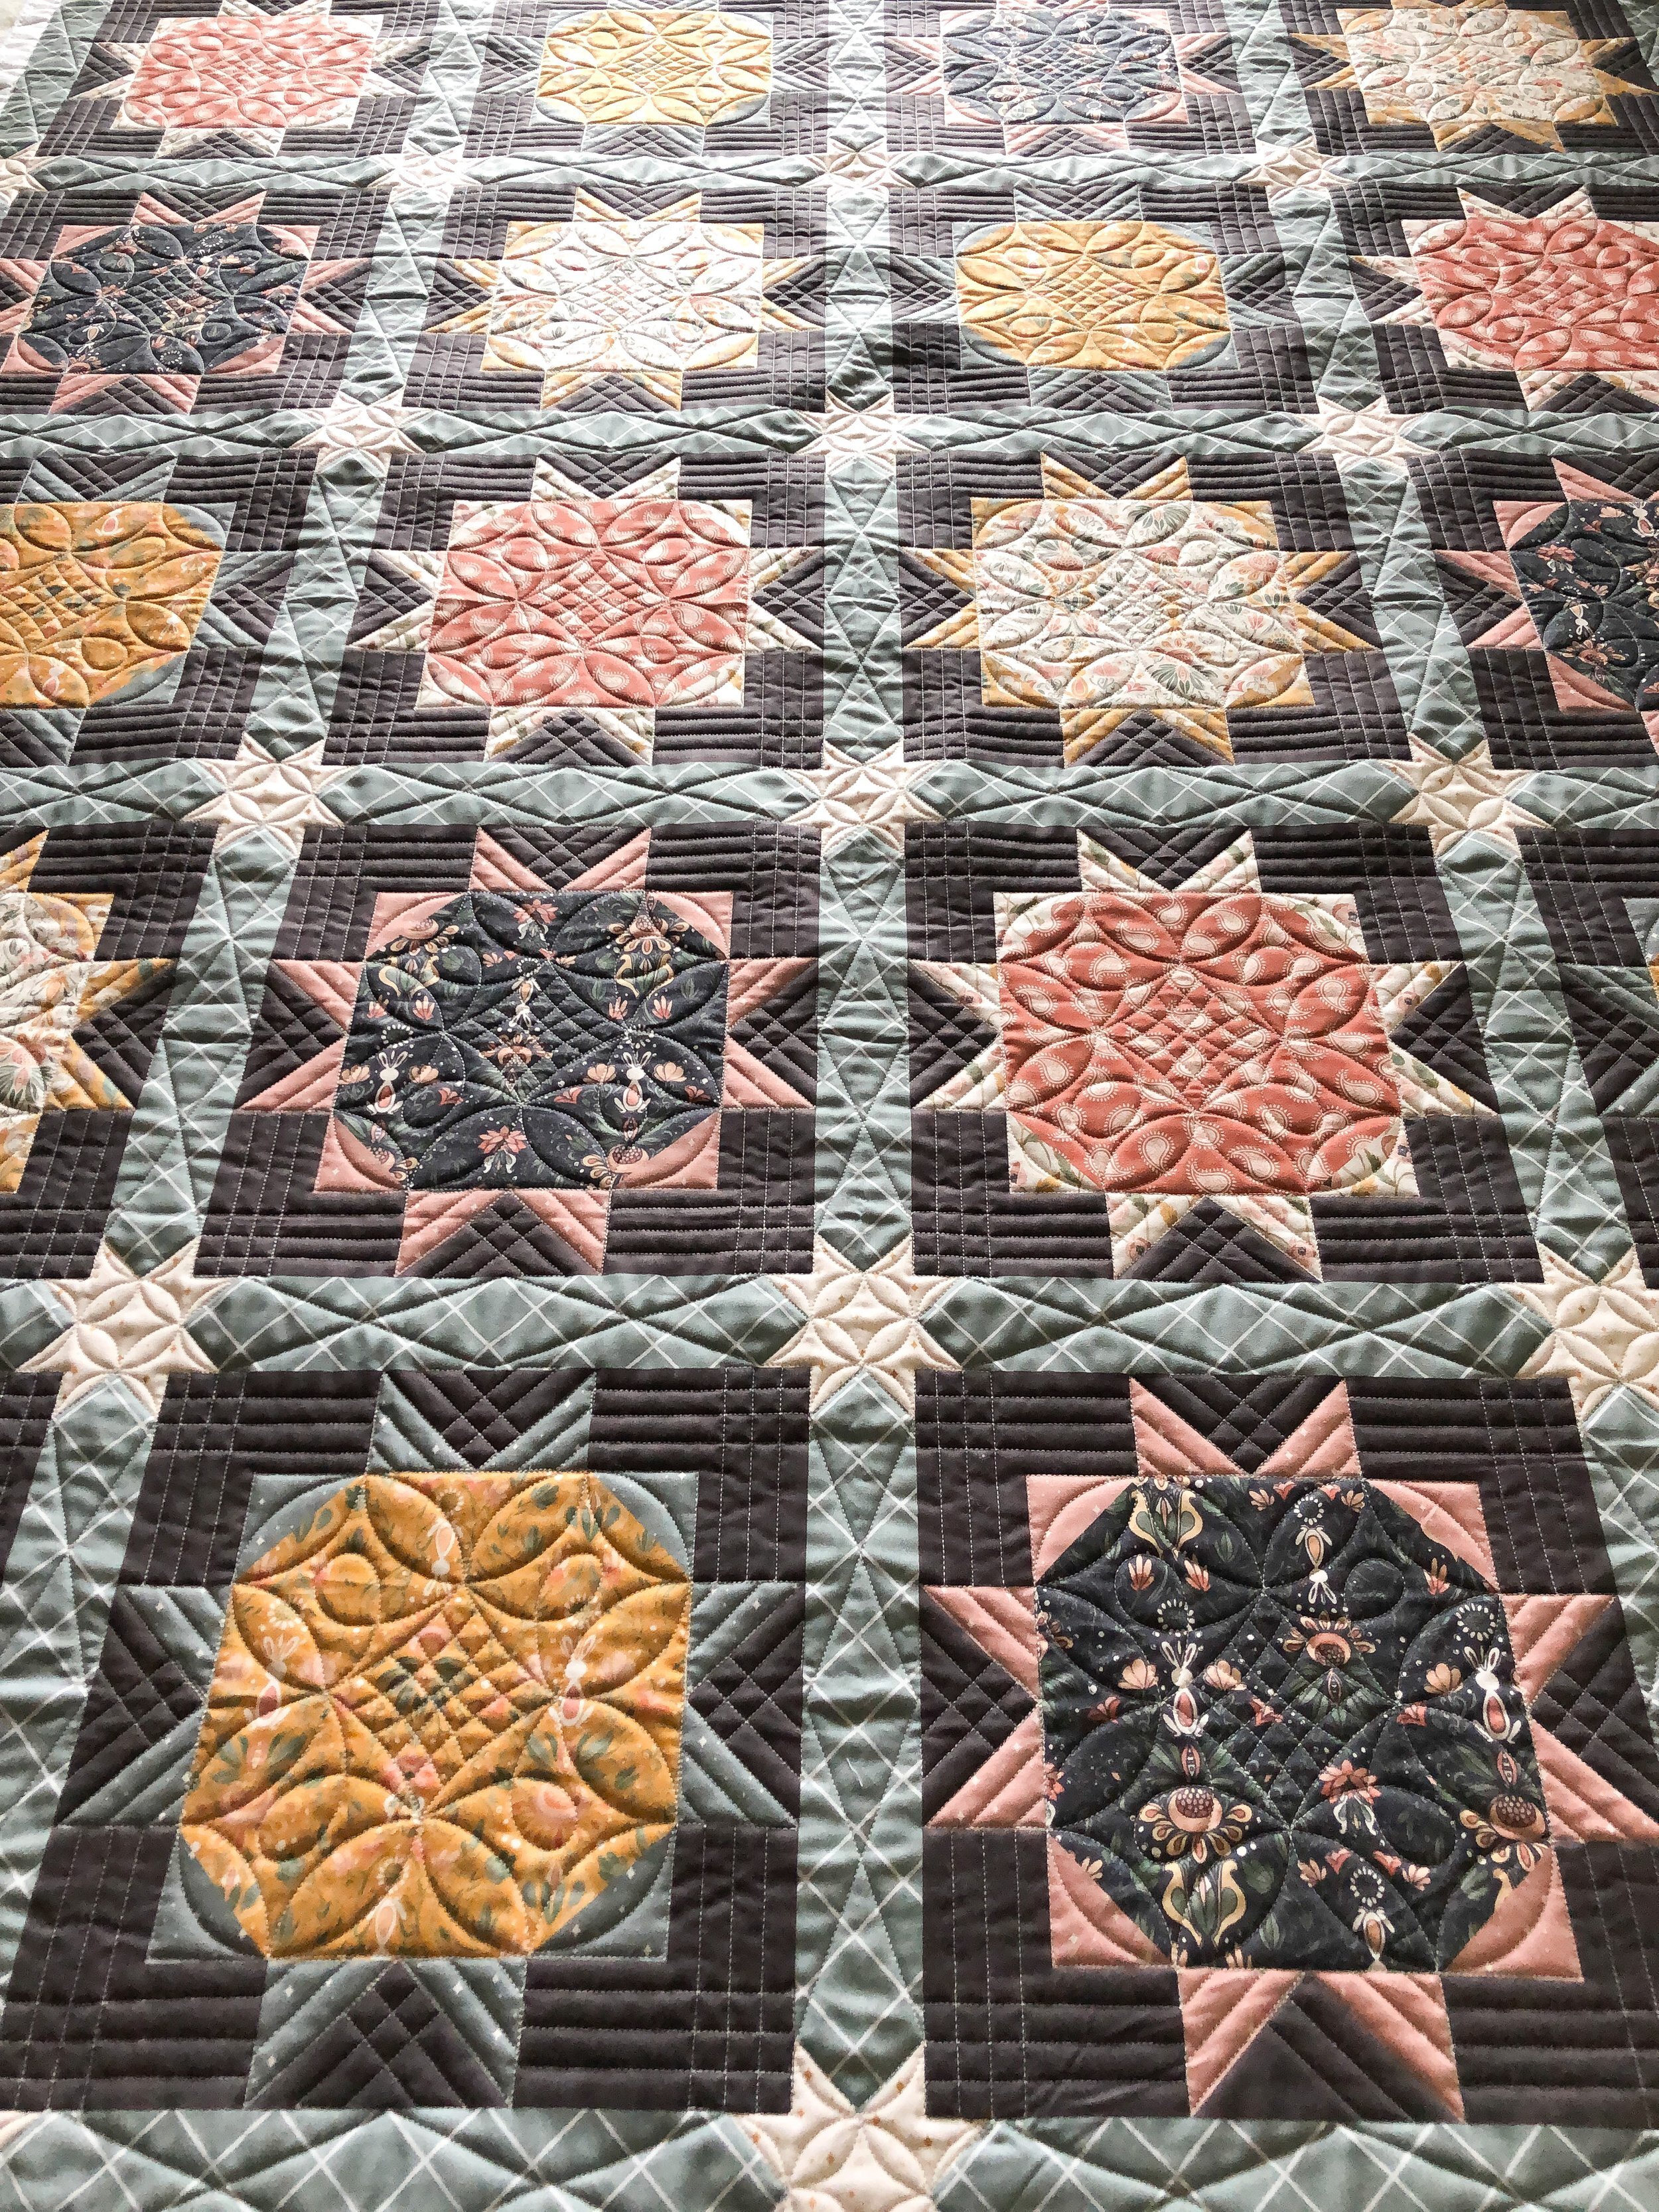
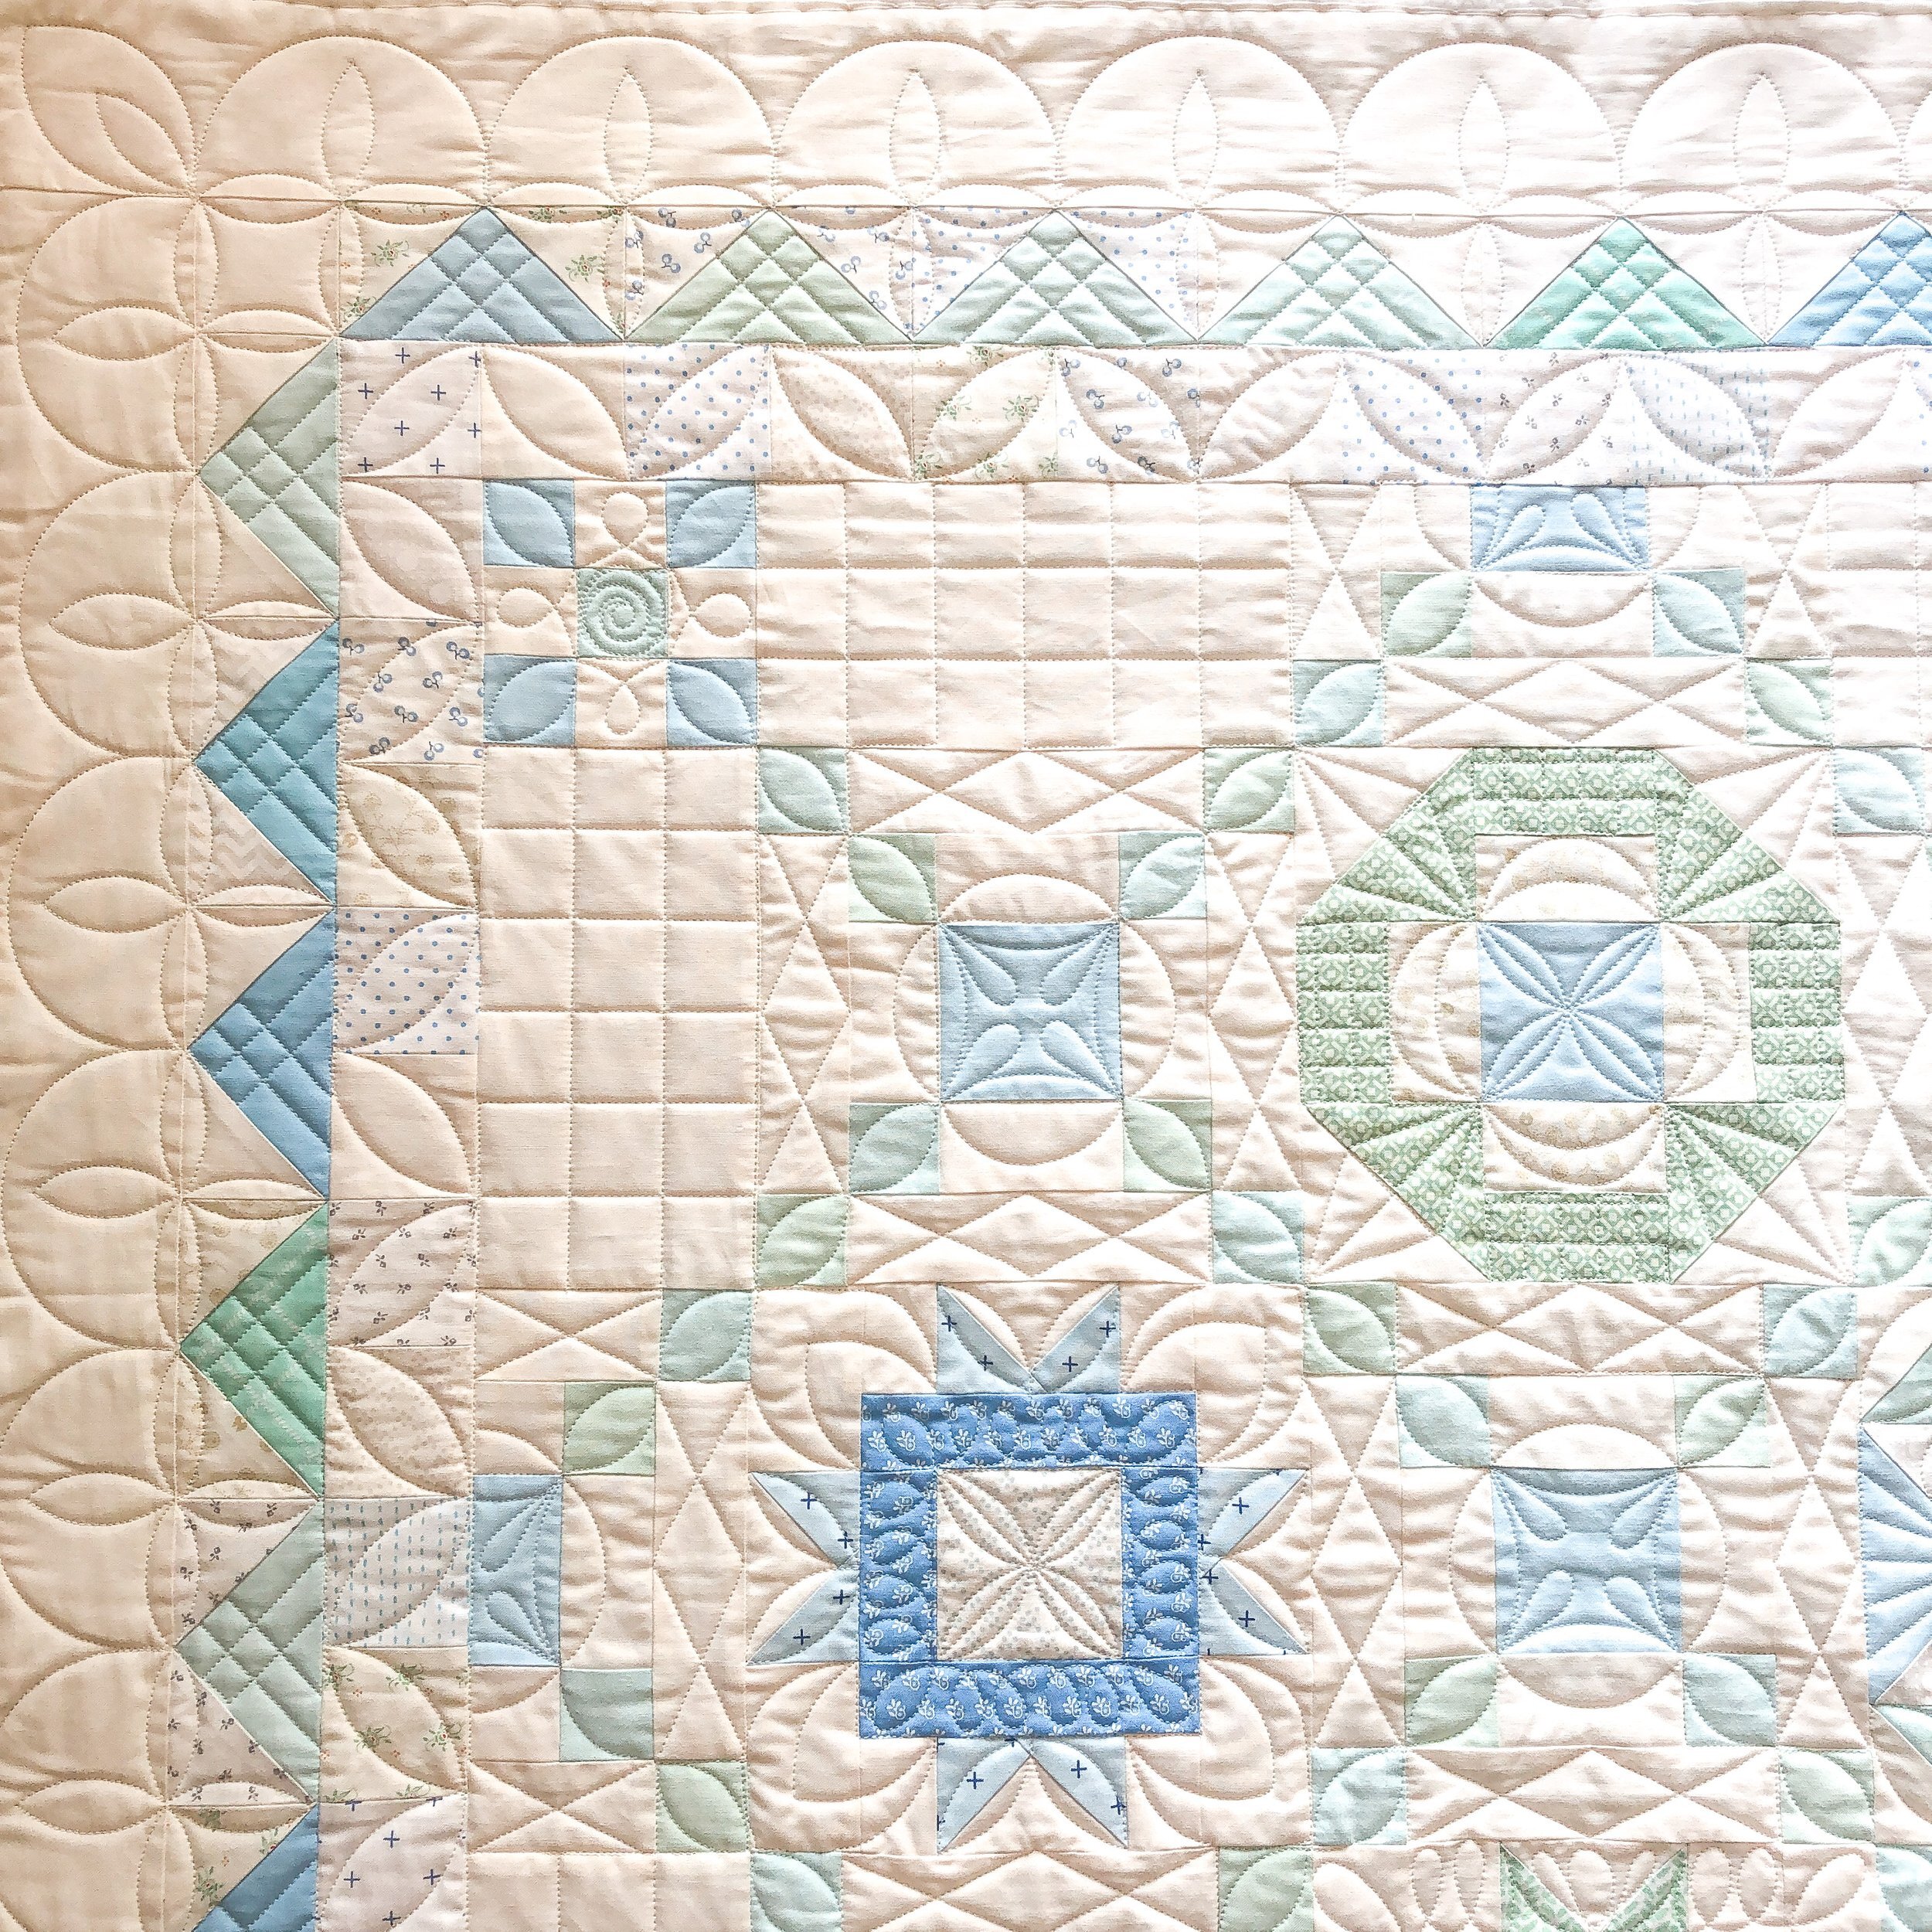
I love all of the borders together. The ribbon candy, pebbles and swirls, and the curves that intertwine. Love it all!!
If you’re new to custom or freemotion quilting, and would like to learn some new designs or even get going, check out my Quilting It Freemotion™ videos for purchase in my store. I teach the pebbles and swirls in the checkered border, in the pebbles video.

Another close up and angled view of the borders. I also love to quilt a simple x, where all the curves come together.
Here are all the Circle2™ rulers stacked up and ready to send your way! They are made in the USA, from high quality acrylic.

They are a 1/4” thick, with a 2.5” width for easy handling while quilting. It has been such a great versatile set of circle rulers. For more info, check out this blog post about them.
Ruler - Design Patent D875,574 -

Thanks for being here! I hope you enjoyed a quick look at this fun little runner. Have a great day!!
Happy Quilting, -Leisha
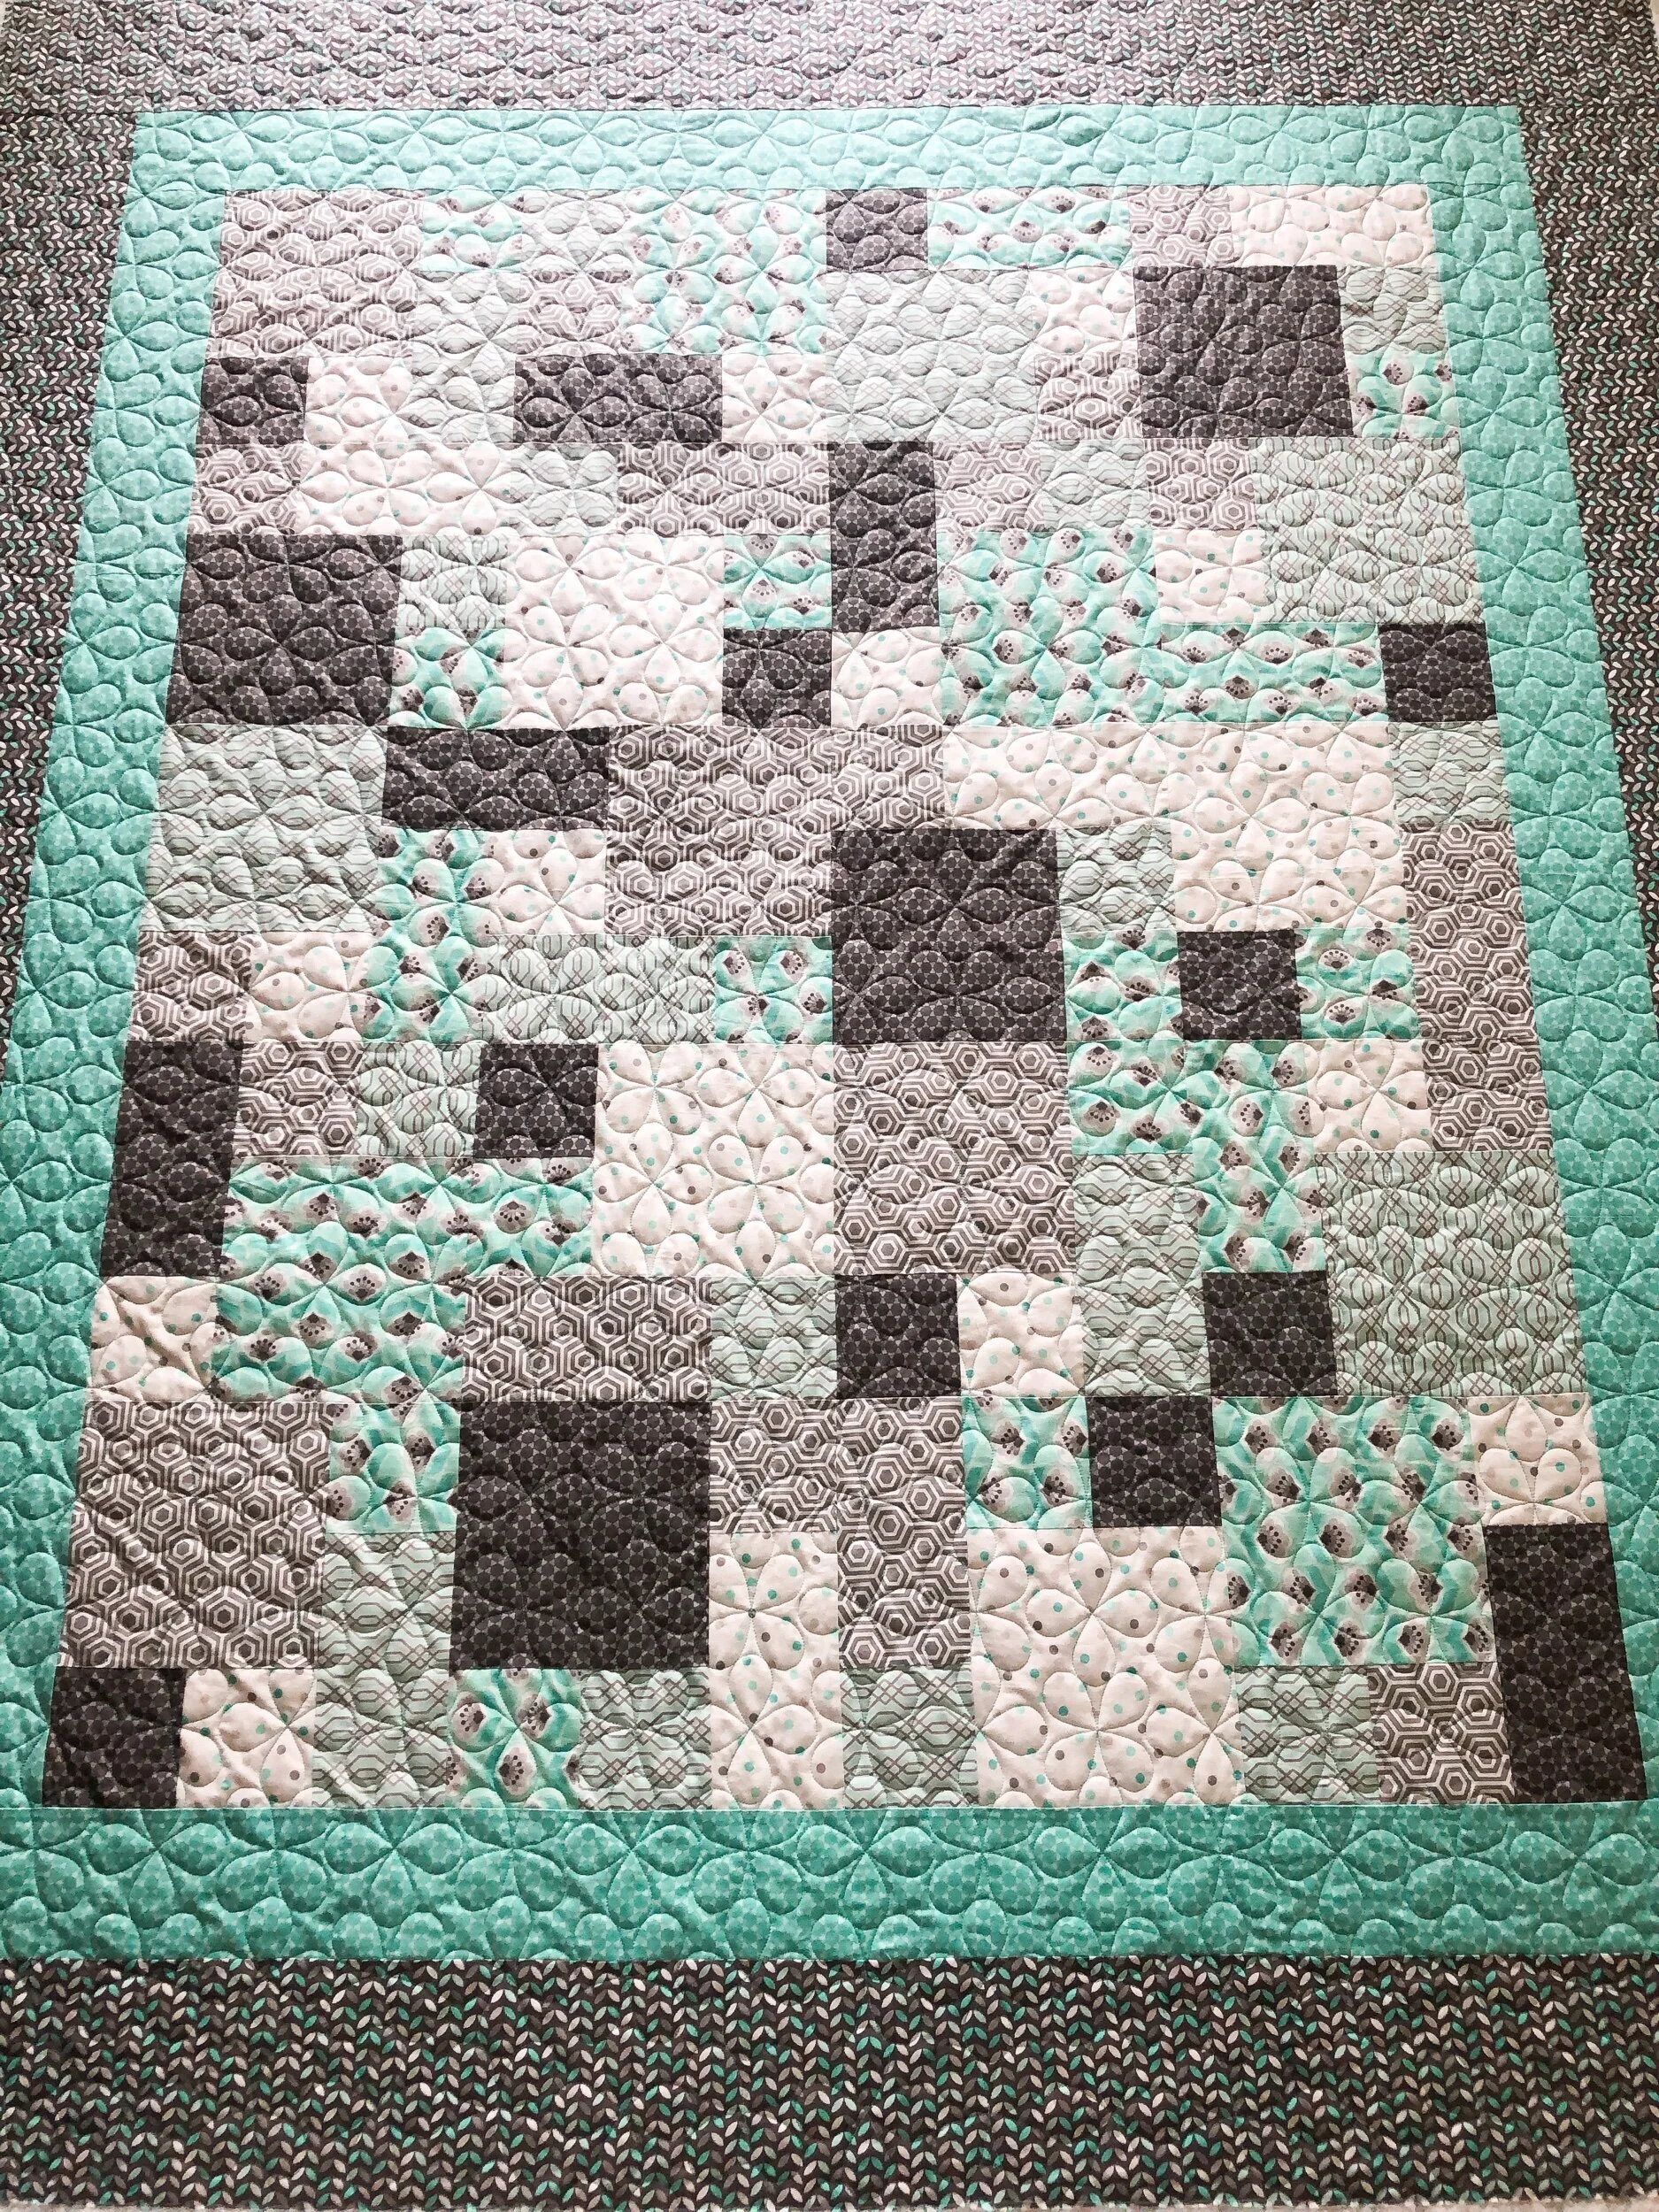
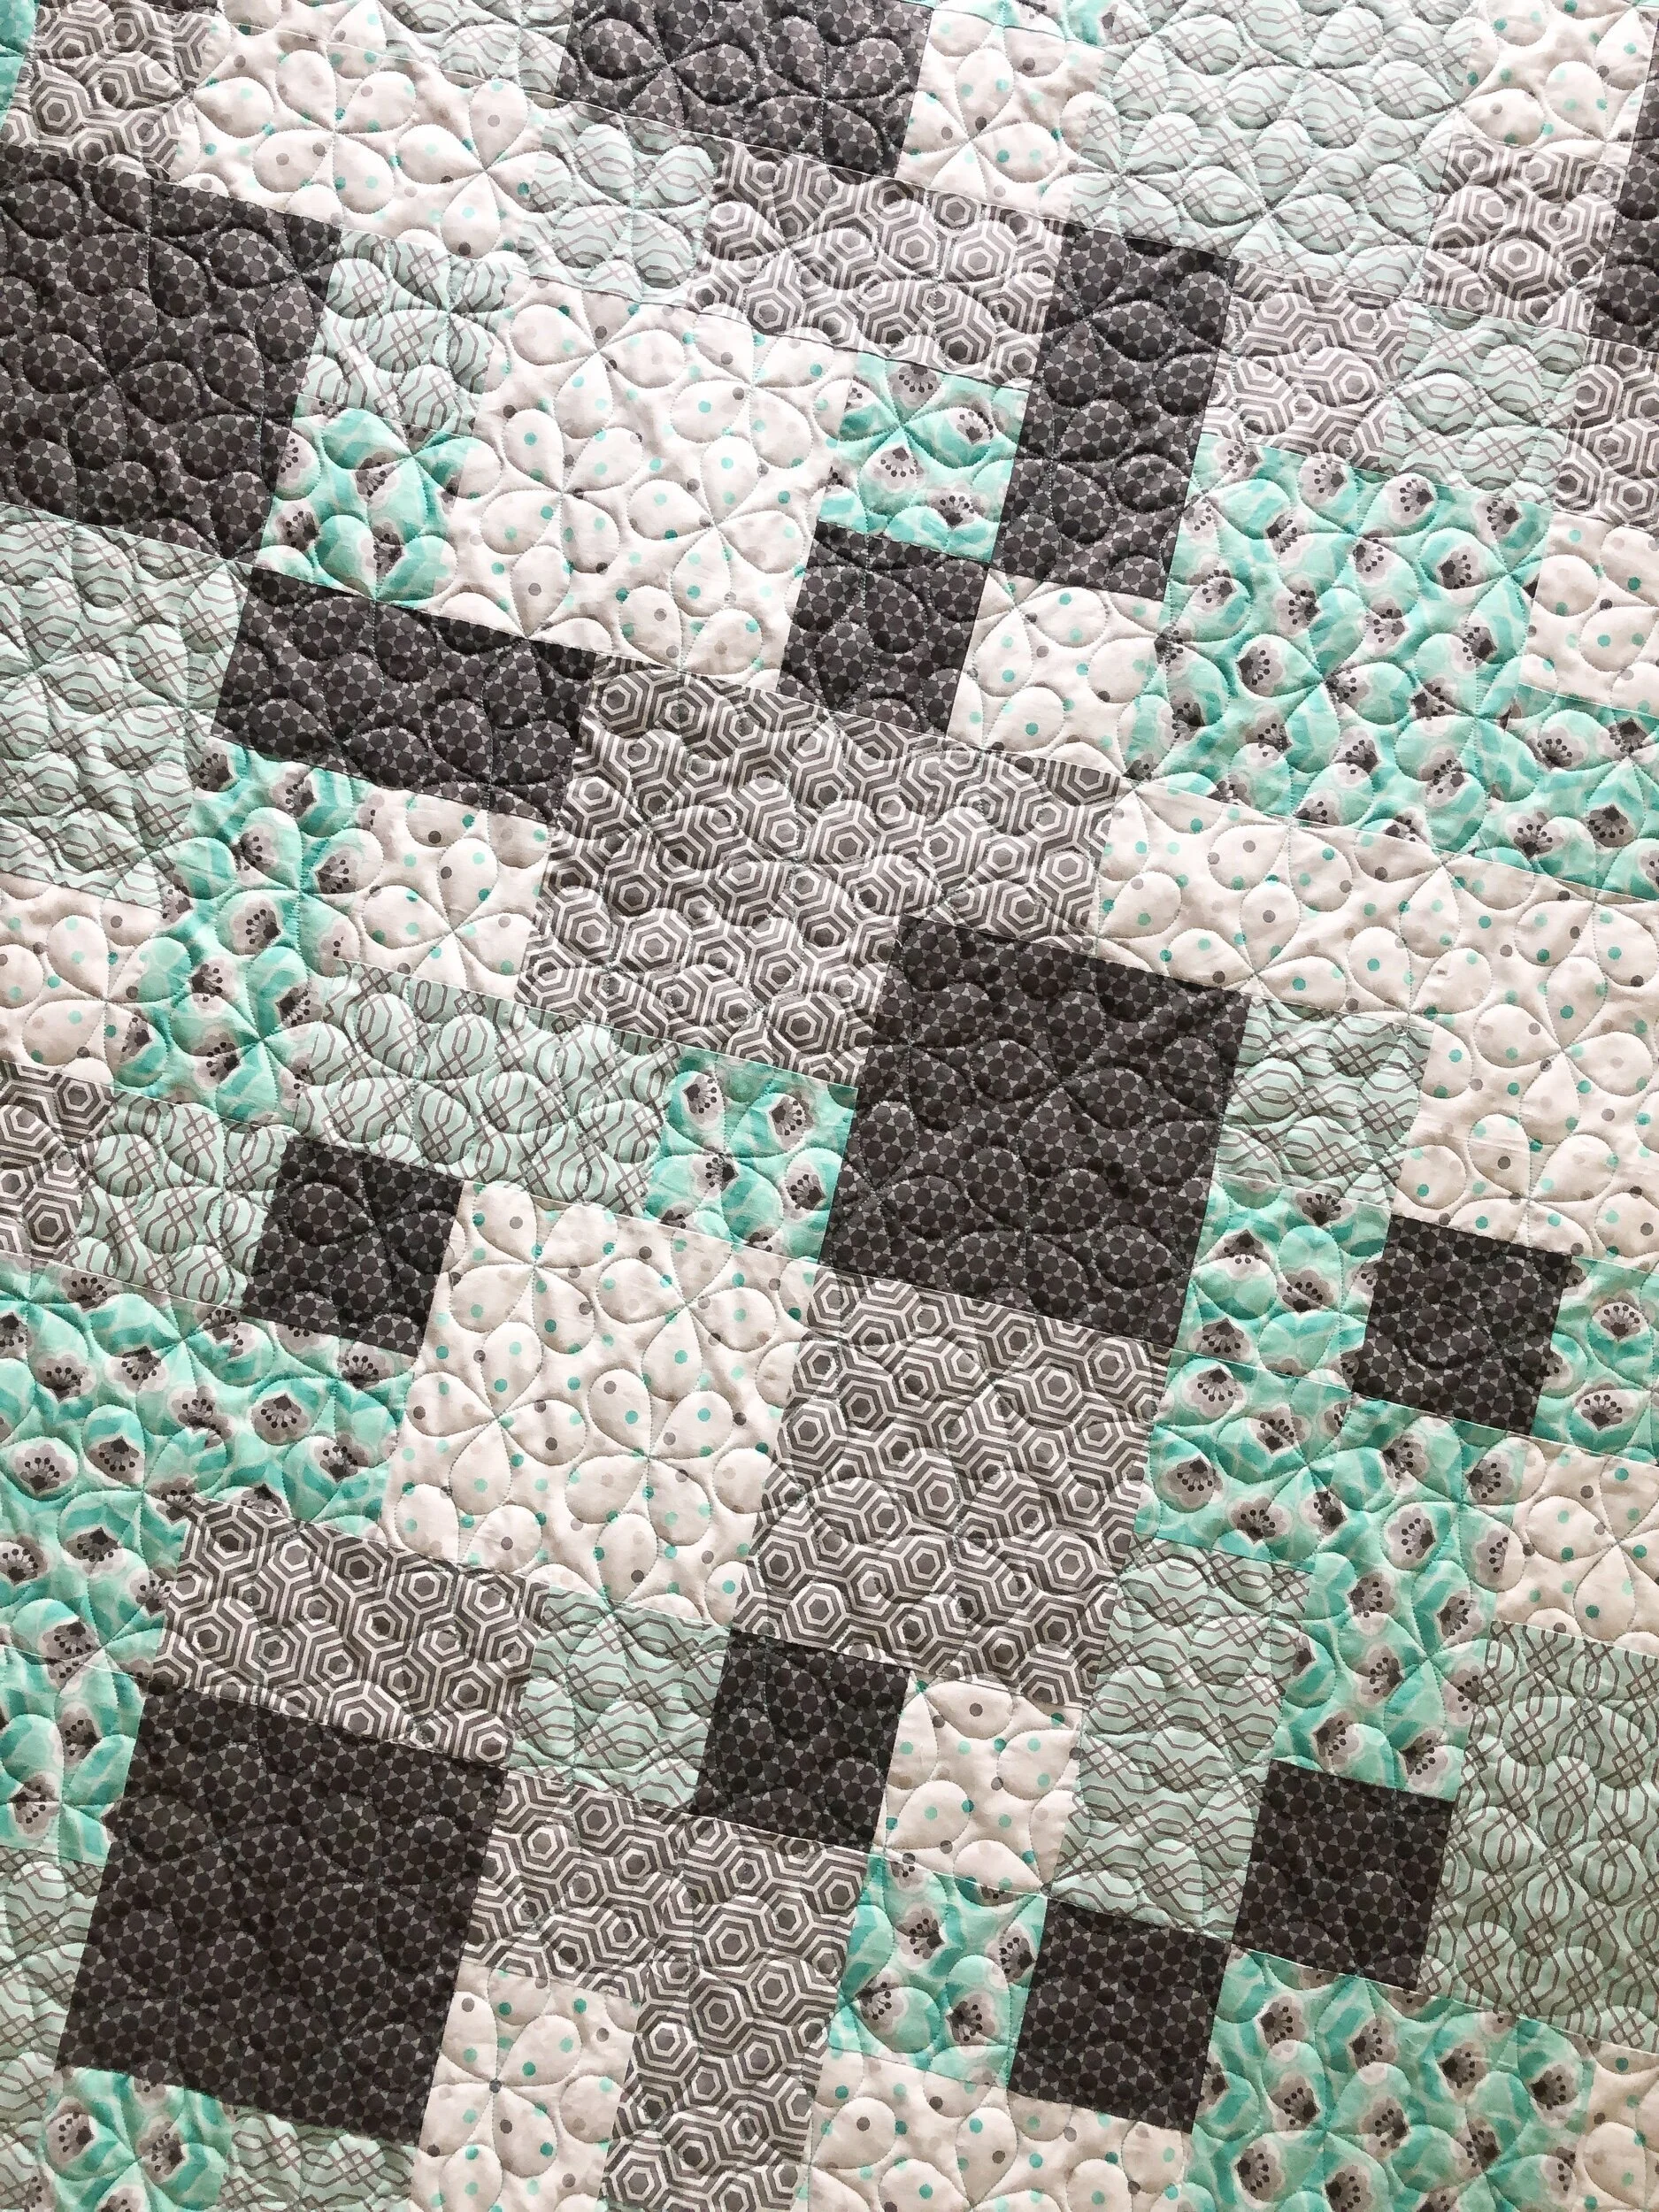
Karla’s Disappearing 9 Patch Quilt
Hi Friends,
I hope your new year is off to a great start!! This lovely Disappearing 9 Patch quilt was made by Karla.

I’ve made a couple of these quilts myself, and it’s such a fast one. If you have a layer cake or some charm packs that you need to use up, this is a great option. Jenny from Missouri Star has a great video tutorial for this pattern.

Karla used gorgeous fabrics from Minick and Simpson by Moda. I used a batting she provided. Interestingly enough…Karla had some ladies that she goes to church with, tie this quilt. She didn’t really love it, so she undid the ties and brought it to me to quilt. I think it turned out beautiful!

With the traditional fabrics and pattern, I suggest Patricia Ritter and my Opal design for the quilting. Opal is one of many designs of ours that are available at Urban Elementz. Opal is one of my go to traditional designs to quilt on a quilt, that isn’t a feather.

I used a cream Omni thread, which blends beautifully.

Some close ups of all that beautiful texture!!

Do you love traditional fabrics and patterns? I do!! If you do too, what are some of your favorites?
Thanks for stopping by!!! Happy quilting, Leisha
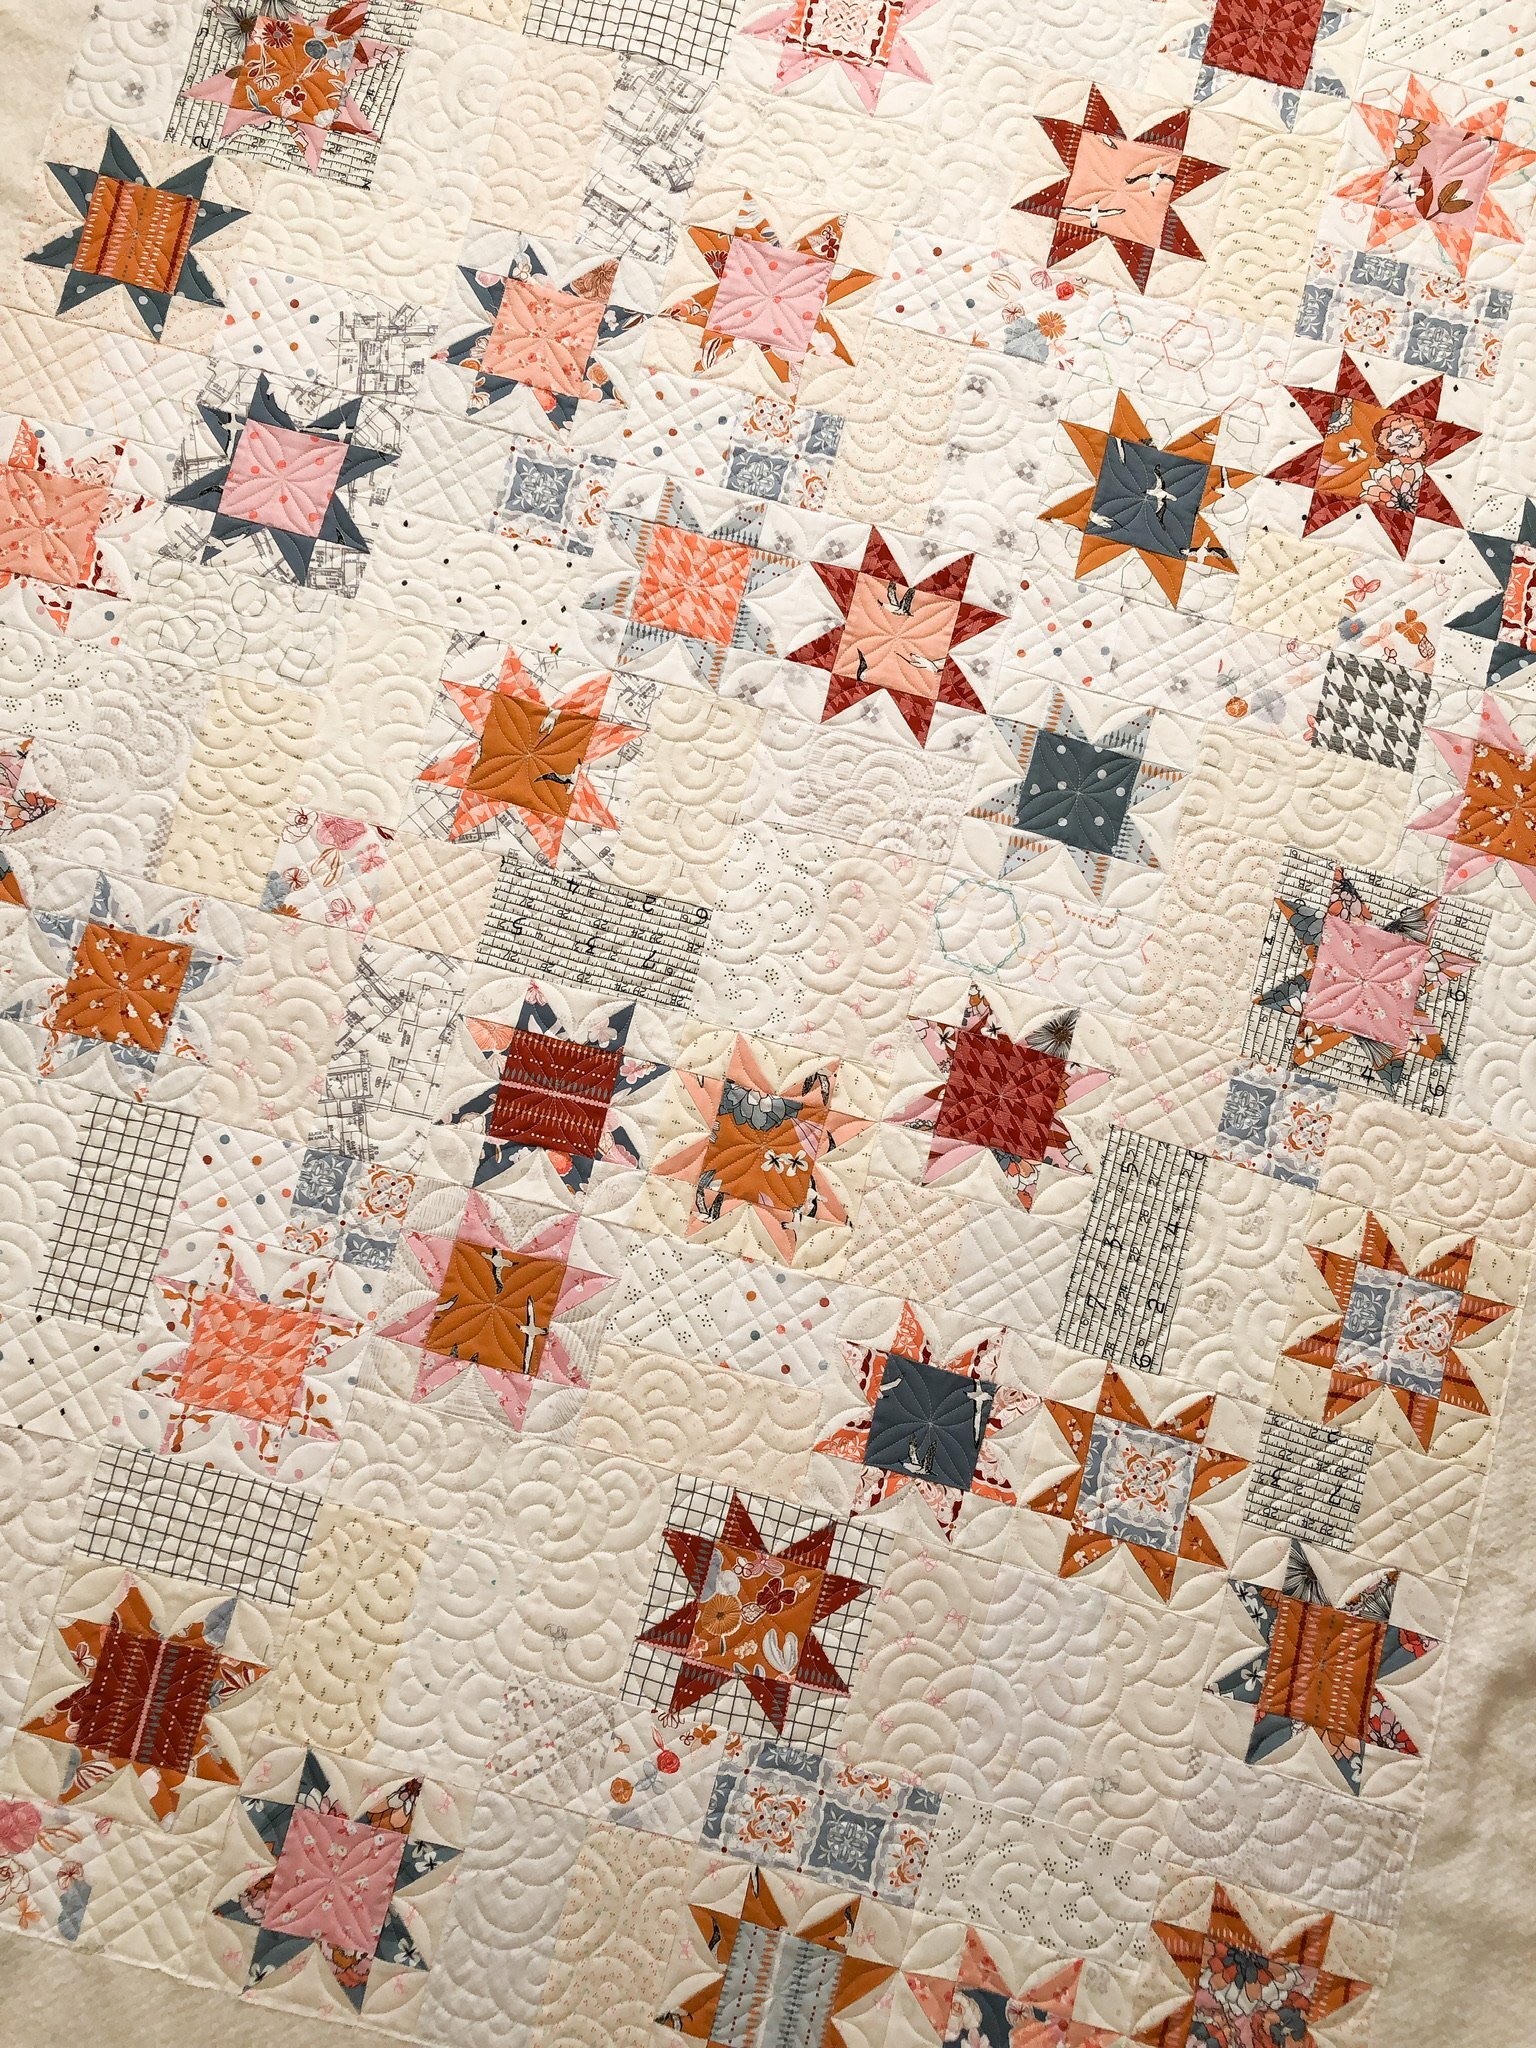
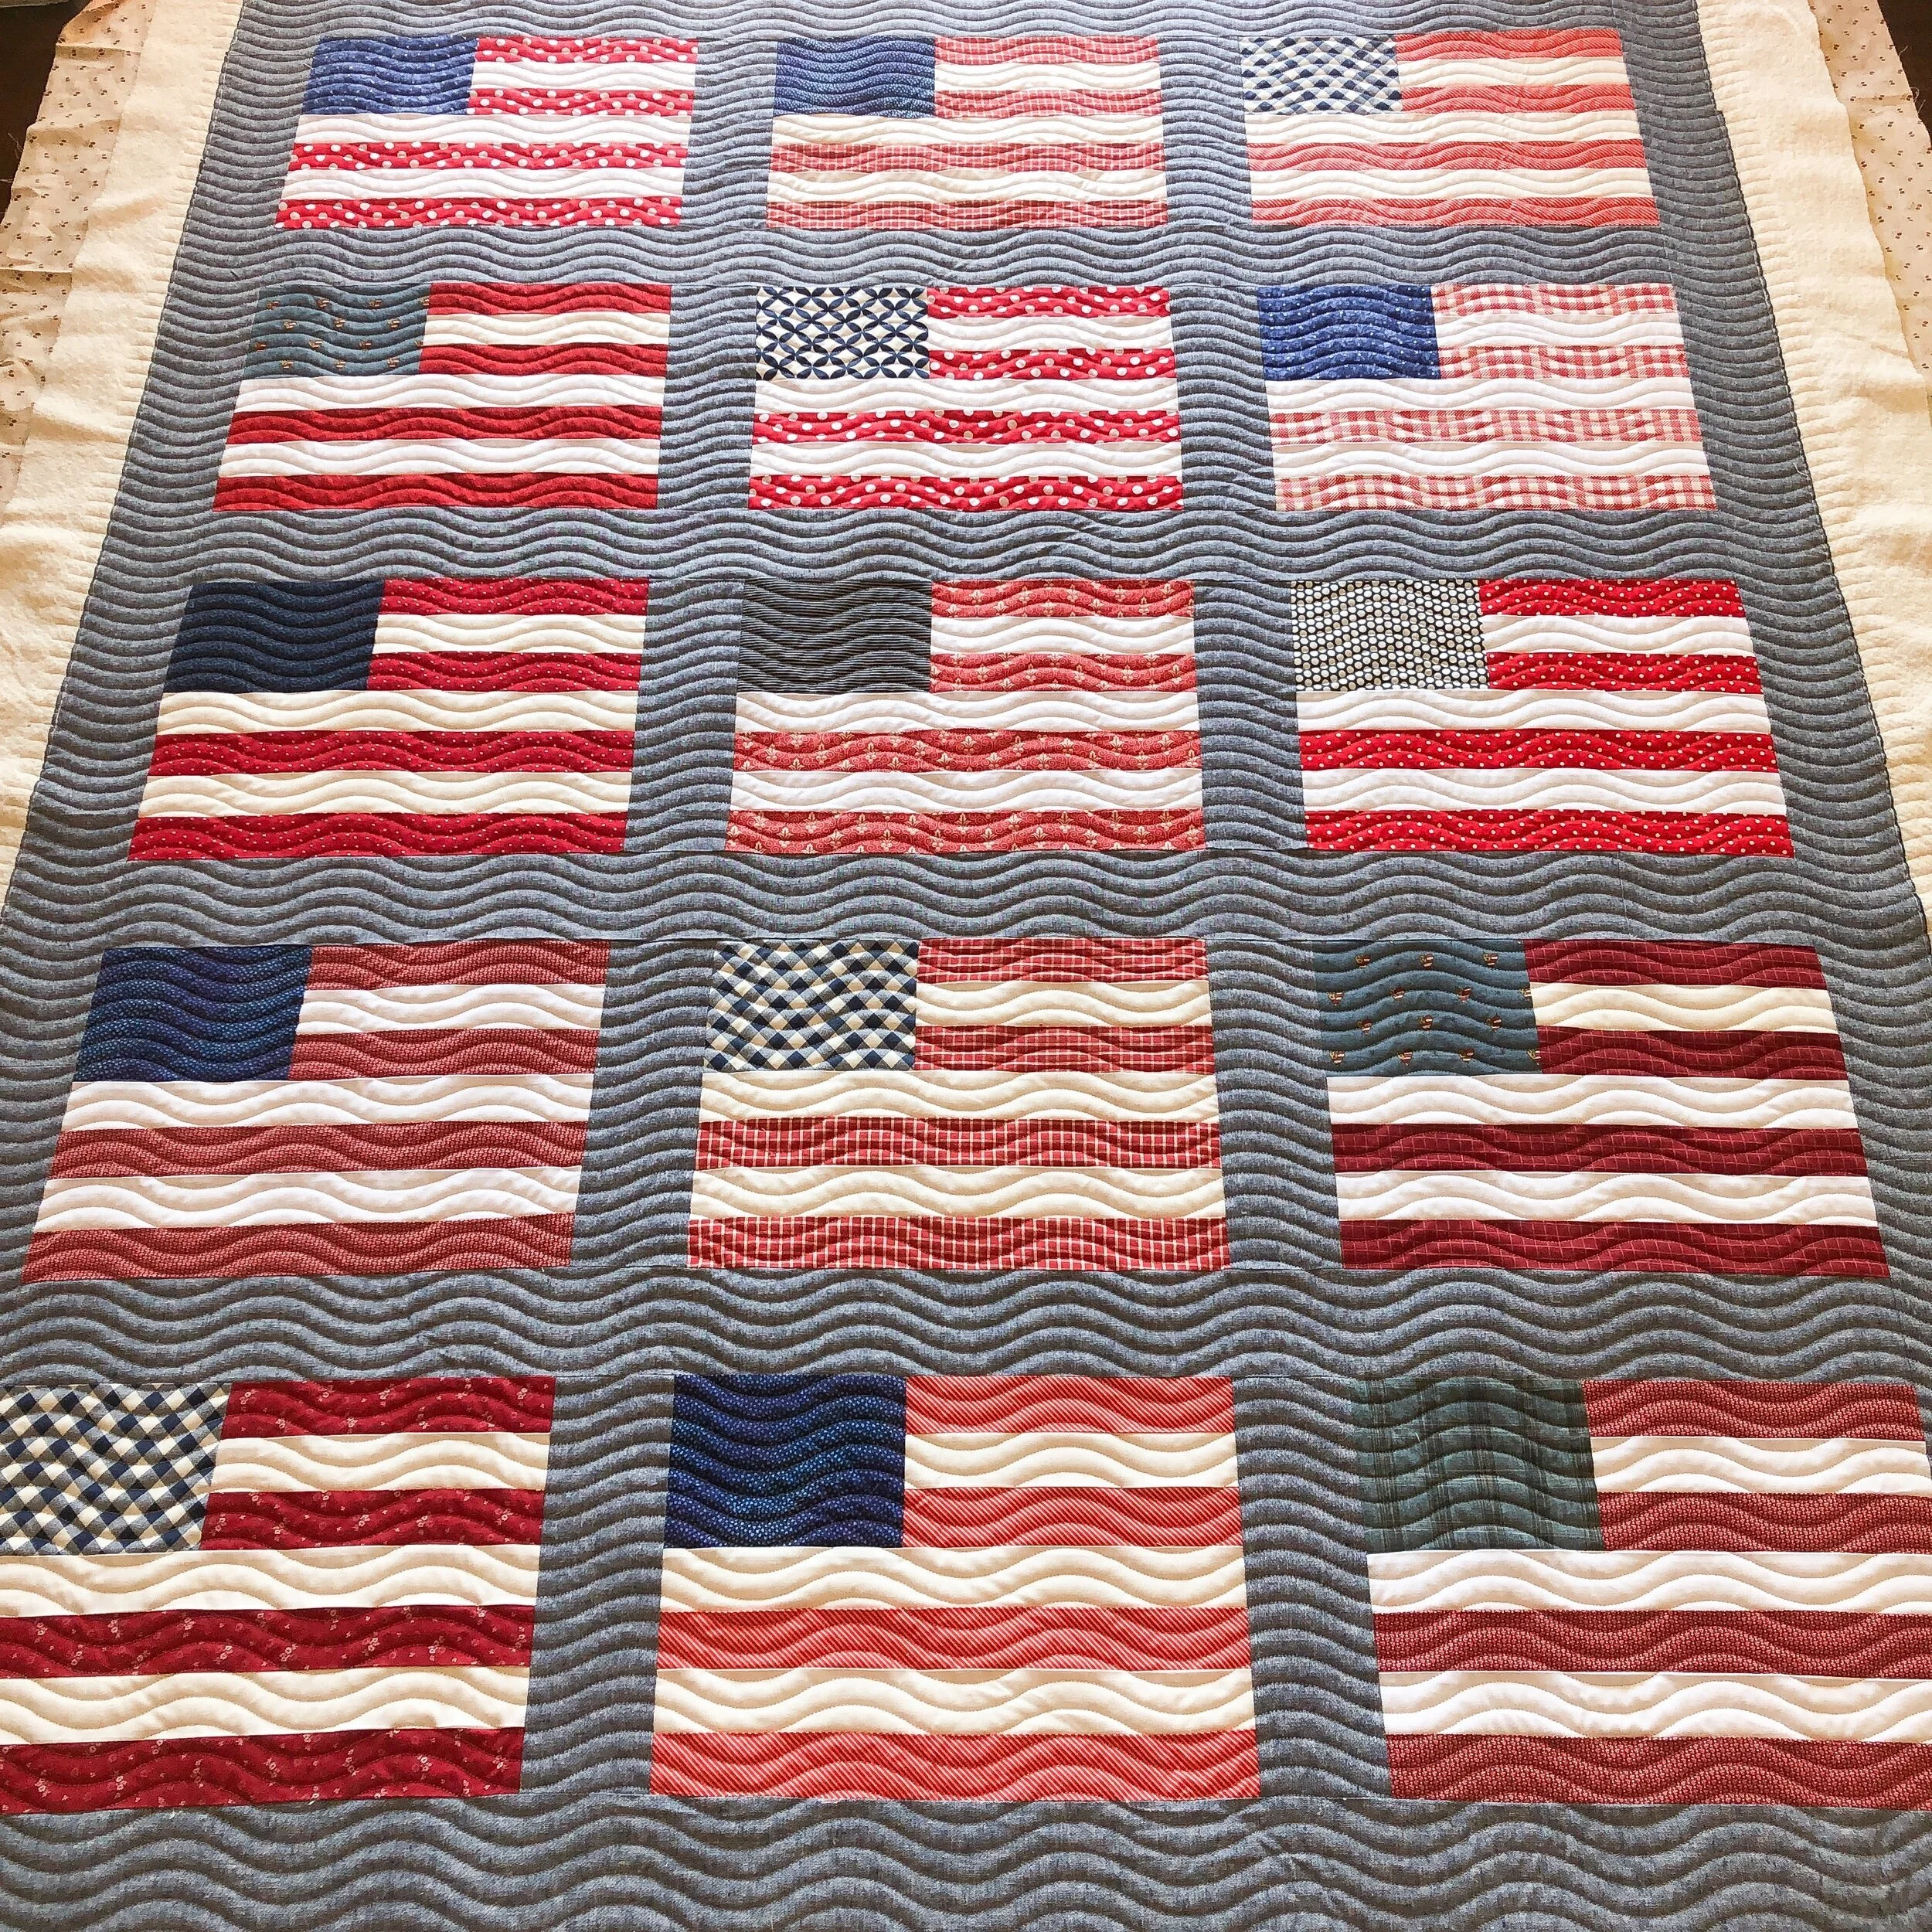
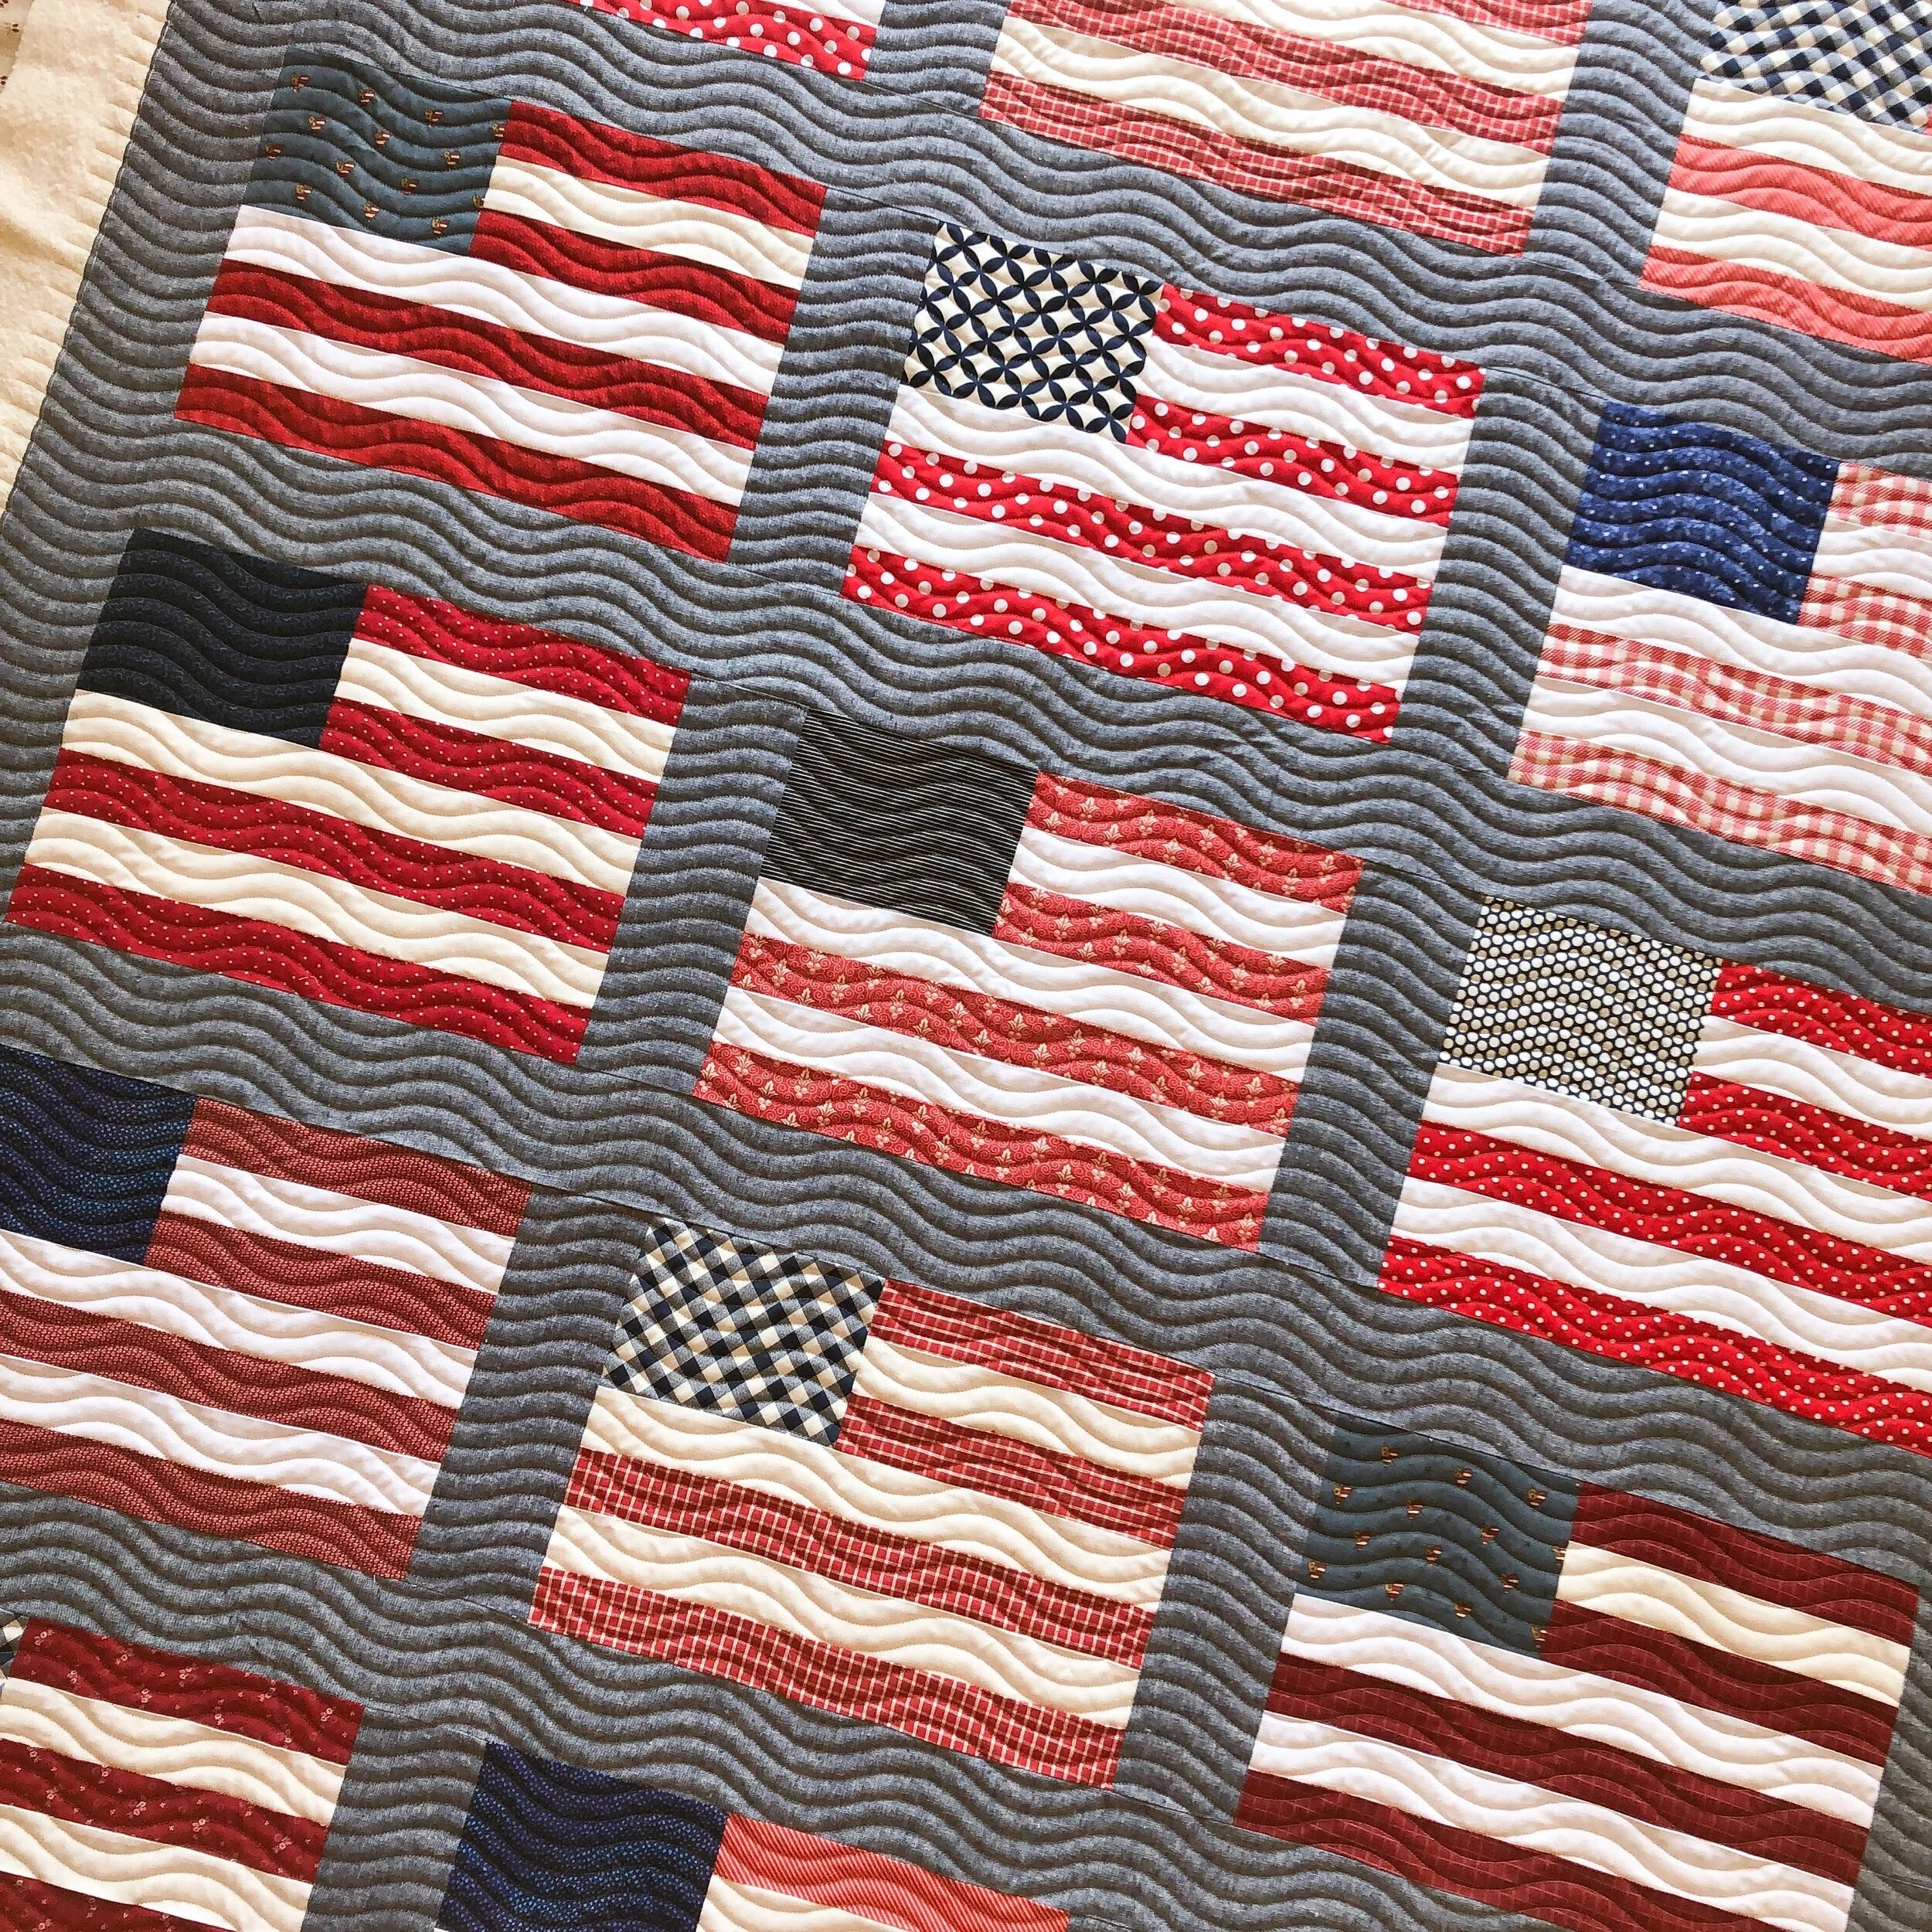
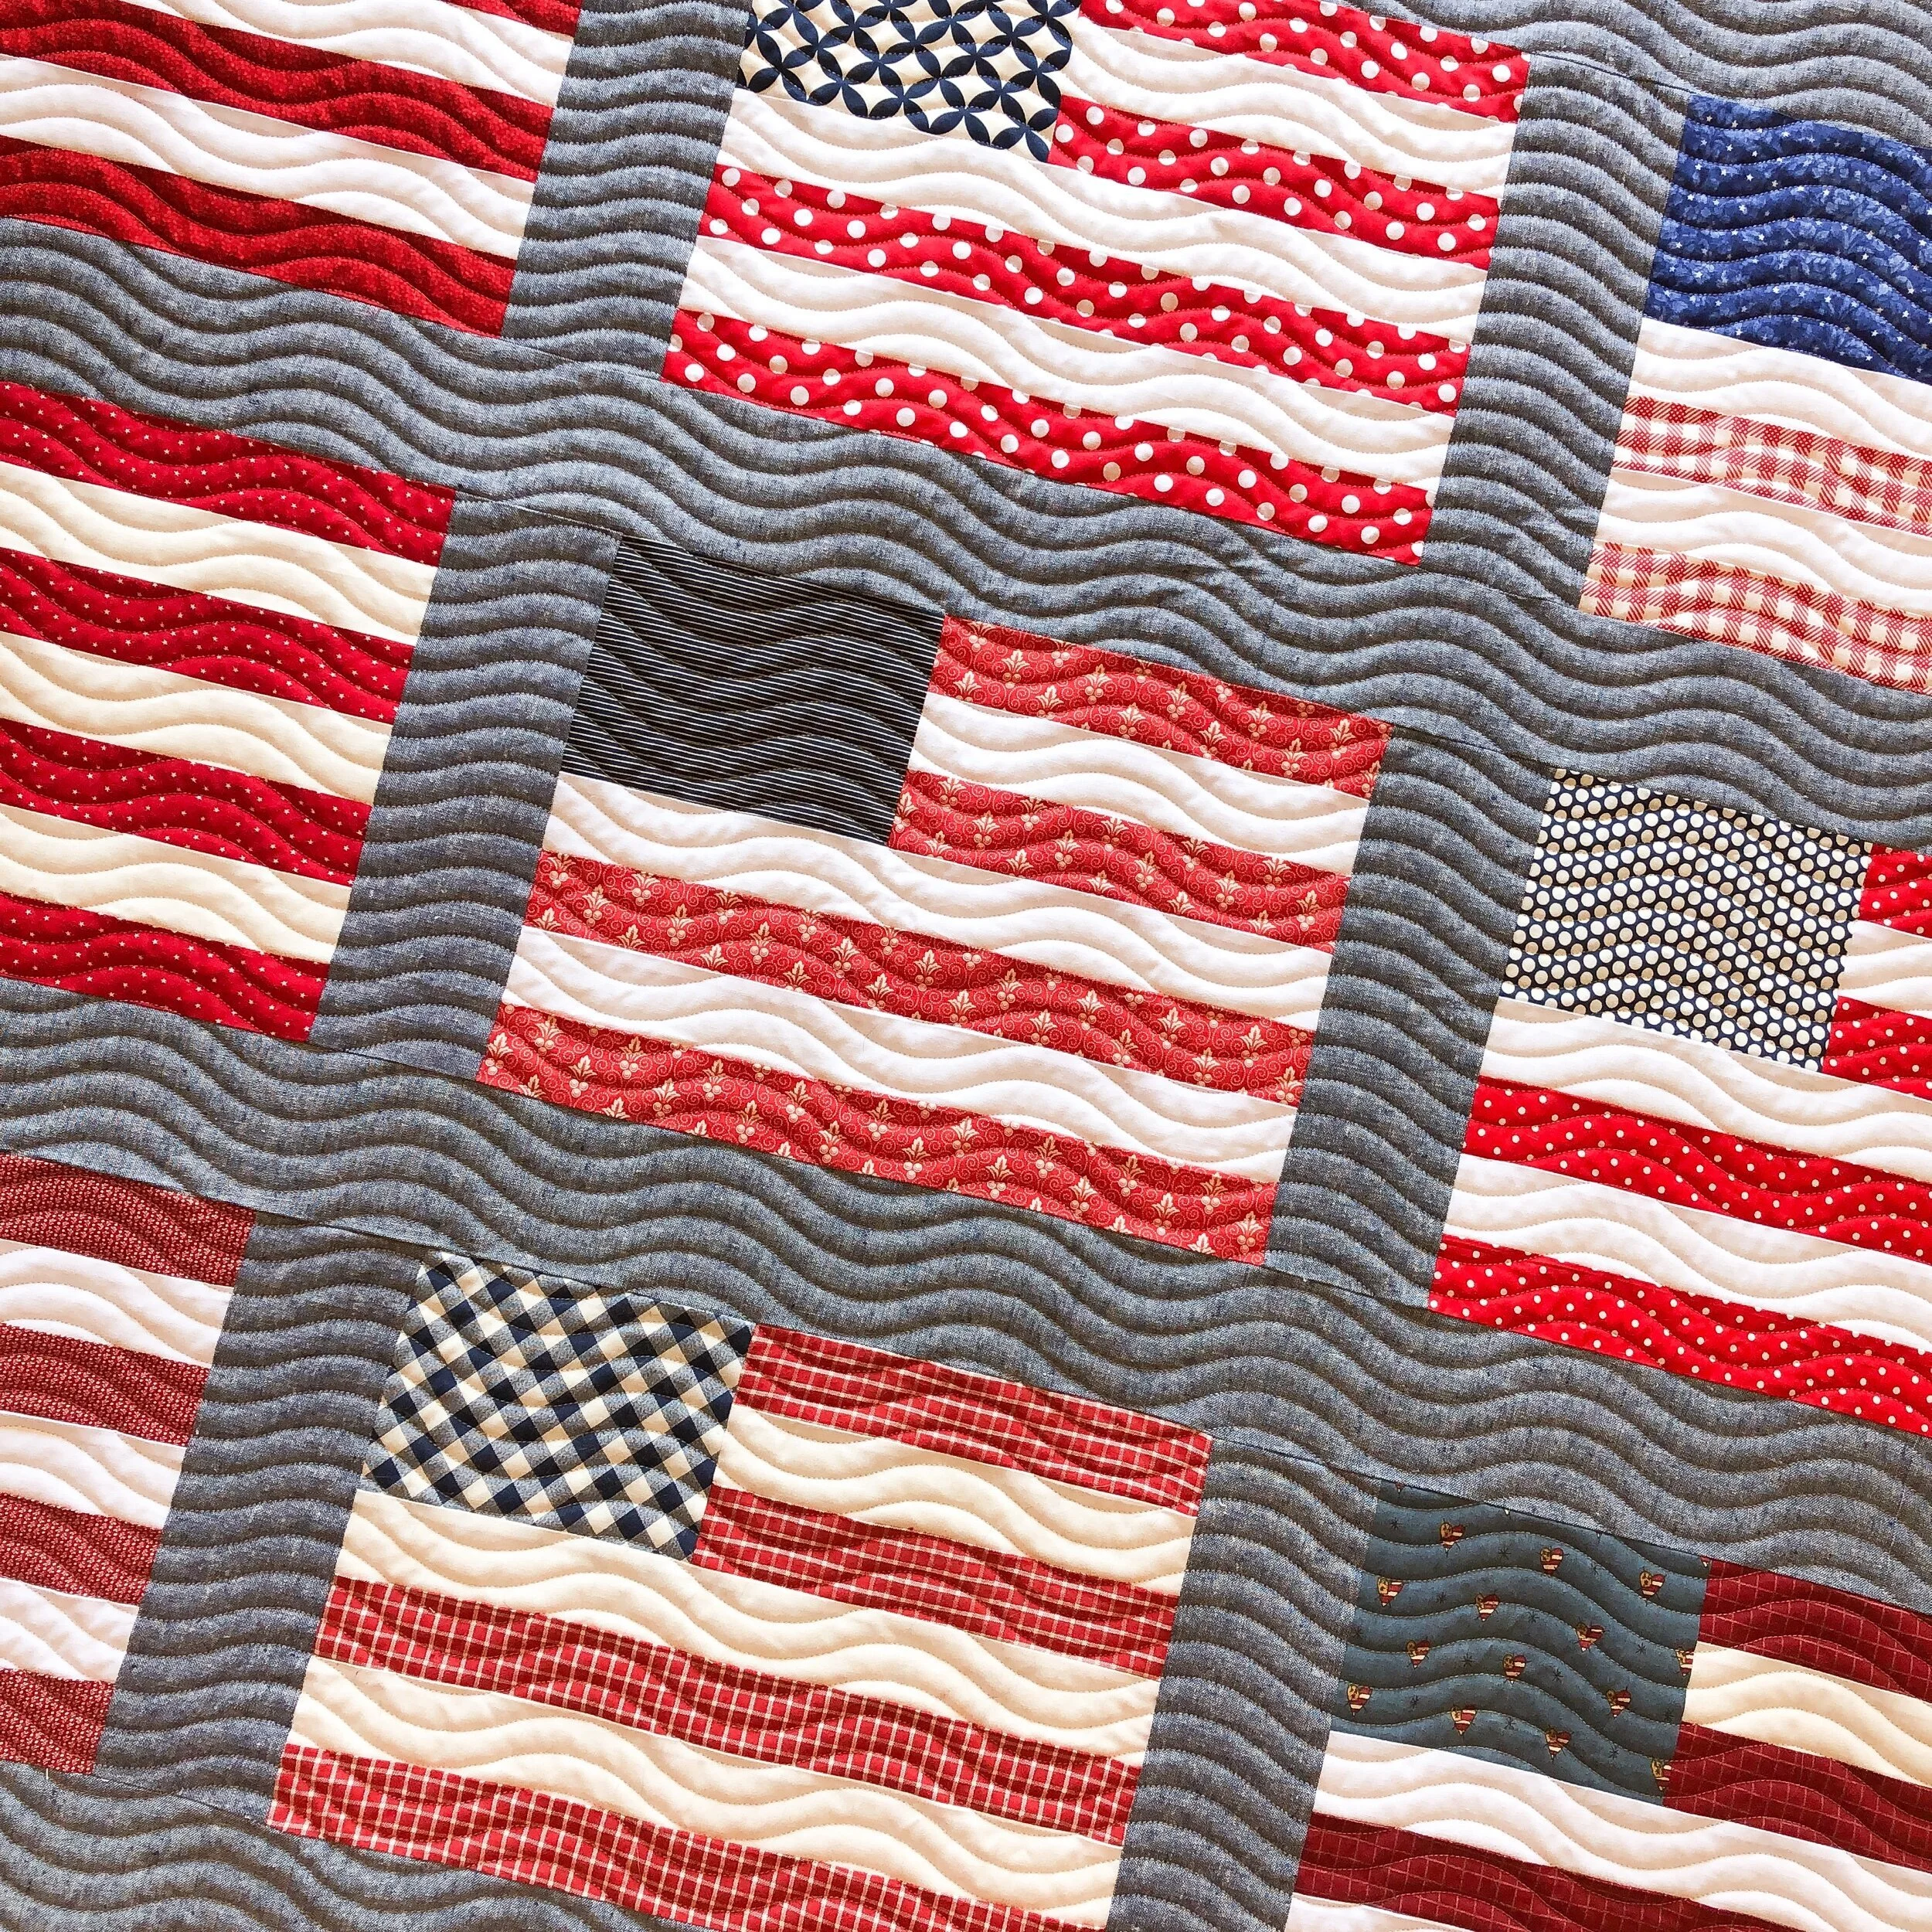
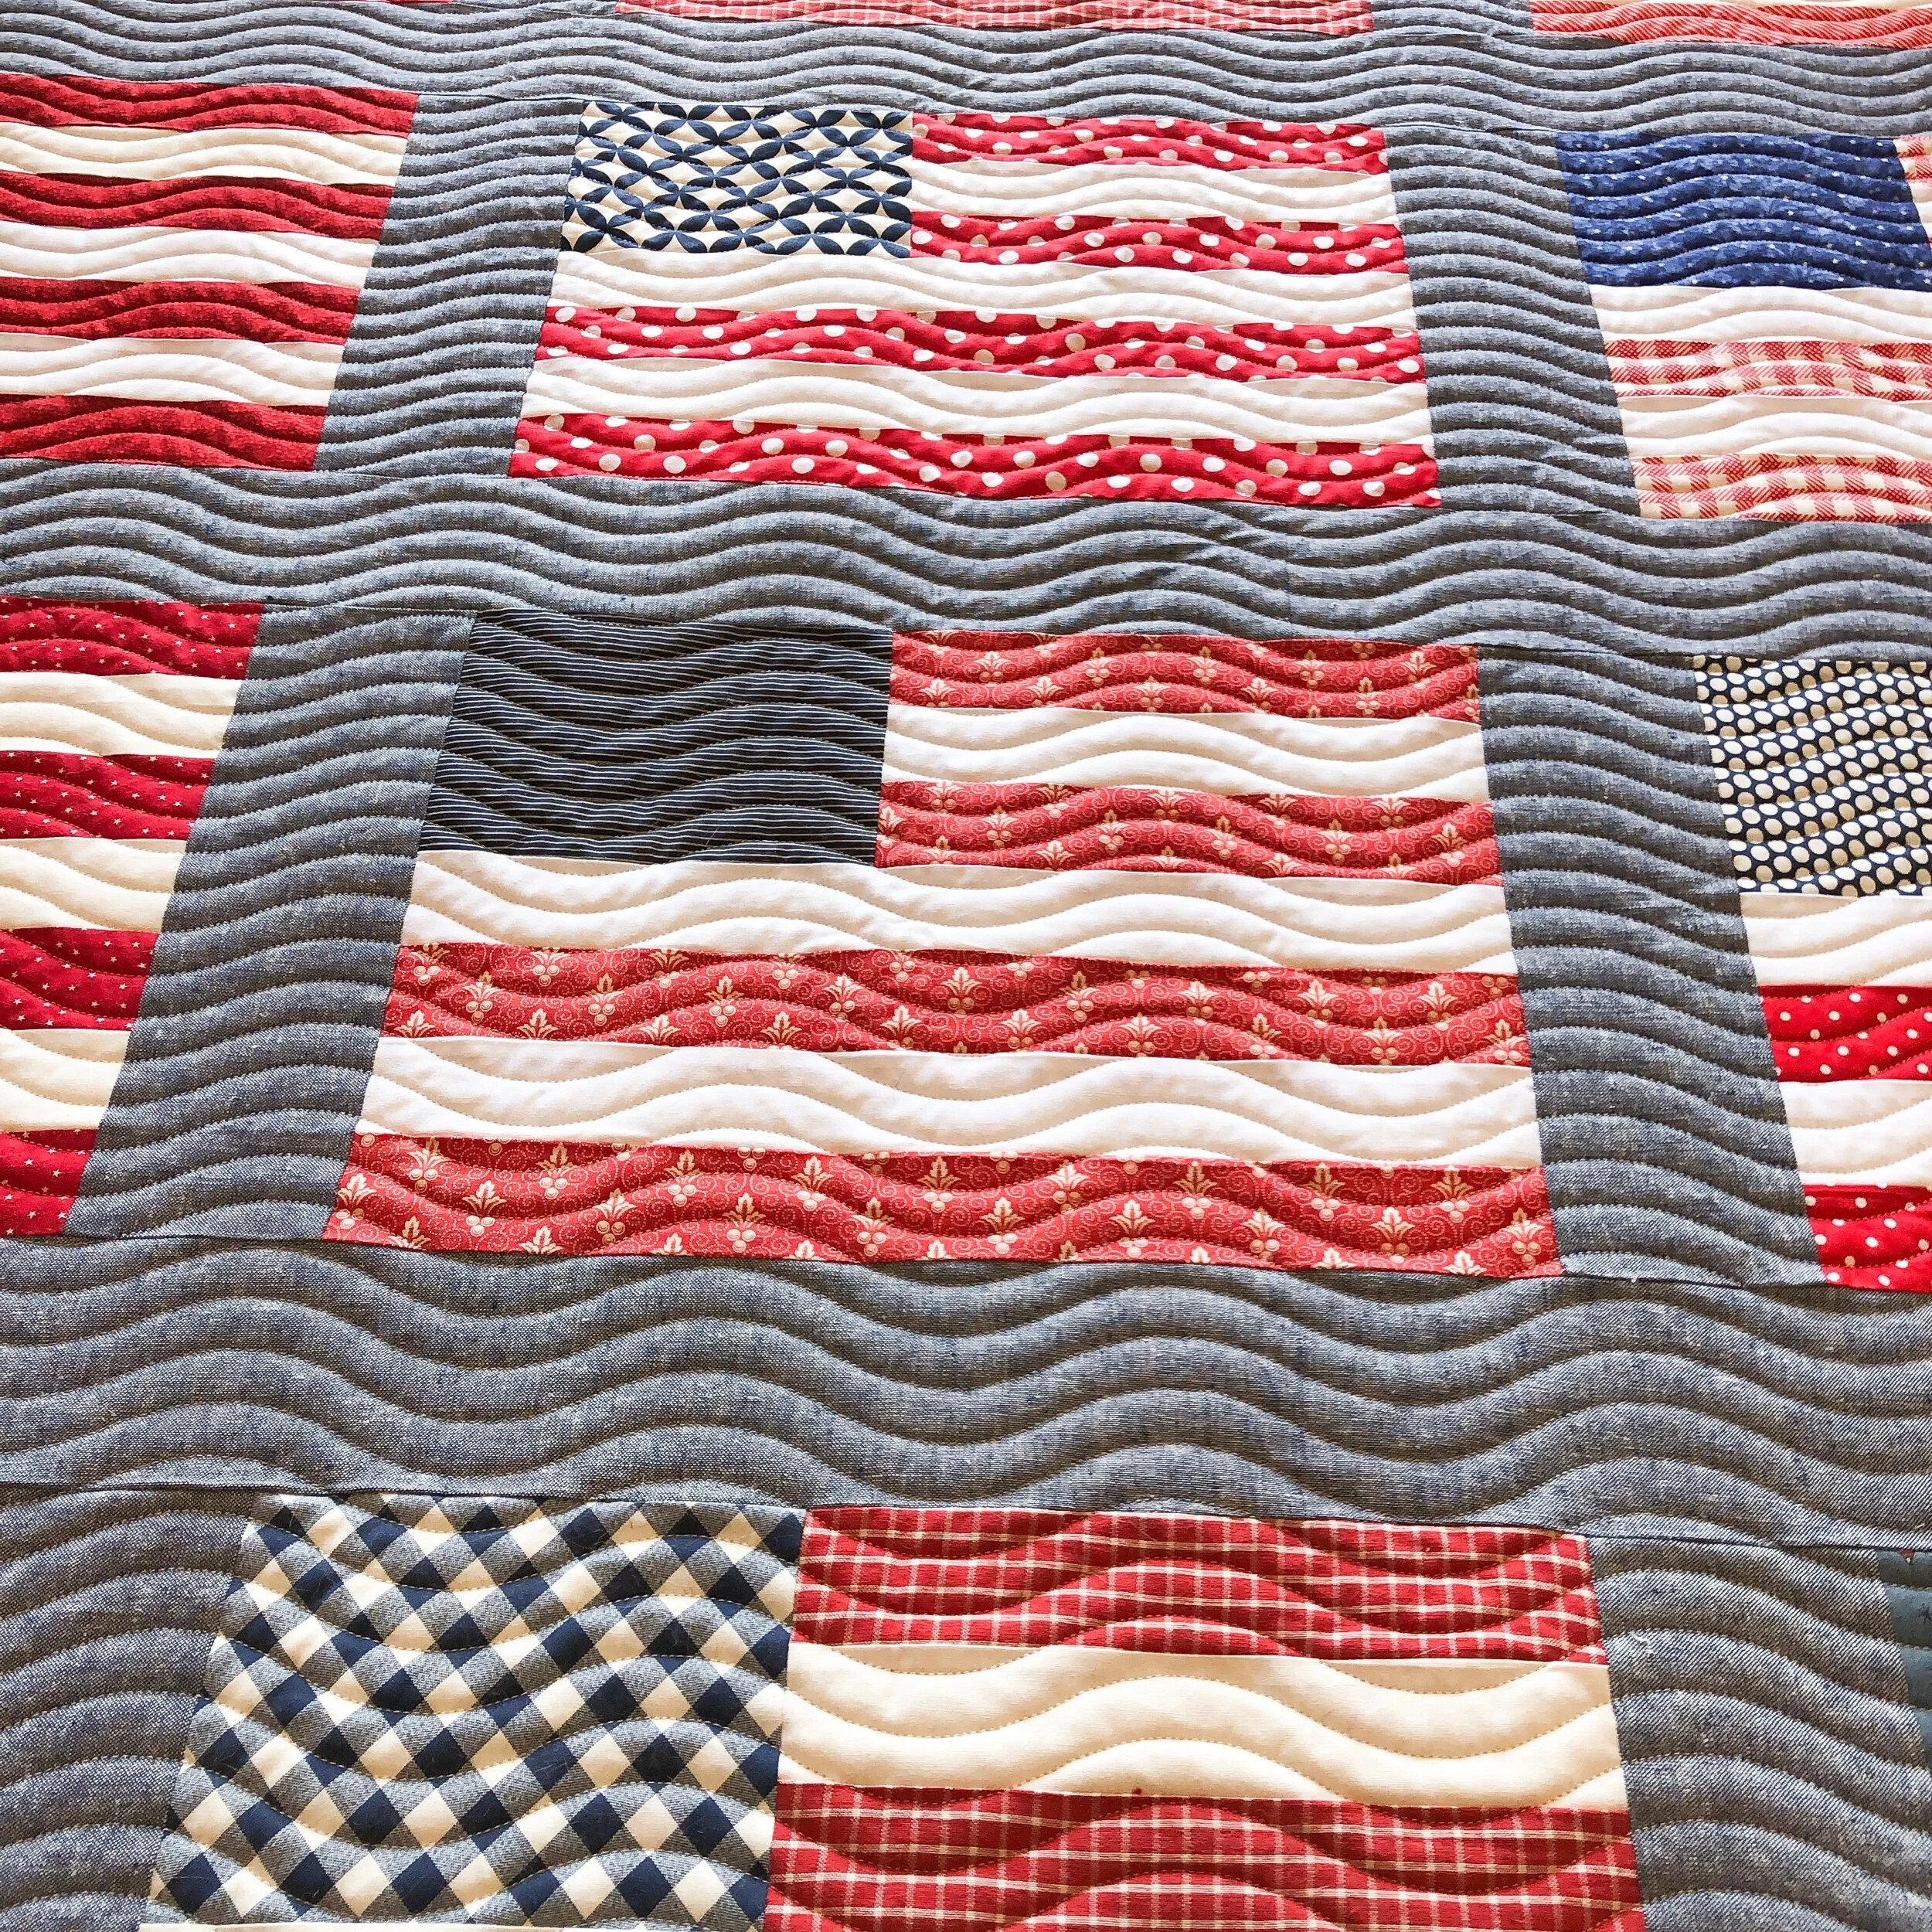
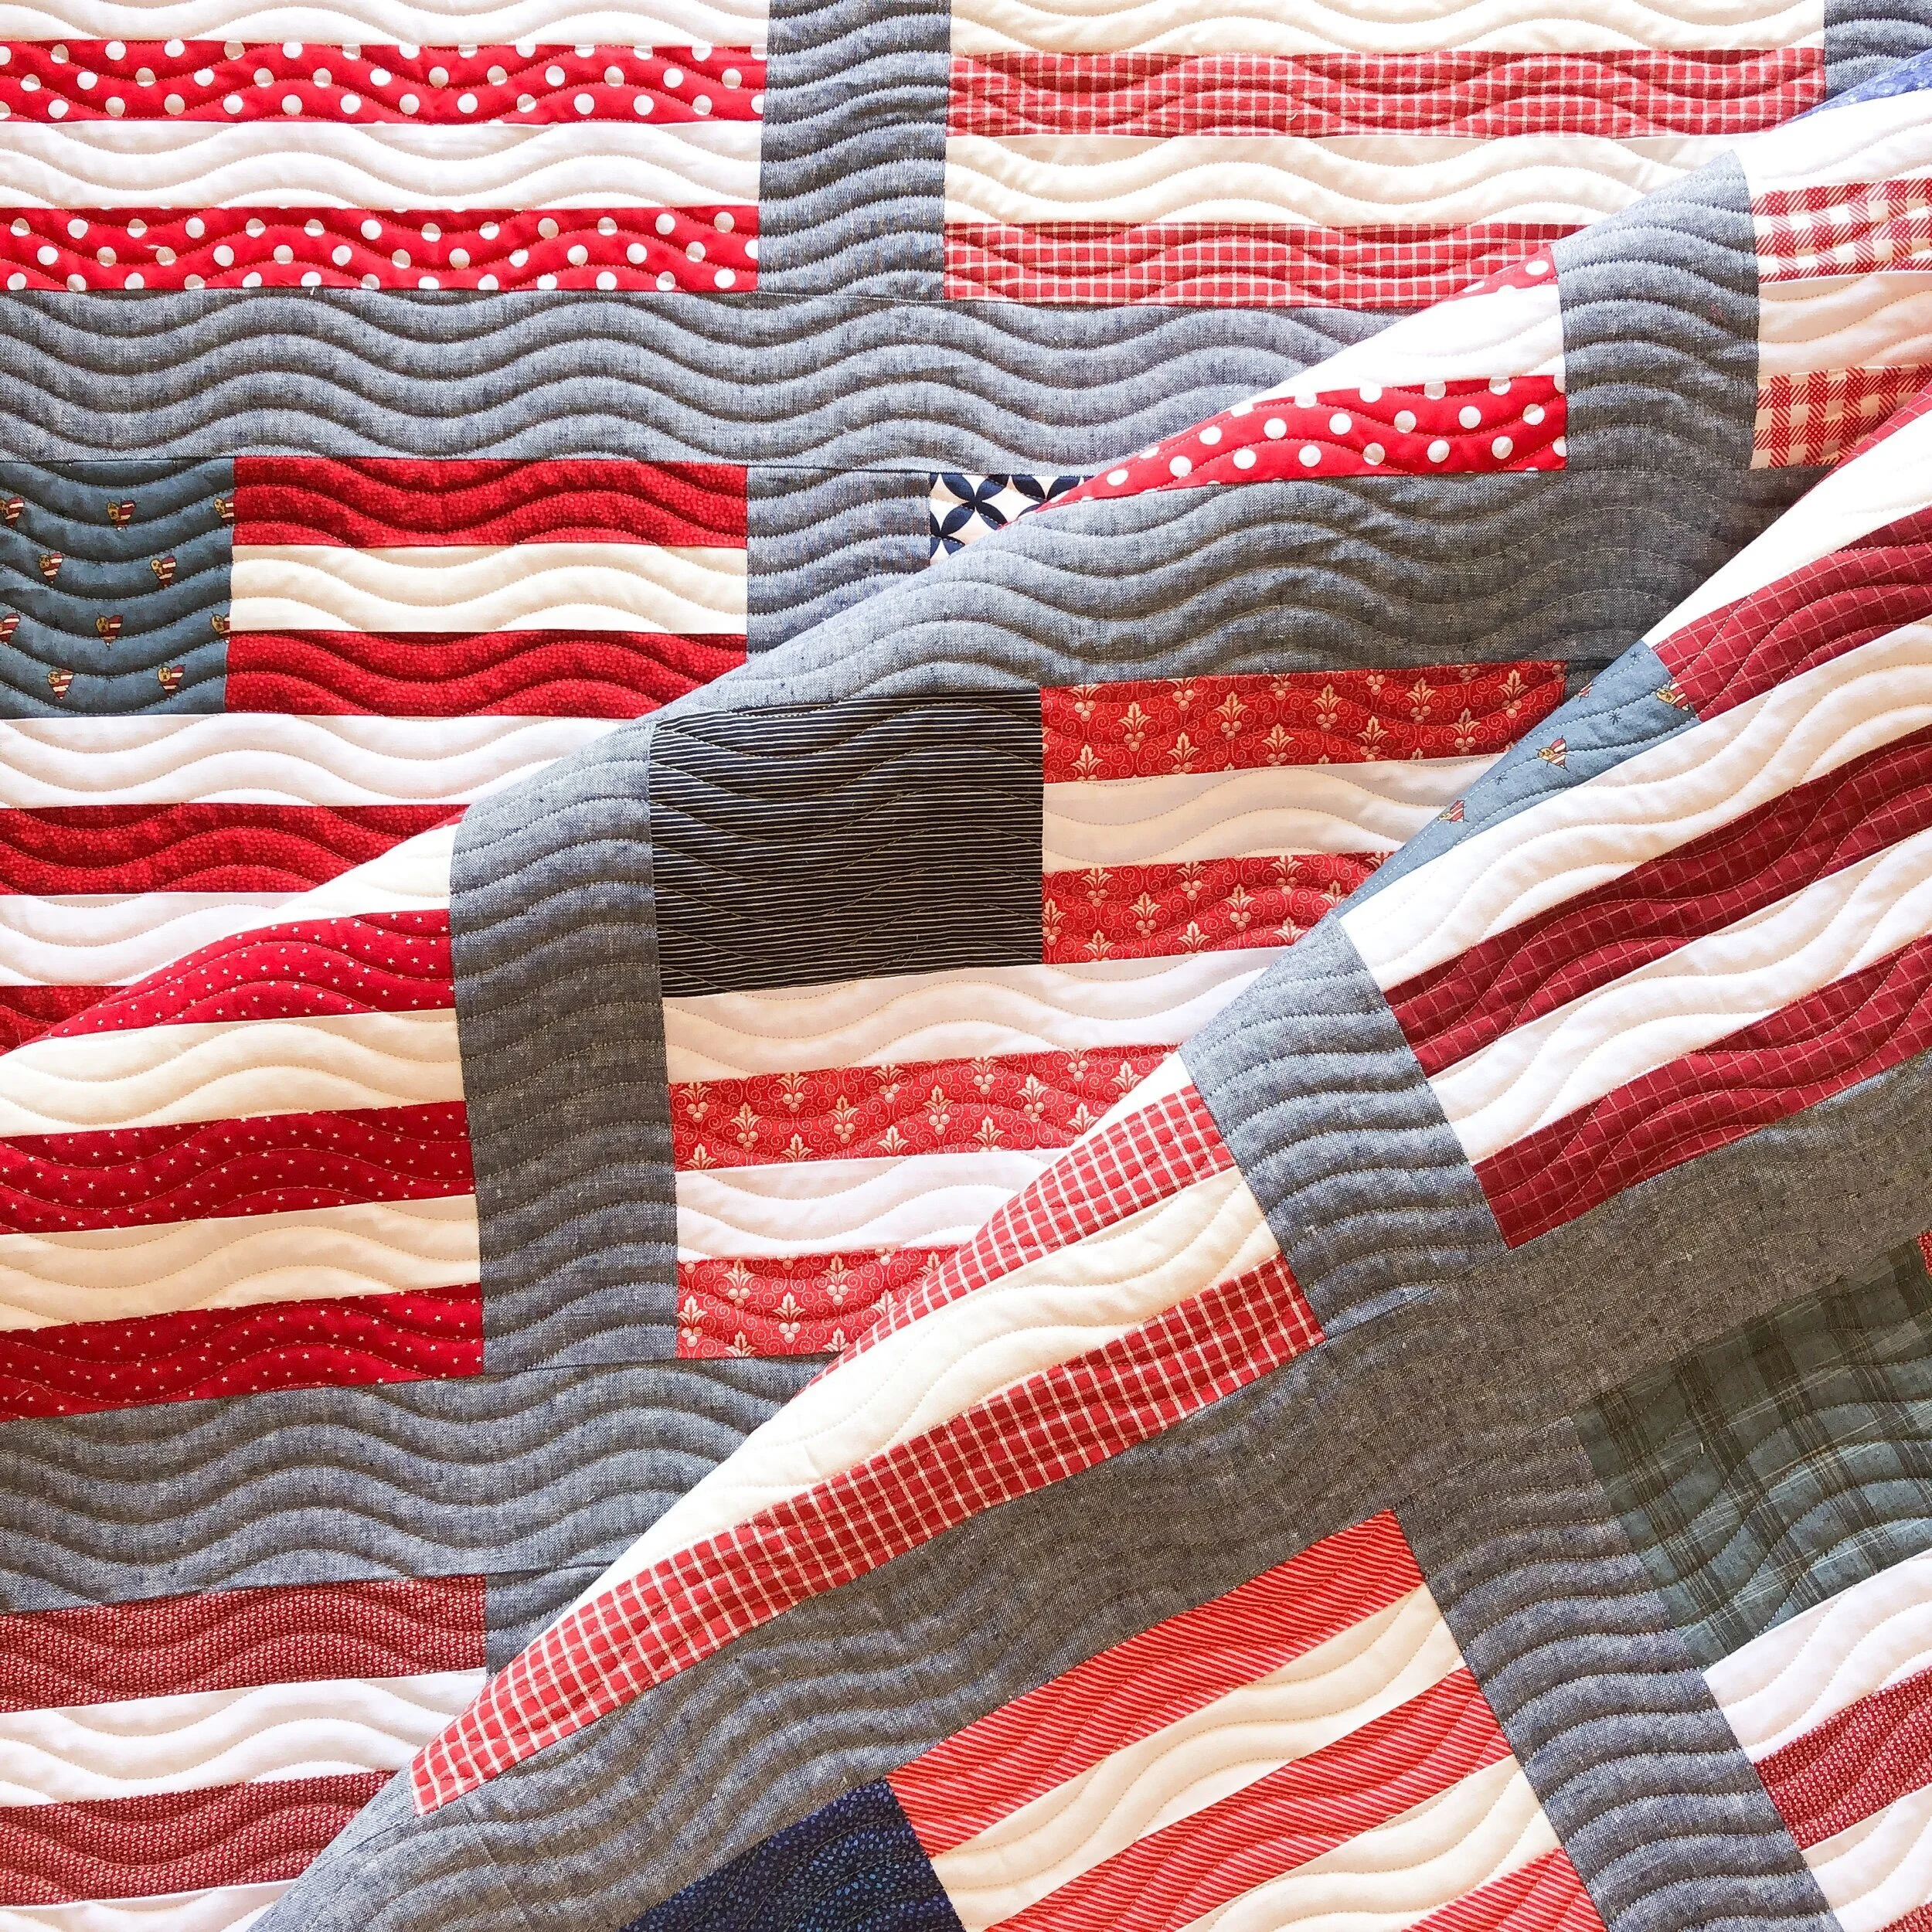
My Stars and Stripes Quilt
Hi Friends,
Happy New Year!! I hope your holidays were wonderful! It’s always great to take some time at the end of each year and spend time with family.
To start this year off, I have a quilt of my own to share.

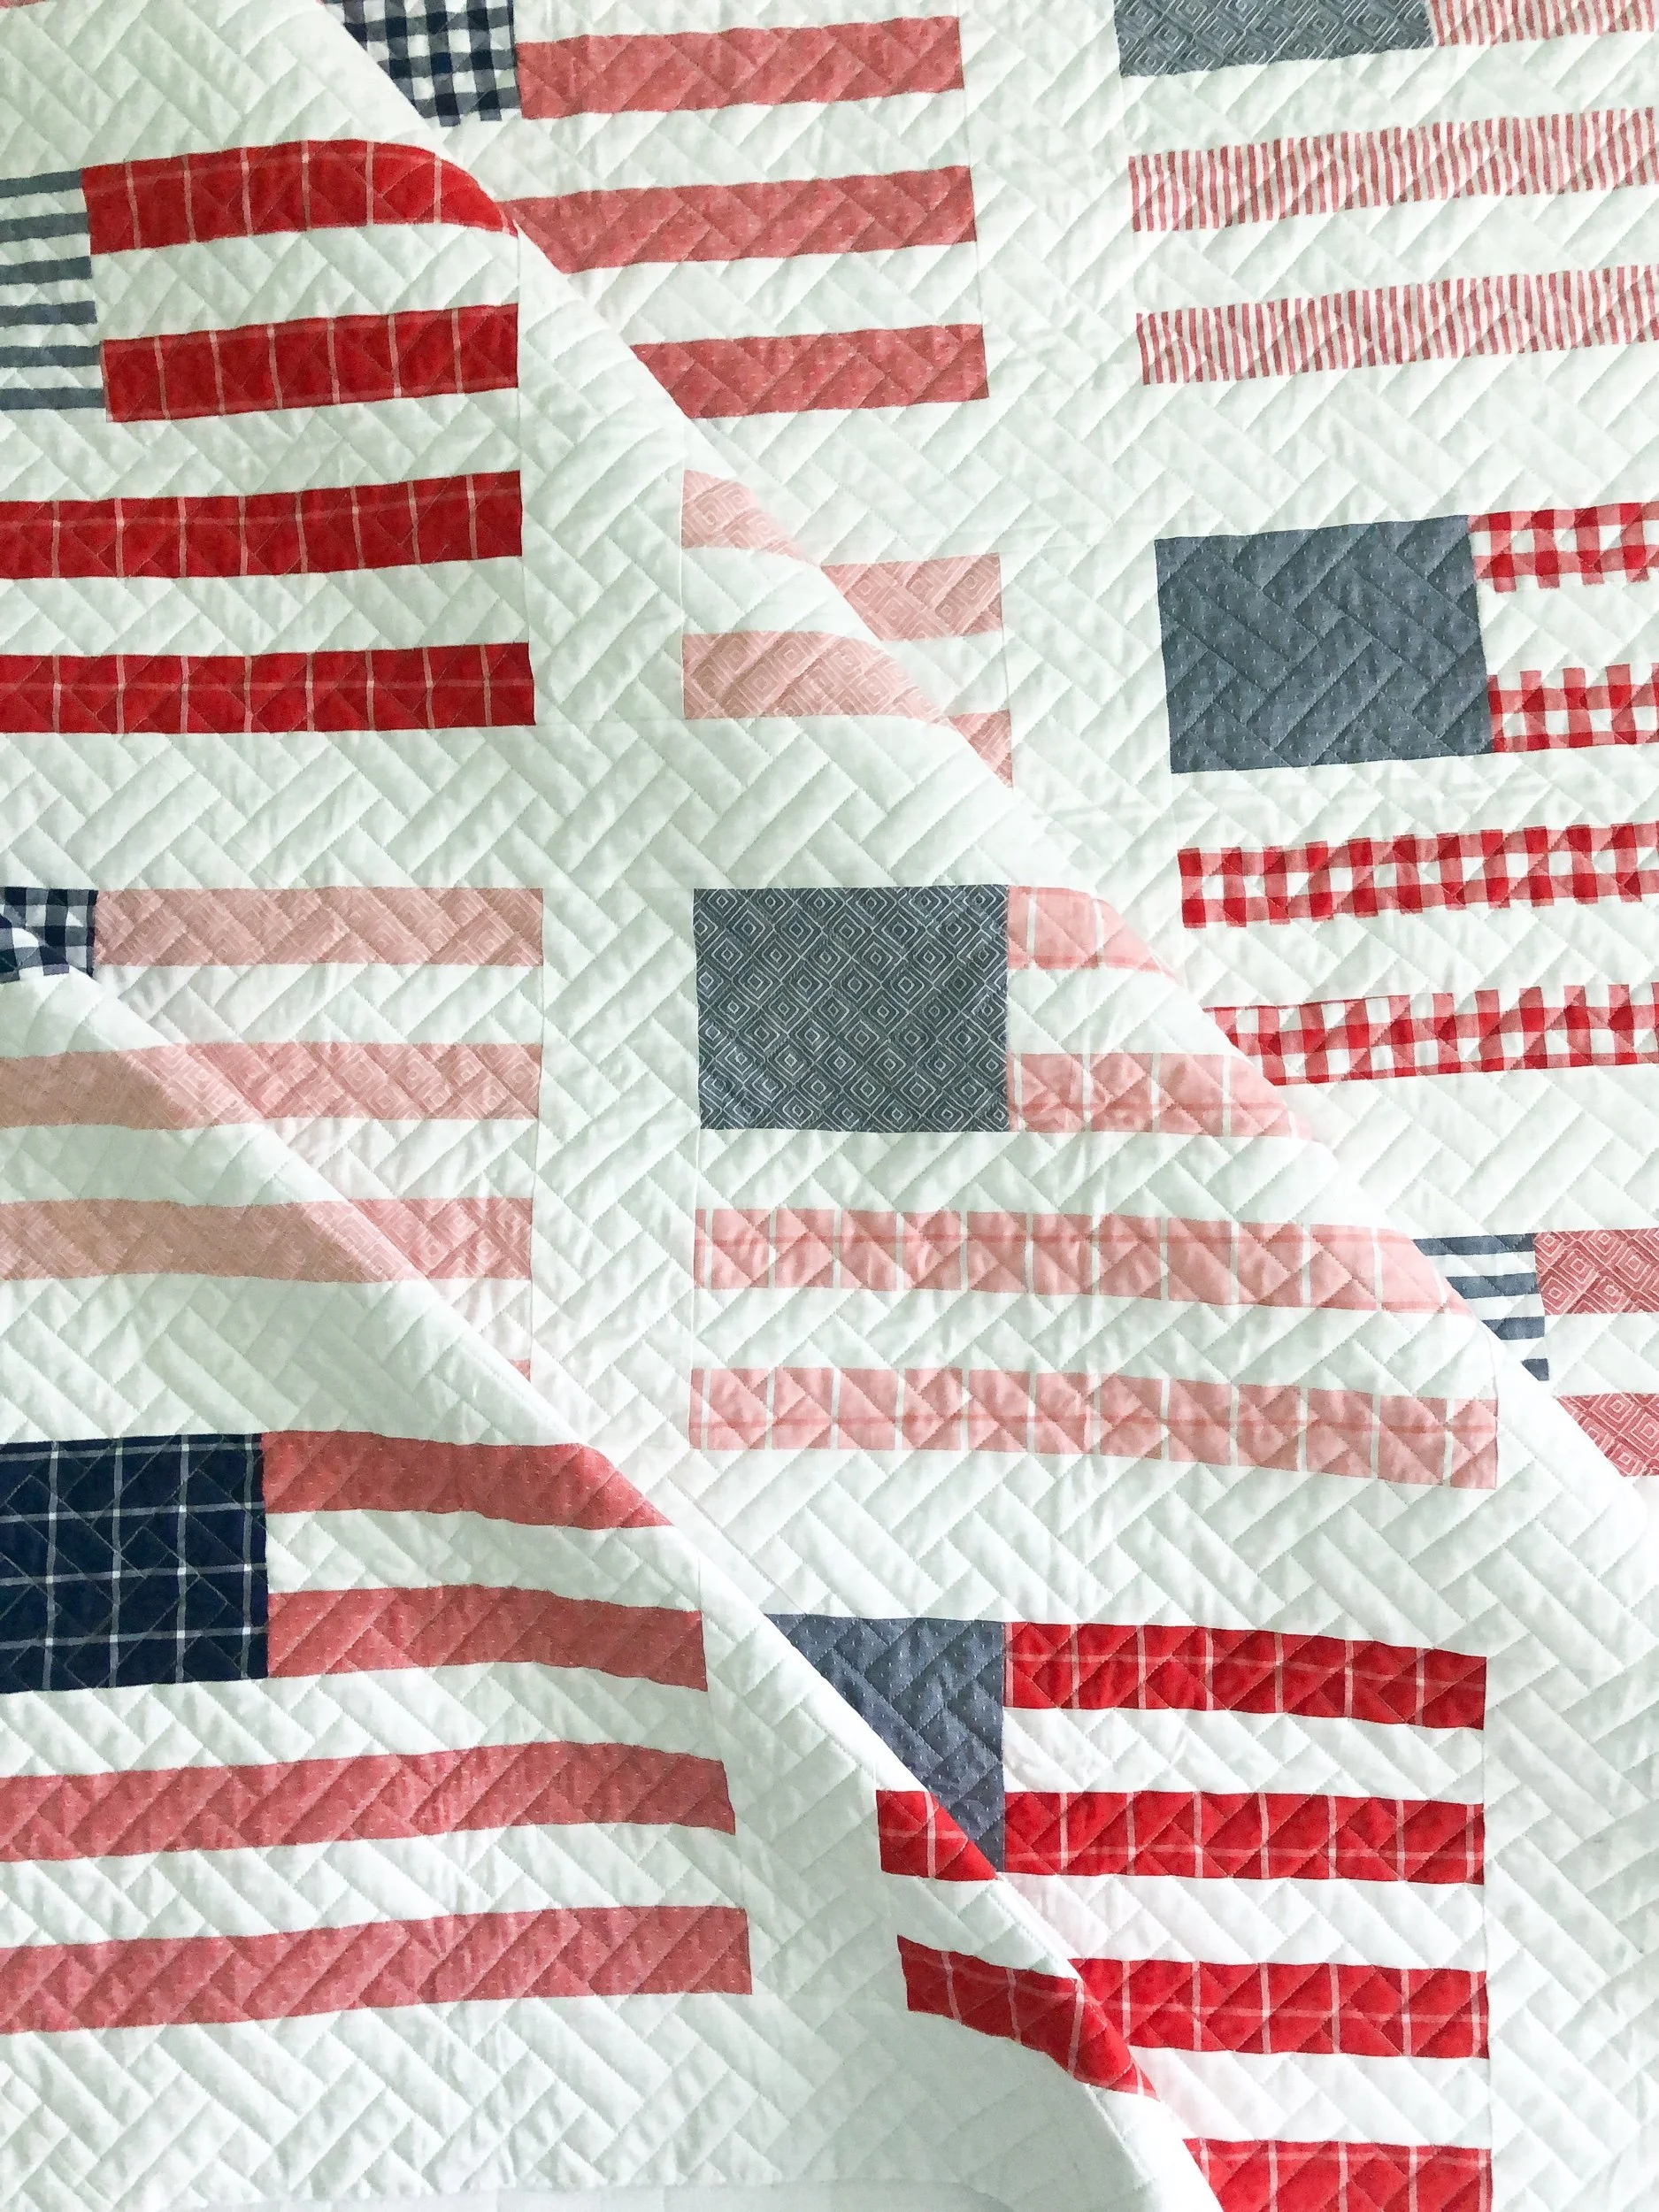
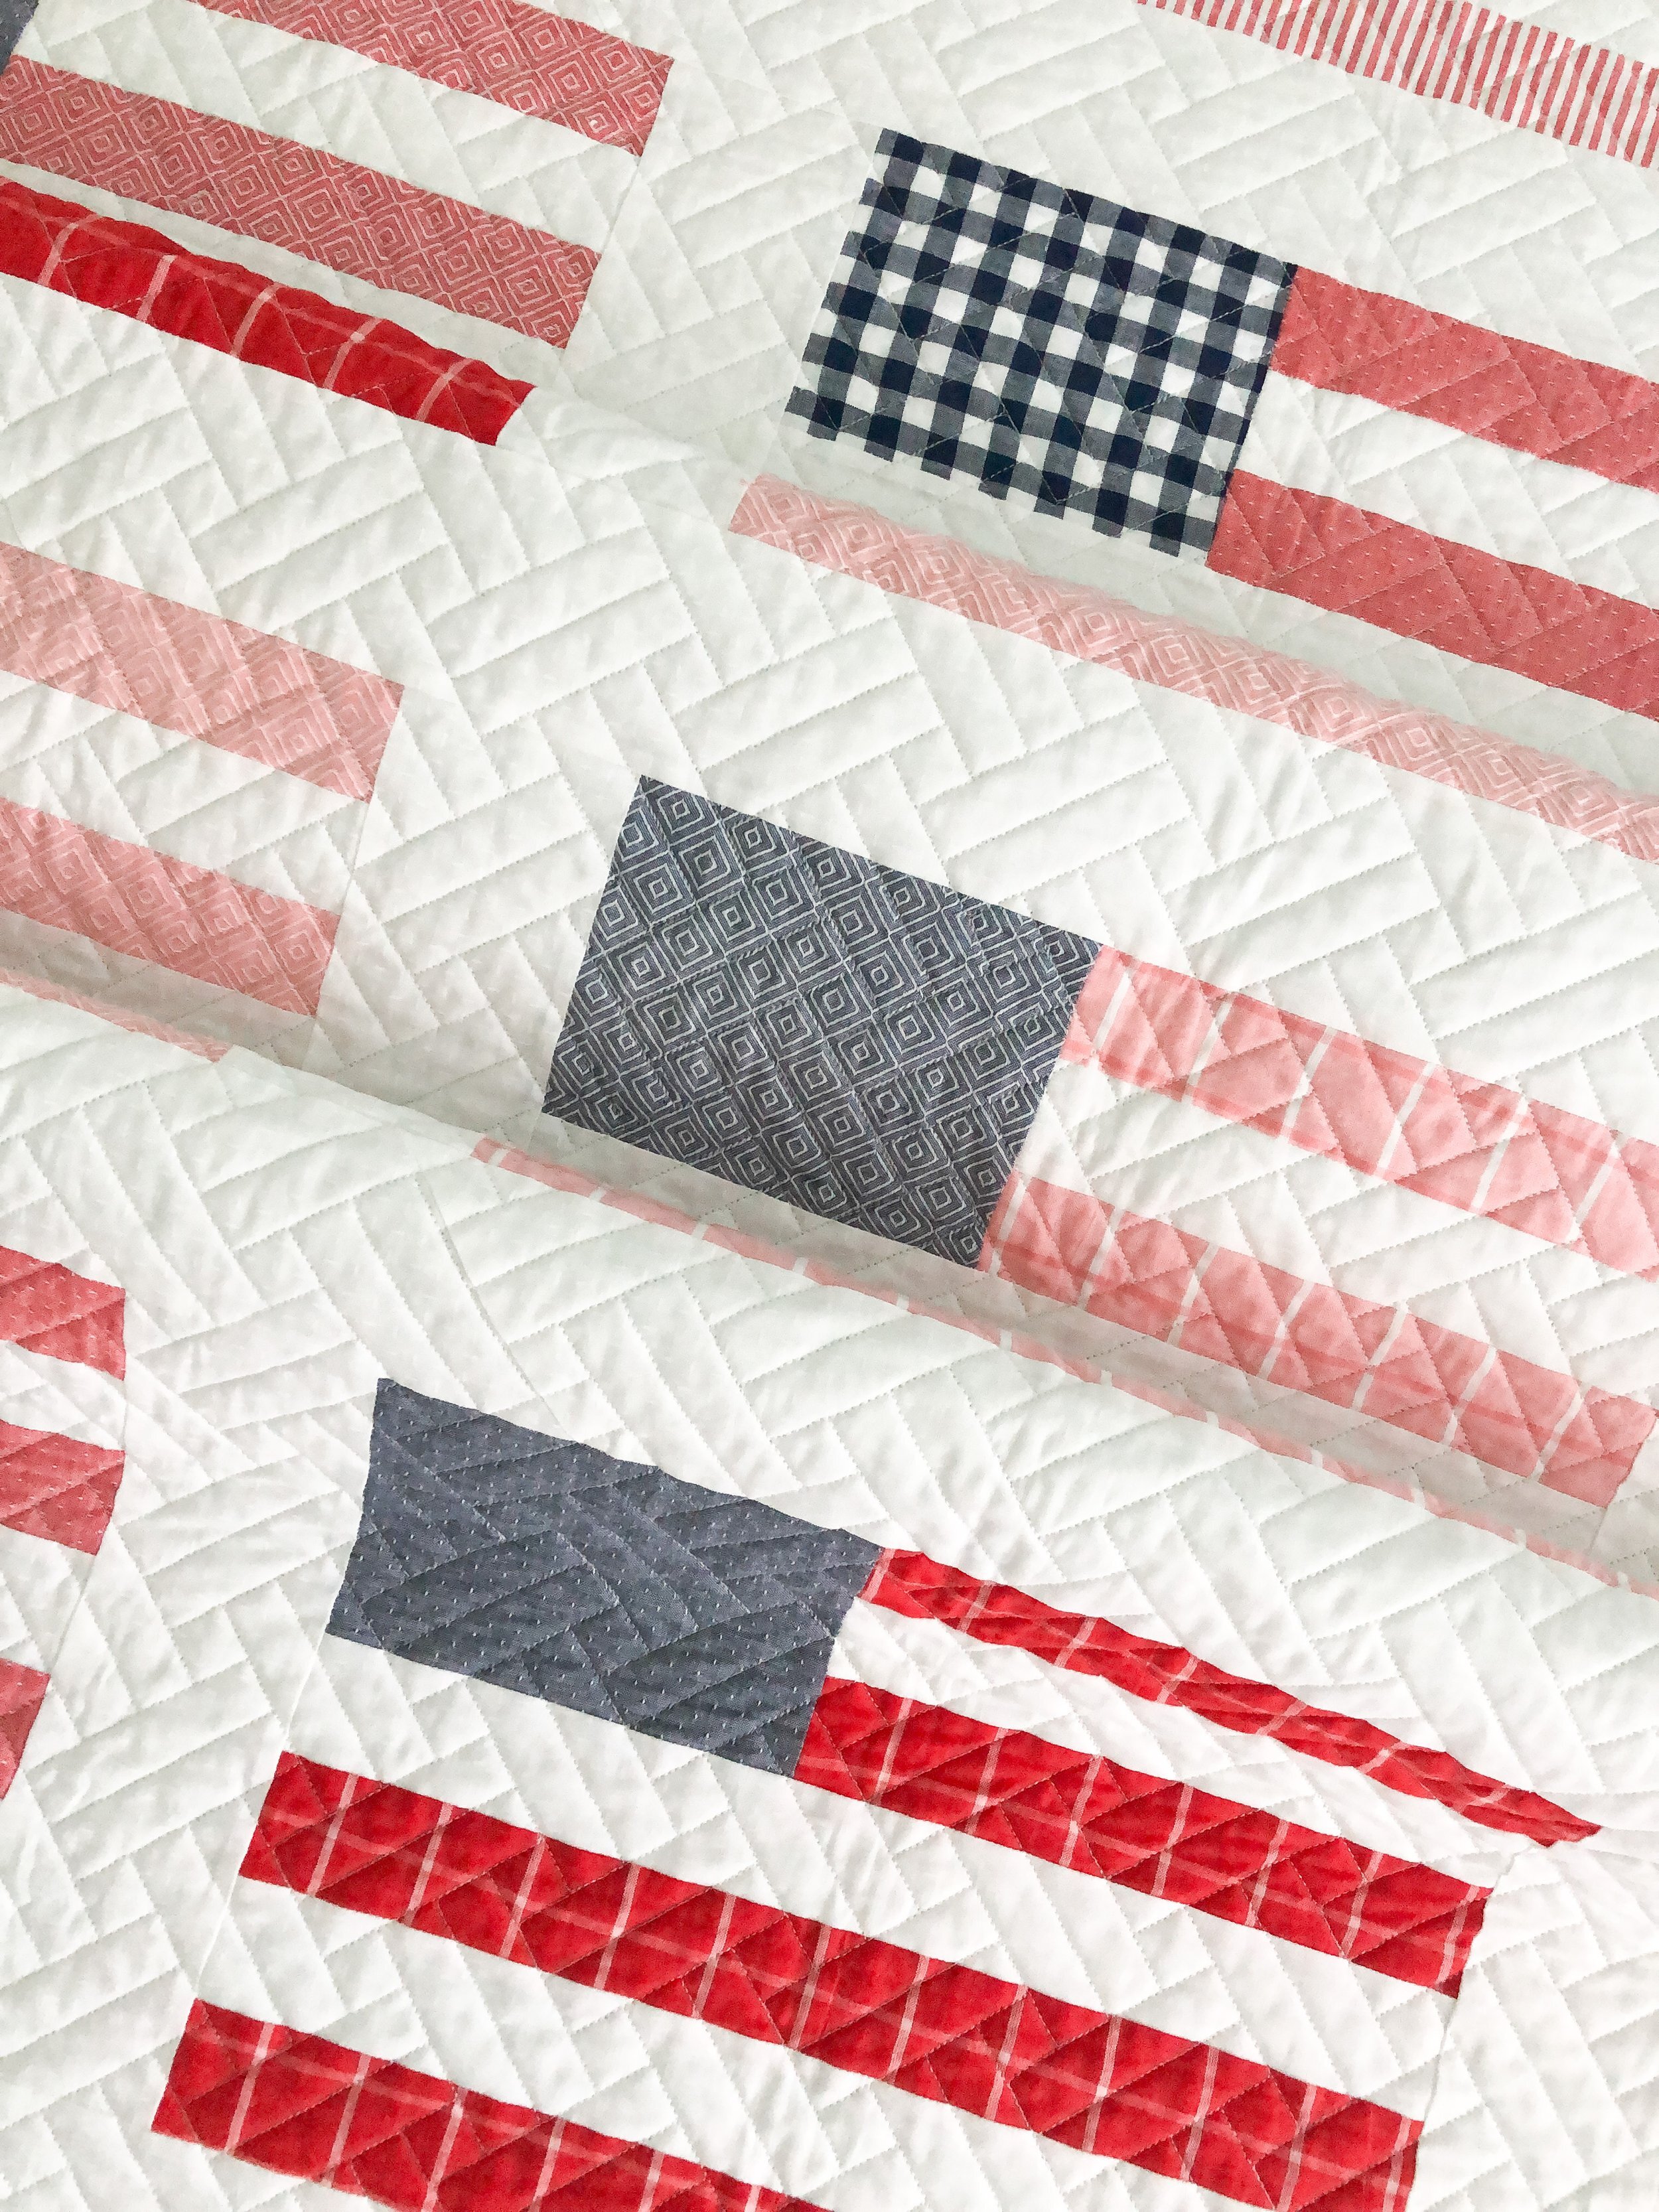
The pattern is called Stars and Stripes by Camille from Thimble Blossoms. It’s such a fun simple yet modern take on a flag quilt. I used her and her mom Bonnie’s woven fabrics to make it as well. The pink wovens work great, as a lighter version of the red wovens.

I used my favorite natural white Omni thread from Superior Threads, and 100% bamboo batting from Winline Textiles out of Ogden Utah.

I can’t remember what I initially planned on for the quilting, but by the time that I got around to quilting it, I decided on my Wicker design. There is minimal backtracking, and it lined up pretty good for me.

I can’t get over that quilting texture!! When I design a quilting design, I think about the overall texture, instead of just the single motif. That helps me visualize it so much better.

I used a muslin mates fabric from Moda, for the background. It has a little white on white dash. I get it from my favorite fabric store Sisters and Quilters. (Their image on etsy is rather yellow, but that is to help show the print.)

One thing I struggled with on this quilt, picking a backing and binding fabric. Something that went well with the wovens. I found this sweet backing, that has a little bud and leaf. I ordered a couple of different wovens that I used in the top for the binding, but I just didn’t love them with the front and backing. So I went with the same fabric that I used in the sashing, for the binding. I think it turned out great!! I’m a pretty decisive person, but for some reason I have the hardest time picking out backings or bindings for quilts.

I love my “handmade by Leisha Kaye” labels. I got them from Custom Labels 4 U.
Can we just pause and appreciate all that beautiful quilty texture? It’s one of my very favorites!!

Would you like Wicker or one of my other quilting designs, quilted on one of your quilts? I would love to quilt for you!! Check out my Longarm Quilting Services page, for more info.
Thanks for being here!! Happy quilting, Leisha
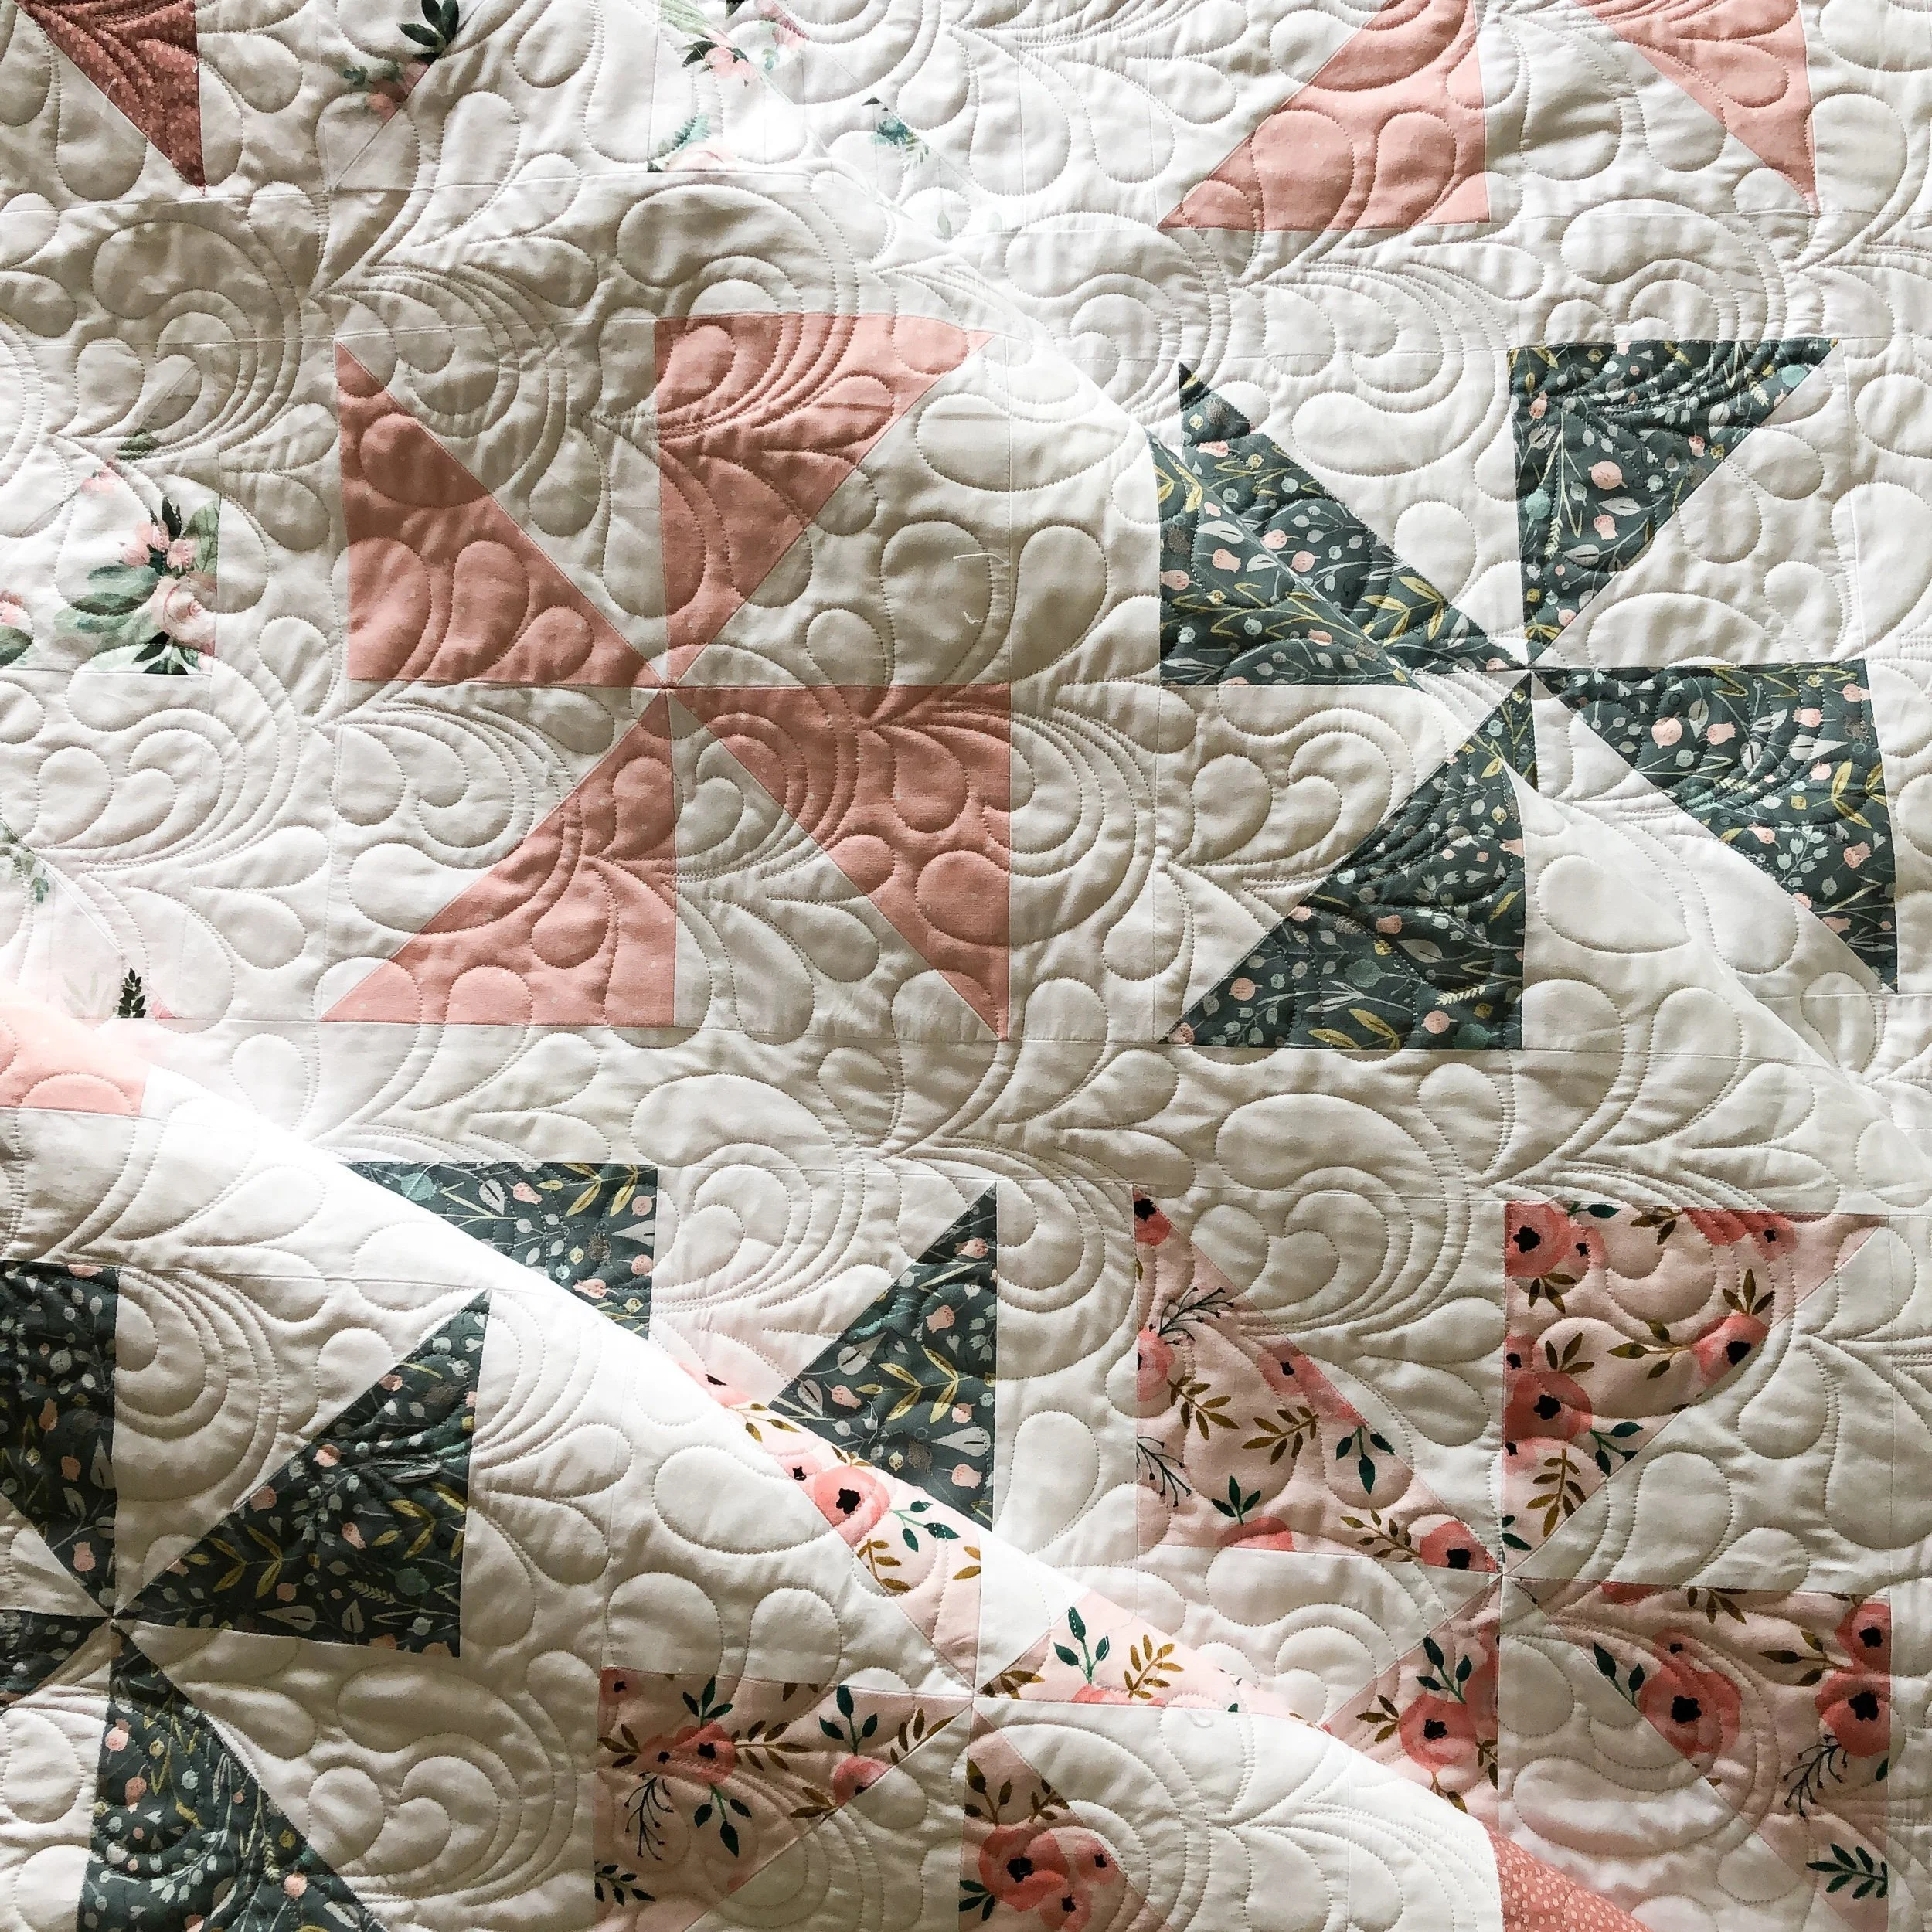
Lori’s Pinwheel Quilt
This Lovely quilt was made by Lori, for her son and daughter-in-law for their wedding. It’s big and beautiful!! It’s so big, I couldn’t really get it all in the picture. There are half square triangles on the outside border, all the way around the quilt.

If I remember correctly, she didn’t use a pattern. I used natural white Omni thread from Superior, and 8020 cotton poly blend batting from Winline out of Ogden Utah.

She asked for feathers, and I was excited to quilt Patricia Ritter and my Ginger quilting design. It’s available at Urban Elementz. We have a handful of feathered designs, but Ginger is my favorite. We have oodles of other designs, if you’re ever looking for something new and fun to quilt.

While I have the image above and the quilt below, I’d like to point out the spacing between the feathers. When Patricia and I were talking about this design during the designing process, I wanted there to be space between the feathers, which I think defines the feathers and helps the design breathe a little. It makes it unique, which I love!

Look at all of that lovely texture!!

I like to quilt this design at a height around 9.5”. Which varies if the quilt itself has a bigger or smaller pattern.
I’ve quilted Ginger on several different quilts, it’s such a versatile design. A modern design take on a classic design.

I hope you have some fun projects in the works!!! Happy quilting!
• Leisha
I would love to quilt for you. Check out my Longarm Quilting Services page for more info. Contact me at quiltingit@gmail.com to get on my list. I look forward to working with you!!

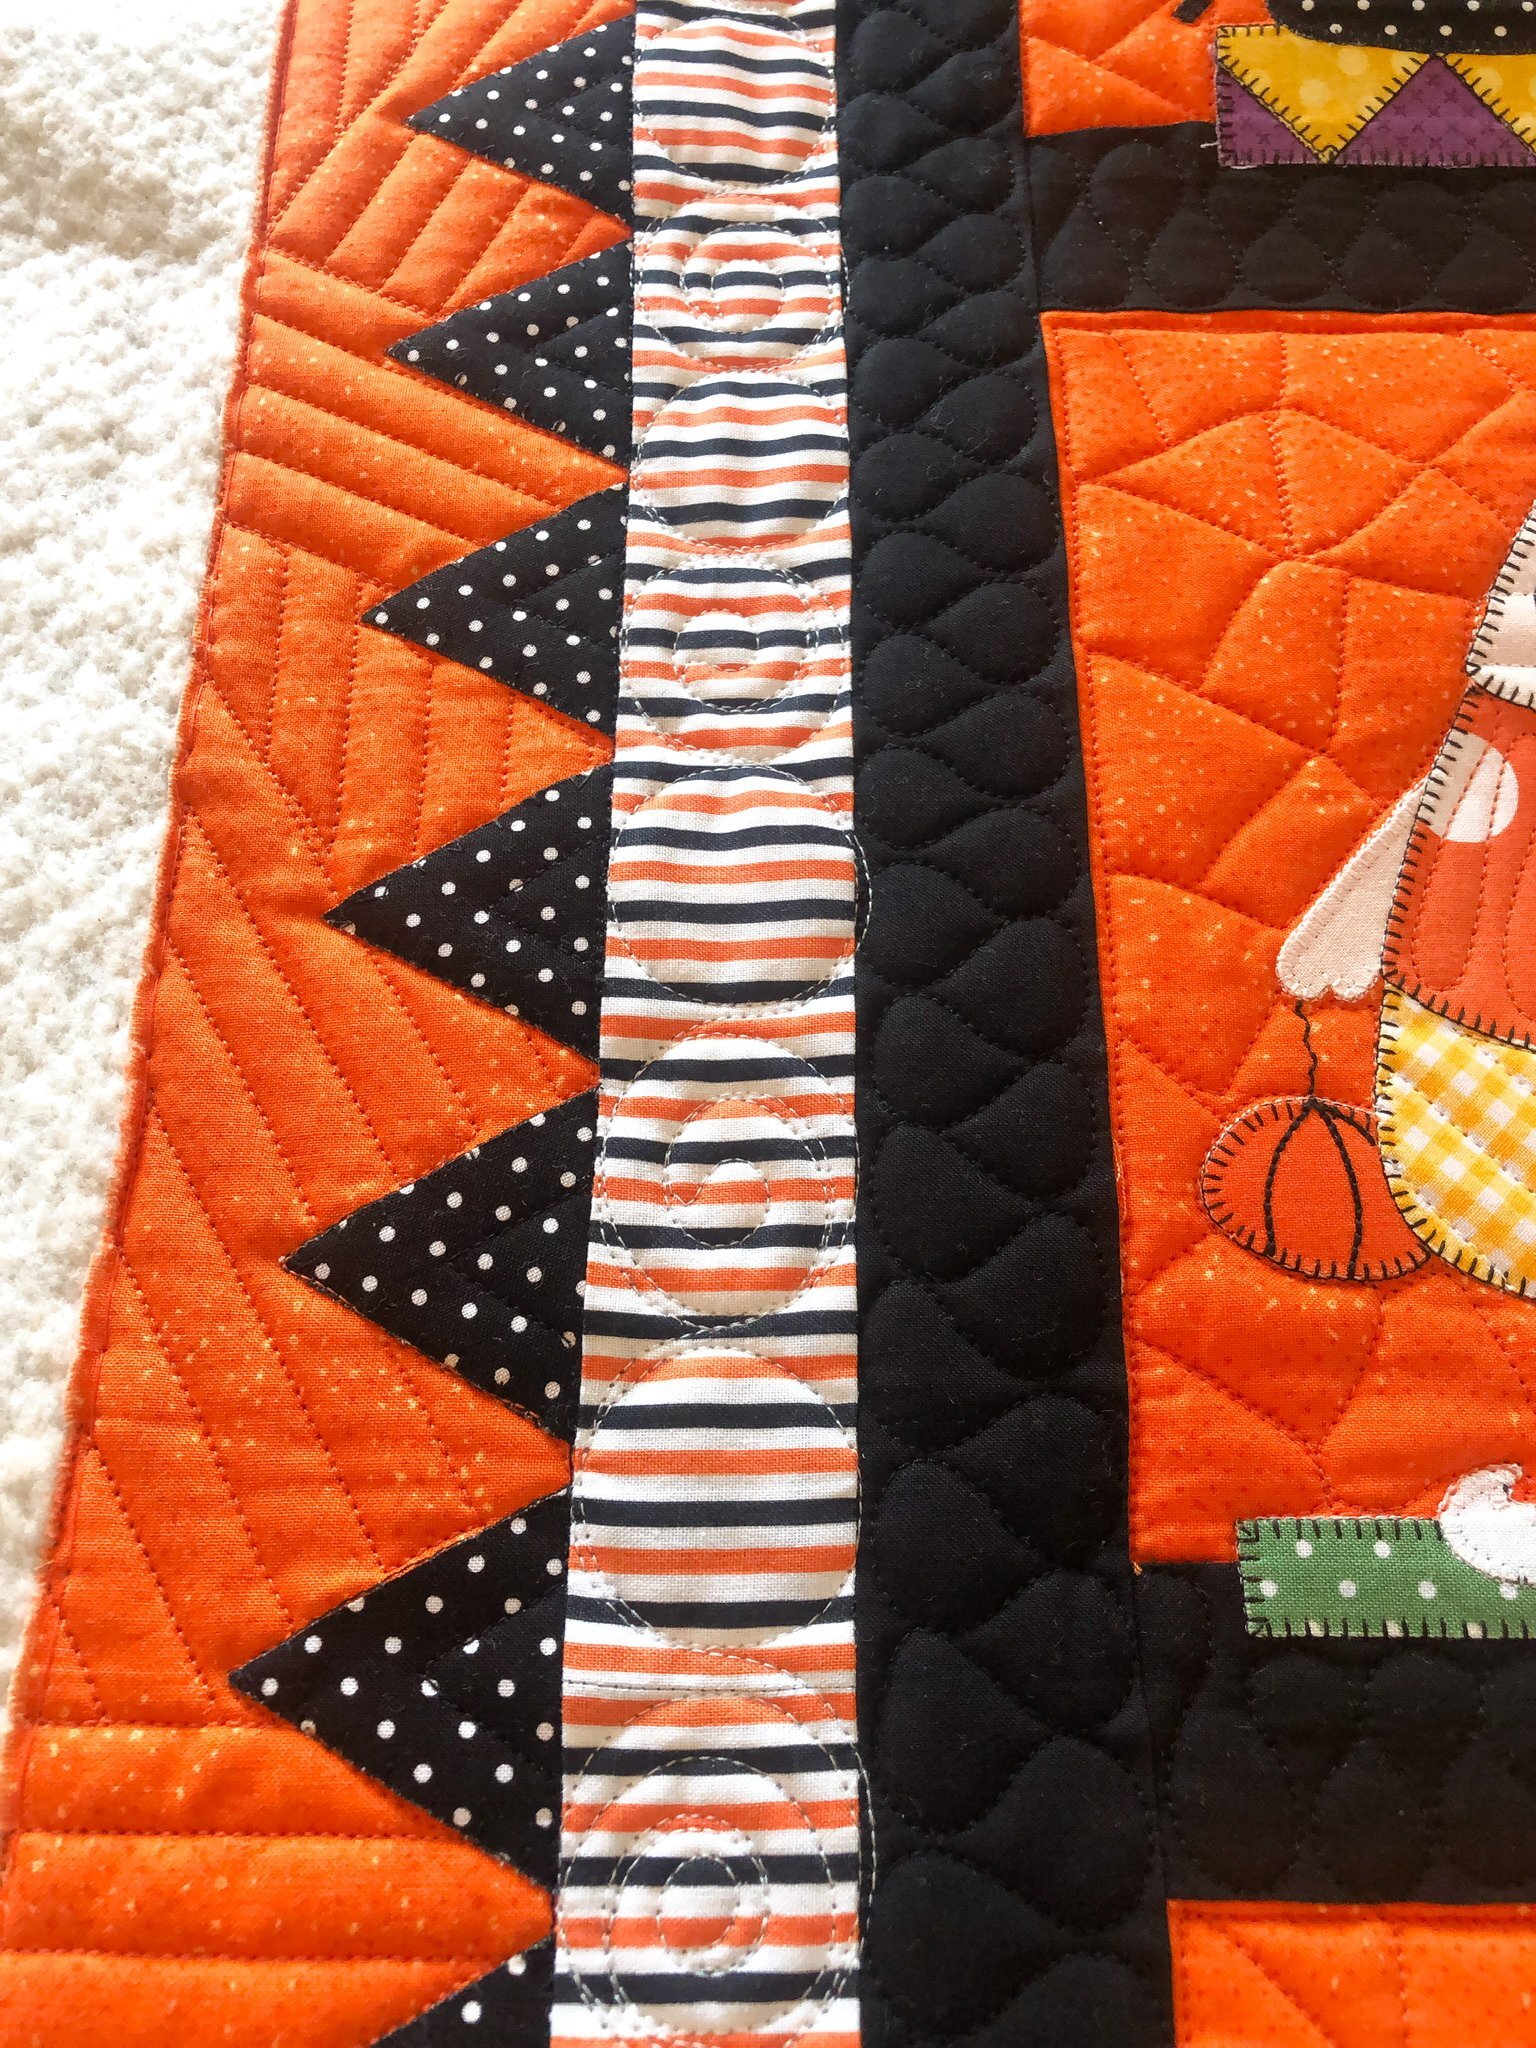
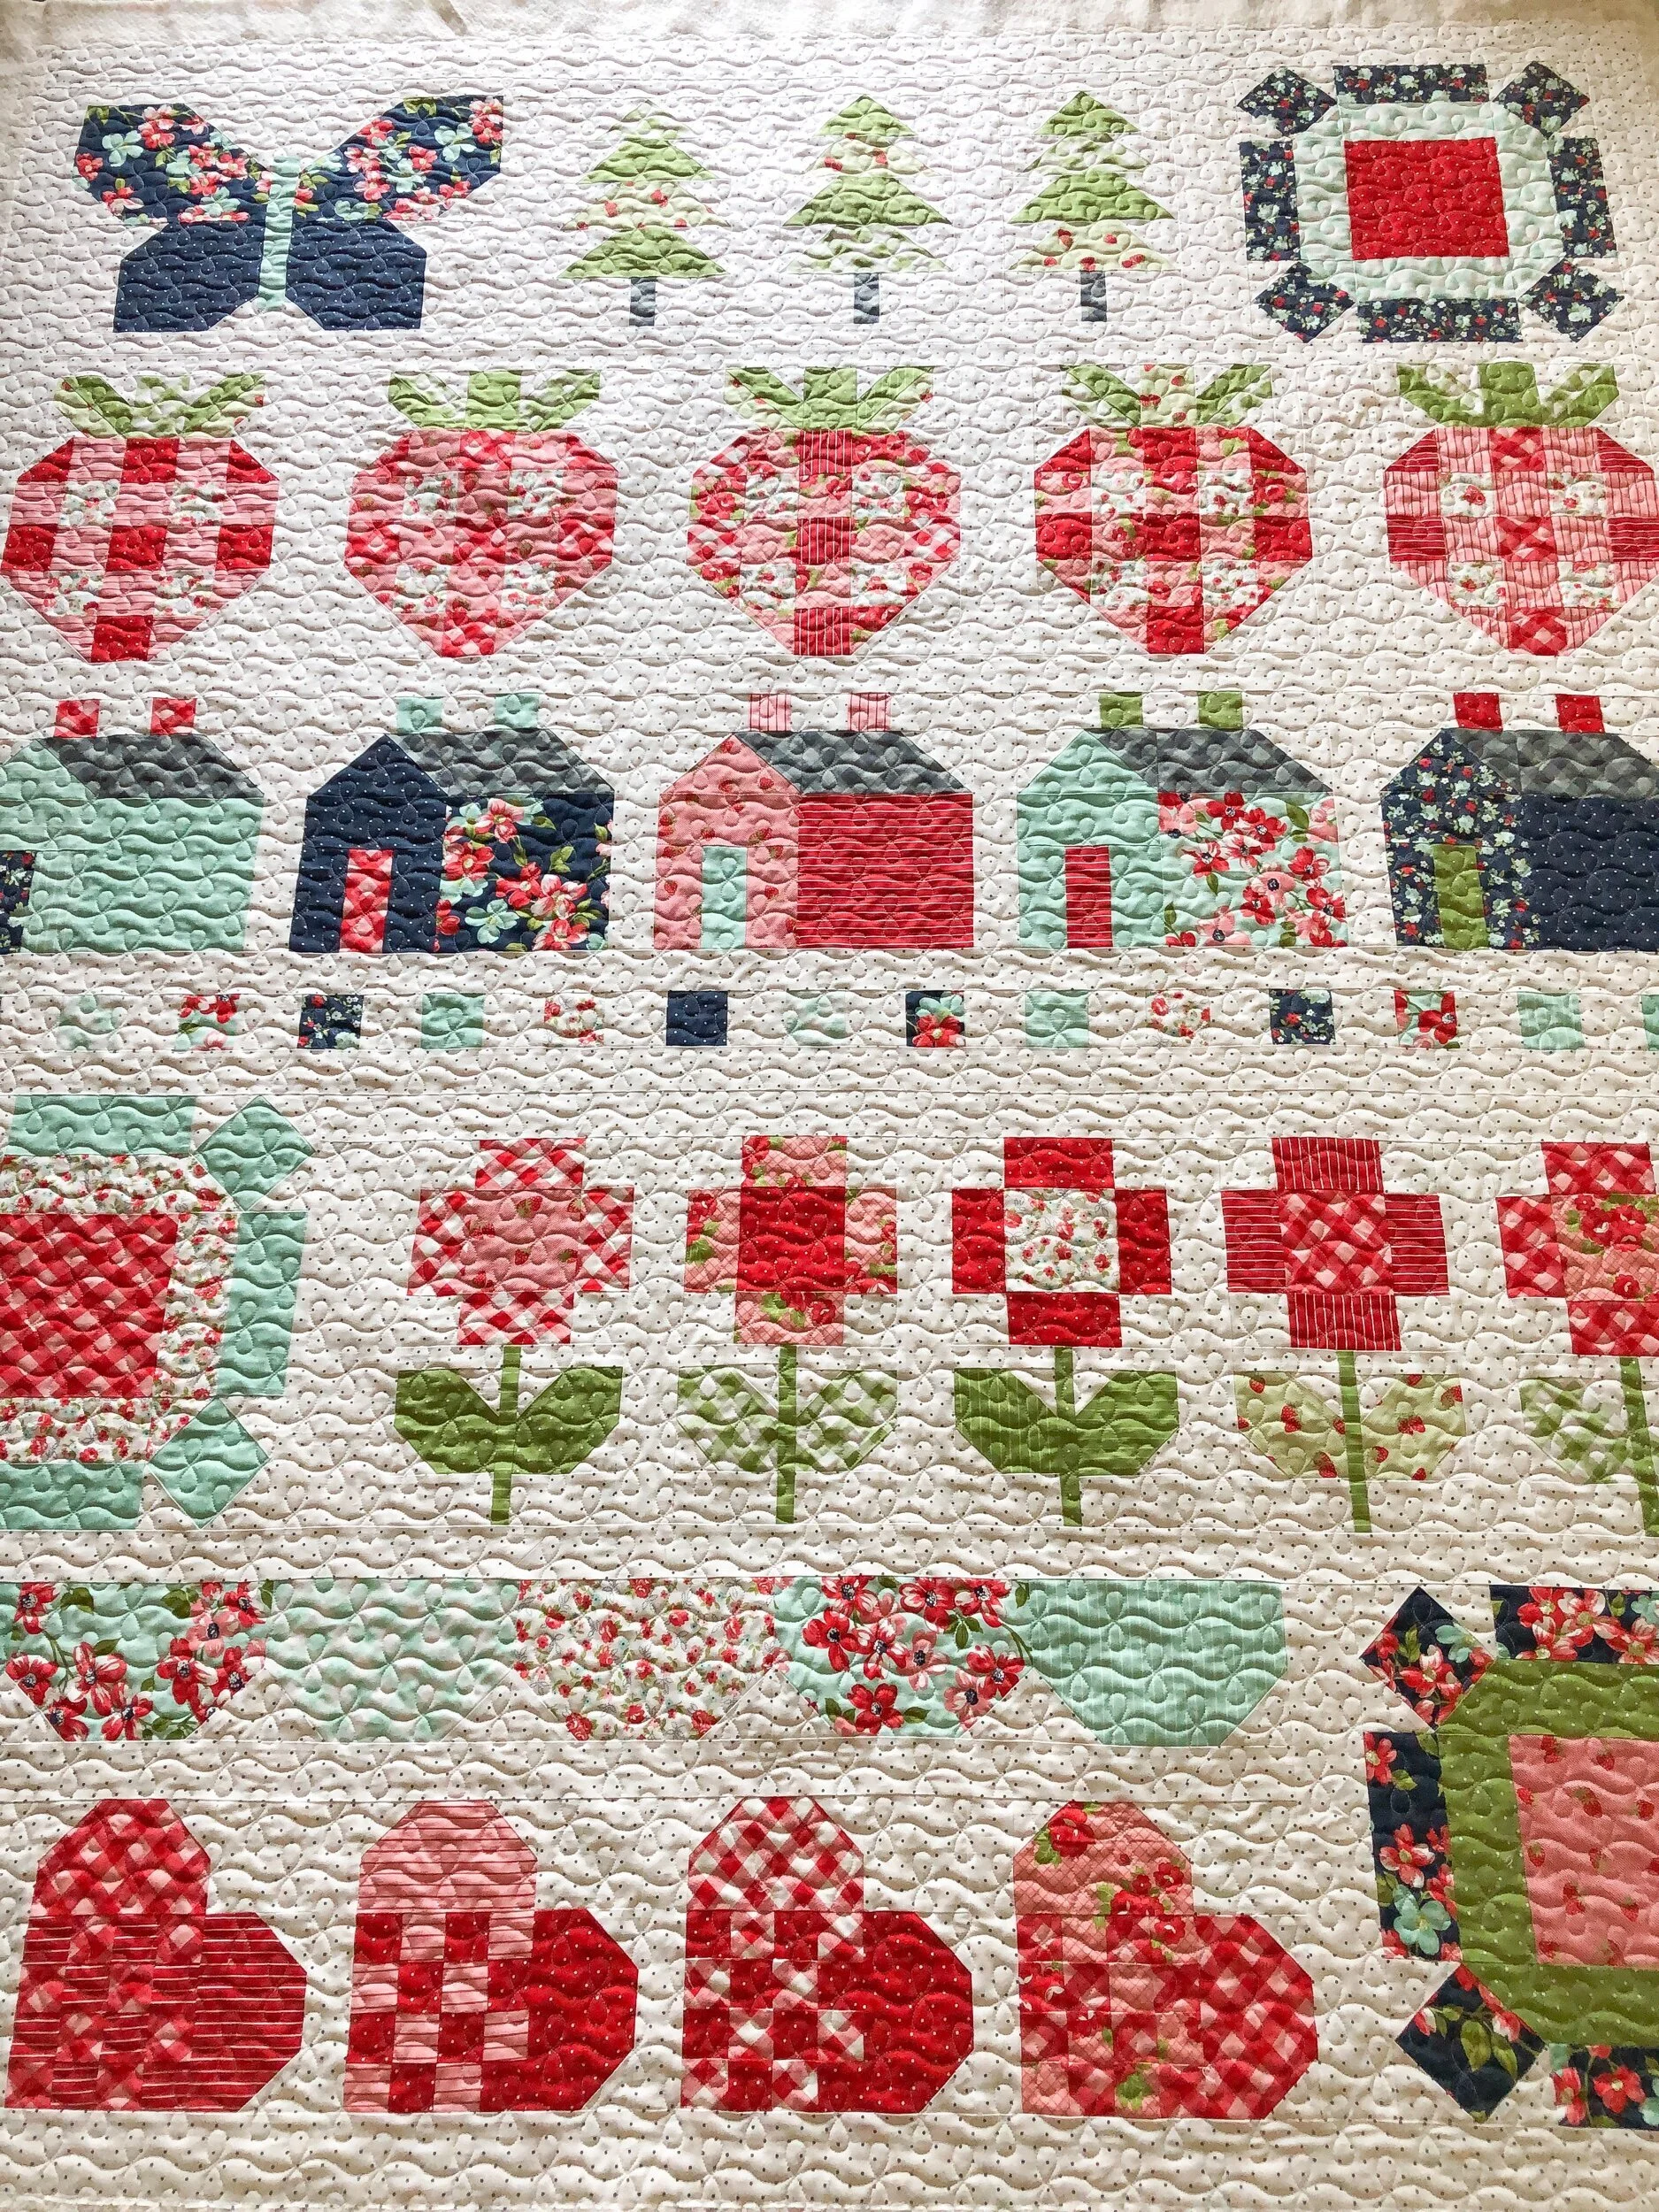
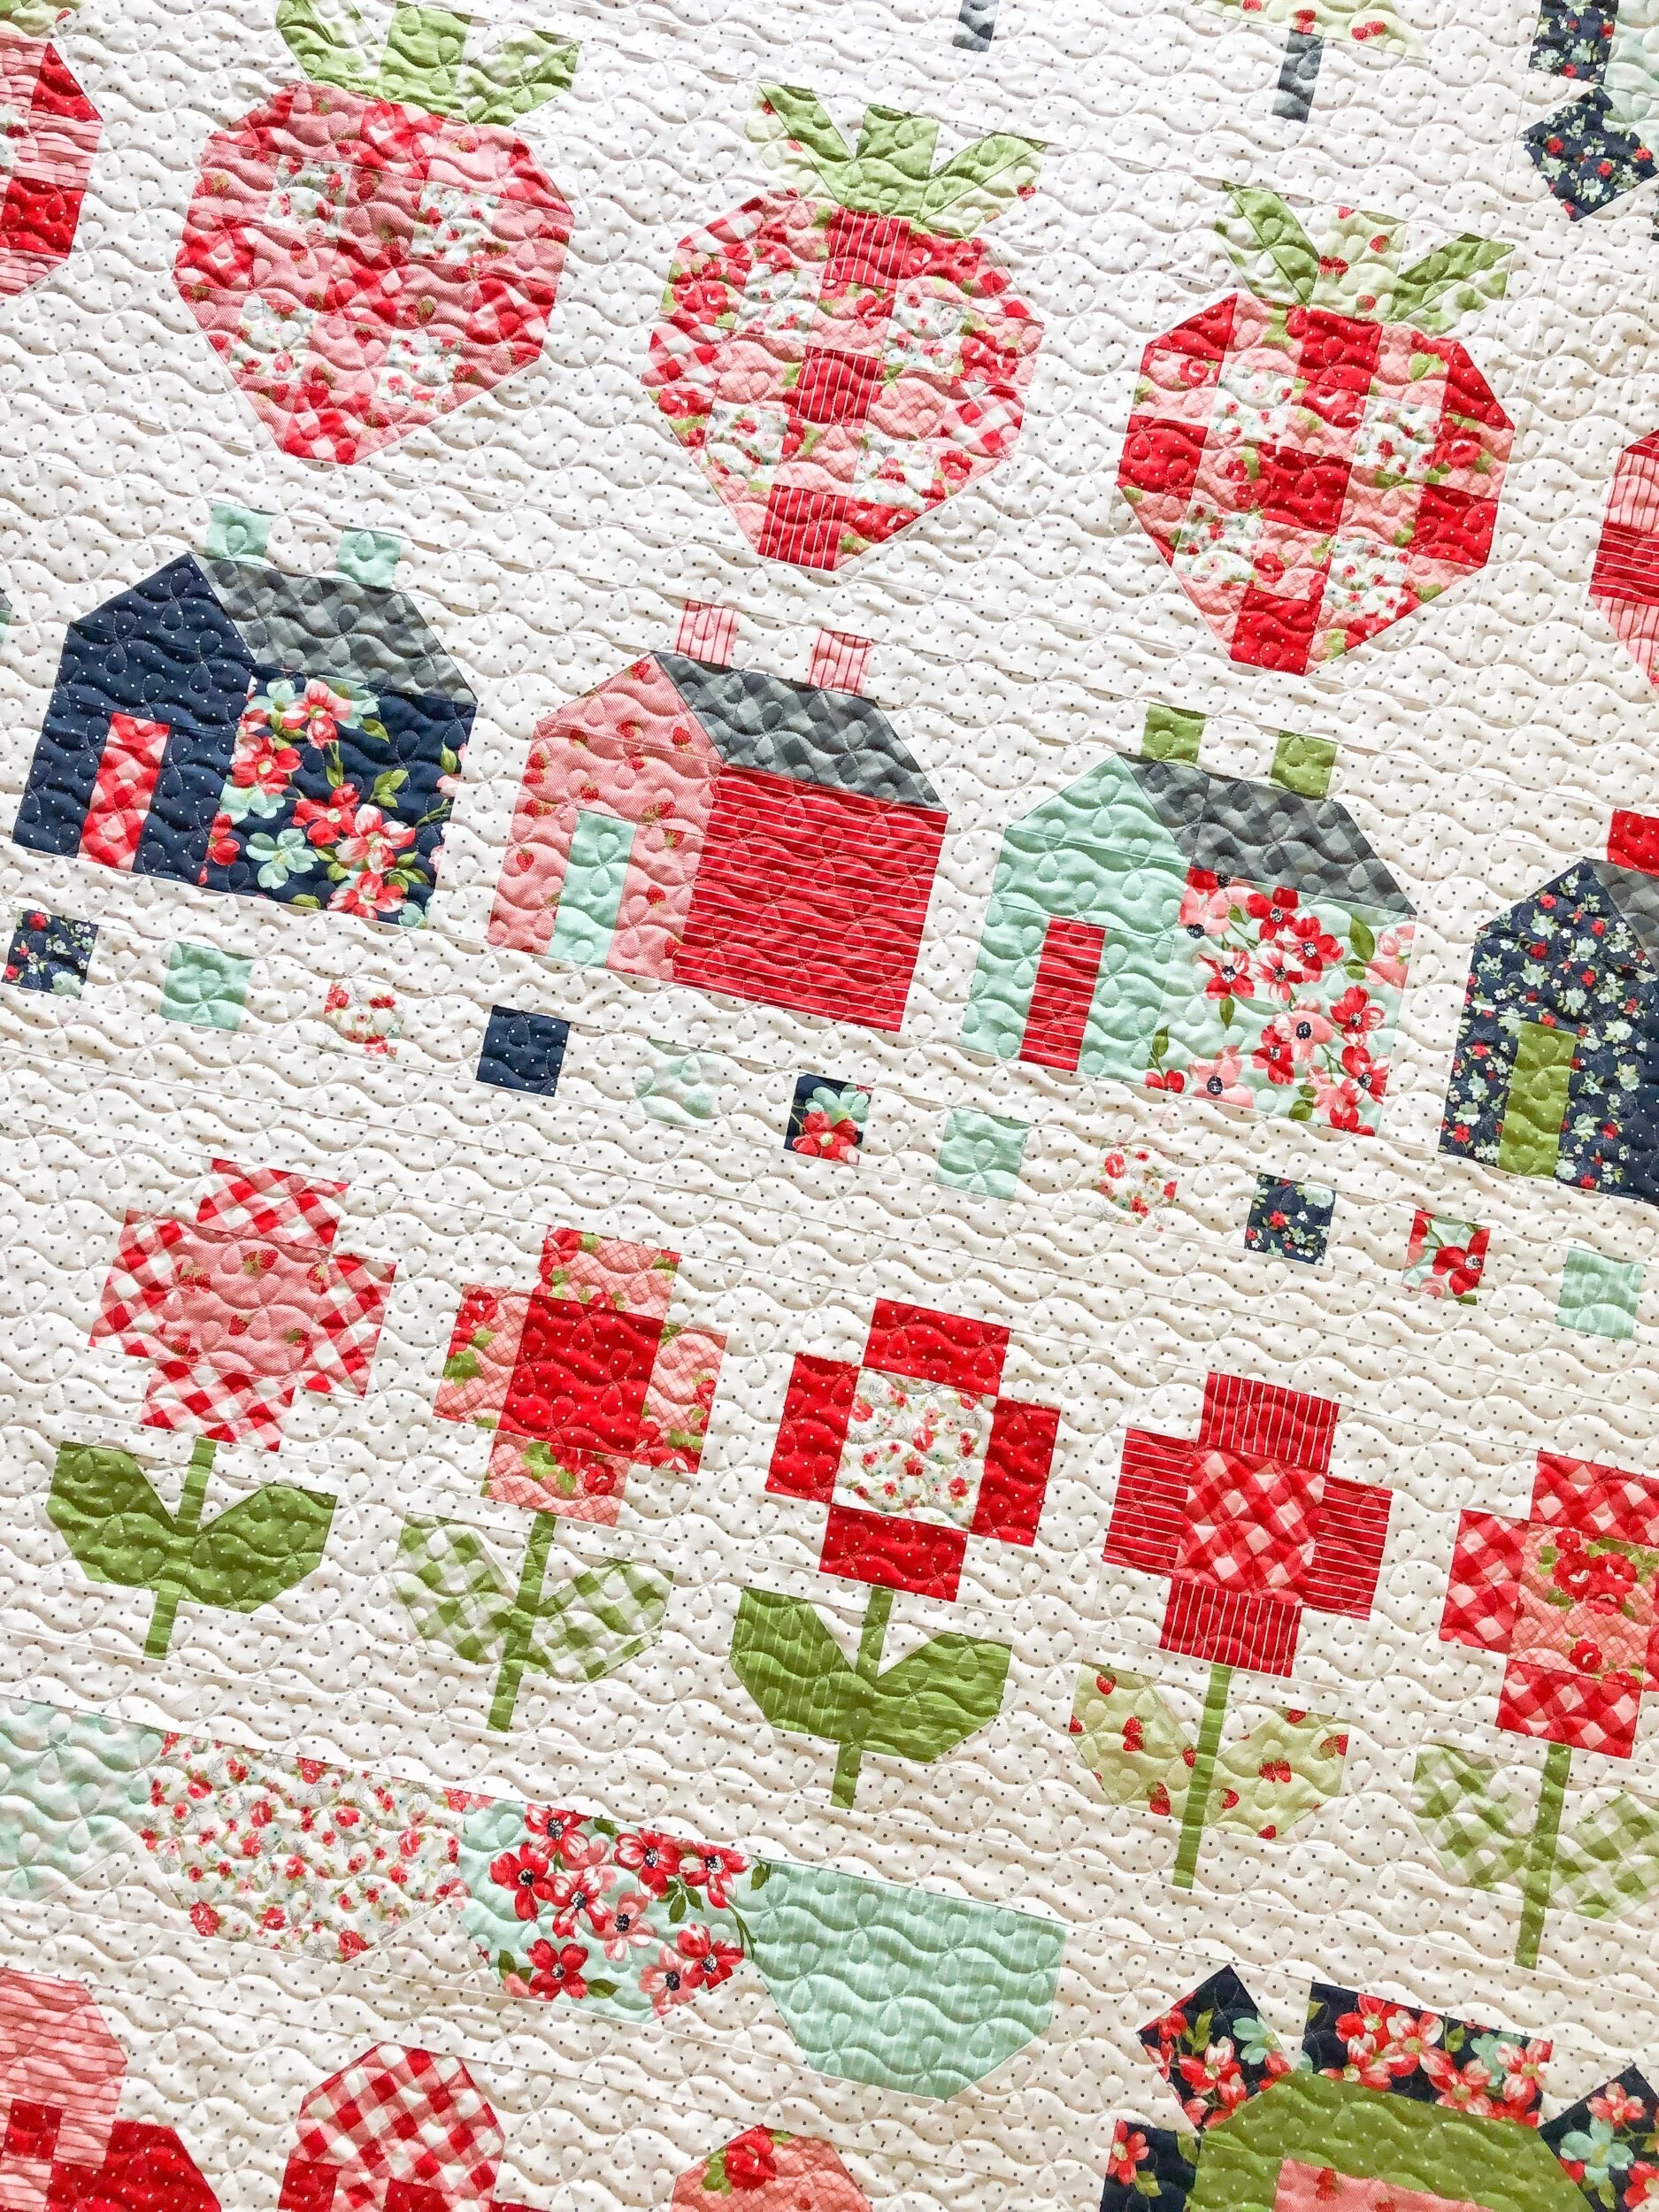
Sherry’s Boo Crew Quilt
Hi Friends,
Happy Halloween!! Just kidding…I thought about waiting to share this quilt, however this would be a fun Christmas gift for you or one of your quilting friends. It’s a block of the month by Stitches of Love, and it’s called Boo Crew. It’s was made by Sherry.
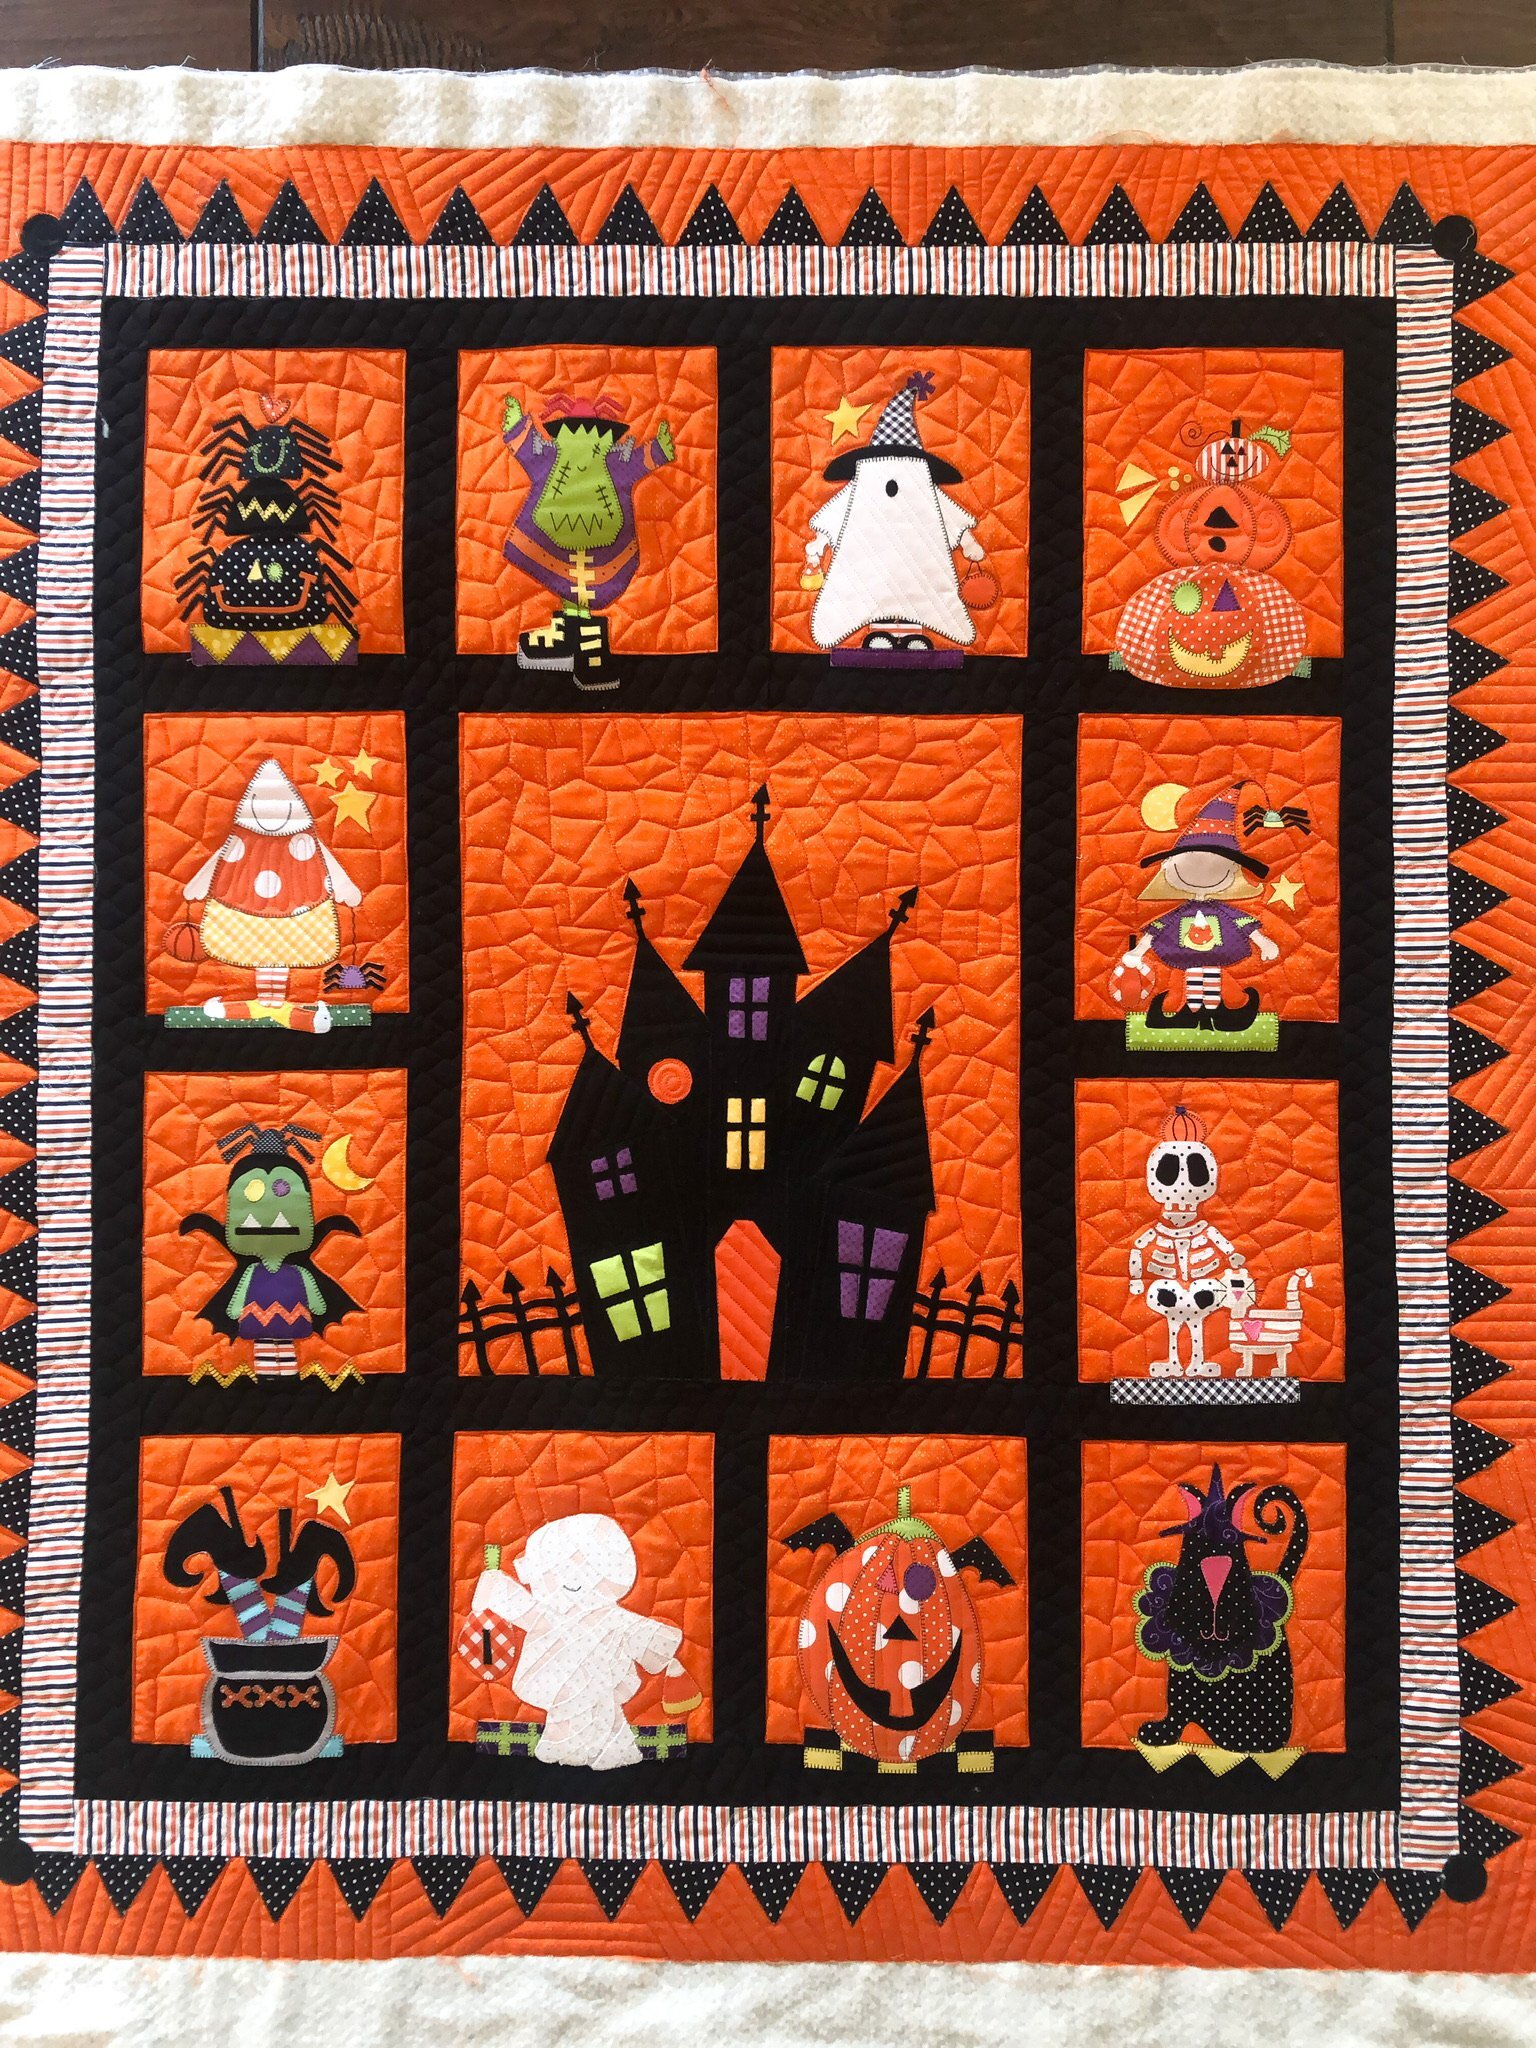
This quilt was such a fun one to custom quilt!! Have you ever wanted to learn how to freemotion quilt? I have a set of 10 videos in my Quilting It Freemotion course, and it’s available in my shop. I used four of the designs on this quilt, along with some ribbon candy and ruler work.

Lets talk quilting details… I knew from the get go that I was going to quilt the Crackle in the background of the applique blocks, its just the perfect texture. The rest just came to me as I continued to quilt, which is typically how I custom quilt. I quilted ribbon candy in the black sashing, and Pebbles with swirls in every other pebble in the white striped border. I added little details in some of the applique, to help it lay flat. I quilted a little triangle in the black triangle, a half inch in from the outside edges. The haunted house got some Wood Grain and 1/2” angled lines on the roofs. To finish off along the edges, I quilted my Overlapping Lines design a half inch apart. Wow!! That’s a mouth full. Haha! I do love the combination of all of the designs together. It adds some modern whimsical touches that enhance the quilt itself. Love what I do!
I used Linda from The Quilted Pineapple’s Edge rulers to quilt the lines. Those Crackle lines however, are all freemotion…no ruler needed. If you’re looking to improve or start freemotion quilting, check out my Quilting It Freemotion™ videos. You can start with Stippling and work your way through the designs, or pick and choose which designs you’d like to learn. Of course there is a bundle of all 10, and you get the 10th video free! Please join me in Quilting It Freemotion™.

Some closer looks at all of those fun details!!
I used orange and natural white Omni threads, and black Perma Core thread from A&E. I used 8020 cotton poly blend batting from Winline, which is based out of Ogden Utah.

A close up look at all of those fun borders. See how great they all harmonize together. The scales are a little different, and yet the quilting itself enhances the shapes.
Do you have a quilt that you would like custom quilted? I would love to quilt for you!! Please head on over to my Longarm Quilting Services page, and check out the details. I have a couple of custom quilting spots left in January, and quite of few edge to edge quilting spots available. Hit reply to this email, and I’ll get you added to my list.
Thanks for being here. I hope that you have a wonderful week leading up to Christmas and New Years. Take care, -Leisha
• Longarm Quilting Services •
Hi Friends,
I hope your holiday season is off to a great start!!
Thank you for another great year!! I’m so grateful for my wonderful clients, and all of the beautiful quilts I’ve had the pleasure of quilting this year. Thank you, thank you!! Which means I have so many beautiful quilts to share with you all!
With a new year approaching, I decided to do things a little differently starting in January 2022. It’s been 9 years since I’ve upped my hourly prices, and thought it was time for a price increase. However I’m going to do things a little differently. Starting in January I will charge $40 an hour for custom quilting, with a $50 minimum. Edge to edge quilting will start at $.03 a square inch with a $50 minimum, and go up from there depending on the desired density. I already quilt edge to edge quilting at the appropriate scale for a quilt, however if you’d like something quilted more densely, that’s totally fine just let me know. (Which is when the price per square inch goes up to $.04)
Honestly… I’ve tried charging by the square inch before, but it was too hard to figure out what to charge for custom quilting, that’s why I stayed at an hourly rate. I’m hoping that separating how I charge for custom vs edge to edge quilting, will work out better.
Thread and batting are not included in the quilting prices. For more info click here: Longarm Quilting Services
I would love to quilt for you!! If you click on the link above, and scroll down, you can see a button that says “Machine Quilting Request Form”, which I linked, and a new window will open up. You will see a pdf, print it and fill it out, to bring or mail with your quilt. It really helps me to have the info about your quilts as I blog and share them on social media.
I’m also planning to quilt 3-4 custom quilts a month, along with all the edge to edge quilts I can fit in. To get on my custom or edge to edge list, you can text (if you have my number) or email me at quiltingit@gmail.com • My turn around times are typically 2 weeks, until fall when Christmas quilting starts. As of right now I have 3 custom spots open in January, and several edge to edge quilting spots still available. I will have more updates available in my Instagram stories @leishakaye of my quilting turn around. Please go follow along there.
Please let me know if you have any questions!! Thanks for being here! Here’s to a great 2022!

A couple of quilts I quilted edge to edge. Quilting details on these quilts, coming soon to my blog.

I quilted the rest of these quilts freemotion or freehand. Custom quilting is so much fun!!

Sometimes custom quilting can be light, like the quilt above. I used rulers, and it’s quite simple, yet the overall look is so fun! Just the right amount of quilting for this quilt.

When custom quilting I try to quilt something to enhance the fabrics and quilt pattern. Like the scalloped edge, which frames it nicely or the organic dense lines in hair and face. When it comes to custom quilting, it’s all about the details.
More of my work can be found in my work gallery and on my blog.
Thanks for stopping by!!
• Have a happy and safe holidays, Leisha
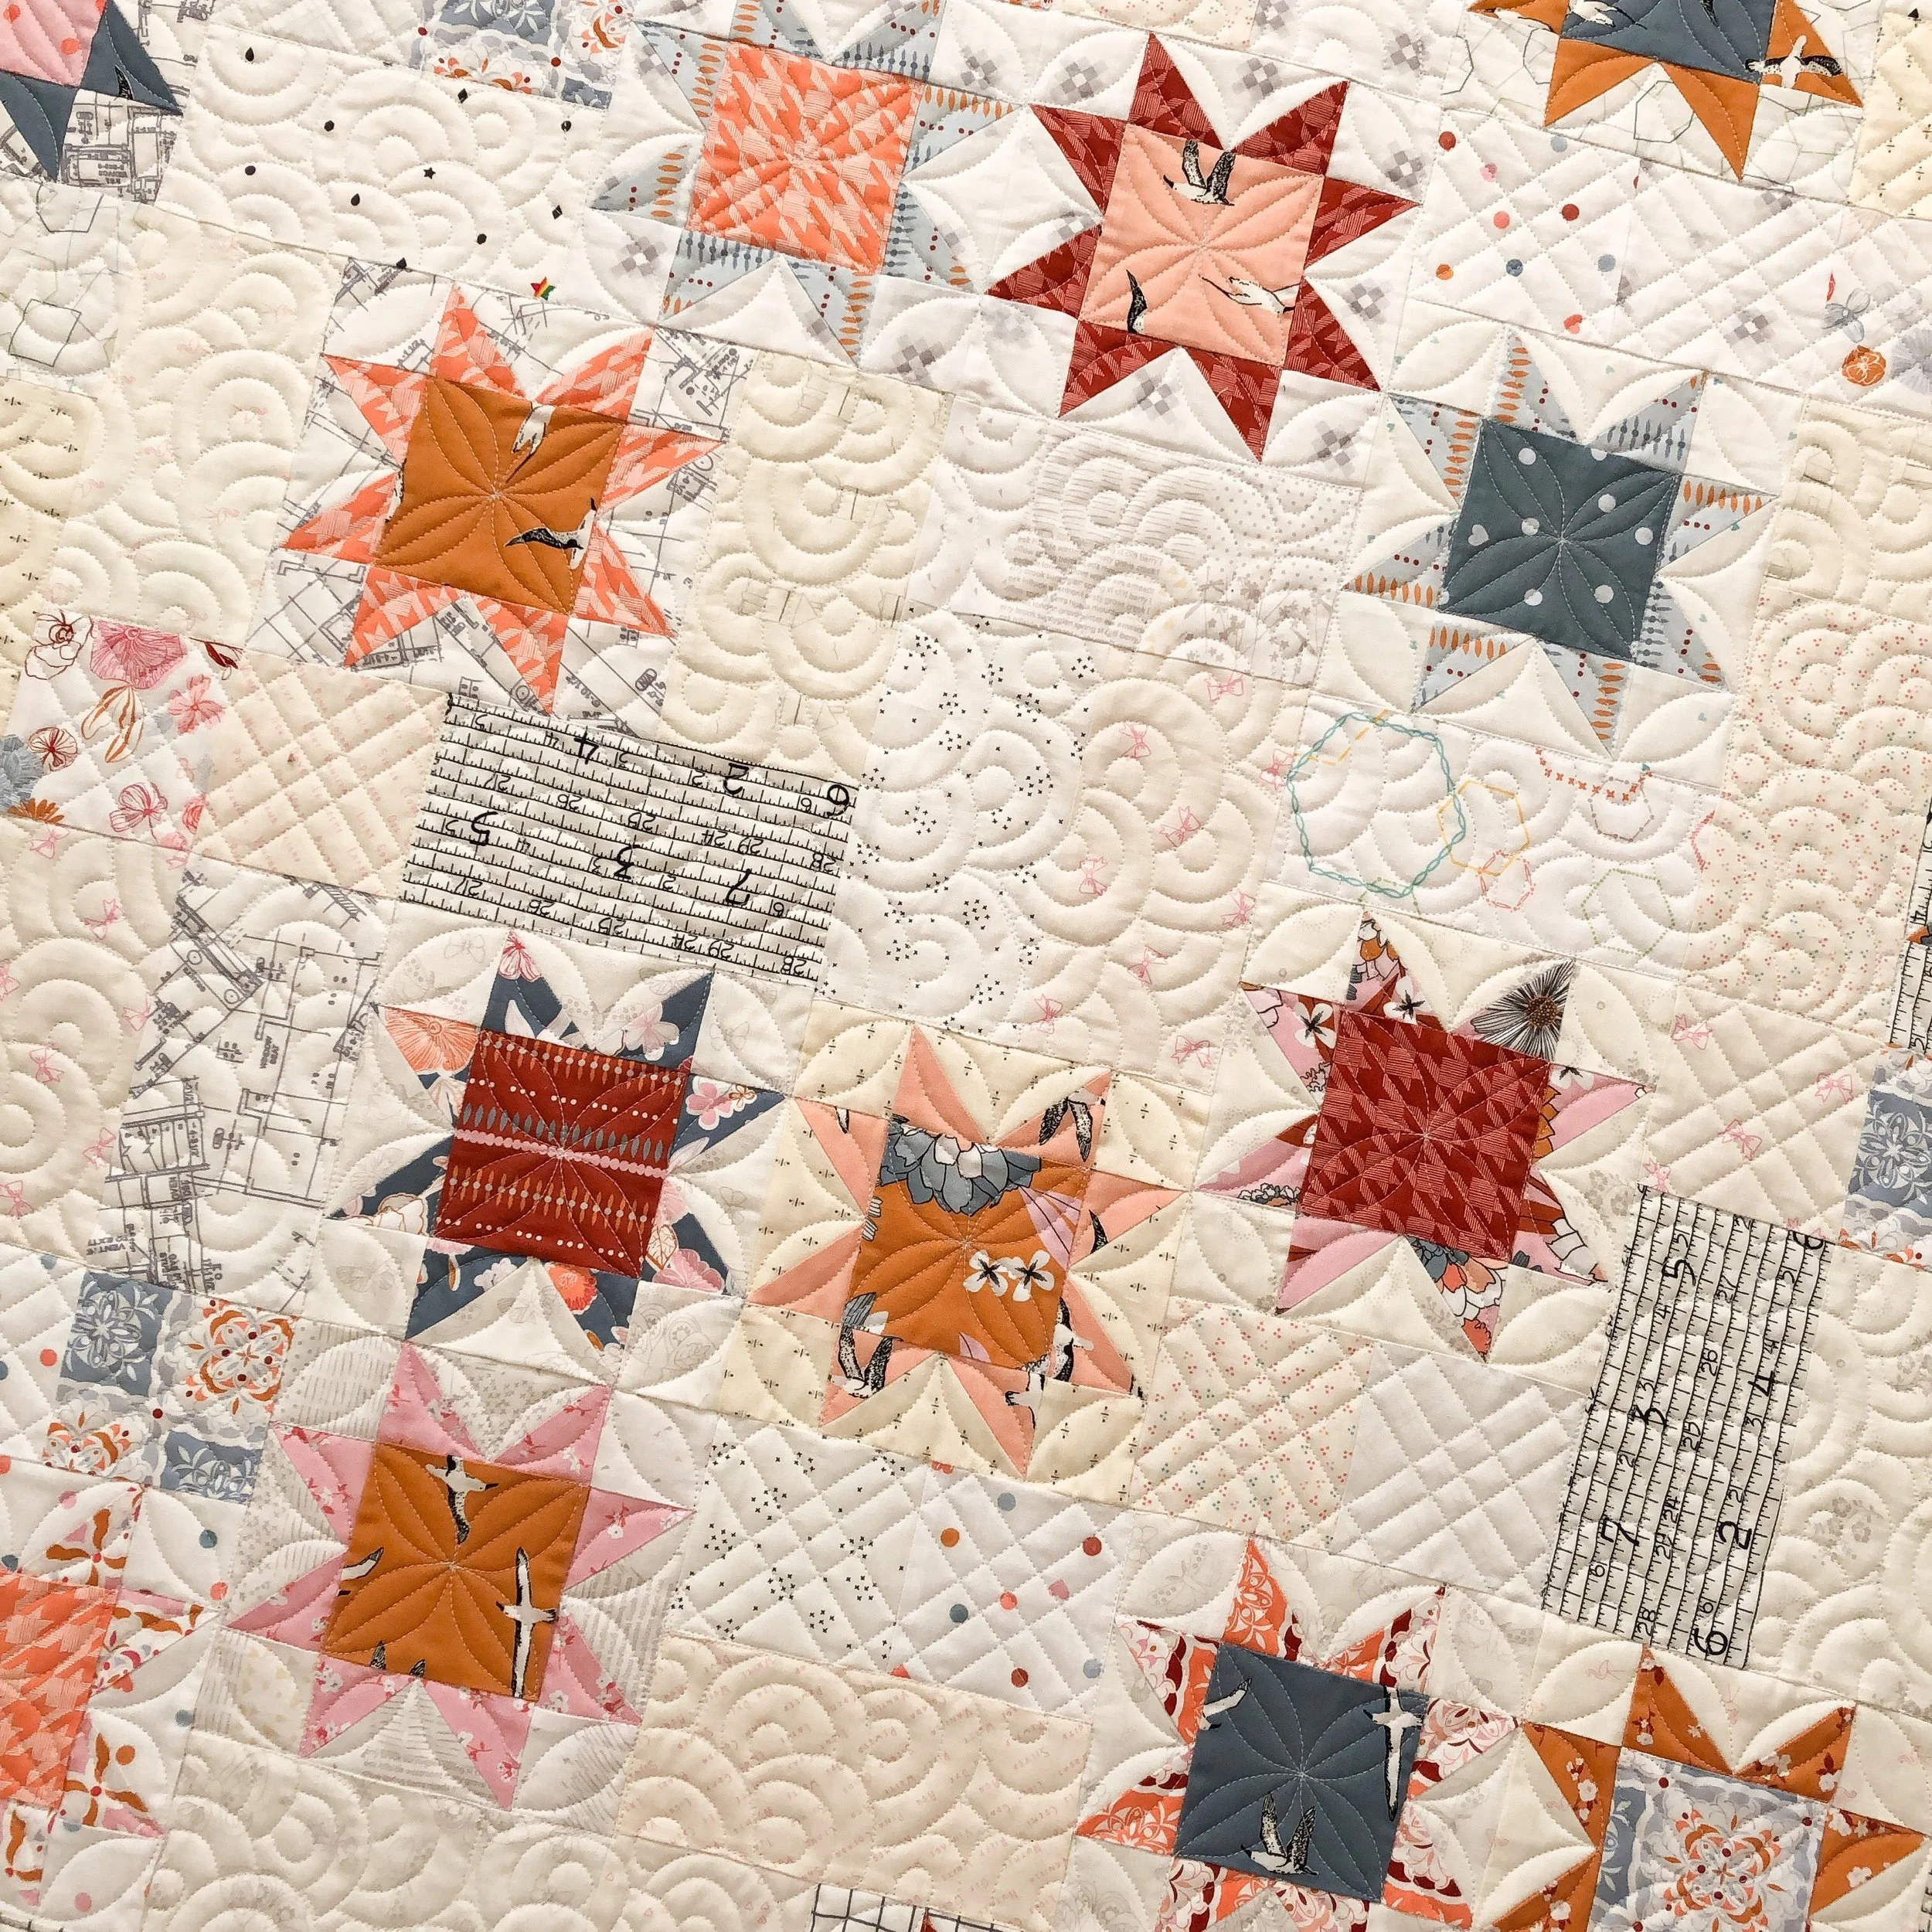
Corinne’s Stargazers Quilt
Hi Friends,
Happy almost Thanksgiving for all of my American friends, and to everyone else I hope your holidays are off to a wonderful start!!
I am sooo excited to share this super sweet quilt pattern called Stargazers by Corinne Wells from Frannie B Quilt Co., that I had the privilege to quilt. Today is release day!!! Click on that Stargazers link above to get your copy of her pattern.
Corinne and I talked about some modern quilting…nothing specific, and this is what I came up with. I wish you could each see the soft creams and beautiful prints by Gabrielle Neil Design for Riley Blake. I just love the combo of all of it together.
I used a cream thread from Superior Threads and 8020 cotton poly blend batting from Winline out of Ogden Utah.

As you look at the background in the picture below, you’ll notice random x or plaid like blocks. You’ll also notice my Overlapping Circles design throughout the background. There is a rhyme and reason behind it all. There are randomly placed squares, amongst several rectangles. I wanted to add some extra depth and variety to the background, and so in each of the square blocks I quilted a plaid like x. In each of the rectangular blocks, I quilted my Overlapping Circles design. So, that gave me a boundary of sorts for each design. Which helped the plaid like x, dance around the background. I love the combination. The Overlapping Circles add some softness and whimsy to this quilt. It’s my take on some softer modern quilting.
If you’ve been hoping to try freemotion quilting, you’re in luck!! I have a Quilting It Freemotion™ course in my shop. I chose 10 different designs to teach. If you already longarm quilt, and have wanted to learn some new designs, check out some of my more advanced designs…and if you’re a beginner, I suggest you start with Stippling and work your way through each of the classes. As you practice, you’ll be well on your way to quilting confidently. It’s so much fun!!!

Lets first start with the plaid x…I used my favorite Edge rulers from Linda at The Quilted Pineapple. I started with an X, and then used those lines to quilt a 1/2” line on both sides of each side of the X. I also paid attention to the corners, as you can see below, and made sure they felt complete. When the squares are together, like pictured below, they naturally create another mini four patch in the corners.

I used my 3” Circle2™ machine quilting circle ruler to quilt all the curves in the stars. I repeated that same X in the center of the star, and did the orange peel petals on it instead of the 1/2” lines. Then used the same 3” Circle2™ ruler to quilt the curves around the outside of the star. Easy to do, and such a beautiful design.

Ultimately, I wanted the quilting to look like it was layered. As if the Overlapping Circles are in the background, and the plaid X is layered just on top, of course with the stars on the very top. The textures are just sooo beautiful all together.

Now…I want to make one and quilt it the exact same!! I love it that much!

I love these close up pictures that show the details, yet as you look into the distance you can see the beautiful textures. I love what I do!

This is a look at my 3”/9” Circle2™ ruler, and also the green set stacked on top of one another. The sizes of circles range from 2” to 13”, with two circles per ruler. Be on the look out for some videos on how to use them. They will be located on my @leishakaye instagram. I even have a video or two from quilting this quilt.
Circle2™ Ruler - Design Patent D875,574 -


I want to thank everyone who shopped during my sale, and those of you who have done so in the past. I really am so grateful to be apart of such a wonderfully supportive quilting community. Thanks for letting me be apart of it with you.
I hope this holiday season is a wonderful one for each of you!! Take care, and happy quilting.
Leisha
PS…I just added these two videos, showing how I quilted the x’s and stars. Enjoy!!!
I’m quilting the x’s in this video.
I’m quilting the stars in this video with my 3” Circle2™ rulers.
Thanks for watching!!
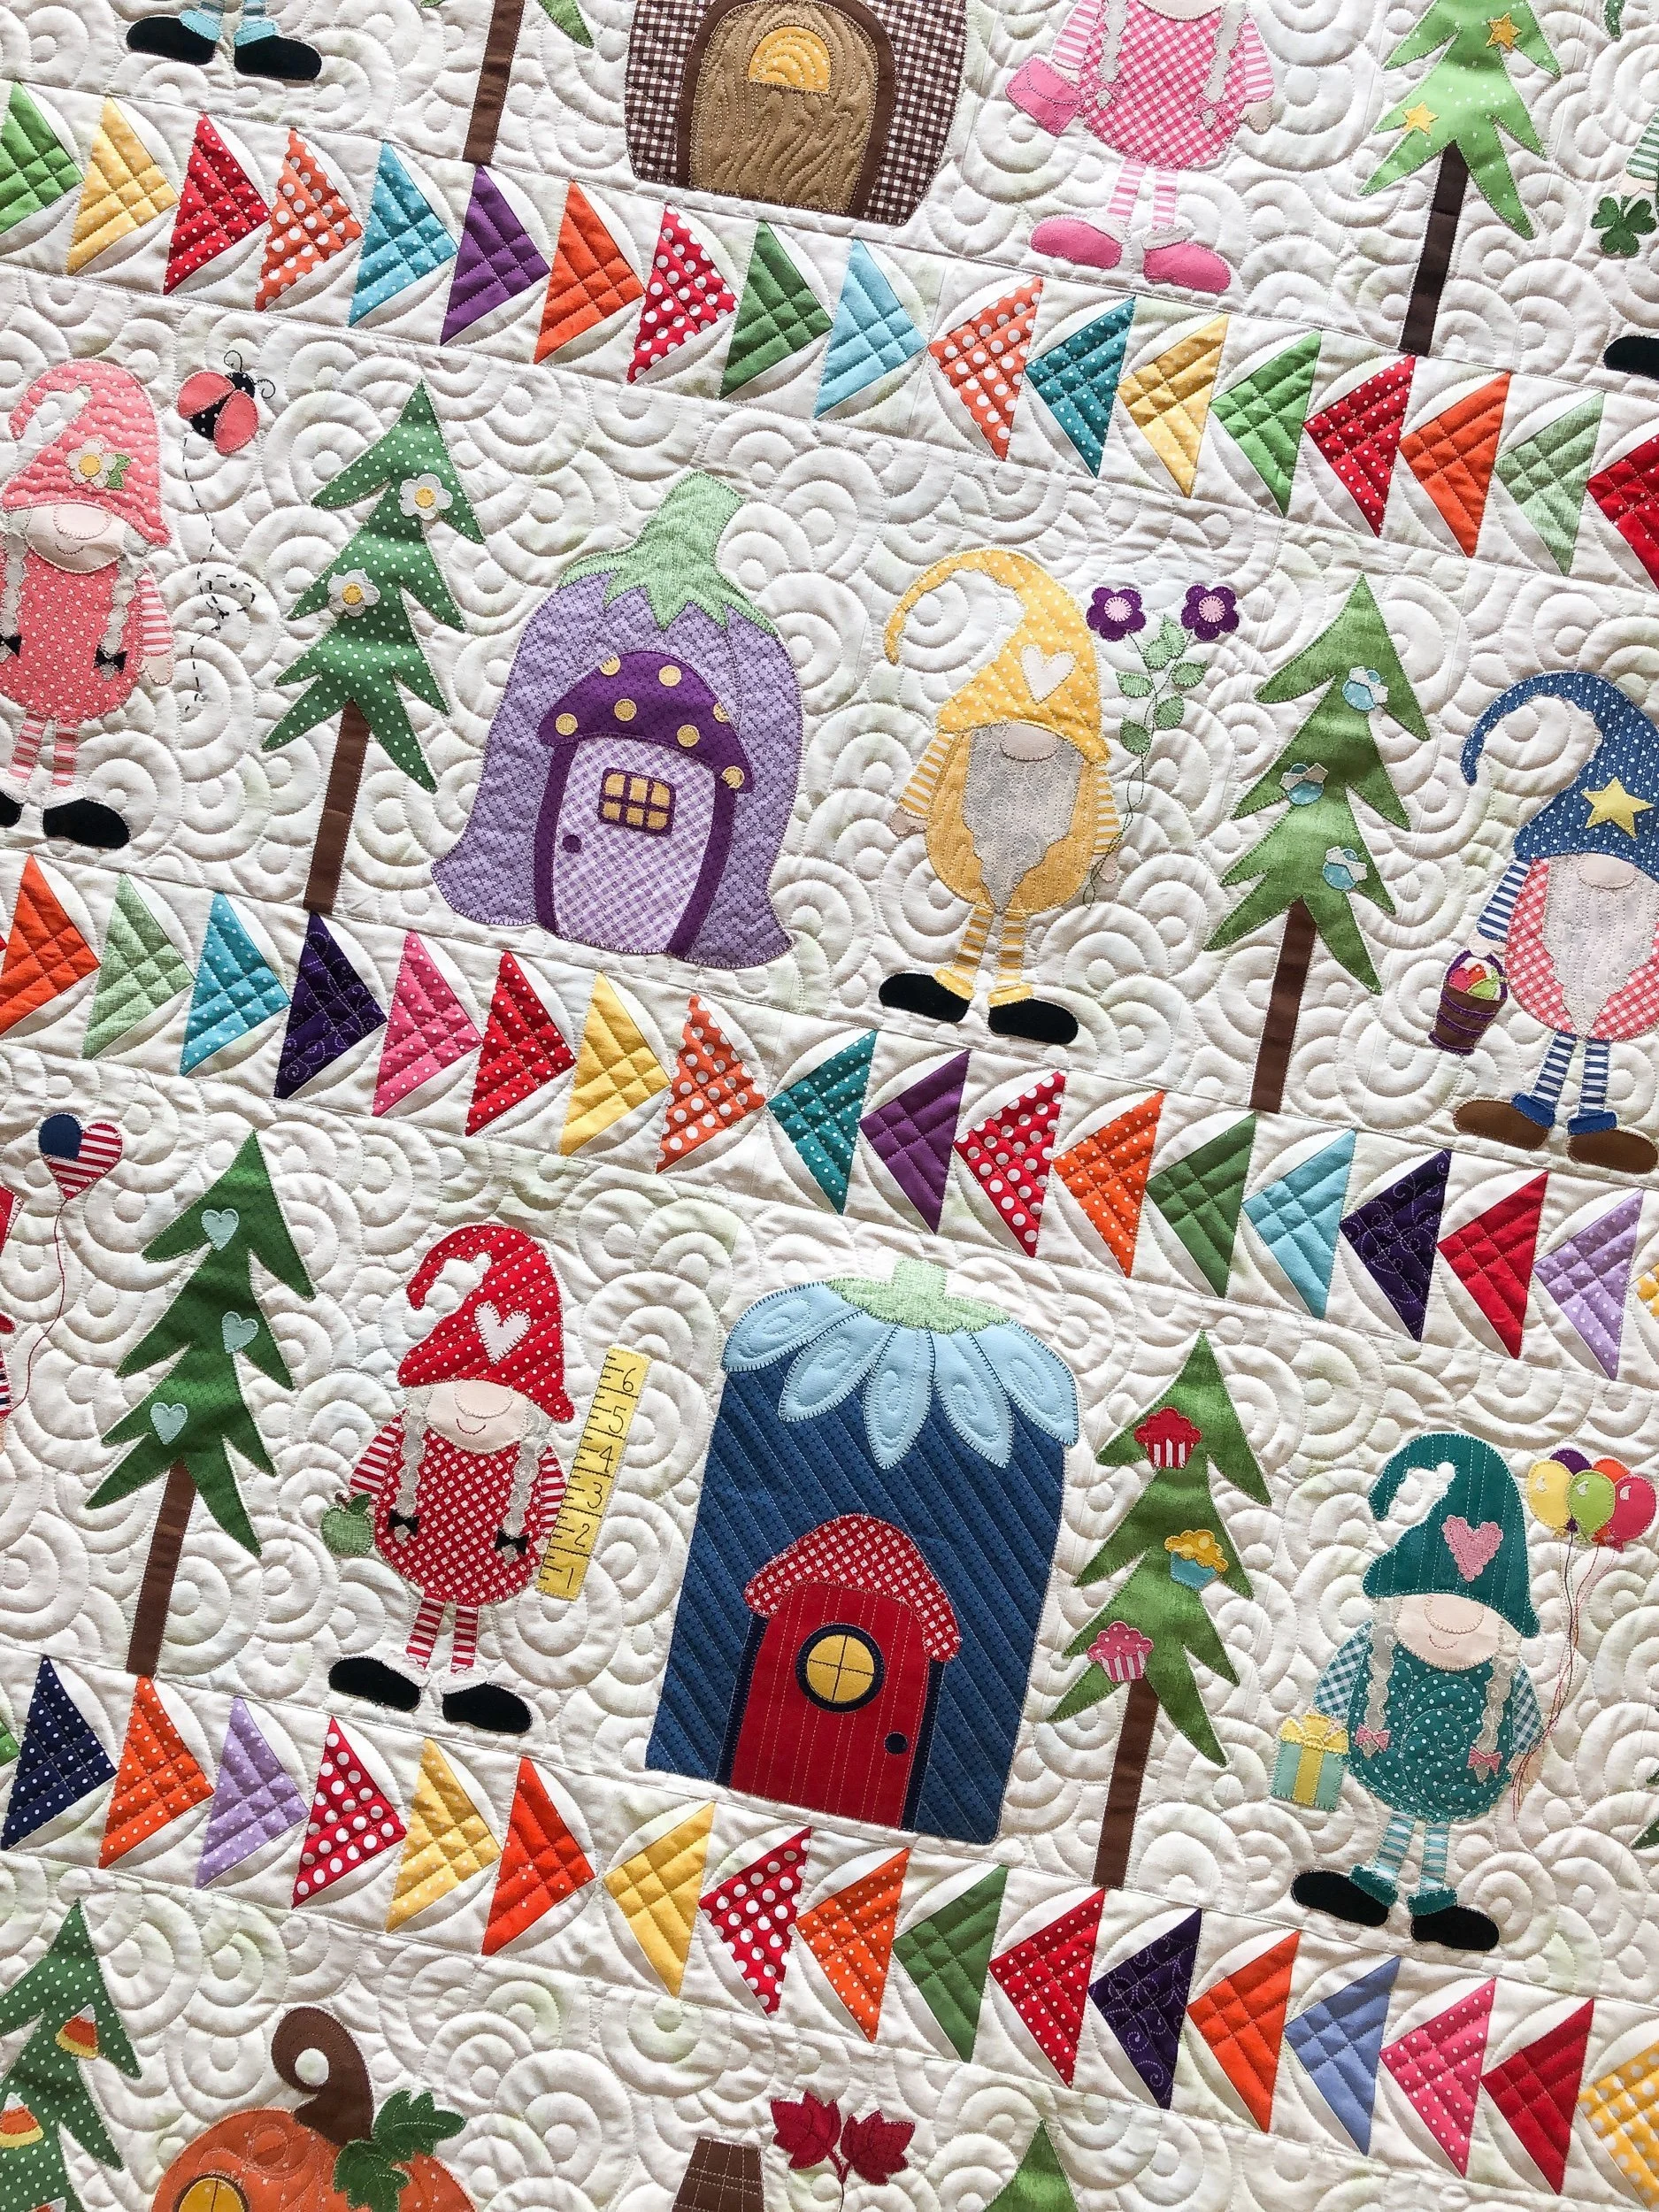
Sherry’s Gnome Quilt
Hello Friends,
I hope you’re doing well!! So excited for the weekend, and I hope you have some fun plans. I’m going to the new ghostbusters movie with a friend, and also getting some things ready for Thanksgiving.
But first, check out this fun quilt that Sherry made!! It’s the Gnome block of the month from Stitches of Love. It really is such a cute quilt. I have lots of pictures and some quick details about the quilting.

When I saw this quilt, I knew that I wanted to quilt my Overlapping Circles design in the background, which adds to the whimsy of this quilt. I love how it brings so much more personality to the quilt, while also combining all of the monthly blcoks together. Have you ever wanted to learn how to freemotion quilt on your longarm??? I have a video to teach you how to do this very design. It’s available in my shop, and is actually on sale right now until Sunday the 21st at midnight.
Side note: While I do have a computer on my machine, this entire quilt was quilted freemotion. Meaning, I hand guided the machine. Which is so fun for me.
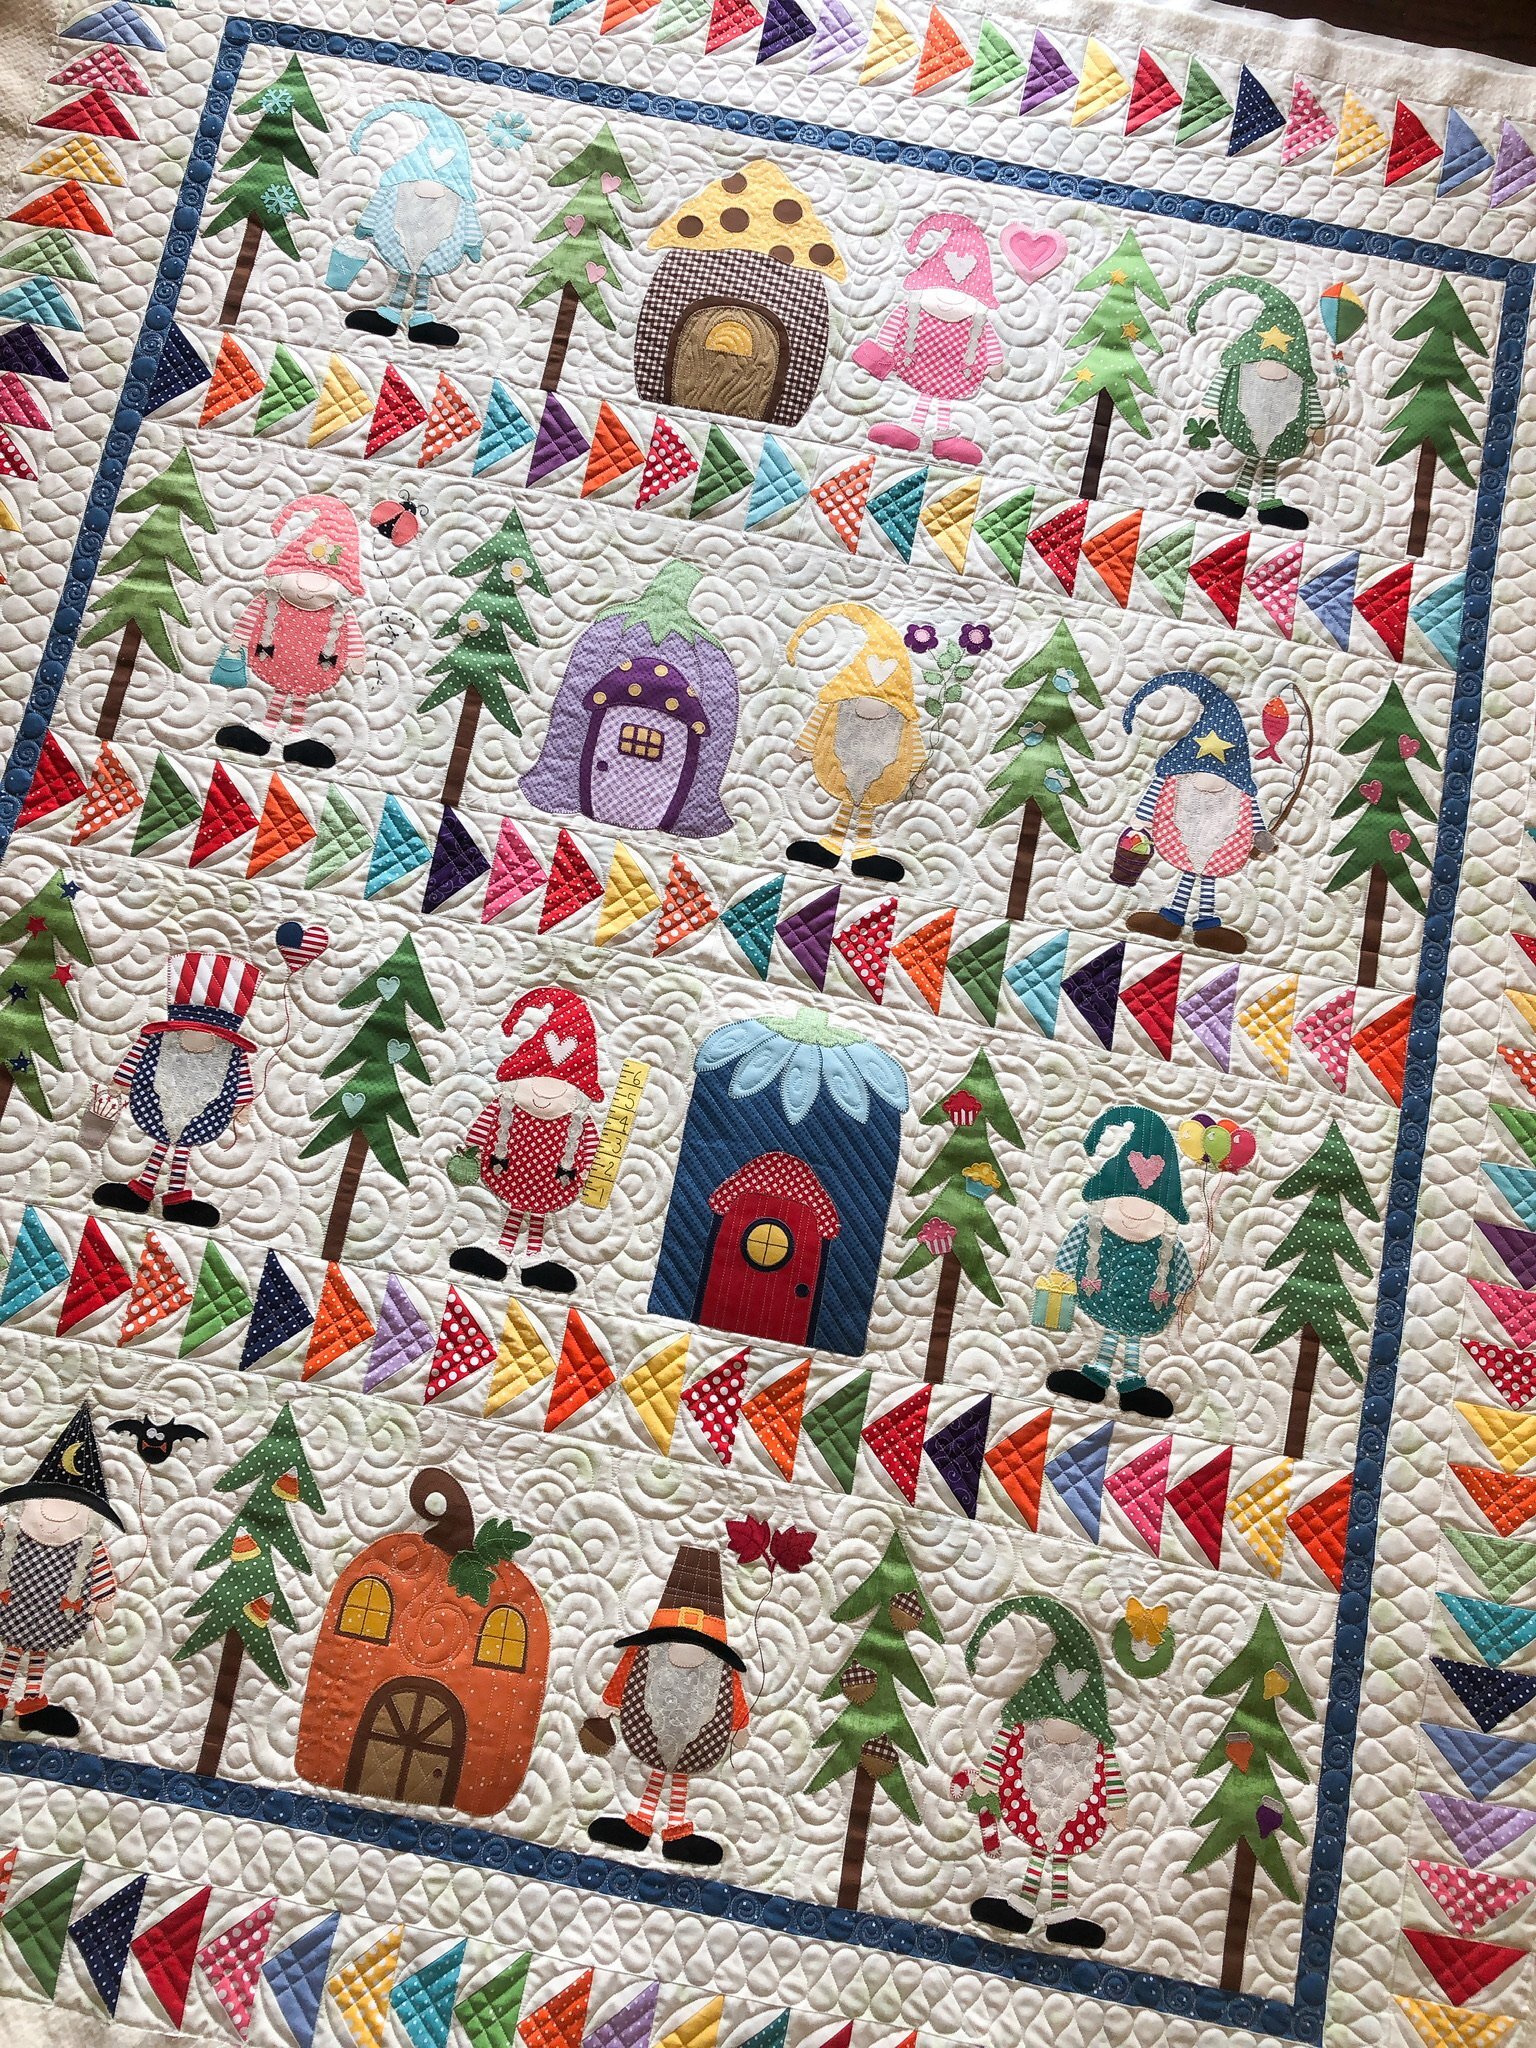
Look at all of those cute gnomes and their homes. Haha!! Really though. When it came to quilting the gnomes, I kept it pretty simple. Their homes got a little more quilting, because that’s just too much space to quilt minimally. I used my favorite edge rulers from Linda at The Quilted Pineapple, for all of the lines throughout the quilt.

So many fun textures. I know that quilting adds great personality to a quilt, but I didn’t want to make this super busy by quilting everything so much, especially with the Overlapping Circles in the background of the whole quilt. So, my goal is to highlight each shape with just the right amount of quilting, while enhancing the overall quilting.

A closer look at the top, and then bottom of the rows. I love the flying geese rows, they frame each section beautifully.
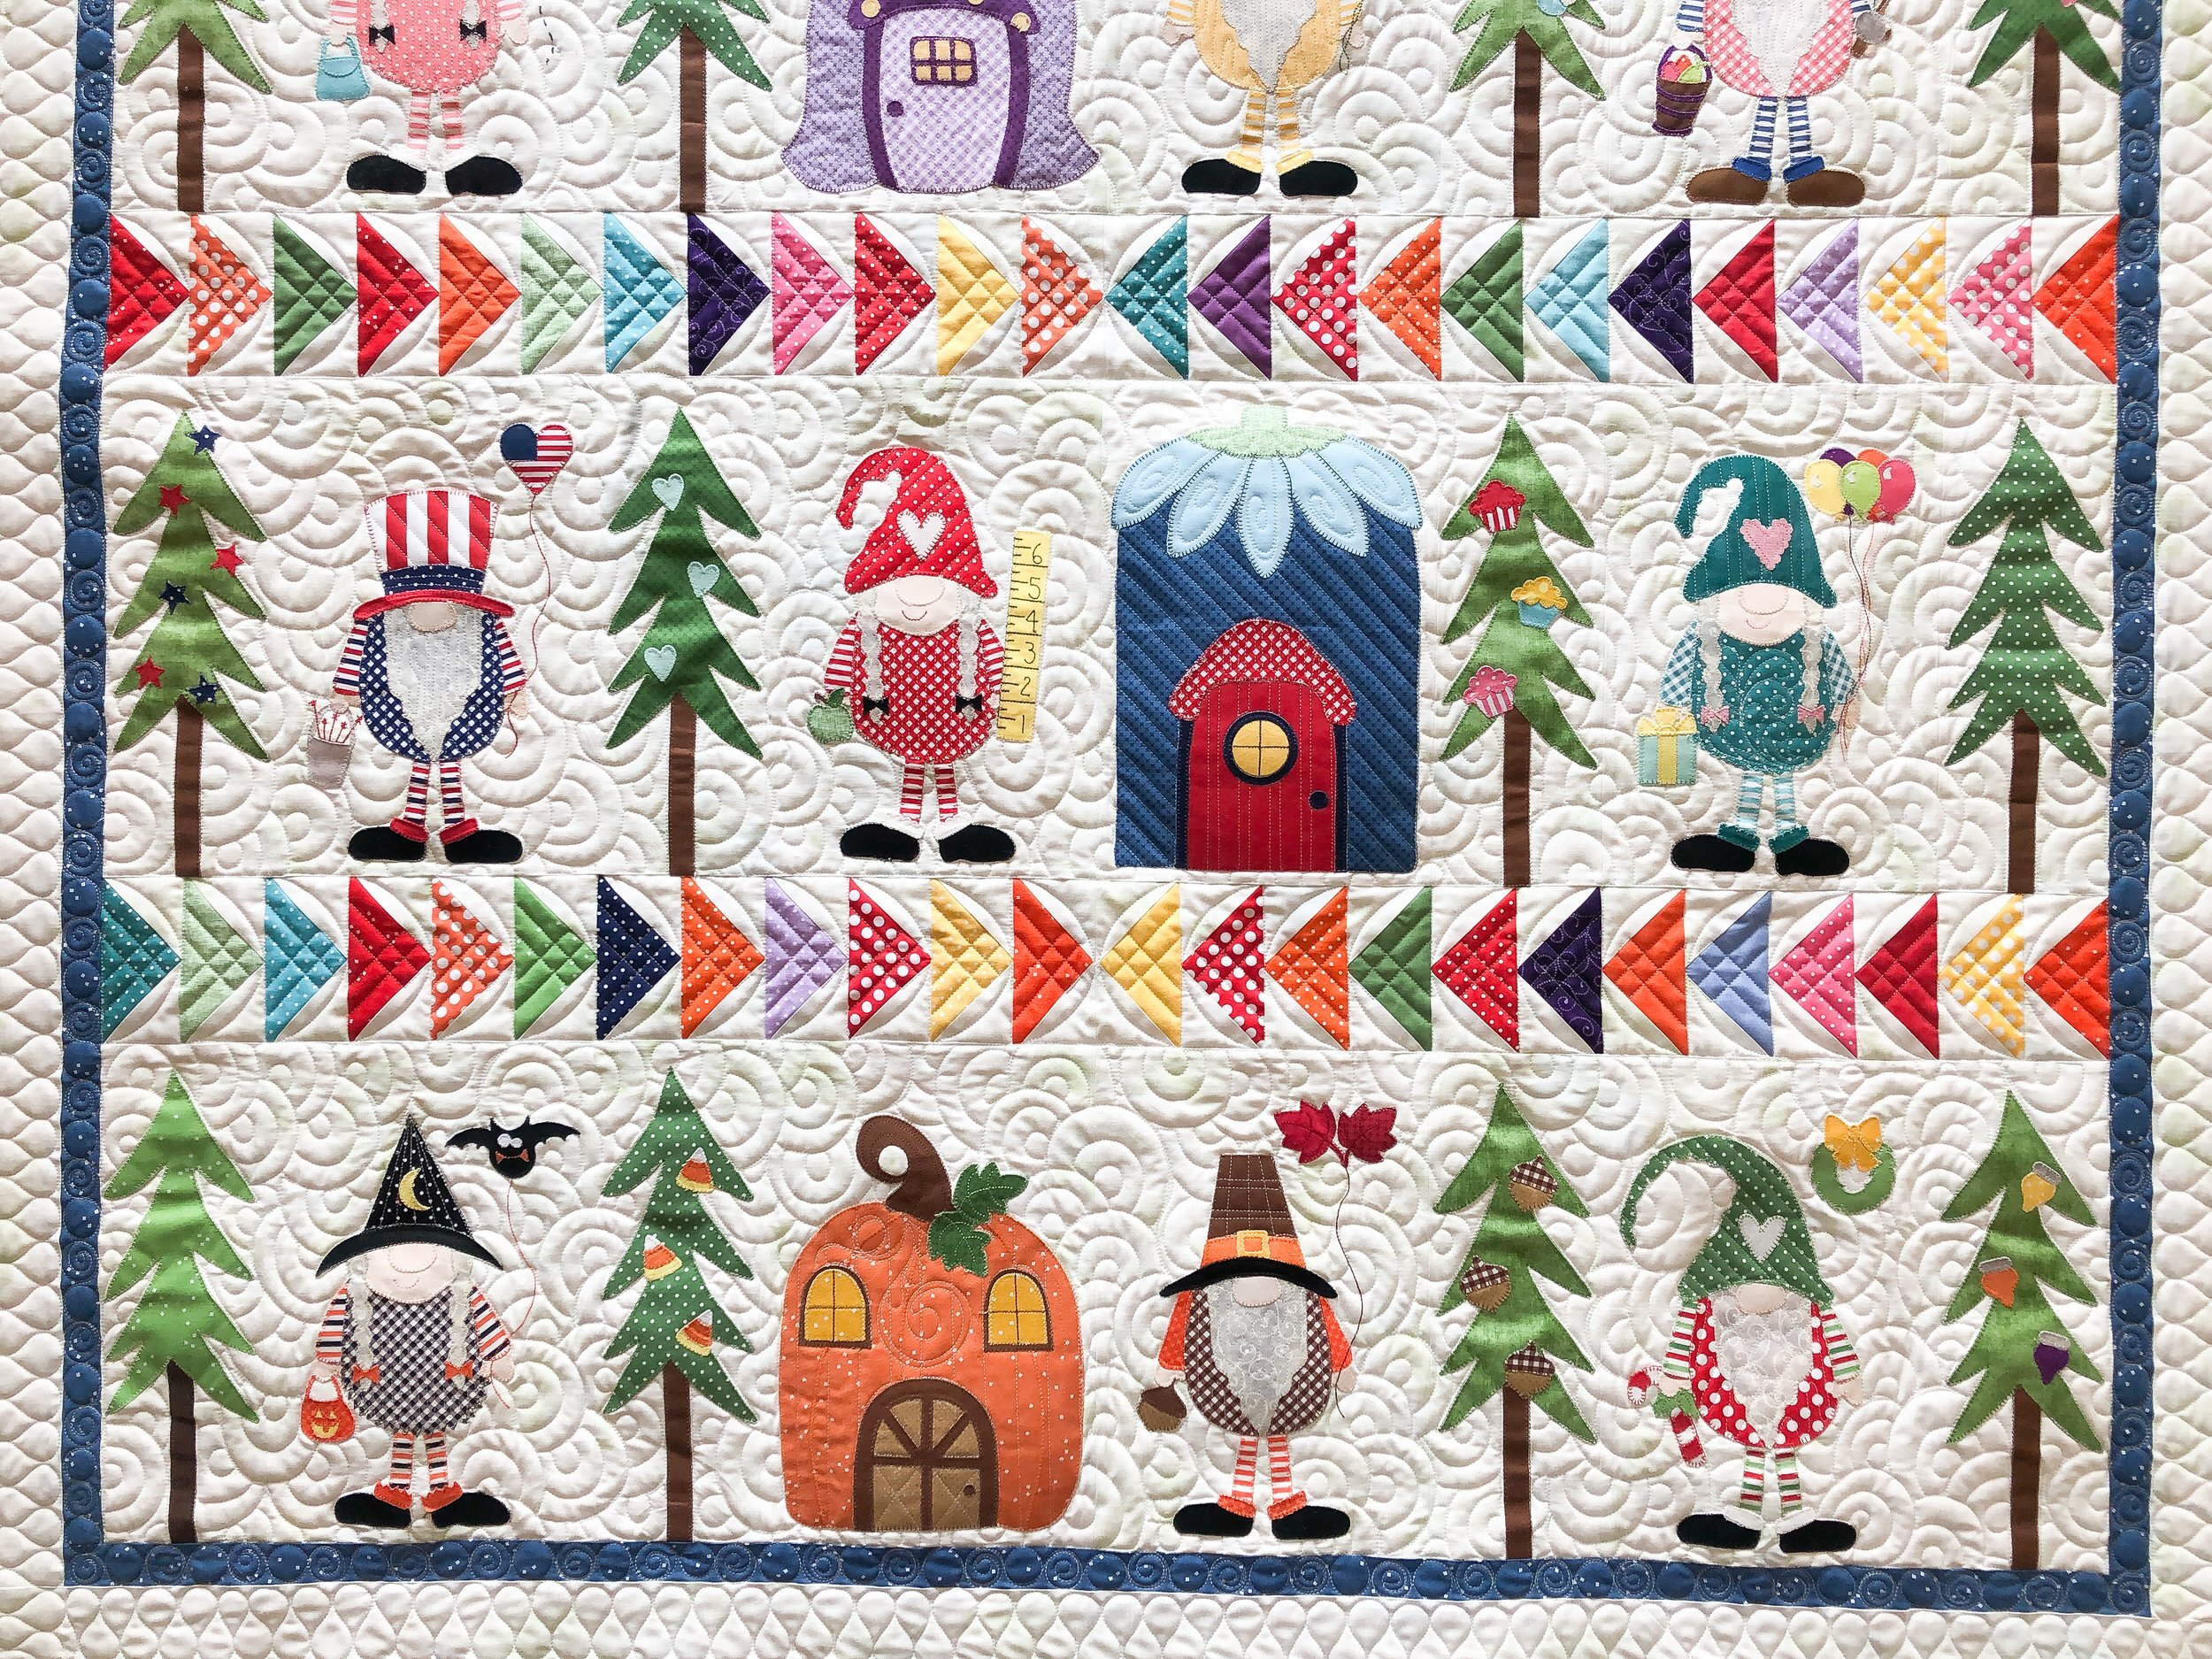
Here is a closer look at the flying geese. This really is a simple yet modern design. For many years I quilted 3 petals in flying geese, and while it looks nice, I wanted to mix it up and try something new. It’s just four simple lines spaced 1/2” apart, crossing to create that fun grid pattern. To fill the negative space in the background I used my 4” Circle2™ ruler to create that subtle curve. Just the right amount of softness.

Also notice the corner block. Once again, simple lines spaced 1/2” apart. It creates some modern touches without losing the overall whimsy of the quilt itself. Custom quilting or freemotion quilting is all about creating textures that work together…which compliments the overall design.
Here are a couple of closeups. I love the pebbles in the santa beard, and the grid in the pilgrims hat. The fun little details are so fun to come up with.

Check out those fun pebbles and swirls mixed together. I have a video on this as well. My favorite thing to quilt in any 1” border.
Also checkout that adorable house…those petals on the top are so sweet!

I used my favorite 8020 cotton poly blend batting from Winline, and the natural white Omni thread from Superior Threads.

I love all of those borders together!! A great mix of straight lines and beautiful soft curves. They frame this quilt beautifully.

I hope you enjoyed this quick look at this fun block of the month quilt.

Here is a look at the 4” Circle2™ machine quilting circle ruler, that I used for the curves on all of the flying geese. You can find out more info on my Circle2™ set of rulers, in my shop. Just a reminder, everything in my shop is on sale until Sunday November 21st at midnight. No codes necessary.
Circle2™ ruler - Design Patent D875,574 -
Thanks for stopping by, and have a great weekend. -Leisha
Corinne Wells • Eclipse quilt
Hi Friends,
I have a super fun release for you!!! I recently had the privilege of quilting two new releases for fabric and pattern designer Corinne Wells of Frannie B Quilt Co. and today I get to share the first one with you as part of a virtual Quilt Market that Riley Blake Designs is hosting. Corinne’s new fabric line is called Frannie B Elegance, and its beautiful!! It’s always a treat to quilt for a pattern designer, even sweeter with they design their own fabrics, too. I’ll share the next one with you, next week.
If you follow me over on instagram @leishakaye, you may have seen this quilt back. Love it when a back looks this great! Keep reading to see the front.
Introducing Eclipse! Beautiful, huh?!?! Eclipse and the Frannie B Elegance line of fabric will release next year, so go to Corinne’s instagram to stay in the know about release dates for both the fabric and pattern.

I love the dark contrast in the background fabric, it showcases all of the other fabrics so well.
When Corinne dropped off her quilts, she wanted modern custom quilting, which I think turned out wonderful. I couldn’t be more pleased. Before I talk about quilting, I used my favorite 8020 cotton poly blend batting from Winline out of Ogden Utah, and Cream Omni thread from Superior Threads. Yes, I used cream on the entire quilt. I couldn’t find a thread to match the background good enough, so…I went with the cream thread, and Corinne and I love it!

Lets talk about scale for a moment… When quilting a quilt like this, I look at the full overall design. The fabric prints, the block design, does it have sashing. Every part, plays a part. For instance…I can do a fun design in the quilt block itself, and then miss the mark by either over quilting the sashing, or doing something that isn’t very harmonious. To be honest, I struggled with what to do in the sashing because the fabric is printed. I love the sashing fabric having a print, because it frames the block nicely, however I needed to quilt something that didn’t make it look busy. A part of me thought stitching right on top of the cross hatch in the fabric would be great, however that would be a lot of quilting. Probably too much quilting. So….I marked the center point on the outside edges of both sides of the sashing strip with a water soluble pen, and quilted two elongated X’s. AND…I loved it!! I thought if it looked bad, I would just unpick the thread and quilt the lines in the fabric. When quilting a sashing I look at how it is going to frame a block, and also frame the block next to it. Really how it starts to frame the entire quilt. You’ll notice the tighter quilting in the solid background too, which makes the lighter quilting in the sashing work so beautifully together. Its all about the combination of lines or angles together. Do they fight each other, or compliment one another. I often refer back to something that I learned in Interior Design school…is it pleasing to the eye and is there a variety in the size or scale of the design? As we are focusing on the 1/2” lines in the background of the block, that cross and create a grid, and the elongated X’s in the sashing…I want to point out the size or scale of them it different. That is why it works. That is why it is pleasing to the eye. Differing sizes or scales create balance. Now, would that work if the X’s were 10 times bigger, probably not. It wouldn’t look proportionate. Keep that in mind as you are custom quilting. I do continue the 1/2” lines in the flying geese background block and the half square triangles along the edges of the block. It can add to the great overall design when something is repeated. That goes back to balance. Even if the designs that are quilted are a little different, or facing a different direction, than say another design.

Now, lets talk curves. With all of the hard lines in the quilt block itself, I love to add curves of some kind, which just softens up the quilt block. I used my 2” Circle2™ machine quilting circle ruler, to quilt all the mini stars in the sashing, with a simple orange peel design. It’s easy to do, yet creates a much needed softness to the sashing and it highlights the star. The scale is great, too. It just a little bigger that the 1/2” lines, yet not as big as the elongated X’s. Can you see how its all coming together???

Now, lets talk about the center part of the block. Because the center piece of fabric is large enough, which is great because it showcases the fabrics beautifully, I have the opportunity to quilt something fun in the center. With everything that is framing the outside of the block, the quilting inside the block, is important. It’s the star of the show…and I need to make it shine. (pun not intended, haha!) I pulled out my 3”/9” Circle2™ ruler, and quilted all of those curves. Minus the freehand loops that I added between the orange peels. All of the orange peel petals are done with my 3” sized circle, and the center curved grid I quilted with the 9” sized circle. That is awesome to use both sides of that particular Circle2™ ruler, on the same design. I did quilt the orange peel and curved grid before quilting the four loops. It helped me have boundaries on where to quilt.
I sure hope that you enjoy learning about my thought process. Custom quilting doesn’t have to be intimidating. If you look at each line or curve, it really is simple. If you want to get started on custom quilting, but are afraid of messing up, pick up some rulers. They can add so much to your quilting, and having that ruler against your hopping foot, allows you to have some stability of sorts. Really, rulers open up soooo many quilting possibilities!!
Now that you have read my thought process when it comes to balance, scale, and overall design. Look at the overall design. Every part flows beautifully into the next. I just love when that happens.

I know that the picture below isn’t the best quality…however, look at that backing. All of that quilty texture makes my heart soooo happy. As a custom freemotion quilter, I never know what the overall design is going to look like on the backing until I take it off the table. And, when it’s this good, I couldn’t be more thrilled about it. The funny thing…It’s never about how its going to look on the backing. That’s just a bonus. It’s all about showcasing the blocks on the front. I will say too, there are some quilters who are huge believers in quilting in every single ditch. (or seam) I am not one of them. If I did that, the backing wouldn’t look this good. Do I see the benefit of quilting in the ditch to travel to another block, so I don’t have to stop the thread and cut it, yes. However, I try and figure out how to quilt as much as possible without stopping and try to avoid a lot of extra unnecessary lines. More on continuous quilting another day. Maybe that would be a great video to share. Would that interest you? Let me know in the comments below.
Also, just notice below…The elongated X’s and orange peel stars together. Creating another star, and that beautiful center is just such a sweet touch. Then add the stars framing around the block, ahhh…its just so good. This is what I love about custom quilting.

I hope you enjoyed a more in depth description into my custom quilting. Come back soon, I always have more to share.
And…watch out for Corinne’s next pattern release, next week. Its a good one…and was such a fun one to quilt.

These are the rulers that I used. The 3”/9” above and the 2” below. I looked and looked for years for a circle ruler set, and couldn’t find one that I liked. So, I designed my Circle2™ ruler set. It’s everything that I have wanted in a circle ruler set. I have only 6 rulers, yet I have 12 different sizes of circles, ranging in size from 2” up to 13”. The 3/4th of a circle design helps you navigate the ruler around easily as you quilt. It’s fun to see what others have created with them, too. Head over to the instagram hashtag #circle2rulers and check them out.
Circle2™ Ruler - Design Patent D875,574 -

The 3”/9” and the 2”/8” rulers pictured above are the green version, and below is the clear set of Circle2™ rulers all stacked on top of one another.
You’ll notice that the rulers have a straight edge with measurements along it, and the holes for easy hanging up. They are made from 1/4” high quality acrylic, in the USA.
BONUS… My Circle2™ rulers are on sale right now!! No code necessary. While you’re there, check out my digital quilting designs and Quilting It Freemotion course. Something for every quilter. Sale ends Sunday November 21st at midnight, mountain standard time.
I hope that you have a great week, and happy quilting. -Leisha
• Huge Holiday Sale •
Hi Friends,
I can’t believe its almost Thanksgiving, here in the US. Time flies!! With the holidays around the corner, I’ve decided to do my Holiday Sales this week, instead of my usual black friday or cyber monday sales. That way you don’t have to remember one more sale during that crazy time.
So…Which quilting designs are your favorite? Is there one or two that you’ve had your eye on? Now is the time to get them!! This is the best sale that I do all year. If you need a little help, I have checked to see what the most popular designs are, click here. So excited to see what you choose!

The exciting thing…I have lots of fun quilty things in my shop. If you’re a longarm quilter, and you’d like to try your hand at some freemotion quilting, I have a 10 video course which can take you from beginner to confident quilter. If you’re interested in trying out some rulers when you quilt, I have some fabulous machine quilting circle rulers, called Circle2™. They are everything that I have ever wanted in a circle set of rulers, with circles ranging in size from 2”-13”. I also have a wide variety of quilting designs, which are so fun for me to create. It’s an absolute joy for me to see them on the quilts that you make or quilt for your clients. If you aren’t a quilter, but would lovvvve a handmade quilt, I have a wide variety of quilts in my shop, with a few Rope Bowls as well. Something for everyone!
Details…All digital quilting designs are 30% off, and everything else is marked down at the sale price. Sale ends at midnight on Sunday November 21st. No code needed.
Thanks for supporting my small business!! I wouldn’t be able to do what I do without each of you. It means the world to me! Thank you, thank you!!
Leisha
Kim’s Mountainside Quilt & a gluten free pie crust recipe...
Hi Friends,
I hope that your week is going well! I’m custom quilting an incredible quilt…that I’ll share soon. Also, trying to keep up with sharing the fun quilts that I’ve been quilting lately. Like this one that Kim made. Plus, I share my thoughts on quilting designs that run vertically on a quilt, my opinion on minky backings, and I even share my favorite gluten free pie crust and apple filling recipes. This is a good one!! Enjoy!
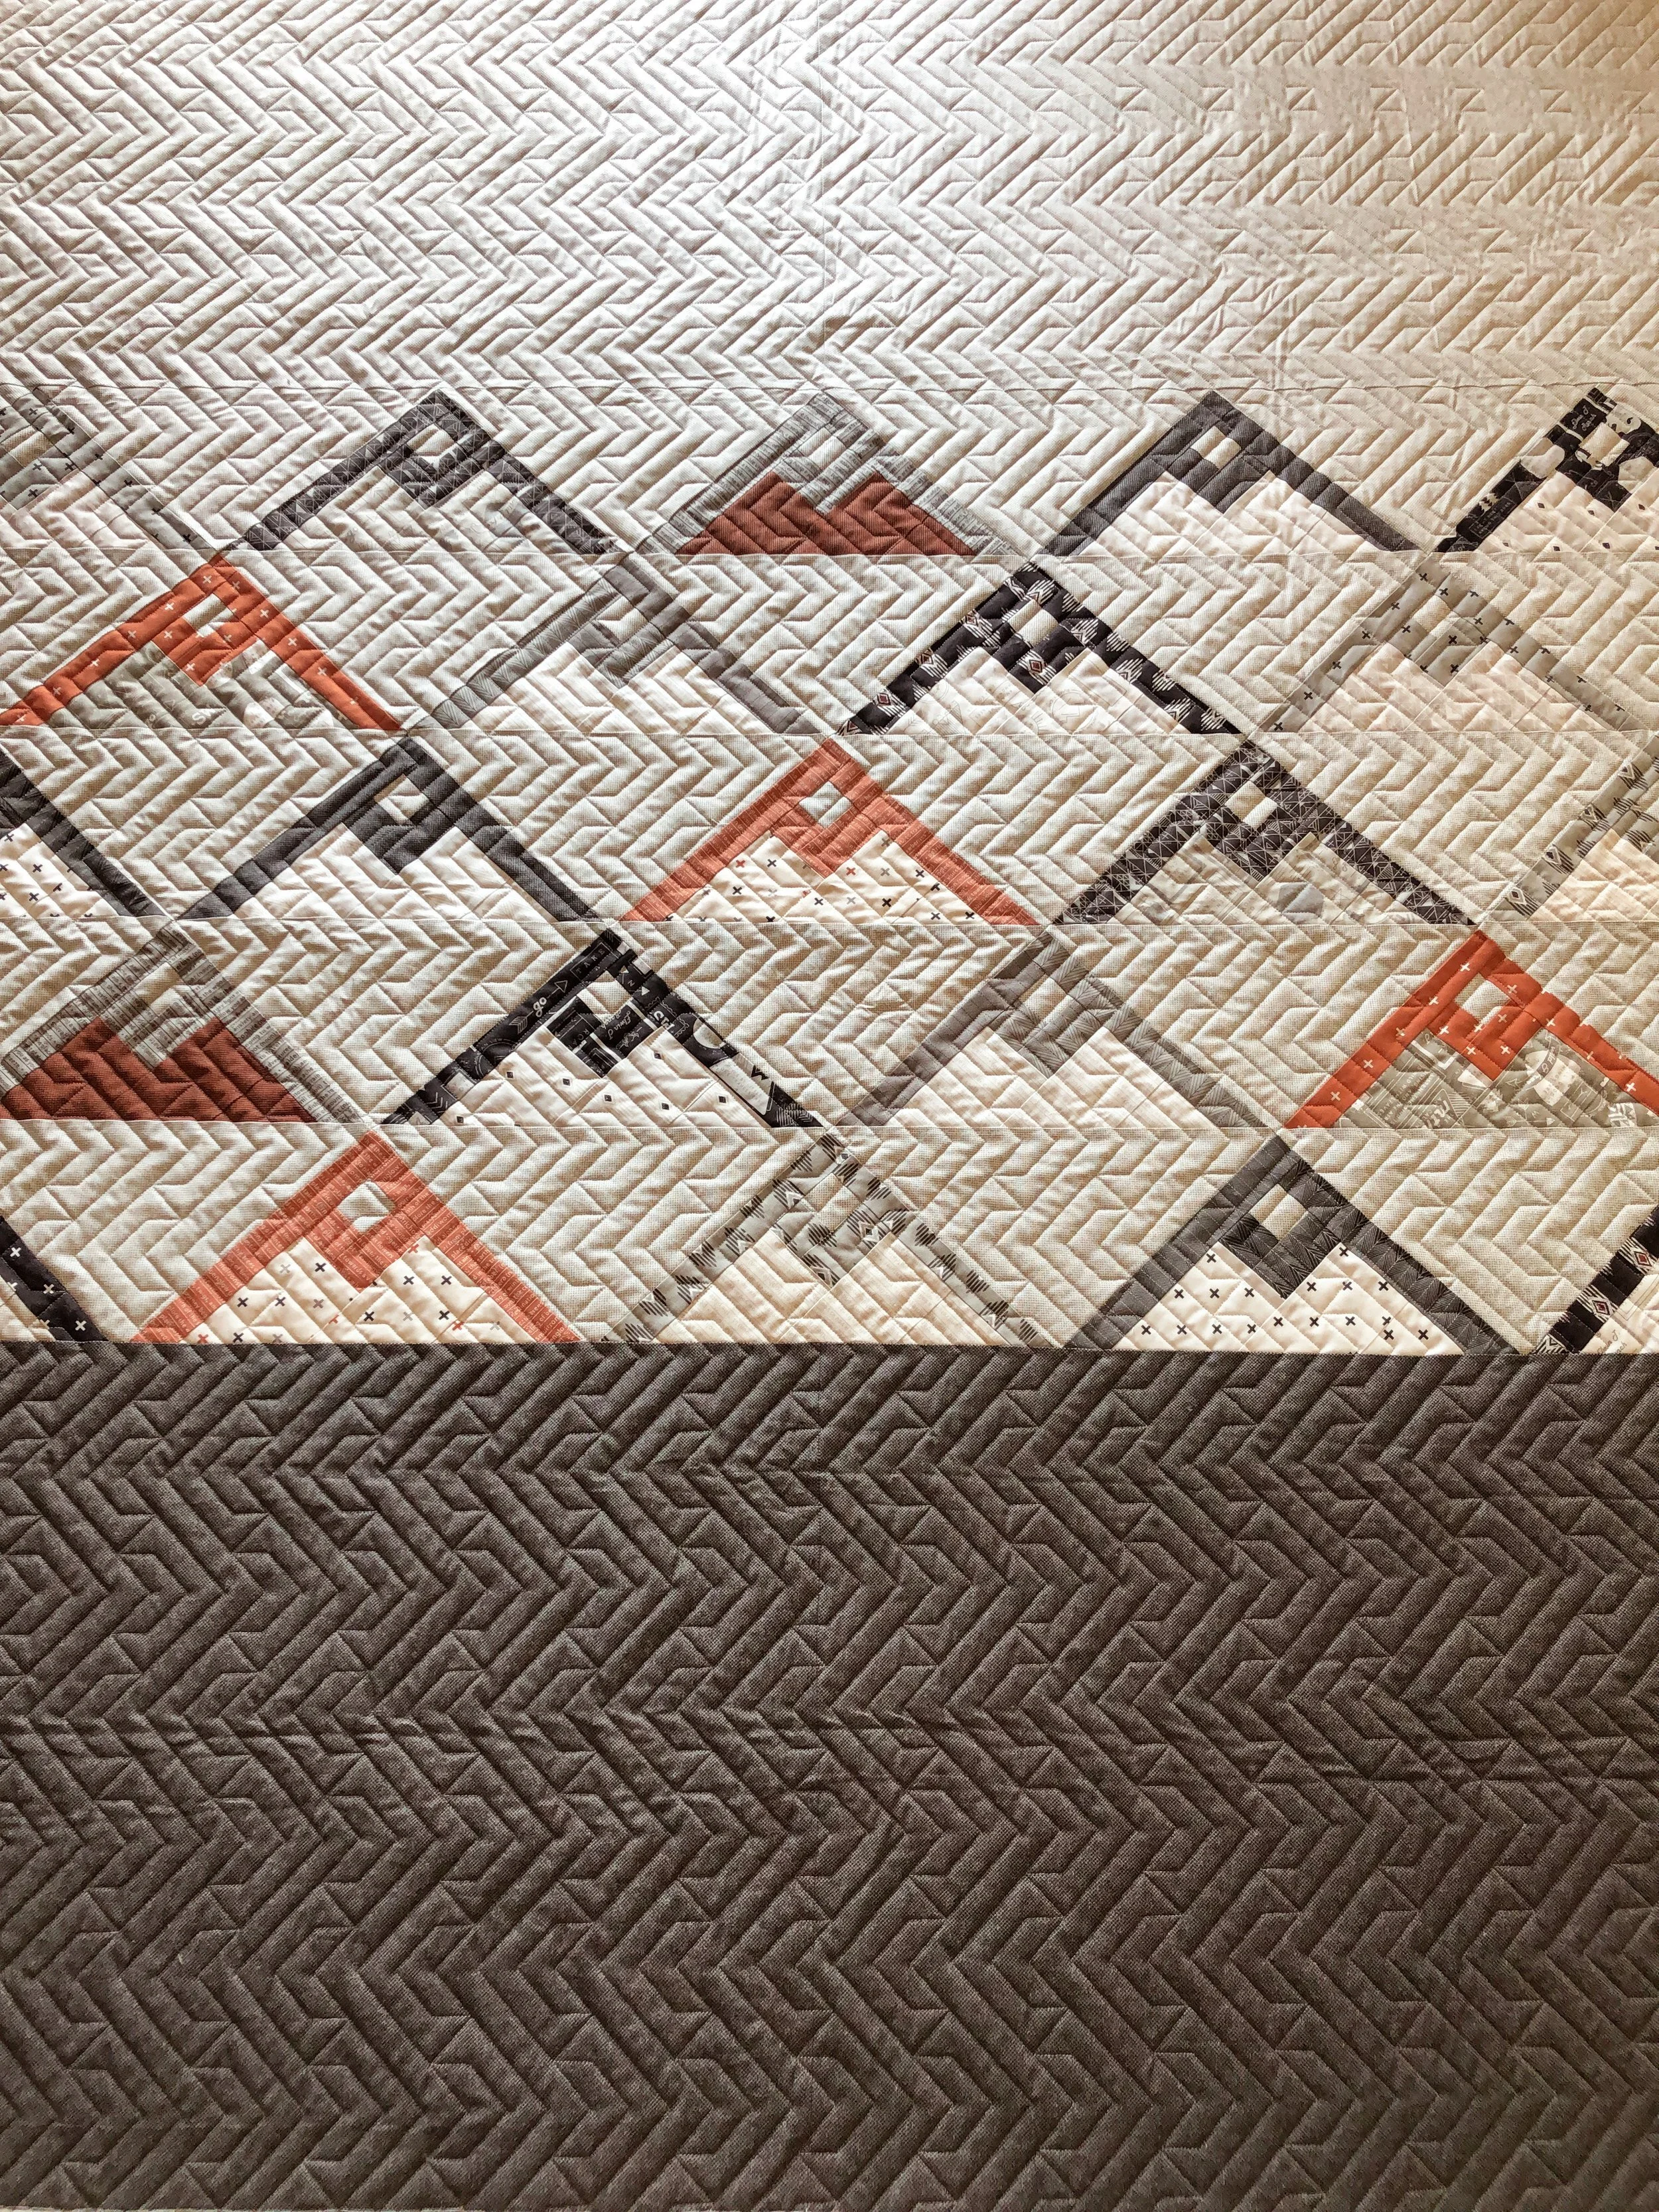
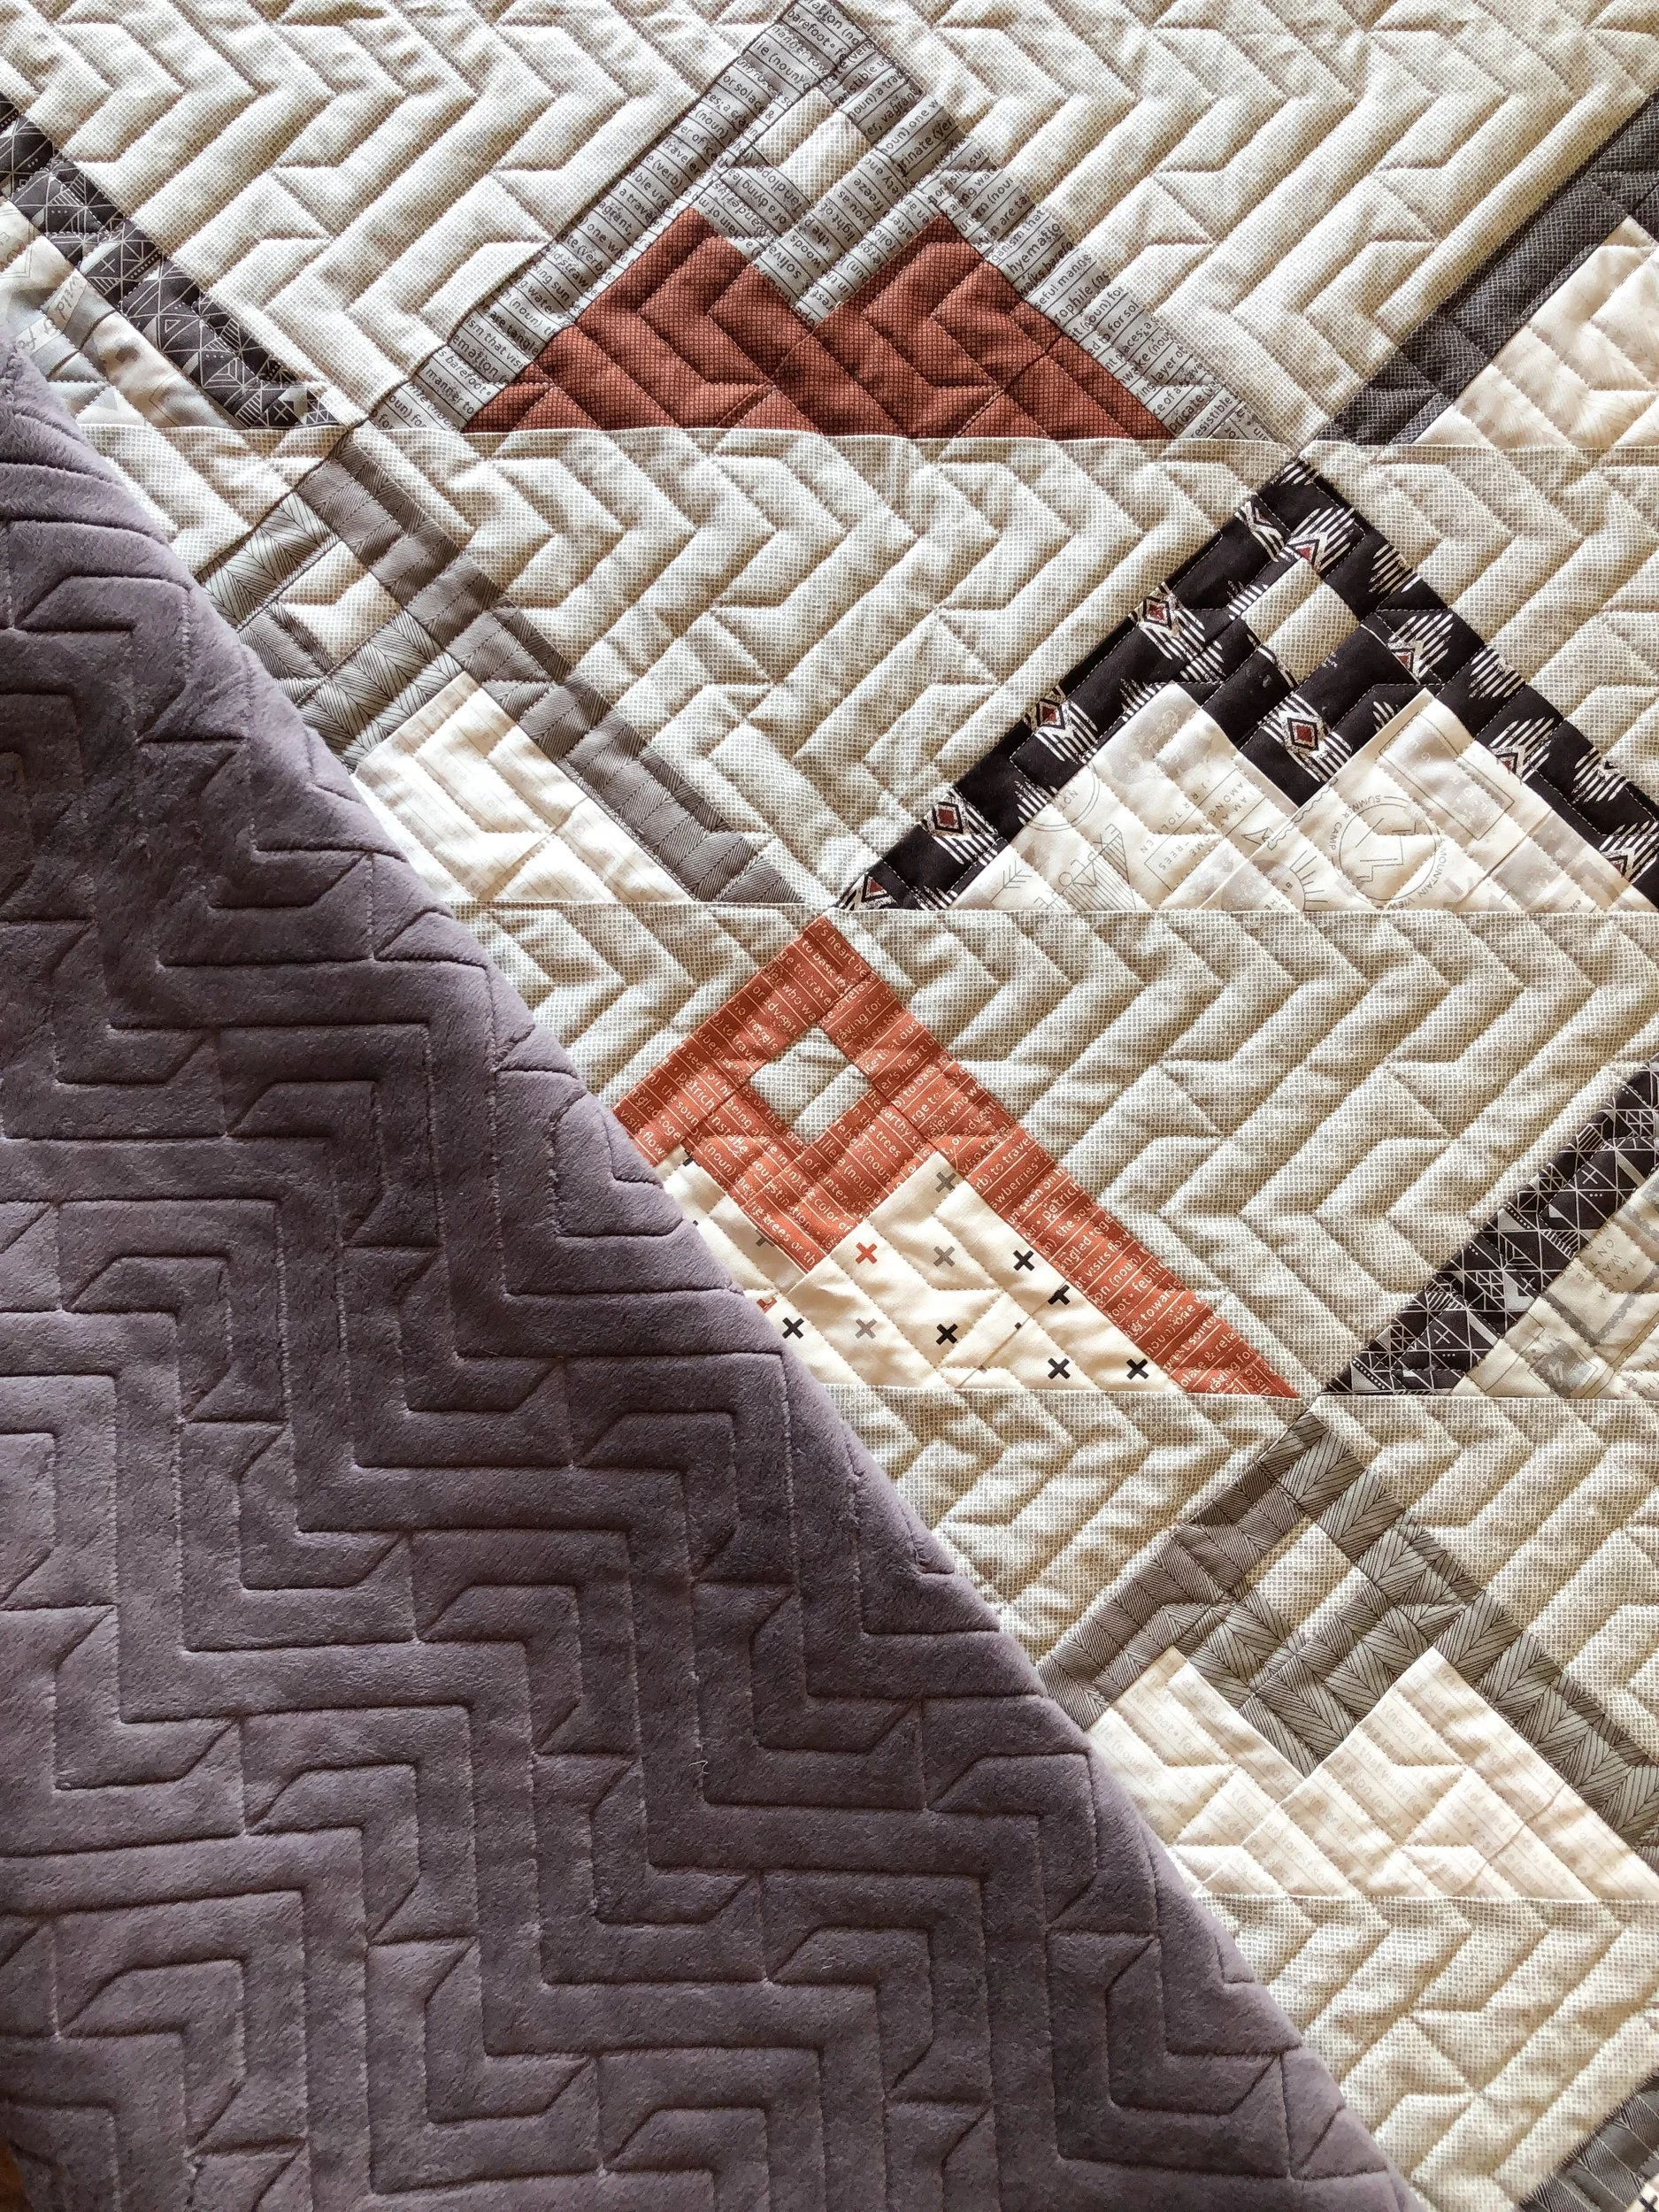
The pattern is called Mountainside by Vanessa from Lella Boutique, and it’s made with her Smoke and Rust line of fabric. This is such a cool quilt. The combination of fabrics… colors, prints and the pattern…such an awesome option if you’re looking for a guys quilt.
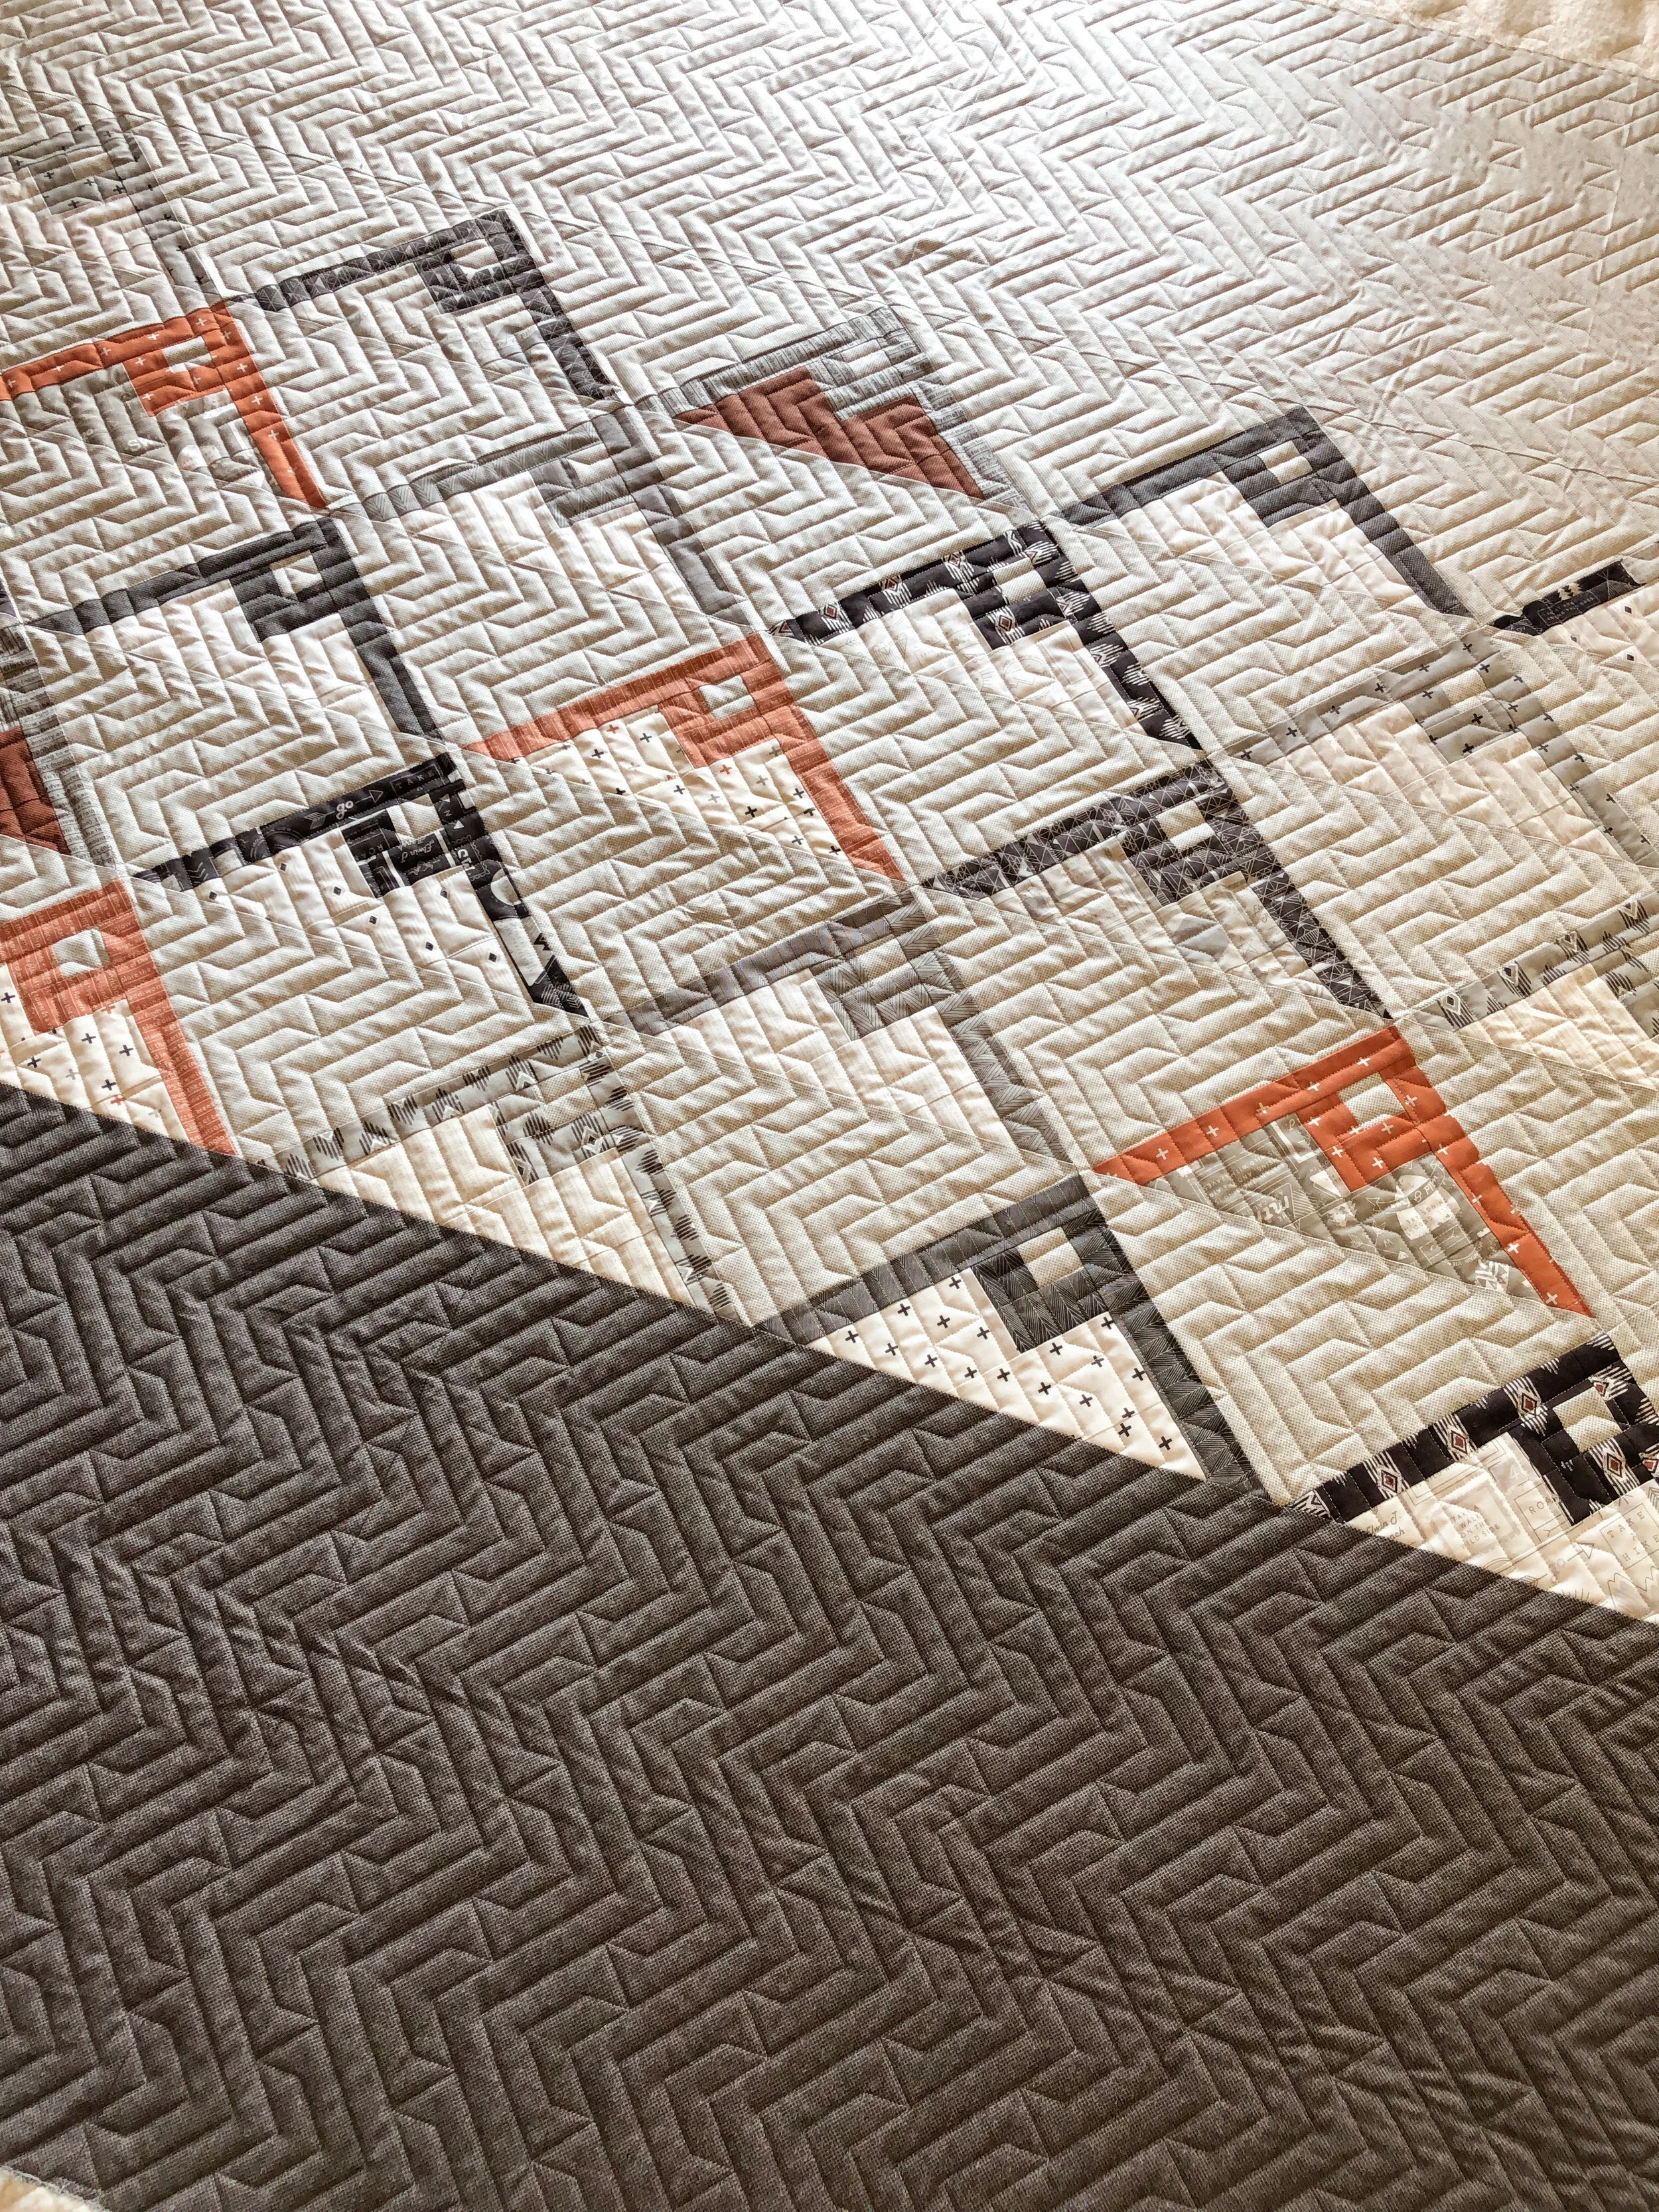
I used my favorite 8020 from Winline out of Ogden, Utah. I also used a cream Omni thread from Superior Threads. They have such great threads!
On a quilt like this one I wanted to pick a fun deal that would create some awesome texture, especially with all the negative space…and it turned out great!!!
This is my Southwest design!! If you notice from the image below, the direction is different than how I quilted it on Kim’s quilt. The reason it’s turned sideways, the backing has minky on it and I only pin minky onto the machine on the two cut ends with the selvages running down the sides…because of the not so lovely stretch. The quilt had to be turned sideways to fit onto the minky backing. The bonus…I actually love that the design is going vertically down the quilt, instead of the normal horizontal direction. The direction of the quilting design isn’t competing with the mountain peaks in the quilt pattern. It’s a win win, if you ask me. If I ever want to run a computerized quilting design down a quilt vertically, because I think it would look great with the pattern and fabrics, I do it!! Unless, minky makes me only go one direction. So, don’t be afraid to have quilting designs quilted vertically on your quilts. Sidenote…some quilting designs do suggest that longarm quilters turn the quilt sideways, and quilt the length. They just look so much better vertically!! So as to not confuse you, quilting designs are typically quilted horizontally on a quilt.
With that being said, there are times when I have designs picked out with my client, and then I realize the quilt has to be turned…usually when the backing is minky…and the design just wont look good sideways on the quilt. For instance…recently, I had a client drop off a national park panel that she wanted quilted, and we decided on our Kindling quilting design. She had minky for the backing, and I realized when I laid the quilt out to make sure that the backing was big enough, that I would have to turn the quilt sideways and quilt the length of the quilt…so we had to change gears and pick a new design. Kindling is a fun design, it just wouldn’t look good sideways. We settled on another design and it looks great!
I love how simple lines can create such a fun texture. I like Southwest quilted at a 5” height, and there is no backtracking. It’s one of the many quilting designs that I offer in my shop. Southwest is a unique take on a chevron…however, it actually has more of an arrow texture to me…hence the Southwest name.
A few more pics of the fabrics…such cool prints by Vanessa.
Some more close ups…
And…look at that cool texture on the minky backing!! I love the solid 90” wide minky from Shannon Fabrics, it shows the quilting beautifully. I personally think the embossed or textured minkys compete with the quilting. Let the quilting create the fabulous texture, and you’ll love it every single time. At least I do.
Even though I have more quilting to do, I am going to take a break the day before Thanksgiving and make some gluten and dairy free pies with my sister, who also eats gluten free. This is the apple pie that I made last year.
If you or someone that you love eats gluten free…here is the recipe. I also don’t eat dairy, so its dairy free as well.
Gluten free and dairy free pie crust, and its flakey just like a regular crust. Recipe vis Gluten Free Gourmet.
1/2 cup tapioca flour
1/2 cup cornstarch (100%)
1/4 cup potato starch flour
1 cup rice flour (I love the Bob’s Red Mill white rice flour…its so smooth)
1 rounded tsp. xanthan gum
1/2 tsp. salt
dash of sugar
1 cup crisco
1 egg, cold
1 T. GF vinegar
4 T. ice cold water
Note: to insure that the crust is actually gluten free, you need to make sure that all of your ingredients say that the are gluten free. Even simple things like vinegar, aren’t always gluten free unless they say so.
More rice flour for rolling.
Blend flours, xanthan gum, salt, and sugar by hand with a pastry blender. Cut in the crisco in small pieces with a pastry blender until combined. In a seperate bowl beat the egg with a fork, then add vinegar and water, then mix into the flour mixture forming a ball. You can knead it a bit because the rice flour is so light. Refrigerate for an hour or longer. Then I used some plastic wrap with rice flour when I rolled it out to help it go into the pan easier. This is enough for a crust and pie shell. Bake according to the filling recipe or for a pumpkin/cream pie bake on 450° for 10-12 minutes. Hint: I have used our dry container on our vitamix and ground up regular white rice, for the rice flour. It was easy! Or, you can just buy the rice flour. You could use 1/2 c shortening and 1/2 cup dairy free butter, if you'd rather not use a cup of crisco. The vinegar from Walmart is GF. I also got a pie mat to roll the crust onto which makes it sooo much easier to flip and add to a pie dish. If there are any cracks or rips in the crust, use a spoon to smooth it together. I used the tip of a spoon to create the fun scallop edge.
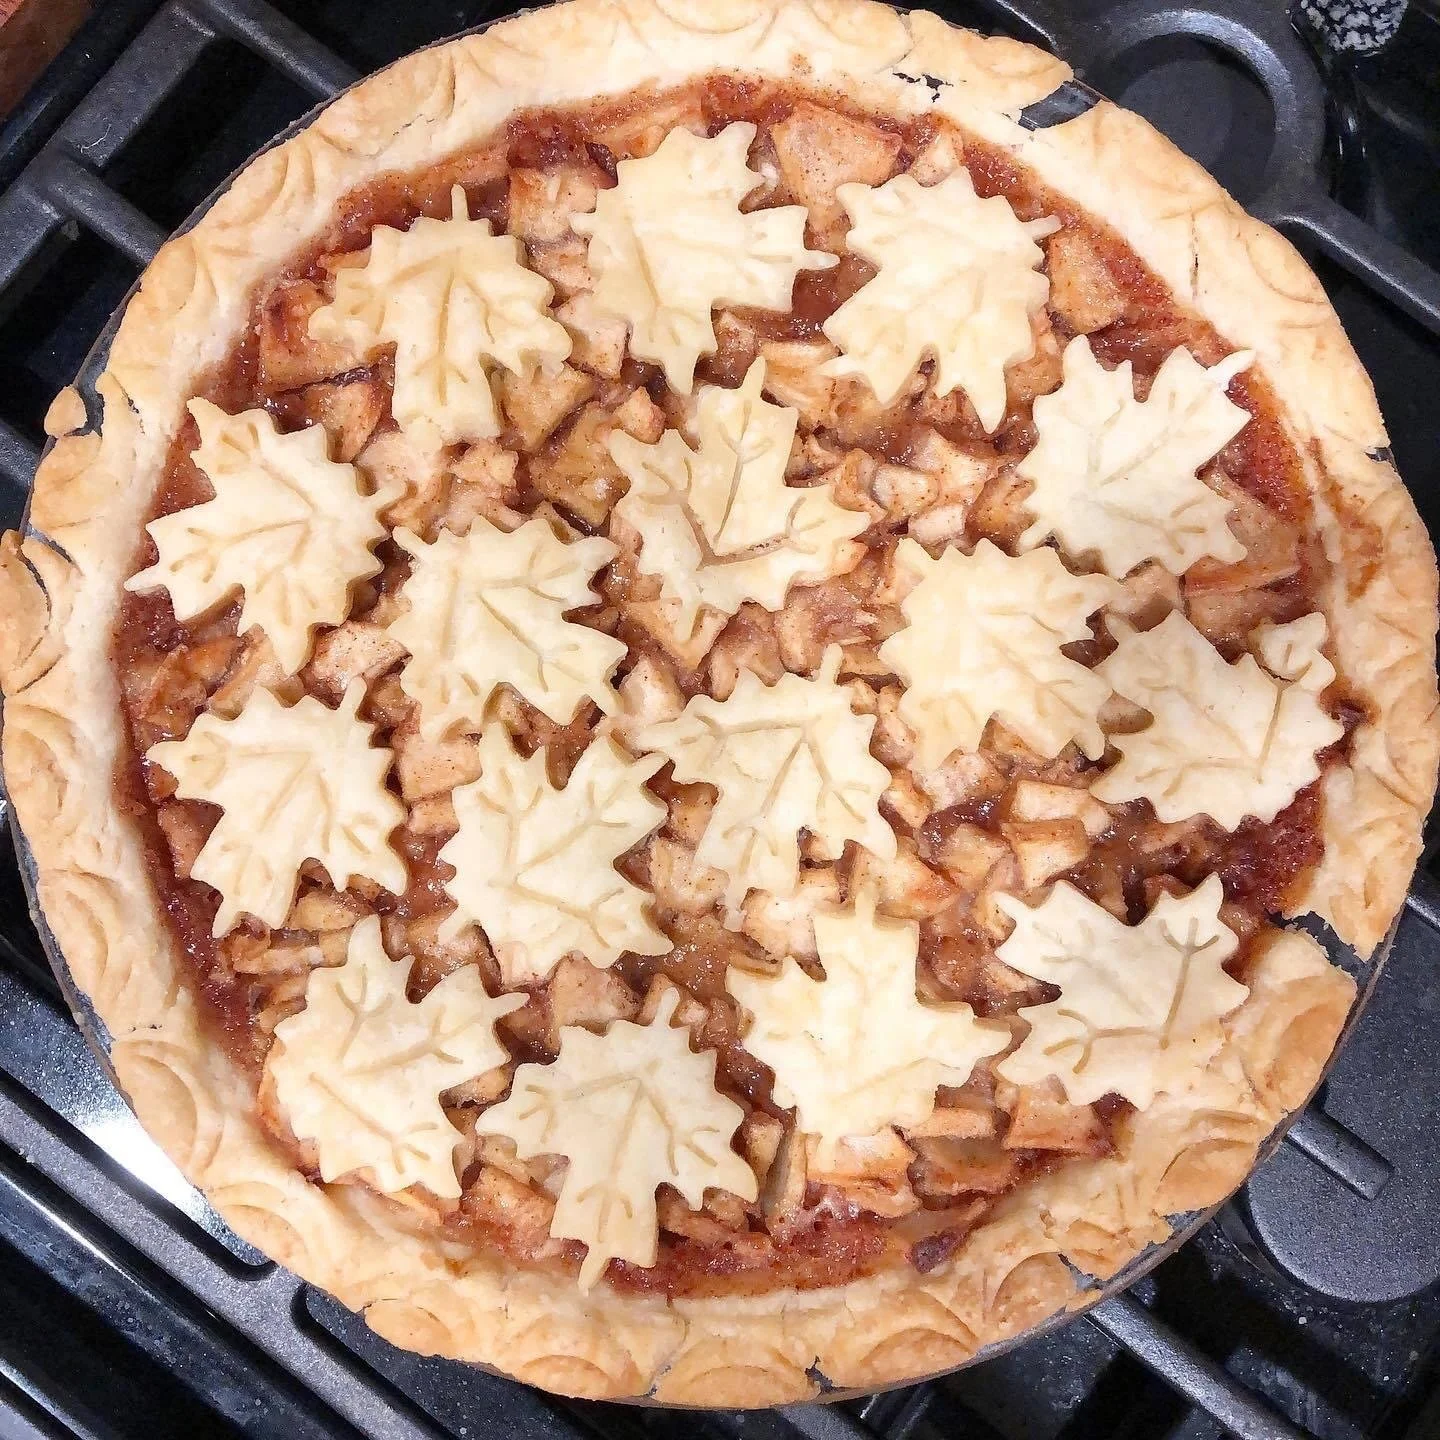
If you’re interested in the filling recipe…
Apple Pie Filling, family recipe:
1 cup sugar
2 T. cornstarch (100%)
2 tsp. cinnamon
1/4 tsp. nutmeg
1/4 cup GF flour (1 to 1 Gluten Free Flour from Bobs Red Mill, is my go to flour)
1/4 tsp. salt
1 T. lemon juice
5 cups sliced apples.
Mix all the dry ingredients, pour lemon juice on apples to help them not brown. Mix well and pour into pie crust. Break up 2 tablespoons of dairy free butter on top the apples before adding the top crust. Bake at 400° for 50-60 minutes. I cooked it for 60 and I'm at a higher elevation. I was thinking I'd need to cover the edges of the crust so they didn't burn, I didn't and its a nice golden brown.
Thanks for humoring me. I know that simple things like eating pie, can be difficult for those of you who can’t eat a normal slice of pie. I was just going to share the picture of last years pie, but then thought someone may be interested in a recipe. Enjoy! No worries, this won’t be a regular thing. I do have a gluten free instagram account where I share recipes or finds, you can go check it out here: @gluten.free.leisha
Have a great week!! Thanks for stopping by. - Leisha
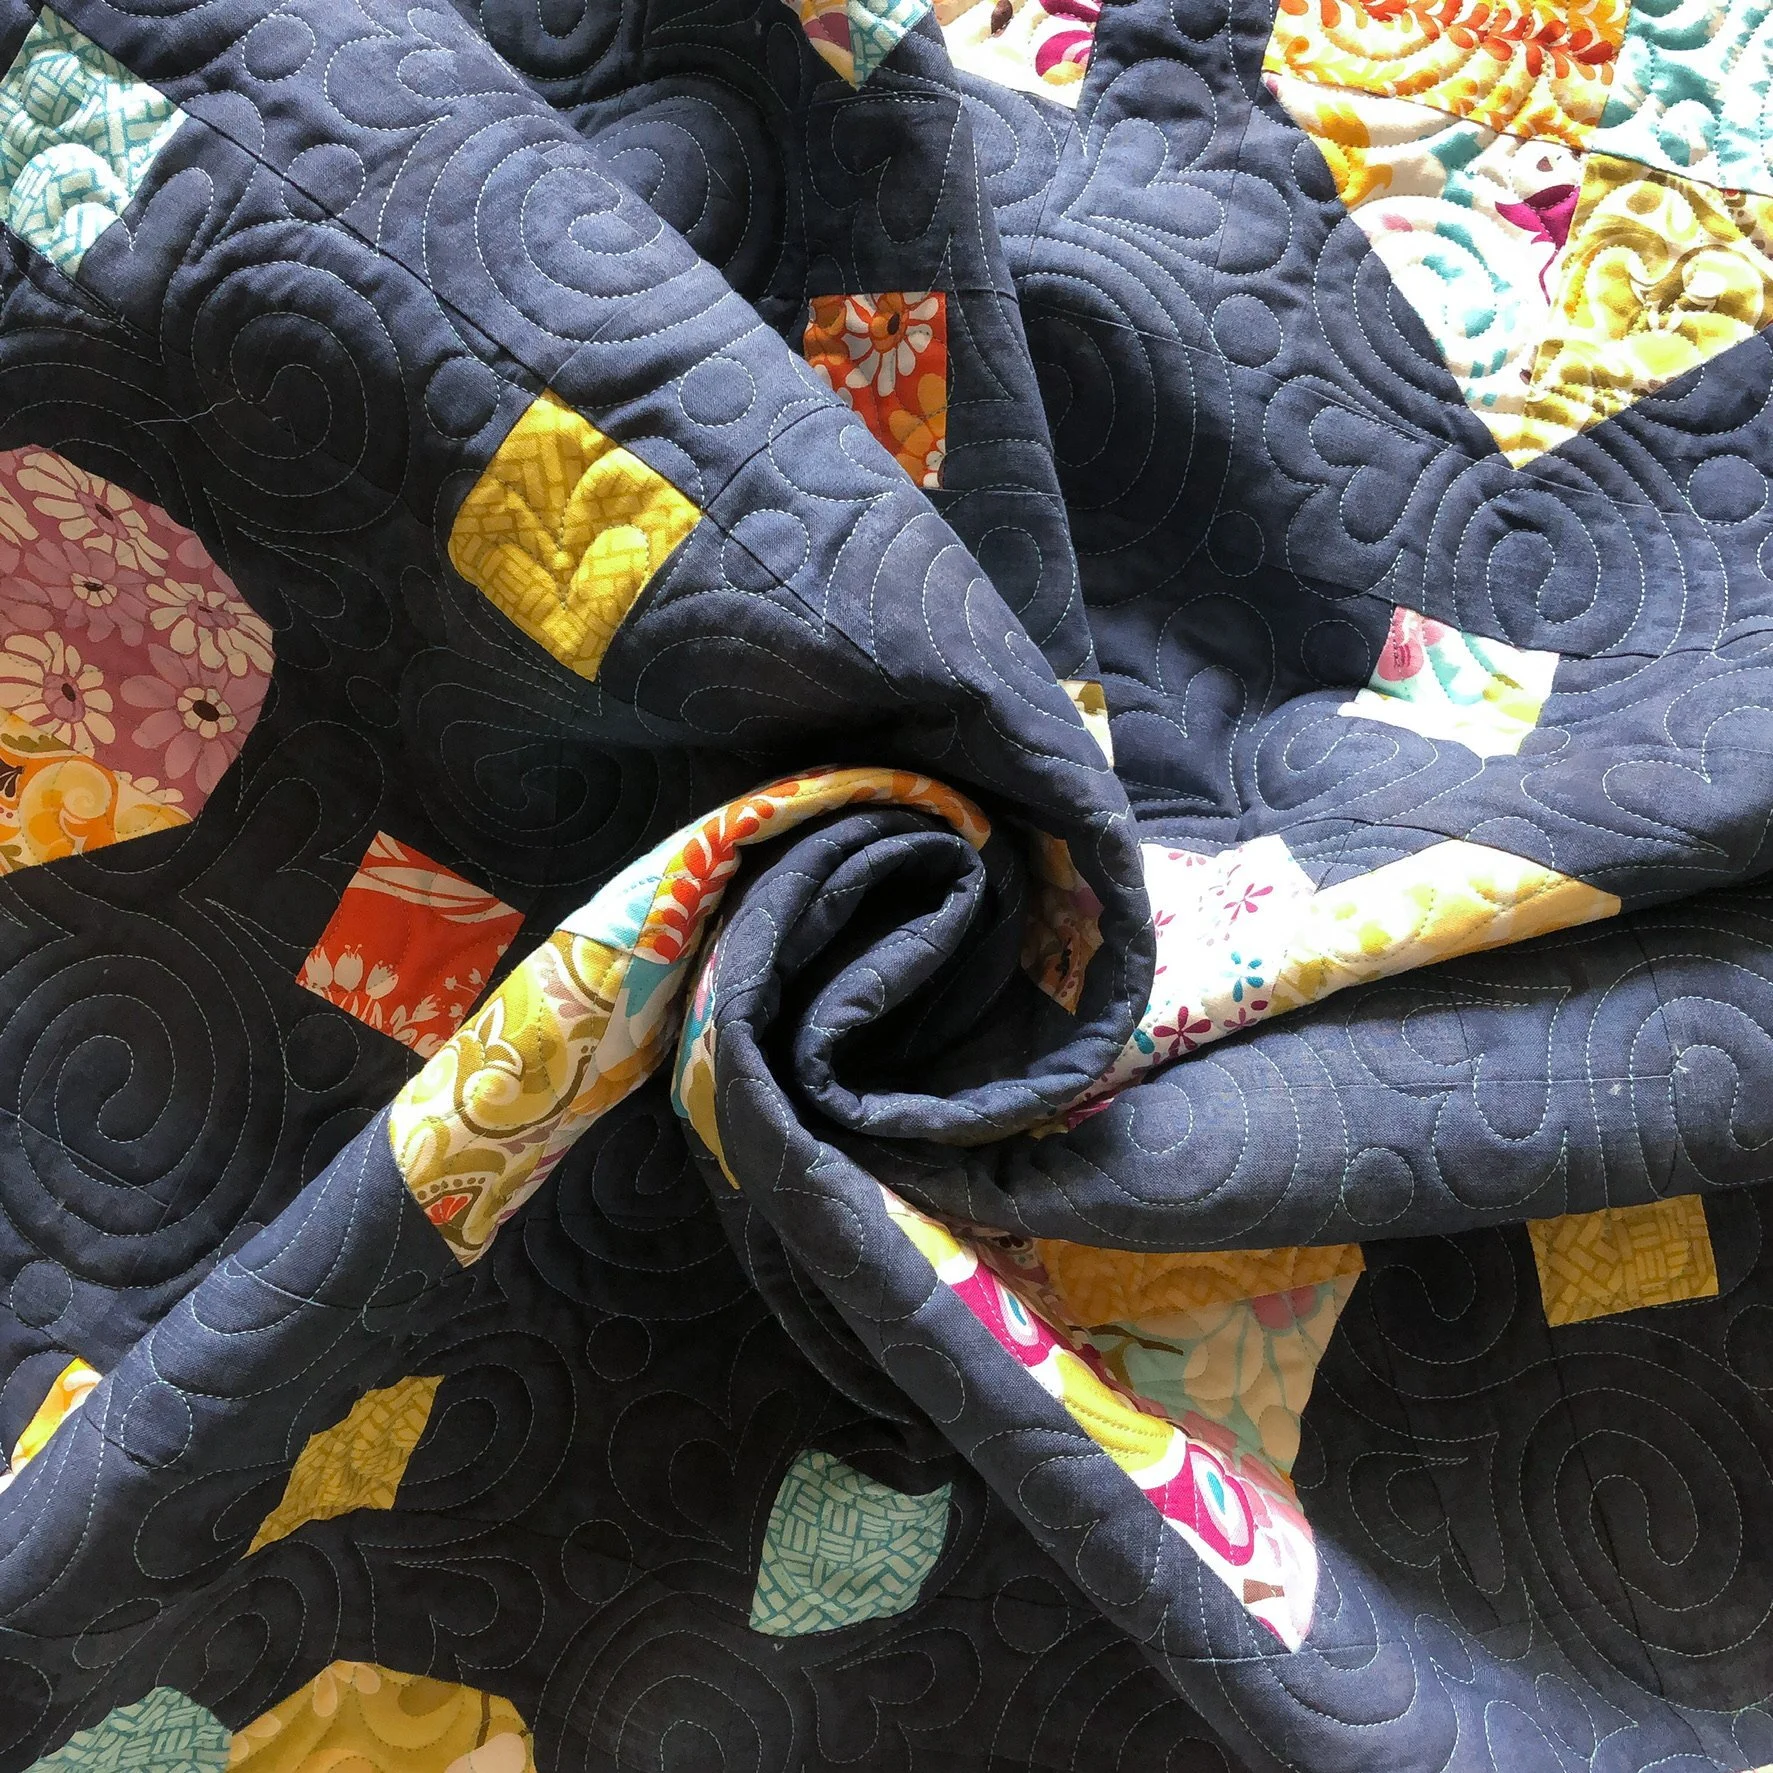
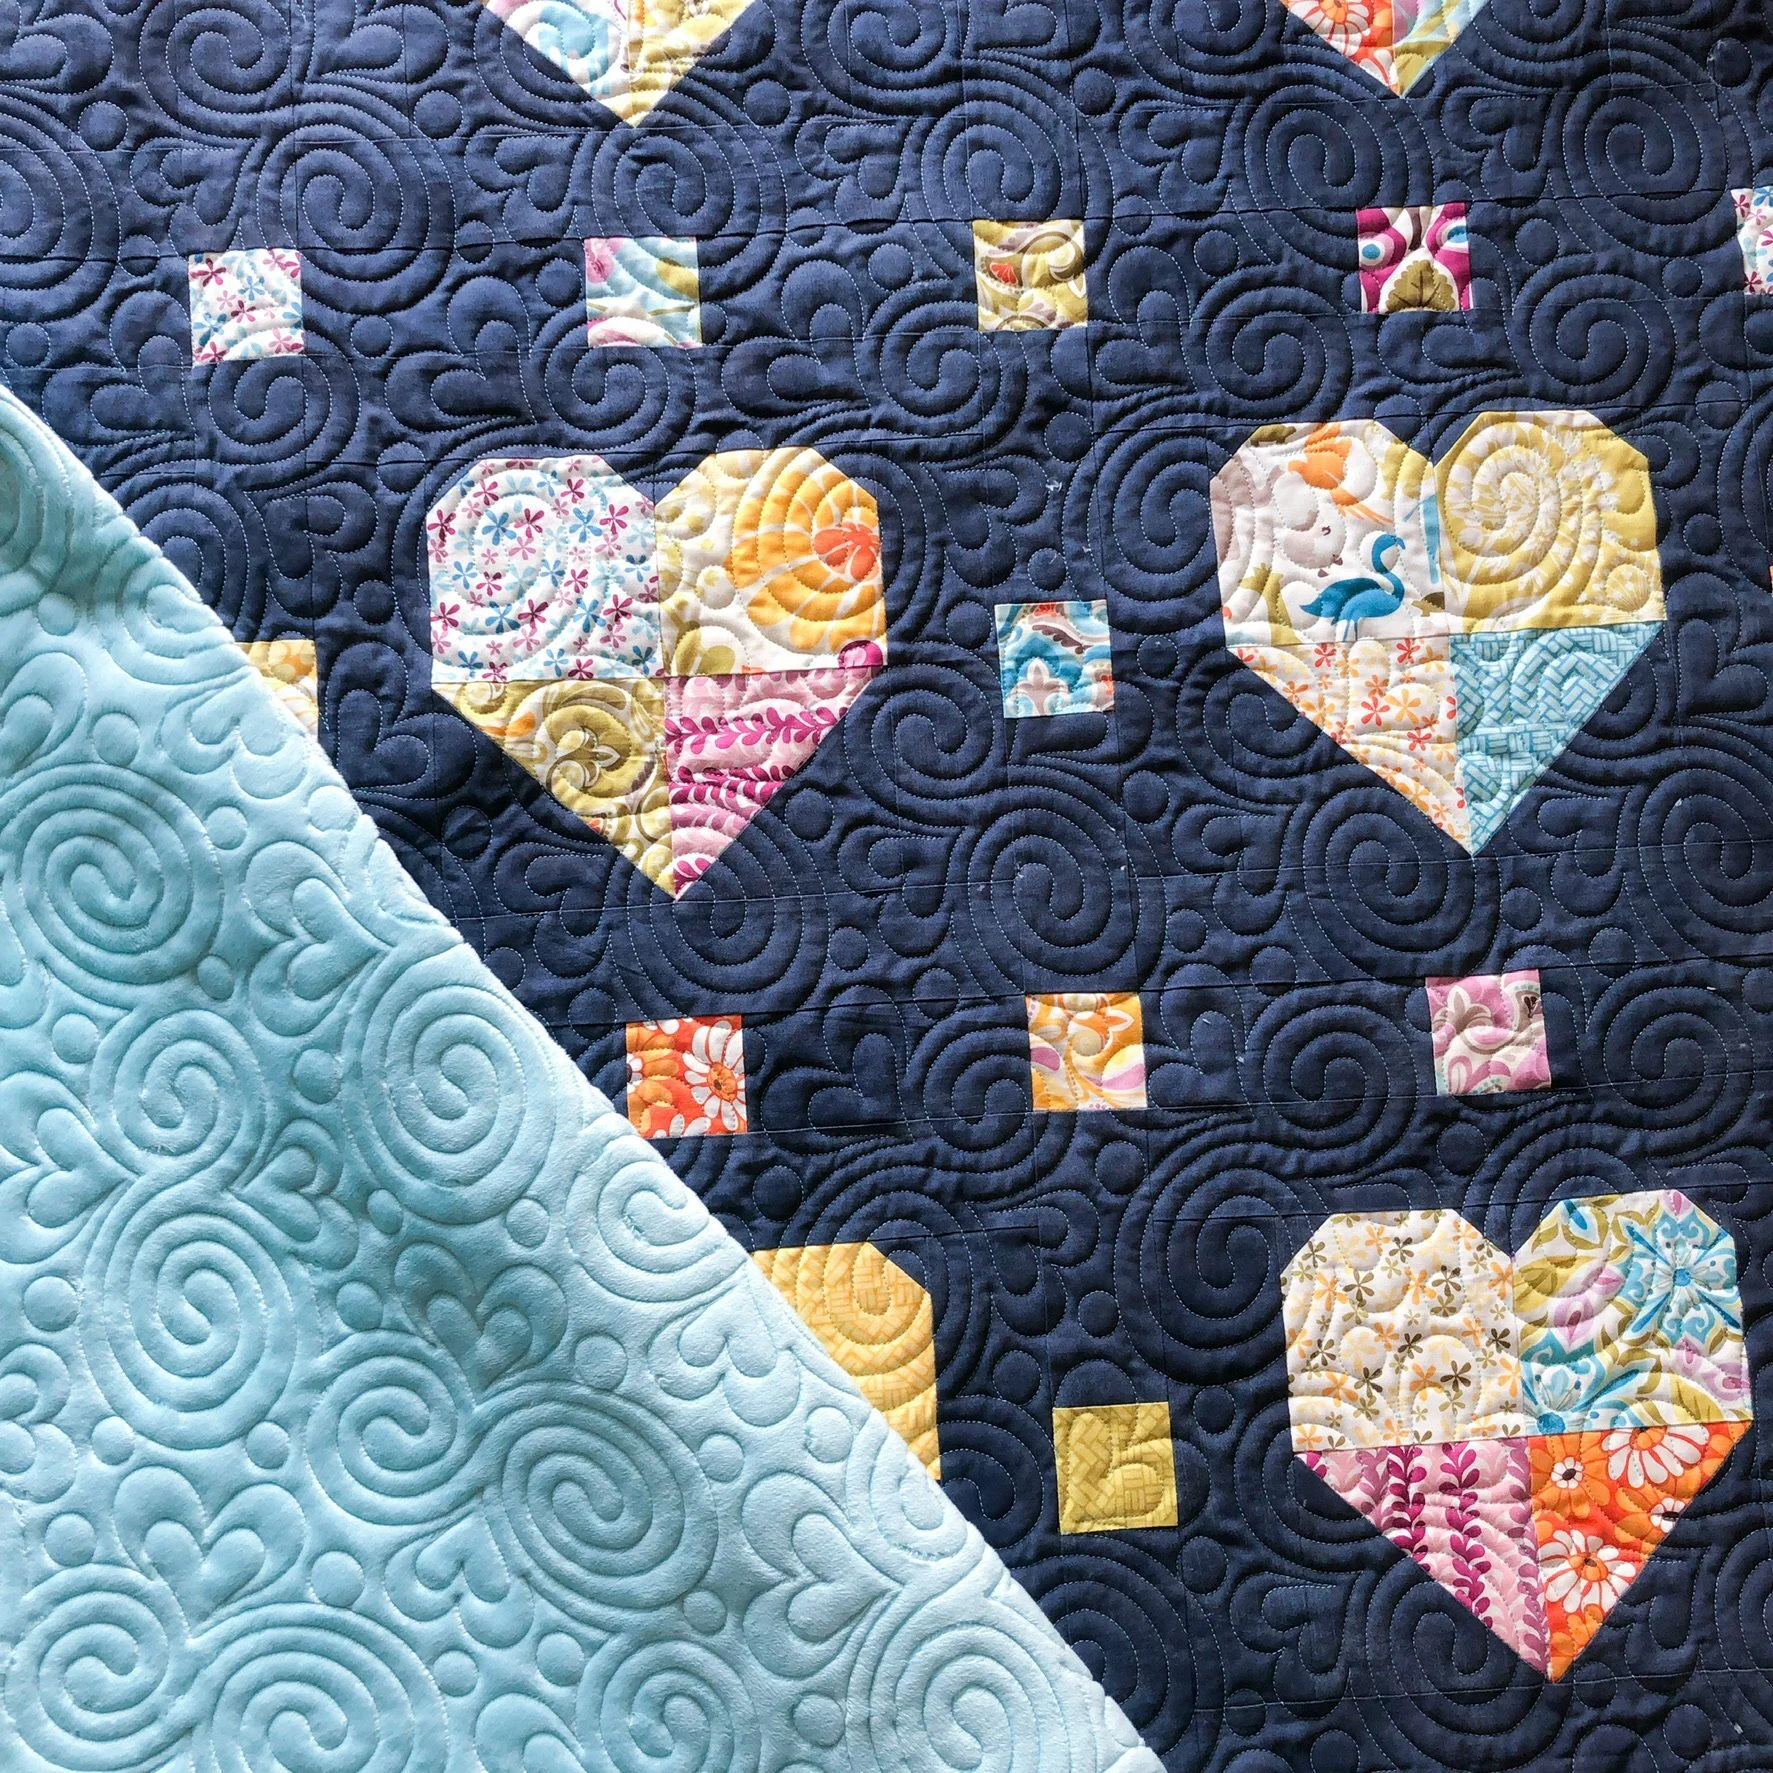
• Kim’s Scrappy Hearts Quilt •
Happy Monday,
I hope your week is off to a great start! I actually love Monday’s. It’s great to get back to my schedule and get things done…although, I do love a great weekend too. Do you like Mondays?
I have such a fun quilt to share with you…
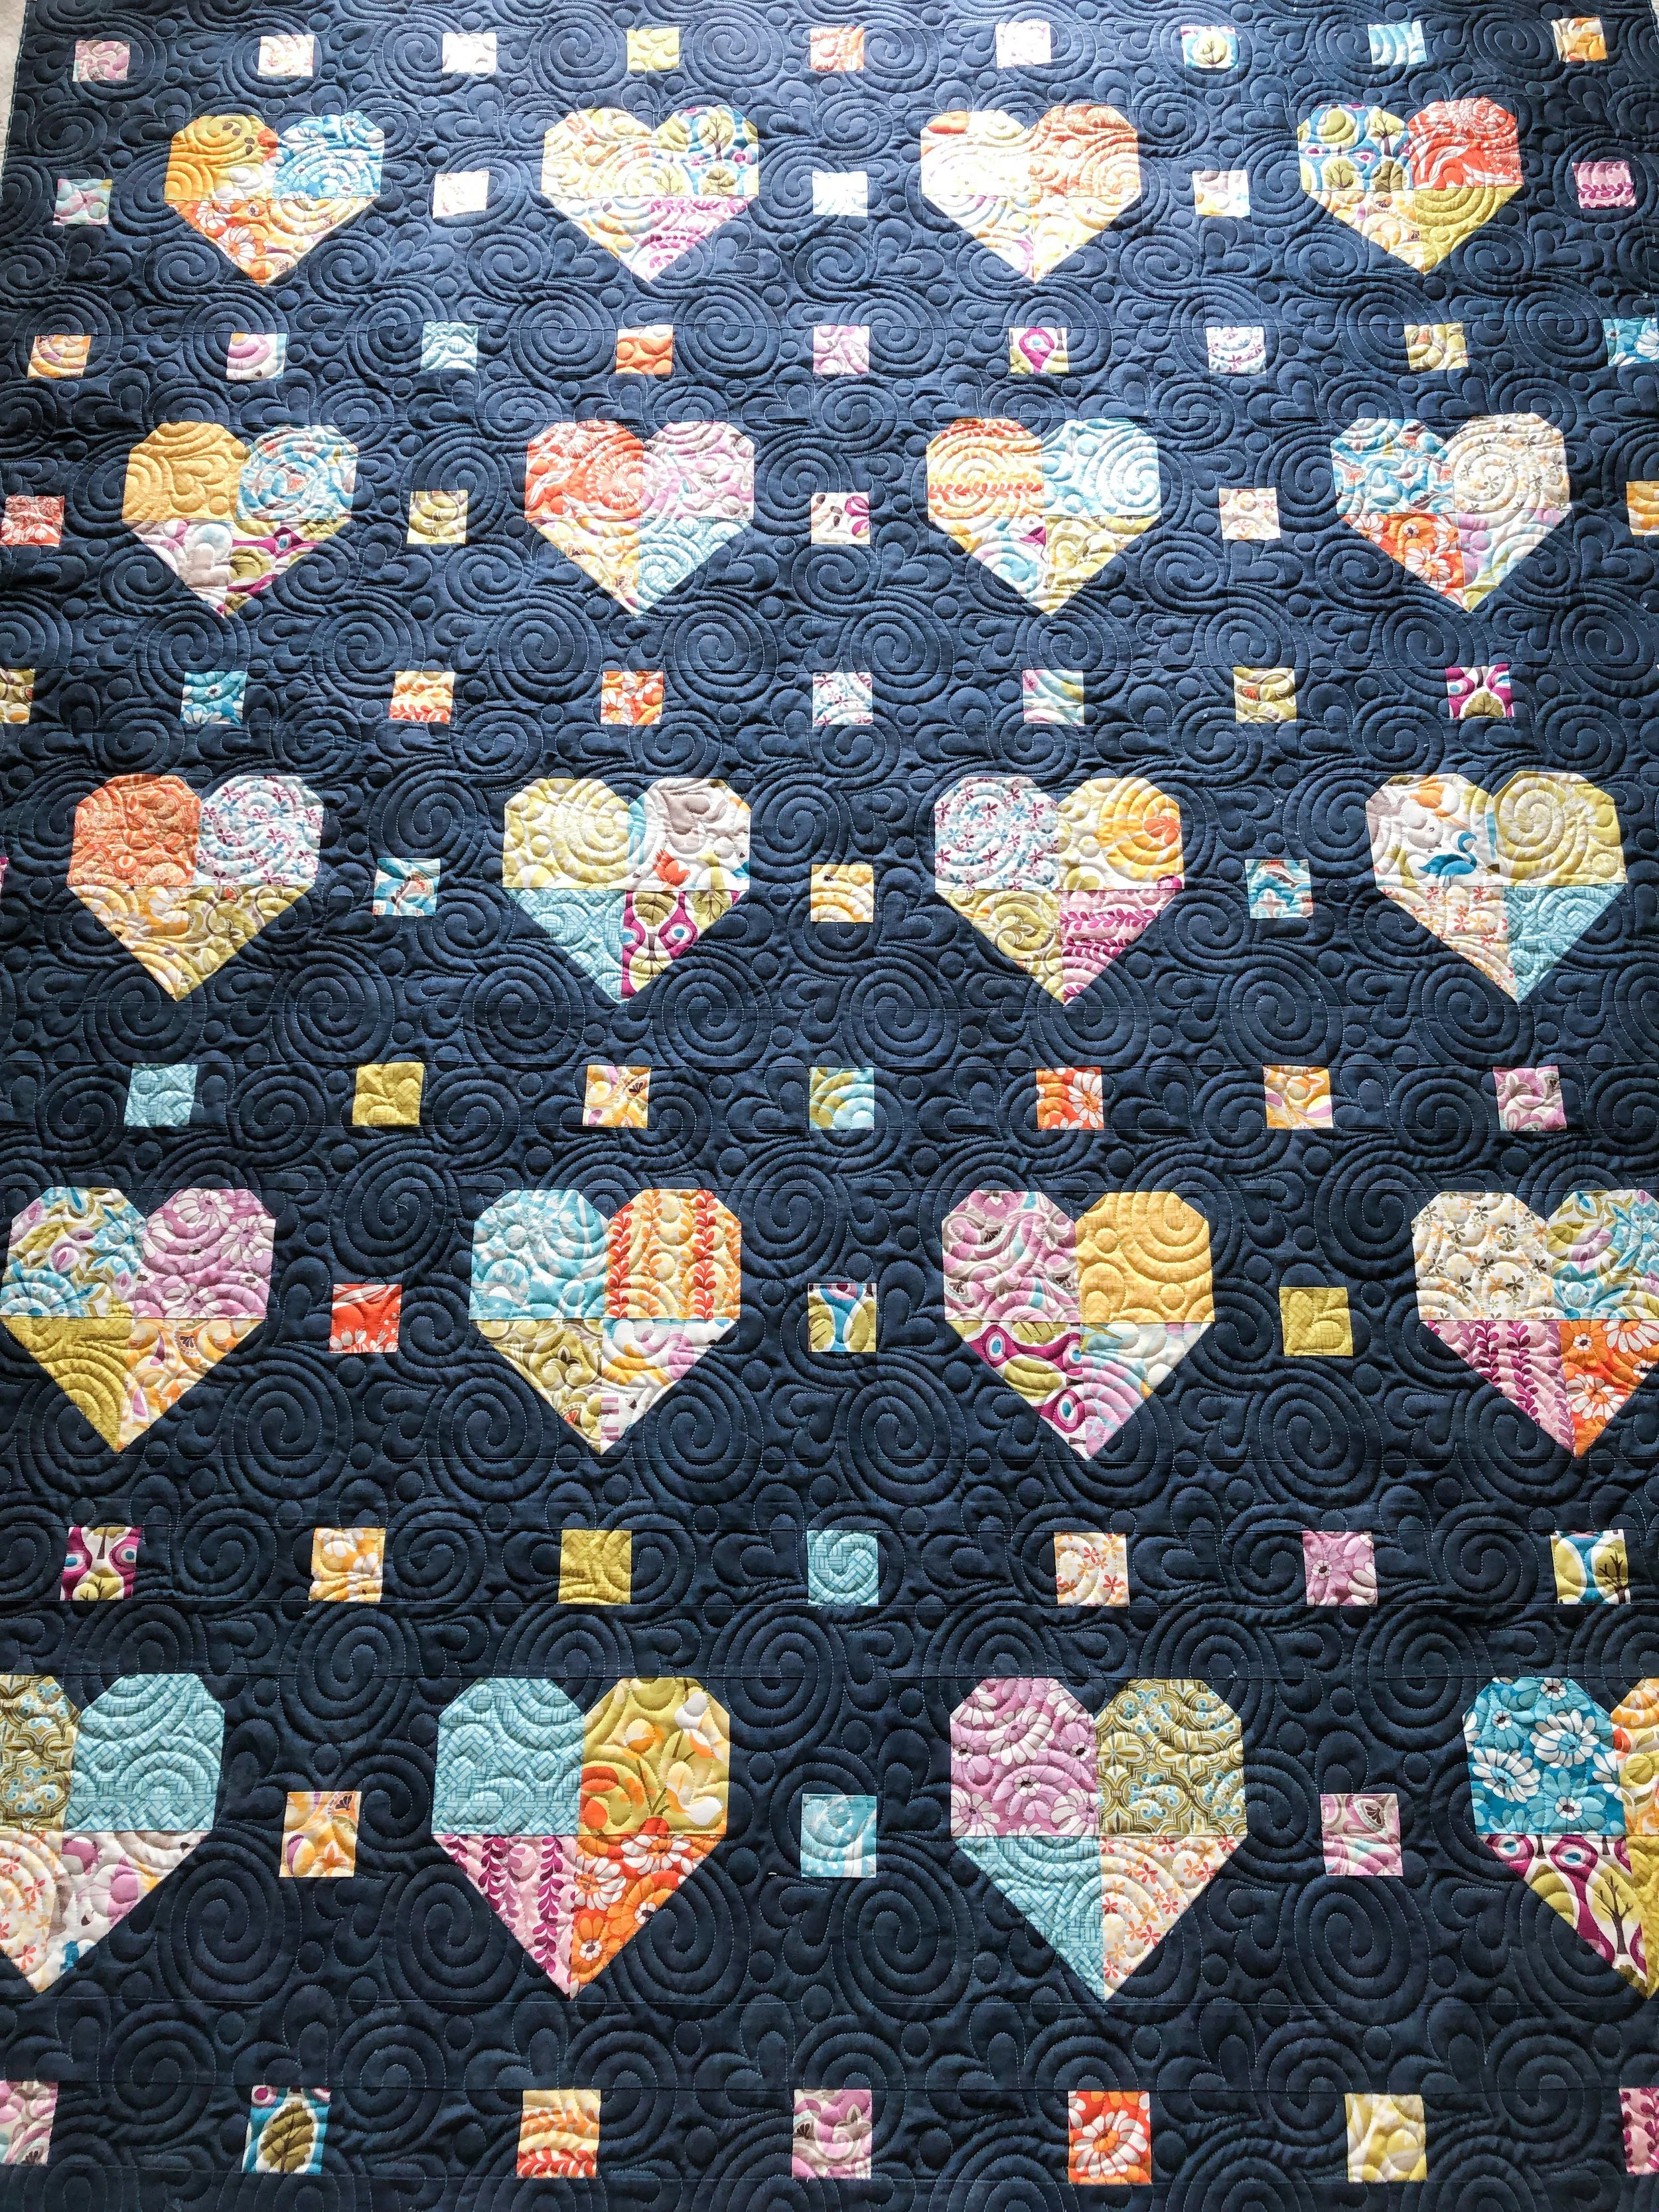
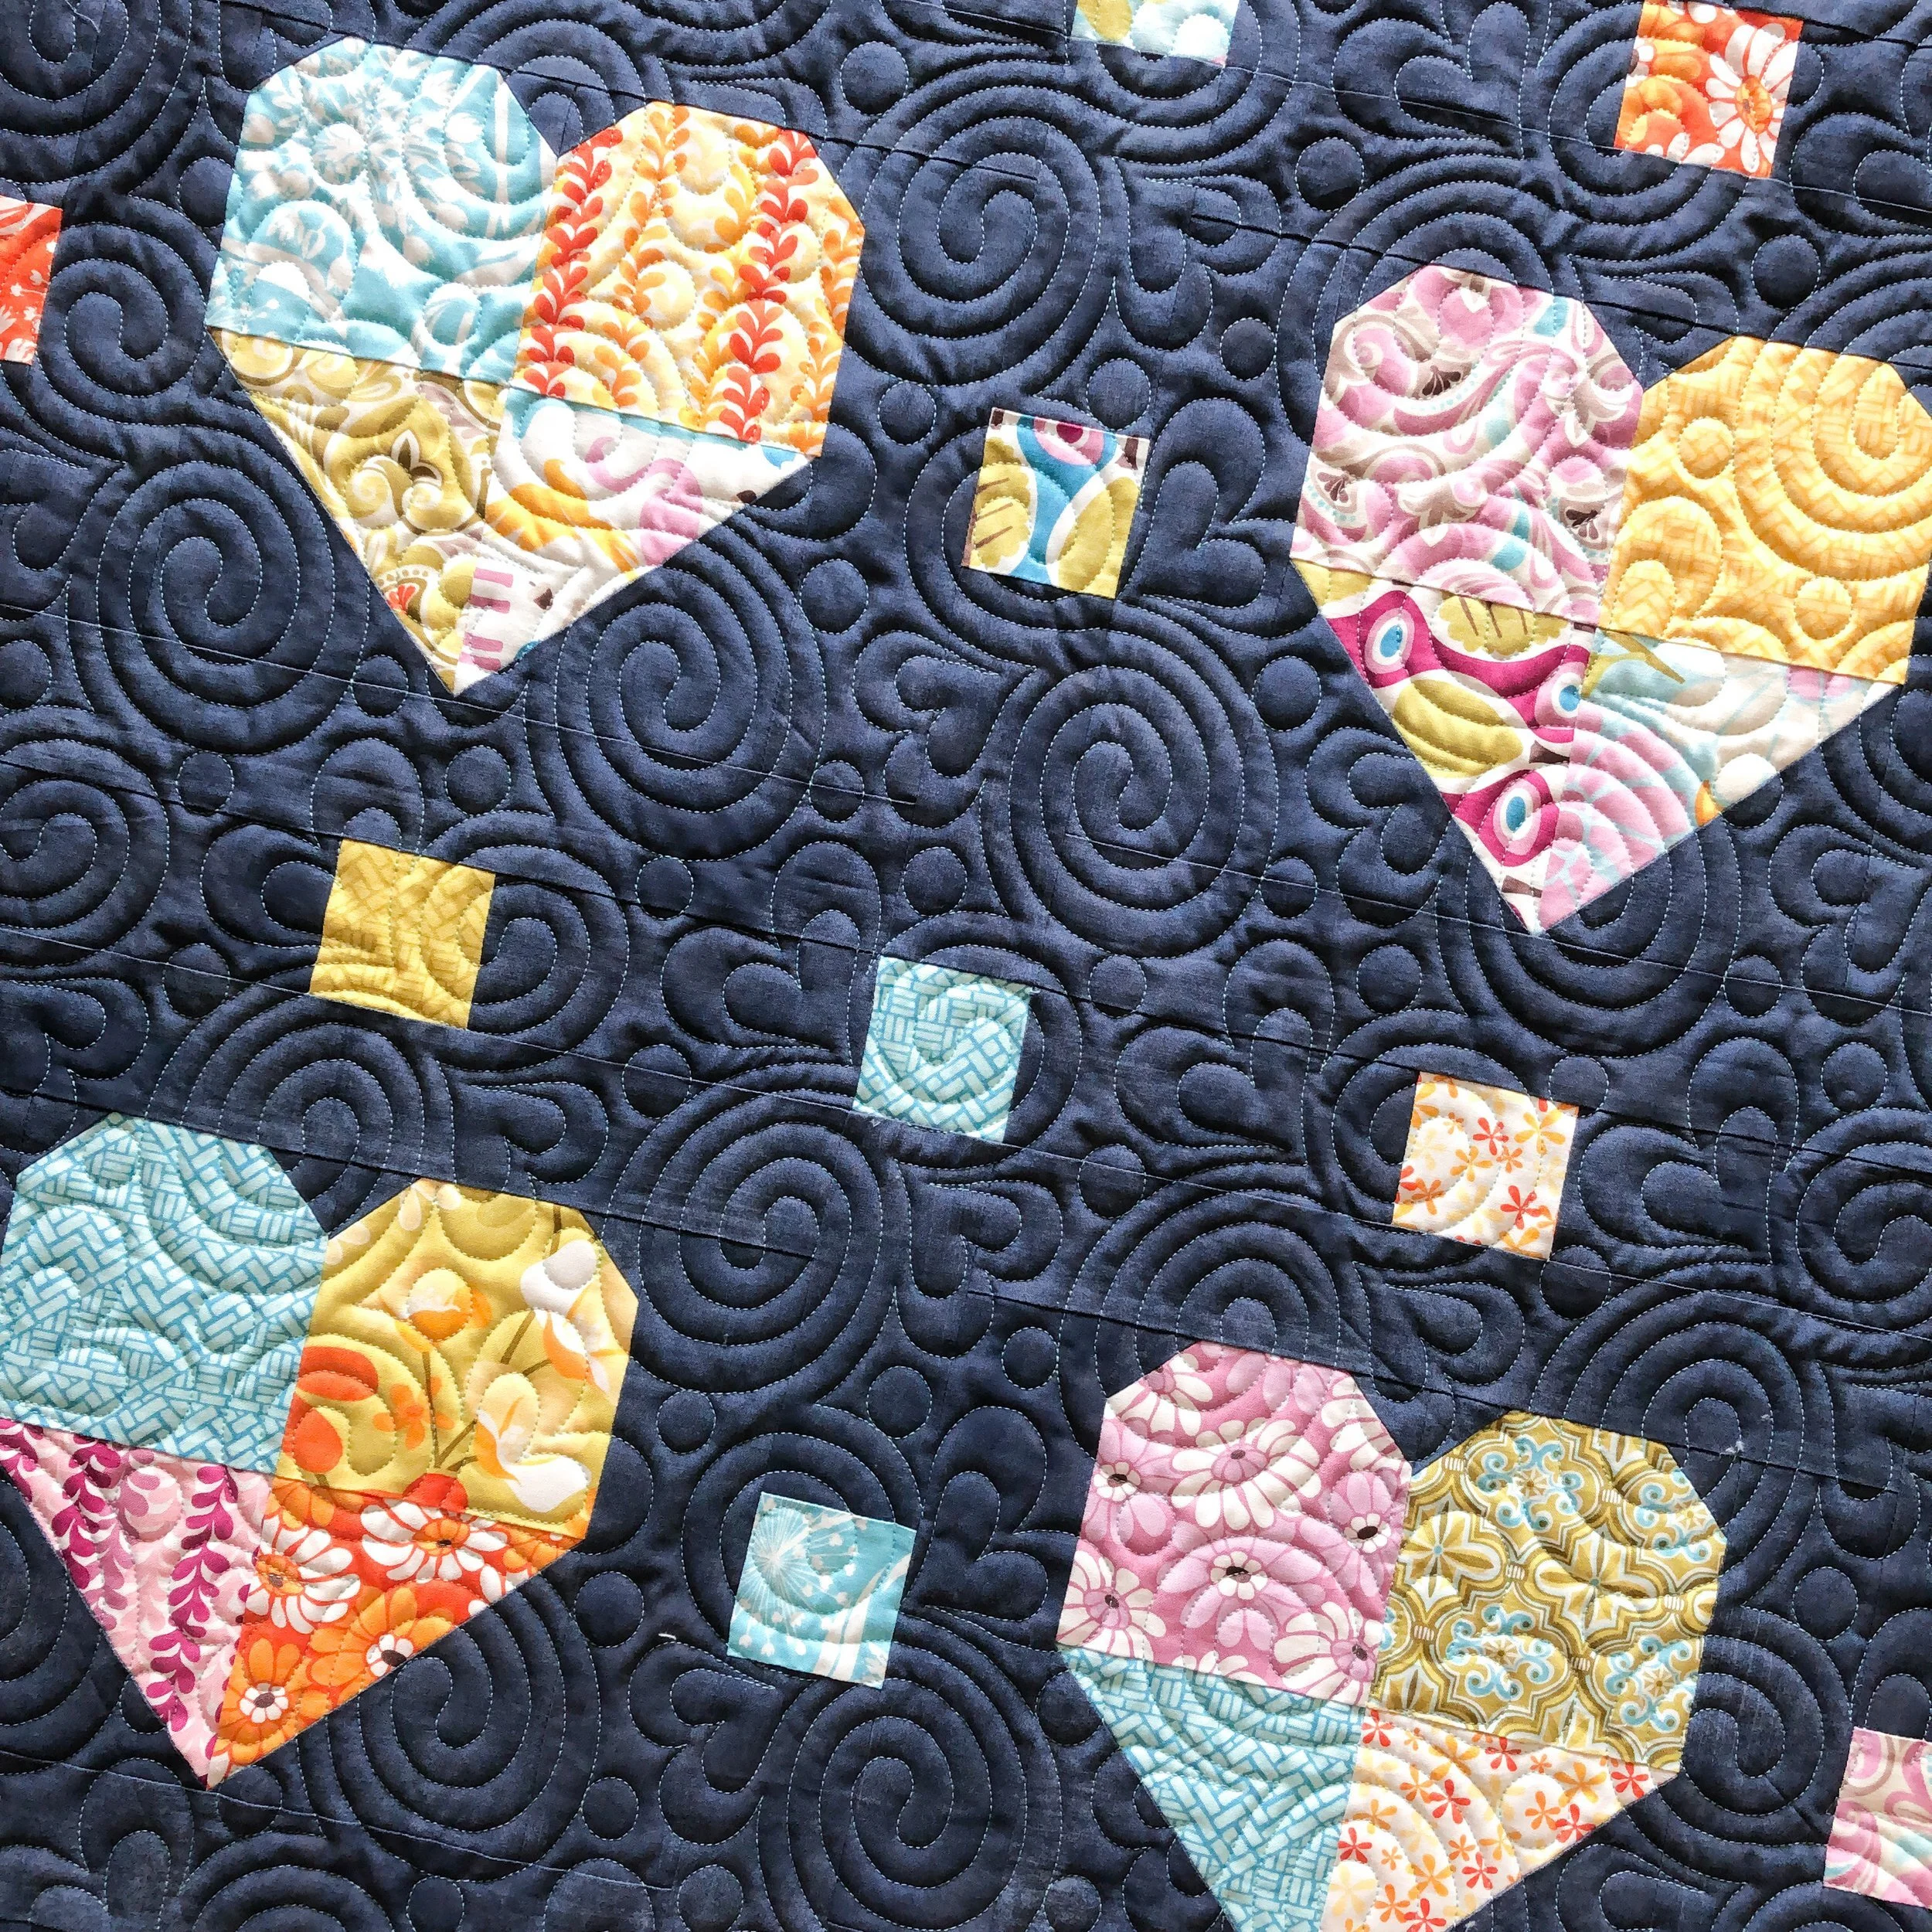
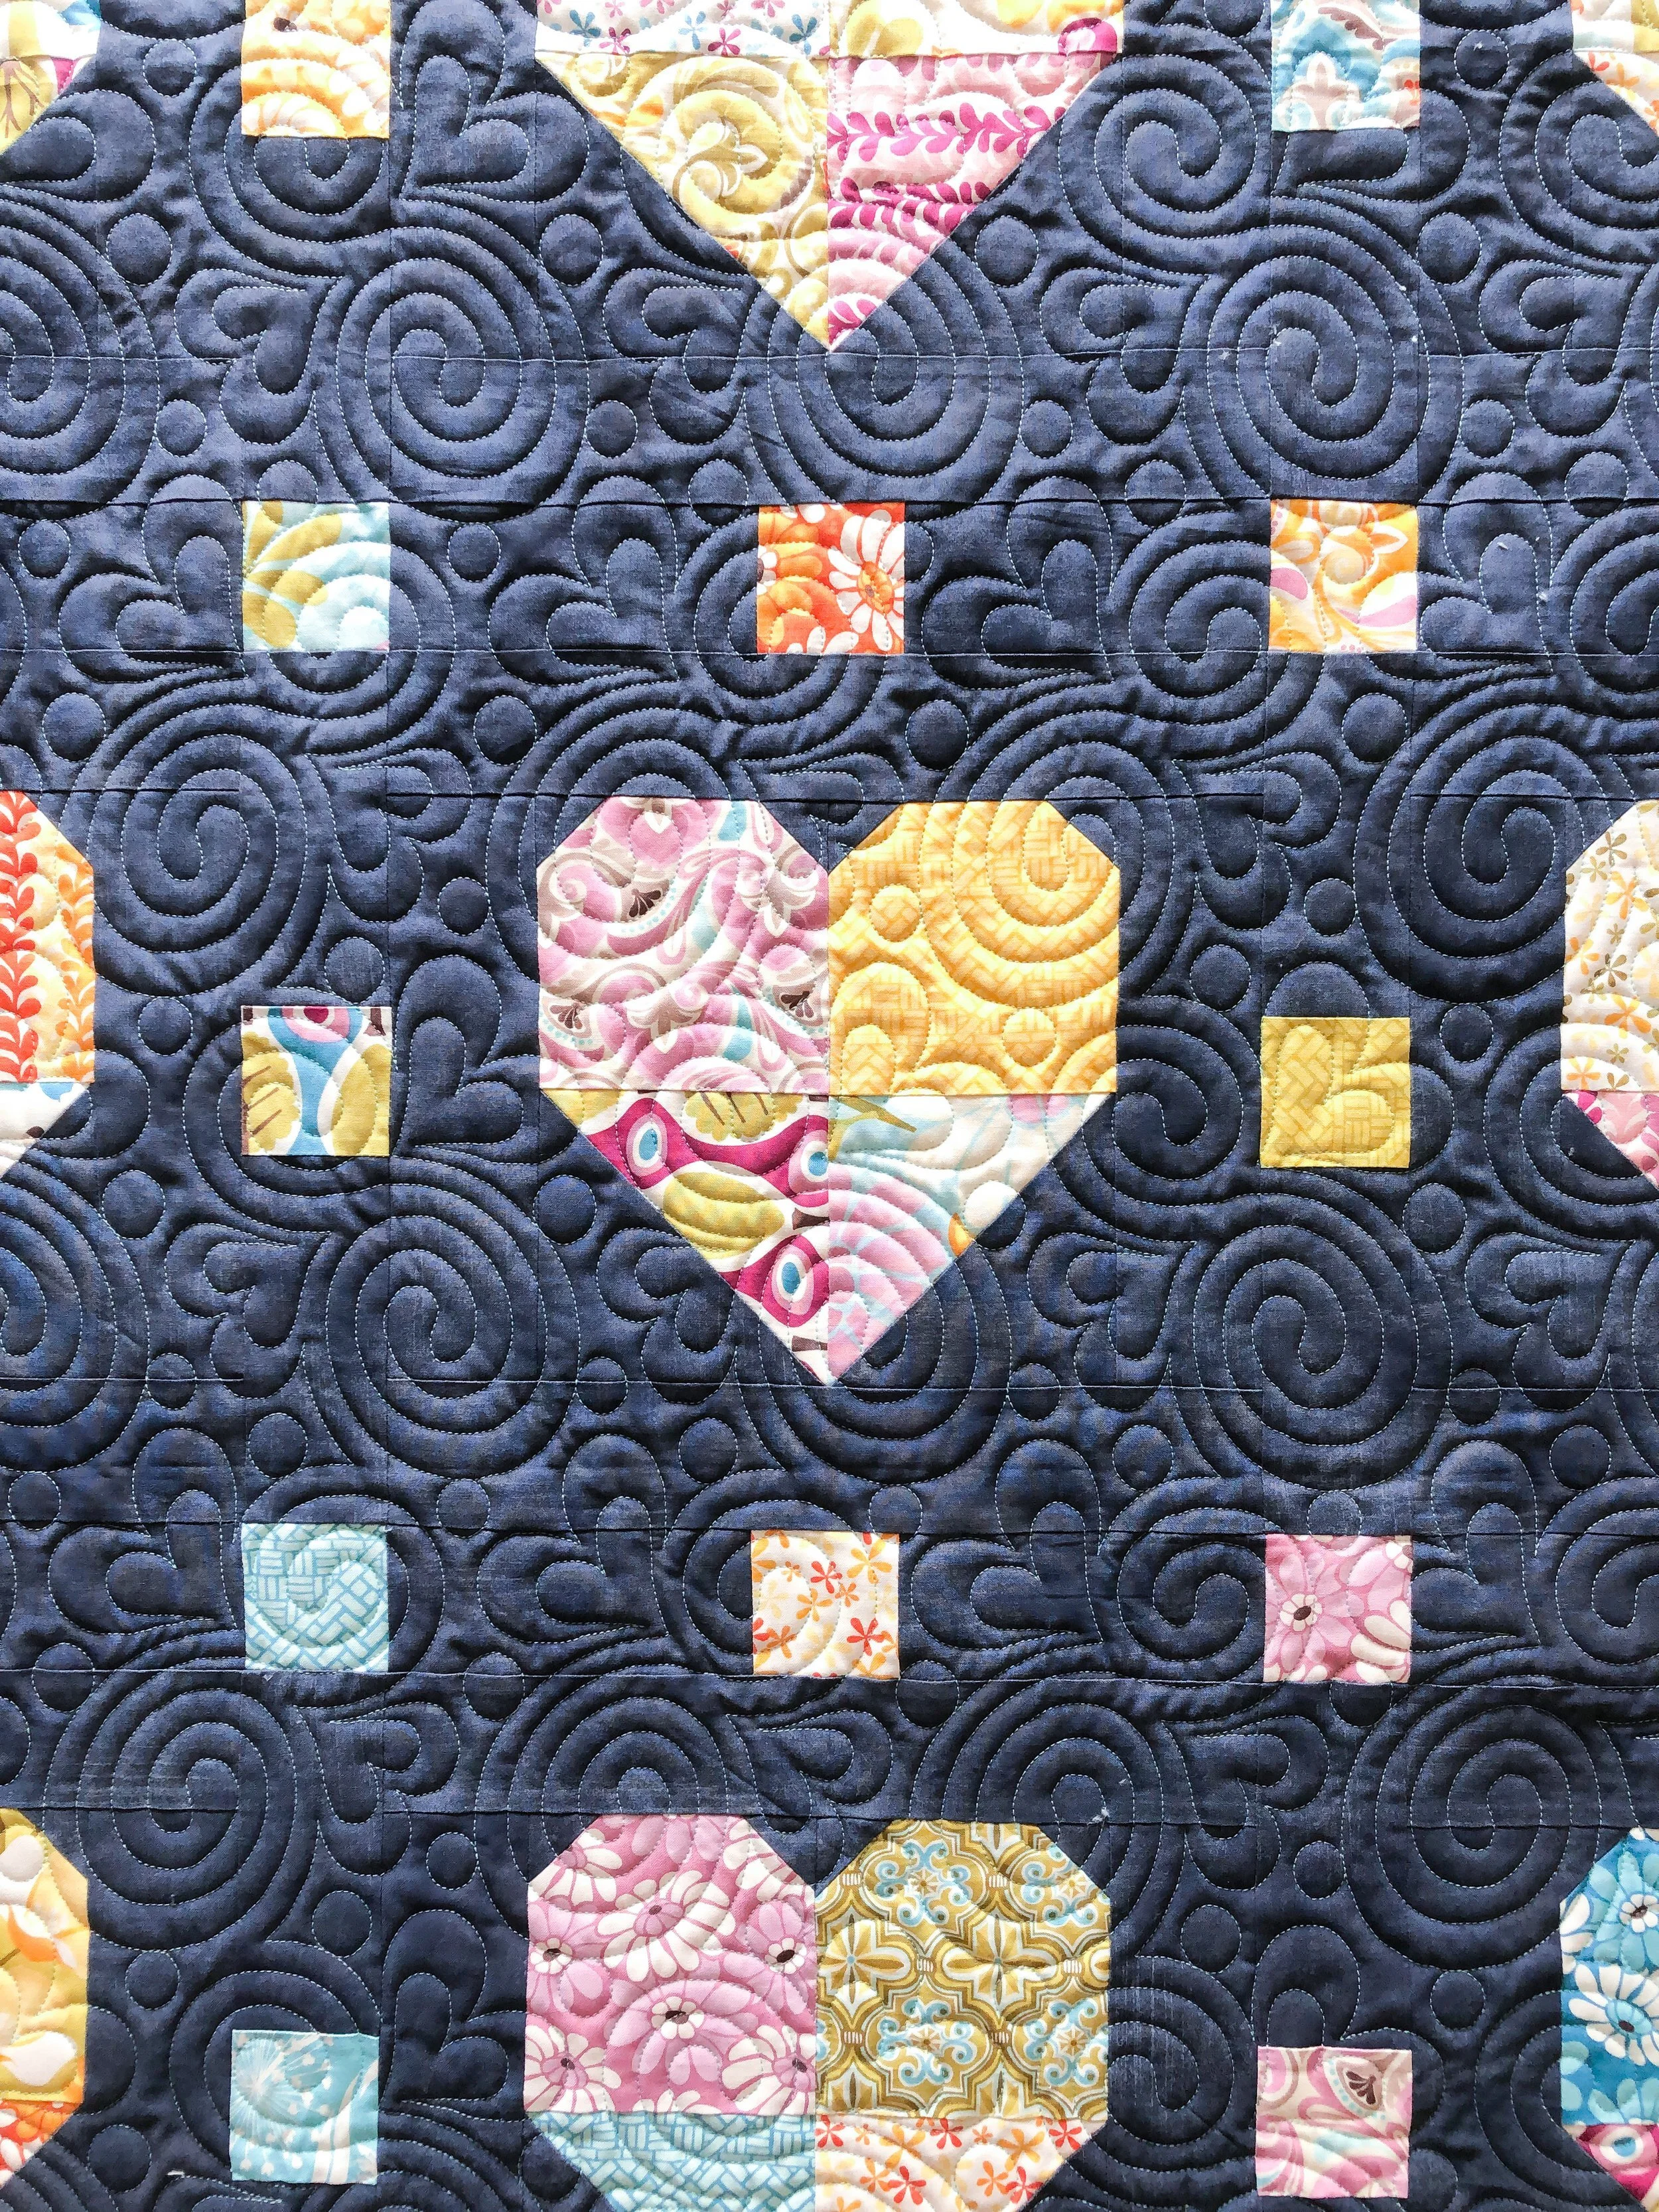
This is Kim’s Scrappy Hearts quilt, the pattern is by Amanda from Jedi Craft Girl and is in her Playful Precut Quilts book. So cute, huh?!?!
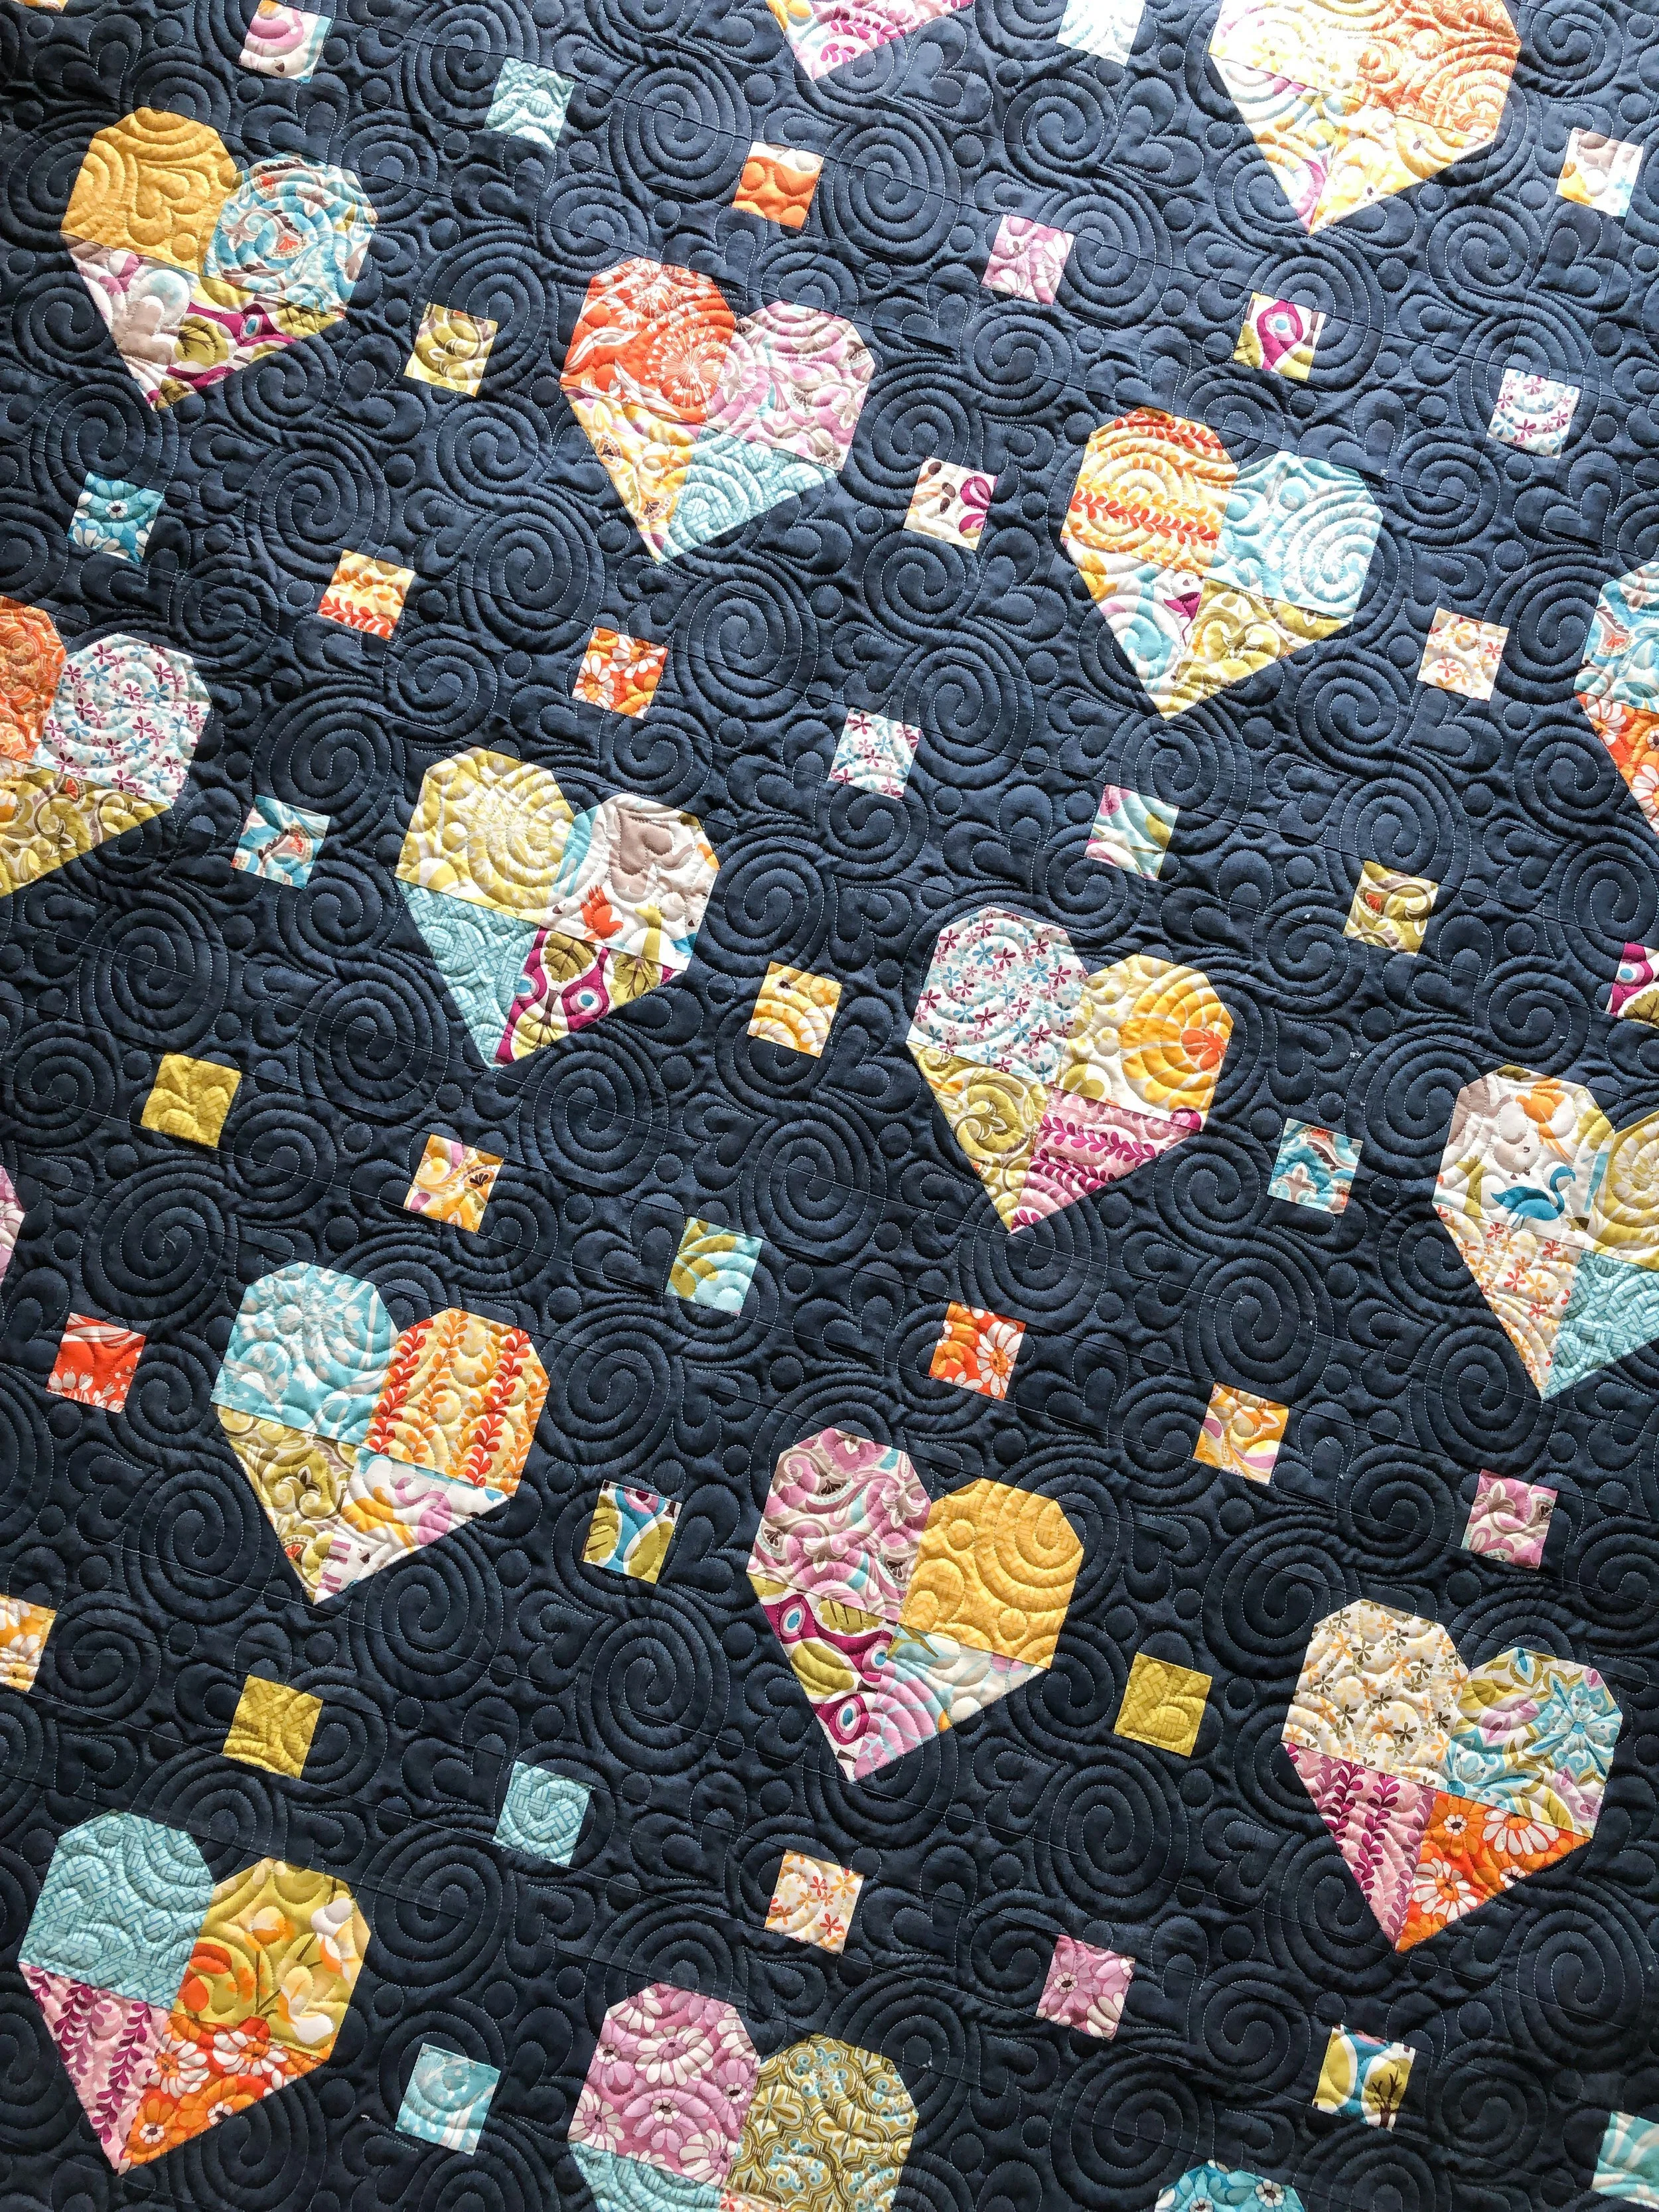
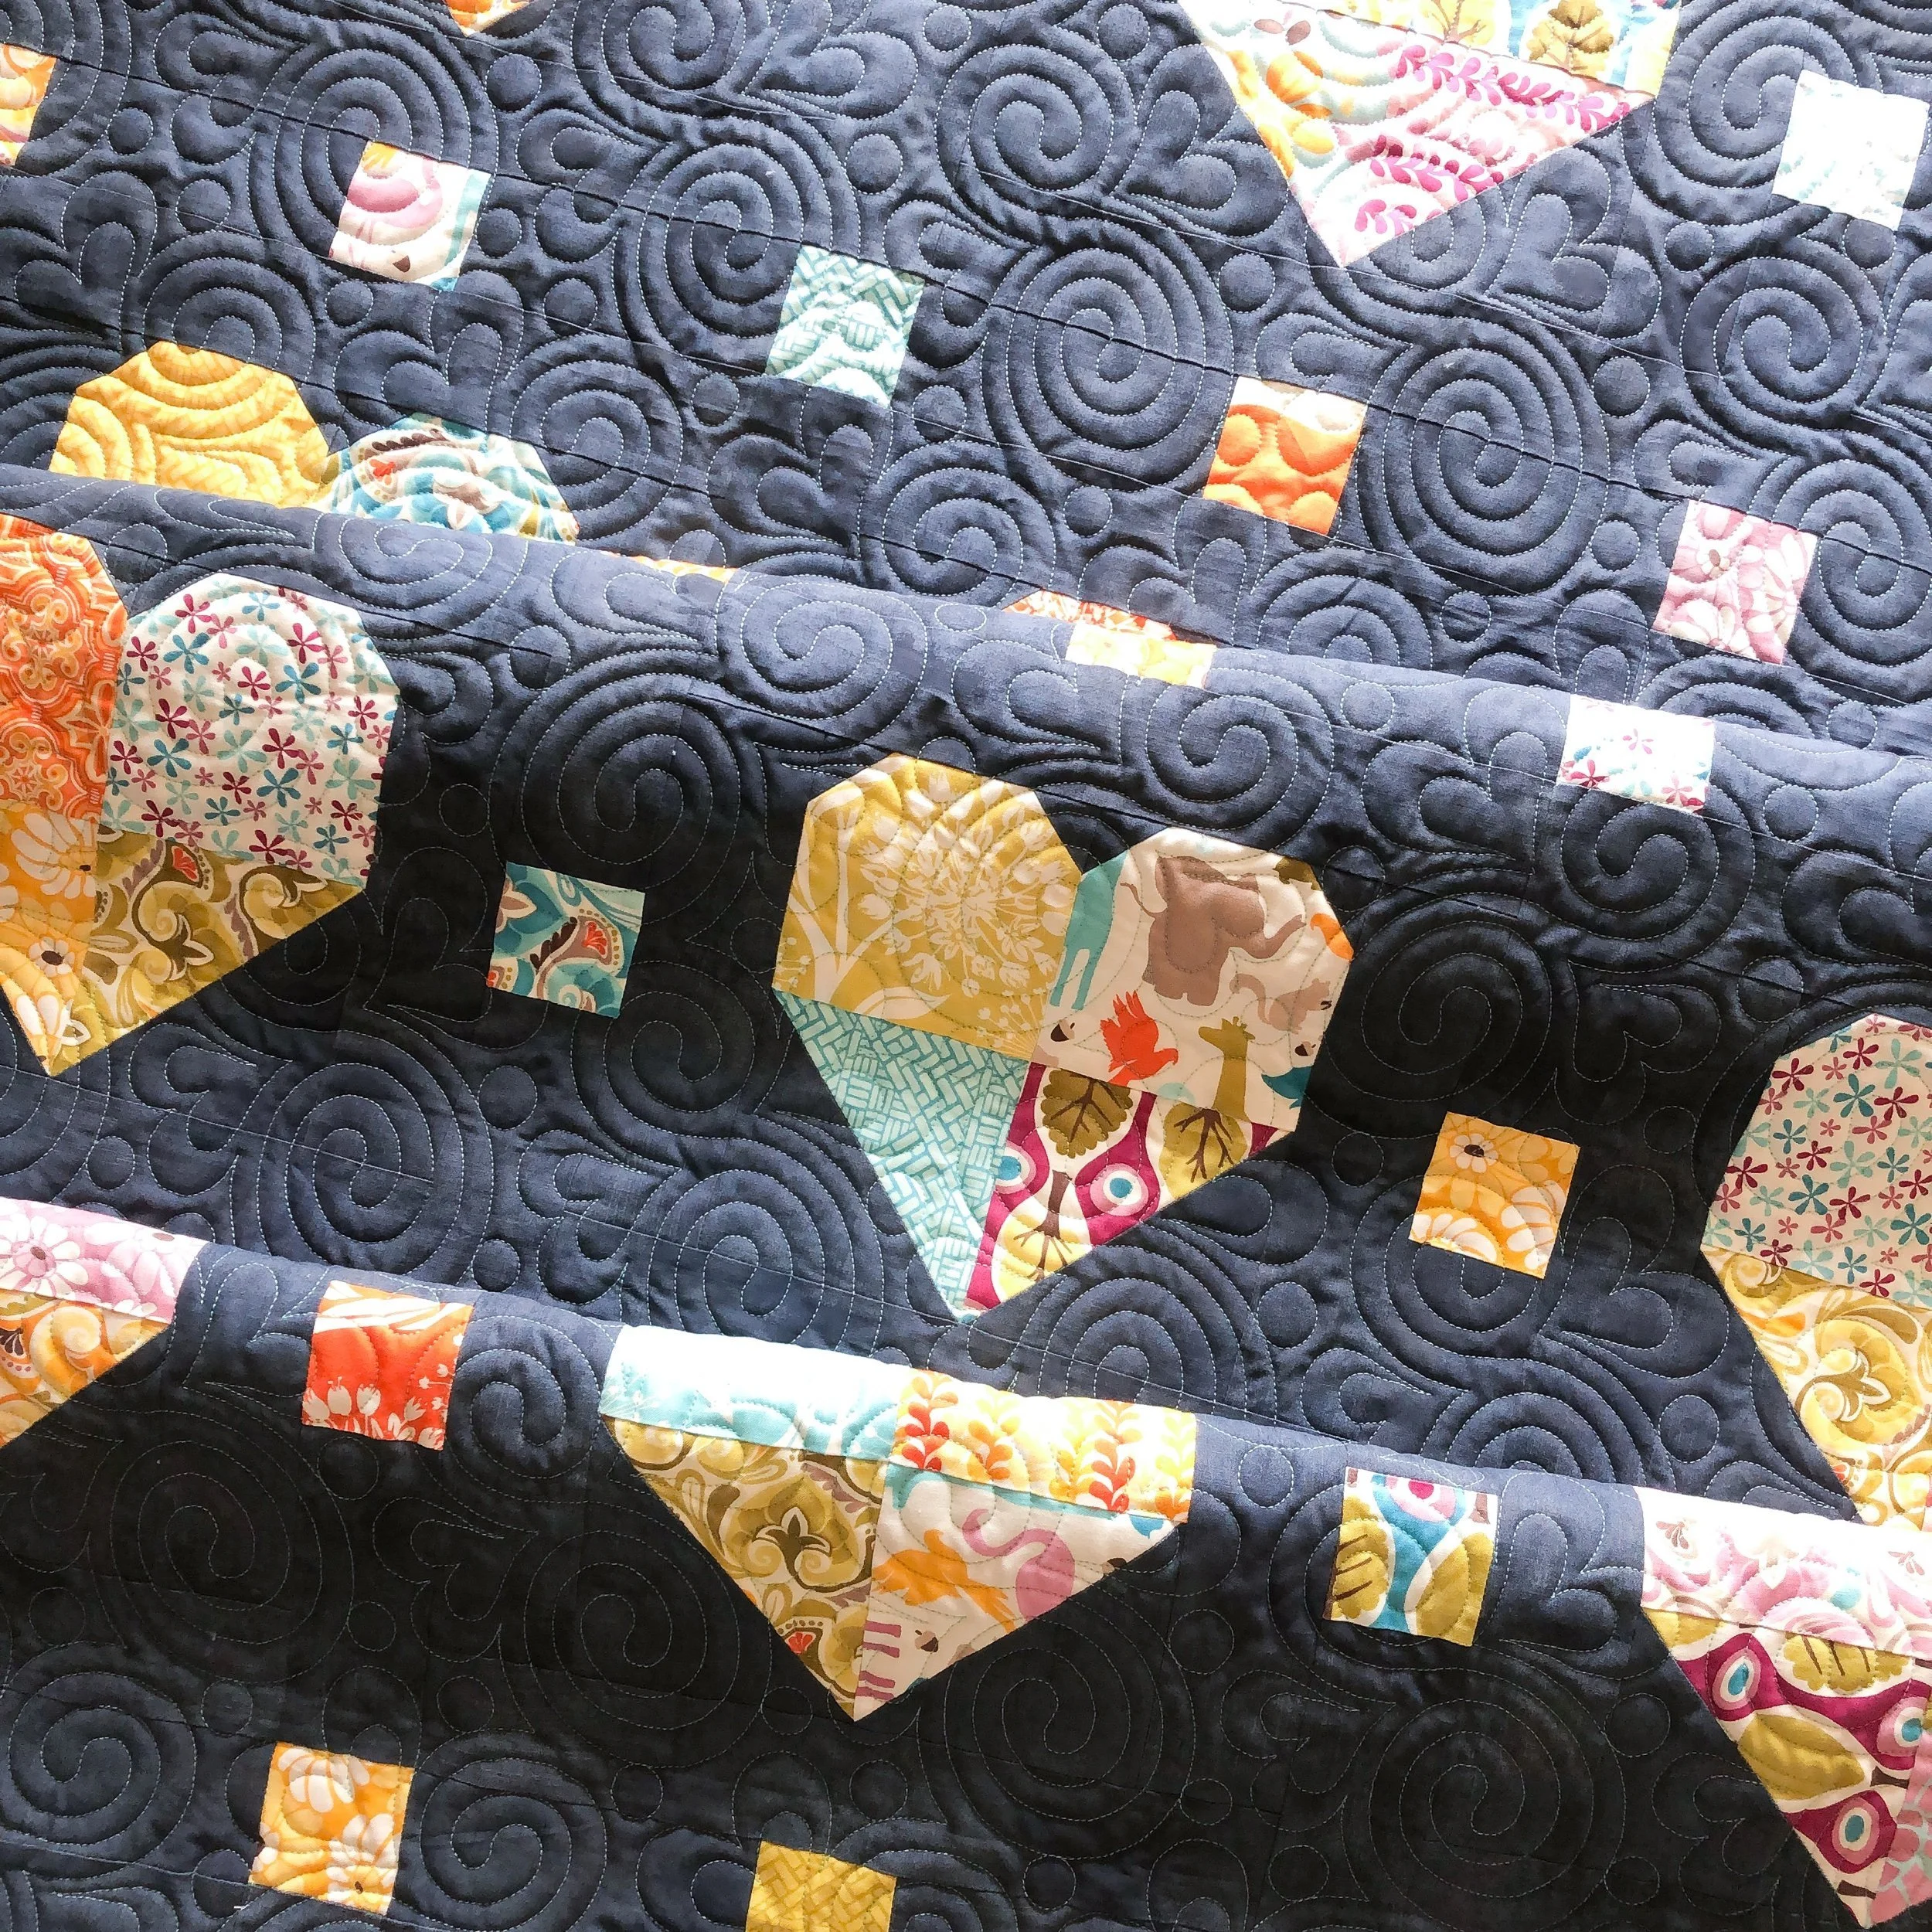
Kim used an old Kate Spain precut, and that gorgeous navy makes all of the bright fun prints in Kate’s fabric…POP! Love it so much.
We decided on a aqua thread, which matches the minky backing perfectly. Scroll to the bottom, and you’ll see all that wonderful coziness. I also used my favorite 8020 from Winline Textiles, out of Ogden Utah.
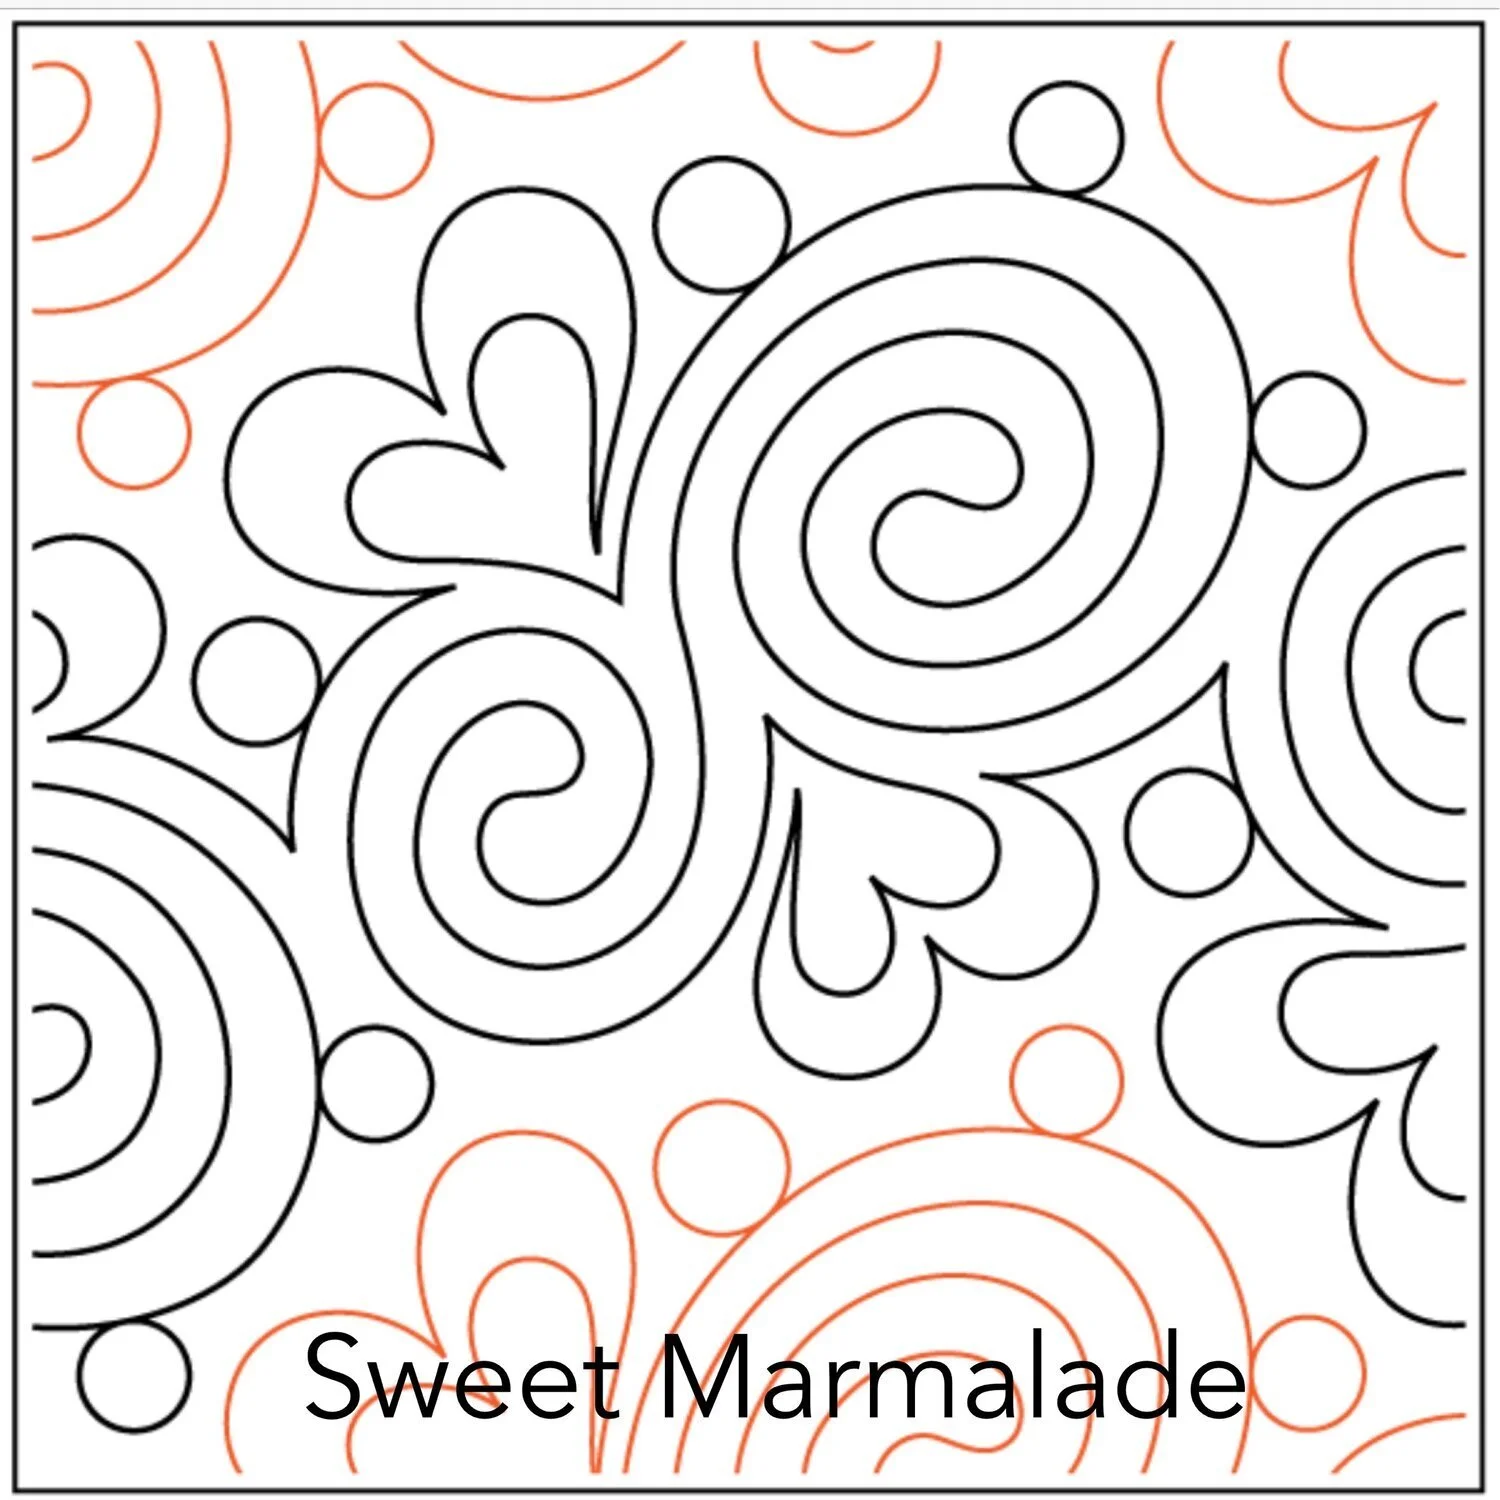
I suggested Patricia Ritter and my Sweet Marmalade design for the quilting…I hadn’t used it yet, and thought it would be adorable, and Kim said YES!! I’m so happy she did, it looks beautiful!
Guess what…Sweet Marmalade digital version is on sale until Wednesday this week, 25% off, at Urban Elementz. Go grab it if you haven’t already, it’s a sweet one for sure.
All this love is actually for one of Kim’s dear friends, who has cancer. There is nothing better than a quilt to wrap up in during treatments or hospital stays. Praying her treatments go well. She’s in the hospital now receiving them. This definitely adds extra meaning to what I do.
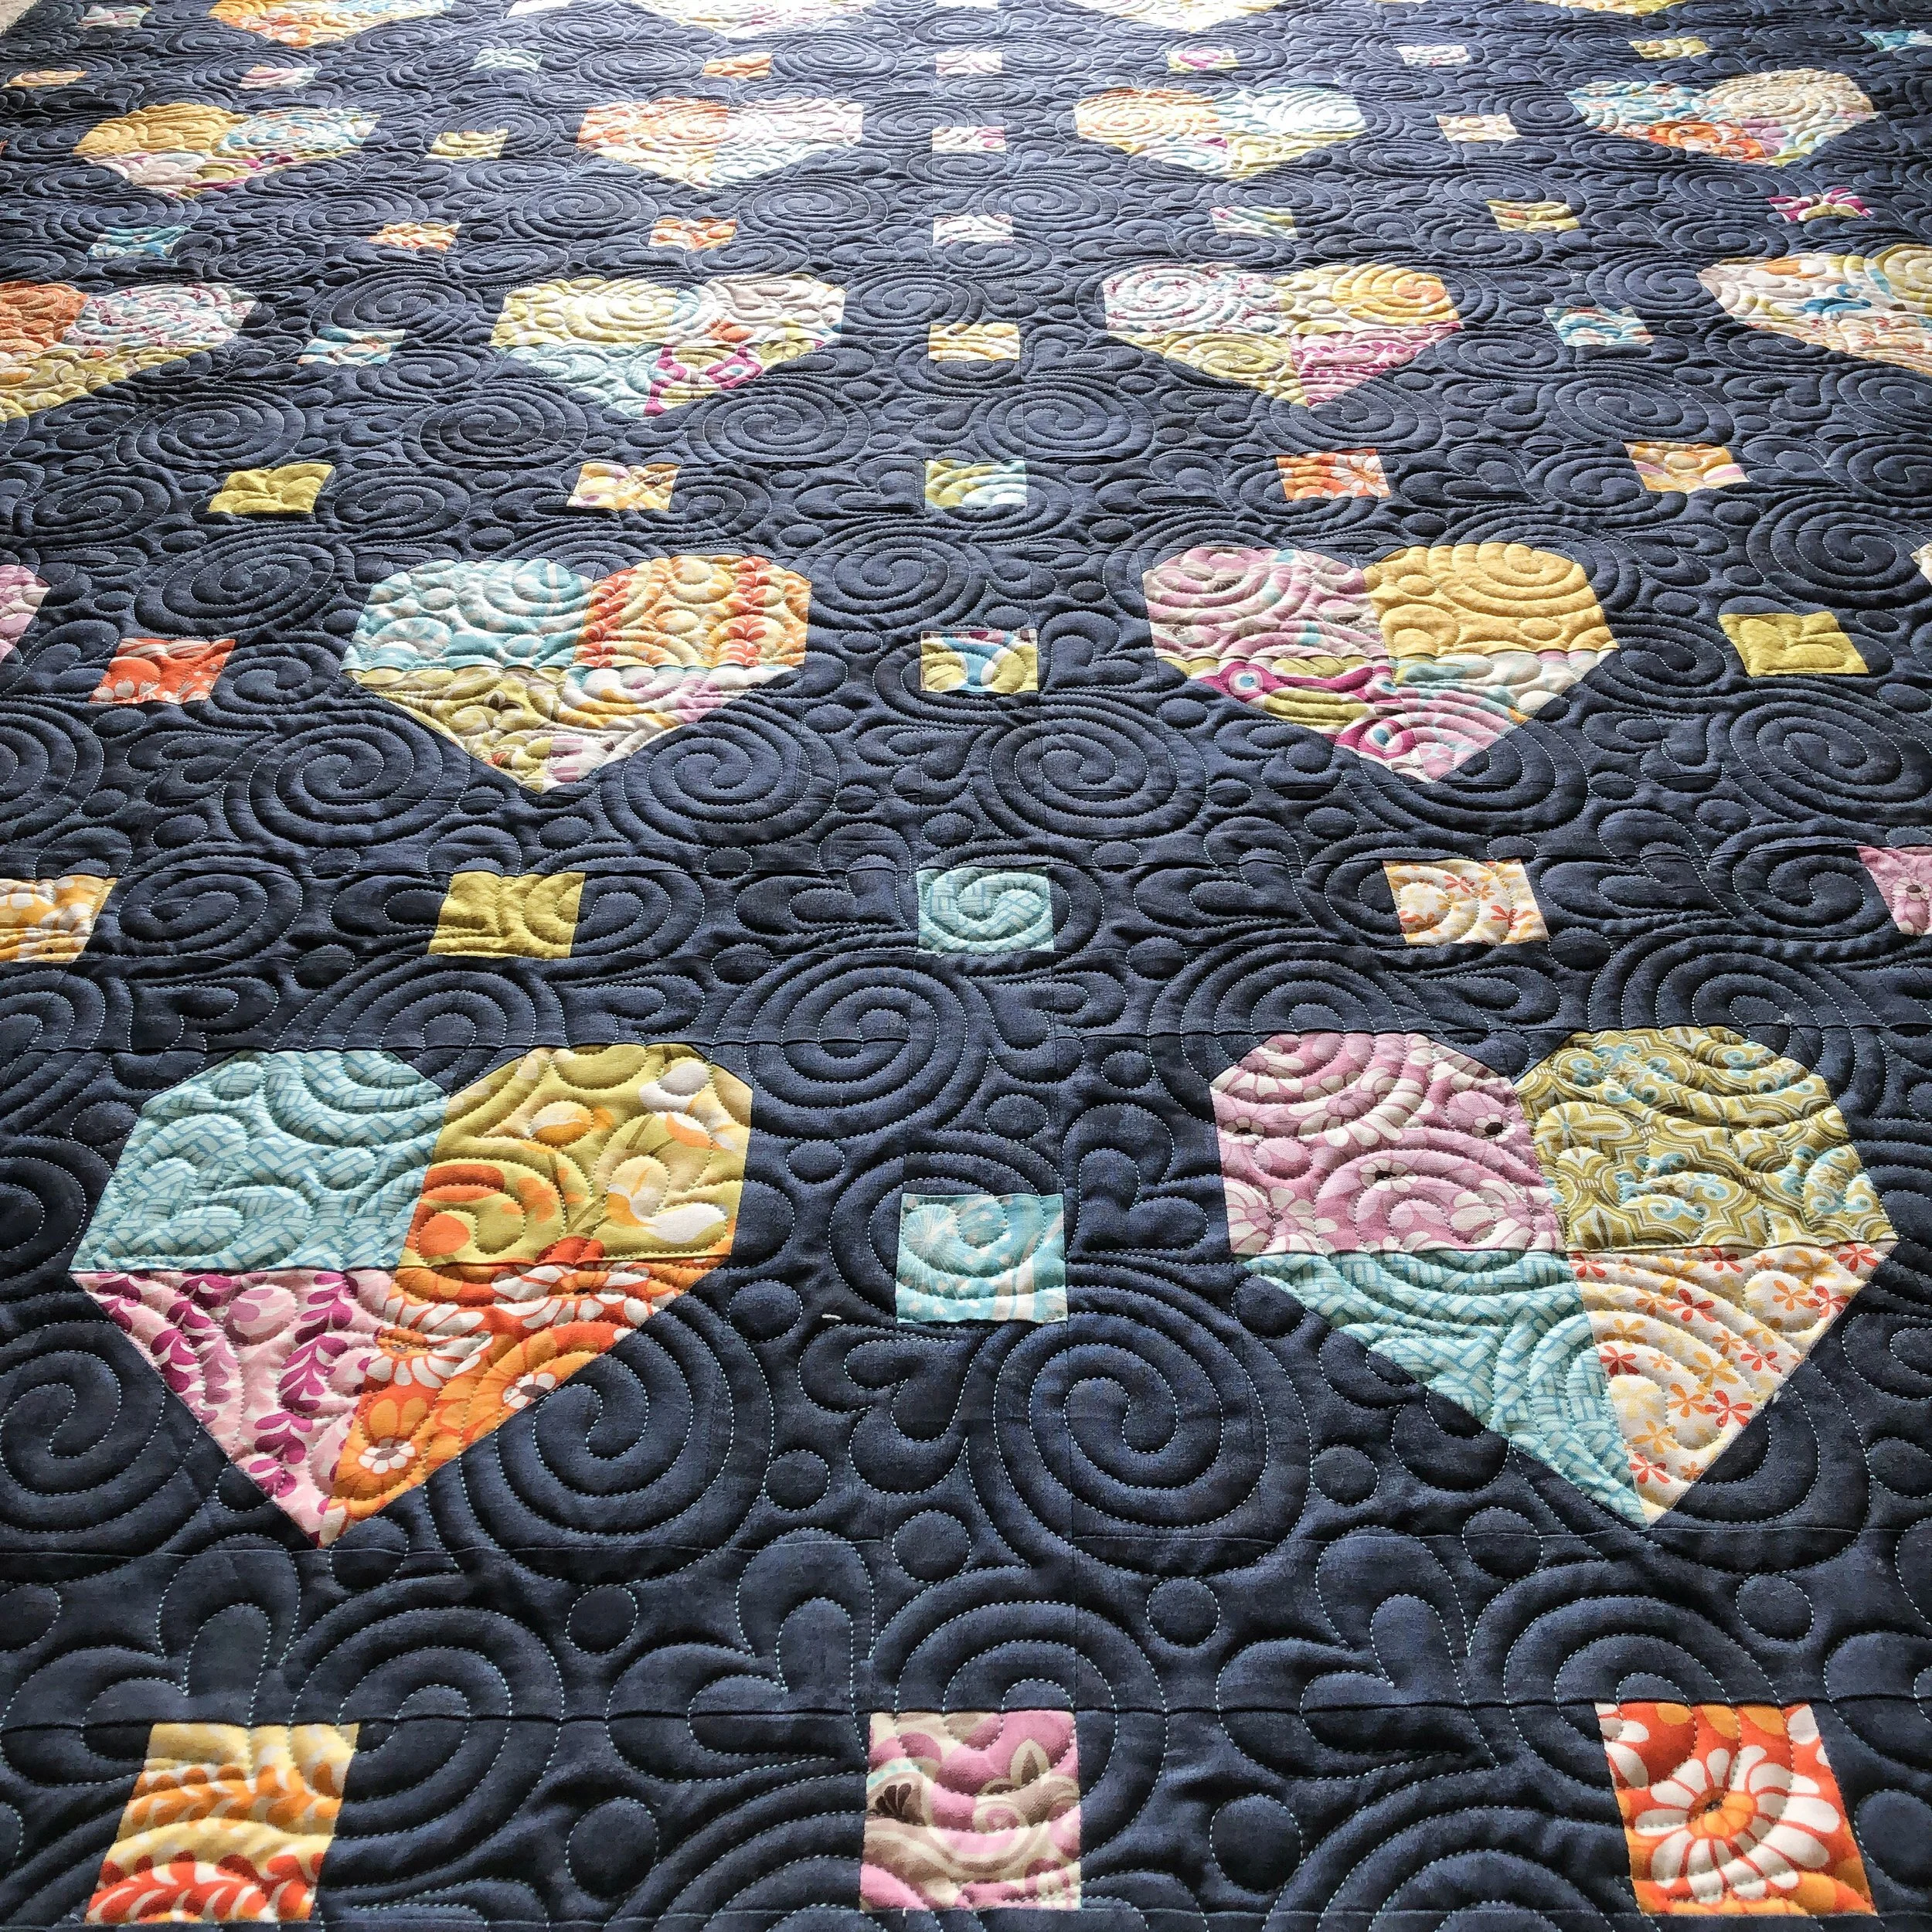
So…question…have you ever made a quilt with a darker background? We, and maybe it’s just me, get used to using white, cream, or neutral for backgrounds. I have one quilt that has a denim background on it, which is not as dark as this navy. I love it, and need to do it more often.
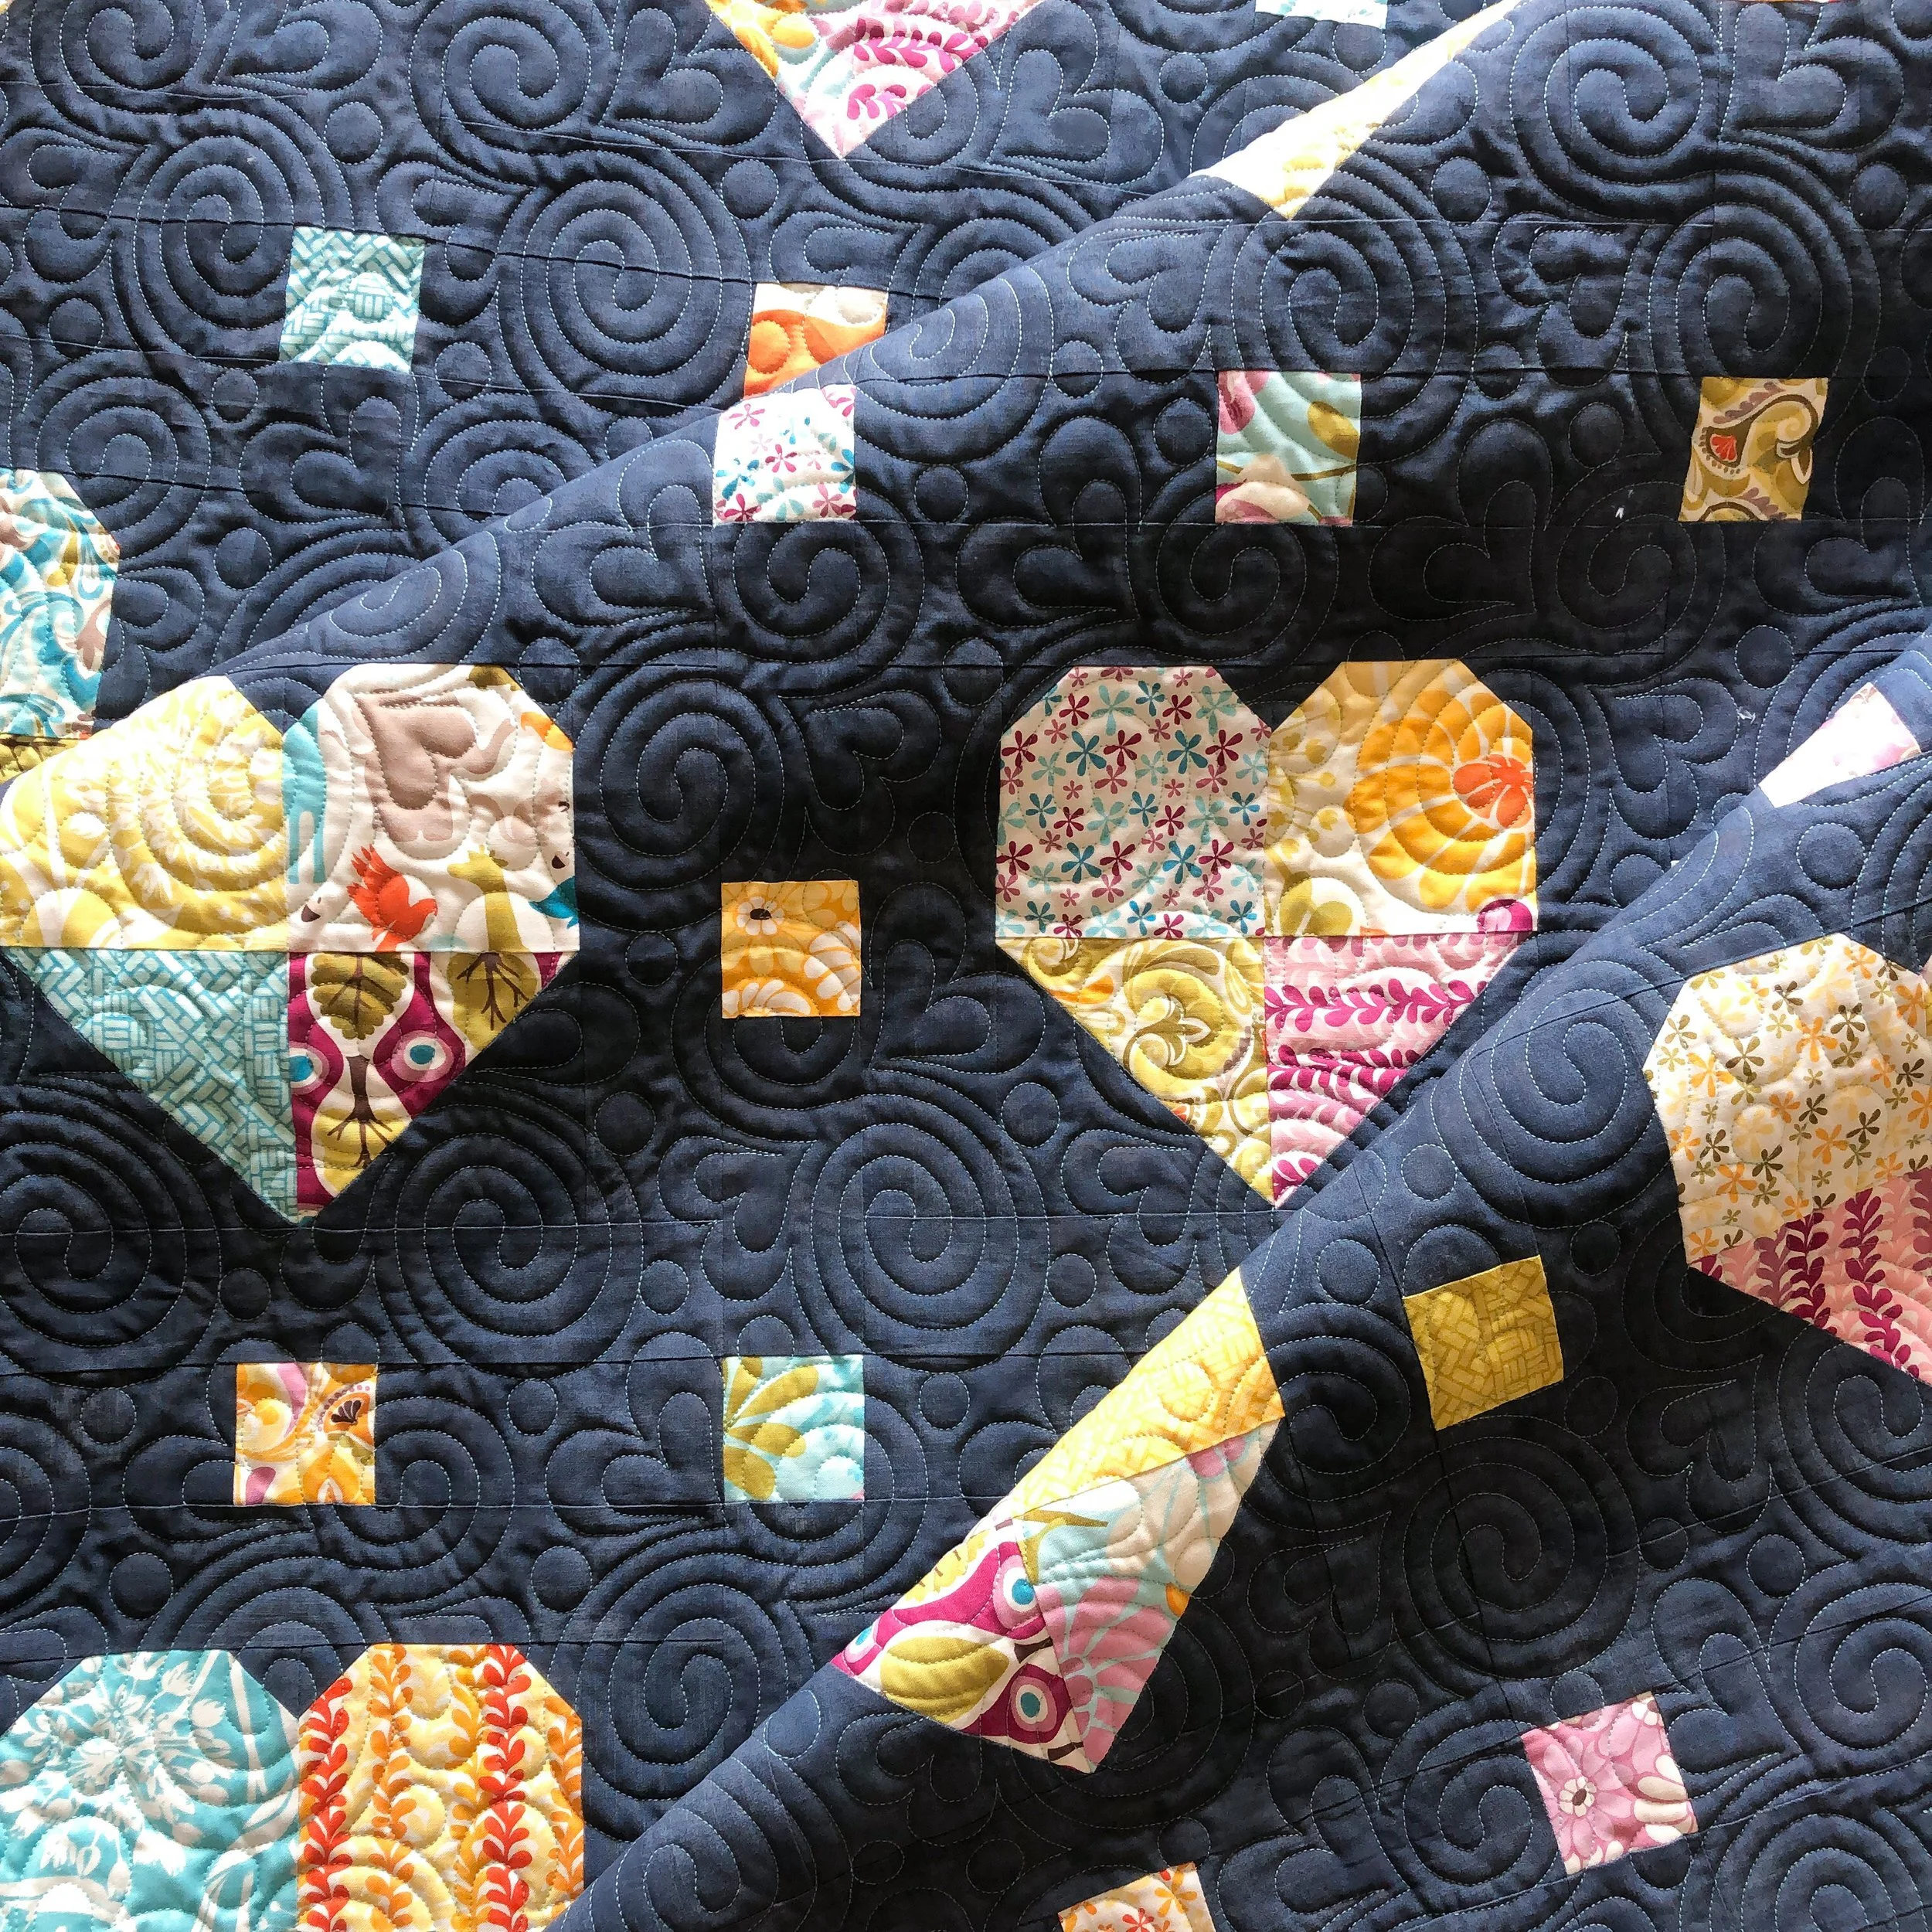
I just love all that Sweet Marmalade texture!!
Sweet Marmalade was actually a suggestion from one of my quilting friends, when I asked for design suggestions. We were all over that idea!! Thanks, Jen!
Thank you for being here!! I have oodles of more quilts to share. Stay tuned for some Black Friday sales, coming your way!! Everything in my shop will be on sale.
Also…if you haven’t seen yet, Urban Elementz is having their 25% off all digital designs until this Wednesday November 10th. This is the time to get all those fun designs, you’ve been seeing. Thanks for supporting us!! It’s such a joy to see our designs on your quilts around the world. Happy quilting… • Leisha
Side note: If you’re reading this in an email, check out a video of all our designs by going to this blog post or going to the video linked below on my Vimeo account. https://vimeo.com/643647707
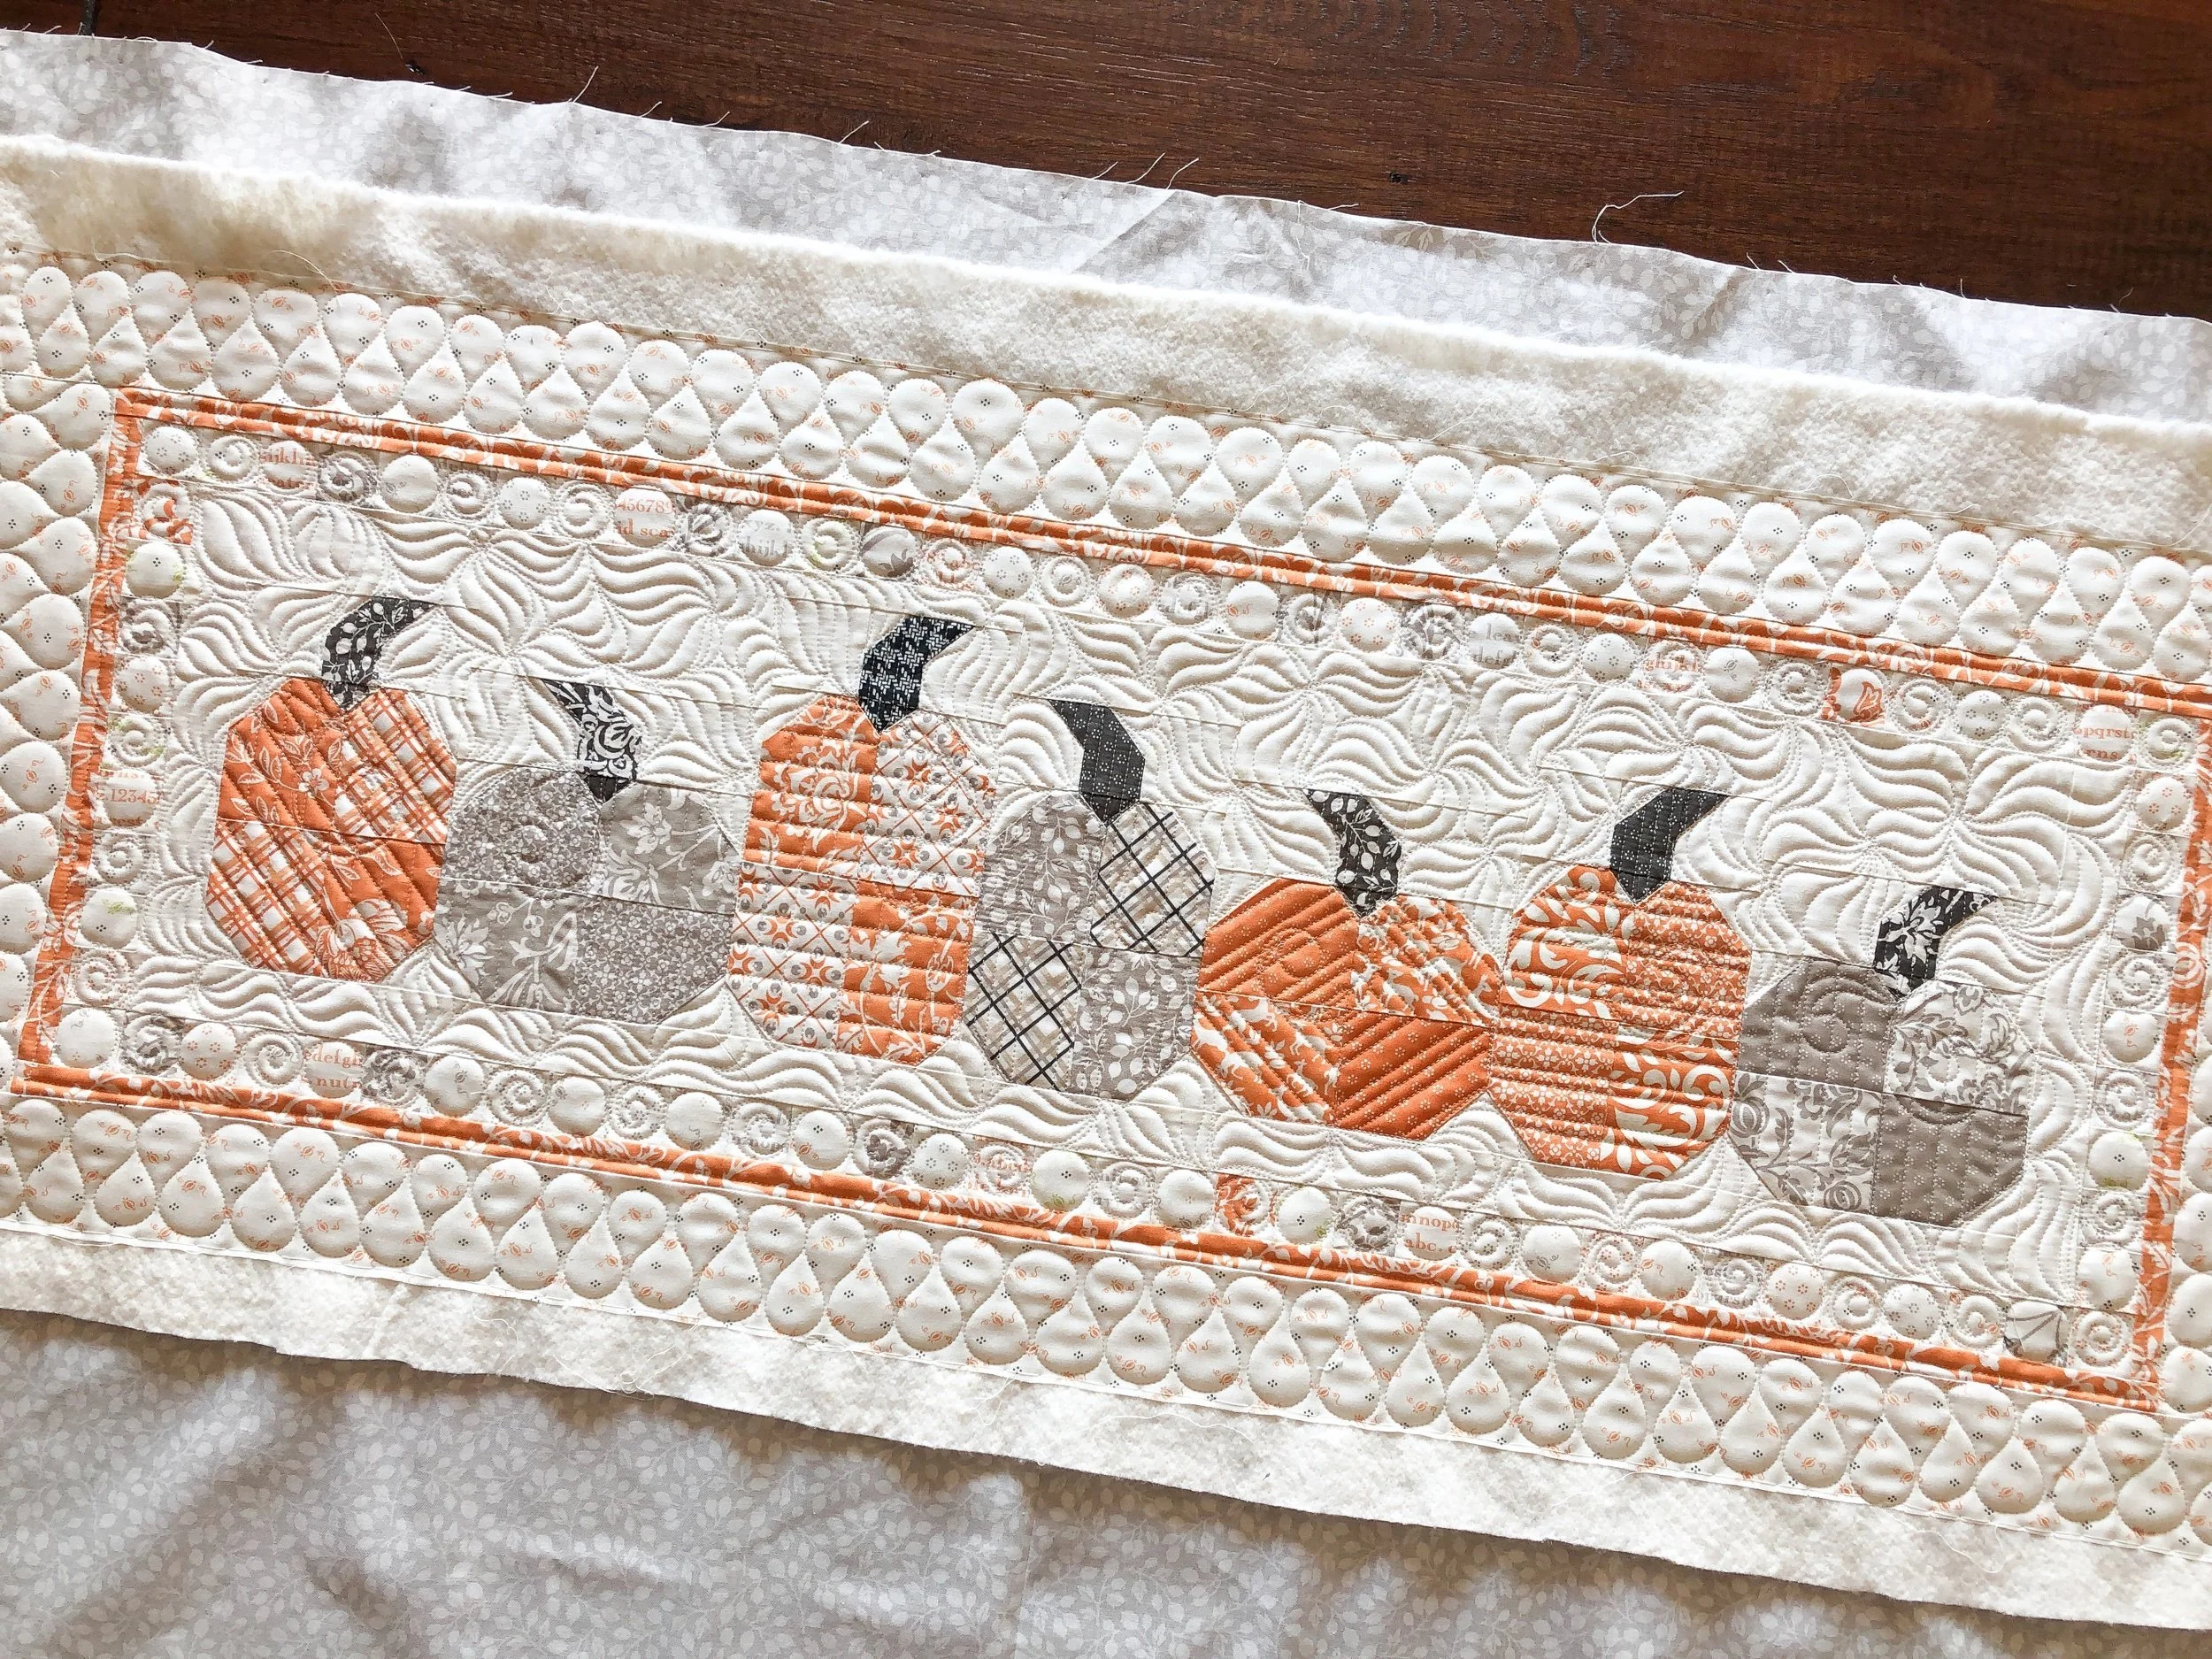
Kim’s Pumpkins in a Row
Hello there,
Even though Halloween is behind us now, it’s still pumpkin season!! Which I love!! Let’s talk about this fun “Pumpkins in a Row” runner, that Kim made, pattern by Joanna from Fig Tree & Co.
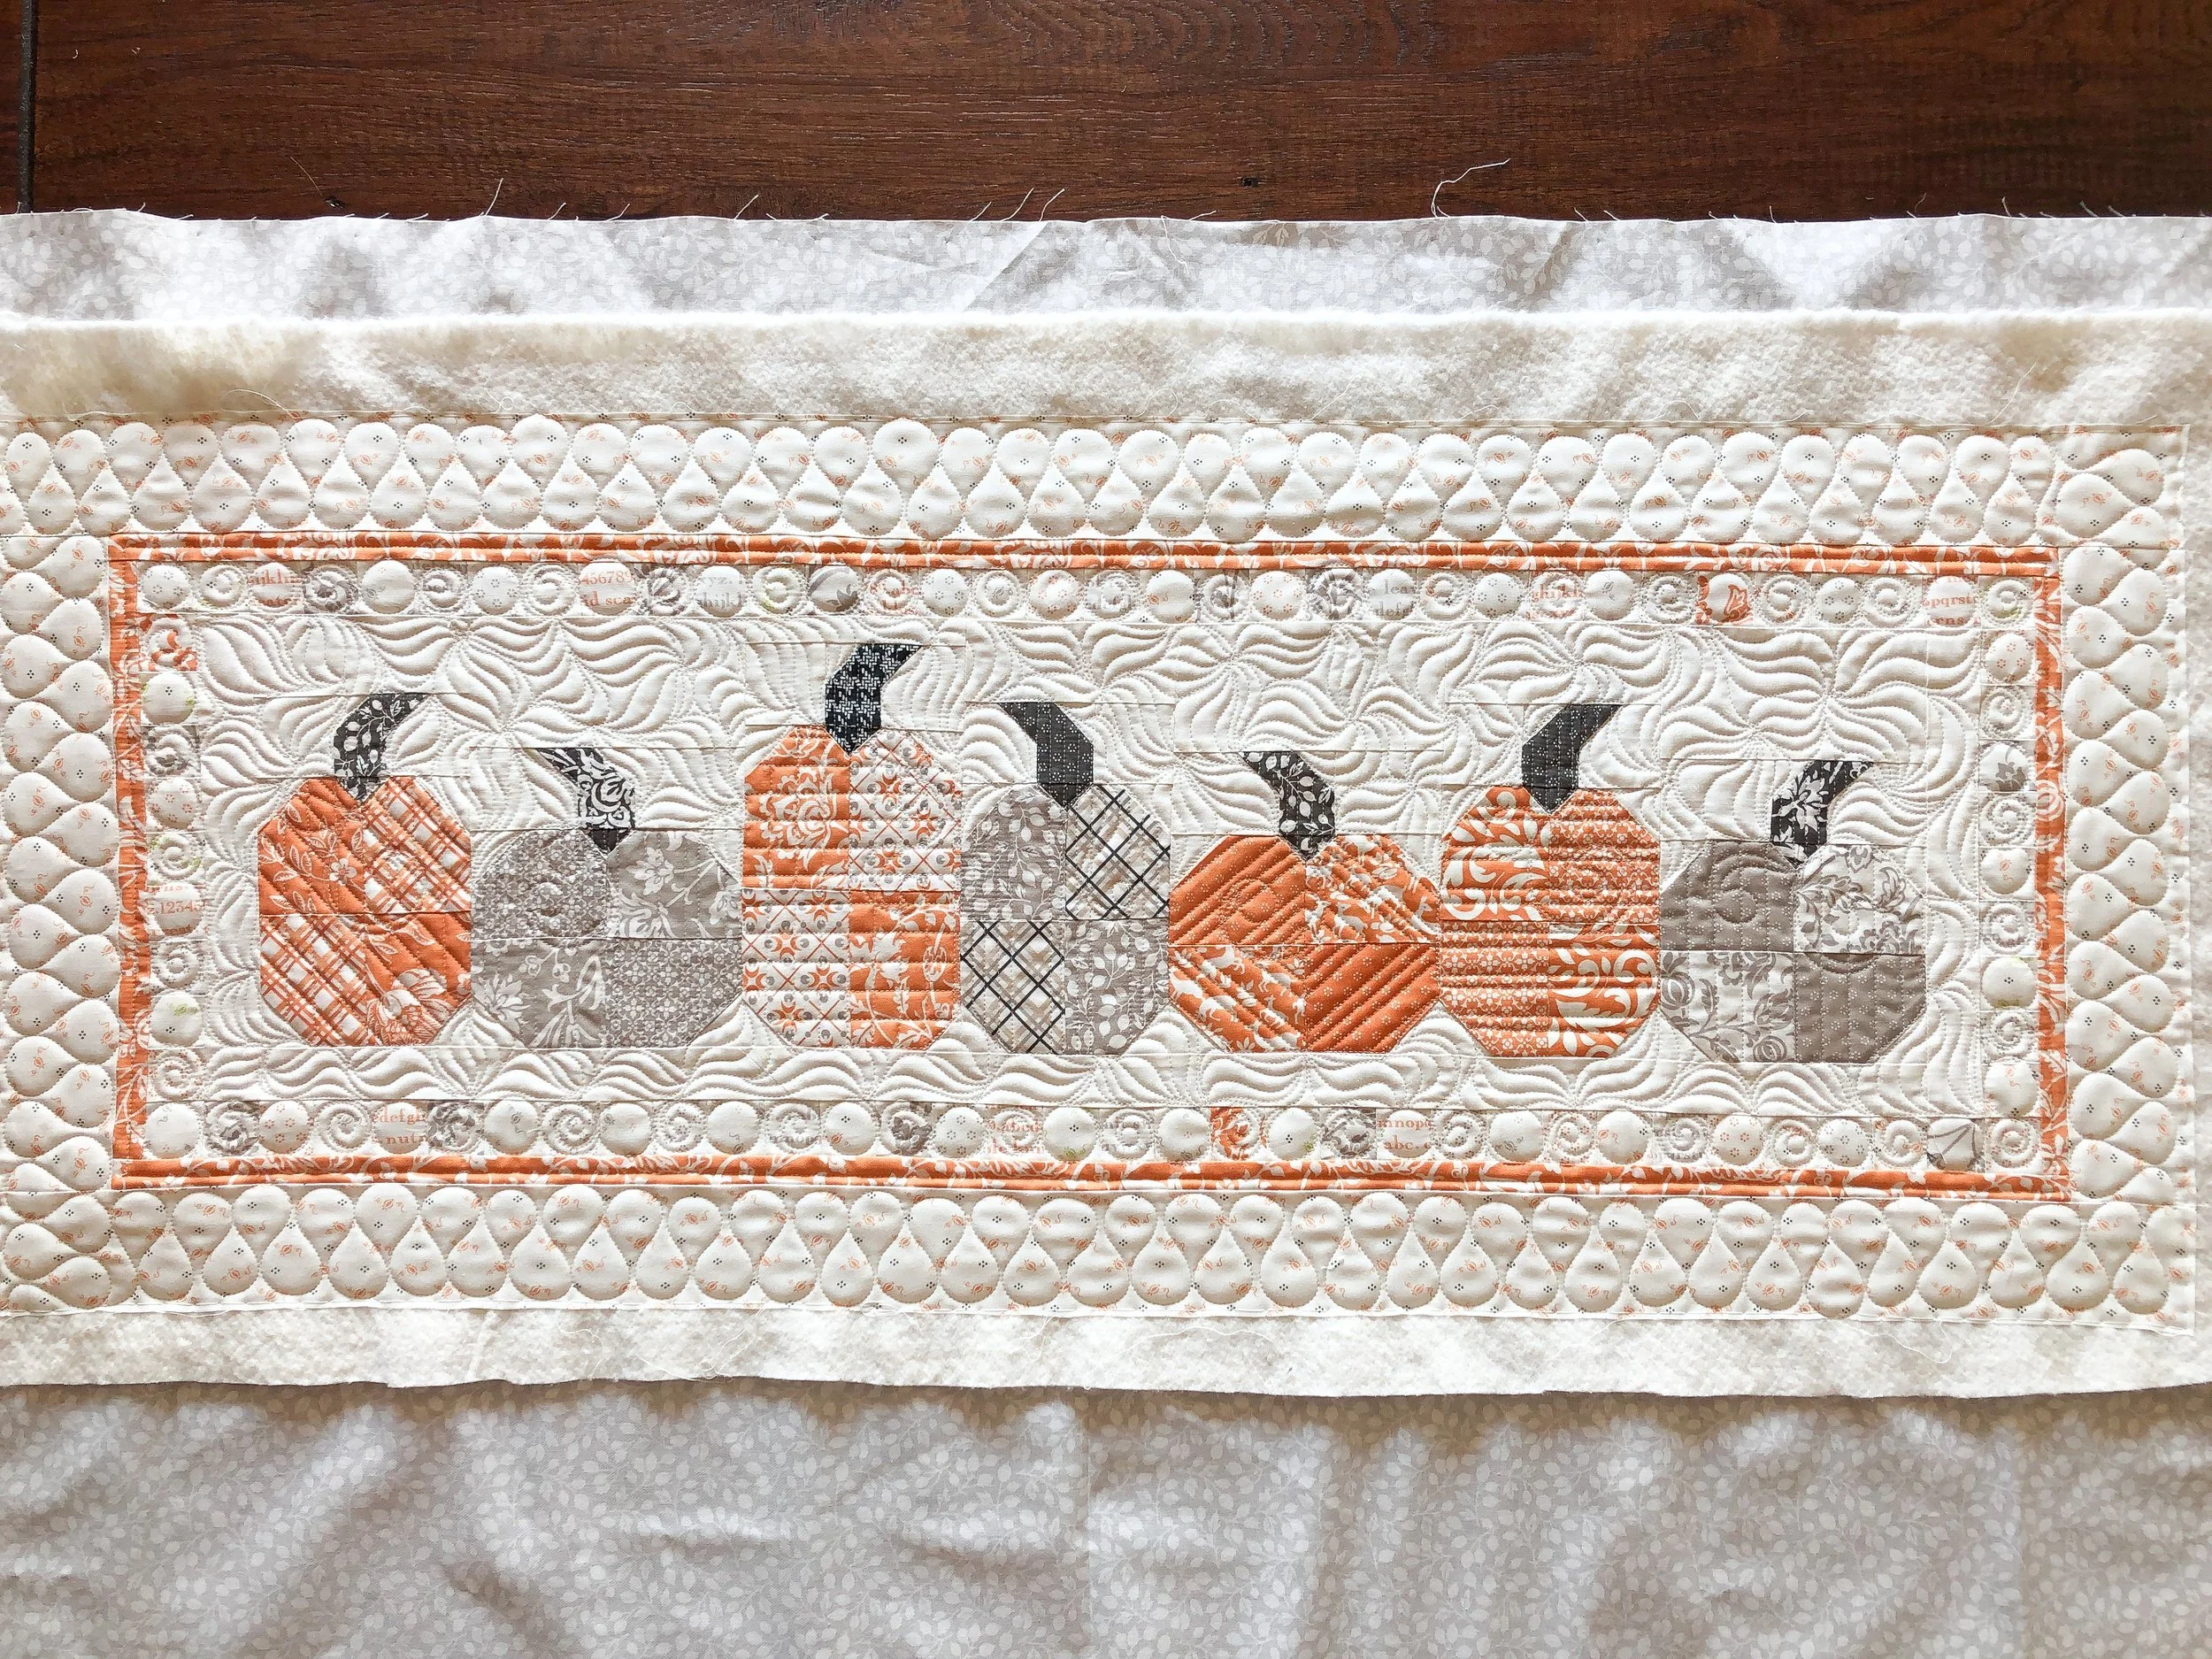
You may have seen this runner a few times lately from me, I’ll get to that later… The beautiful fabrics are also by Joanna from Fig Tree & Co., it’s her All Hallows Eve line. Which is the classiest Halloween fabric line ever, in my opinion.
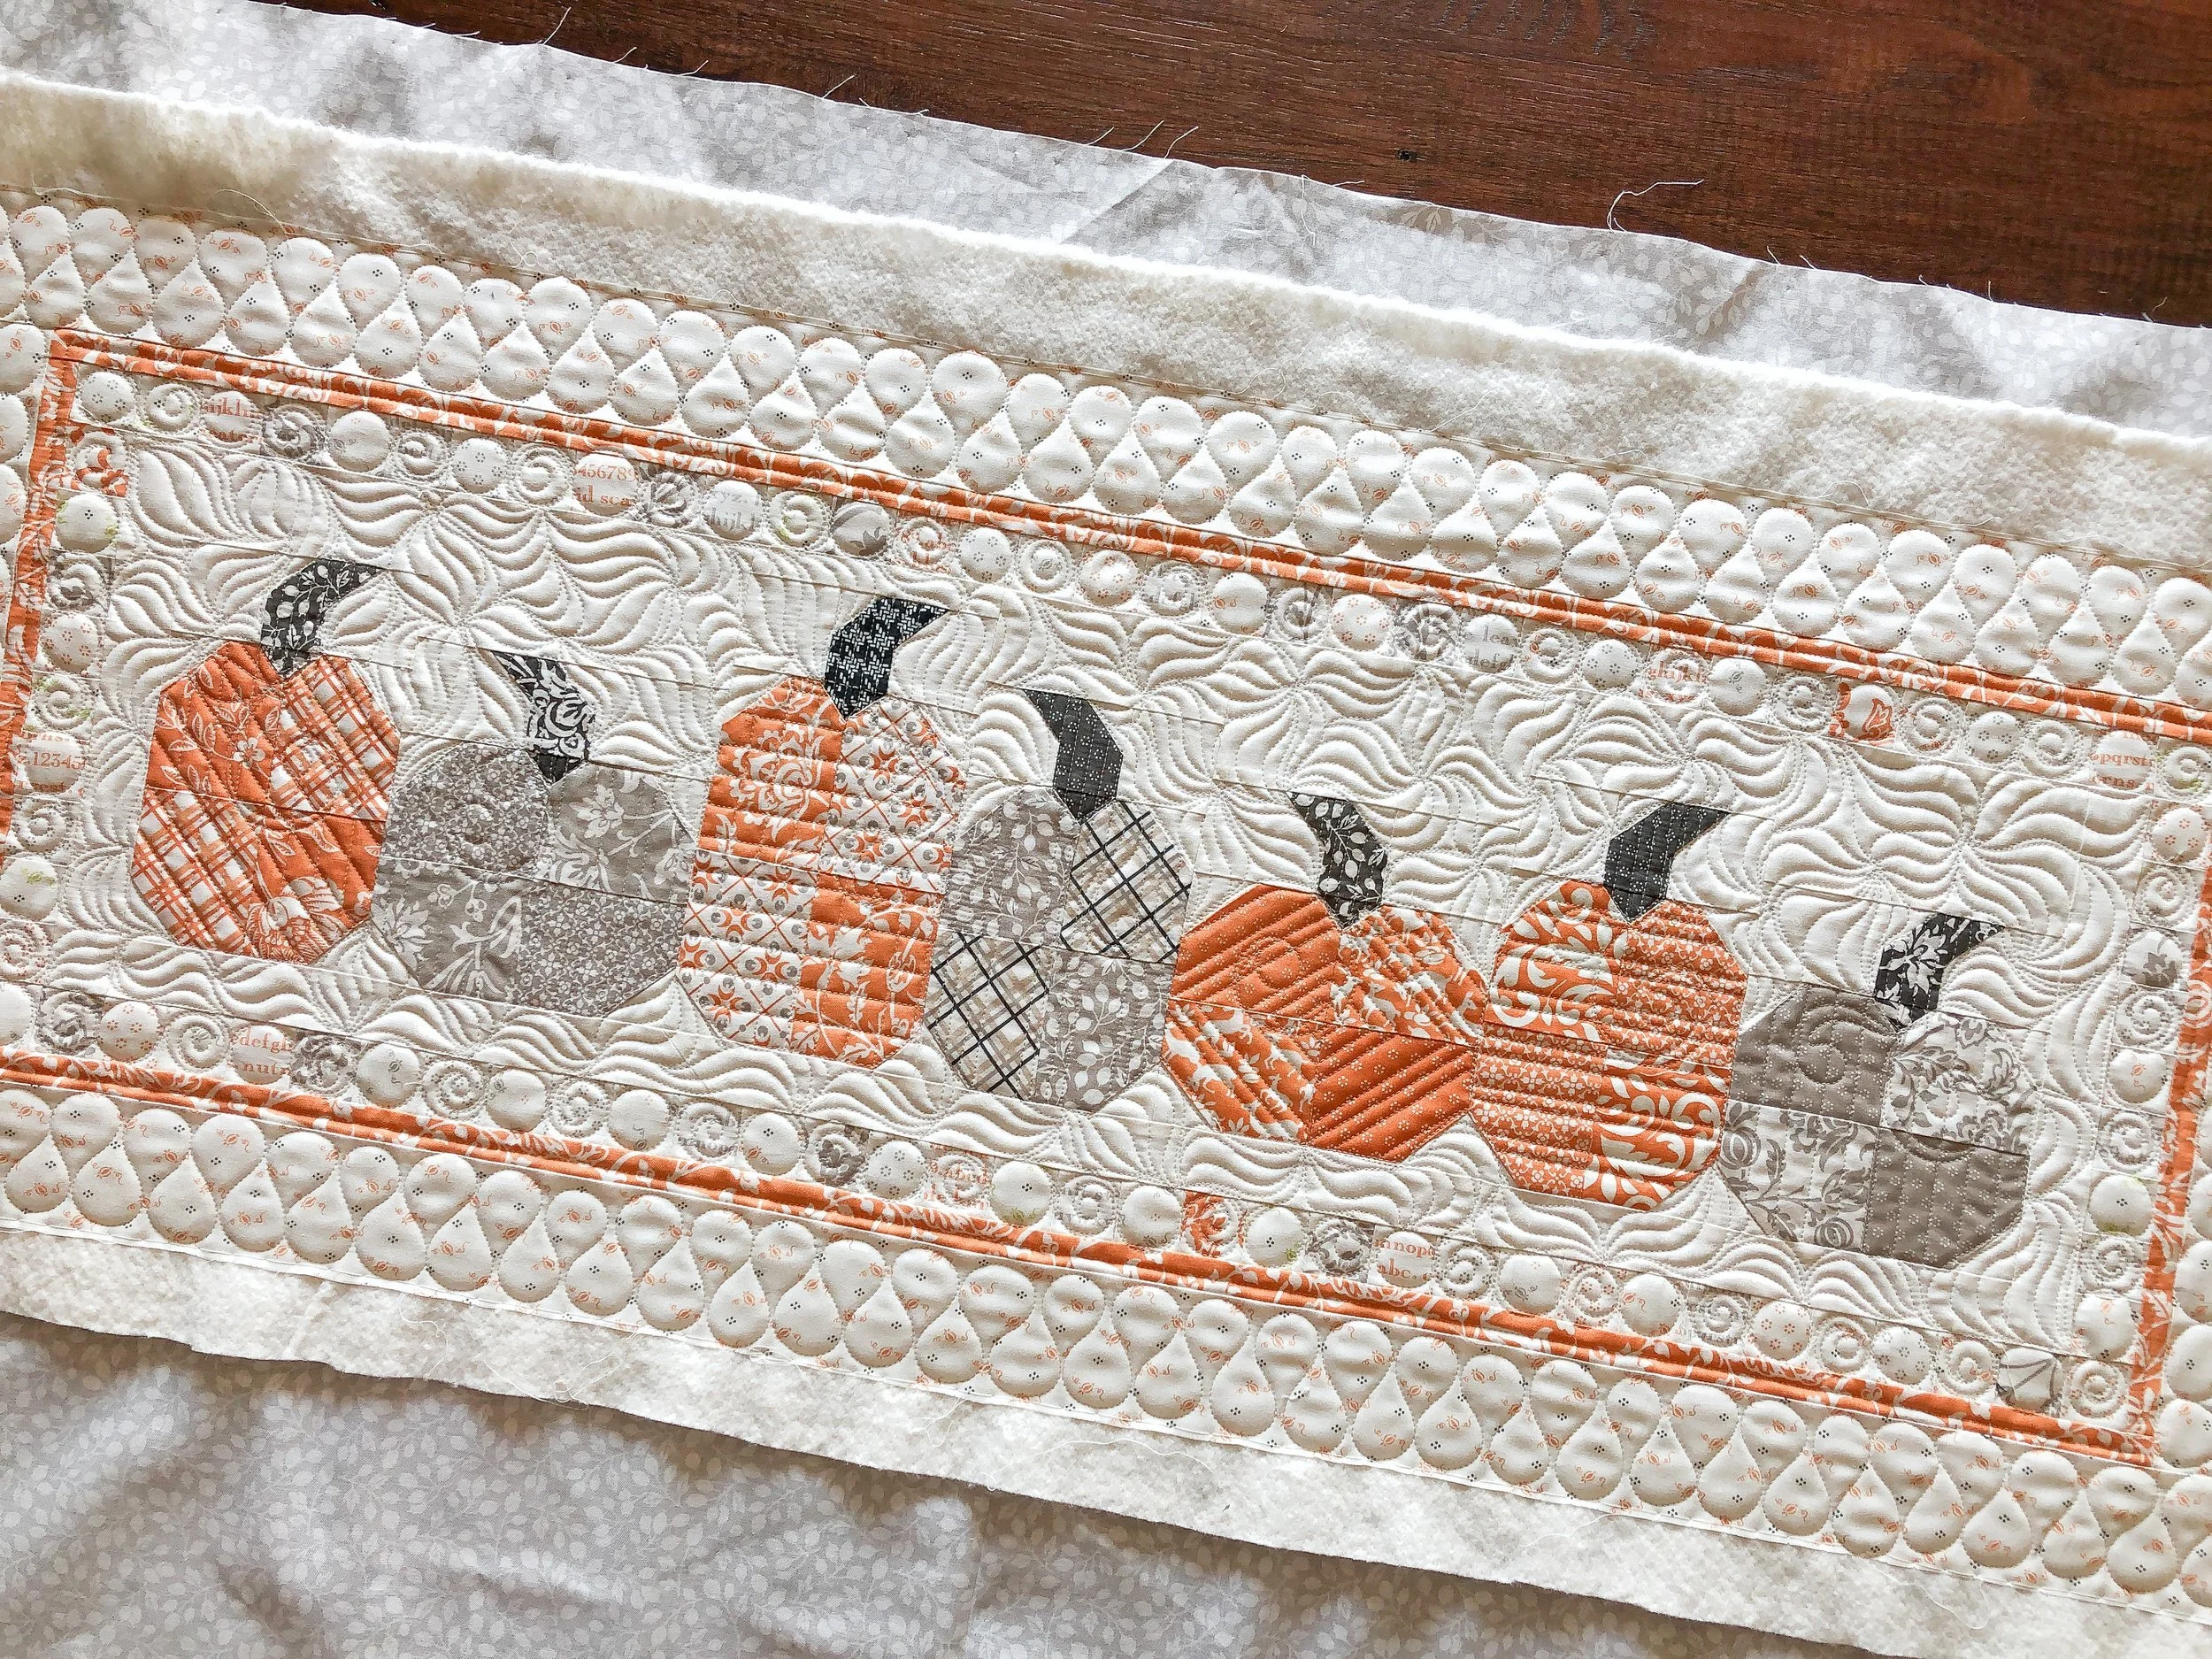
Kim made this for a store sample, so I wanted to have some fun with the quilty textures.
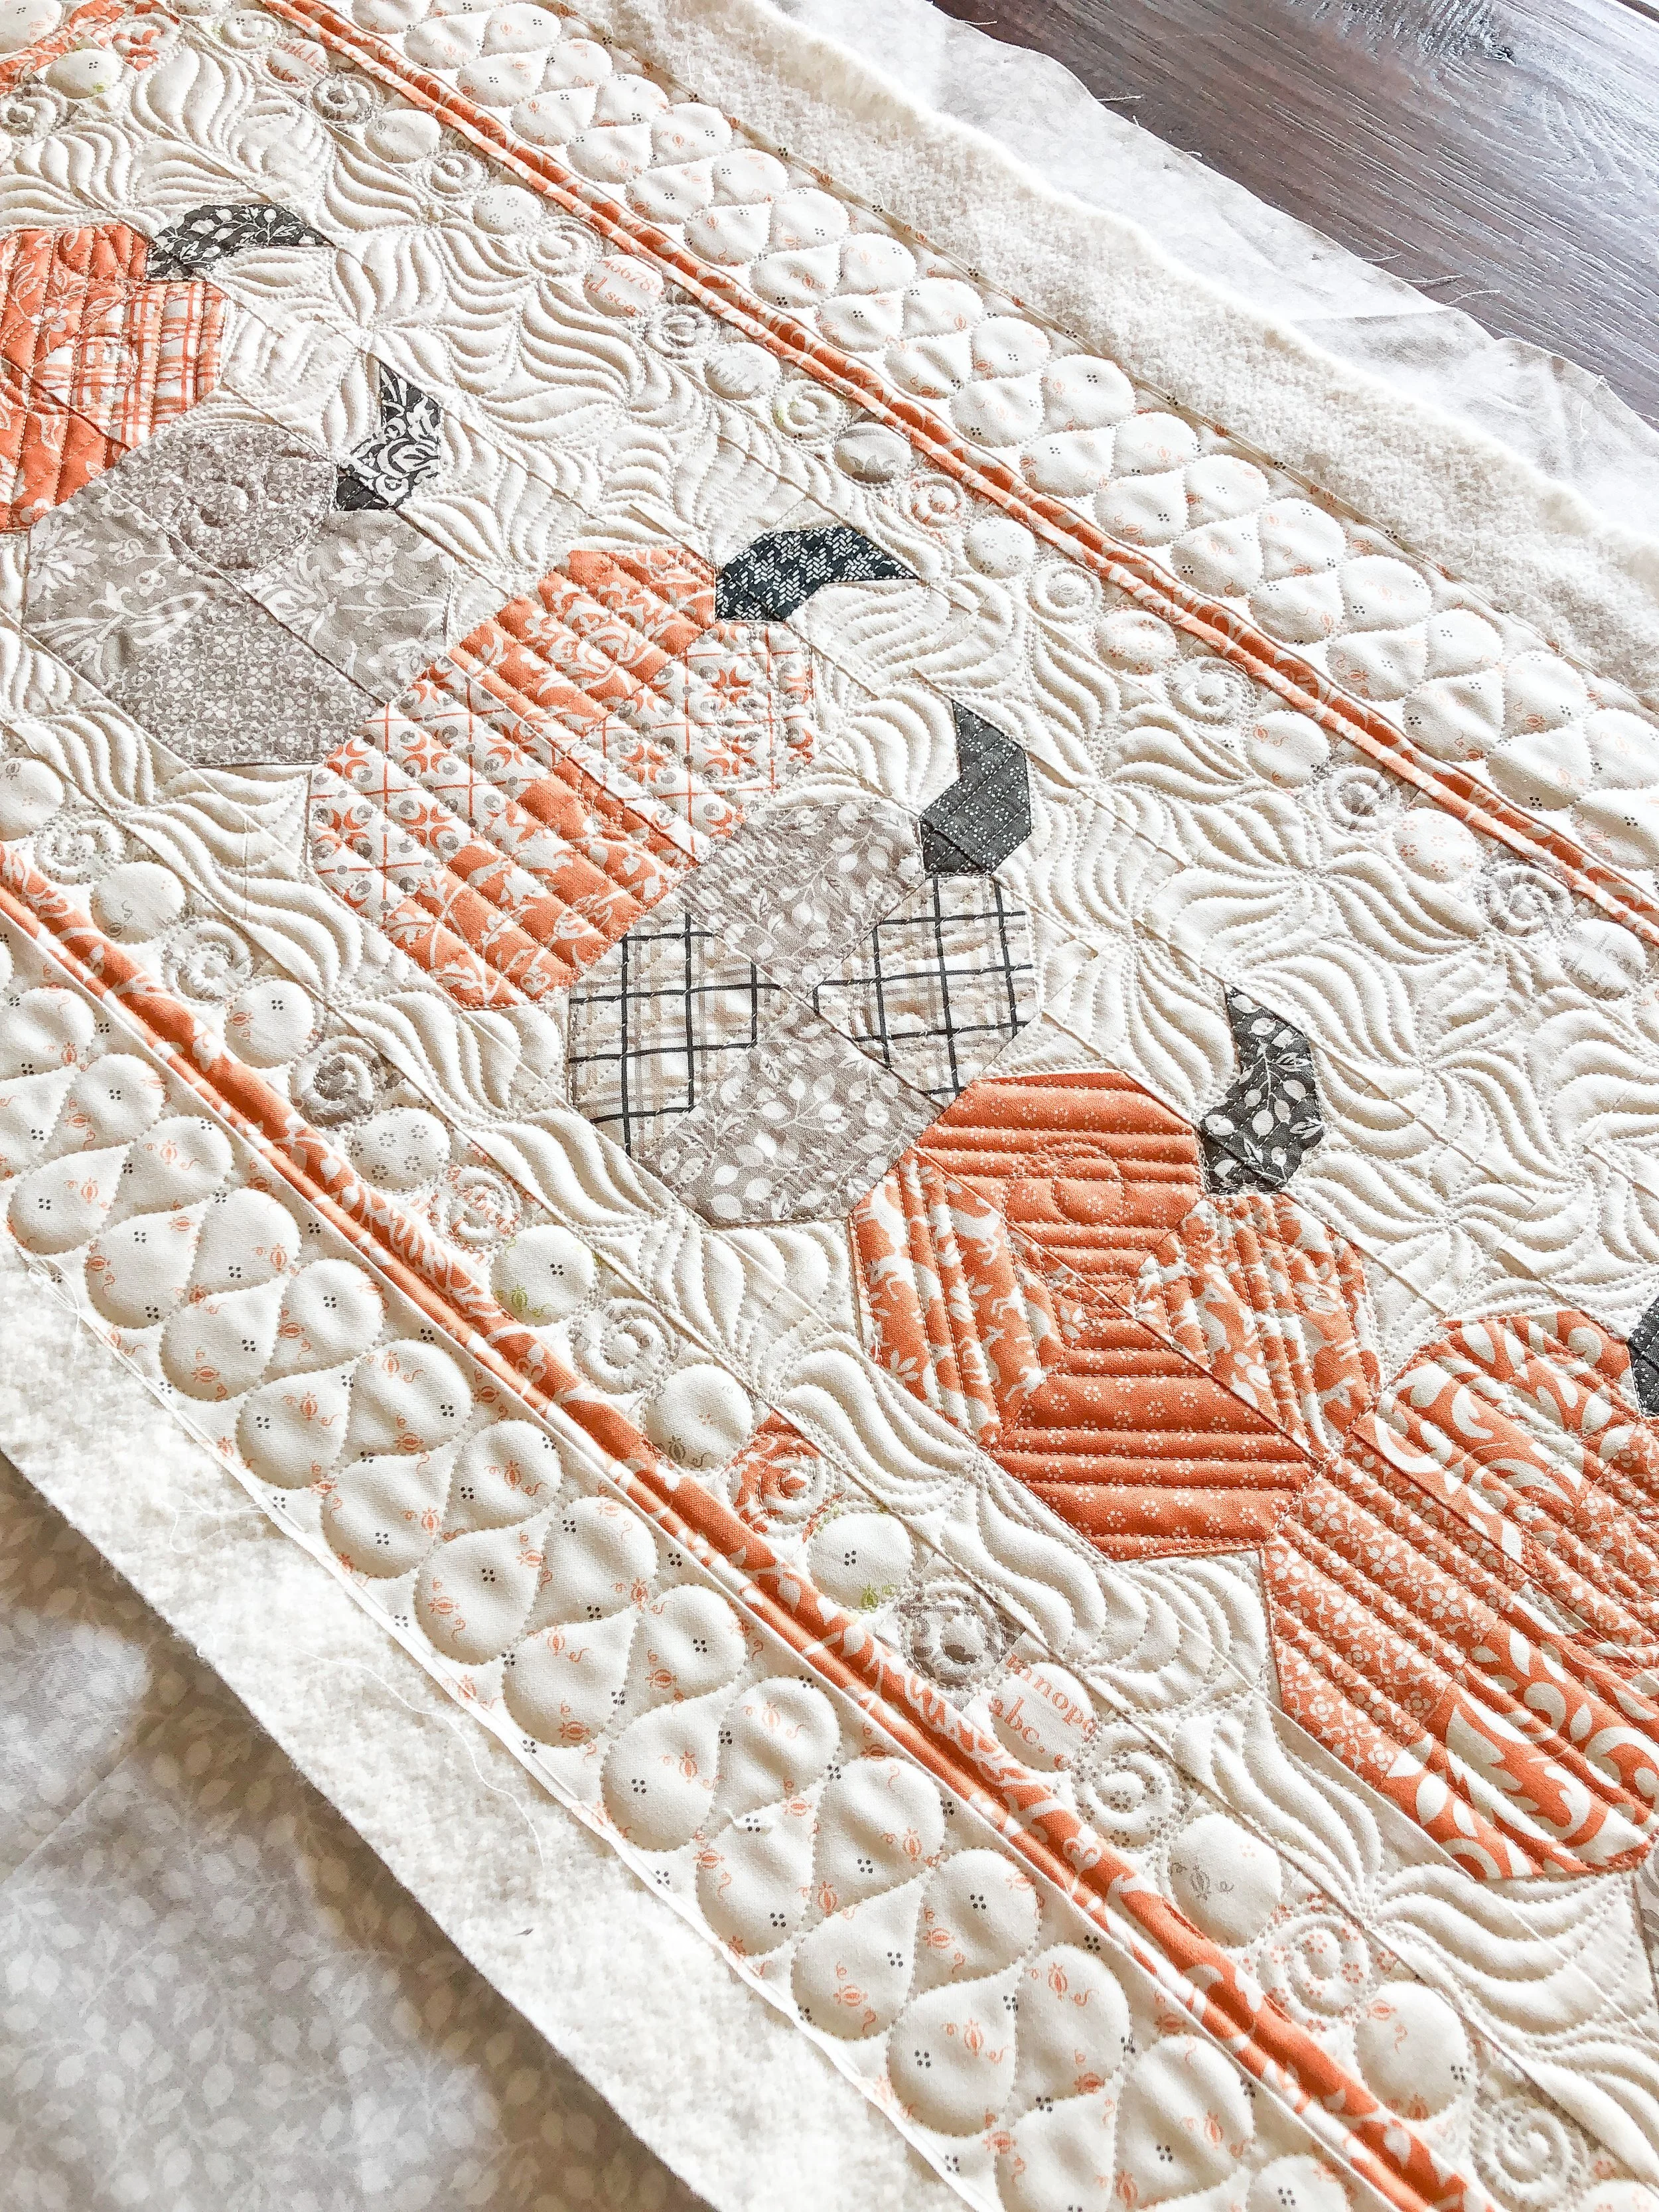
Let’s start with the background. That’s my Grass design, lovely huh?!?! It just so happens to be one of the designs that I teach in my Quilting It Freemotion™ course. If you’ve wanted to learn, go check it out in my shop. It’s such a fun design that I have used on many quilts…and oh so forgiving, as far as freemotion quilting goes.
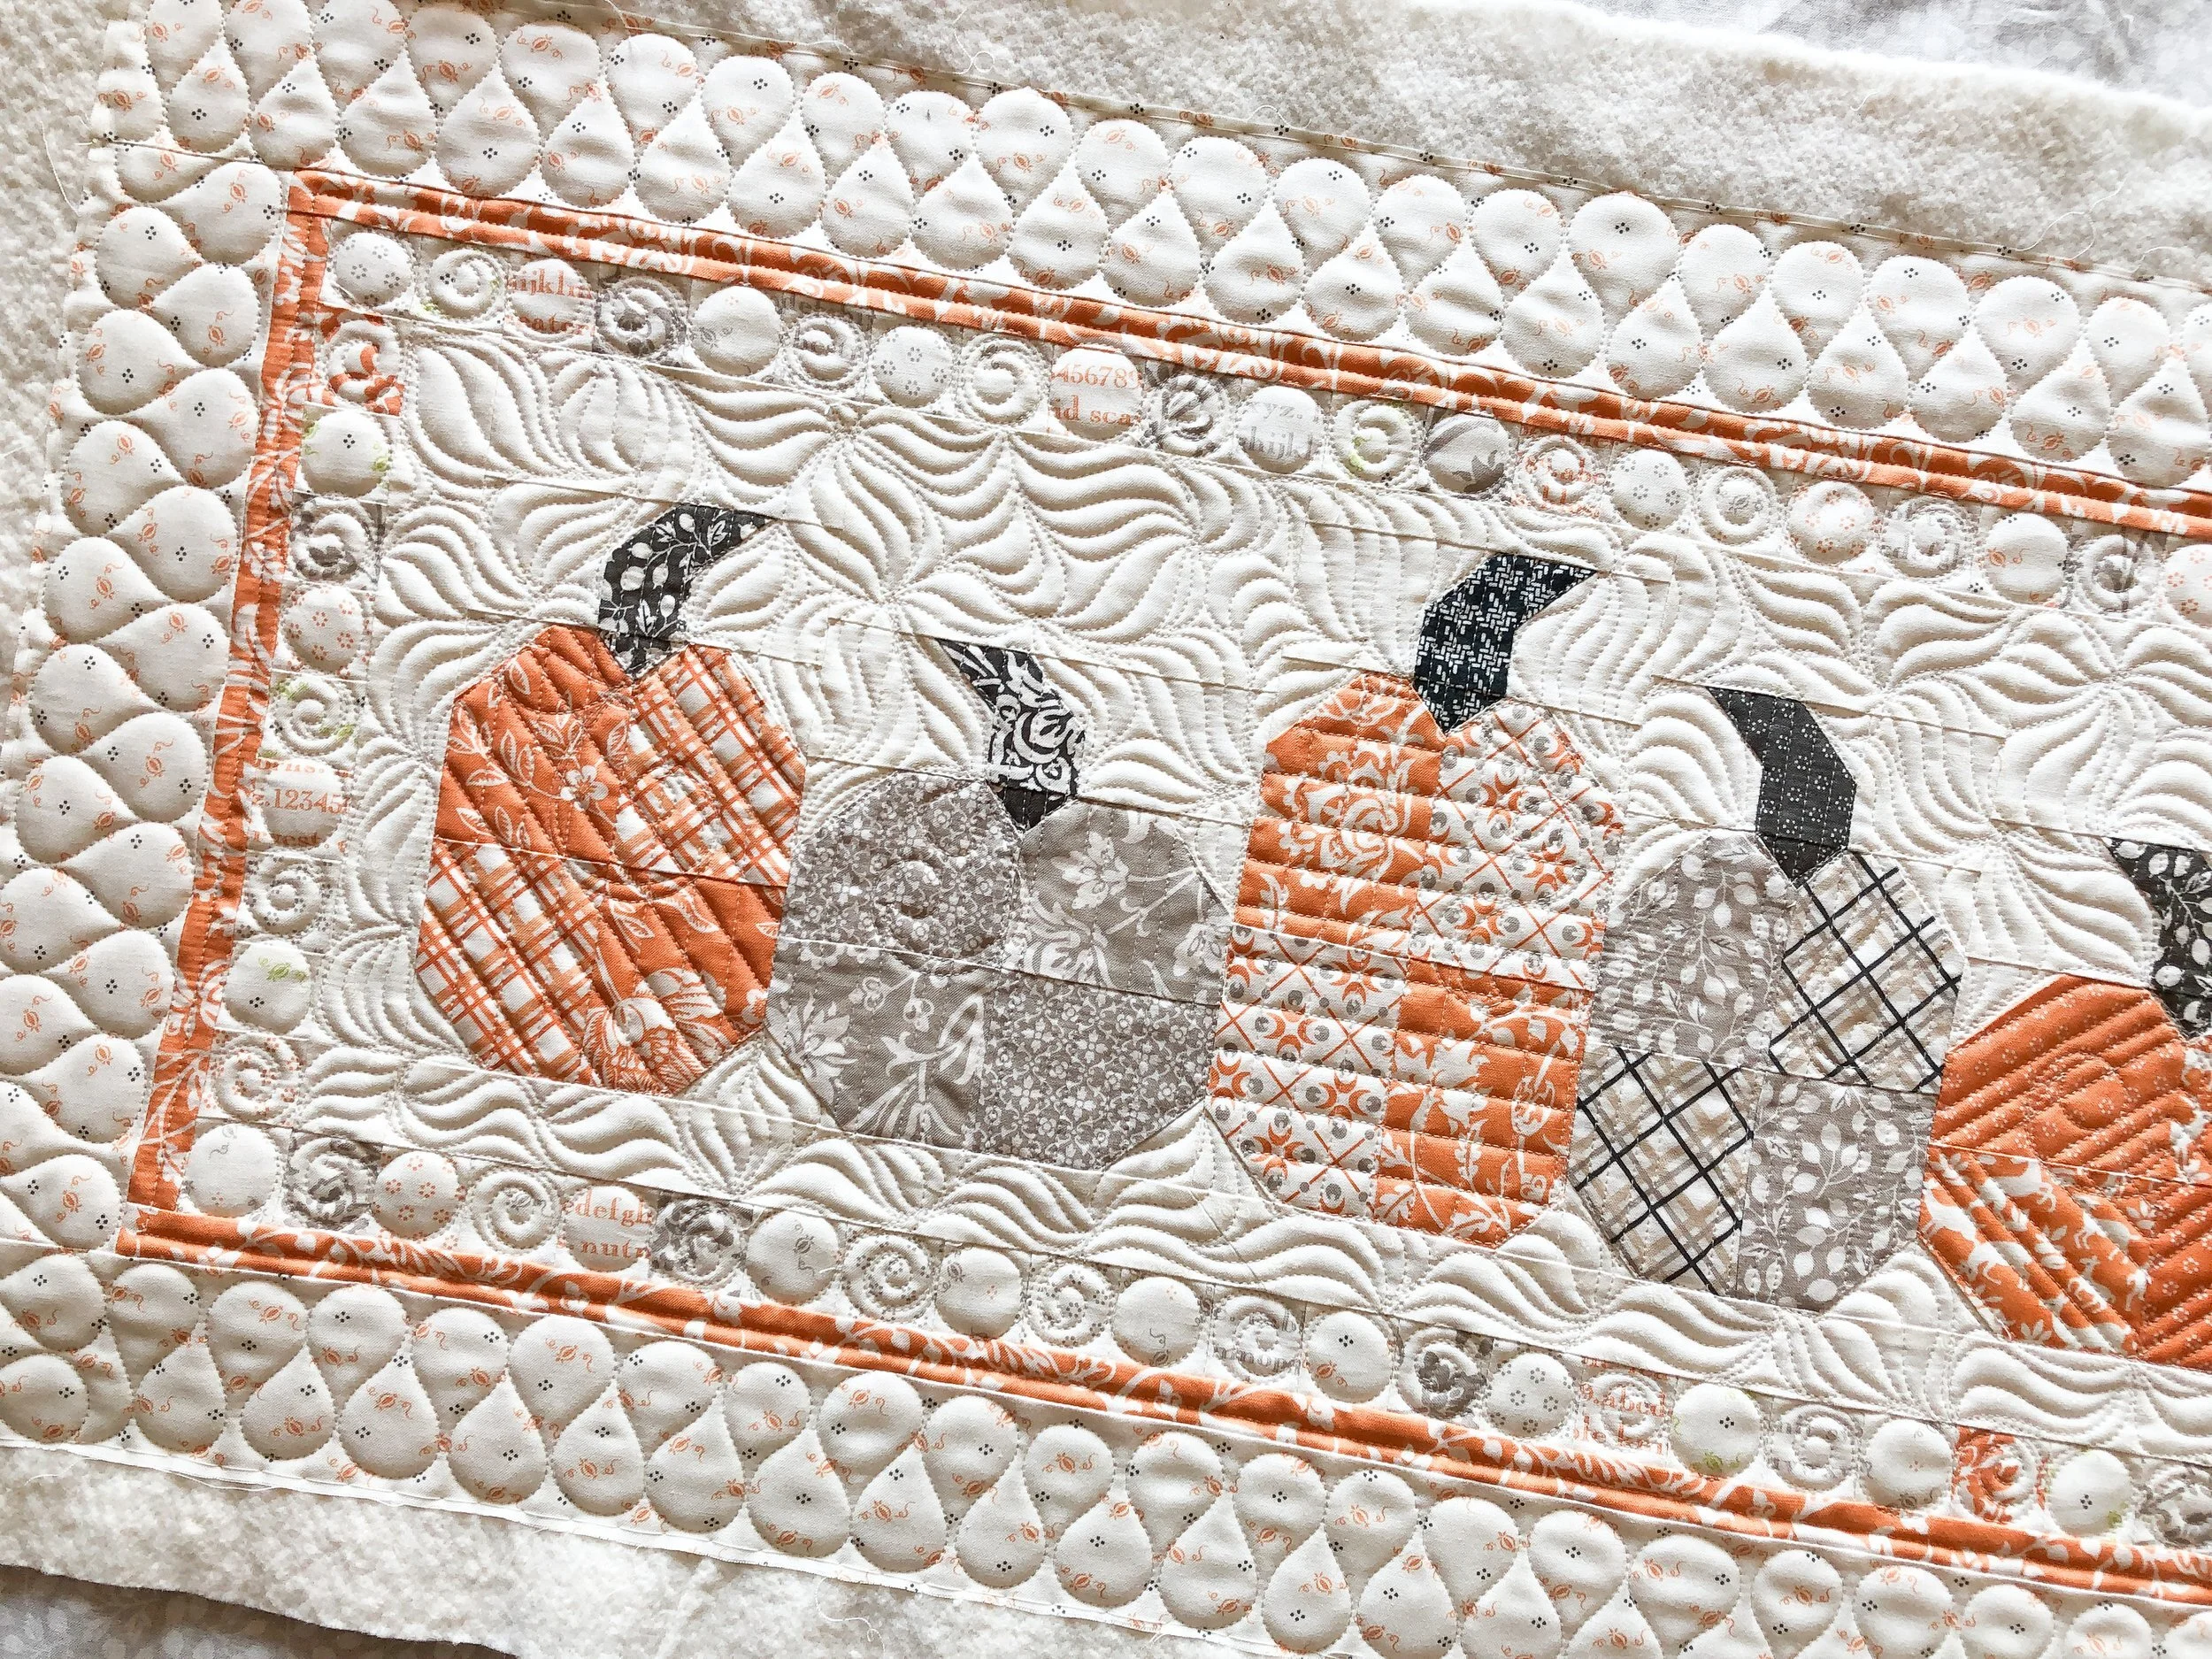
I also quilted some pebbles and swirls, every other one, in the 1” inner border. Such a fun touch! I used to do just the pebbles in the thinner borders like that, then I saw my friend Natalia Bonner quilt pebbles and swirls every other one. I love those little touches. I also teach you how to quilt that in my Pebbles video, in my Quilting It Freemotion™ course.
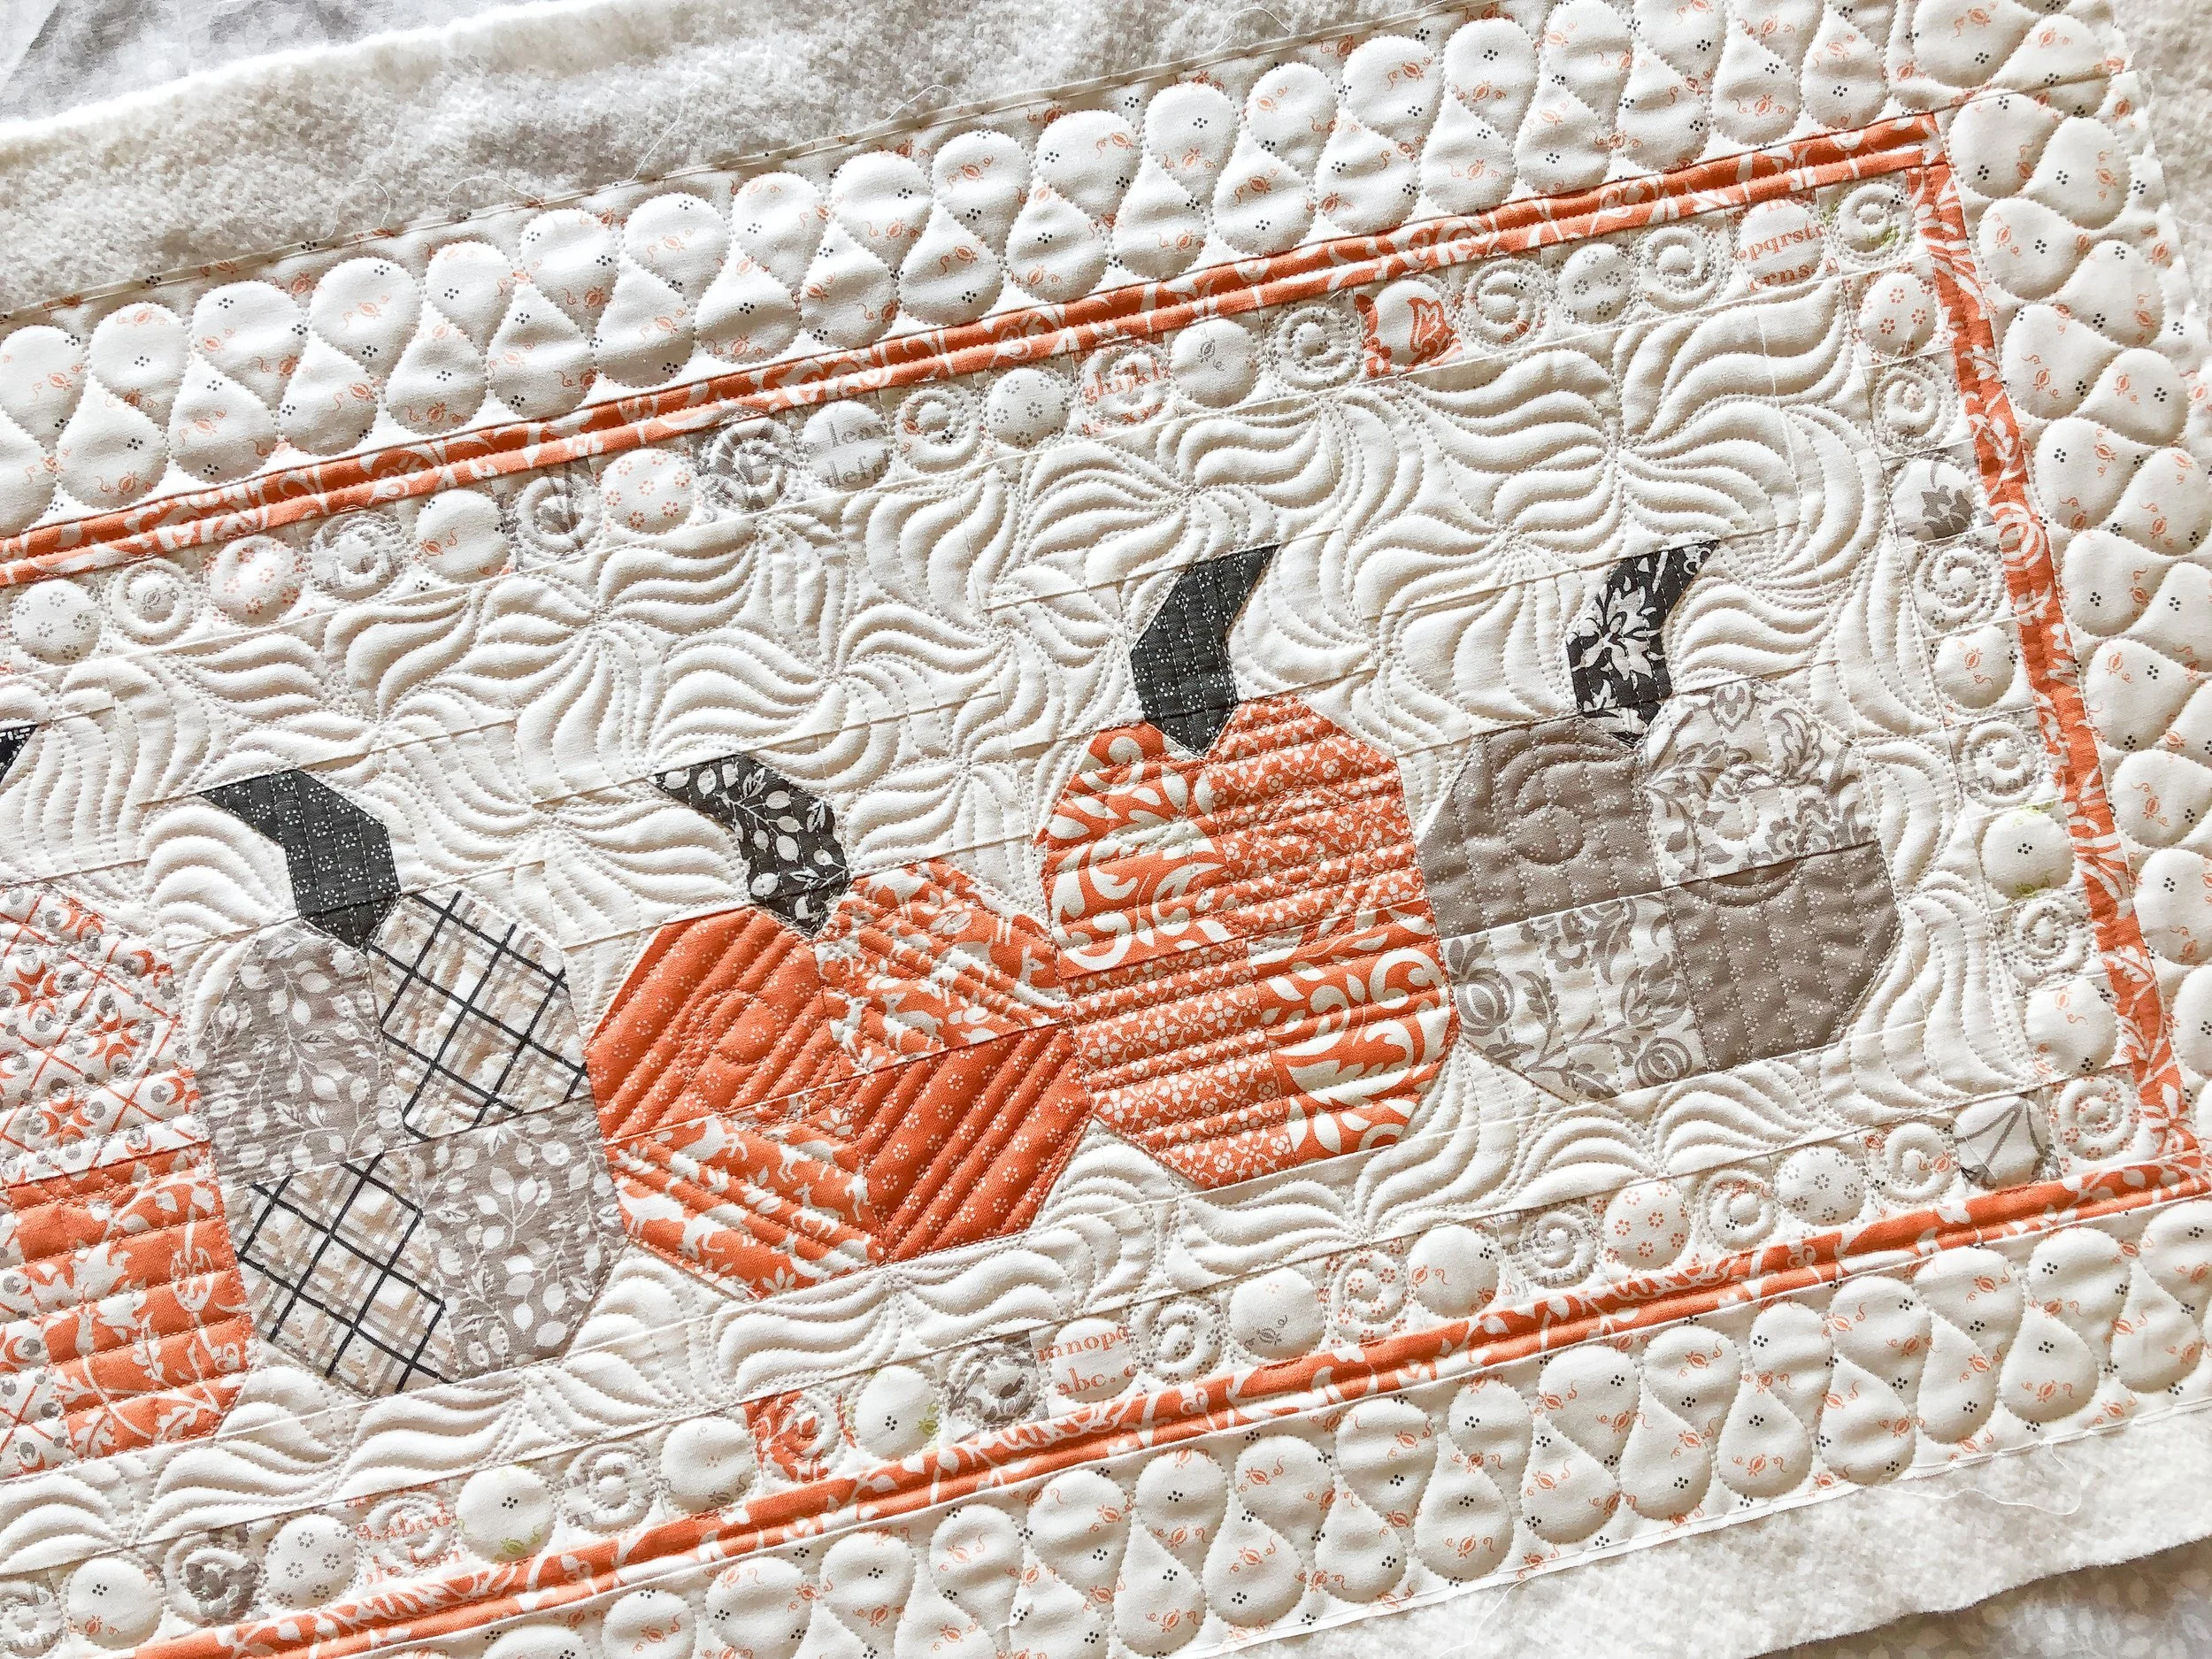
I like to keep super thin borders simple, like the little orange 1/2” border, so I just quilted right down the middle of it. Then of course ribbon candy!! It is definitely a custom quilting go to design. I’m thinking of videoing that and putting it on my Quilting It Freemotion Facebook page, that is for those who purchase my entire course, as a freebie.
I also did some fun ruler work in the pumpkins, with some swirly fun vines that the top of the pumpkins. I used my favorite 8” Edge ruler from Linda at The Quilted Pineapple. This is such a fun table runner to quilt!! It’s all about the details.
So…if you saw the promo video for my Quilting It Freemotion™ course, then you saw me quilting part of this runner. If you didn’t see it, check it out above!!
Thanks for stopping by, happy quilting!! - Leisha
PS>>> If you are viewing this post in a email and it won’t show the video, so you have a few options… you can either go to my blog, click on “View full post” in the email, or click here: https://vimeo.com/597456814 …to see the video.

Chris’ Quilts
Hello Friends,
I hope you’re having a great weekend!! As I’m busy quilting, I’m going to try and share the quilts that I’ve quilted the last few months.
I also have 10 or so spots open for quilting before Christmas. Please let me know ASAP, if you’d like something quilted. I offer custom and edge to edge quilting, and basting for hand quilters out there.

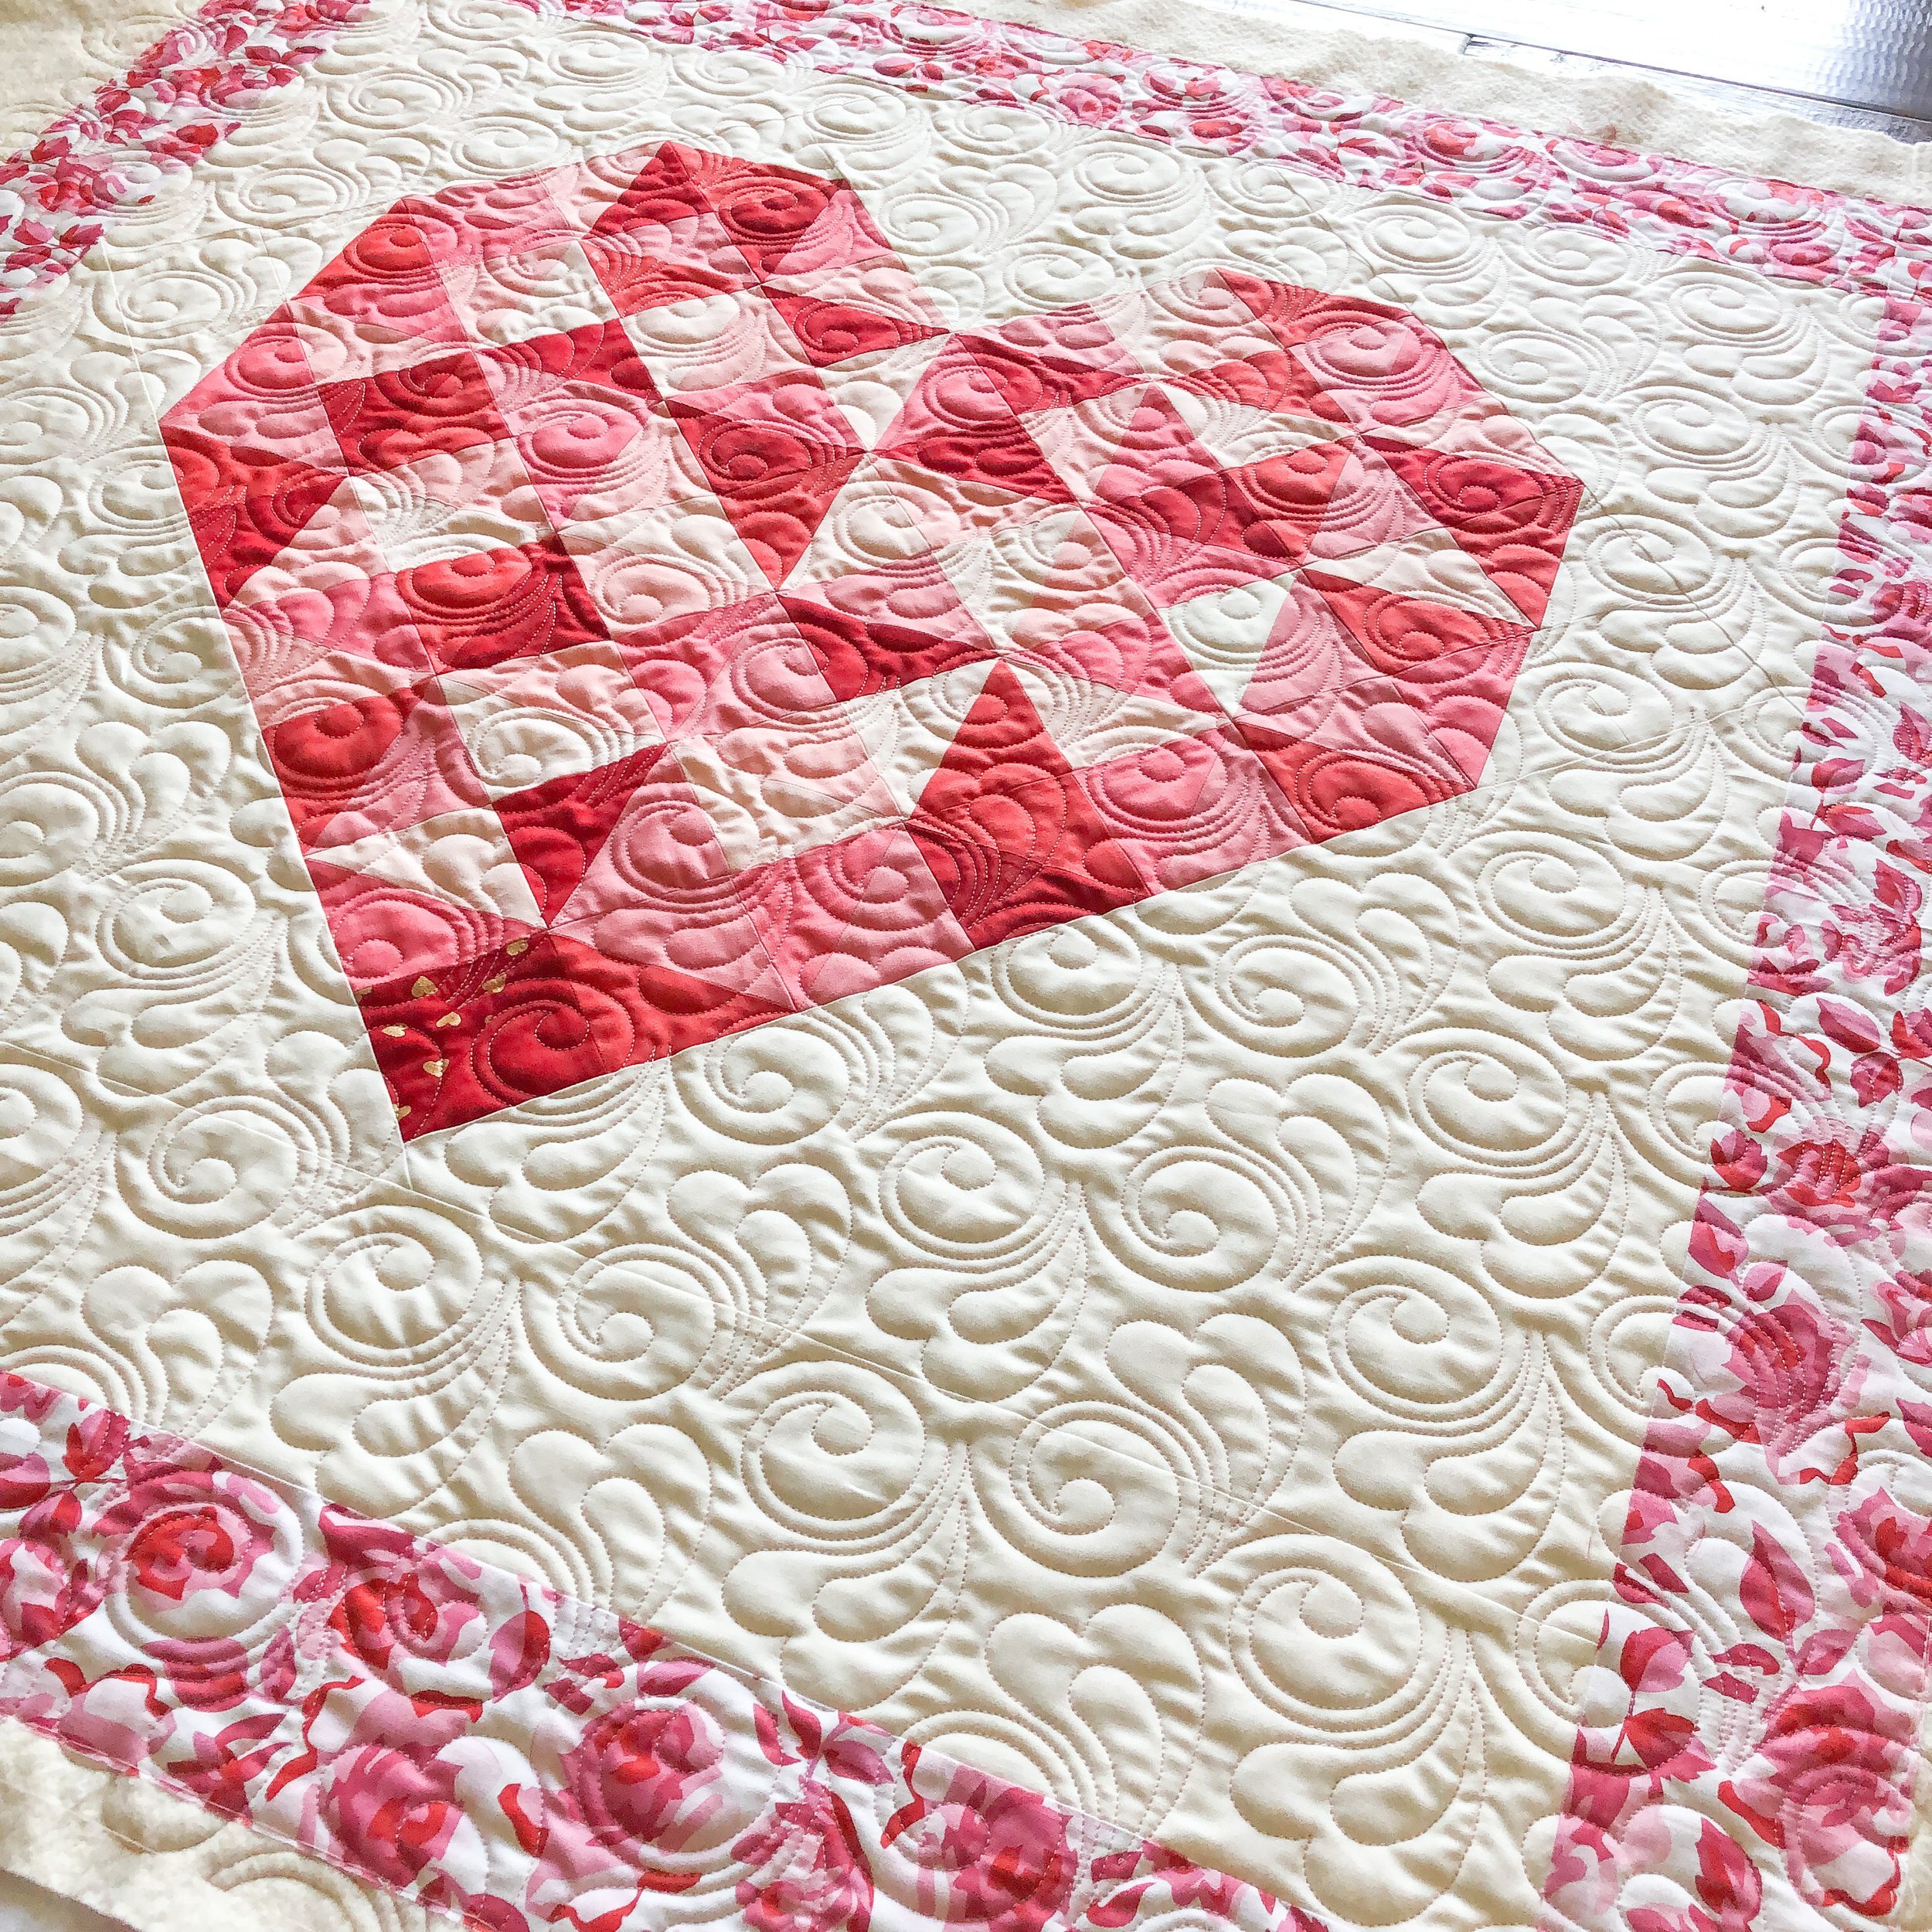
Chris made this sweet pixelated heart quilt with bow tie blocks. Which looks like the perfect way to use up your scraps. The pattern is called Stitches from the Heart by Fat Quarter Shop….and it’s free!!!

I used my favorite 8020 cotton poly blend batting from Winline and natural white thread from Superior Threads.
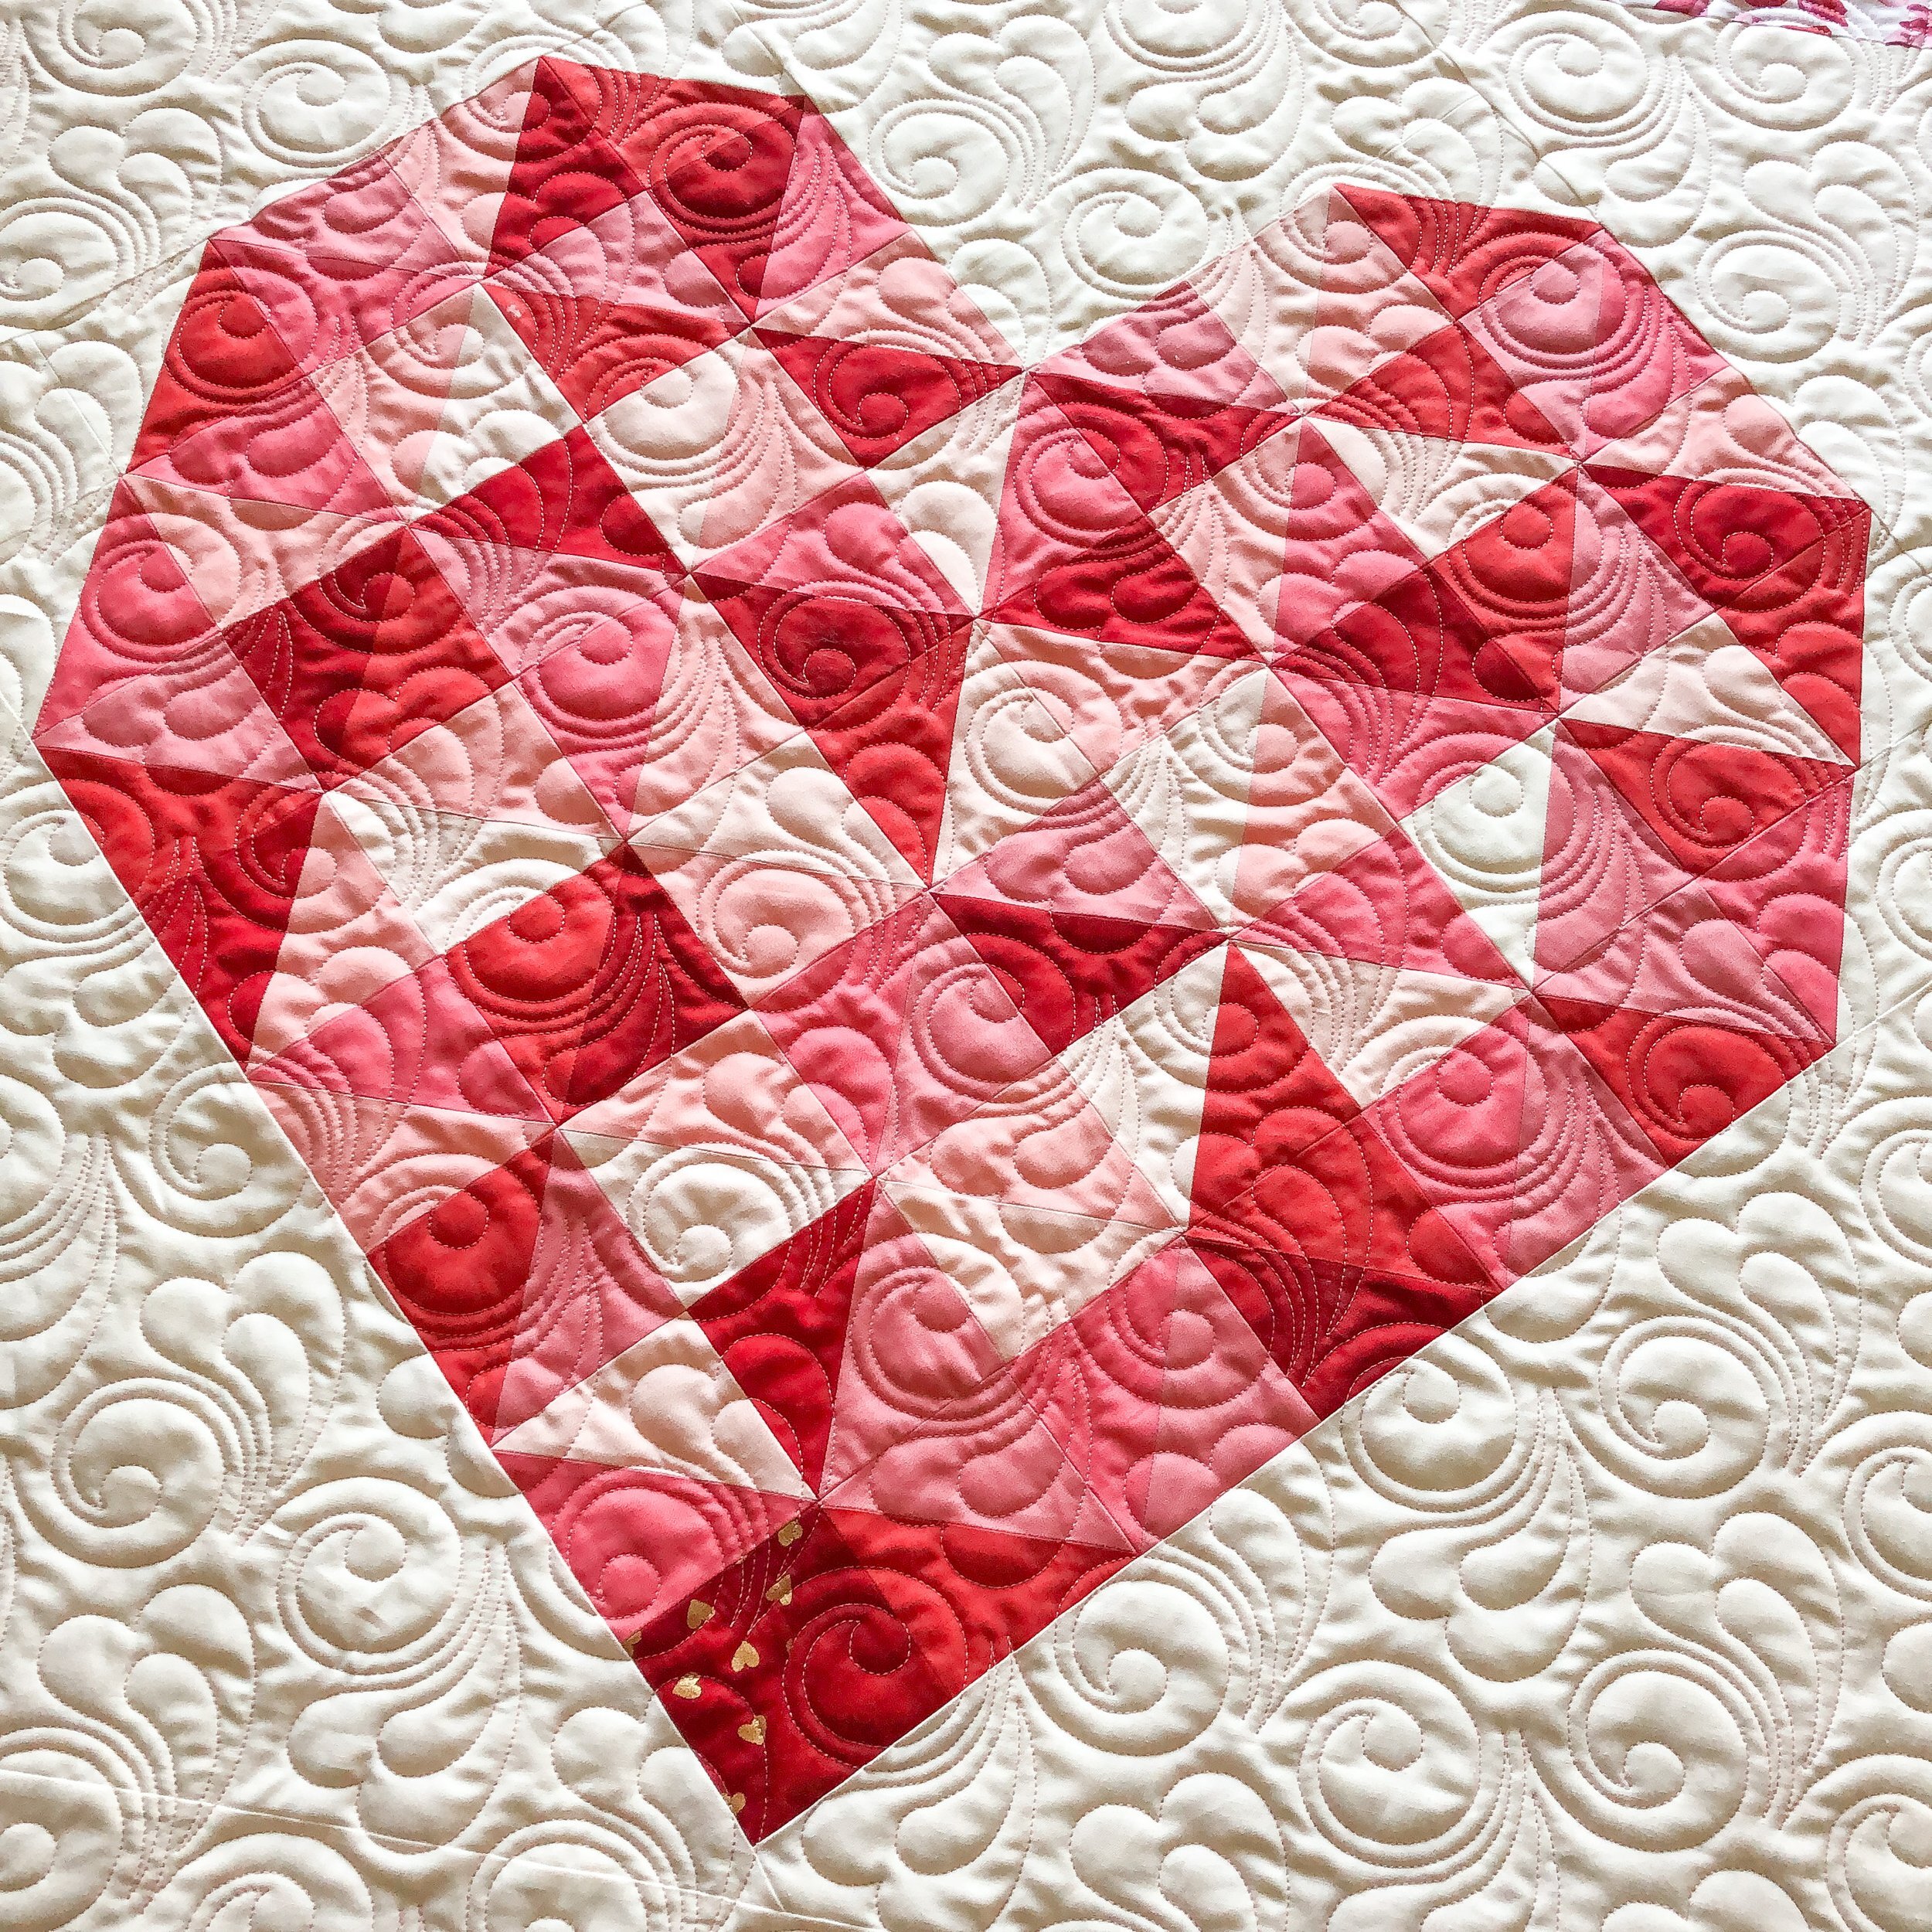
Chris requested Cupid, for the quilting!! Cupid©️ is one of Patricia Ritter and my quilting designs, that is available at Urban Elementz. It’s one of my absolute favorites!! It adds such a fun swirly texture on any quilt that you want to quilt with a little extra love. The feathered heart add such a sweet touch to it.

Chris does a beautiful job picking out fabrics and fun quilt patterns.
This next quilt is a friendship quilt that a local quilt shop did several years ago, that Chris finished. She asked that I just quilt in the ditch. I can quilt as little or as much, as you’d like. I used a cream Omni thread, and 8020 cotton poly blend batting.
I’m so grateful to be able to do something I love, and part of that is interacting with my wonderful clients. Thank you!!! Have a wonderful weekend. • Leisha
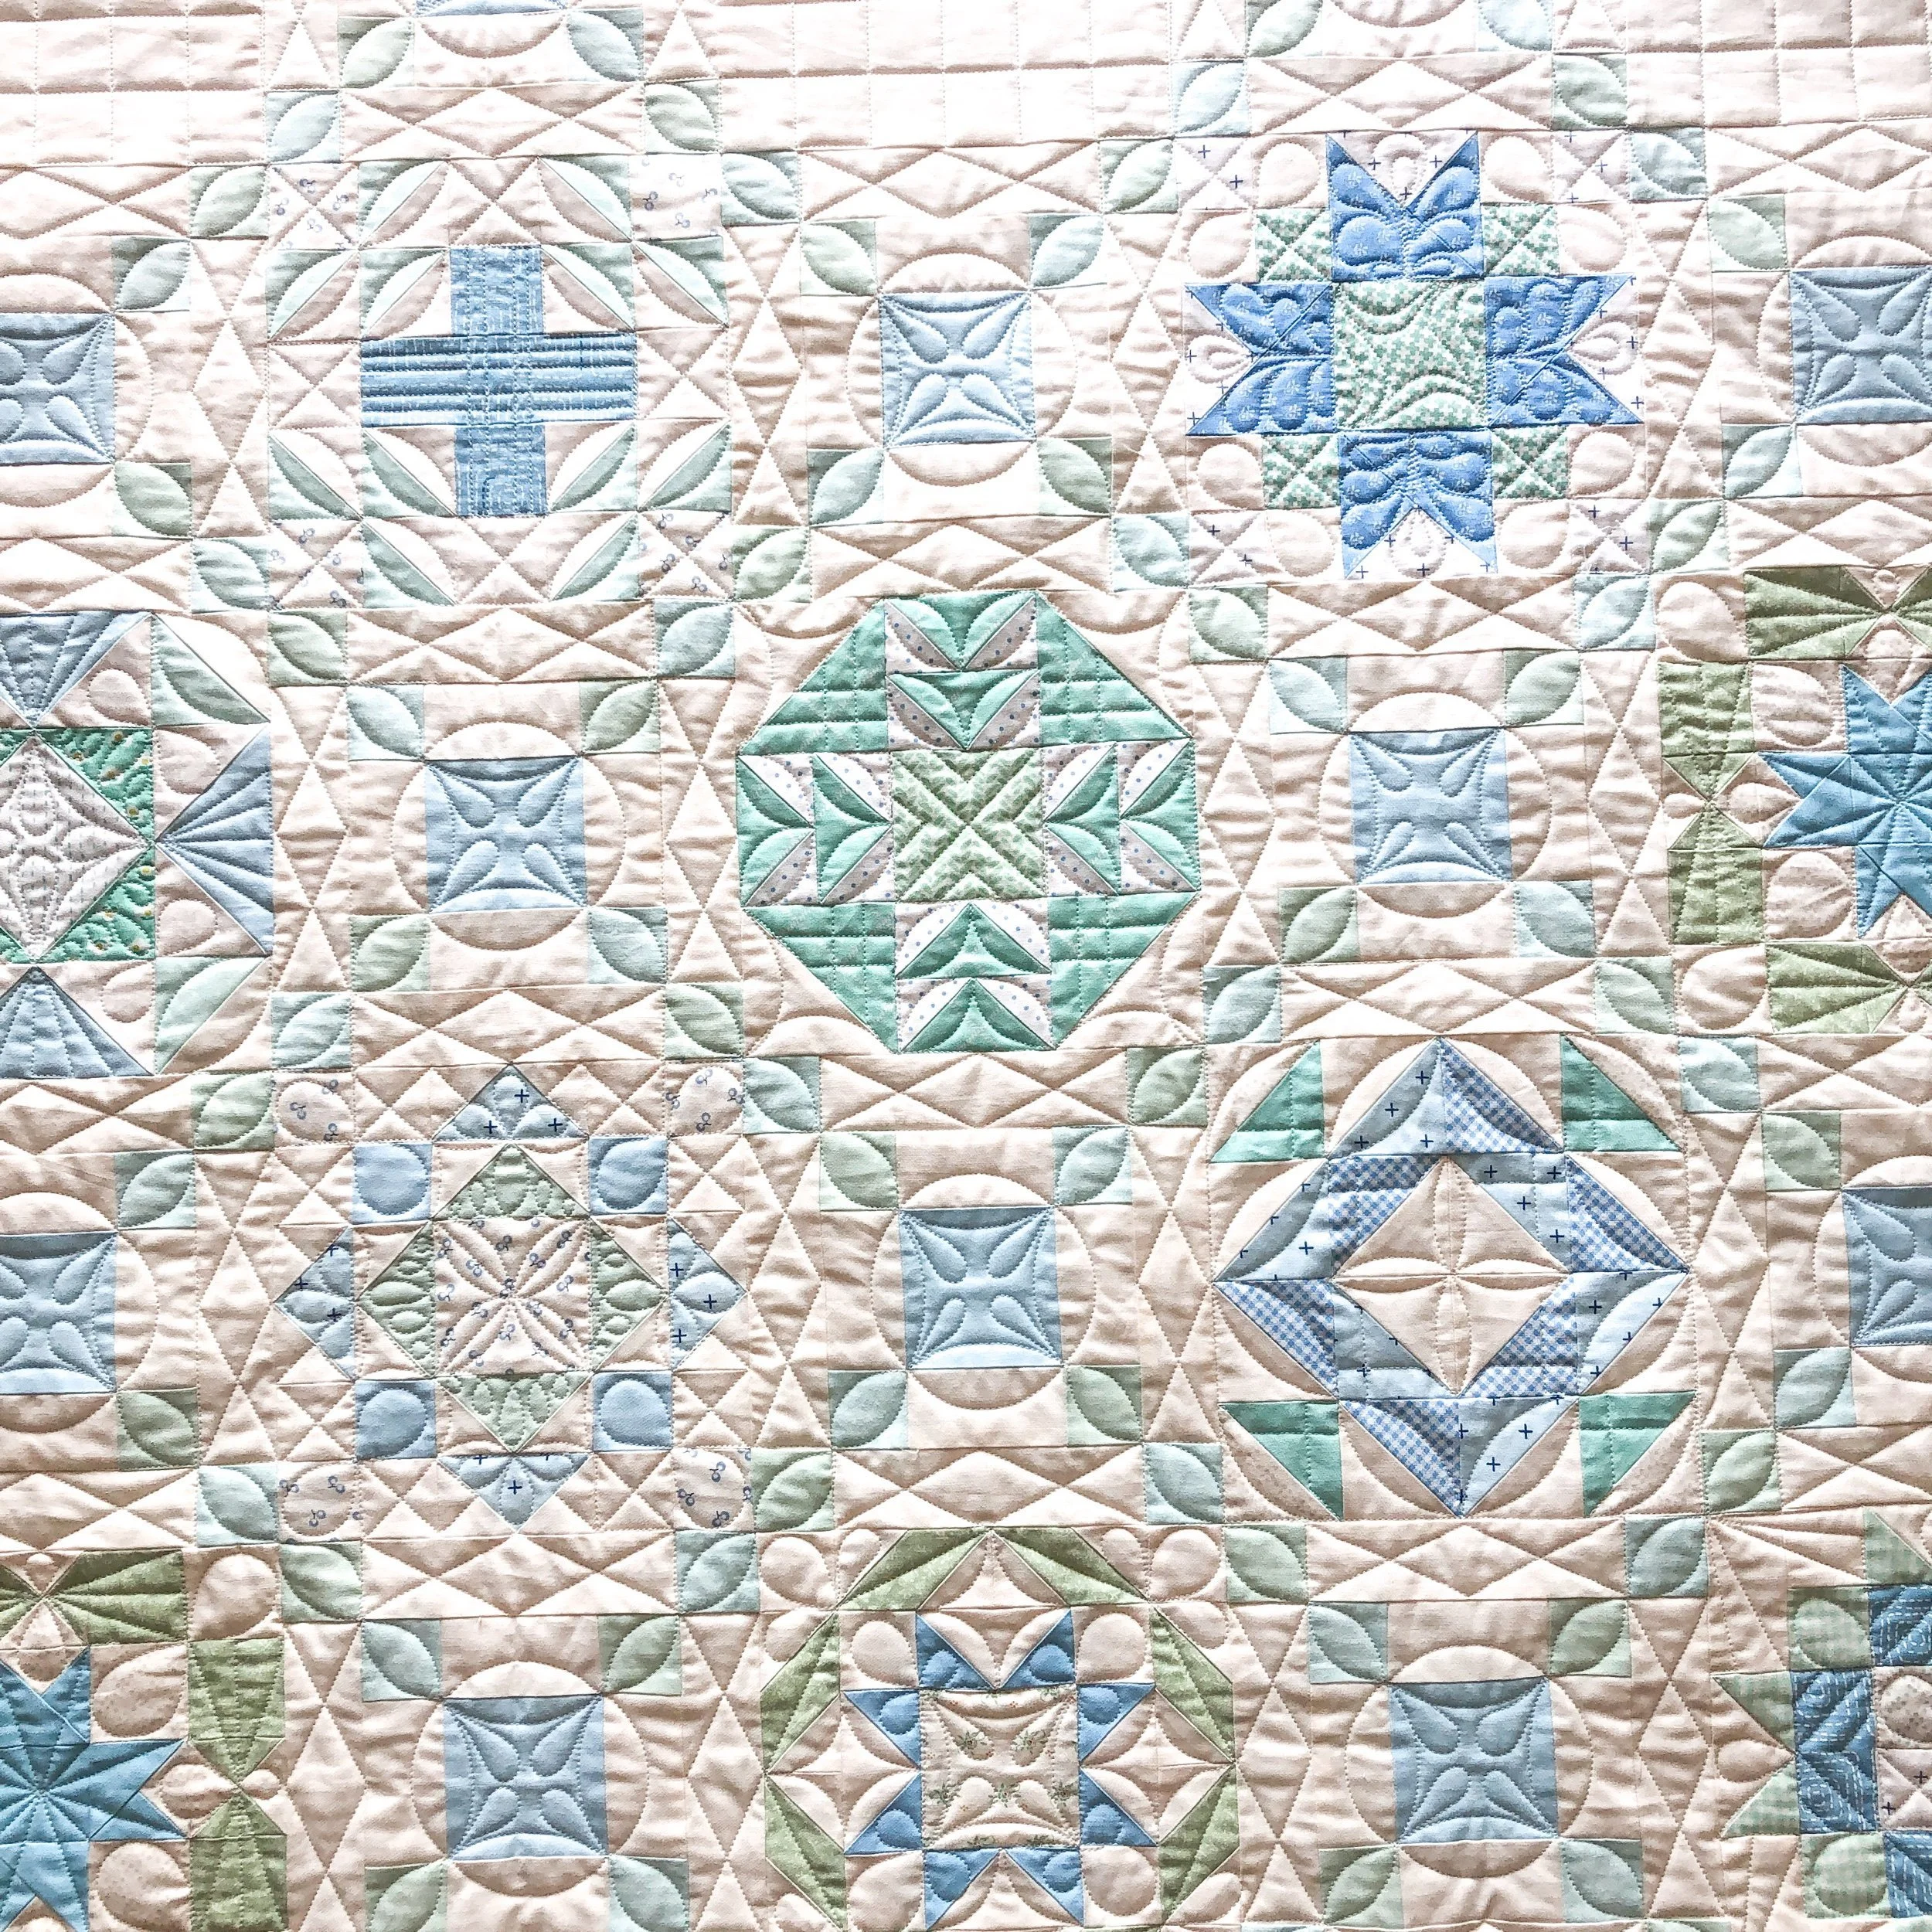
Beverlee's beautiful Sea Glass Quilt
Hello Friends,
I hope that you’re all doing well. The holiday quilting rush is well underway over here, and Christmas will be here before we know it. I still have a few spots available, if you need something quilted. Please keep in mind if you’re planning on shipping a quilt, to send it as soon as possible. USPS shipping times are even slower this year. Please email me for questions or to get on my quilting list. quiltingit@gmail.com
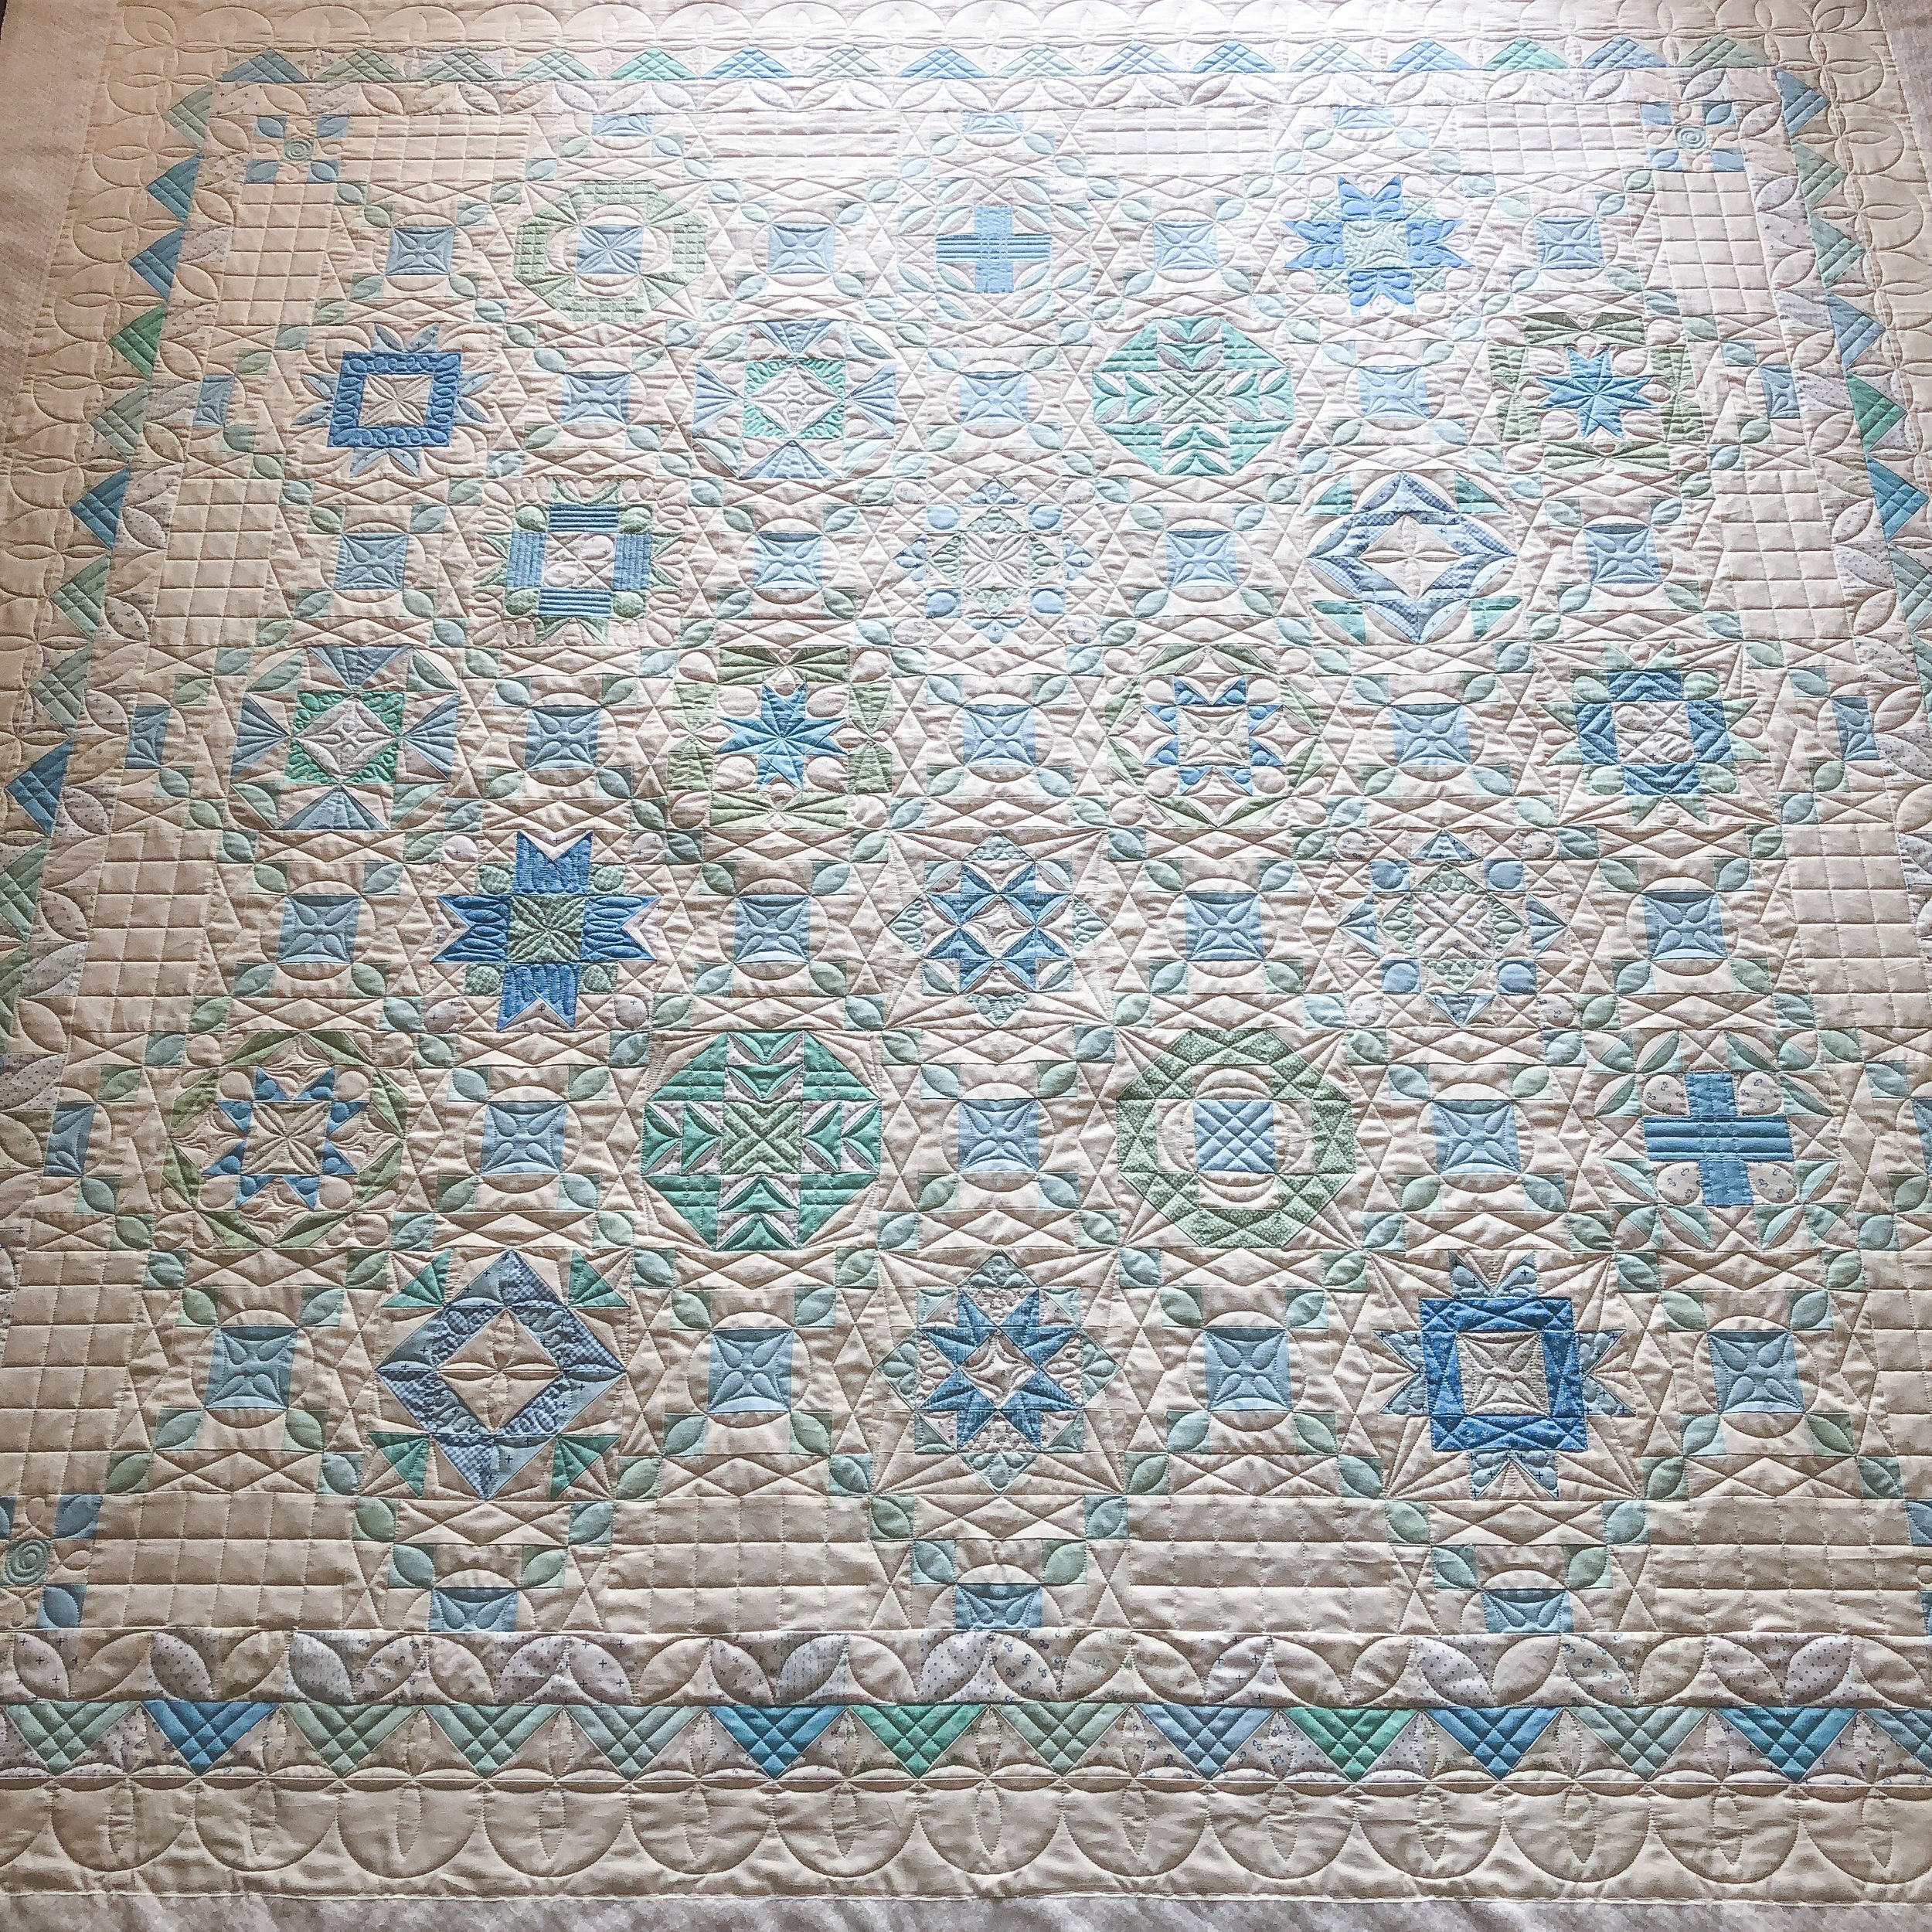
Back in July I quilted this fabulous quilt that Beverlee made, beautiful huh?!?! The pattern is by Joanna from Fig Tree and Co. and is called Sea Glass. She actually has a couple of the full kits available. She did it as a block of the month. It’s such a beautiful pattern! The following pictures just don’t do this quilt justice.
I love it when my clients have me custom quilt quilts like this one, and just say do whatever you think will look good. That gives me the opportunity to be creative as I quilt, and not worry about planning out the entire quilt. There are definitely times when I draw out what I’m going to quilt on a block that is repeated throughout the quilt. When it came to this quilt, I knew that I wanted to use my Circle²™ machine quilting circle rulers, that are available in my shop, and the 8” Edge ruler from Linda at The Quilted Pineapple. Then I just look at the size of the blocks and start quilting. If you actually look at the individual lines or curves, they are very simple shapes, yet together they look great! One little orange peel petal linked to another, creates a chain through the corners to the block that is diagonal to it. Which frames the unique quilt blocks beautifully. That was my plan going into quilting the “chain blocks” or the repeated quilt blocks, because they were every other block. It’s also nice to have a repeated block, because not only can I quilt the same design out on each block, it helps create a beautiful overall design.

I love to take progress pictures to post on my instagram, which Beverlee was so excited to see. Go follow me there, and check out my stories for pictures or videos, as I quilt.
I love a good angled picture. Even though you can’t see the entire quilt, you can see all the beautiful quilting shapes and textures. Quilting brings a quilt alive, and I feel so bless to be able to do this for my clients.
I used bamboo batting from Winline Textiles out of Ogden, Utah and Natural White Omni thread from Superior Threads.

Here is a straight on picture of several of the blocks. When I quilt the single blocks, that are not repeated anywhere, I do a lot of similar shapes which helps bring the overall design together while highlighting the shape of the block itself.

I love how simple lines mixed with curves, add just the right amount of detail to a quilt block, like these blocks. With a lot of the horizontal or vertical lines I quilted, there is a 1/2” spacing.
These blocks are some of my favorites!! On a quilt like this one, that is mostly quilted with rulers, I love to add some freehand loops or petals. It helps soften the near perfect lines and curves that are quilted with the rulers that I use. Like pictured below.

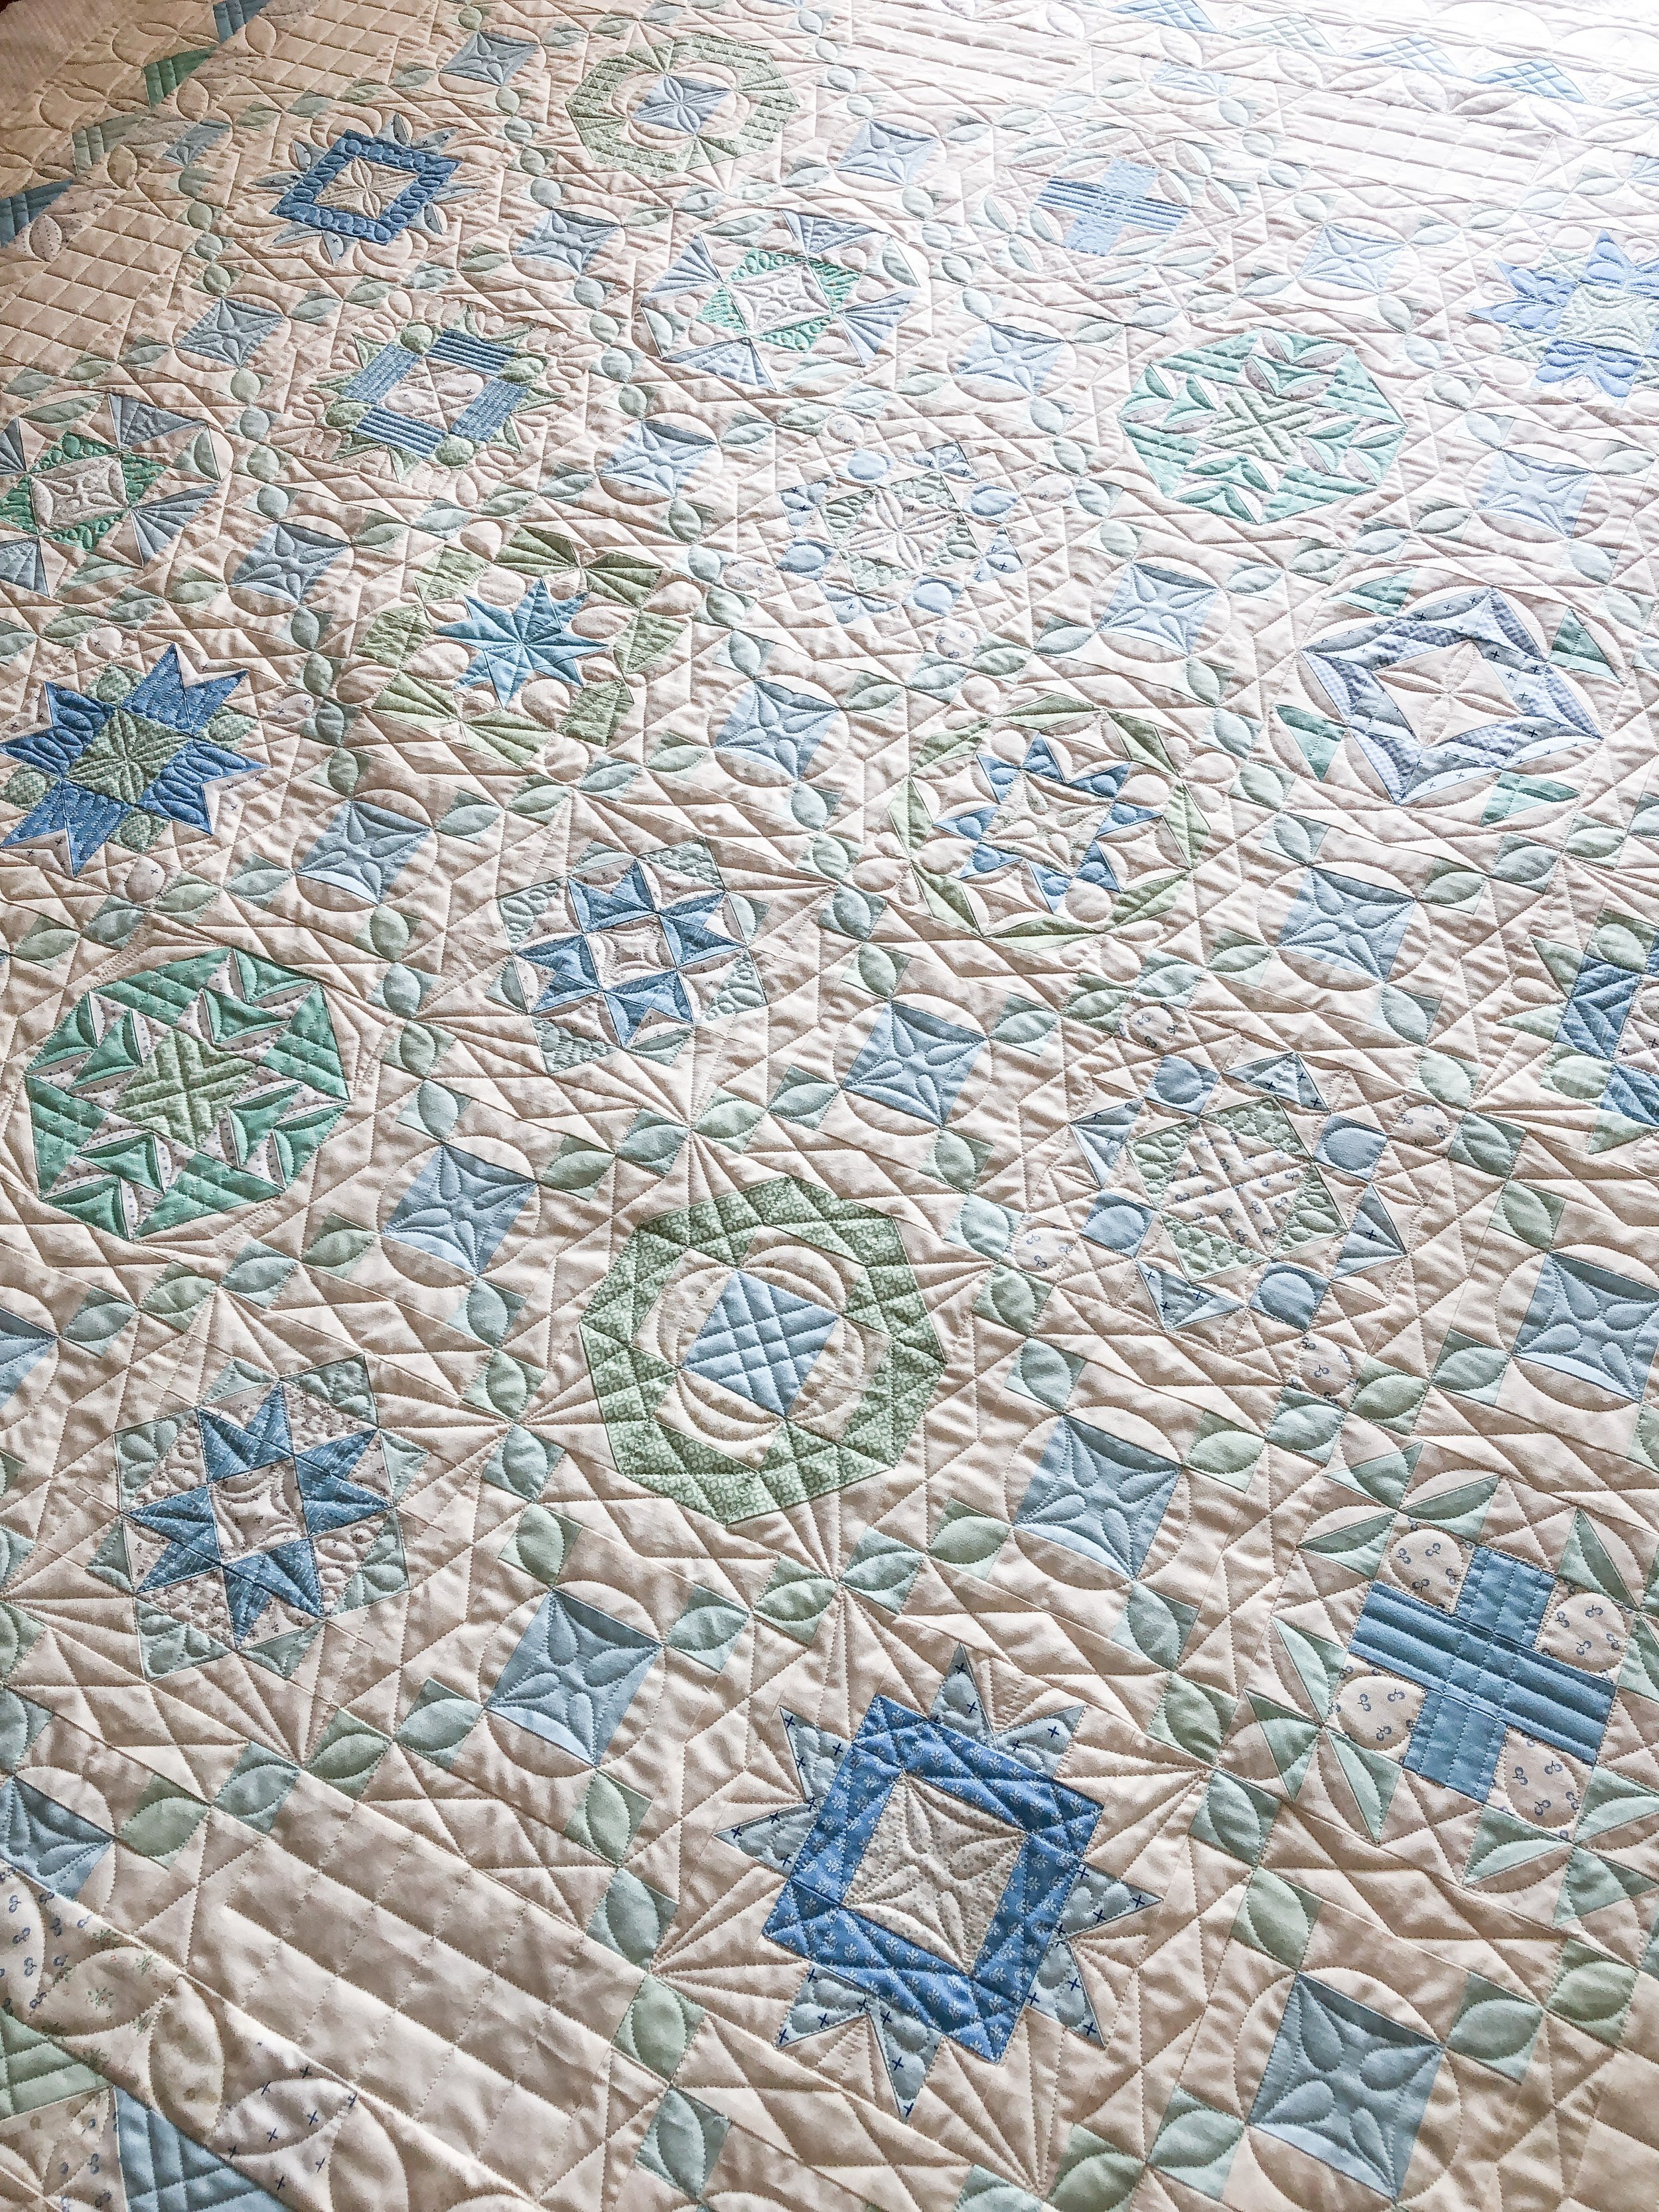
Lets talk borders…I love a good pieced border, why??? Because look at these fun details. It’s a great way to frame a quilt, and sometimes that comes with multiple borders…like the 4 you can see below. Yes, I’m considering the row with the half “chain blocks”, as the first inner border. Having those half blocks completes the overall look of the quilt. I was a little perplexed on what to do in the solid rectangular background. So perplexed, I quilted everything else and then just starred at it for a moment. Ultimately going with squares that are the same size as the 9 patch block. I personally think, those simple squares allow the quilting to breath a little. It helps define the space and blocks that surround them a little more, too. I quilted the half “chain blocks” the same as the full blocks in the quilt. The 9 patch blocks are quilted the same on each of the four corners. The rest of the borders just get better and better, as they go out to the edge. In the 2nd inner border I used my 4” Circle²™ ruler, I did make sure that the corner was going to be angled like so. So that is looks complete. My favorite way to quilt flying geese is with four simple lines, crisscrossing and spaced 1/2” apart. Which adds some fun details…and straight lines…to all those beautiful curves. I love mixing the lines with the curves. They harmonize so well together. I used Linda’s 8” Edge ruler, linked above, for those lines too. Next, the orange peel petals link the background of the flying geese to the solid background. If I remember right I quilted the scallops first with my 4” Circle²™ ruler, then went back and used my 3” Circle²™ ruler for all the orange peel petals. I used a water soluble pen to mark a dot inside each curve, so that I had a reference point. Then I quilted the peels continuously, by quilting the top petals, and then coming back and quilting the bottom. When I custom quilt and move the machine from right to left, it helps to quilt down or up to help avoid the thread from breaking. Yes, I have my needle turned to 5:30. Quilting right to left just puts a lot of stress on the thread, and it can break sometimes. That’s all the details about the borders.
For the “chain block”…the only repeated quilt block in the center of the quilt, I used my 2”, 3”, and 4” Circle²™ rulers. Which are the same three Circle²™ rulers that I used to quilt all the curves throughout the quilt. I used the 2” ruler to quilt all the small orange peel petals, which create the beautiful diagonal links. I used the 4” ruler on the inside of the center square, and the 3” Circle²™ ruler to quilt the curves in the rectangular blocks. I also used Linda’s Edge ruler to quilt a couple of elongated X’s in the bigger background that is rectangular. You can see a couple of these blocks pictured above.

Here are the three rulers that I used. 2”, 3”, and 4”. As you can see, the 2” ruler also has an 8” circle on the outside. The 3” has 9” on the outside, and the 4” has 10”. Each of my Circle²™ rulers have two different circles per ruler, which means that there are twelve difference sizes of circles. Ranging in size from 2” to 13”. It’s such a versatile set of rulers. My Circle²™ rulers are made in America with high quality 1/4” acrylic. The 1/4” lines help with measuring while quilting, and I even used those straight ends sometimes to quilt a short line or in the ditch while I’m using the circle ruler. I also created these with the 1/4” hopping foot in mind. When means when you quilt out a 2” circle with the 2” ruler, your circle will actually be 2”. Other rulers that I’ve seen or used in the passed always gave me circles a 1/2” too big or too small. For more info check out this blog post.
- Design Patent D875,574 -
My Circle²™ rulers come in clear or green (as pictured). The green set is a little easier to see on lighter fabrics. If you’ve used clear rulers, they would work great for you as well. I used them both equally, it truly a matter of preference.
- Design Patent D875,574 -

The Circle²™ set all stacked up together.
- Design Patent D875,574 -

There are holes in each ruler for hanging them up, and measurements along the straight edge, for your convenience.
- Design Patent D875,574 -
My Circle²™ ruler set would be a great addition to your machine quilting!!
- Design Patent D875,574 -

I look along the side of the quilt…

Another look straight on.
The backing looks fabulous!!

I wish you each could have seen this quilt in person!! It’s so beautiful.
Thanks, Beverlee for trusting me with this beautiful quilt!!
I have oodles of quilts to share with you. Thanks for stopping by. Take care, and happy quilting! - Leisha

Quilting It • Freemotion™ Launch
Hello there Friends,
I hope your fall or spring has been a beautiful one.
Tomorrow is the day!! My Quilting It • Freemotion™ video course is launching!!! So excited!! Those of you who’ve already purchased a video or two will receive a NEW link in an email, you’ll then download a PDF which will have all the information you’ll need to access the video you purchased. Because of the size of the videos, you can download the videos directly from Vimeo if you wish, or you can continue to view the videos using the link on the PDF and password provided. Please keep the link and passwords private, no sharing with others. Remember, you do have to have a Vimeo account to view the videos. No worries, it’s free. Go to: Vimeo.com
If you’ve been following along on my Instagram, I’ve been sharing short videos of pictures of the quilts I’ve quilted using the designs in my Quilting It • Freemotion™ course. If you haven’t, you’ll have to go to: https://instagram.com/leishakaye/ and watch the several videos in my feed. I have a few more to post.
Below is a video of the bundle of 10. (If it doesn’t show up correctly in the email, use this link: https://youtu.be/gpZqBIaiwRM )
Here is a look at the intro video…in case you missed that, too...below. (https://youtu.be/5i_iKdnyq2Y ) (Note: The table runner pattern Pumpkins in a Row and fabrics are by @figtreeandco • and was quilted just for this promo video)
Now that launch day is tomorrow, yay, my sale will end at midnight on Friday October 15th MST. If you purchase the entire bundle of 10 designs, you’ll get access to a private Facebook group where you’ll be able to share your work and see some iPhone videos of me quilting client quilts. I hope that you’ll join me.
Now…just a quick look at each design on a quilt. To see more examples of quilts I’ve quilted with these designs, head over to my shop and check out the Quilting It • Freemotion™ listings. There are lots of pictures. You could also look through my blog posts, there are even more pictures than what I can share here.
Above is Stippling in the background behind those beautiful flowers. Stippling is the first design to learn…and it’s a classic!
Loops, like the ones above can be extra sweet! The great thing about practicing loops, it helps you when you go to quilt pebbles.

A great Pebble can add some awesome texture on a variety of different quilts, like this Christmas tree quilt. The swirls are a fun addition to add to your pebbles.

I teach a variety of different Swirls and how/where I quilt them. All found in the Swirl video in my shop.
Crackle is one of those designs that you’ll love to add to just about every garden, winter, or Halloween quilt. It’s versatile, organic, and very forgiving as you quilt it out.
My Swirly Feather design can be a show stopper on an entire quilt, in a border, background, in appliqué, and it’s as fun as it looks. Definitely one of my favorites!

Wood Grain is also one of those organic, forgiving and fun designs to quilt in a small area or over an entire quilt. This will certainly be a favorite to add to your skills.
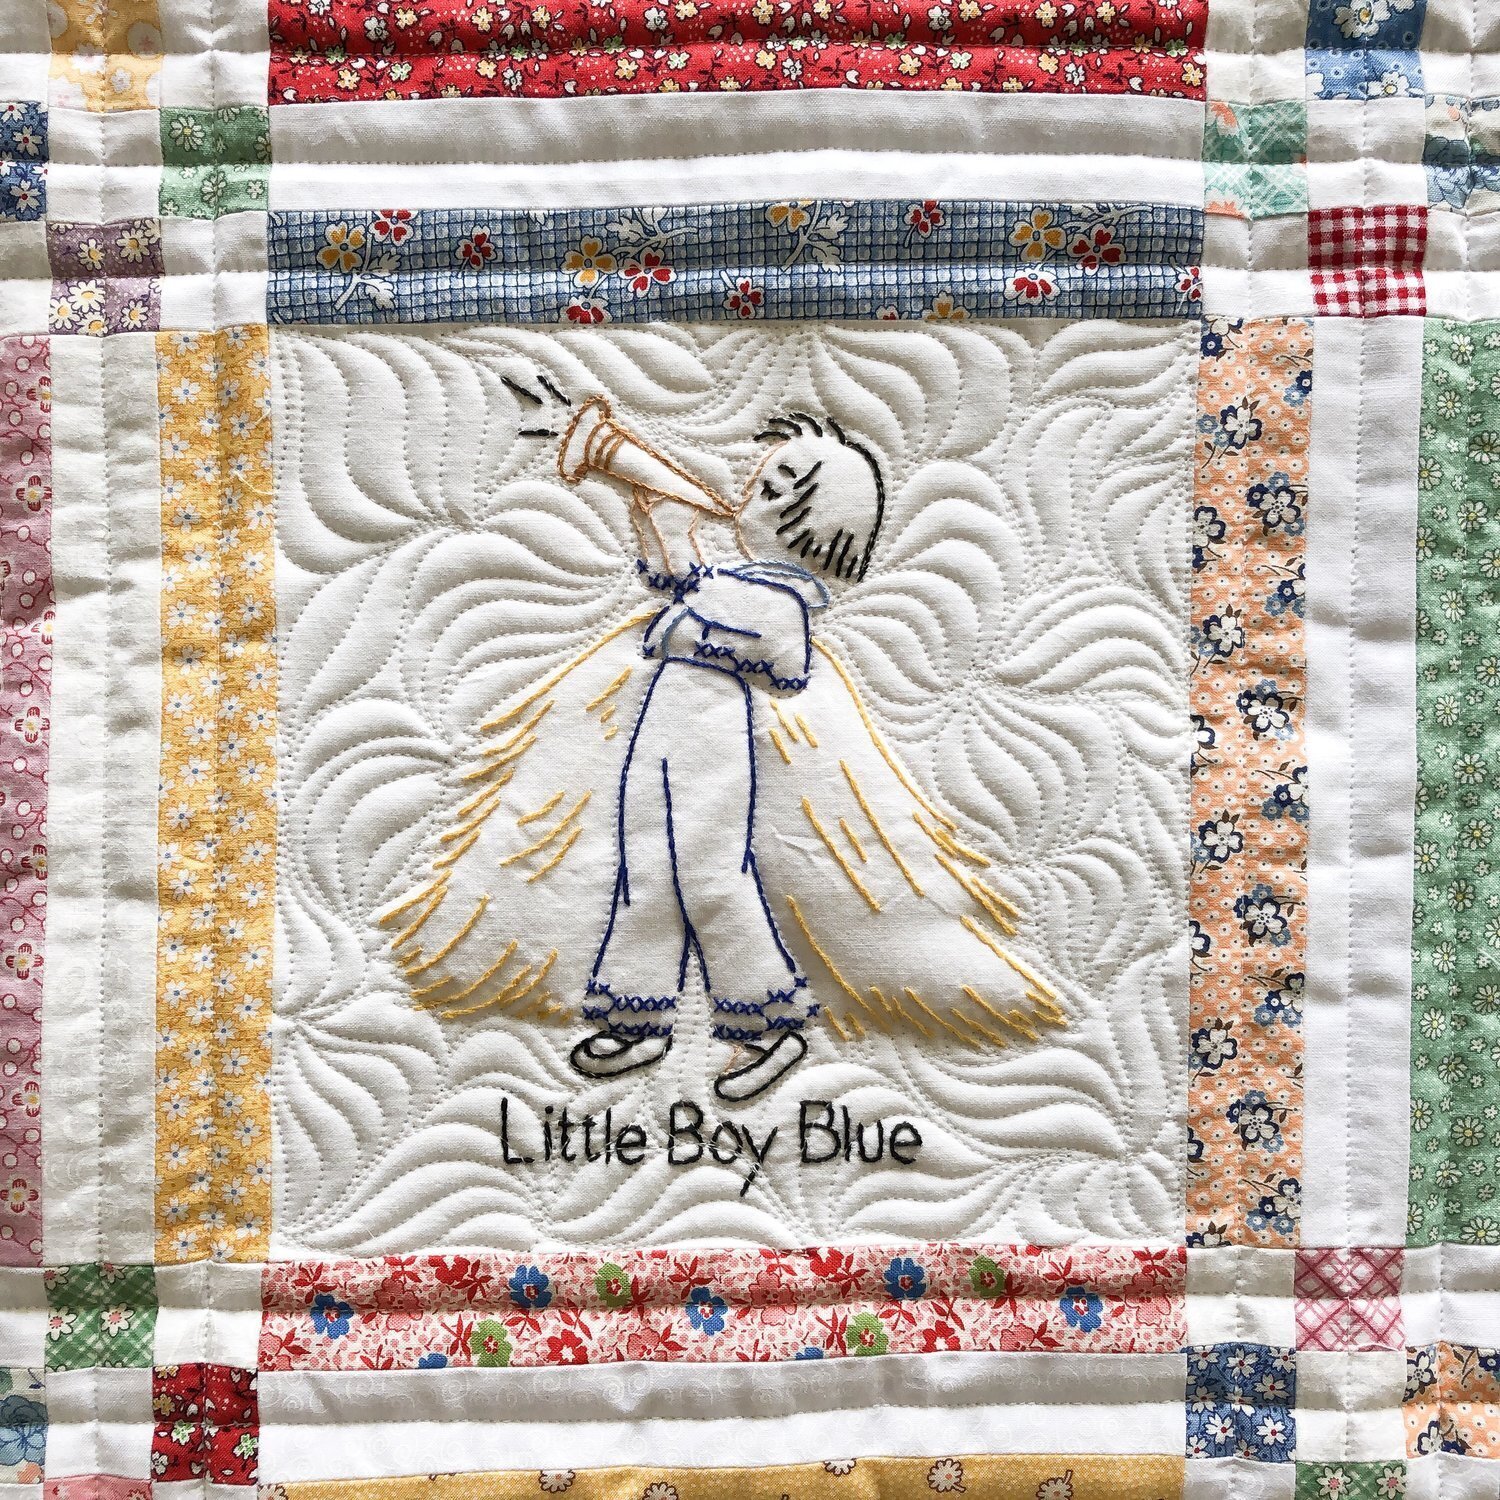
That Grassy texture in the background of Little Boy Blue, created the perfect texture for this single block. It’s also like Wood Grain and Crackle…organic and forgiving and so much fun.
Overlapping Circles is sure to be a show stopper as well. There are many quilts I’ve quilted it on, like the one above, just look at that background texture. This one is the most popular one so far!

If you noticed the lines in the leaves in the Wood Grain picture above, then you’re sure to love this border. Its called Overlapping Lines. It’s definitely one of my favorites, especially when it comes to borders, when I don’t know that a swirly feather would look good.
I hope you noticed in the pictures the variety of different quilting designs, that go so well together. There is great value in learning all the designs, so you can quilt some of them on the same quilt. I hope you enjoyed a little look into the designs that I have available. I kept getting requests for videos, so I decided to start with 10 basics and/or favorites to teach you. If you’d like to get started with freemotion quilting, start with Stippling the 1st video, and work your way up through each of the videos. This is self paced, so noooo rush. I hope you’ll join me, let’s get quilting. Thanks for being here. Take care,
• Leisha
PS…all of these pictures are from client quilts that I’ve already blogged…check out my previous blog posts from the last few years for all of the pattern or quilting details.
Prelaunch of Quilting It Freemotion™ is LIVE!!
Hello Friends,
I know it’s been quiet around here, and if you checked out my last blog post, you know why.
My Quilting It Freemotion™ course is available Friday October 15th!! To celebrate today is the first day of my prelaunch…which means you get an awesome deal. Go to my shop, to check them out.
My approach with these videos is to bring the classroom into your home. A way for you to learn at your pace, and enjoy the process. In each video listing in my shop, I’ve found pictures of client quilts that I’ve quilted over the years, with the particular design on them. Many of the quilts have more than one design on the quilt, and some even have them intermixed in a background. My hope is that you watch, learn, practice…practice…practice, and then quilt confidently. Please join me, it’s going to be so much fun!
Here is a look into my course. I’m sorry my promo video didn’t show up in emails last time. If it’s still not working, head to my blog and check this post out or click here.
Disclaimer: The table runner in this video is only used in this promo video. In all of my design videos I quilt on white muslin with a contrasting navy thread for easy visibility. The table runner pattern (Pumpkins in a Row) and fabrics are by Fig Tree & Co.

Here are a few examples…swirls in the background with grass texture in the bird.


Quilting It • Freemotion™ Prelaunch Sale
Hello Friends,
It’s been quiet around here, and if you saw my last blog post, you know why. I’ve been working on a freemotion quilting video course, which will be live on Friday October 15th, called Quilting It Freemotion™!! To celebrate let’s have a prelaunch sale starting today! Head on over to my shop, to check out the listings. No code necessary.
Have you ever wanted to learn how to freemotion quilt? You’re in the right place!! We will be covering the basics of each design, and then my hope is that you’ll become a confident freemotion quilter someday. You’ll need to watch and learn, then practice…practice…practice, and you’ll be well on your way to quilting custom quilts, all from the comfort of your home. Yes, a class brought right to you!!
I have 10 different videos available…1•Stippling, 2•Loops, 3•Pebbles, 4•Swirls, 5•Crackle, 6•Swirly Feather, 7•Wood Grain, 8•Grass, 9•Overlapping Circles, 10•Overlapping Lines, and a Bundle of all 10. You can buy whichever designs you’d like to learn, or get the bundle of all 10. If you get the bundle of all 10, you’ll have access to a private Facebook group, where you can share your progress and get more videos from me, from my iPhone as I custom quilt clients quilts.
You will receive a temporary PDF, until the 15th of October, when I’ll send you the file with the link and password to access it on Vimeo. The first thing you’ll need to do, is sign up for a free Vimeo.com account. Tell your friends!! This is going to be so fun!
Here is another look at my promo video. If you are reading this from an email, please click the “promo video” button above to watch, or head on over to this blog post by clicking on “read in browser” at the bottom of the text.

In each of my video listings I share a variety of pictures of quilts I’ve quilted over the years, like these few. They are great examples of when I’ve used a particular design or two, on a quilt. Also, notice the combination of designs used on the same quilt. Like the swirls and grass texture on the quilt above. The bird and tree are quilts that I quilted for Laser Cut Quilts.
You’ll notice in the picture above pebbles and swirls, with a touch of wood grain on the tree. Love the combination of these designs together.
This last quilt has wood grain in the background, and my overlapping lines in the leaves. I believe this pattern is by V&Co, it’s one a client made for her daughter.
These are just a few examples of the variety of different designs that you can quilt together on one quilt. Go check out the listings in my shop to see the vast variety of options. Click on the listing, then click through the pictures. The sky is the limit on what you’ll be able to do!
Check out my instagram for more ideas over the 12 days, as we get closer to release day!!
Don’t miss out on the amazing prelaunch prices, they expire on the 14th of October at midnight!! No code necessary.
I hope that you’ll join me!! Thanks for being here, Leisha.
Disclaimer: The table runner in the promo video is only used in the promo video. In all of my freemotion videos I quilt on white muslin with a contrasting navy thread for easy visibility. The table runner pattern (Pumpkins in a Row) and fabrics are by Fig Tree & Co.
Coming Soon…
Hello friends!
I have something so exciting to share. Take a look!
By popular demand, I have created 10 videos to teach you a variety of different freemotion quilting designs. Taking you from beginner to confidant quilter. If you’ve never freemotion quilted before, no worries. I encourage you to start with video #1 and go in order to #10. However, you’re welcome to pick and choose which designs you’d like to learn…let’s get quilting. Coming Friday October 15th. Yay!!
PS…Watch for prelaunch sales! You won’t want to miss those. Also, please create a free Vimeo account to watch the videos. More details to come.
Disclaimer: The table runner in this video is only used in this promo video. In all of my design videos I quilt on white muslin with a contrasting navy thread for easy visibility. The table runner pattern (Pumpkins in a Row) and fabrics are by Fig Tree & Co.
Also, I have been working at redoing all of the images for my digital quilting designs in my shop, and adding the suggested design height to the details on each listing. They are done!! Yay!! You’re welcome to take the images from my shop and use them, or contact me and I can resend you the digital files from your order(s), which include the new images. PDF’s are something that I’ll work on adding in the near future. Thanks for your support, it means so much to me!! (My friend Molly is going to redo the images for her designs.)
This is my Arbor design. The images now have a highlighted row.
Thanks for your support over the years!! I’m so excited about quilting with you. ❤︎ Leisha

quilt + quilt + quilt
Hello!!
Thanks to everyone who got my free Hexie Scallops quilting design…I think there was close to 100 of you. I hope to see it on lots of fun quilts. Please tag me on Instagram @leishakaye and I’ll re-share it.
Its been awhile since I’ve posted quilts from a few of my different clients, and in an effort to help me get caught up faster, I thought I would quickly share a few quilts with you, that were all quilted with my Gammill Statler computer. Of course, there is a design that is 20% off at the end. It’s my best seller…in my shop. Any guesses without looking. It’s definitely a crowd favorite.
Let’s start with Kathy’s beautiful Stroll quilt, which is actually a boxed kit from Moda. The pattern is by Camille Roskelley of Thimble Blossoms, and it features her and her mom Bonnie’s fabric line Sunday Stroll. My favorite fabric shop has some yardage, precuts, and 4 kits available.
Kathy made this sweet quilt for her mother…she’s pretty lucky to get such a beautiful quilt! My pictures aren’t doing it justice.
A few of my favorite blocks.
I quilted New Moon Loops by Wasatch Quilting. It’s a free design that came on my Statler. So sweet and just the right amount of quilty texture.
I used my favorite 8020 cotton poly blend batting from Winline, and natural white Omni from Superior Threads.
Which row is your favorite??? Mine are the flower blocks.

That little dotted background fabric is adorable!! I sew with Kathy, and got to see this one come together. Such a darling quilt.
Next up, the Stars and Stripes quilt made by Kristan. The pattern is by Camille Roskelley from Thimble Blossoms. I made one too…which I need to take pictures of. It’s such a fun quick pattern.
Kristan used a variety of reds, blues, and whites. That’s the great thing about this pattern. Scrappy looks so beautiful.
I quilted Good Vibrations on it by Patricia Ritter at Urban Elementz. There was a 1/2” gap, if I remember right.
I used natural white Omni thread from Superior Threads, and my favorite 8020 cotton poly blend batting from Winline.
Such a fun fun texture for this particular quilt!
Karla made this adorable Take 5 quilt from the book The Teacher’s Pet. This is one of those quilts that showcases the fun fabrics that you choose. I love the fun geometric prints Karla chose.
I used a light gray thread and Karla provided a 8020 batting.
She chose Cartwheels by Julie Hirt for the quilting design, and I think it’s perfect with the fabrics.
I’m loving that cartwheel quilting texture!!
Do you have a quilt that needs quilting? You can contact me or email me at quiltingit@gmail.com …I’d love to quilt for you!! For more info click here…Quilting Info. Look forward to quilting for you!!
Did you guess it?… my Sweet Orange Peel design is the most popular design I sell in my shop, and I’ve seen it on countless quilts. It’s one of those designs that looks good on so many quilts. Sweet Orange Peel is going to be 20% off until my next blog post, no code necessary. Thanks again for using my designs. It’s so fun to see them on your quilts.
Hope that your week is going well!! Take care, and happy quilting!
• Leisha