


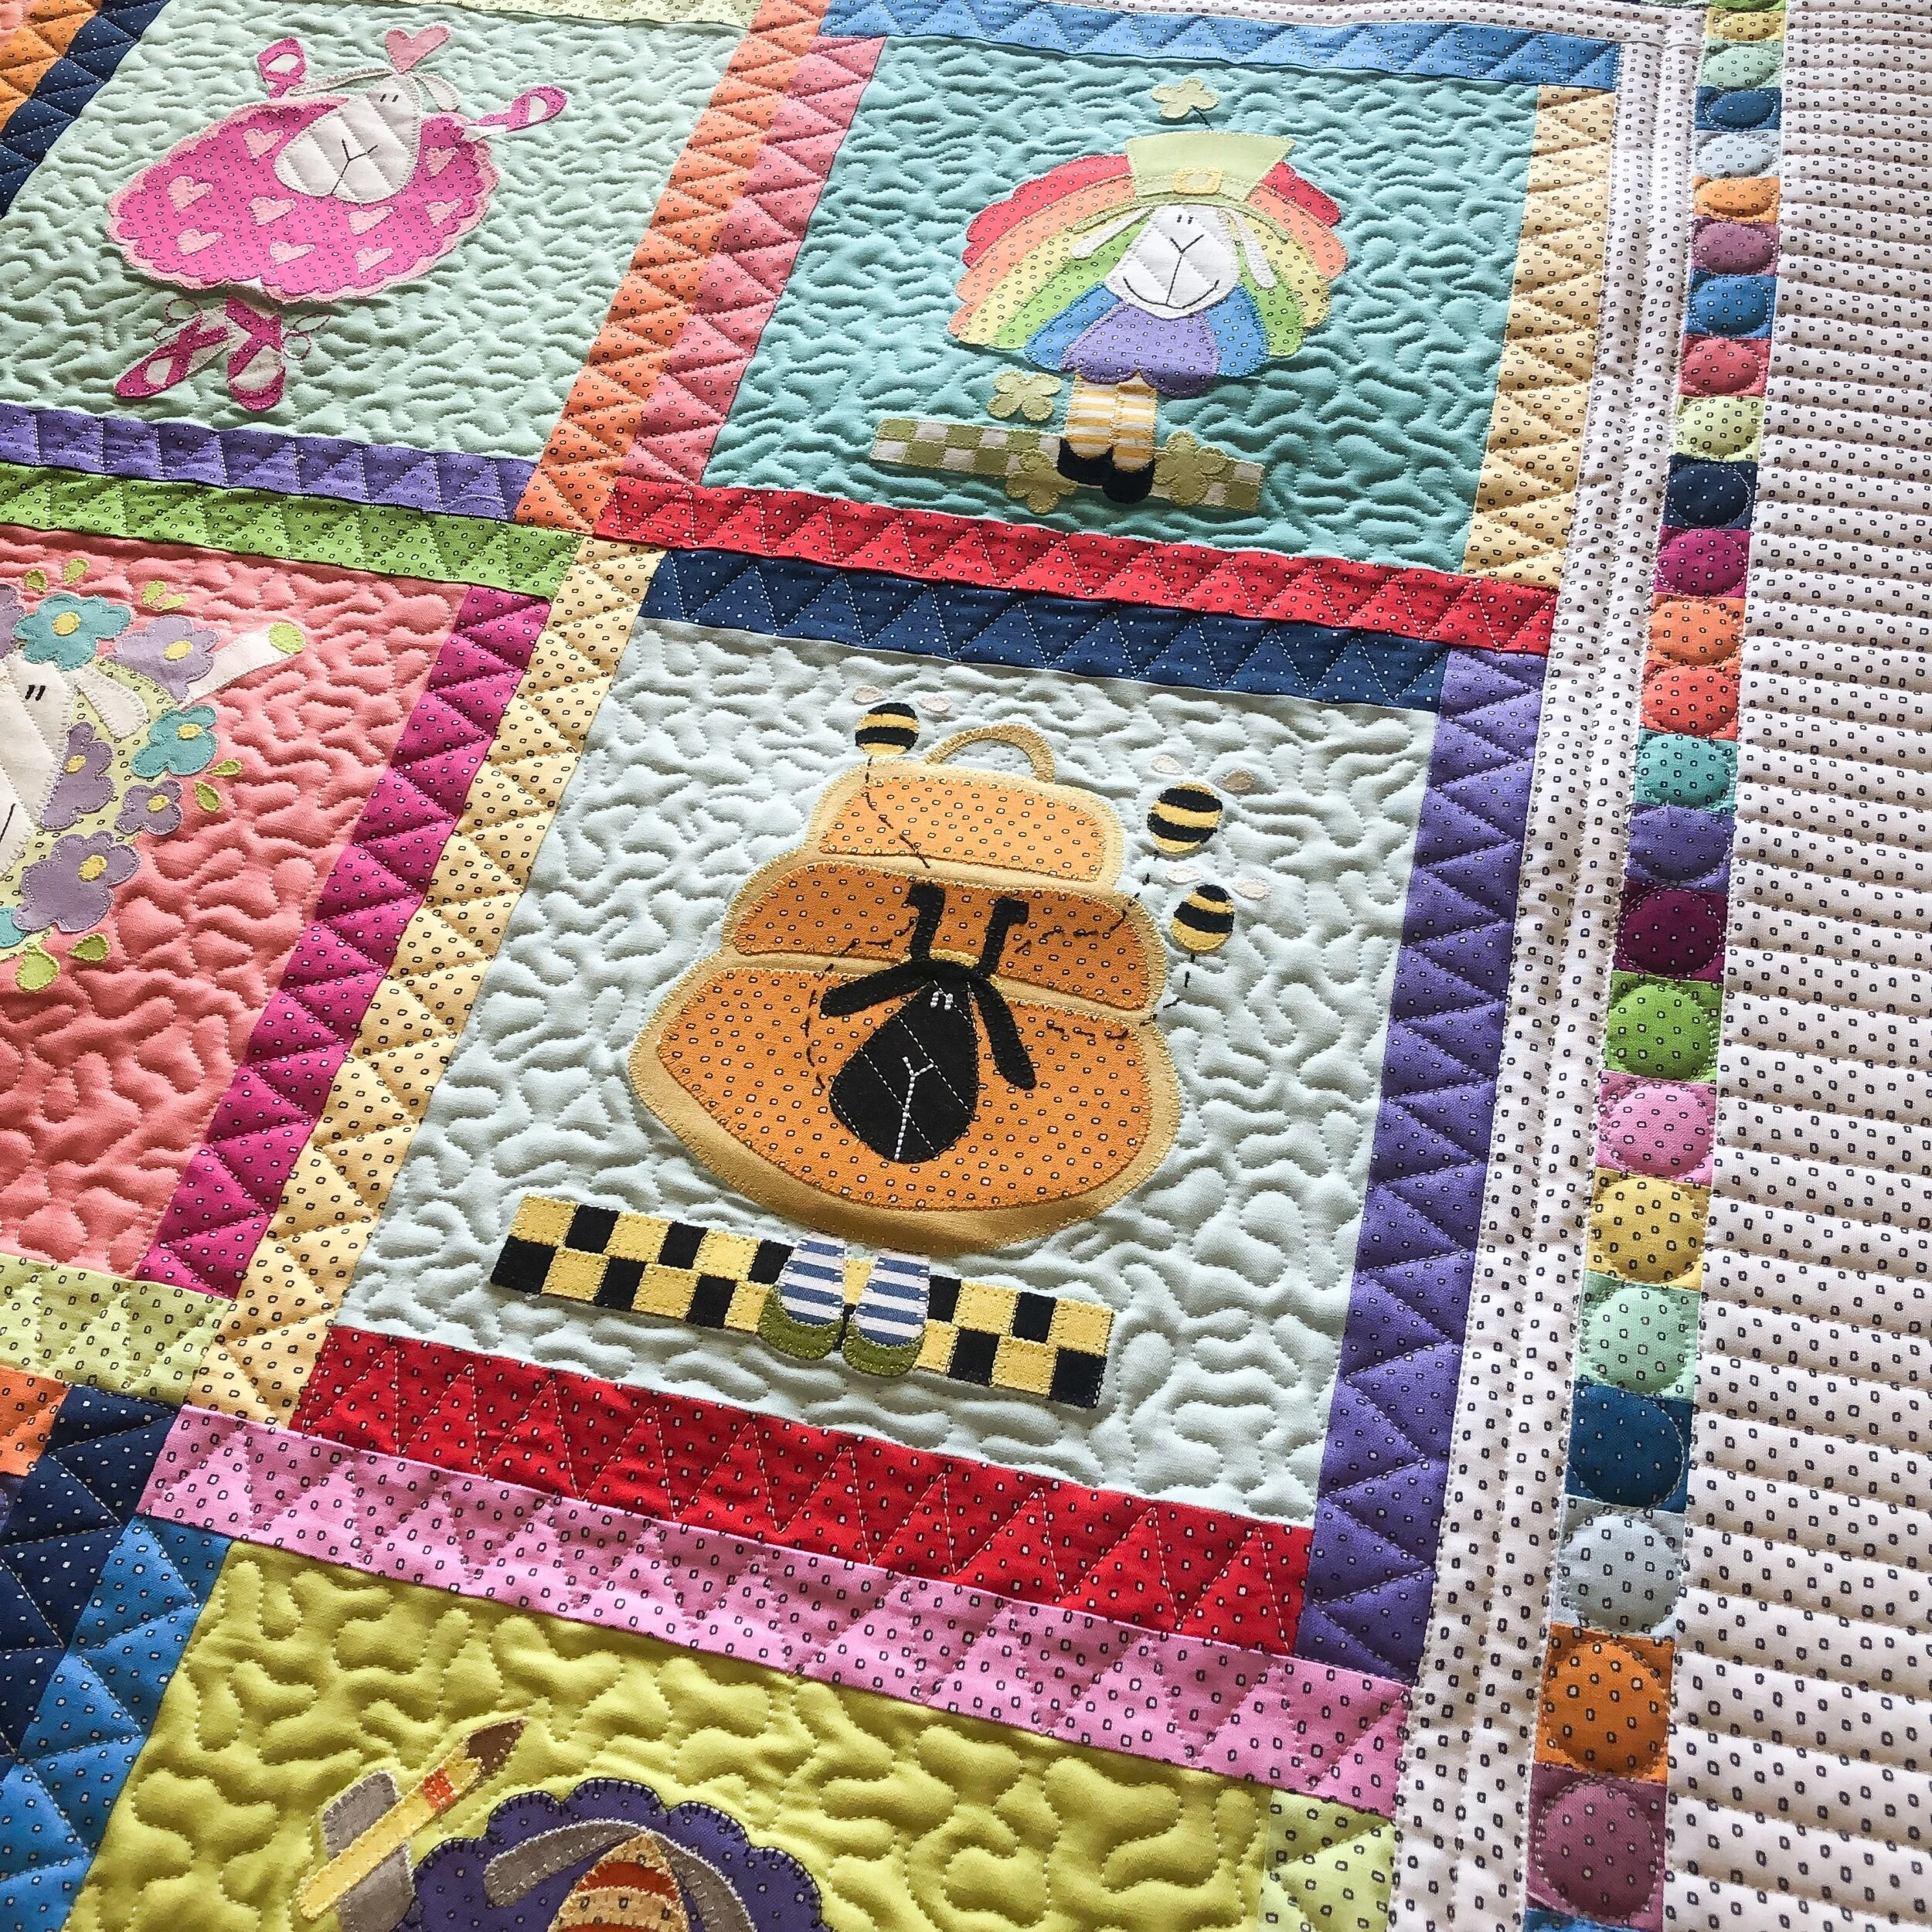
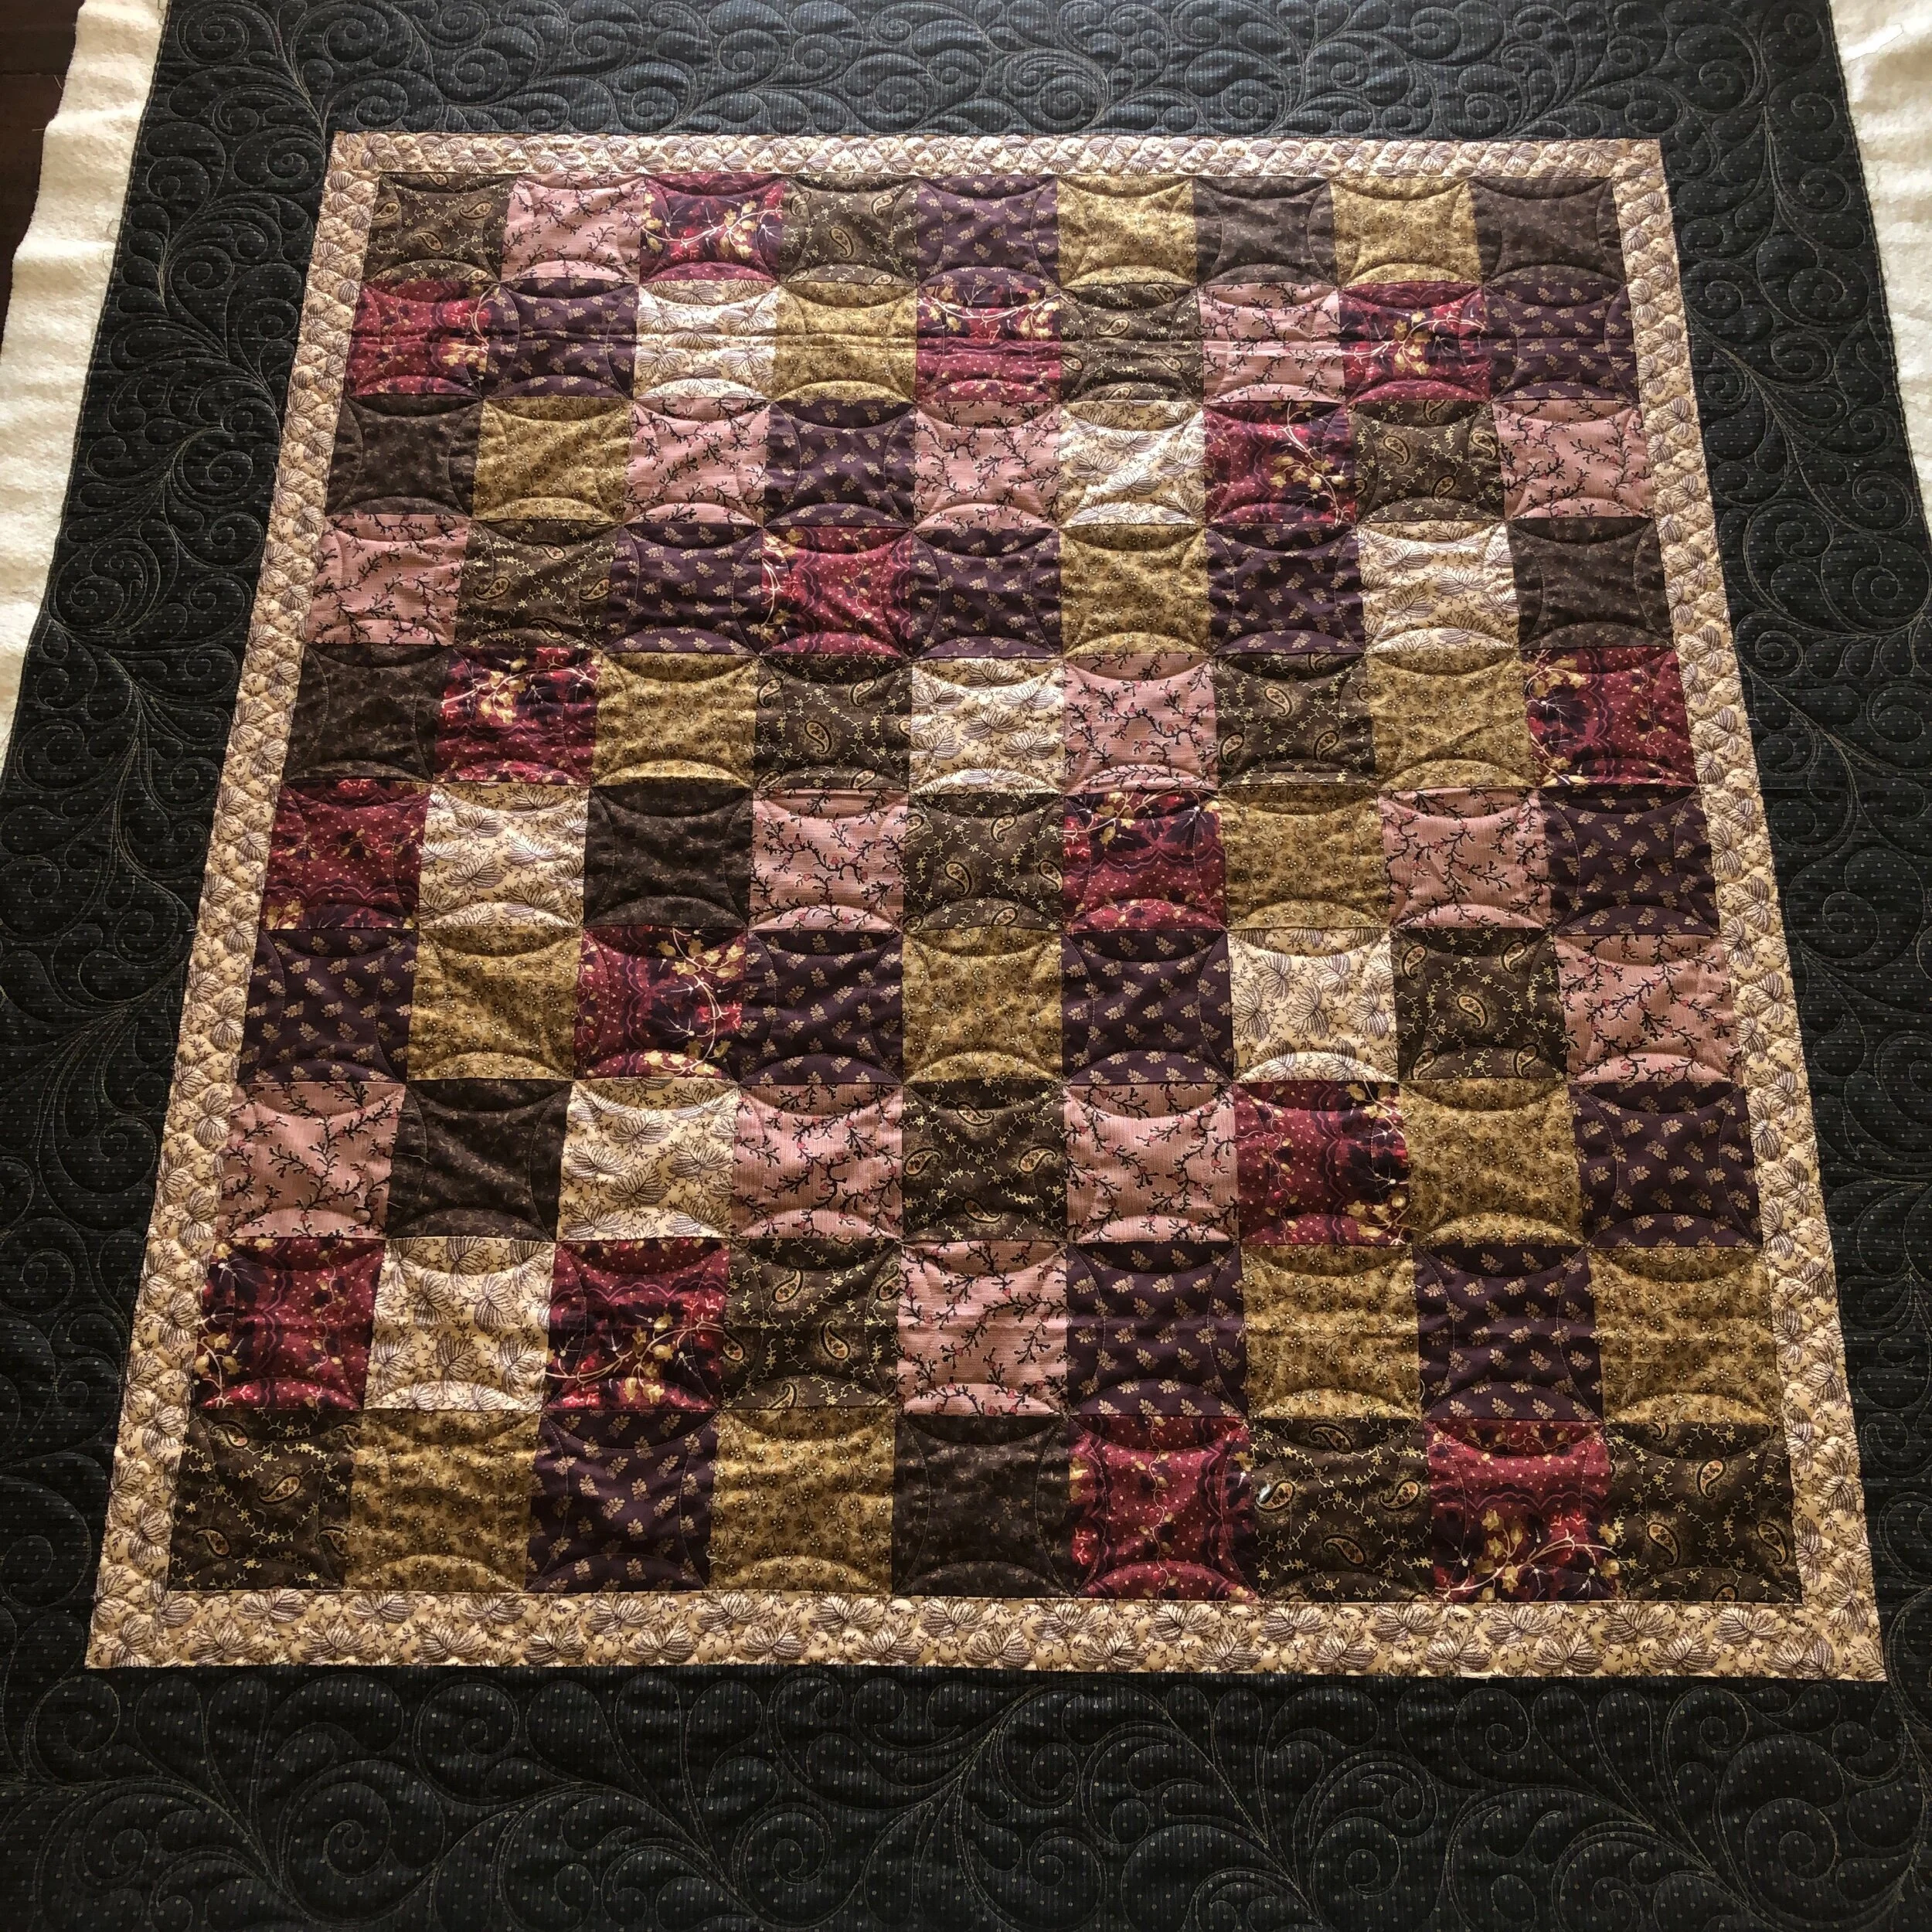
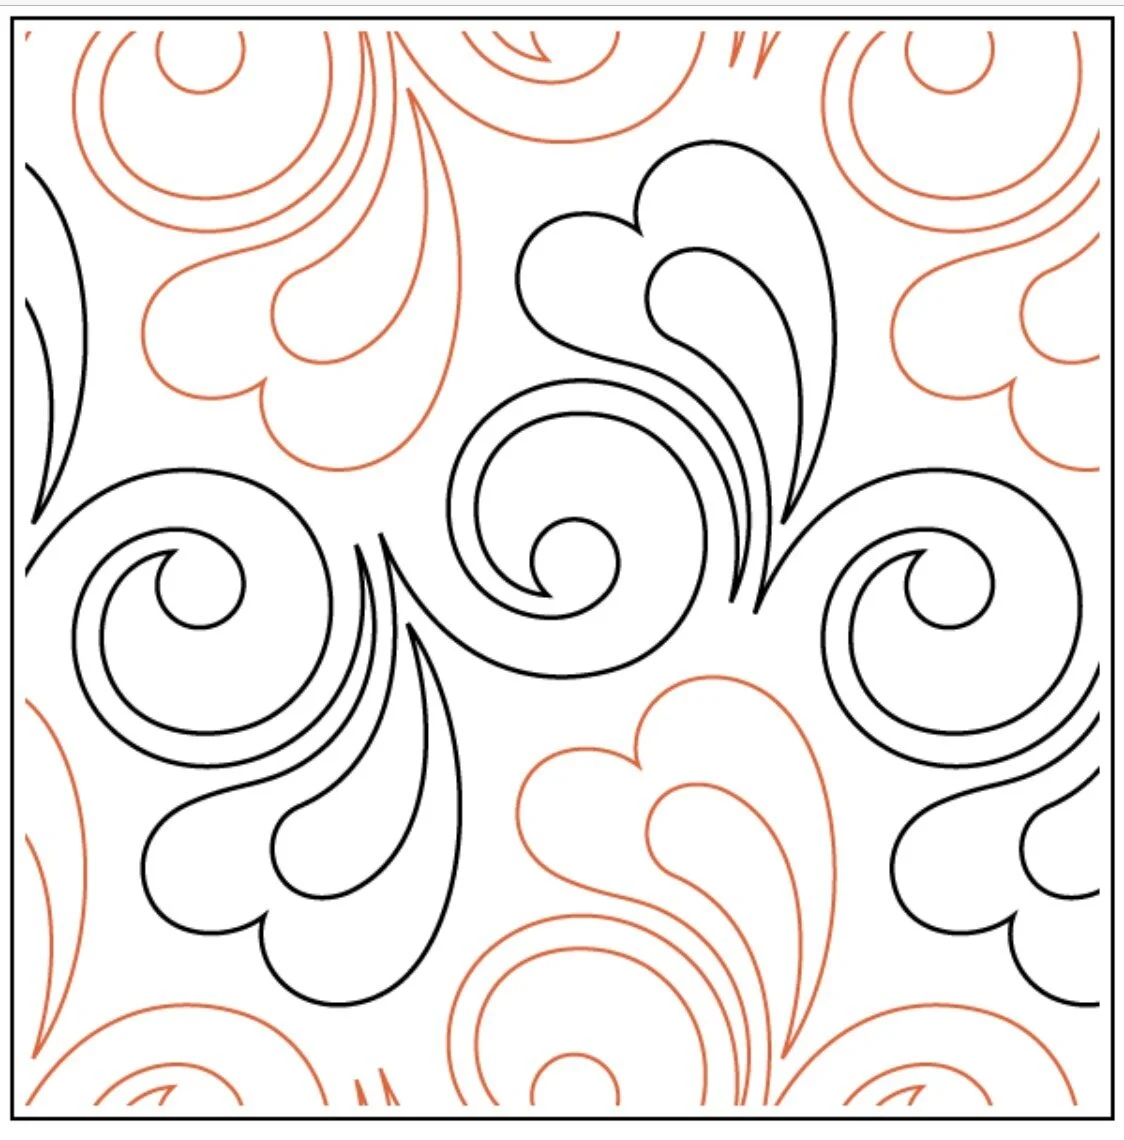
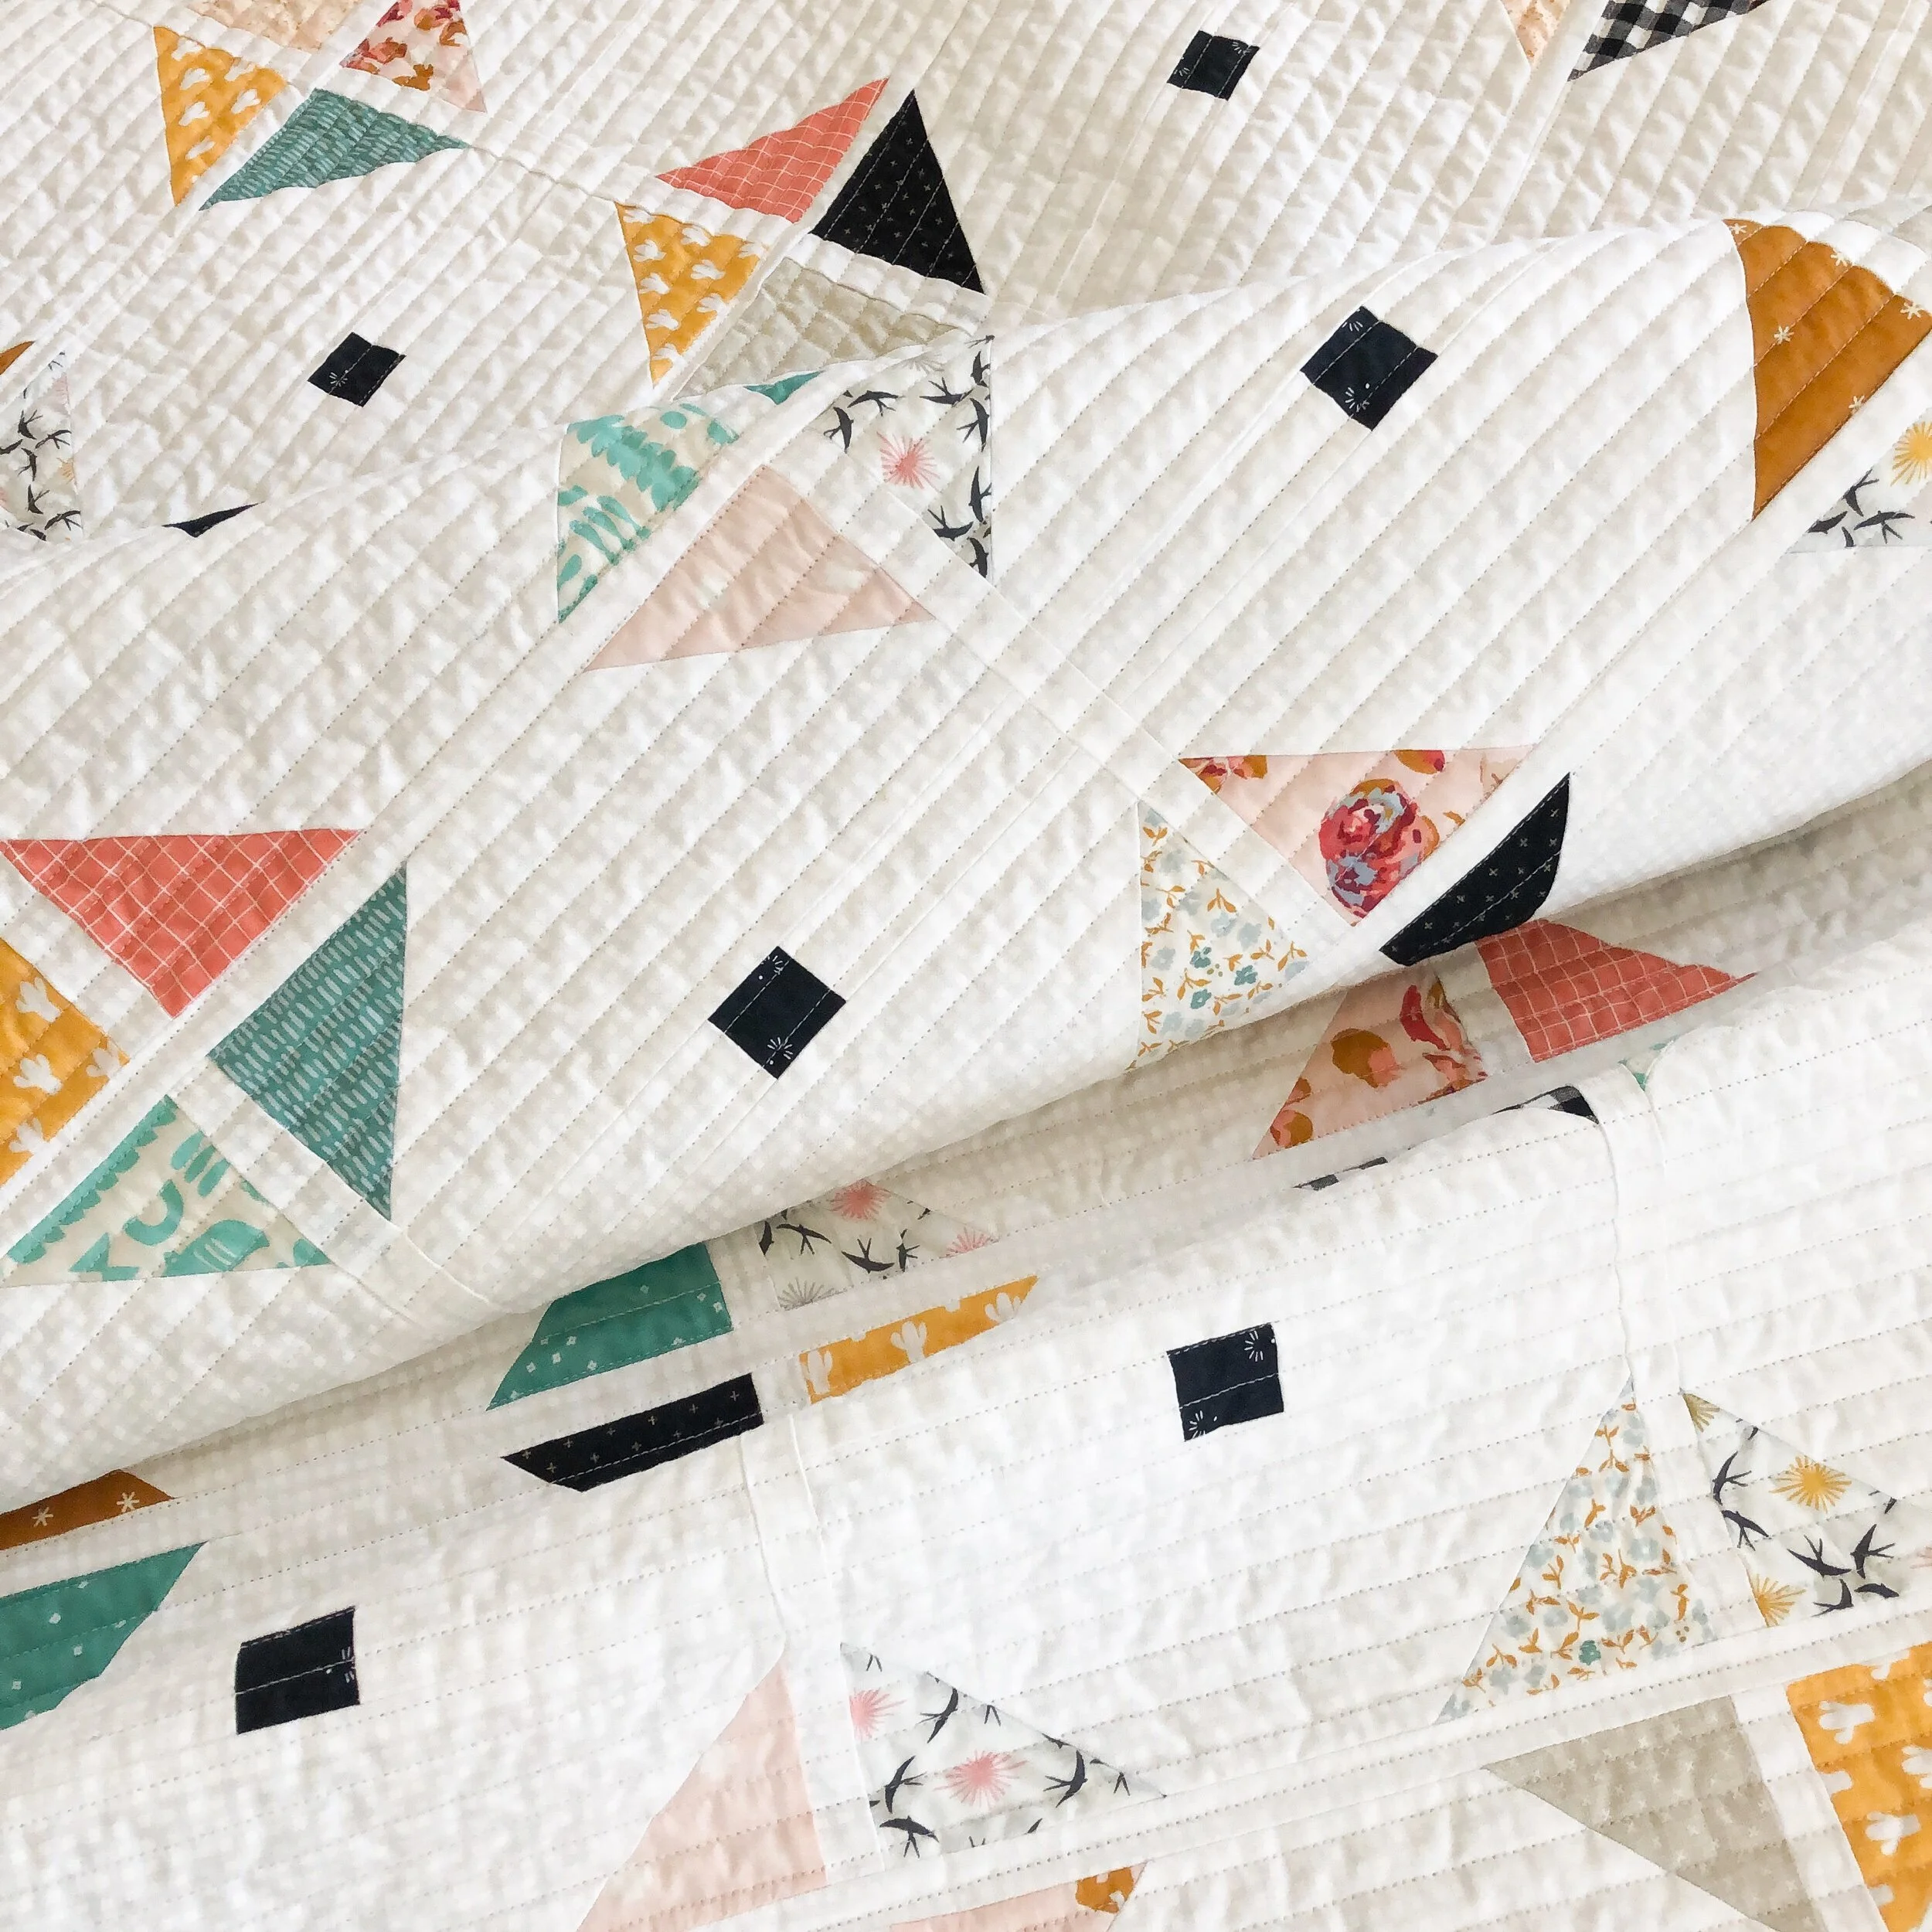
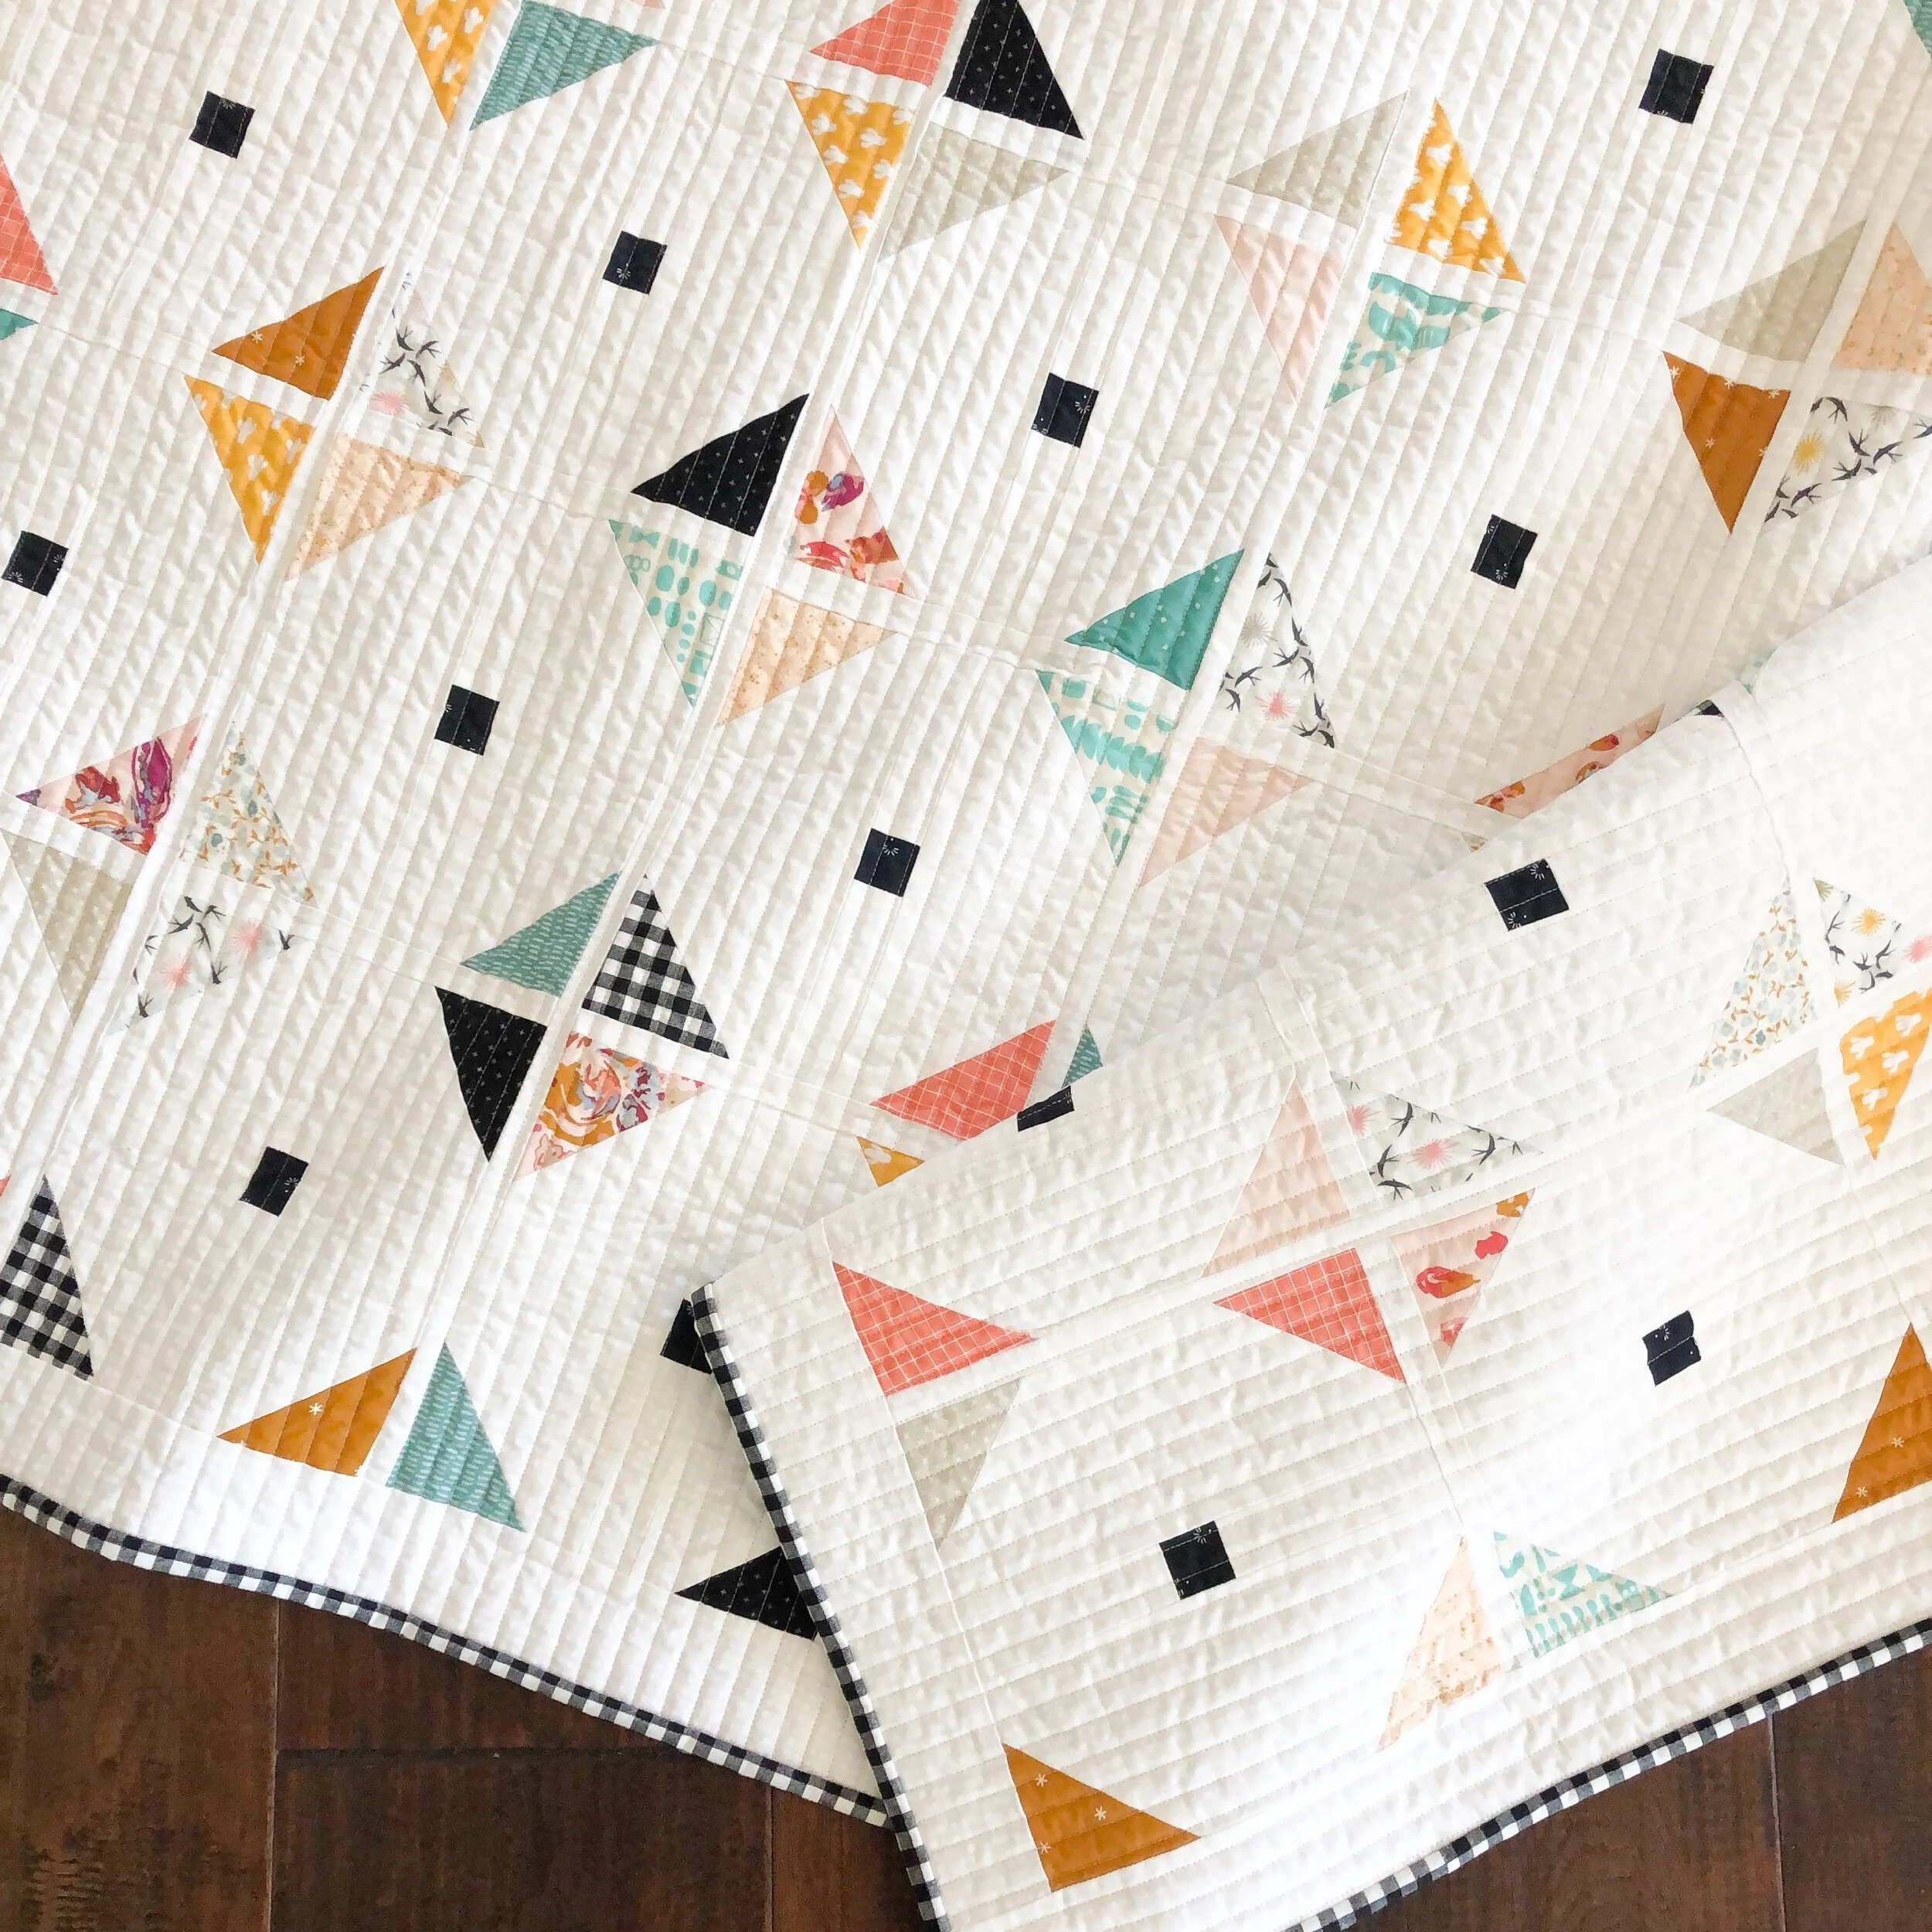
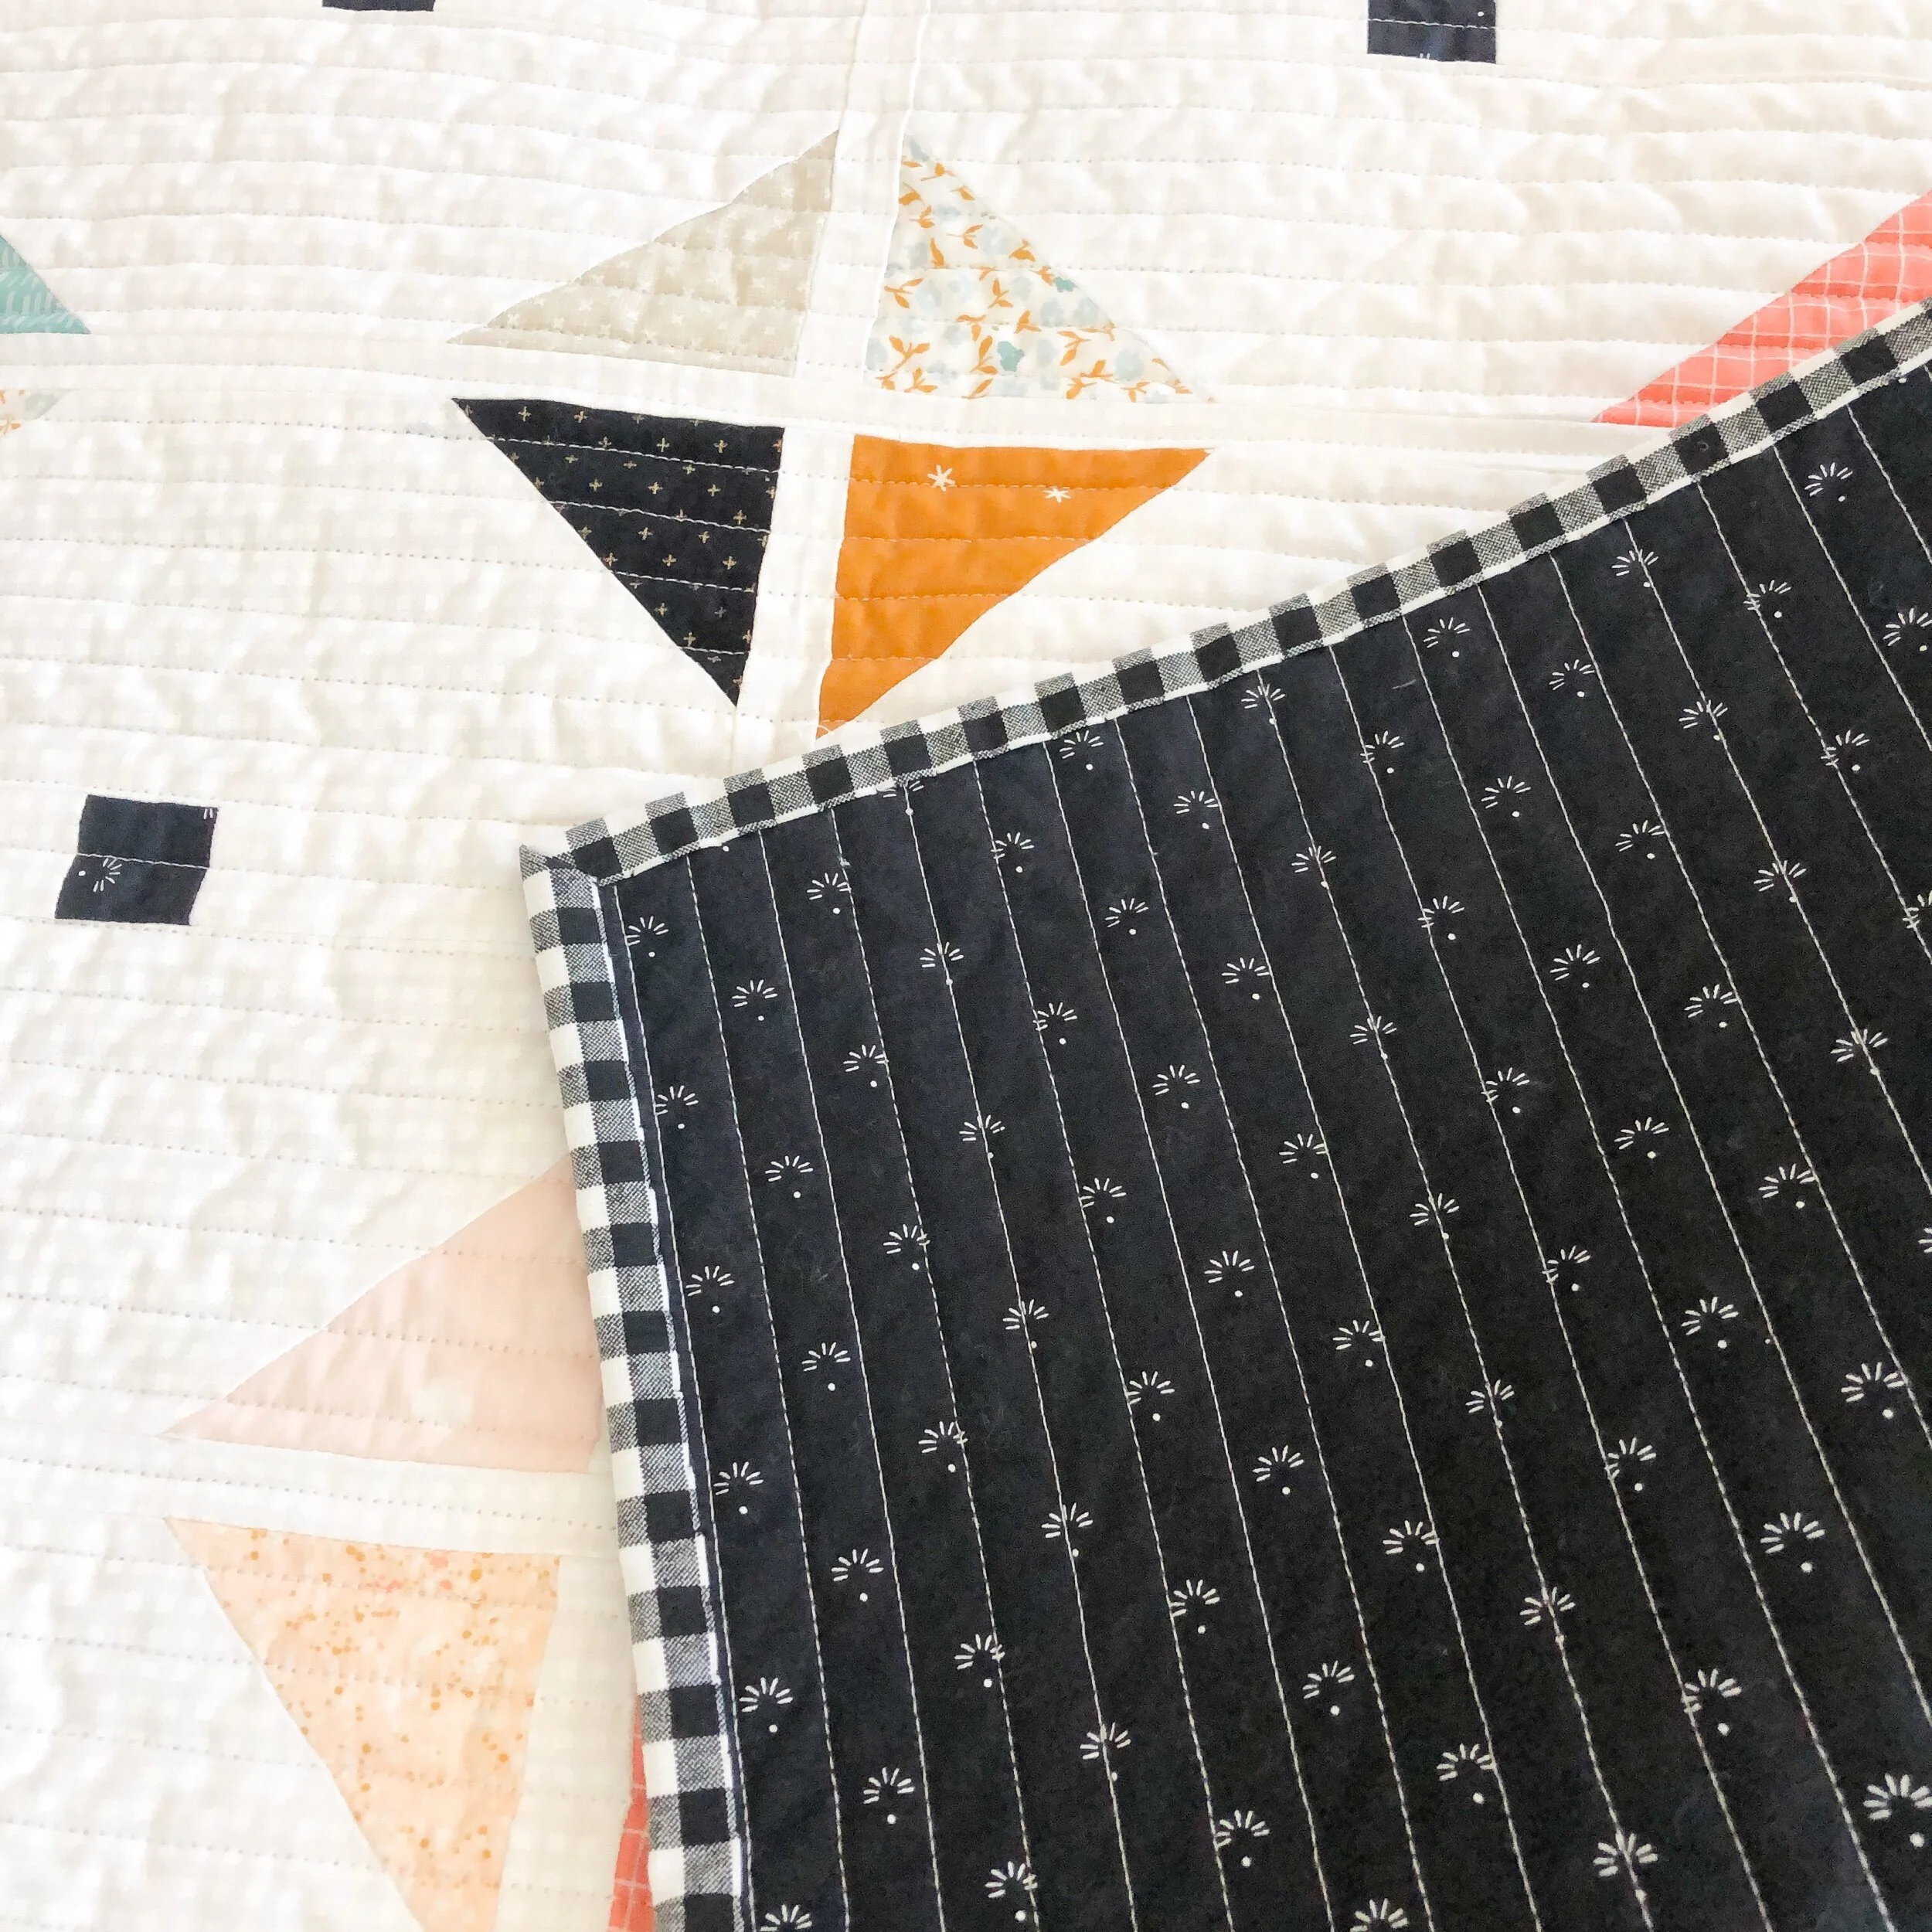
Sherry’s Ewe Troupe Quilt
Hello there,
I hope you’re having a great week!!
First off, I still have plenty of openings for quilting from now until Christmas, I would love to quilt for you! I’m about 2-2.5 weeks out at the moment. Email me at quiltingit@gmail.com or text me. You can drop off or mail in your quilts. I have a form on my website under quilting info that you can print and send with your quilt. If you have any questions, please let me know.
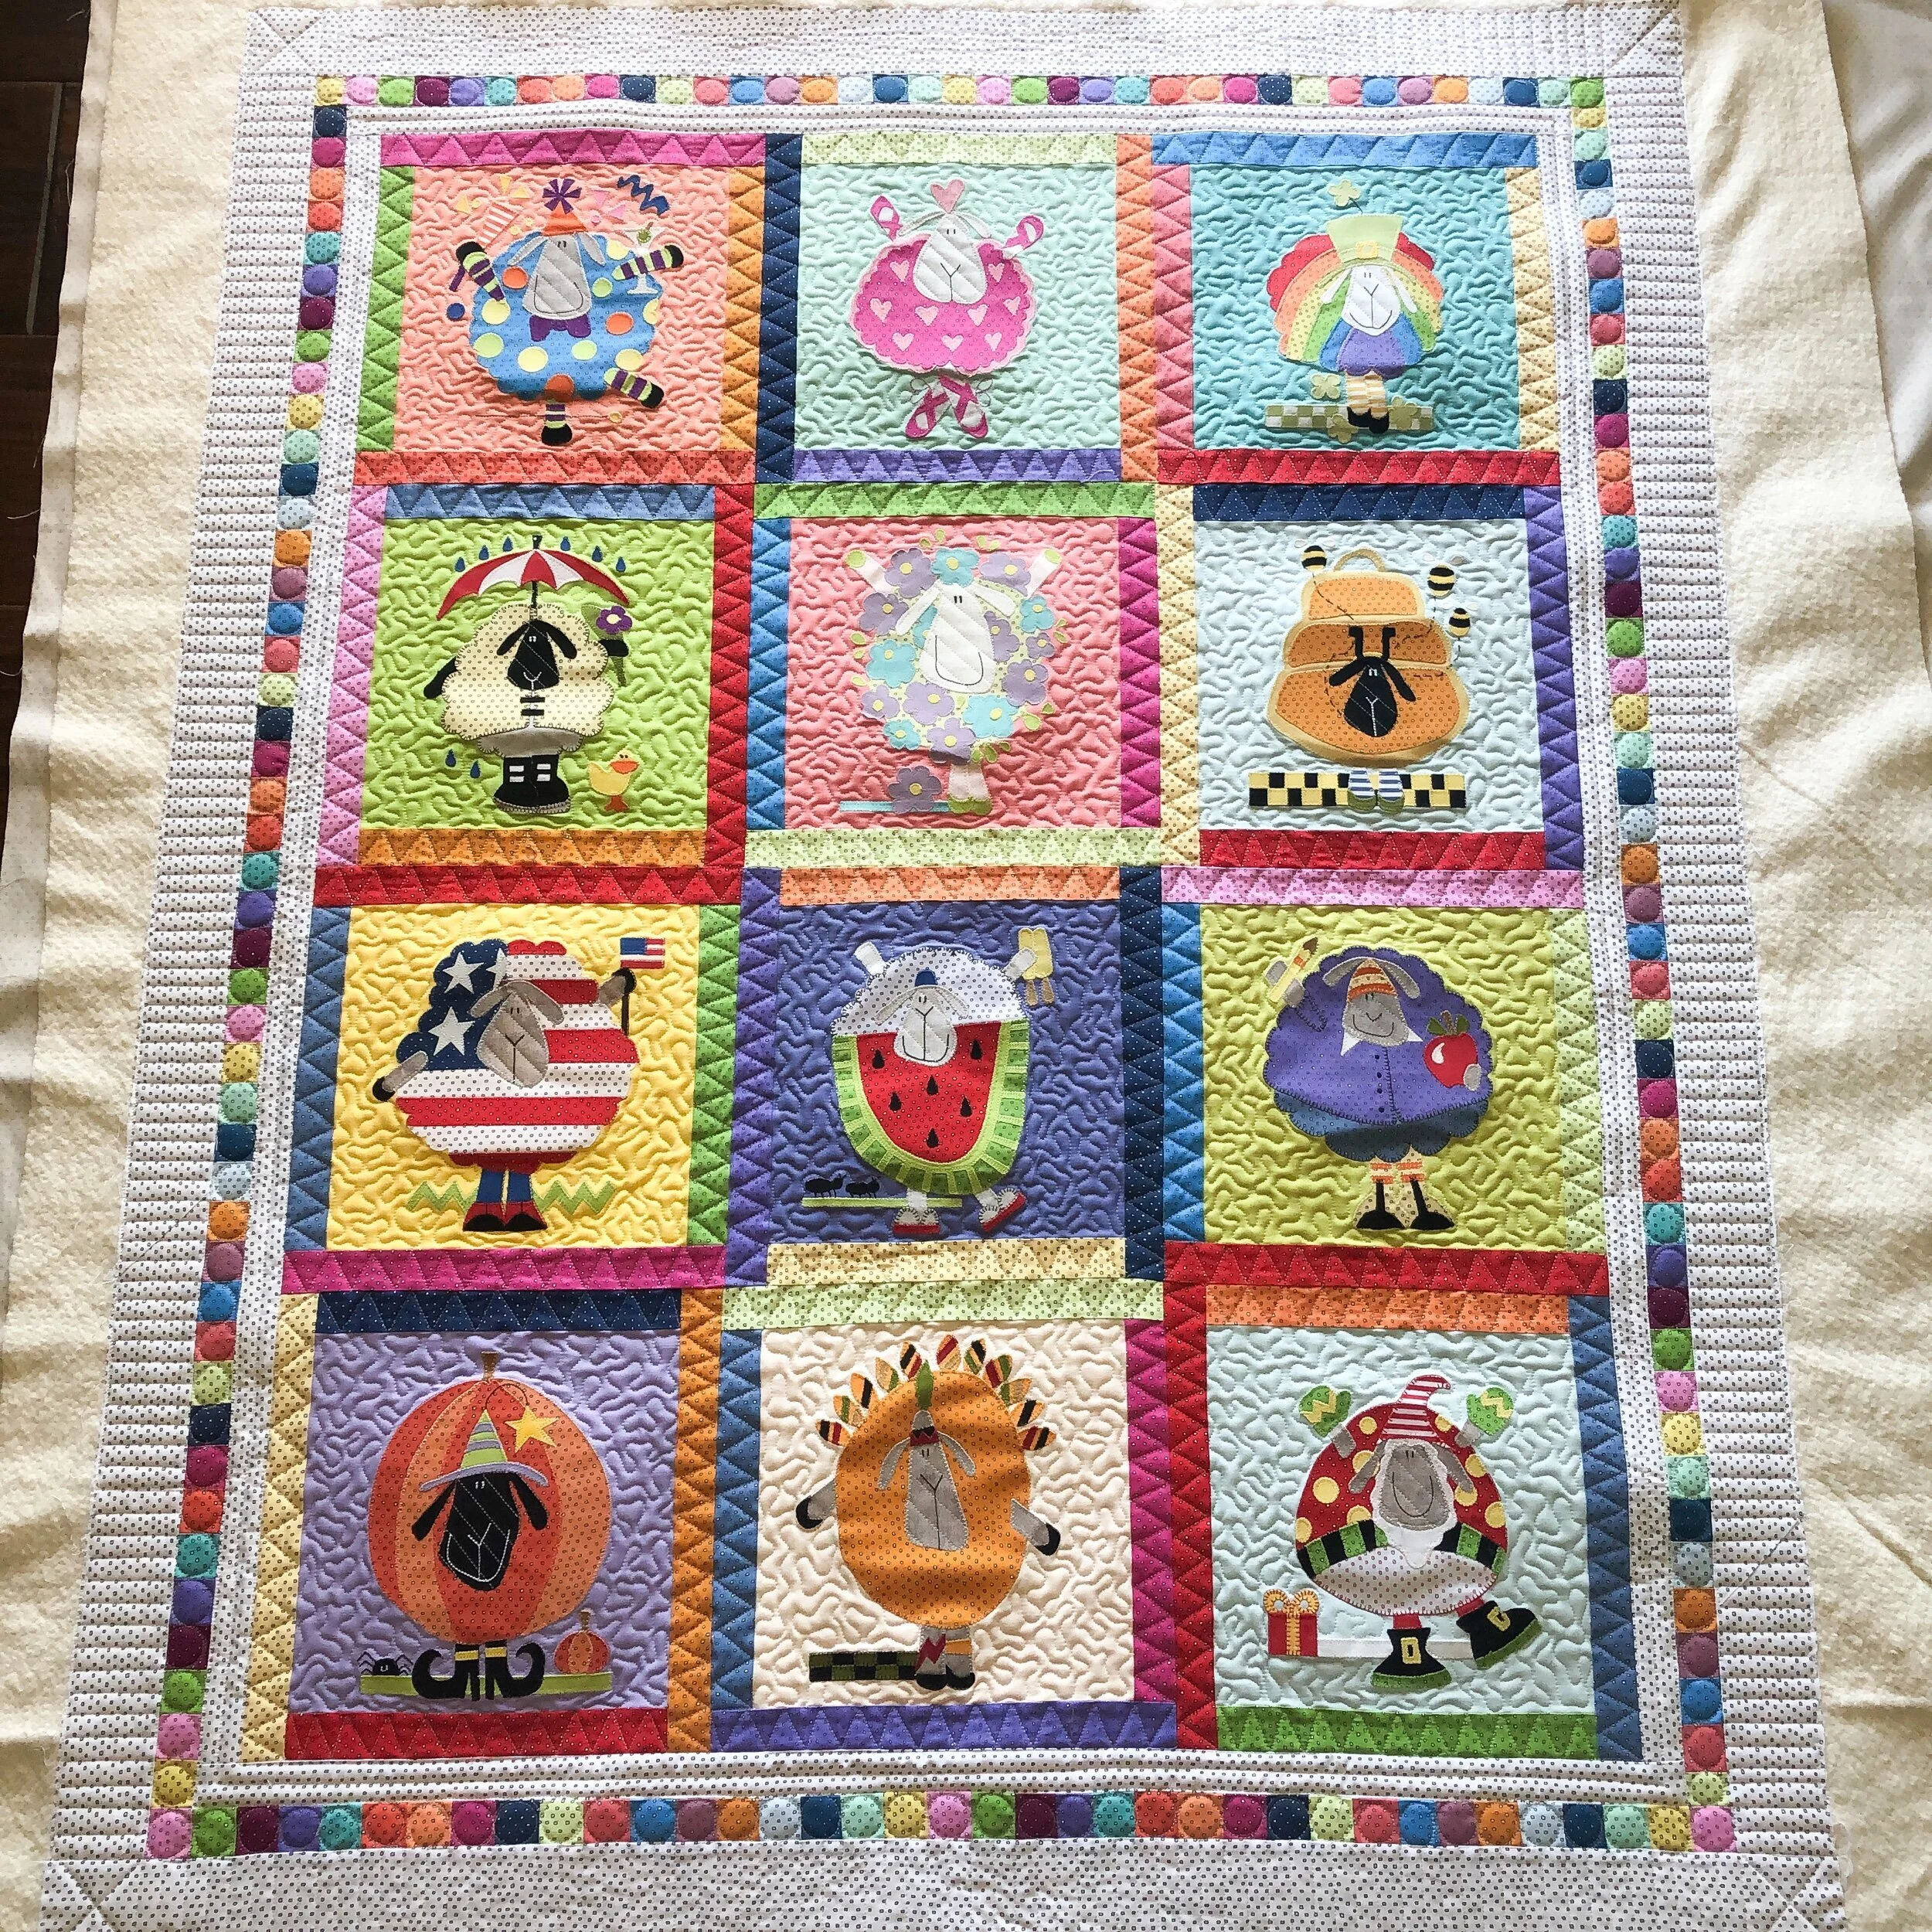
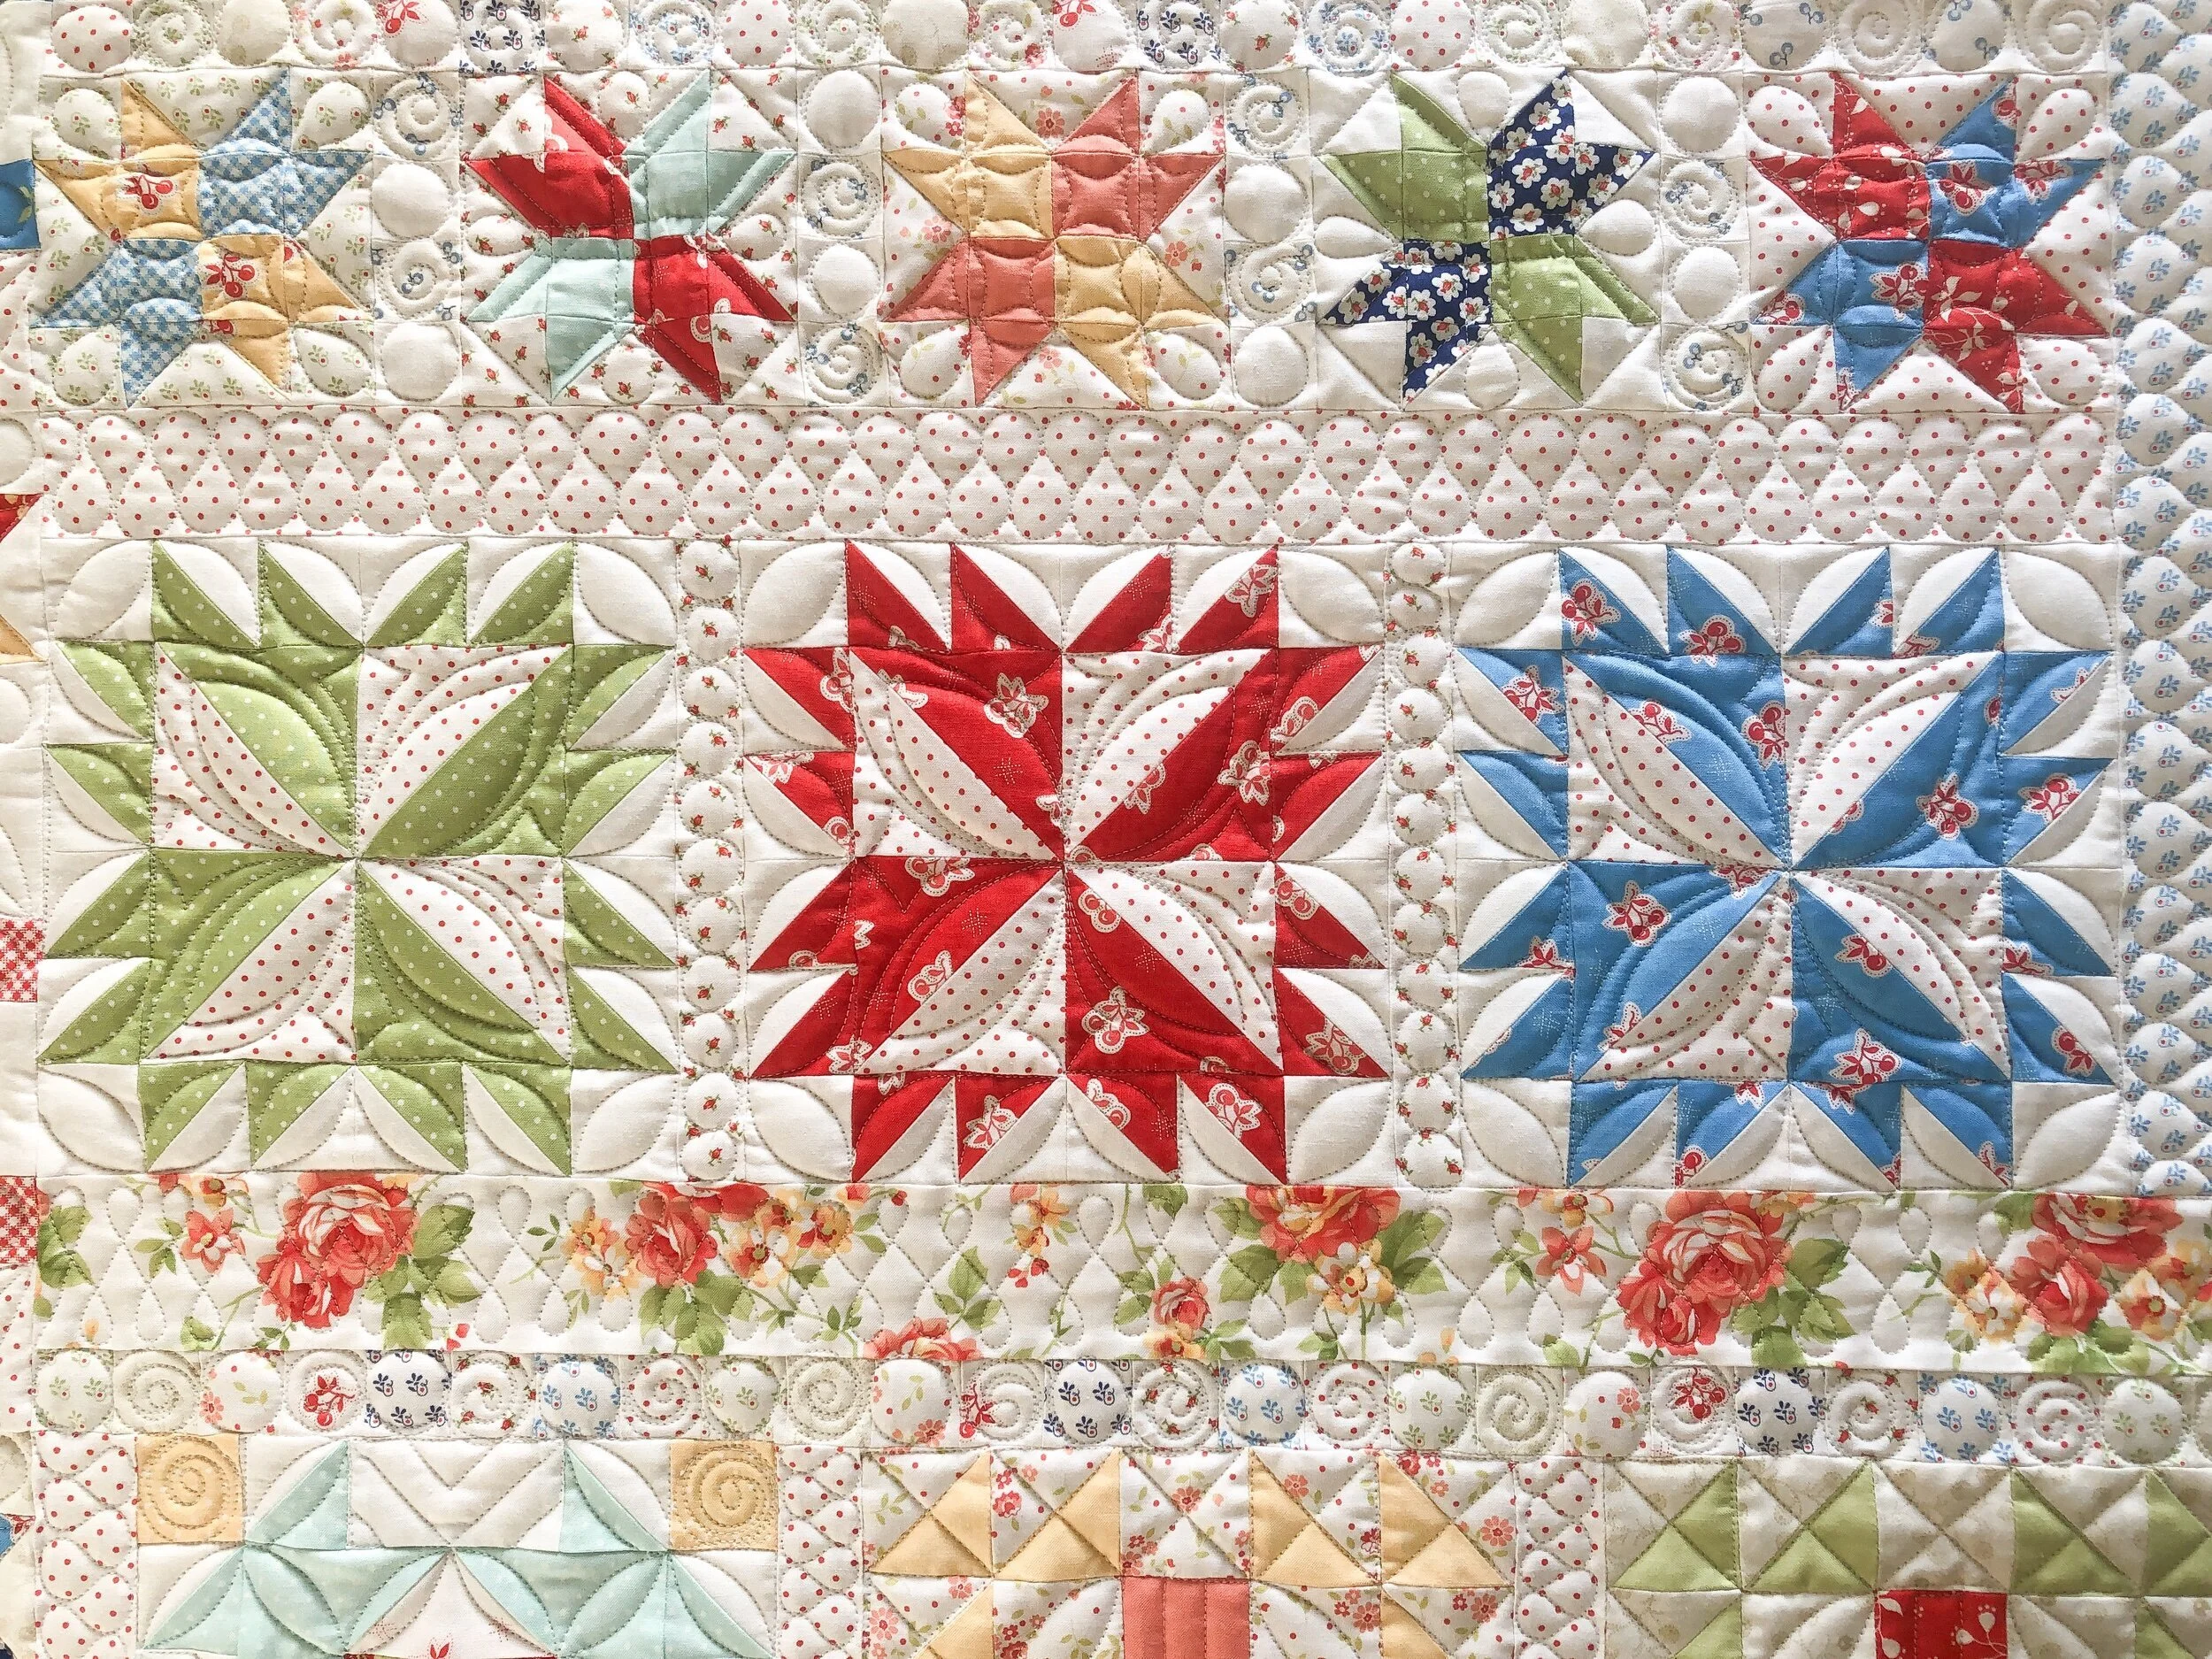
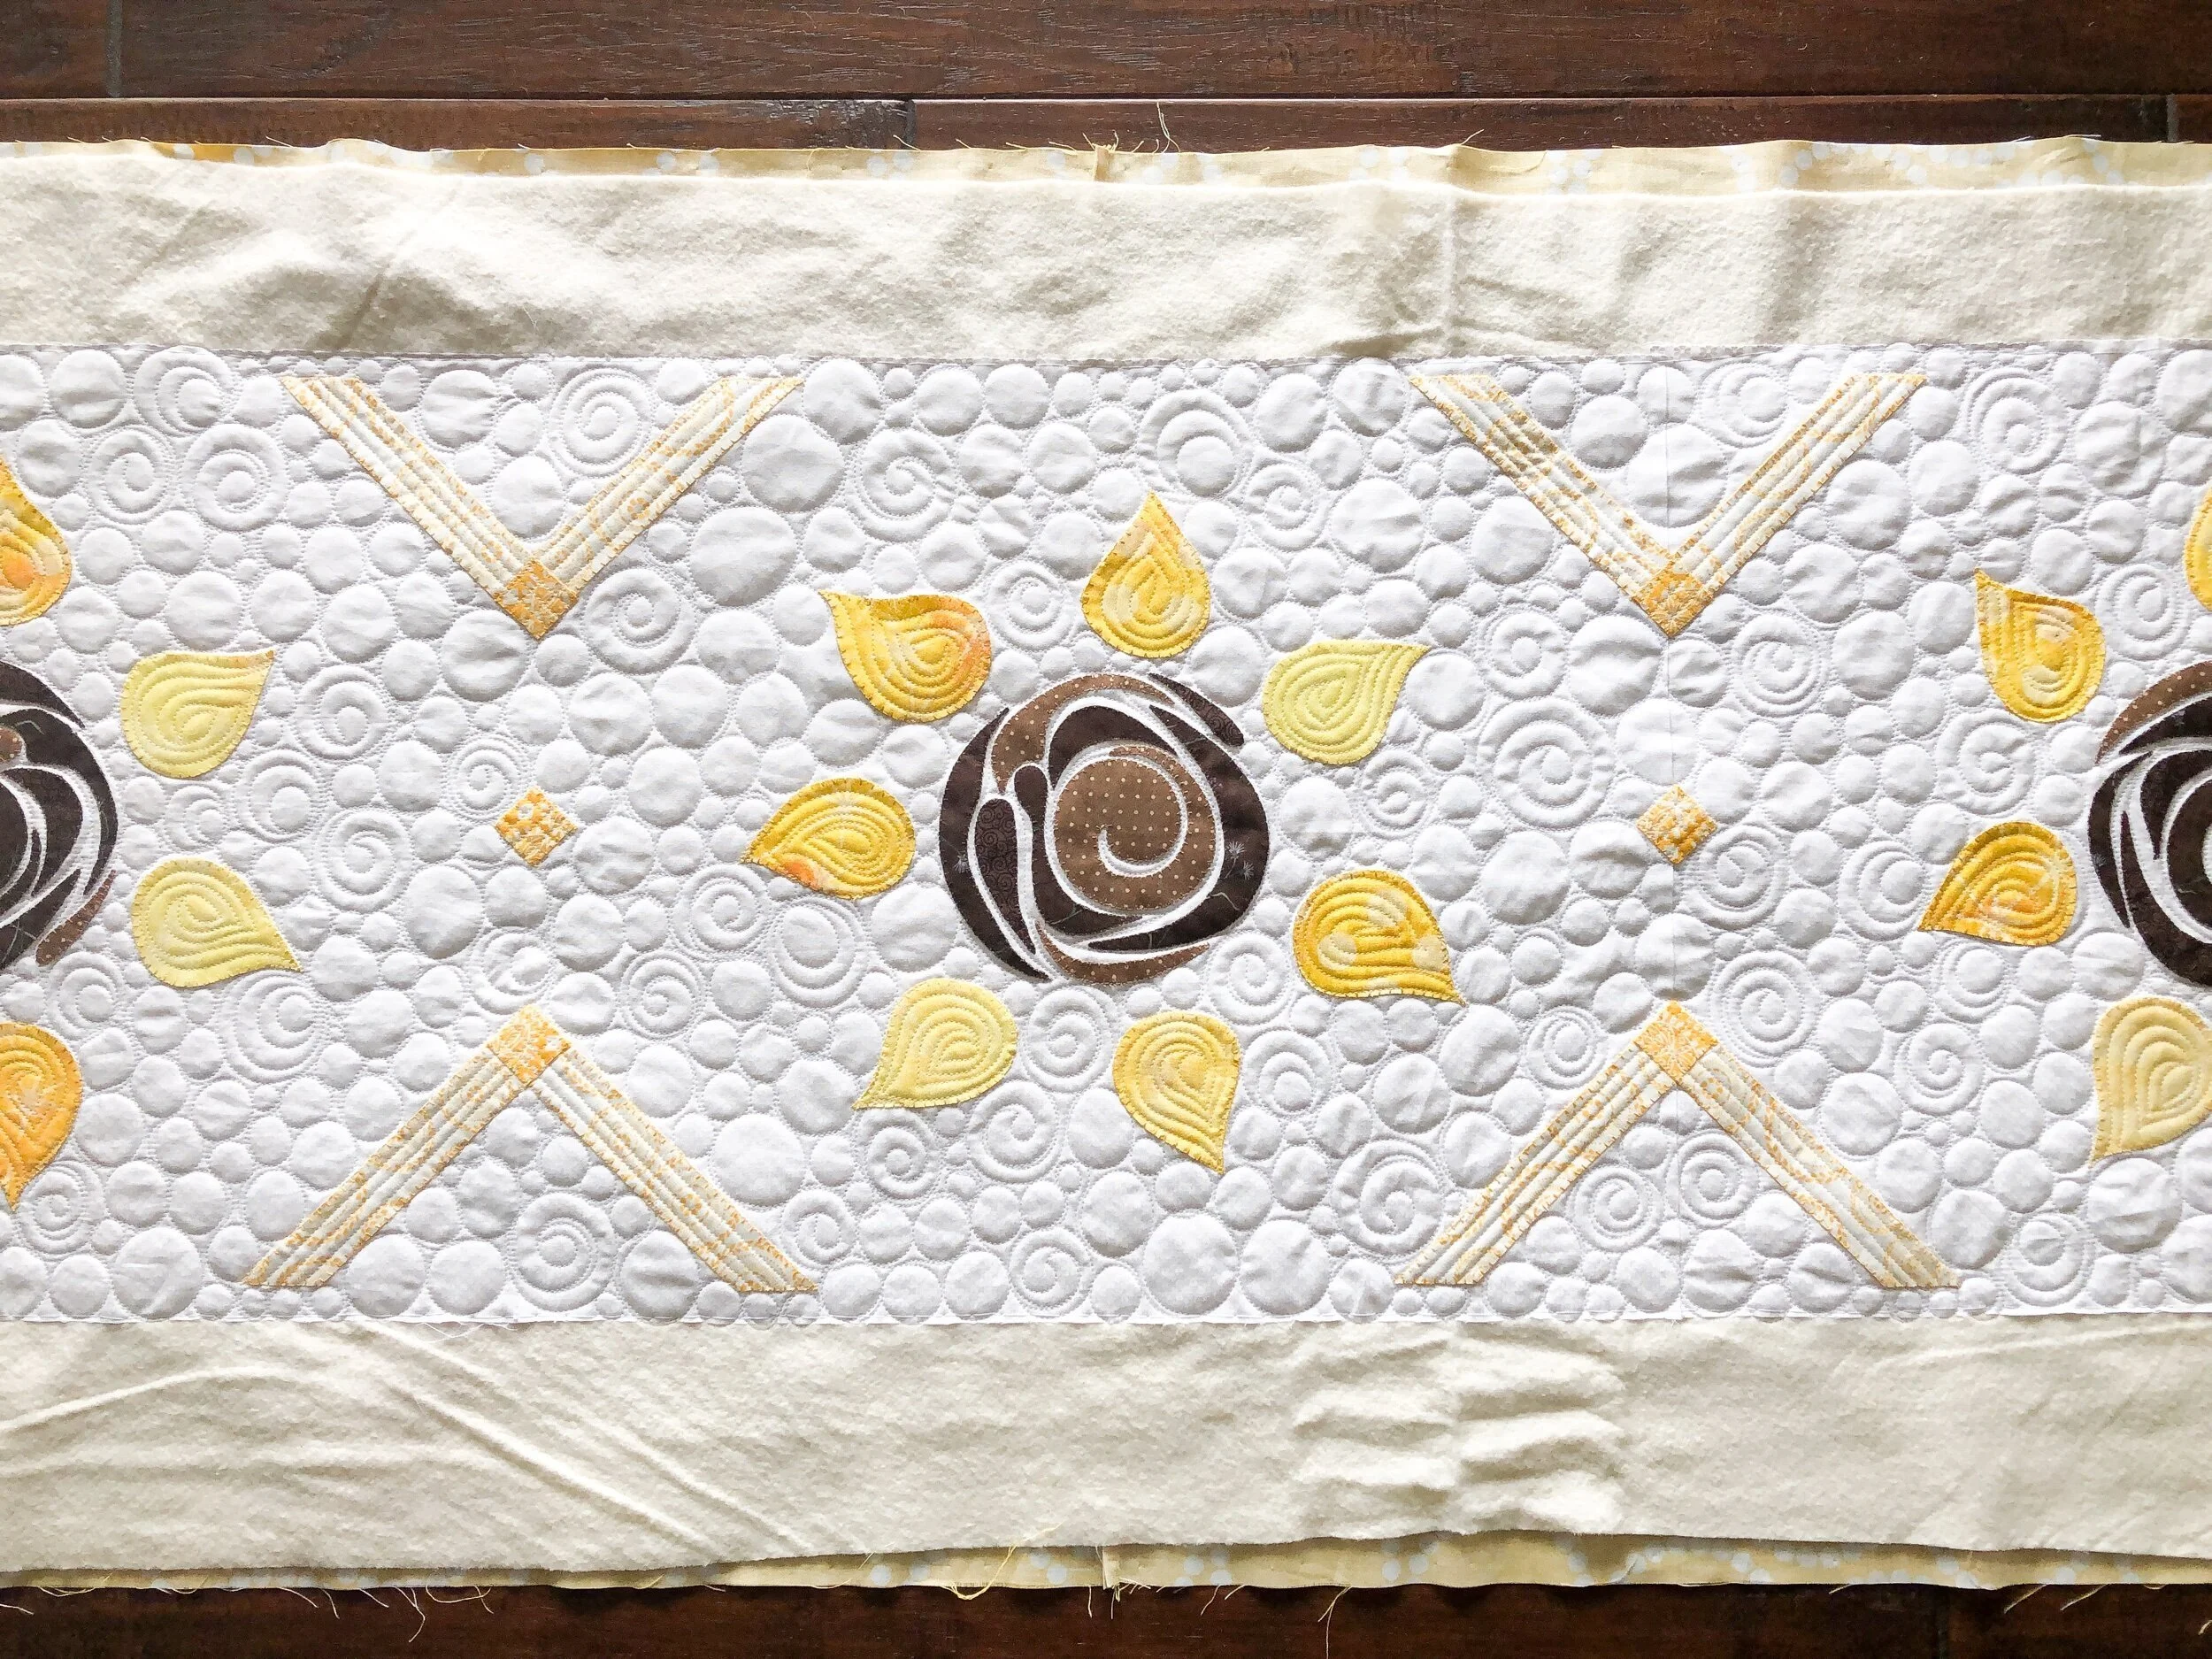
This fun block of the month was made by Sherry and is called, The Ewe Troupe by Stitches of Love. It’s a machine embroidery pattern.
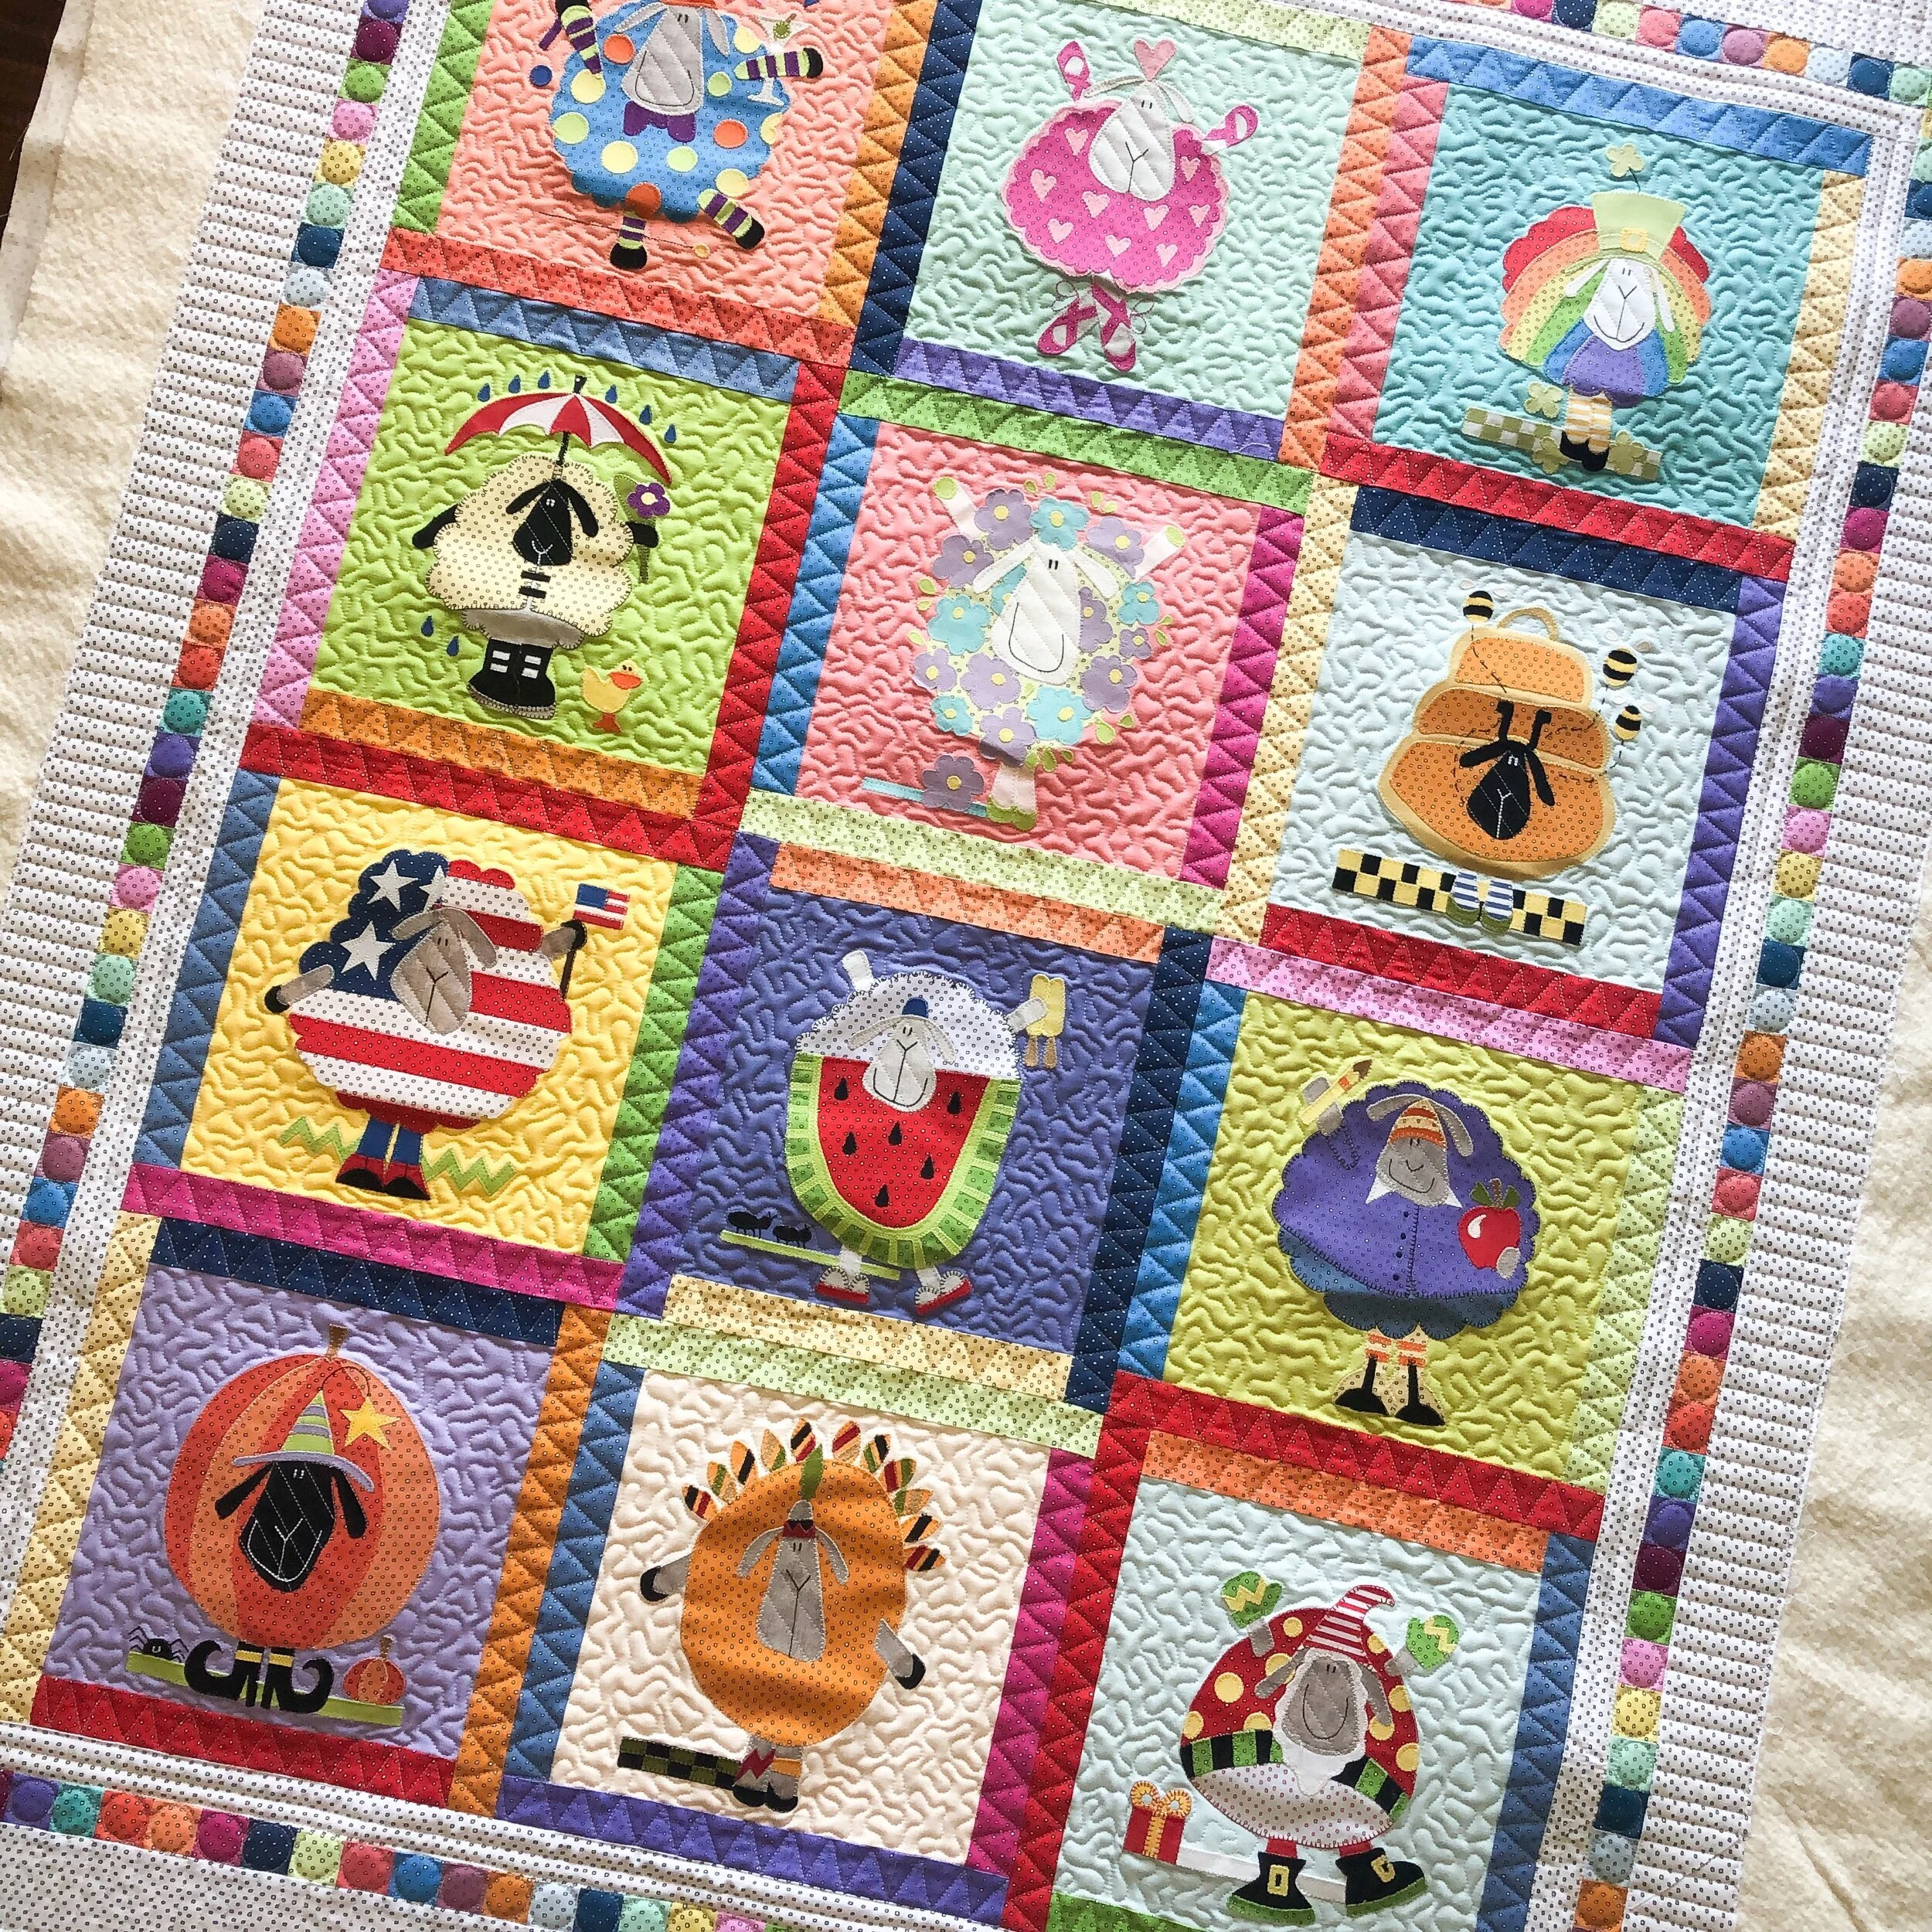
I love how the sheep are dressed up in something different each month, which coordinates with the holidays or seasons.
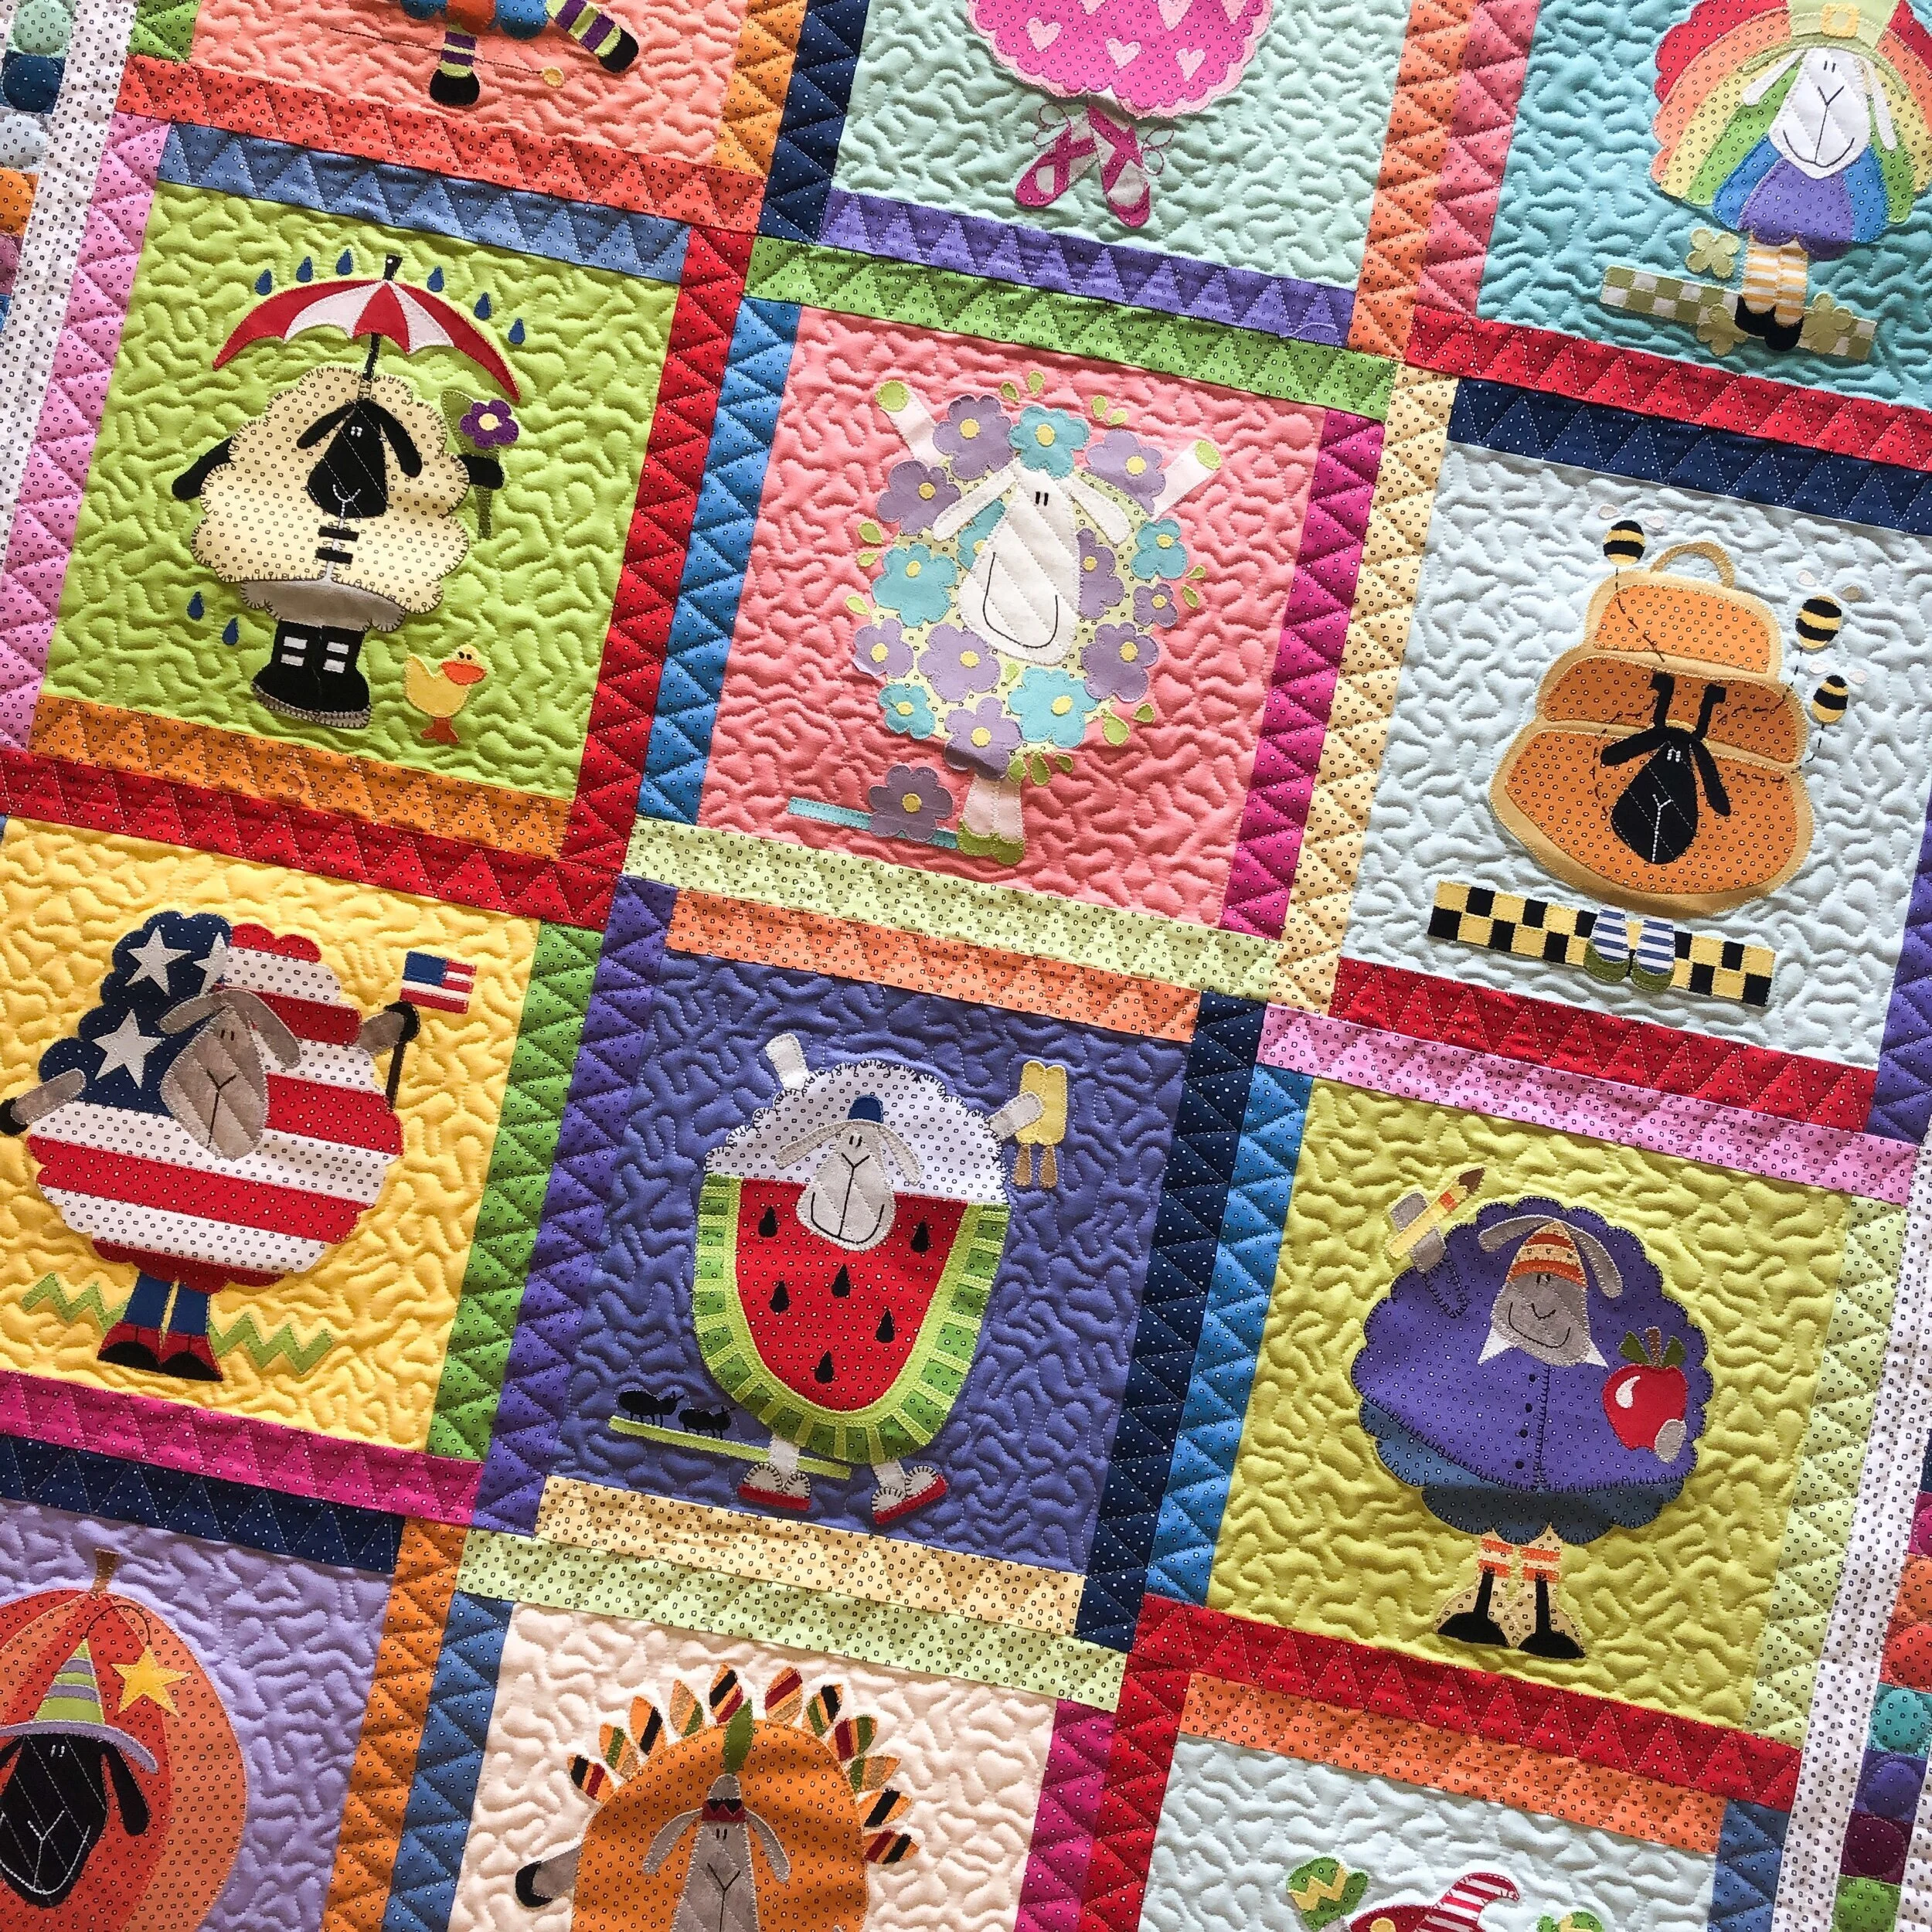
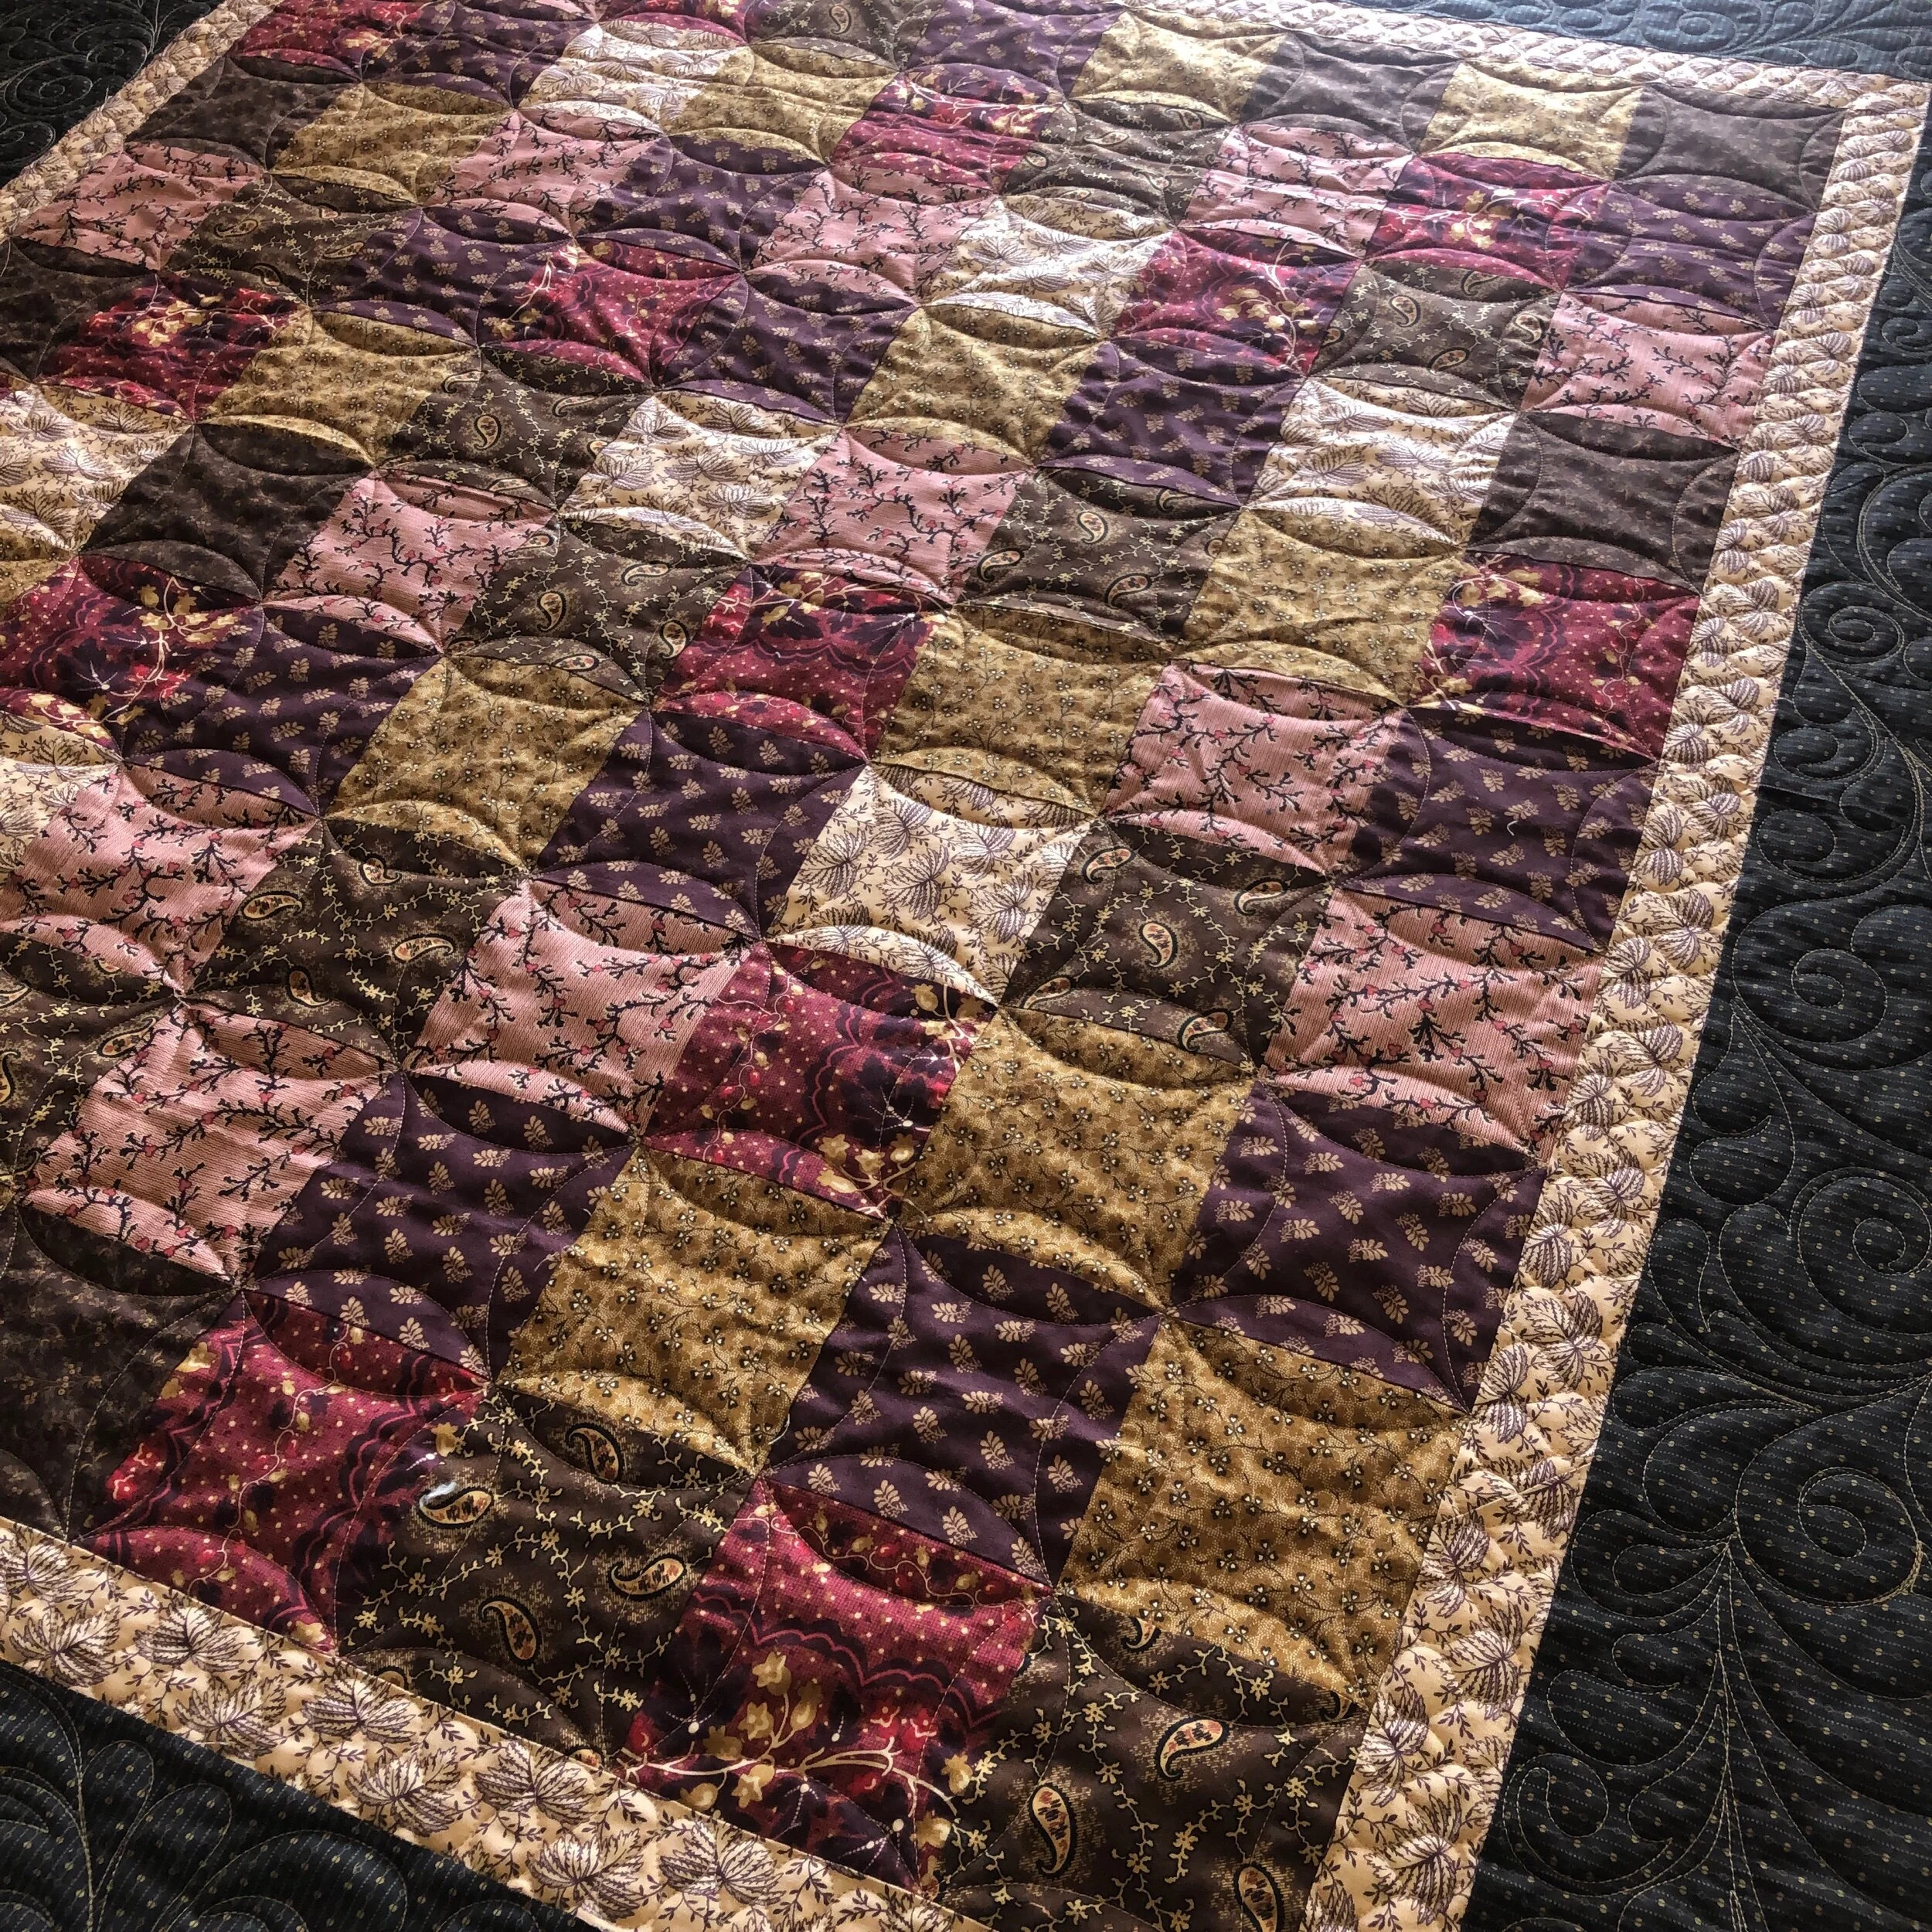
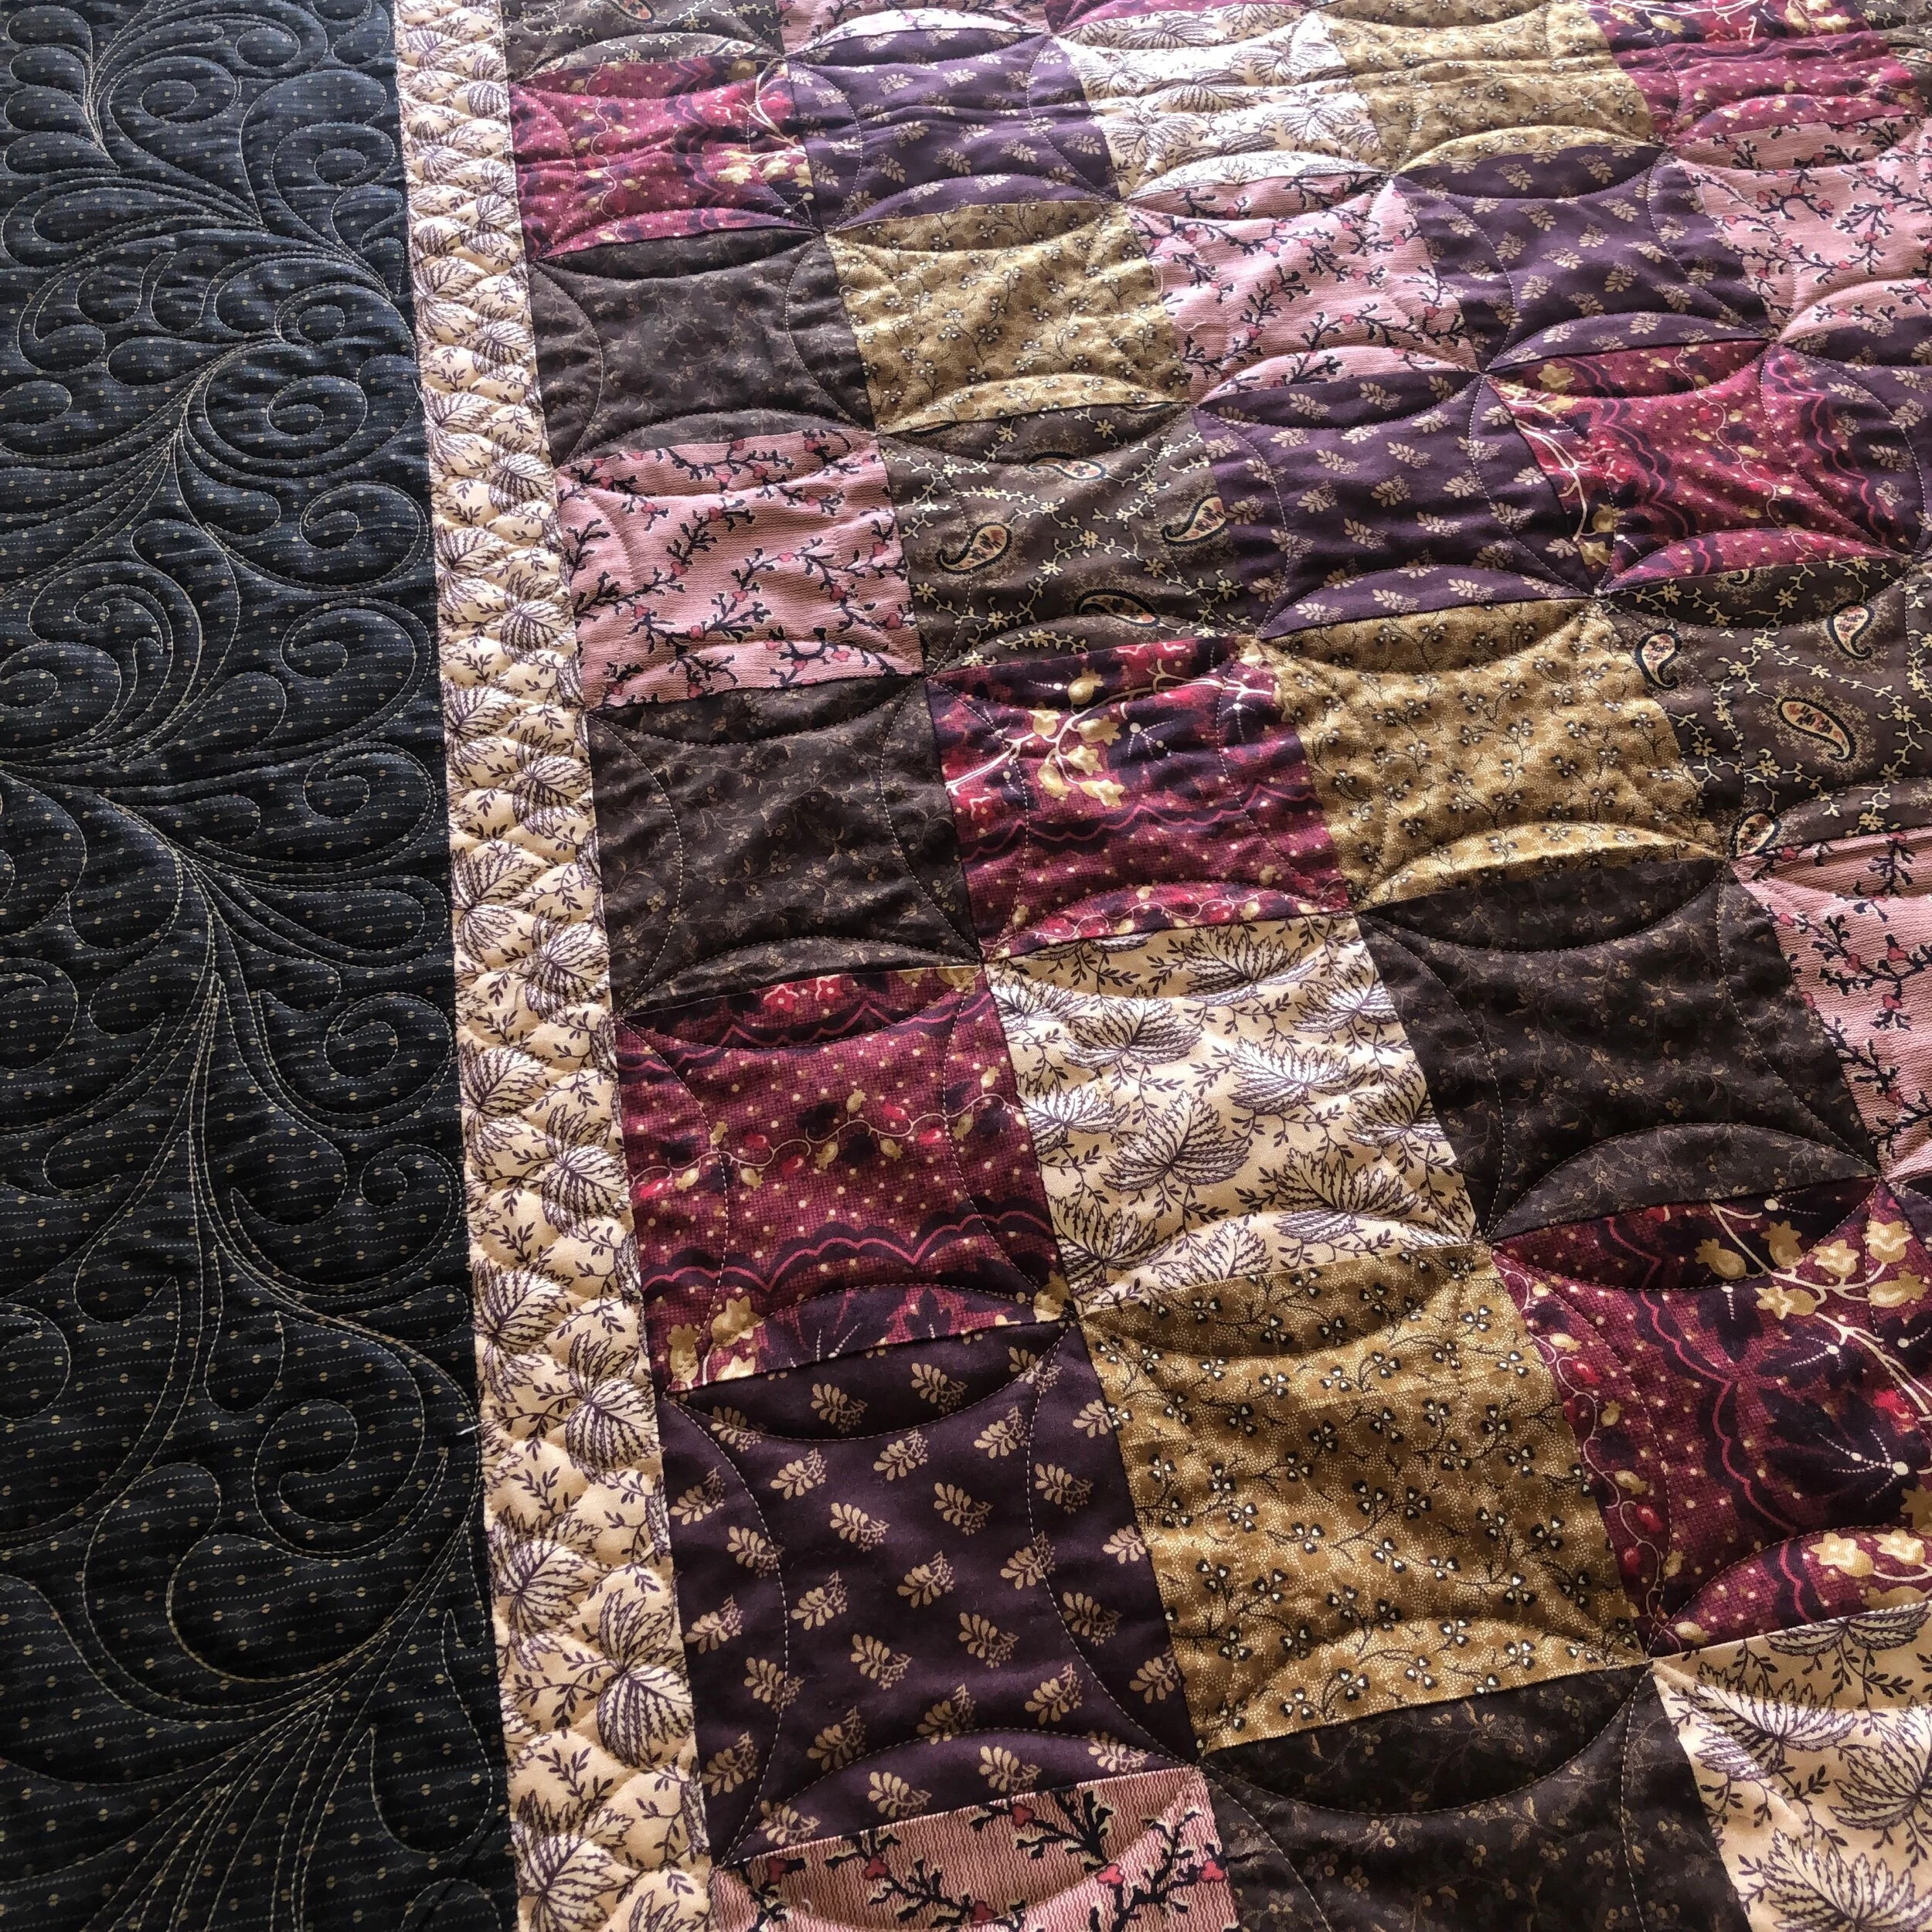
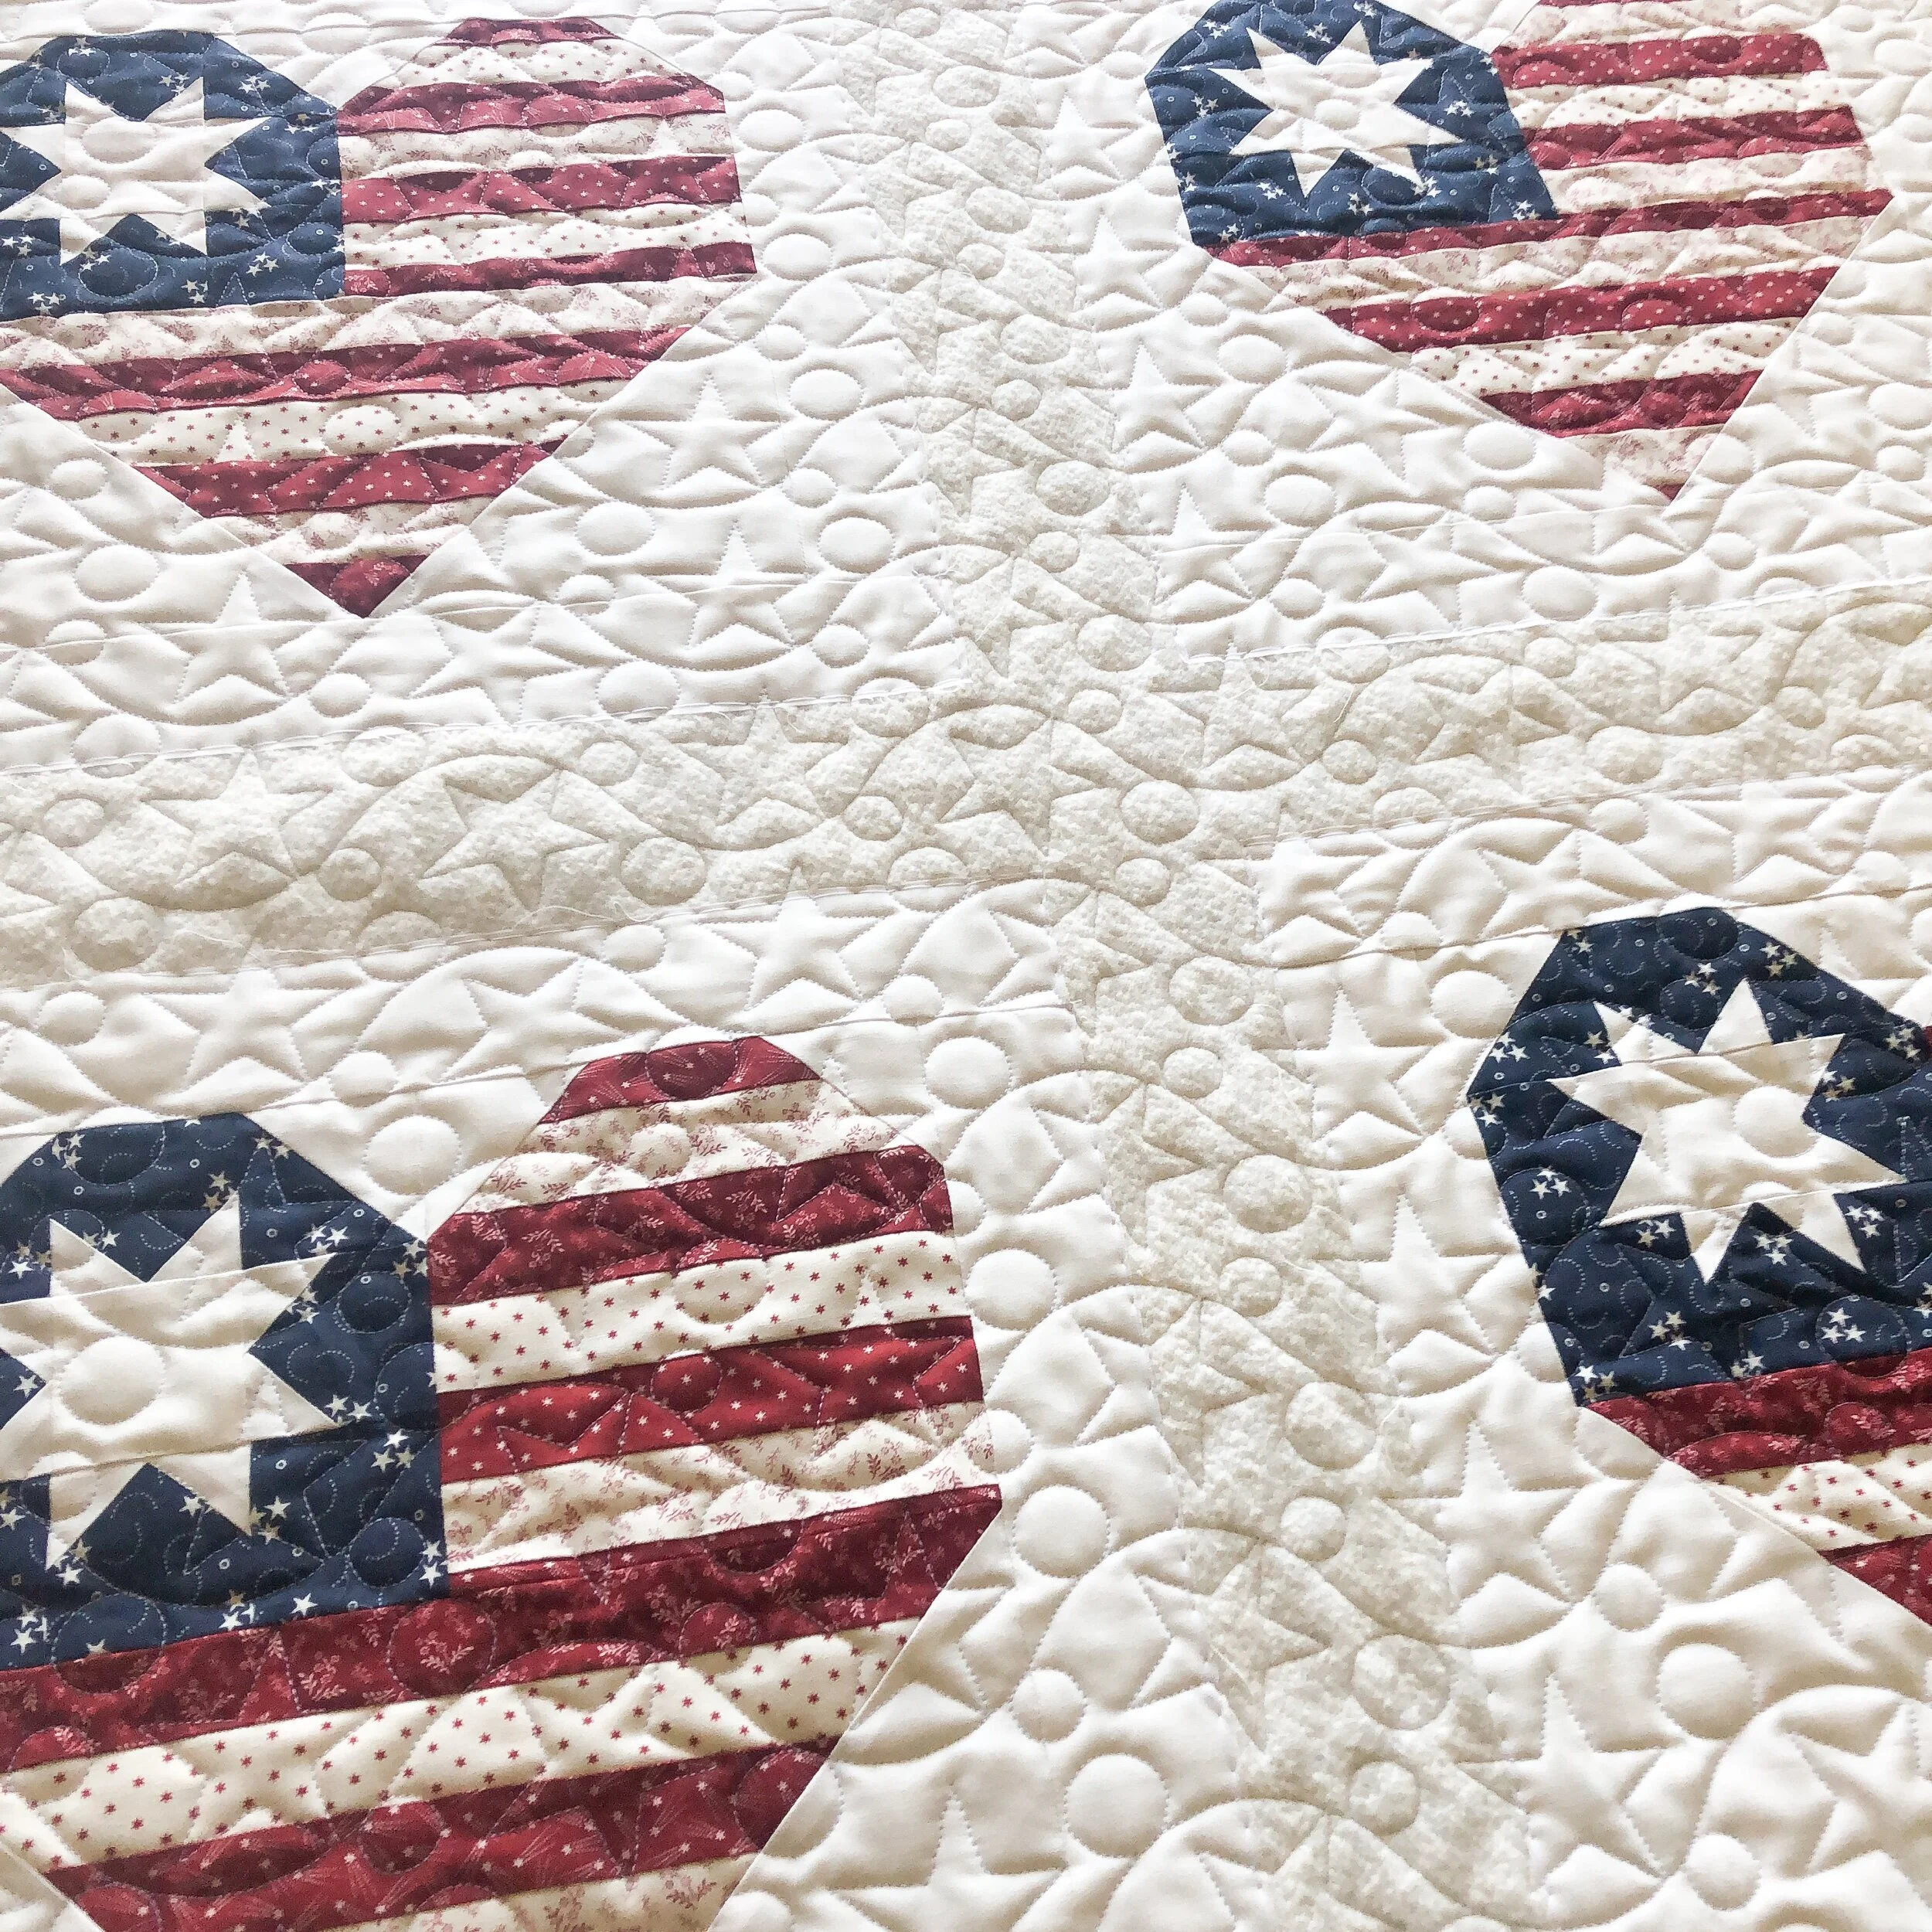
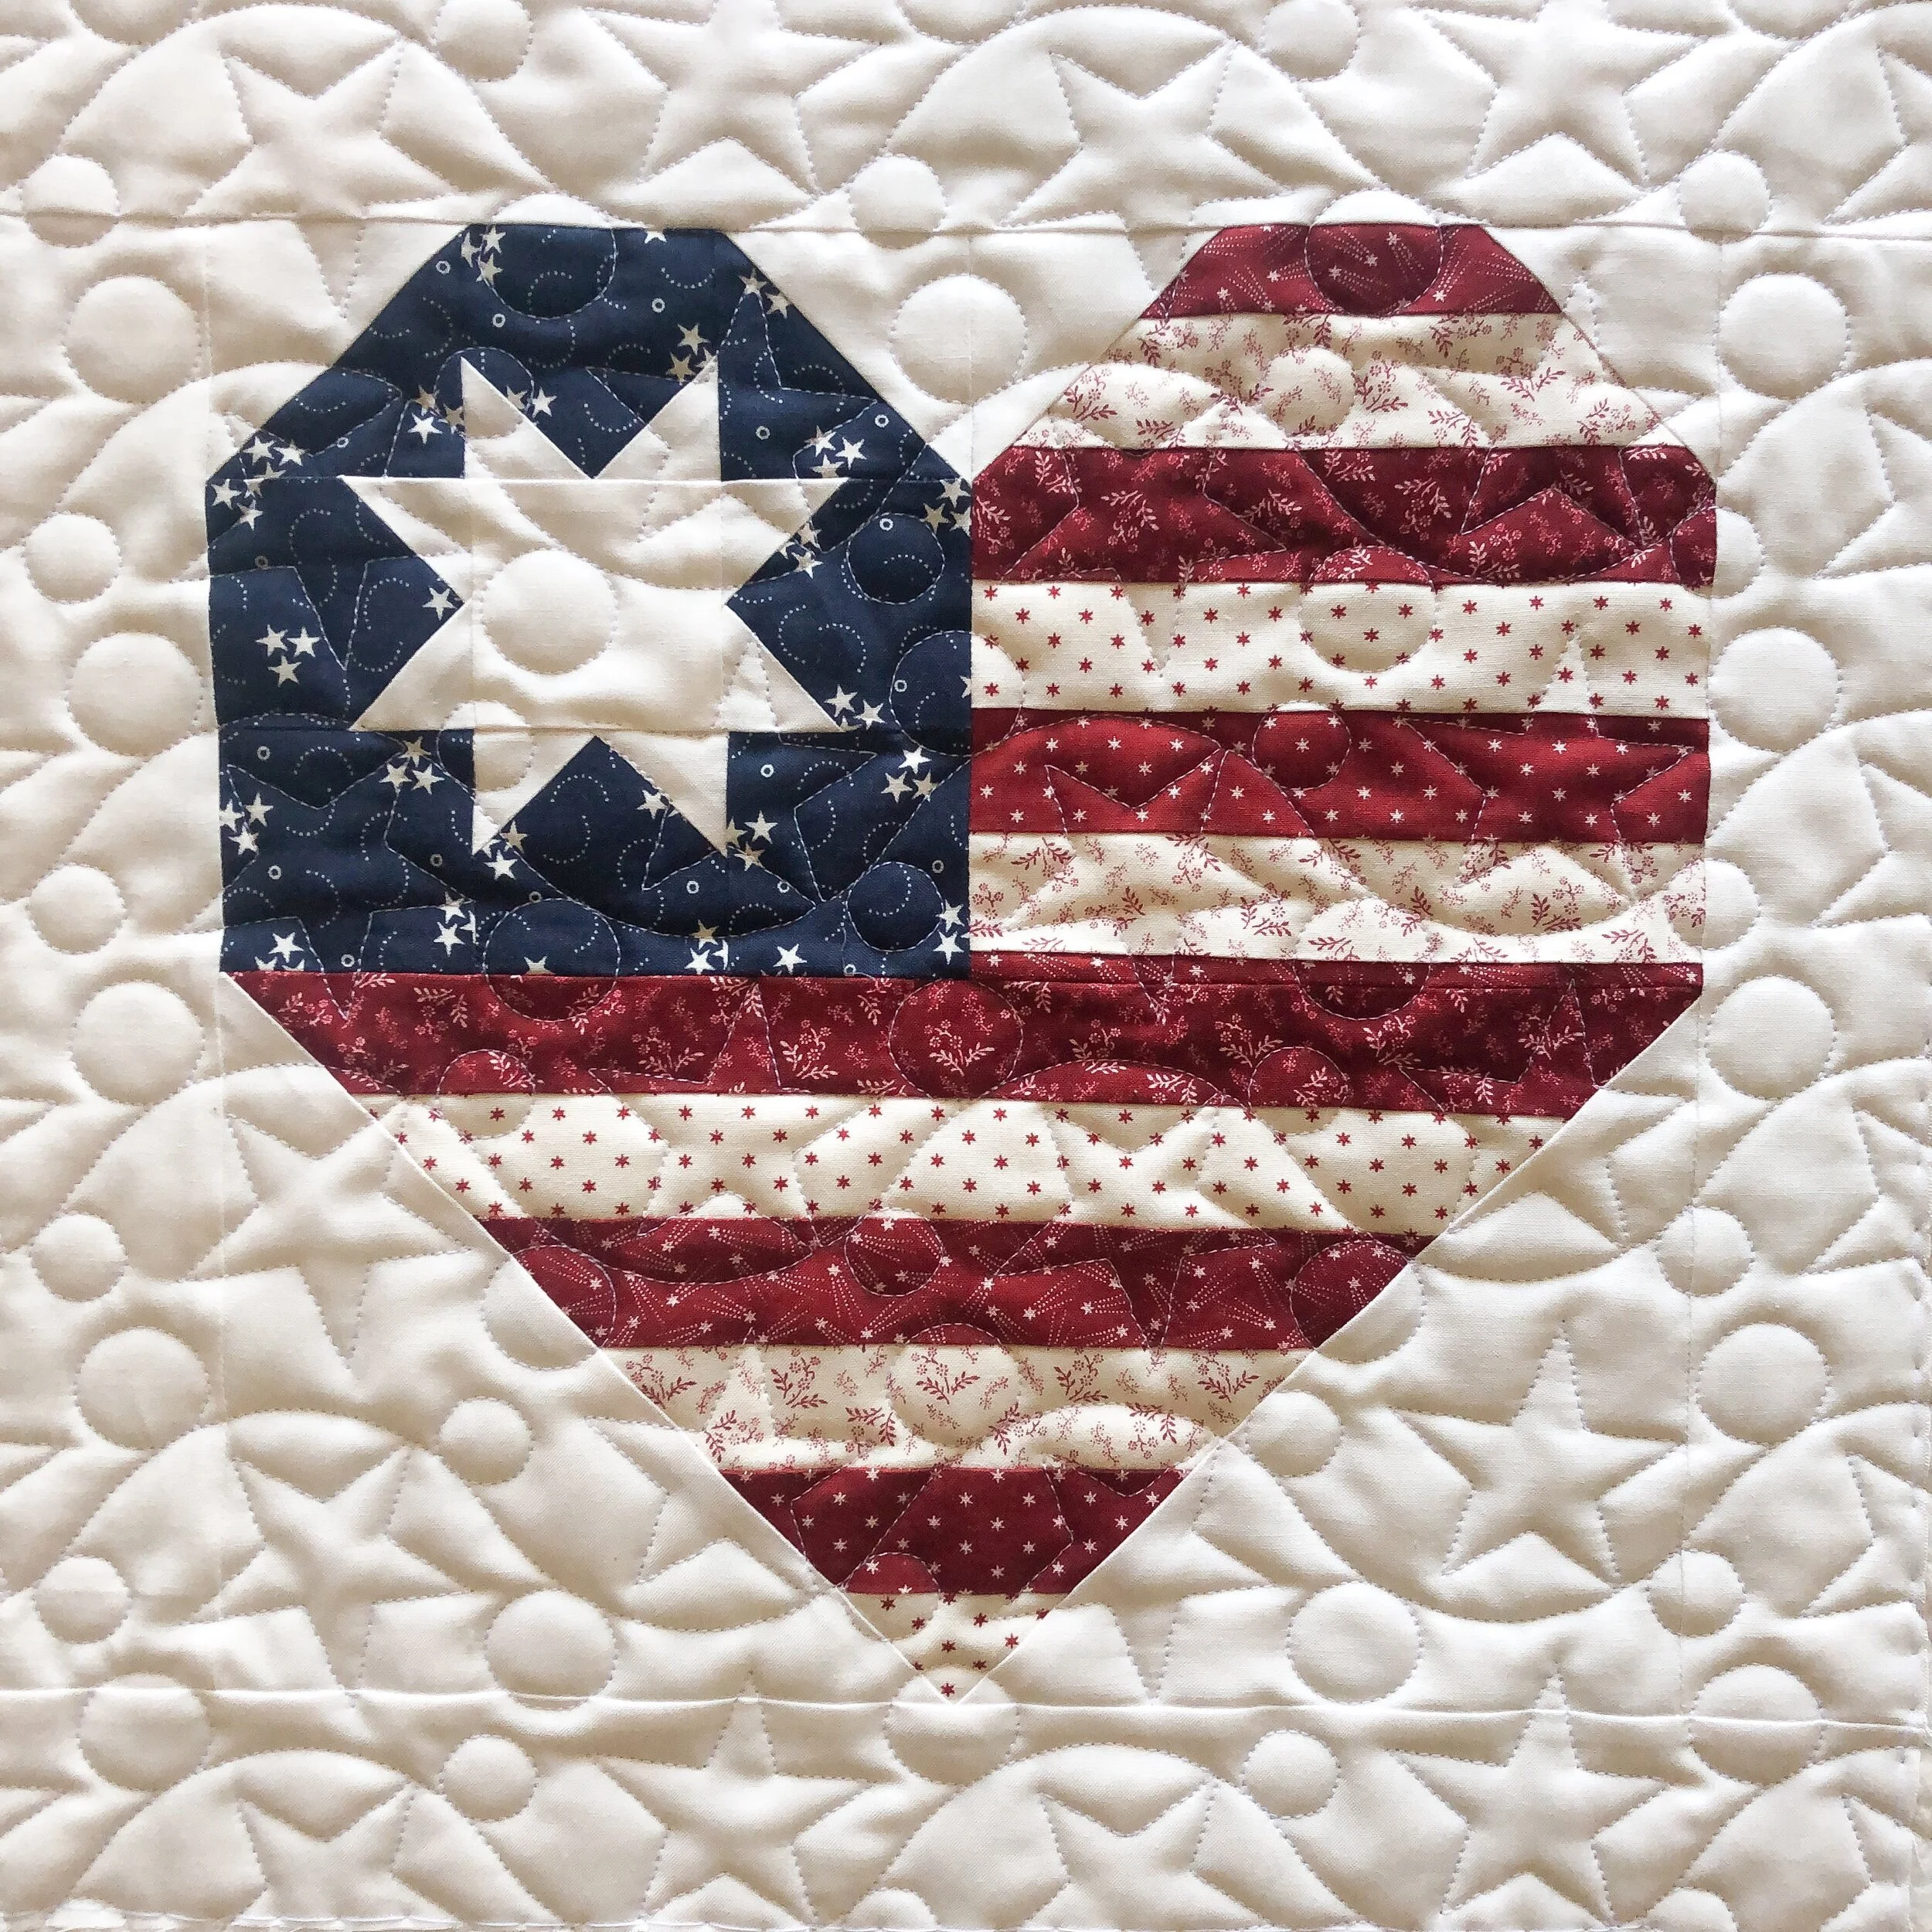
Sherry loved how the original quilt was quilted, and asked that I quilt it the same. Simple custom quilting for the win! The backgrounds have a small stipple, with a zig zag in the inner border. And, nothing quilted in the sheep, other than the stripes in their faces.
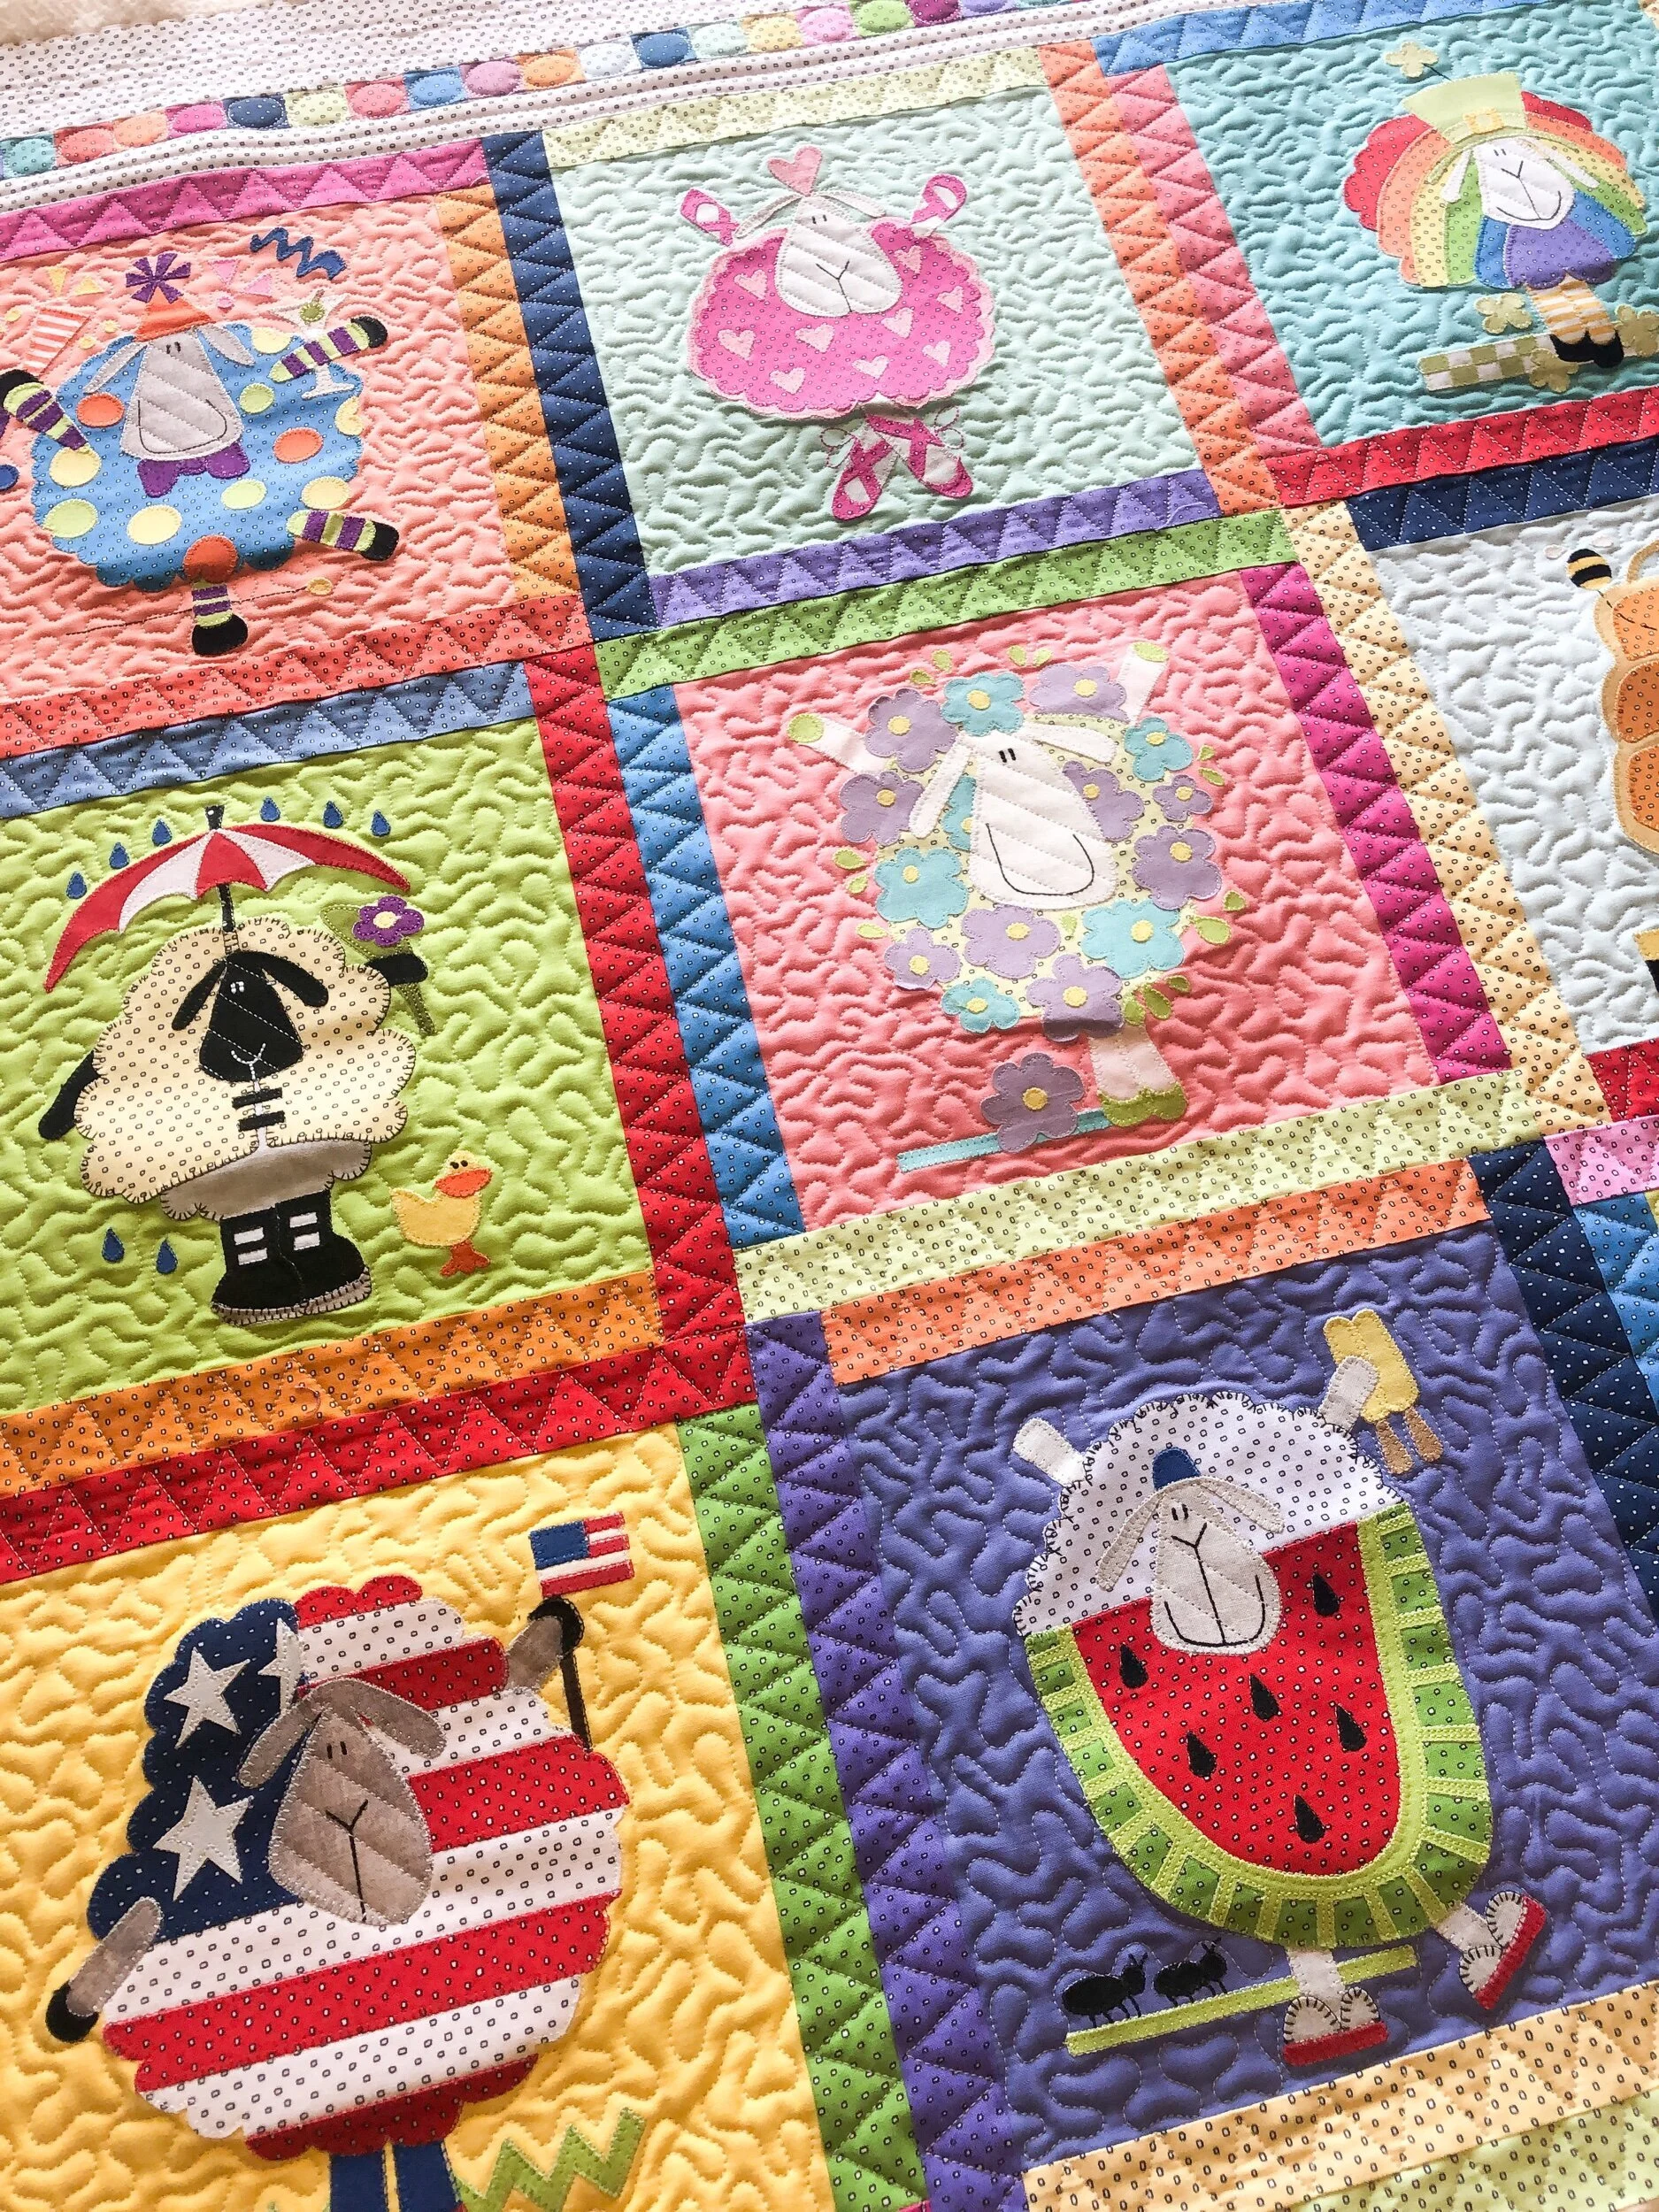
I quilted a line right down the middle of the lighter inner border which is between the sashing and 1” squares. Then some simple one inch pebbles in the postage stamp squares. To finish it off, some 1/2” lines using an Edge ruler from Linda at the Quilted Pineapple in the outer border. Her 8” Edge ruler is my favorite!
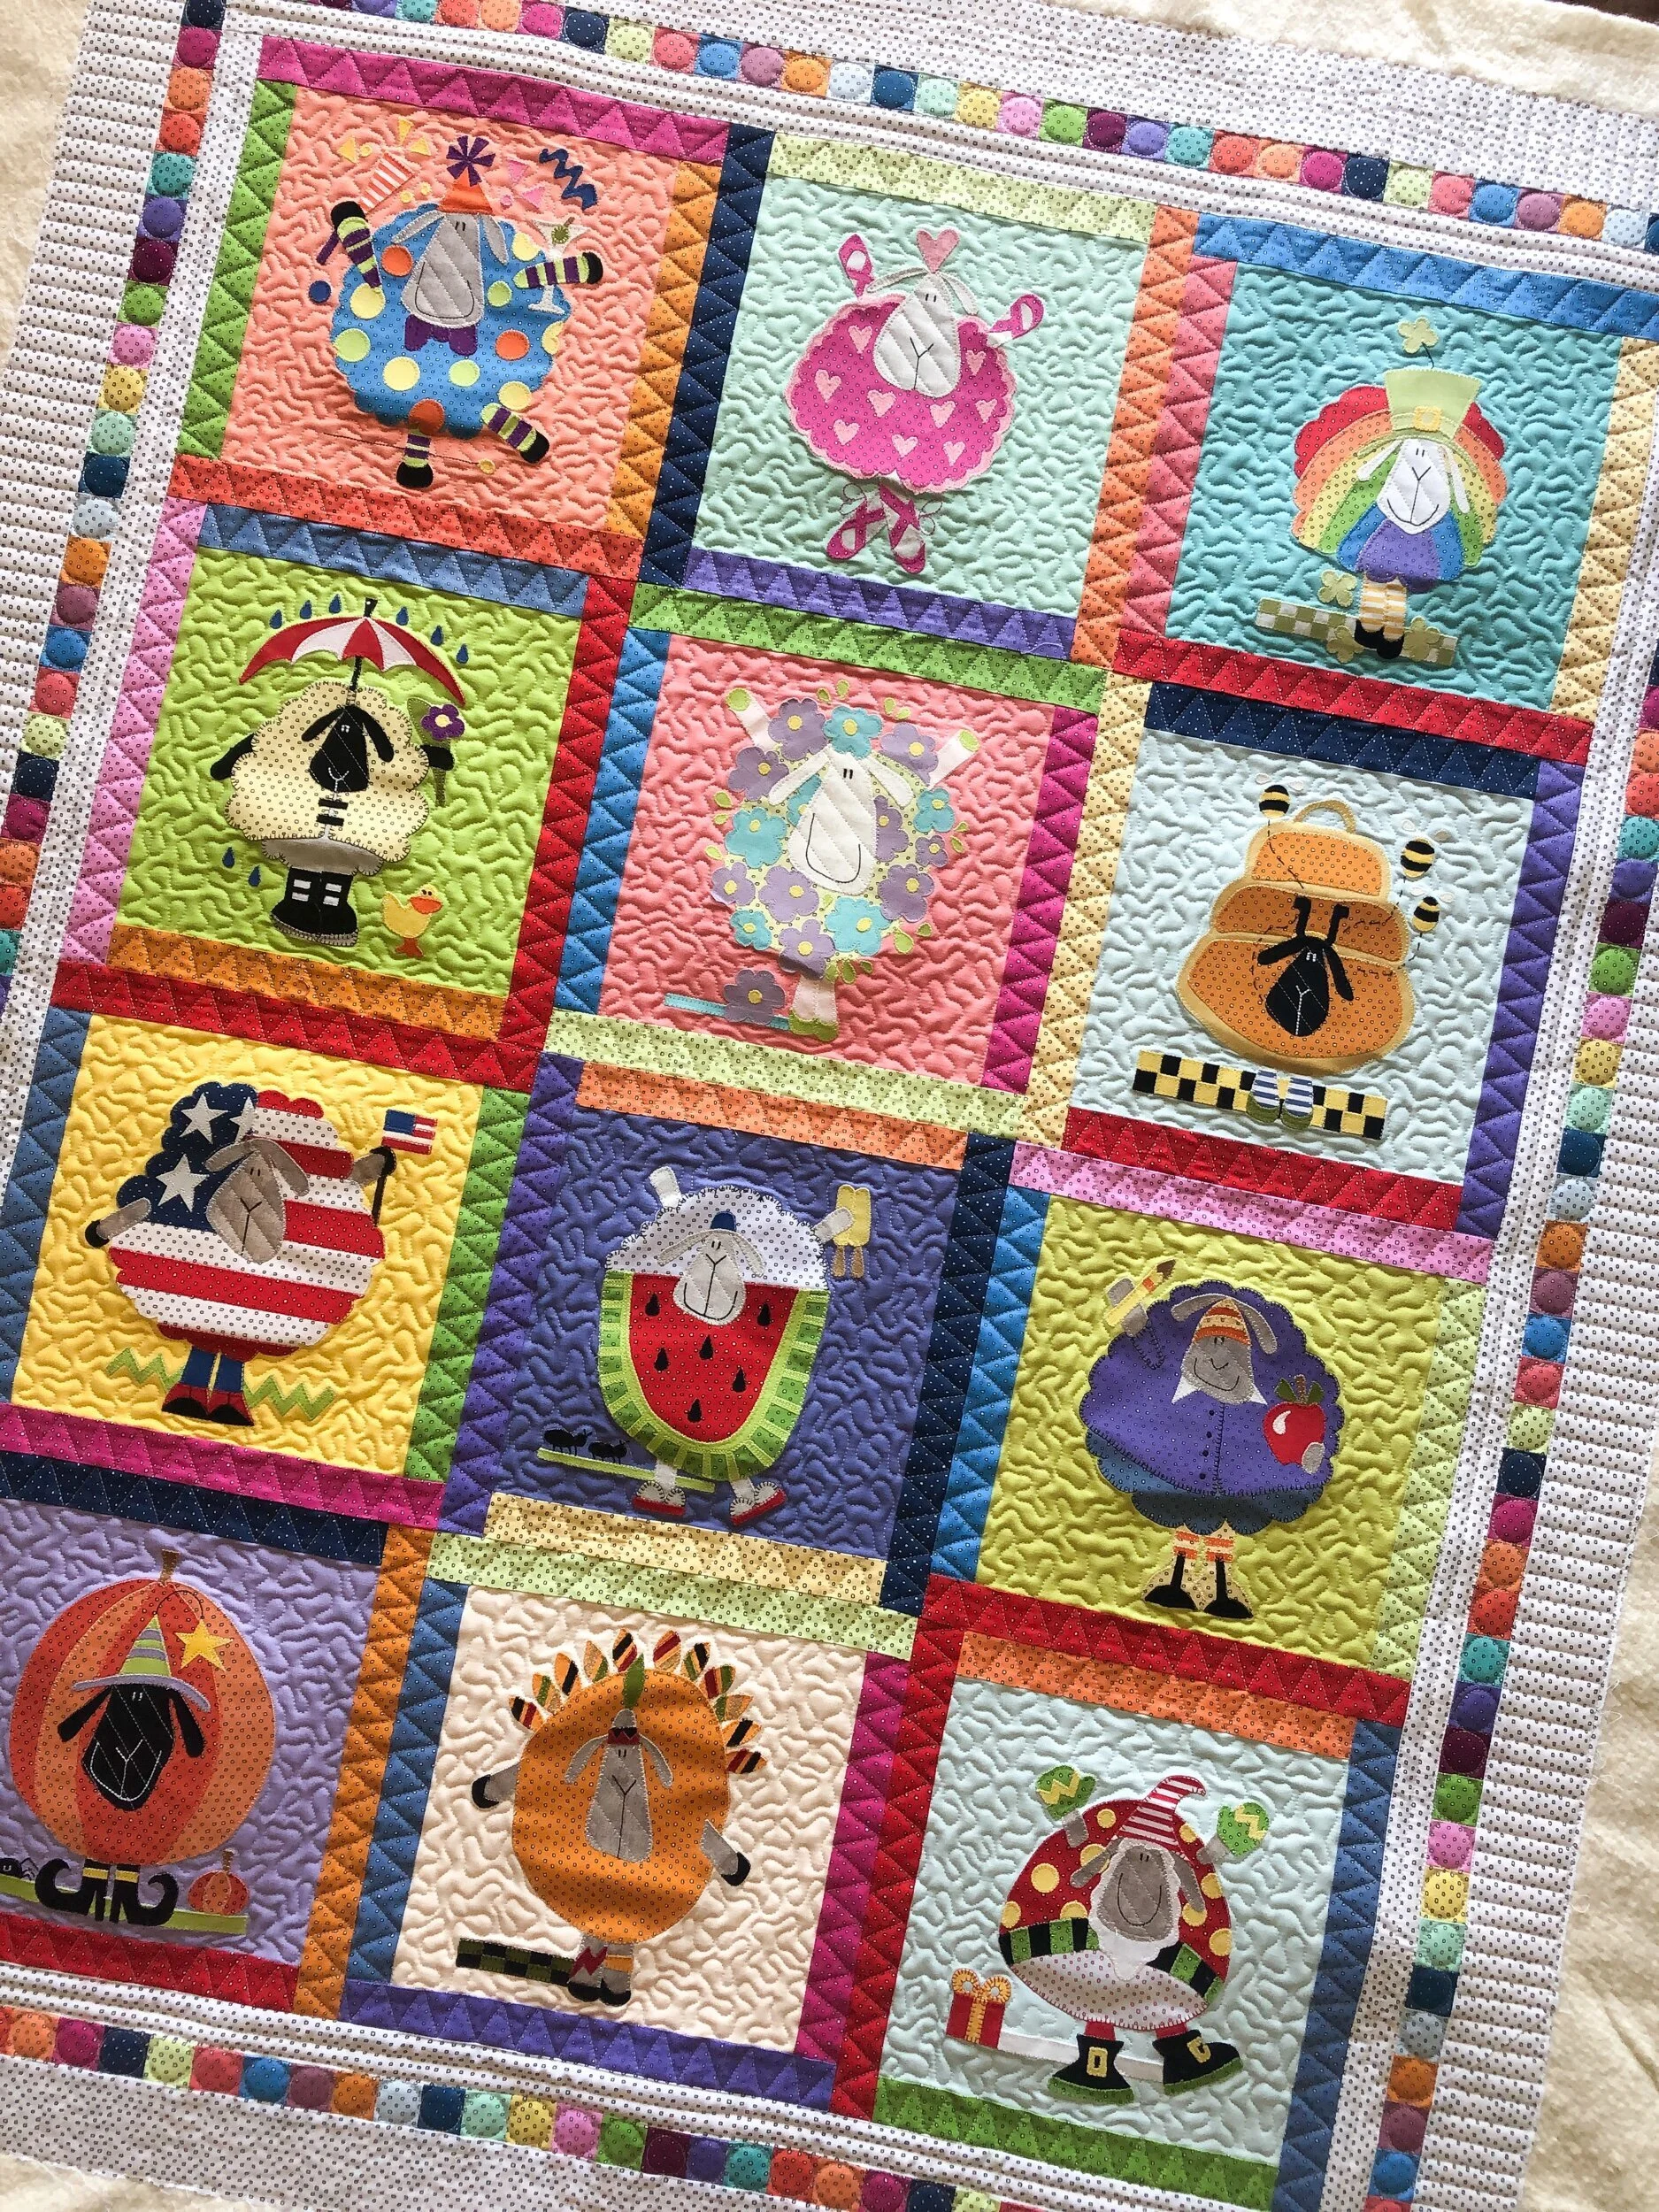
Even though the quilting designs are simple, it has great quilty texture overall.
I used 8020 cotton poly blend batting from Winline out of Utah, and natural white Omni thread from Superior Threads.
The design on sale for this blog post…is my Hexie Scallops and it’s FREE until my next blog post. Don’t hesitate to go get this one!! I’m going to try and blog in the next day or so, and will pick a new design. No code necessary.
Short and sweet…more fun quilts coming soon!! Plus, I have a fun project that I’ve been working on, thats coming soon…more details to come.
Happy quilting and thanks for being here, Leisha

Liz’s Tumbler Quilt
Hello there,
Things are starting to pick up around here. If you’d like a quilt quilted before Christmas, let me know. I’m only scheduled into the first week and a half in September at the moment. I’d love to quilt for you!!!
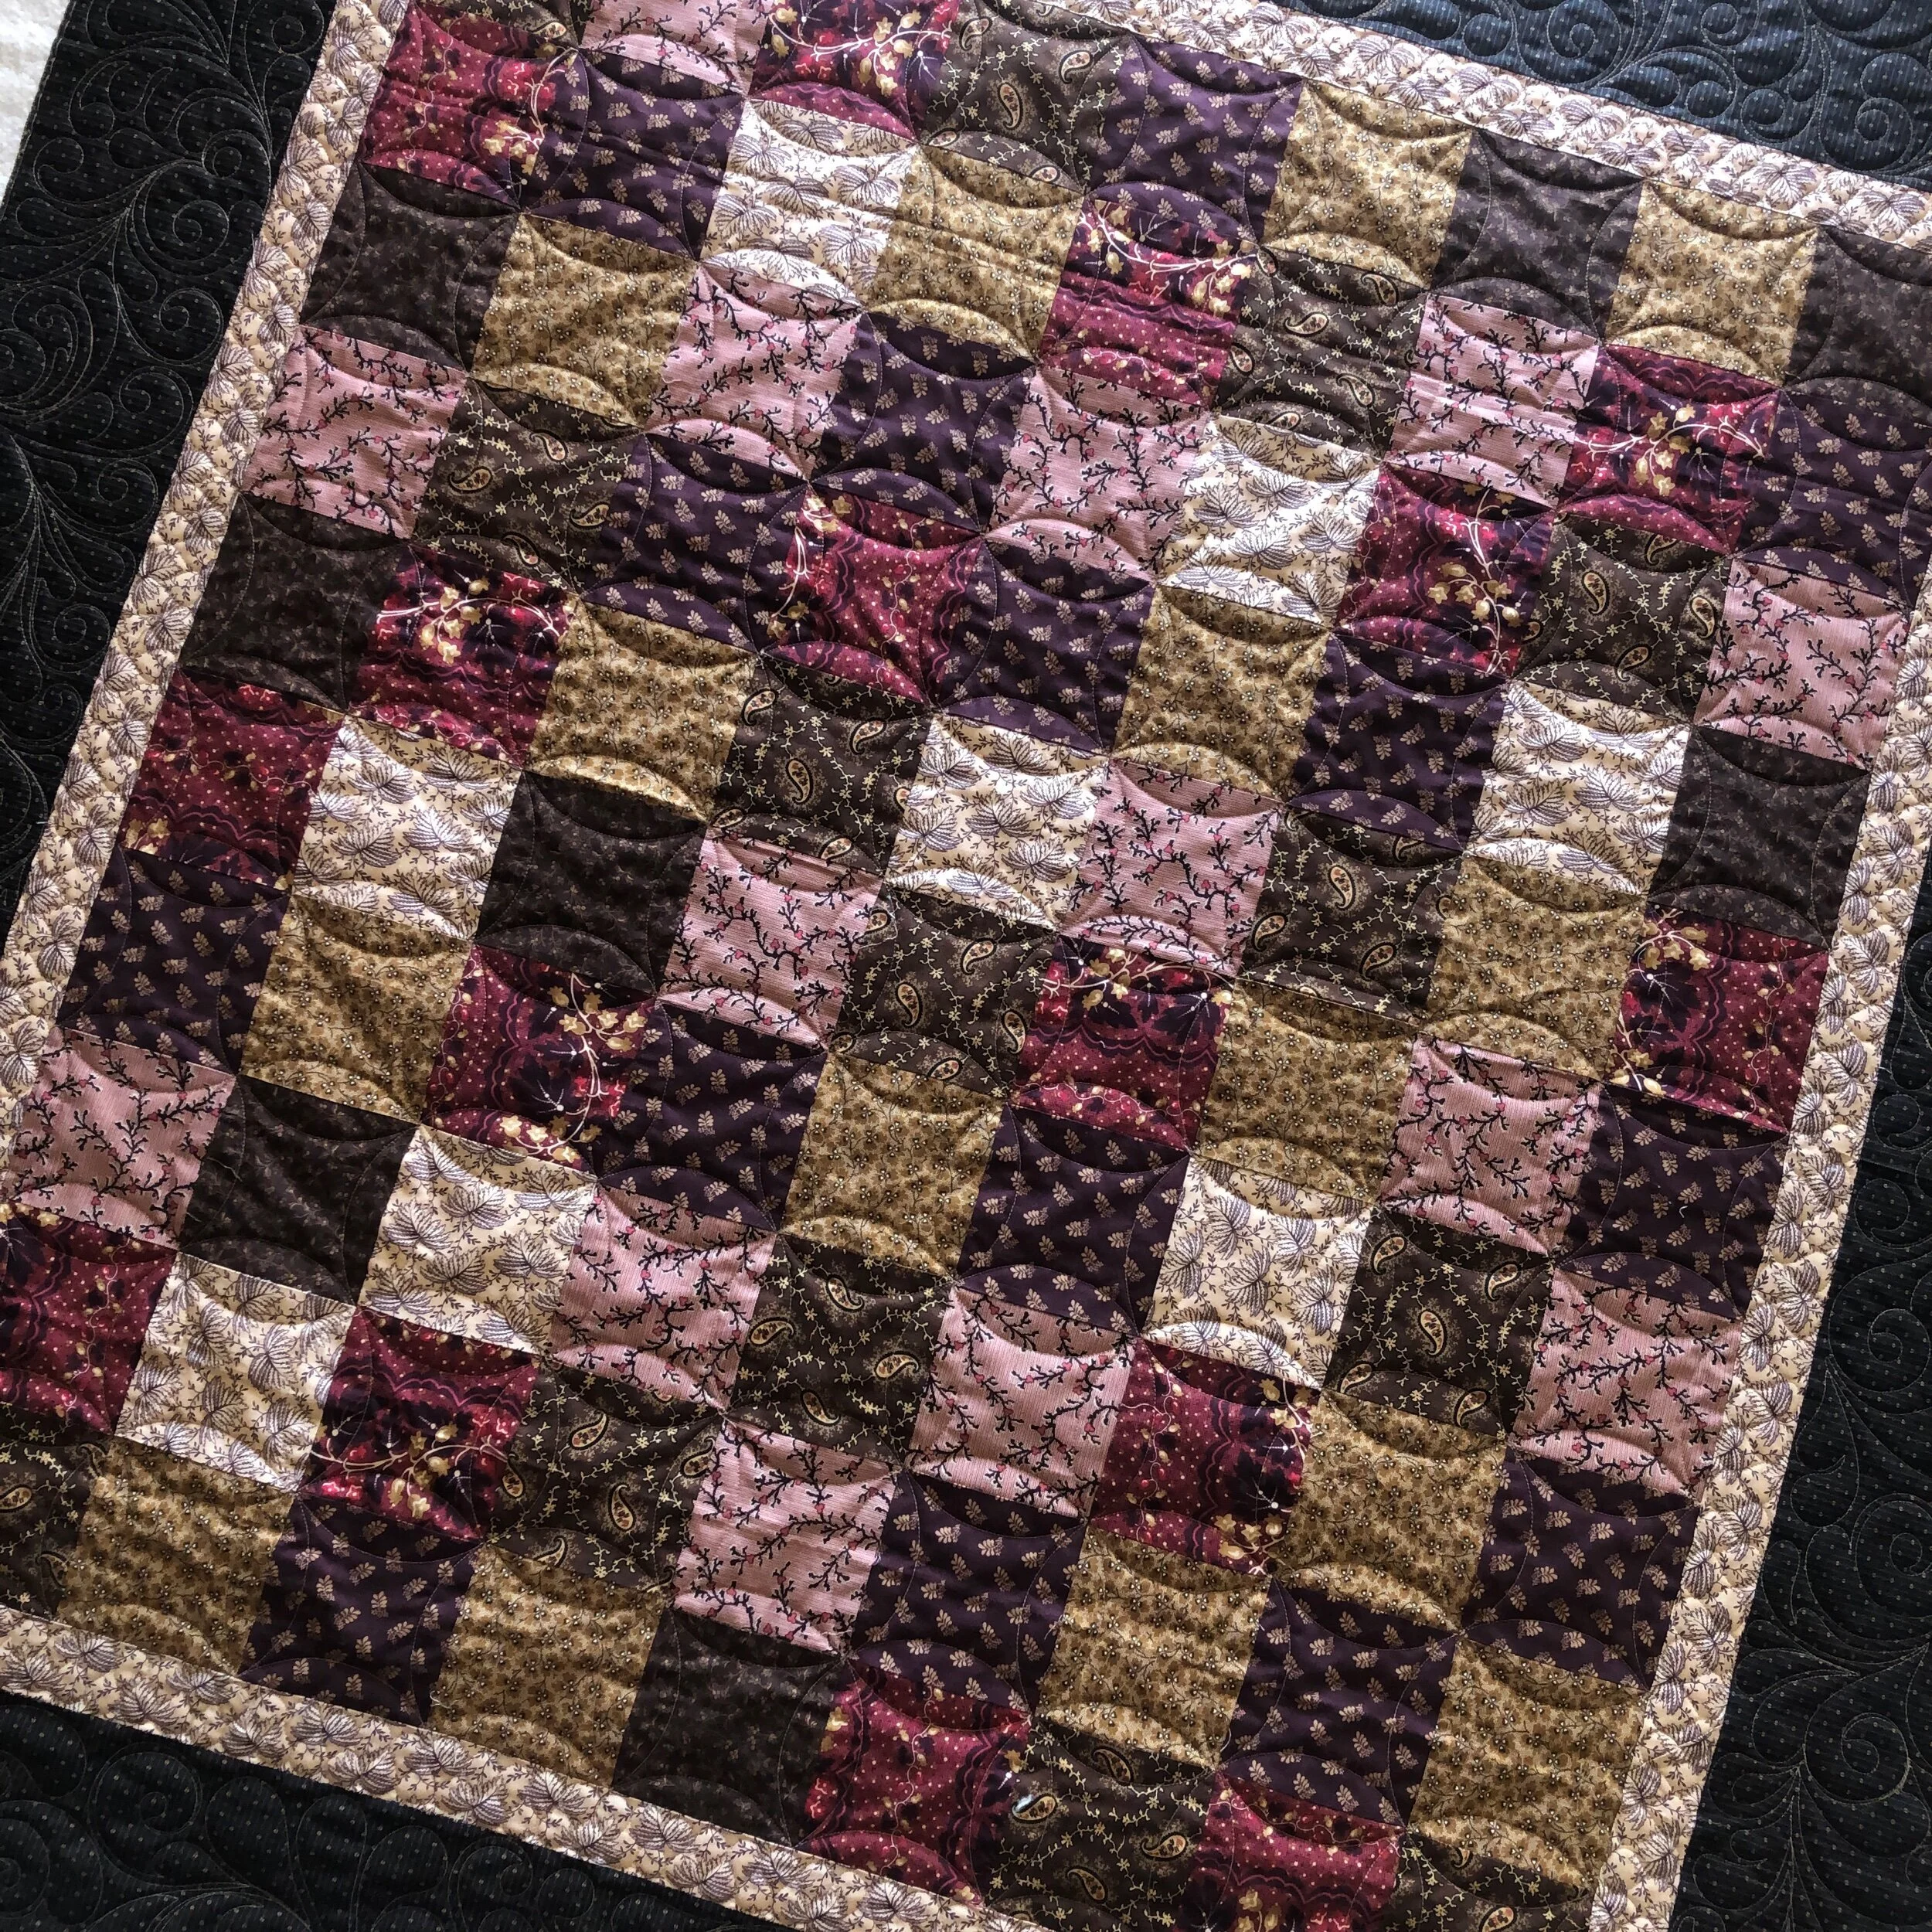
Liz and her sister Pat love sewing together. They found this tumbler quilt at our local quilt shop, I wish you could really see the fabrics they are sooo sweet. You can do a google search and find several tumbler patterns. It’s such a good basic block. I even have a tumbler quilt from back in the day.
I used 8020 cotton poly blend batting from Winline and a tan’ish cream Omni thread from Superior Threads.
We decided on Patricia Ritter’s and my Sweet Indigo quilting design for the quilting. I don’t think we could have chosen a more perfect design, than this one. It’s just so lovely with those fabrics. Sweet Indigo is available at Urban Elementz.

Look at that lovely texture. This is a prime example of looking at the overall design of the quilt blocks and fabrics, as you’re selecting the quilting design. I also want the scale to also be appropriate to both the fabrics and blocks. I think it turned out fabulous.
And…the added bonus, is the minky. It definitely has the coziness factor…and this design on that backing is just awesome.

I know this quilt is simple…sometimes that’s what we need. A simple quilt pattern that shows off the beautiful fabrics. I’ve seen a local quilt shop offering these kits. The tumbler quilt is trying to make a comeback.
The design deal today is Flight. Fun huh?!?!?!!! It’s was such a fun one to design. Excited to see it on a quilt. Flight is 20% off, no code necessary. Snag it before my next blog post.
That was short and sweet!! Thank you for being here. - Leisha
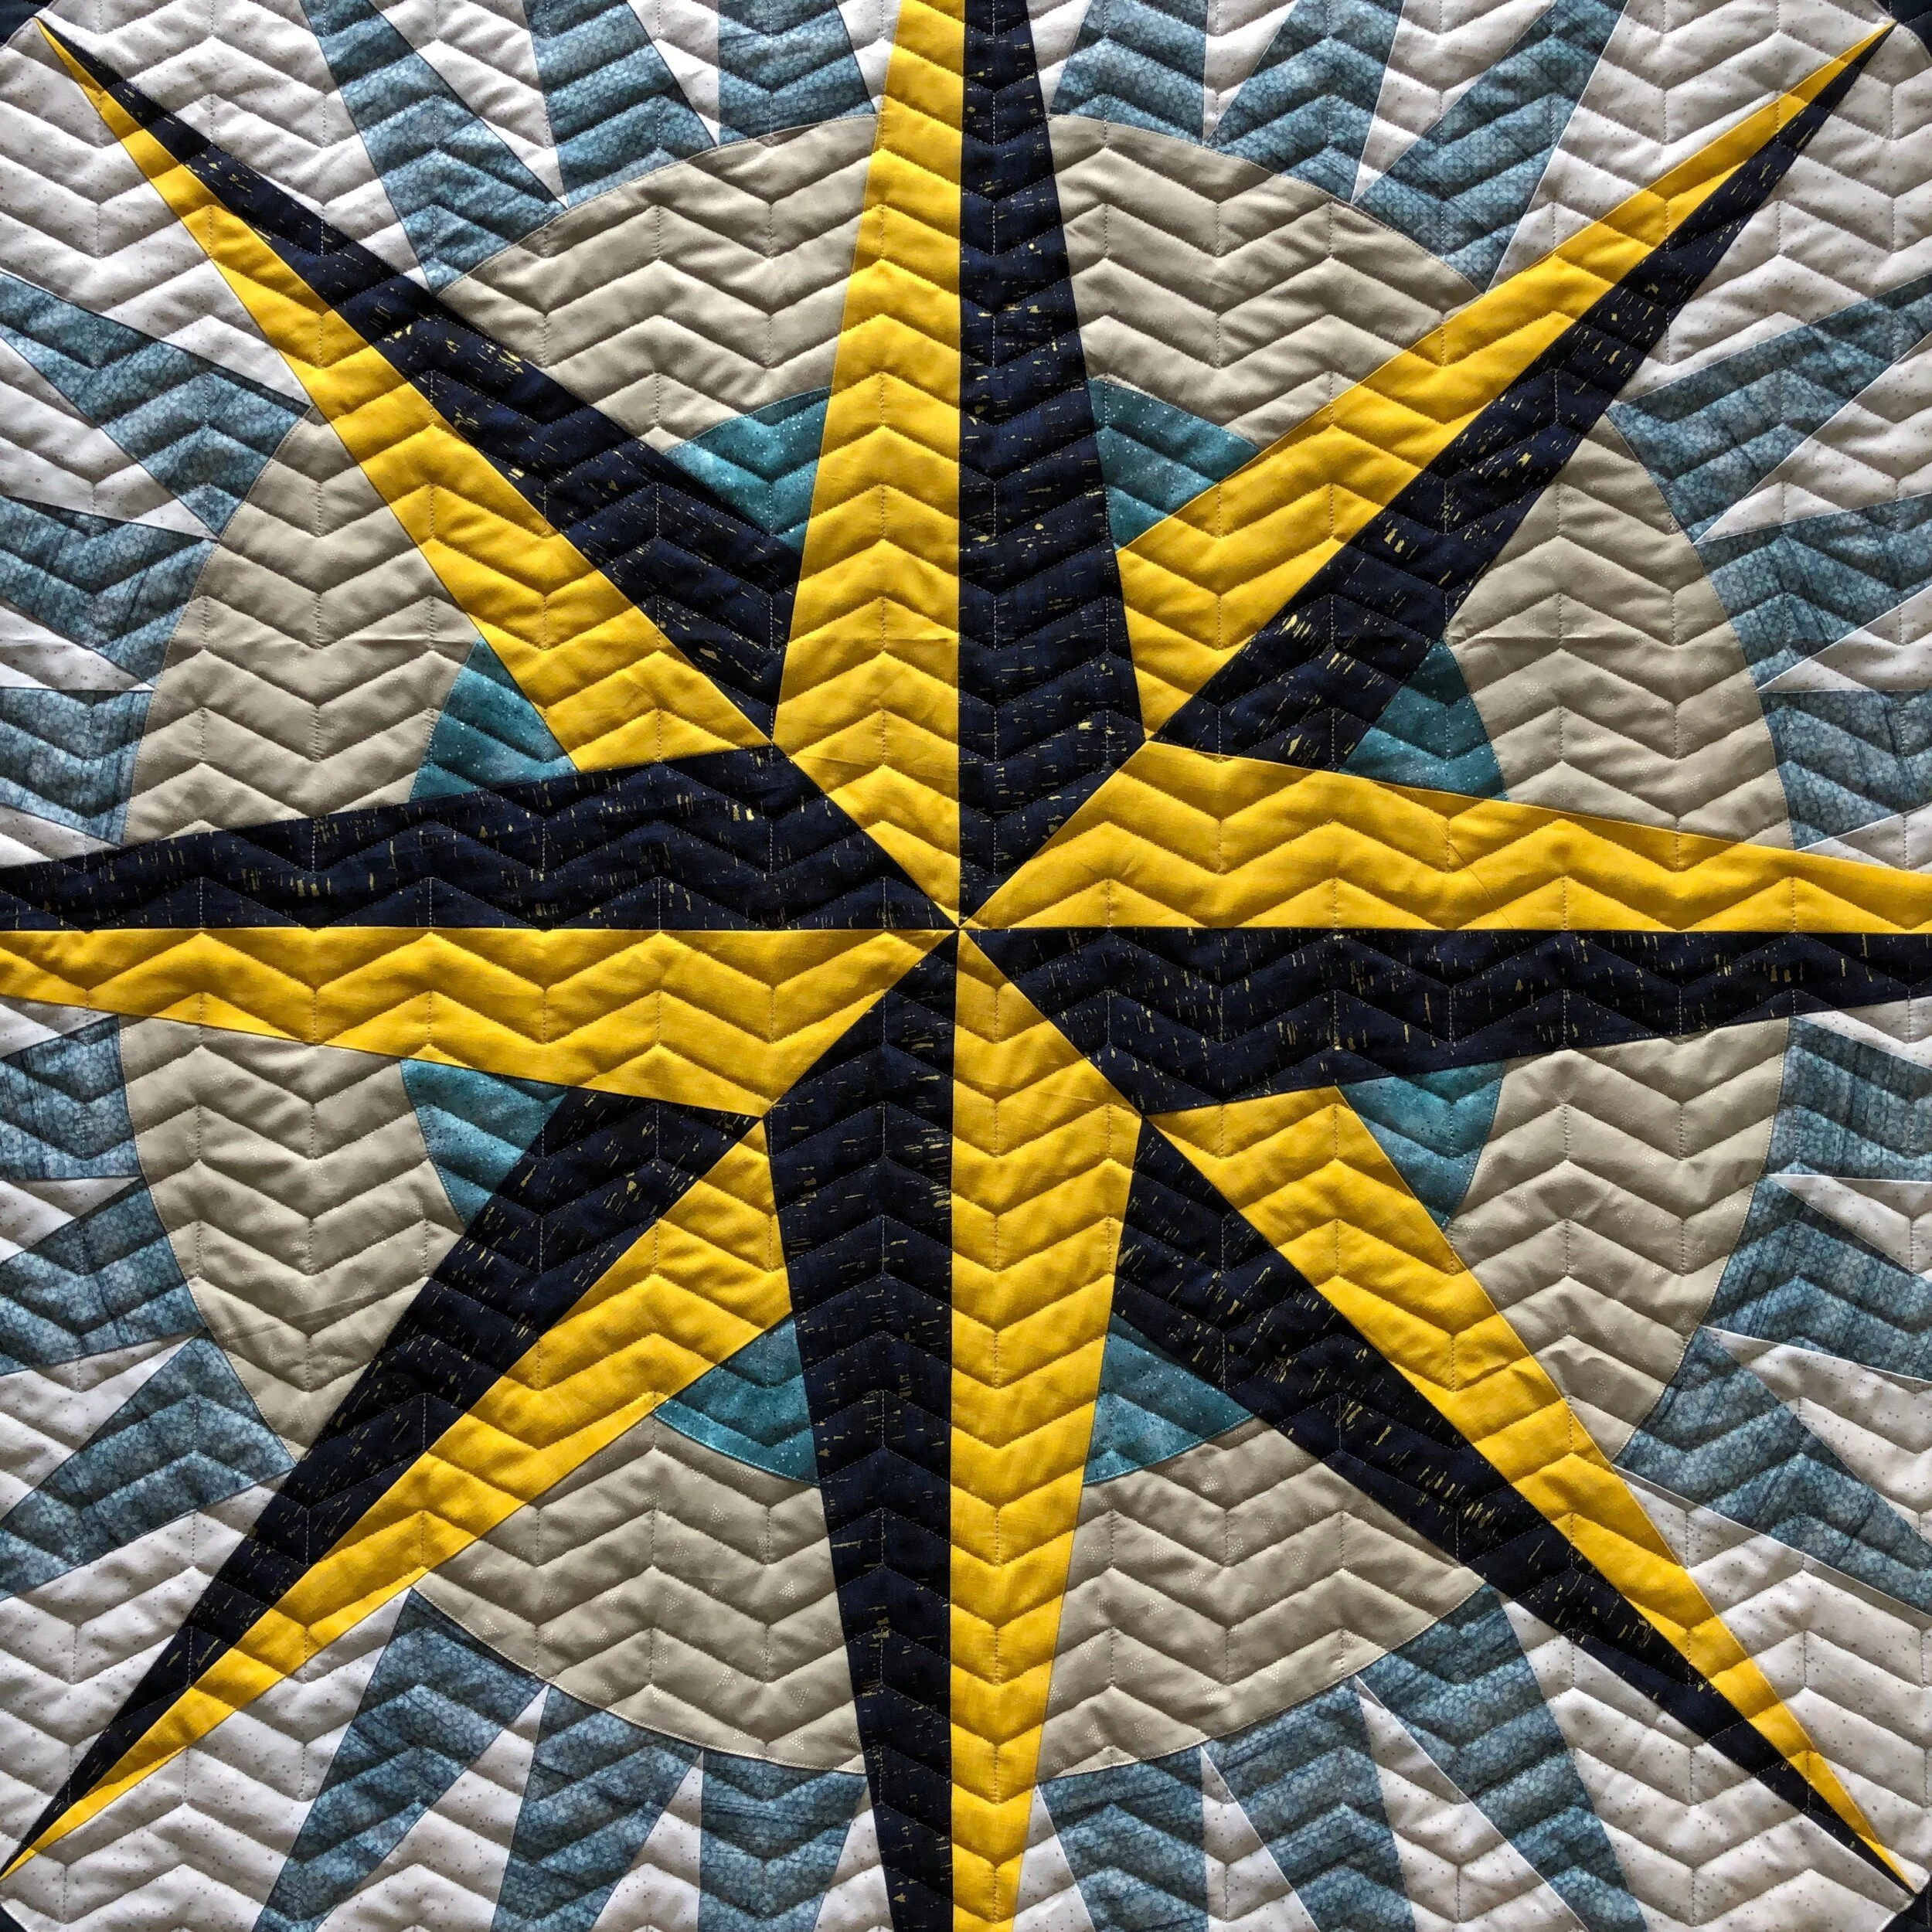
Brenda’s Mariner’s Compass Quilt
Hi Friends,
Let’s start this new week off with an amazing quilt, made by Brenda!!

The pattern is called Mariner’s Compass by Quiltsmart. Check out the kit that comes with that link. Brenda did an incredible job sewing this together!!
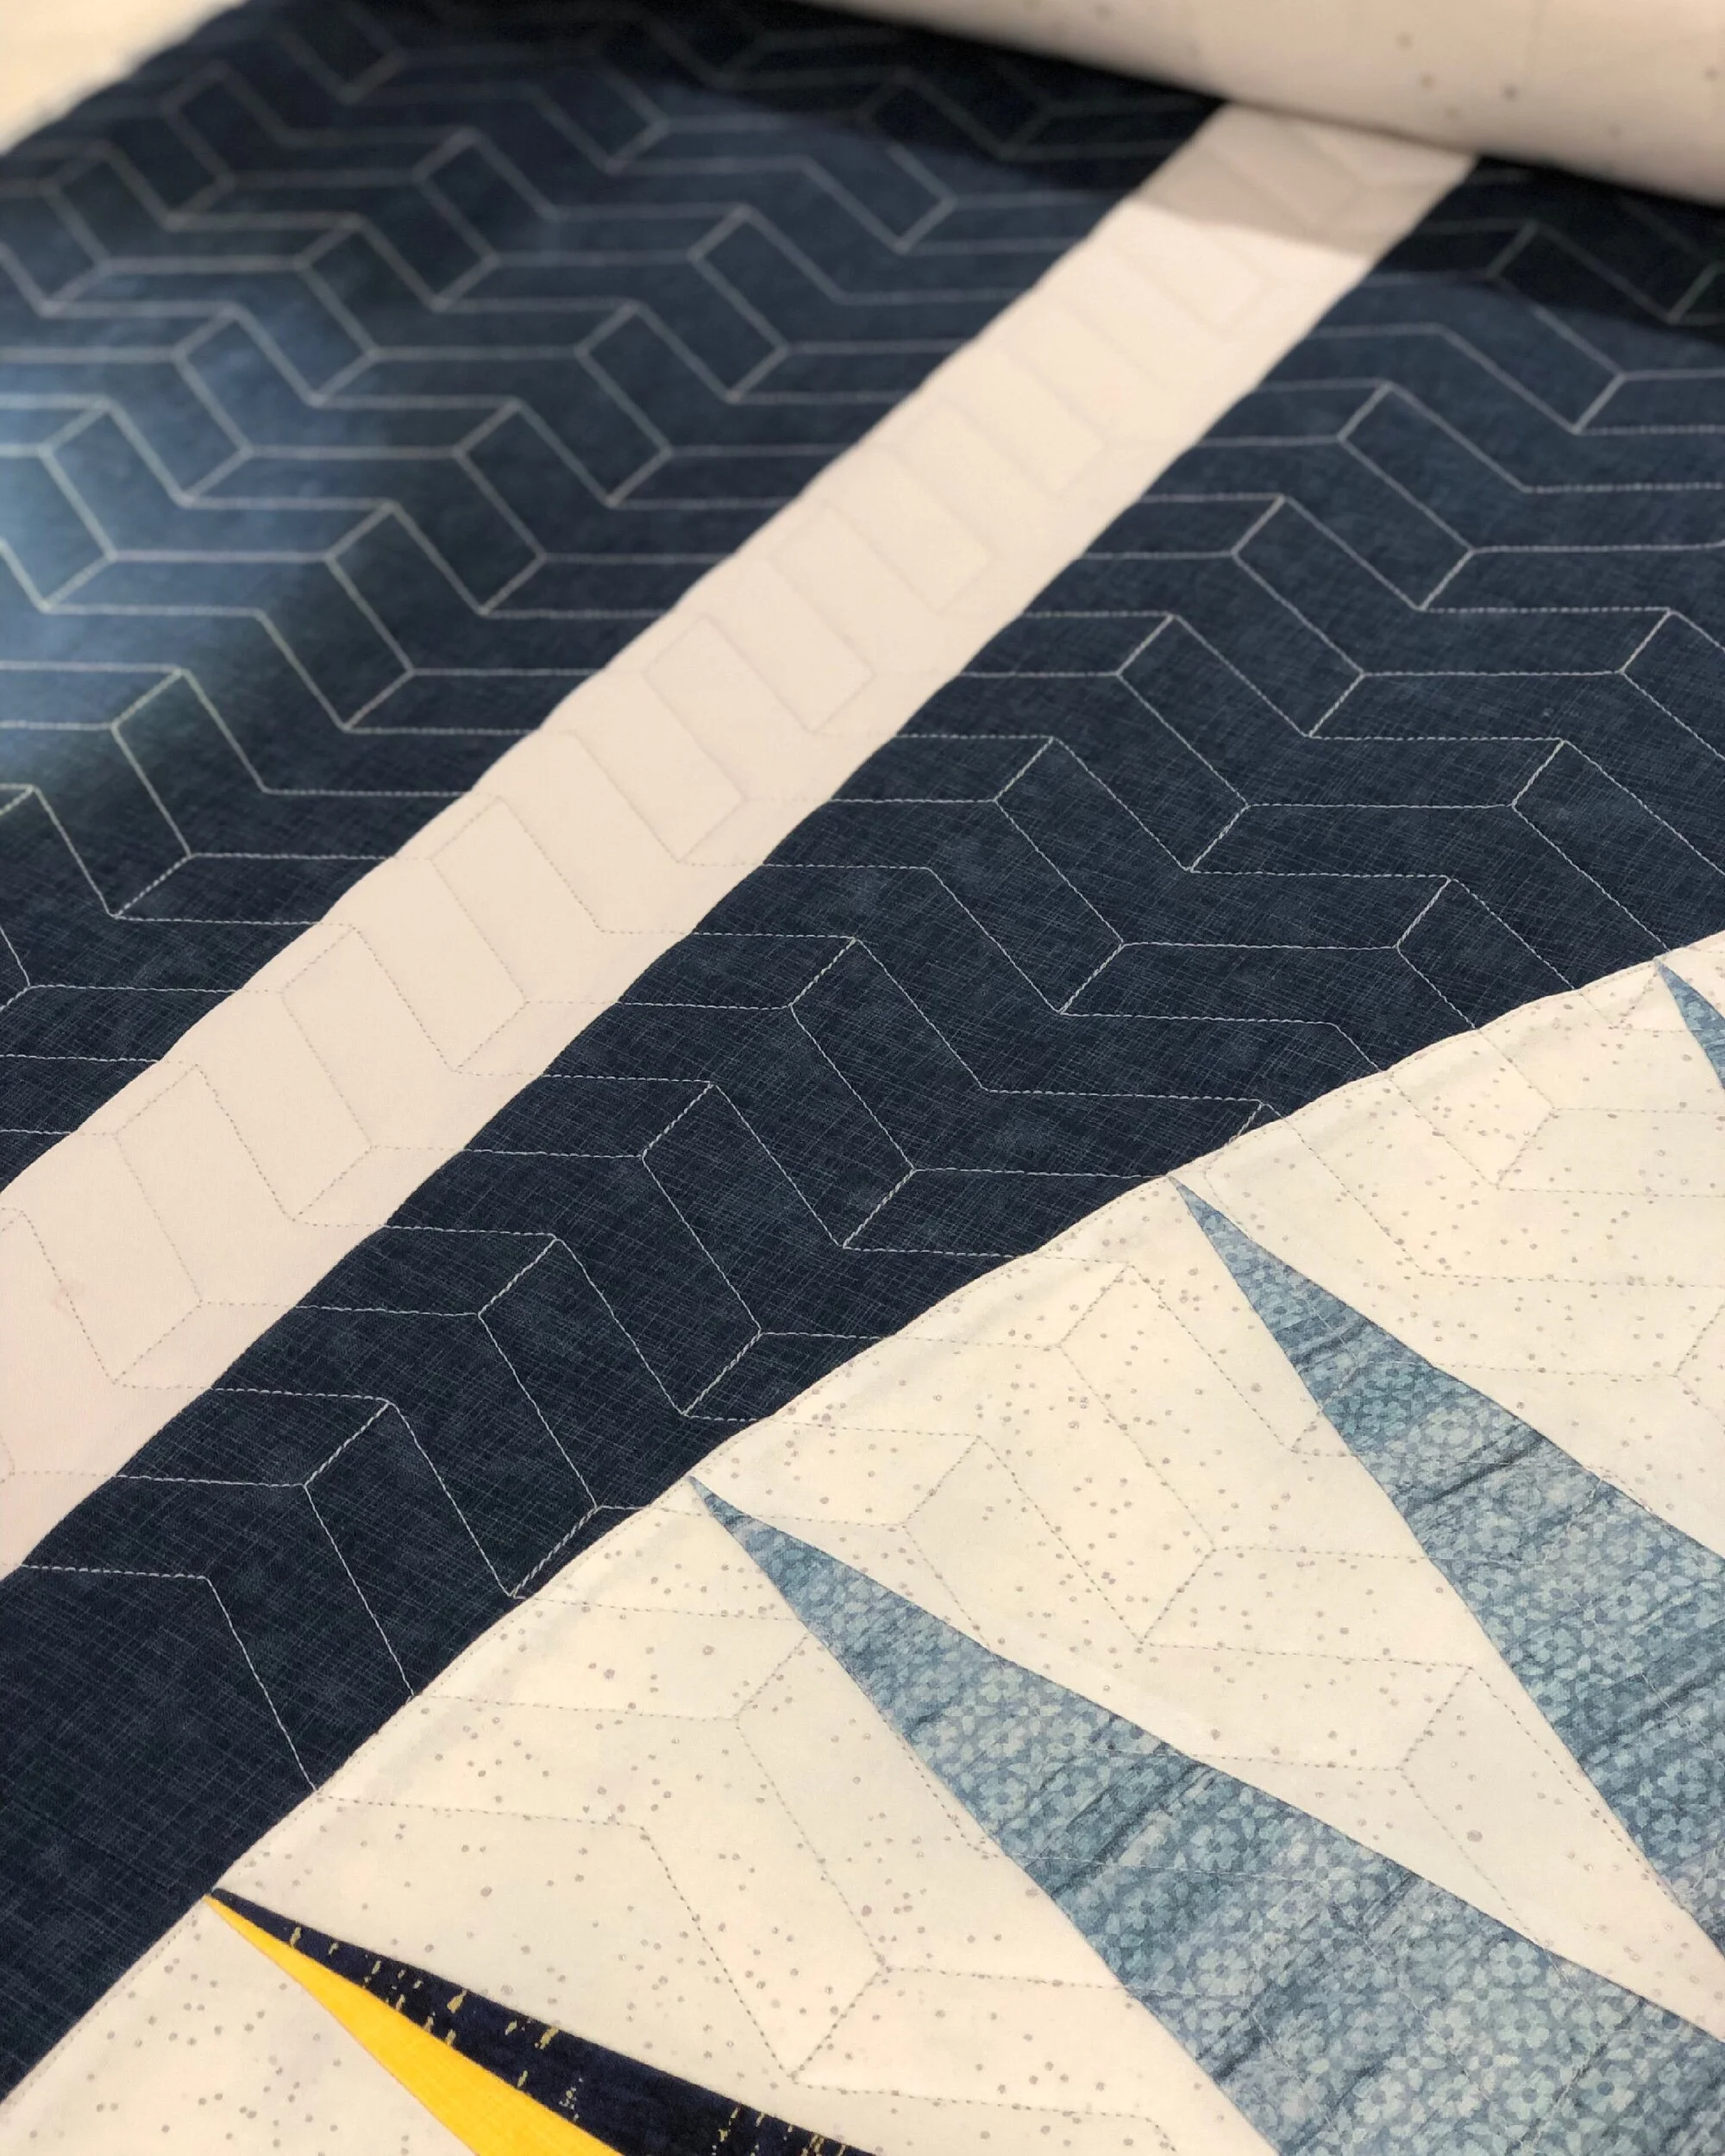
Above is a look of it while it’s being quilted!!! Just loved the texture so much!
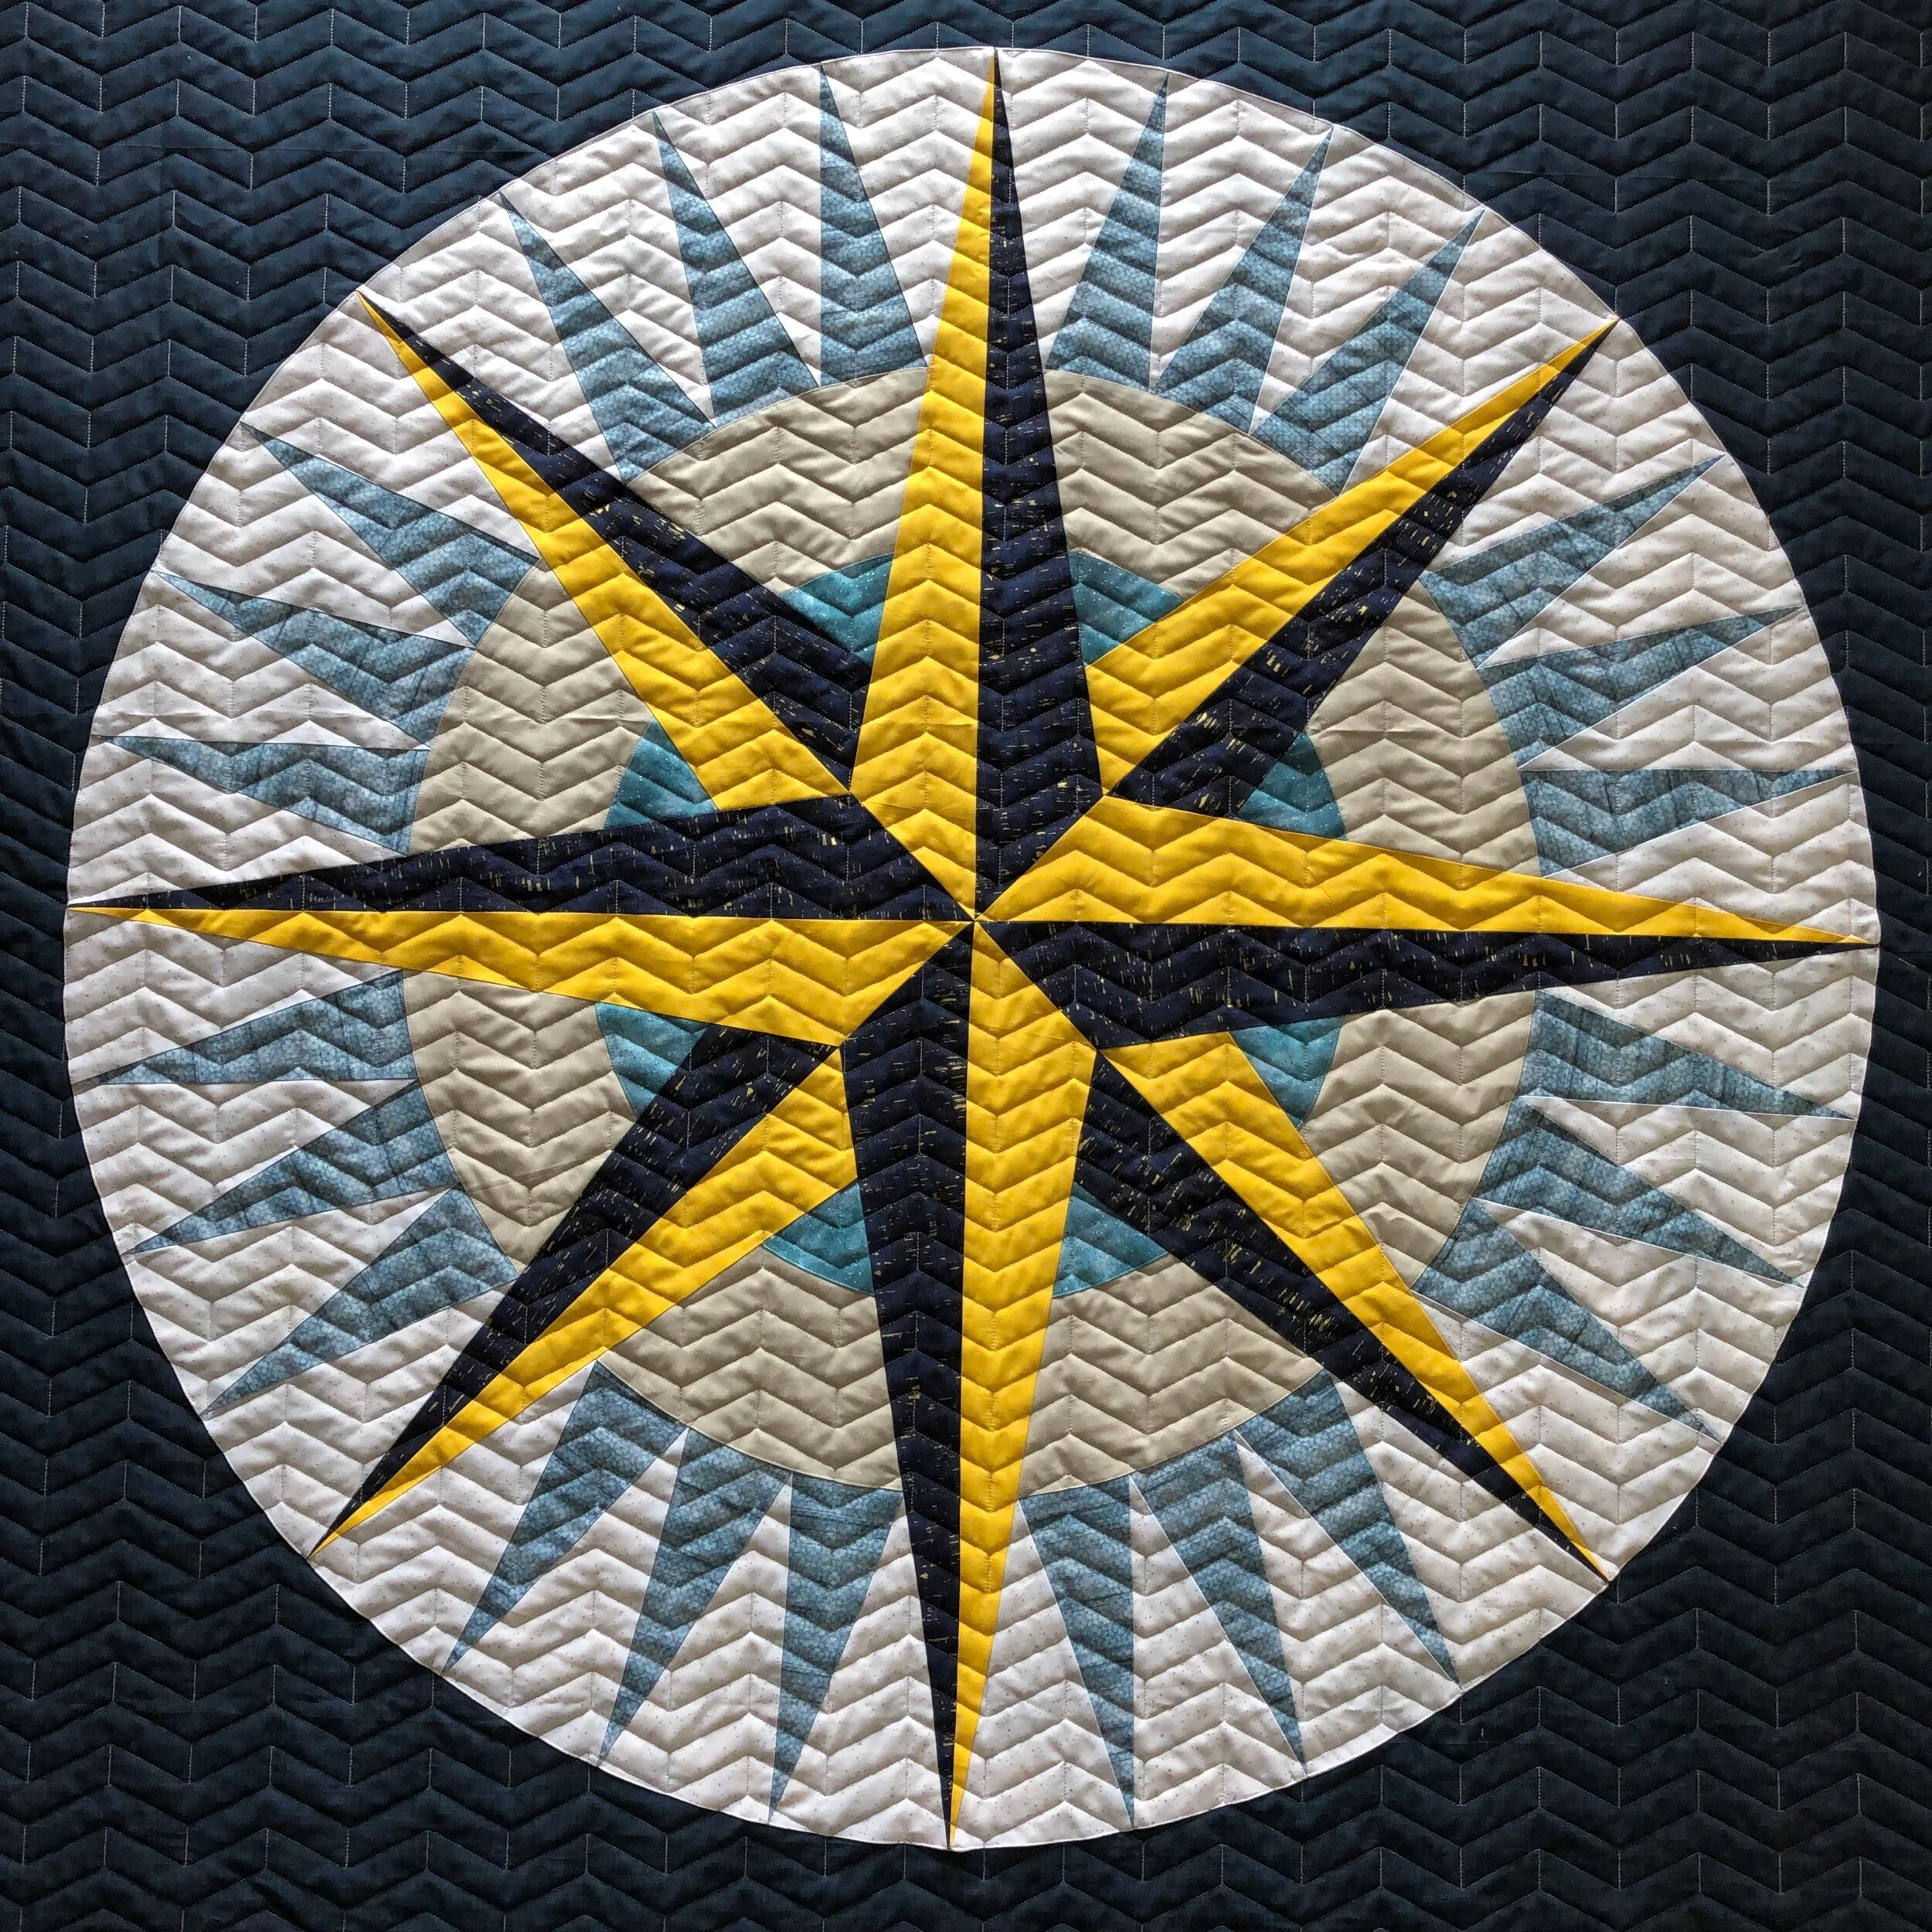
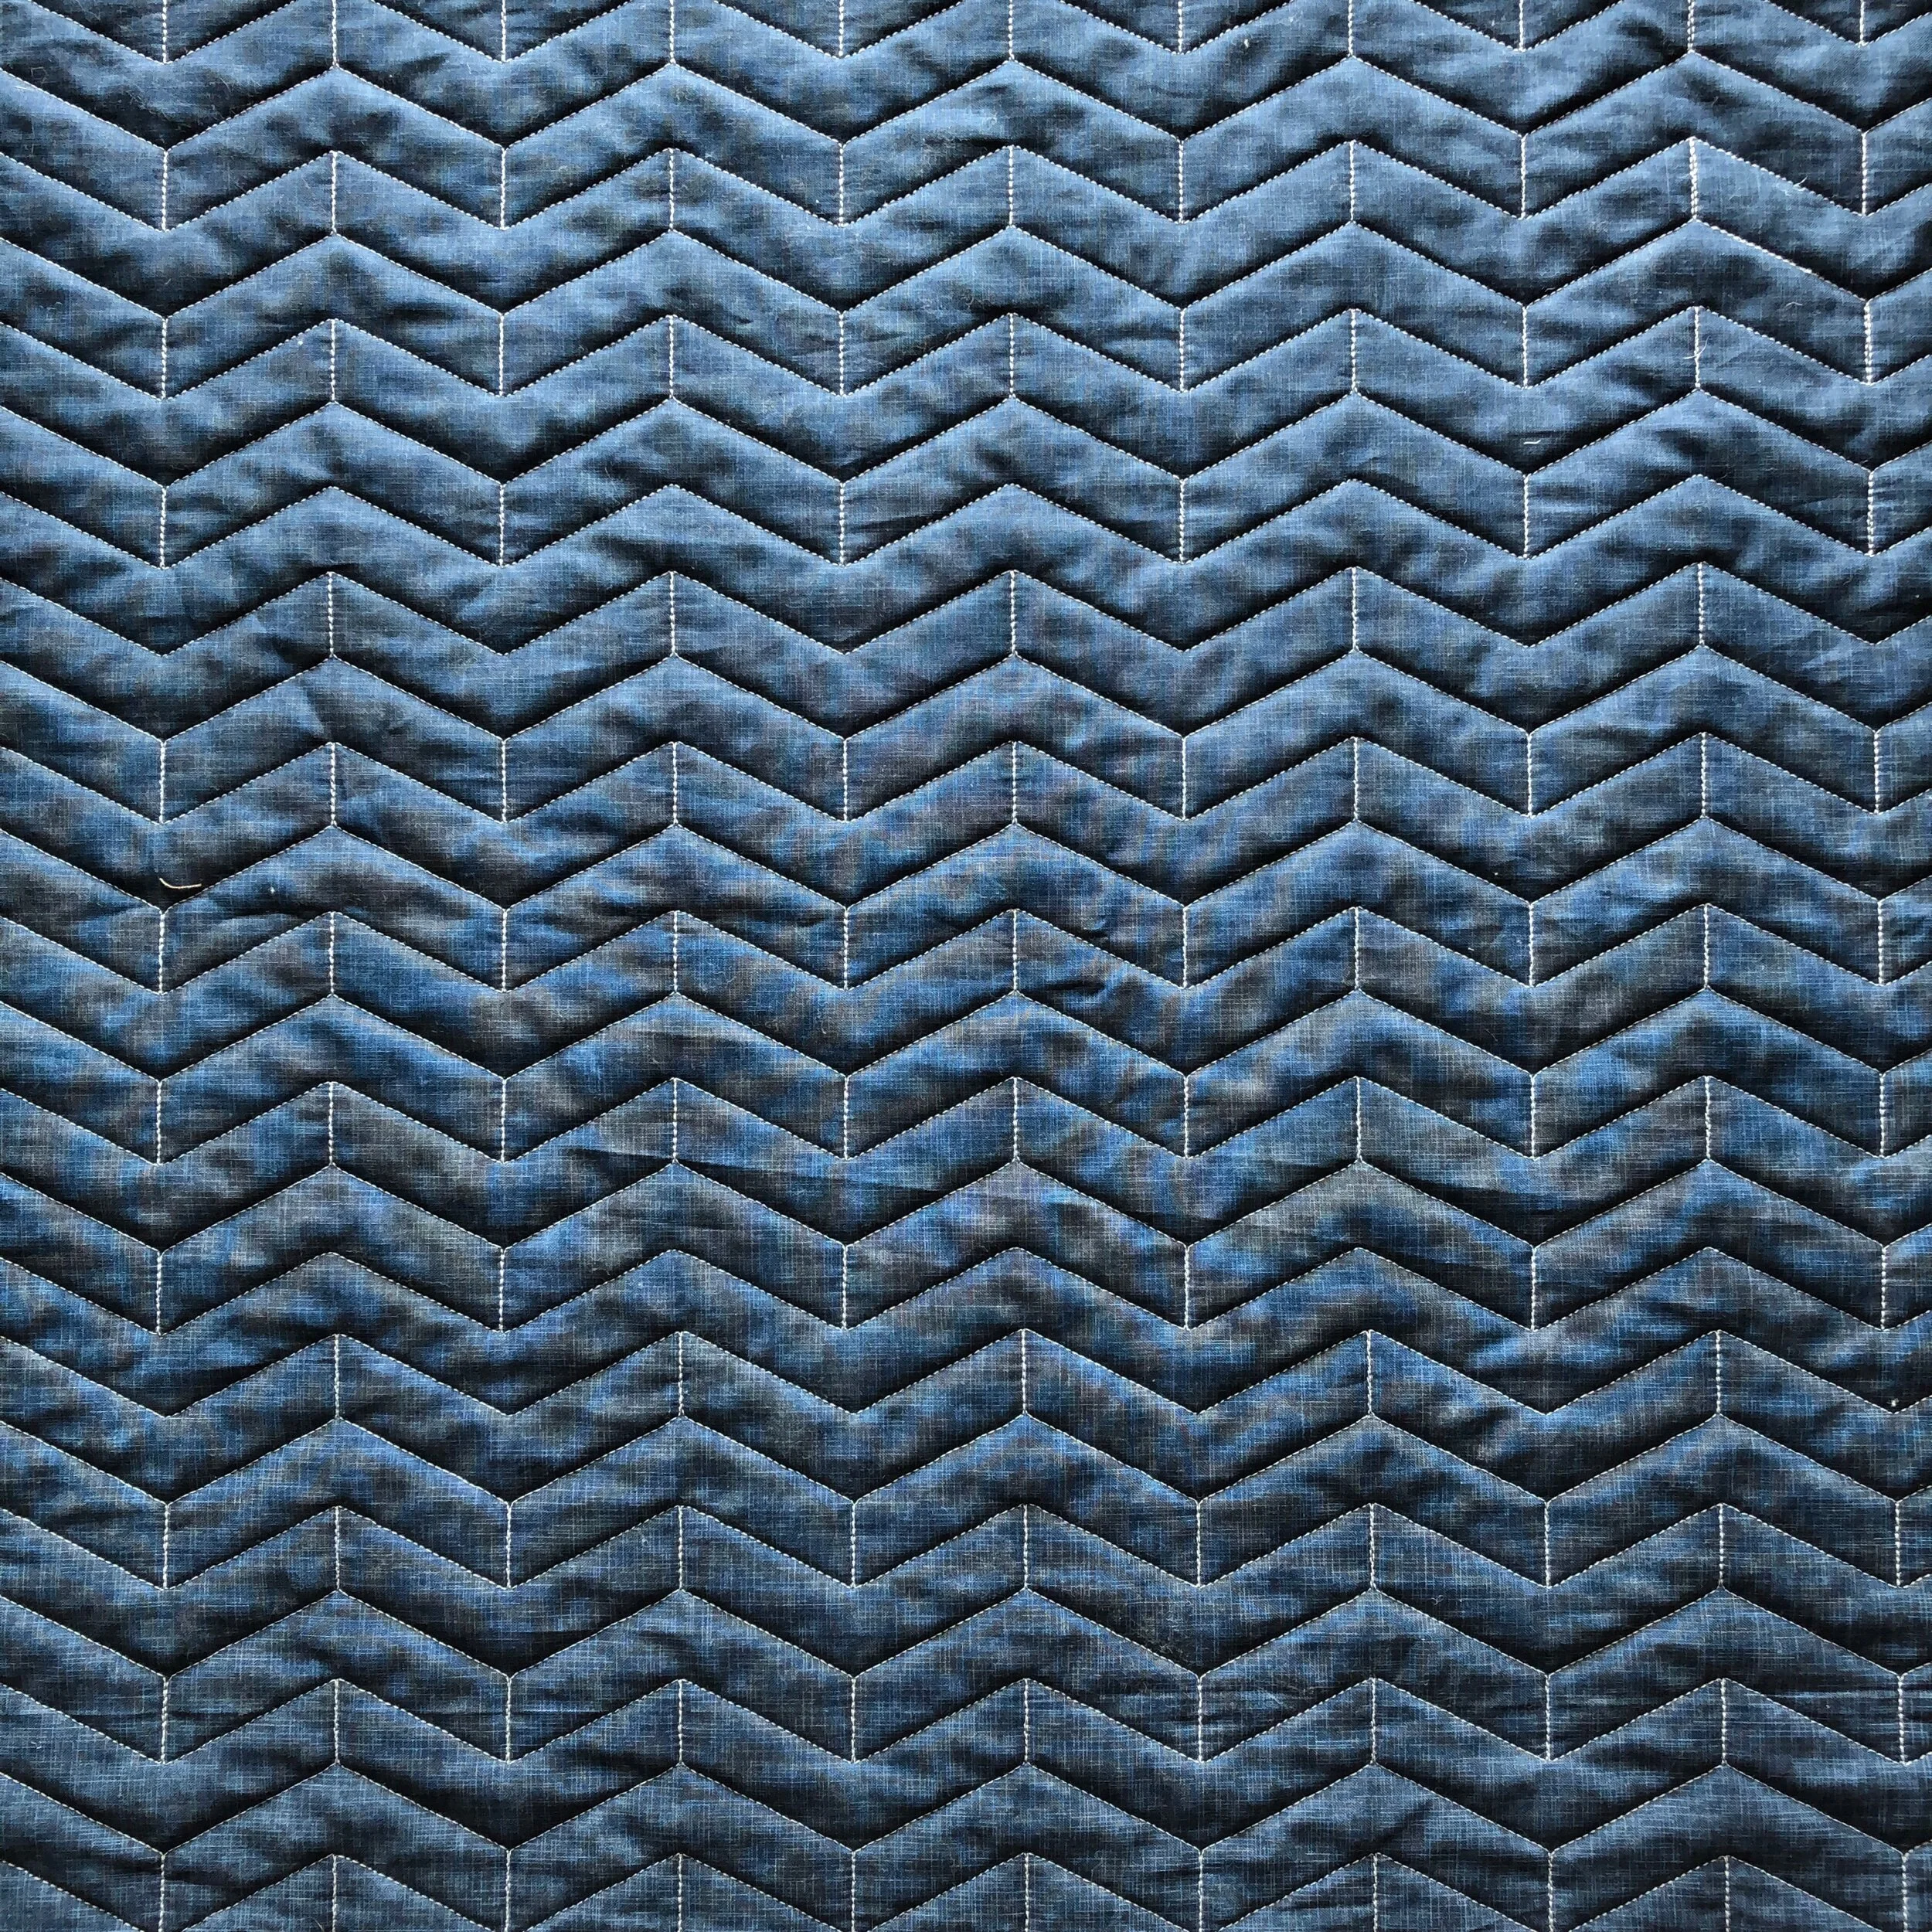
Brenda and I talked about some custom quilting ideas, and then she and her husband decided on my Cornerstone quilting design. I’m so glad she did!! Cornerstone adds the perfect amount of quilting texture, that doesn’t take away from all the amazing points.
See what I mean? Cornerstone can be found in my shop.
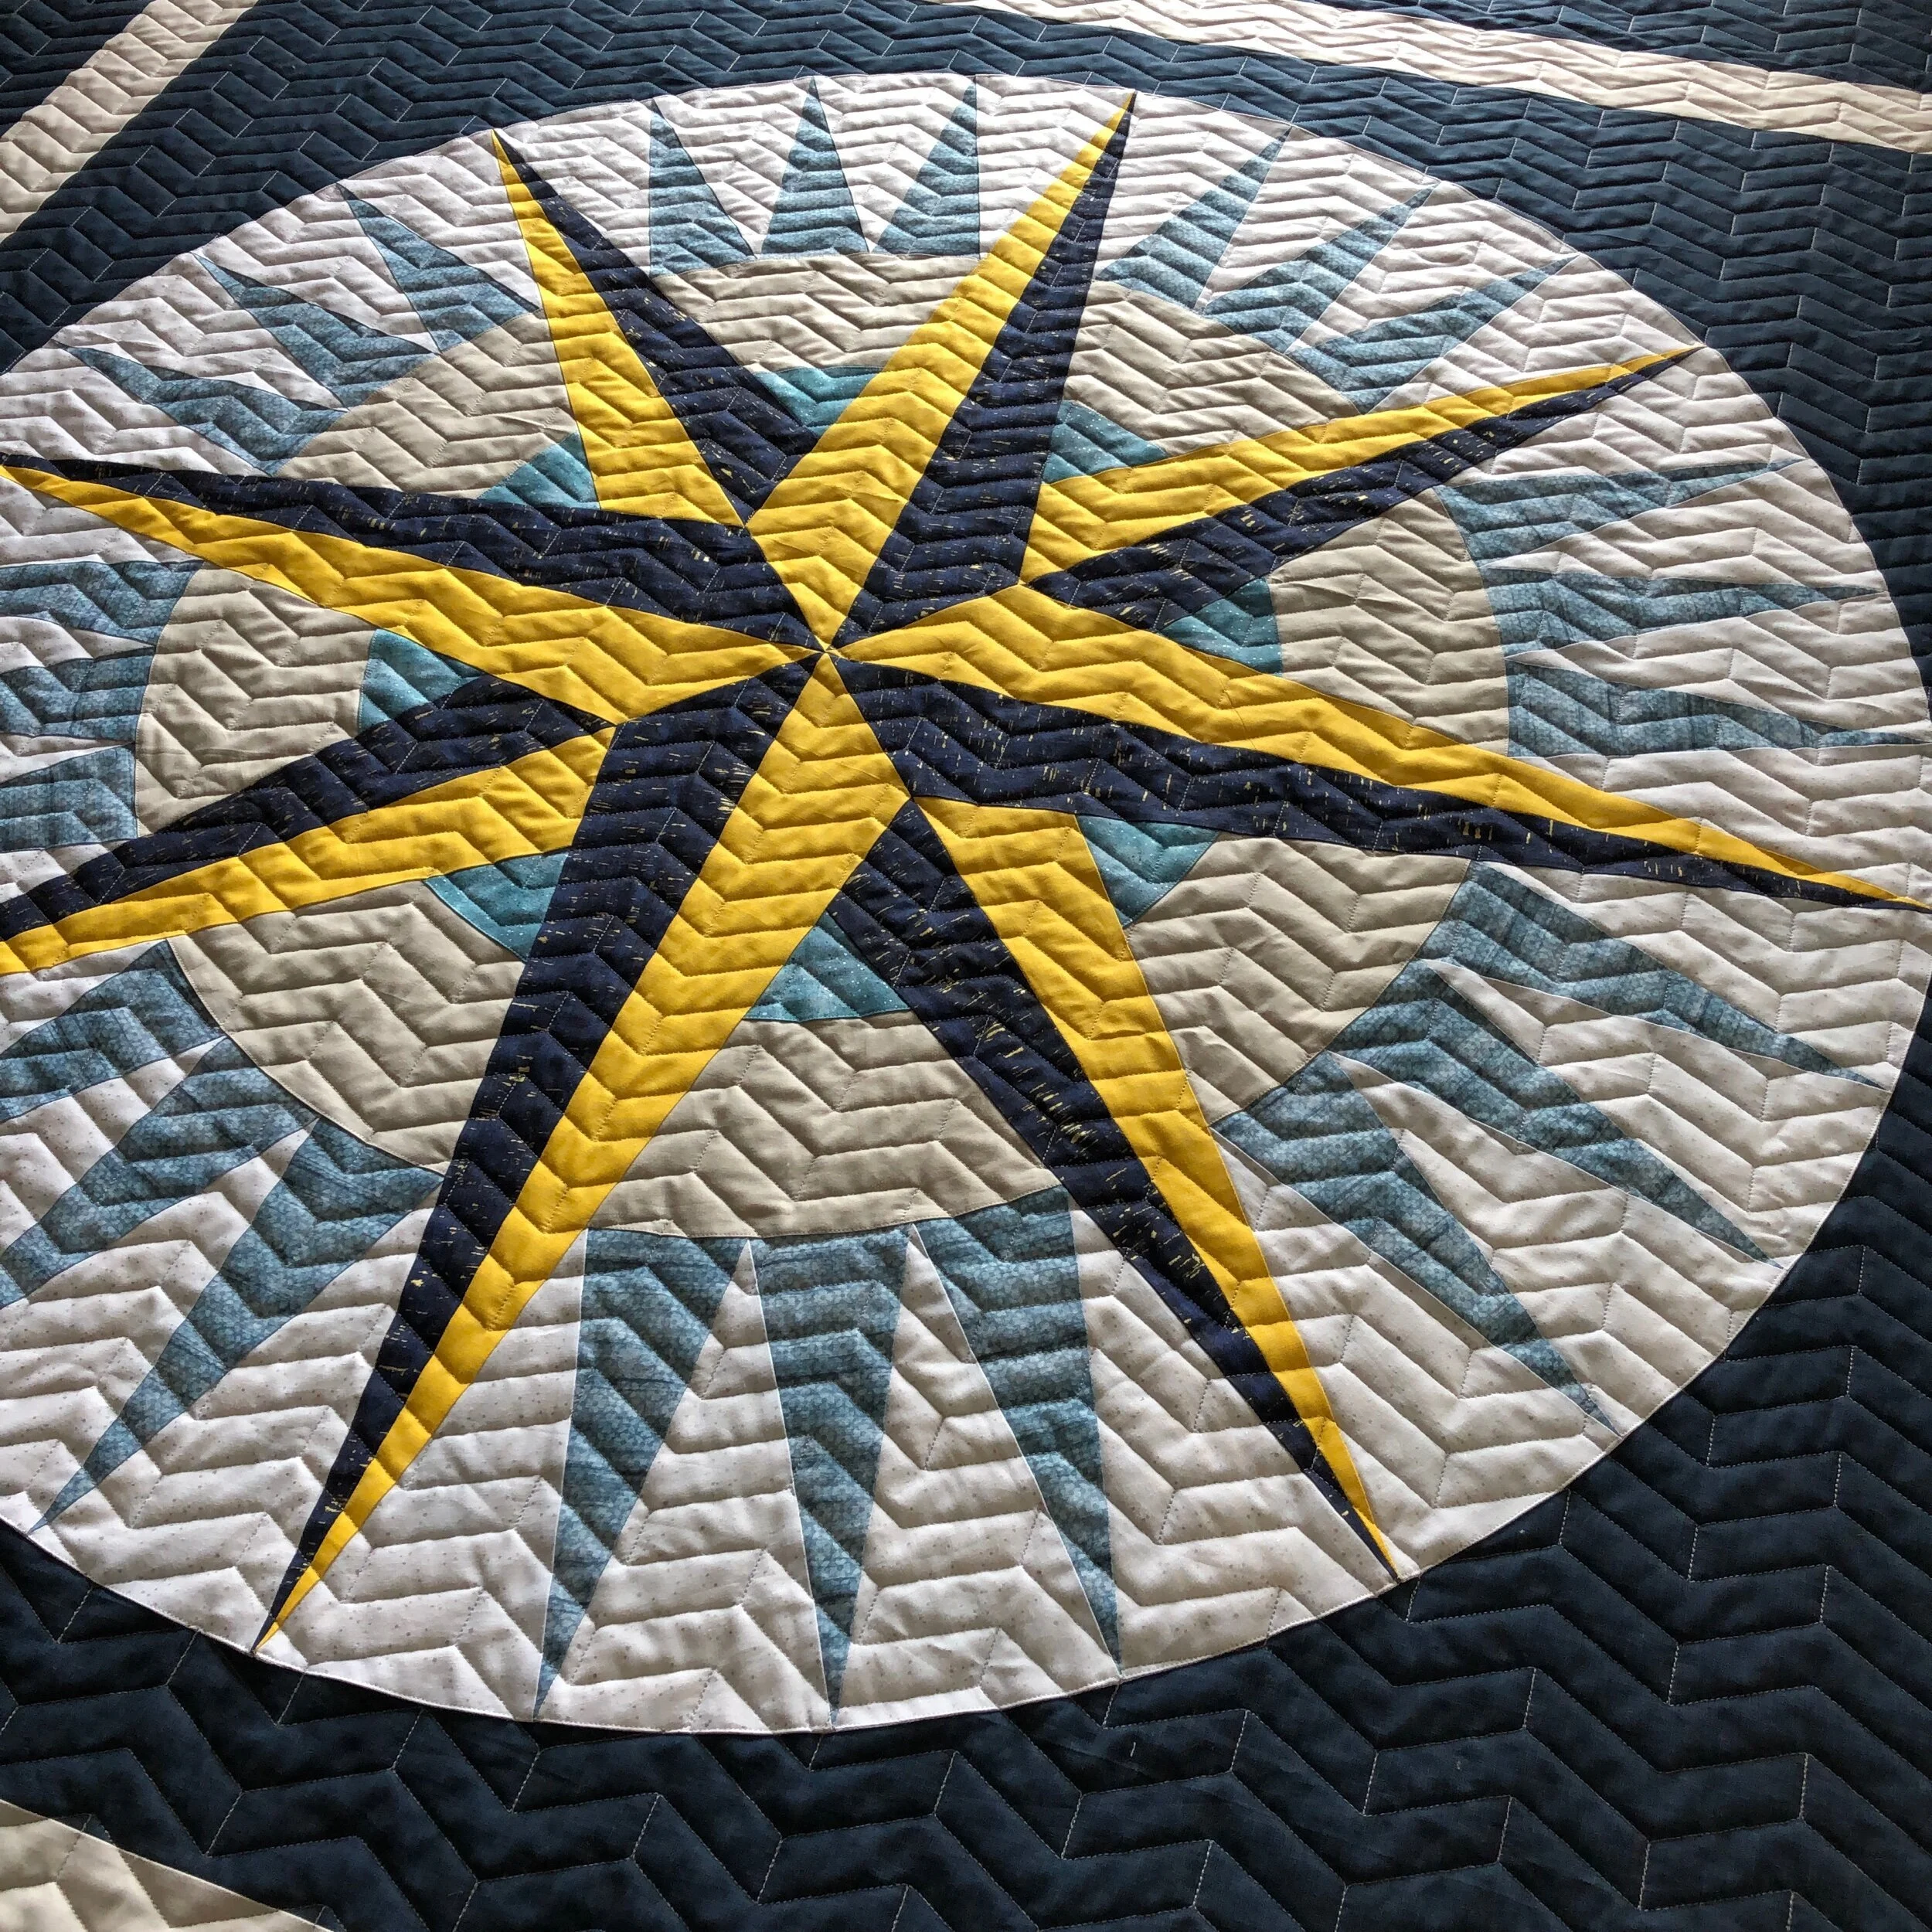
I used 8020 cotton poly blend batting from Winline and light gray Omni thread from Superior Threads. I love that Brenda wanted light gray thread. It almost looks white, unless you look close up. The light gray thread was softer on all that navy background, than a white would have been. A majority of this quilt has navy fabric, so one might think navy thread is necessary. Yet, navy thread wouldn’t blend very well over the Mariner’s Compass, and take away from the overall design. I actually prefer 10/10 times, matching the thread to lighter neutrals in the quilt. Lighter threads on darker fabrics blend better, than darker threads on lighter fabrics. Keep that in mind when choosing thread colors.
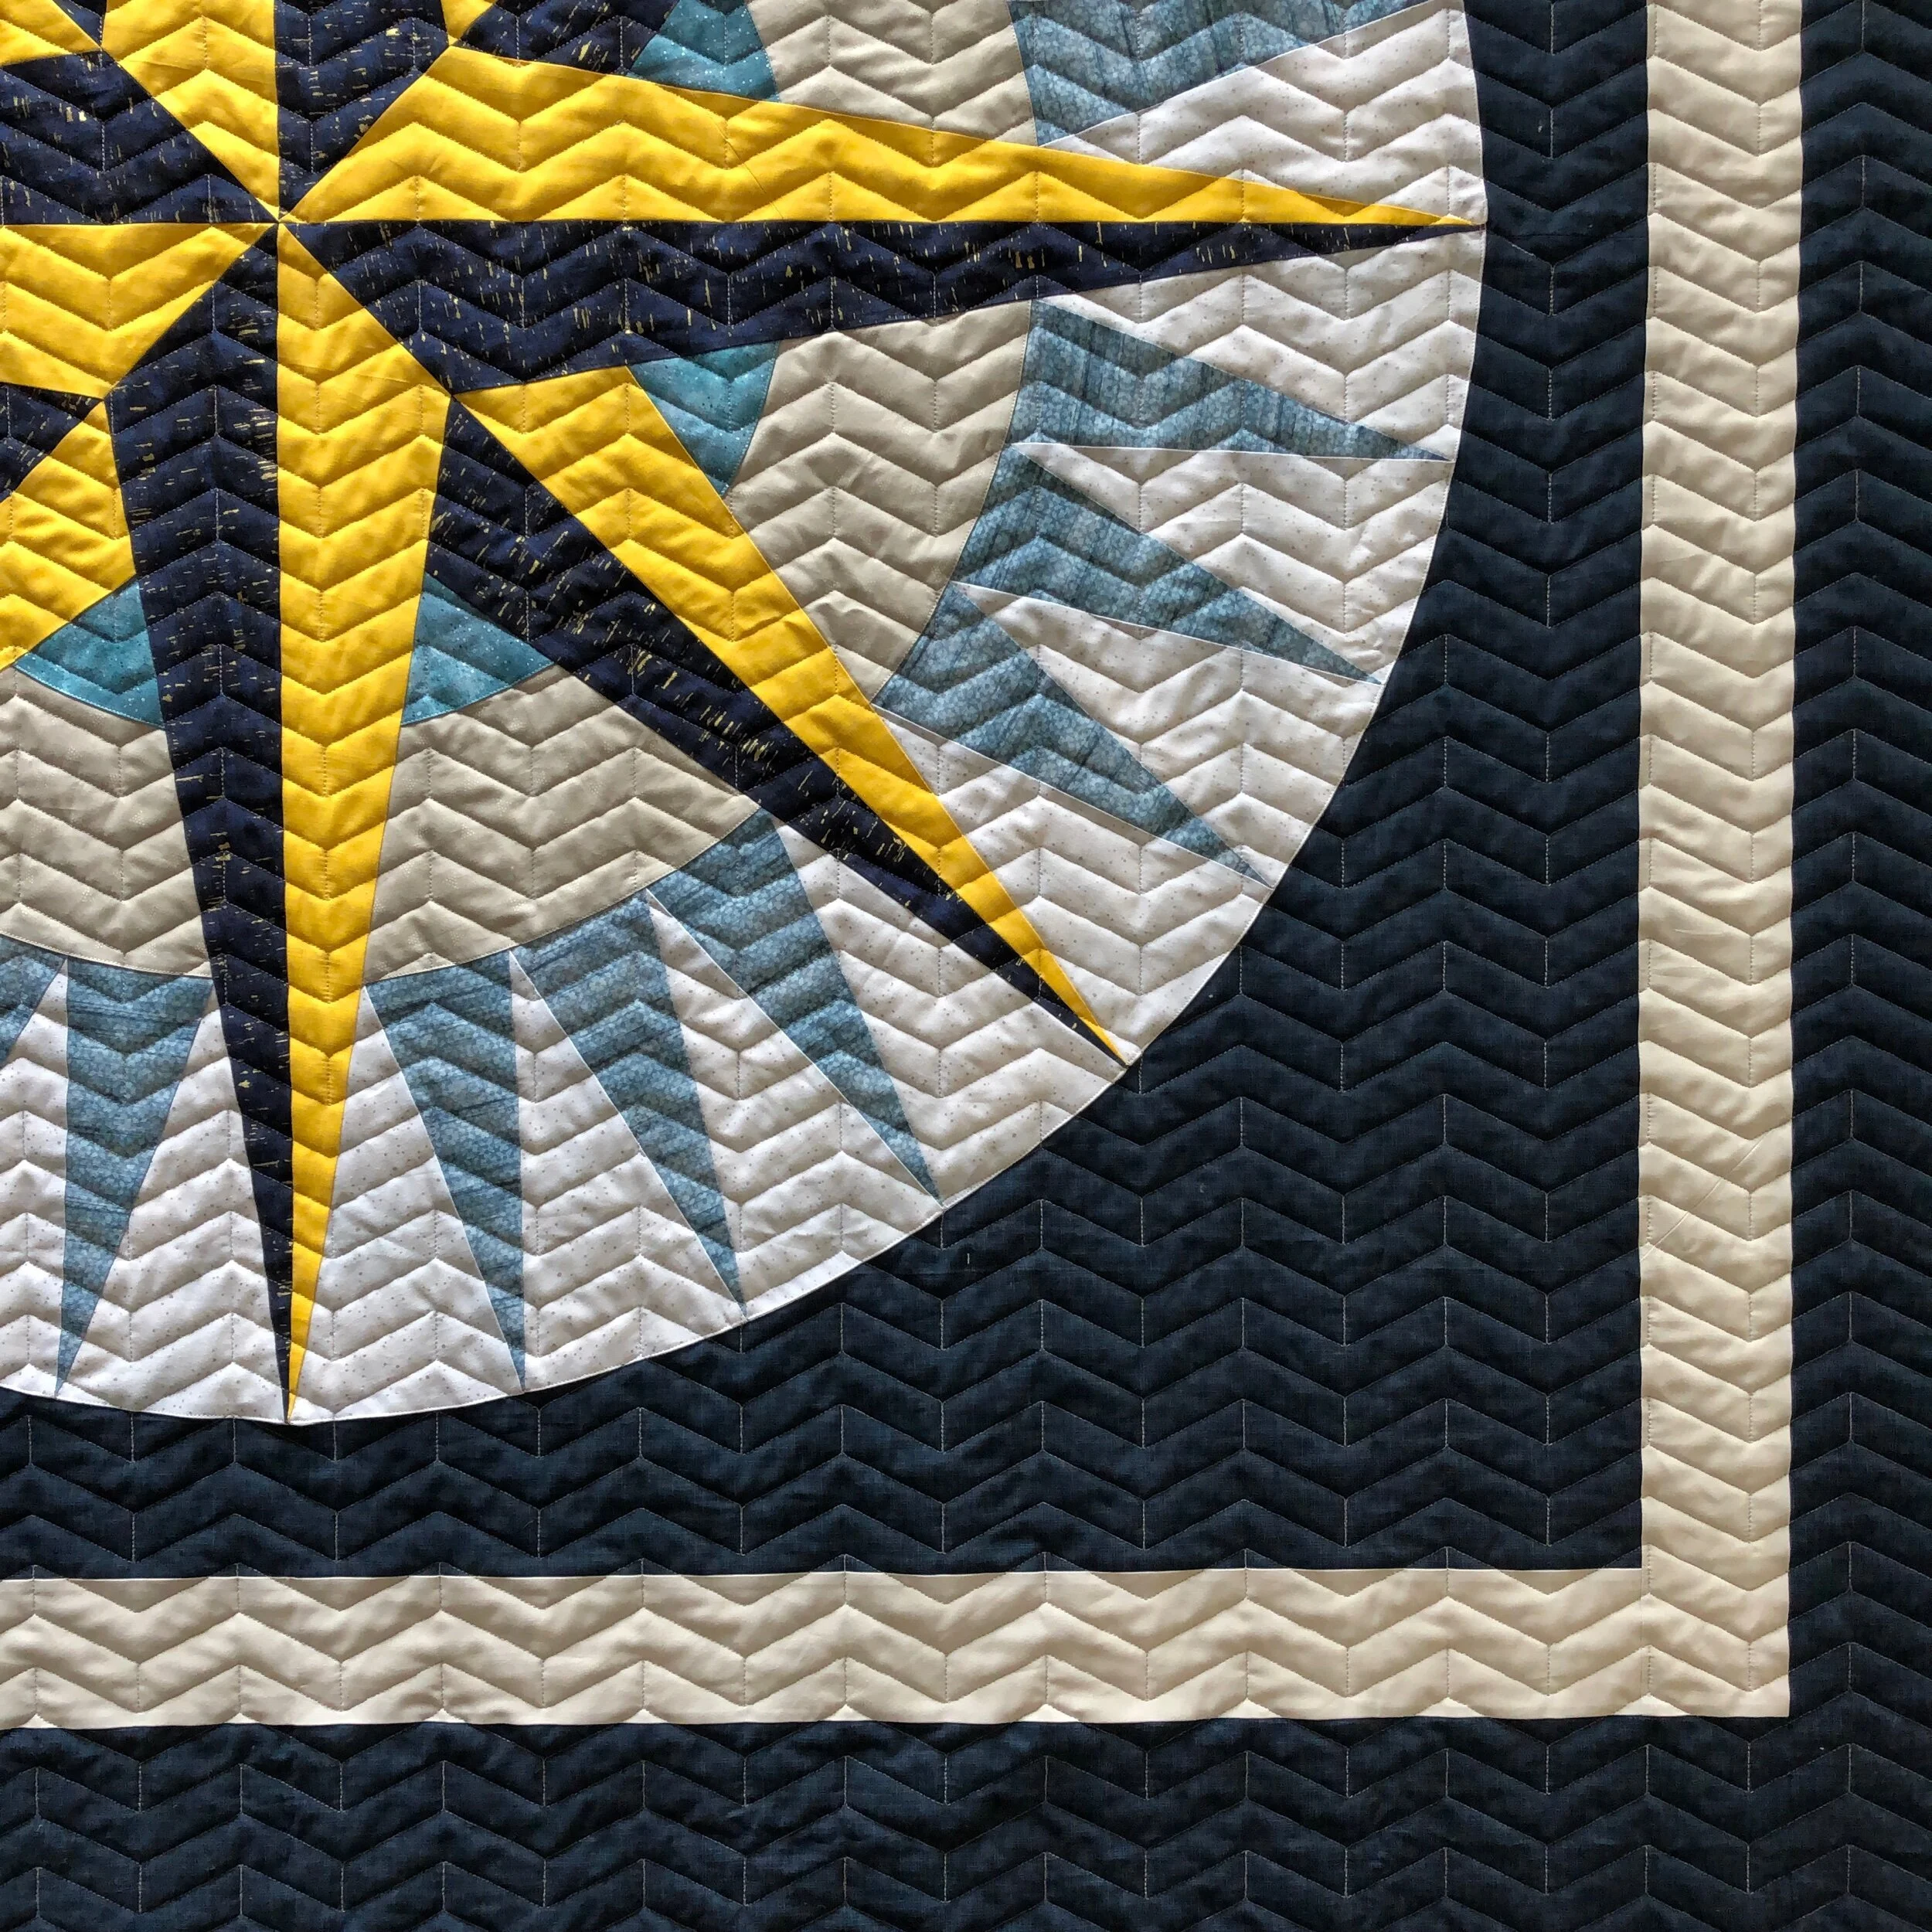
Some close ups of the quilting!!
Such a cool quilt!!!

Brenda was so wonderful to share some pictures with me, here are a couple of them. Which I love to see!!
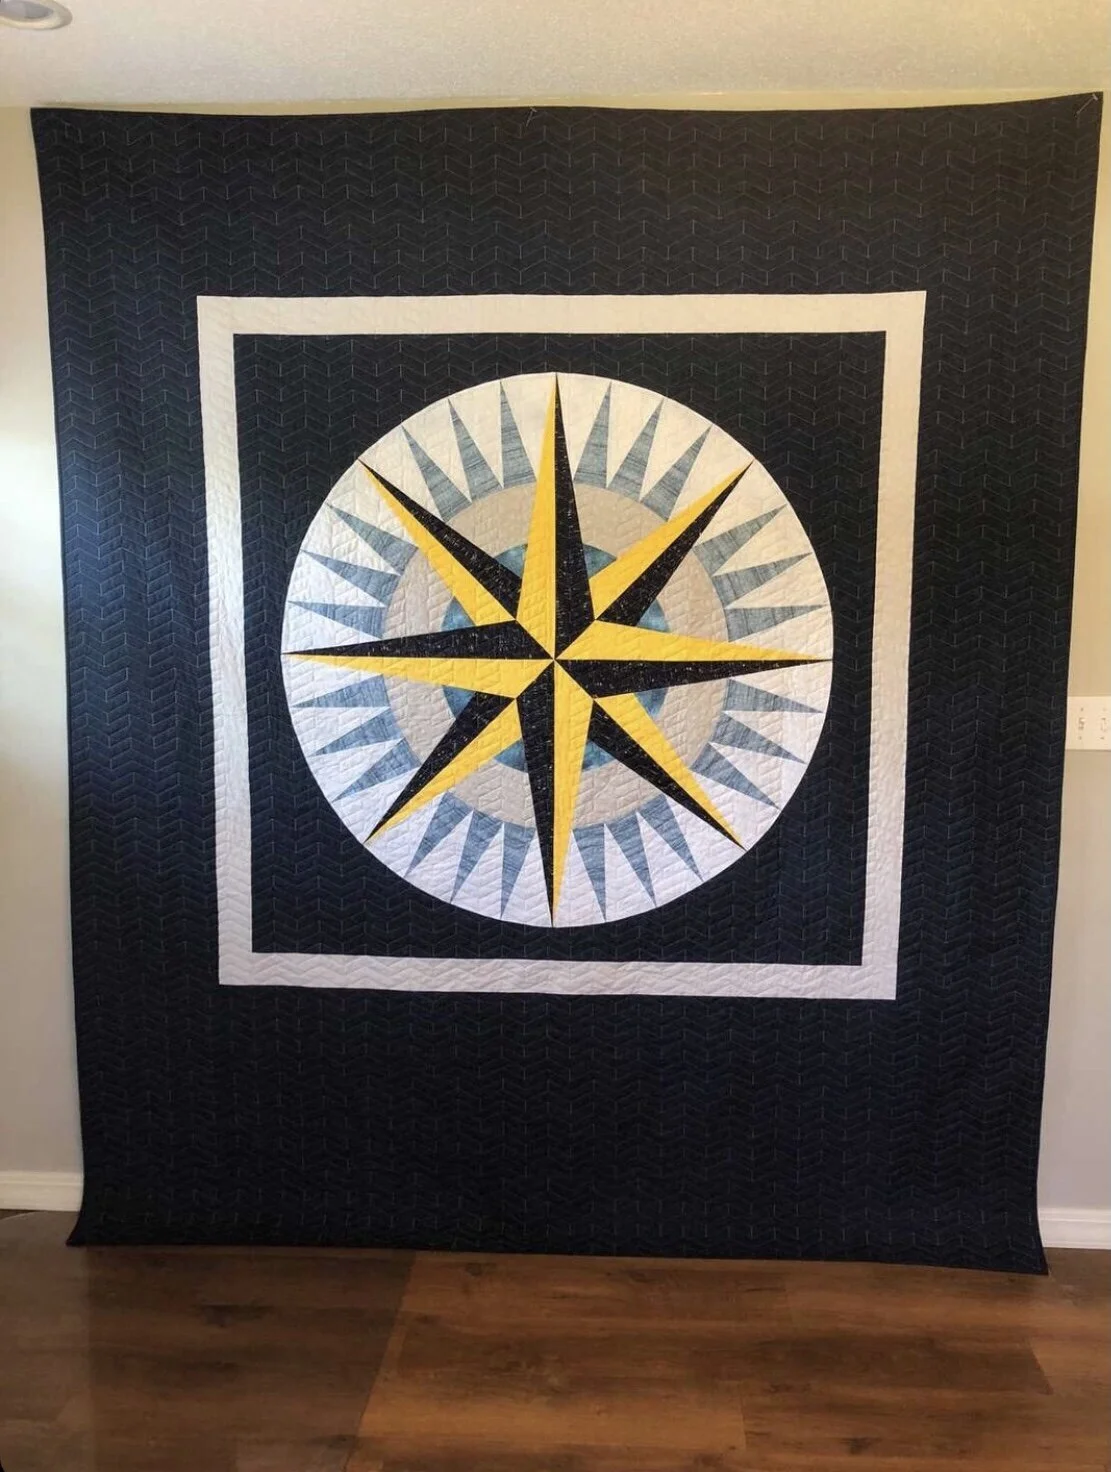
I look forward to seeing what Brenda makes next!

Thank you for being here!! Have a great day!! and…Happy quilting… • Leisha
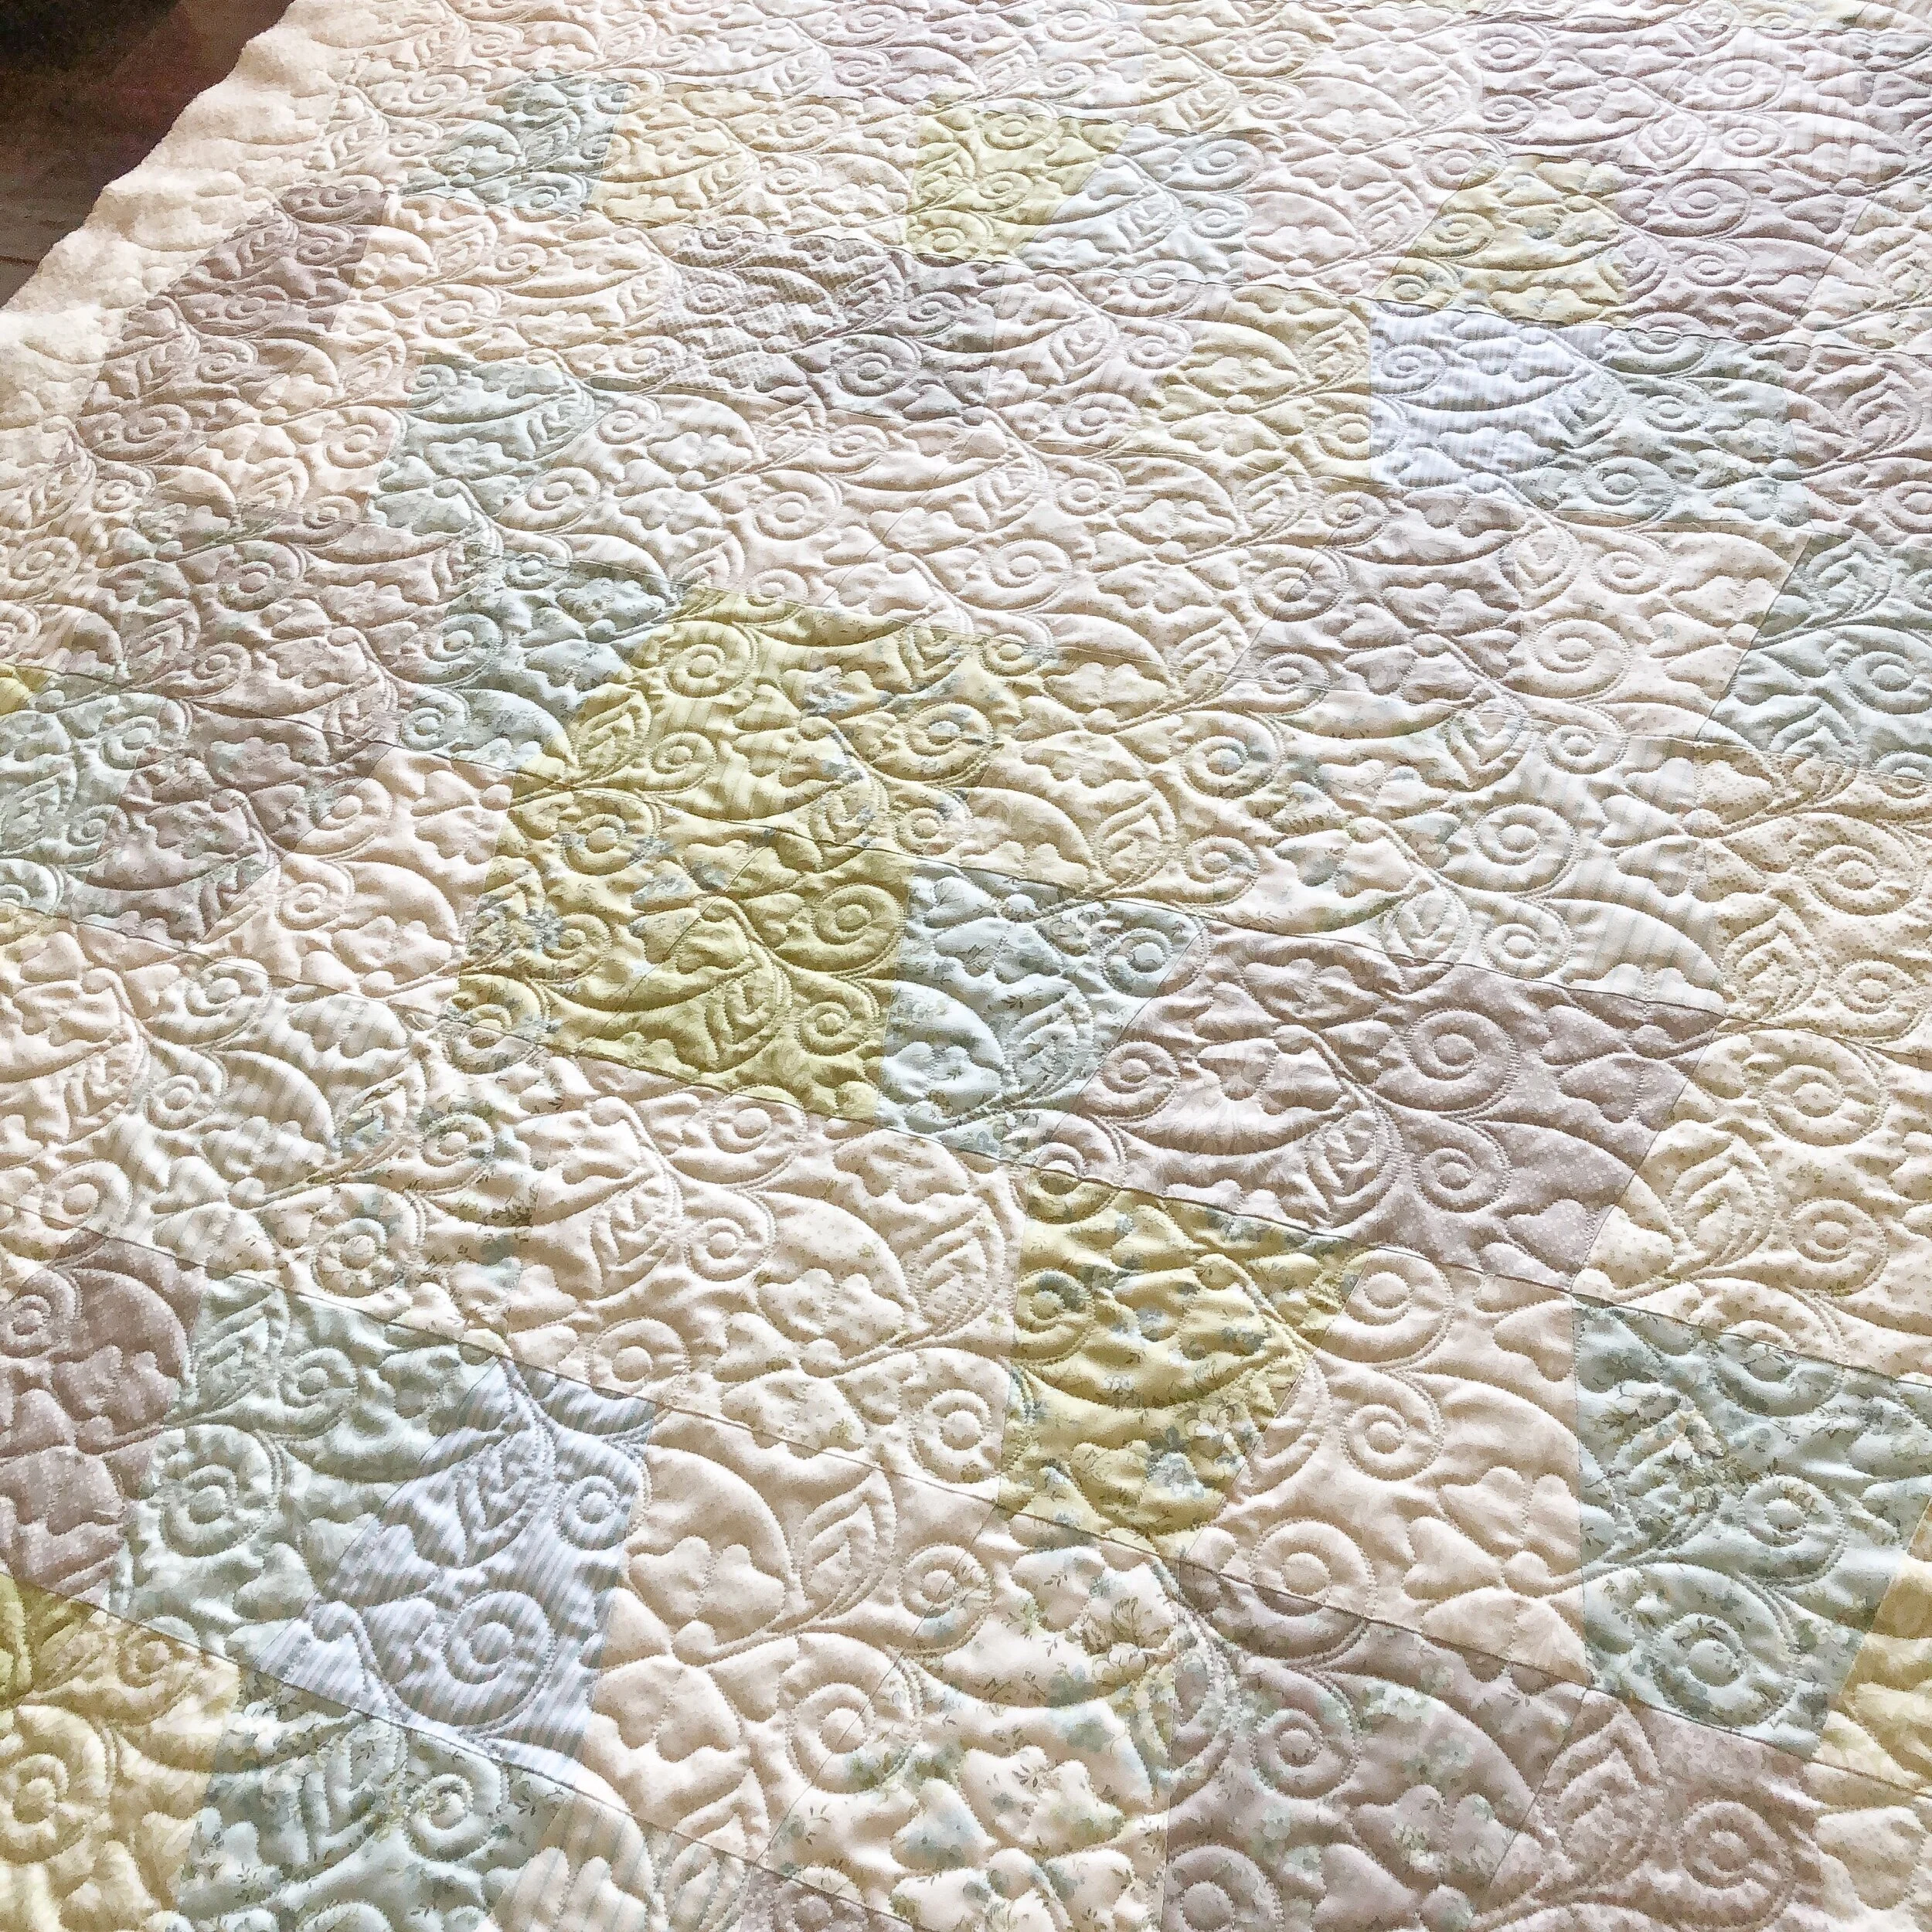
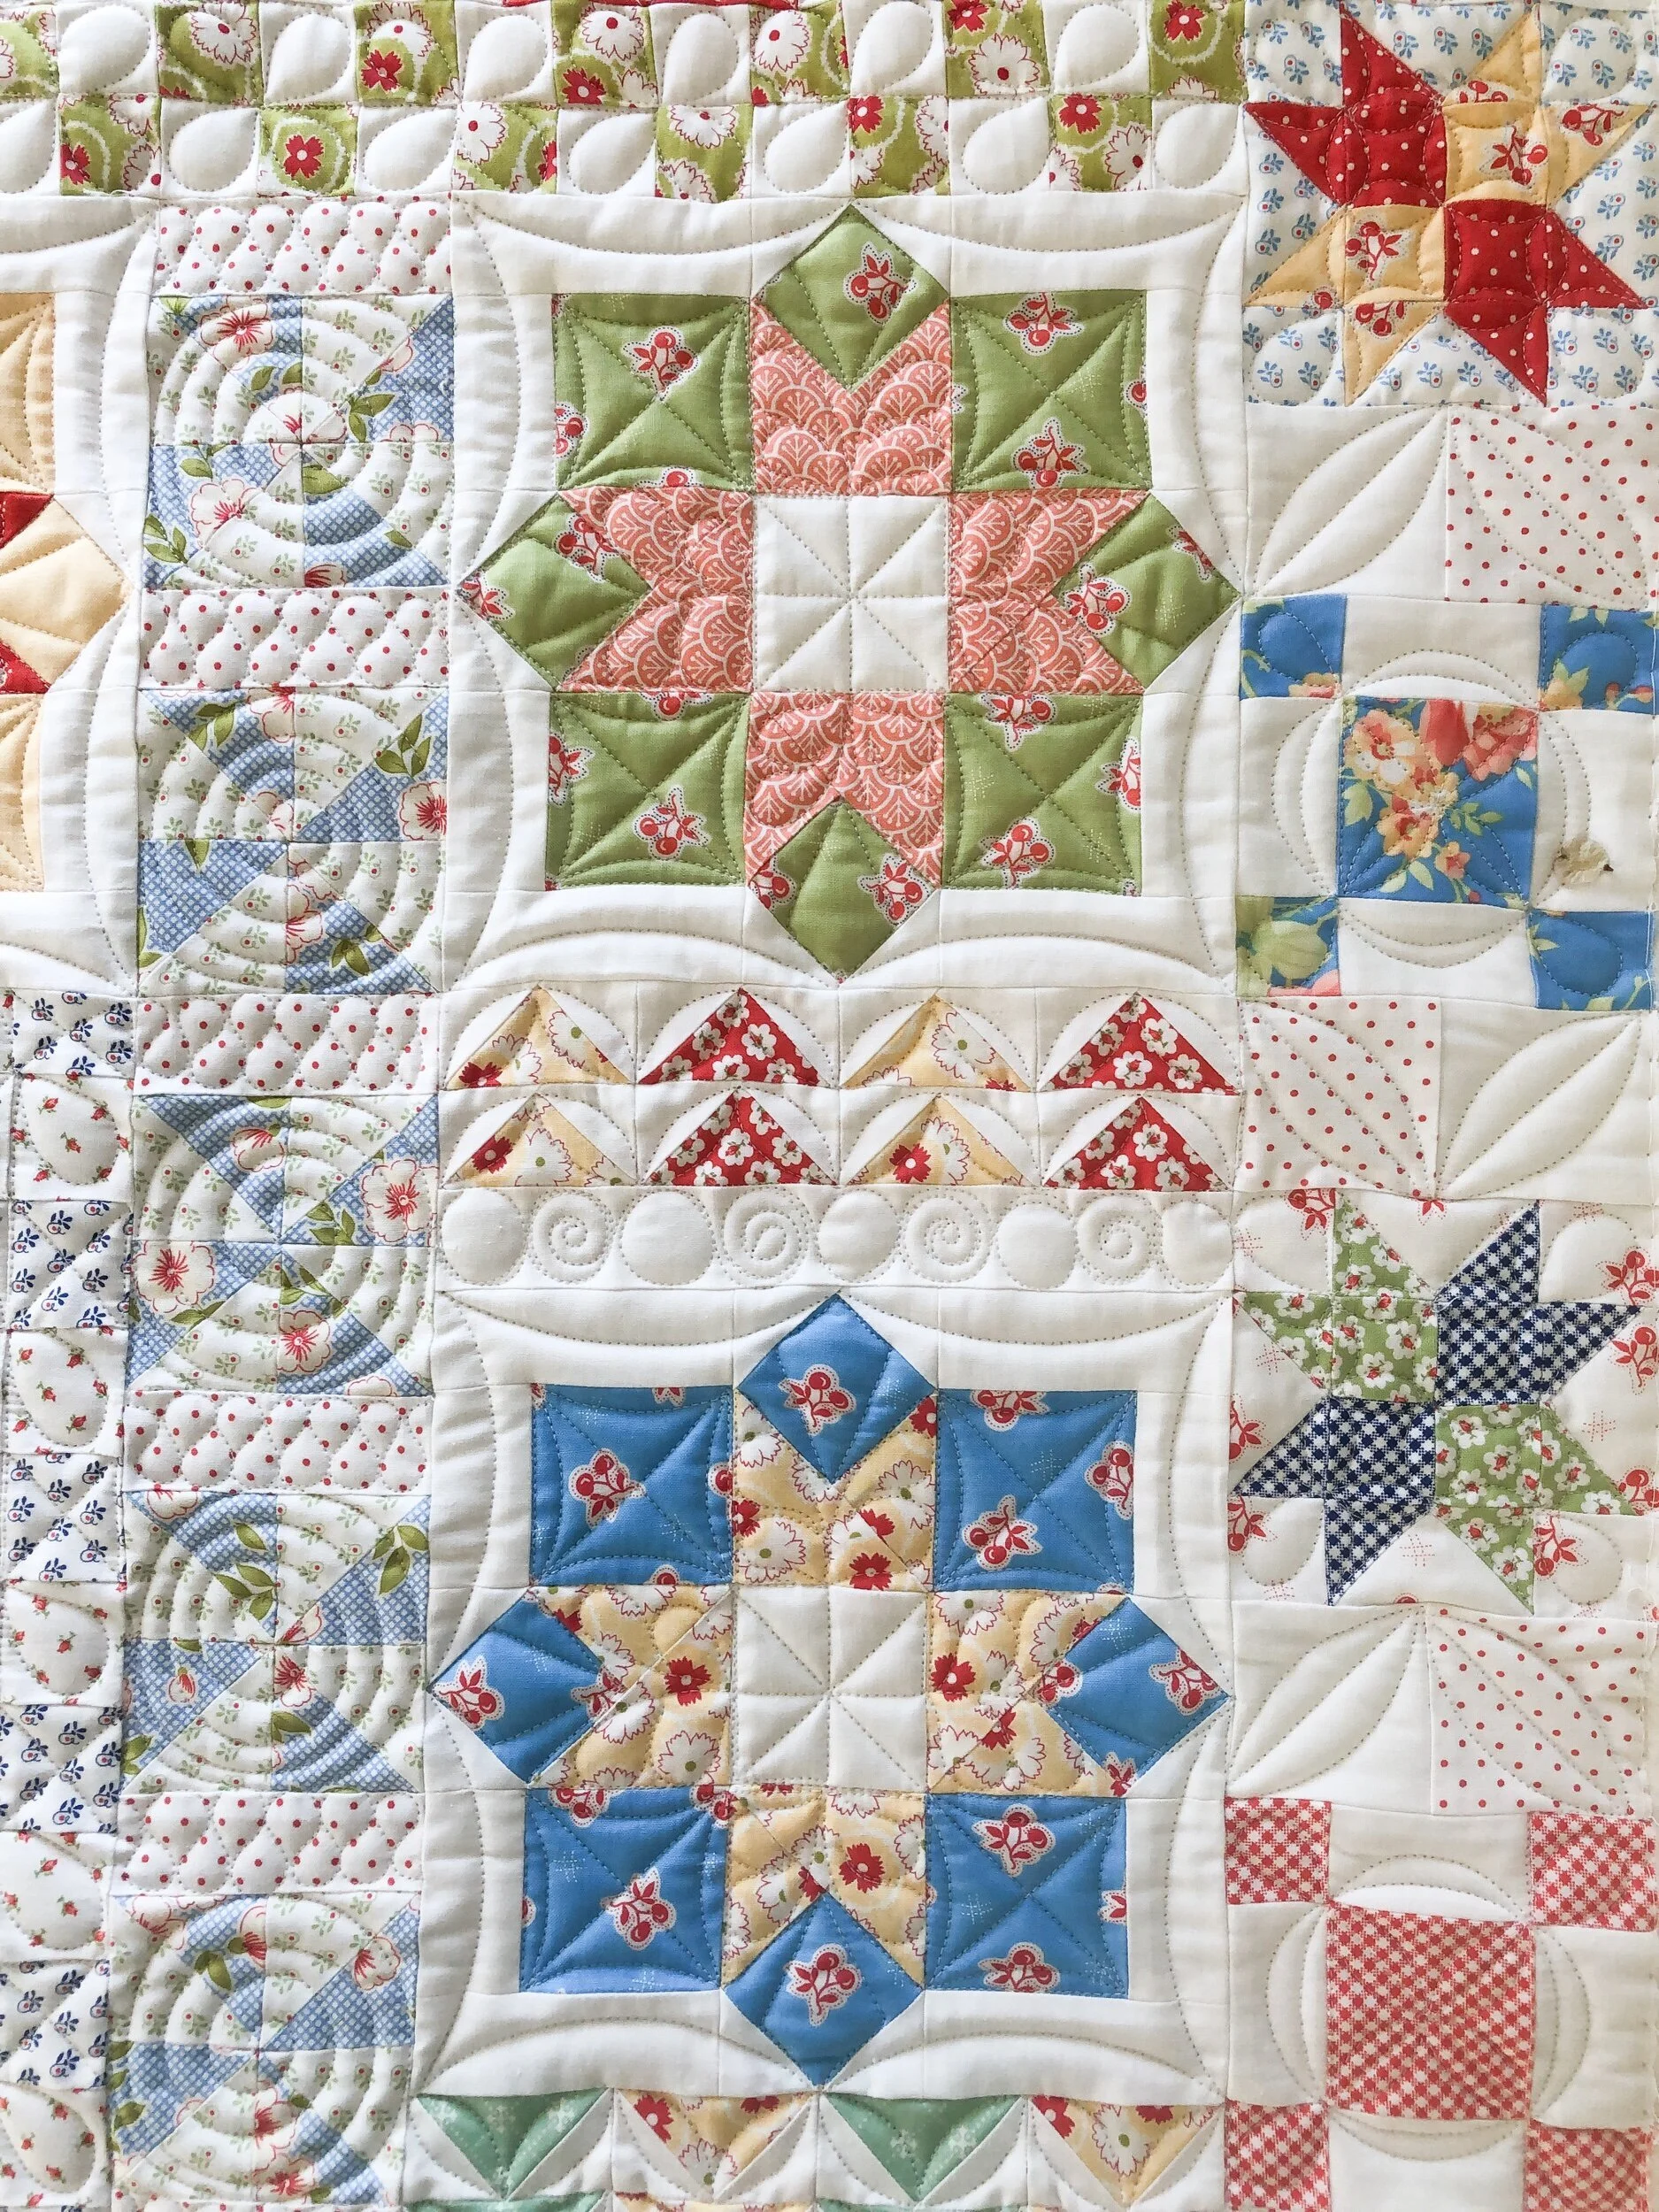
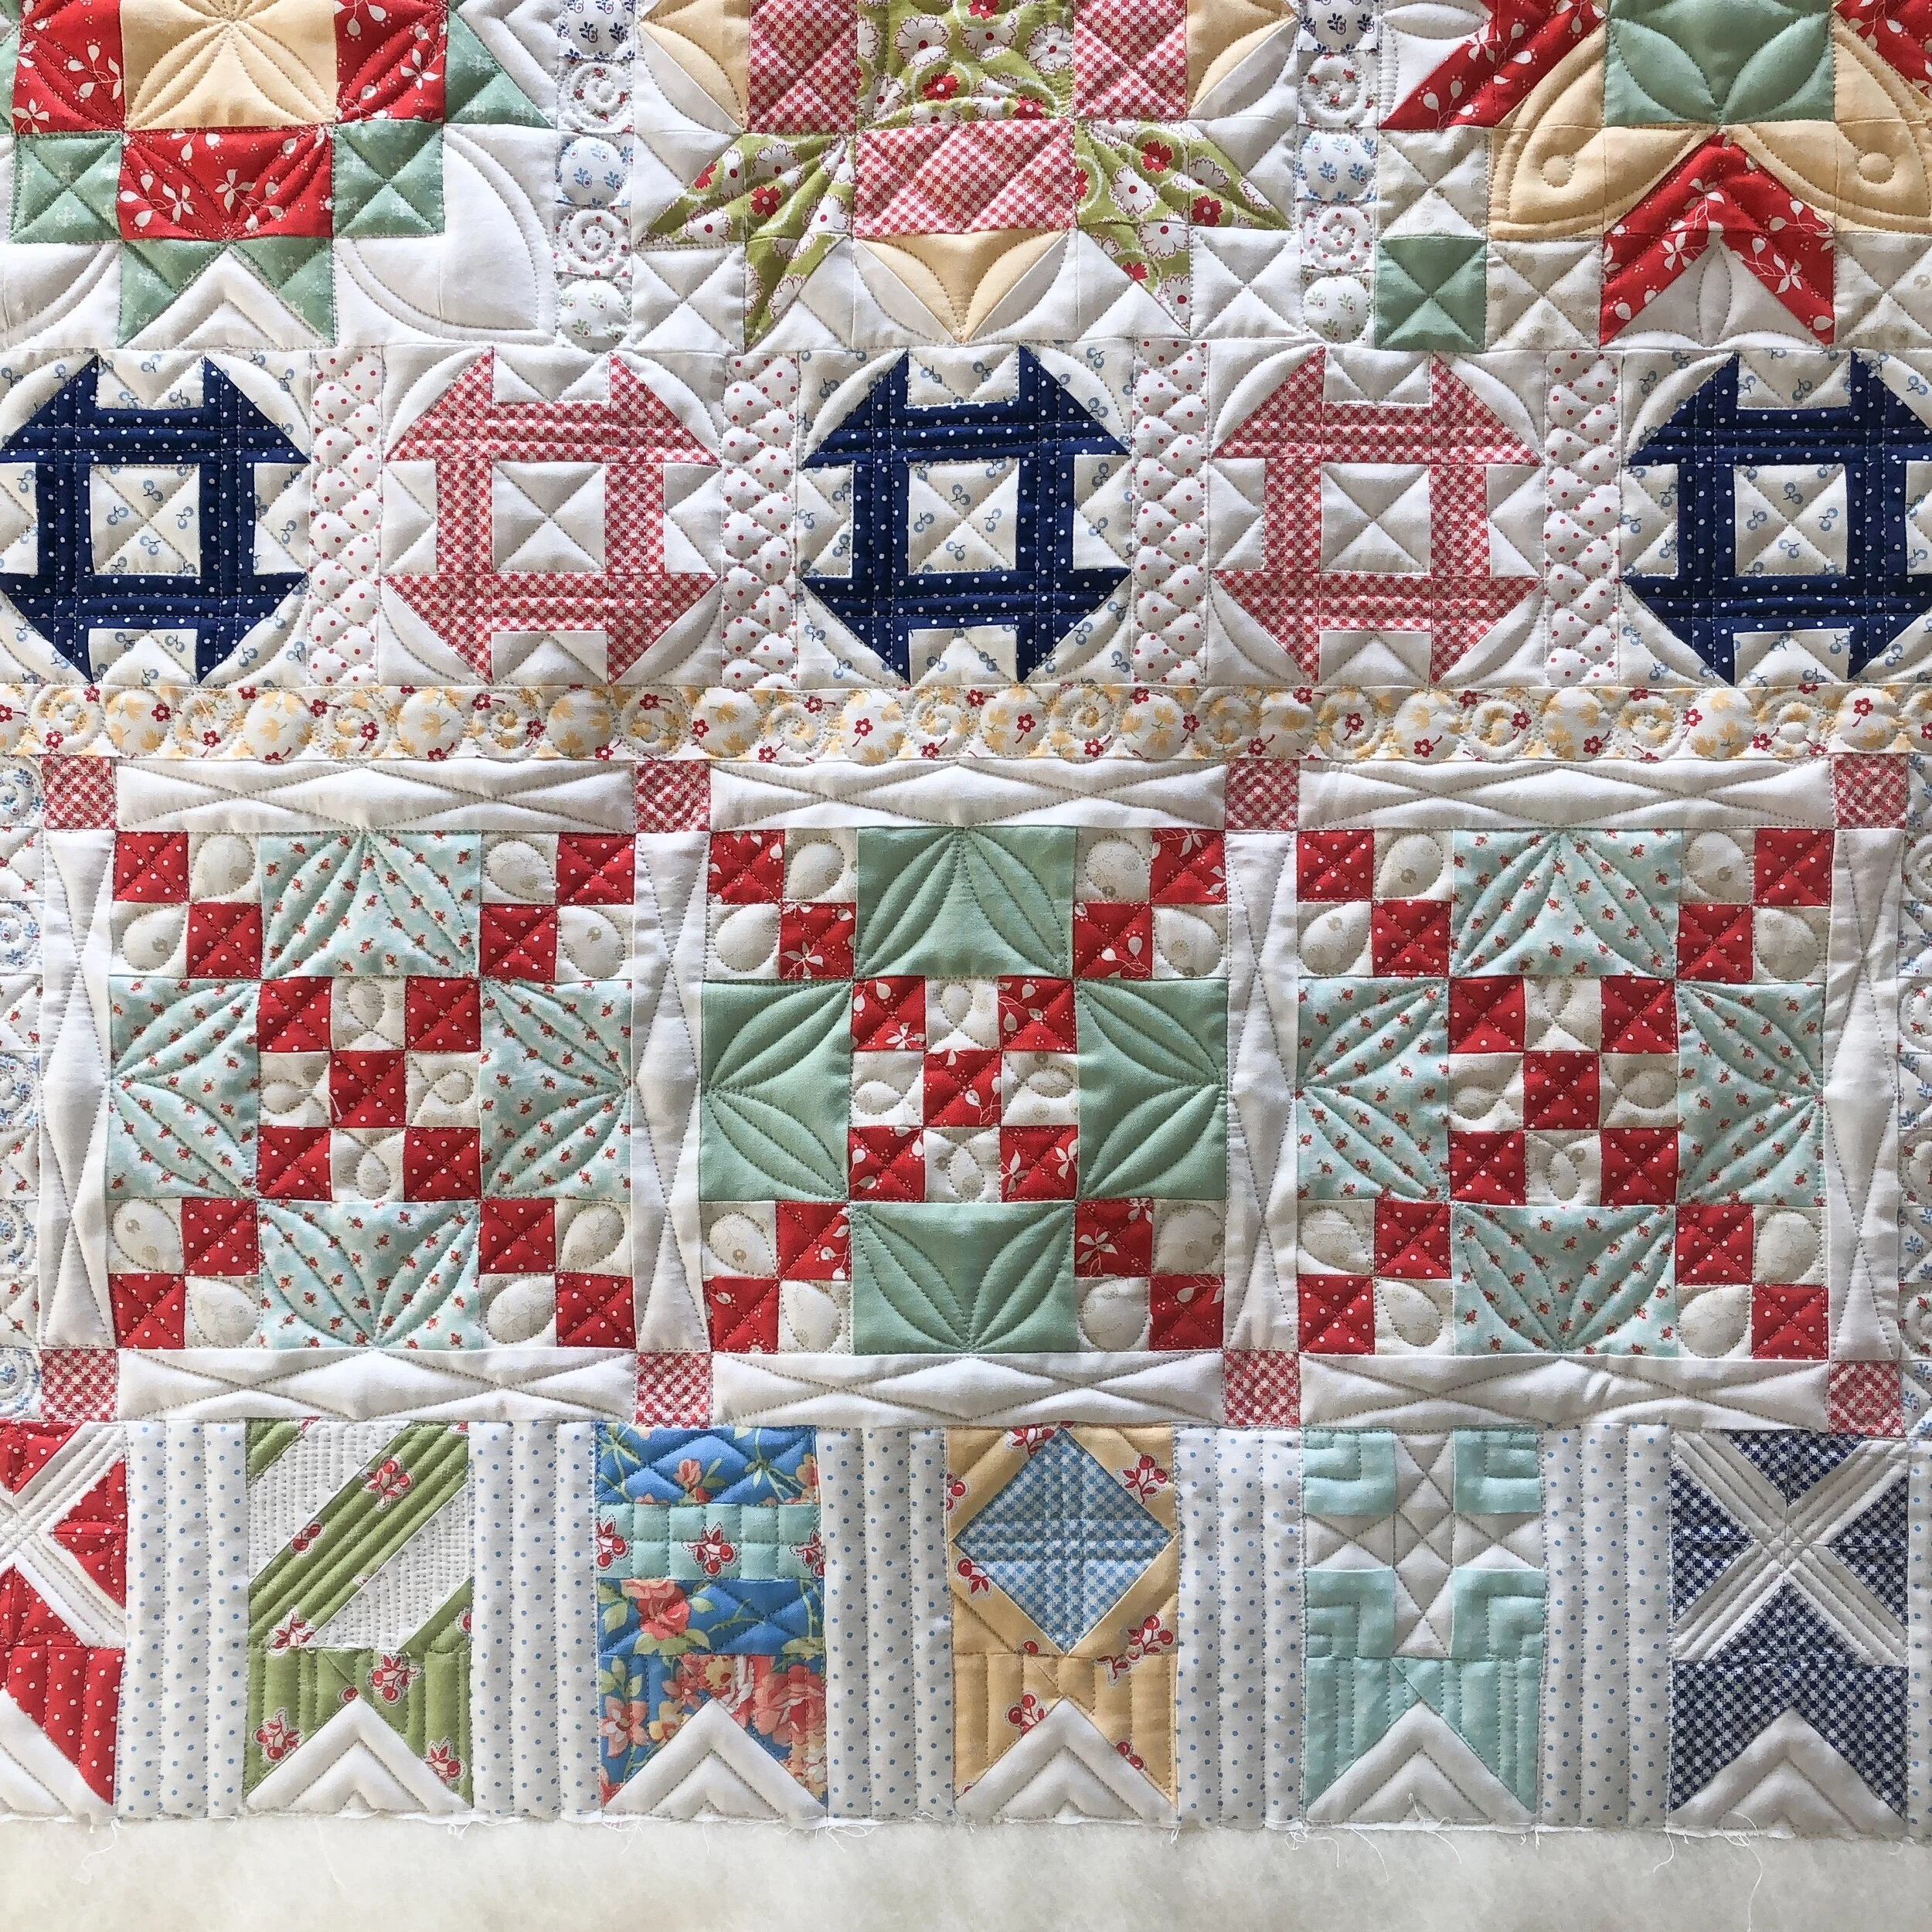
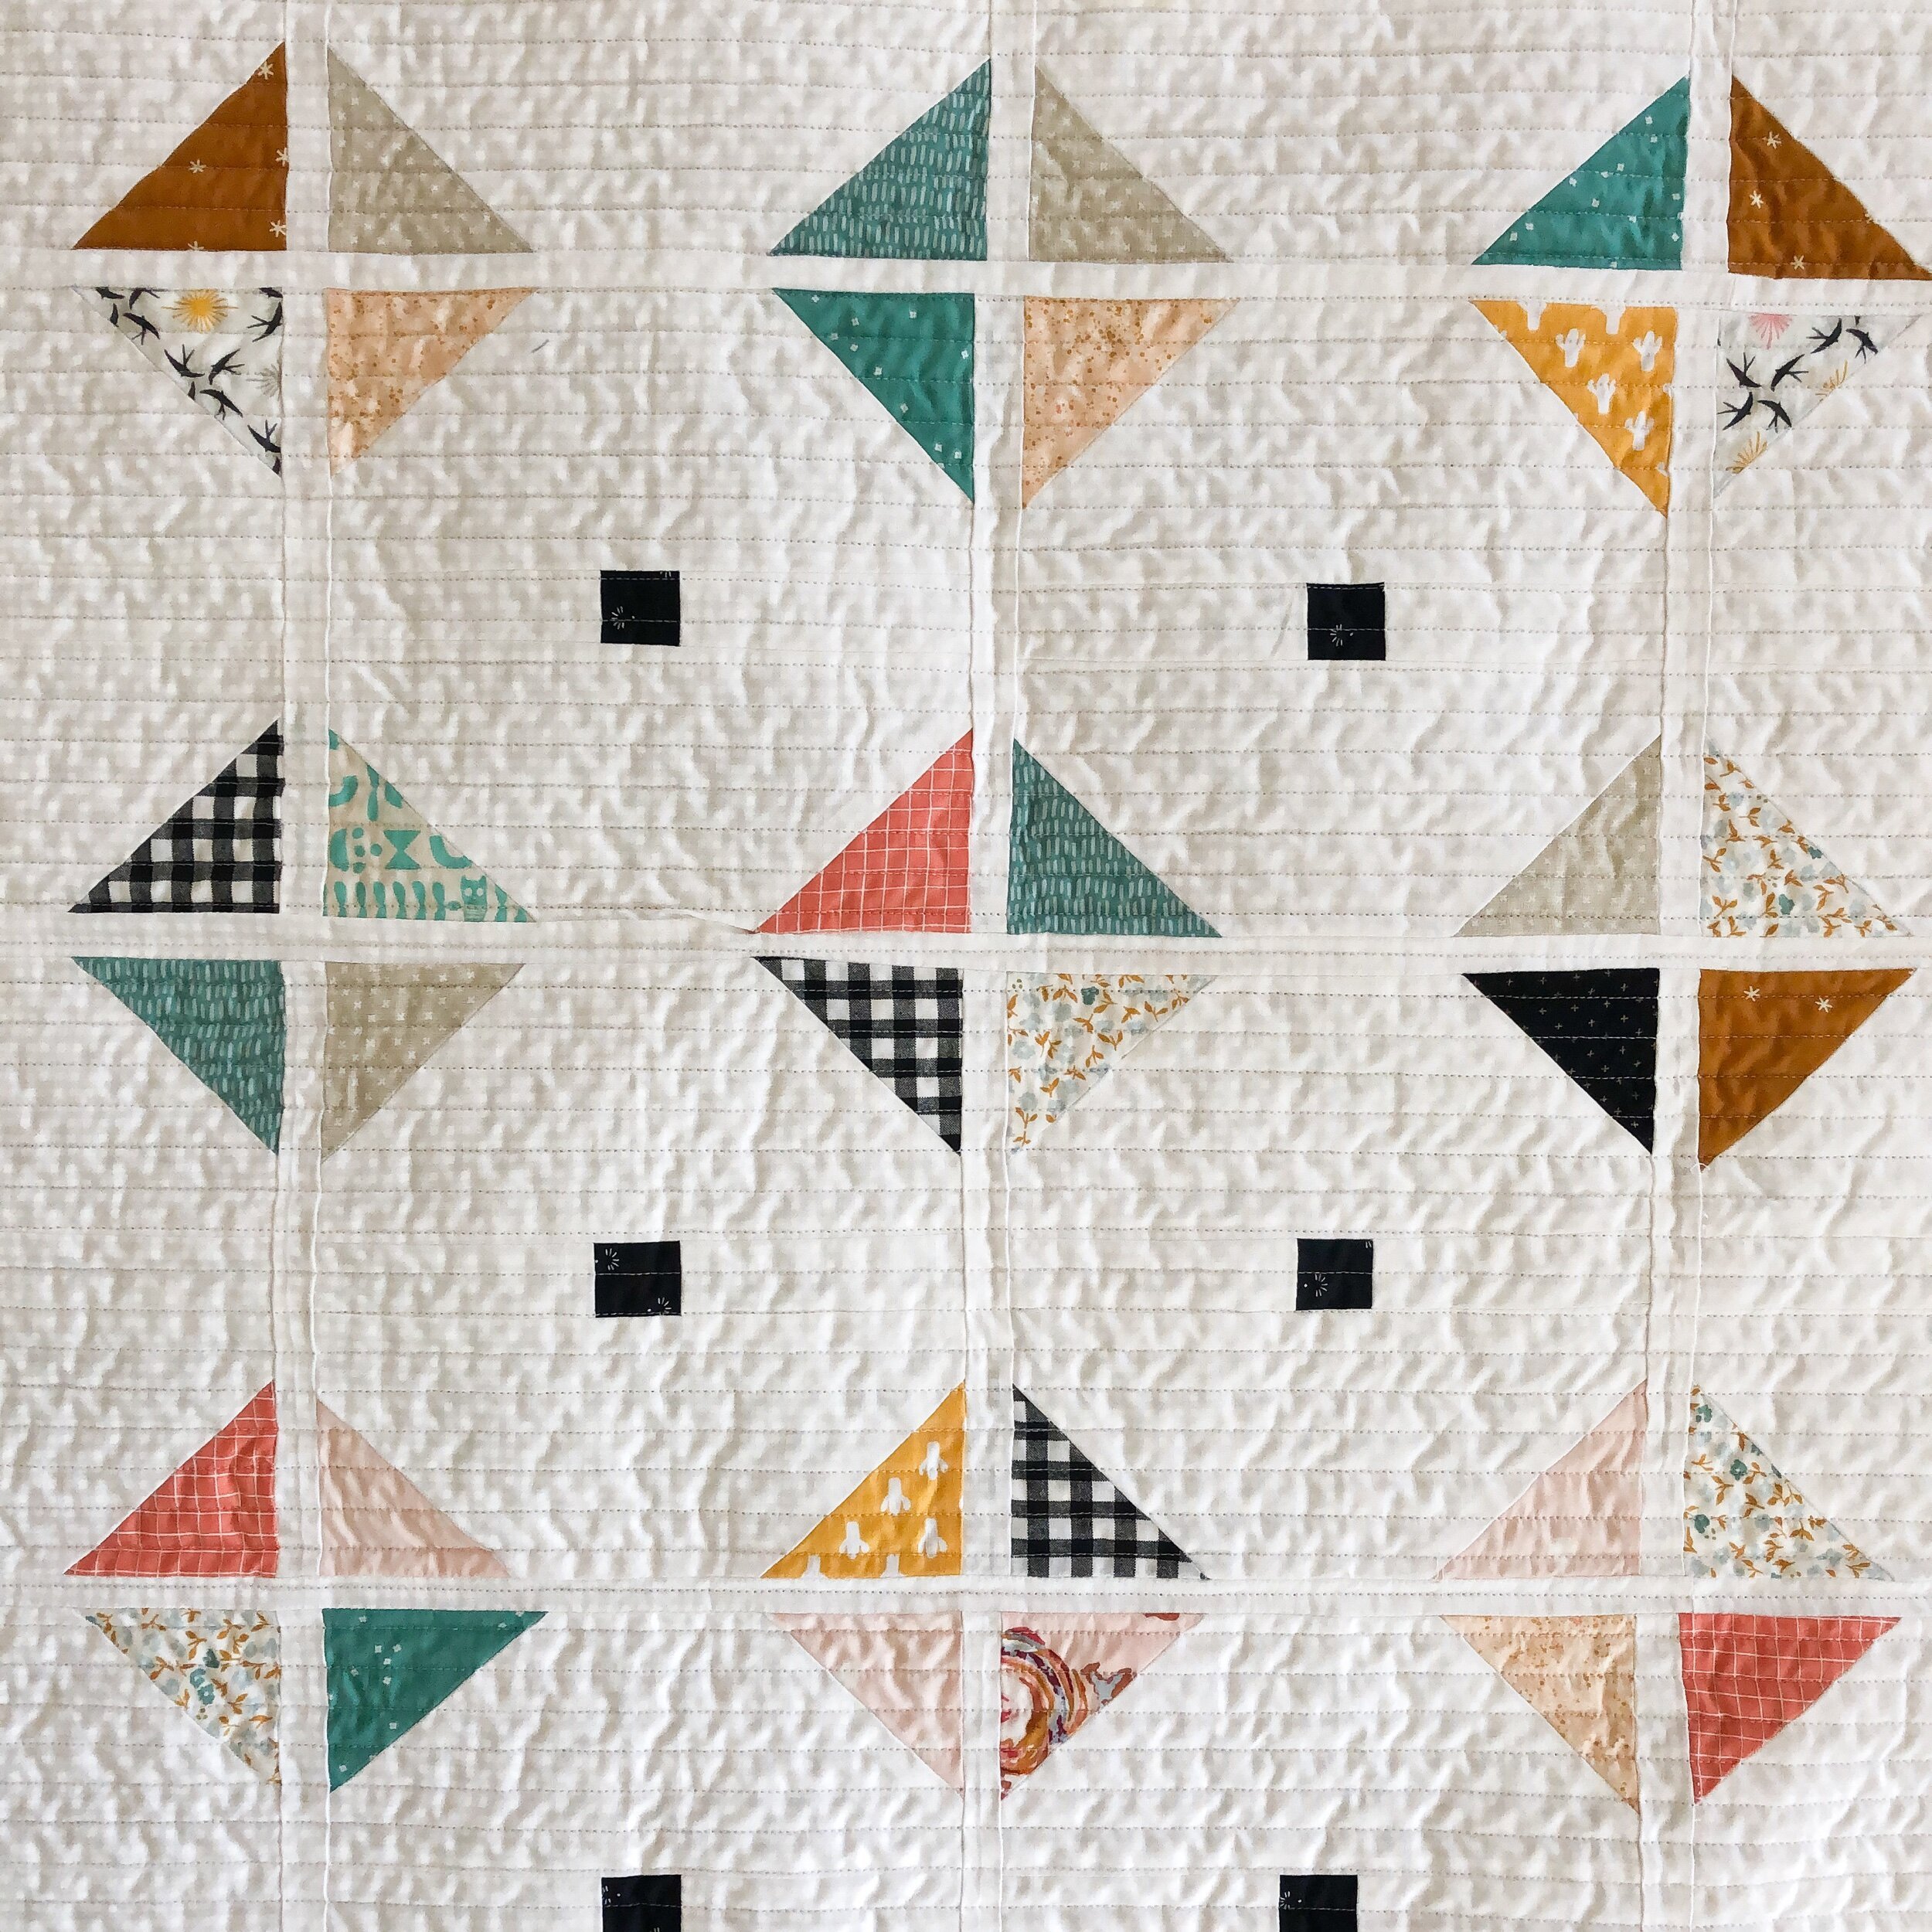
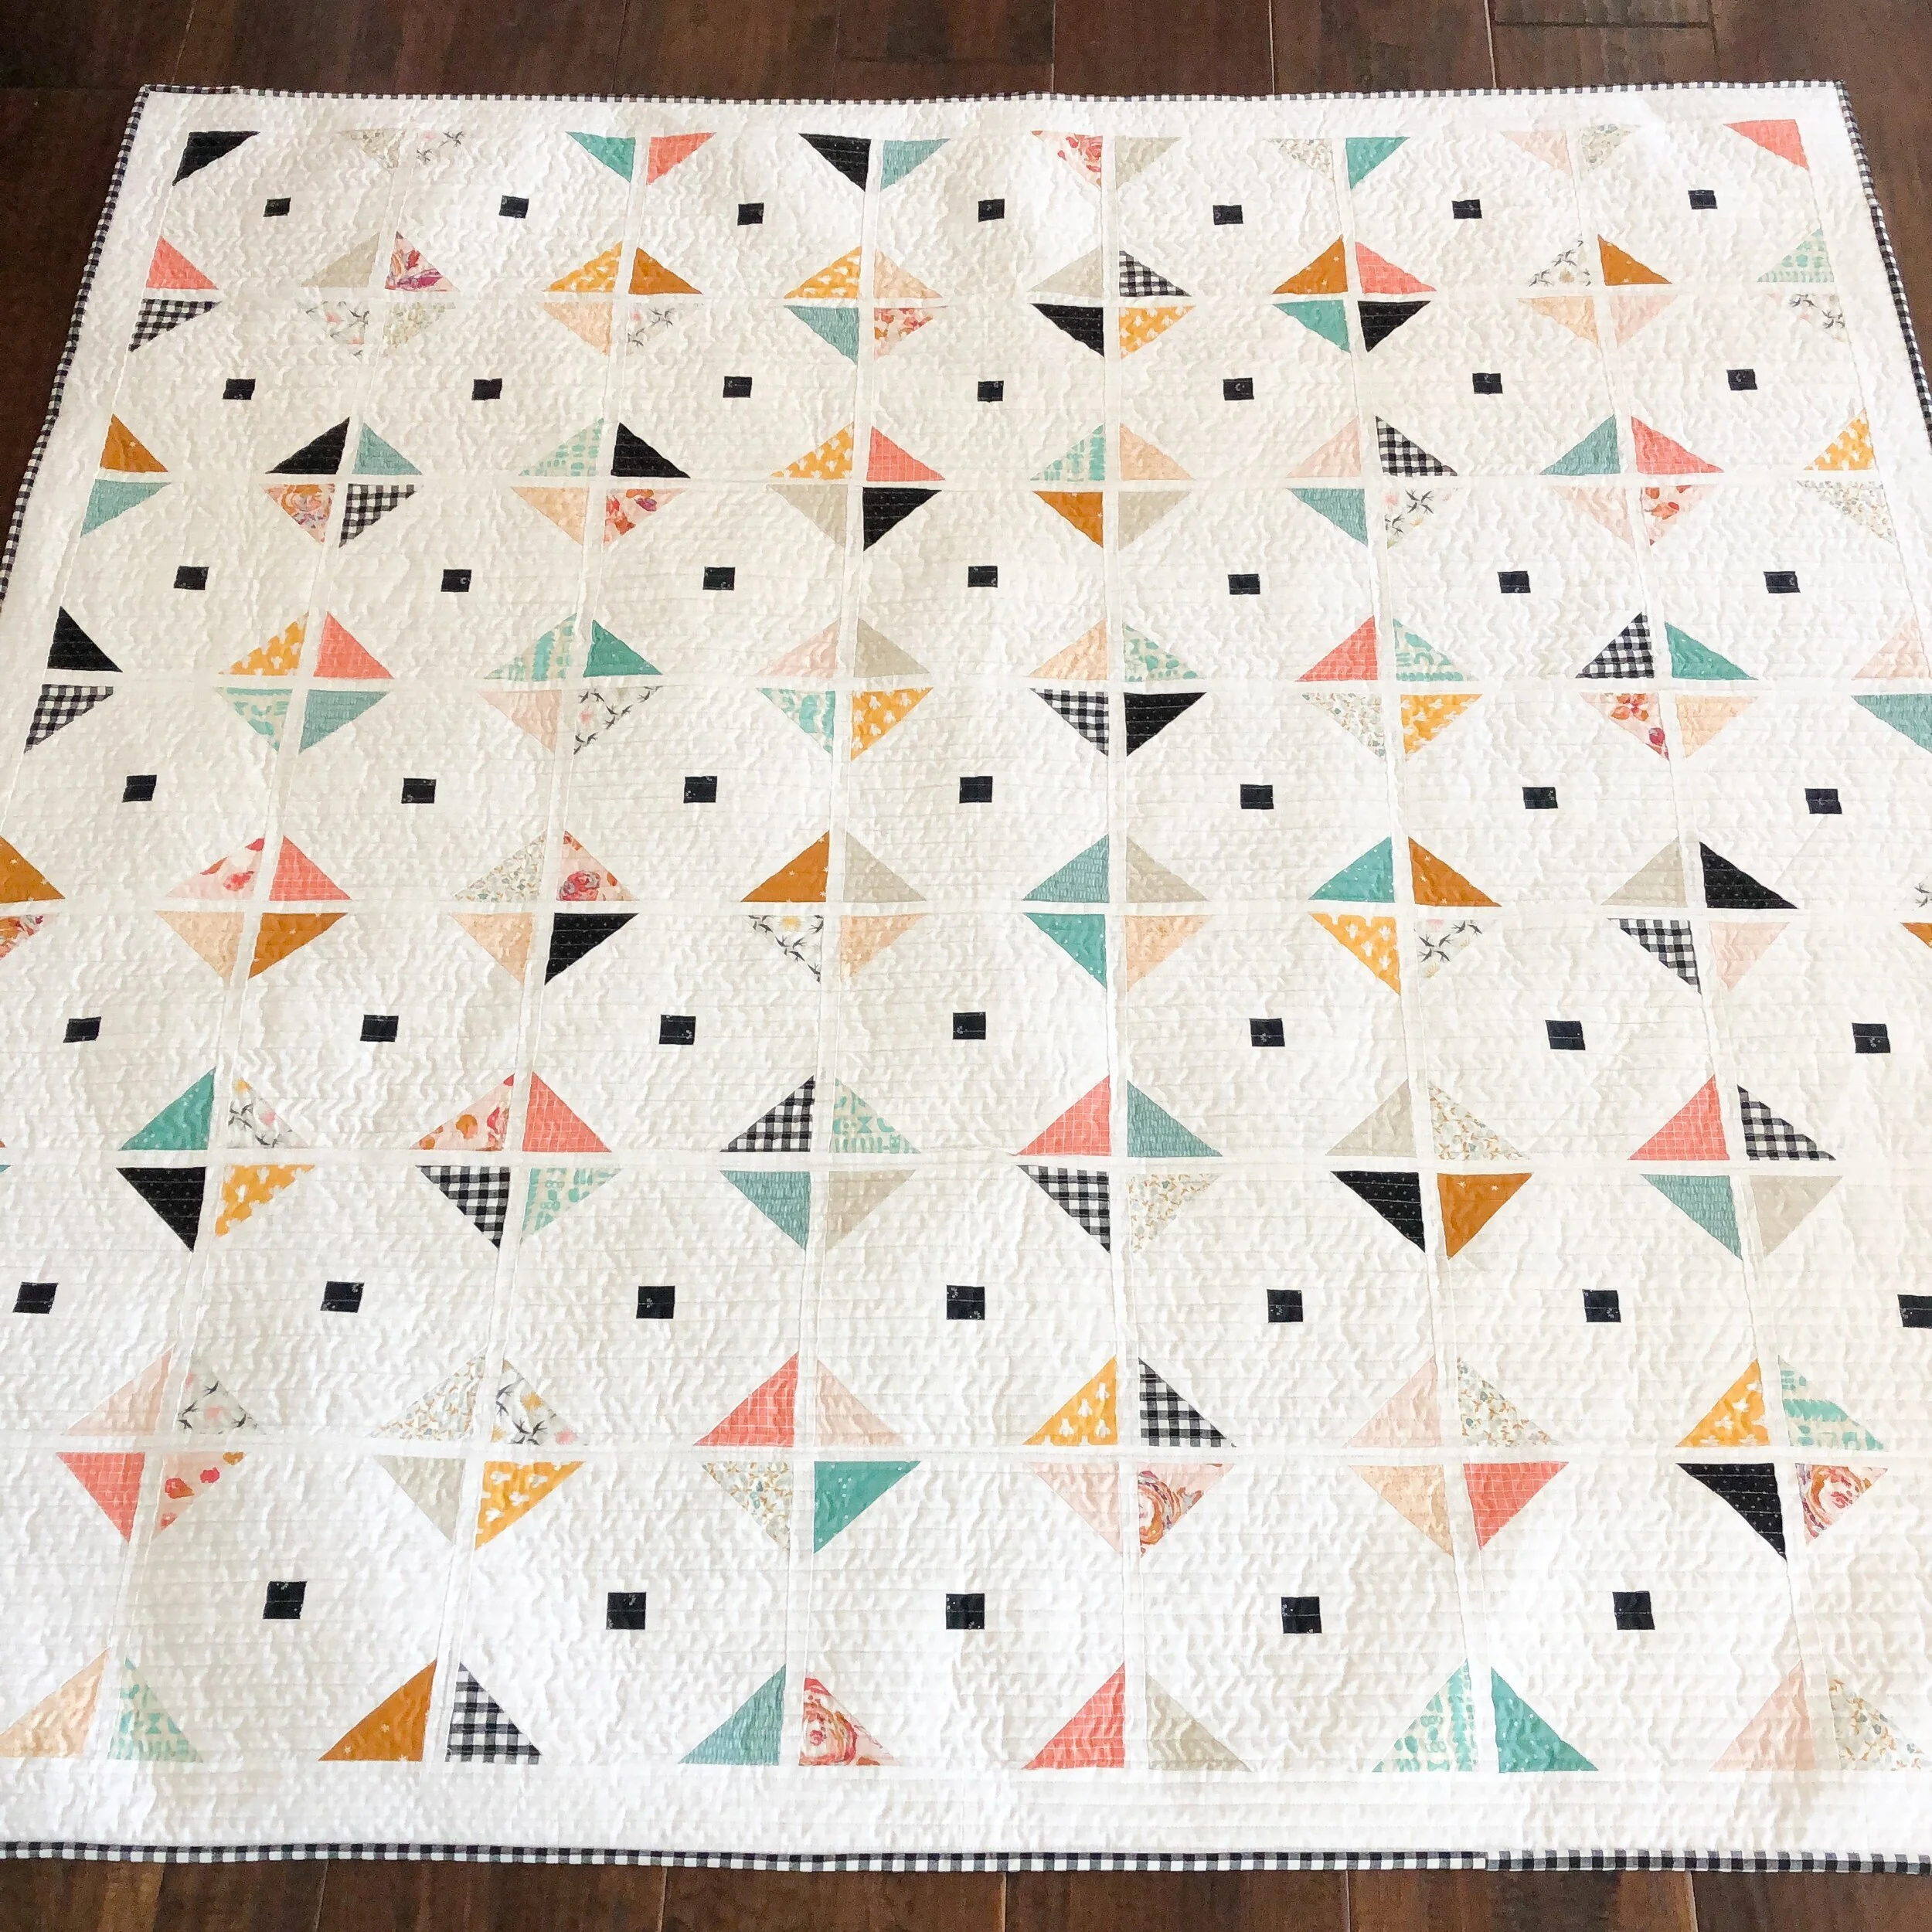
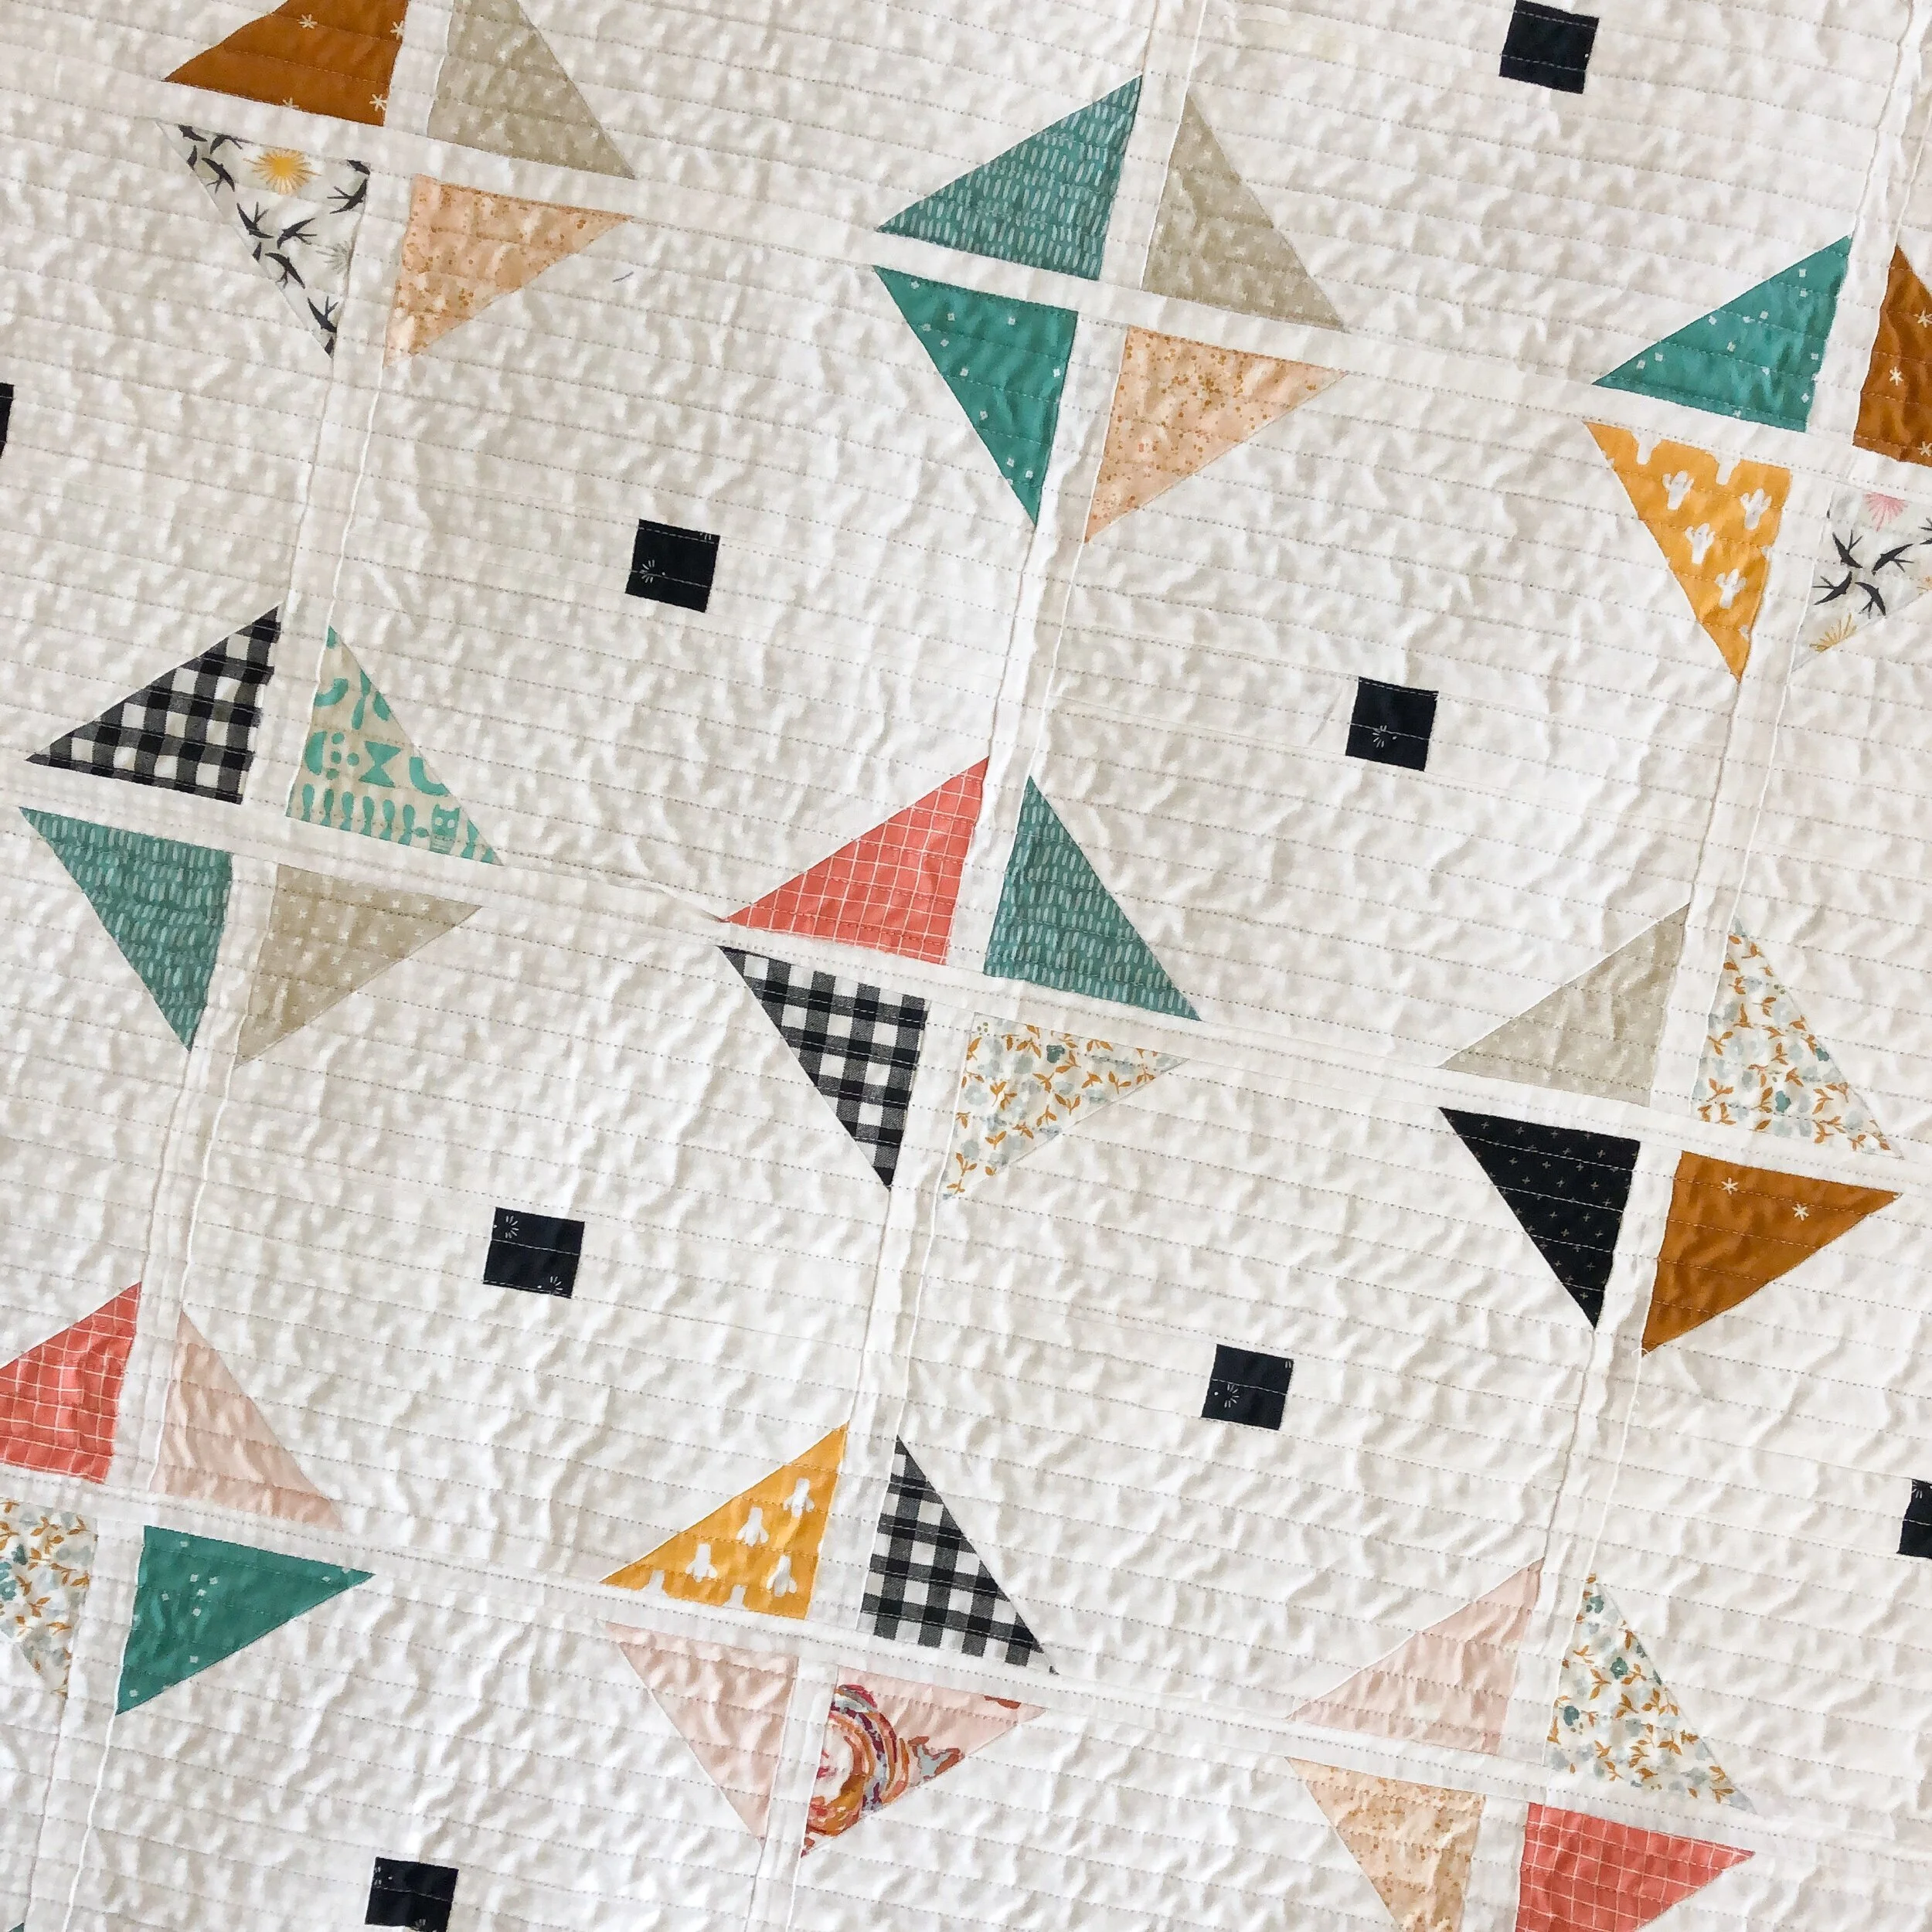
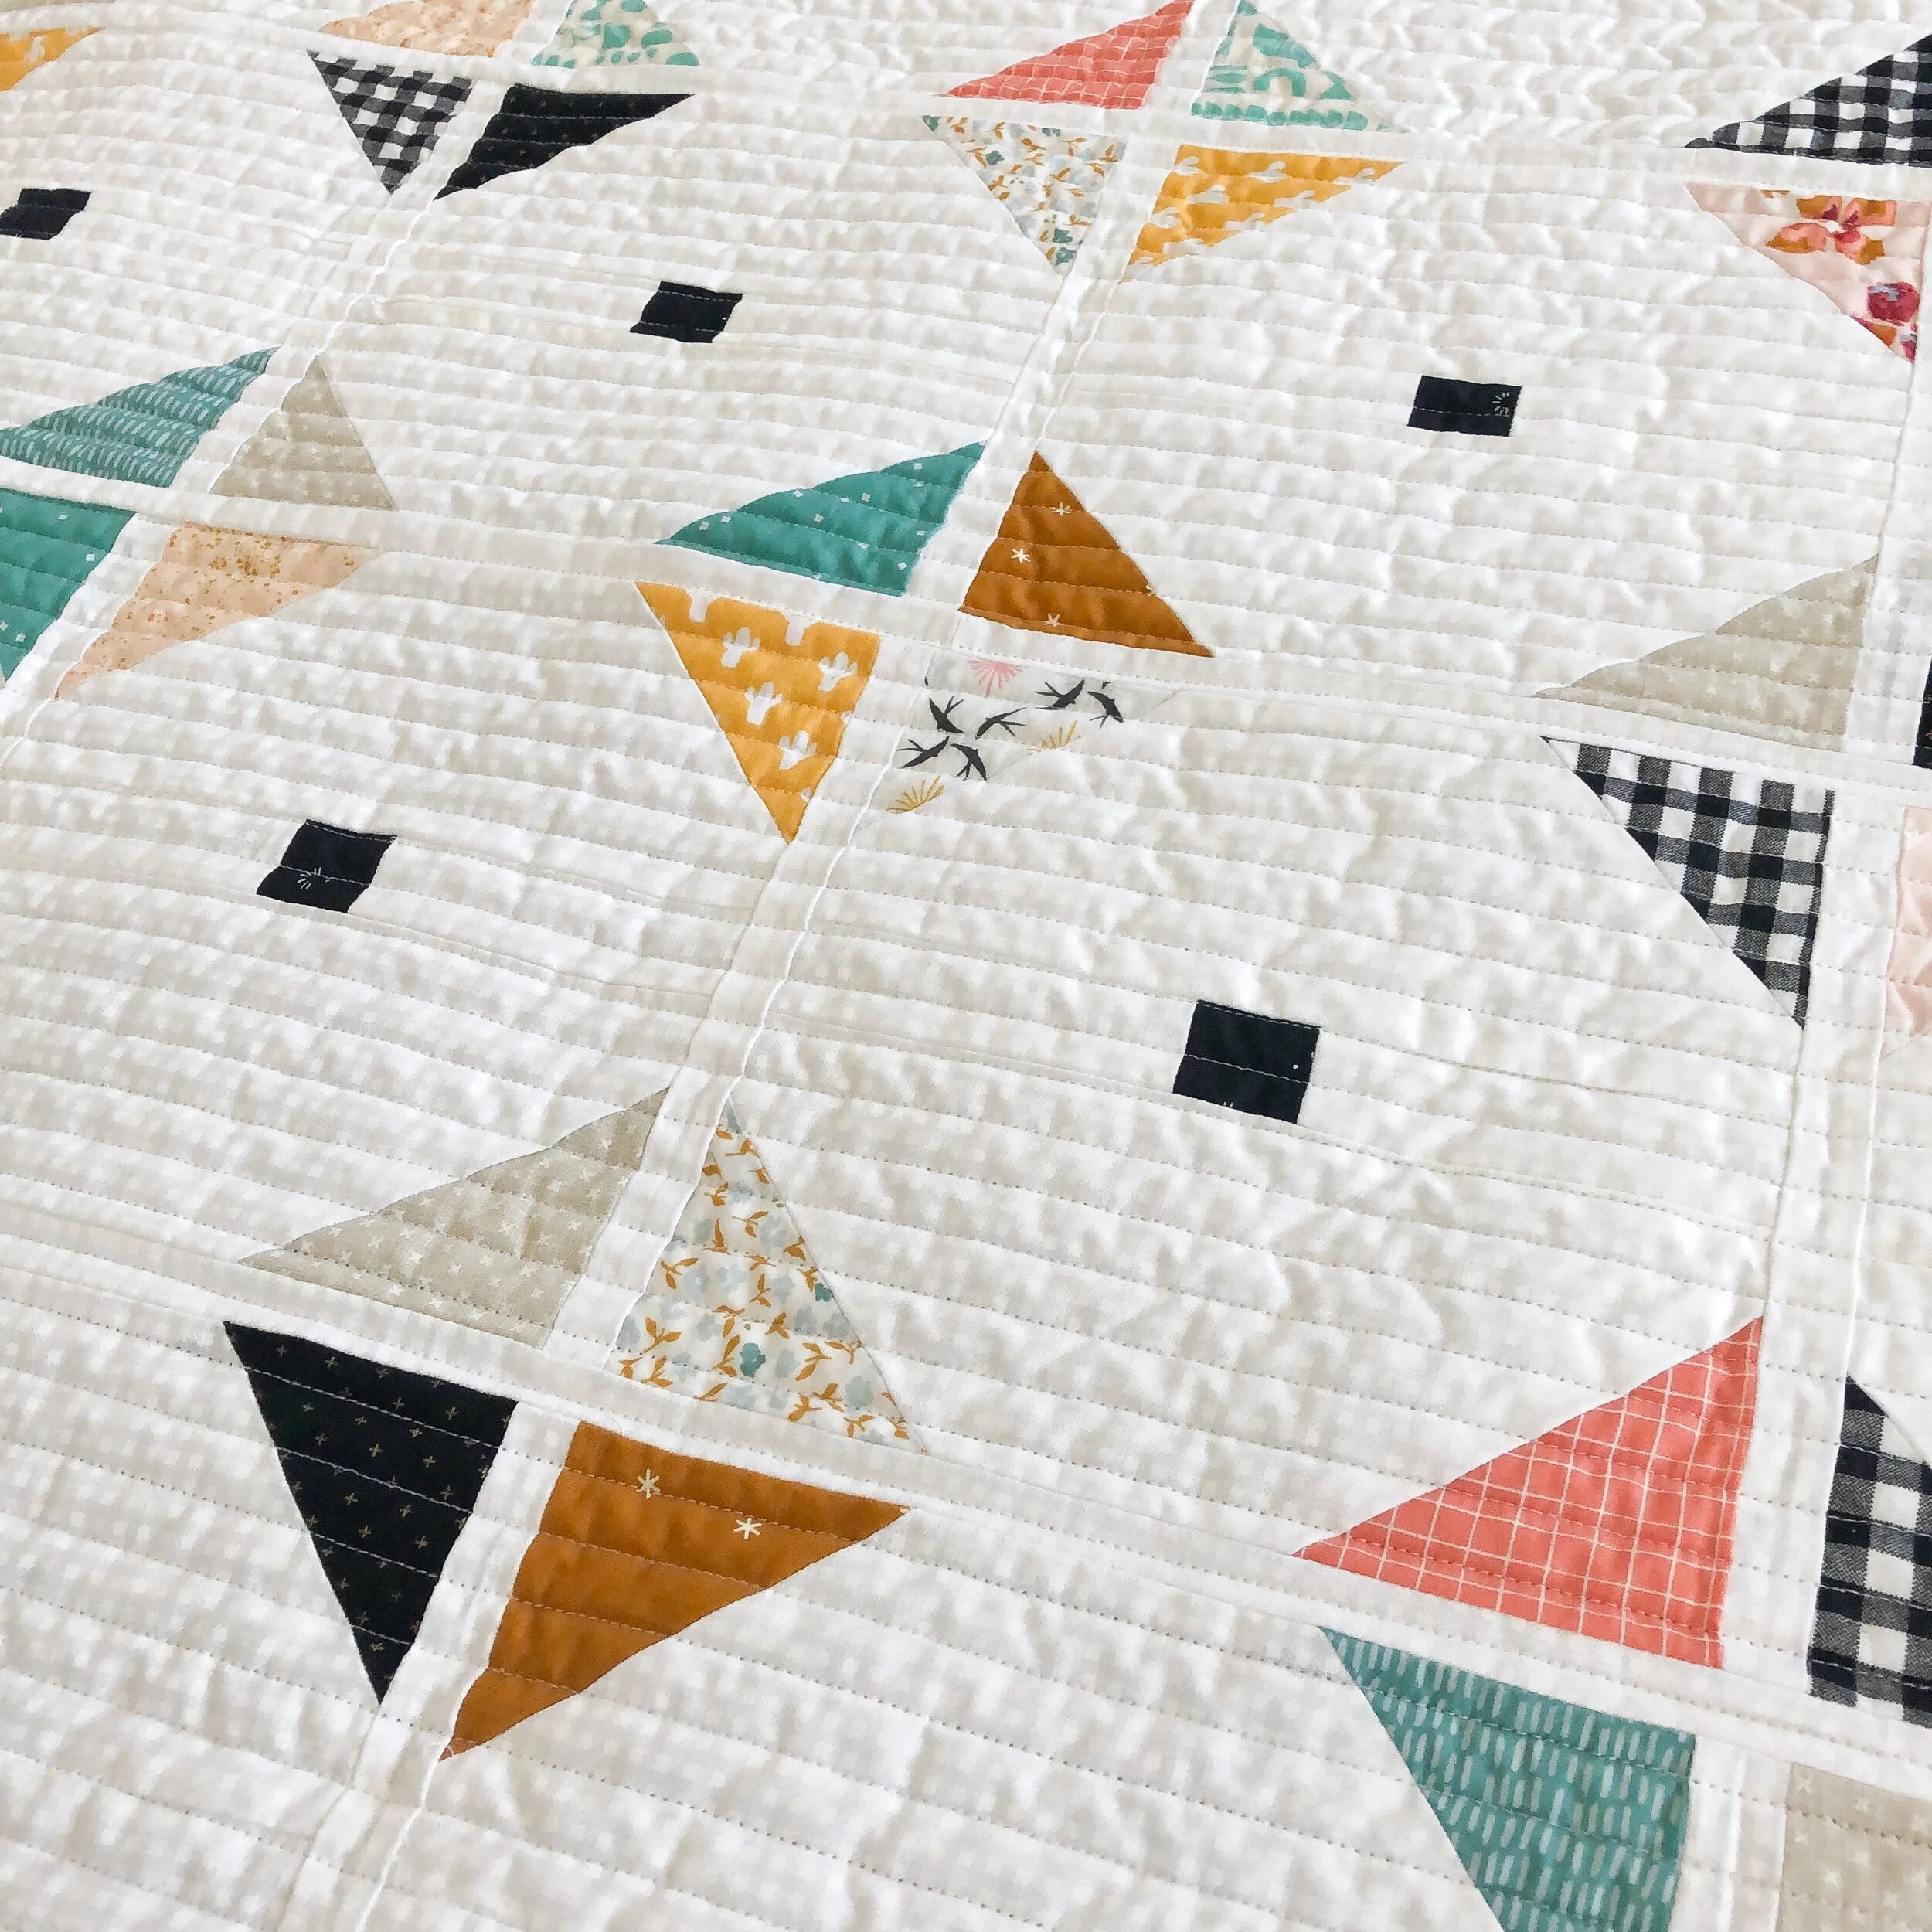
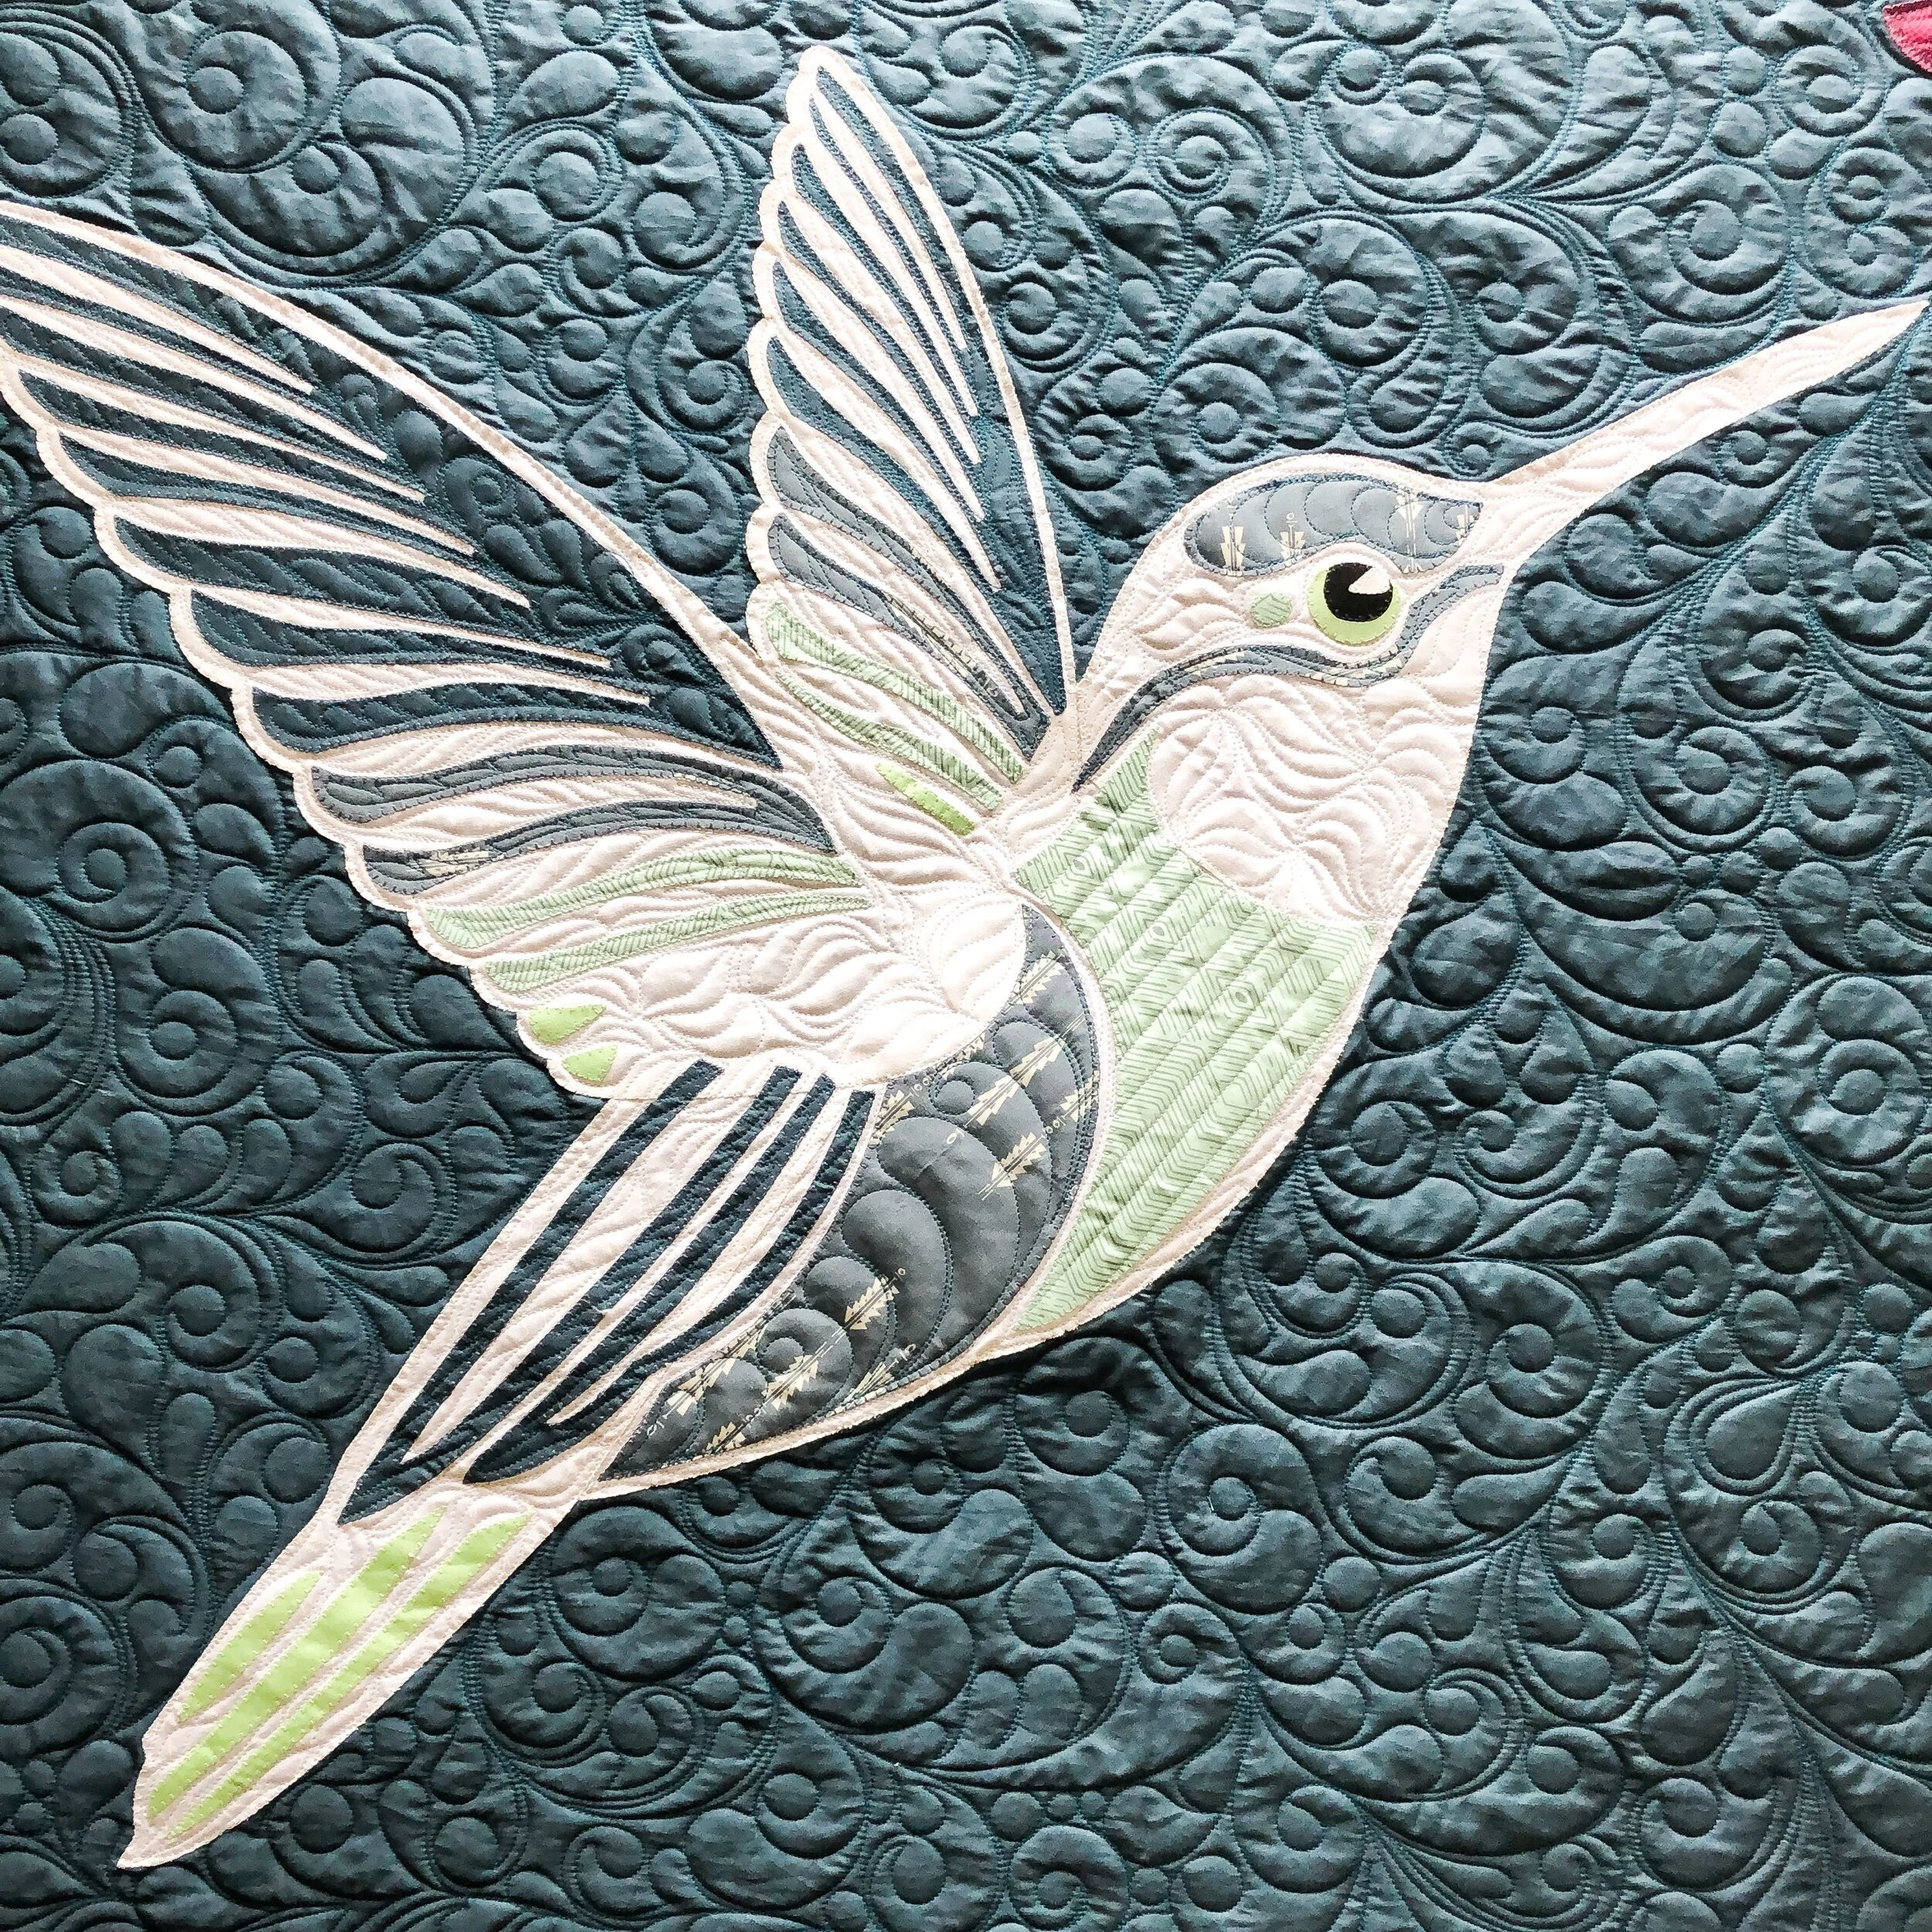
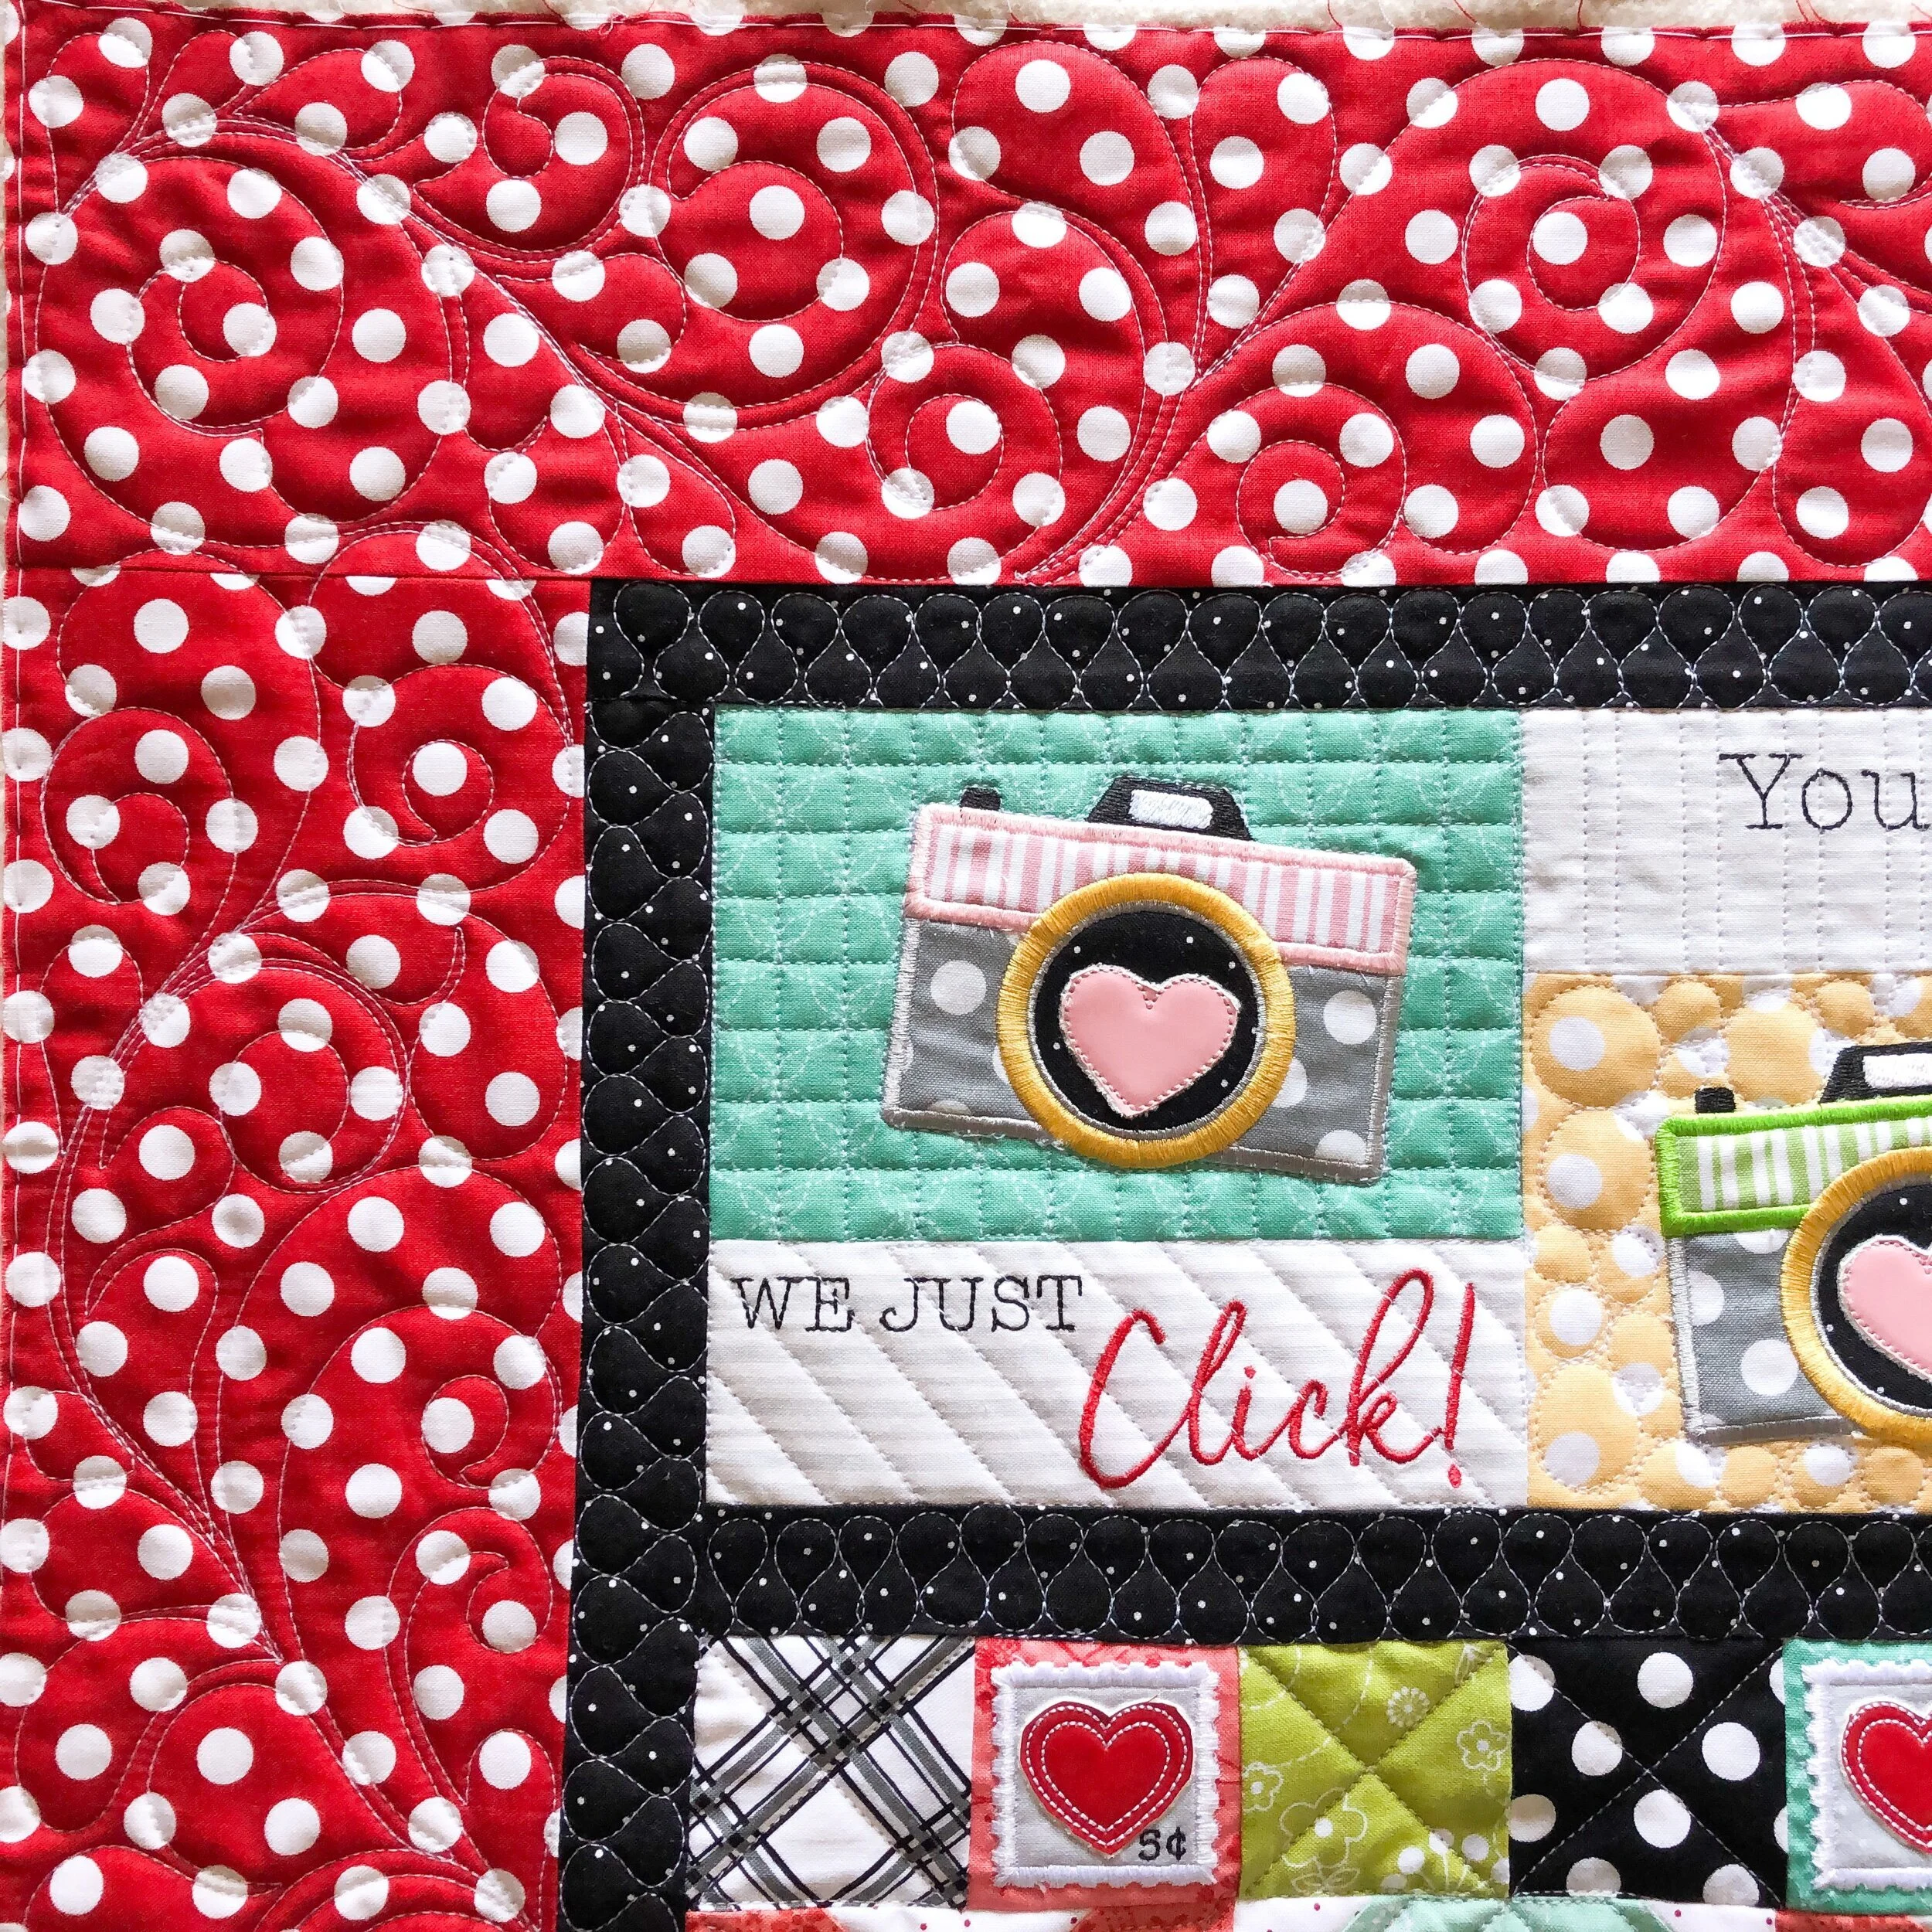
Dot’s Summertime Picnic Quilt
Hello,
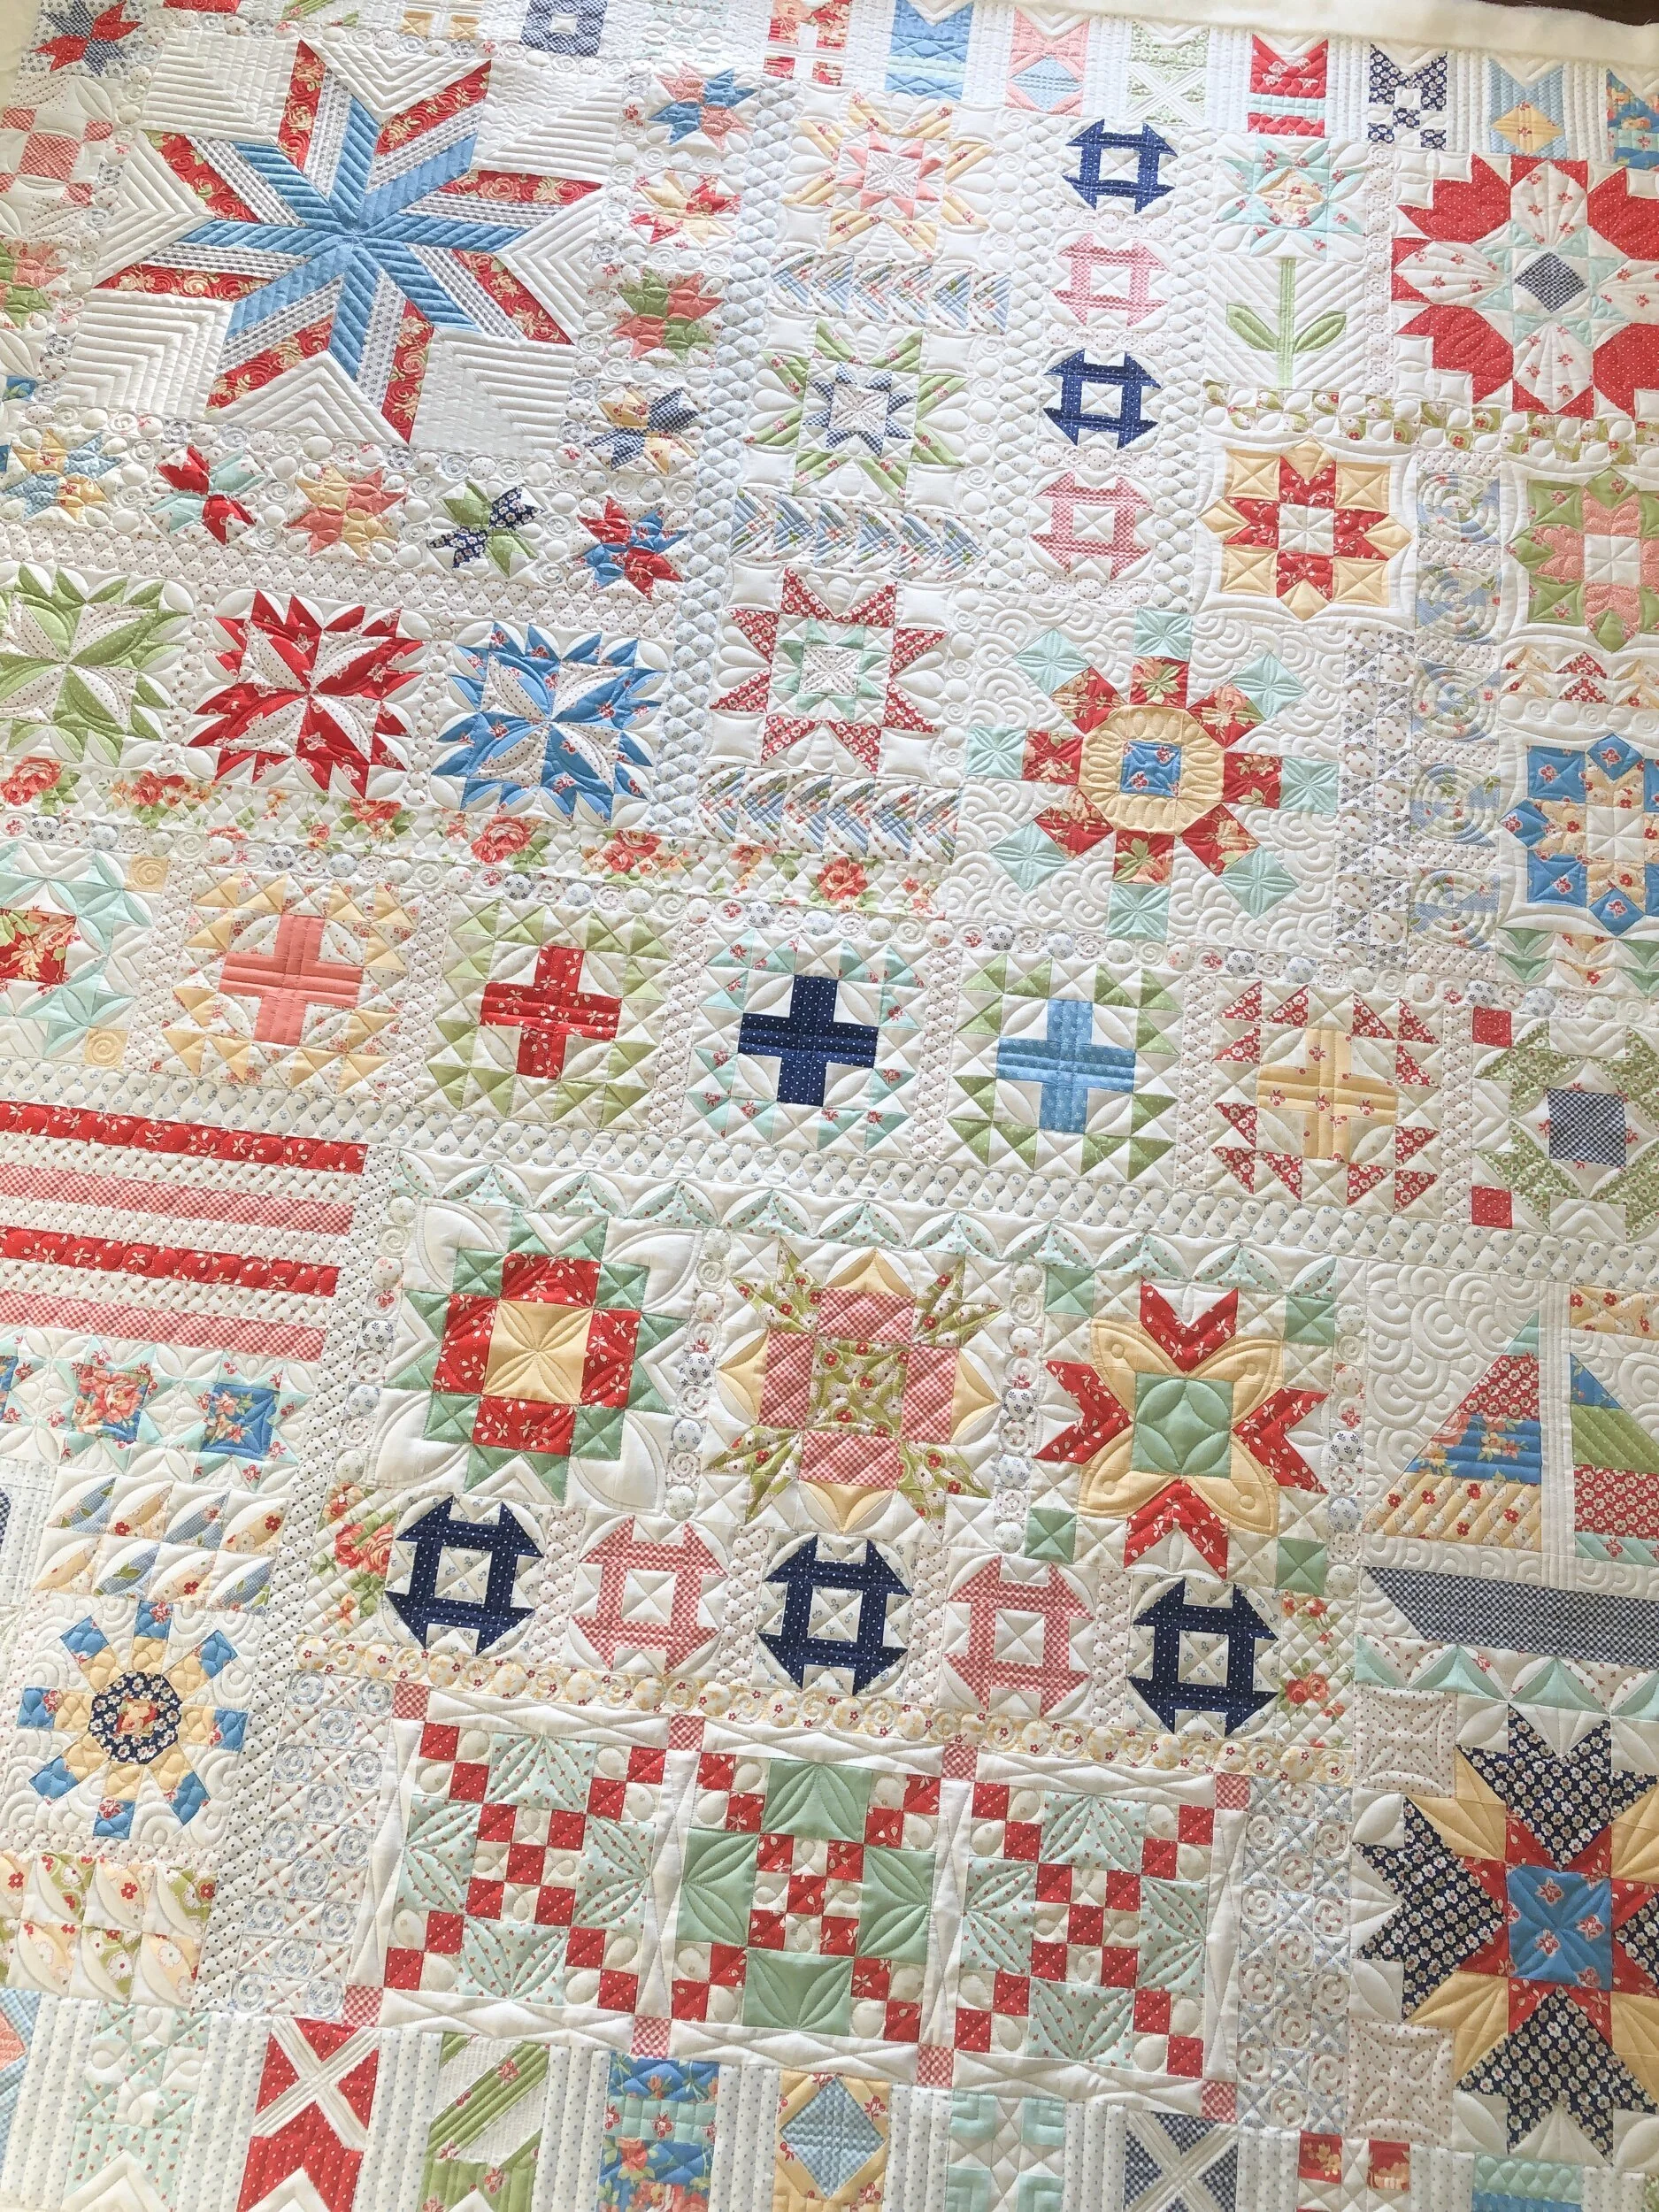
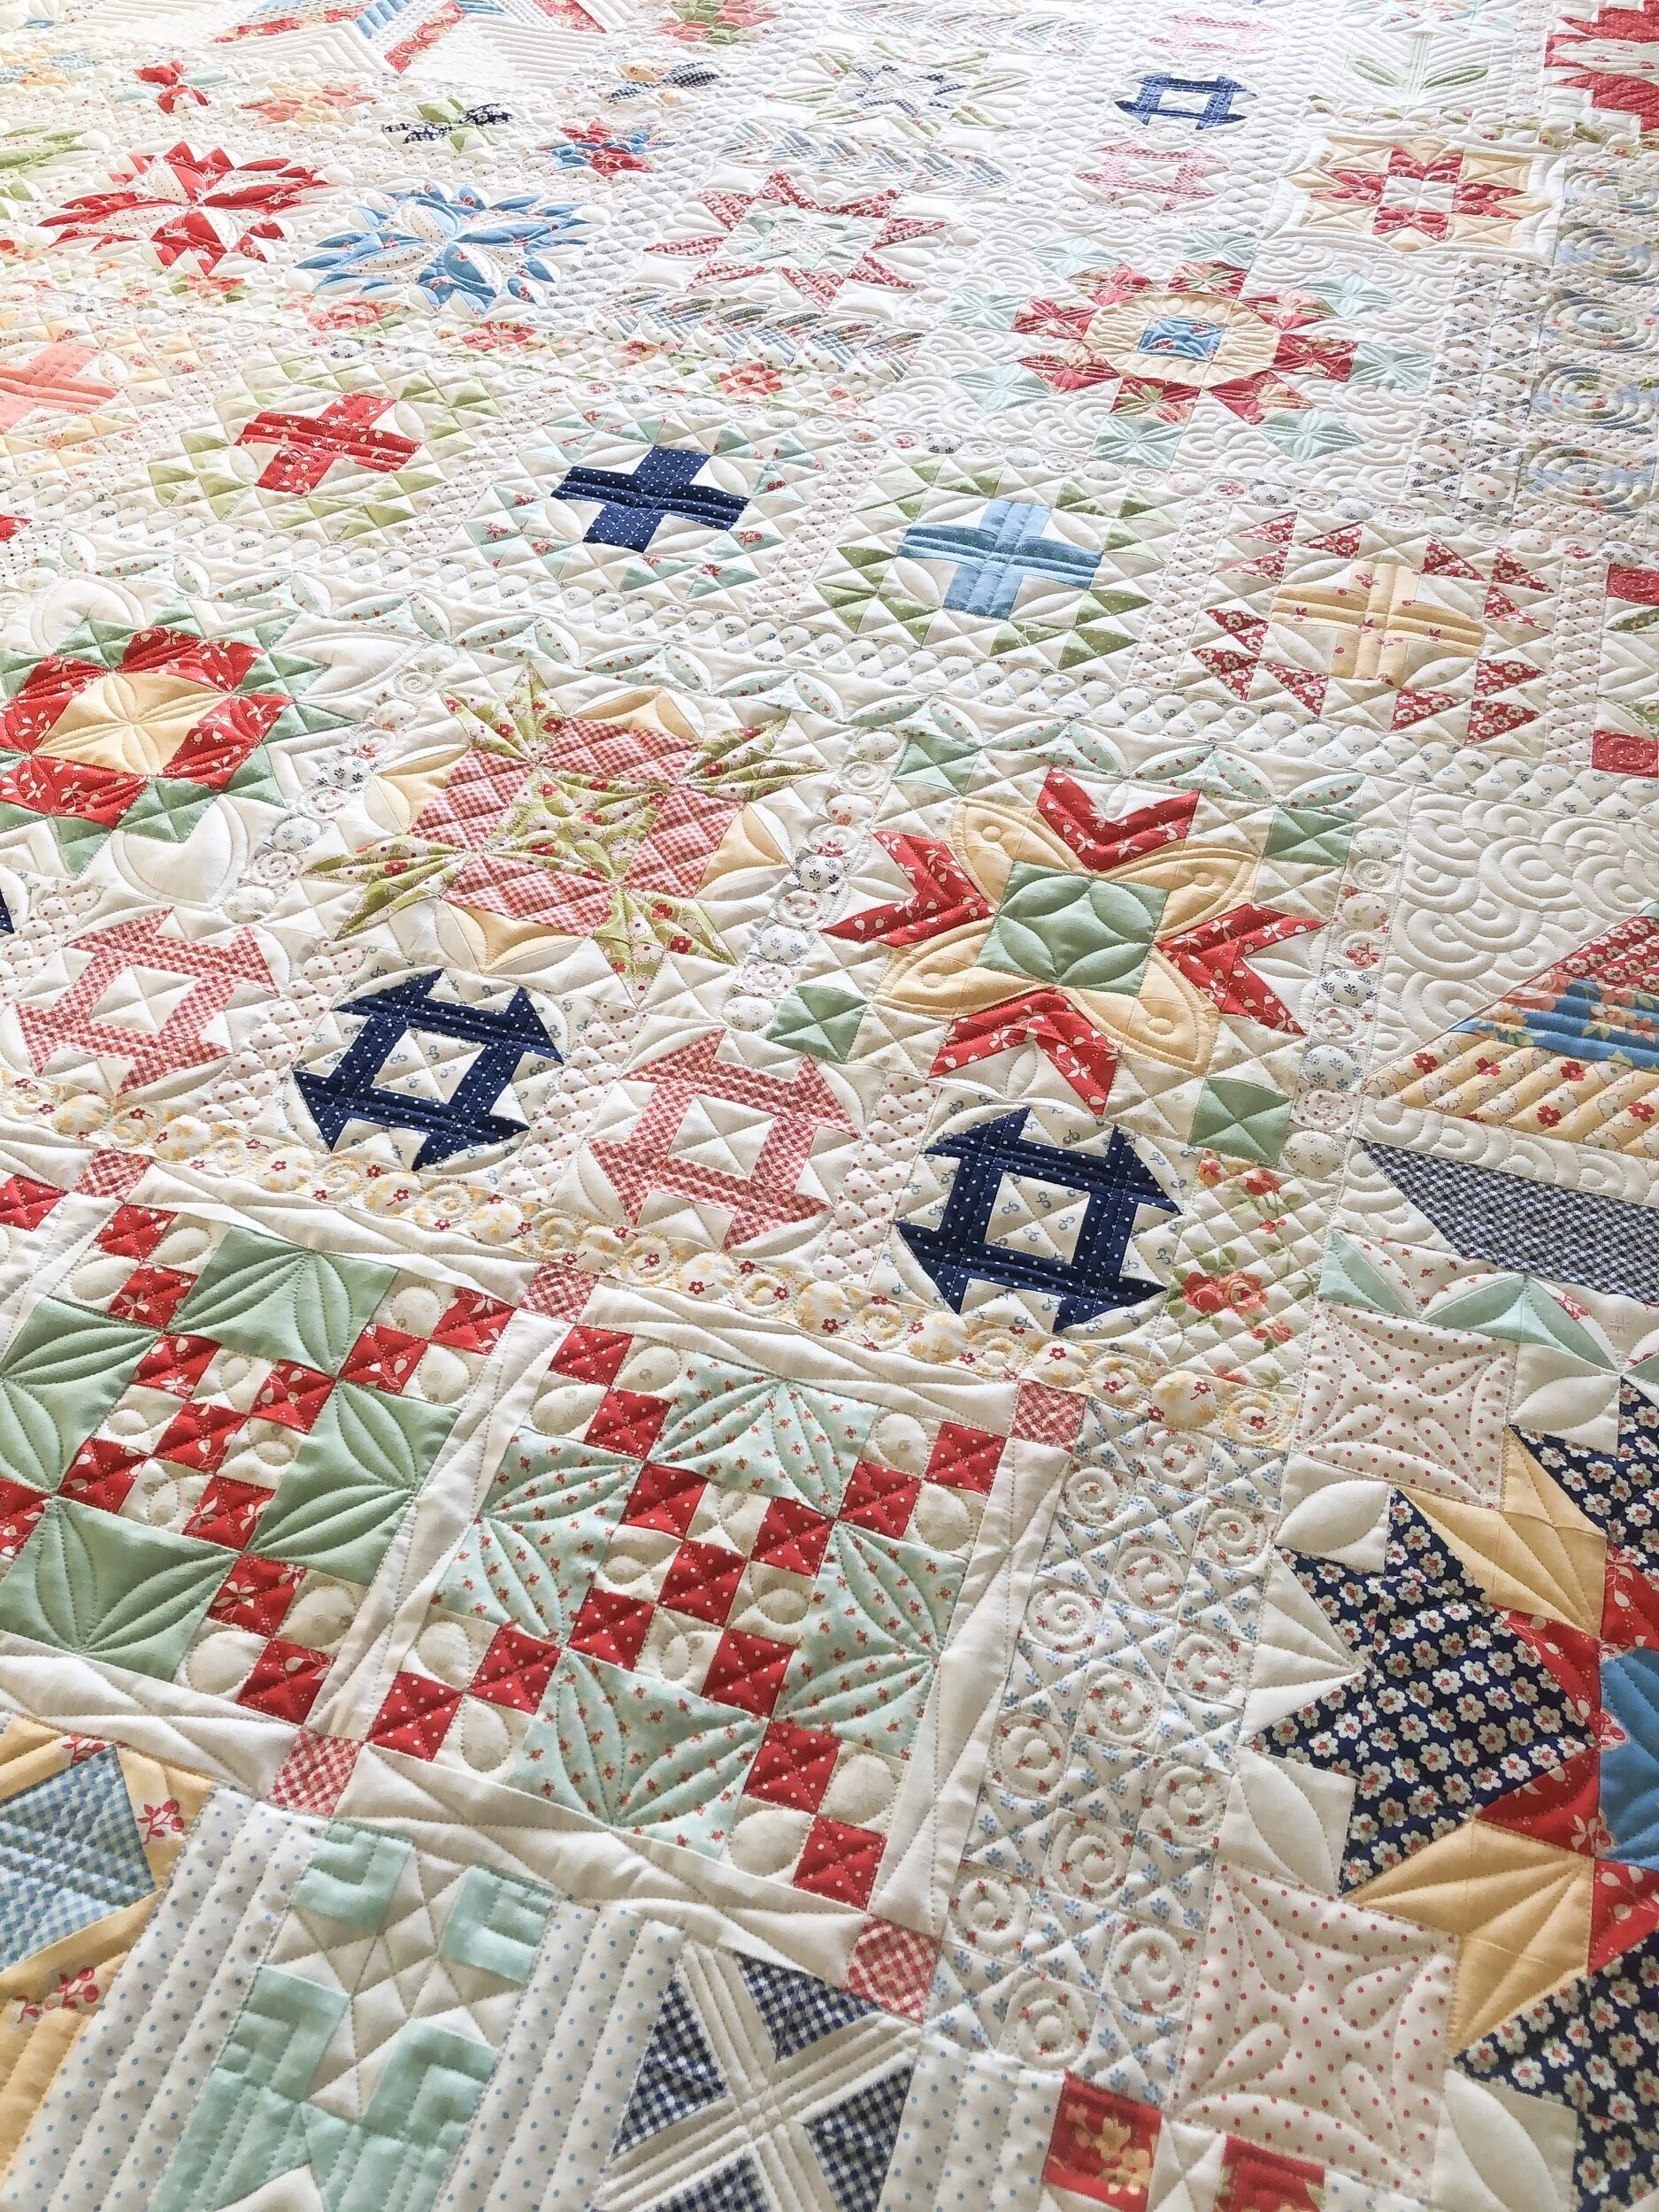
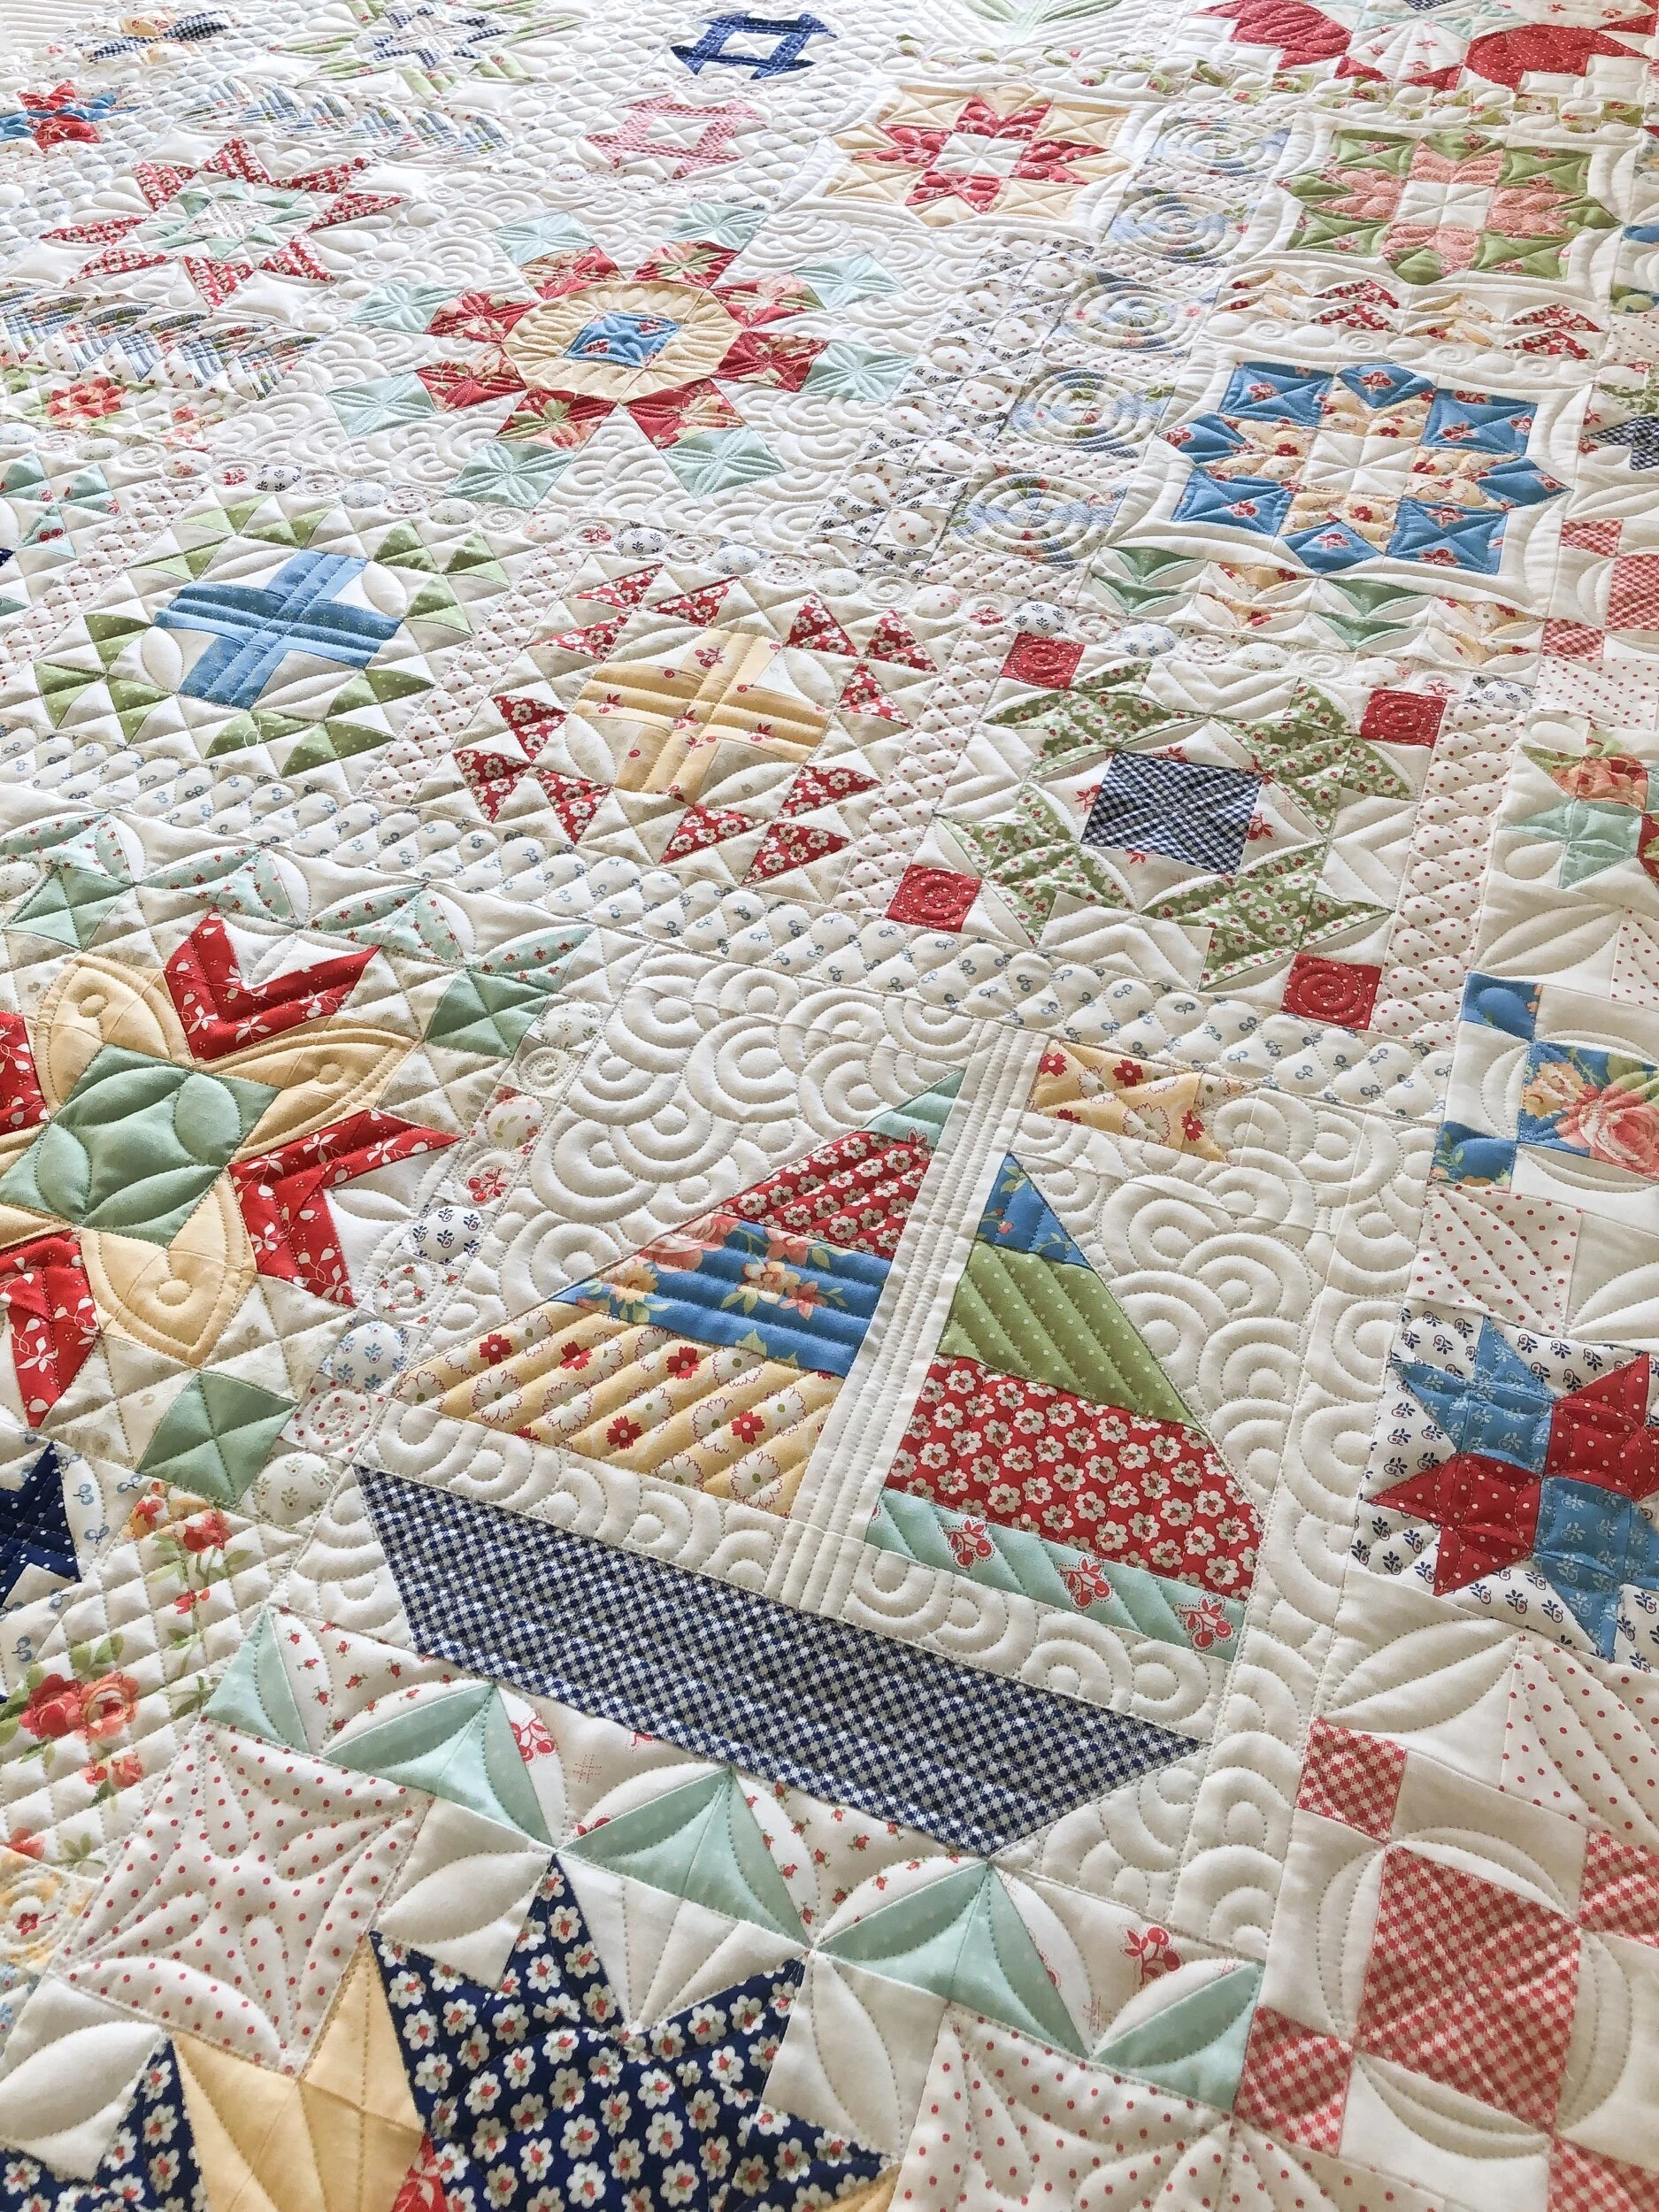
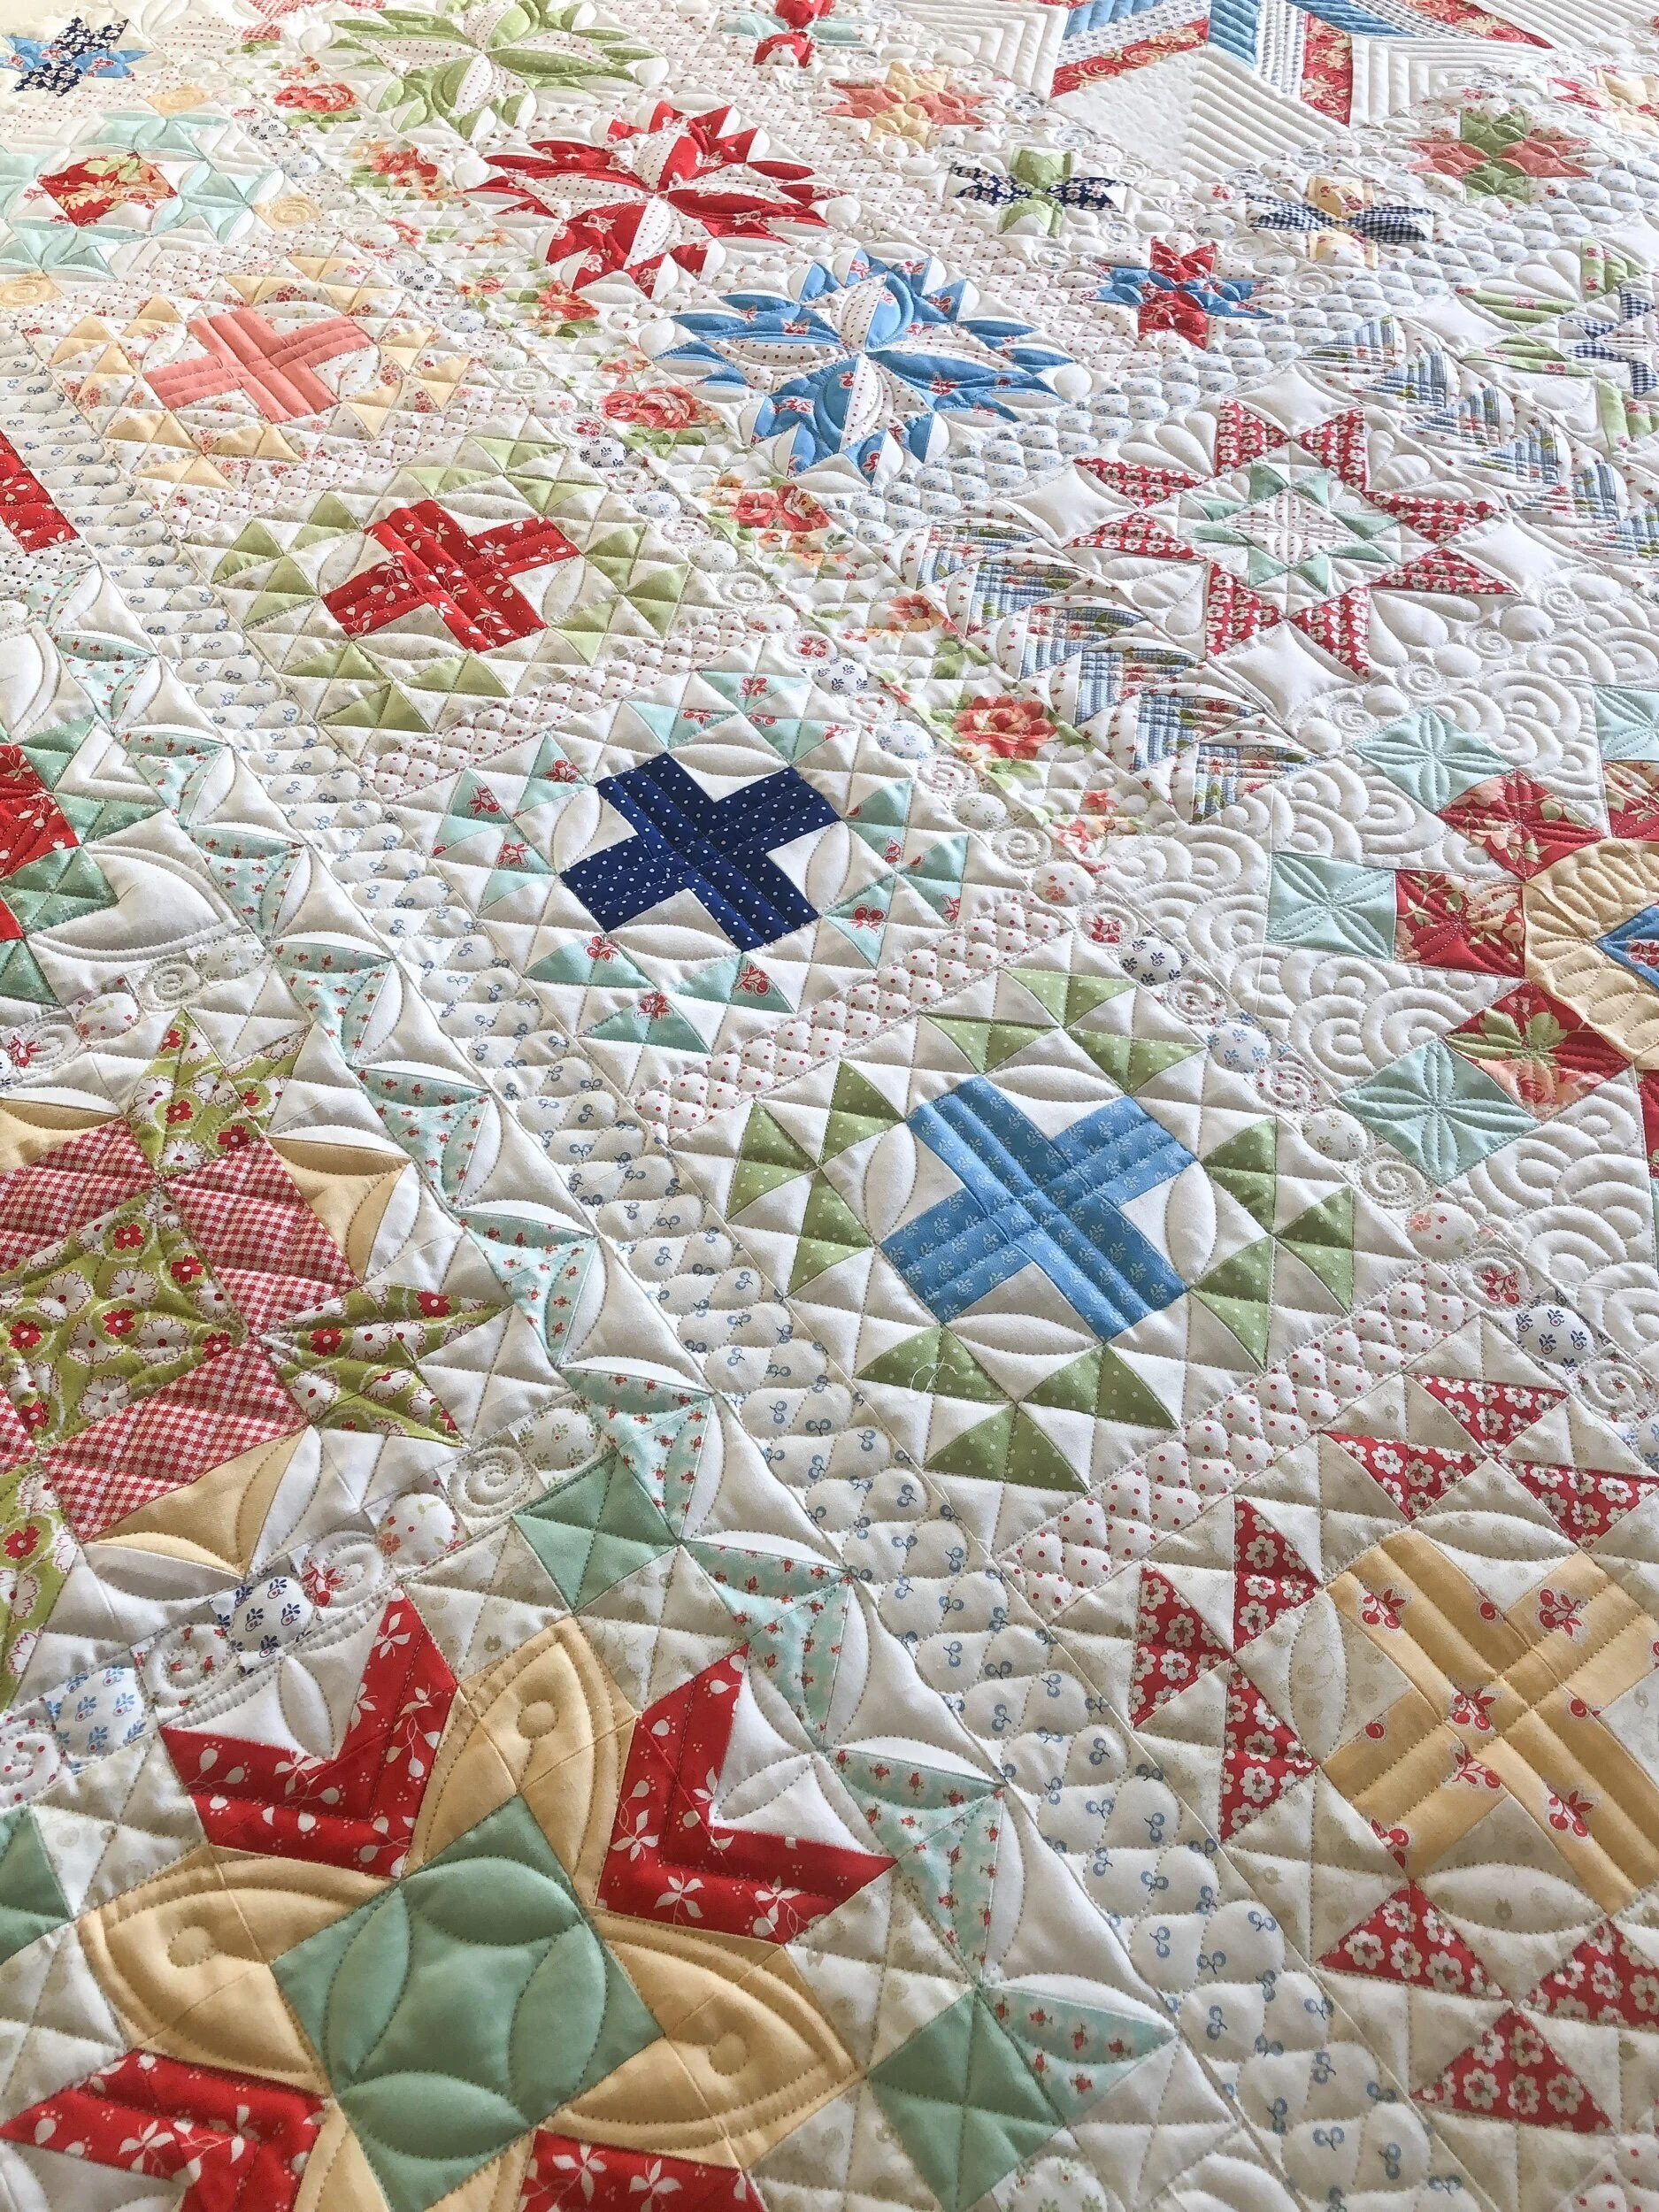
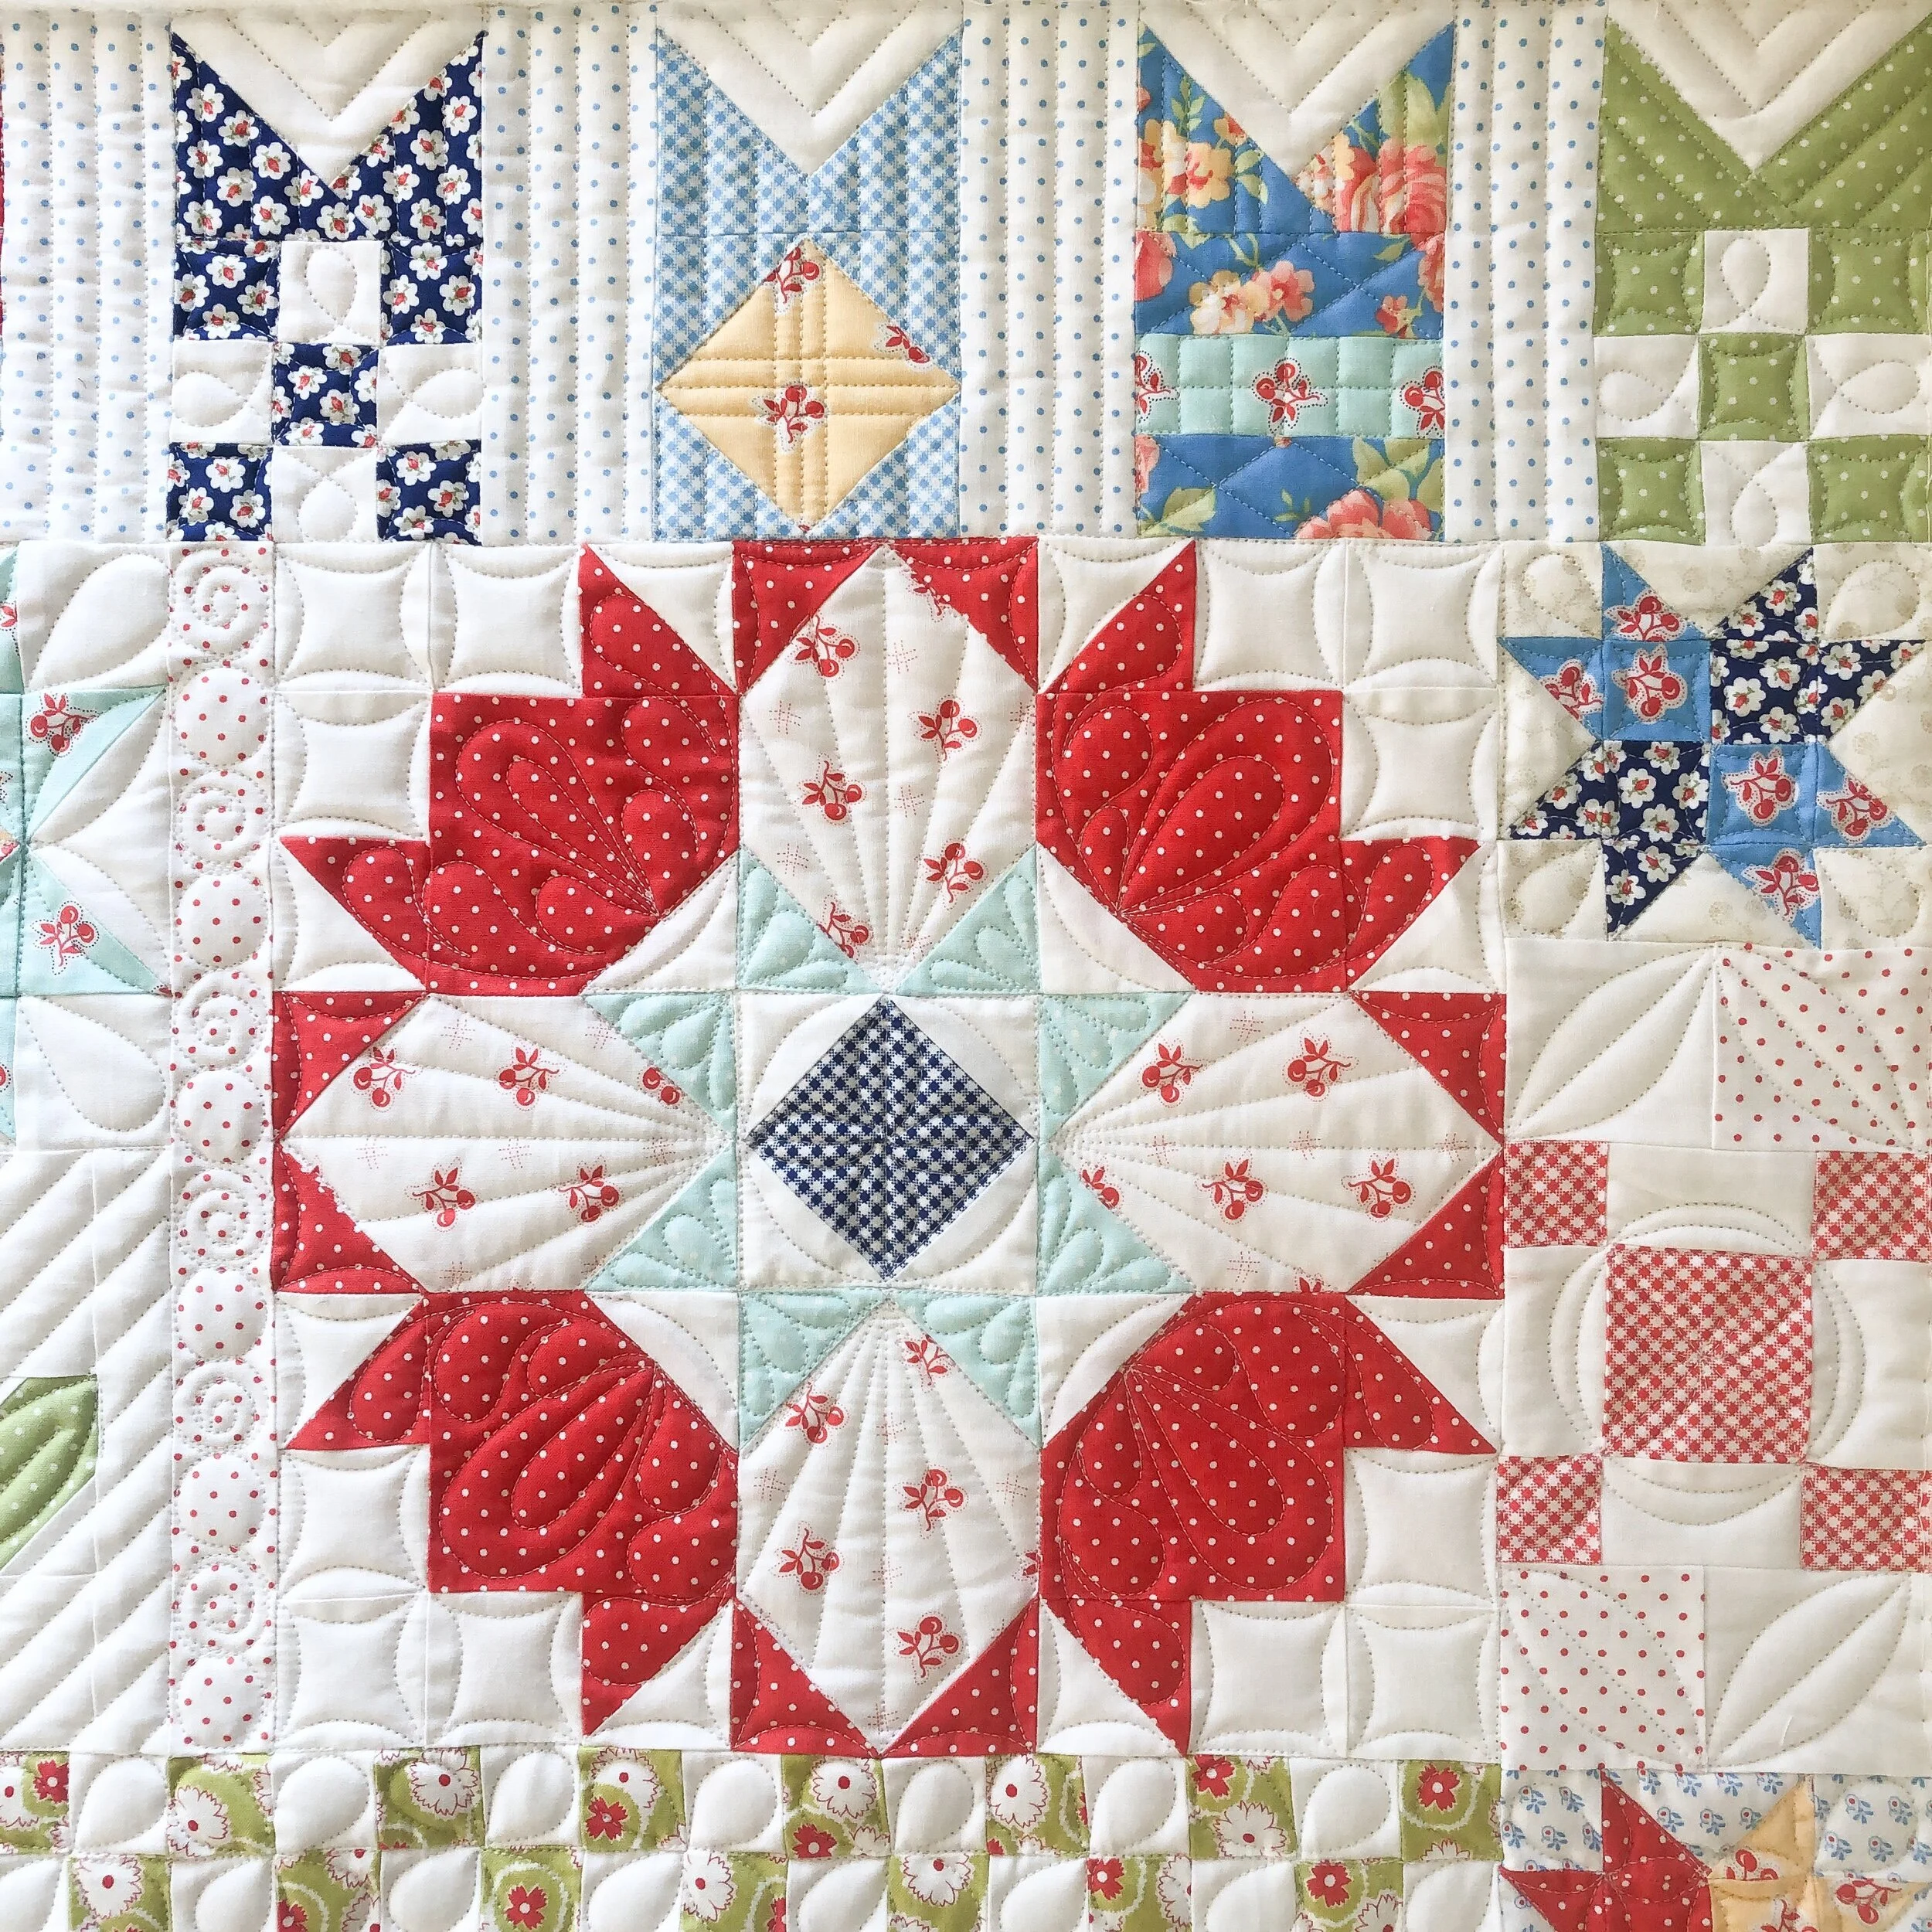
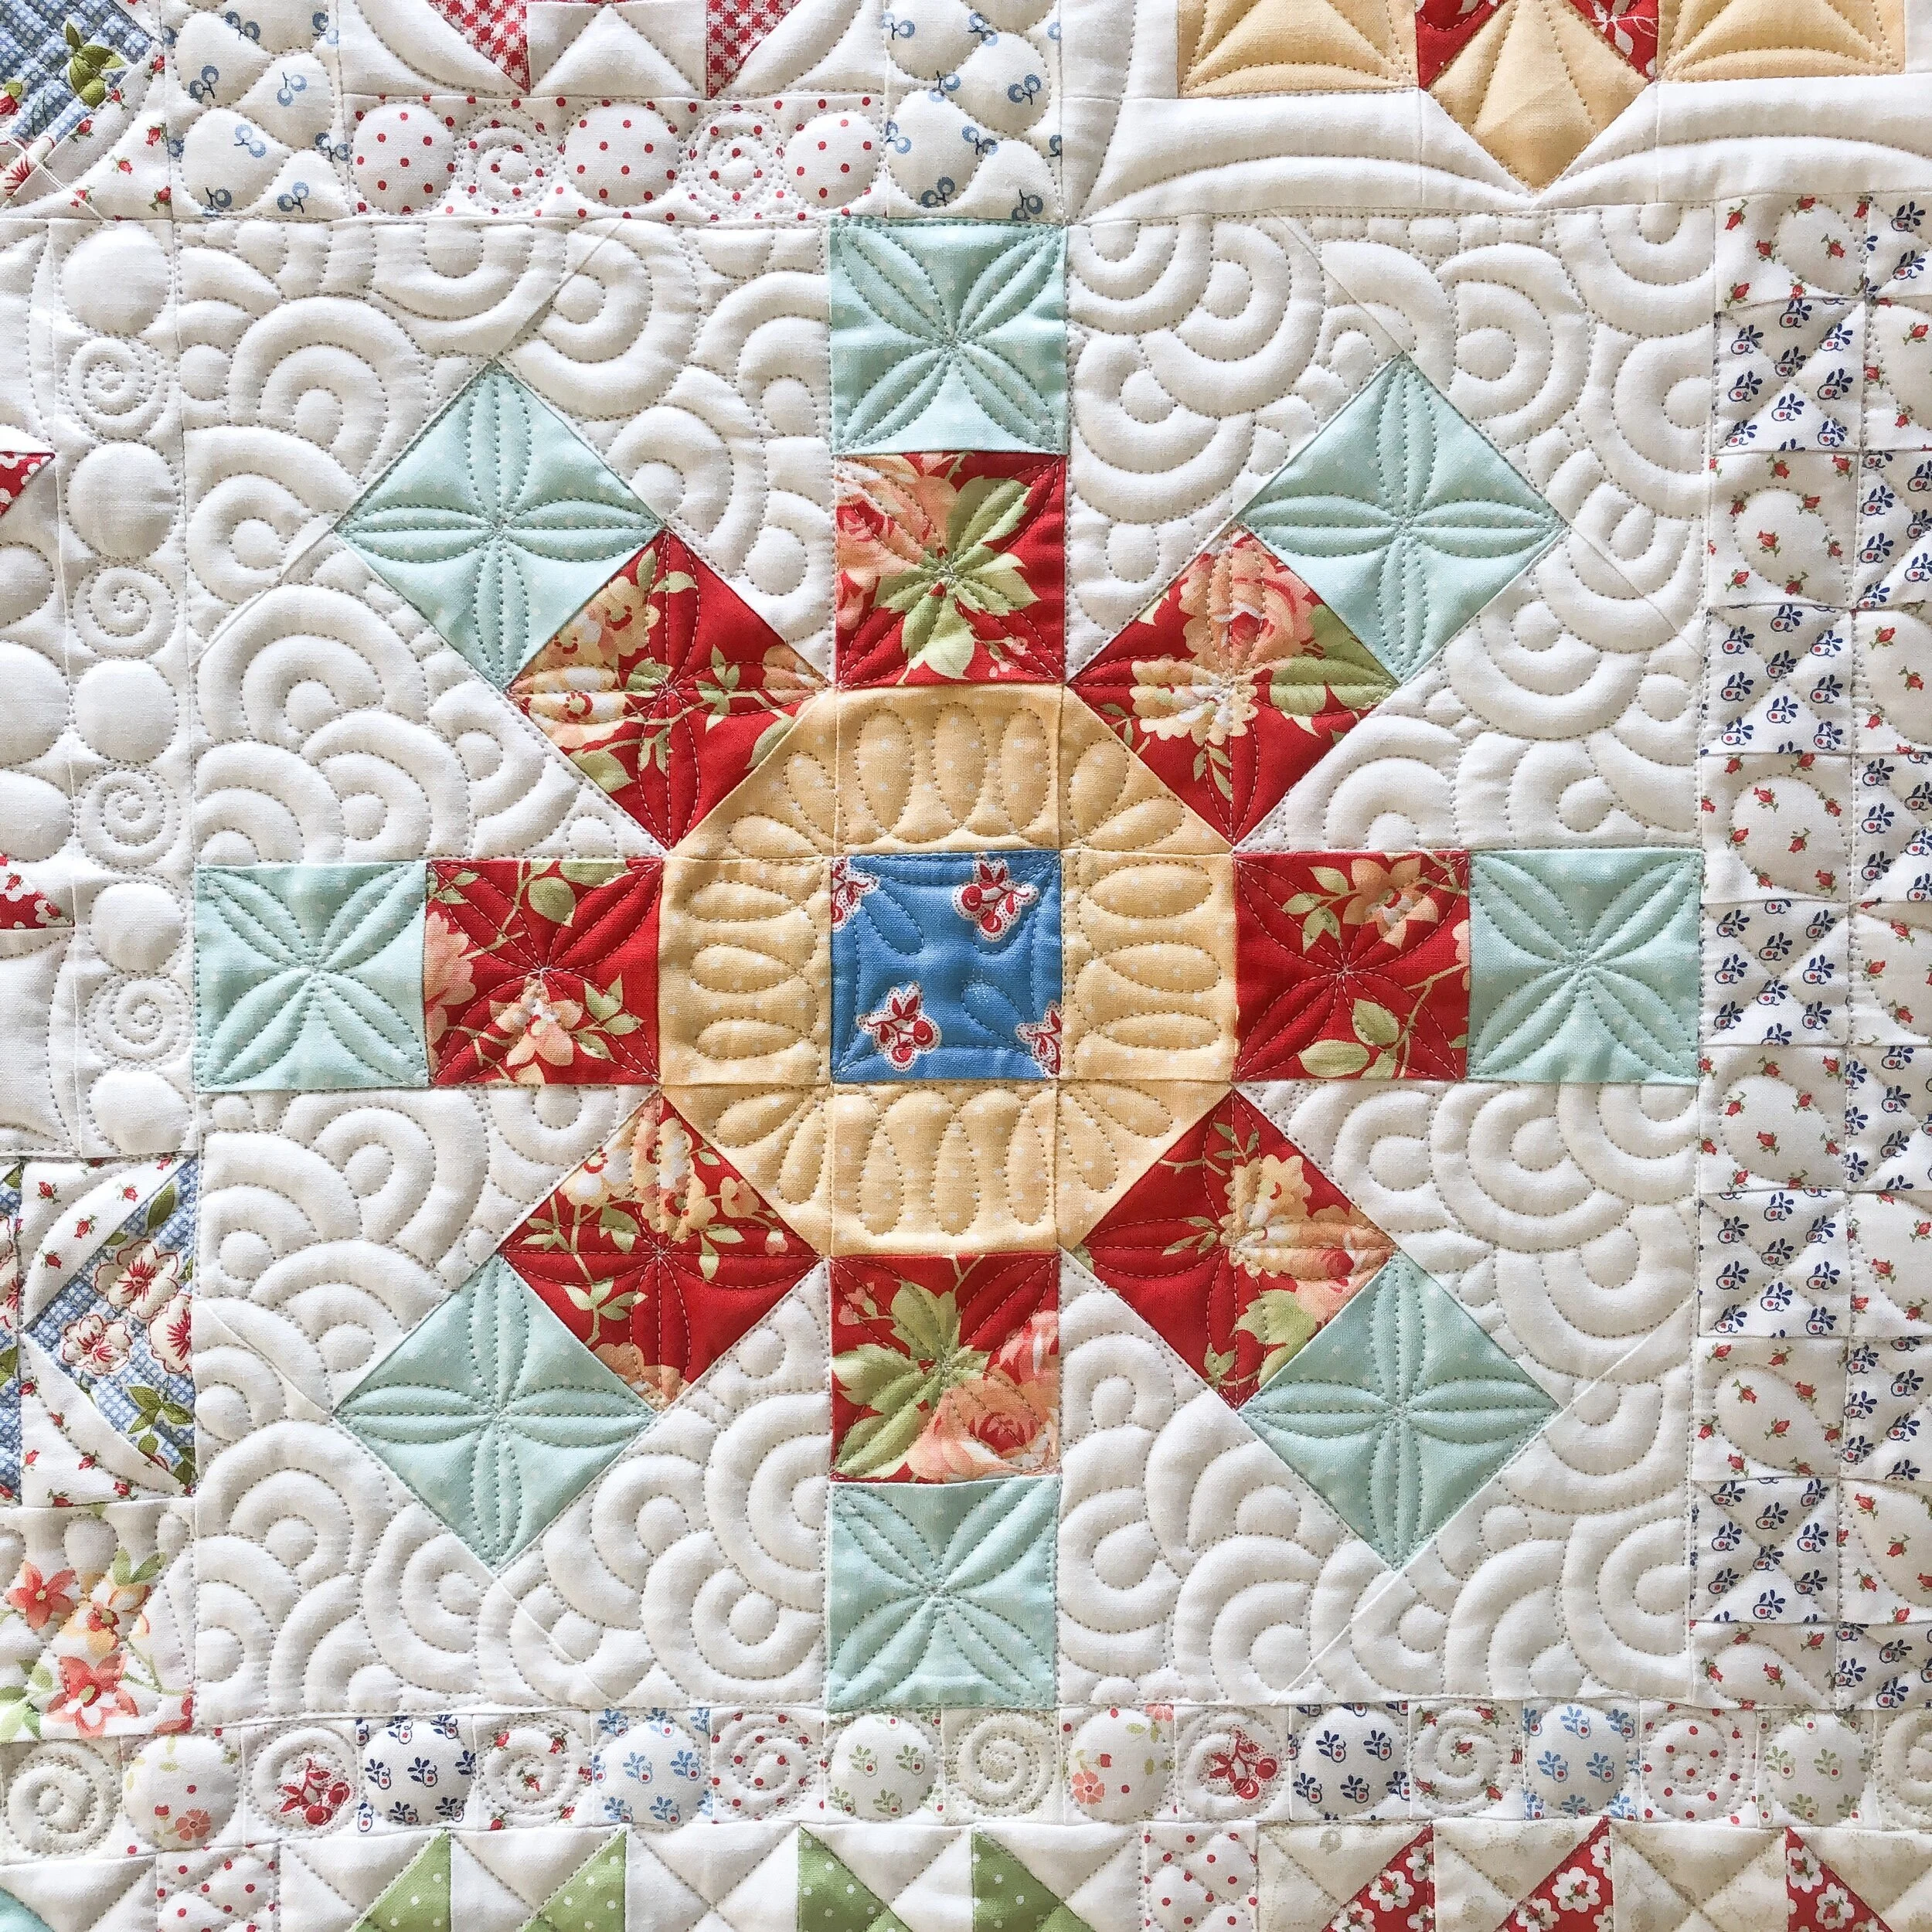
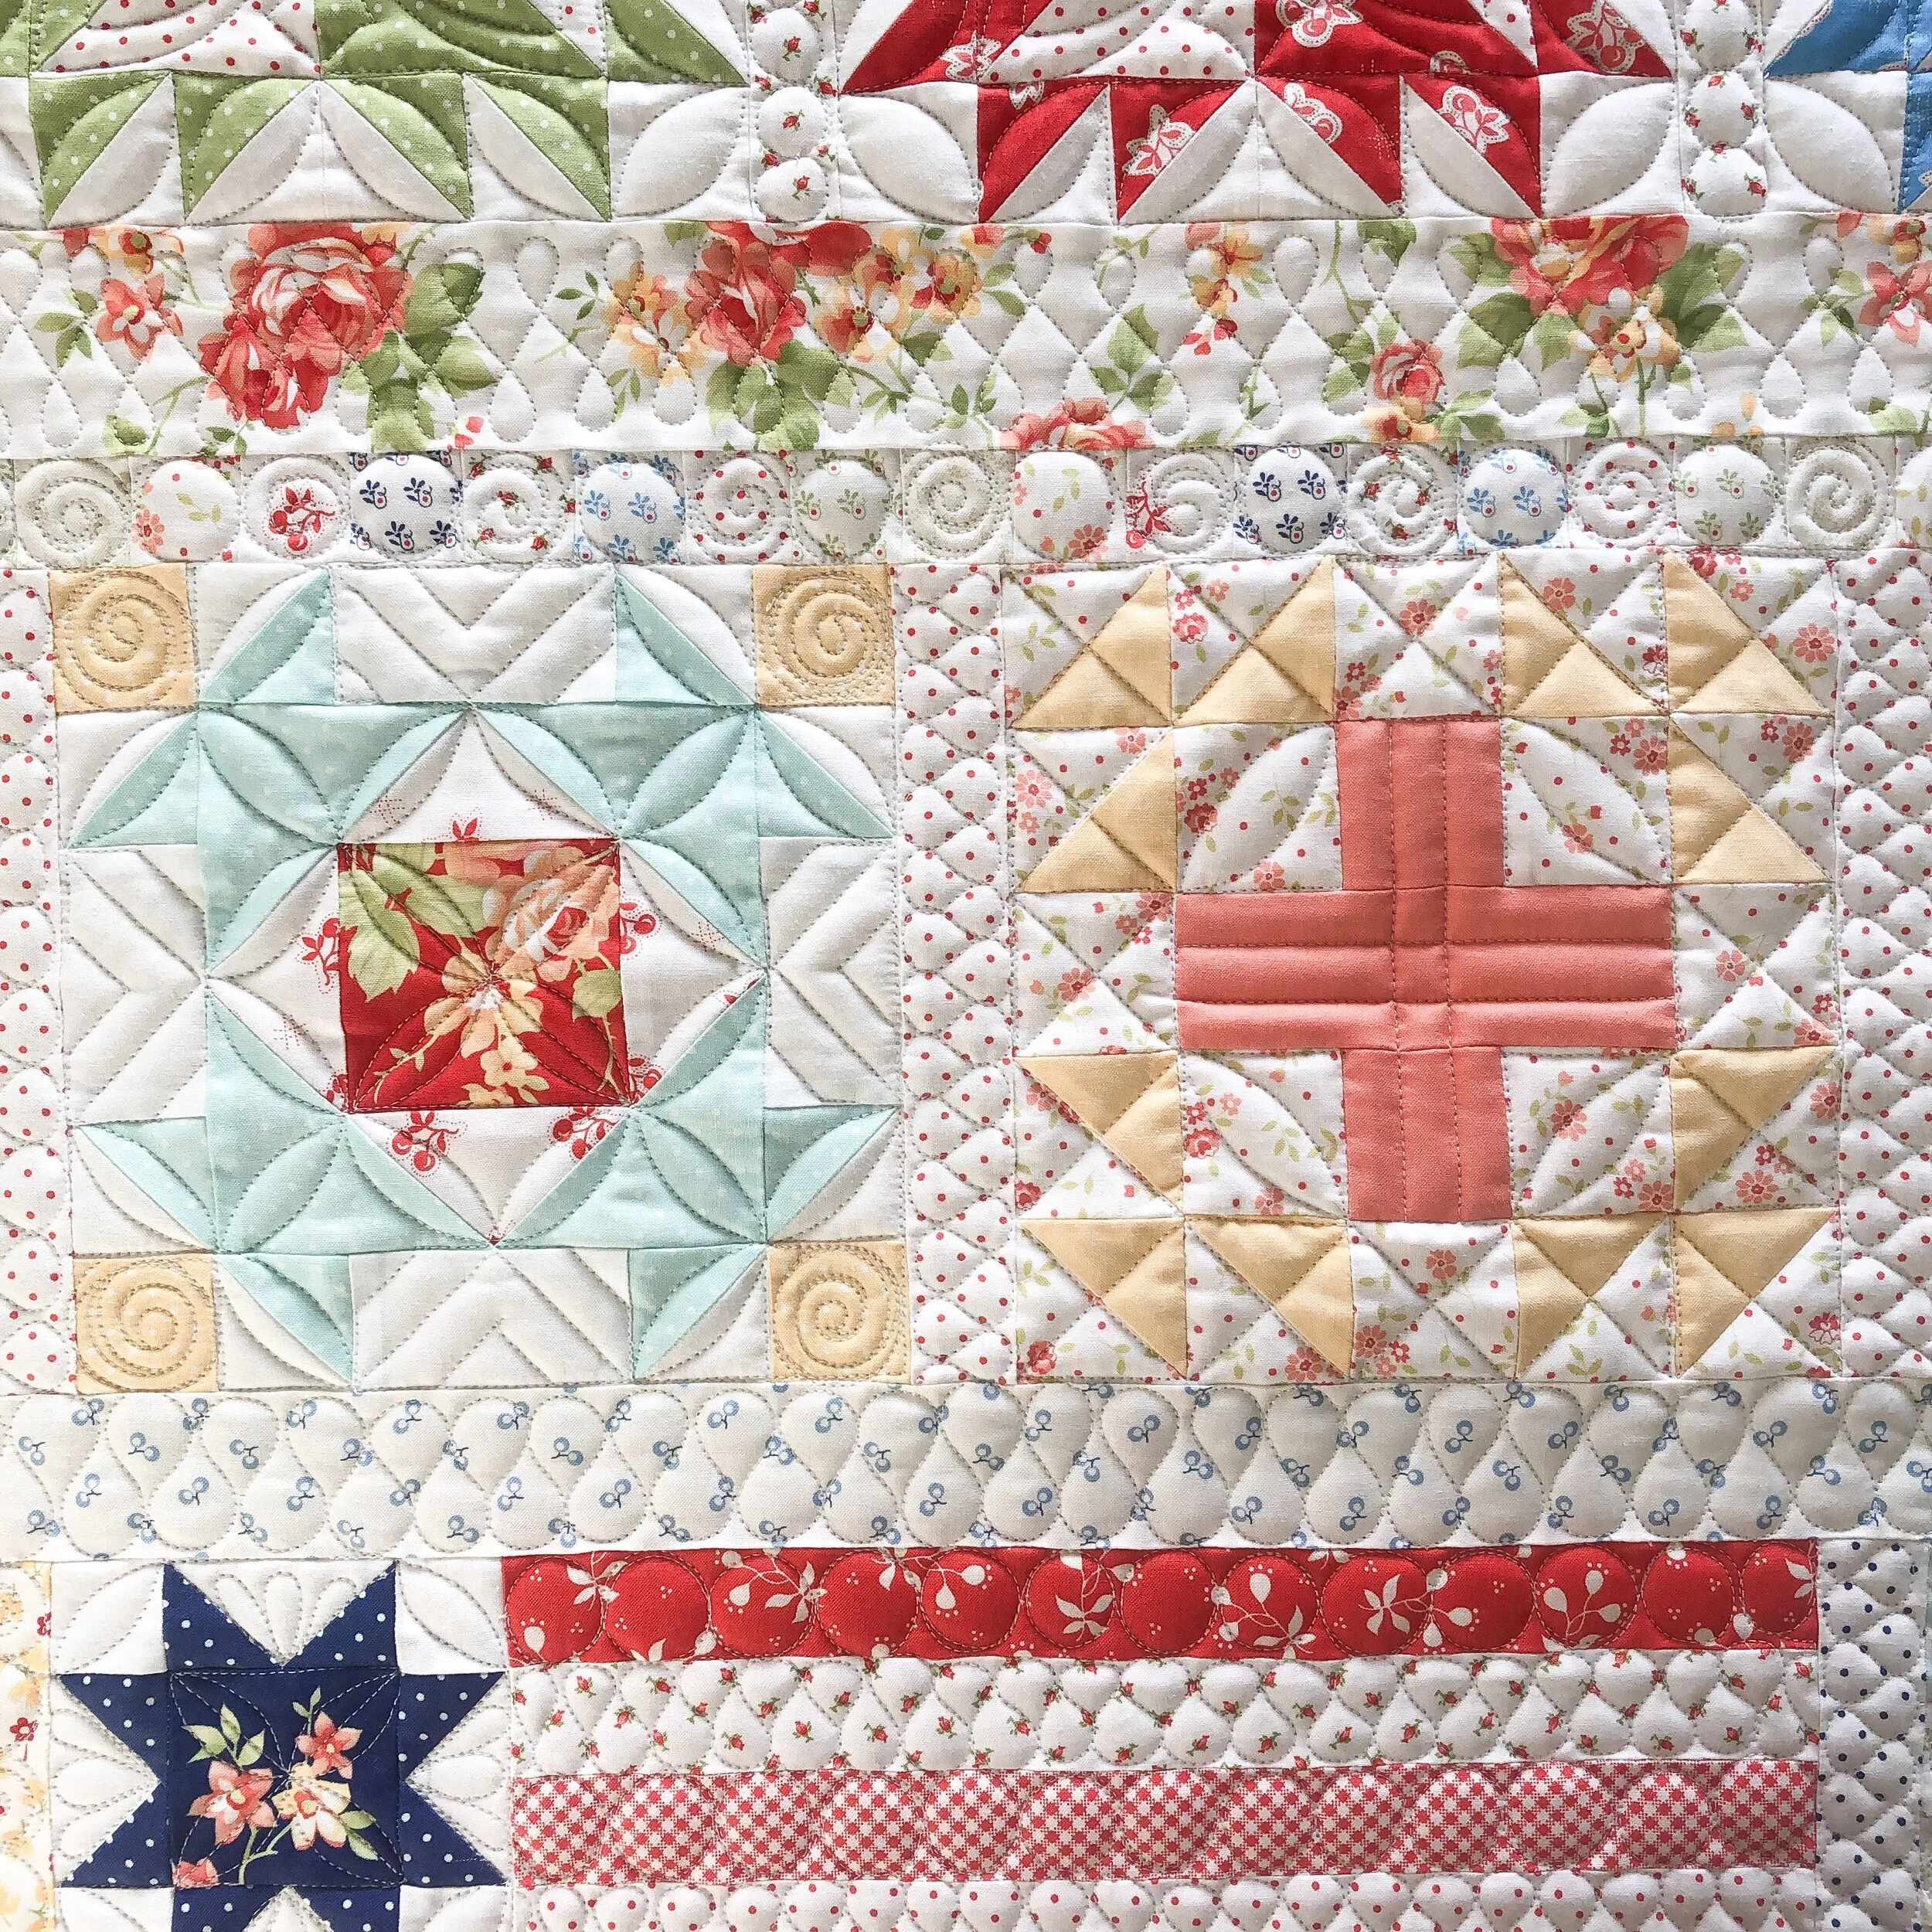
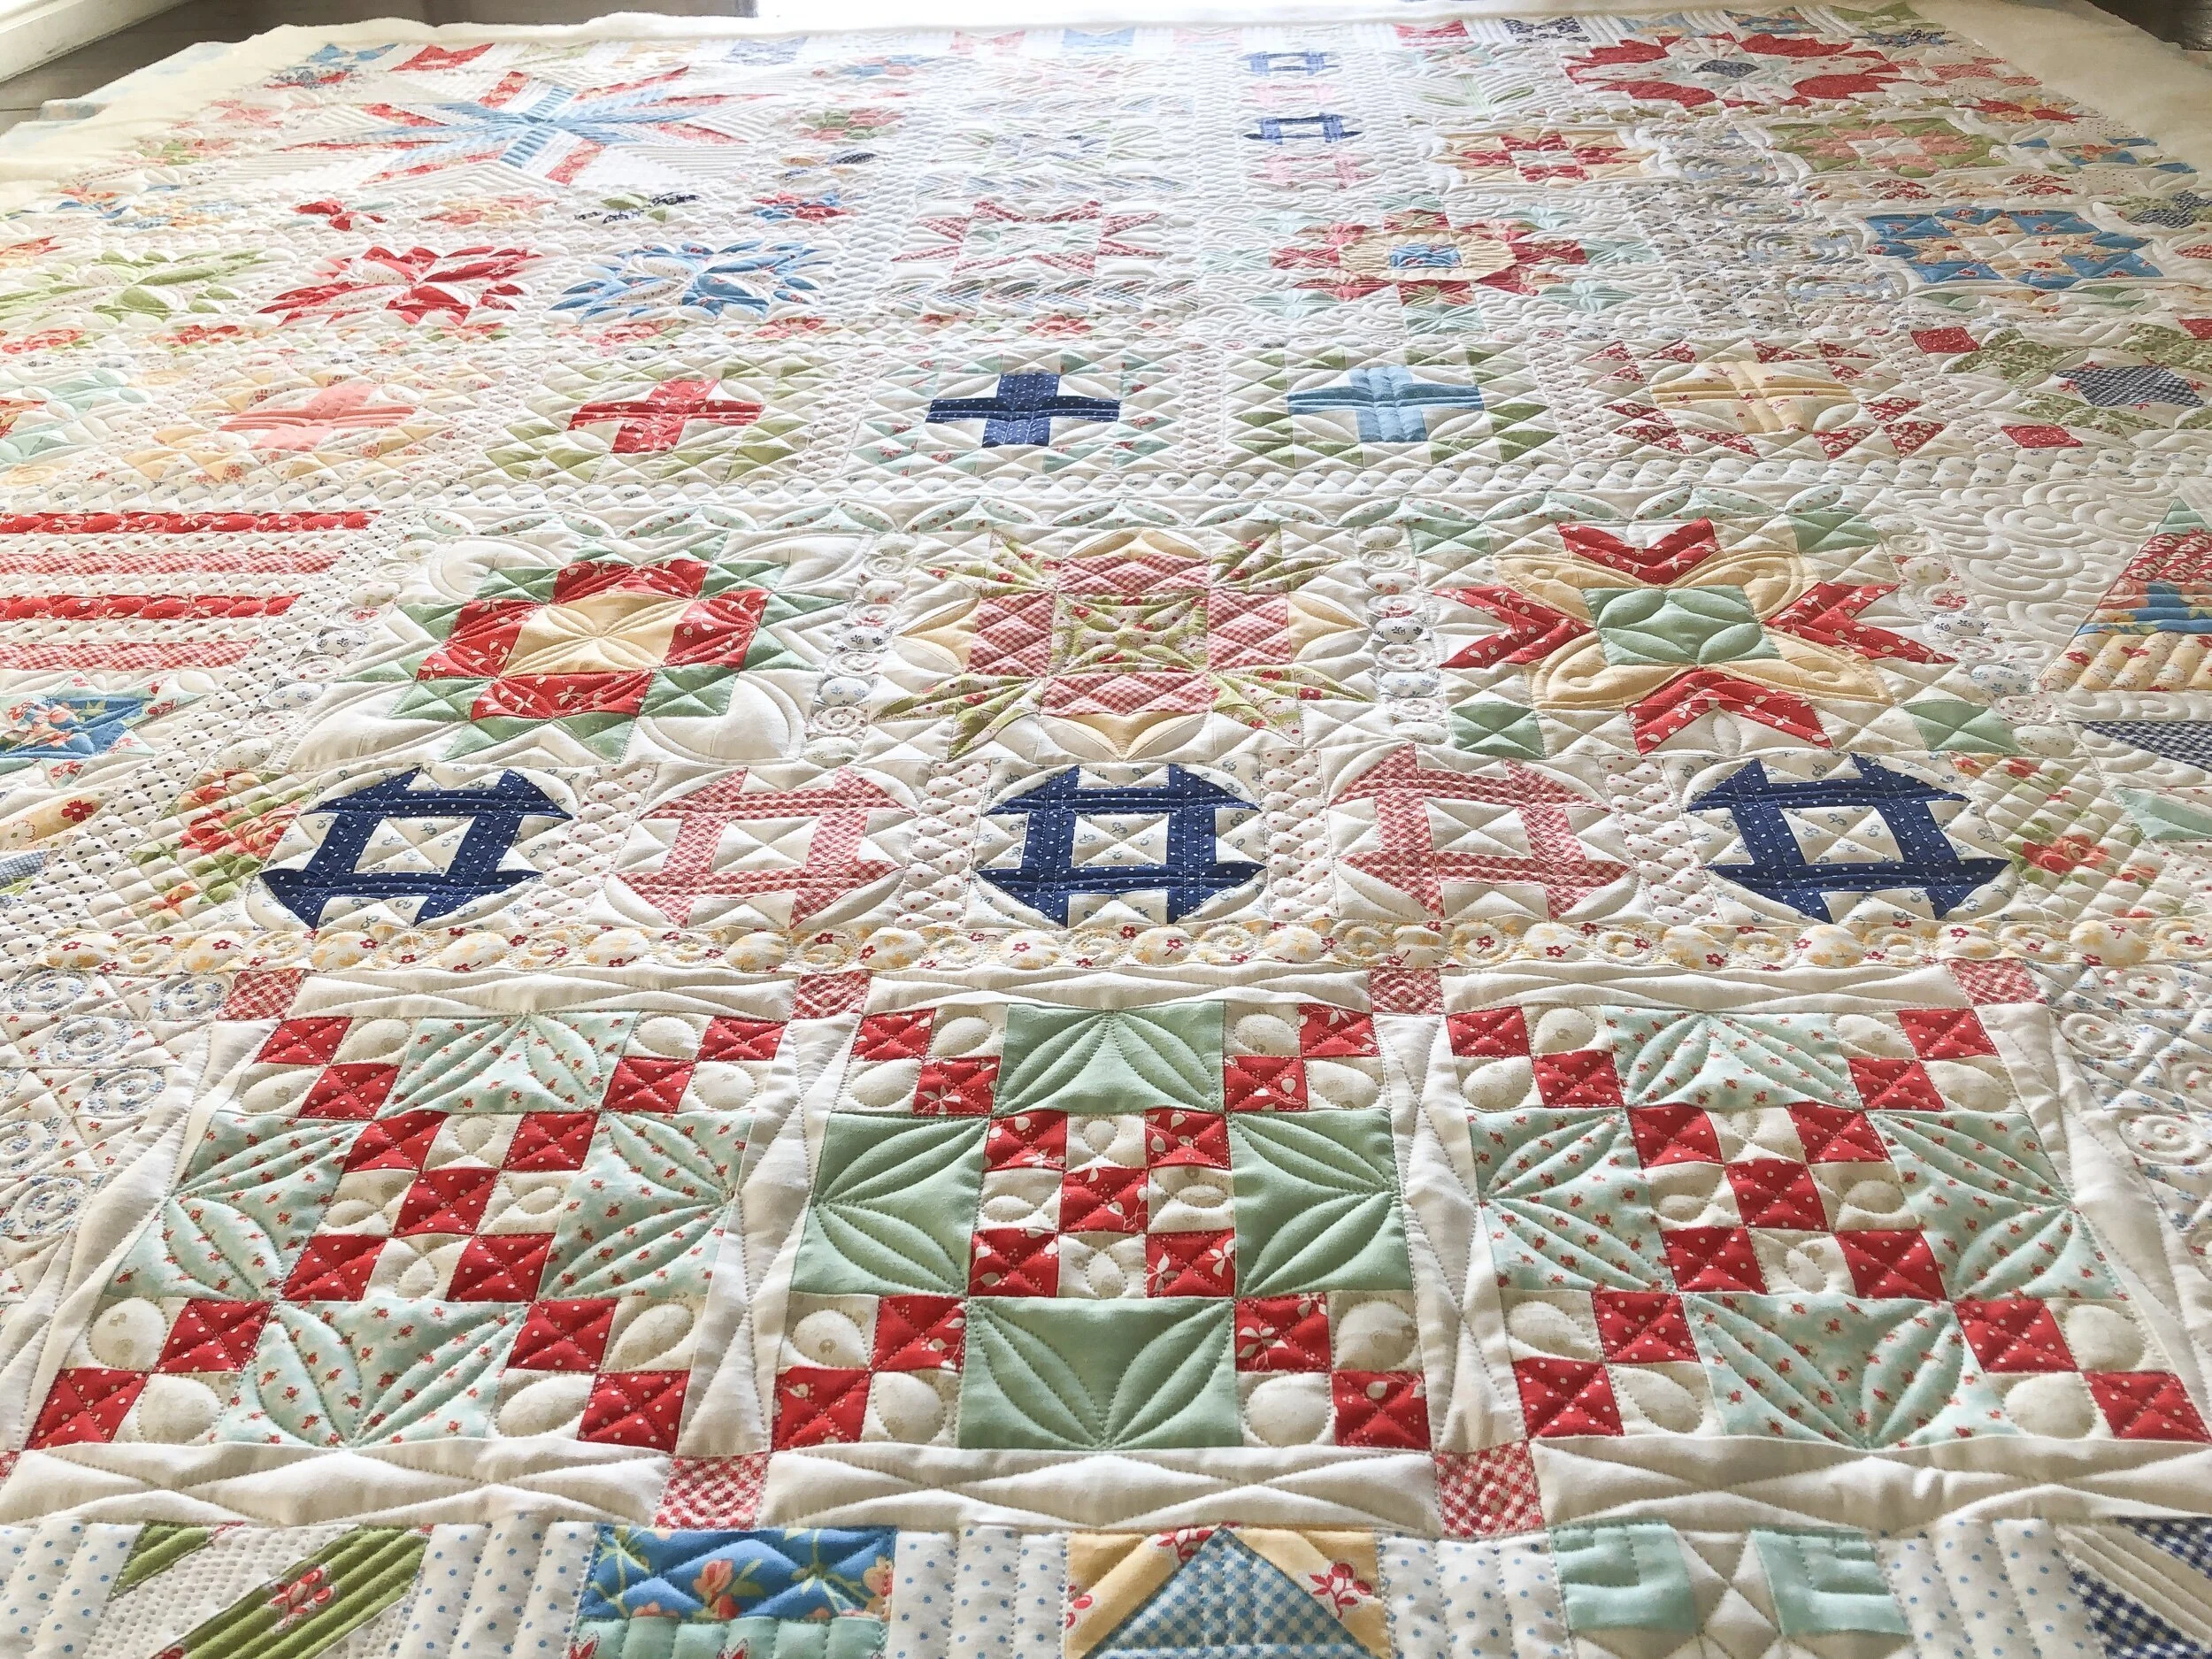
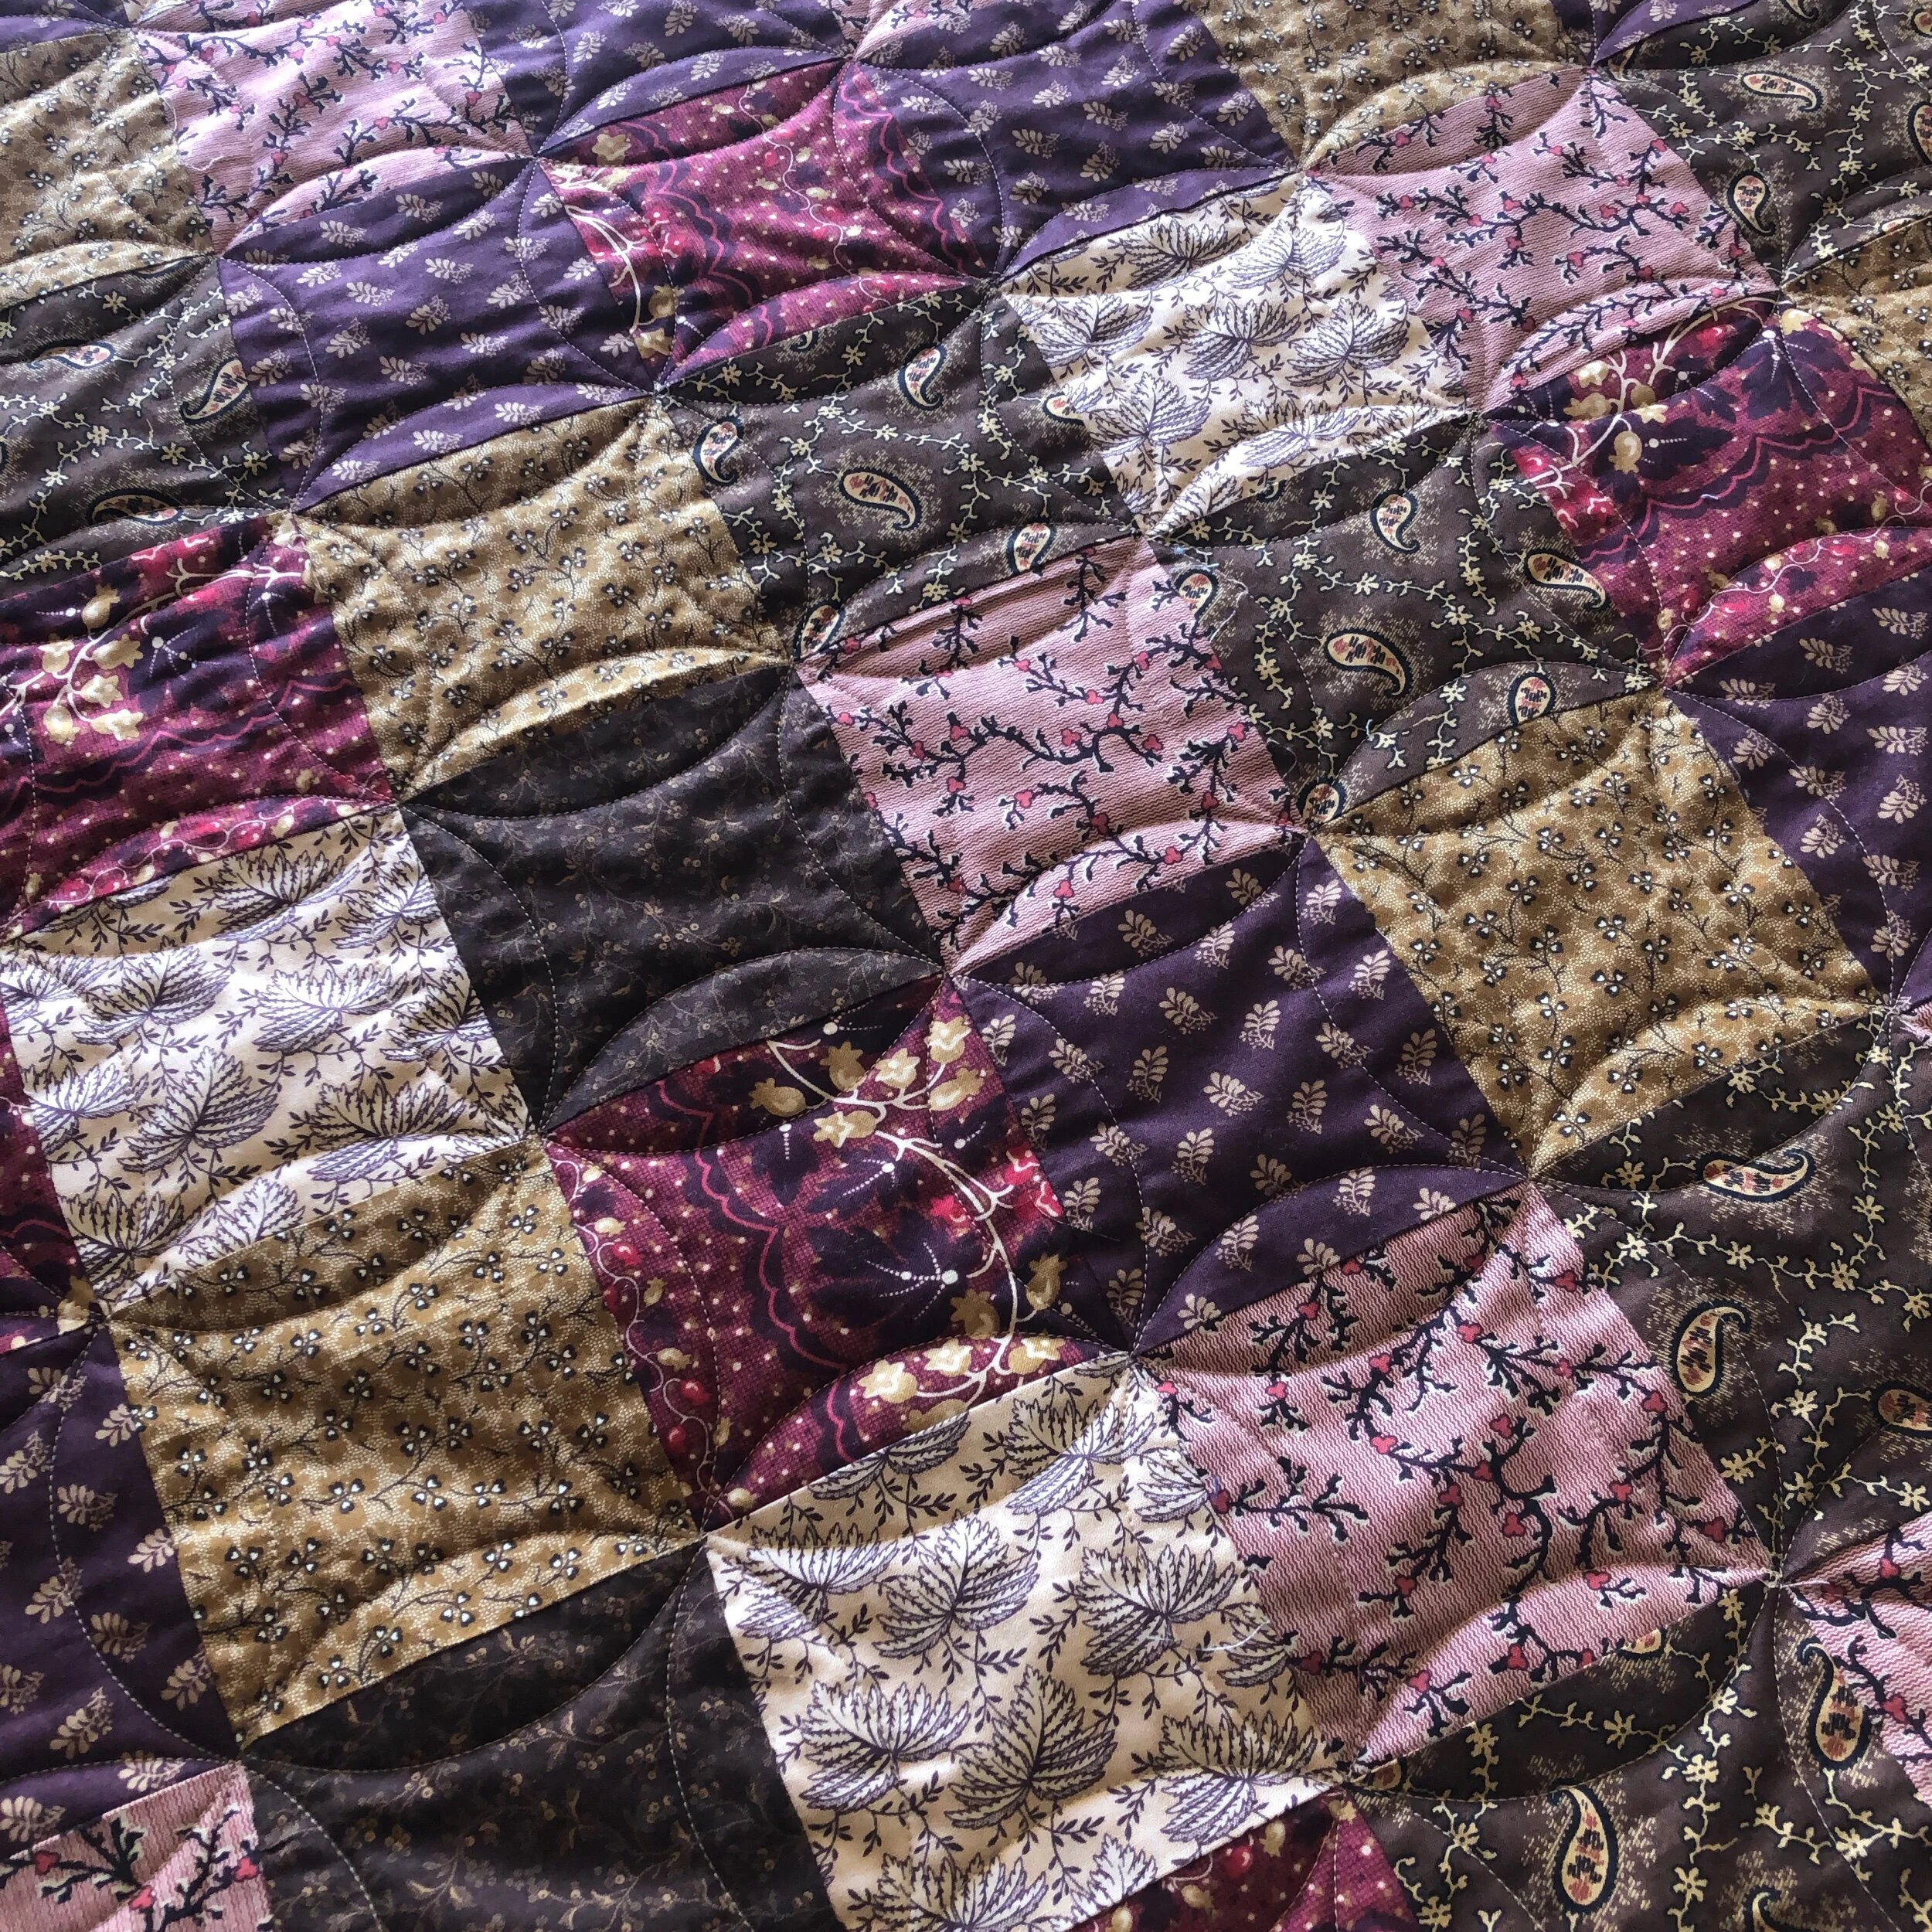
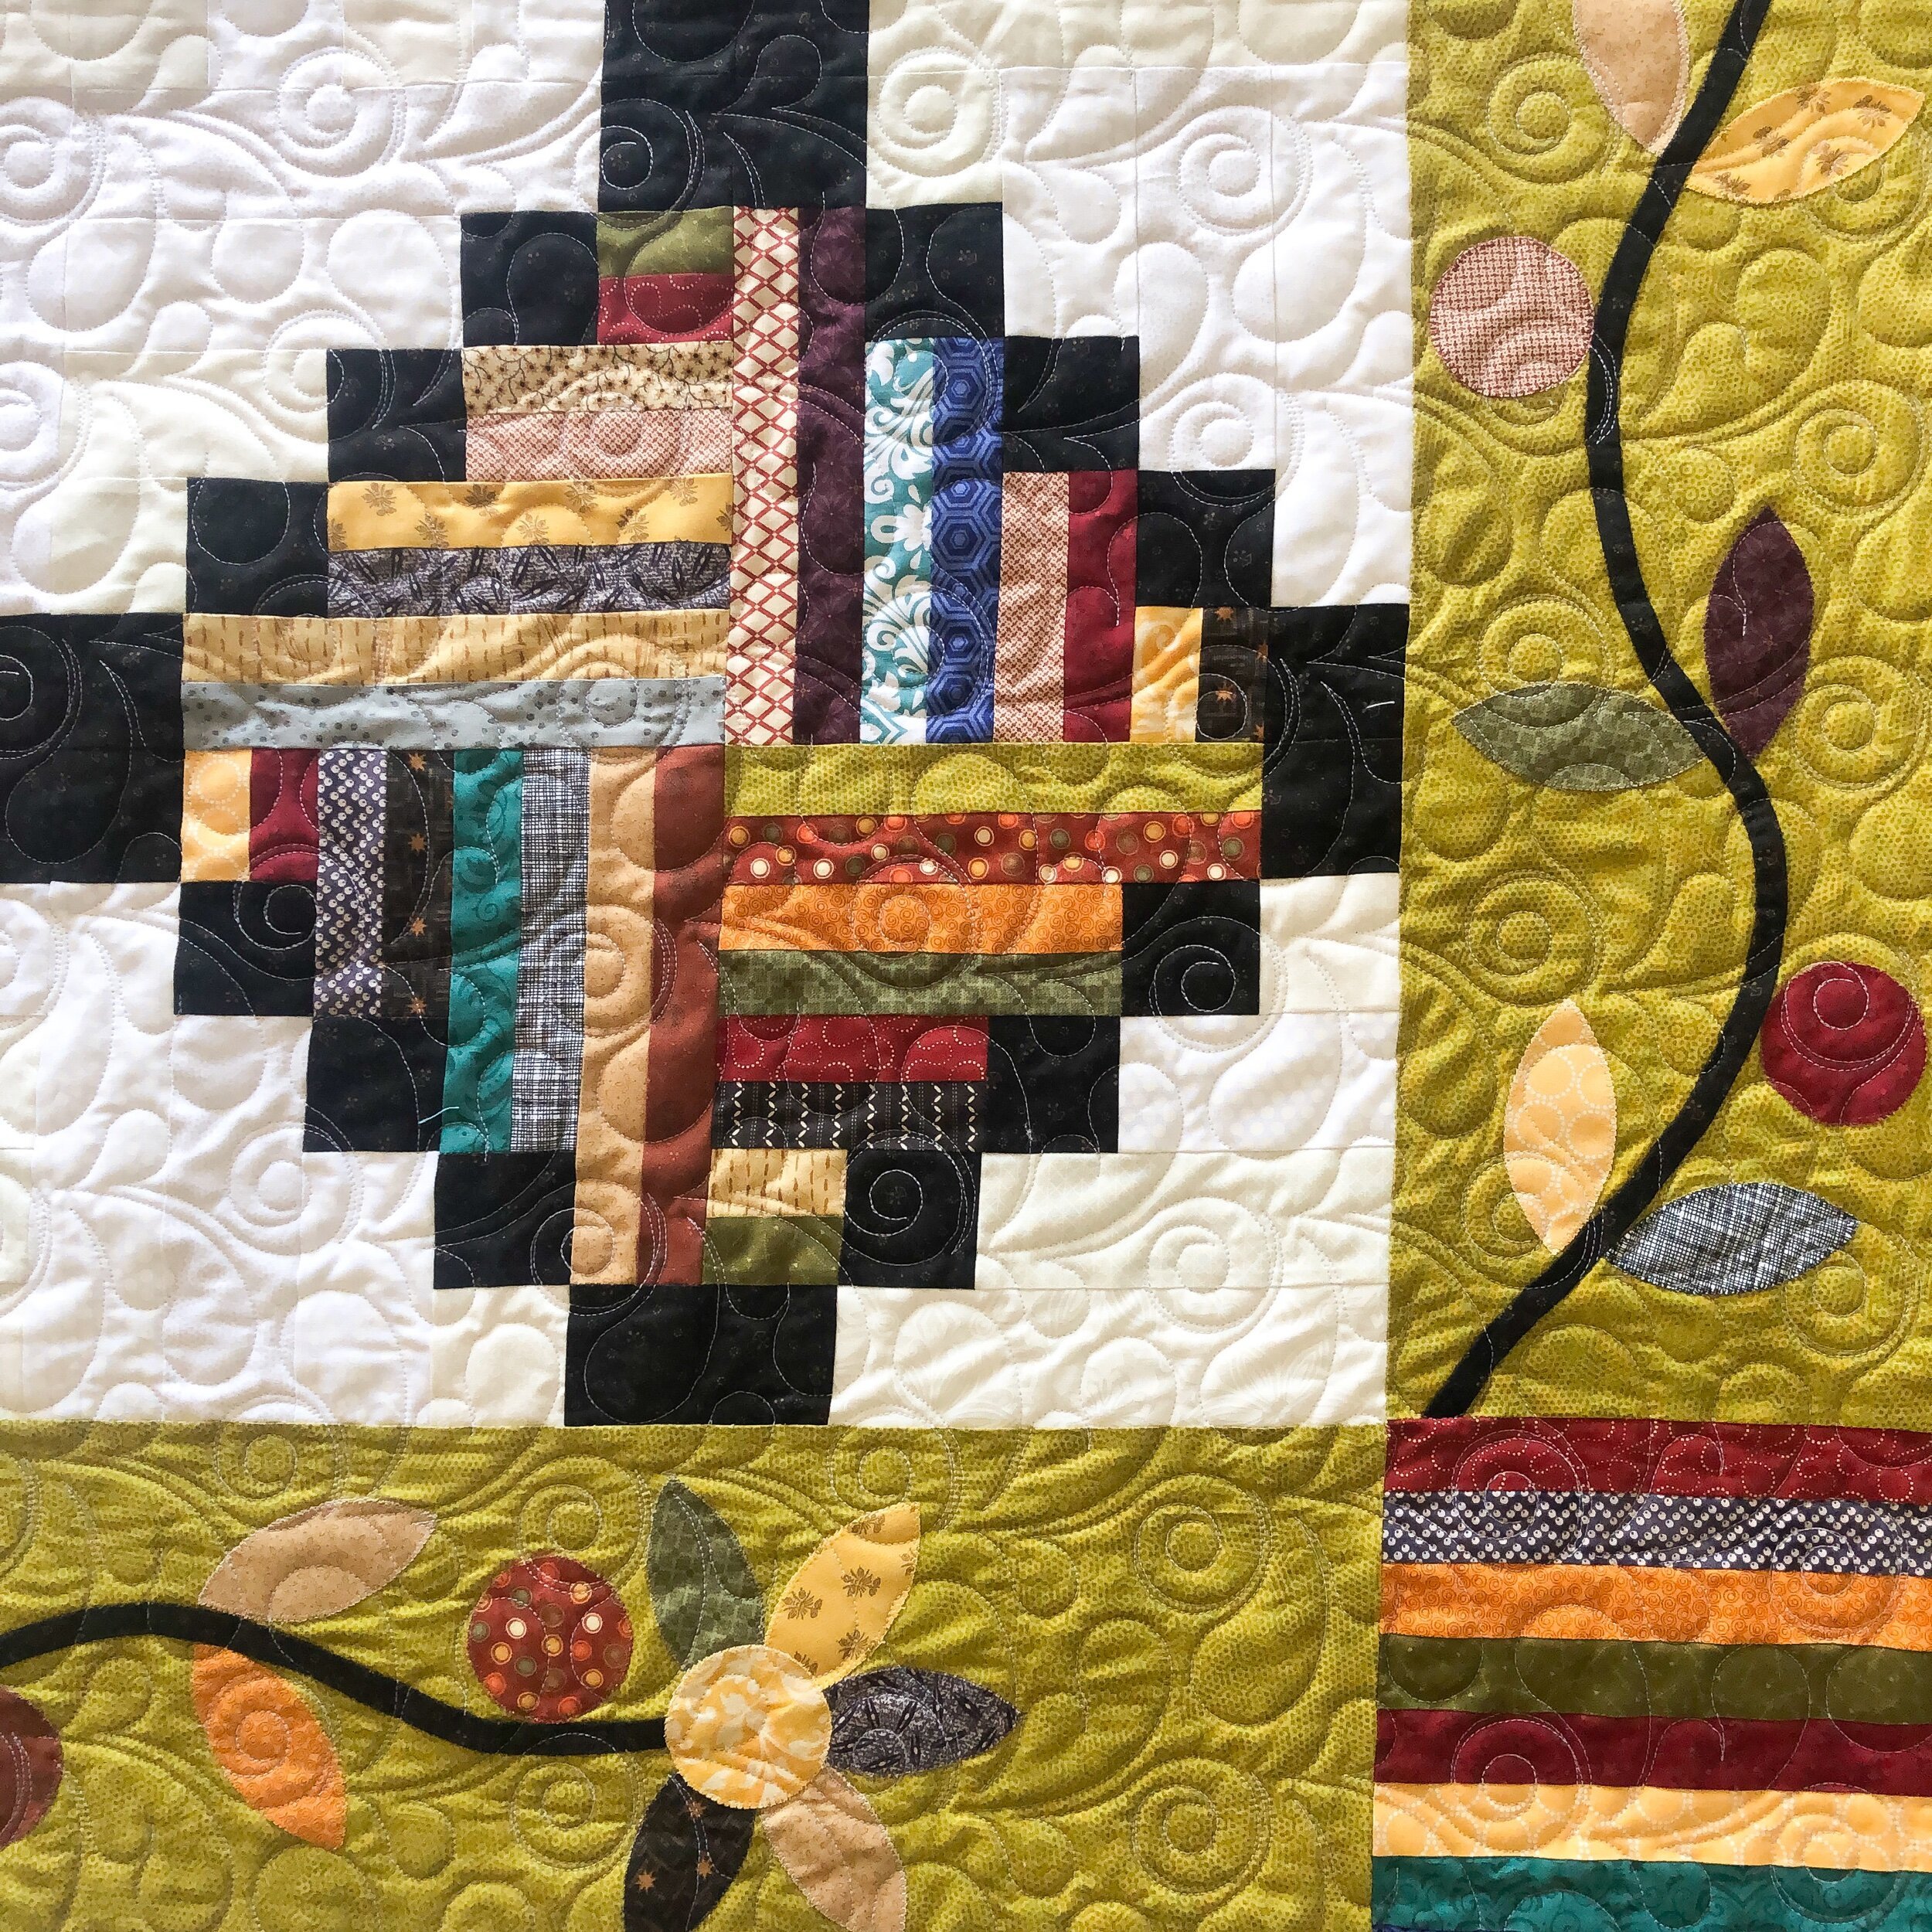
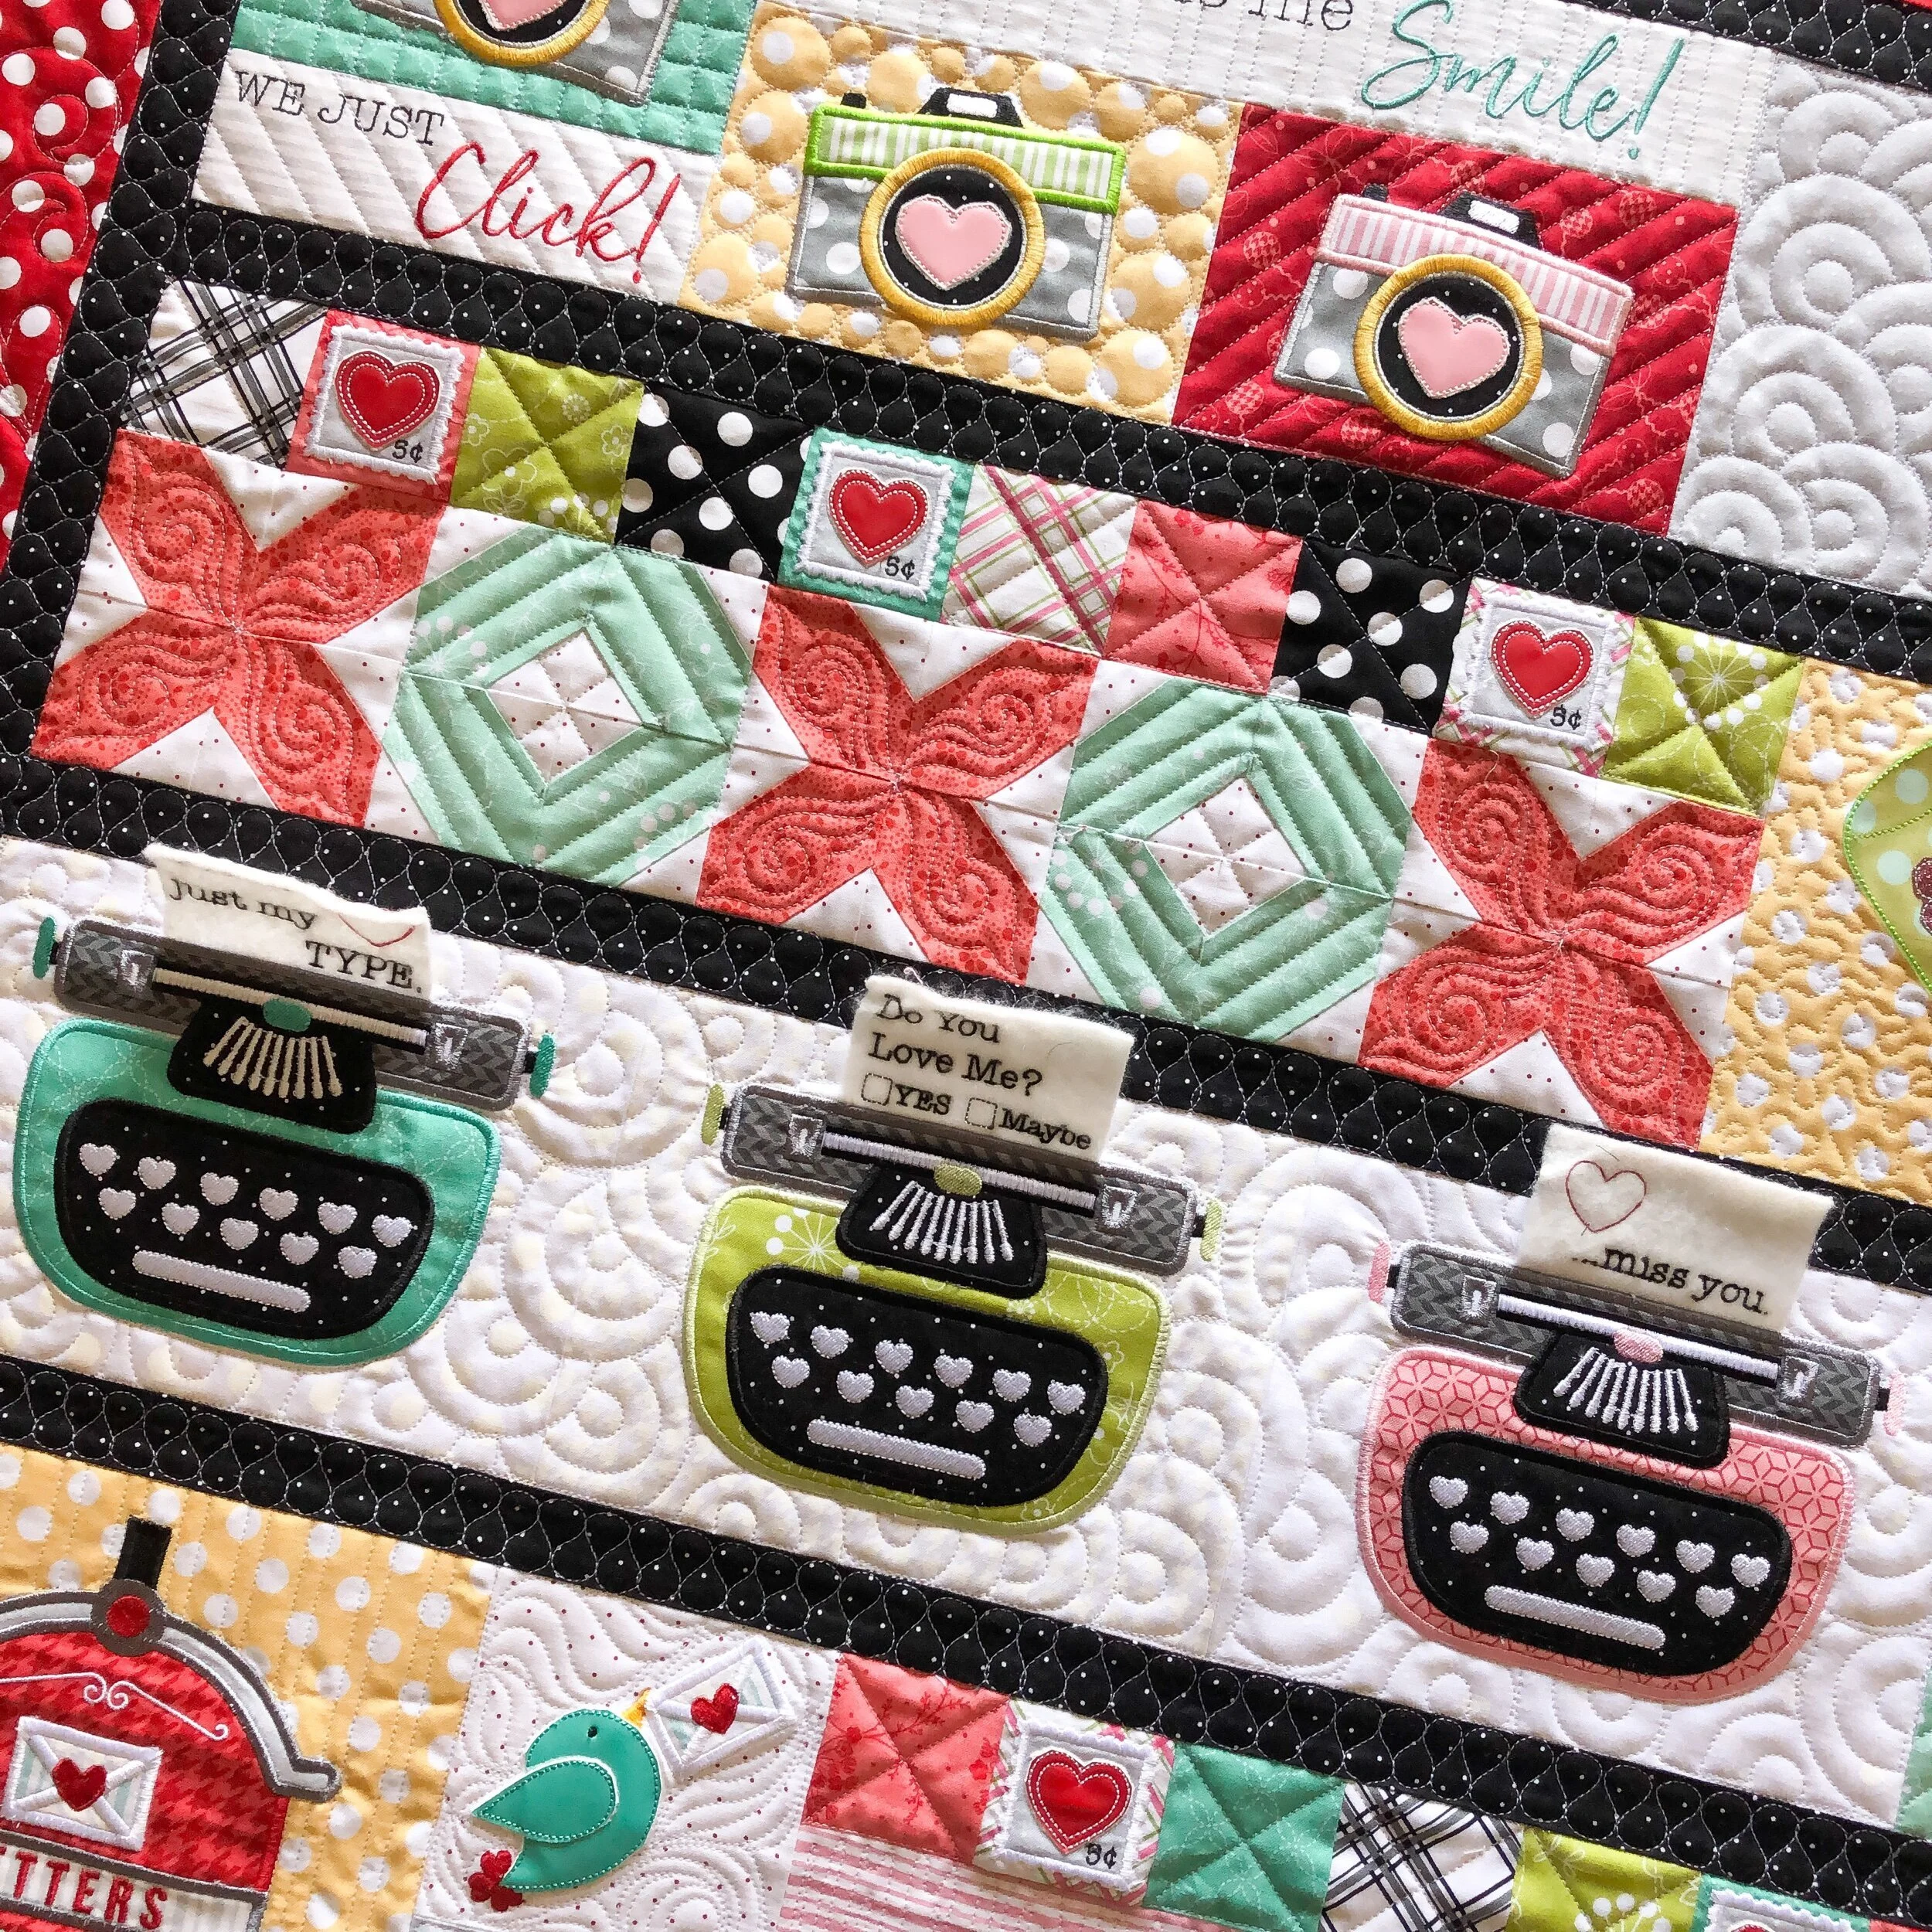
I hope all is well with you!! I was doing so good at catching up on blogging quilts, and then our summer just got busy. I’m back, and ready to share Dot’s amazing quilt with you!! I hope you enjoy all the pictures…there are a lot of them. As I share this quilt with you, I am going to talk about some of the things that I quilted, and some pointers on how to quilt such a detailed sampler quilt…lets get started!!
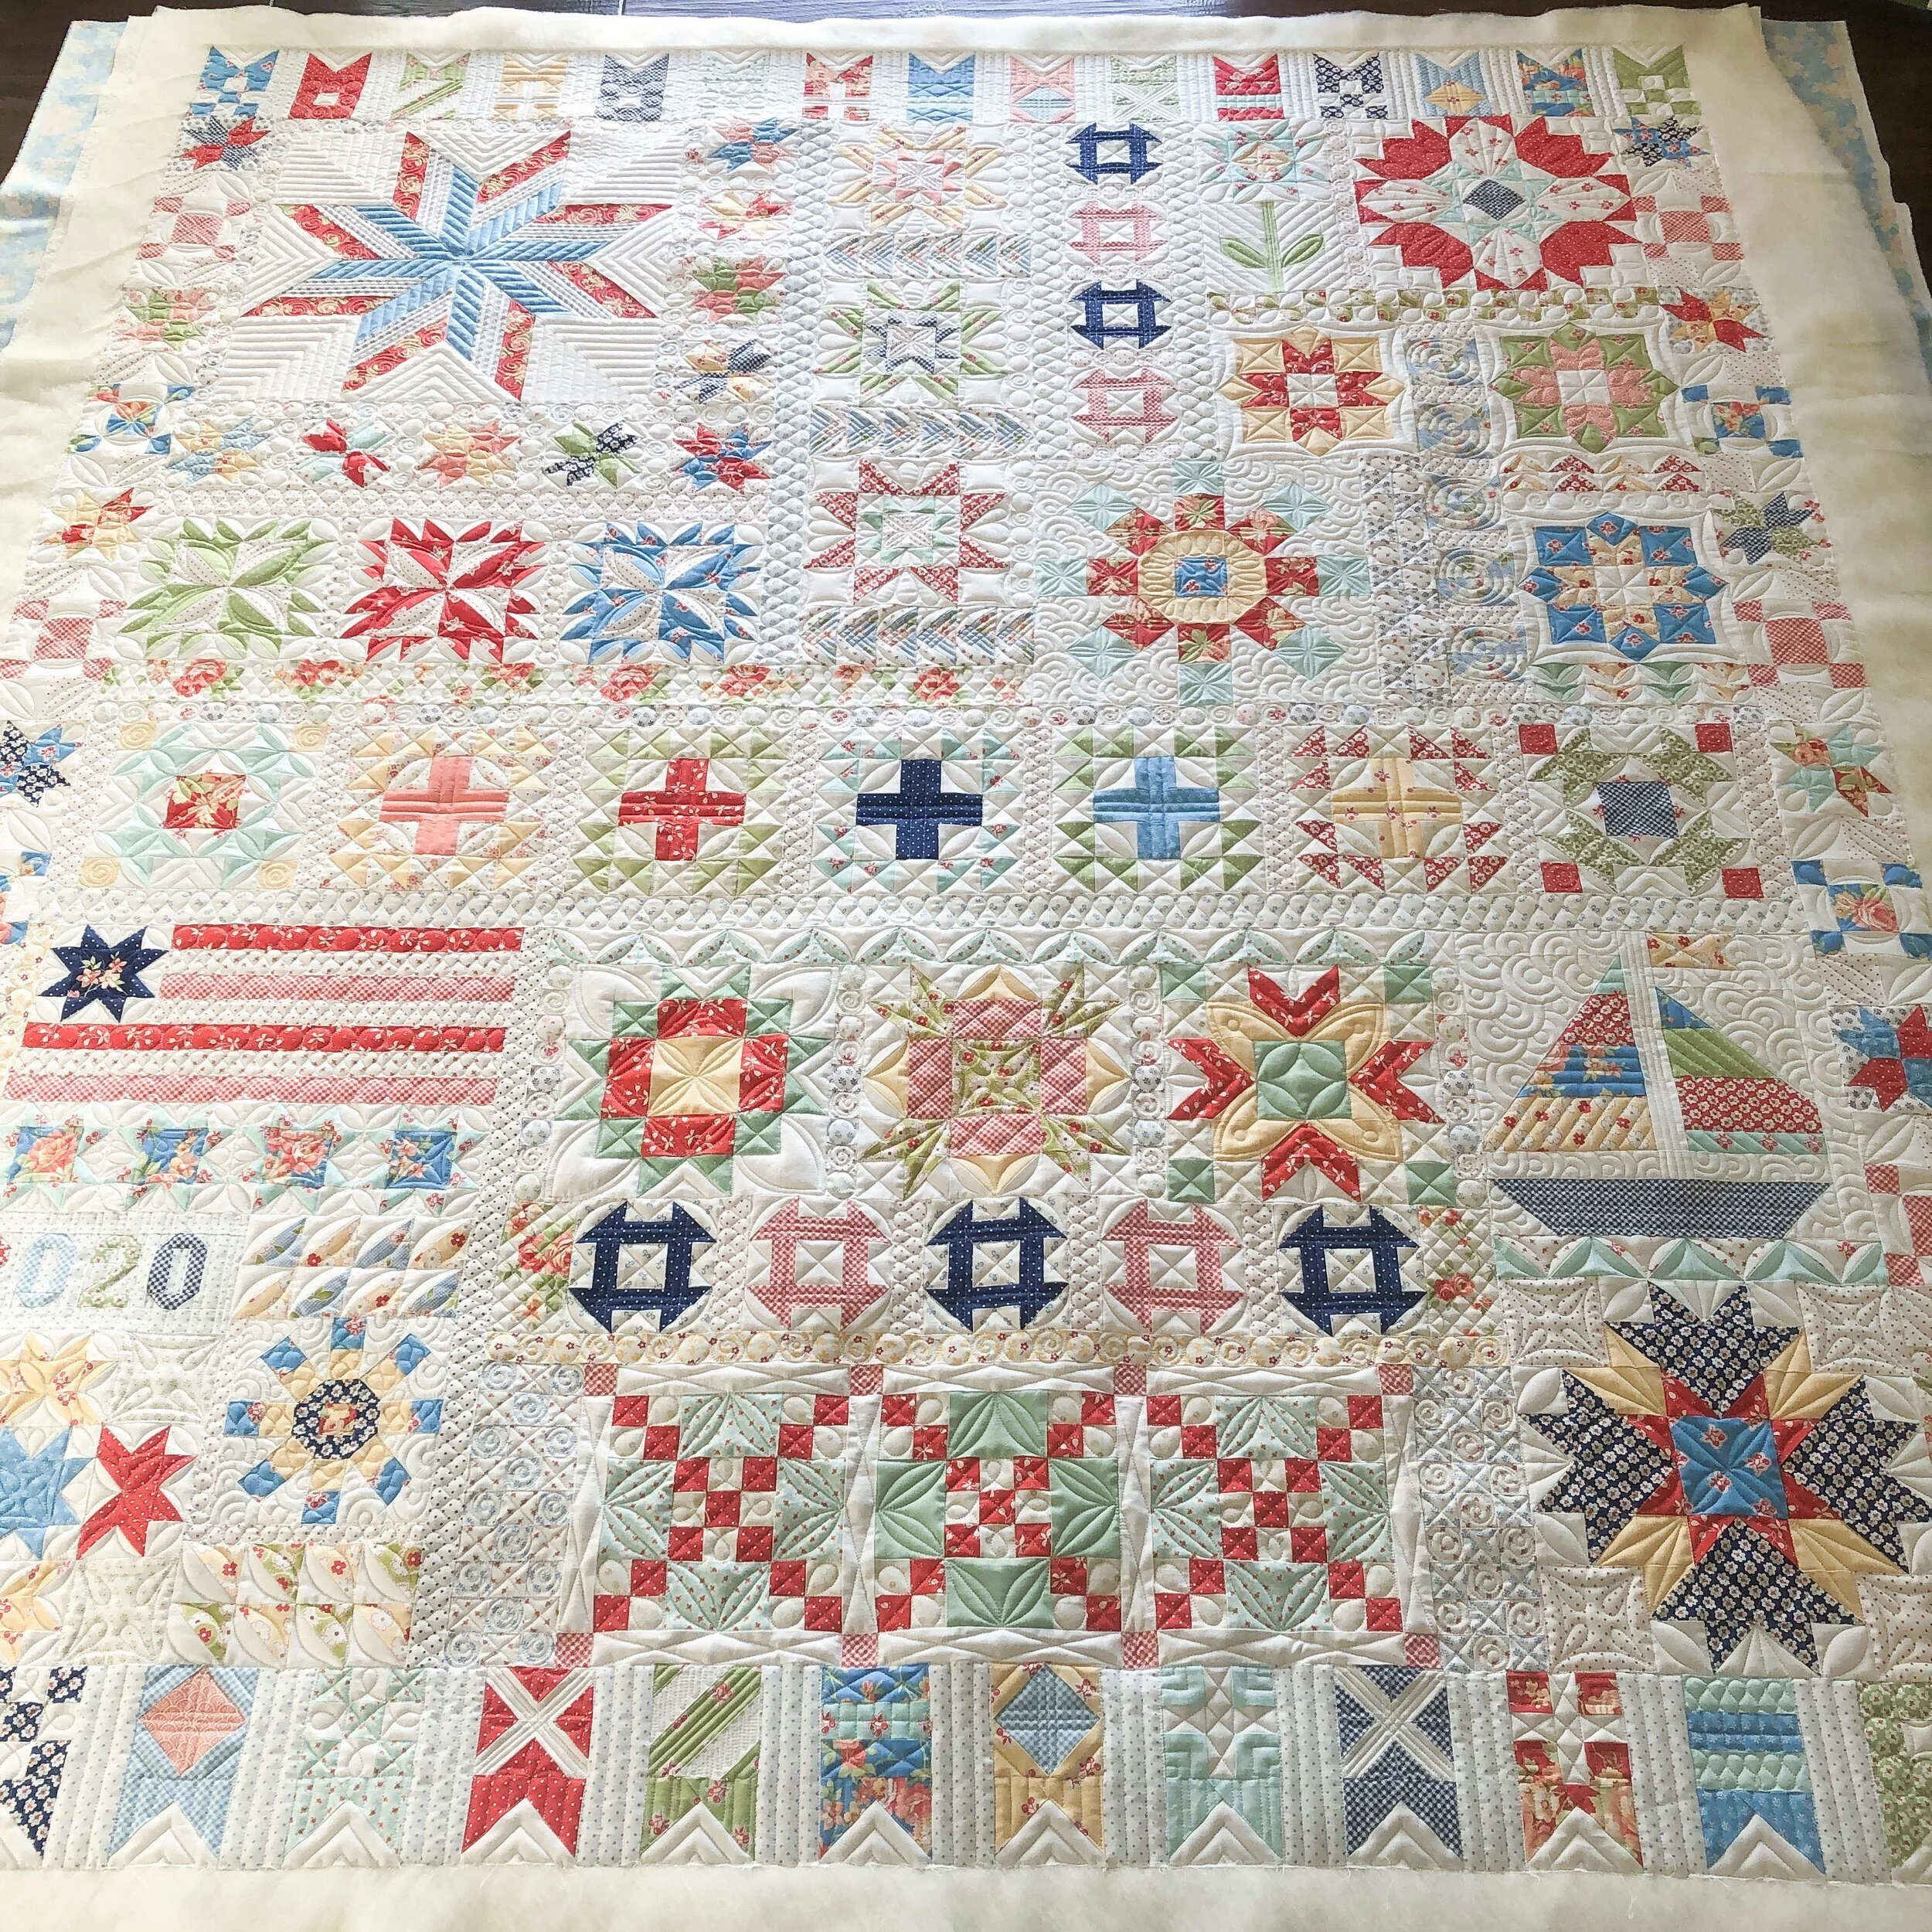
The pattern is called Summertime Picnic, and it’s by Fig Tree & Co. It’s a block of the month. Dot also used Fig Tree & Co.’s Catalina fabric line. For more info on the pattern, check the link above.

Dot did an incredible job piecing this quilt!! It was so fun to quilt! We did a double batting, which helps the quilting pop so much more. A 8020 cotton poly blend on the bottom with Hobbs wool on top! My favorite double batt combo, can you see why???
I used Omni natural white thread from Superior Threads, and I think it blends beautifully with all of these lovely colors.
Quilting a quilt like this requires a lot of detail, and it took nearly 12 hours. It was so much fun to quilt!!!
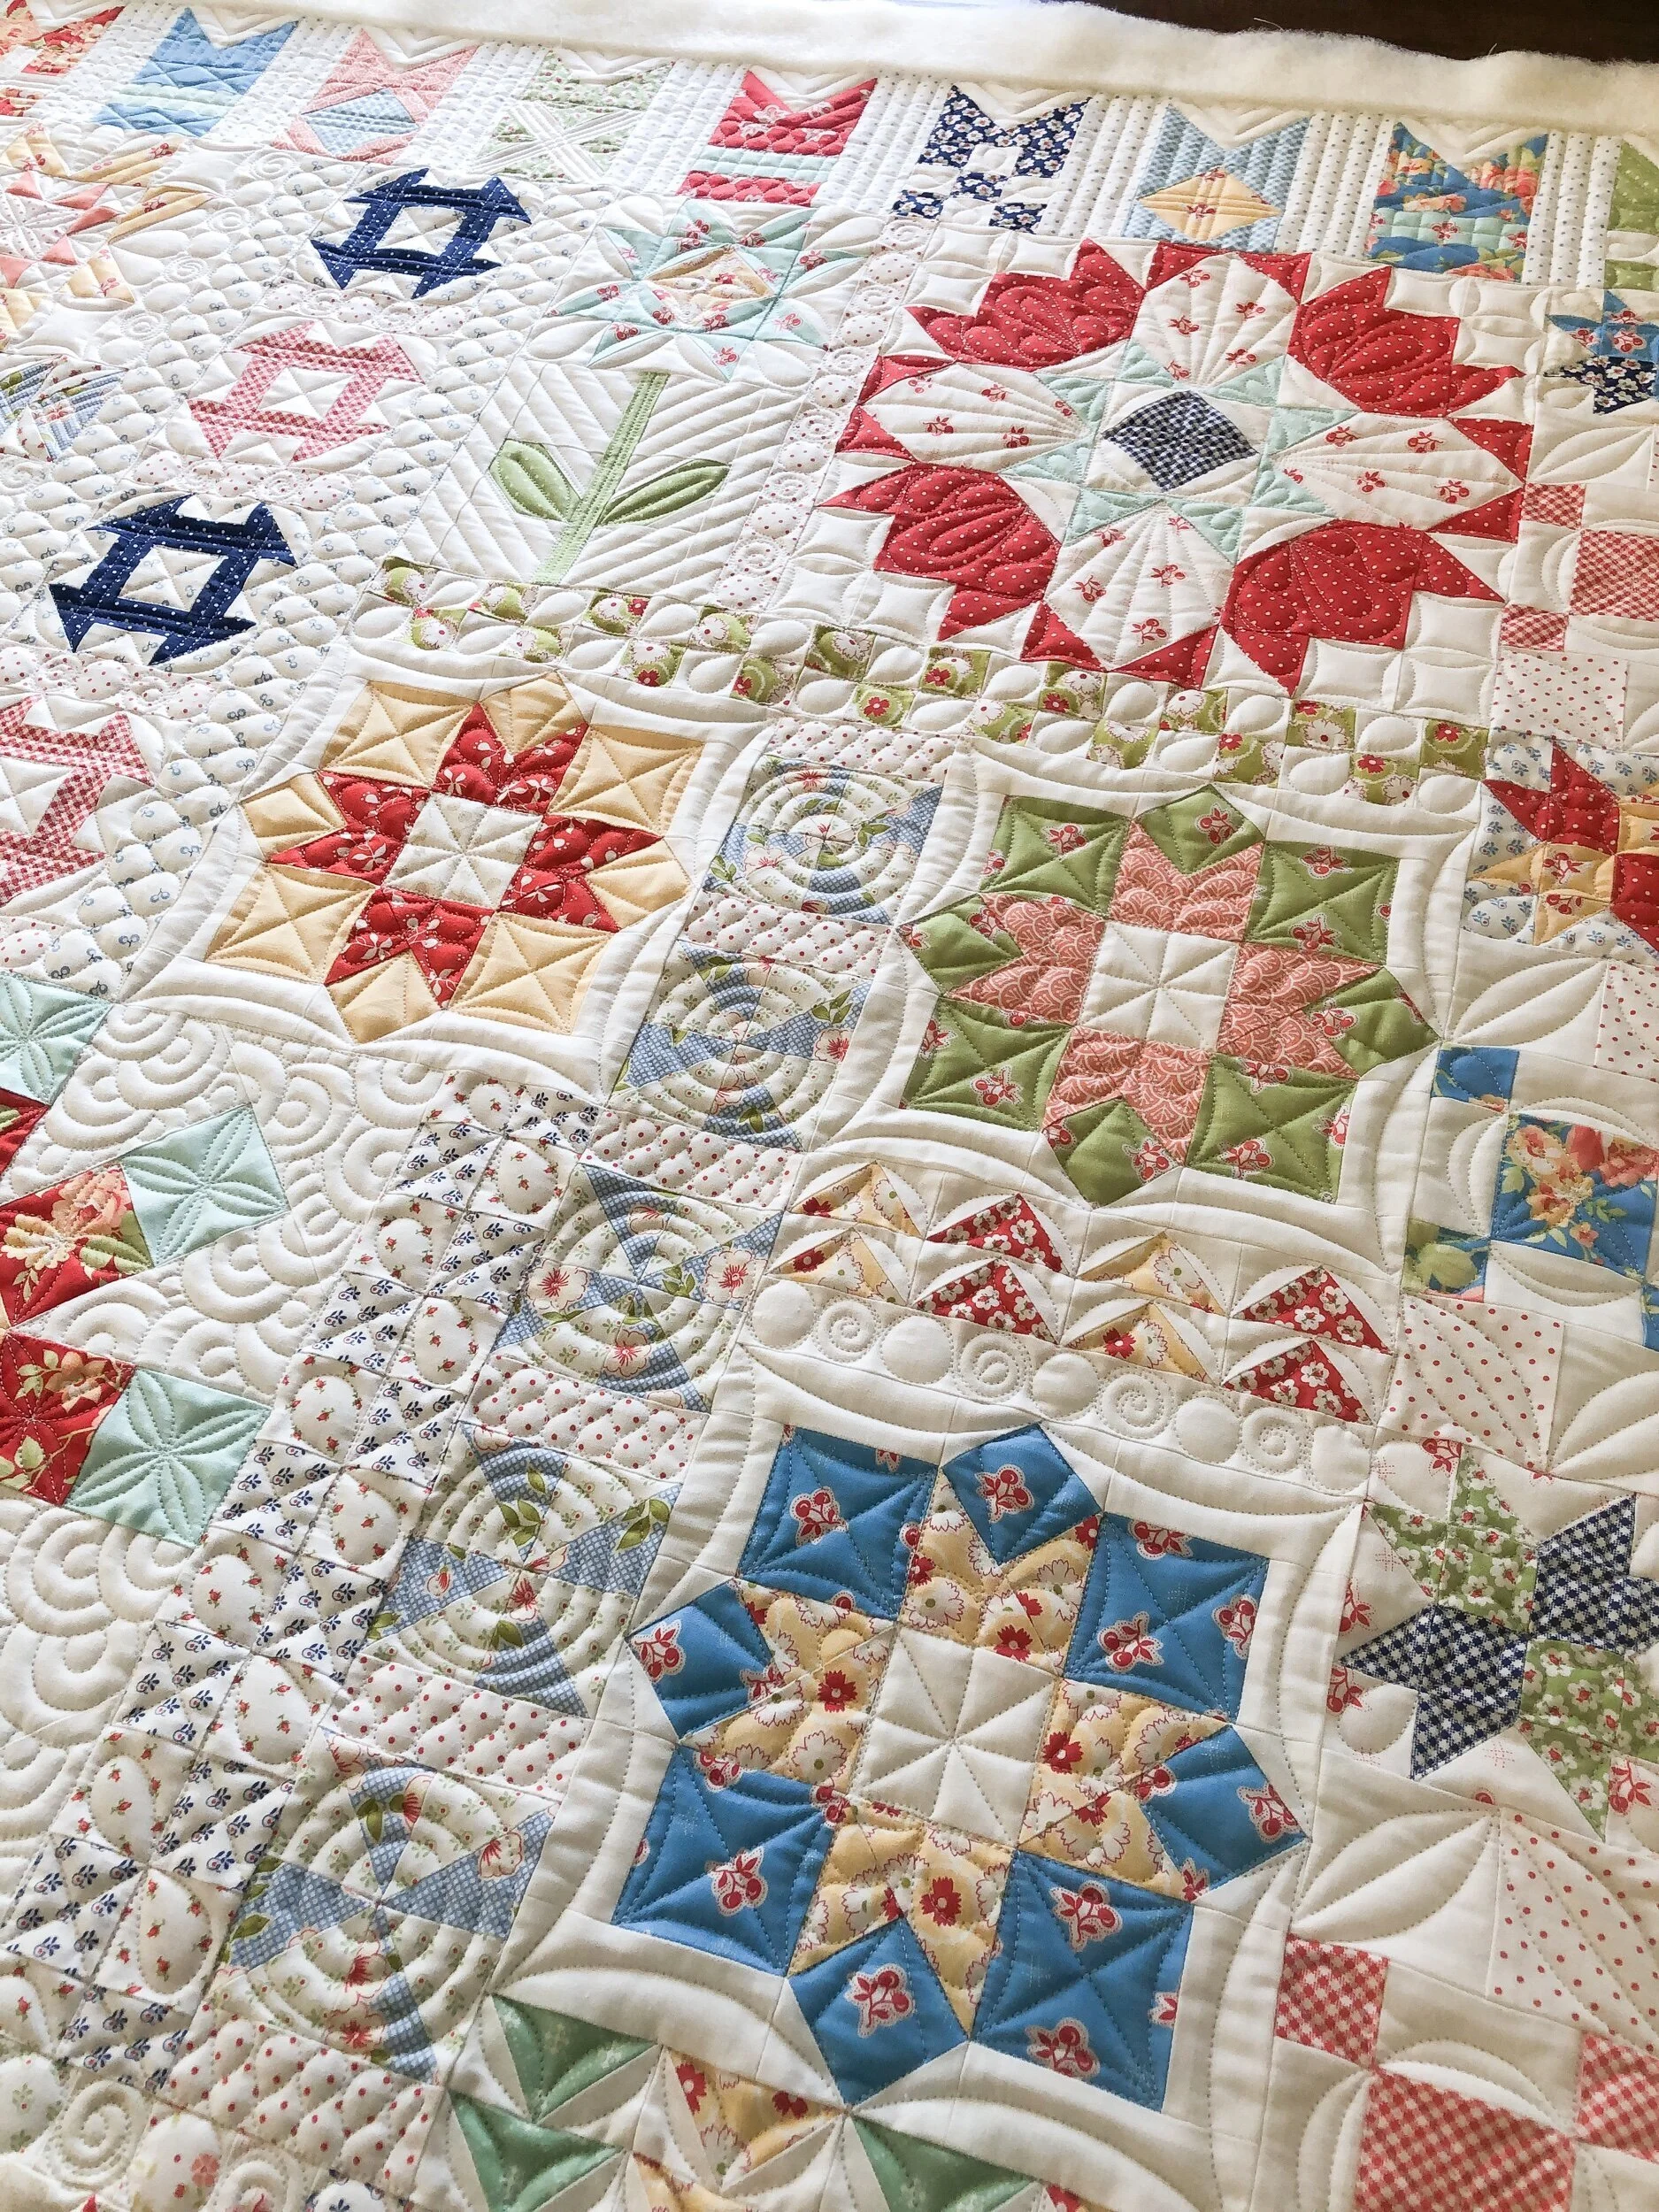
When I quilt a quilt like this, I quilt similar designs throughout to have the quilting harmonize from top to bottom. I also like to highlight the shapes within the blocks.

Orange peel petals in a variety of sizes, circles and swirls, ribbon candy, arcs, a variety of different lines, and so on. If you look at the quilt, that’s really all it is. The variety of those designs really play well with the shapes in the quilt blocks, and adds such an incredible amount of texture. This is my favorite way to quilt a sampler quilt. I also want to point out there isn’t a lot of background filler…stippling, pebbles or swirls, grassy texture…and so on. The only background filler is my overlapping circles in three of the blocks. A couple of wagon wheel blocks and the sail boat block. By simplifying the backgrounds, the quilt blocks shine and the quilt isn’t over quilted. I like to use the “background” of a quilt block to enhance the quilting within the block. It adds so much to the block itself, making it unique because of the shapes, yet keeping that design harmony. My quilting philosophy is to keep my quilting clean. It just looks so much better! If you machine quilt, I challenge you to try something custom on the next sampler that you quilt. Don’t be afraid of rulers, if you haven’t tried them. They are an incredible asset to your quilting, and can help you achieve some pretty amazing designs!!
Now that you know my quilting approach for this quilt, let’s enjoy all the details.

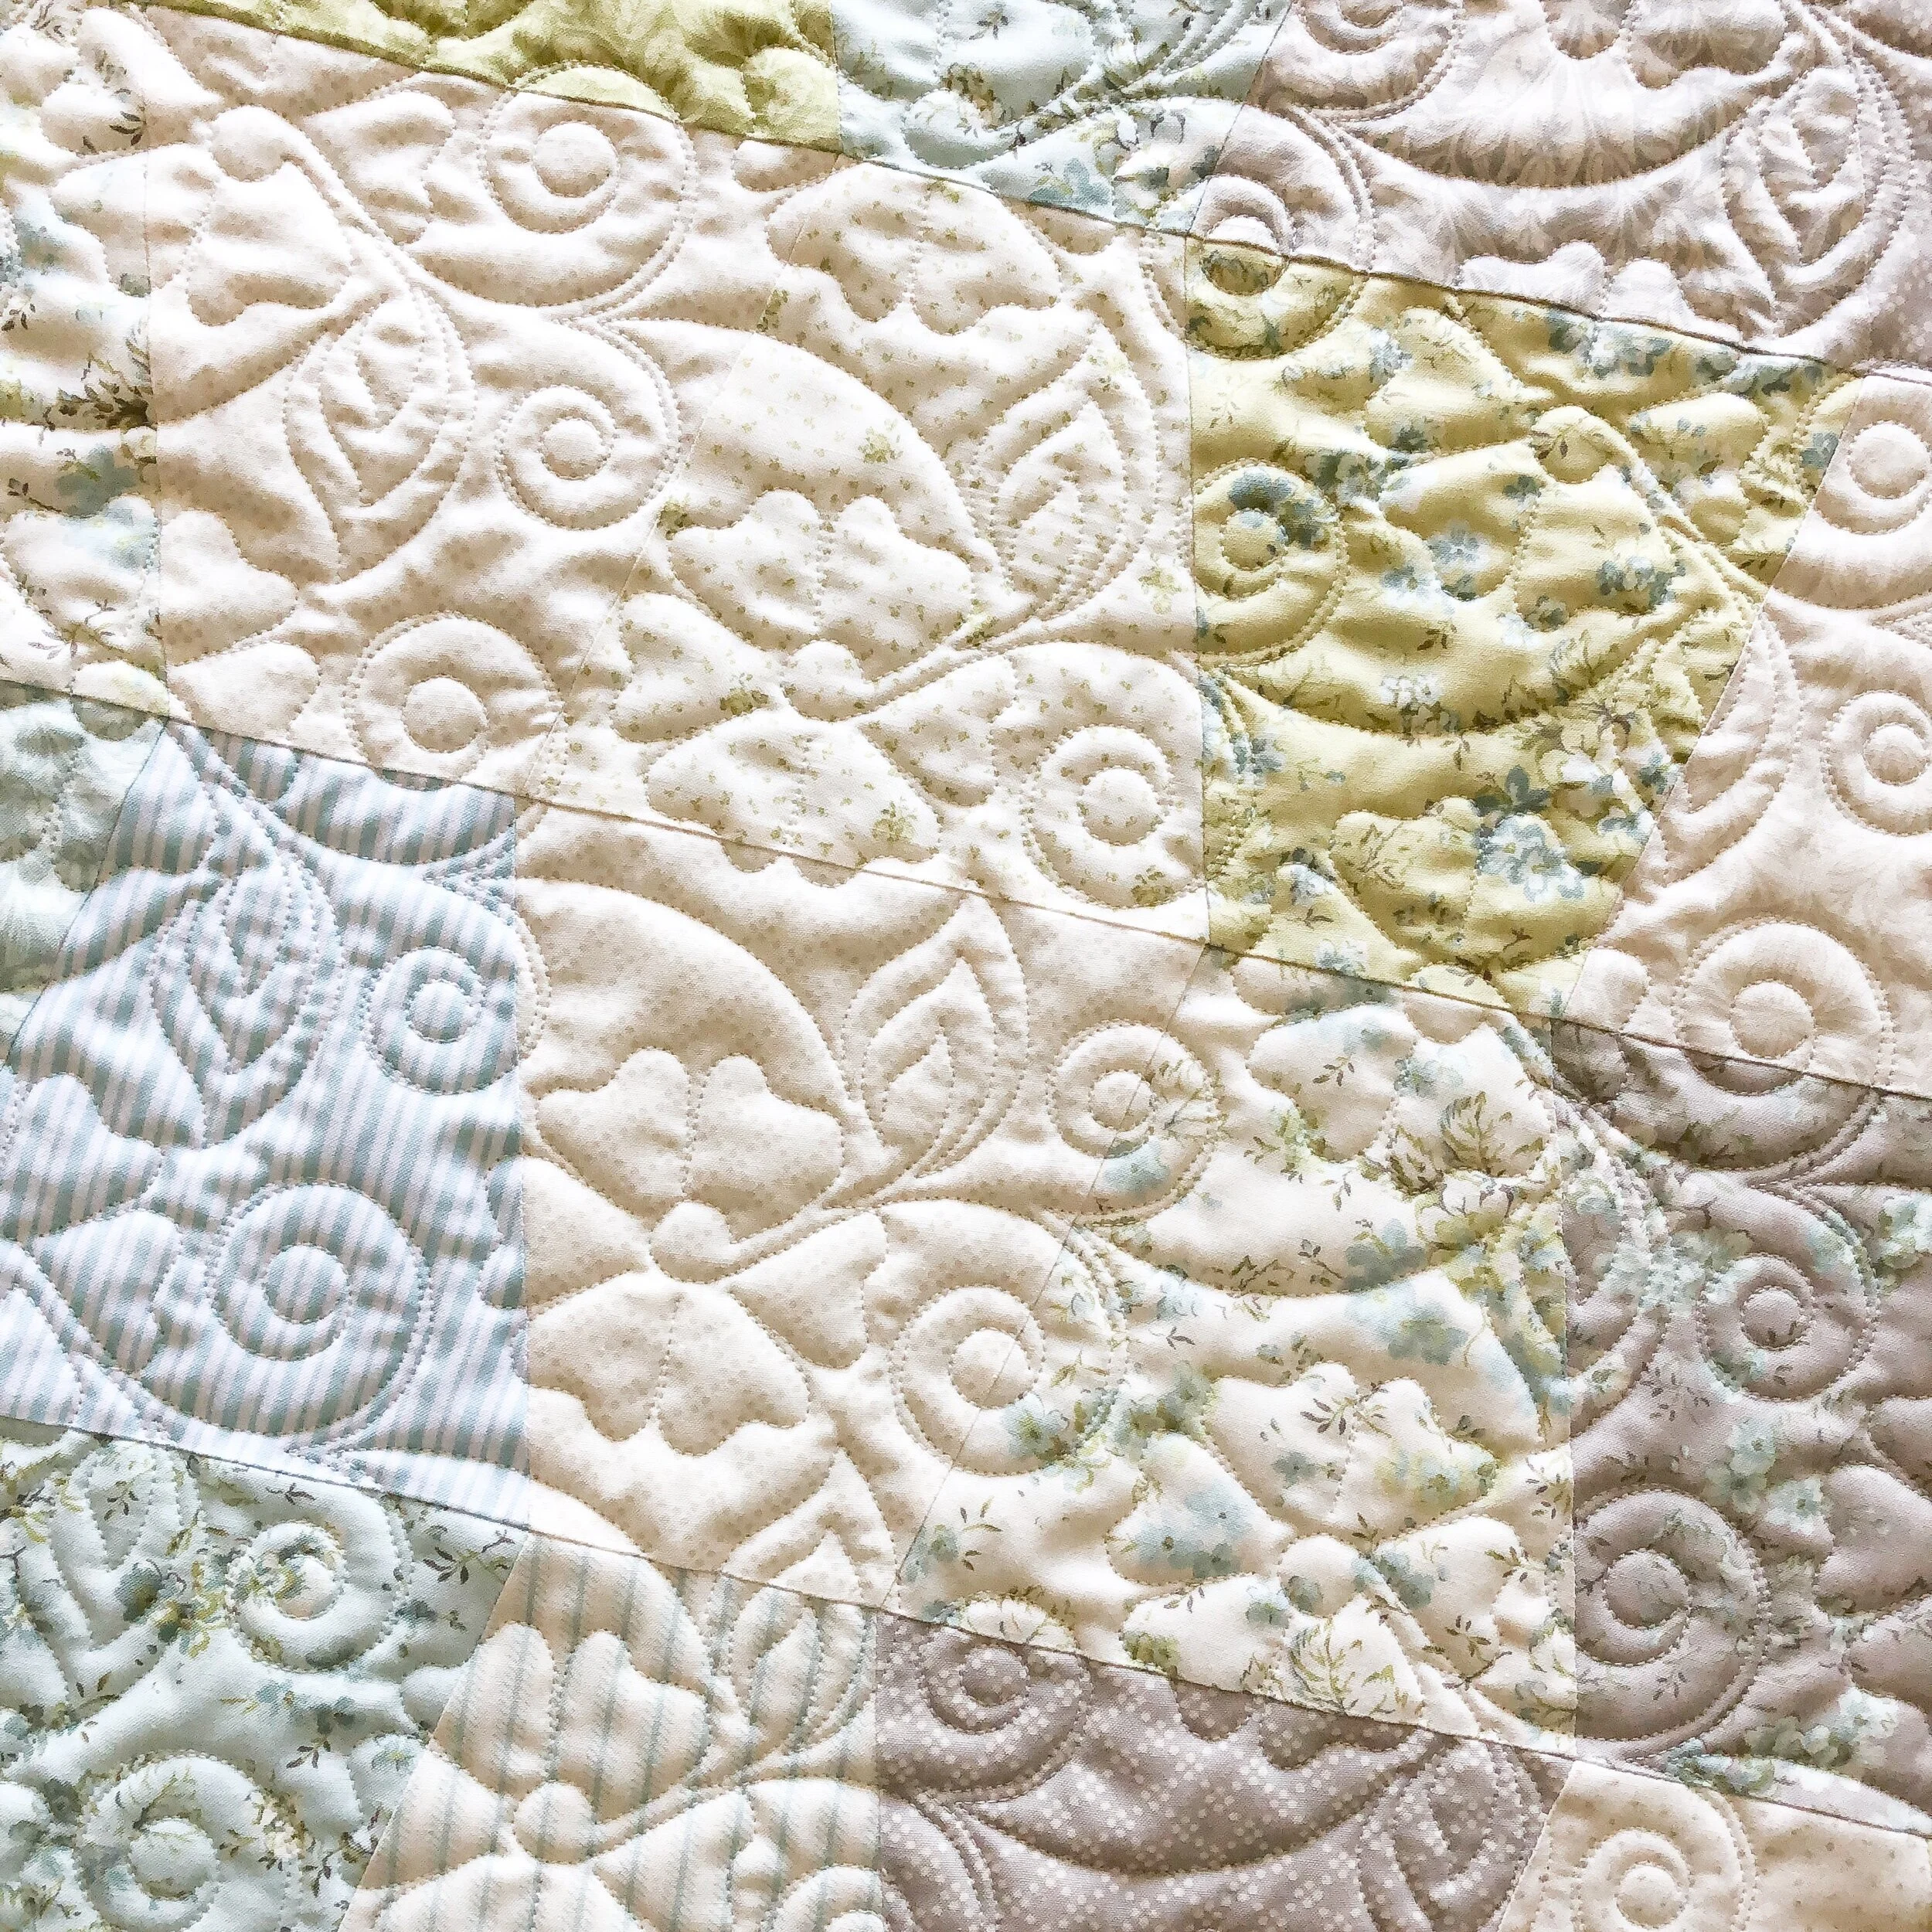
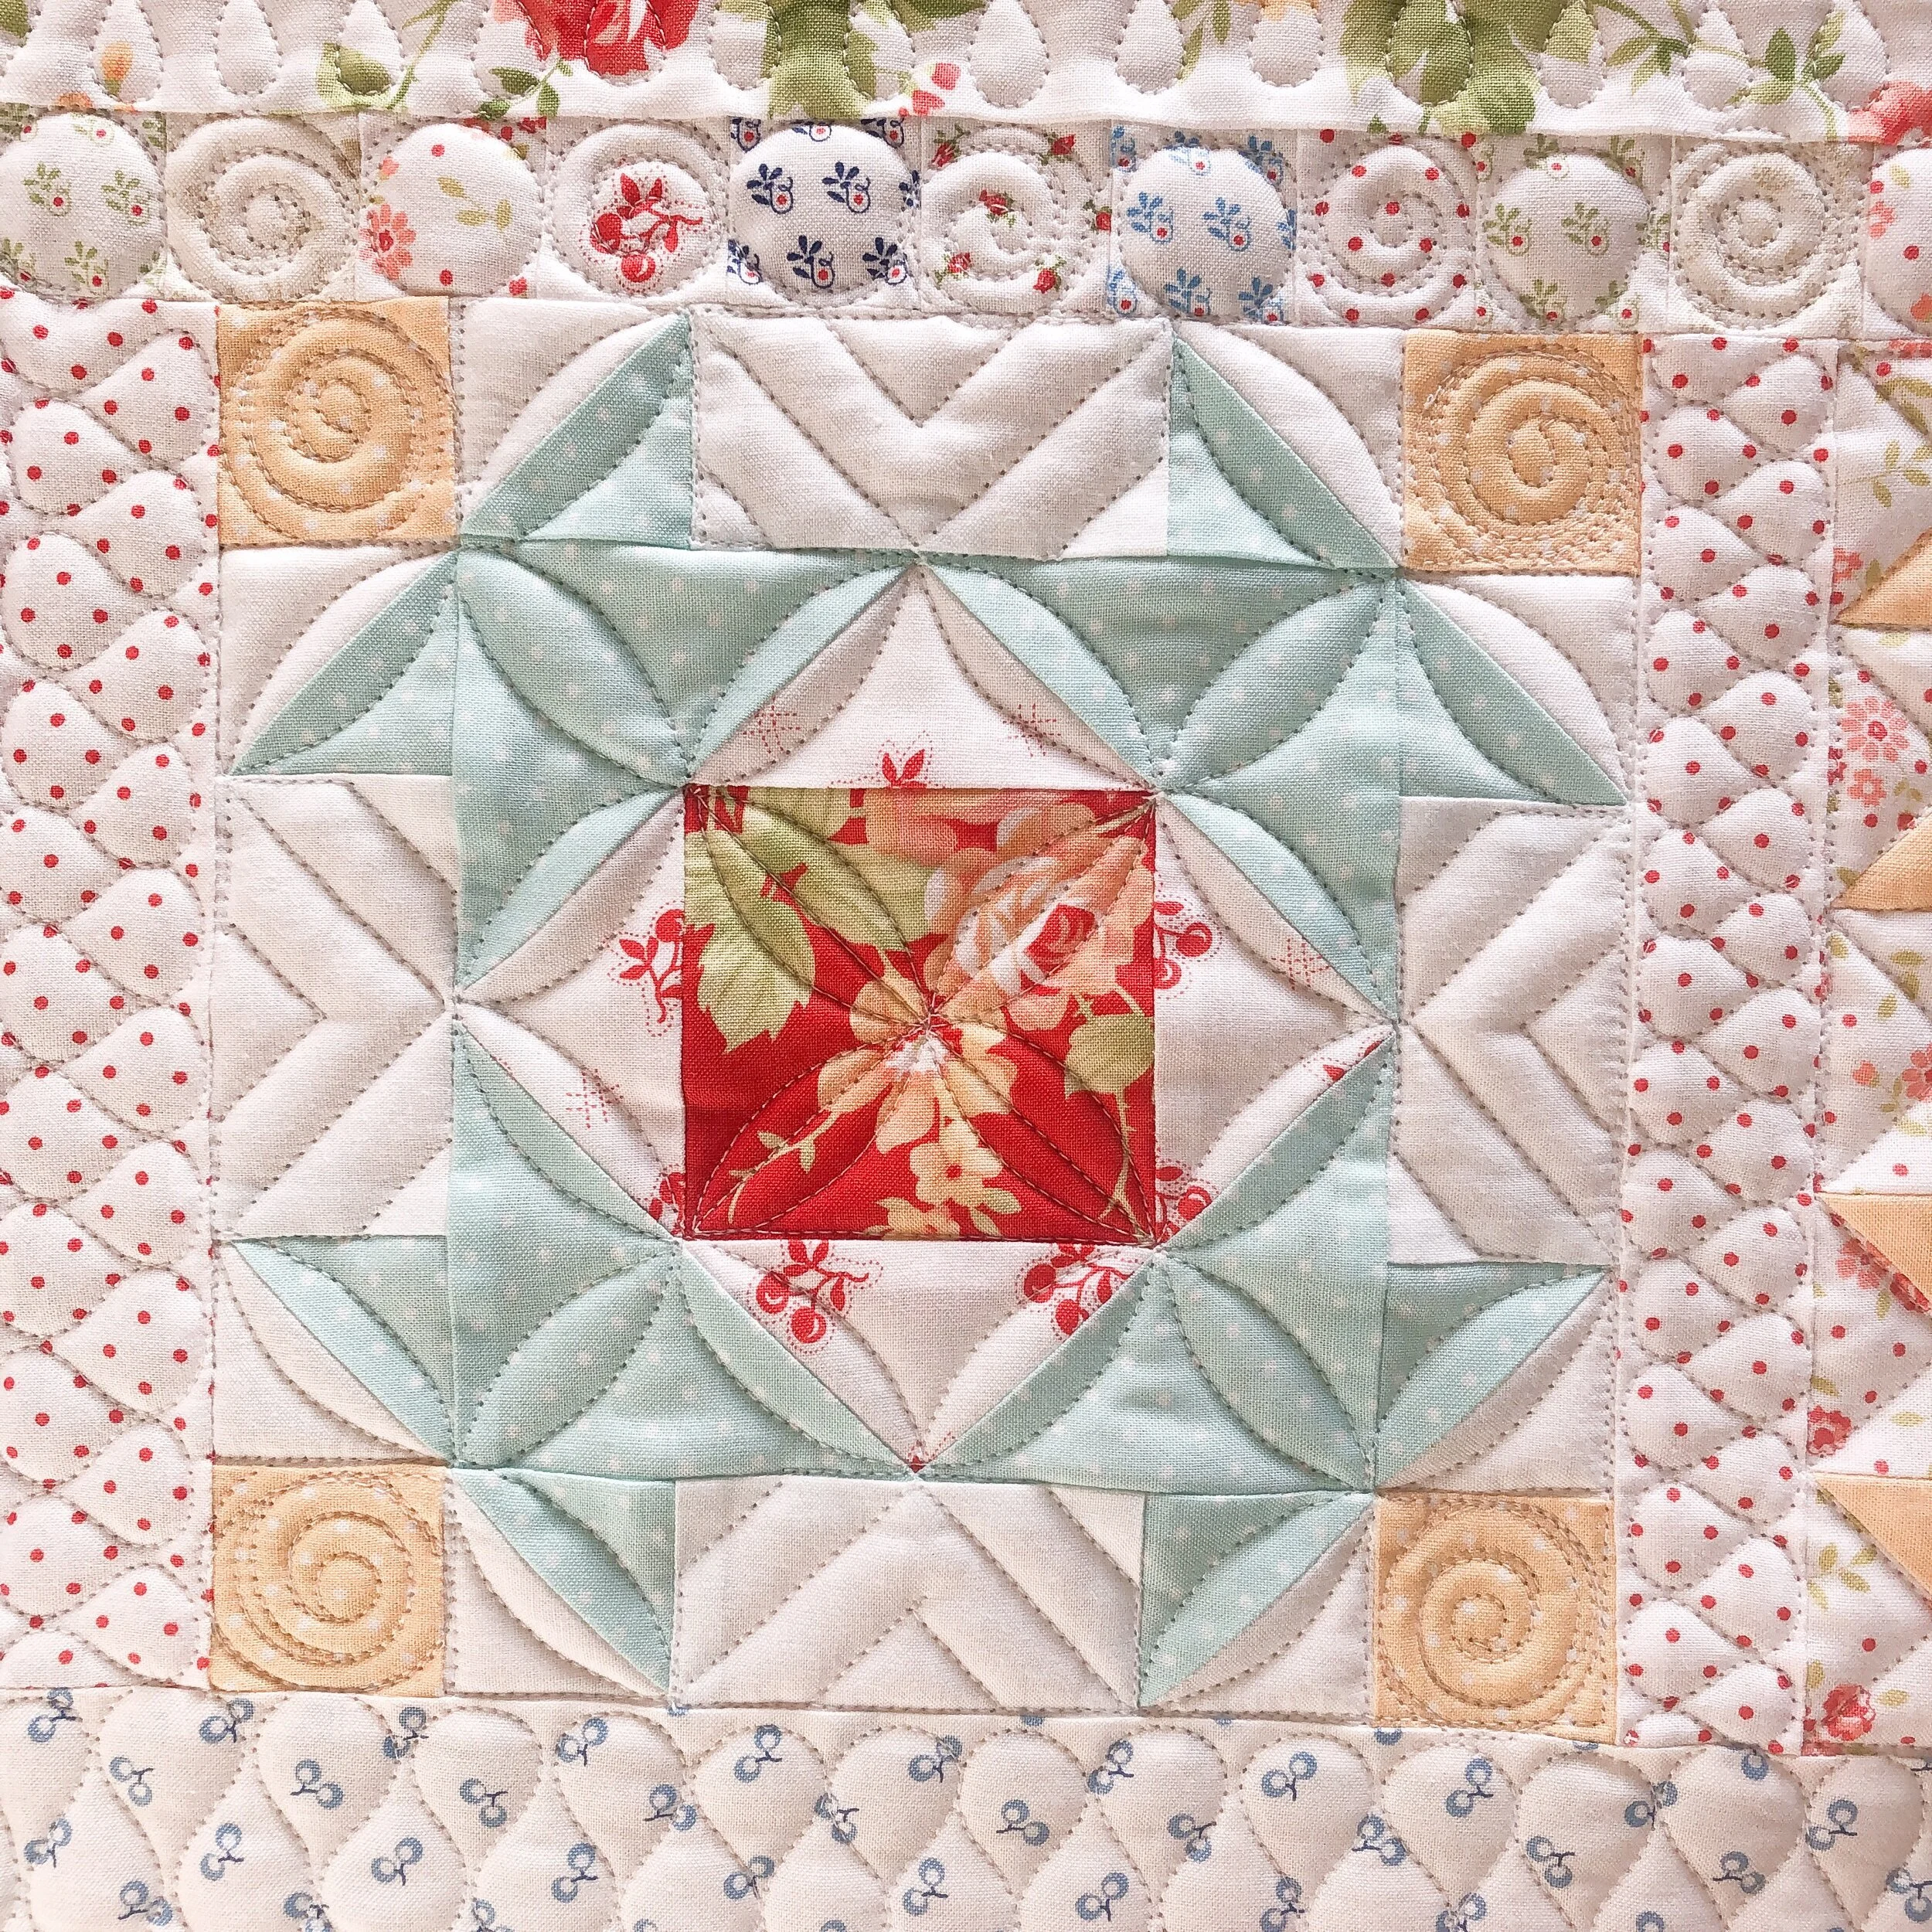
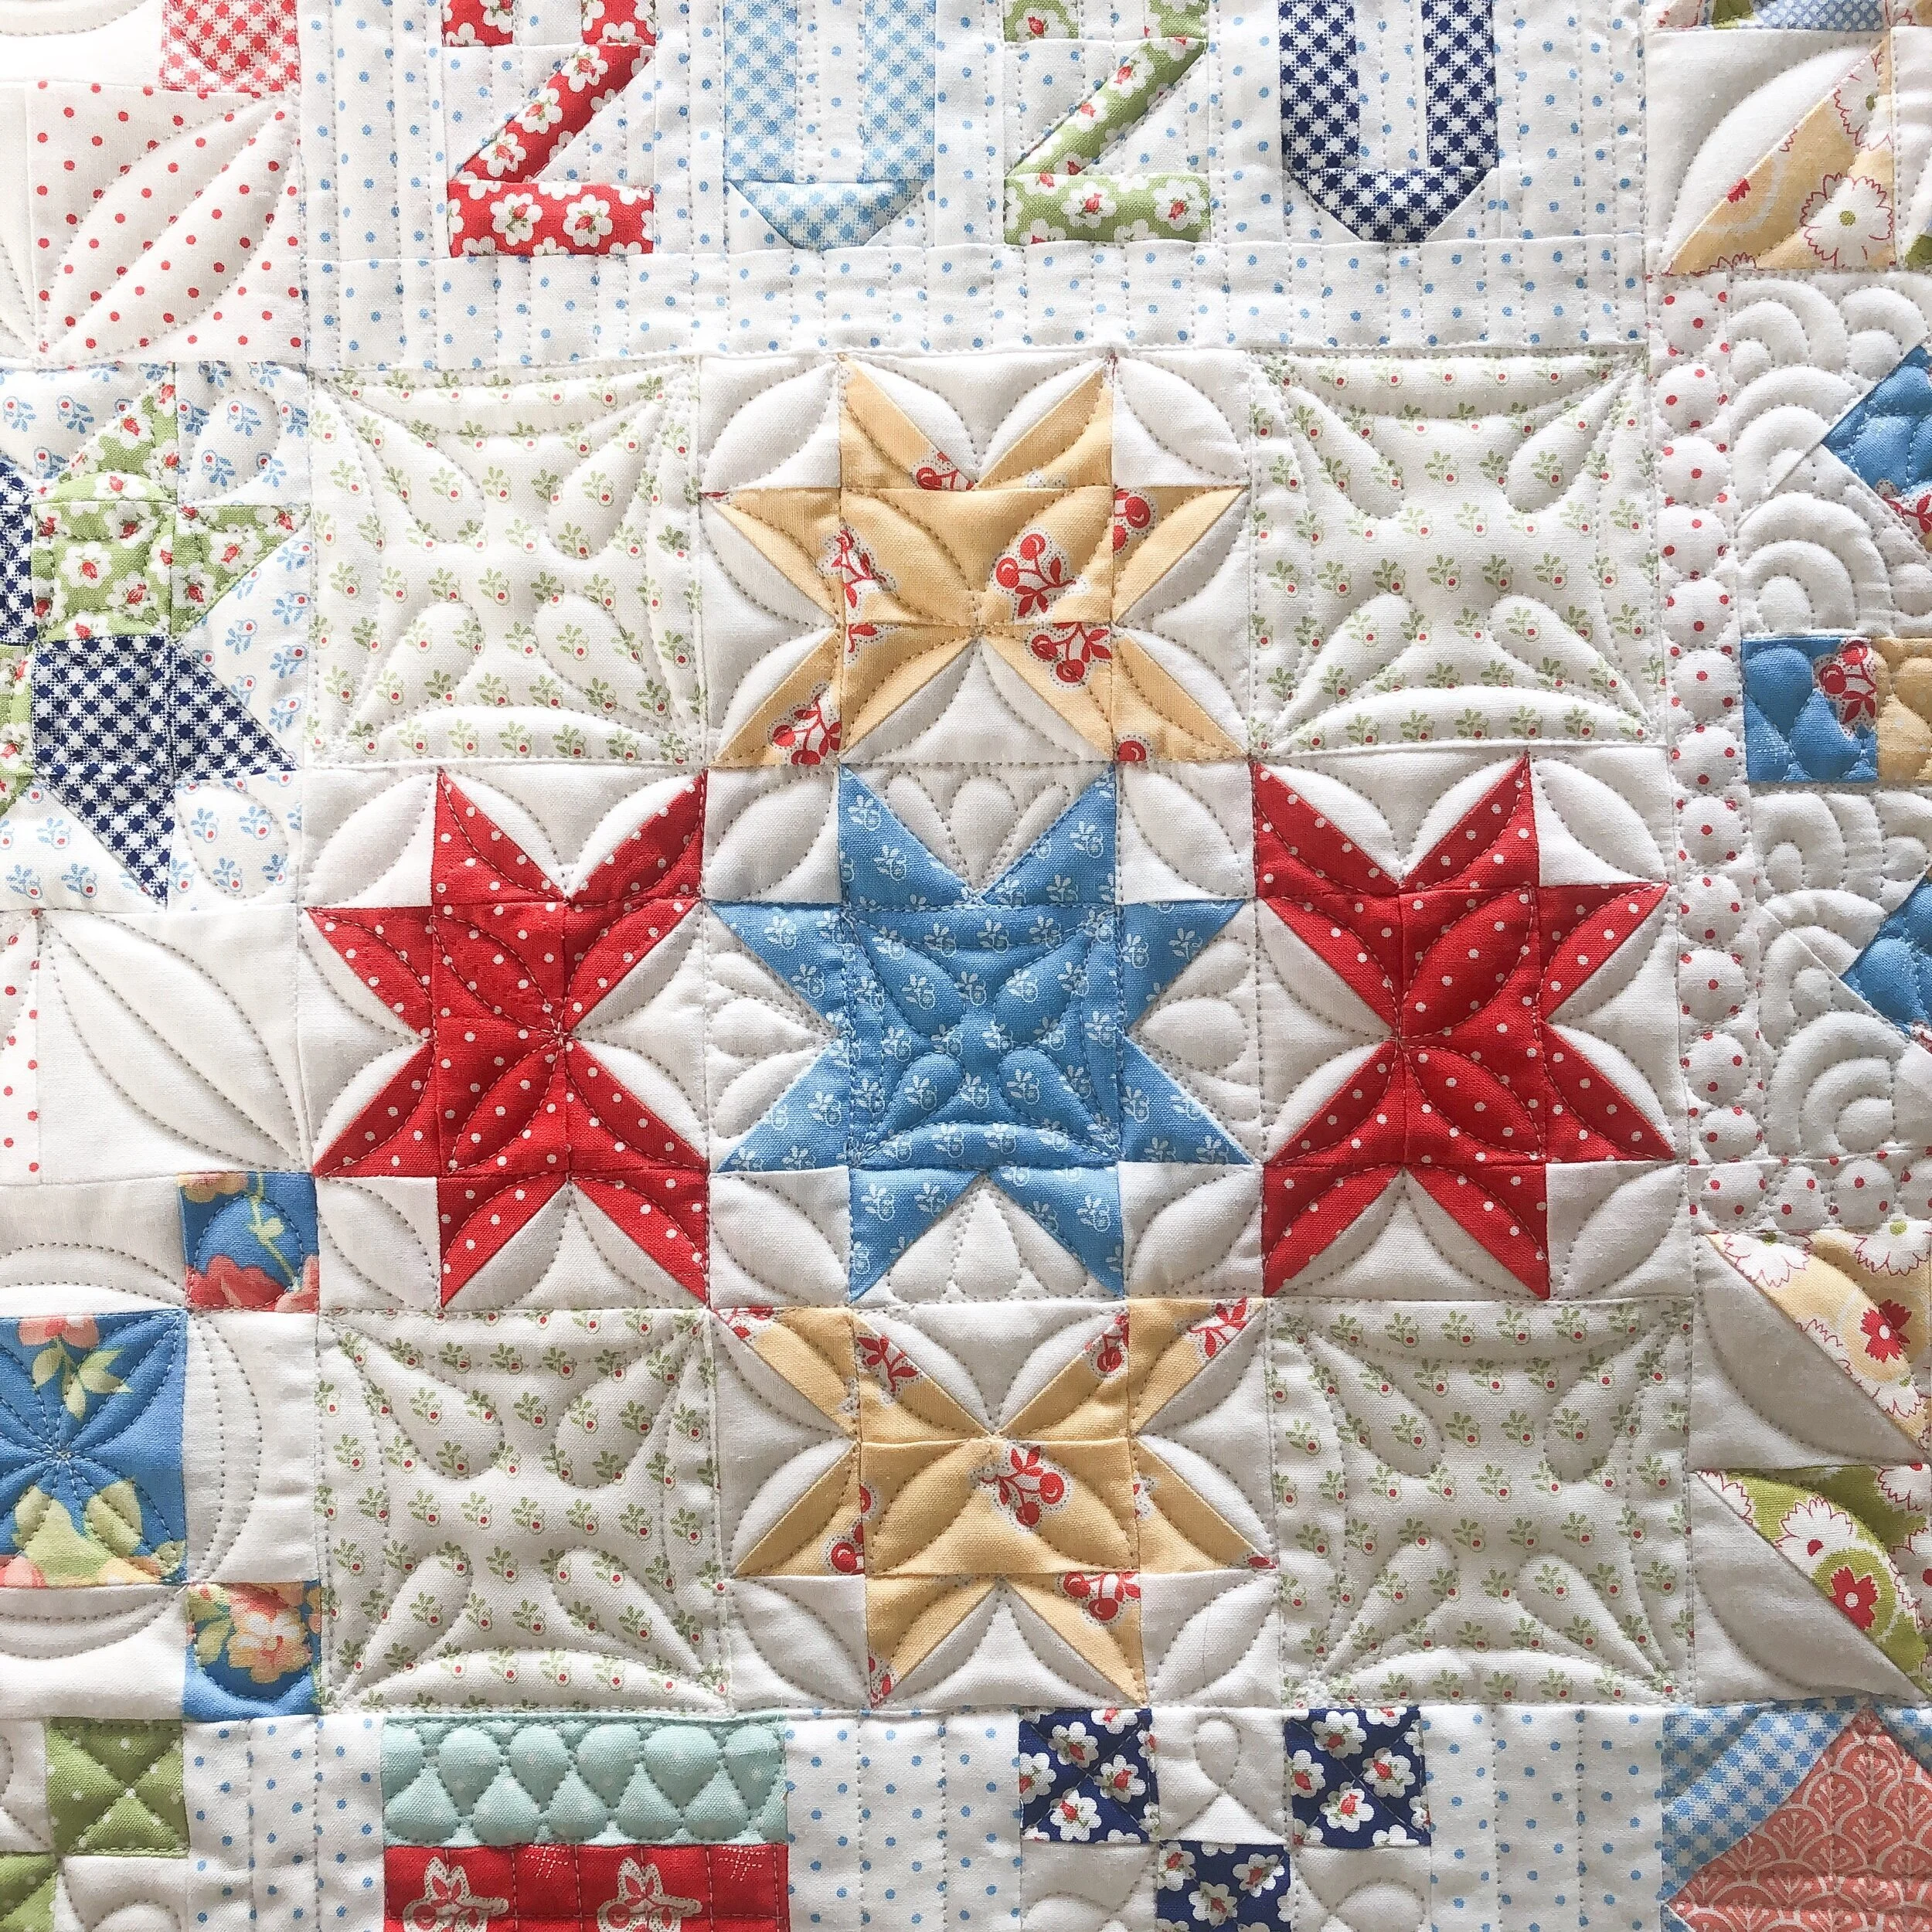
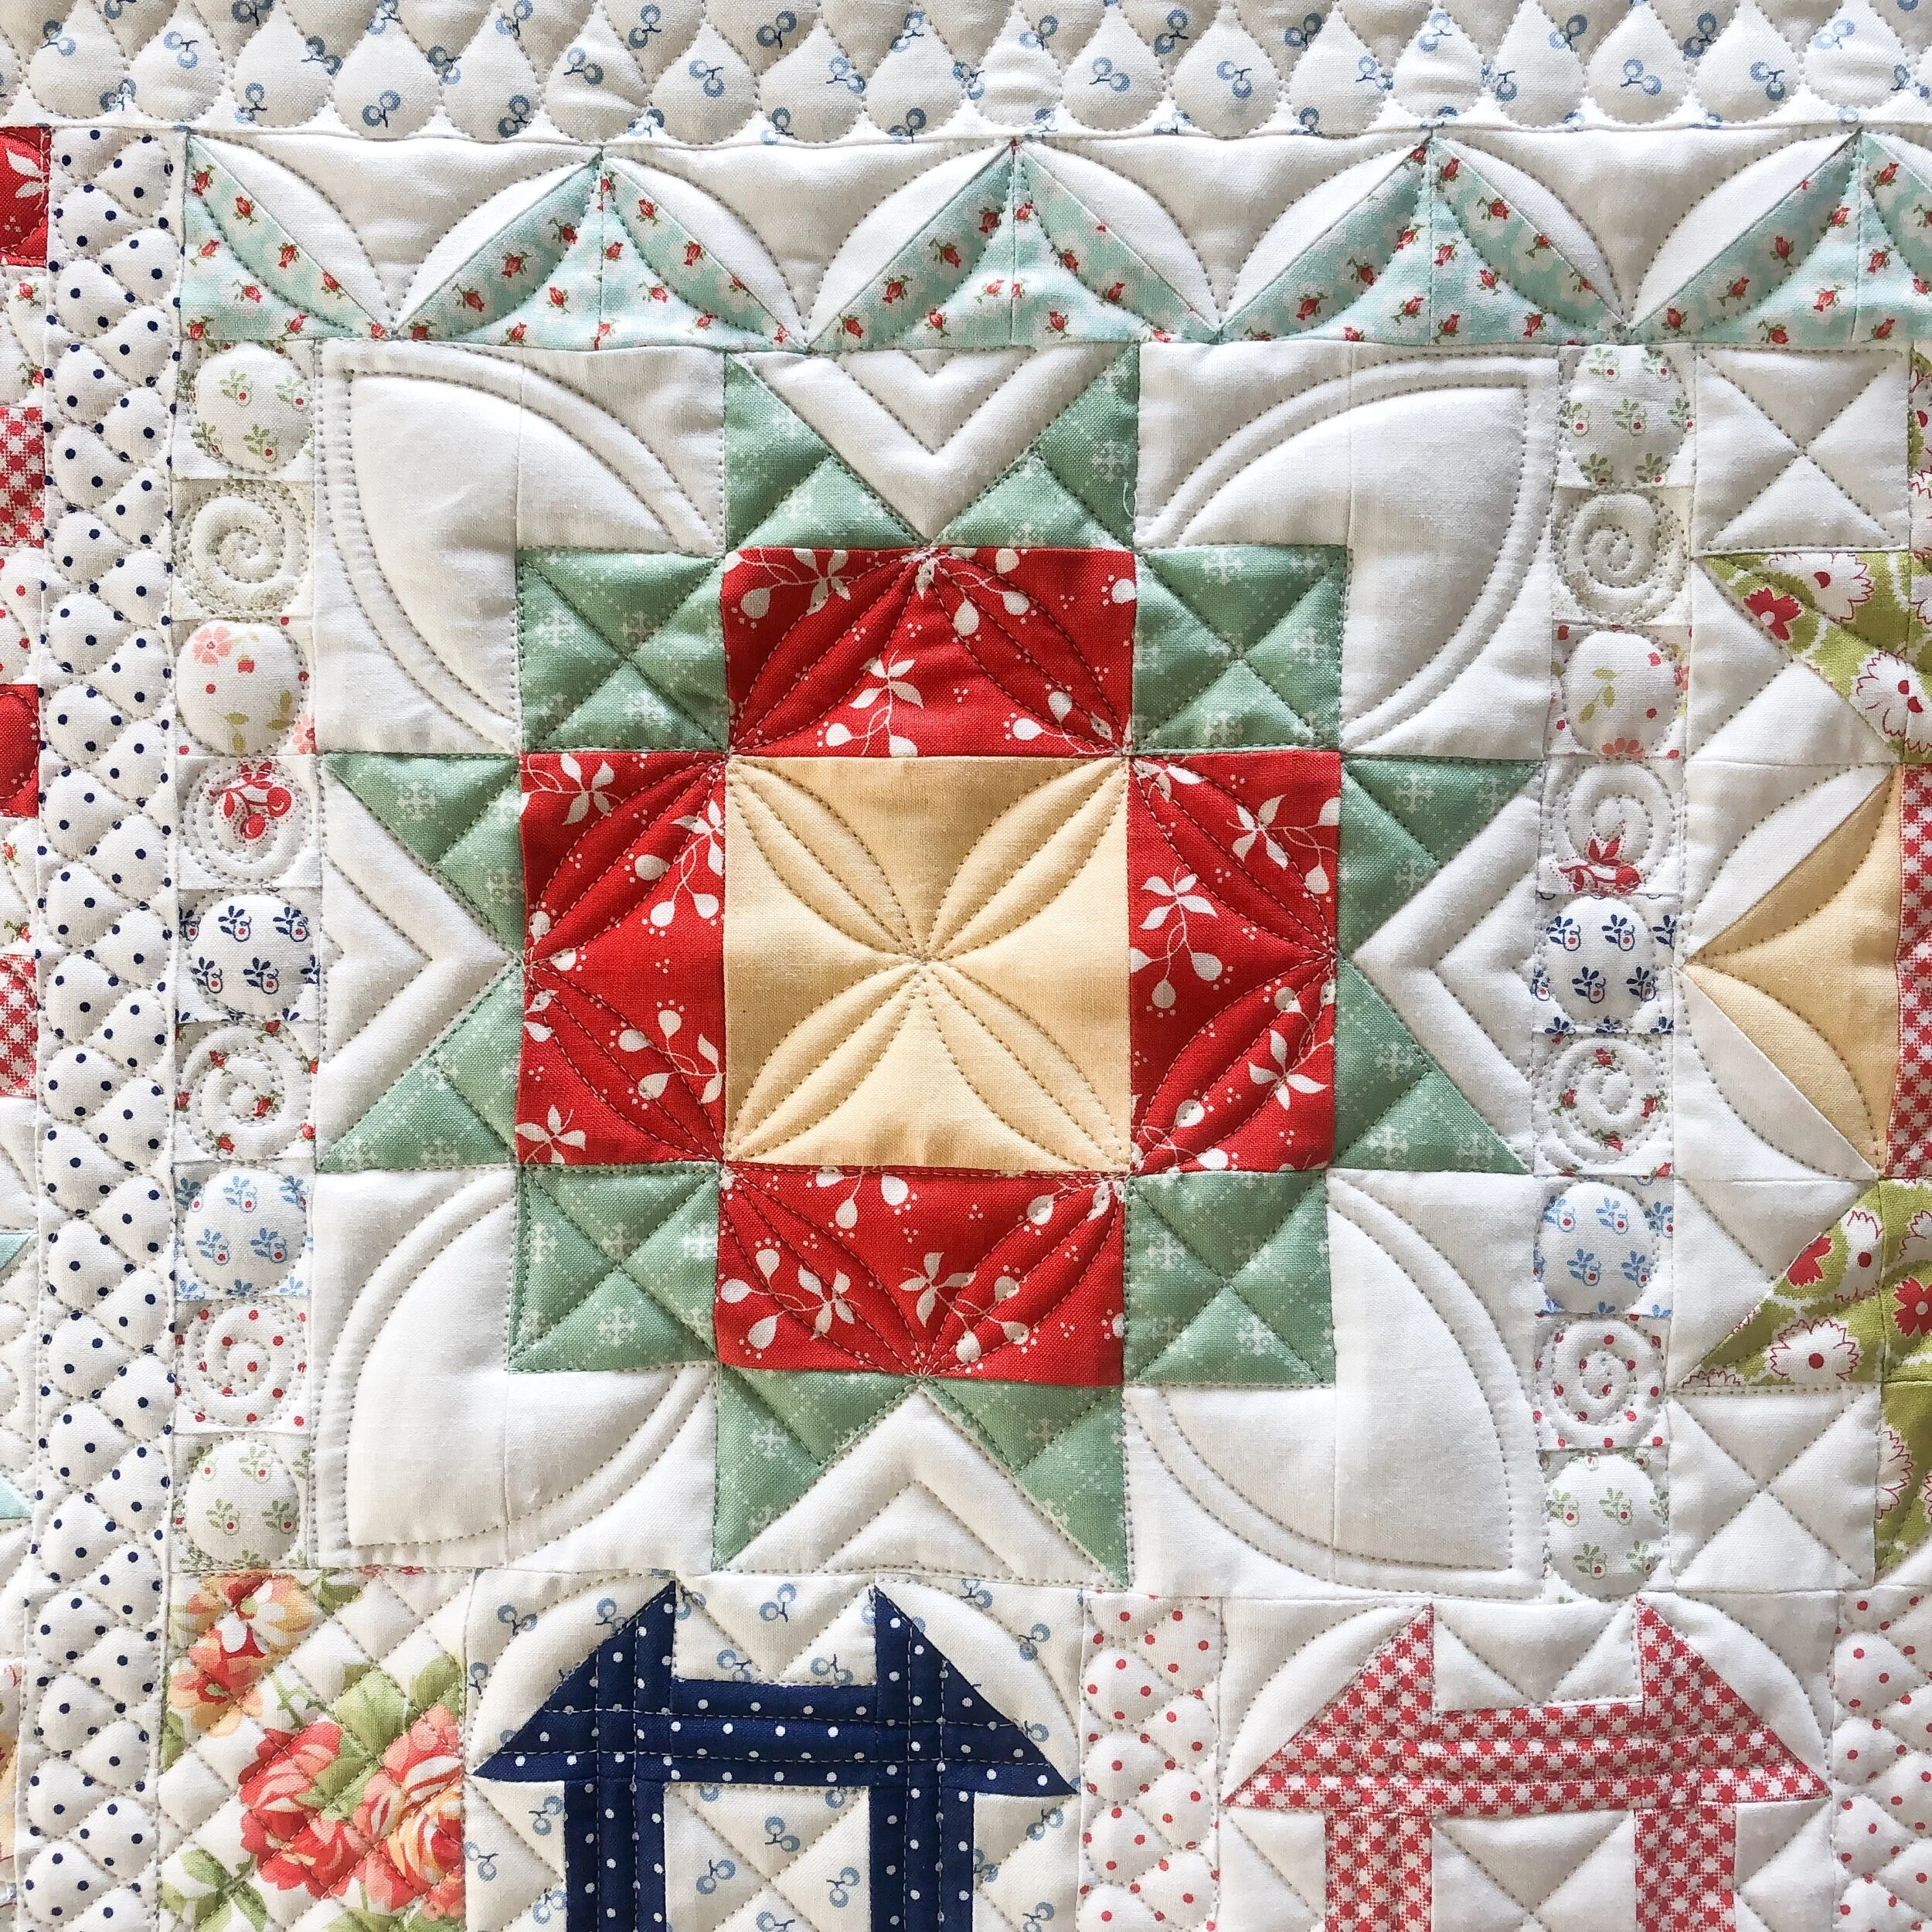
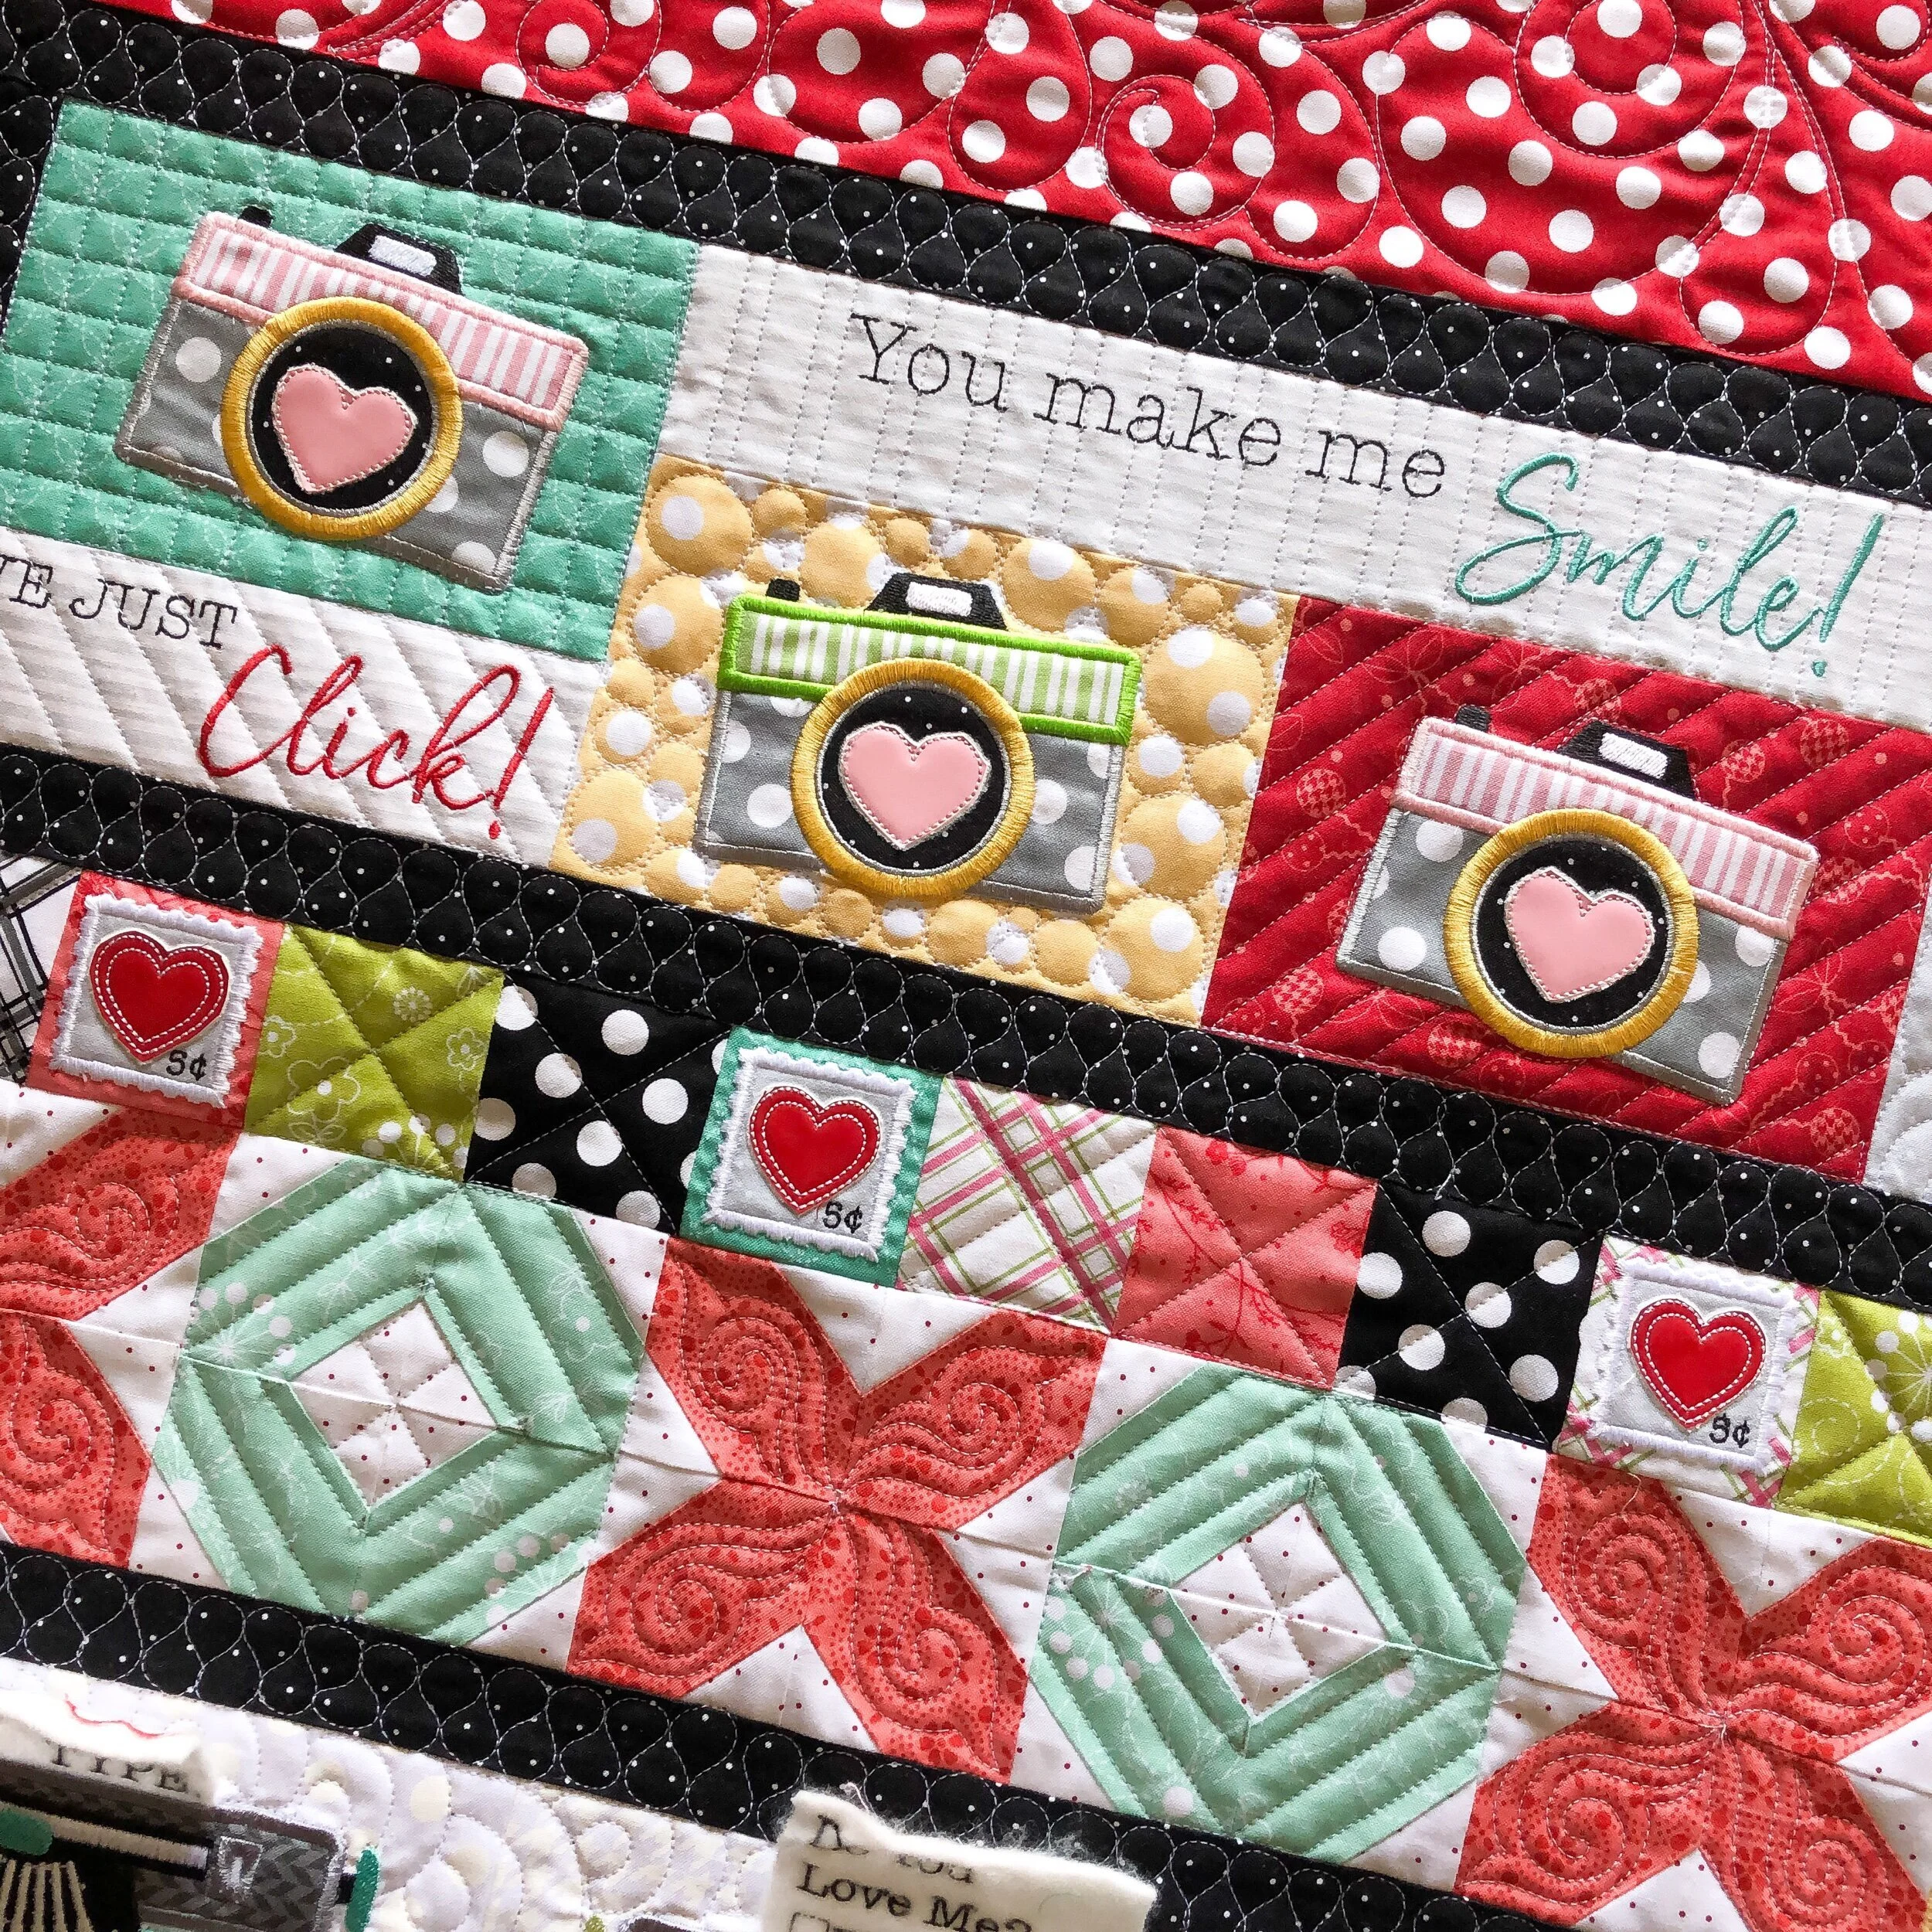
The star above has a variety of different lines, and then swirls in the red floral. I wish the pictures picked up those swirls. They were a fun addition to all those hard lines.
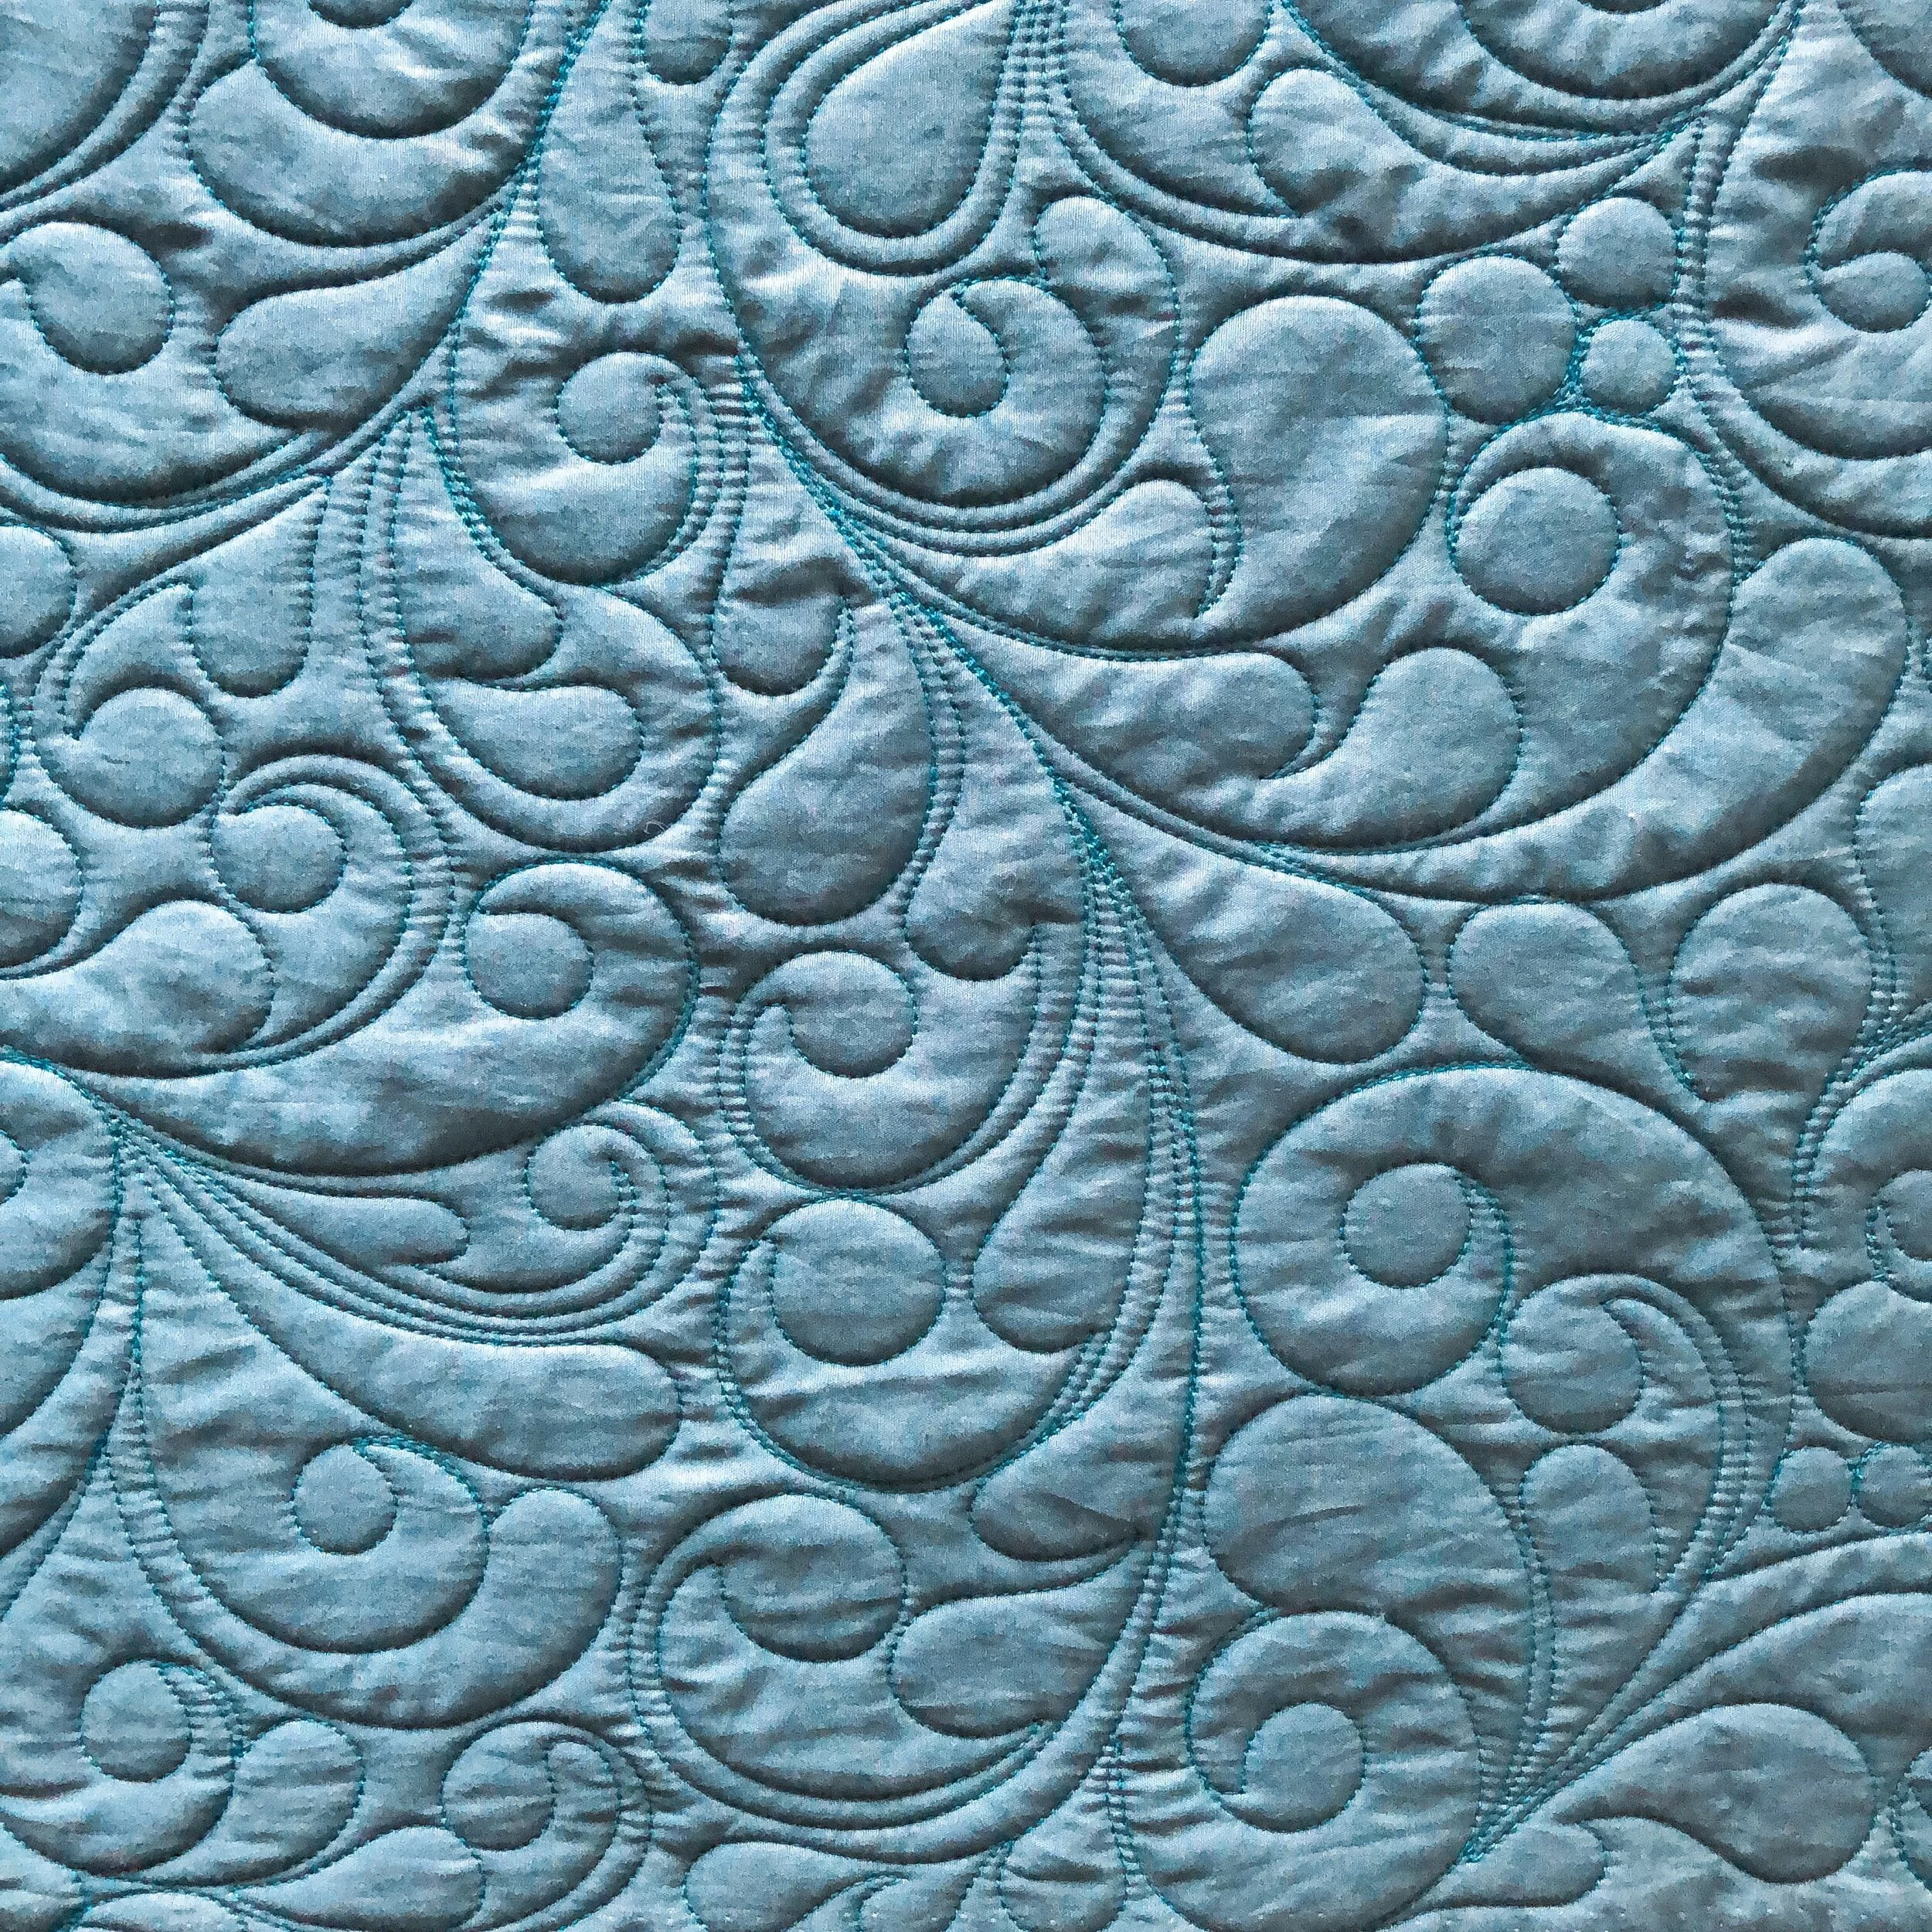
Speaking of hard lines…look at the mixture of lines, in these pictures. Now look at the curves. Intermixing them adds just the right texture and softness at the same time. A quilting balance. I love that sooo much.
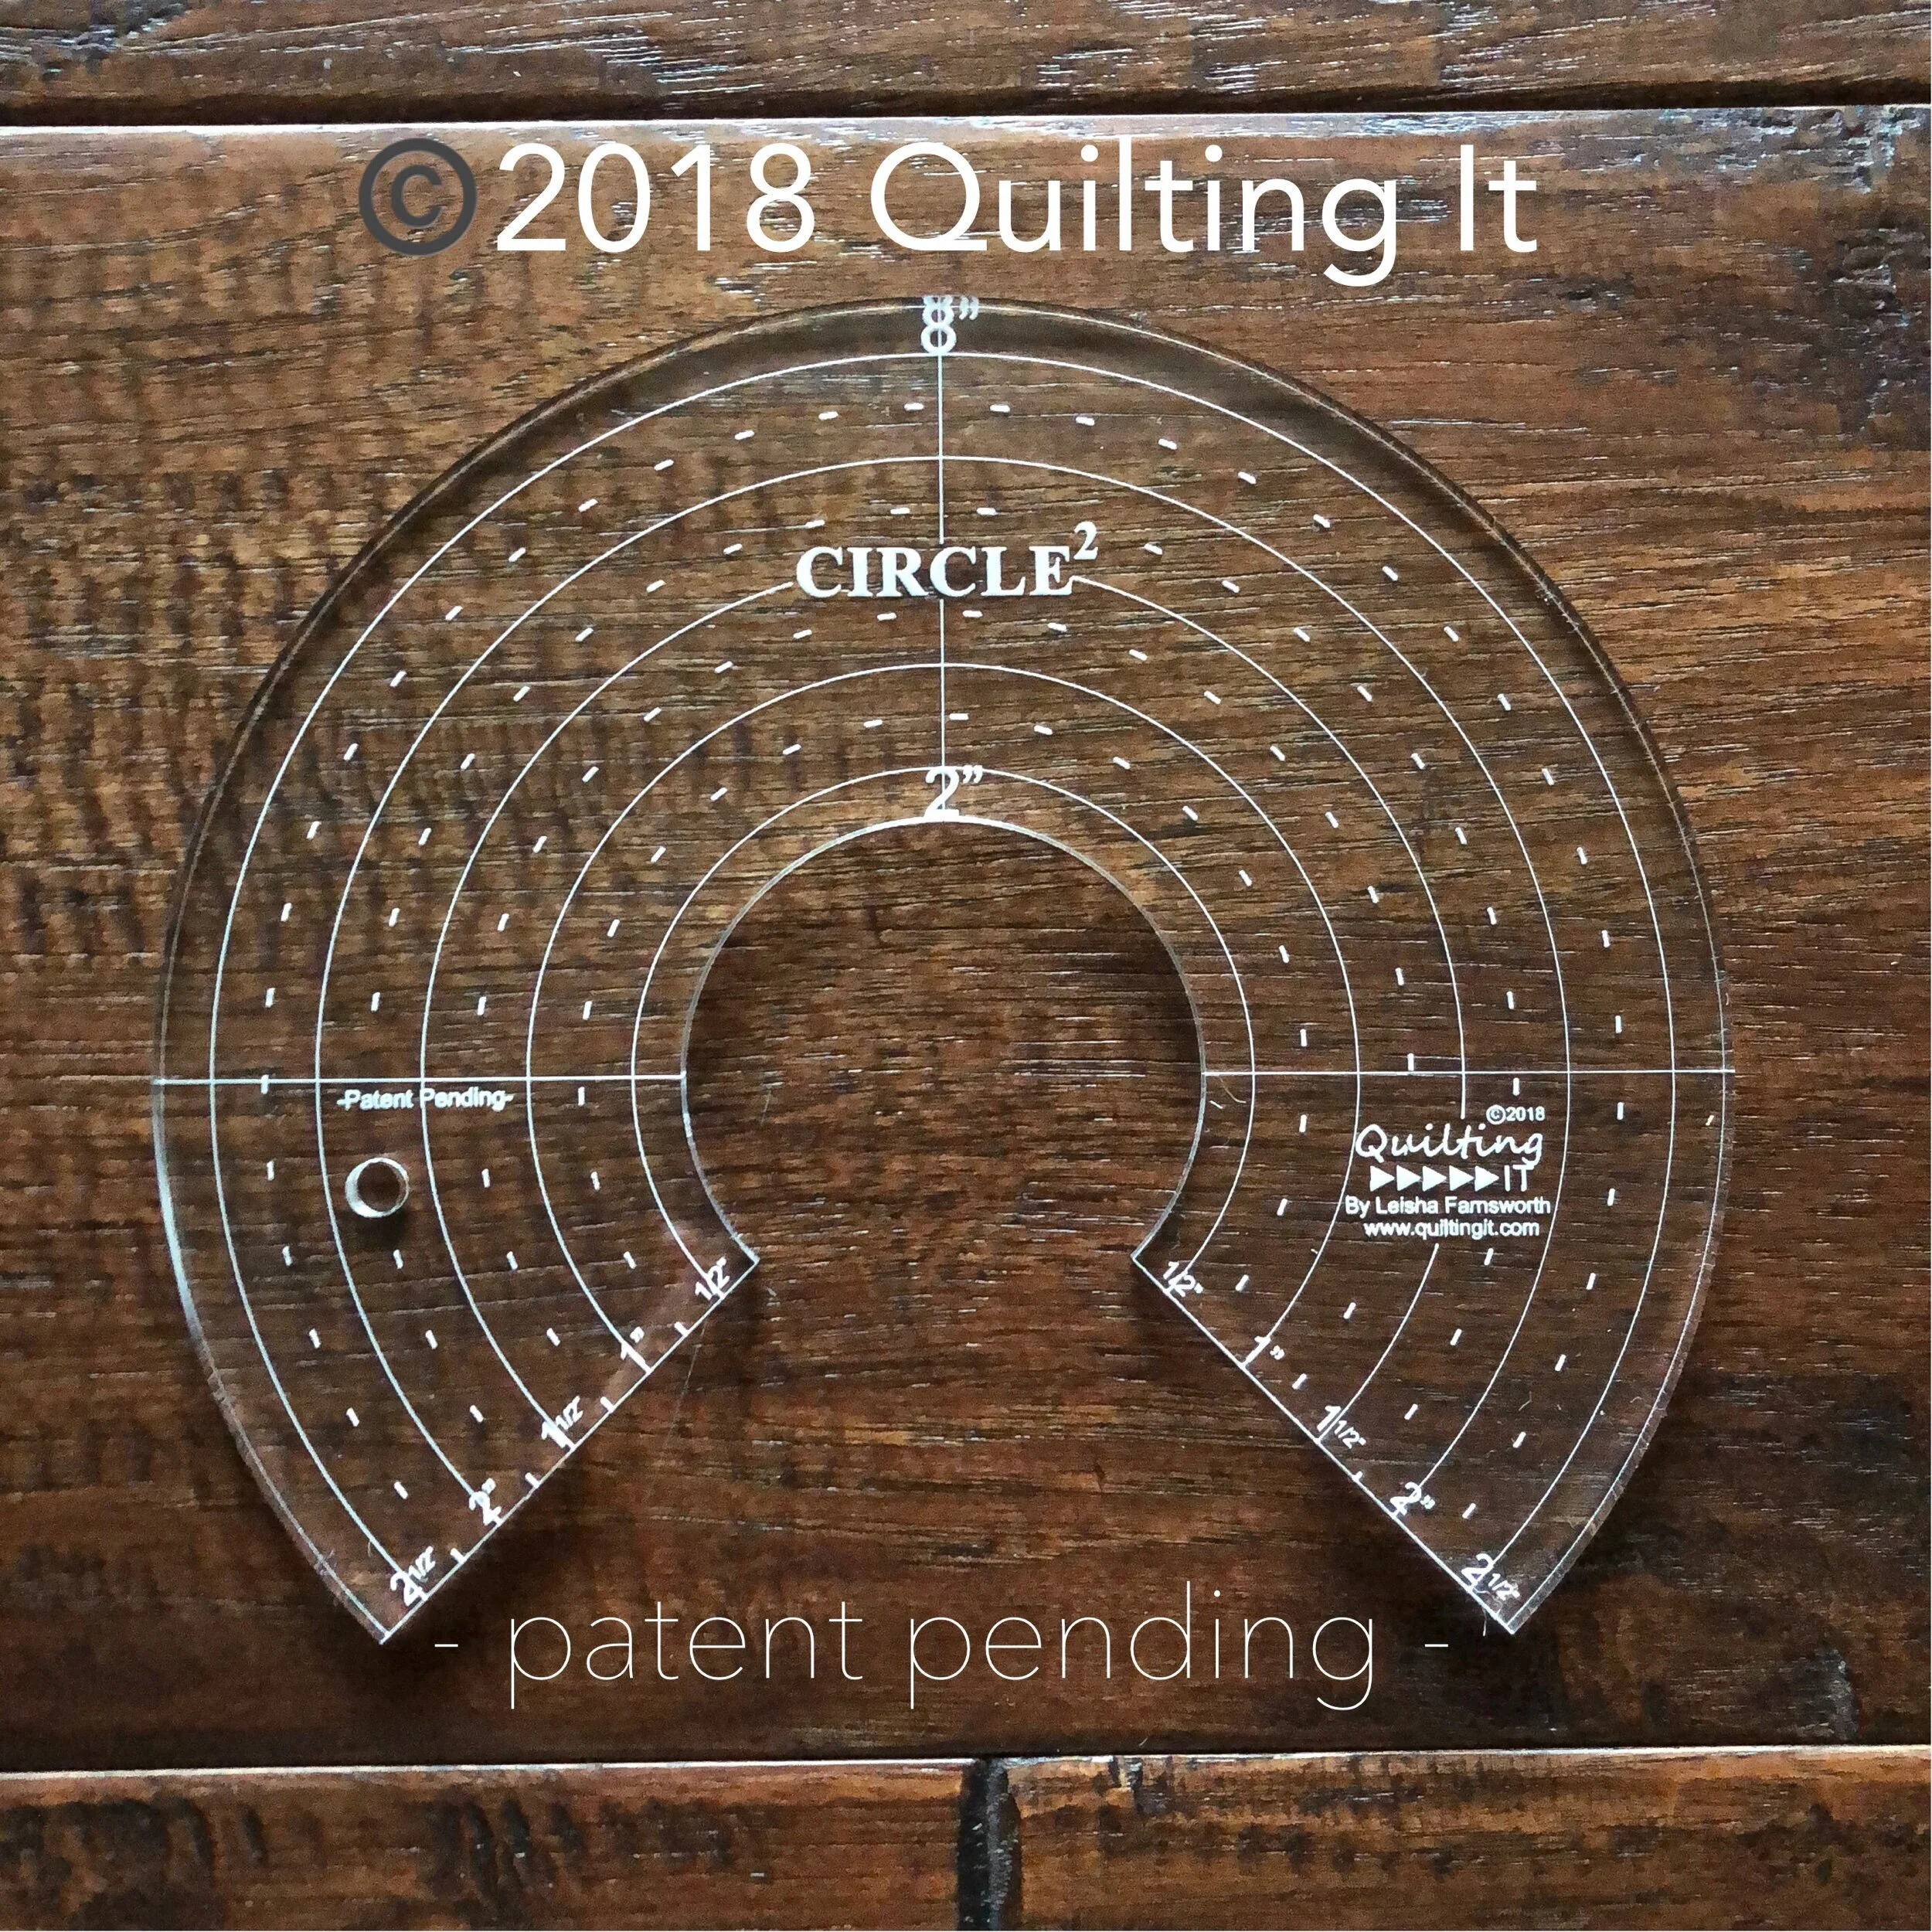
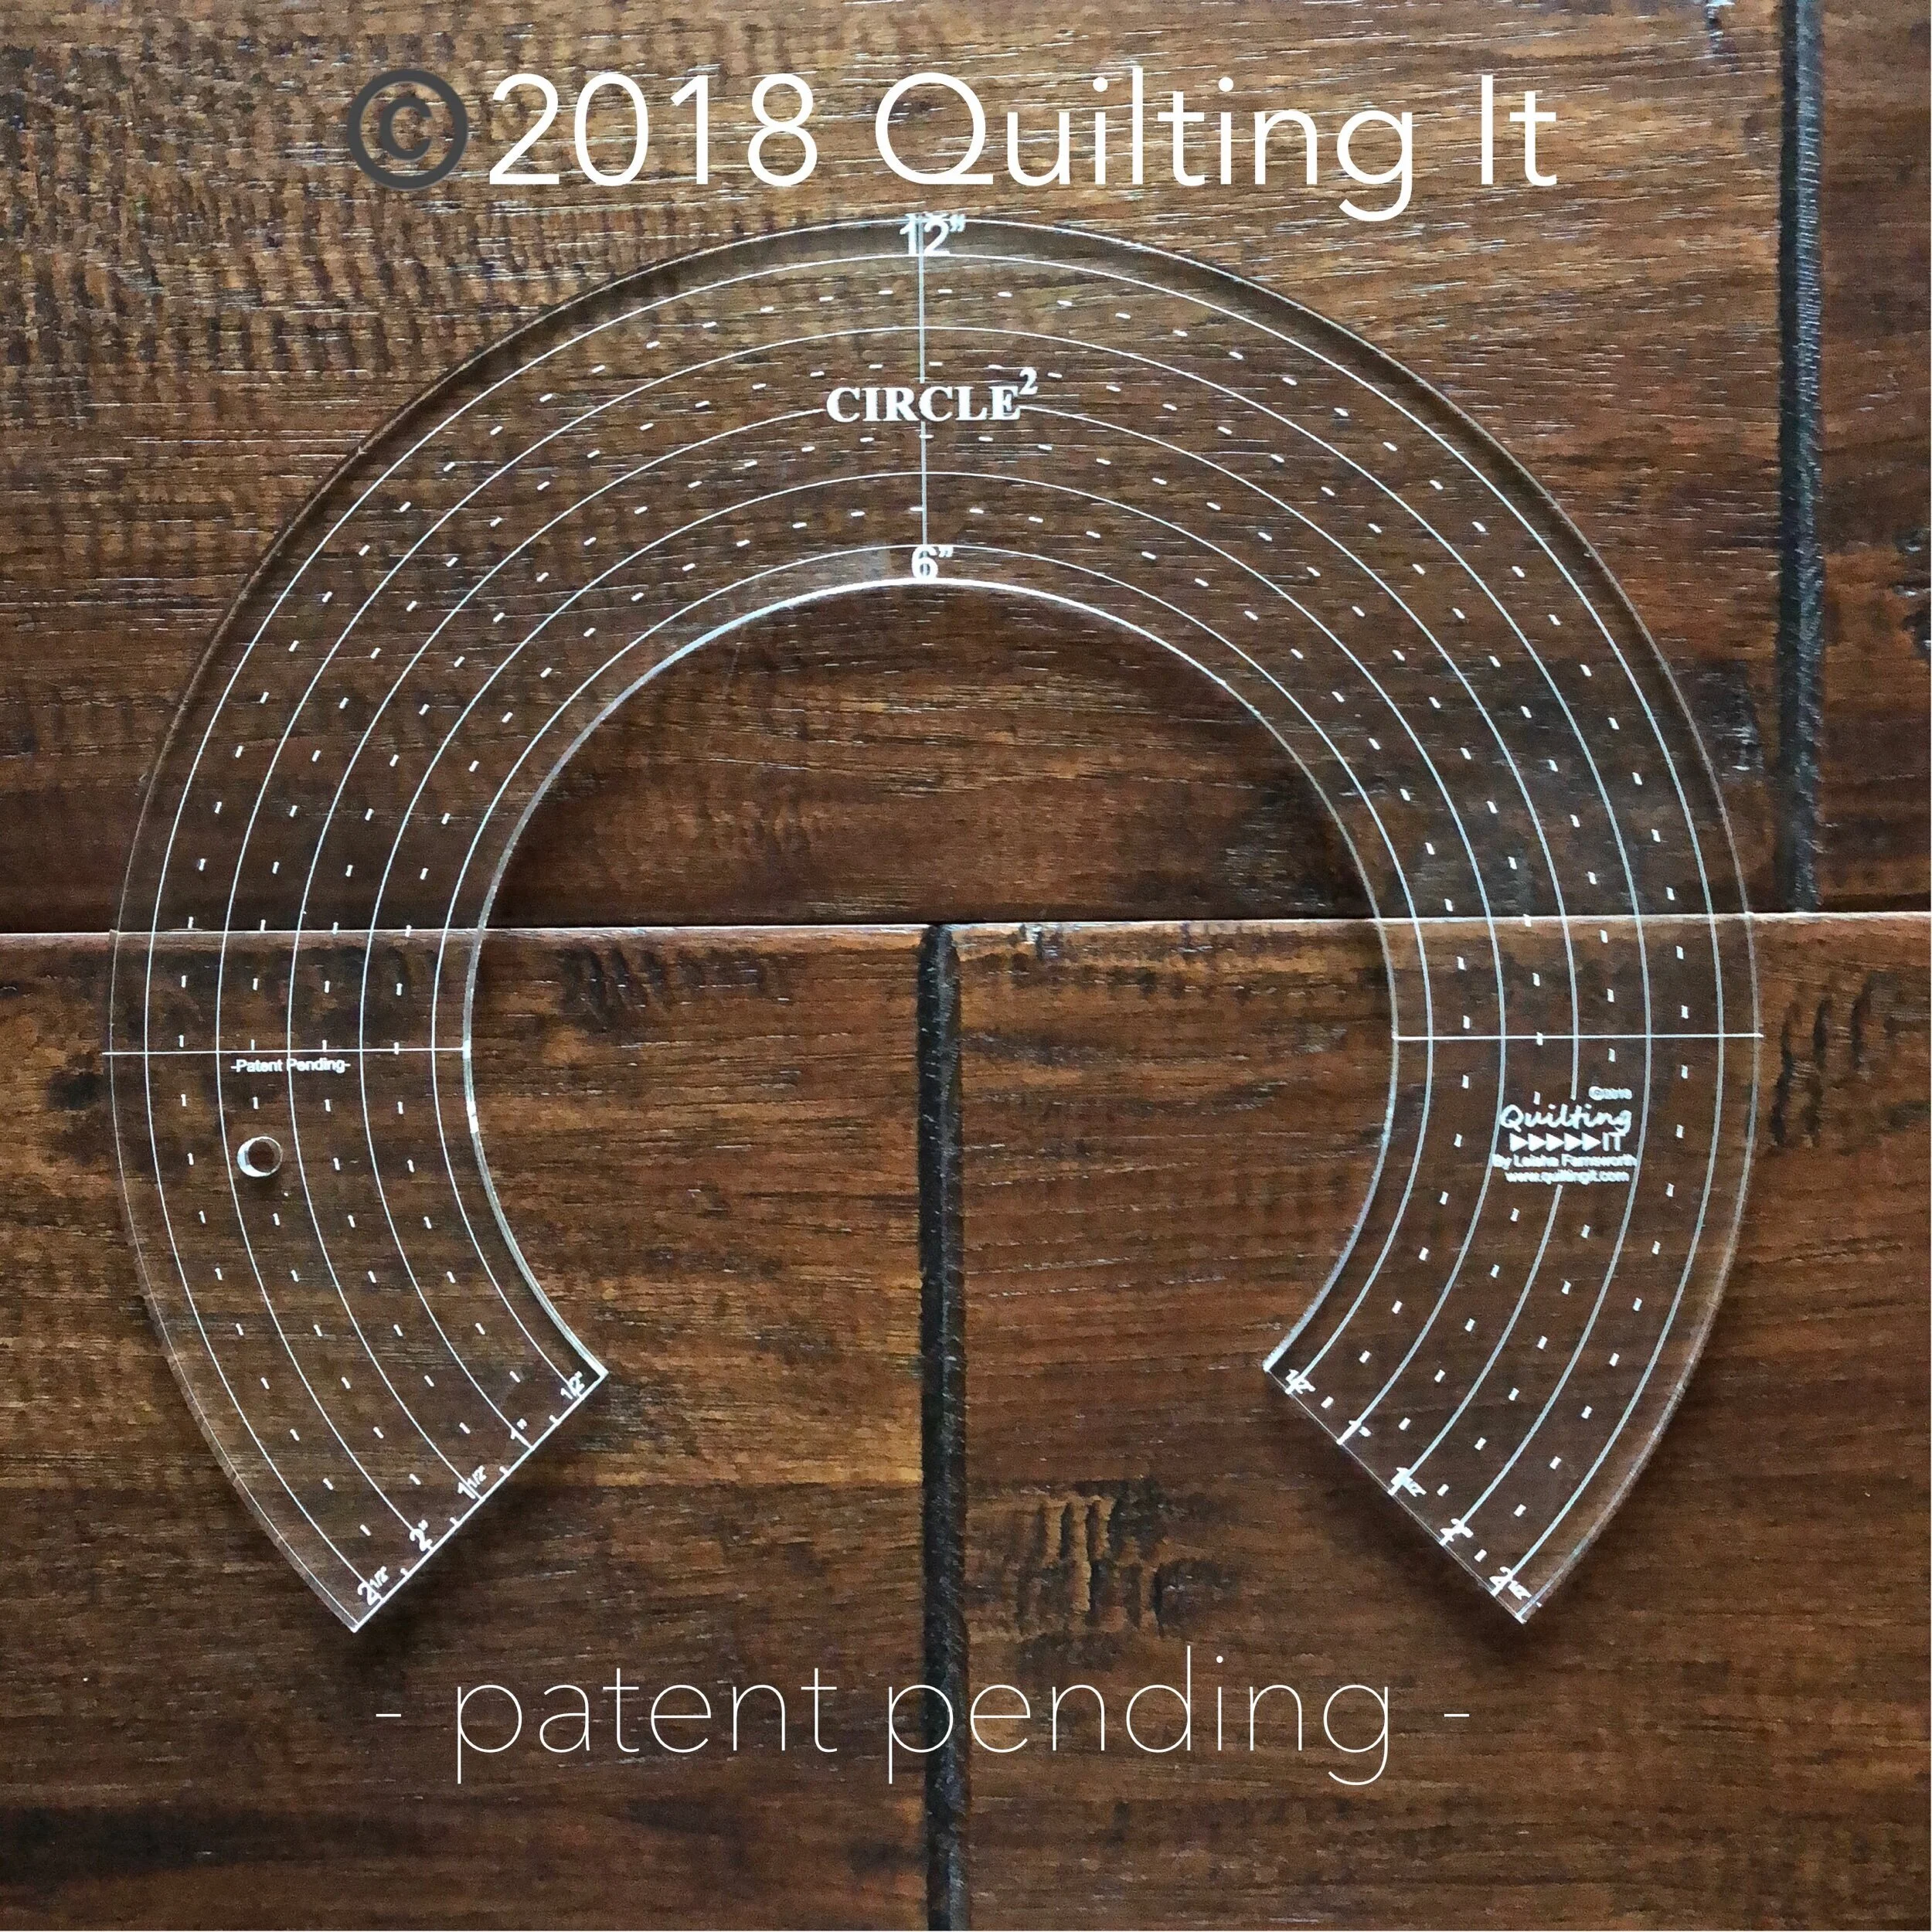
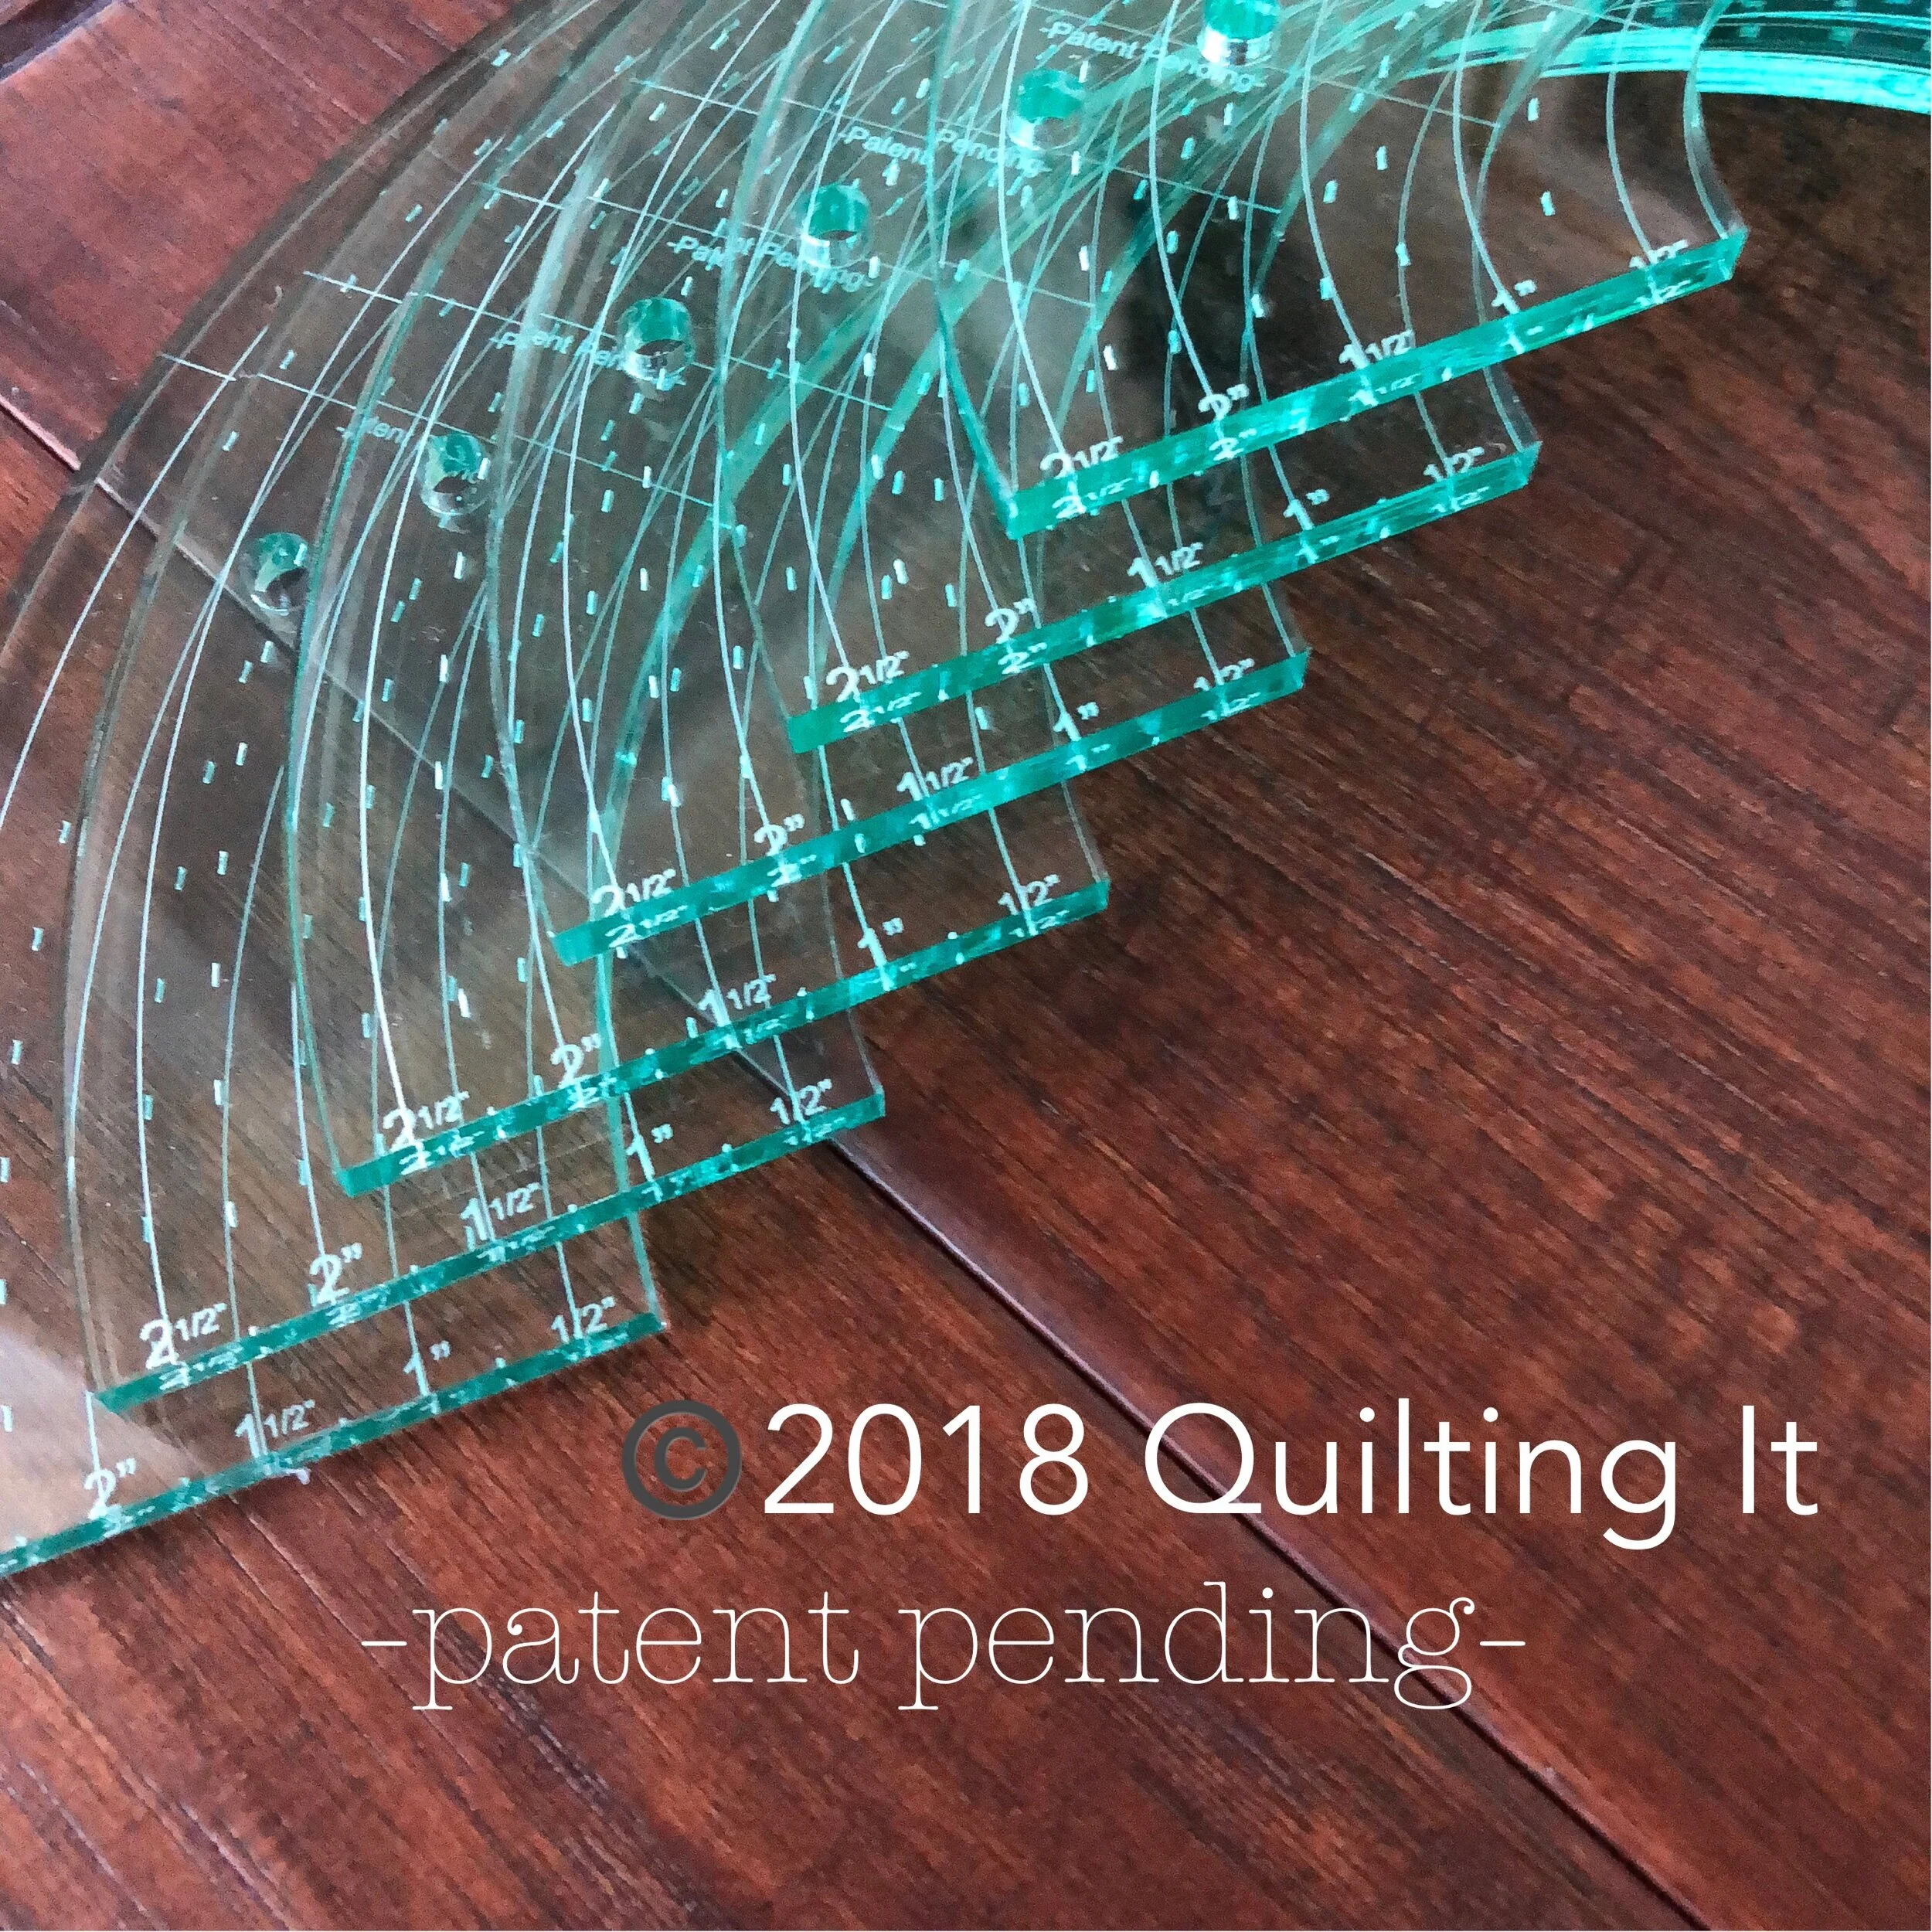
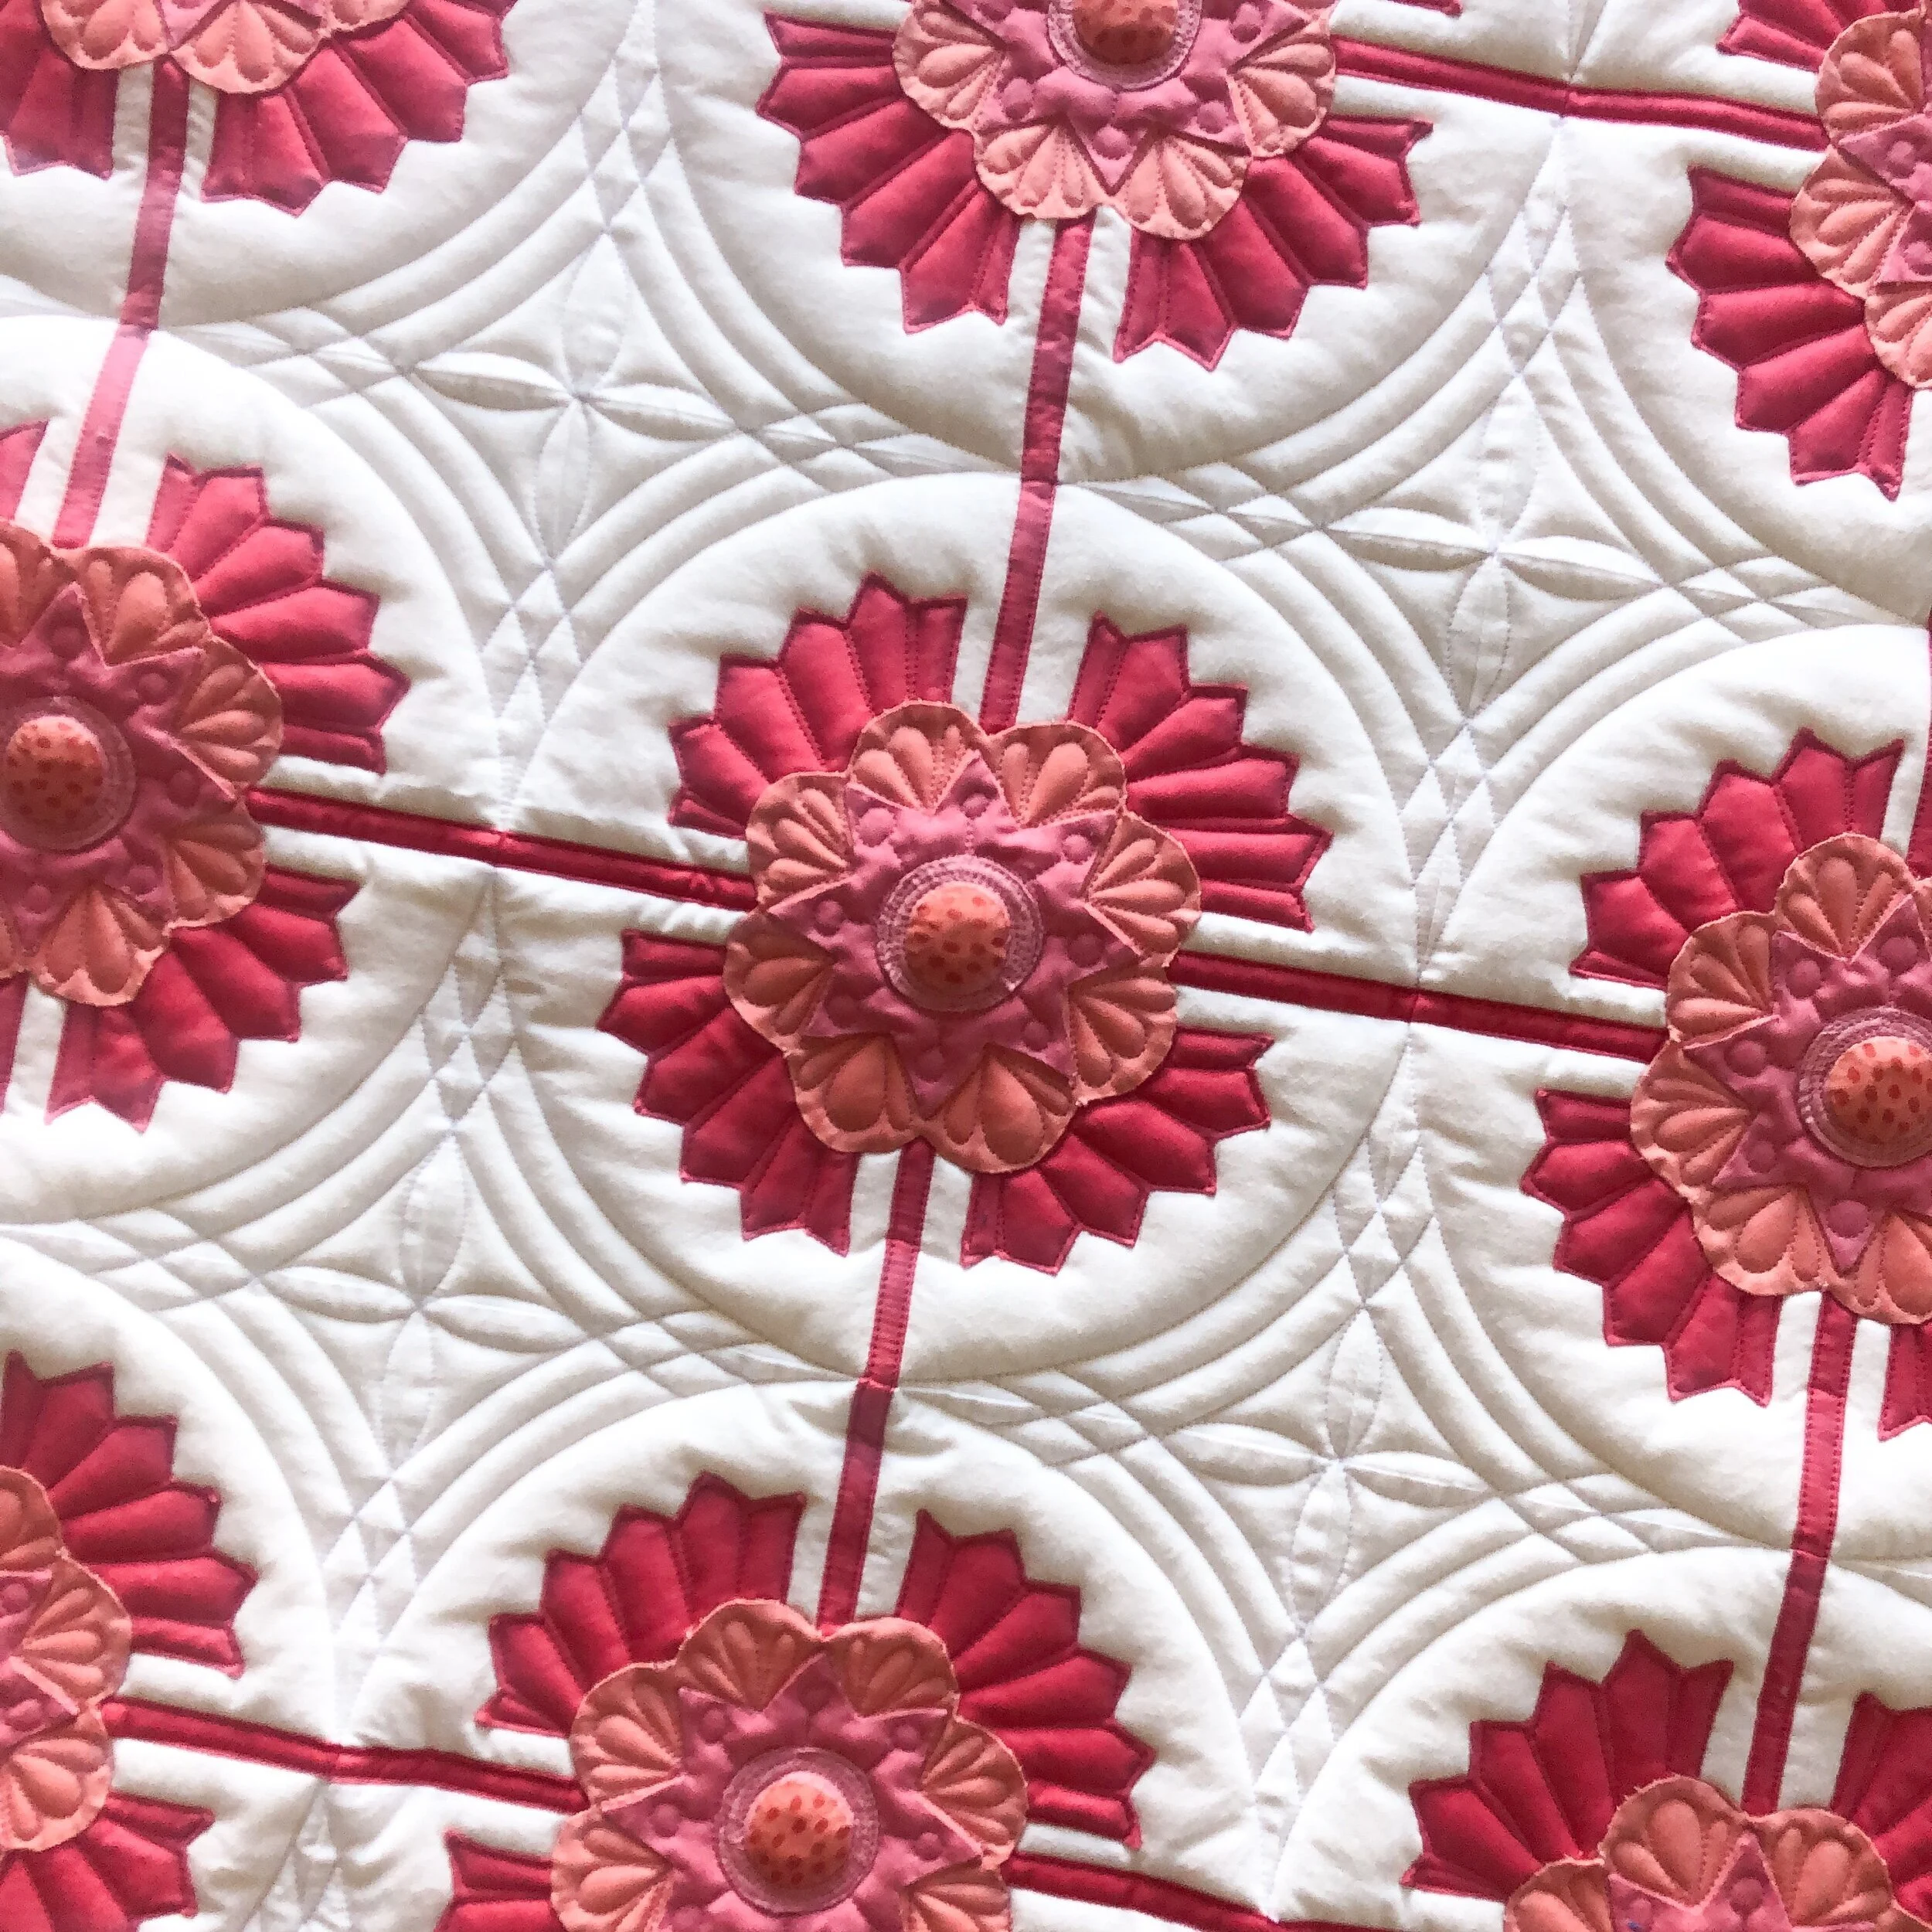
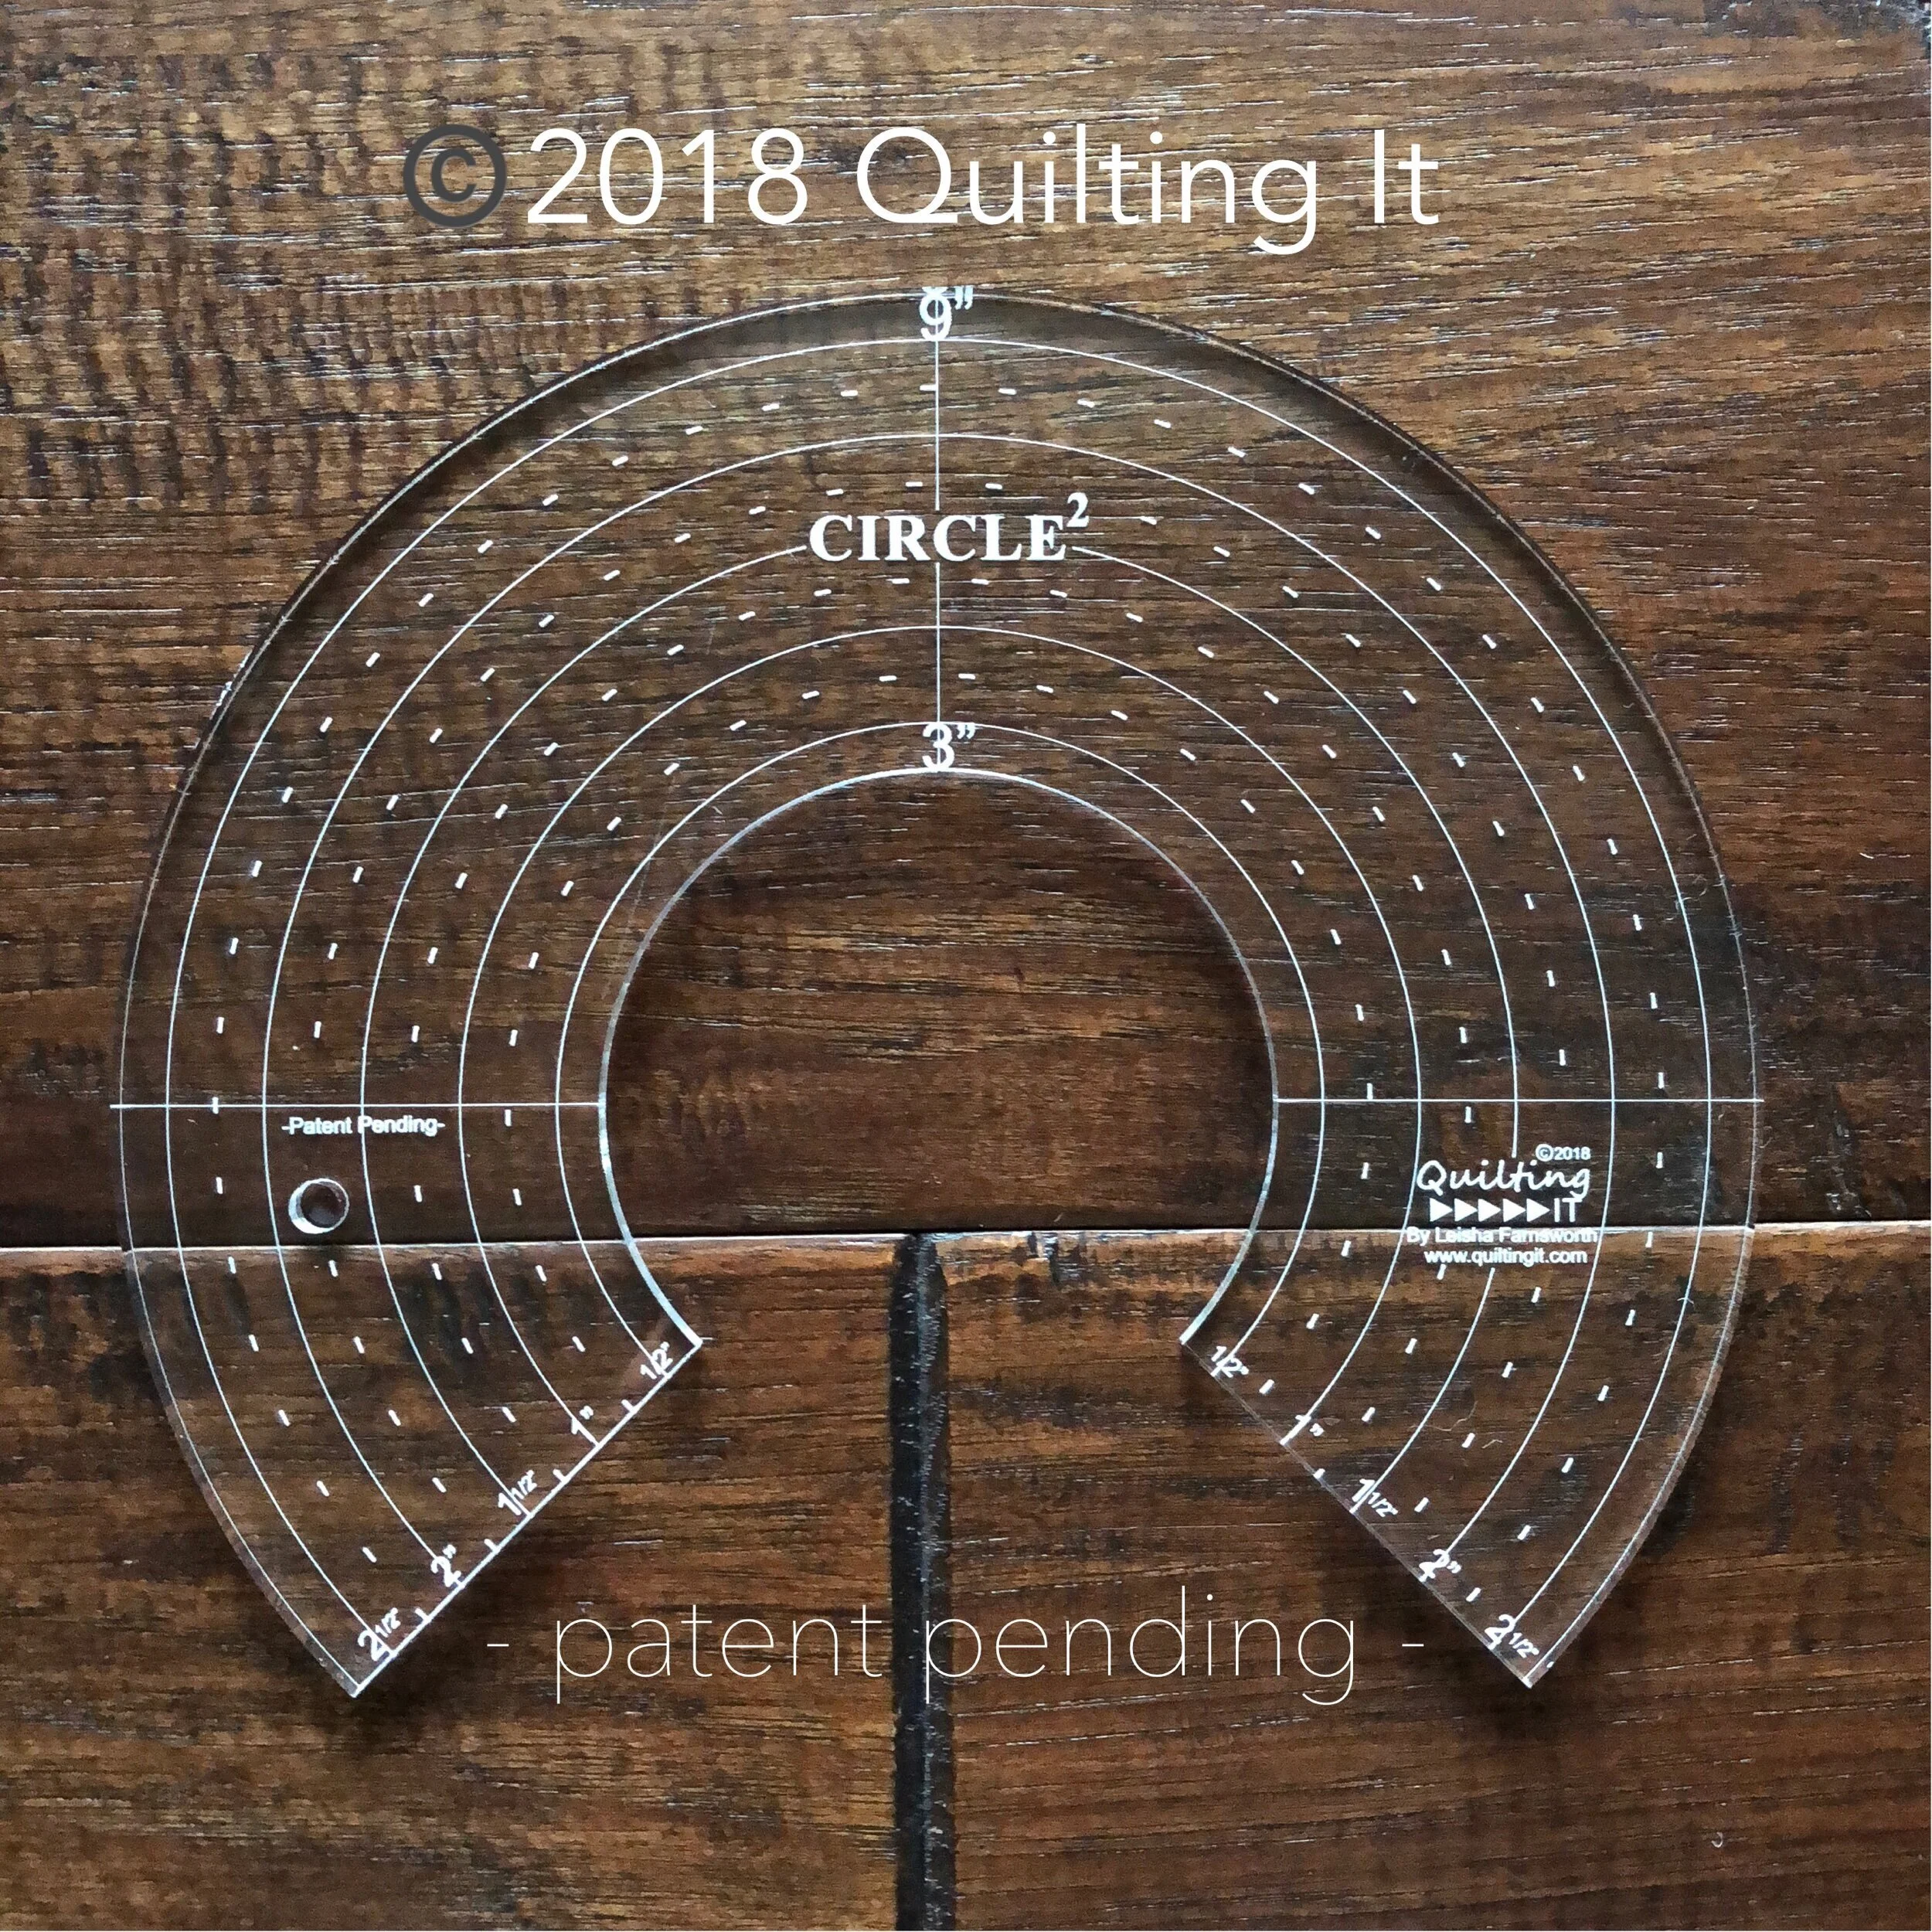
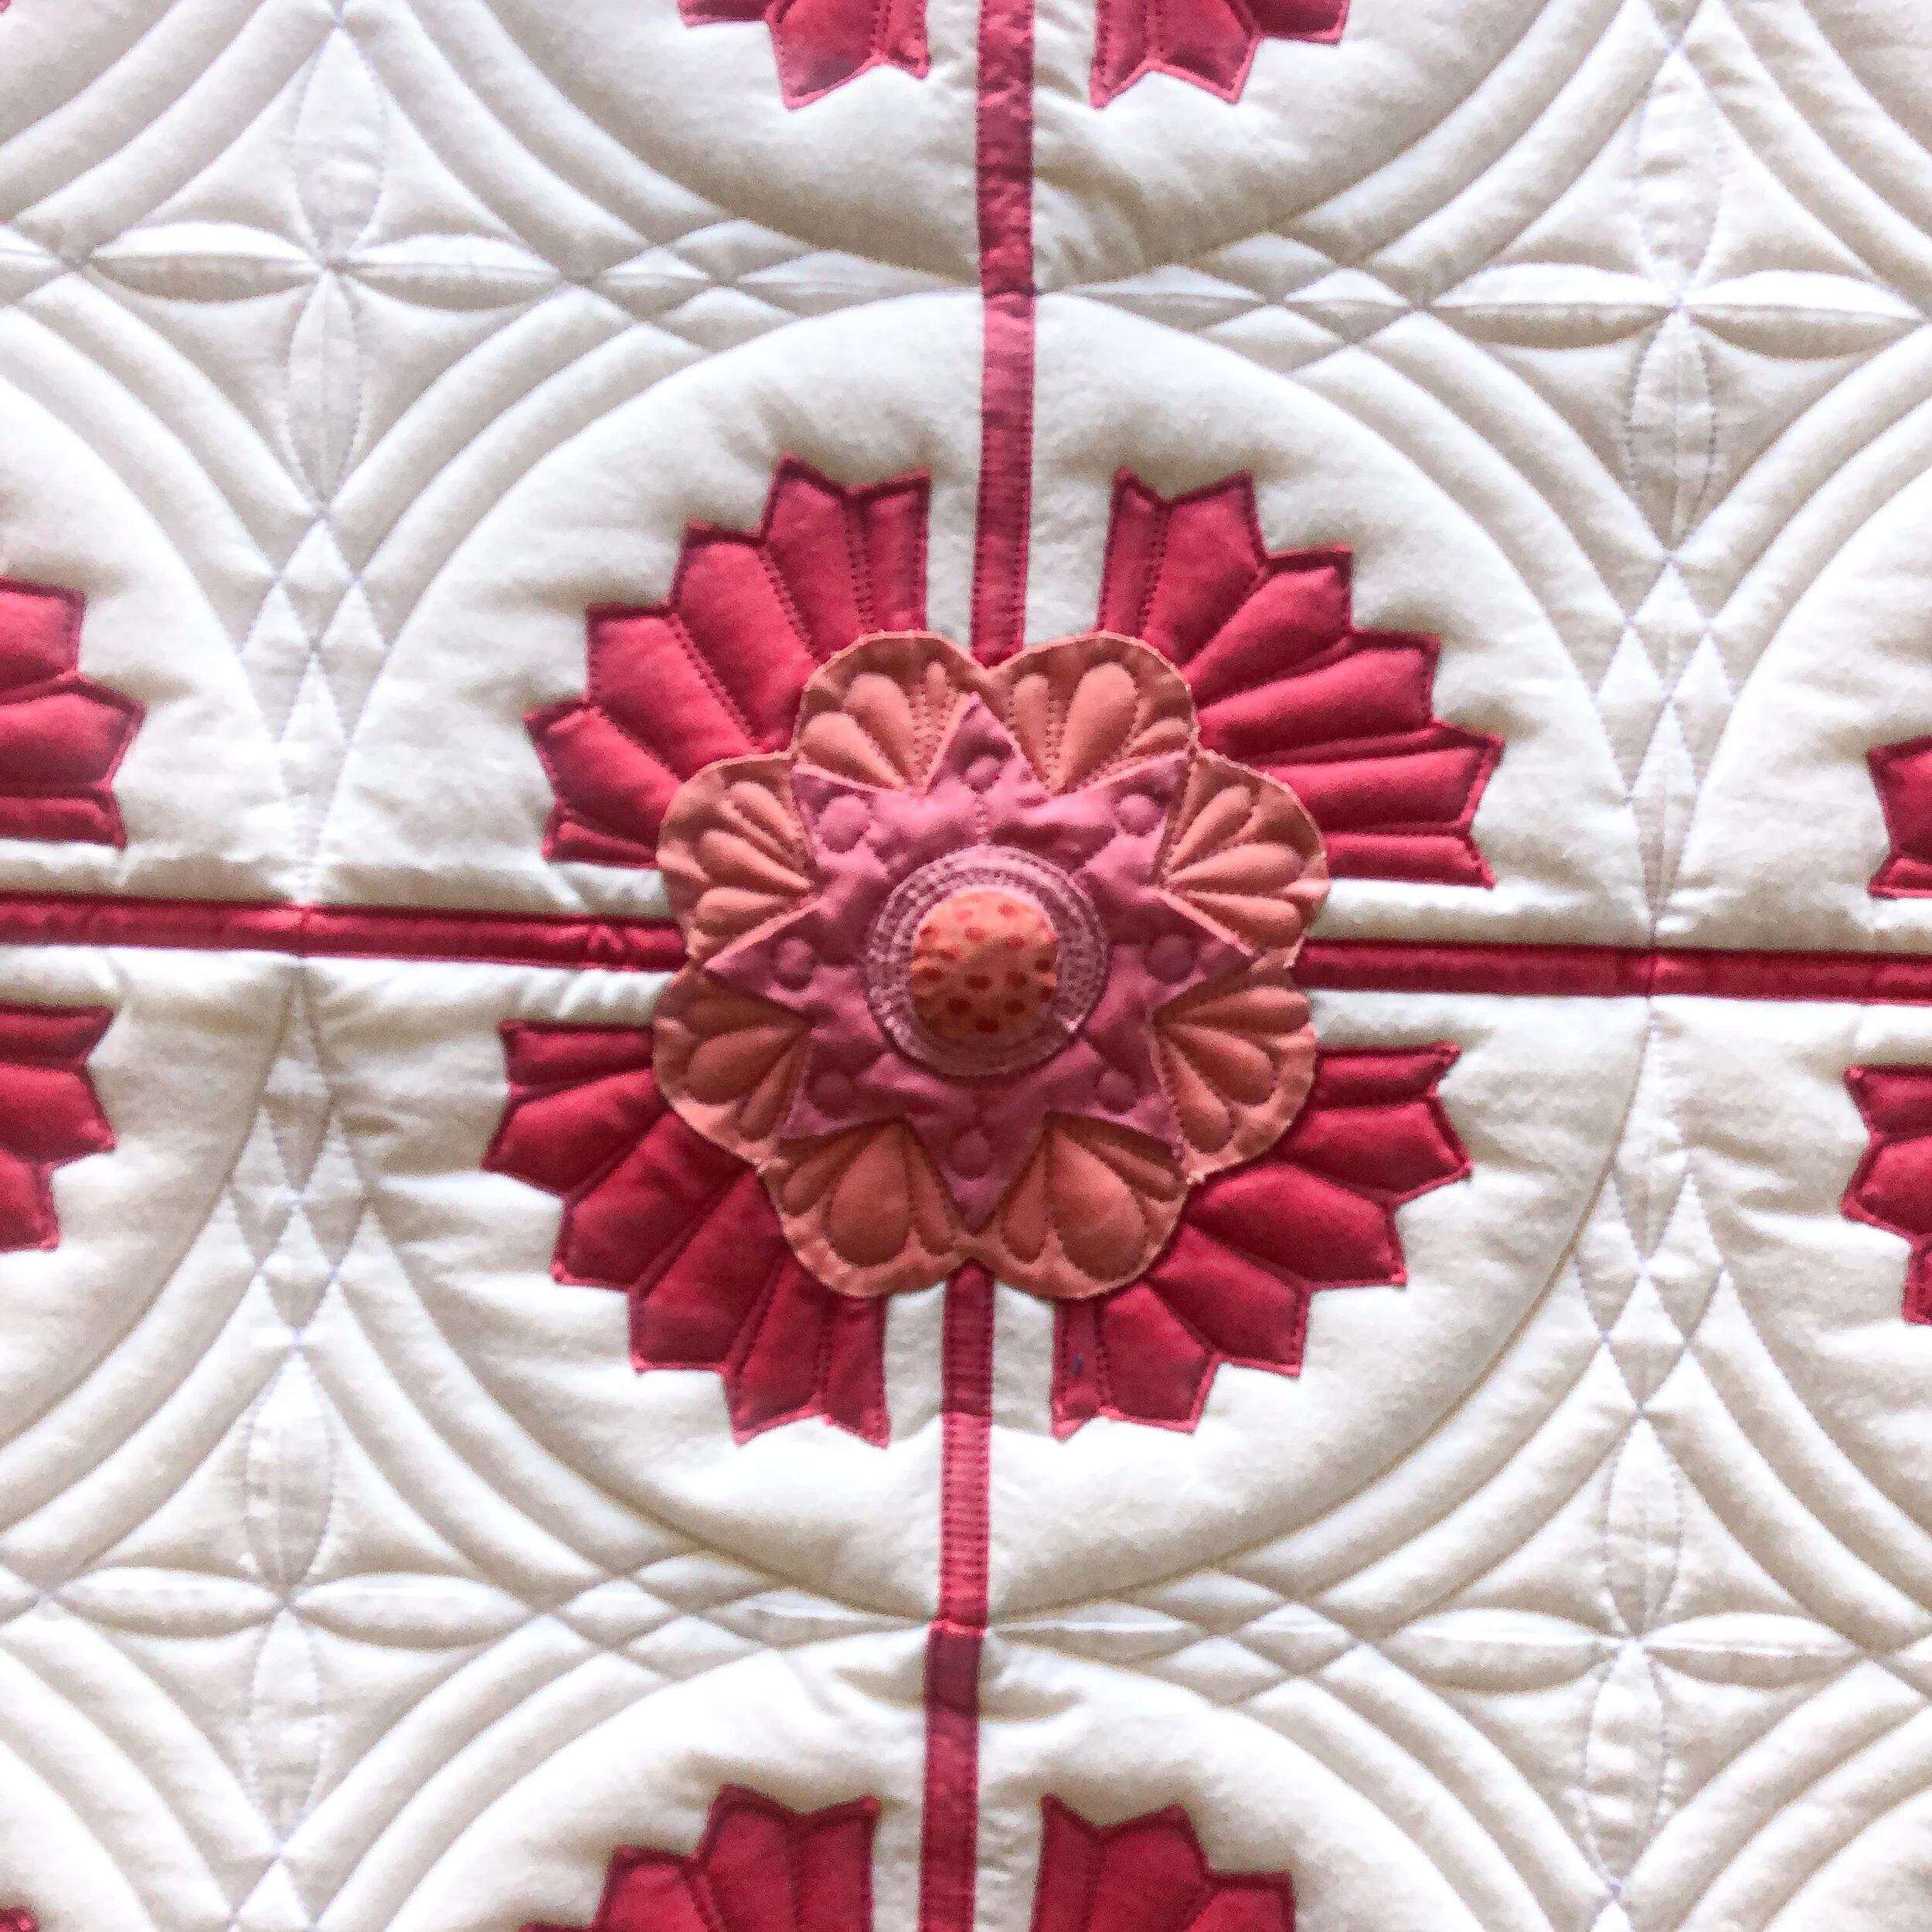
I look at the above picture and see 6 different sizes of orange peel petals…and that is just in the bottom more detailed part of the picture. The top portion has some as well. Because I have a variety of different sizes of orange peel petals, it requires me to have different sizes of rulers to create those lovely petals. I love my Circle2™ machine quilting ruler set!! I am able to quilt all those different sizes of petals with the right curve to fit the shape so nicely. I actually used my 2”, 3”, 4”, 5“, 6”, and 8” rulers. That is actually 5 out of the 6 rulers in my Circle2™ set. The 2” and 8” circles are on the same ruler. If you aren’t familiar with my Circle2 rulers, the circles come in 12 different sizes 2”-13”. They are made in the USA with 1/4” high quality acrylic, and the width of the ruler is 2.5” from the outer circle to the inner circle. I designed them with the 1/4” hopper foot in mind. If you use the 2” circle, you’ll get a 2” circle. The other sets I’ve seen give you circles at 2.5”, or 3.5”…and so on. For more info head to this blog post: Circle2 Rulers™. There are clear and green sets available in my shop! Below is the 2”/8“ clear ruler. More pictures are available at the bottom of this post, as well as in my shop. There are also pictures of other quilts in the ruler listings…its fun to see what they can create. I’m also loving the quilting I’m seeing on instagram under the hashtag #circle2rulers
You may wonder why I’m not telling you which curve I used where. The smallest orange peels were created with the 2”, and then I worked my way up from there. I actually lay the rulers next to the shapes from point to point and see which ruler is going to give me the curve that I would like. I do it the same with all of the curves I quilt.
- Design Patent D875,574 -
I also have a mix of freehand quilting in there, too. The circles and swirls, petals and loops, with the occasional feather. I just love the mix of textures so so much.
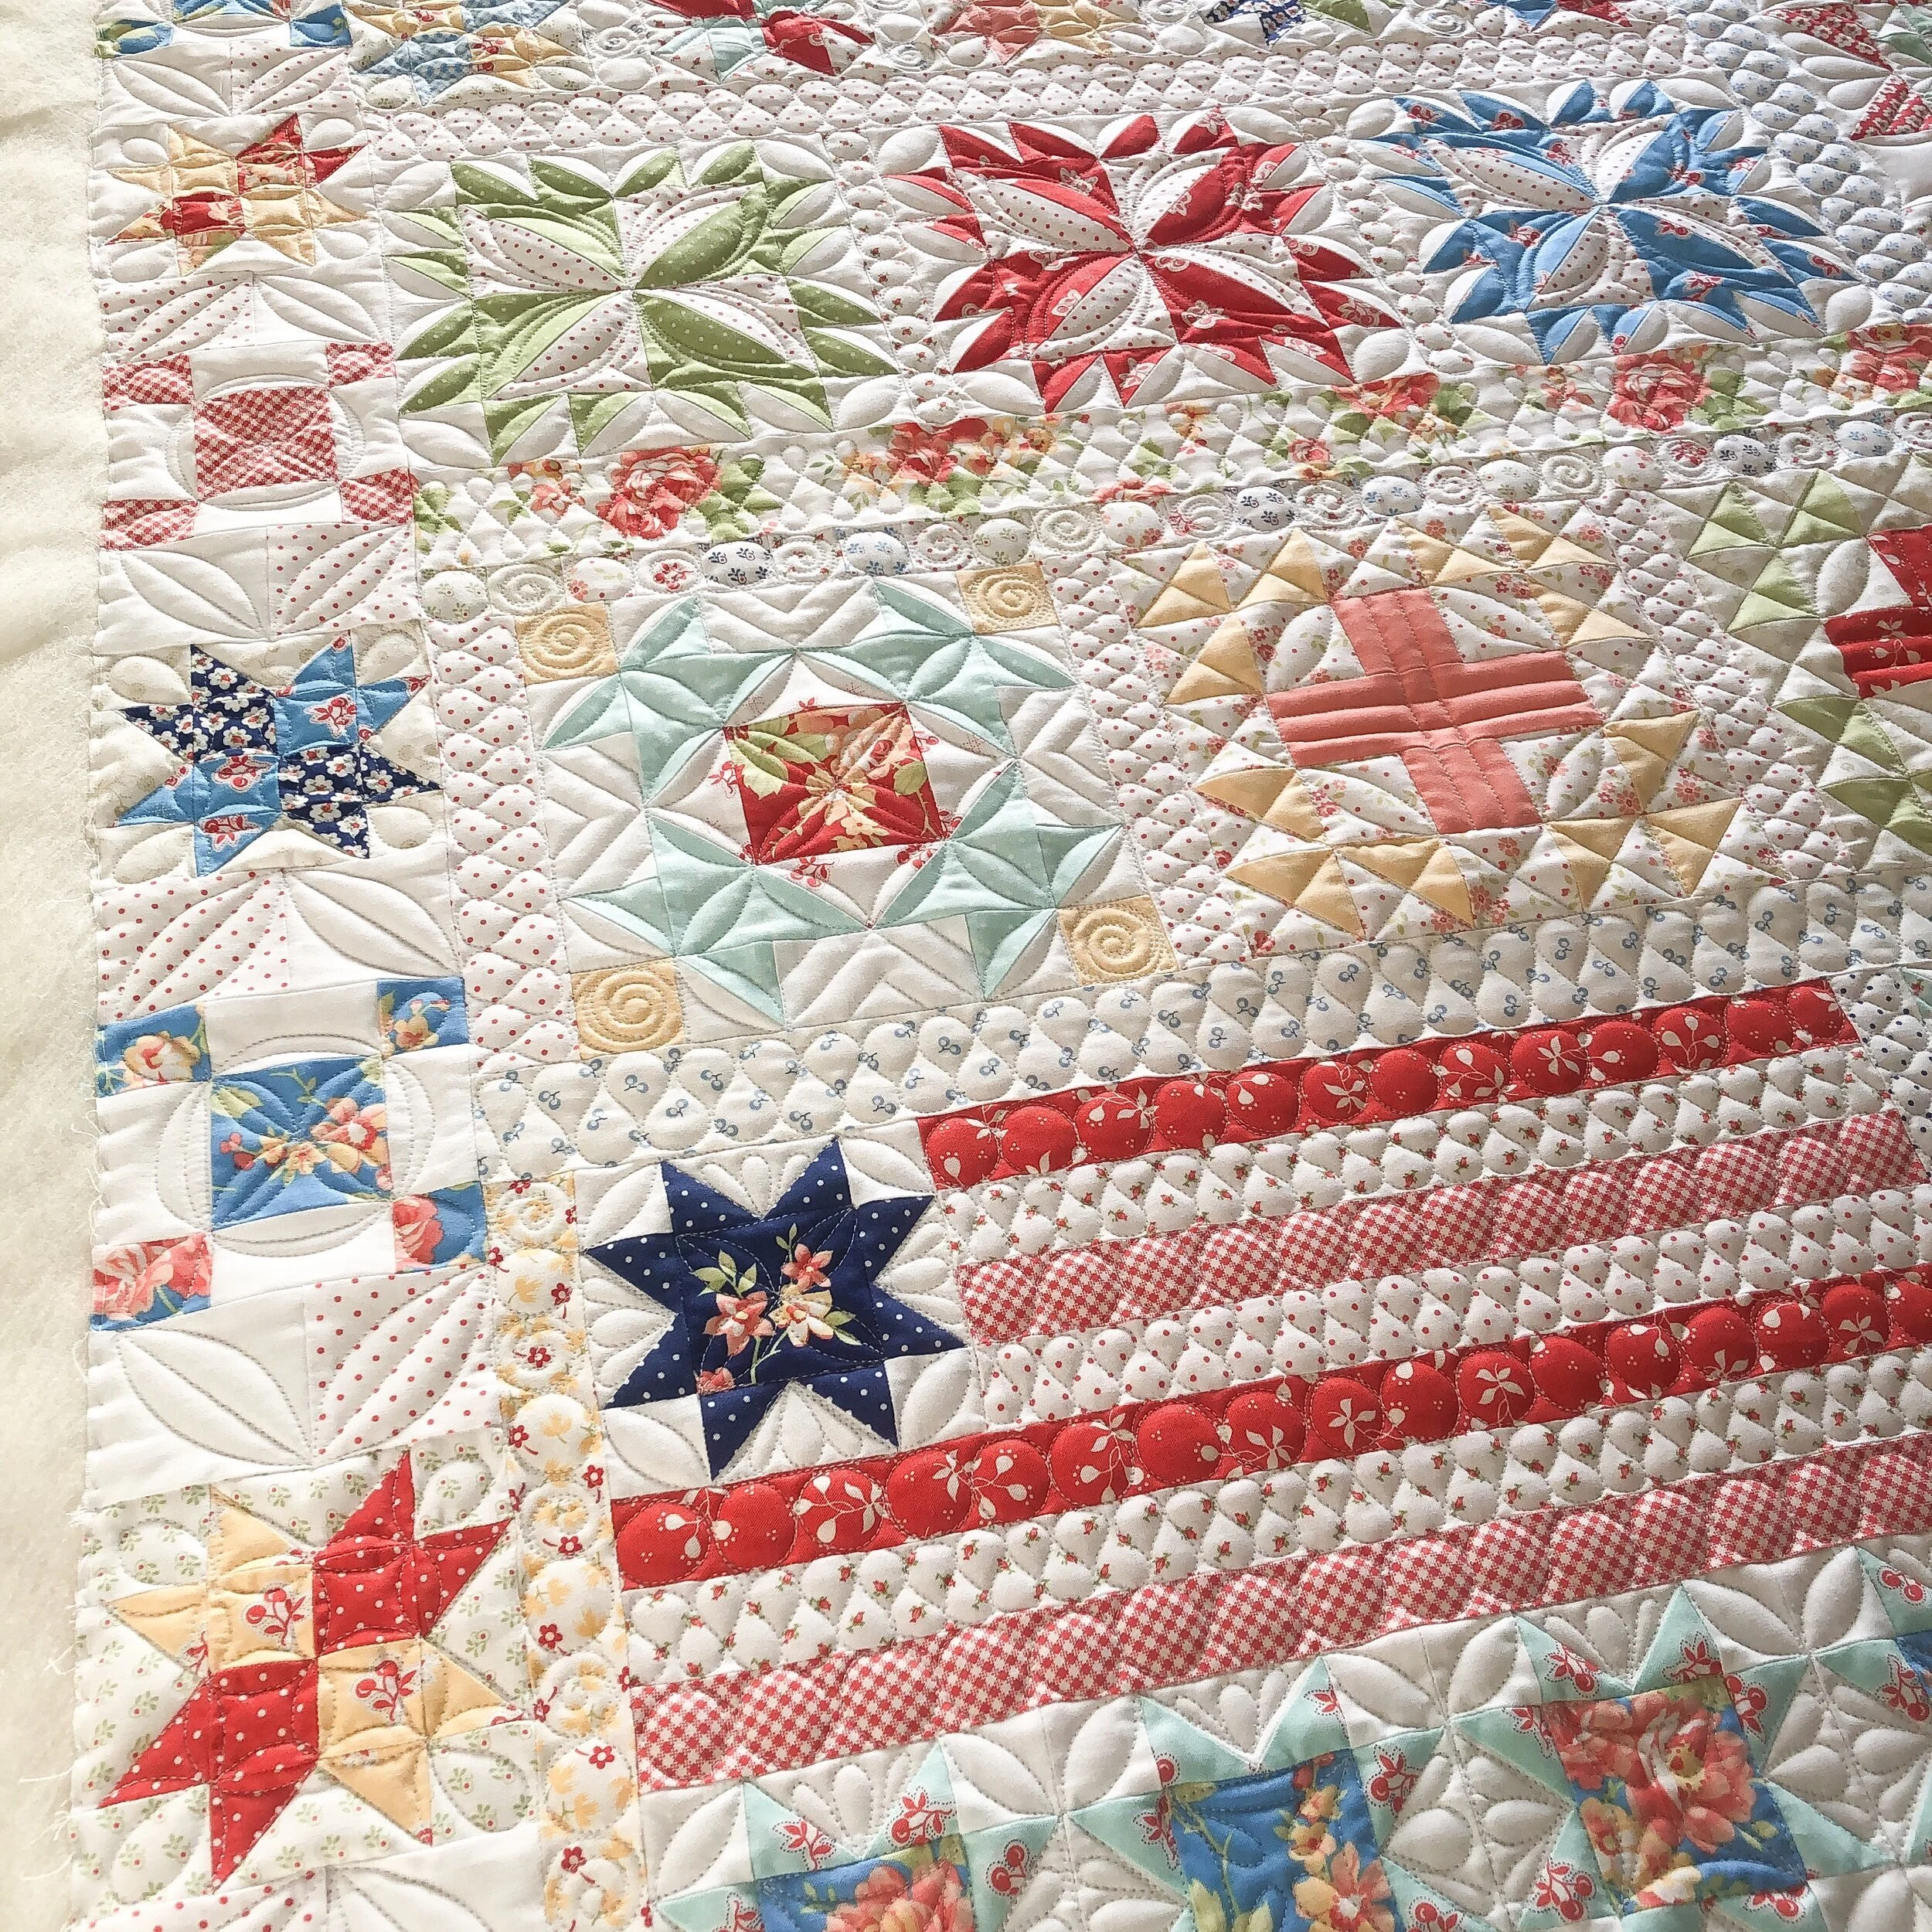
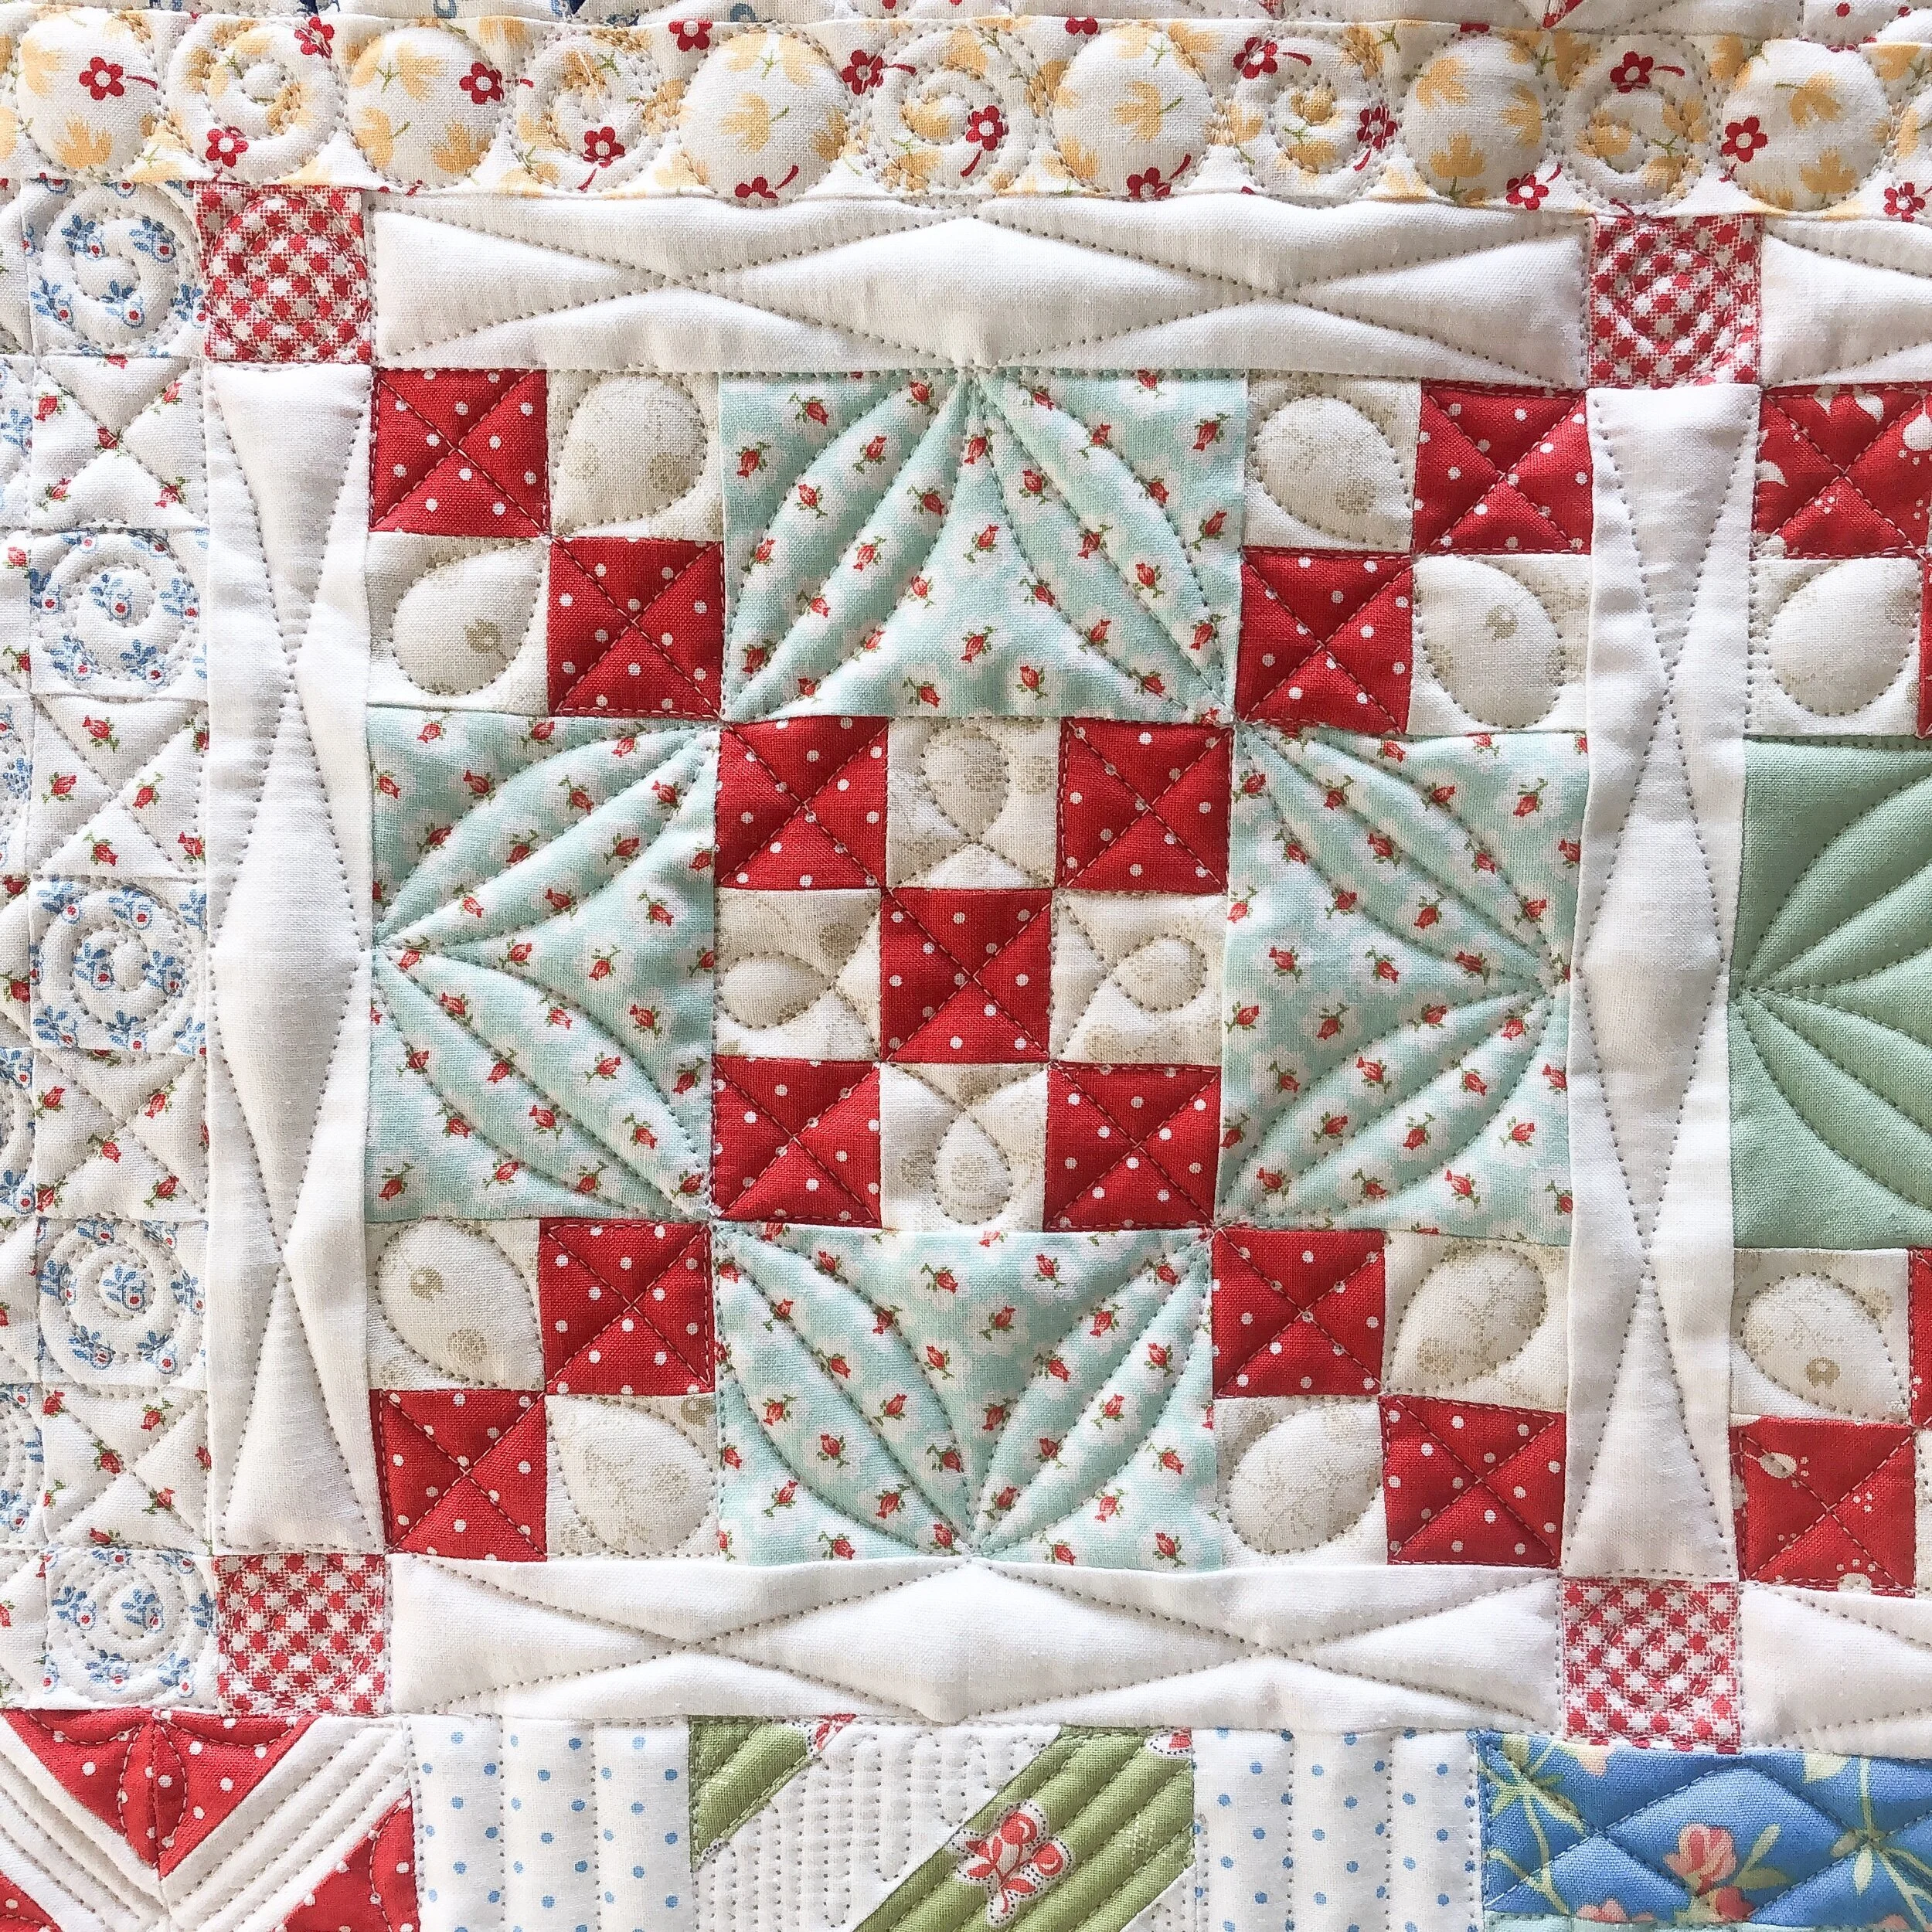
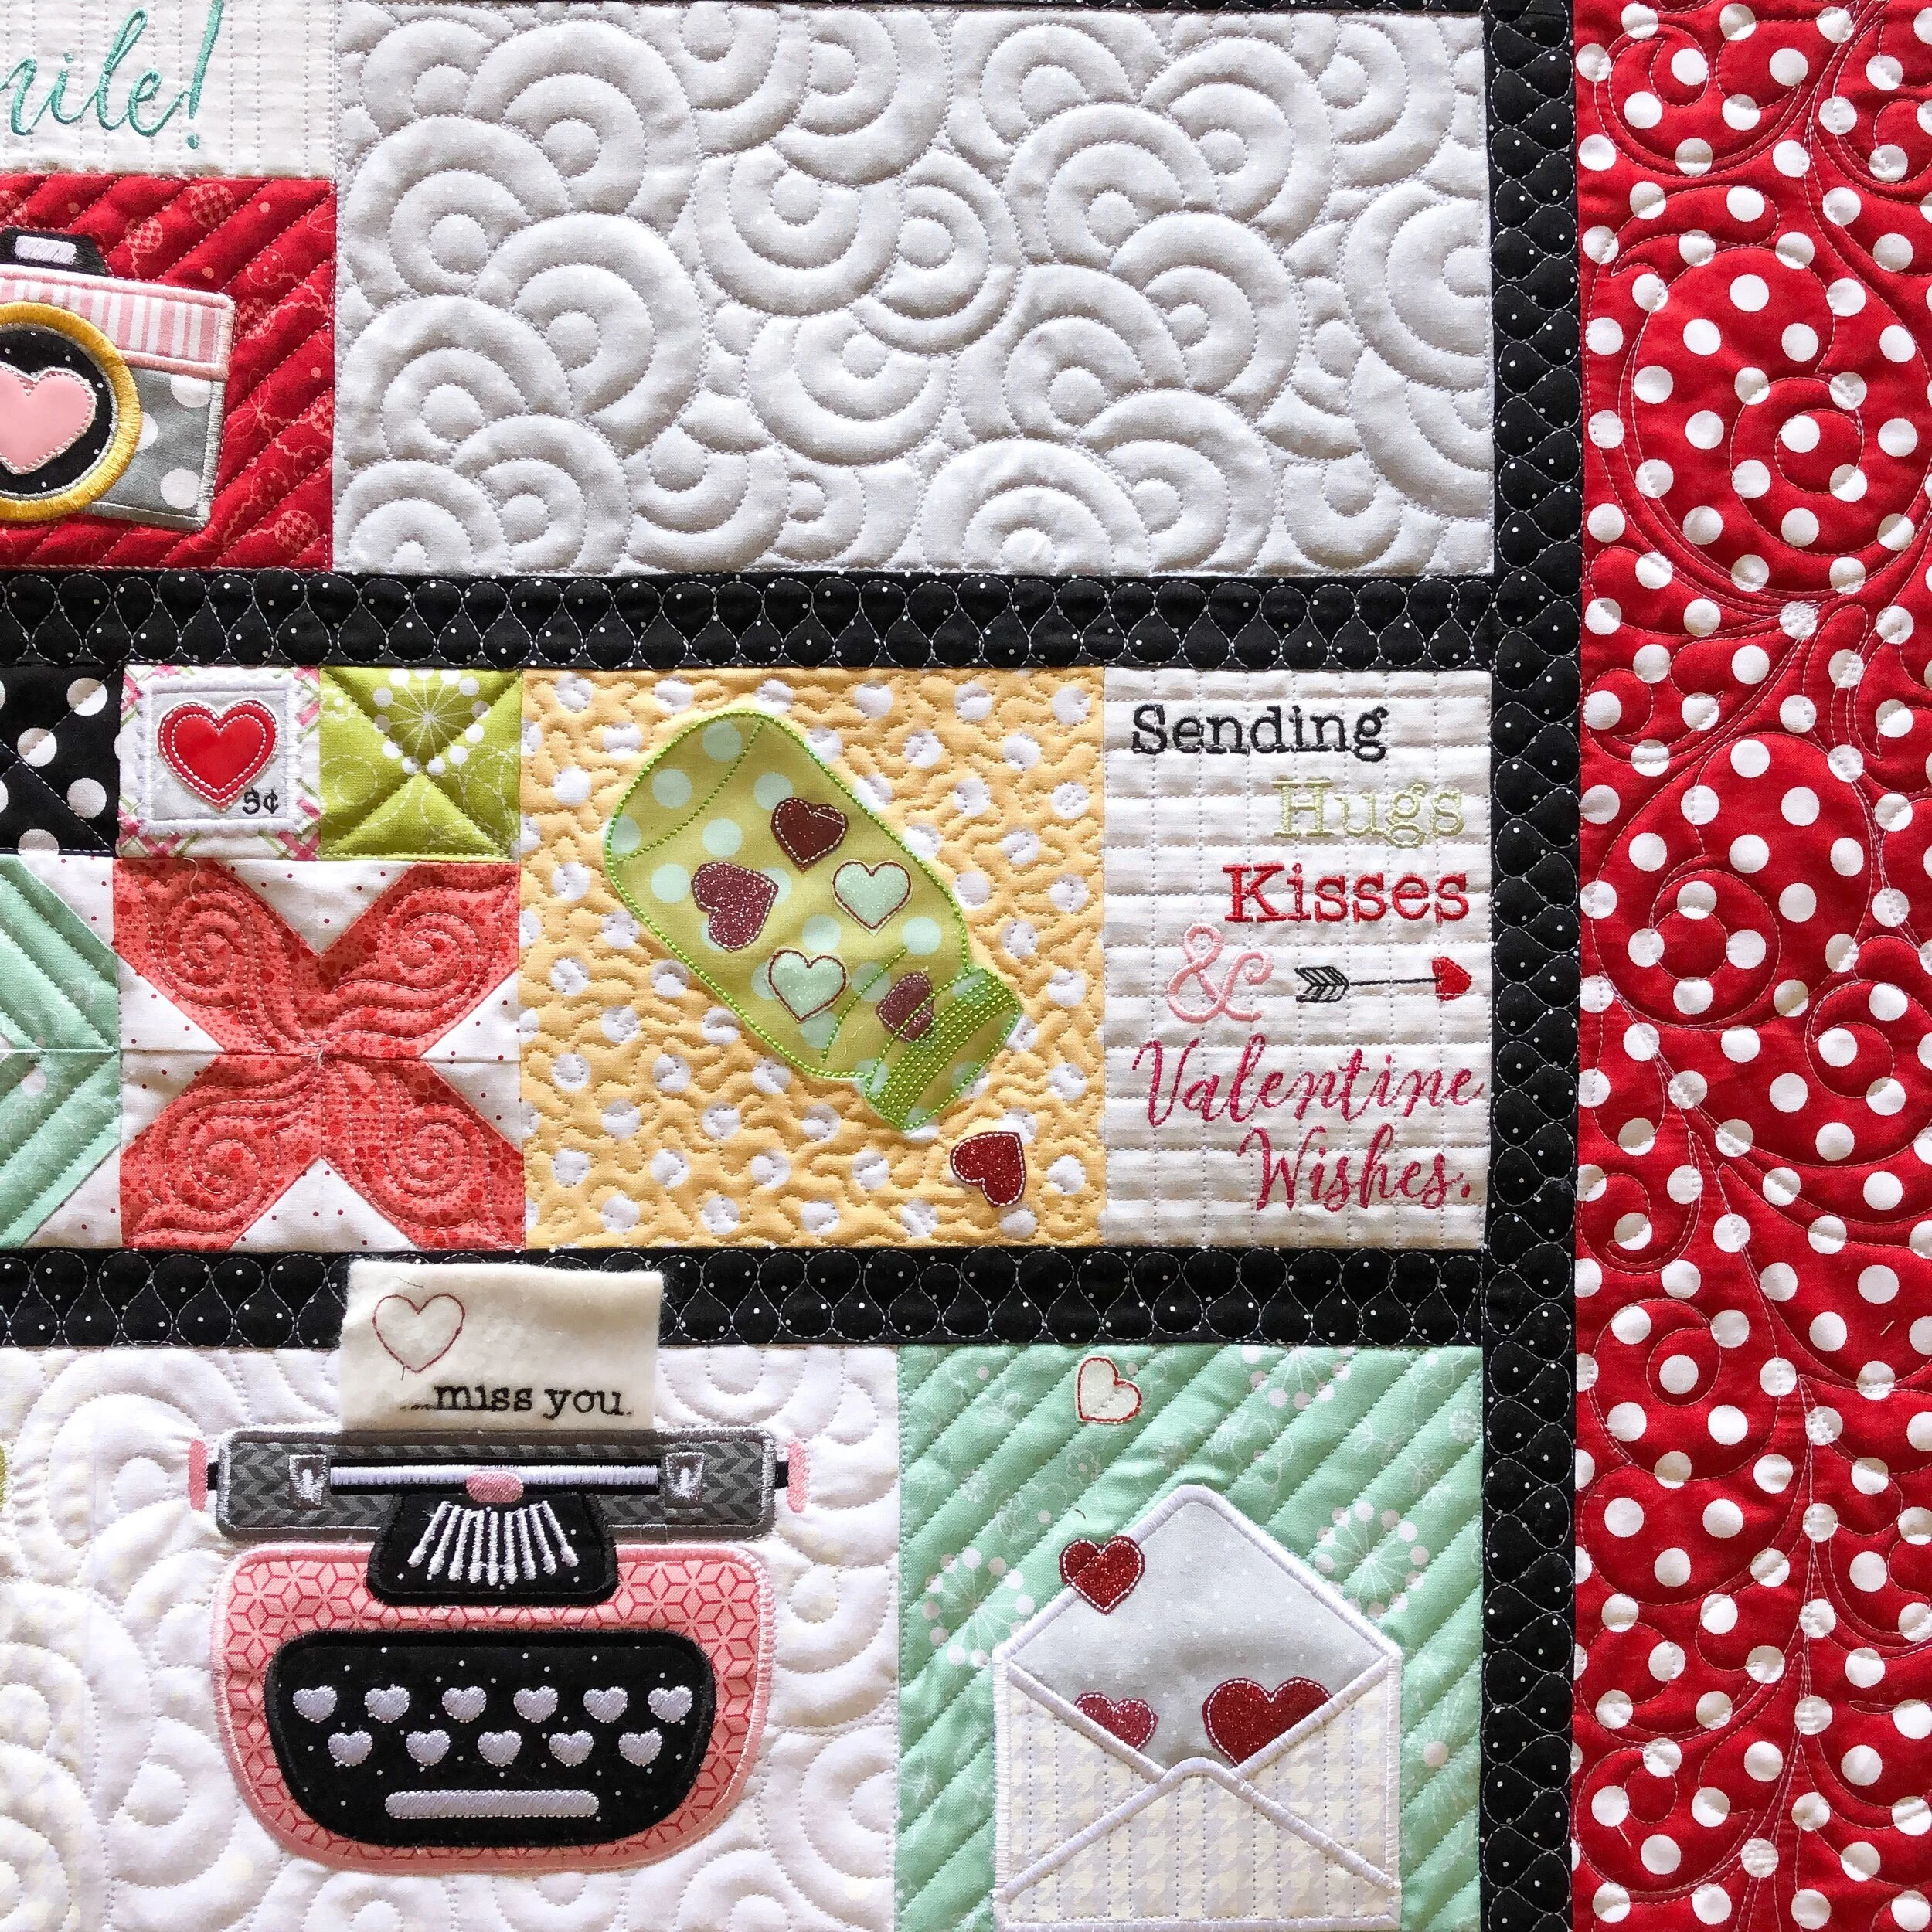
Below is one of the three that I mentioned before, that has a background filler…this is one of the wagon wheel block, the other one is a lot smaller. I loved adding the overlapping circles in the background because with that much negative space its noticeable, plus it softens up the hard lines. I love it with the mix of curves in the other parts of the block. Also, notice the checkered squares down the right…I love love those petals that are diagonally from one another and the x’s that are diagonally in the other direction. Along the left side, my favorite way to quilt a string of pearls or pebbles, with a swirl inside every other circle. It’s the little details that add such a fun touch. The string of pearls or pebbles is also a great way to fill a strip of fabric used as a spacer or filler.
The orange and green block below is a great example of trying to highlight the shape of a block. After quilting the lines in the green and center and the feathers in the orange, I had a hard time trying to figure out what to quilt in the background. Because of the odd shape, nothing was coming to me. Then, I grabbed one of my Circle2™ rulers, probably the 5” or 6” ruler, and quilted these lovely curves. Its amazing what one simple curve can do to a quilt block. It frames this quilt block perfectly, enhancing the overall shape. Next time your stumped with a background, try adding some curves from point to point! I know I need to remember this.
Check out all the other fun little details!!
These angled pictures show the details in a totally different way.

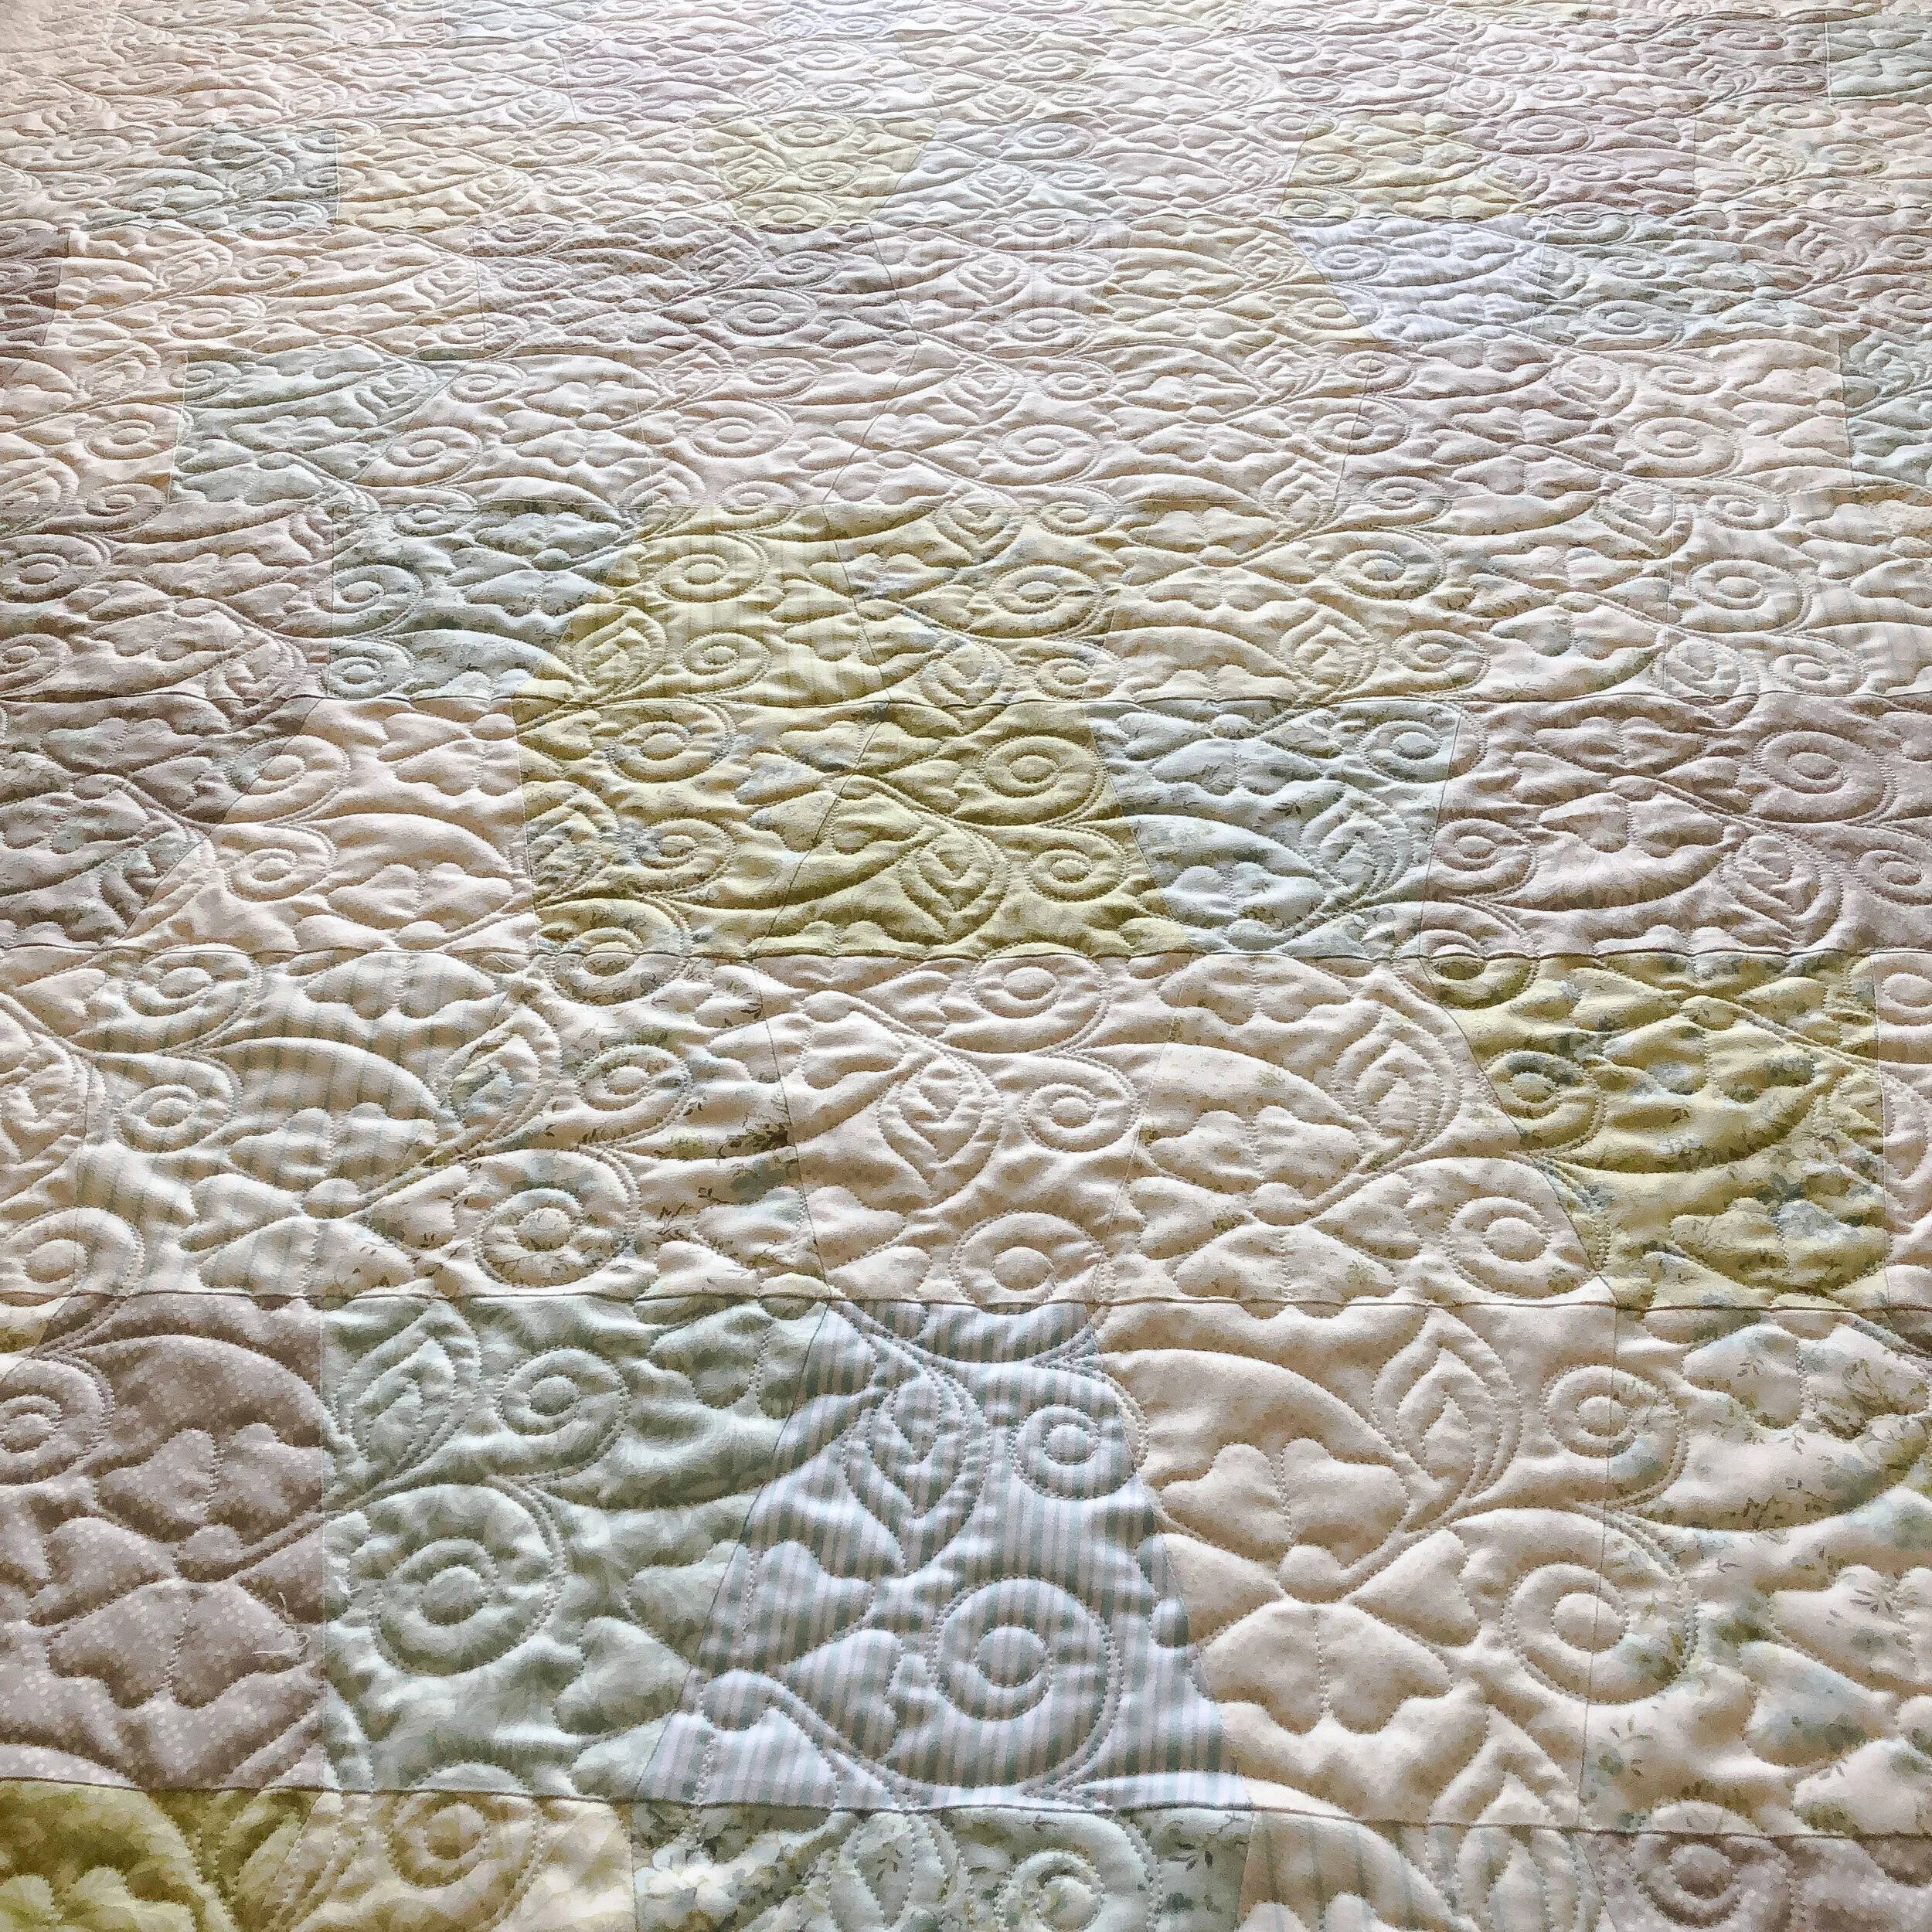
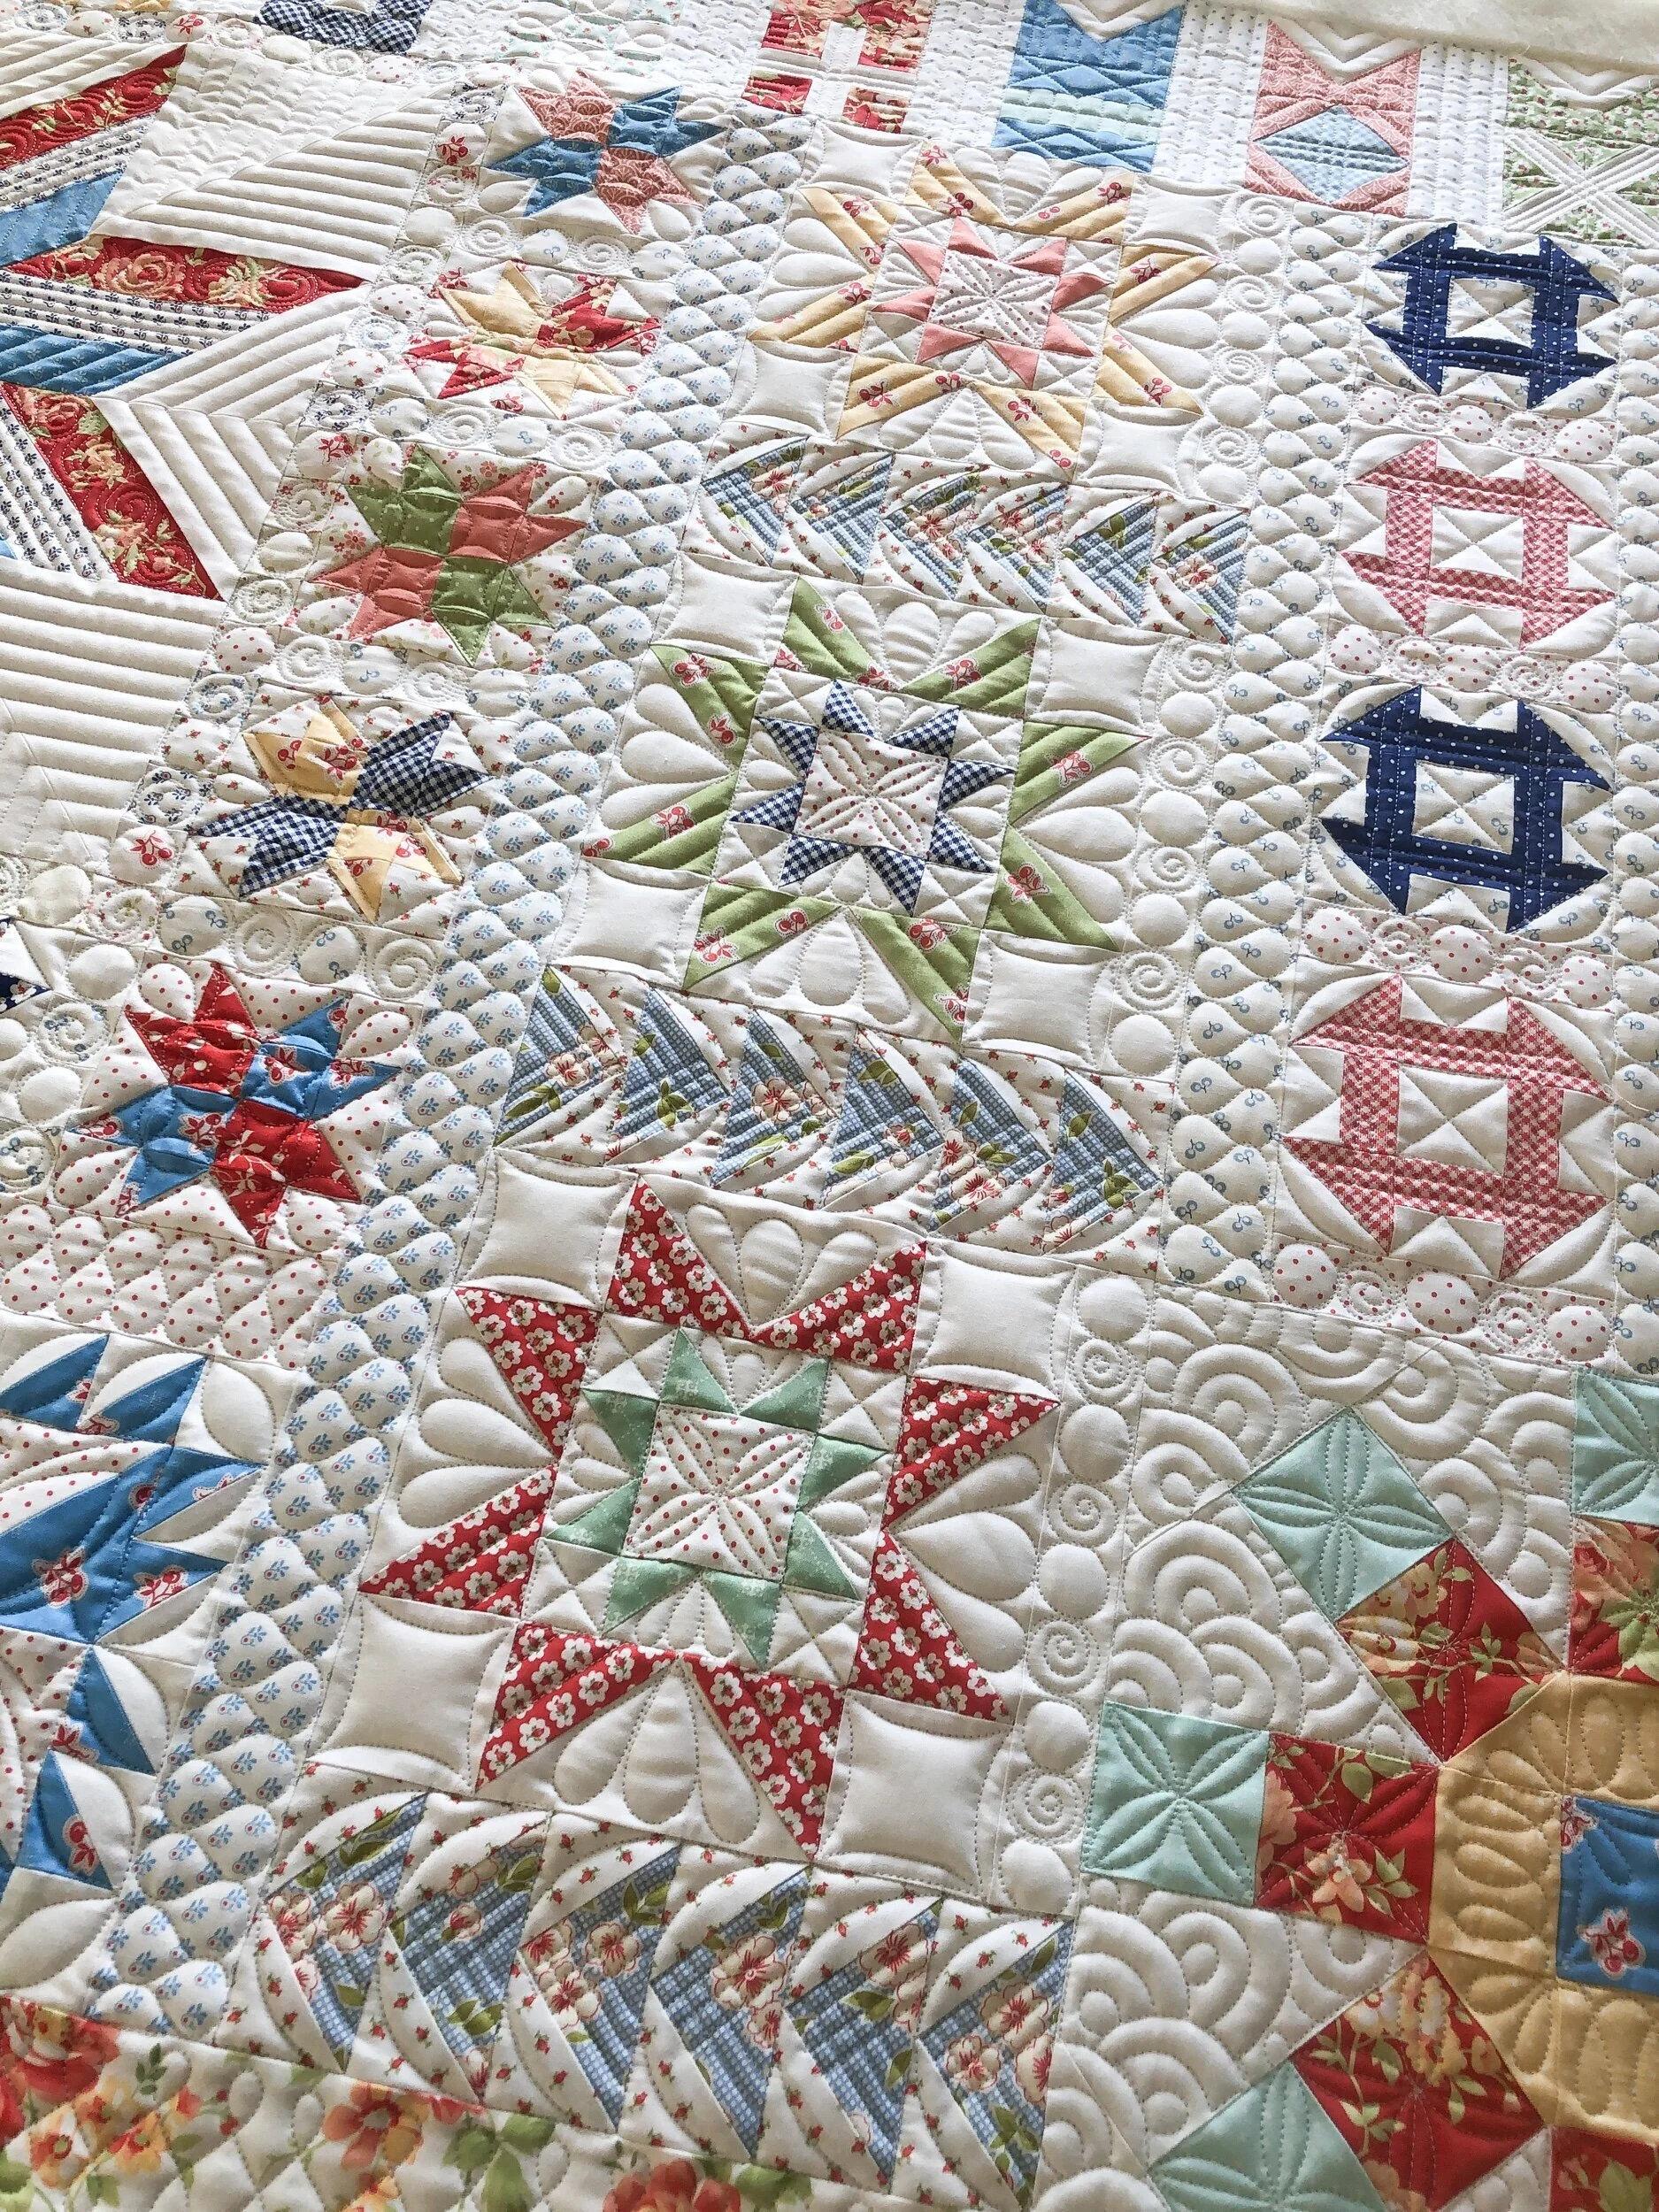
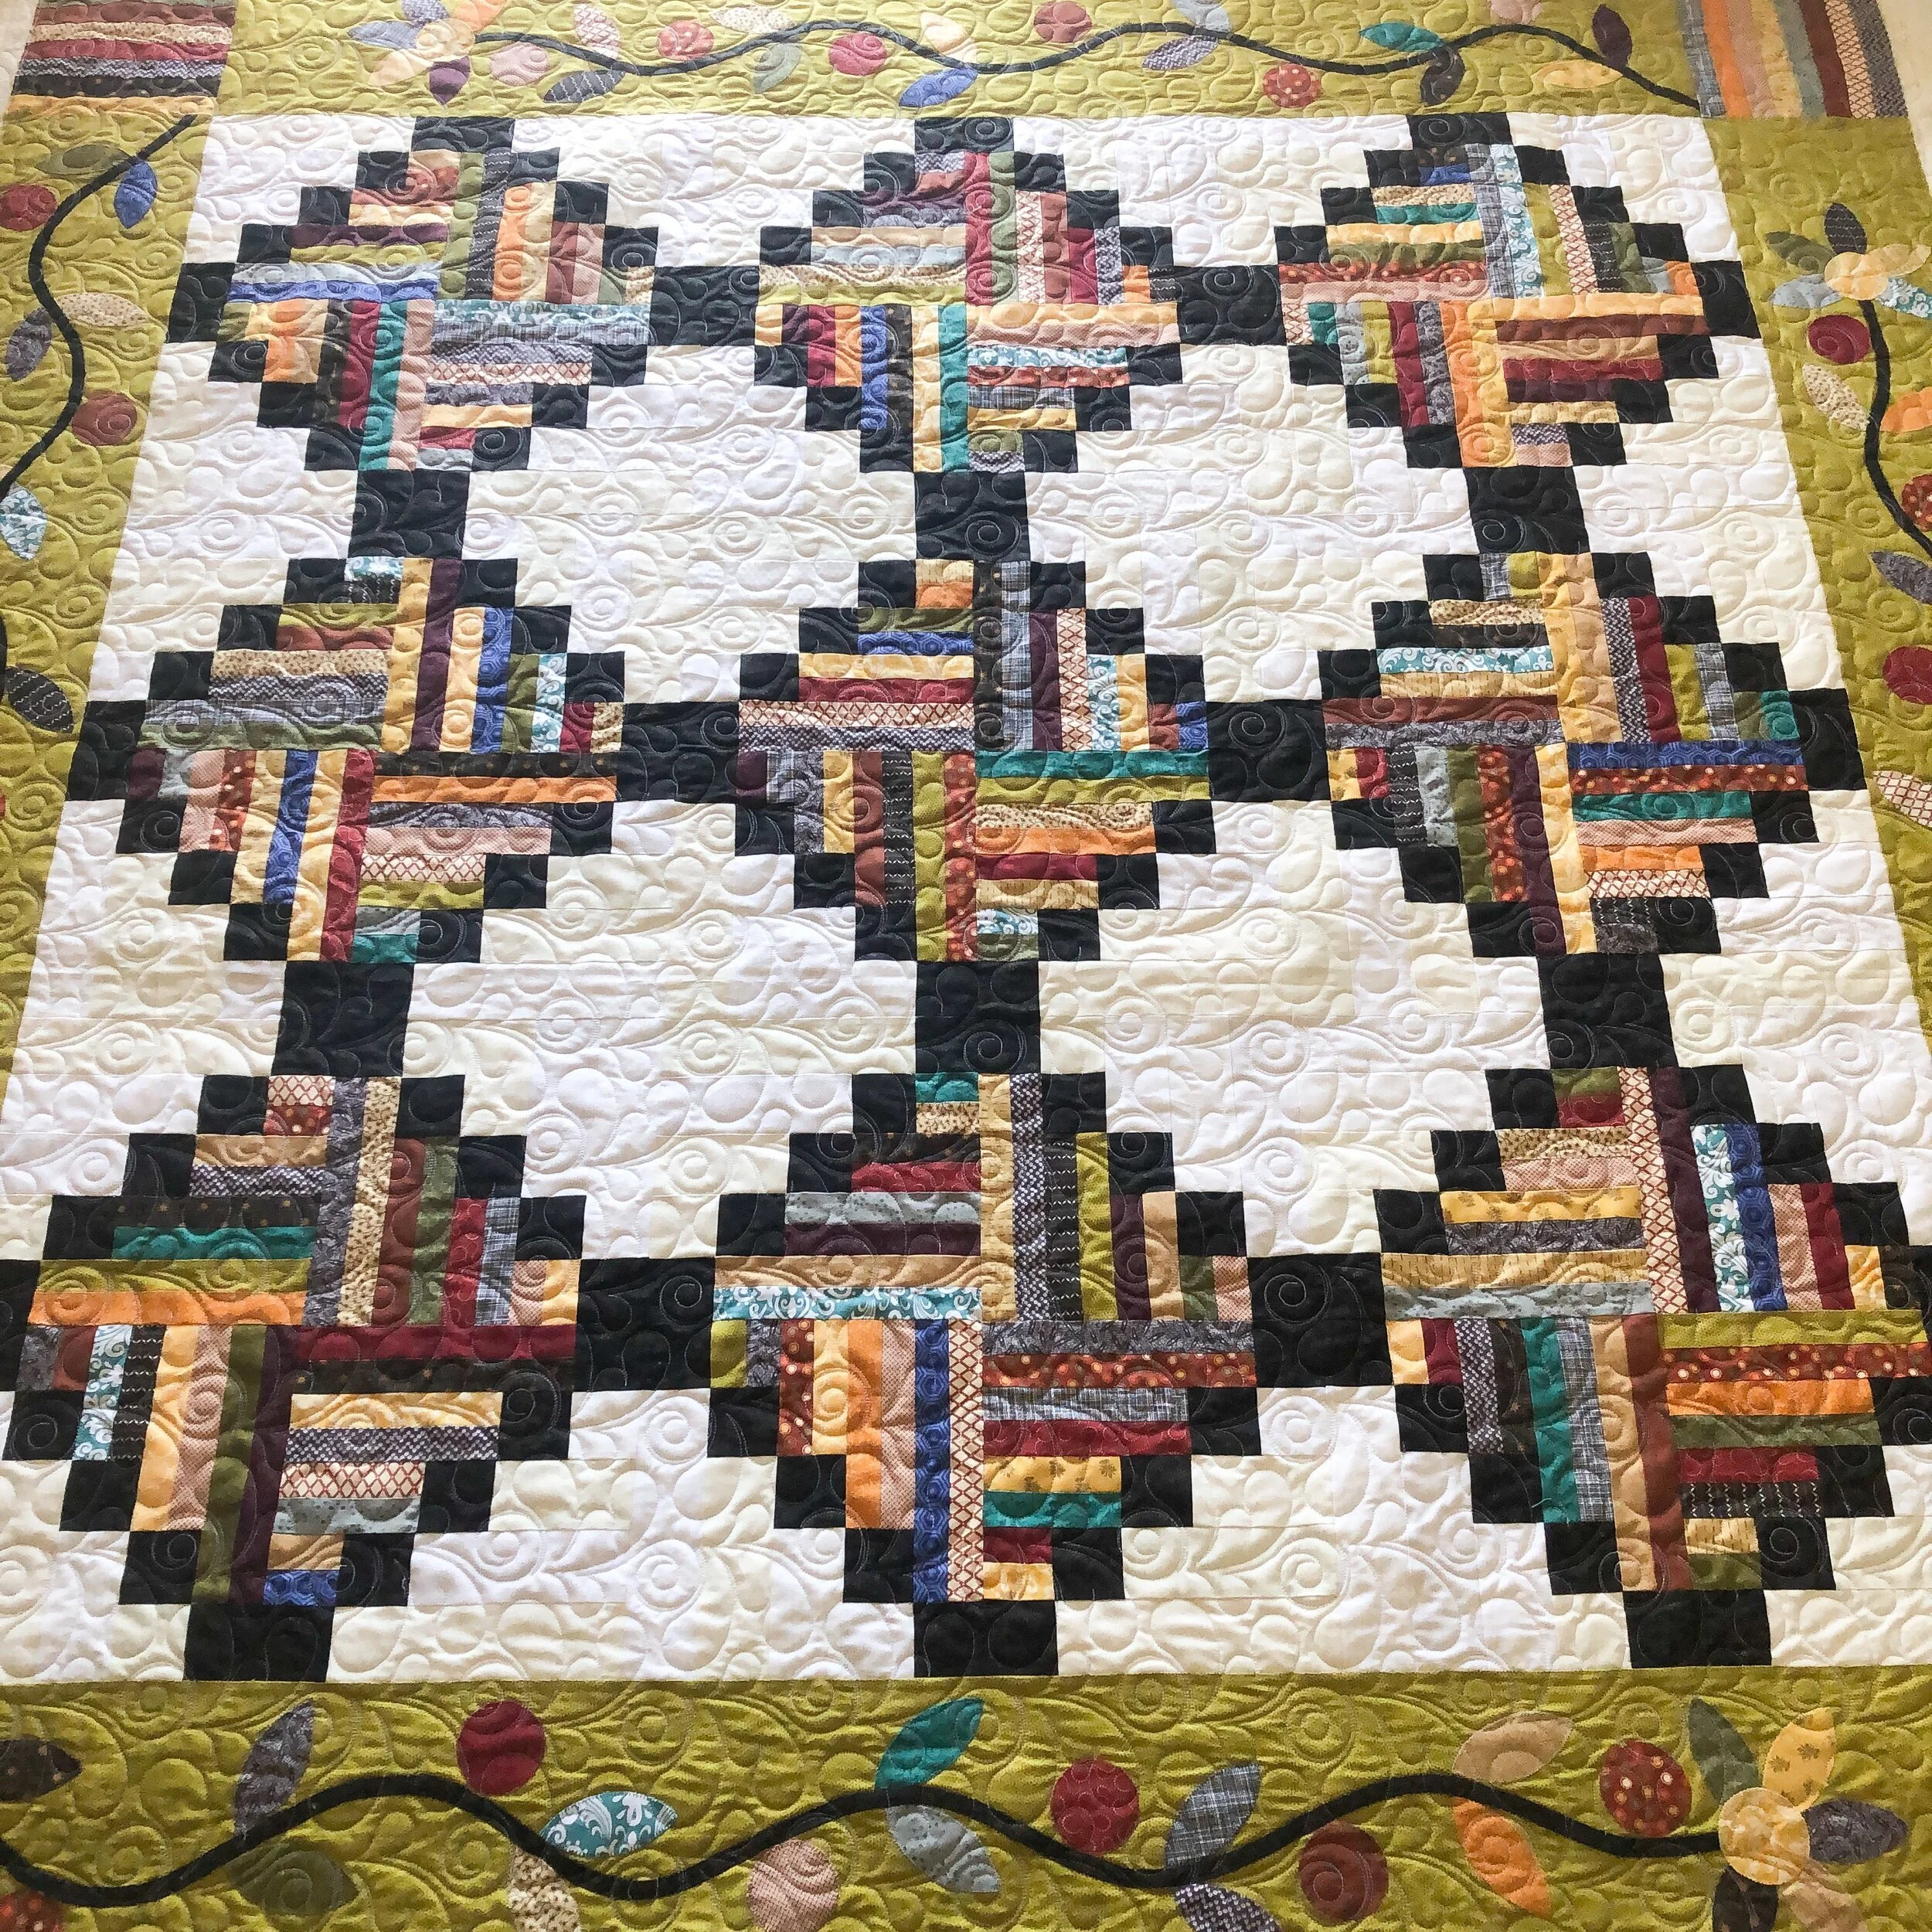
More details!! Those churndash blocks were so fun to quilt…simple and cute, you can see the curves and lines behind, what you cant see very well is a 1/4” pinstripe line inside the churndash itself. Also, this three larger block are certainly fun. That vertical row of orange peels and ribbon candy are such sweet touches. With the variety of different designs, you may wonder how does everything work together so well together…its all about scale! Different sizes of some of the same curves and lines. Also, it’s great to look at the size of the block as well as the fabric prints, and quilt designs accordingly. Keep scrolling down to see more detailed pictures of the three bigger blocks.
I love to use Linda from the Quilted Pineapple’s Edge rulers to create all of the lines that I quilt!

Now, I want to share with you some quilting in individual blocks. It’s all in the details.
Another…a closer look…
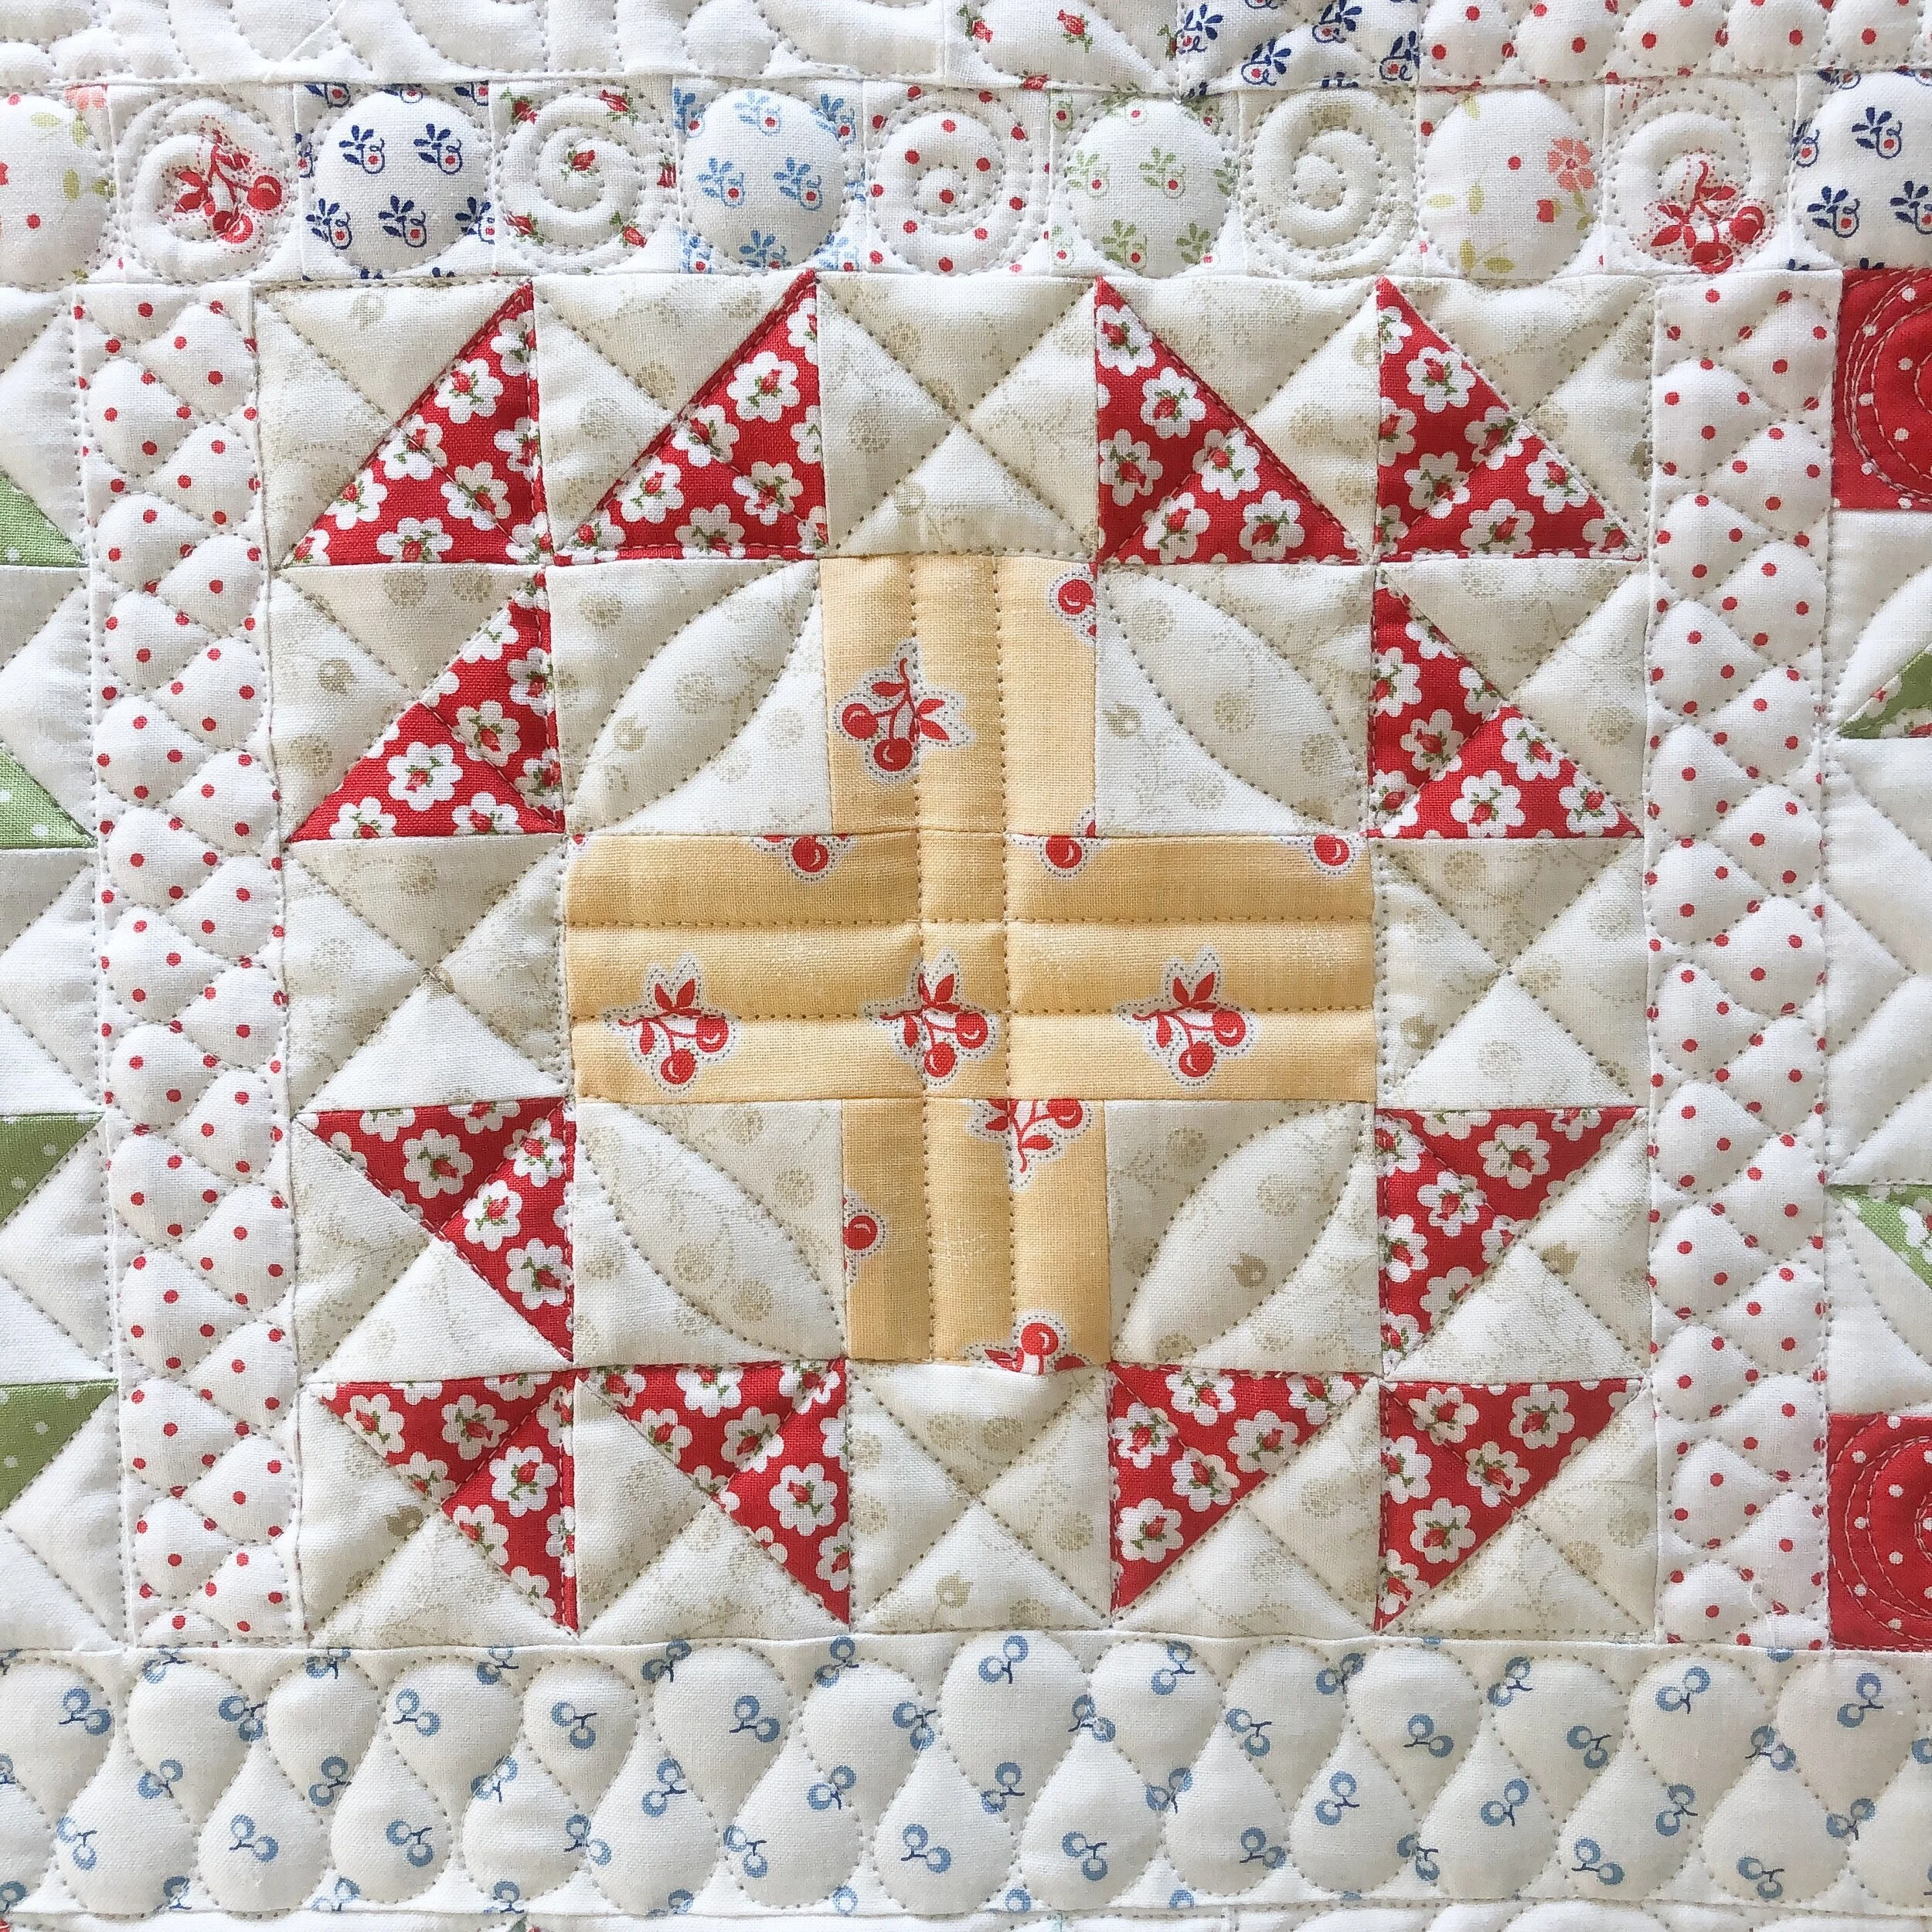
Then a look at three of them together. ….also, while we are right here, look at the flying geese at the top of the picture below. I love the mini 9 patch that was created with the 3 simple 1/4” lines going in both directions. There are some fun designs to quilt in flying geese blocks.
Some more blocks…and more details. I love how those soft curves make a difference with all of those hard lines.
The twisted loop design is also a great strip quilting design. I also love these blocks side by side.
Another great angled picture. As you can see the repeated shapes throughout, really work beautifully together.
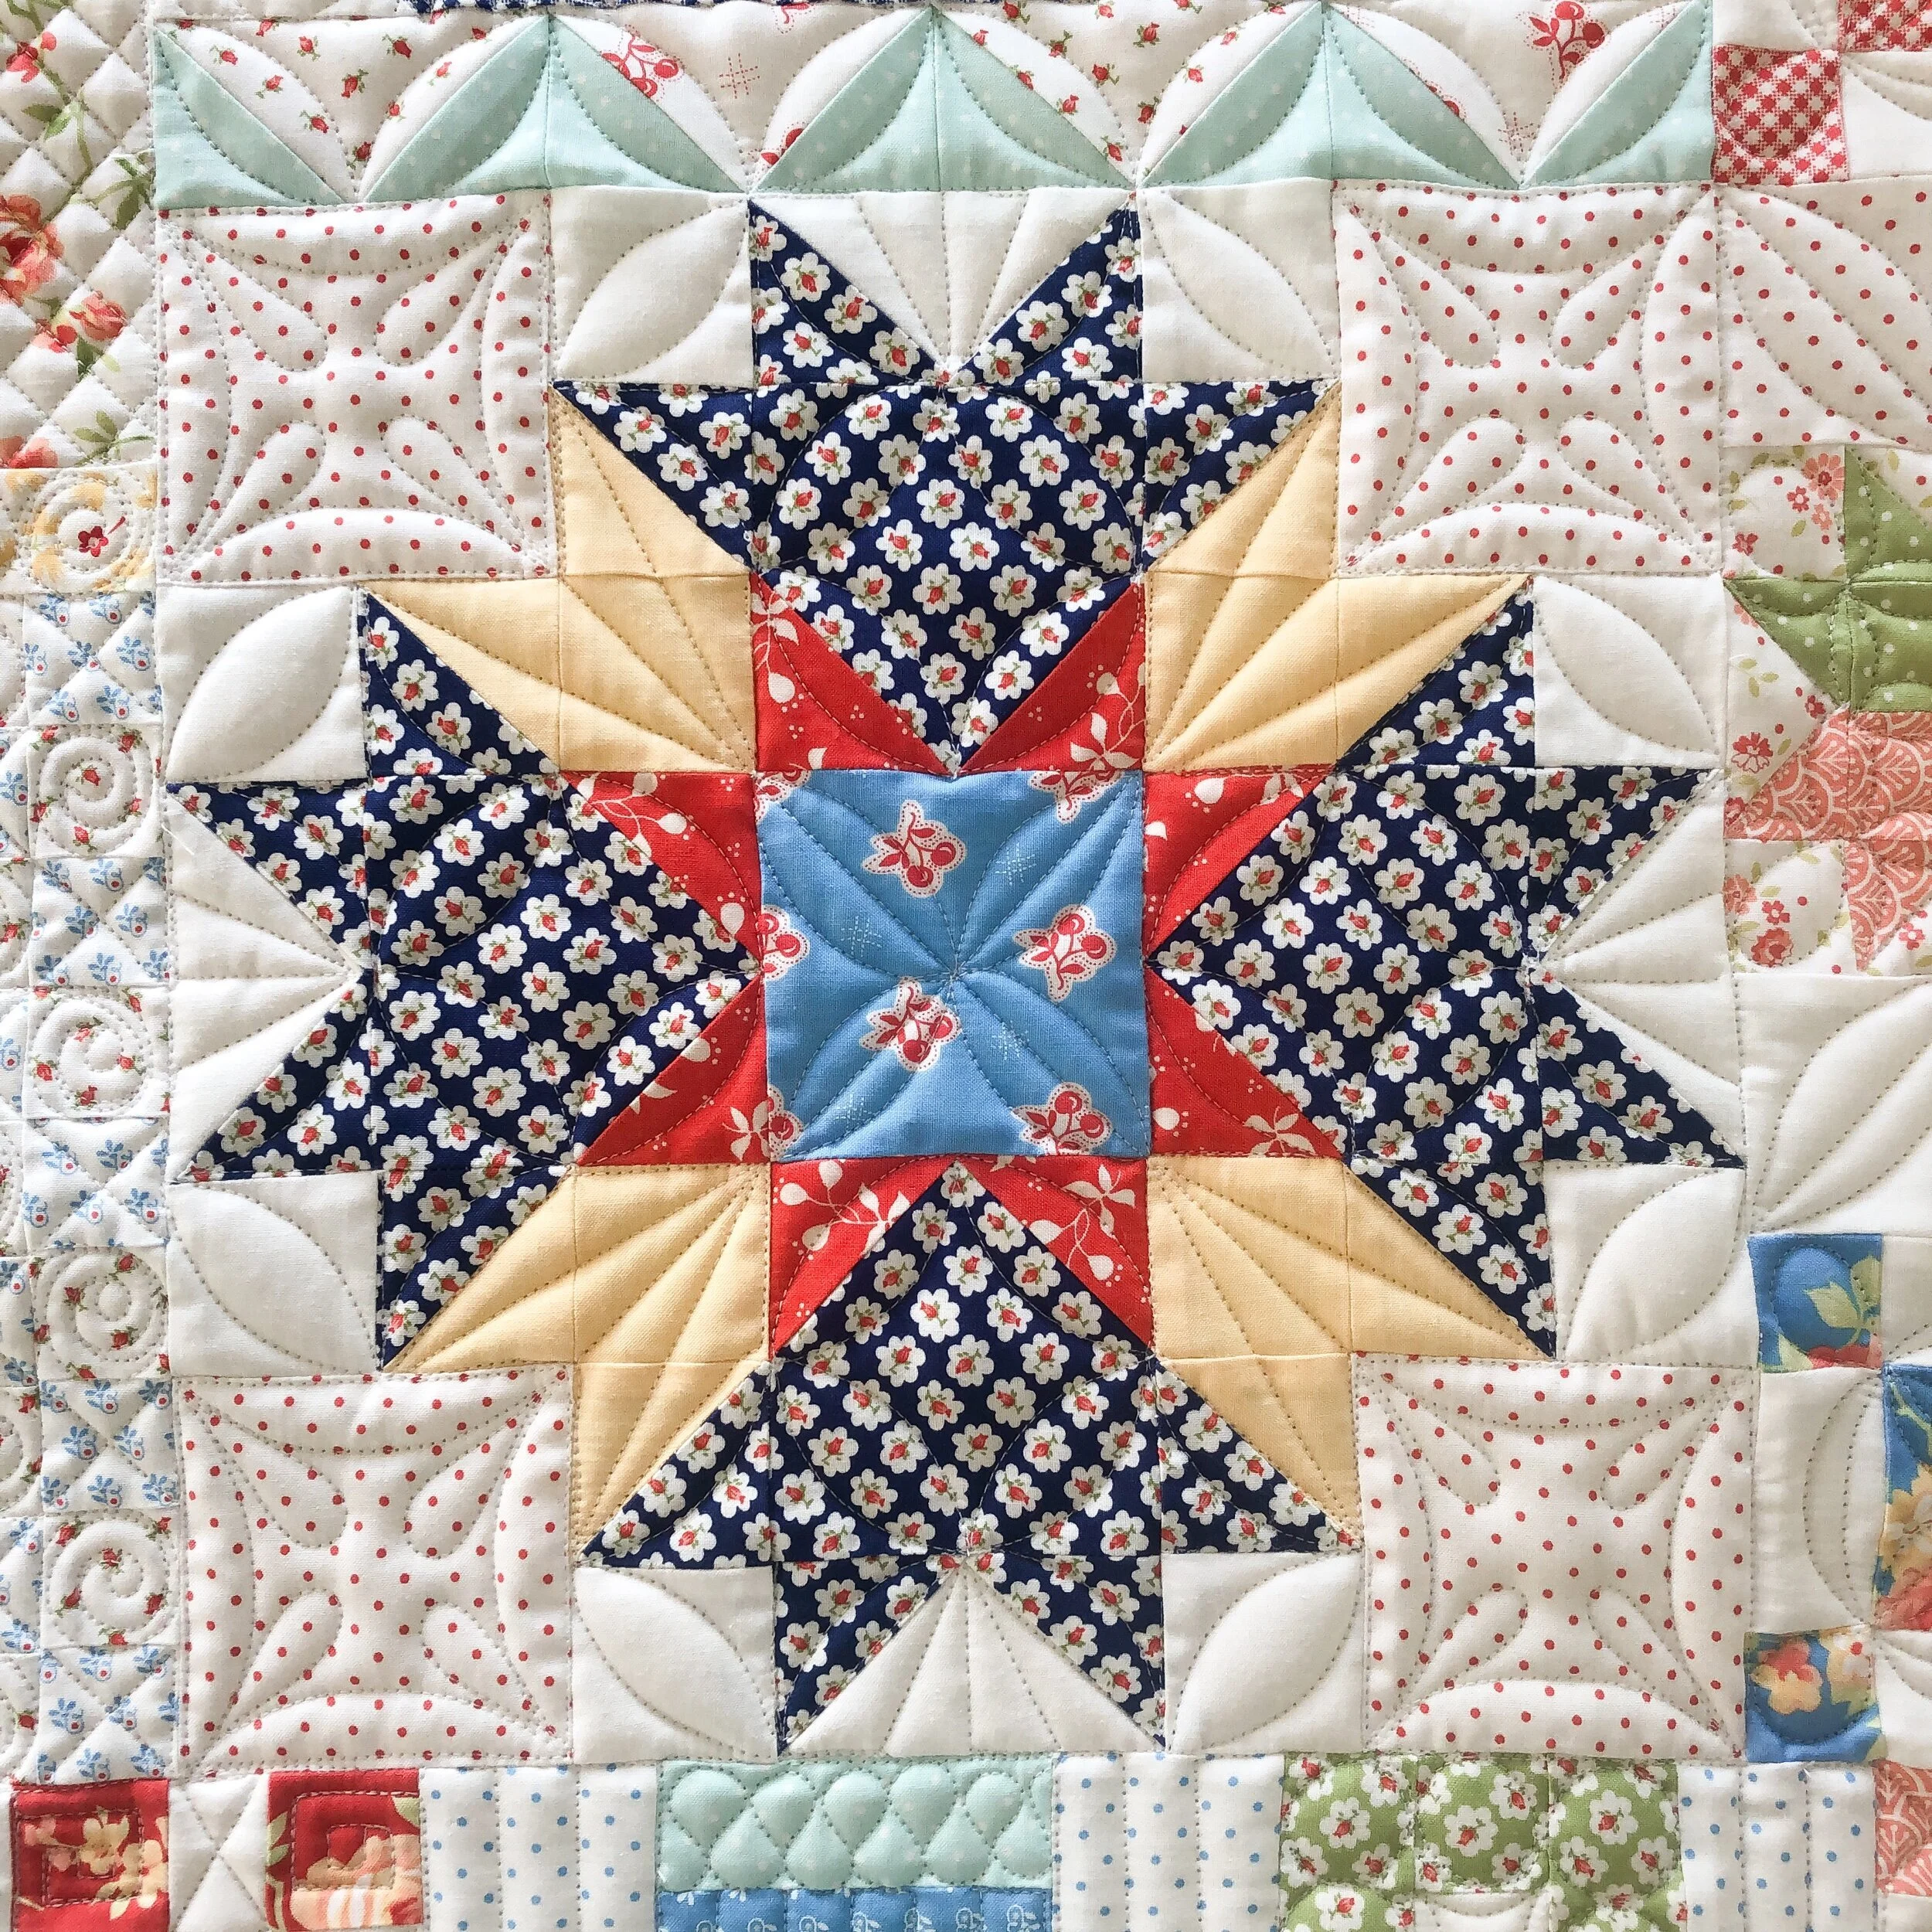
This is one of my favorite blocks. The quilting actually links together so nicely. I love it sooo much!
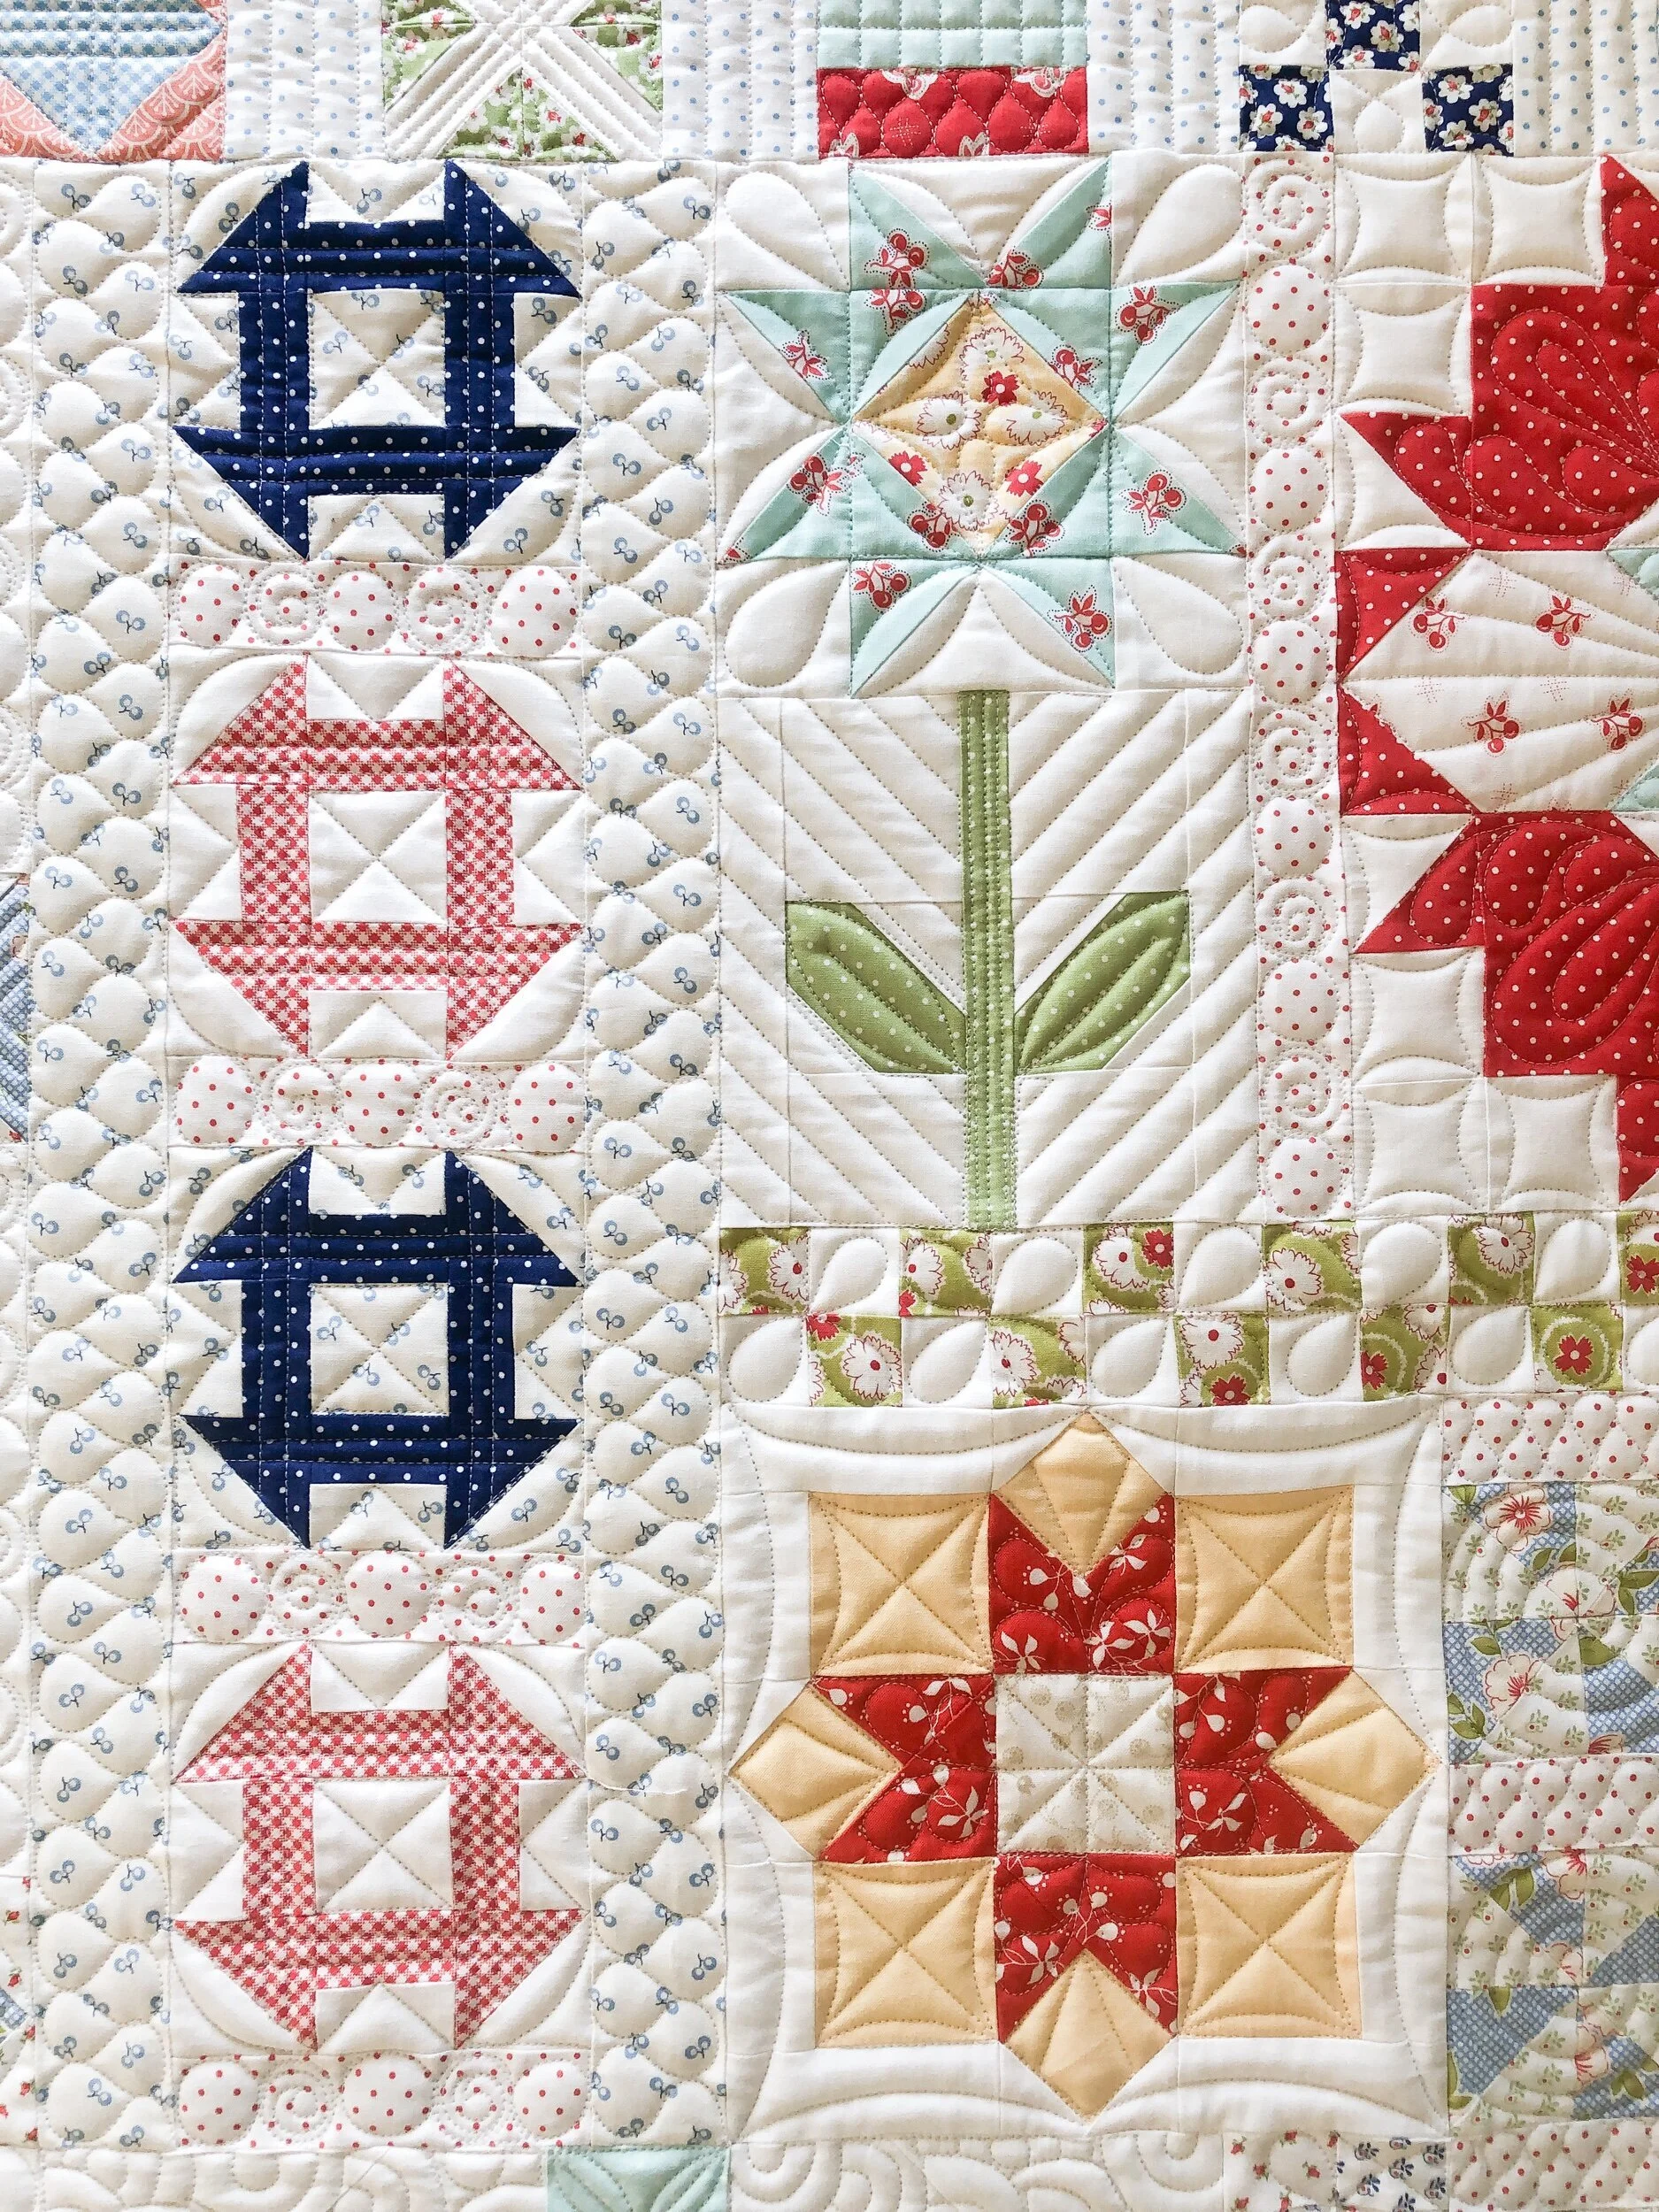
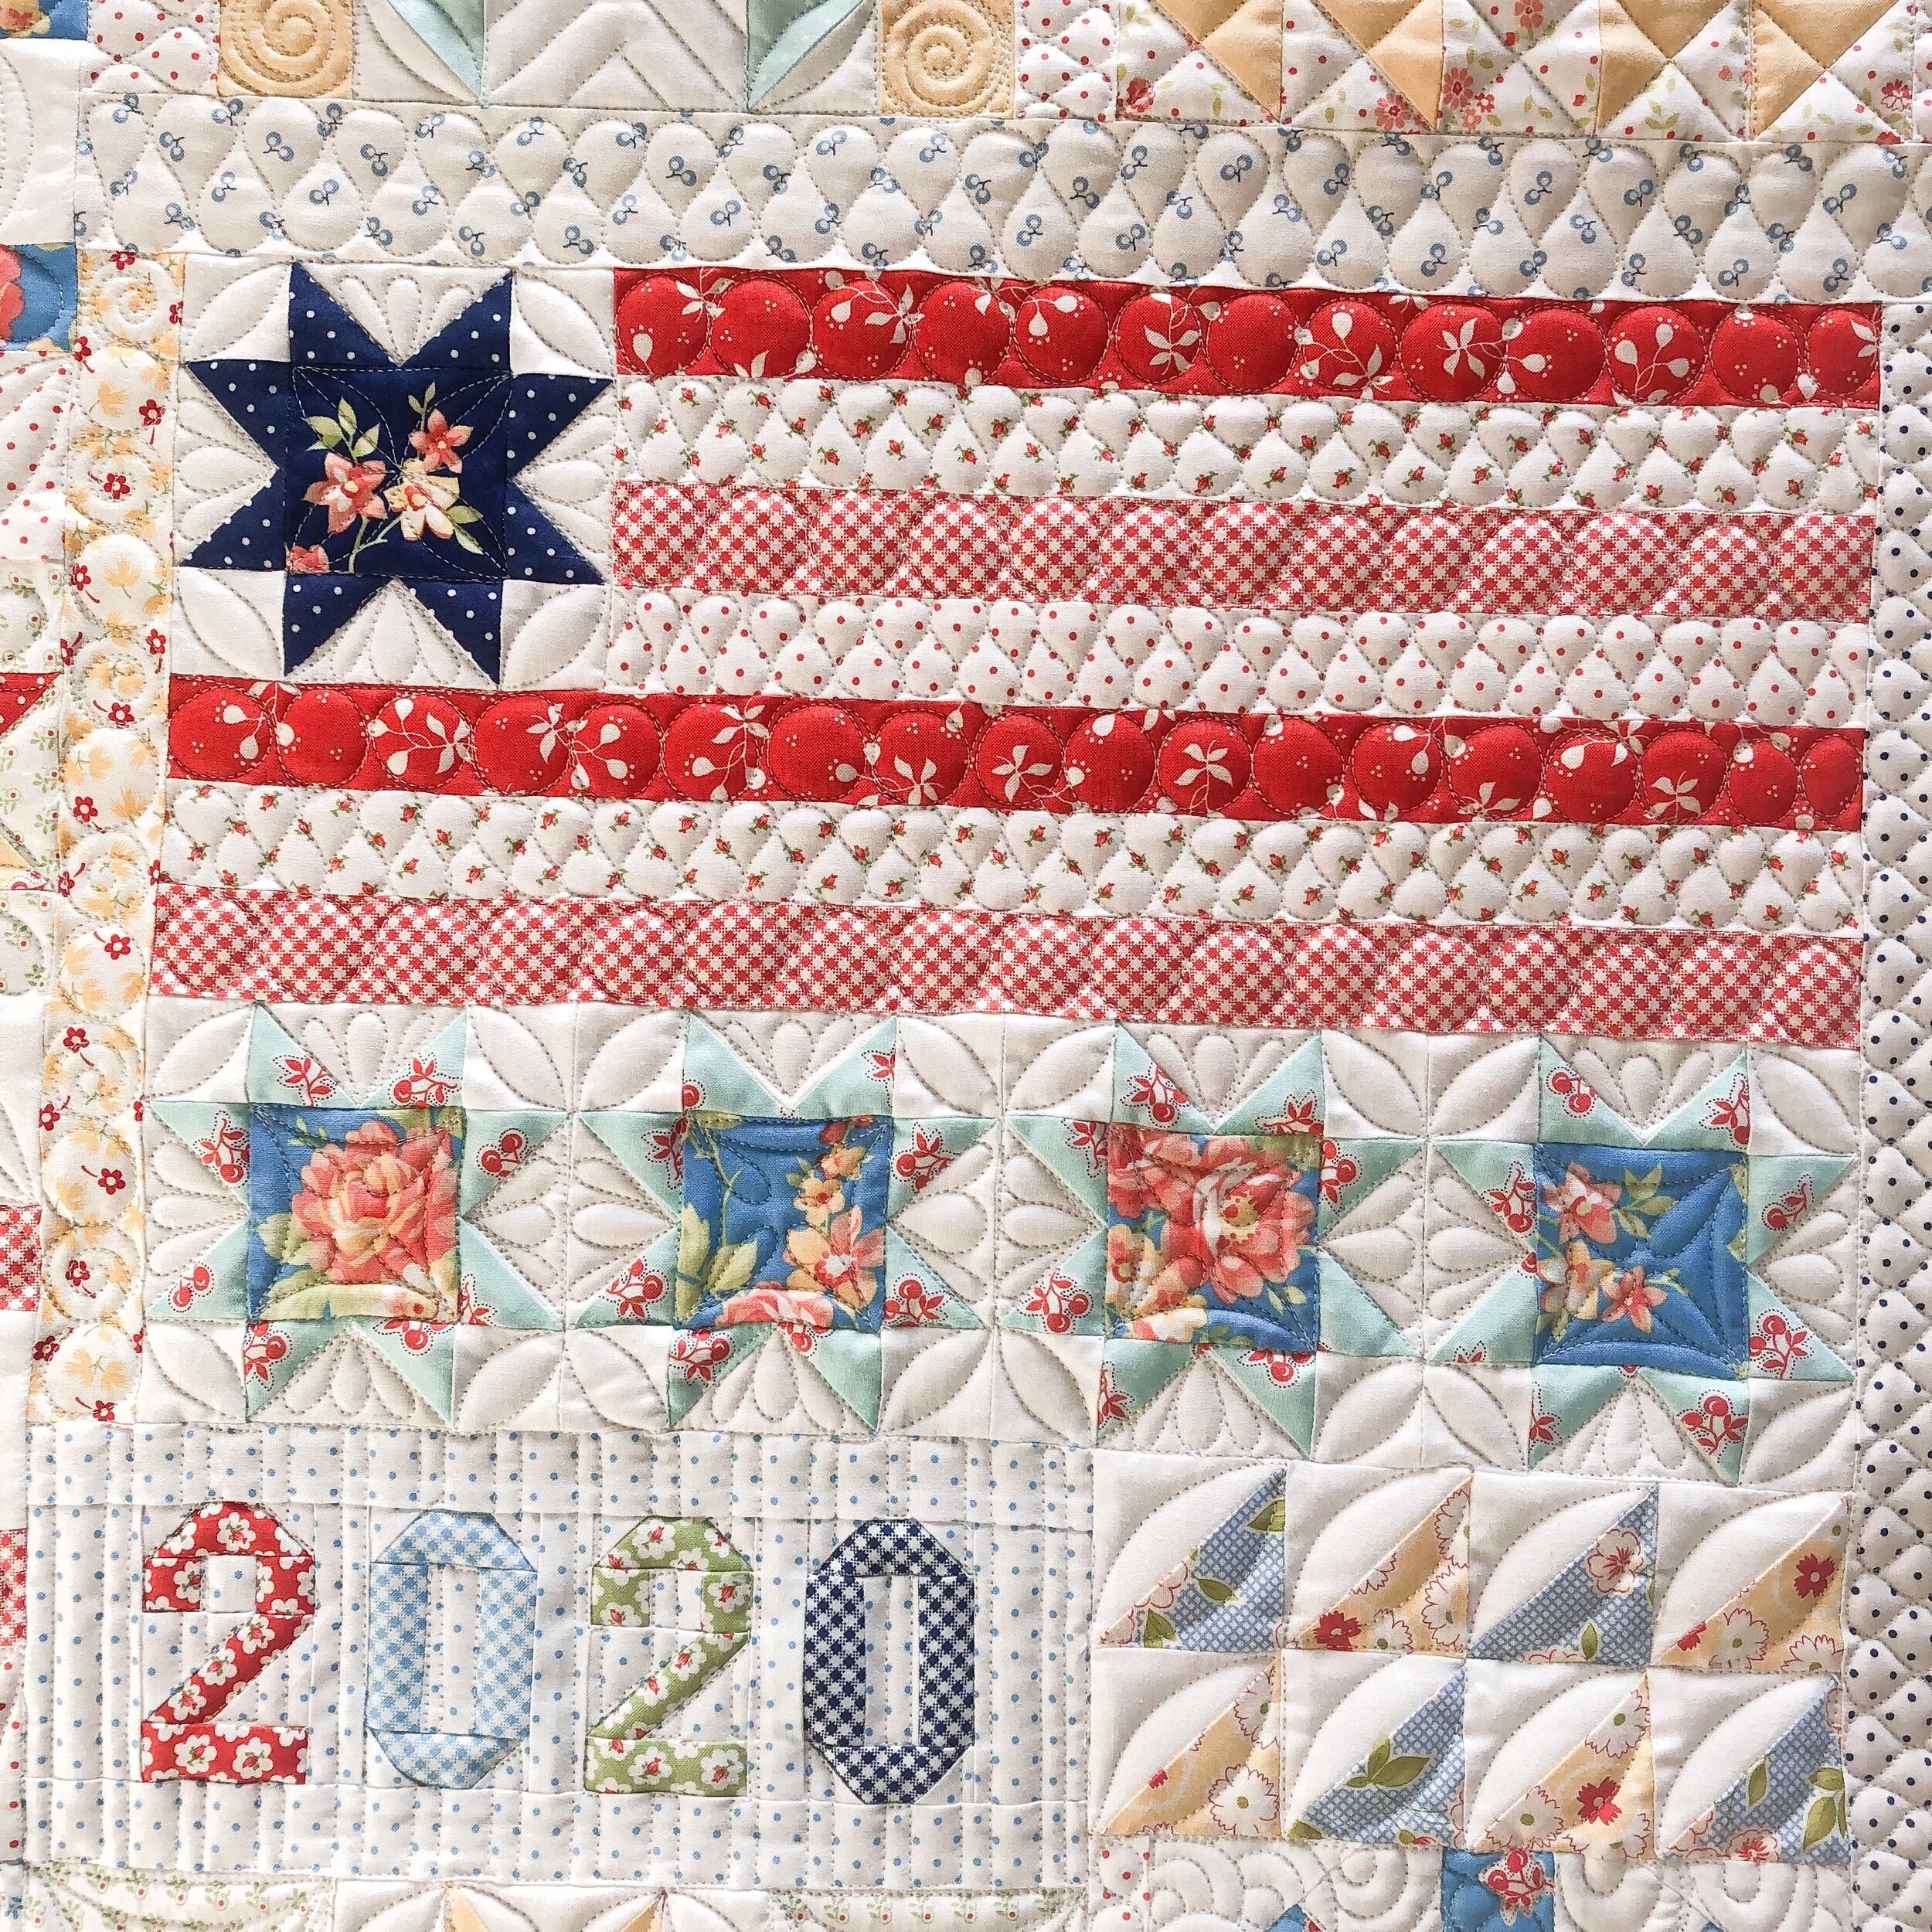
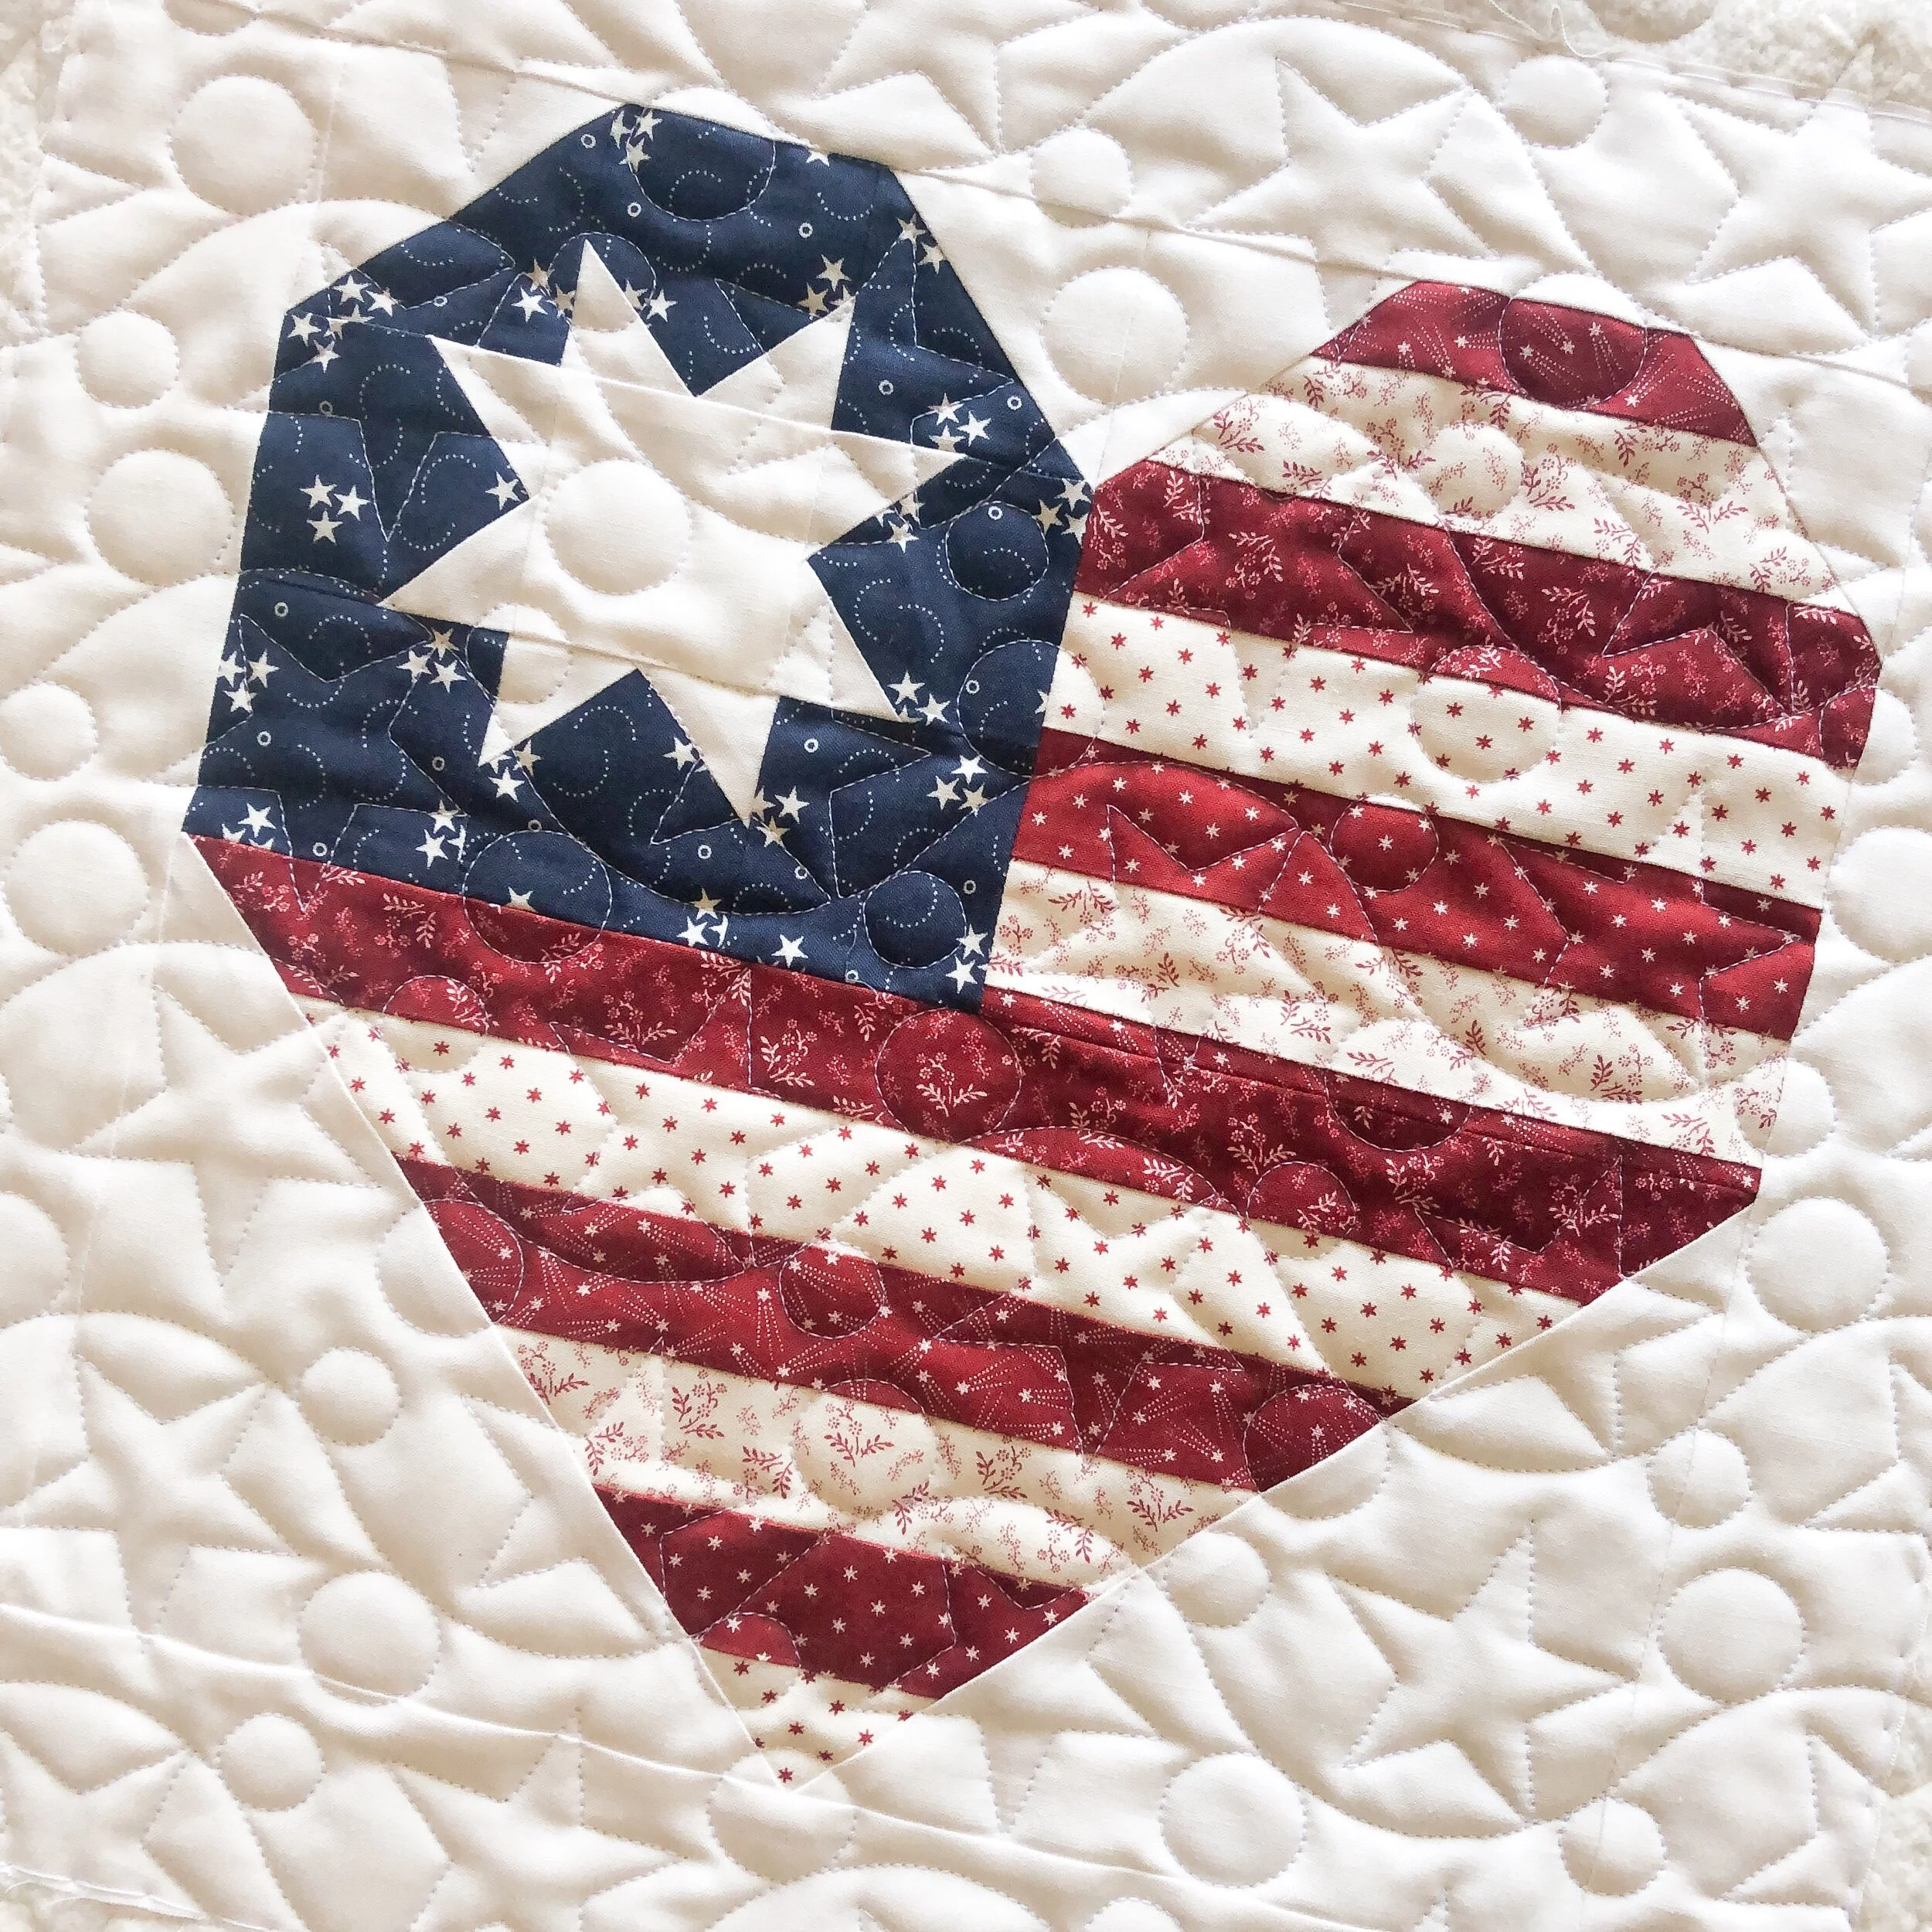
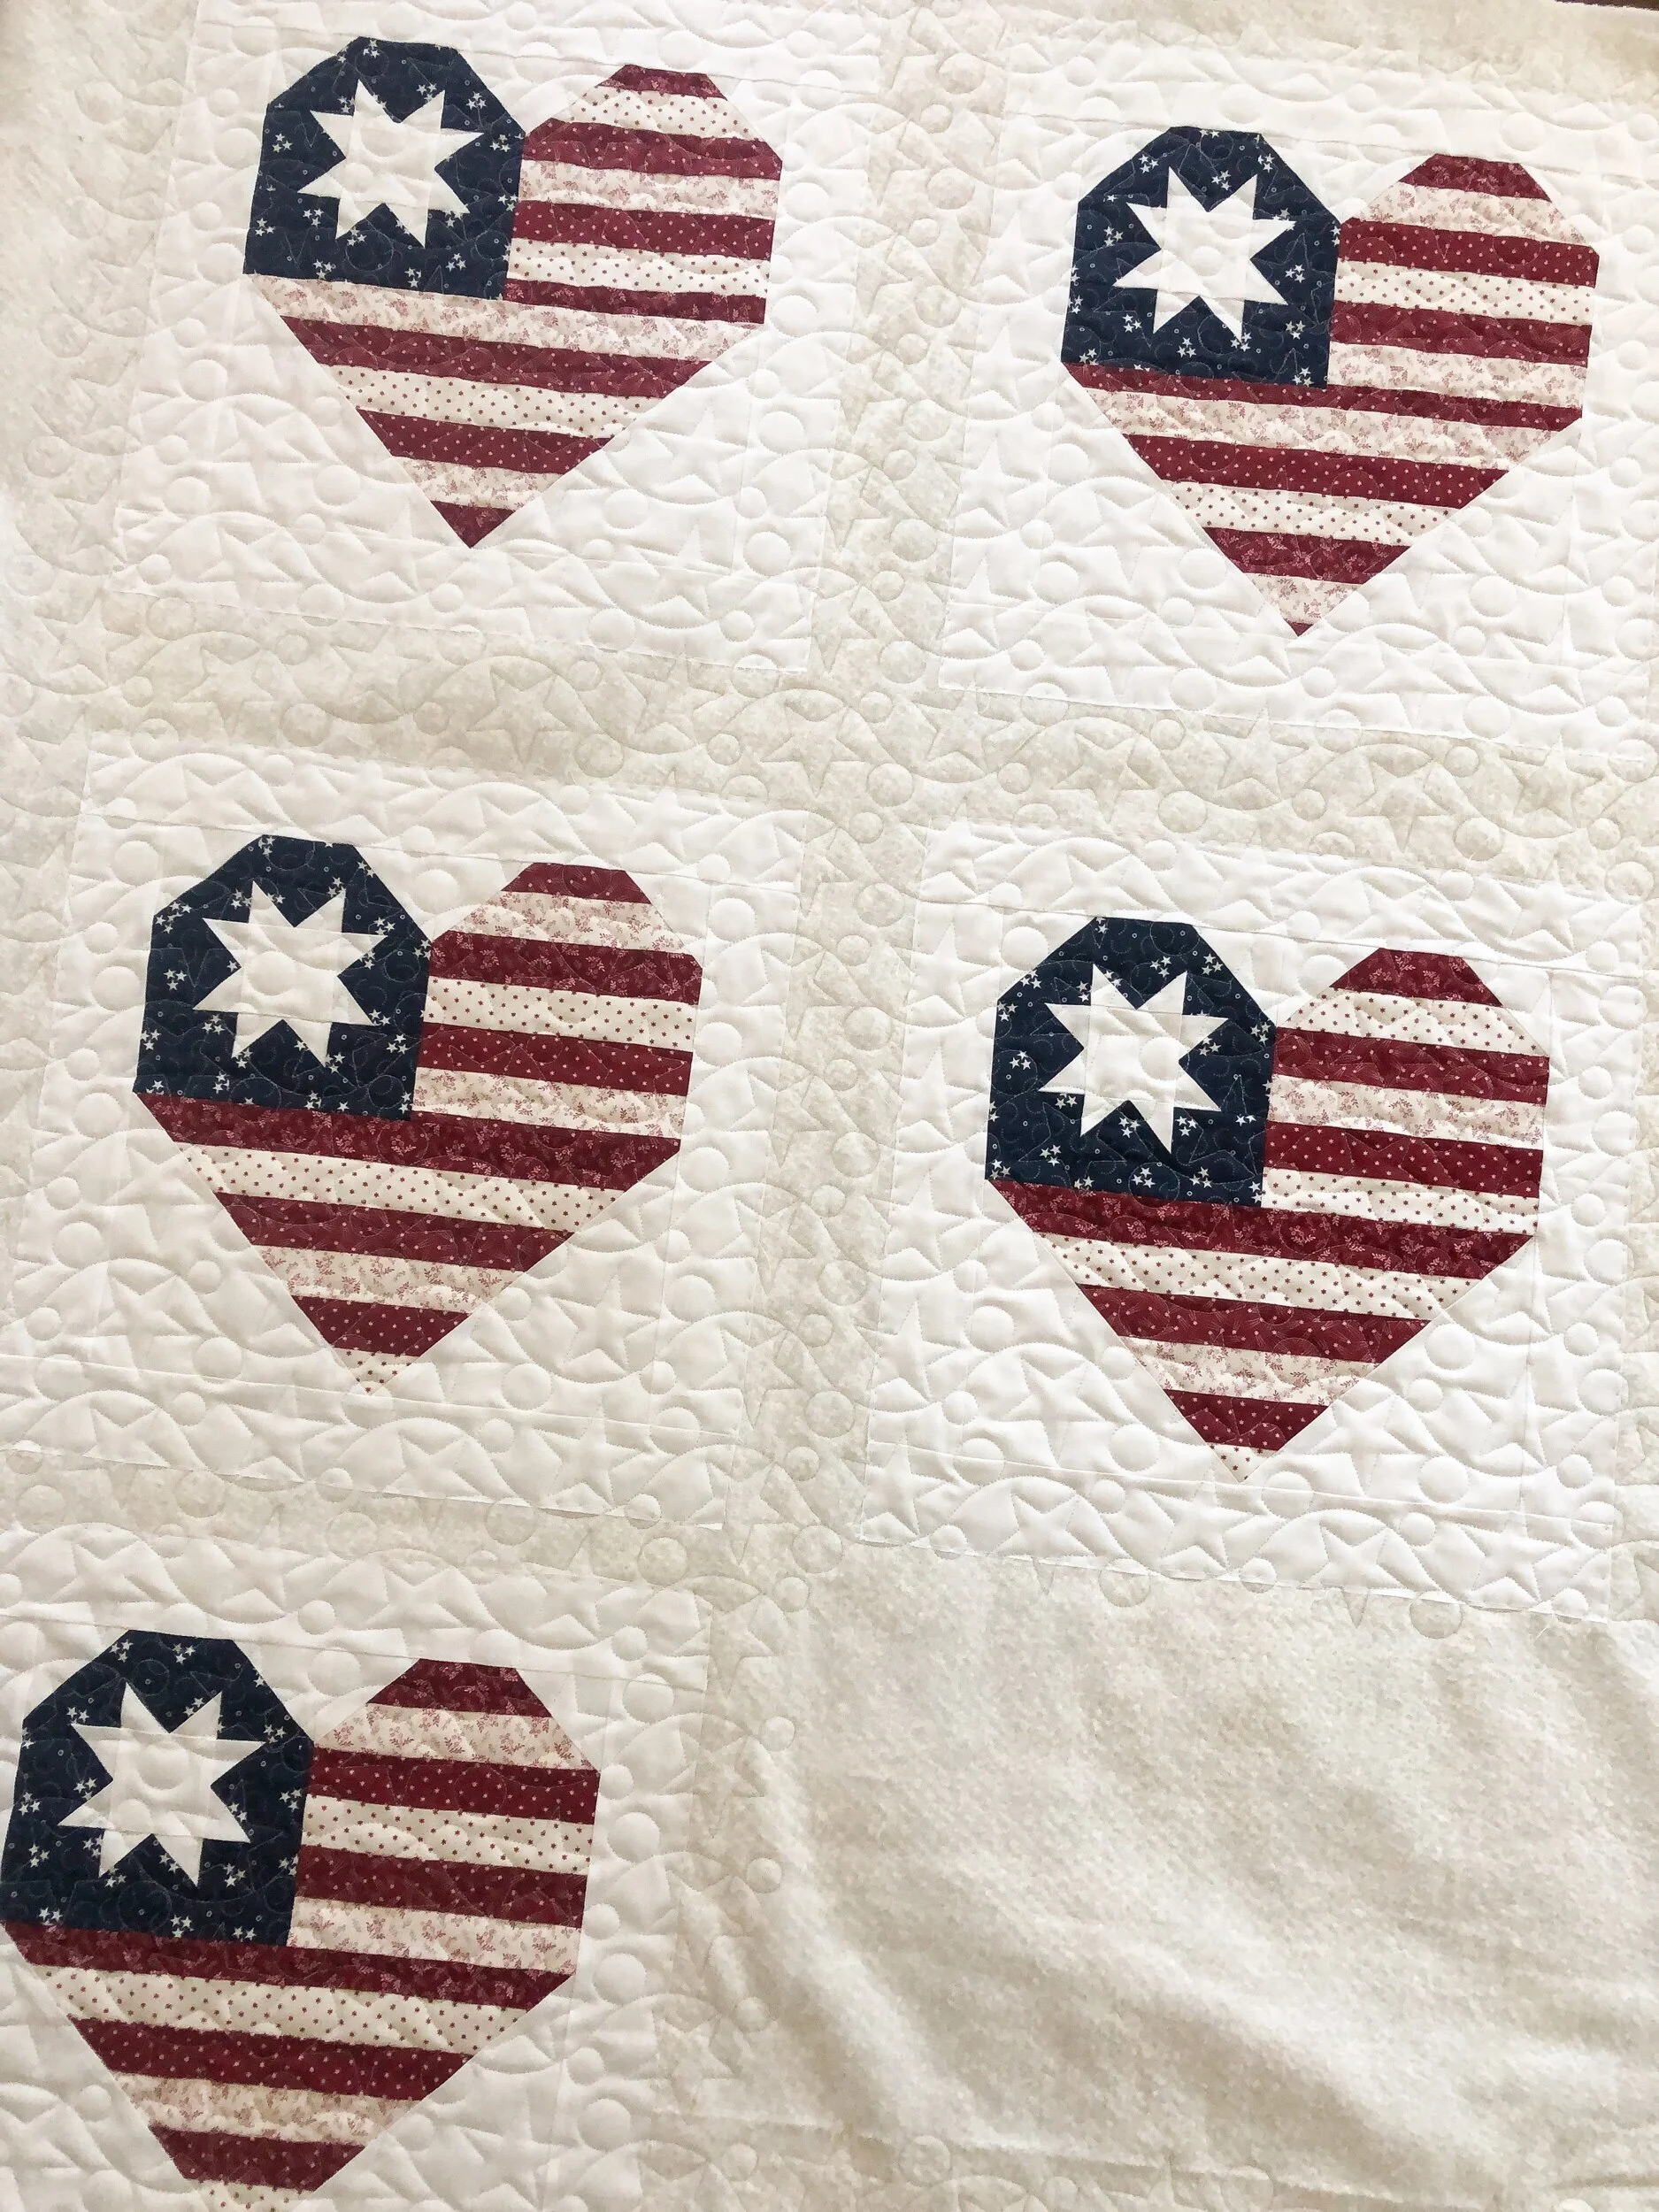
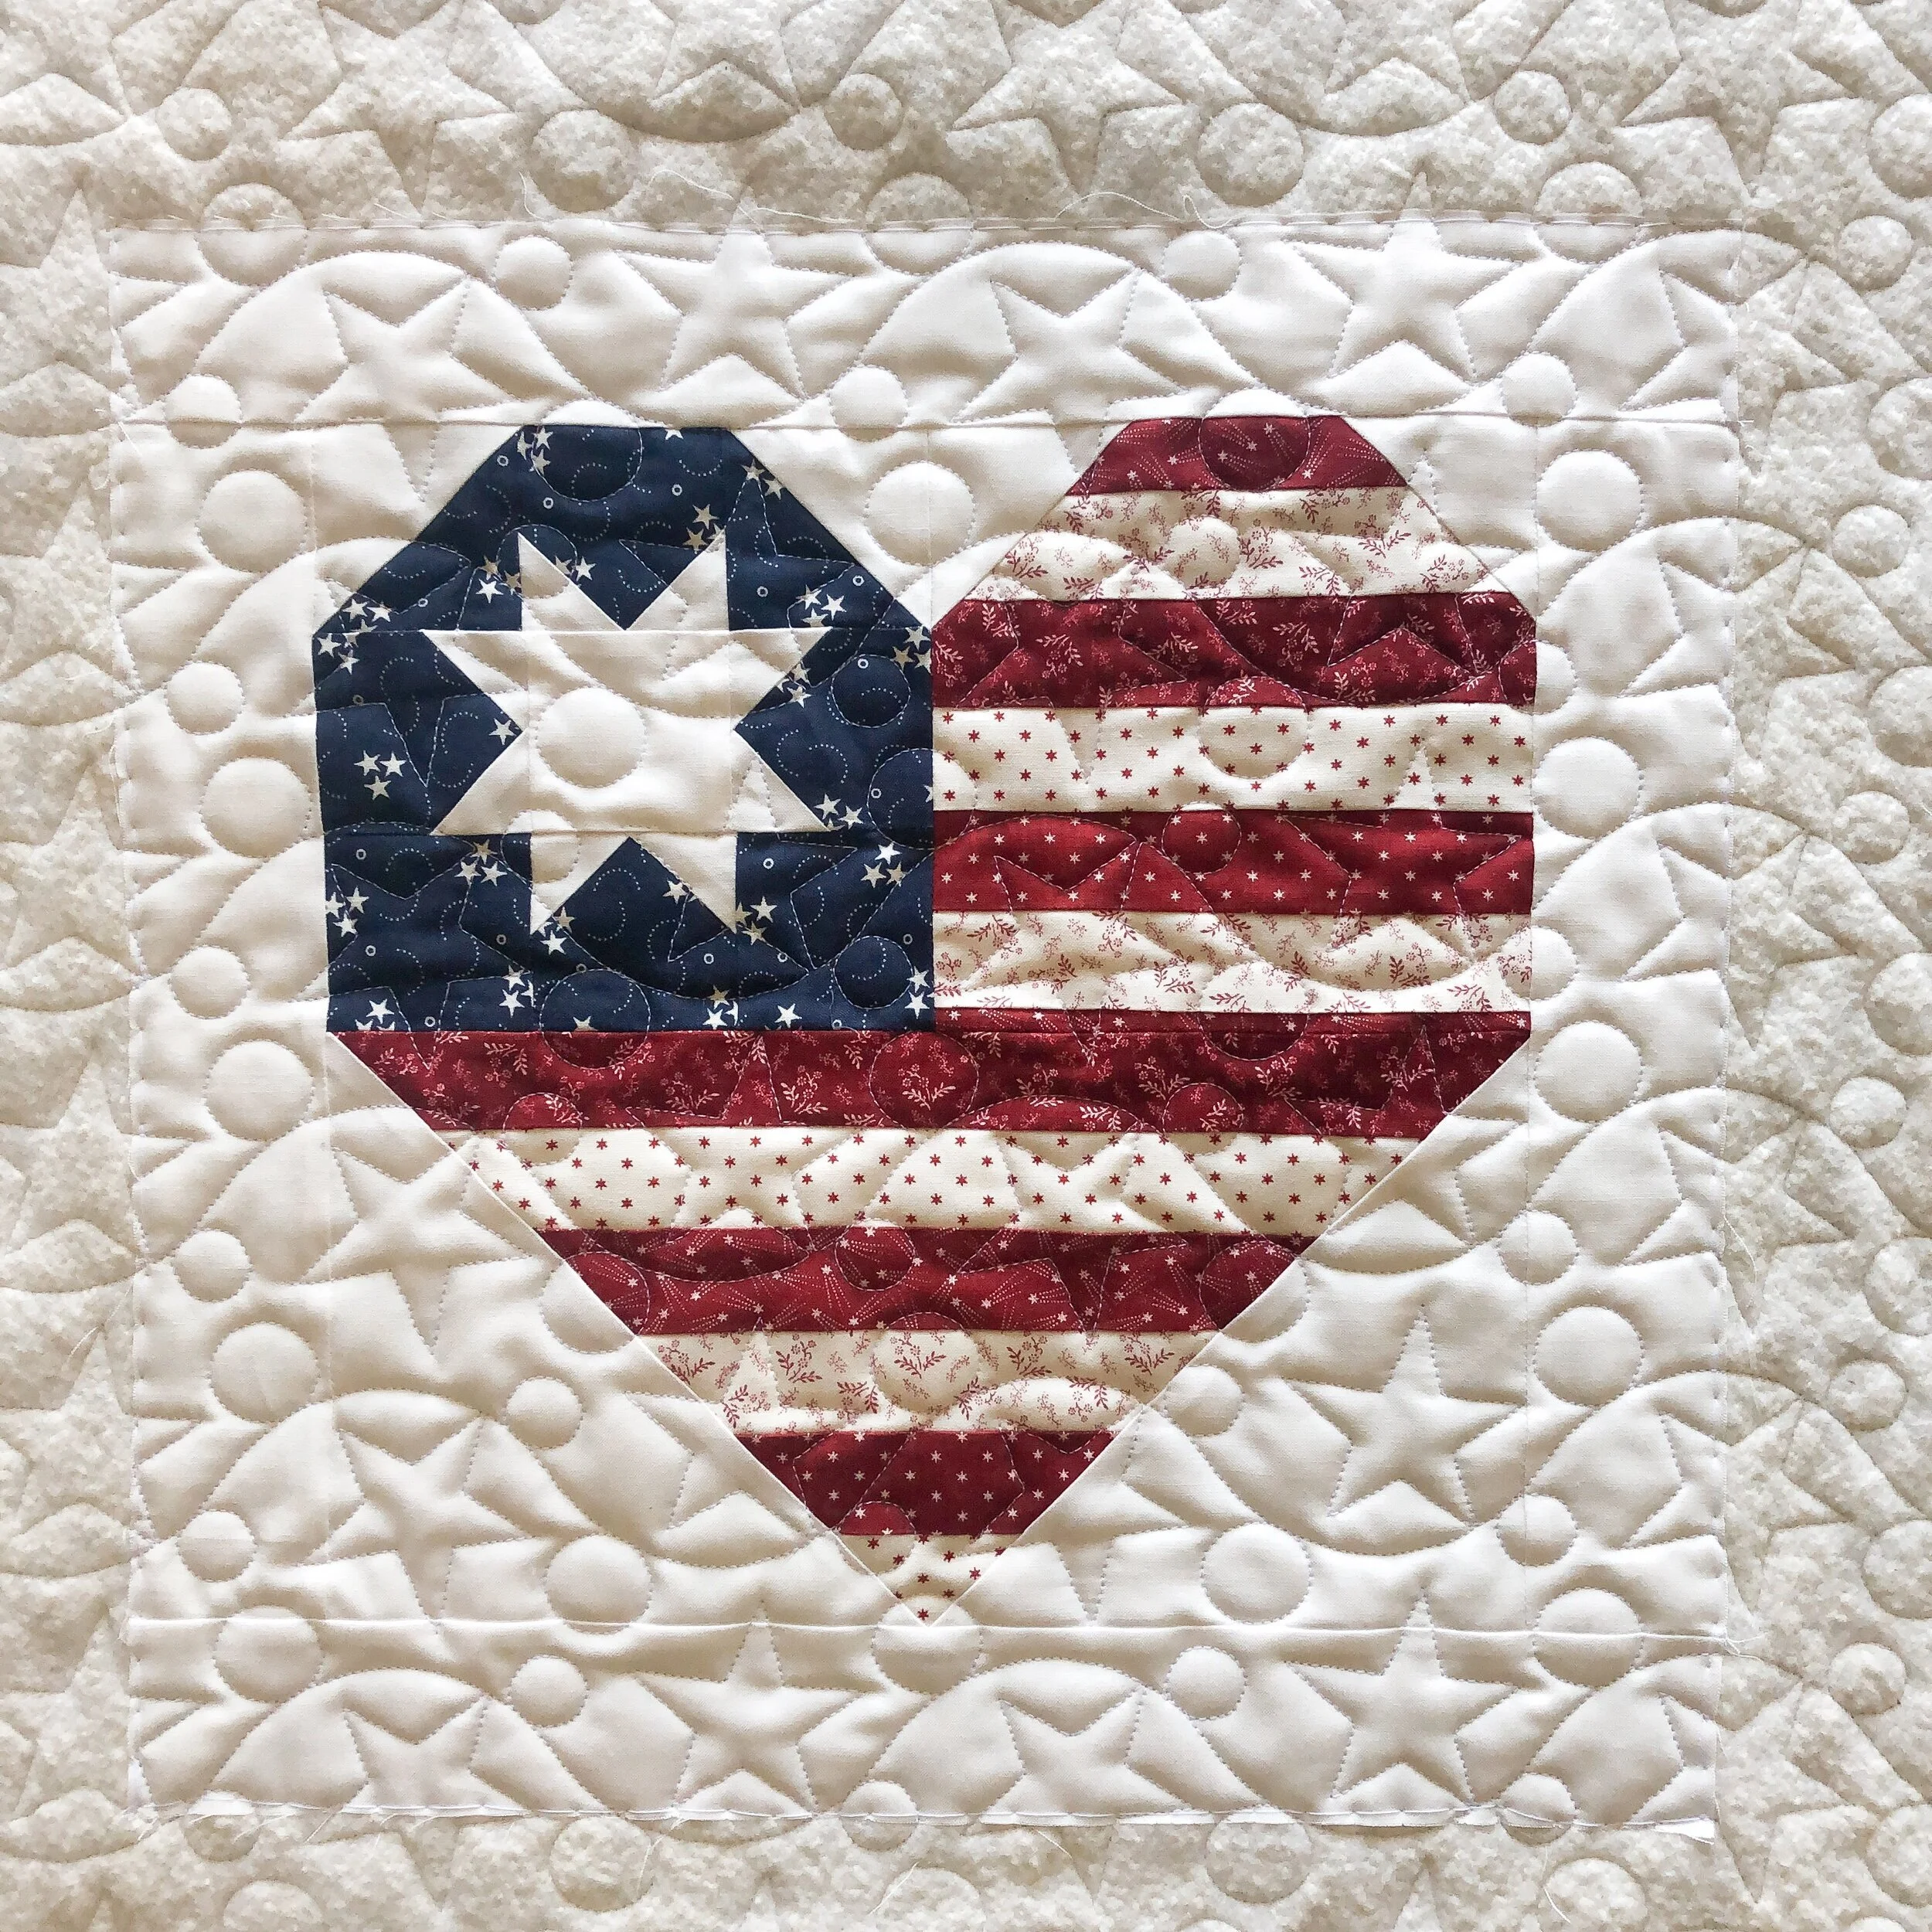
How cute is that navy block in the flag?!?!?! I quilted the blue blocks below the flag nearly identical to the navy one. The center square is just a little different. I also love the simple pinstripe behind the 2020.
Another block close up!
Another…

And, another. These are the trio of blocks pictured above.

Here is the sail block, with more of that overlapping circle design. While we have this close up, look at the 1/2” lines at a variety of different angles. I love the dimension that it gives the stripes of fabric in the sails. The boat itself has a 1/4” plaid with a 1/2” center of the plaid. Simply changing the spacing adds some variety to the quilt overall. If I only quilted vertical 1/2” lines throughout the quilt, it wouldn’t look diverse. Just like each of us…diverse in our likes, abilities, beliefs, humor, and so on. Quilts need diversity in the quilting as well.

Can you tell that the next block is directly below the sail boat…haha!! Those lovely flying geese and orange peels should tip it off. Just another closeup of a beautiful block.
So much good about this block…scroll down one more picture.
Above you see a close up on one of the three blocks, that you see below.
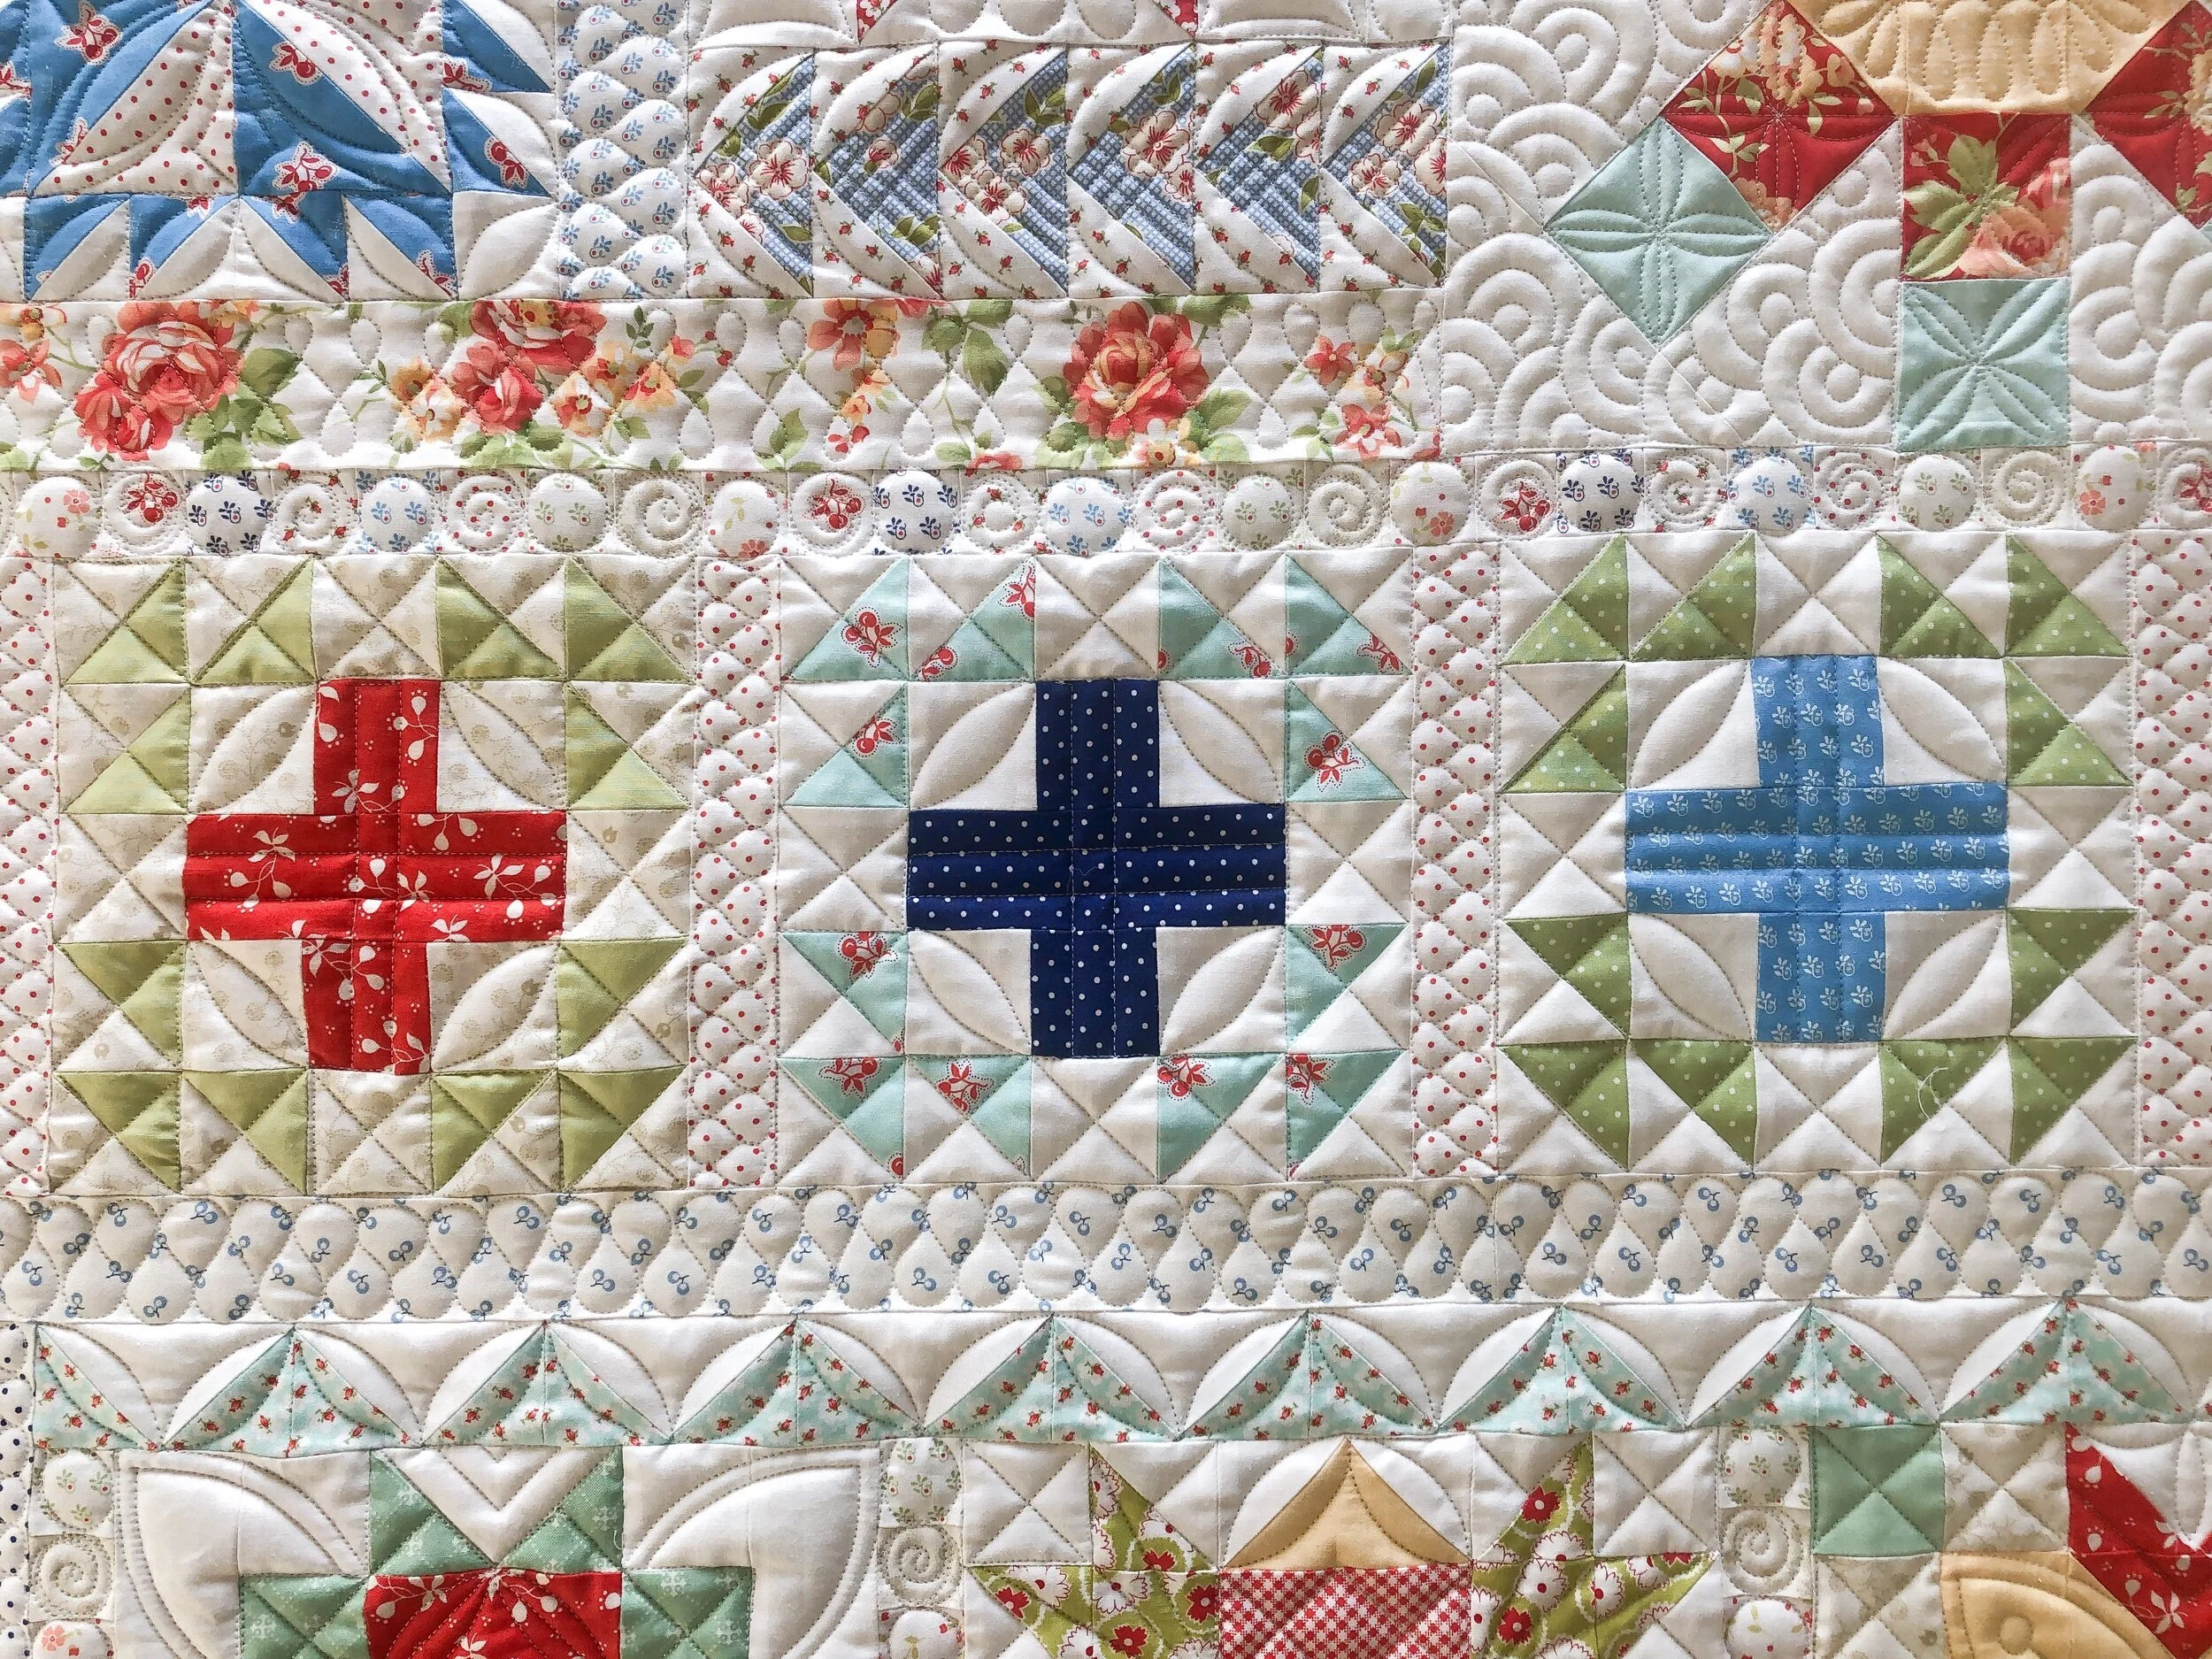
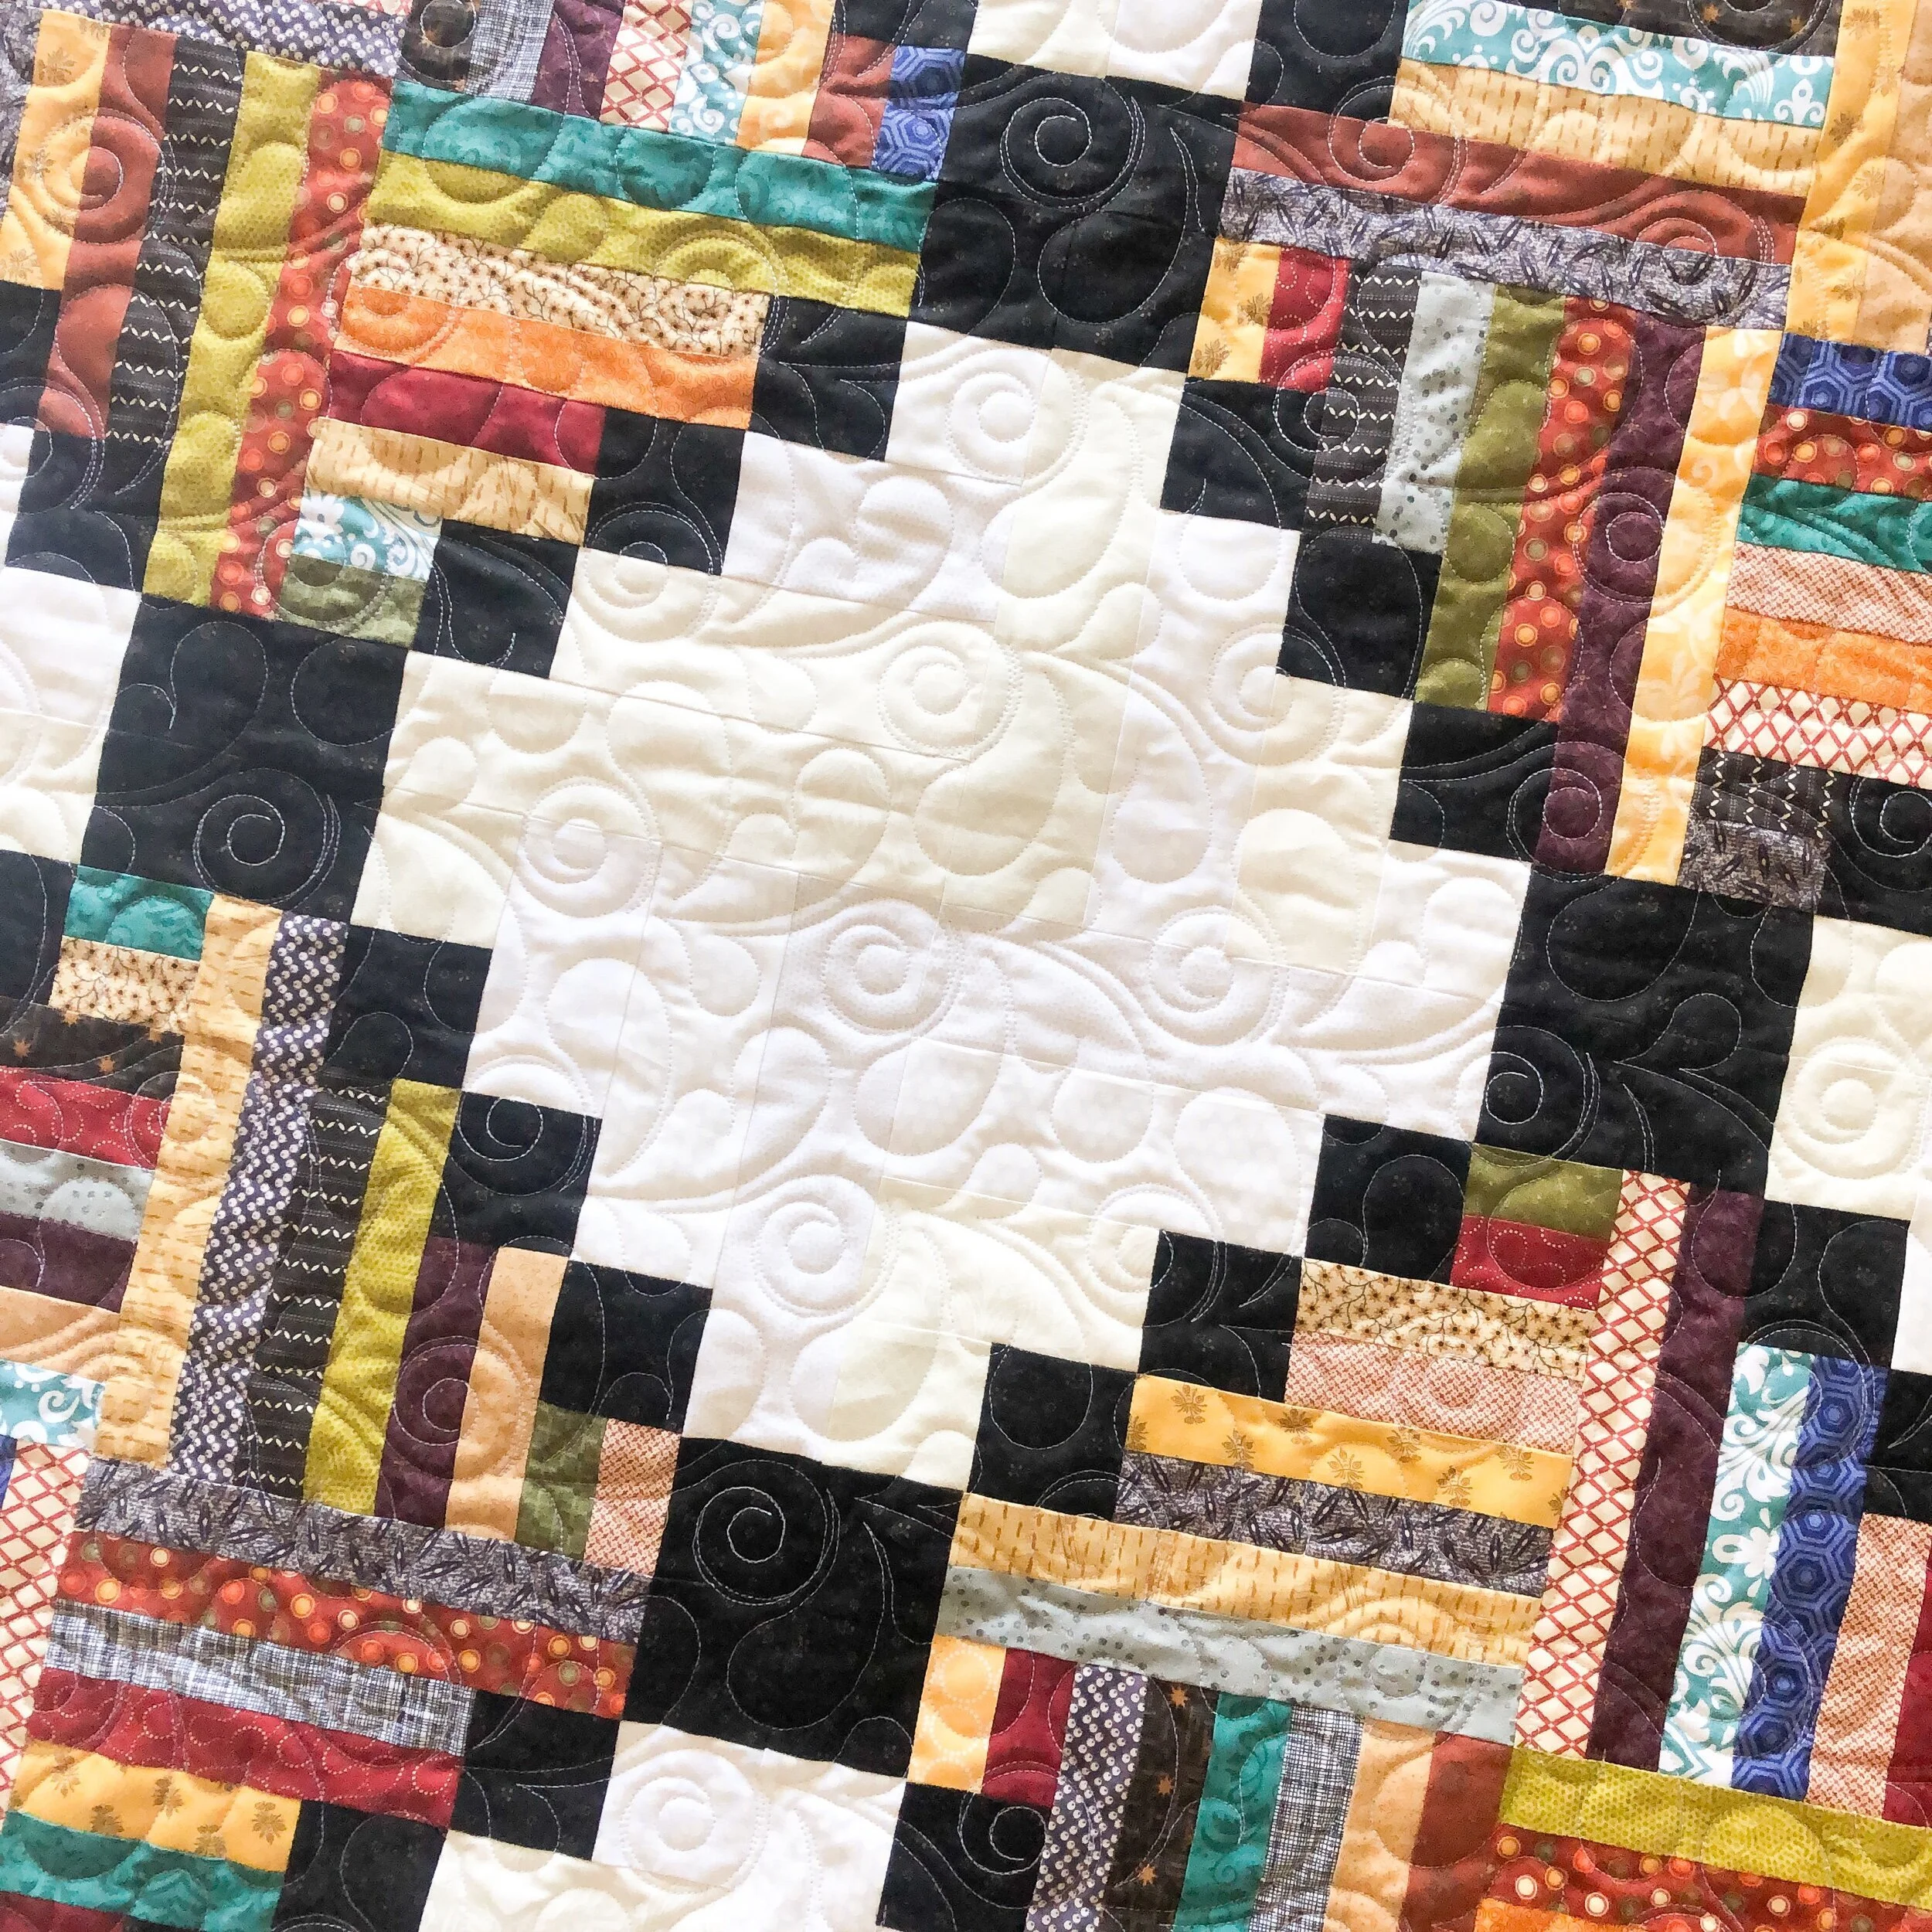
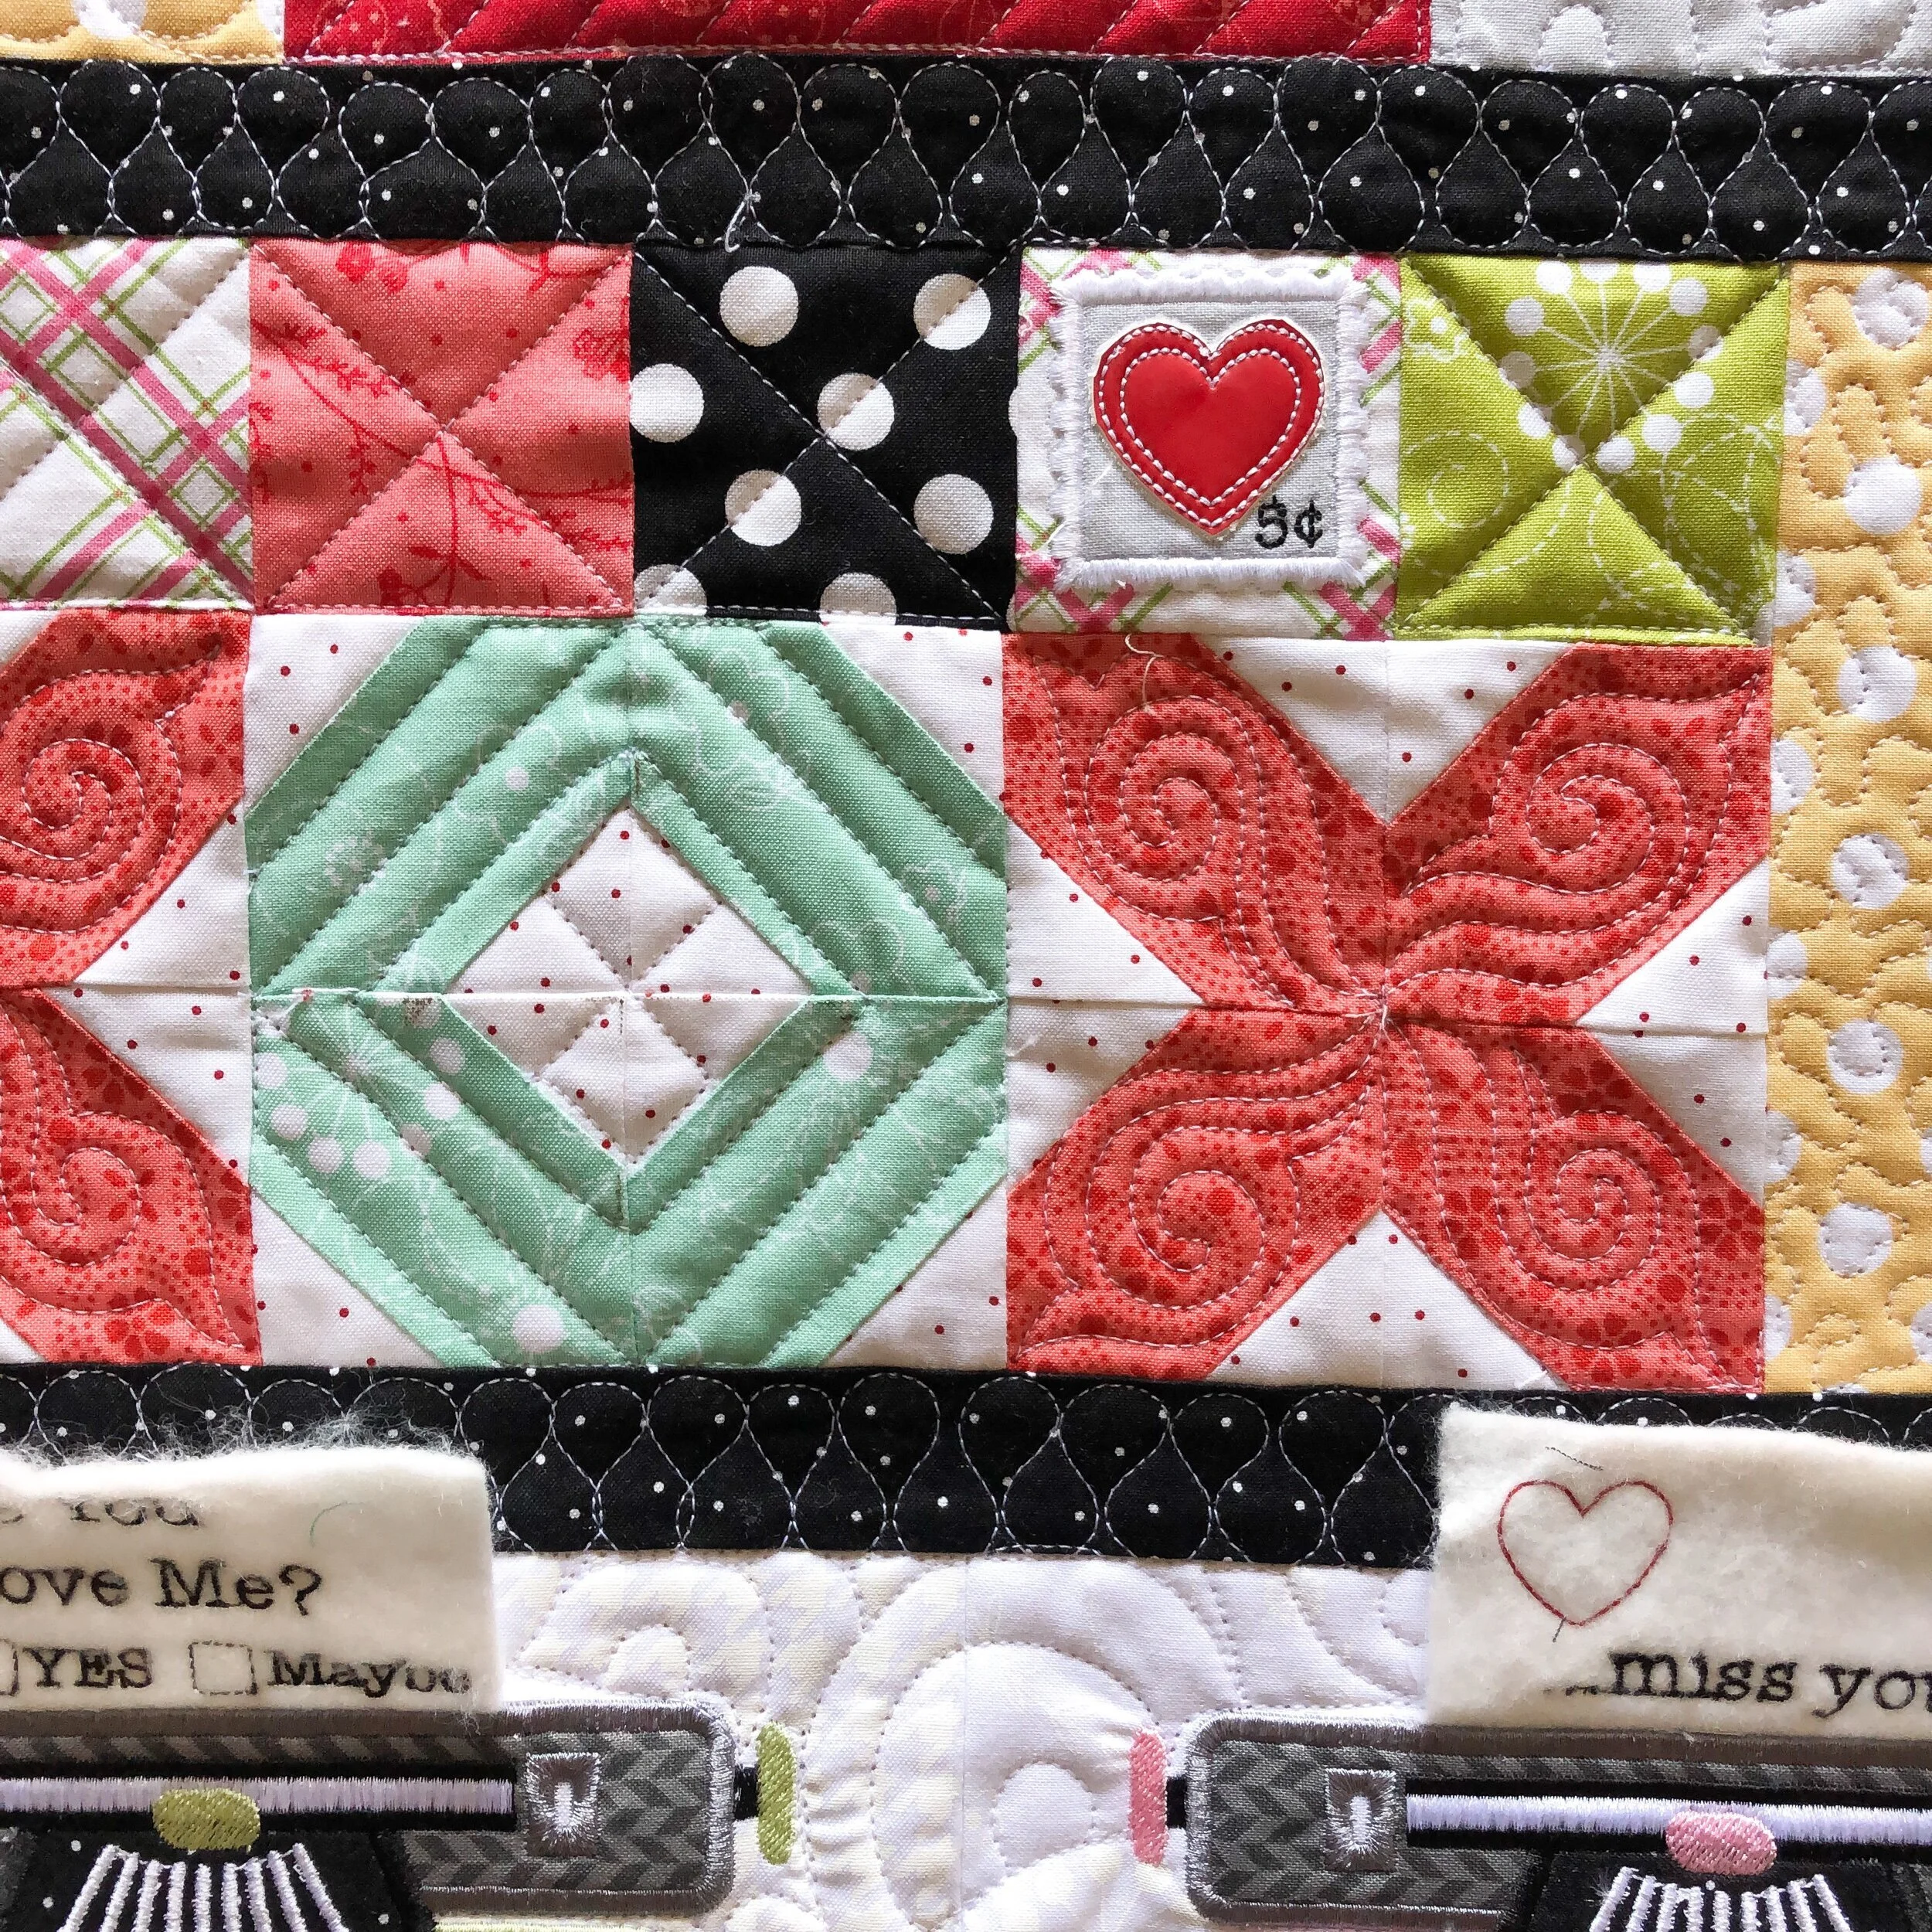
Lets talk about details. First up, the sashing. With the curves in the block, I wanted to highlight the blocks with a fun diamond design that frames them beautifully. Those corners…like I mentioned above…are diagonal petals and then diagonal x’s, and with the corners being opposite directions, it add some fun shapes to the overall design. The center loop design, in the cream fabric, which goes around the squares is a fun. One of my favorite parts of an overall favorite block, is the orange peel petals with a line down the middle. Lines are actually an easier way to help find a center…when quilting an x…or just a simple way to add dimension to a simple petal. You can see it a little bit, in the block on the upper left of the bottom picture, as well. I think the simple x’s in the chained blocks are just the right amount of quilting. Simple and perfect for the overall design. Also, I should note that the squares in the sashing have a little swirl circle.
The bunting blocks are such a fun touch. They are also along the top edge as well. That light blue block with the simple x’s adds some fun depth to that block.
I mentioned…texture…dimension…variety…scale…diversity…which are all important aspects in custom quilting. I hope you enjoyed reading about my thought process.
If you made it this far, thank you!!! I wanted to share lots and pictures and thoughts about this quilt. You can see why I’m behind on getting this quilt blogged, too many details to share. I also wanted the time to share my approach to quilting a sampler quilt. They may seem daunting with the variety of blocks and block sizes, however as you use similar designs throughout…you can quilt something beautiful.

Here are a few more pictures of my Circle2™ rulers. Above is the green 3”/9” and below is the entire green set stacked up, which is how I ship them, with a piece of cute tape across the center to keep the together.
- Design Patent D875,574 -

Below is the 4”/10” clear ruler. To see all 6 rulers, head on over to my shop and check out the pictures in the ruler listings.
- Design Patent D875,574 -

Below you can see an angled look at the clear set stacked up, and see the measurements along the straight edge. Notice the 1/4” lines from the inside of the ruler to the outside, which help tremendously with quilting. If needed reference the picture above to see the lines as well. So, the question I get asked a lot, clear vs. green, which is better and why so you offer both. The clear are cheaper to make, and some quilters are used to working with clear rulers. The green ones are actually not much more in price, but add a great depth especially when placed on lighter fabrics. It’s easier to see the lines better, which some quilters prefer. Truly it is a matter of preference.
You may be wondering about what this means… - Design Patent D875,574 - …My design patent was approved, and it is recommended that I share the number with images of my rulers, to protect them. I’m so proud of these rulers. I’ve wanted a great set of circle rulers for years, and these actually turned out better than I could have dreamed. I’m so grateful for the wonderful people who help me manufacture them. I couldn’t do it without them!!

In honor of all of the orange peels, the next design deal is Woven Orange Peel, and will be 20% off until my next blog post. No code necessary. Thank you for using my designs…it’s such a joy to see something I create used on your quilts.
I have a fun quilt coming up next, with one of my digital designs quilted on it. Excited to share with you!! Thanks for being here. • Leisha
Simple Quilt + Ruby Loops
Hello there,
I took a few days off from blogging, as I spent time with my family camping. We had so much fun together!! Summer is going by too quickly. School starts in a little over 2 weeks, and we have some fun things planned between now and then.
Maria made this beautiful simple patchwork quilt. 5” squares sewn together in a random layout.
She requested orange peels in the center section, which I love!! Then to tie in the fabrics I did freehand ribbon candy in the thin inner border and my swirly feather freehand in the outer border. I think it turned out beautifully!!

I used a golden tan thread, and my favorite 8020 cotton poly blend batting from Winline.
To get a perfect sized curve, I used my 6” Circle2™ ruler. I love these rulers!! The design of the ruler, makes it easy to rotate the rulers depending on the angle I’m quilting.
My Circle2™ machine quilting circle rulers come in a set of 6 rulers. They come in clear or green, 1/4” high quality acrylic and have a 3/4th of a circle design so that you can have 2 circles per ruler and for the ease of using the inside/outside of the ruler. The rulers range in size from 2”-13”. There are 1/4” lines on the ruler to help you measure as you quilt. I also designed these rulers to give you a true sized circle. The hopping foot adds a 1/4” on each side. So…when you use the 4” Circle2™ ruler to quilt a circle, you’ll get a 4” circle. I couldn’t find that with any other circle rulers. Check out the #circle2rulers hashtag on Instagram to see some beautiful quilting ideas, using these rulers. (Sorry it wouldn’t let me link it.)
- Design Patent D875,574 -
I love the measurements along the straight edges of the Circle2™ rulers. Sometimes I even use that straight side of the ruler to quilt in the ditch or quilt a quick little straight line.
It’s fun to quilt some more traditional designs again. These fabrics are gorgeous!!
The classic orange peel!! Simple yet exactly what this quilt needed.
It’s been fun for me to do a quick little feature of my quilting designs at the end of these blog posts…and this design is one of my favorites!! Ruby Loops is one of 4 variations of my Ruby designs. I can’t wait to have a client quilt to quilt it on. I’m starting to see the Ruby designs on some quilts quilted by other longarm quilters…I love them!! Such a fun quilty texture. Ruby Loops is 20% off until my next blog post, no code necessary.
Top left to bottom right… Ruby, Ruby Crosshatch, Ruby Loops, and Ruby Twist. They are all available in my shop. Would you be interested in a Ruby design bundle?
Thanks for stopping by!! Have a great Tuesday! Happy quilting.
• Leisha

Ramona’s “Dresden Neighborhood Haunted Houses” + Grove
Hello,
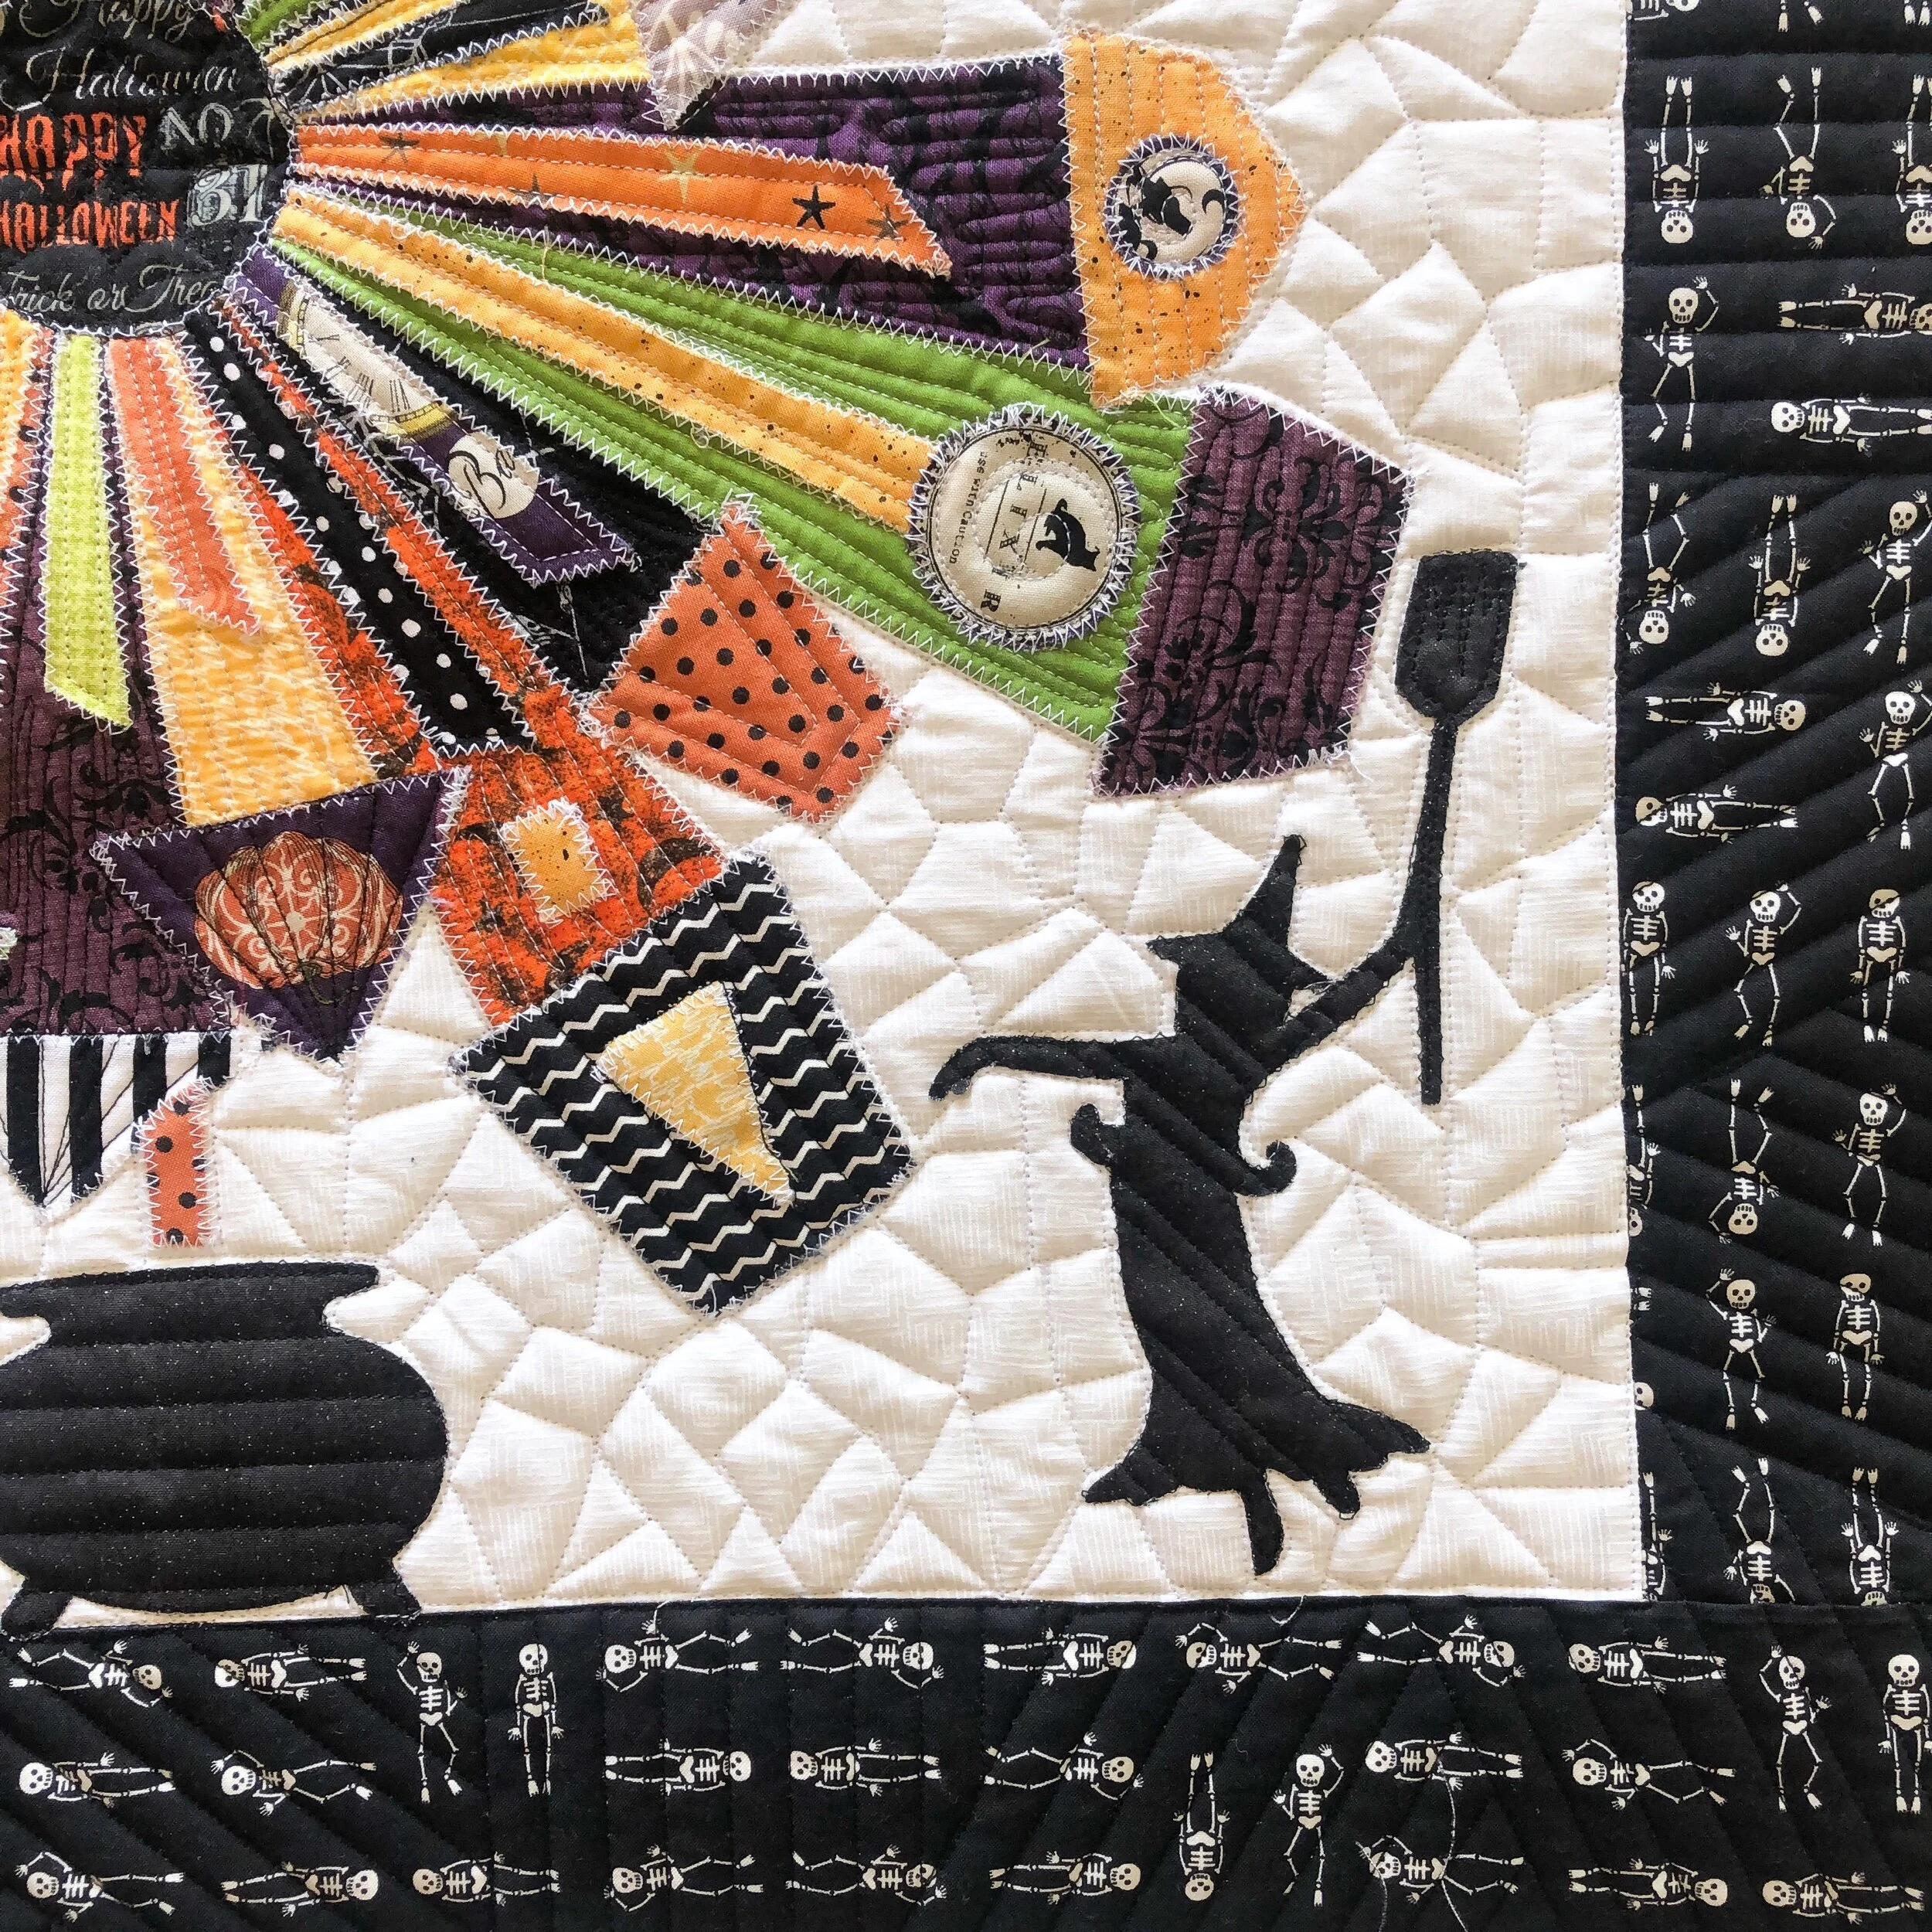
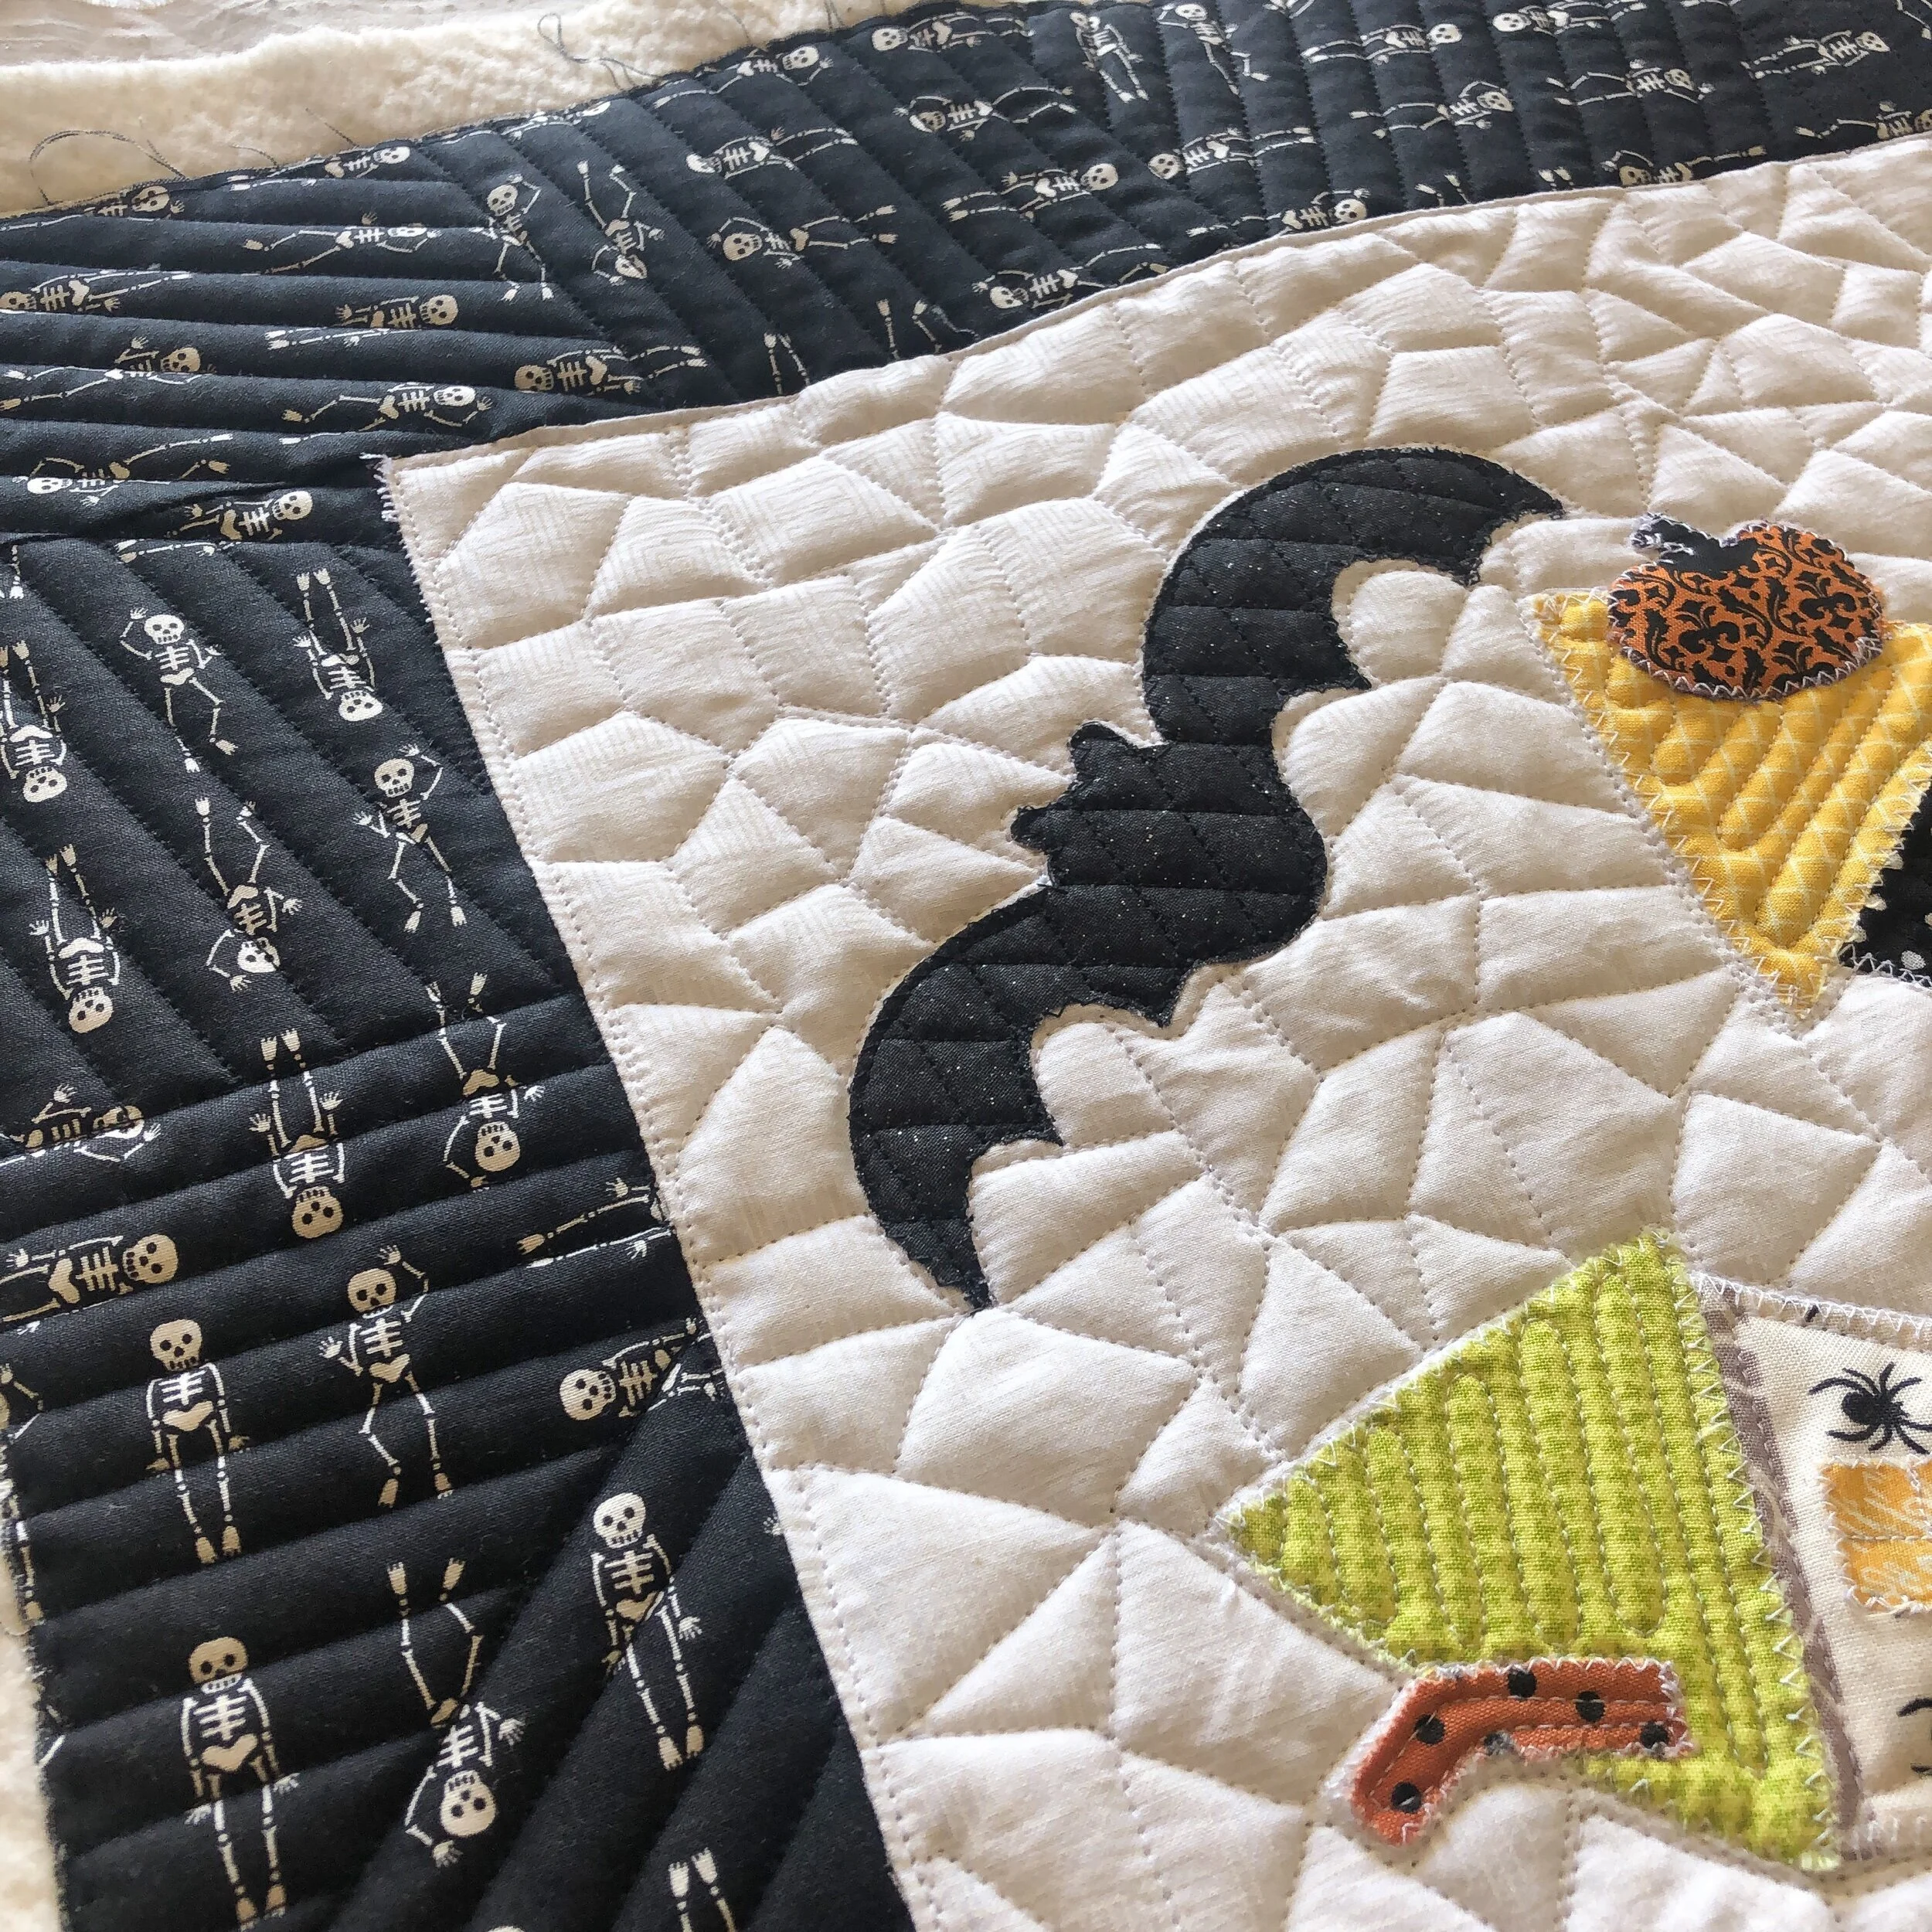
Hope all is well for each one of you!! Are you looking for a fun Halloween wall hanging? My dear friend Ramona made this fun “Dresden Neighborhood Haunted Houses” wall hanging. Pattern is by Persimon Dreams. Ramona added a few more things, like the bats, witches, and moon…which she found on her cricket, I believe. I think they are such a cute addition to the quilt. Ramona is so creative, and it’s fun to see her create things, as she is sewing.
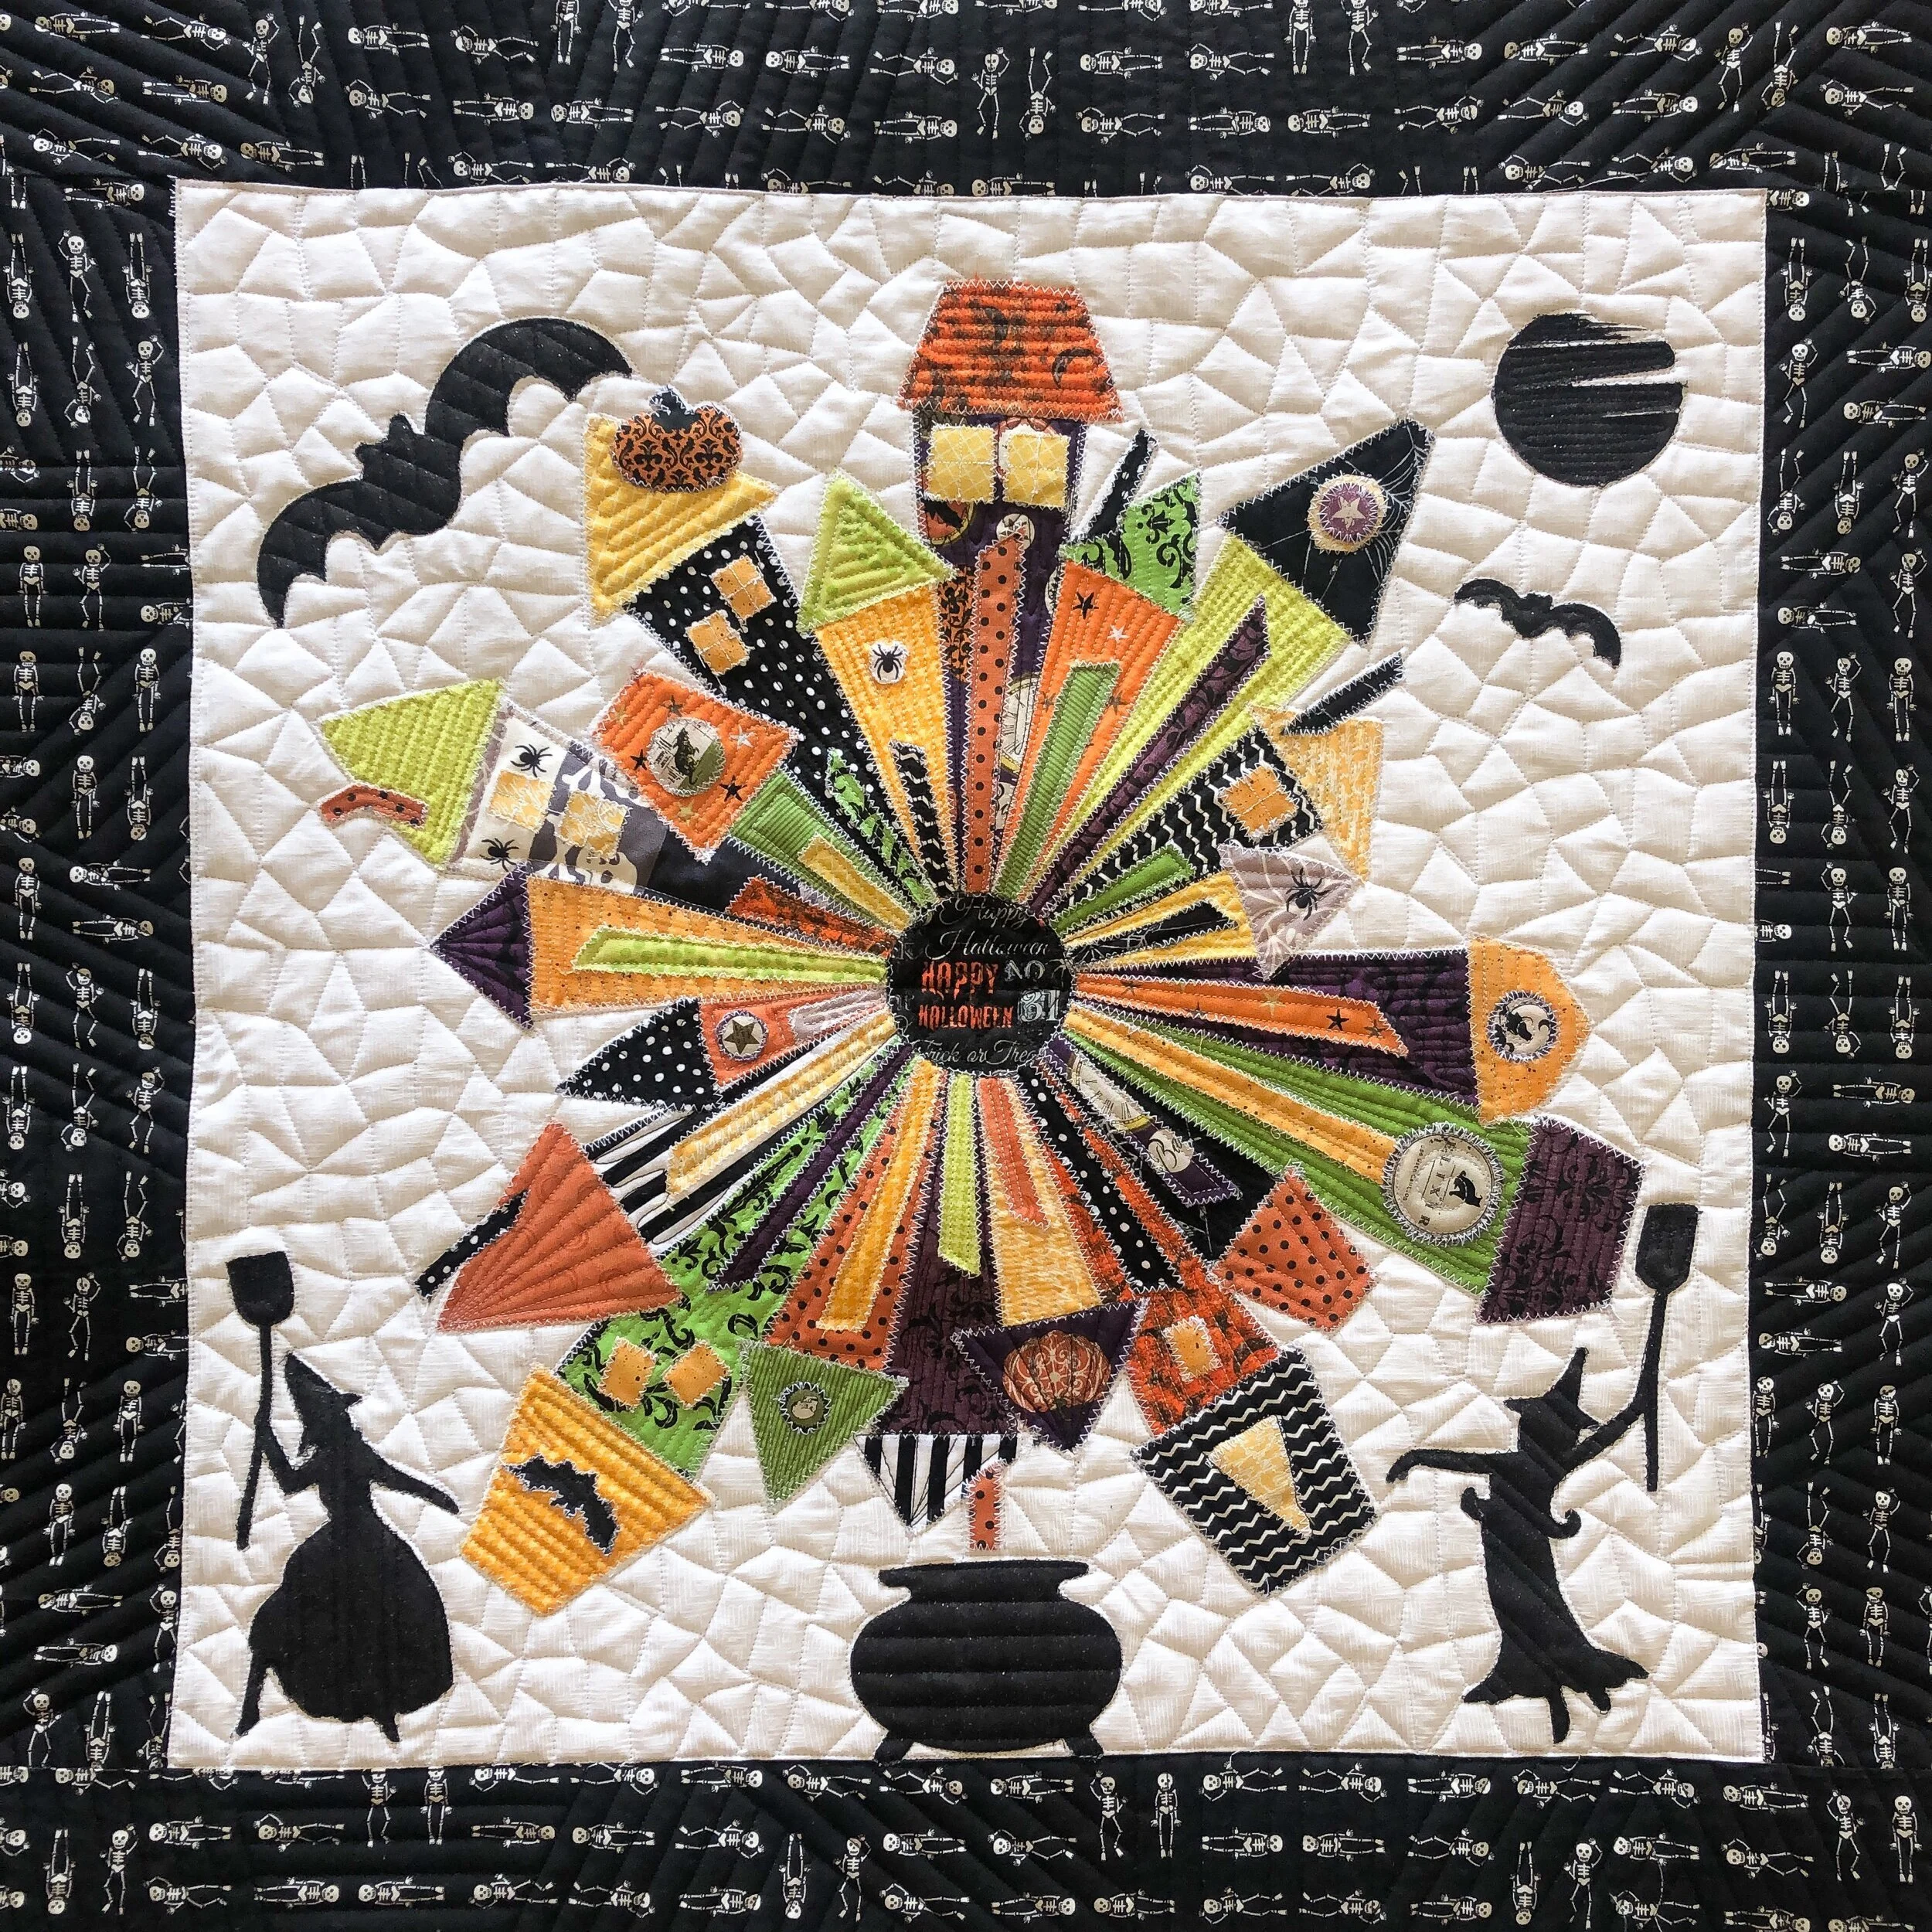
I did a crackle background freehand, with no ruler. I also added a lot of lines in the houses, some with an Edge ruler from Linda at The Quilted Pineapple.
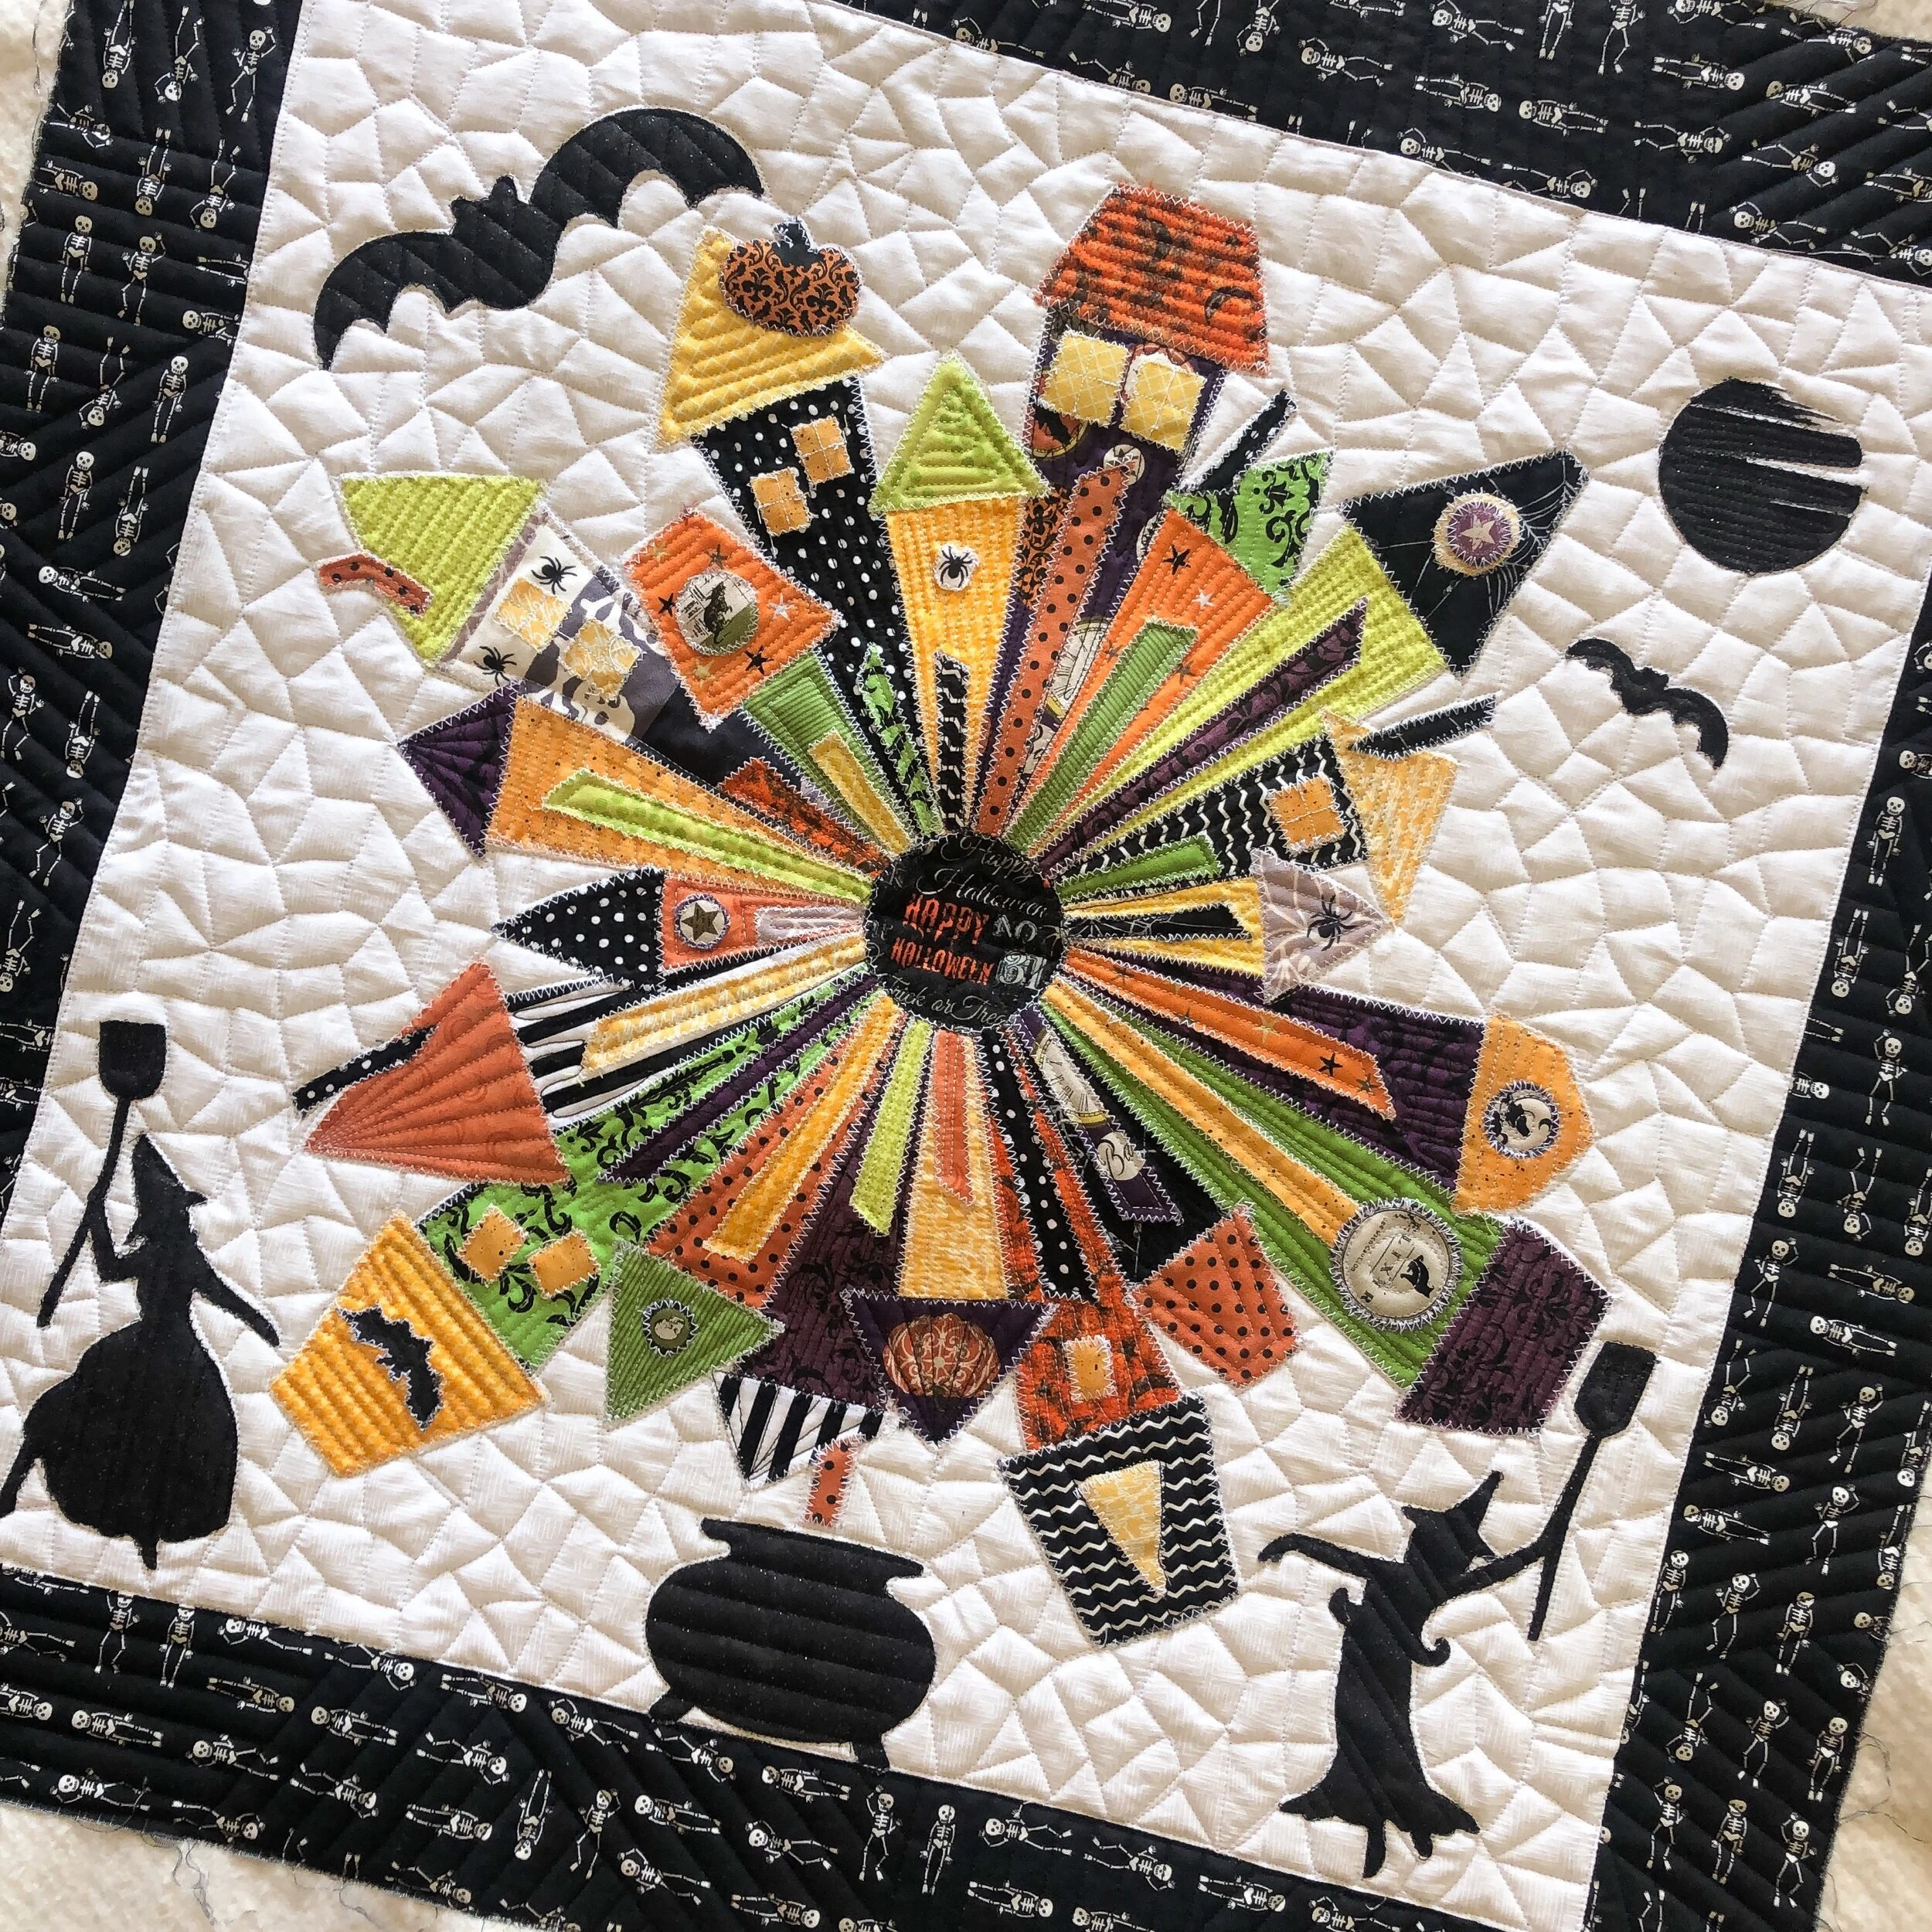
I used natural white Omni thread from Superior Threads. I also used 8020 cotton poly blend batting from Winline.
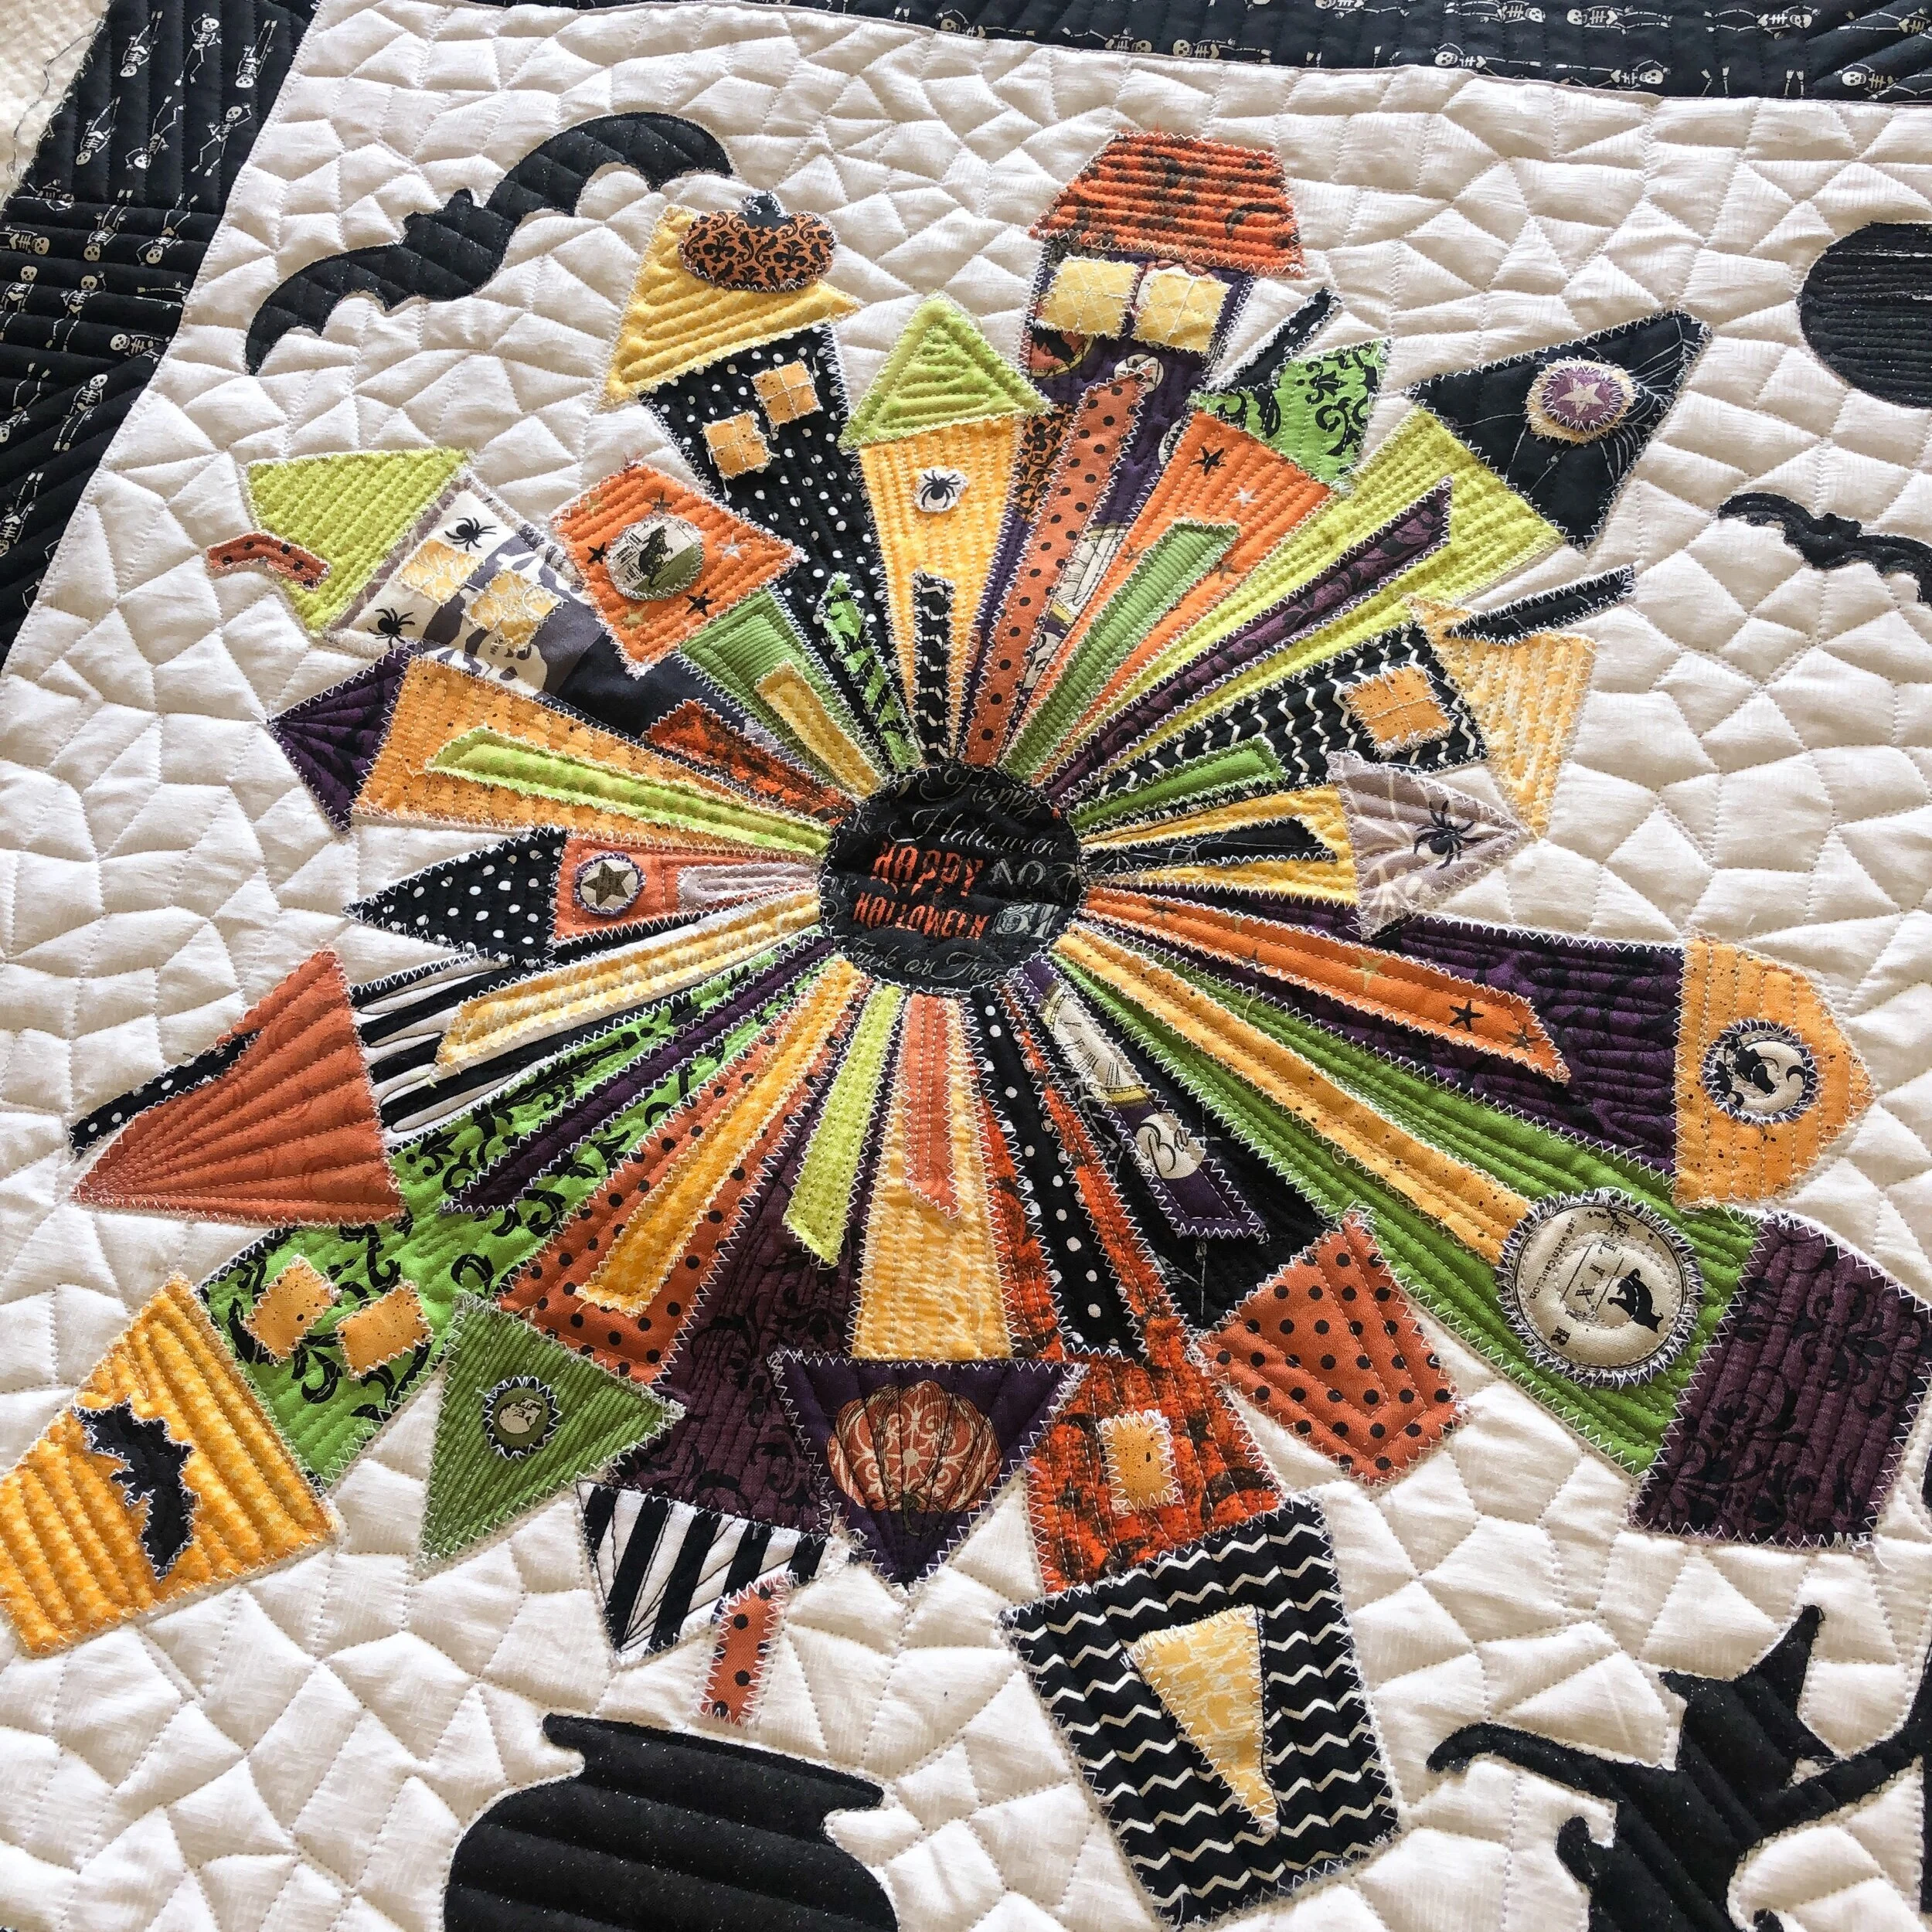
You can see the cauldron has a 1/2” horizontal line? And the witches are quilted with a pinstripe. It works great to have a variety of different lines, because the scales are all a little different.
Now…for my favorite!!! The borders…they are seriously so so good! My favorite part of quilting on this quilt. This overlapping line design is one I came up with back in February 2019, inspired by a quilt pattern. It’s been such a fun design to quilt in borders. I have a fun addition to my shop coming soon…if you’re a longarm quilter, you’ll want to stay tuned!!
I used an Edge ruler, linked above, to quilt the lines 1/2” apart. Love it so much!!!
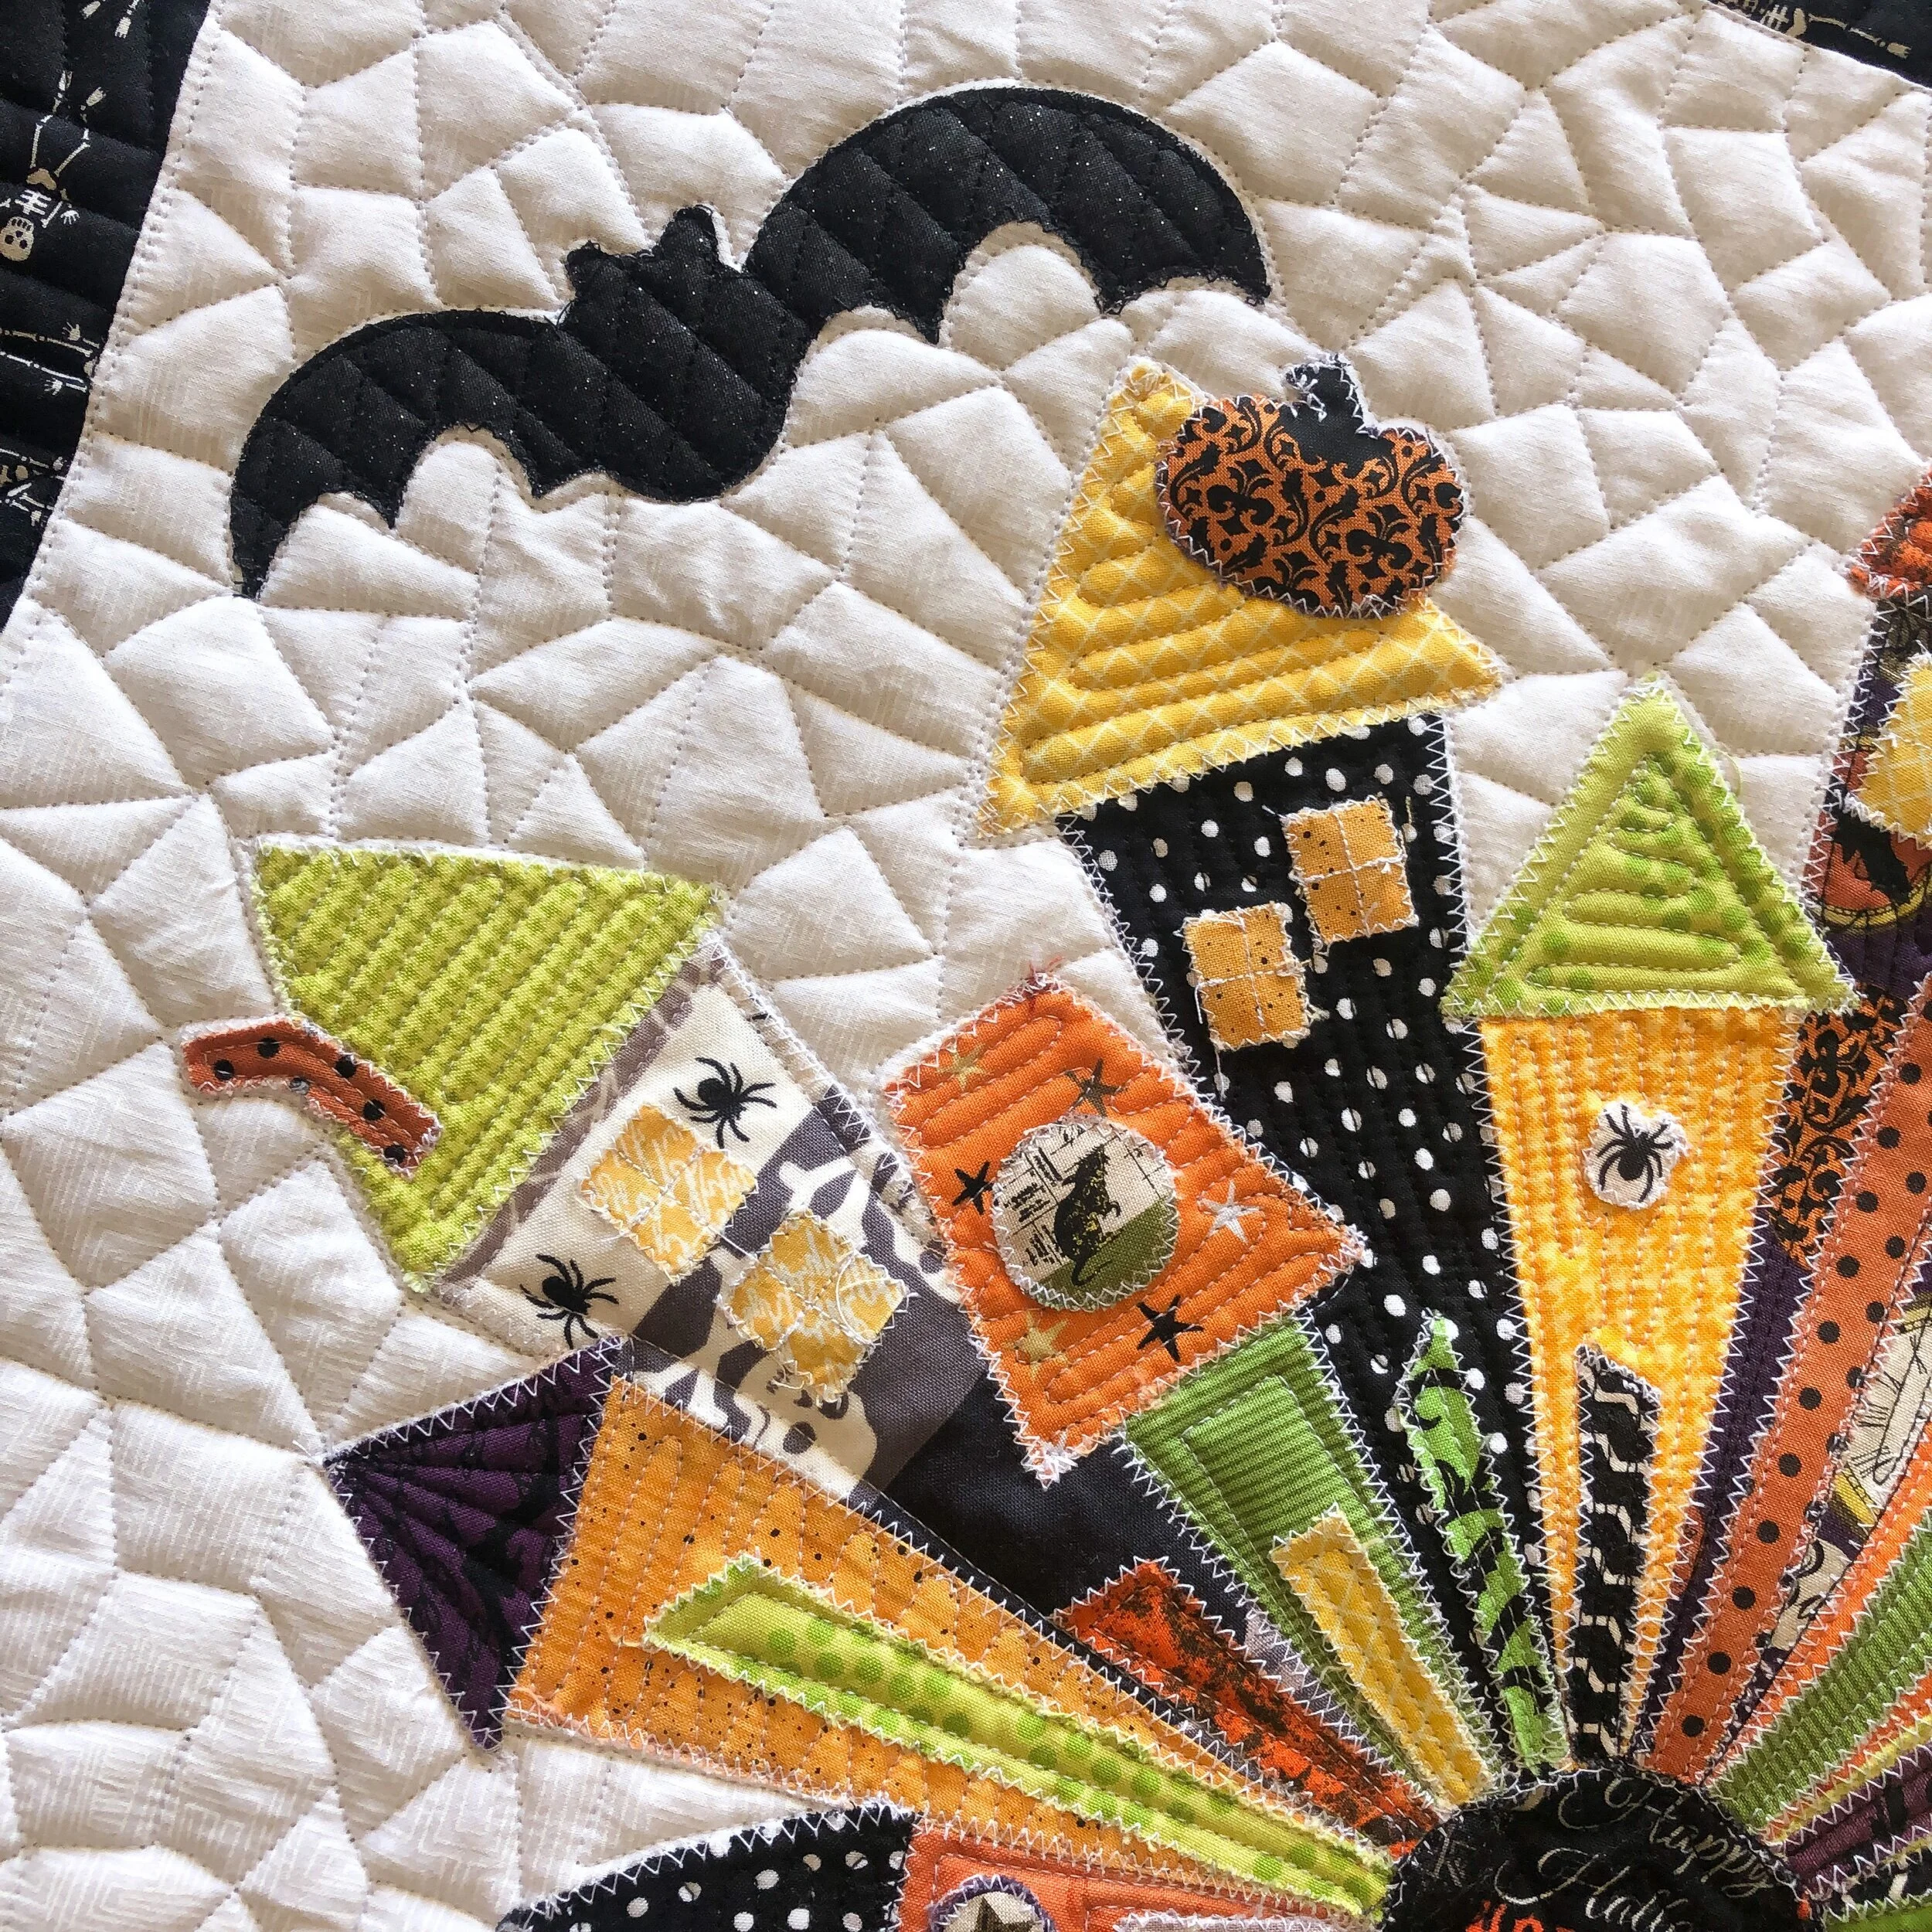
Here is a close up on the houses, and rooftops. I do want to point out, quilting this crackle design is great as a background for areas that are tight to quilt a design in between…like all the spaces next to the rooftops.
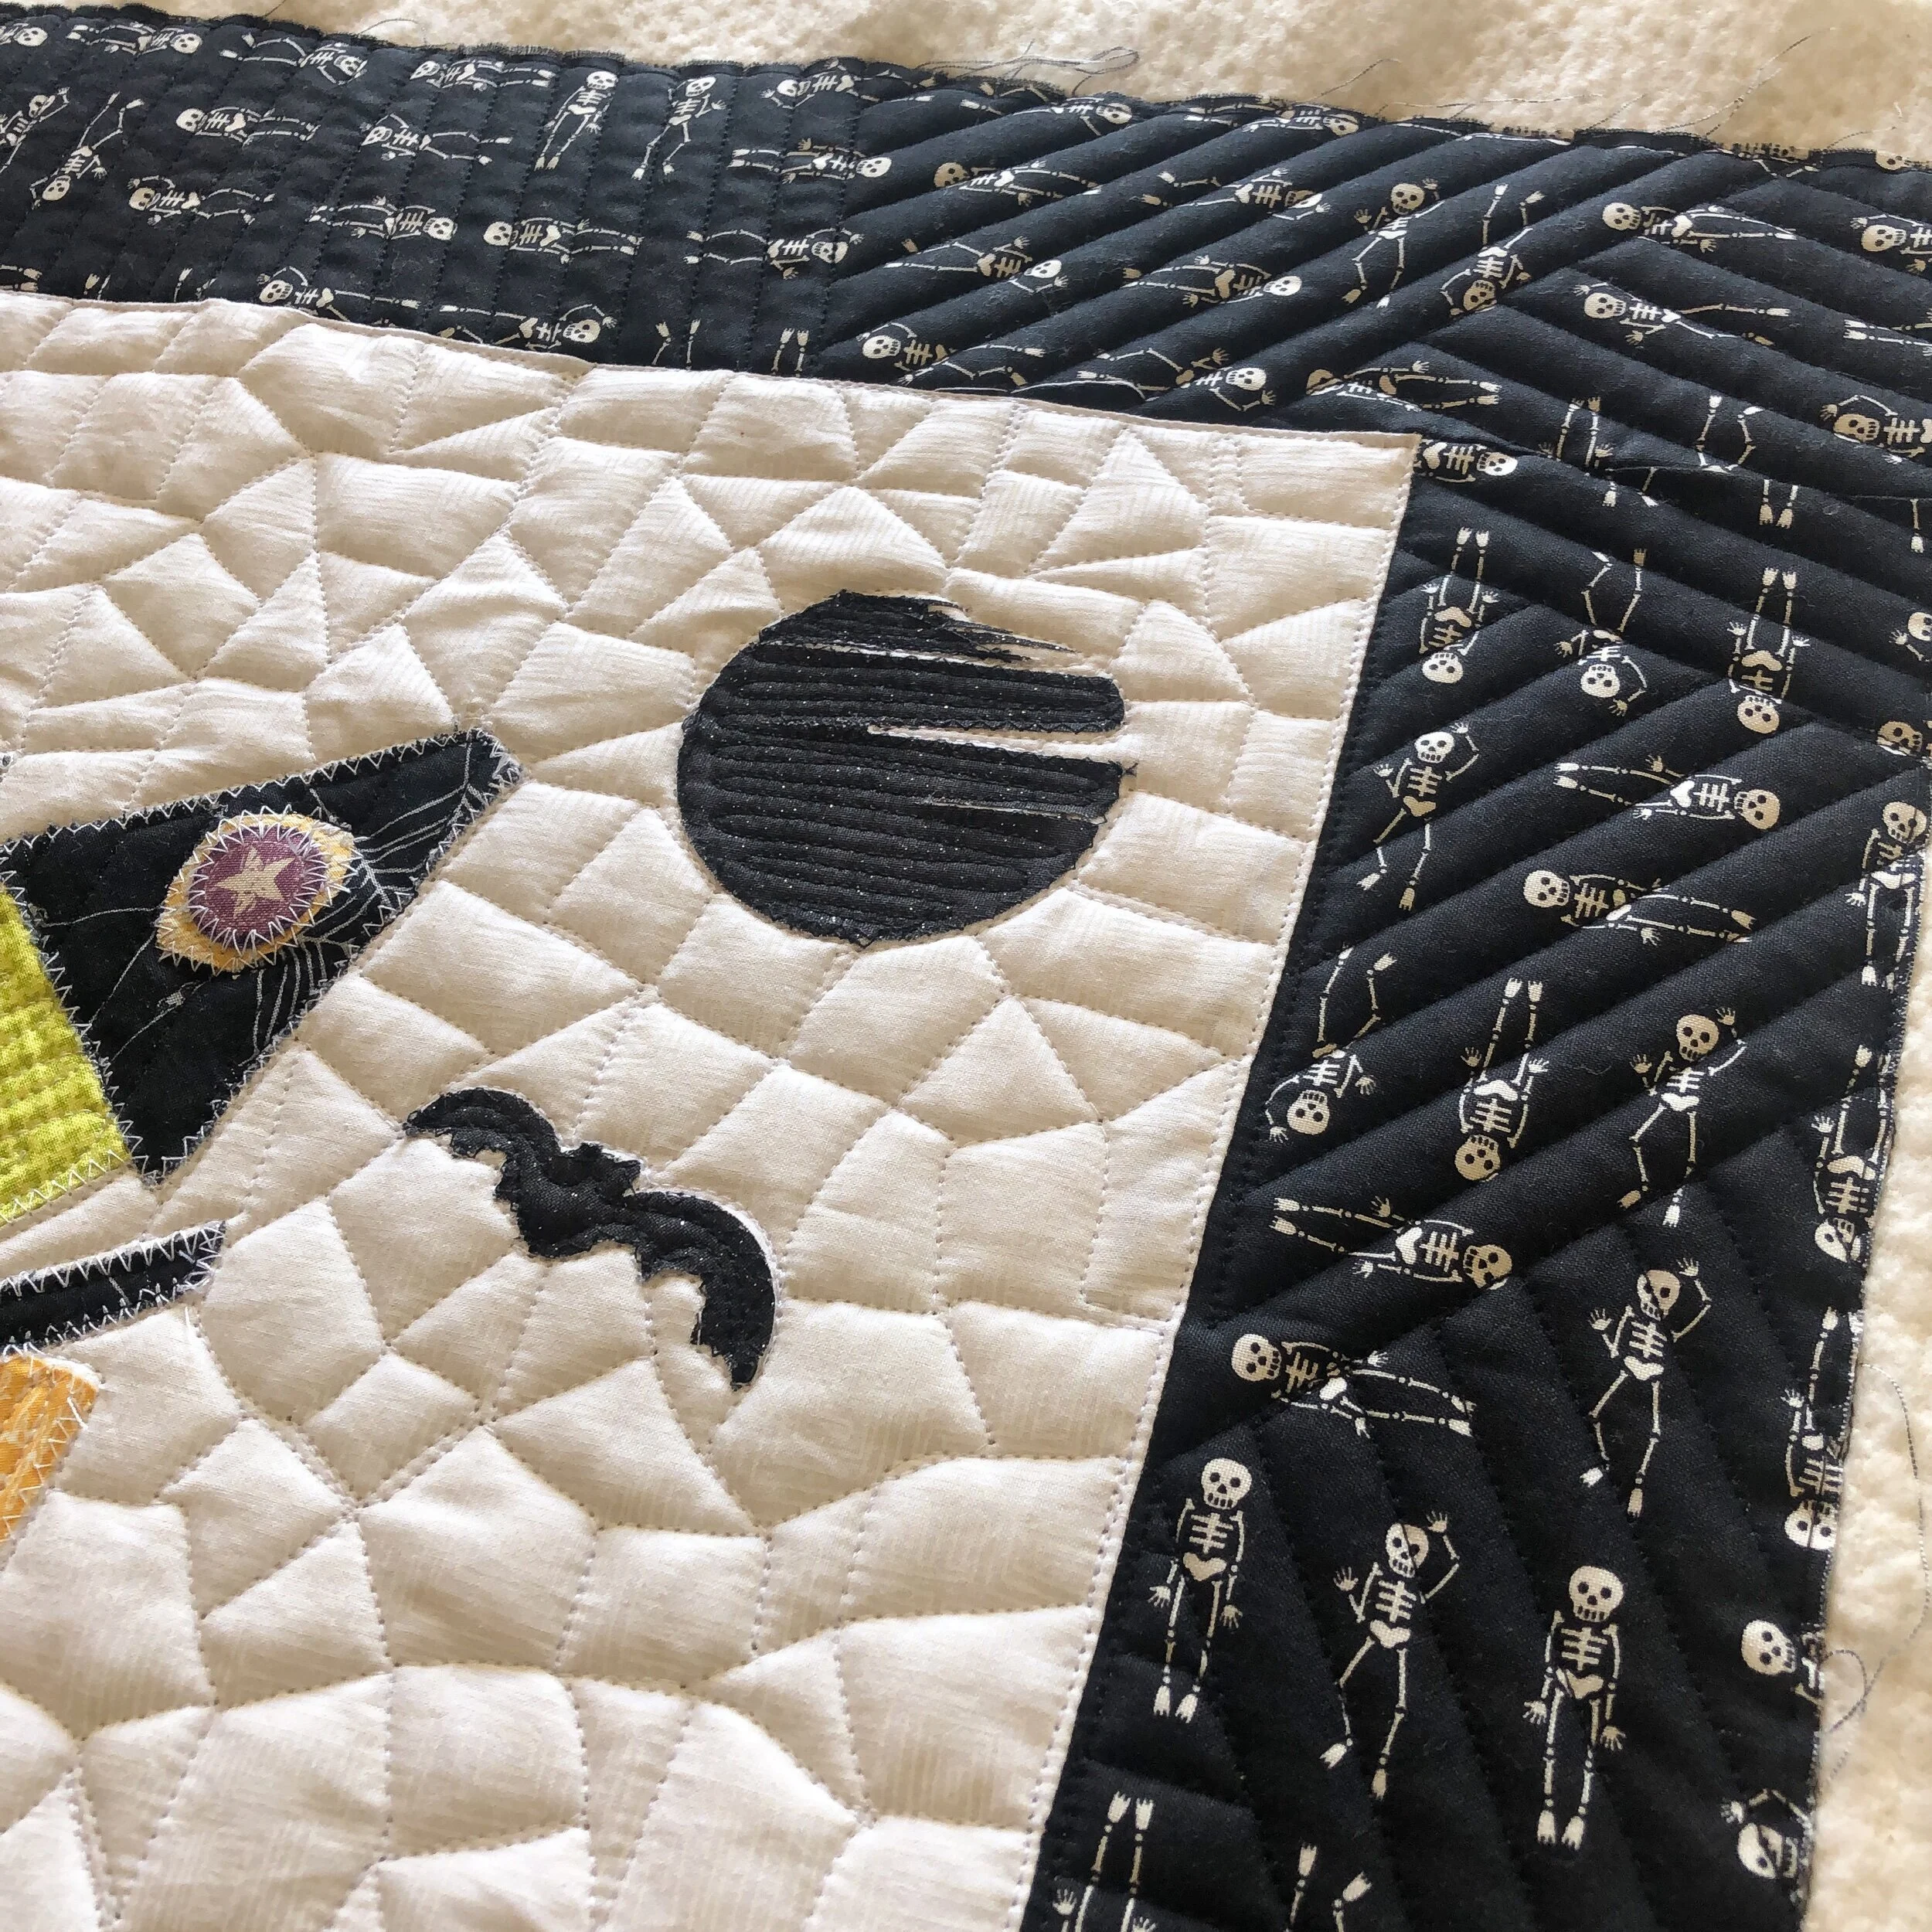
Okay…another favorite…that MOON! Seriously, love it. I tried to keep the quilting inside the moon simple, yet reflect the fun design of the moon itself.
I’m excited to keep sharing quilts with you!! But first…
Today’s design is Grove, and it is also 20% off, like the others have been. Follow the link or go to: https://www.quiltingit.com/shop/grove
Thanks for all your kindness and support over the years!! Happy Quilting! - Leisha
Barbara’s Country Haven Quilt + Beaded Orange Peel
Hello,
I’m on a roll!!! Being accountable is going to help me get caught up. It’s going to feel so good, too.
Remember to scroll to the bottom to see the design of the day…which is 20% off!! No code necessary.
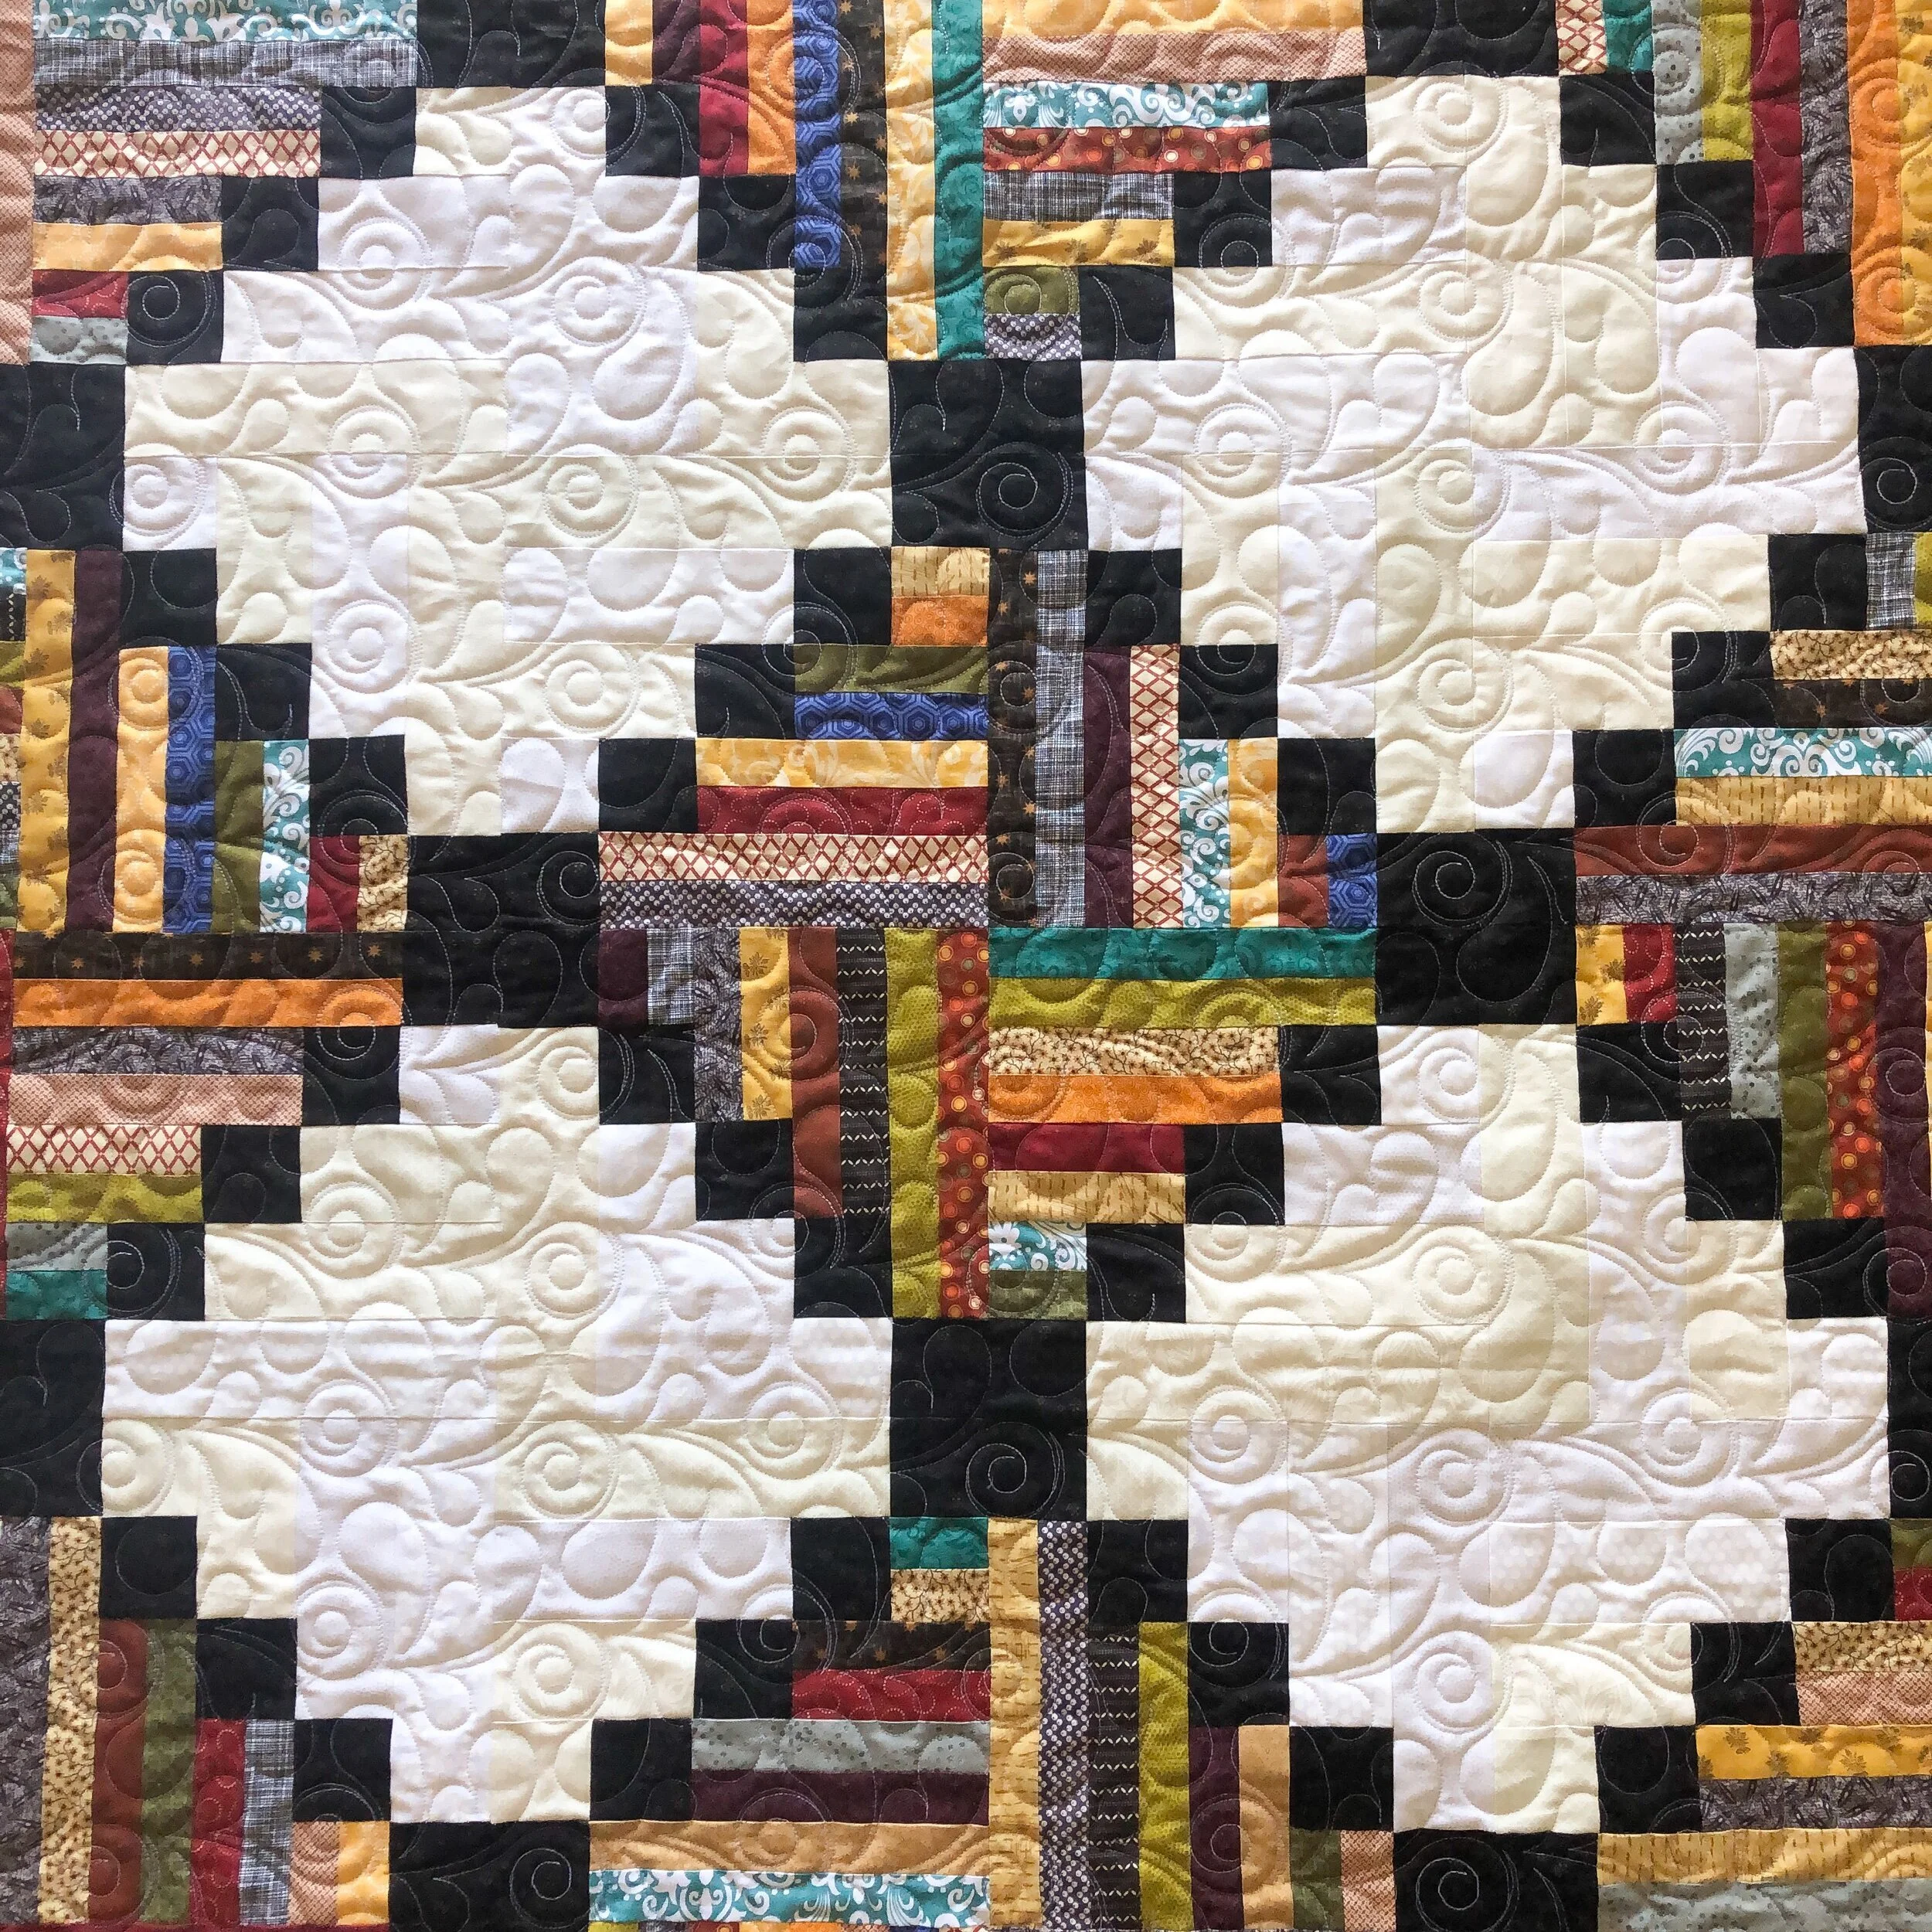
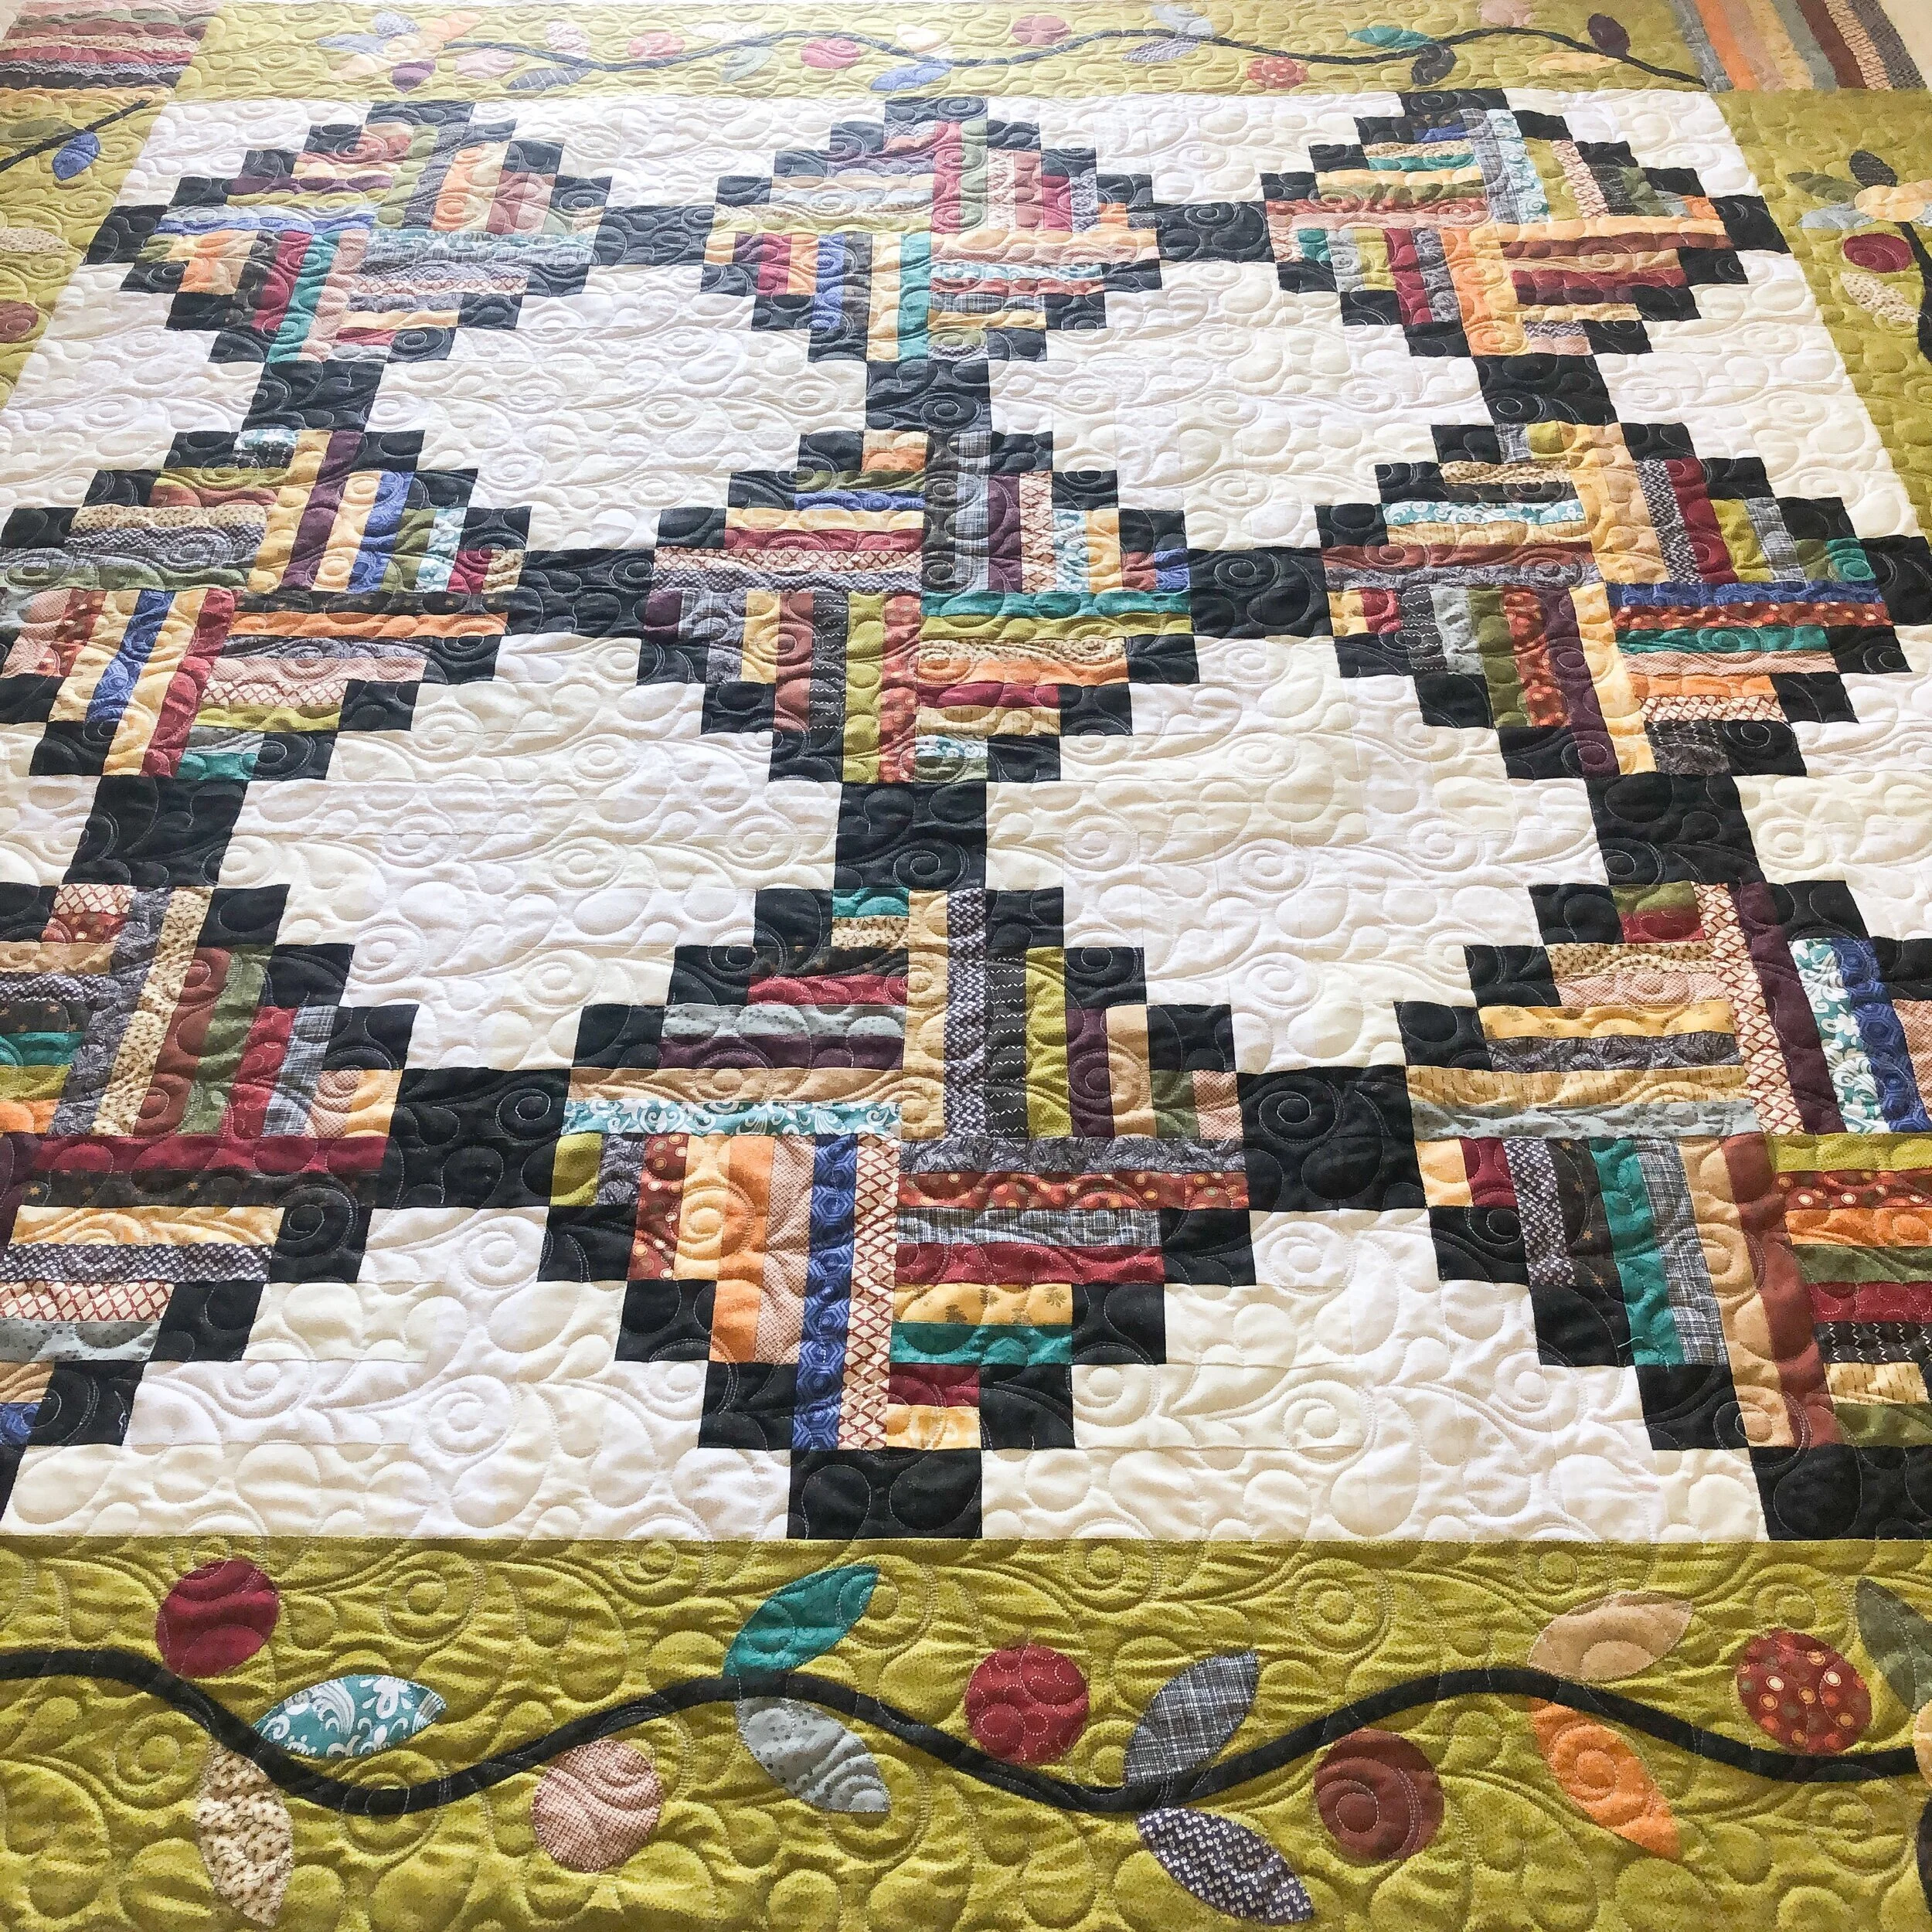
This incredible quilt was made by Barbara!! She makes such beautiful quilts. The pattern is by Kim Diehl and is called Country Haven. She said it was in a magazine, but I’m not sure which one. Barbara did a beautiful job with all the appliqué, which if I remember right, is needle turned.
*if anyone knows which magazine the pattern is in, please comment below, and I’ll edit the post. Thank you!!

I used 8020 cotton poly blend batting from Winline and a cream Omni thread from Superior Threads. Such great companies to work with!
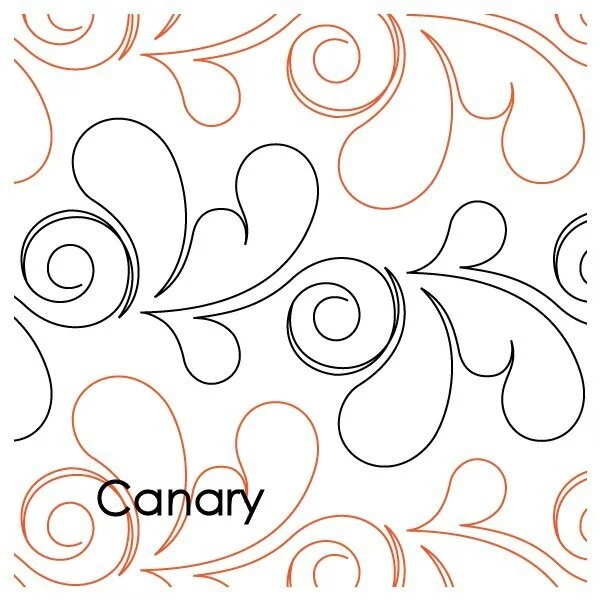
I suggested a handful of designs to Barbara, and I was excited when she chose Patricia Ritter and my Canary quilting design. The swirls add some fun interest to the feathery design. Canary is available at Urban Elementz.
This looks like the perfect quilt to use your stash and make it scrappy.
Below is a closer look at some of the appliqué in the borders. So pretty!!

I think that the quilt design pairs so well with Canary. So classy and beautiful.
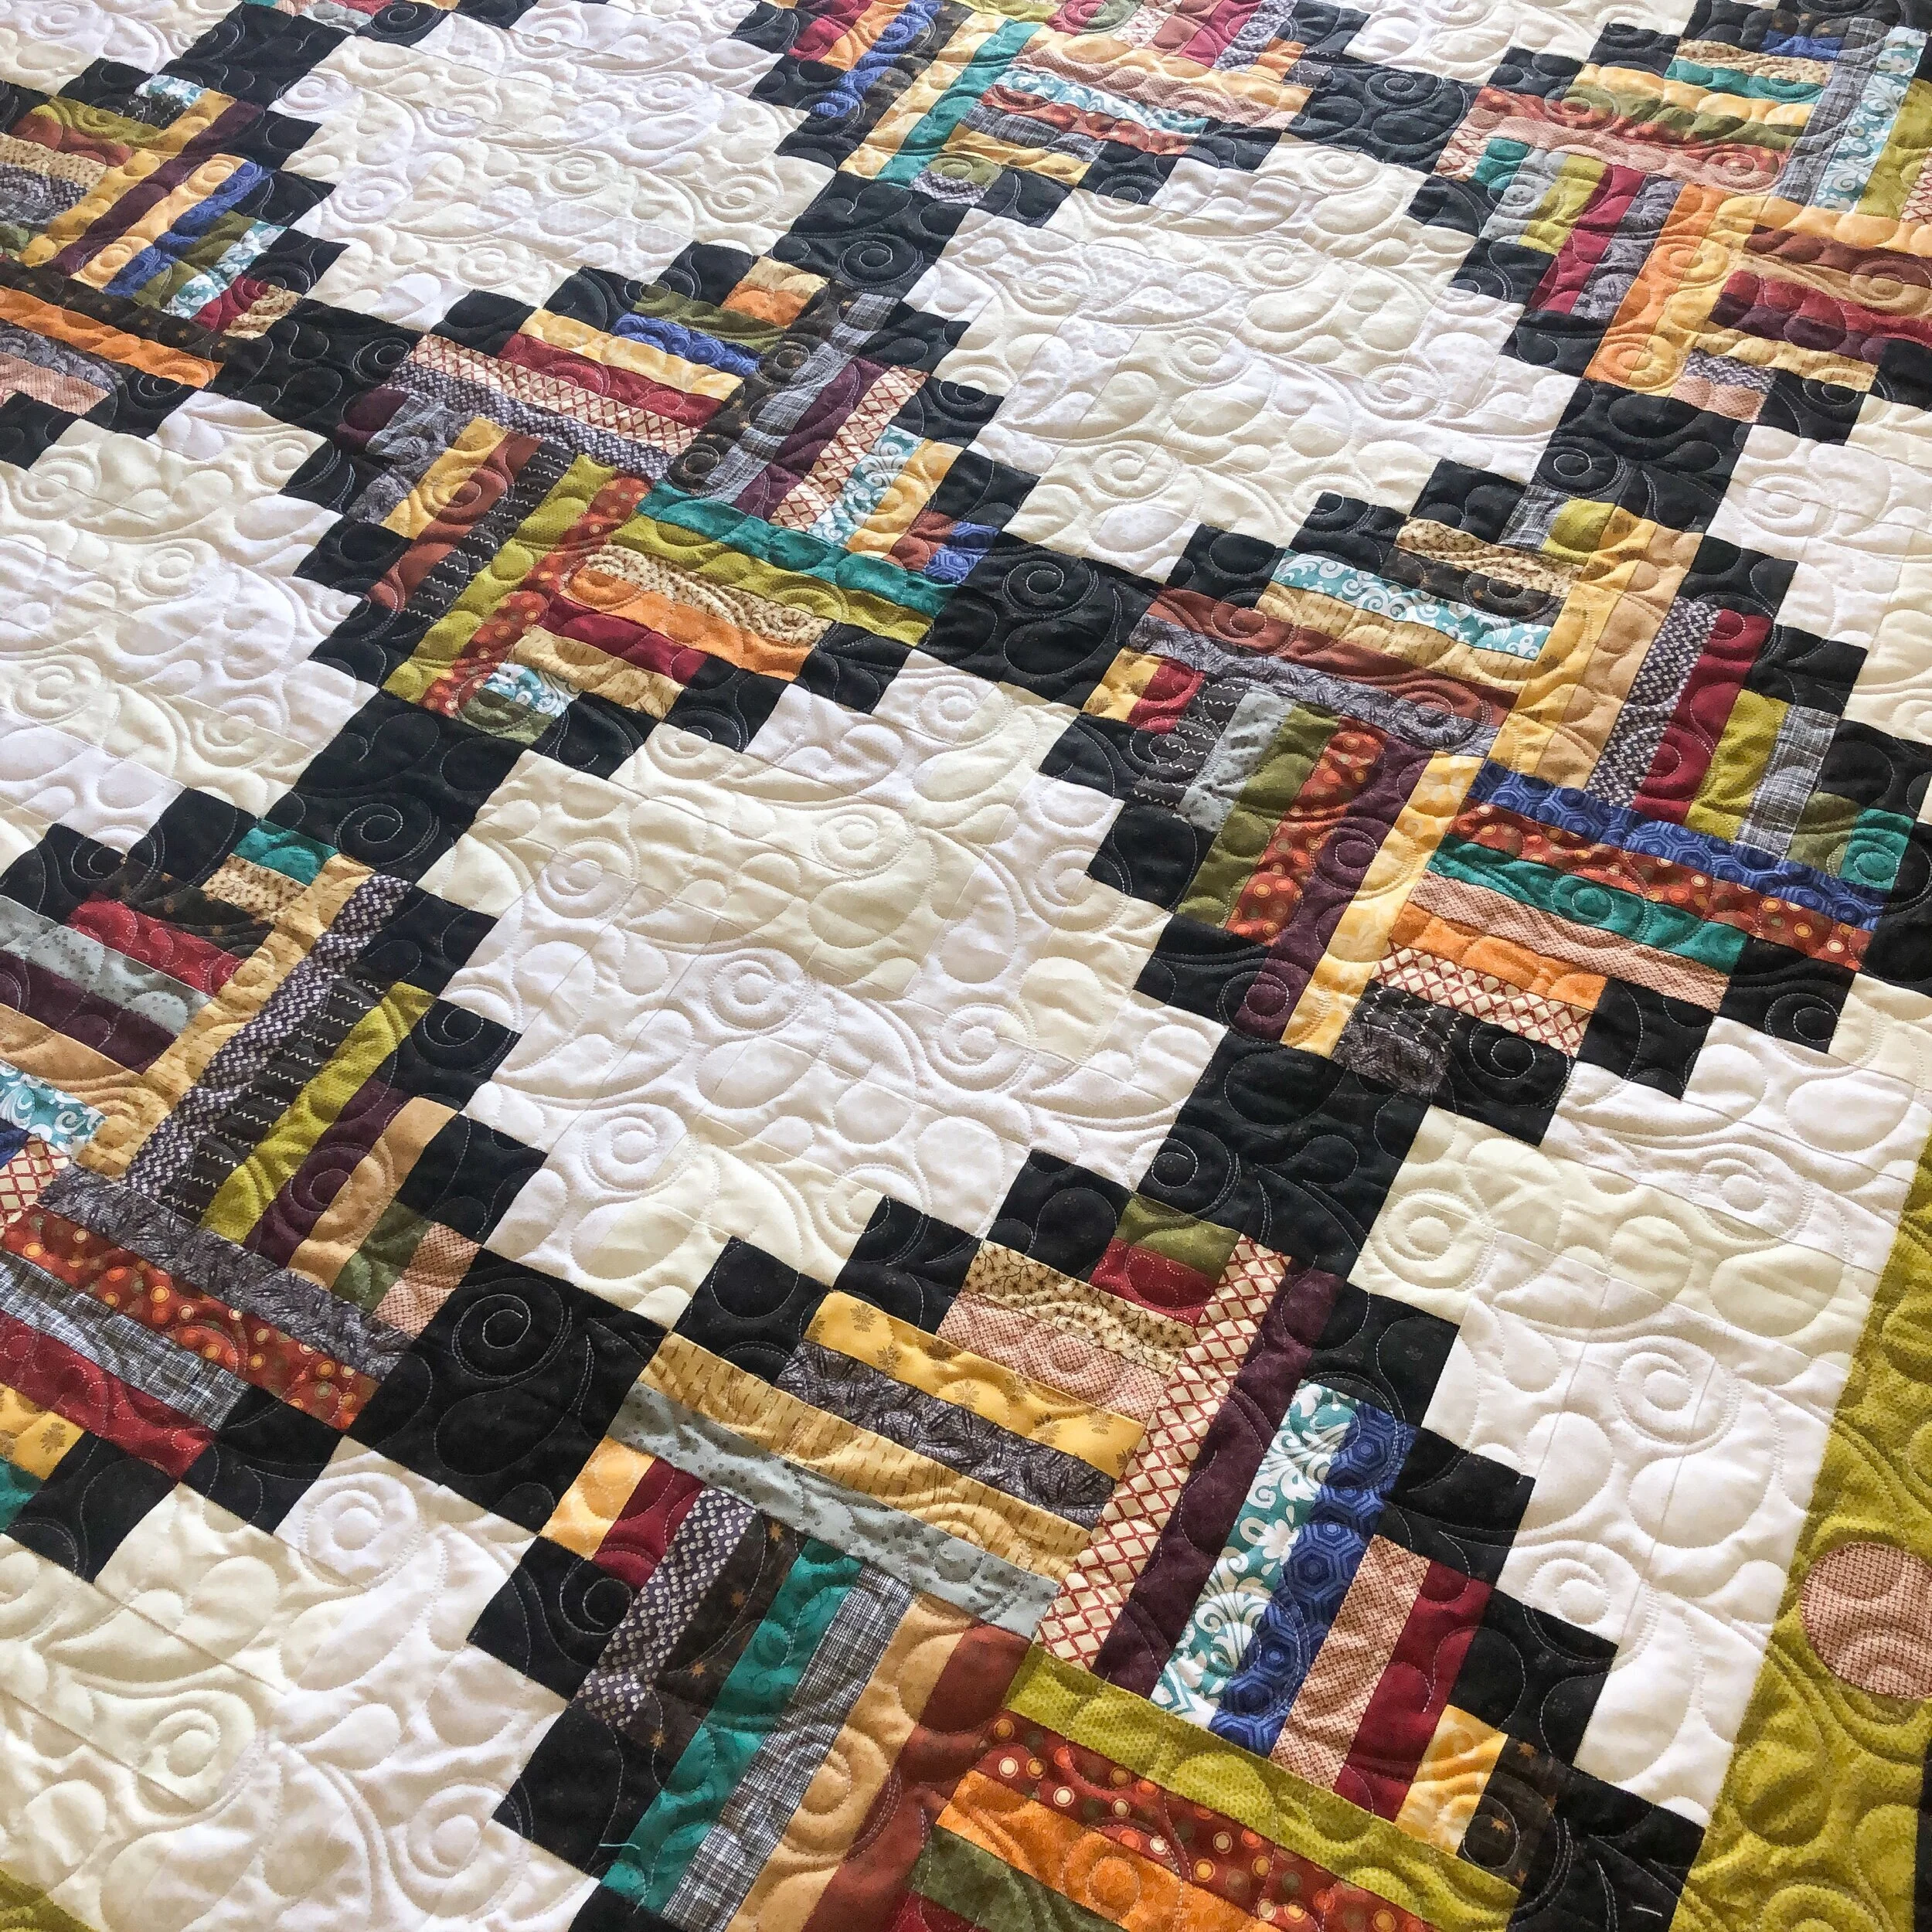
I’m loving the black and white contrast, it’s so striking.
I’m so blessed to get to quilt such beautiful quilts!! Thank you, Barbara!
Beaded Orange Peel is the design of the day!! It’s already marked down 20%. It’s such a fun versatile design, too. There are so many fun quilting designs in my shop. You can head over to Instagram and see the pillow that The Felted Pear made, which has Beaded Orange Peel quilted on it!!
Thanks for coming by!! • Leisha
I ♡︎ America Pillow + Fort Design
Hello,
I hope your day is going well!!
Just a quick reminder, there will be one quilting design each day, discounted 20%. Scroll to the bottom to see today’s design.
I love it when my clients make multiple of the same thing, and it’s small enough to quilt them all on the same backing. And, yes…you can see I just quilted continuously between the pillows as well. It was just faster.
These super cute “I Heart America” pillows were made by Barbara. The pattern is free and available on Pretty Little Quilts blog from back in 2016.
I gave Barbara a few quilting options, and she chose Rock 'n Roll Starz - Petite, by Patricia Ritter at Urban Elementz. I think they turned out super cute!!

I used a natural white Omni thread from Superior Threads, and 8020 cotton poly blend batting from Winline.
This would be an excellent gift, plus you could use some fabrics from your stash.
These colors and patterns like this, just feel like summer to me! I heart this pillow!
Today’s design…. Fort! It is 20% off until my next blog post. No code necessary, check it and my others designs out in my shop. Go to: https://www.quiltingit.com/shop/fort
Thanks for stopping by! Happy quilting. • Leisha

I Spy Quilt + Fun Surprise!
Hello there,
It has been too long!! Summer has been flying by, and I haven’t blogged a handful of quilts…sooo…I thought it would be fun to offer 20% off one design each day, until I catch up and blog the quilt I quilted a few days ago. Scroll to the bottom of each post to find out which design I chose. Sometimes emails don’t always send, like they should, so please check here each day. I figure this is a fun way to keep me accountable, and for you to get a design or two along the way at a great deal.
First up, Sydney’s fun I Spy quilt!! Simple, yet sooo much fun for her grandson. These are the quilts where fun and sometimes funky fabrics fit perfectly.
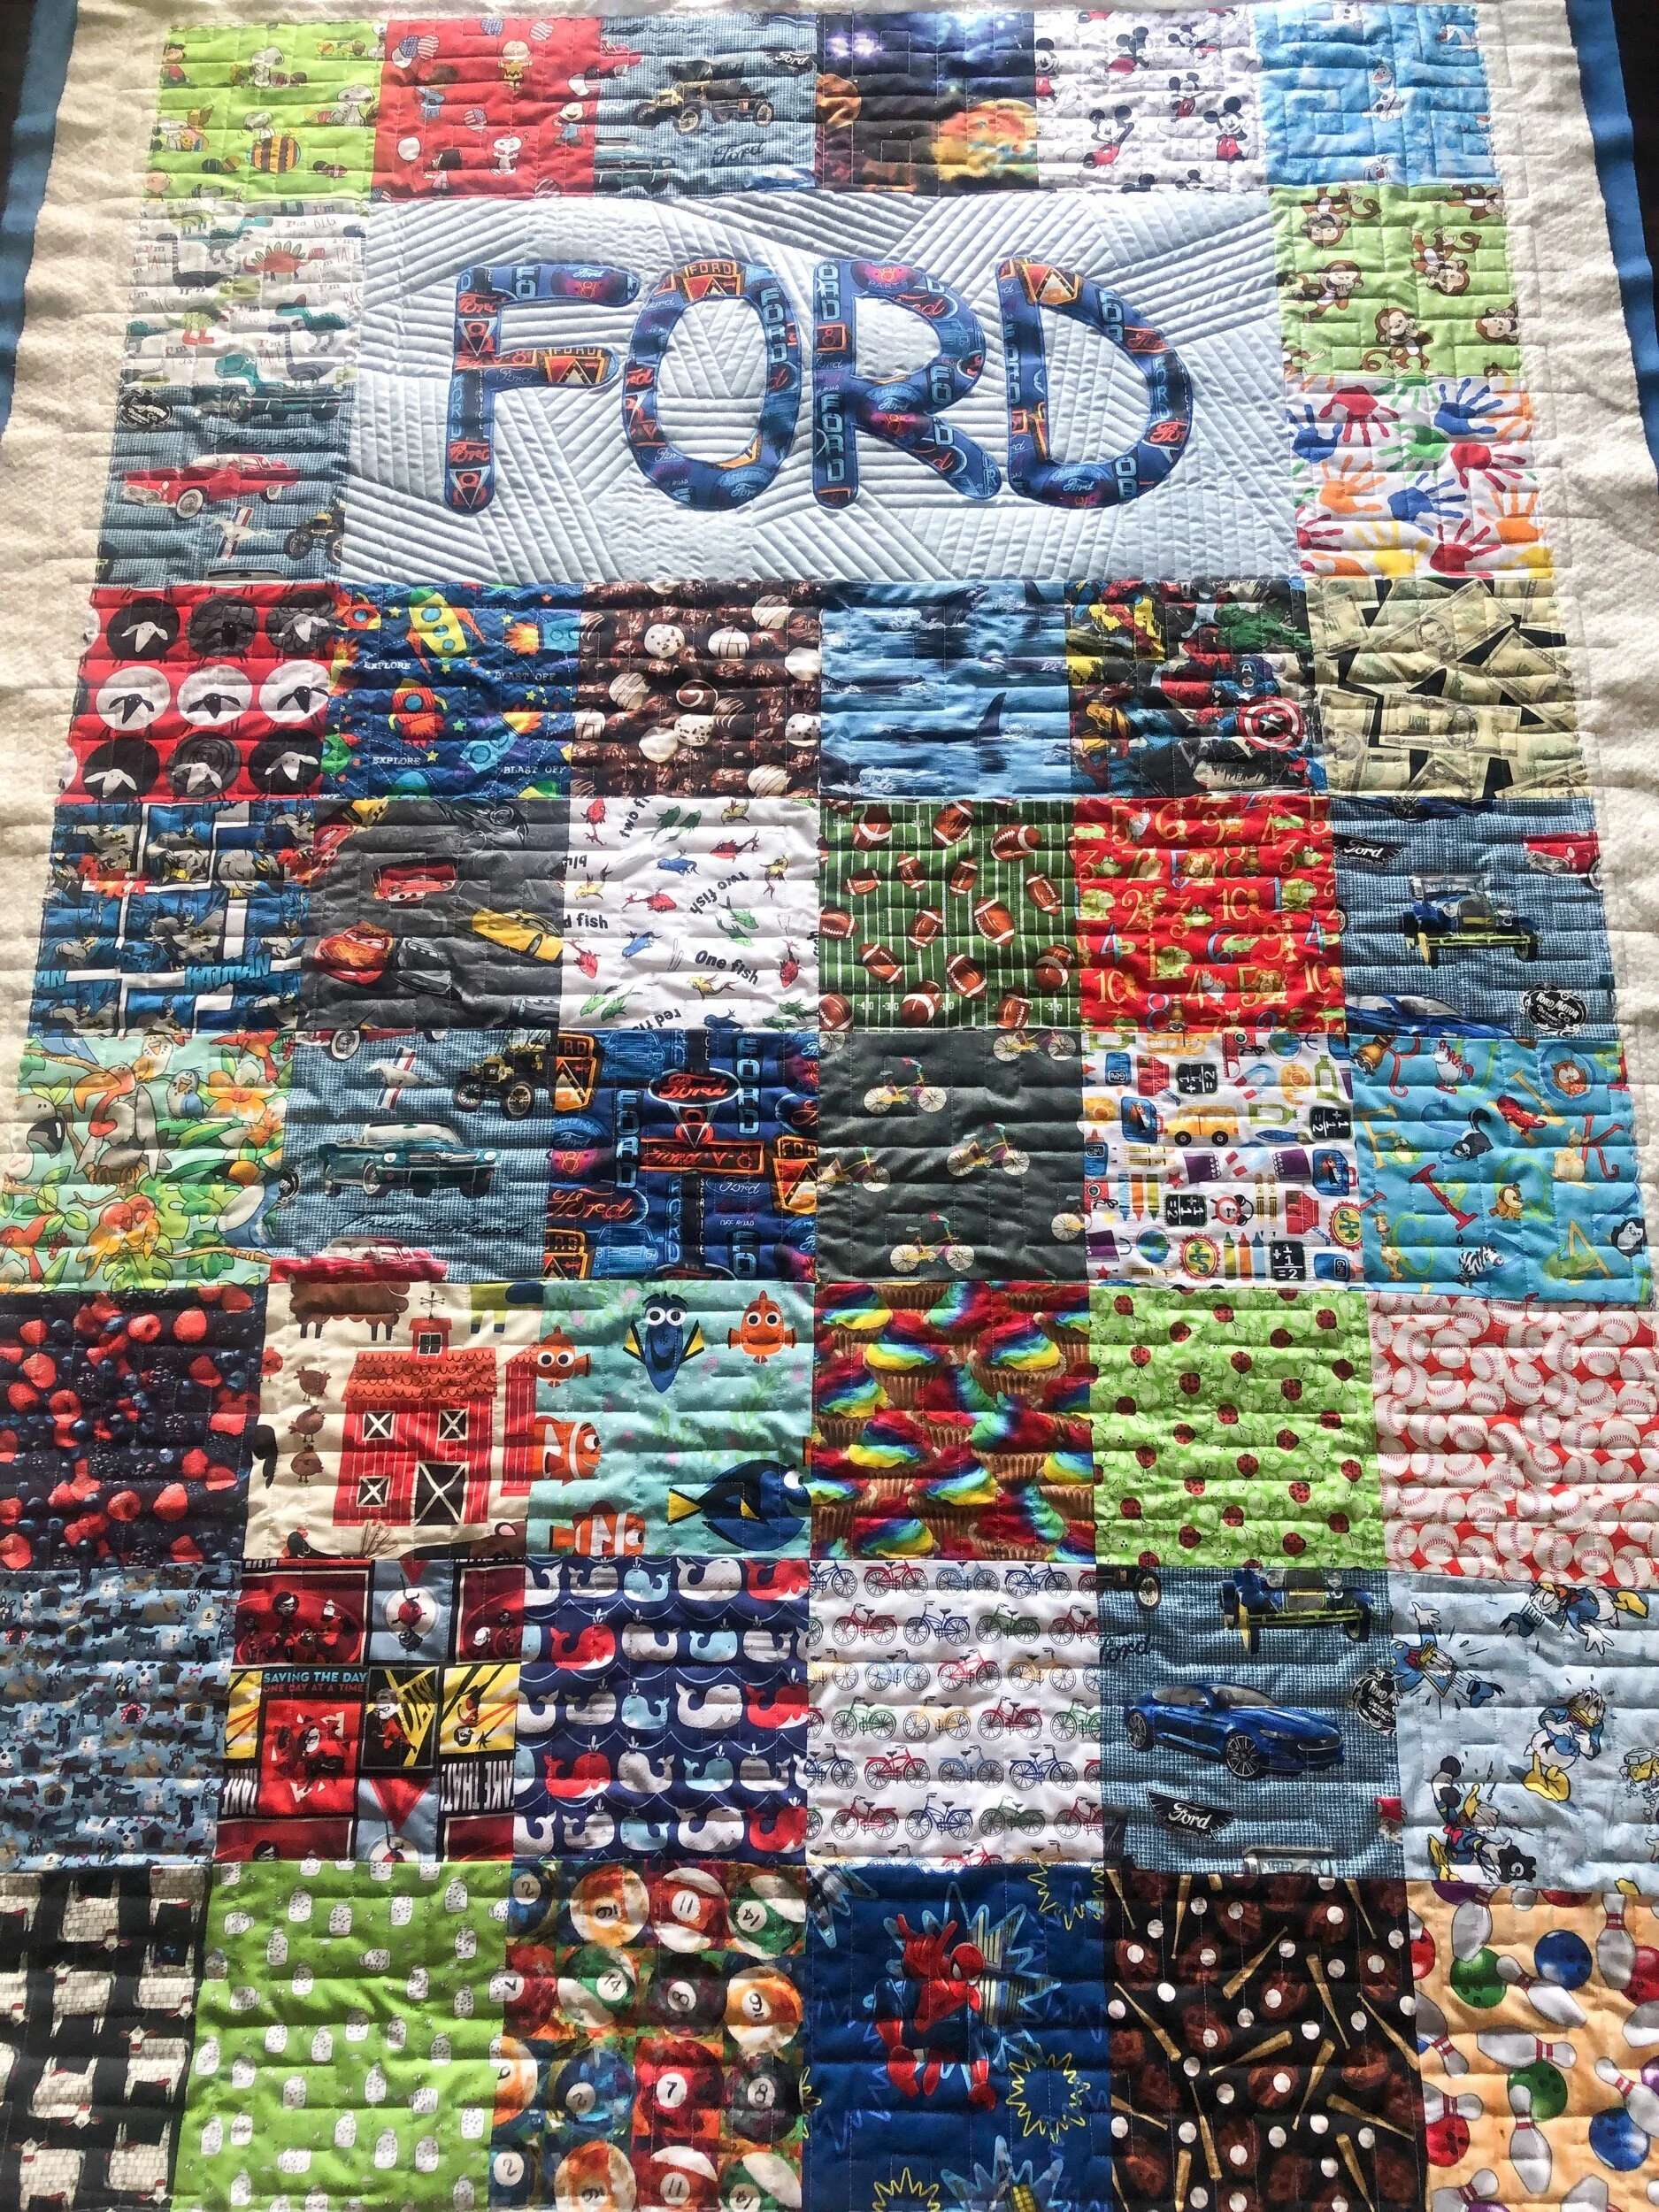
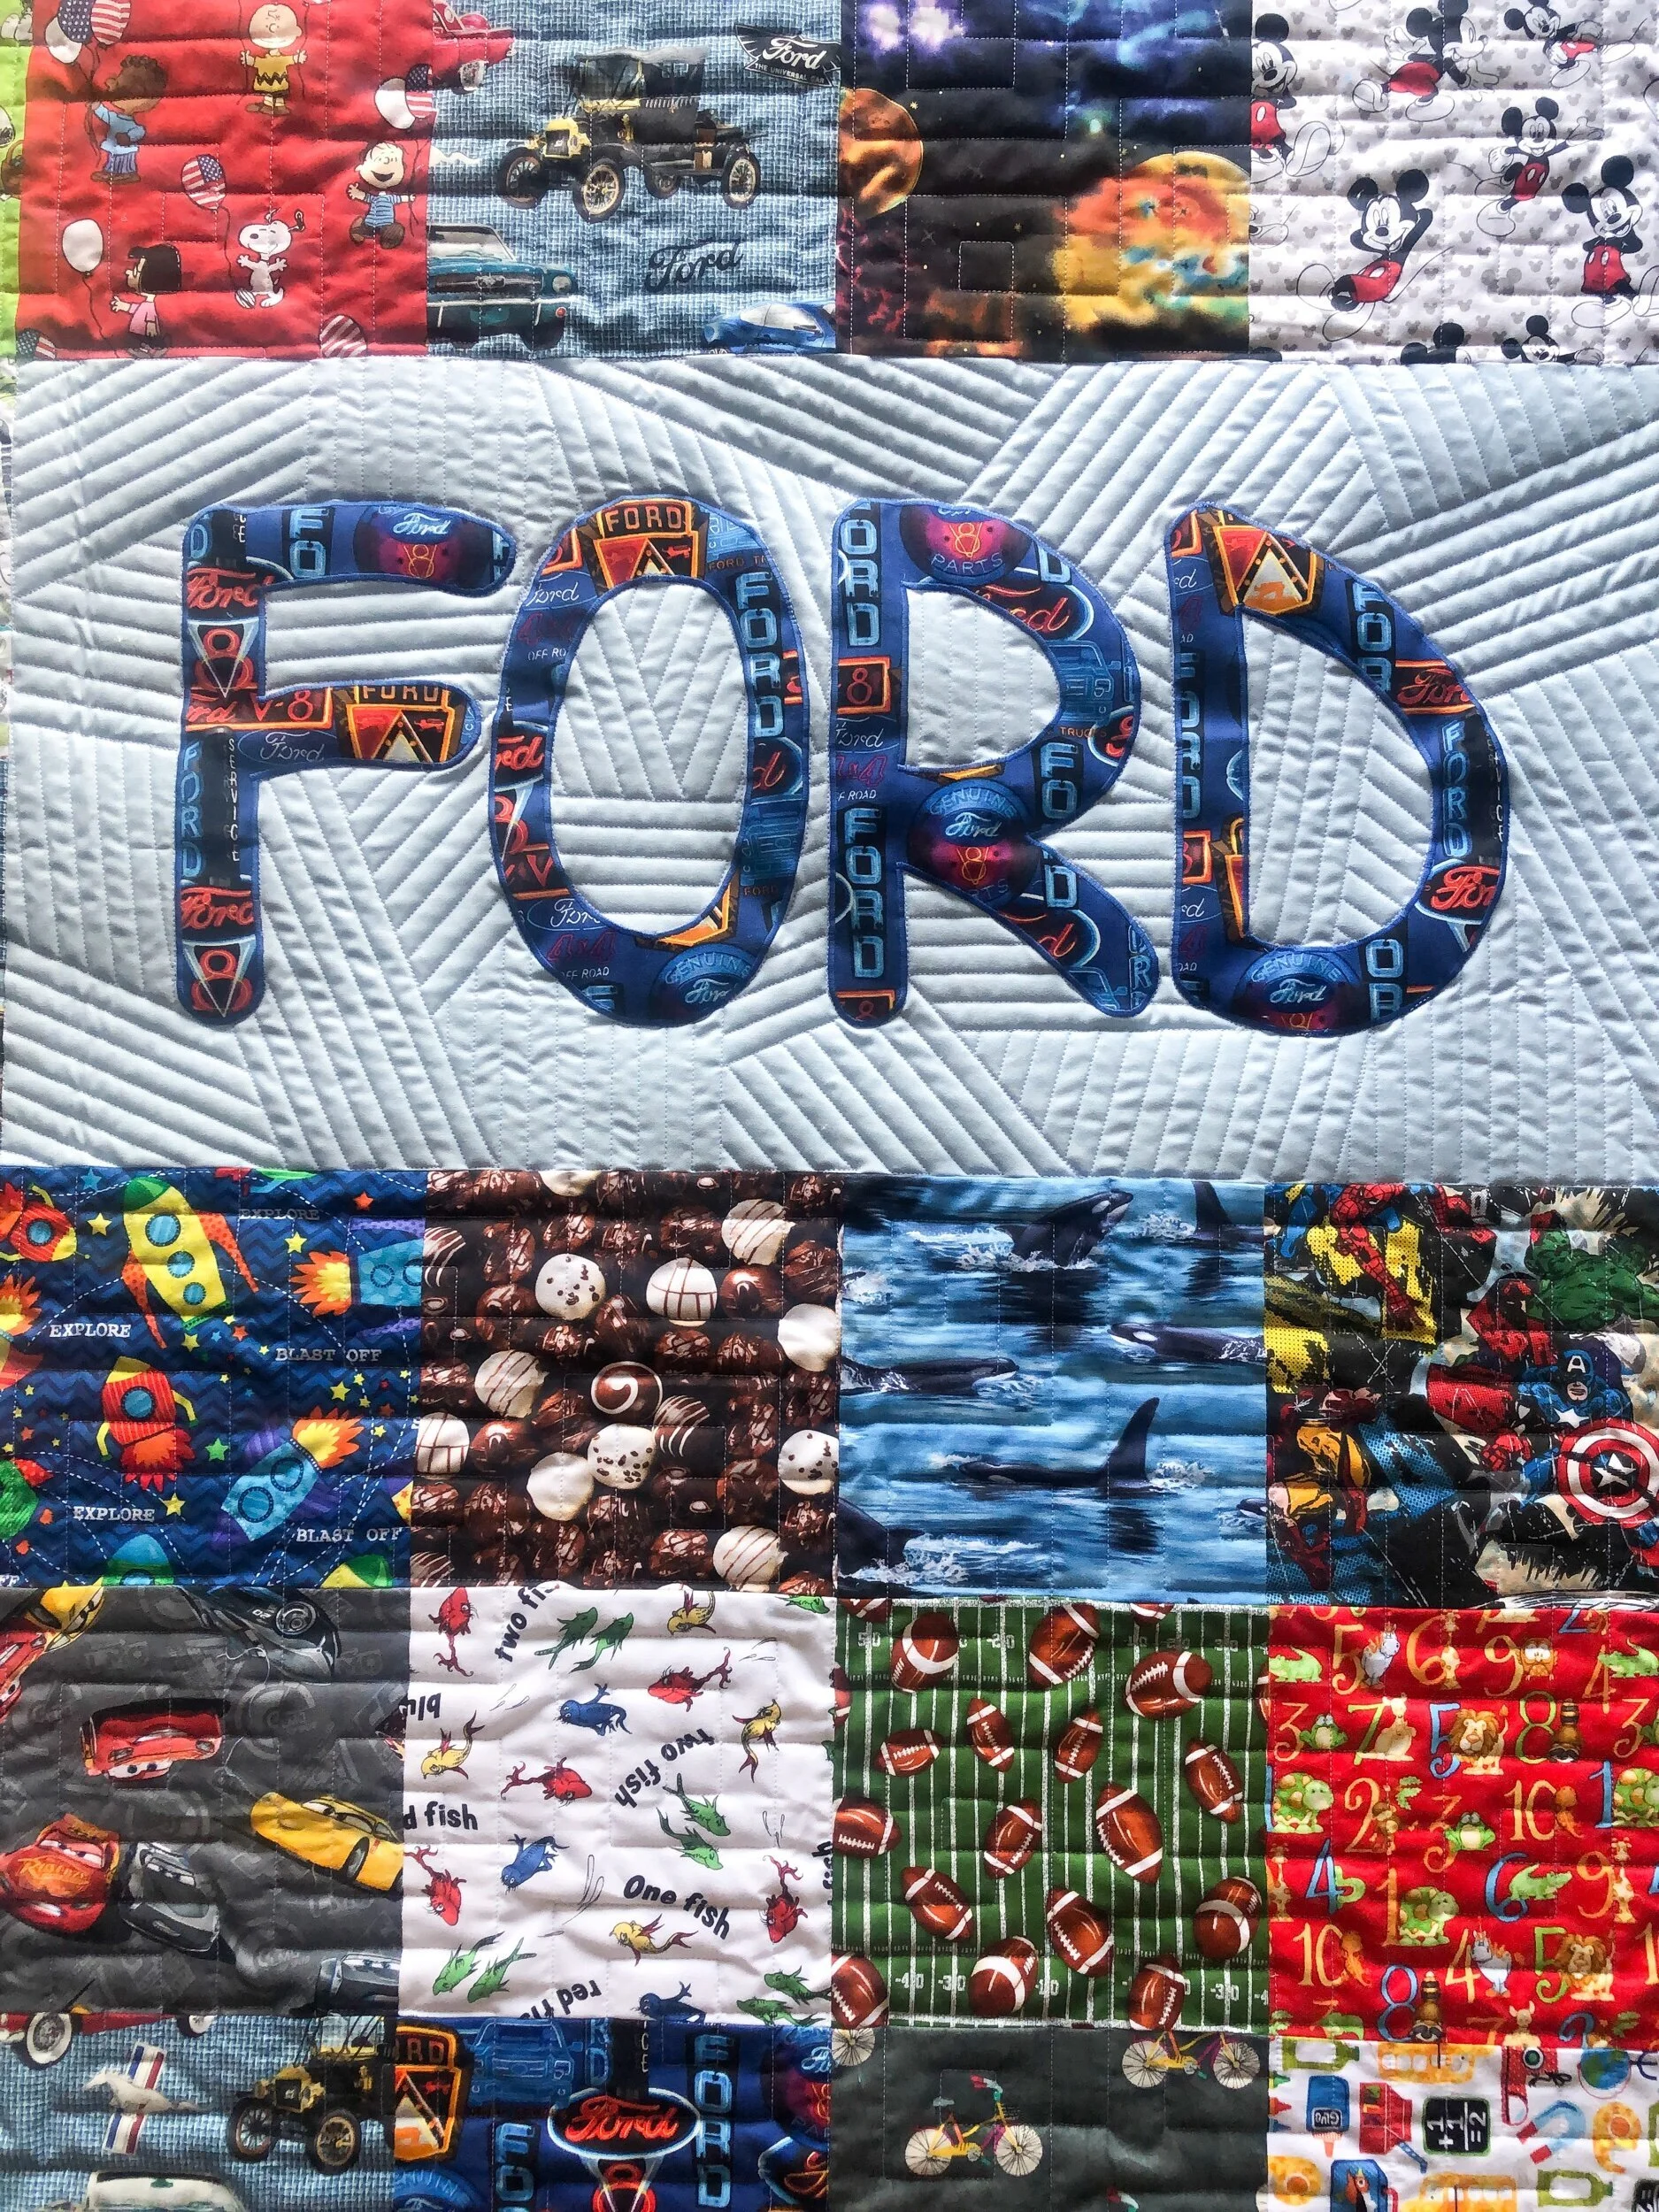
Sydney appliquéd Ford’s name, and then zig zagged along the edges, which helps the name pop a little more. The royal blue Minky backing adds a lot of puffiness to it as well.
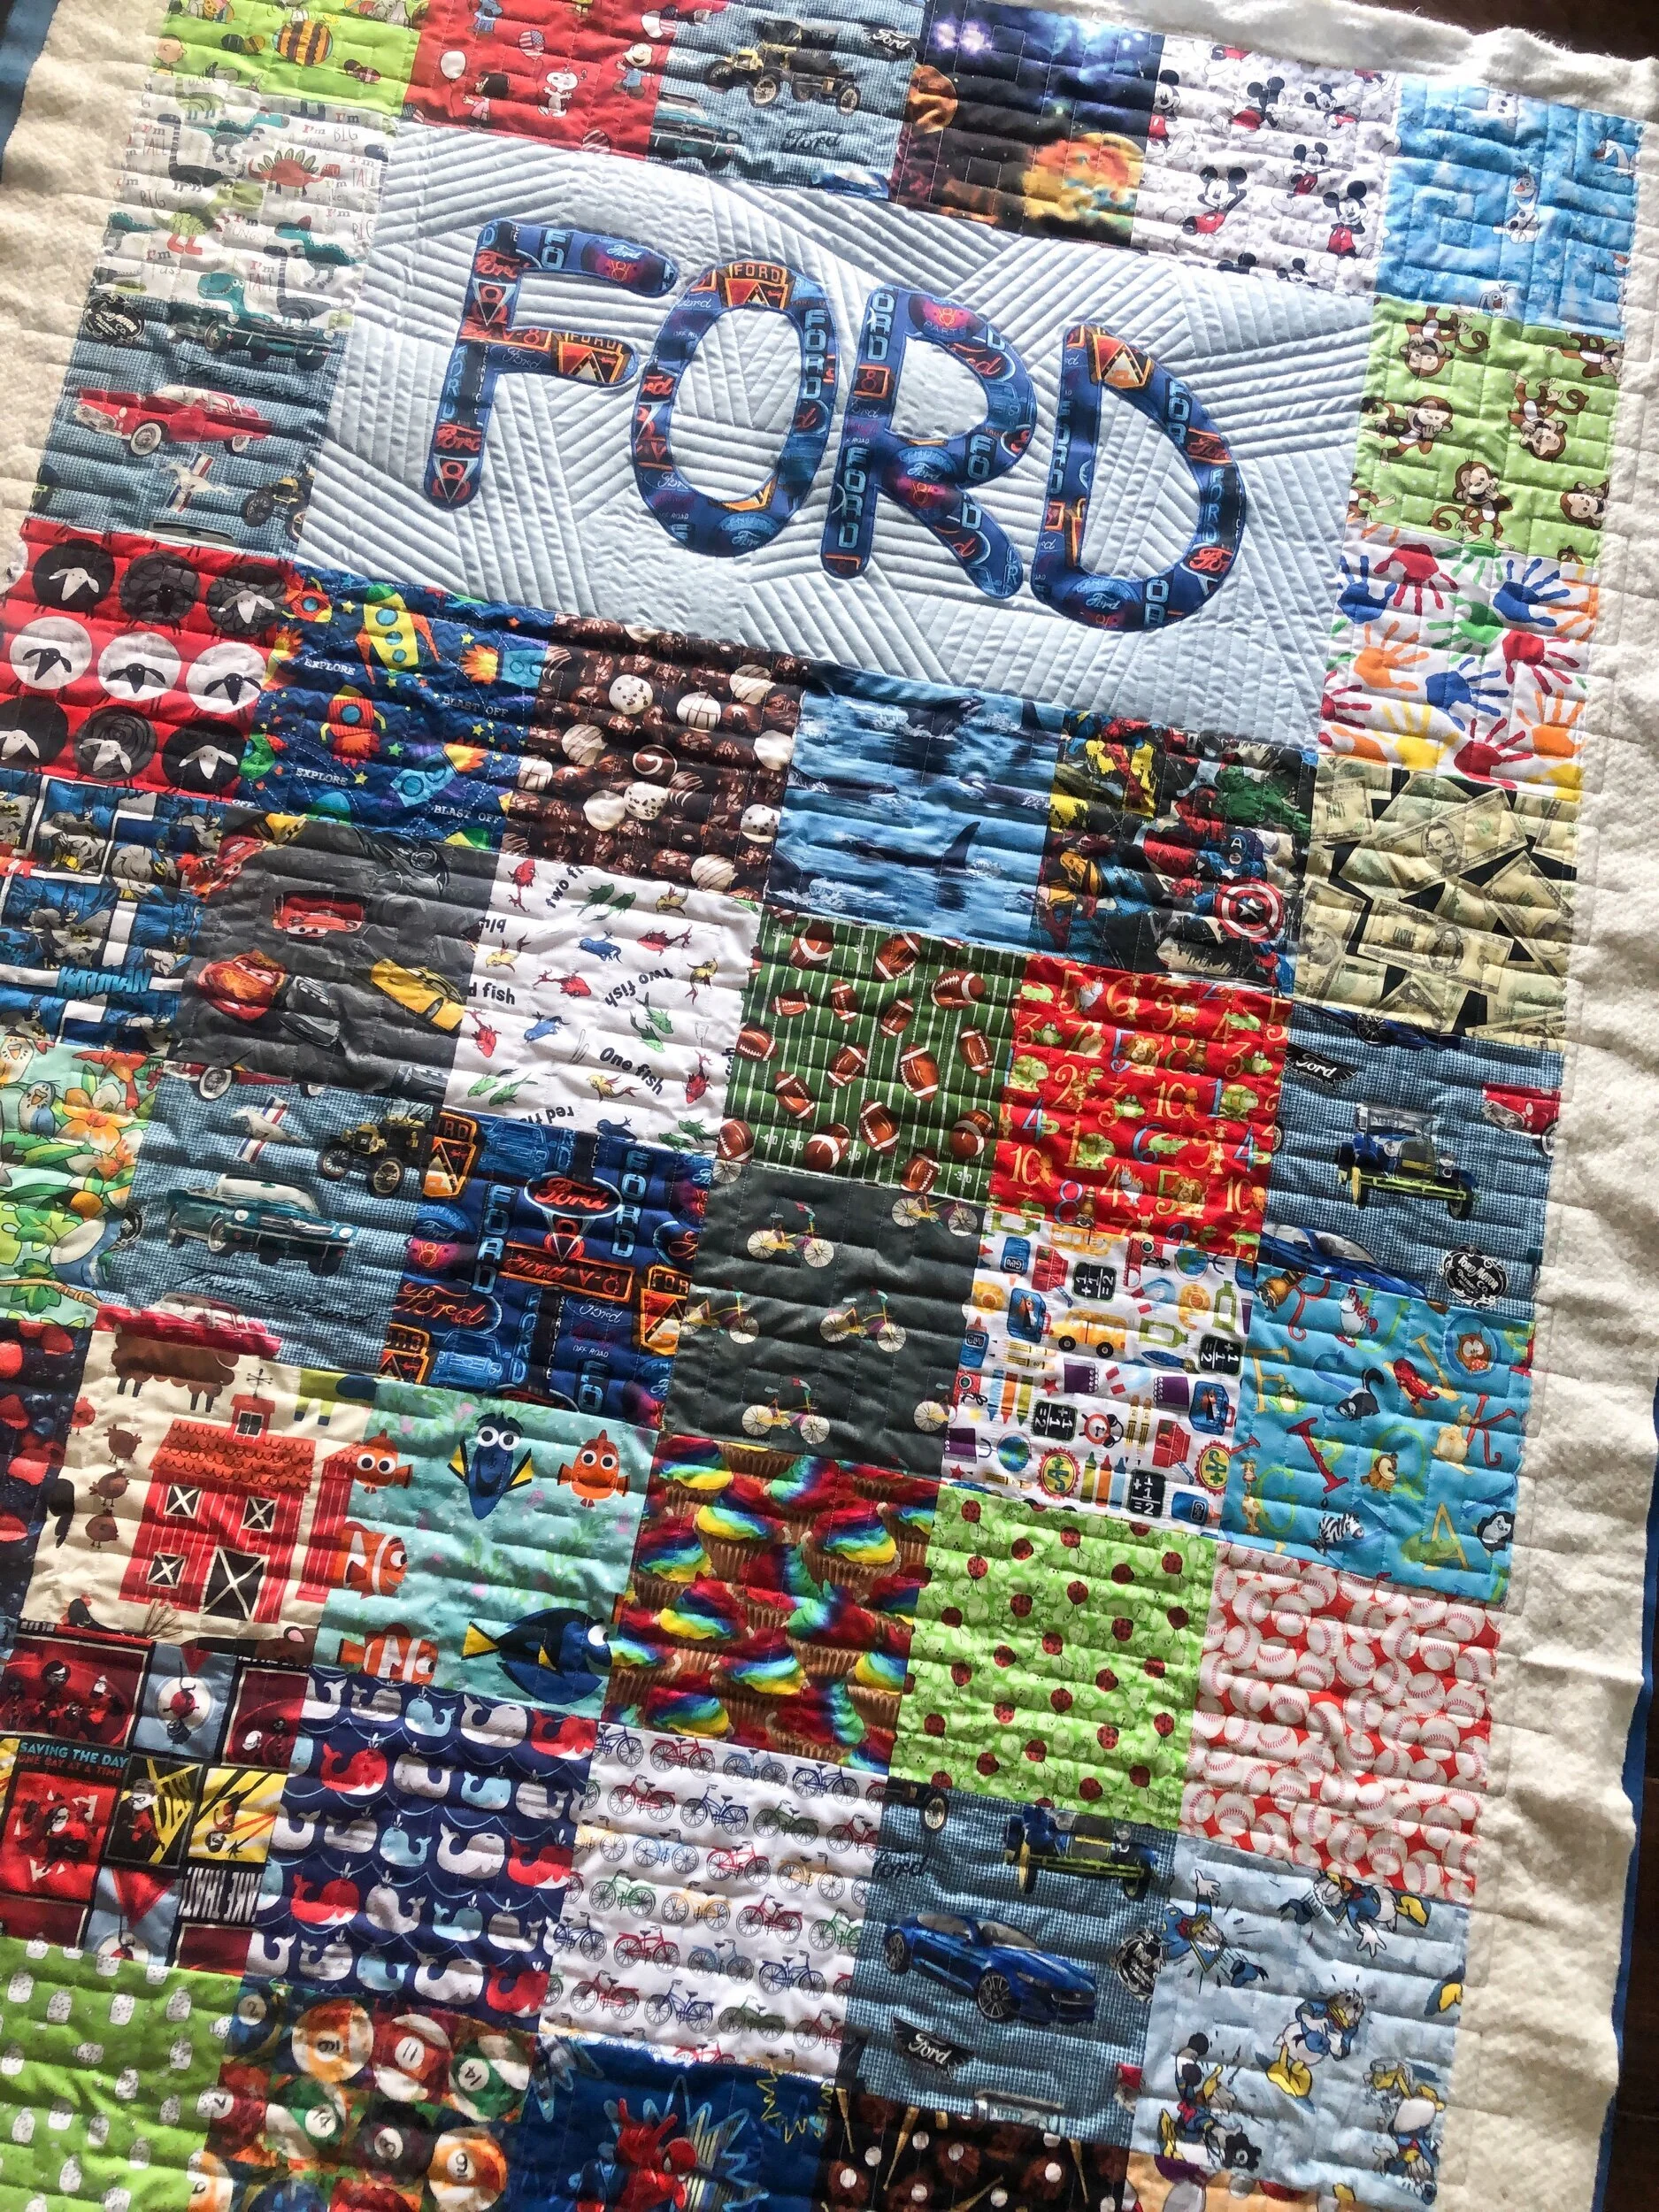
Sydney asked for custom behind his name, and then edge to edge on the rest of the quilt. She chose my Double Squared quilting design, for the edge to edge part of the quilt, and I think it turned out great!! Double Squared is such a fun design. Then I took one of the longer Edge rulers from Linda at The Quilted Pineapple and quilted my overlapping line design. I quilted the lines 1/2” apart. I actually have something fun coming your way sooon, with this design. So excited to share!
I used natural white Omni thread from Superior Threads, and if I remember right 8020 cotton poly blend batting from Winline.
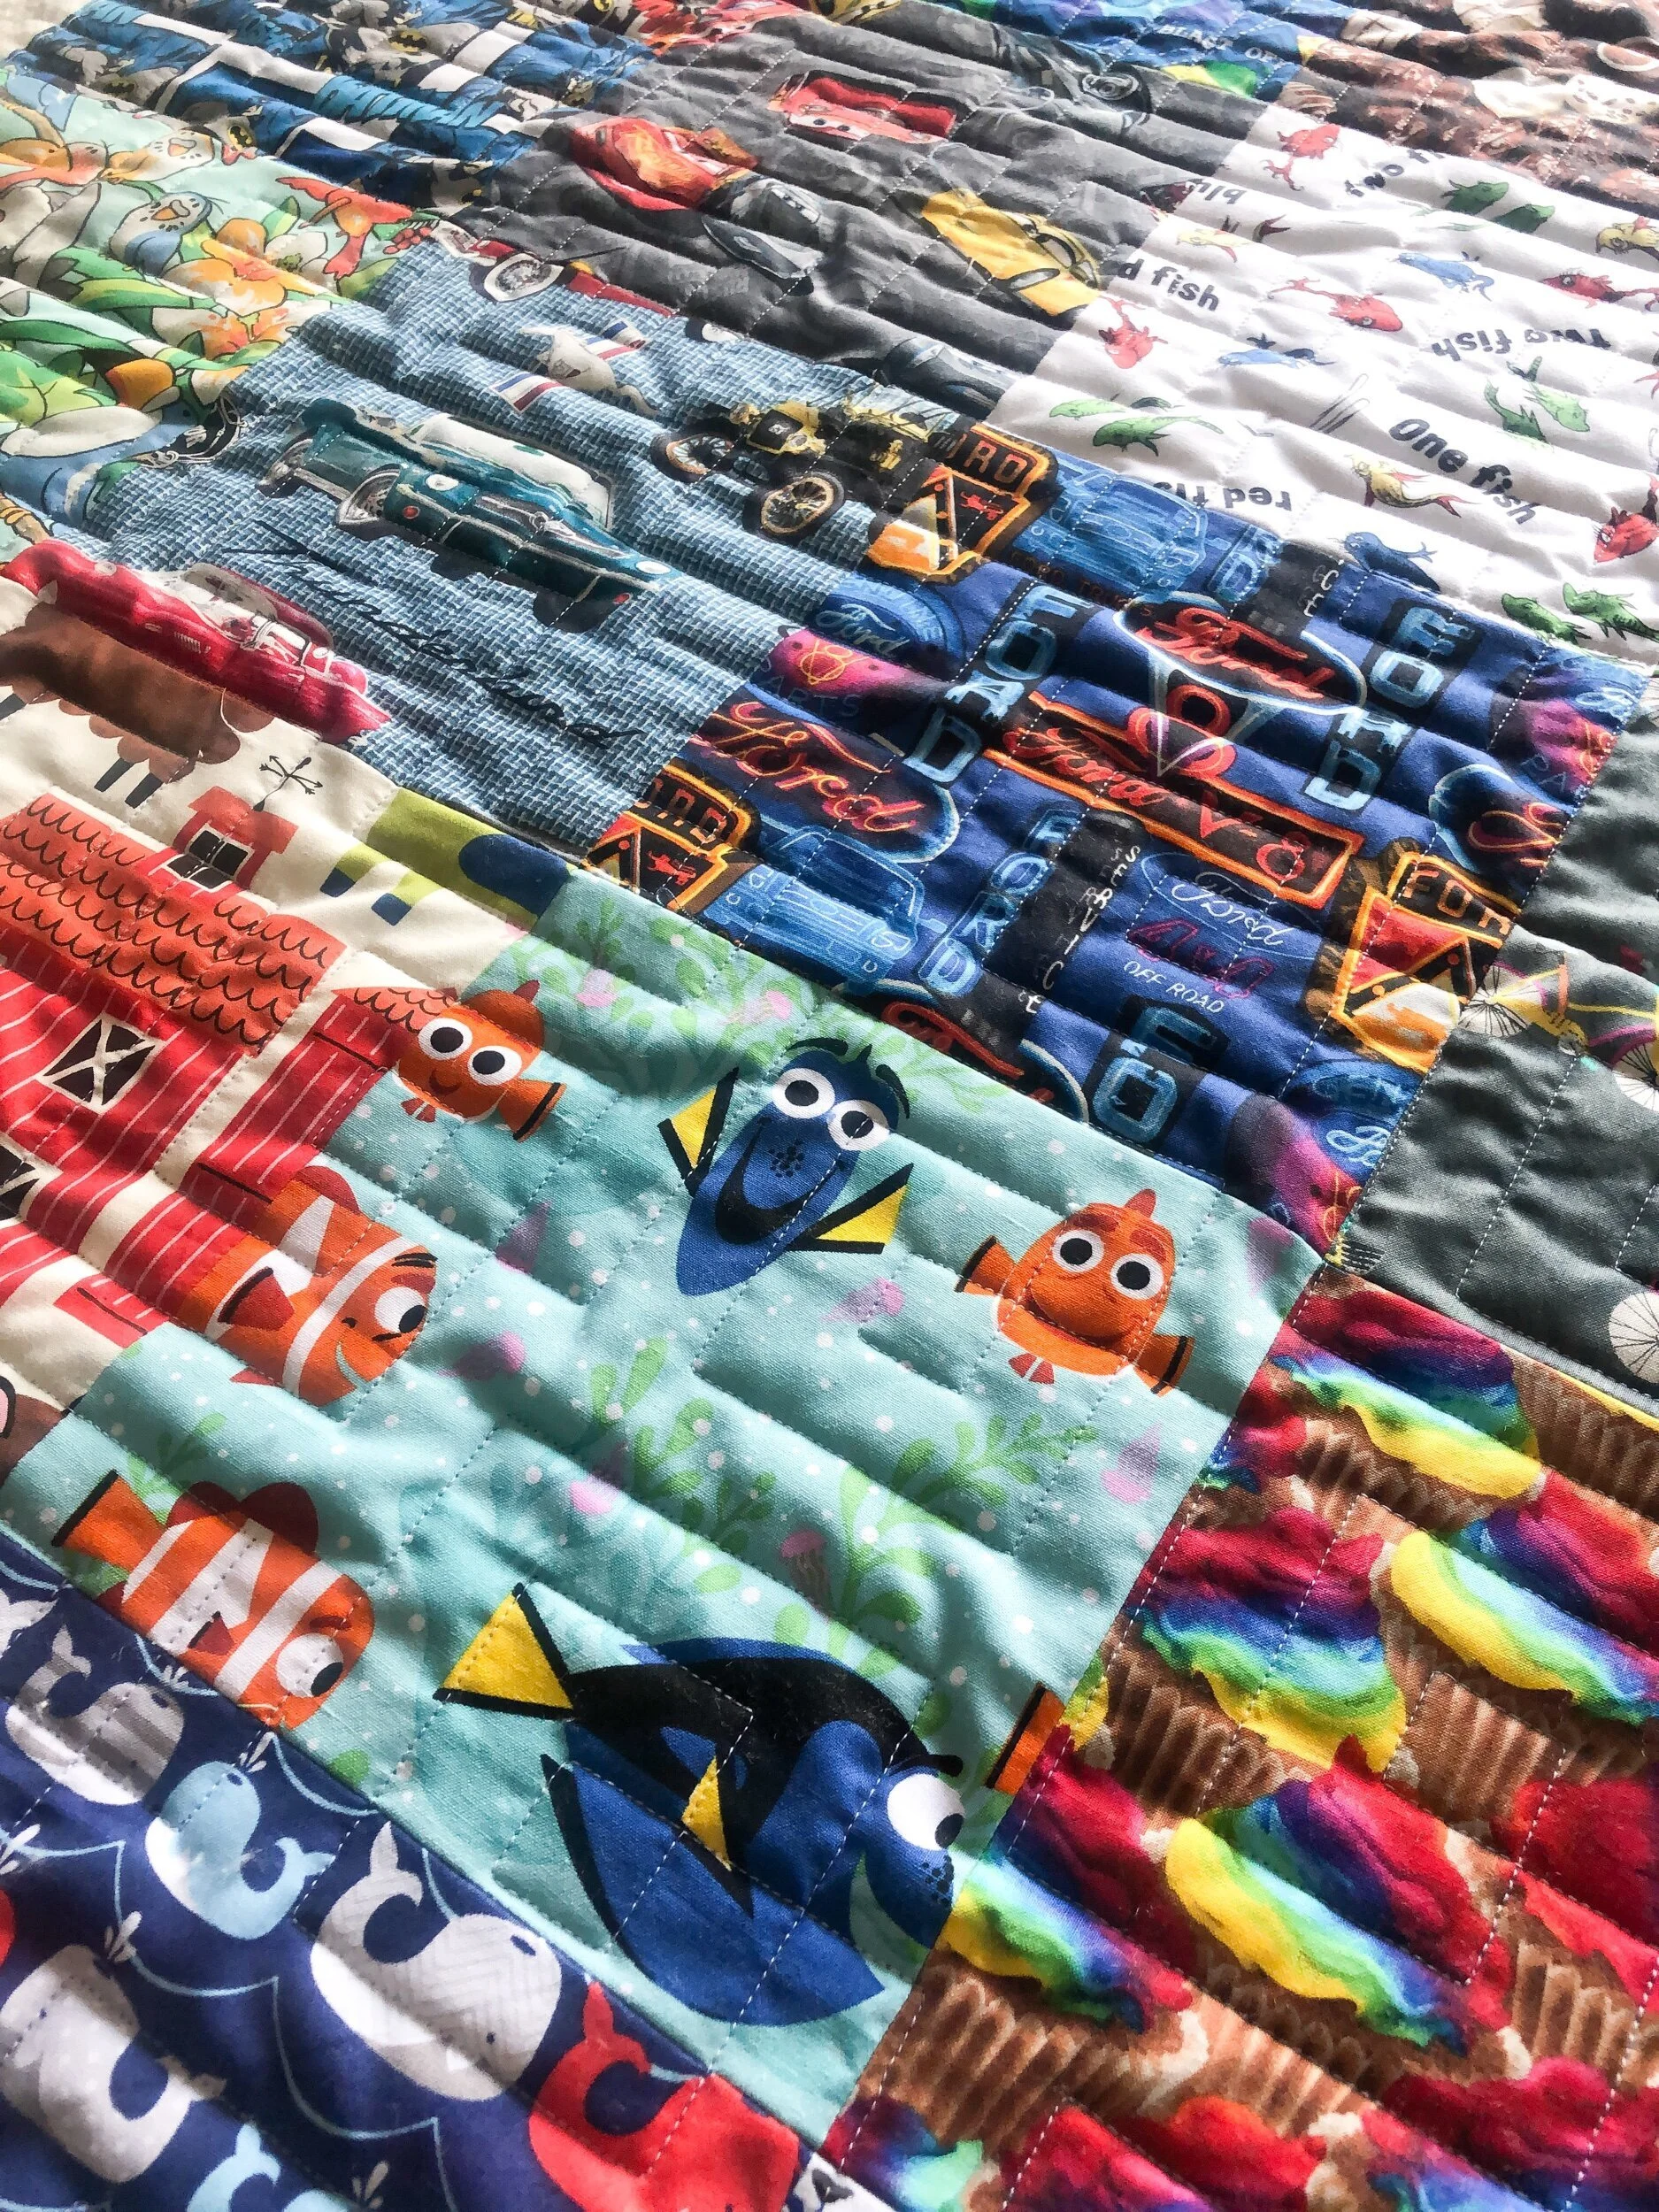
Look at all of those fun fabrics!! Any kid would love searching for all his favorite characters.
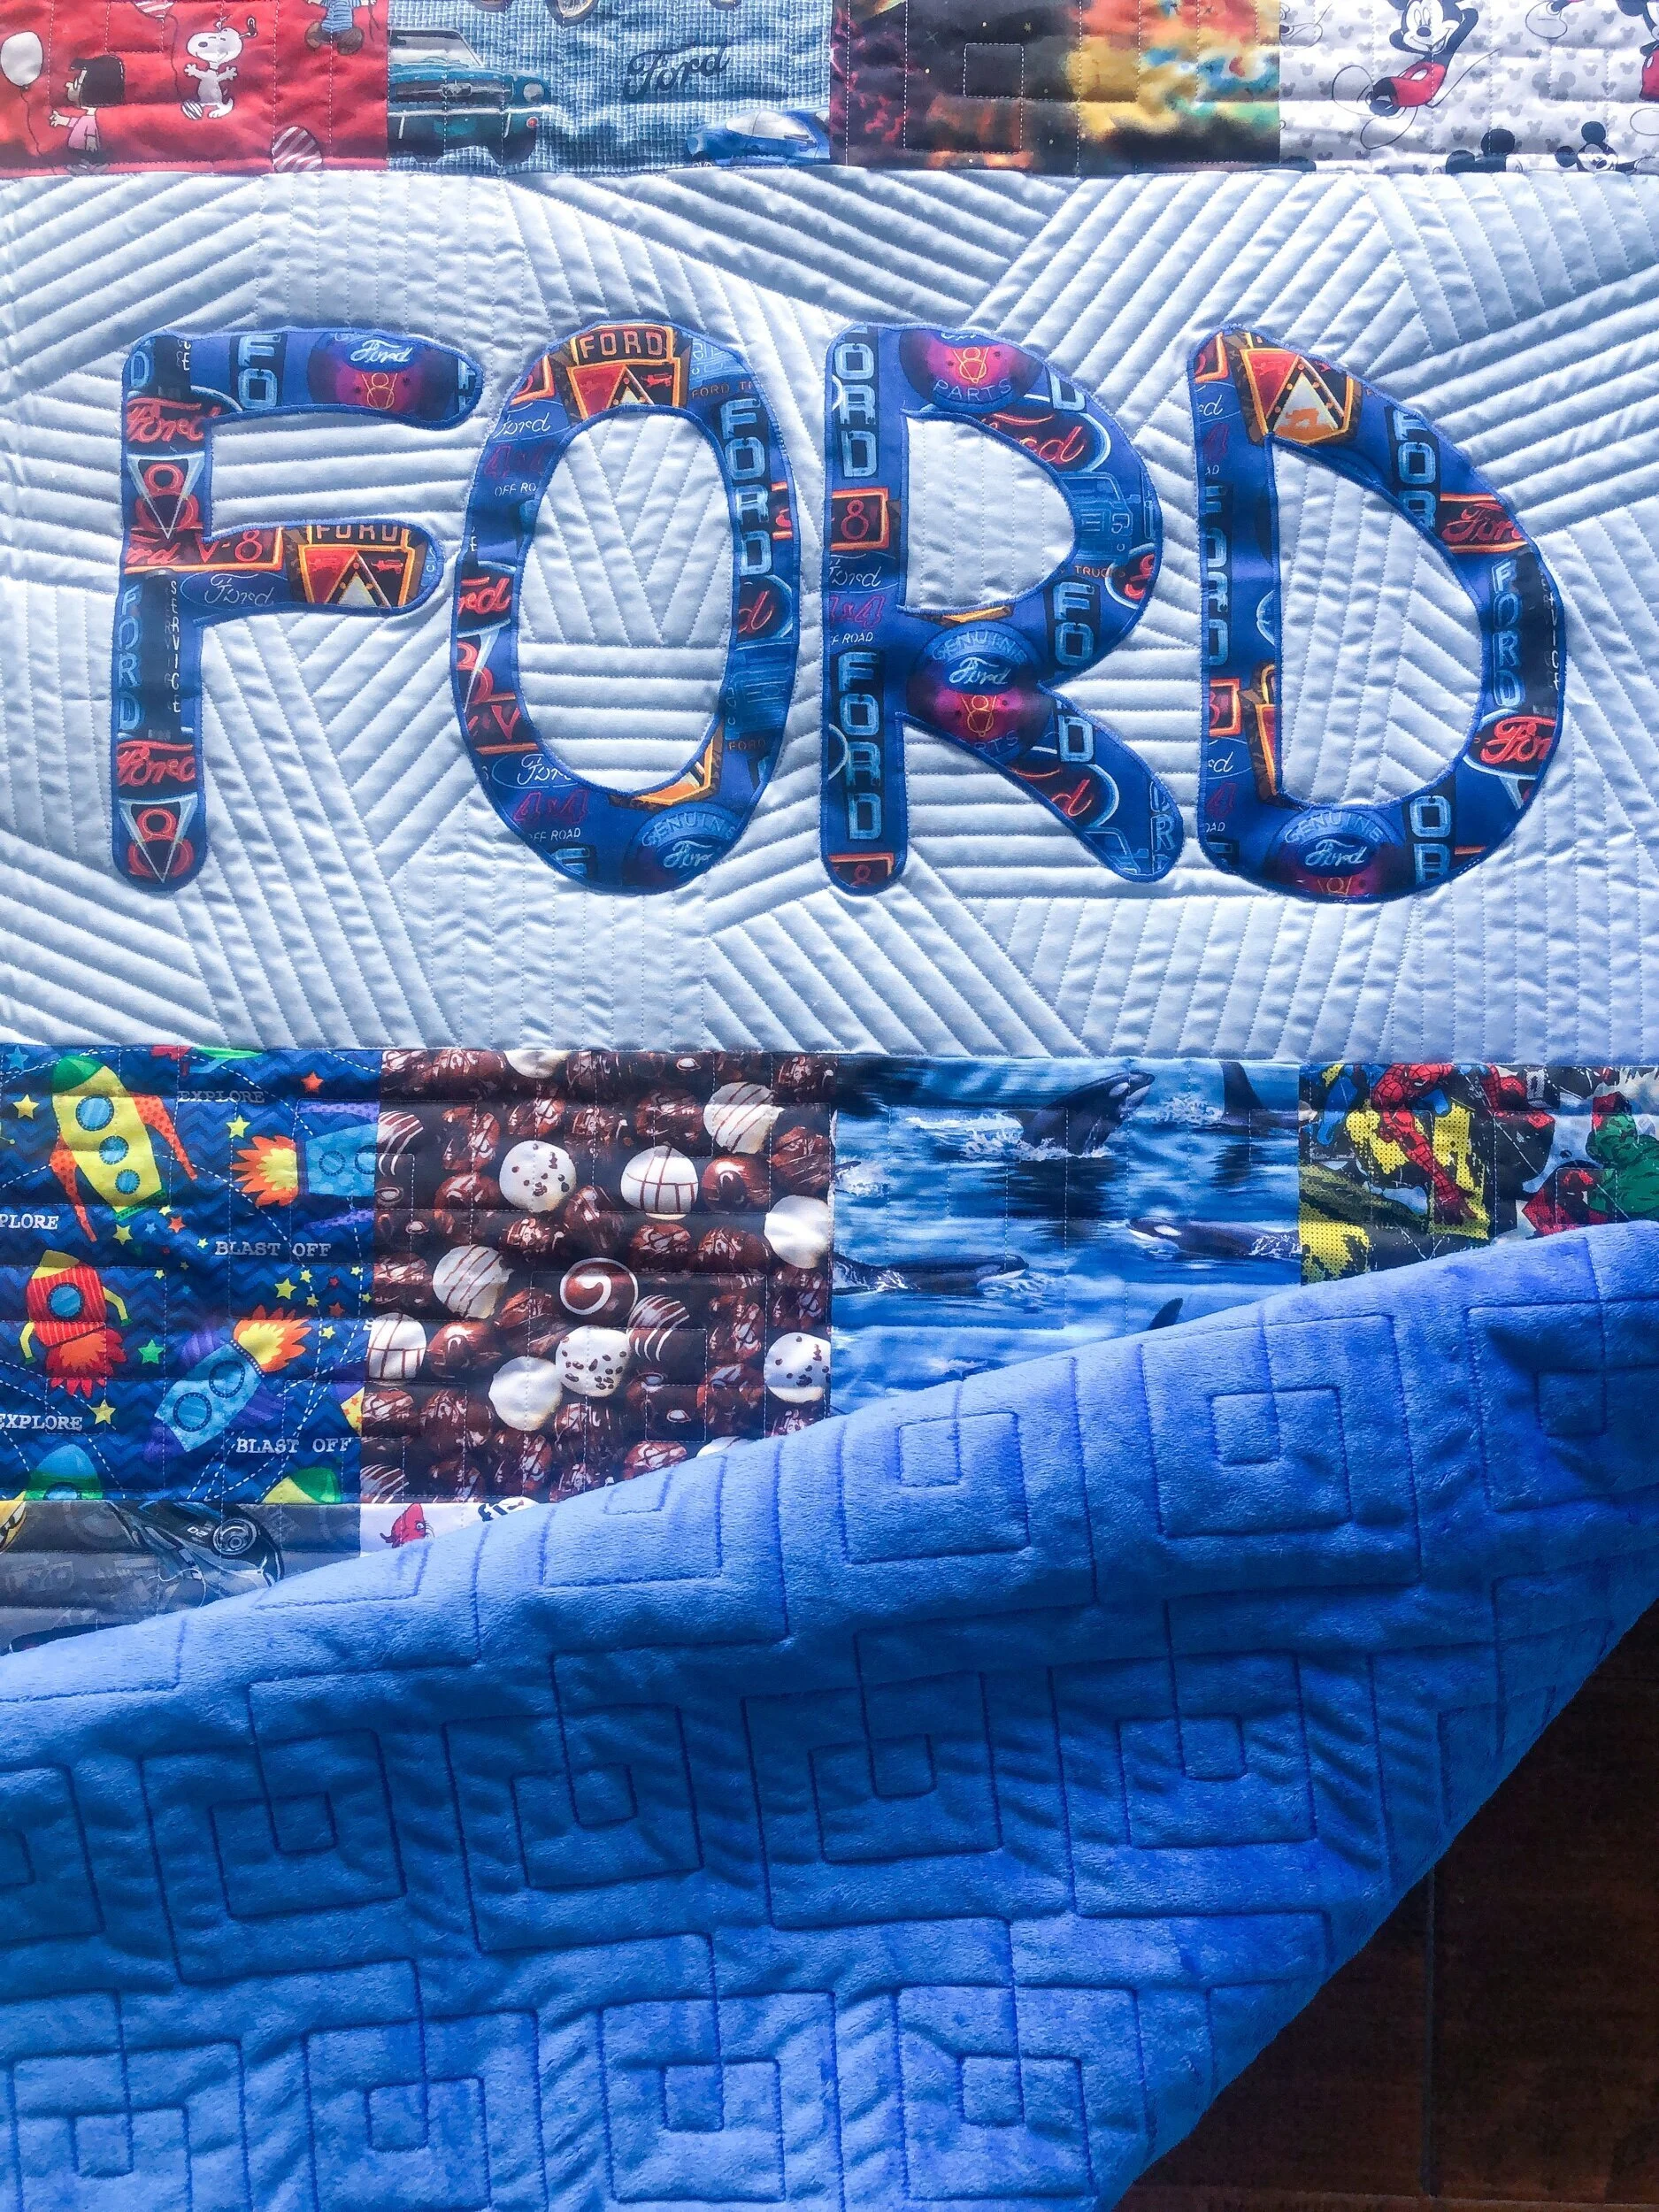
A peak at the minky!!! Loving this texture!!
So…the design of the day is Spinner!!! I have marked it down 20%, and it will stay that price until I blog again. Keep checking back and see what design is next. You can find Spinner here: https://www.quiltingit.com/shop/spinner
I’ve seen a few longarm quilters use Spinner recently, and it quilts out beautifully. Note: Spinner does require a 50% offset.
Thank you for being here!! Check back soon for another quilt, and another design deal!!
• Leisha
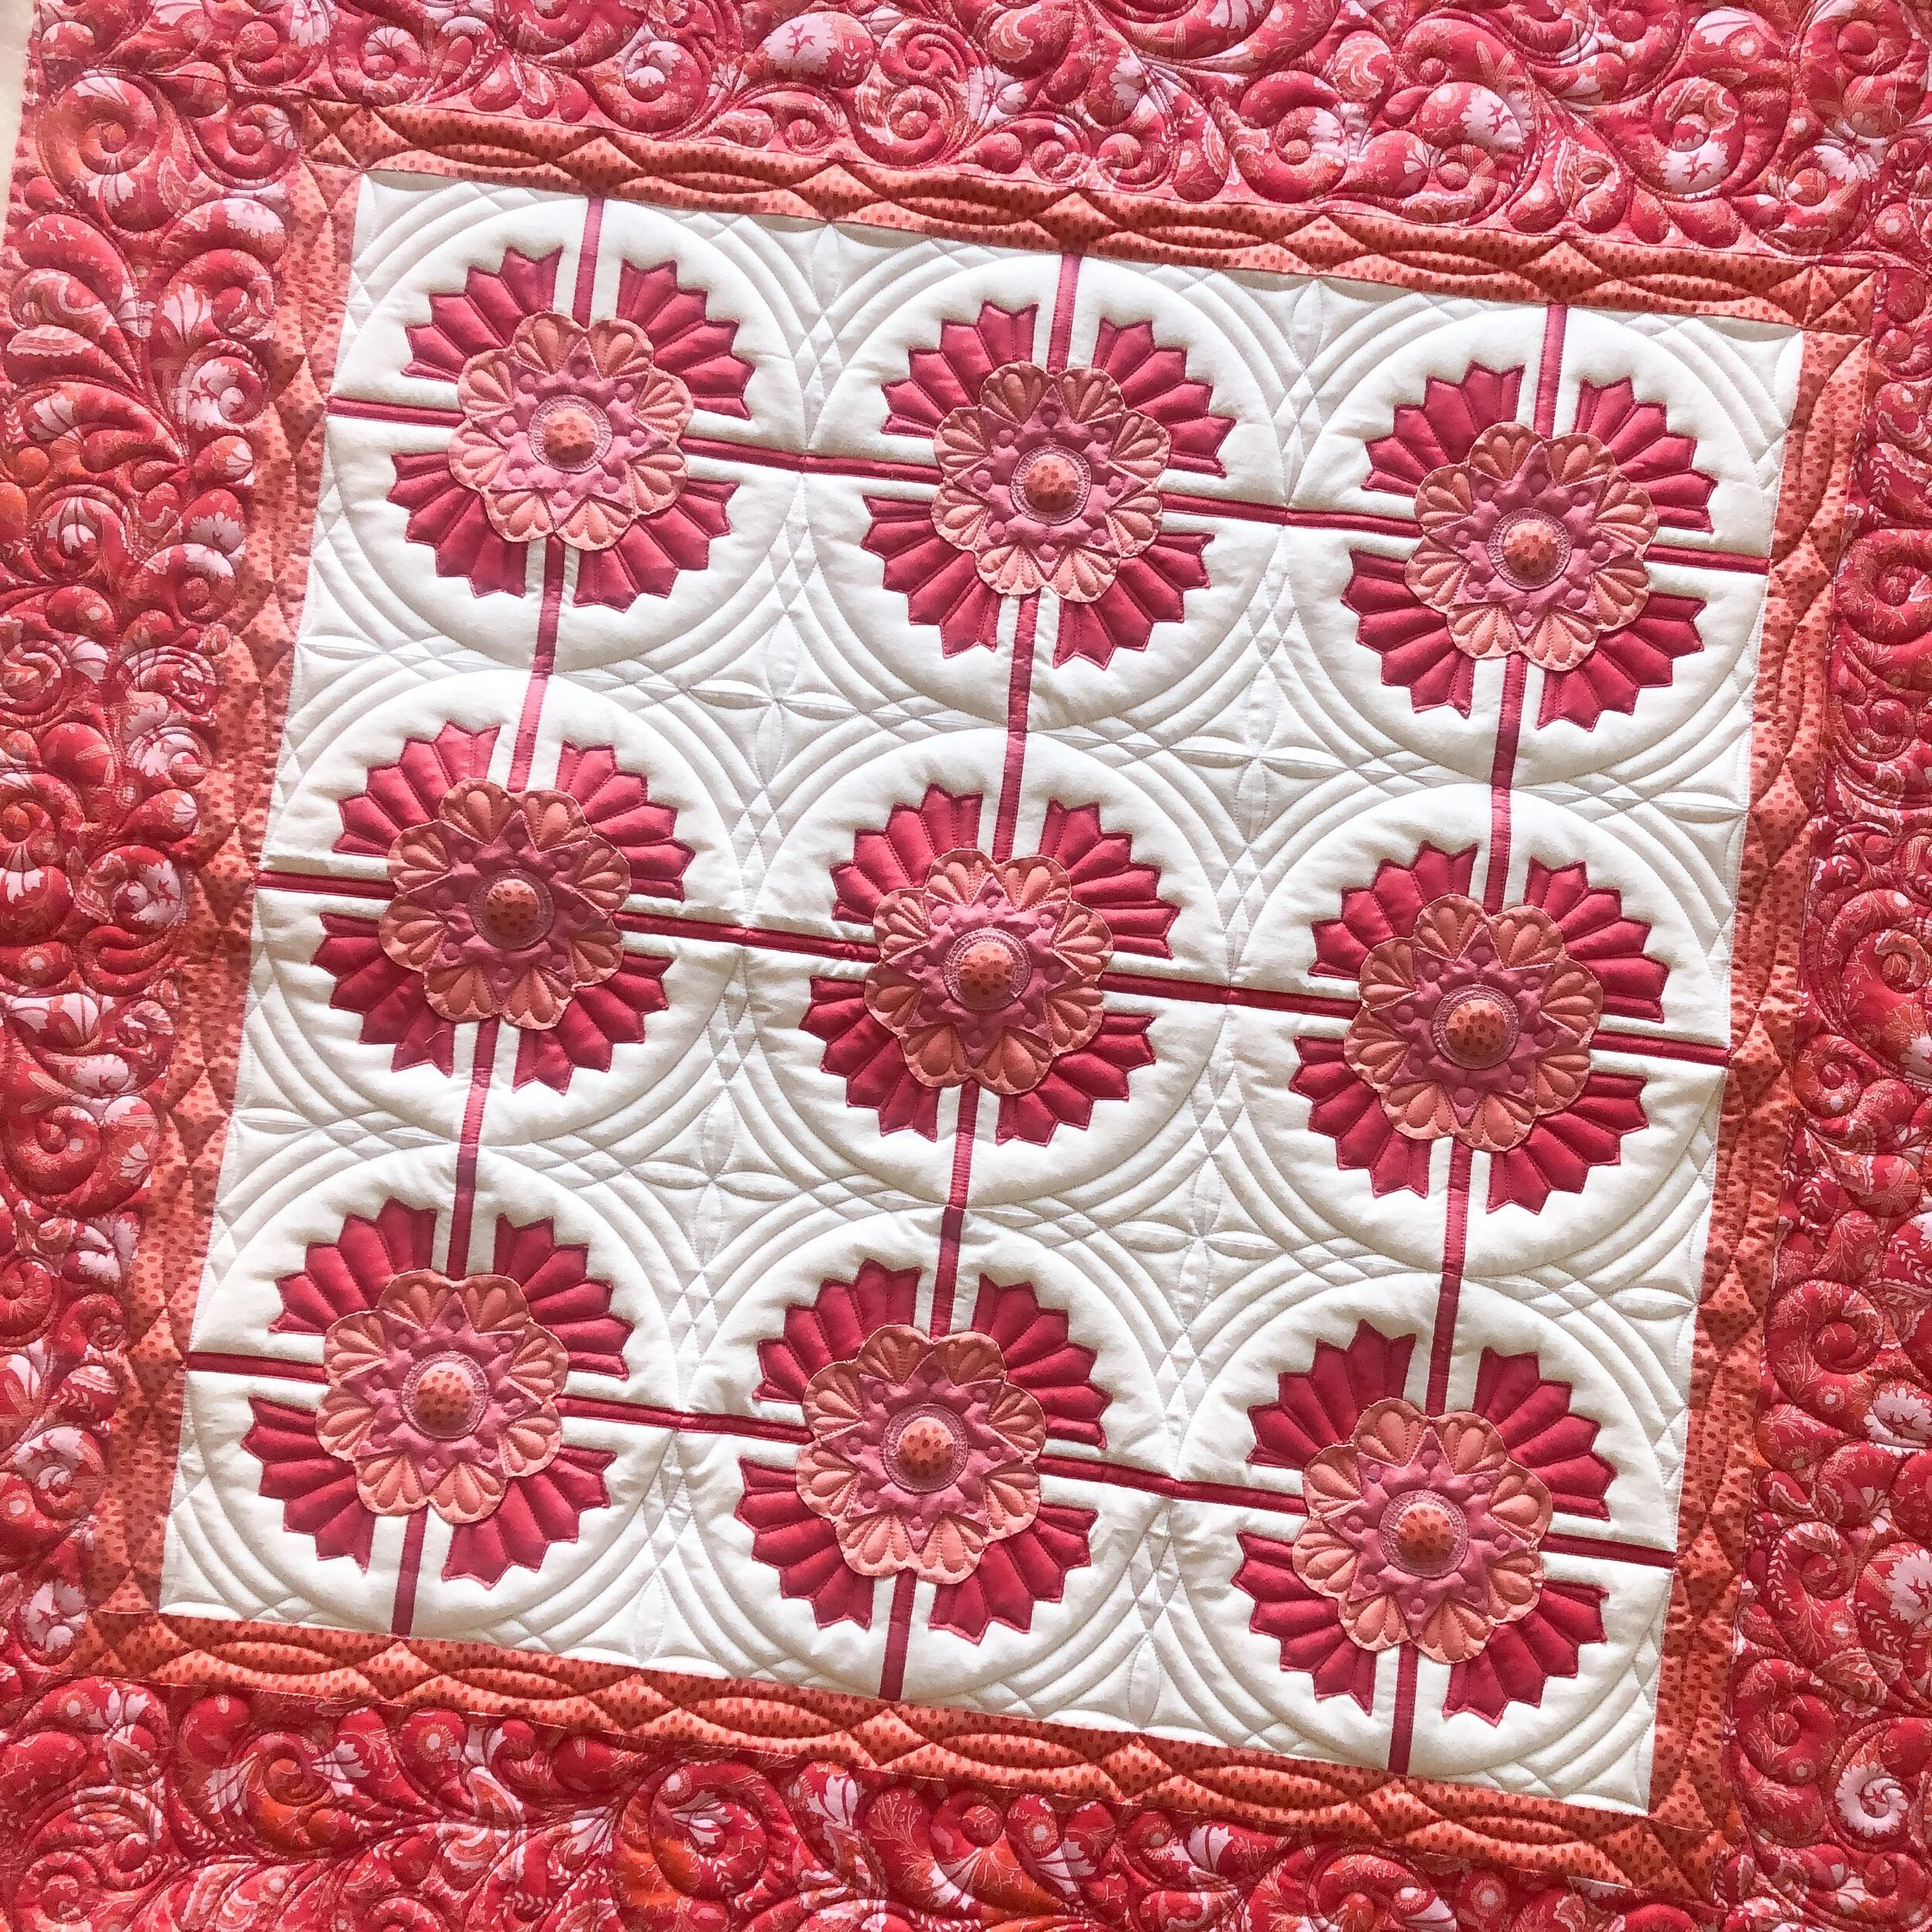
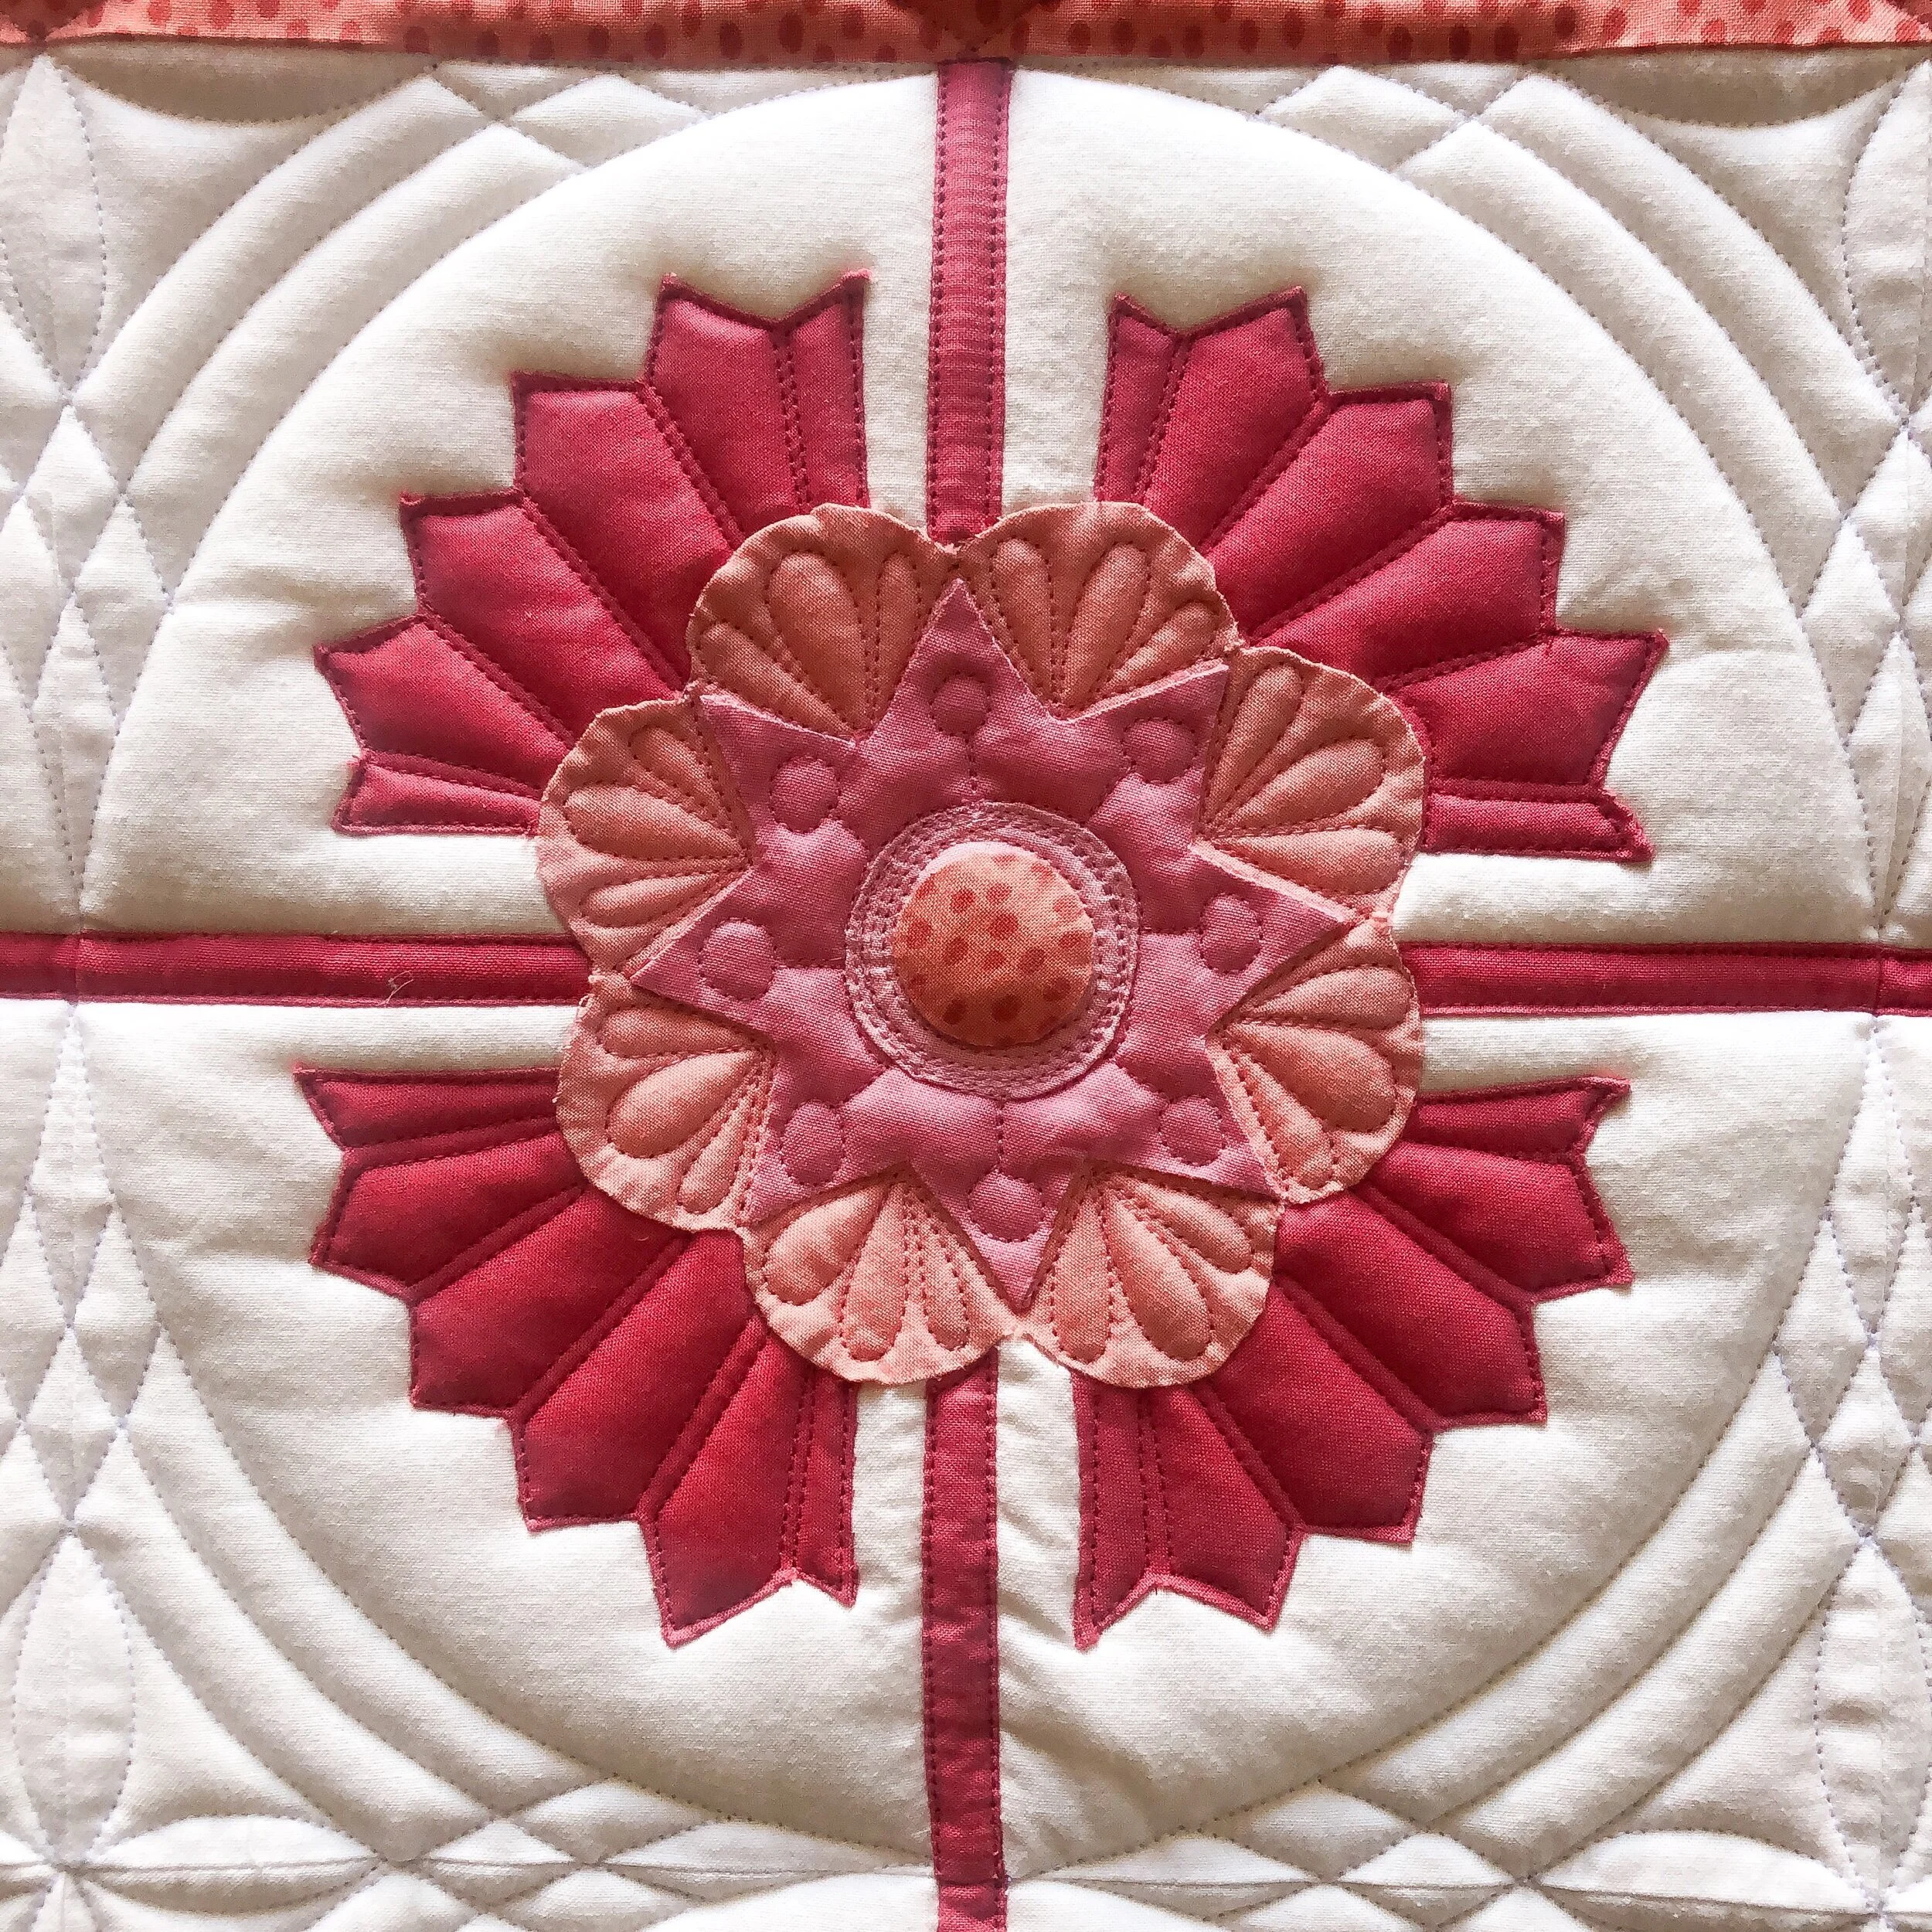
Maria’s Pink Peonies Quilt
Hello there,
I’m very behind in blogging, because I’ve had some fun things I’ve been working on, that I’ll share with you soon. I first want to thank each one of you who bought designs during my birthday sale!! It was the best sale I’ve had! Thank you!! Also, thanks for all the birthday wishes.
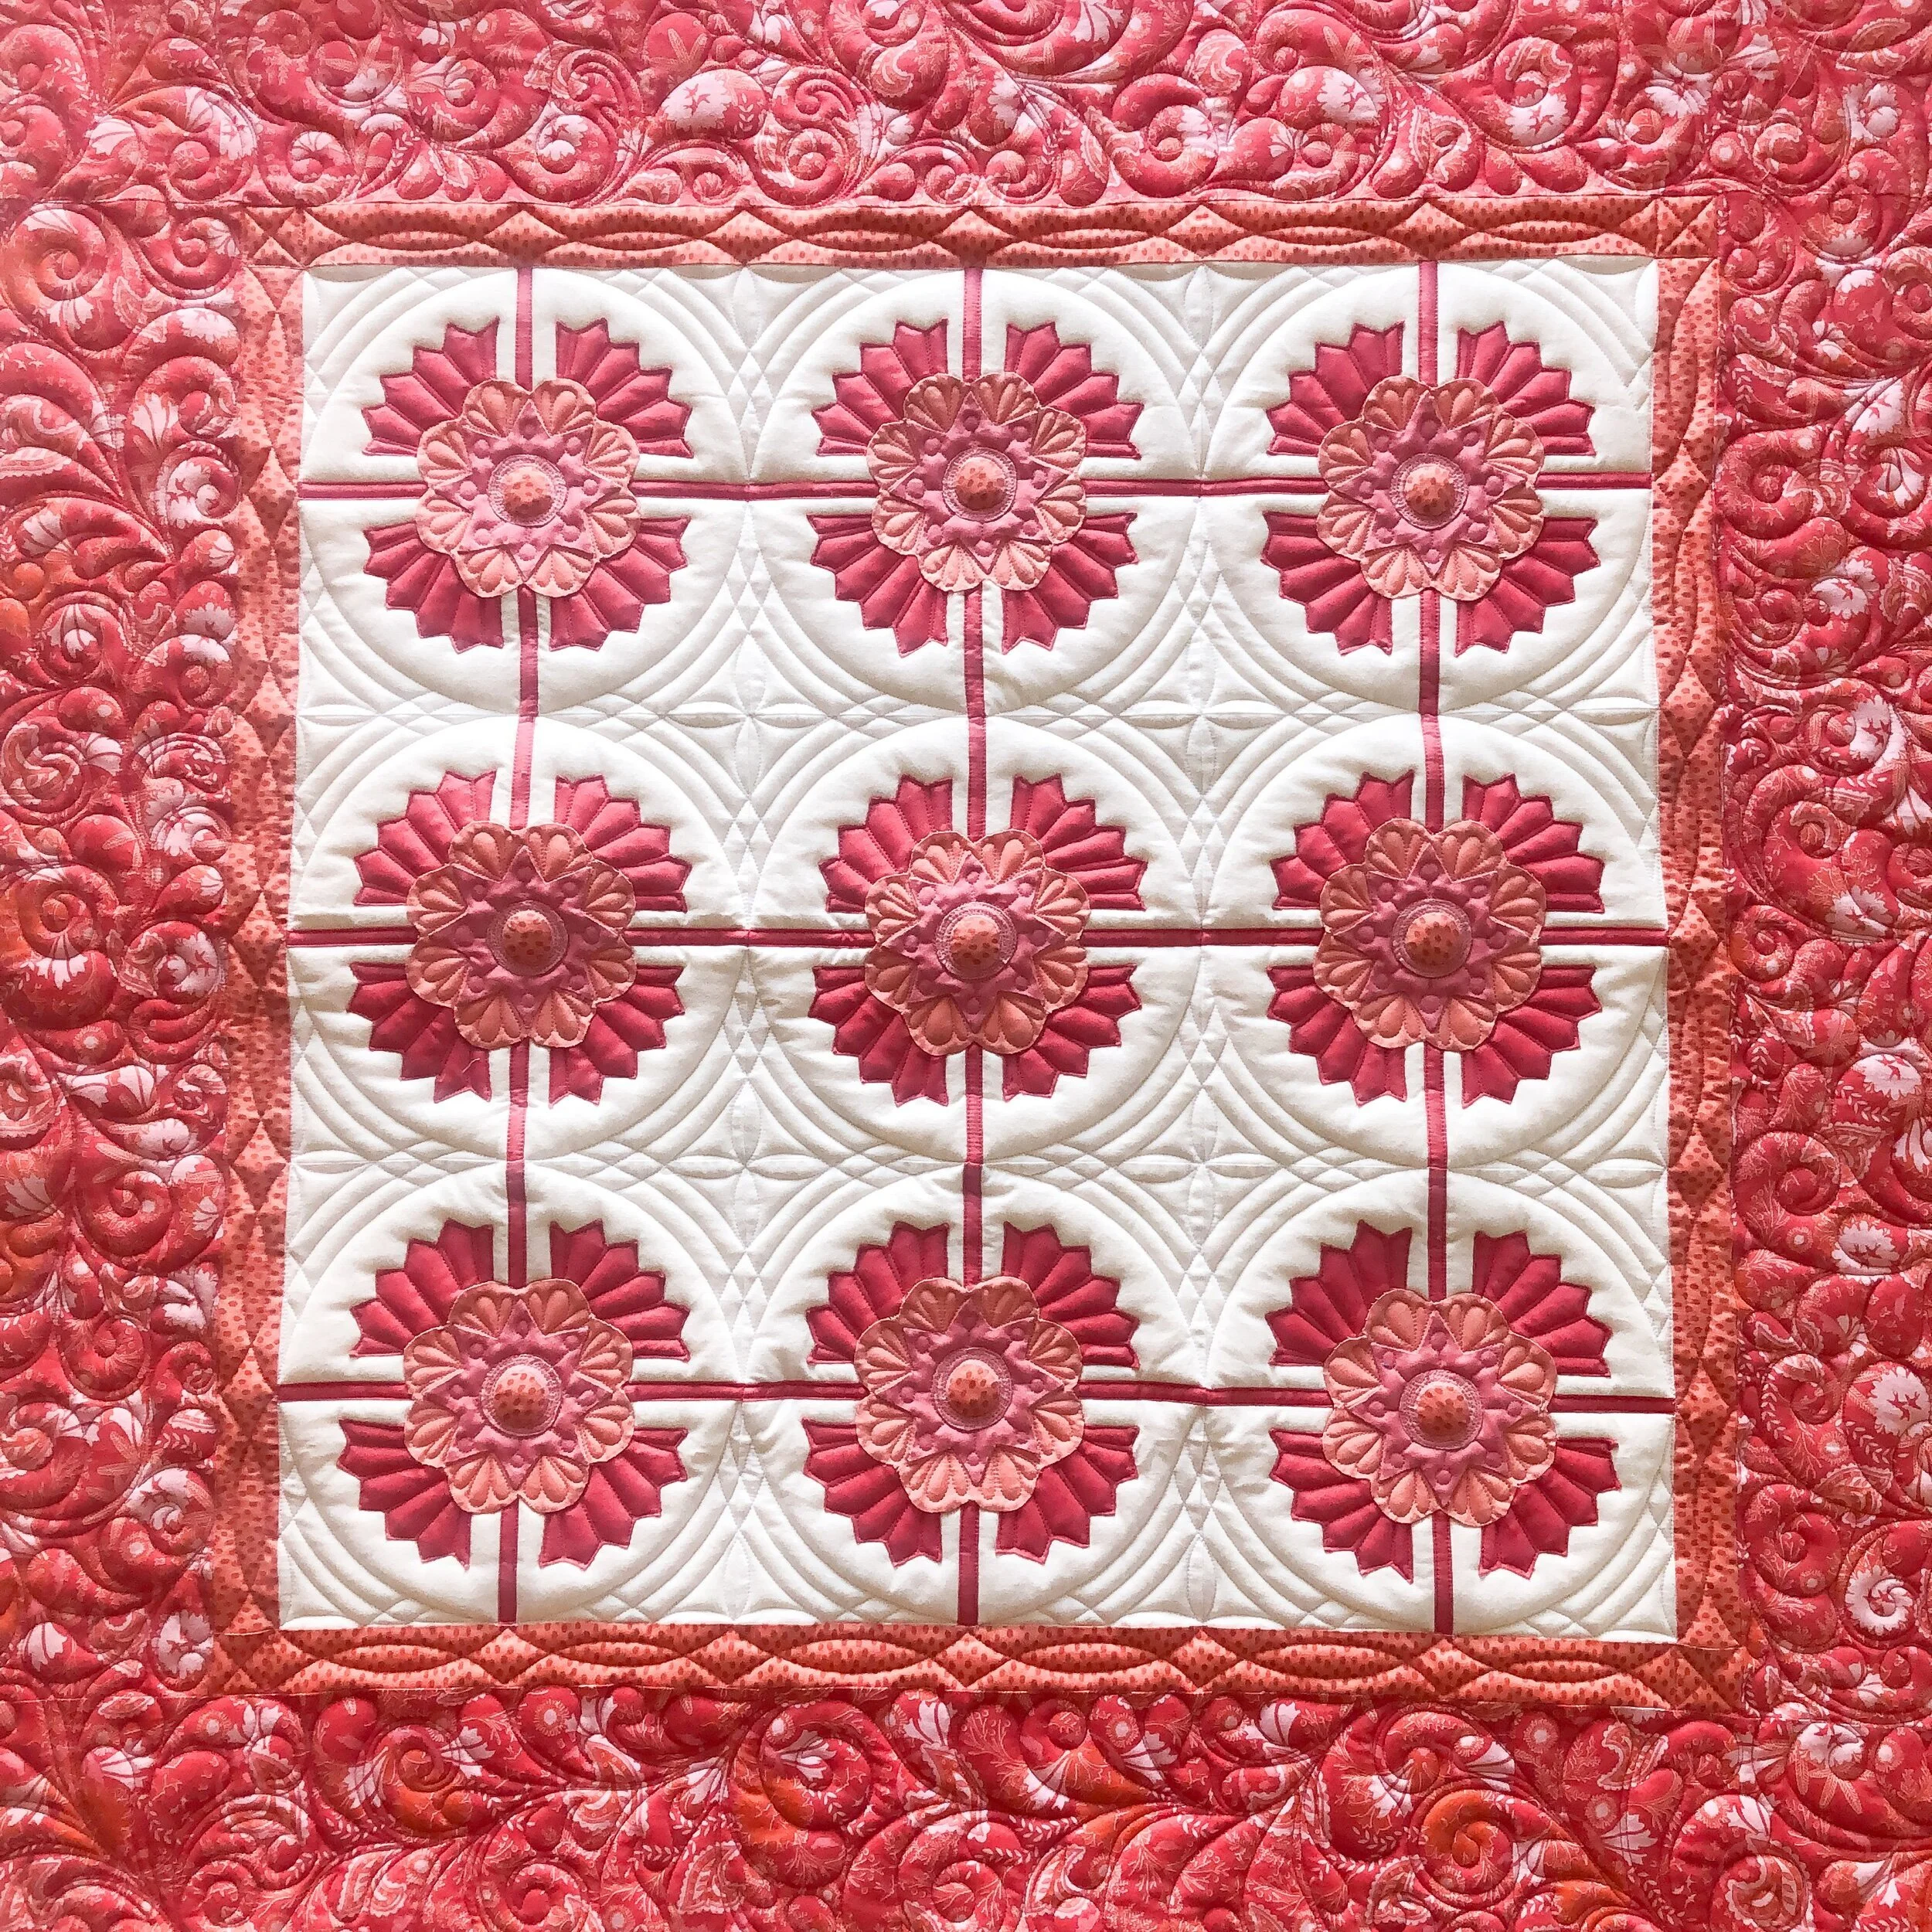
I quilted this beautiful quilt back in the middle of April. It was such a fun one to quilt. It was made by Maria. The pattern is by Teri Christopherson from her book called Mulberry Lane and the pattern is called Pink Peonies.

The medallion block pieces are all needle turned, so there aren’t any raw edges. They also seem to have a dresden look to them.
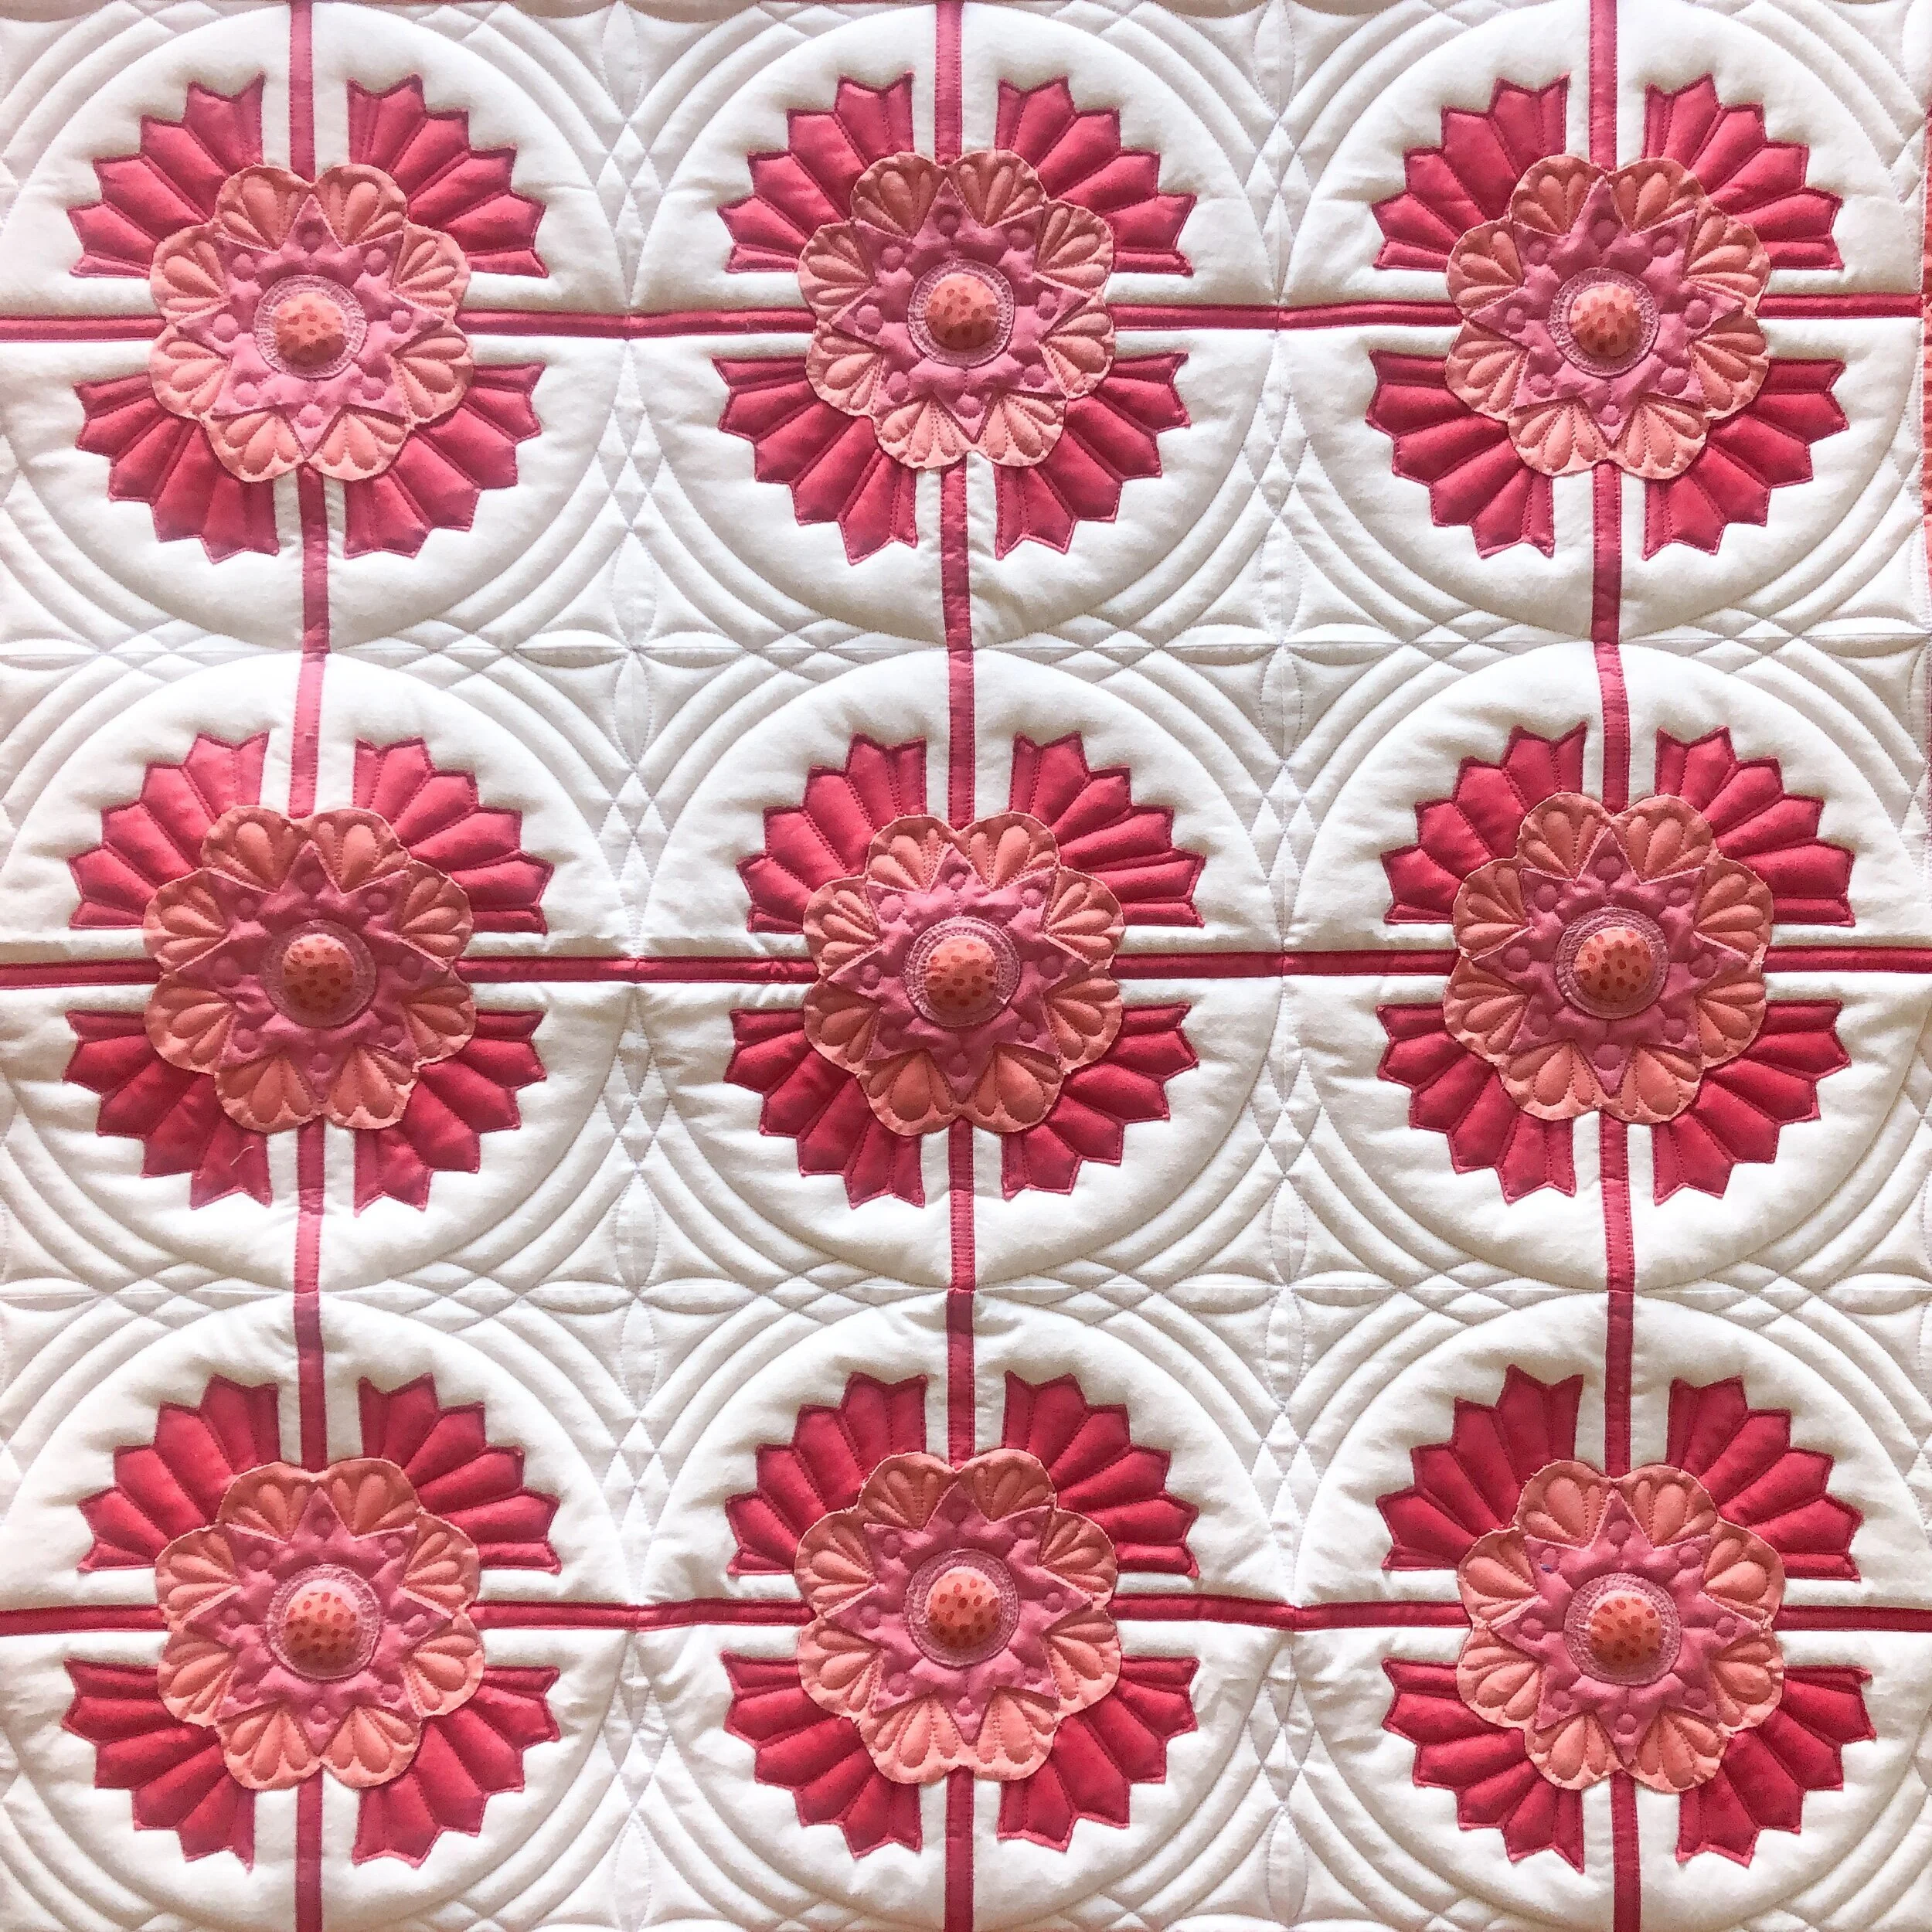
I used 2 layers of batting, Winline’s bamboo on the bottom and Hobbs wool on the top. I also used two pink threads as well as a natural white for the background, all Superior Threads Omni thread.
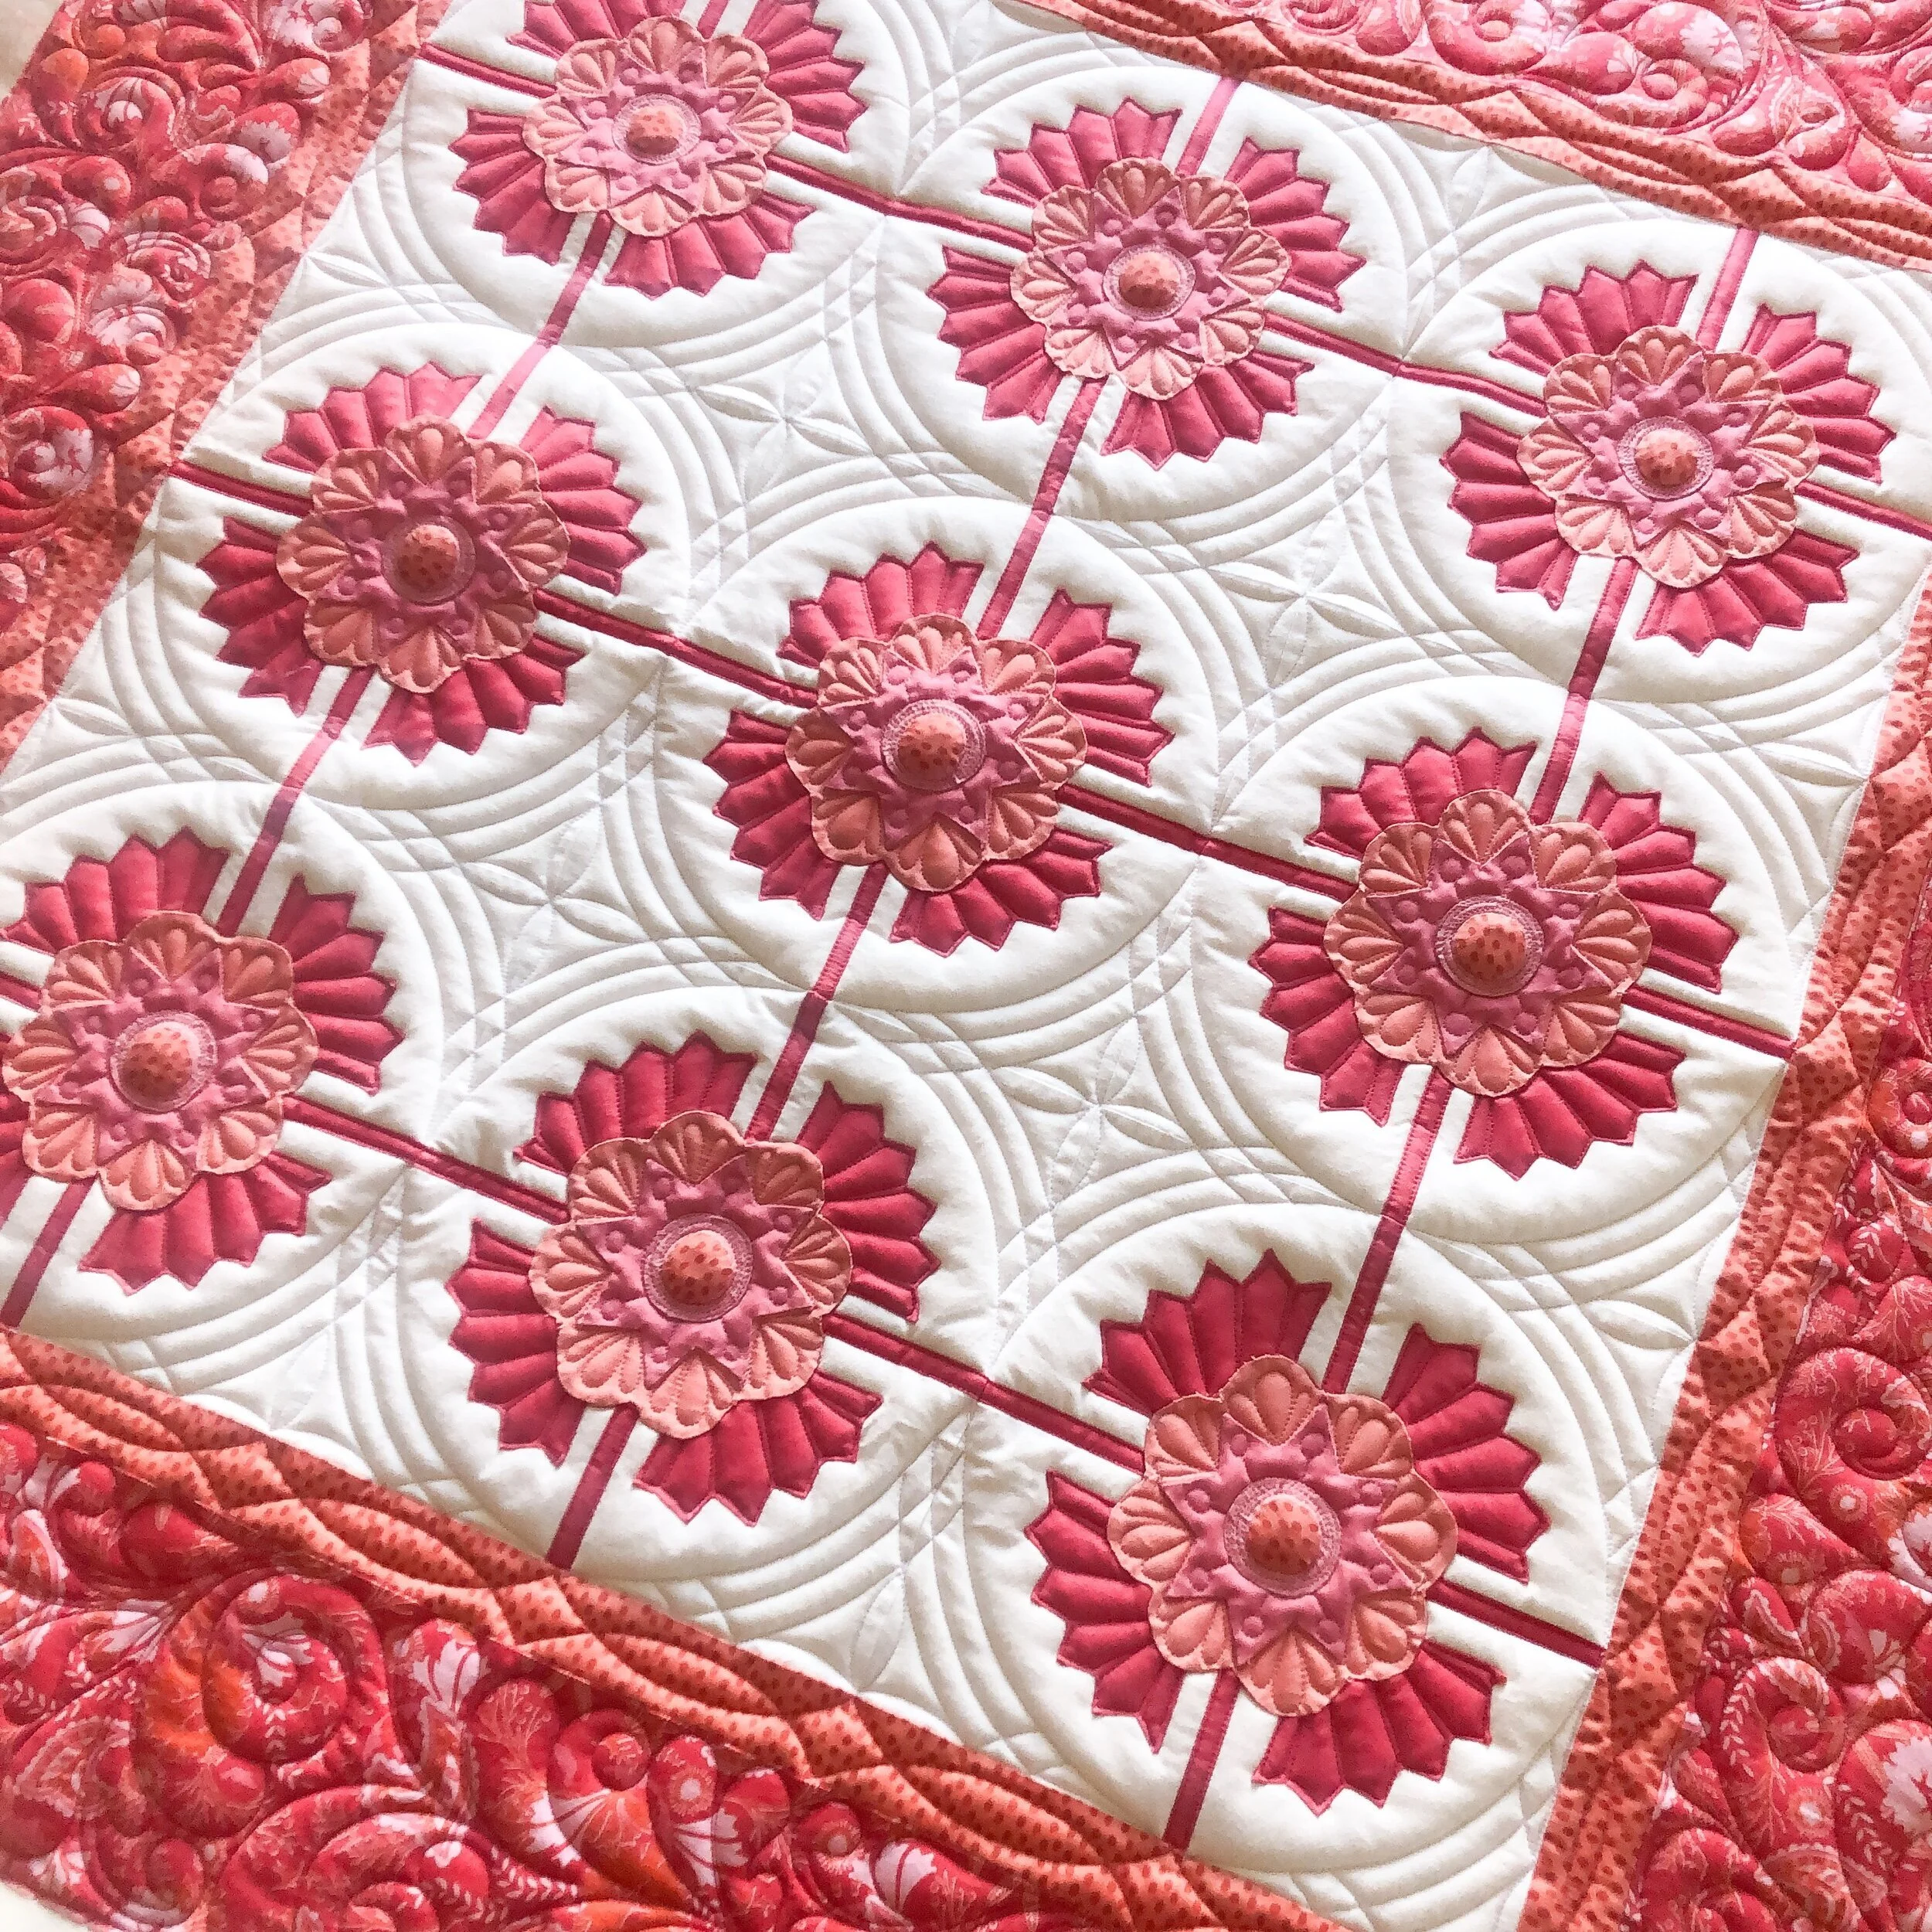
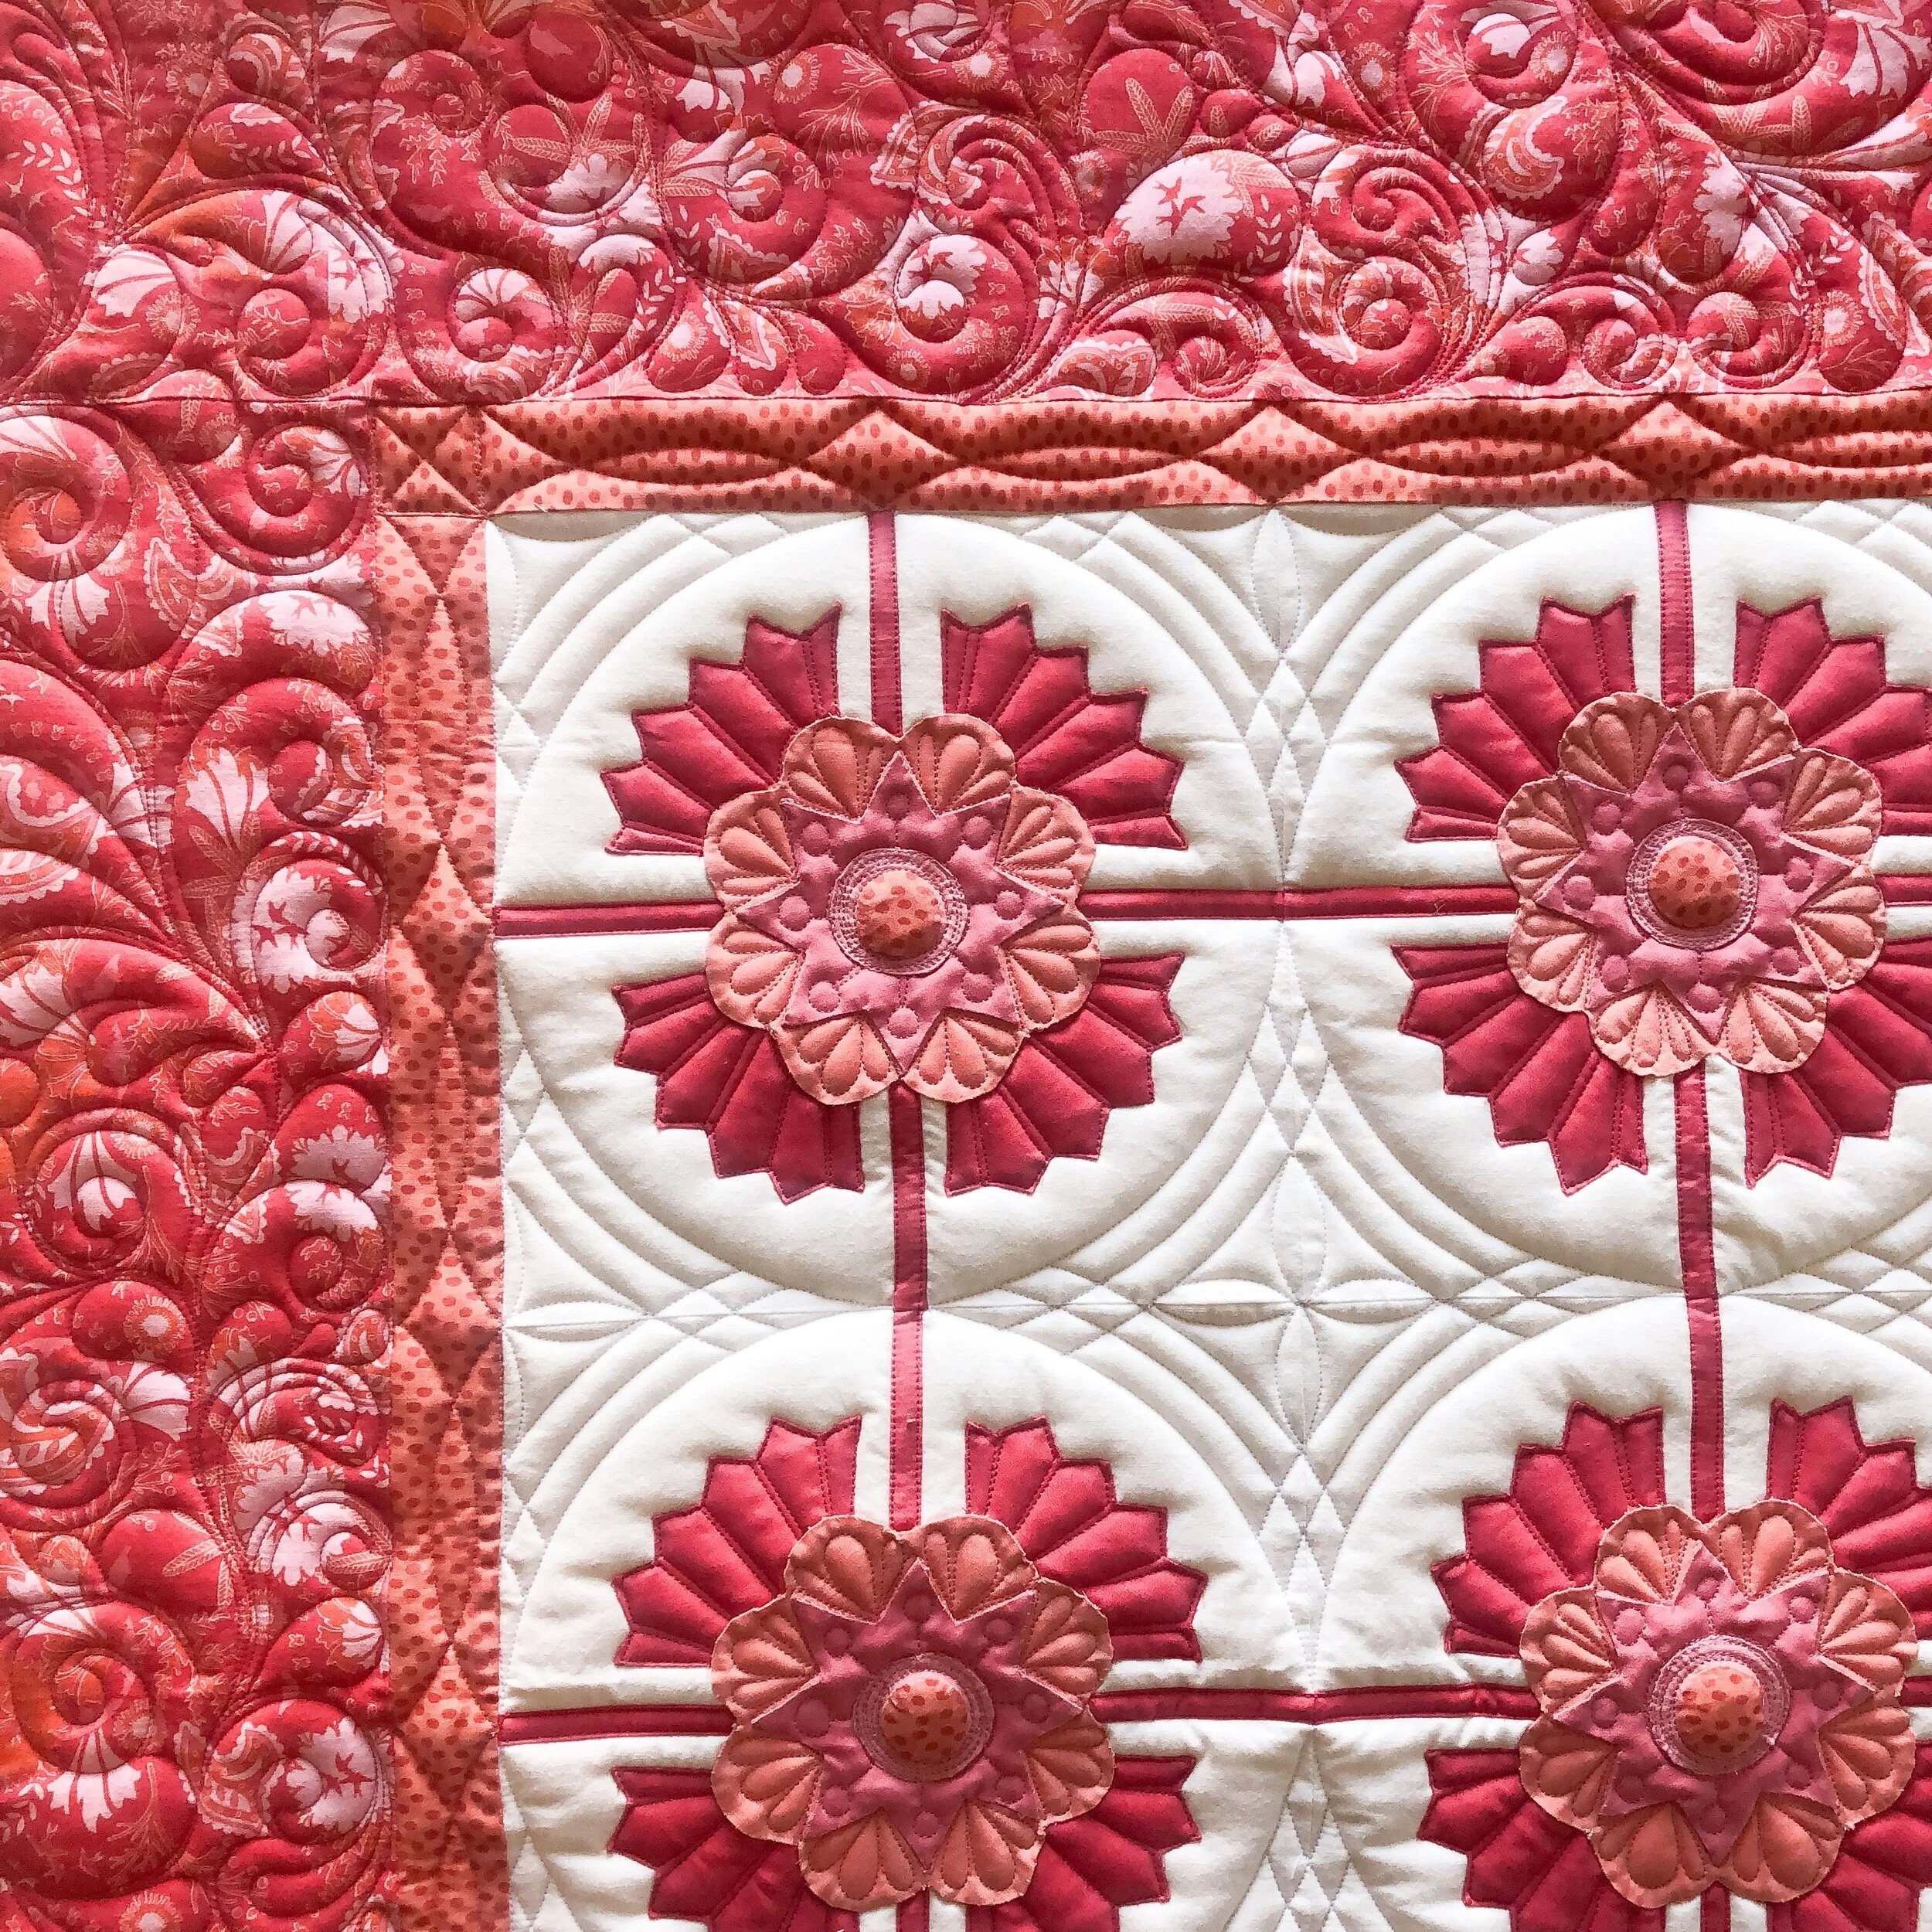
When I first saw this quilt, I knew I wanted to quilt those curves in the background to highlight or frame the block, while also doing something pretty in all the negative space. I used my 11” Circle2™ machine quilting circle ruler to quilt the arcs, with a 1/2” space between each arc.
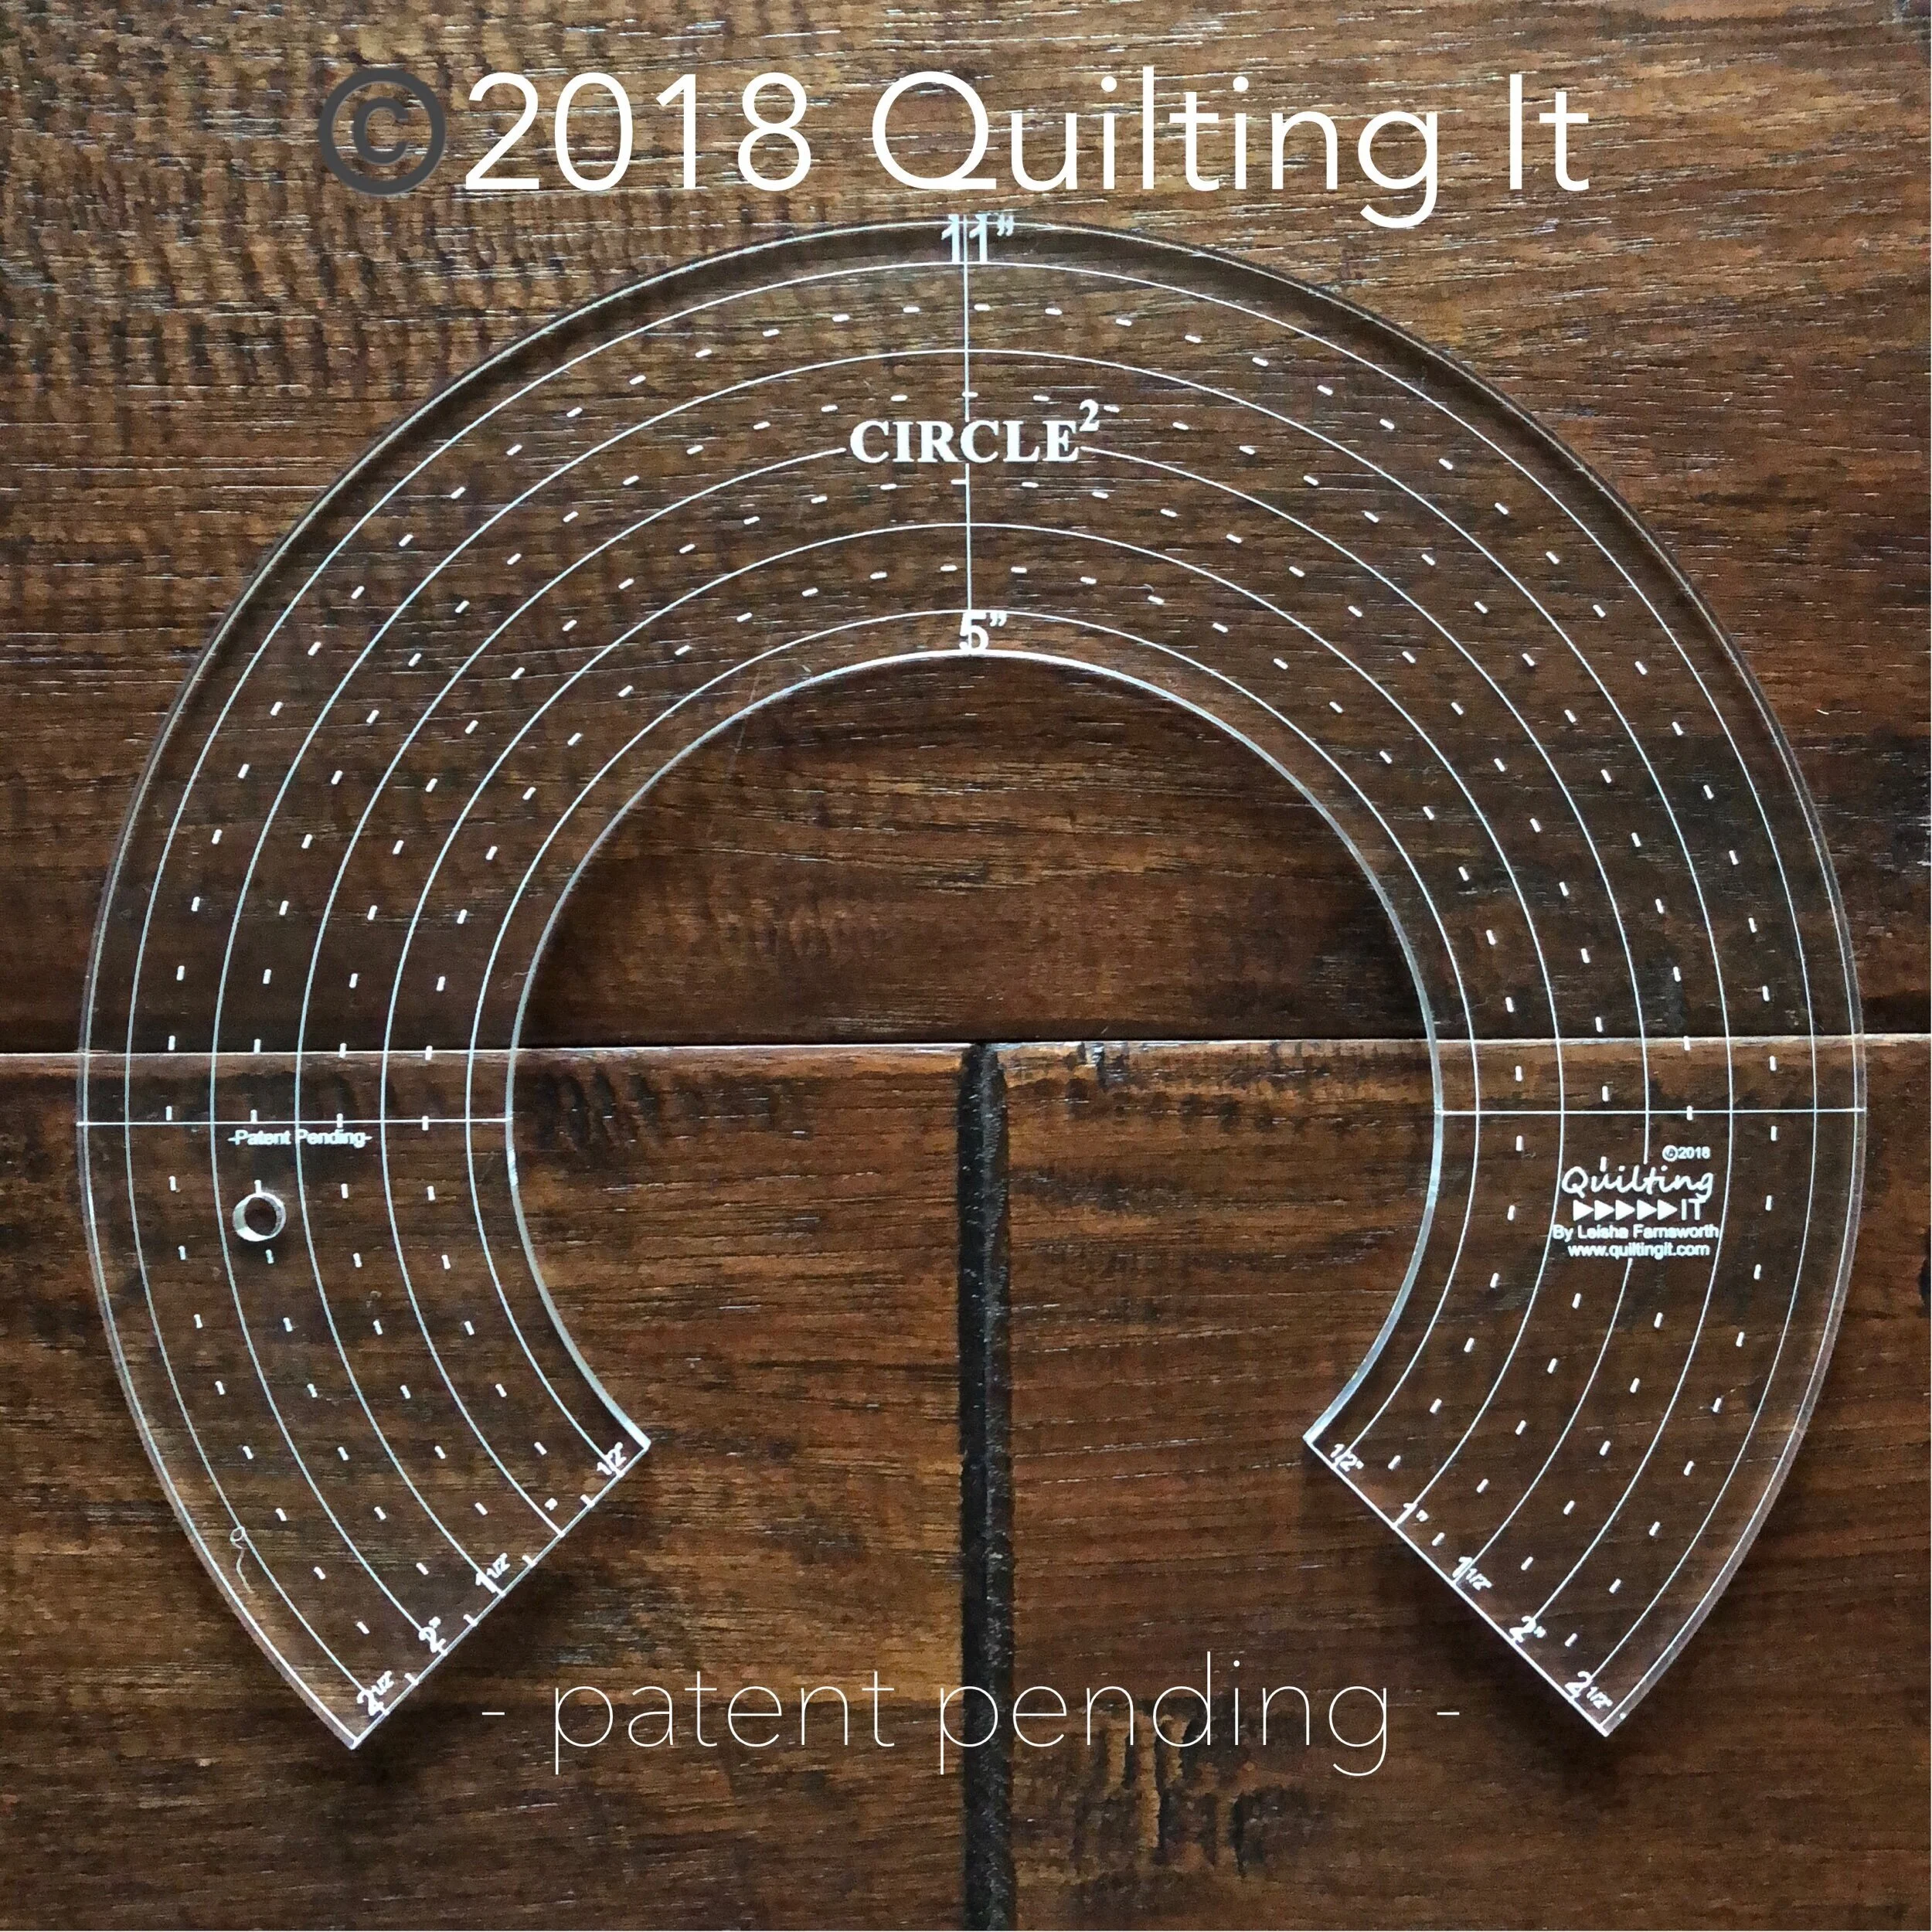
These are the clear versions of my Circle2™ rulers. They come in a set of 6…two sizes of circles per ruler, with circle sizes ranging from 2” to 13”. They also come in green acrylic, too. (Scroll down) They come in 1/4” thick high quality acrylic and are made in America. Here is a link to learn more about this set of rulers. https://www.quiltingit.com/blog/2018/10/10/introducing-my-circle2-longarm-circle-ruler-set
My Circle2™ machine quilting ruler sets are available in my shop.
- Design Patent D875,574 -
I used the 3” Circle2™ ruler to quilt the 4 petals inside the center of the arcs. The combination of the arcs and petals, beautifully frame around the medallions.
For the medallions themselves, I tried to highlight the shape. I went around the center circle several times to help the center pop even more, especially with the double batting. In the star portion of the block I simply quilted a circle with a 1/2” line, which adds some variety to the overall design. I added a few petals in each of the scallop petals, and then finished off the dresden pieces with some simple pinstripe lines, using the 8” Edge rulers from Linda at The Quilted Pineapple. Then to enhance the pink pinstripes, I just quilted a line along the edge or in the ditch. It helped the batting pop even more.
I love the overall look of this quilt. And…I may be a little bit biased but I think the quilting makes this quilt shine!! Thread, rulers, and a little bit of creativity can work wonders.
This is why investing in some great quilting rulers is so important to increasing your freemotion quilting. I was very particular when I created my Circle2™ rulers. I wanted you to have 2 rulers per ruler, so you only need 6 rulers to get 12 sizes of circles. I also took into consideration the 1/4” hopping foot on your machine. If you quilt a circle with the 3” circle, it will be 3”…not 3” like all the other circle rulers I’ve come across. Which is something that frustrated me with the previous set I used. My Circle2™ rulers are 2.5” wide which fits nicely in our hands. There are also some very helpful 1/4” lines to use as you quilt, and measurements along the straight edges. Here is a look at me using one of them on a table runner… https://youtu.be/GWyDTymyzoE

See that scalloped diamond design in the inner border? I used the 8” Circle2™ ruler to create those beautiful curves, which also frames the quilt beautifully.
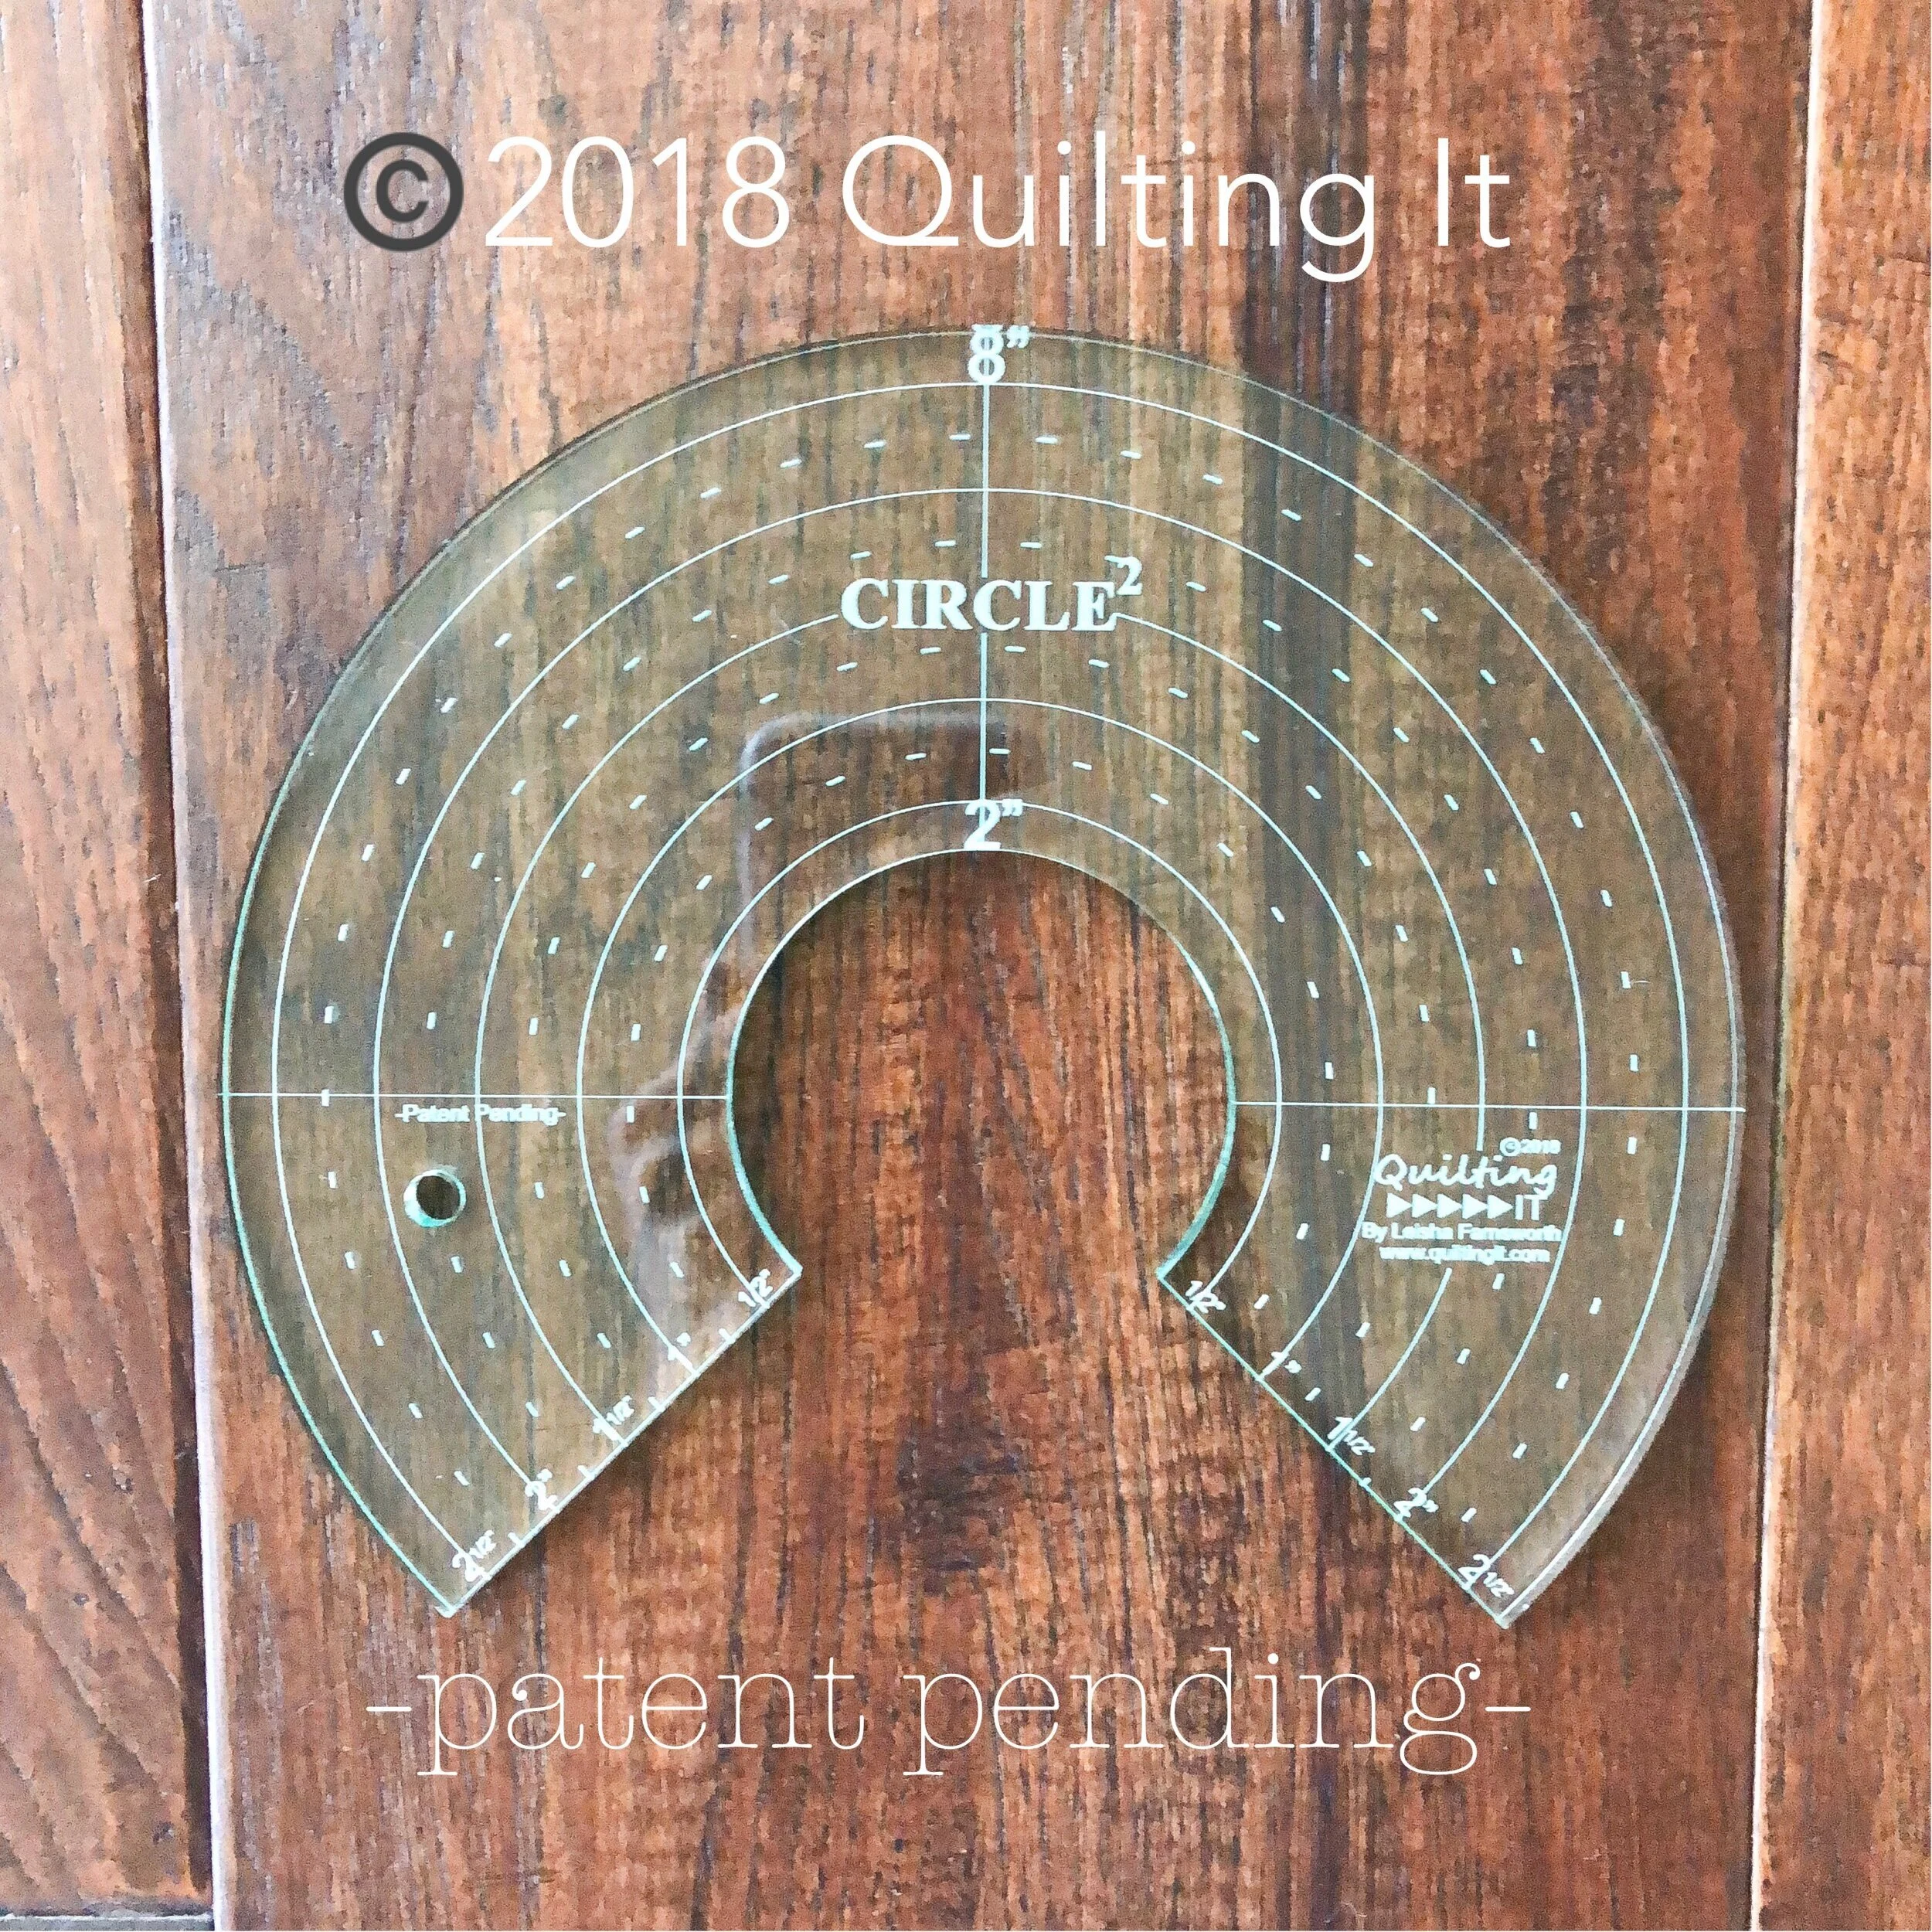
This is the 2”/8” Circle2™ ruler. The previous rulers, pictured above are the 3”/9” and the 5”/11” sizes of circles.
I finished off the outer border with my freehand swirly feather design. If you’d love to learn this design, stay tuned. I have something coming very soon to help you do just that!
Thank you for coming on by!! Happy July and I hope you’re getting some sewing done. Take care, • Leisha

40% off All Digital Quilting Designs
Hello,
It’s me, Leisha. In case you missed it I’m turning 40, and so I thought it would be great to do a 40% off sale on all Digital Machine Quilting Designs in my shop. All you need to do is enter “HAPPY40” during checkout. The sale started at midnight and ends at 11:59 pm. (Mountain standard time) my website is: www.quilting.com/shop

Here are a few of my new favorite quilting designs….Trellis, Skipper, and Smitten…all are available in my shop. There are several others as well!!

Which designs are your favorite? I would certainly have a hard time choosing. Have a great Monday!!!!!
Thank you for coming by!!
• Leisha

40% off Sale!
Hello,
I hope you’re all doing well!! I just wanted to quickly share….
I’m turning 40 on Monday July 5th…so, I thought it would be great day to have our best sale ever on digital quilting designs!! 40% off!! Enter code: “ HAPPY40 ” at checkout. The sale will only last for 24 hours, it starts at midnight on the 5th and goes until 11:59 pm (mountain standard time). Be sure to get the designs that you’ve had your eye on for awhile. Head over to my shop. My Circle2™ rulers will also be $10 off that day as well!
Thanks for being here!!
• Leisha

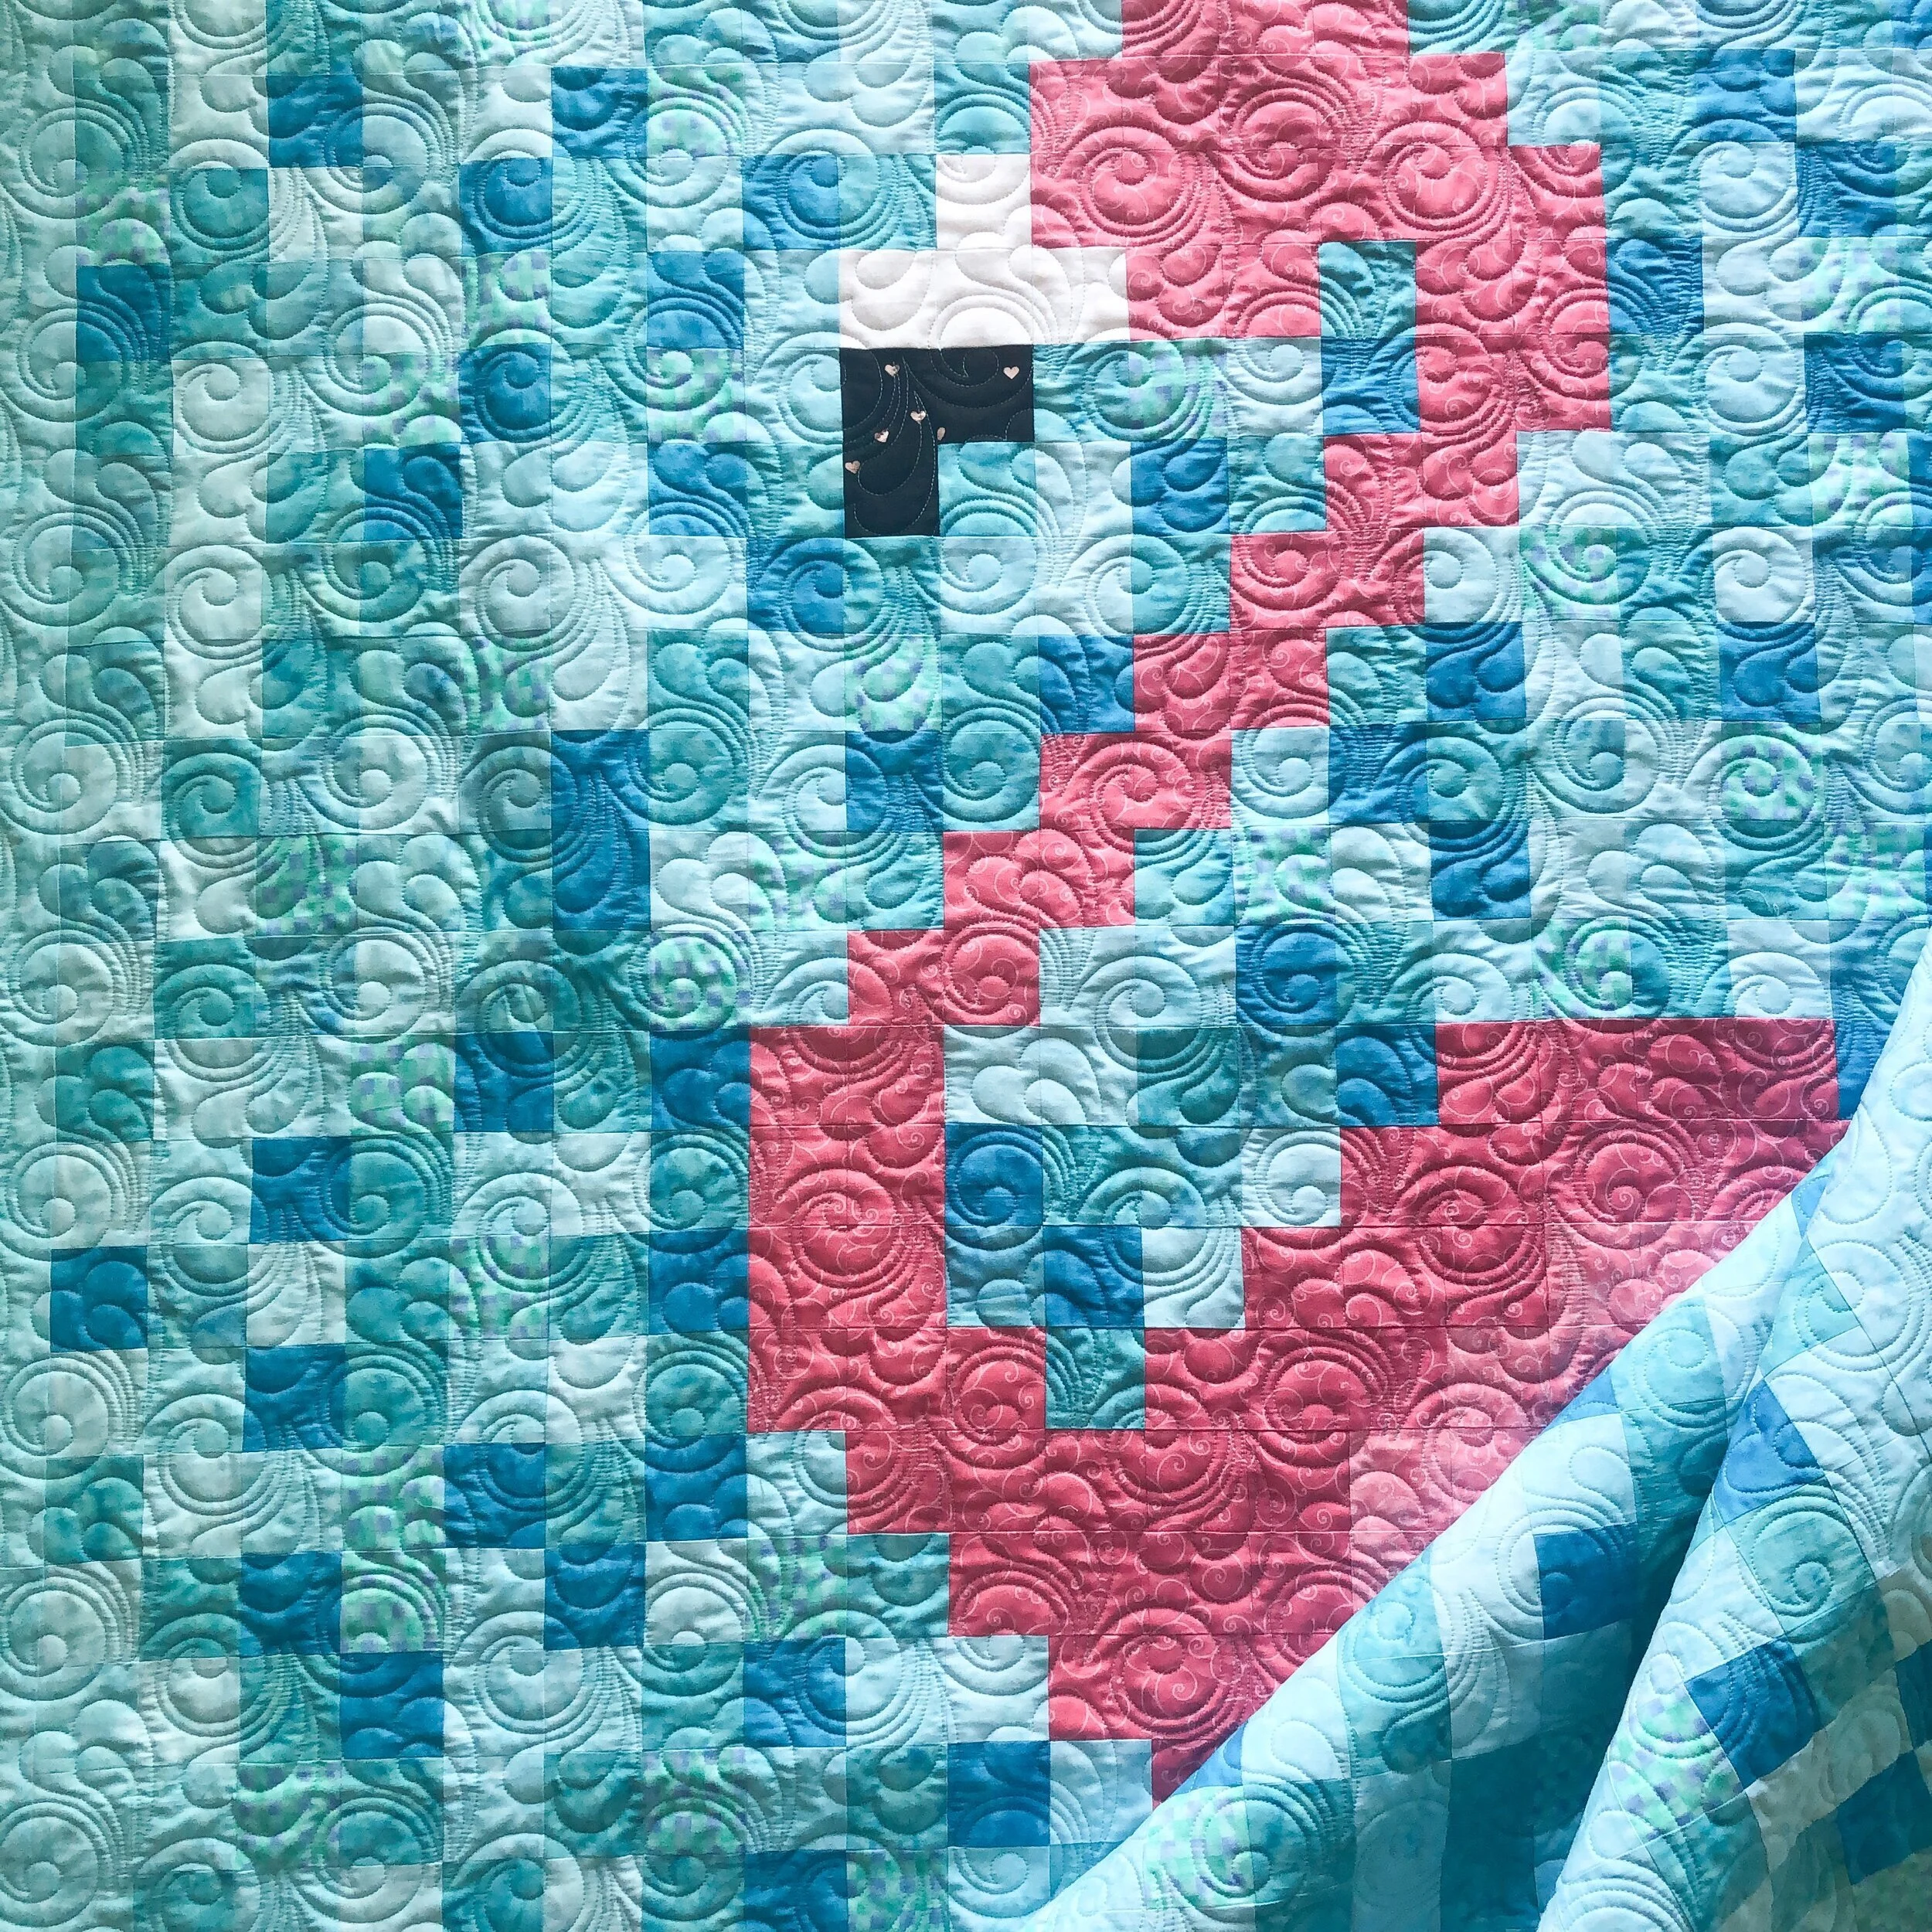
Chris’ Flamingo Quilt
Hello,
I have another fun quilt to share with you, but first, I want to mention I have something big for you happening on the 5th of July!!!! Watch for an email a couple days before, because if you’re a longarm quilter you will not want to miss it!!
My sweet friend Chris made this adorable quilt for her granddaughter! It the Easy Grid “Flamingo Sisters” pattern by Ten Sisters Handicraft. It’s actually on sale right now, and FREE!!
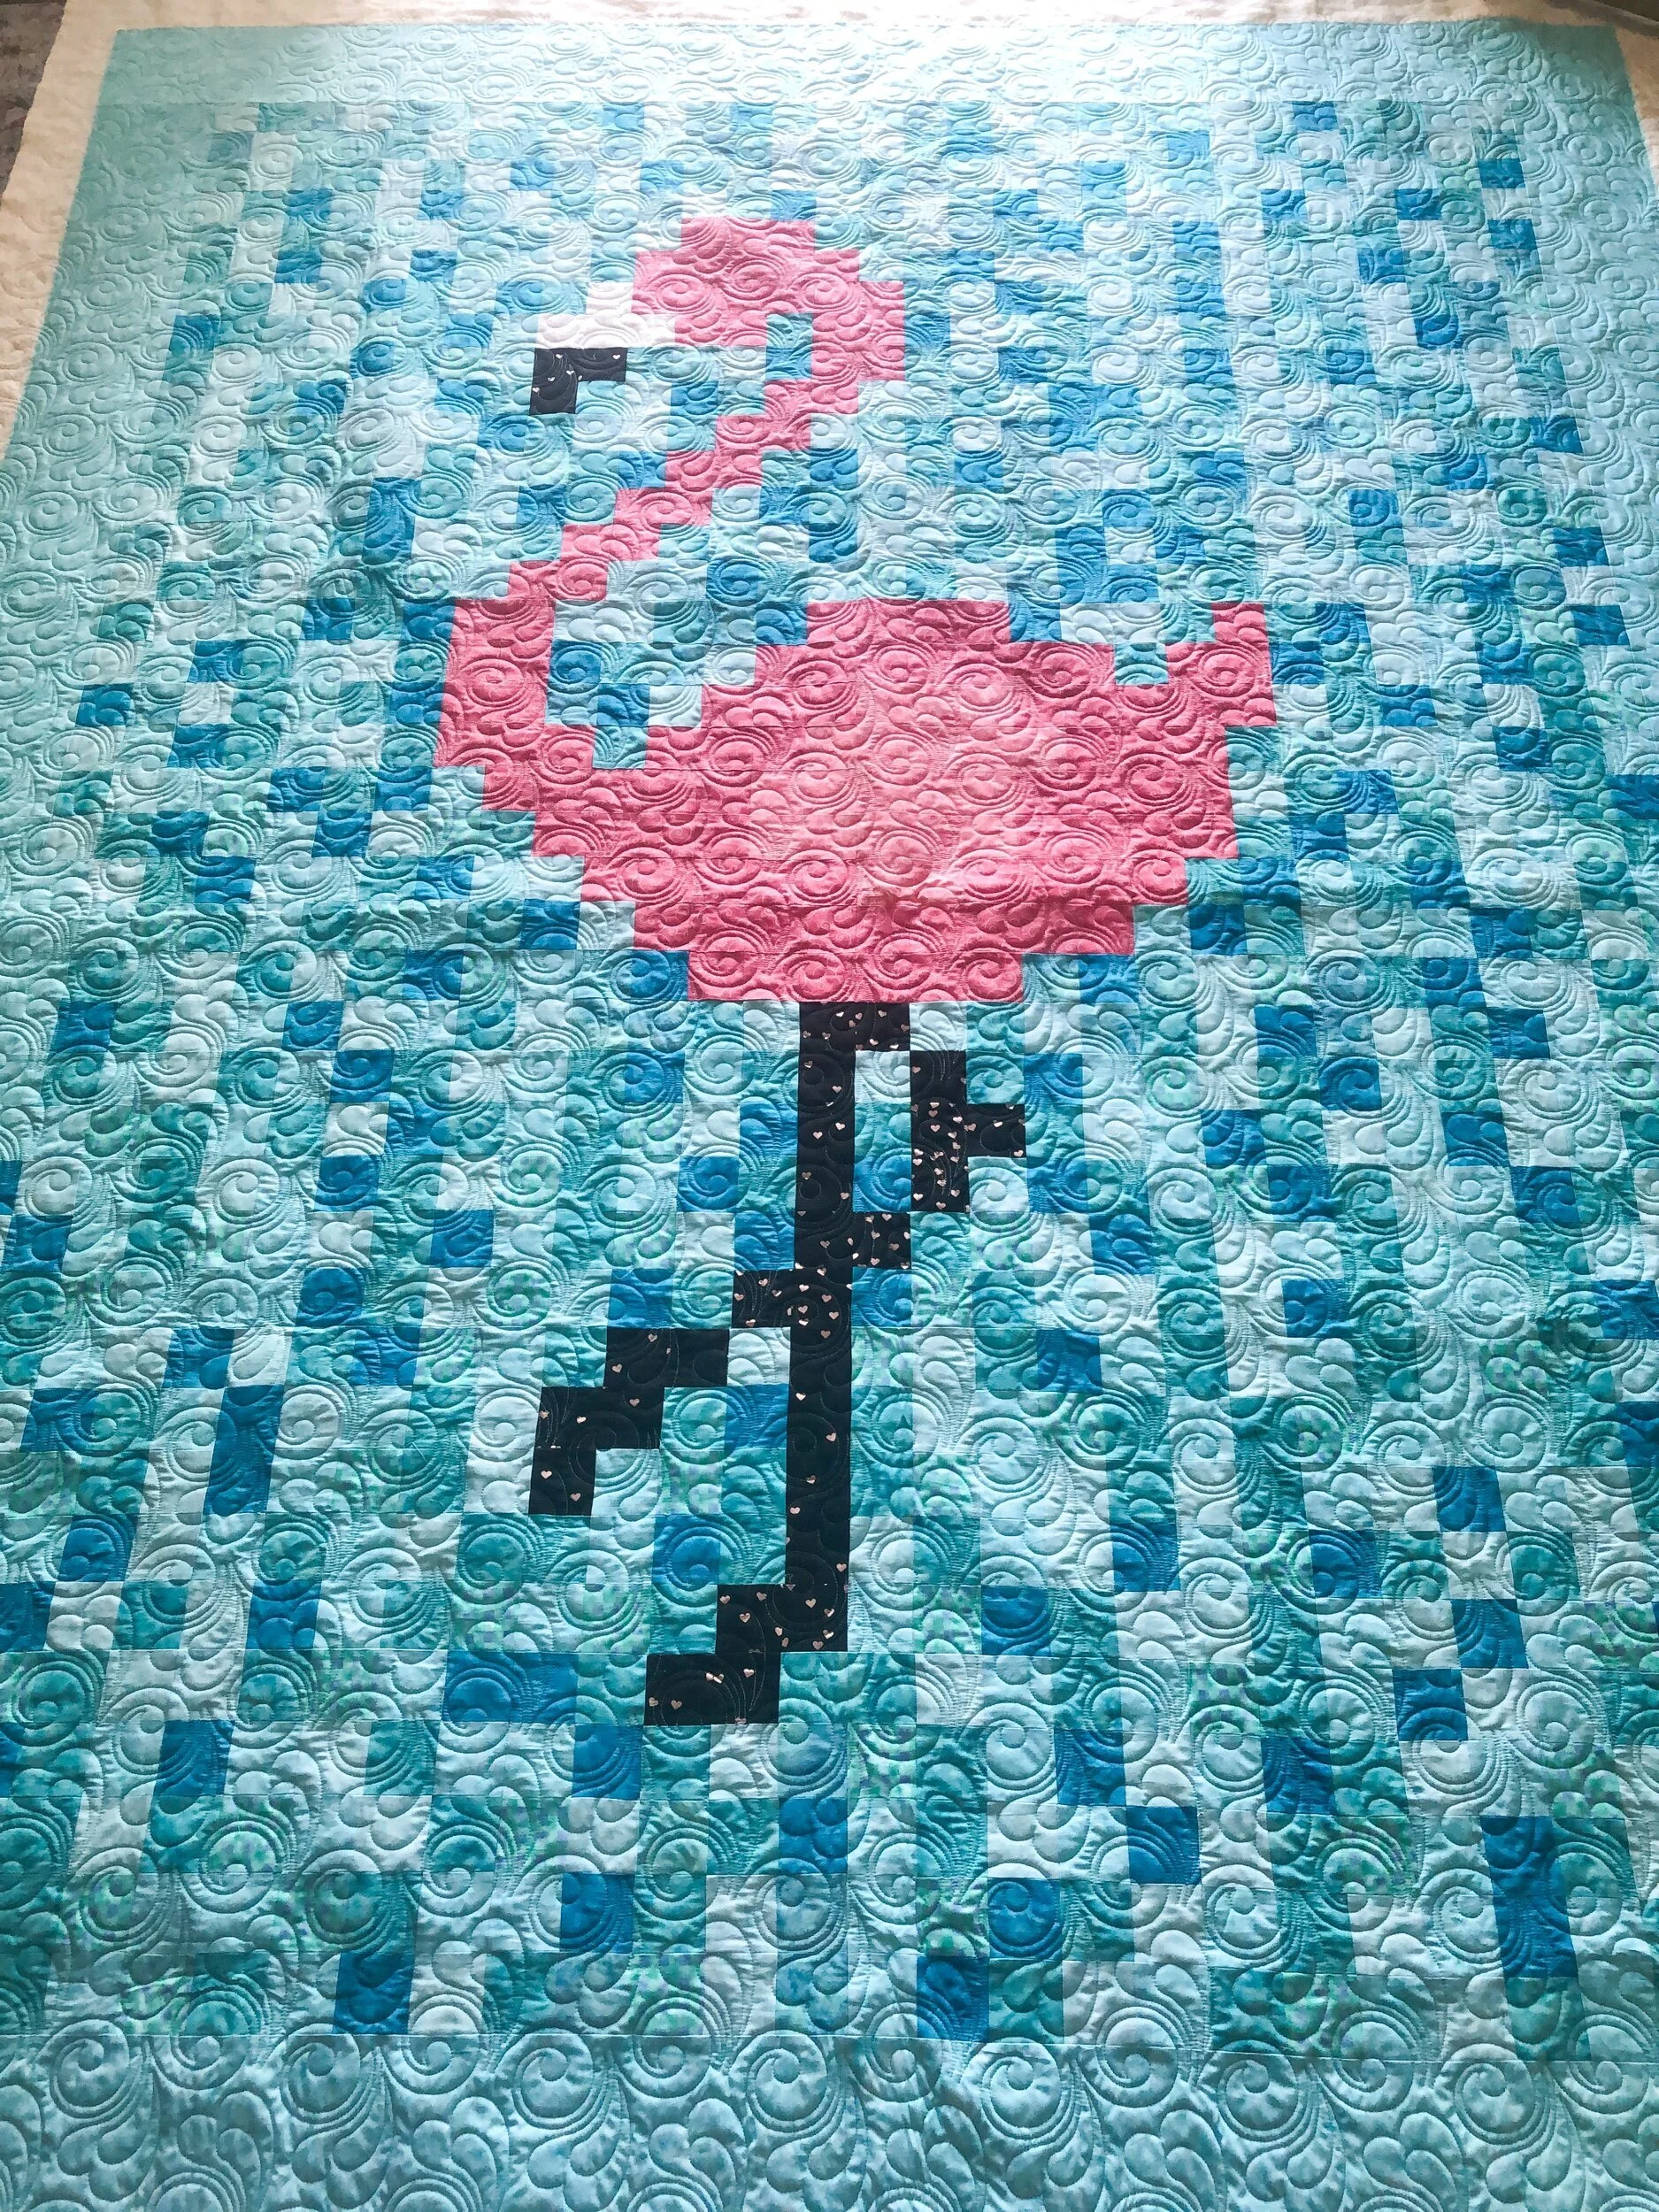
Chris’ 6 year old granddaughter Fiona, loves when Chris sends her videos of things she’s making, and even let her pick the pattern and fabrics for this quilt. She did a great job!! Hopefully someday she will sew along with her grandma. To add to the fun, I videoed the machine quilting her quilt and sent it to her. Which she loved seeing.
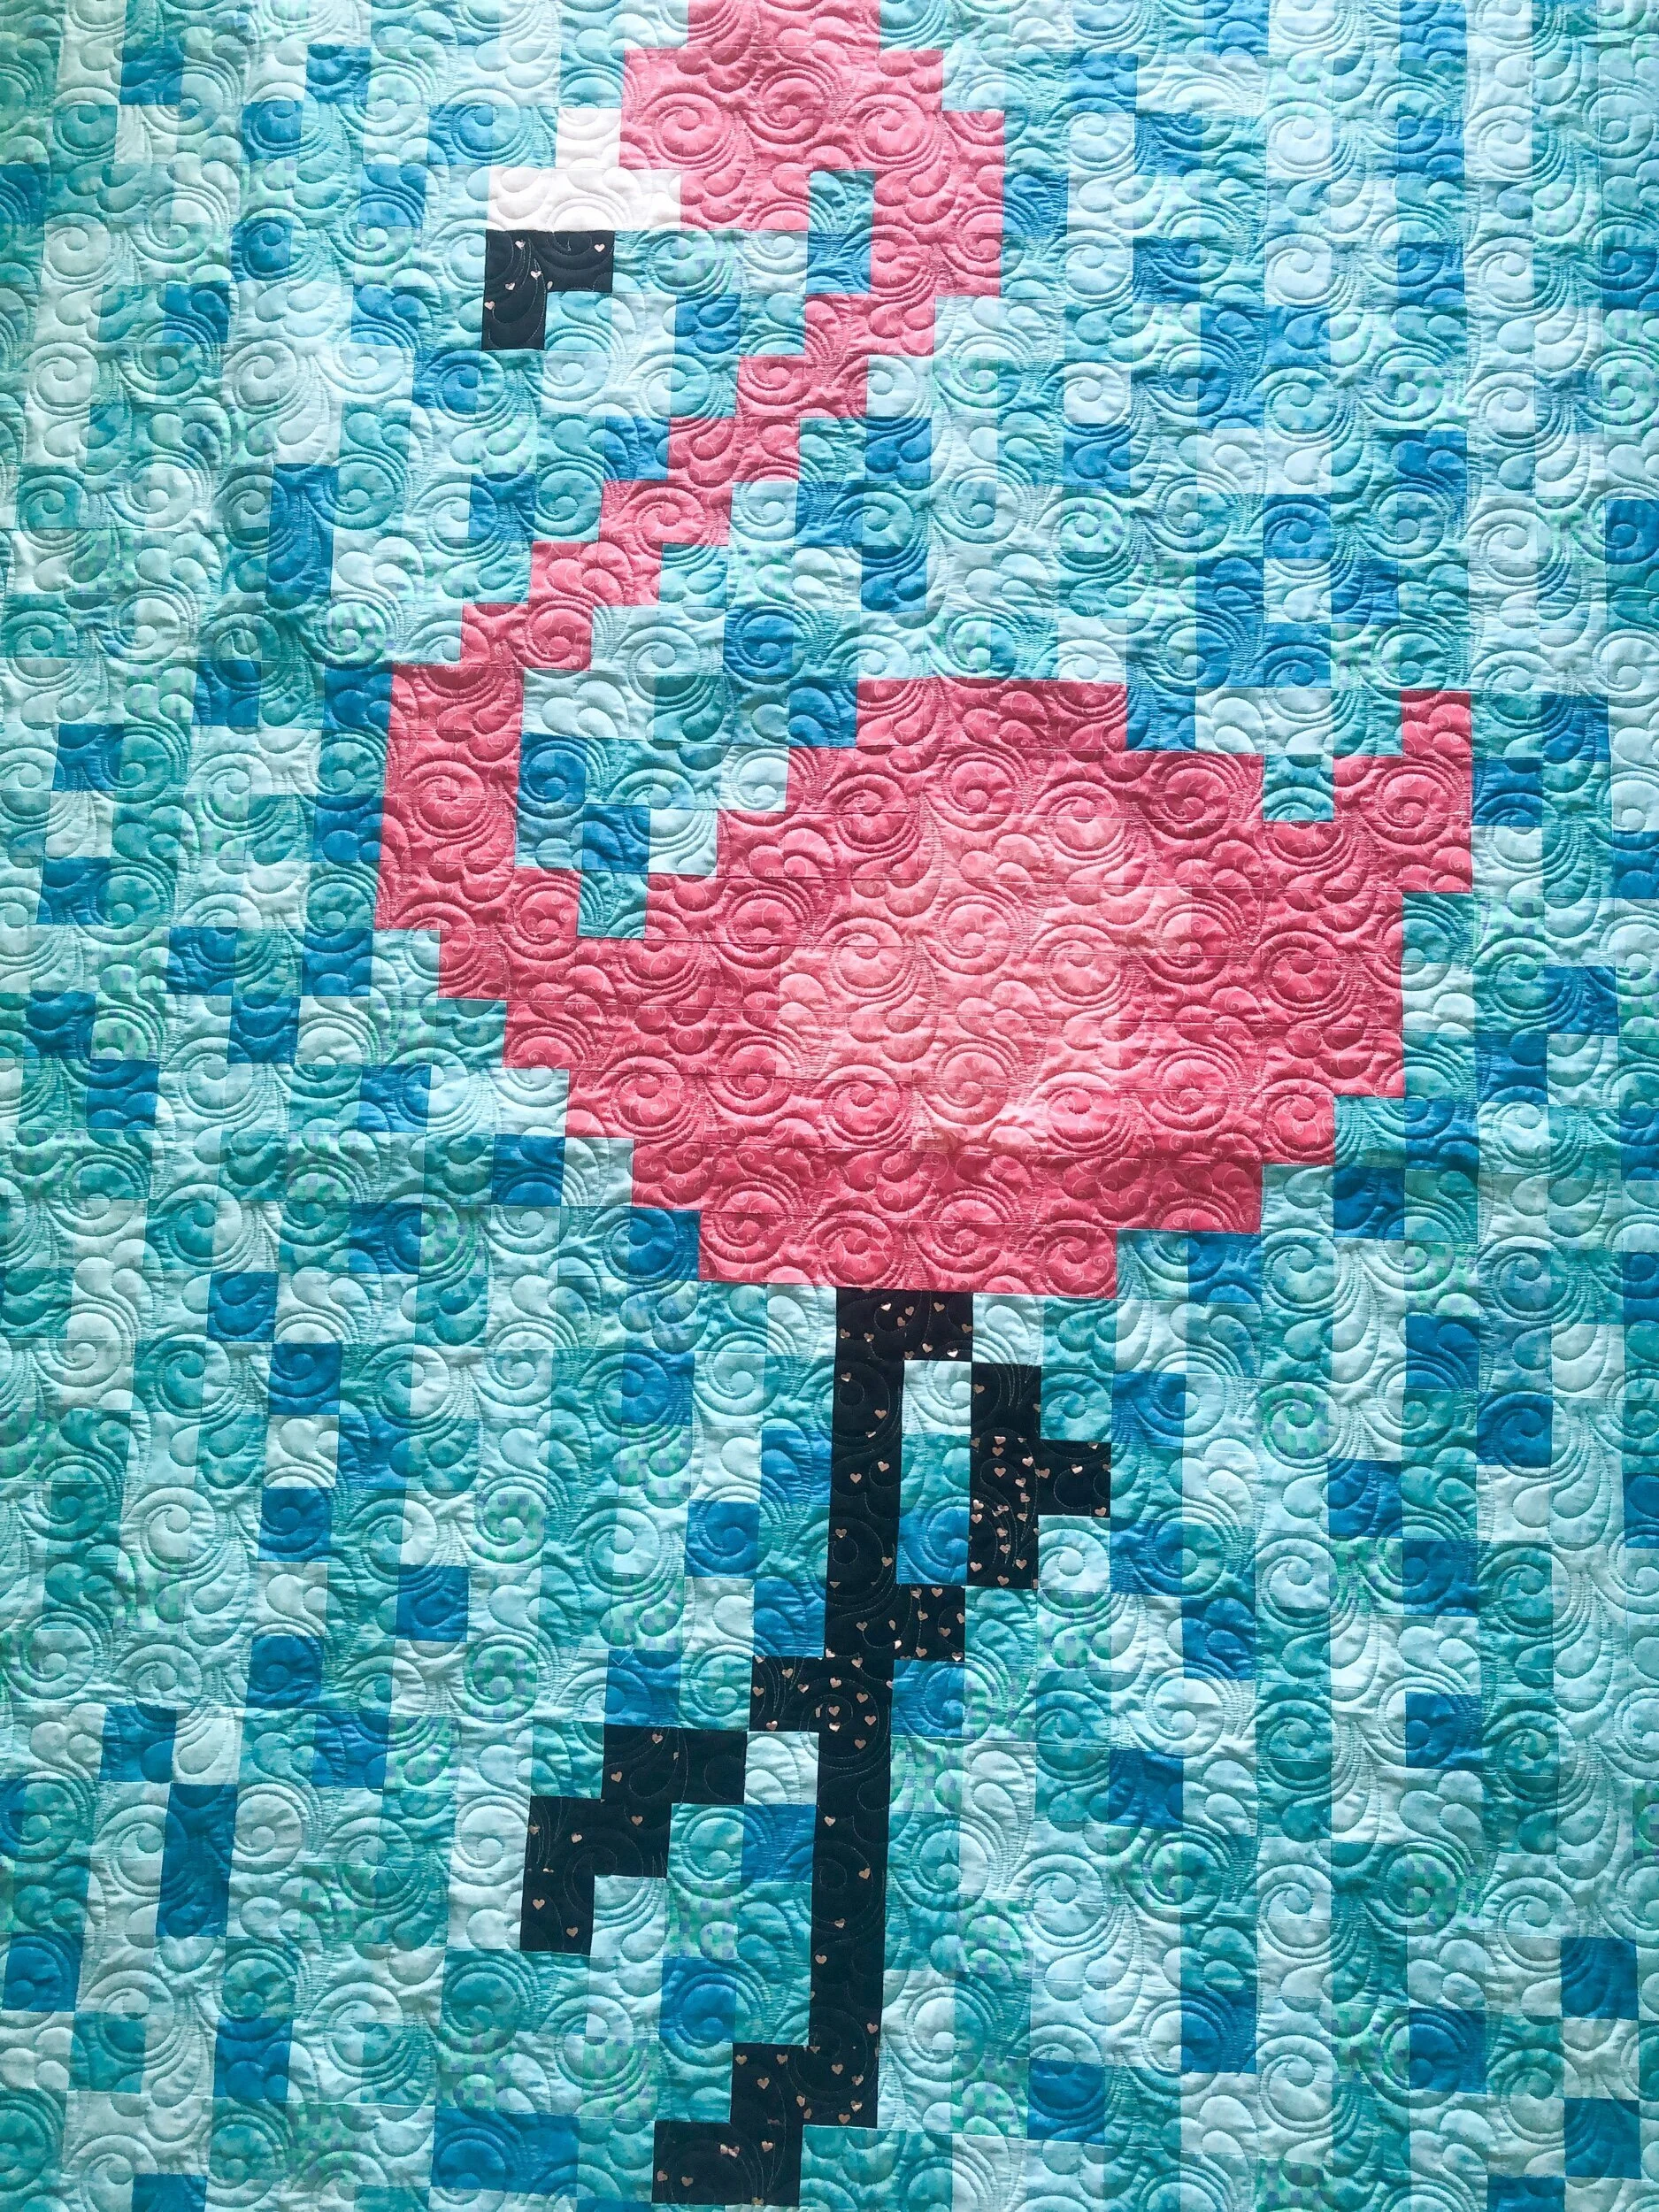
I love the variety of blues that Chris used! She’s an expert at intermixing the blue fabrics.
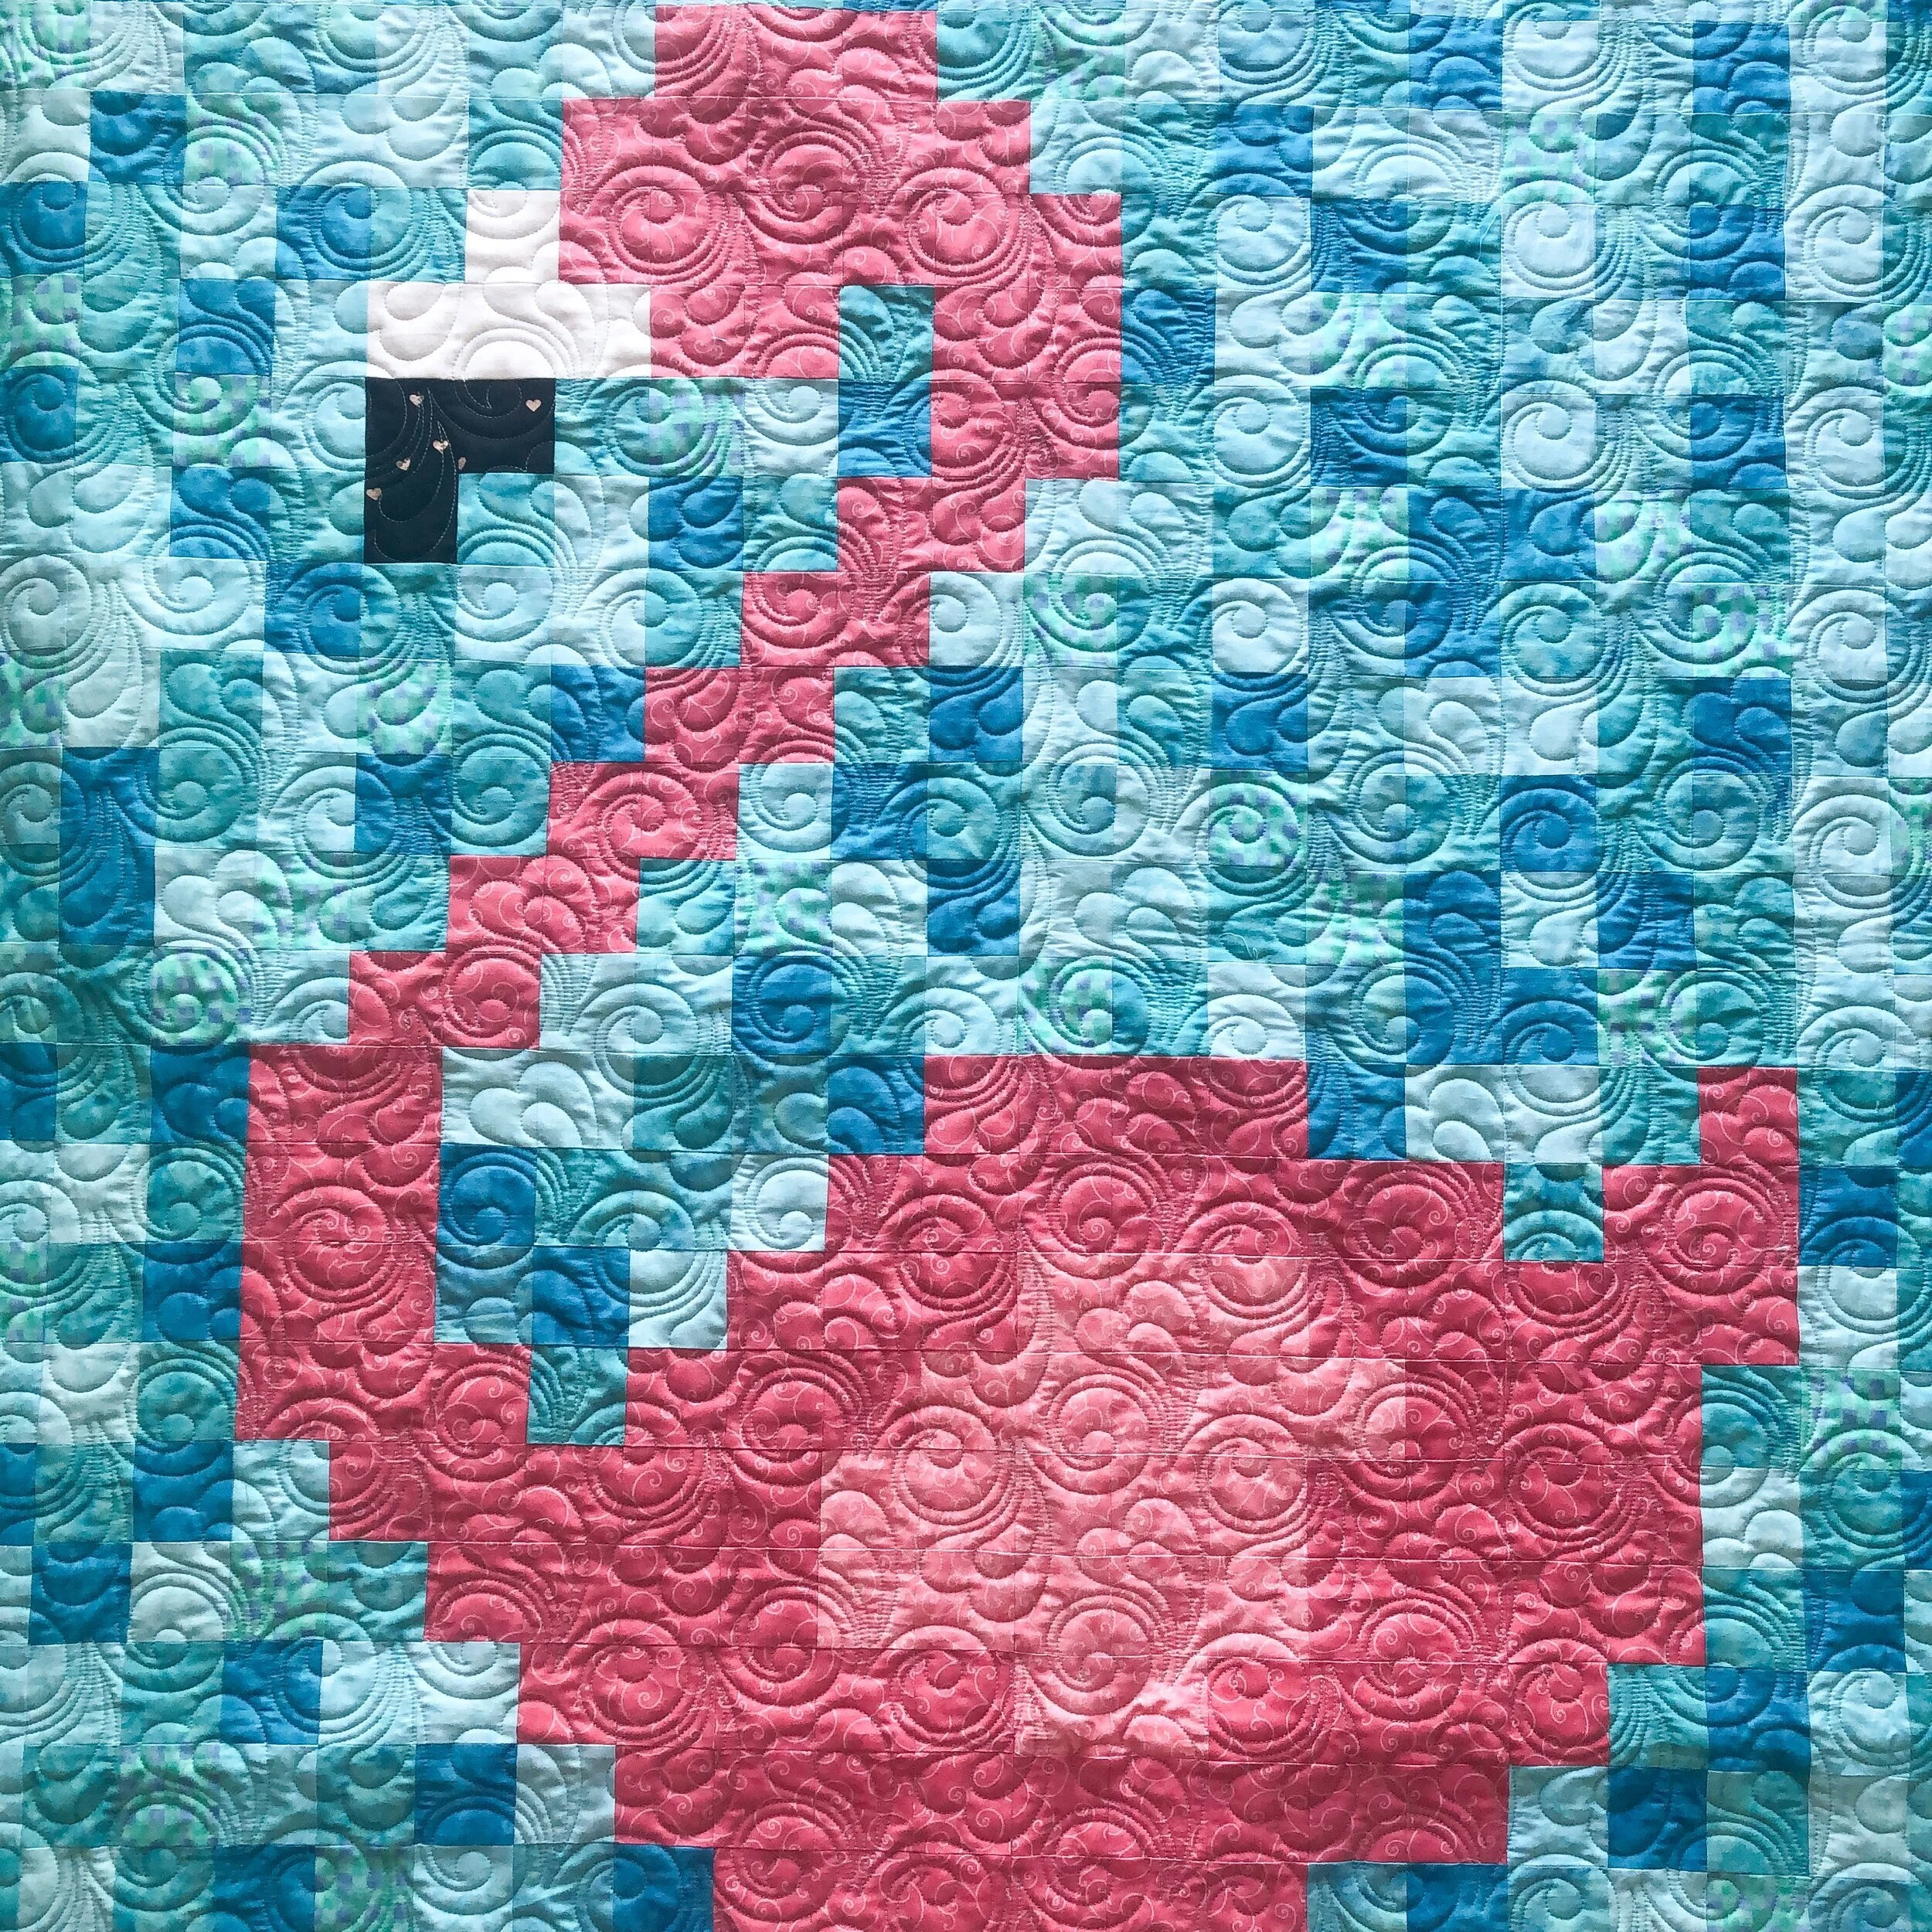
I used 8020 cotton poly blend batting, and an aqua thread.
We decided on Cupid, one of Patricia Ritter and my quilting designs for the quilting. It’s available at Urban Elementz. I think it turned out cute!! I love how the swirls and heart like feather soften the overall look of the quilt.
That quilty texture is just soooo good!!!
Hope you’re enjoying summer!! It will be over before we know it. Take care and happy quilting!
• Leisha
Trellis + 20% off
Hi there,
I hope your summer (or winter) is off to a great start. We are loving all the sunshine over here. I have some fun quilts to share with you soon, but first I wanted to share my newest machine quilting design with you first. Meet Trellis! Naming this one took me awhile. I typically think of a few names until something clicks. Nothing was coming to me so did a little search and saw the word Trellis, and it just instantly felt right. Naming designs can be a fun part of the designing process.
Trellis is 20% off until midnight tonight. (Friday). Trellis is available in my shop. Do you have a quilt this would be beautiful on?
This design requires a 50% offset to achieve the layouts in the first and third image. I like offering other layout options, when there is an offset, it shows the versatility of the design. This is my favorite layout…I like the spacing just like this!!
This is how the design will look without an offset, which is great if you want to do something else in the negative space or size the design down.
In the image above, the design is almost touching, but not quite… which makes it easier when machine quilting. This layout is also offset 50%.
Trellis reminds me of some of the free motion designs I custom quilt on quilt blocks using my Circle2™ rulers. It’s so fun to have it as an edge to edge design.
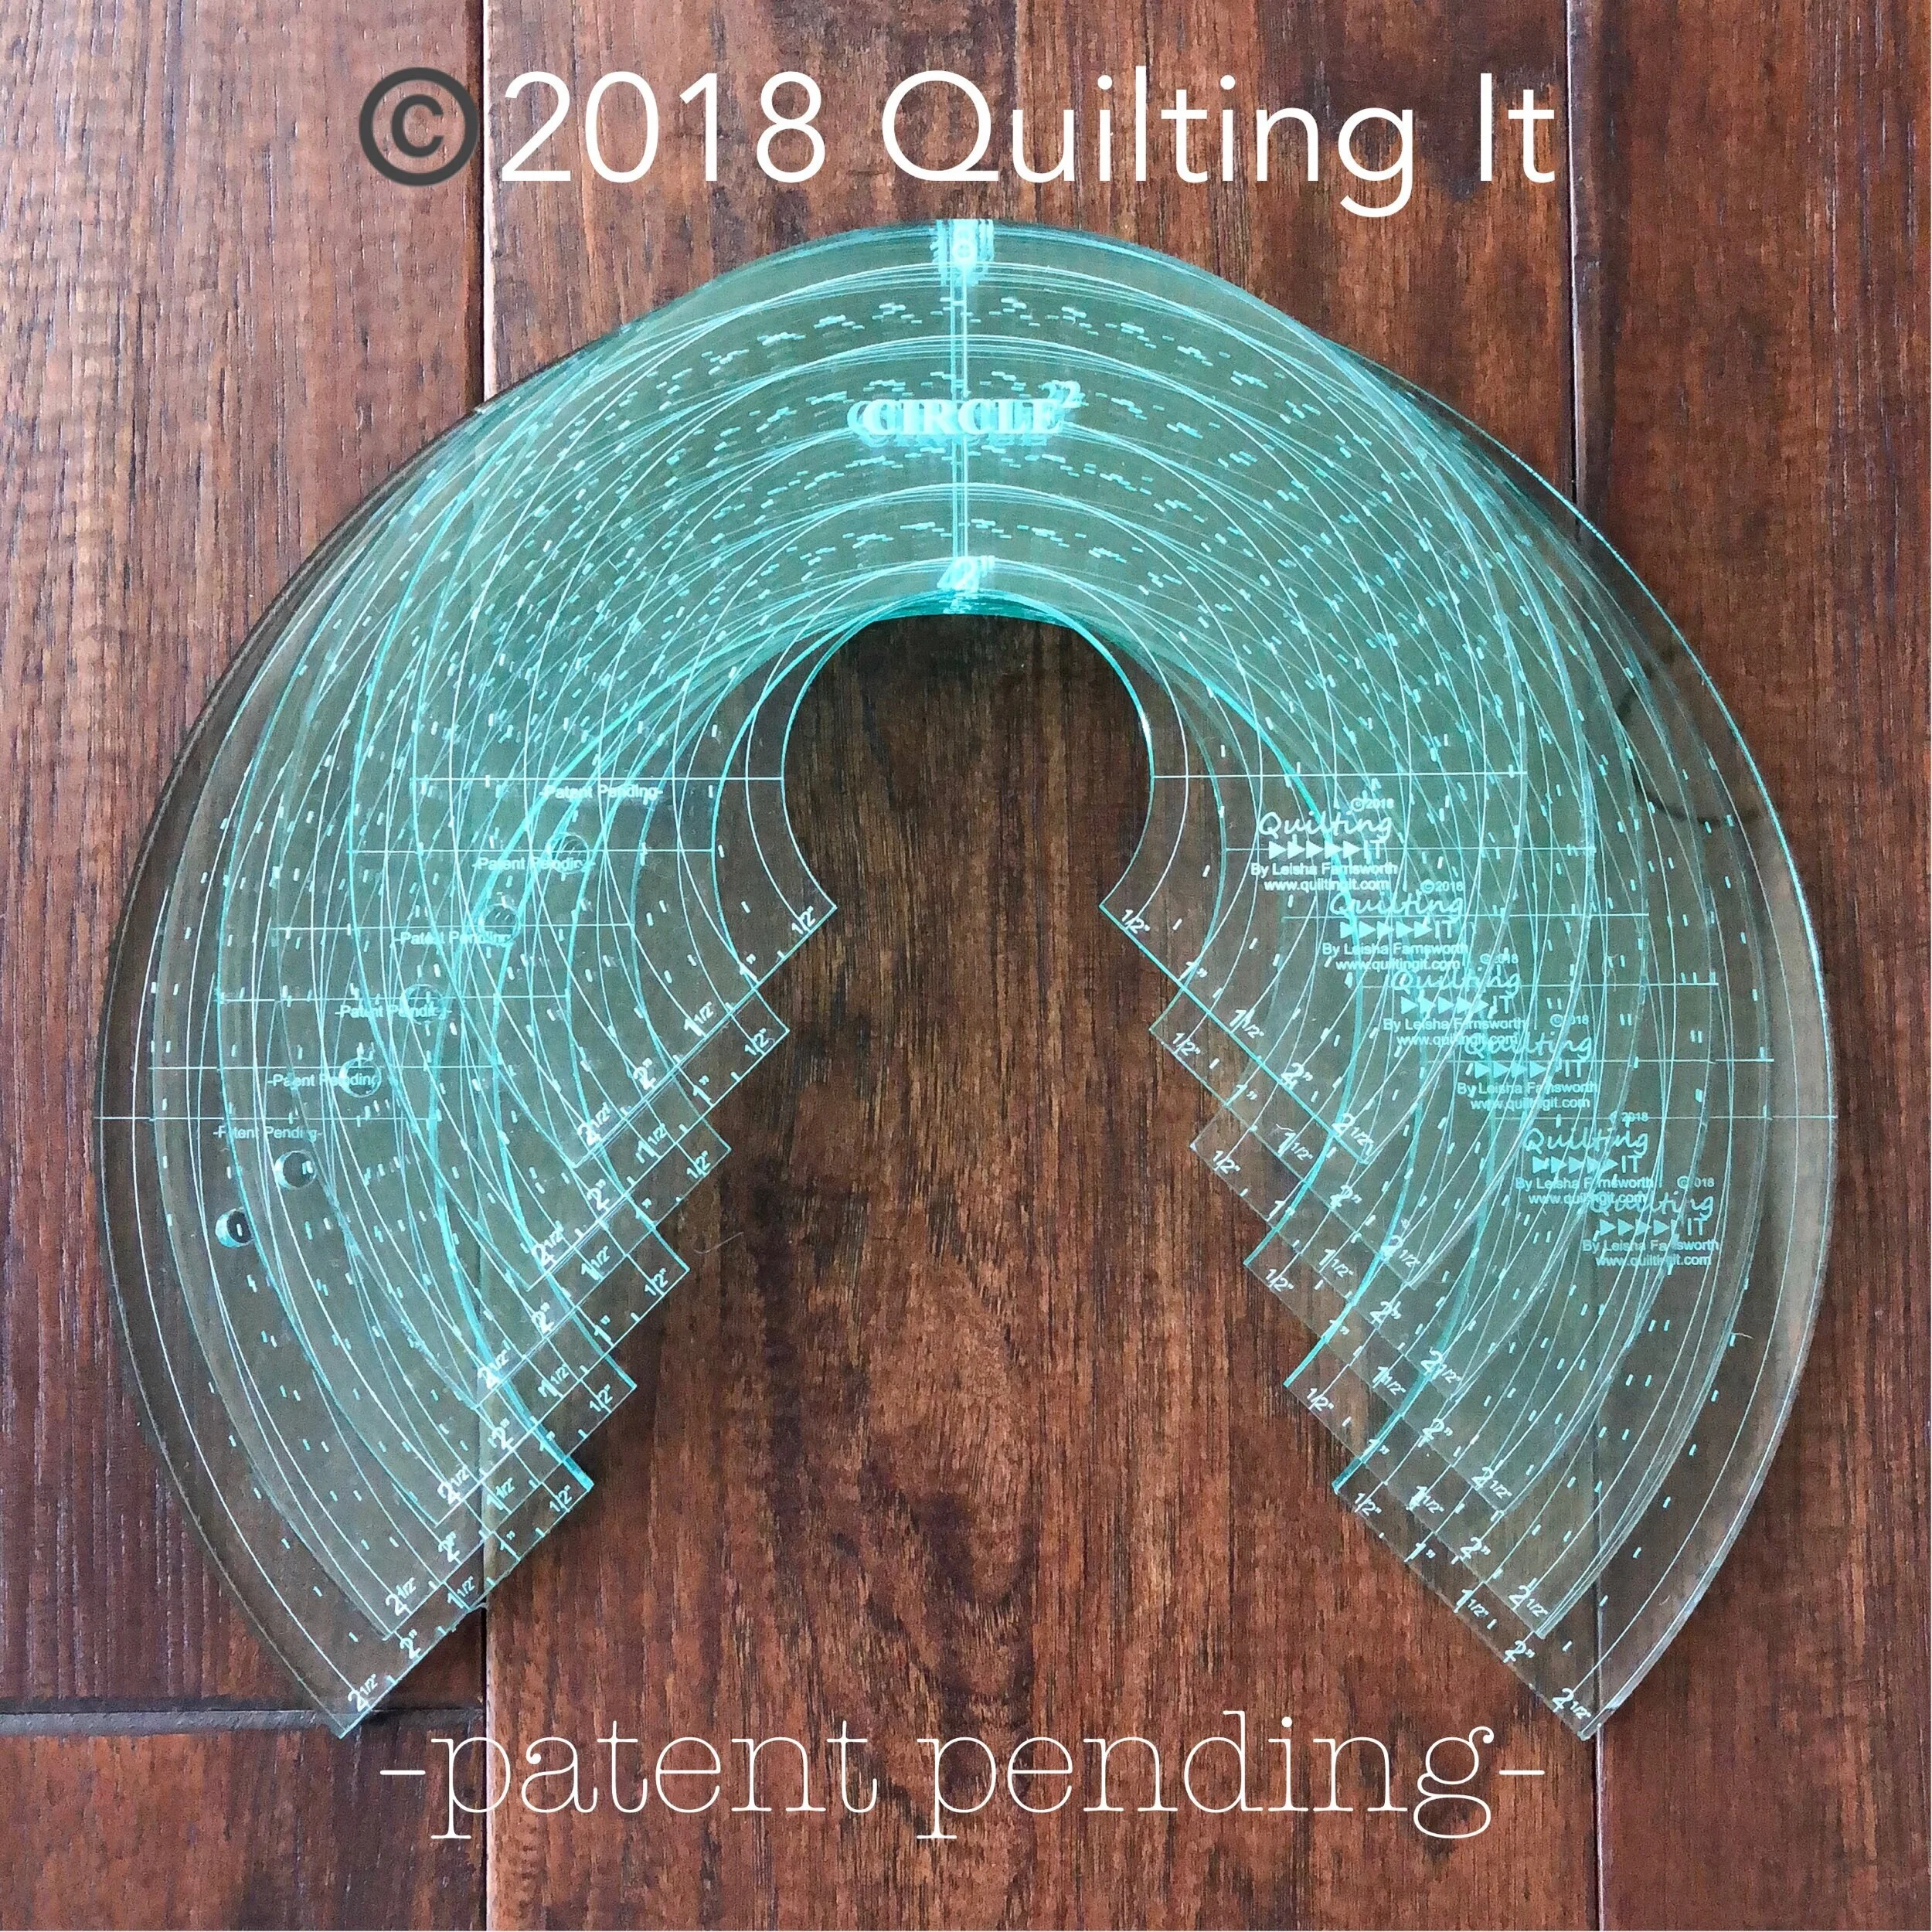
Here is a look of all 6 green Circle2™ machine quilting circle rulers stacked on one another. I use them nearly every single time I custom quilt. It’s the best circle ruler set I’ve ever used.
- Design Patent D875,574 -
OOOOhhhh! Also, I have a couple big things coming soon…I can’t wait to share. I’ll announce one of them on the 4th of July, so stay tuned!!
Have a great weekend!! • Leisha
Jaimie’s “Lucy Quilt” + Design of the Week
Hello,
I hope you are having a great week!! I am excited to share with you this cute quilt that Jaimie made!!
This is called the Lucy quilt by Cottoneer. It is a free quilt pattern when you sign up for their email list.

I love the contrast of the colors, black and white fabrics!
I used bamboo batting from Winline, which is so wonderful!! I also used white Omni thread from Superior Threads.
I created some Lined designs, one of which I used. If you’re a longarm quilter, and you’ve tried quilting lines back and forth, then you know about the possibility of thread breaks. Machines don’t love quilting from right to left and the thread likes to break or shred. There are some great tips like…turning the needle to a 5:30 position and having just the right speed as it’s quilting out. A new tip, which I got from Kaitlyn at Knot and Thread, is to spray your thread with water. She said to get your spool pretty wet to start and then spray it good again each time you roll the quilt. This was a huge help for me. I heard another quilter say that Glide thread really helps them with thread breaks. I shared these tips in a highlight bubble on my Instagram, as I was quilting this quilt. Check it out!! I typically have 3-5 breaks per line, and ended up having 5-6 in an entire section…which is a big difference. My machine is definitely temperamental. Play around with those tips for machine, and figure out what is best for you!
The reason the design goes back and forth, is so that it can quilt out an entire section without stopping. I have quilted many quilts where I quilt one line at a time. Which takes a lot of time and wastes more thread.
Jaimie also asked me to bind her quilt for her. I see one side on with the sewing machine, and then hand stitch the other side.
I used my Lined 1/2” design for this one. I also have a Lined 1/4”, Lined 3/4”, and a Lined 1” available in my shop. All the details are listed in each individual design. These are also the Design of the Week!! All four are already marked 20% off, no code necessary, until Wednesday of next week.

Okay…so this is important!! During design setup before you quilt, you want the design to look like the one above, not below. There should be no vertical lines. On the Gammill Statler that I quilt on, there is a box checked for the “maintain aspect” option when I’m setting up the design. You’ll want to uncheck that. The width of the design should be the width of your quilt boundary with no repeats, and then the height of the design must be the height that I share in each of the individual design descriptions. For example, this Lined 1/2” design must be set at 11.5” height in order to get a 1/2” spacing between each row. I have had requests for a line design that quilts back and forth, for years. This is what I’ve done to make it possible. Setup options may be a little different on your machine, but I’m sure the concept is similar.
Thanks for stopping by!! Have a great week! - Leisha
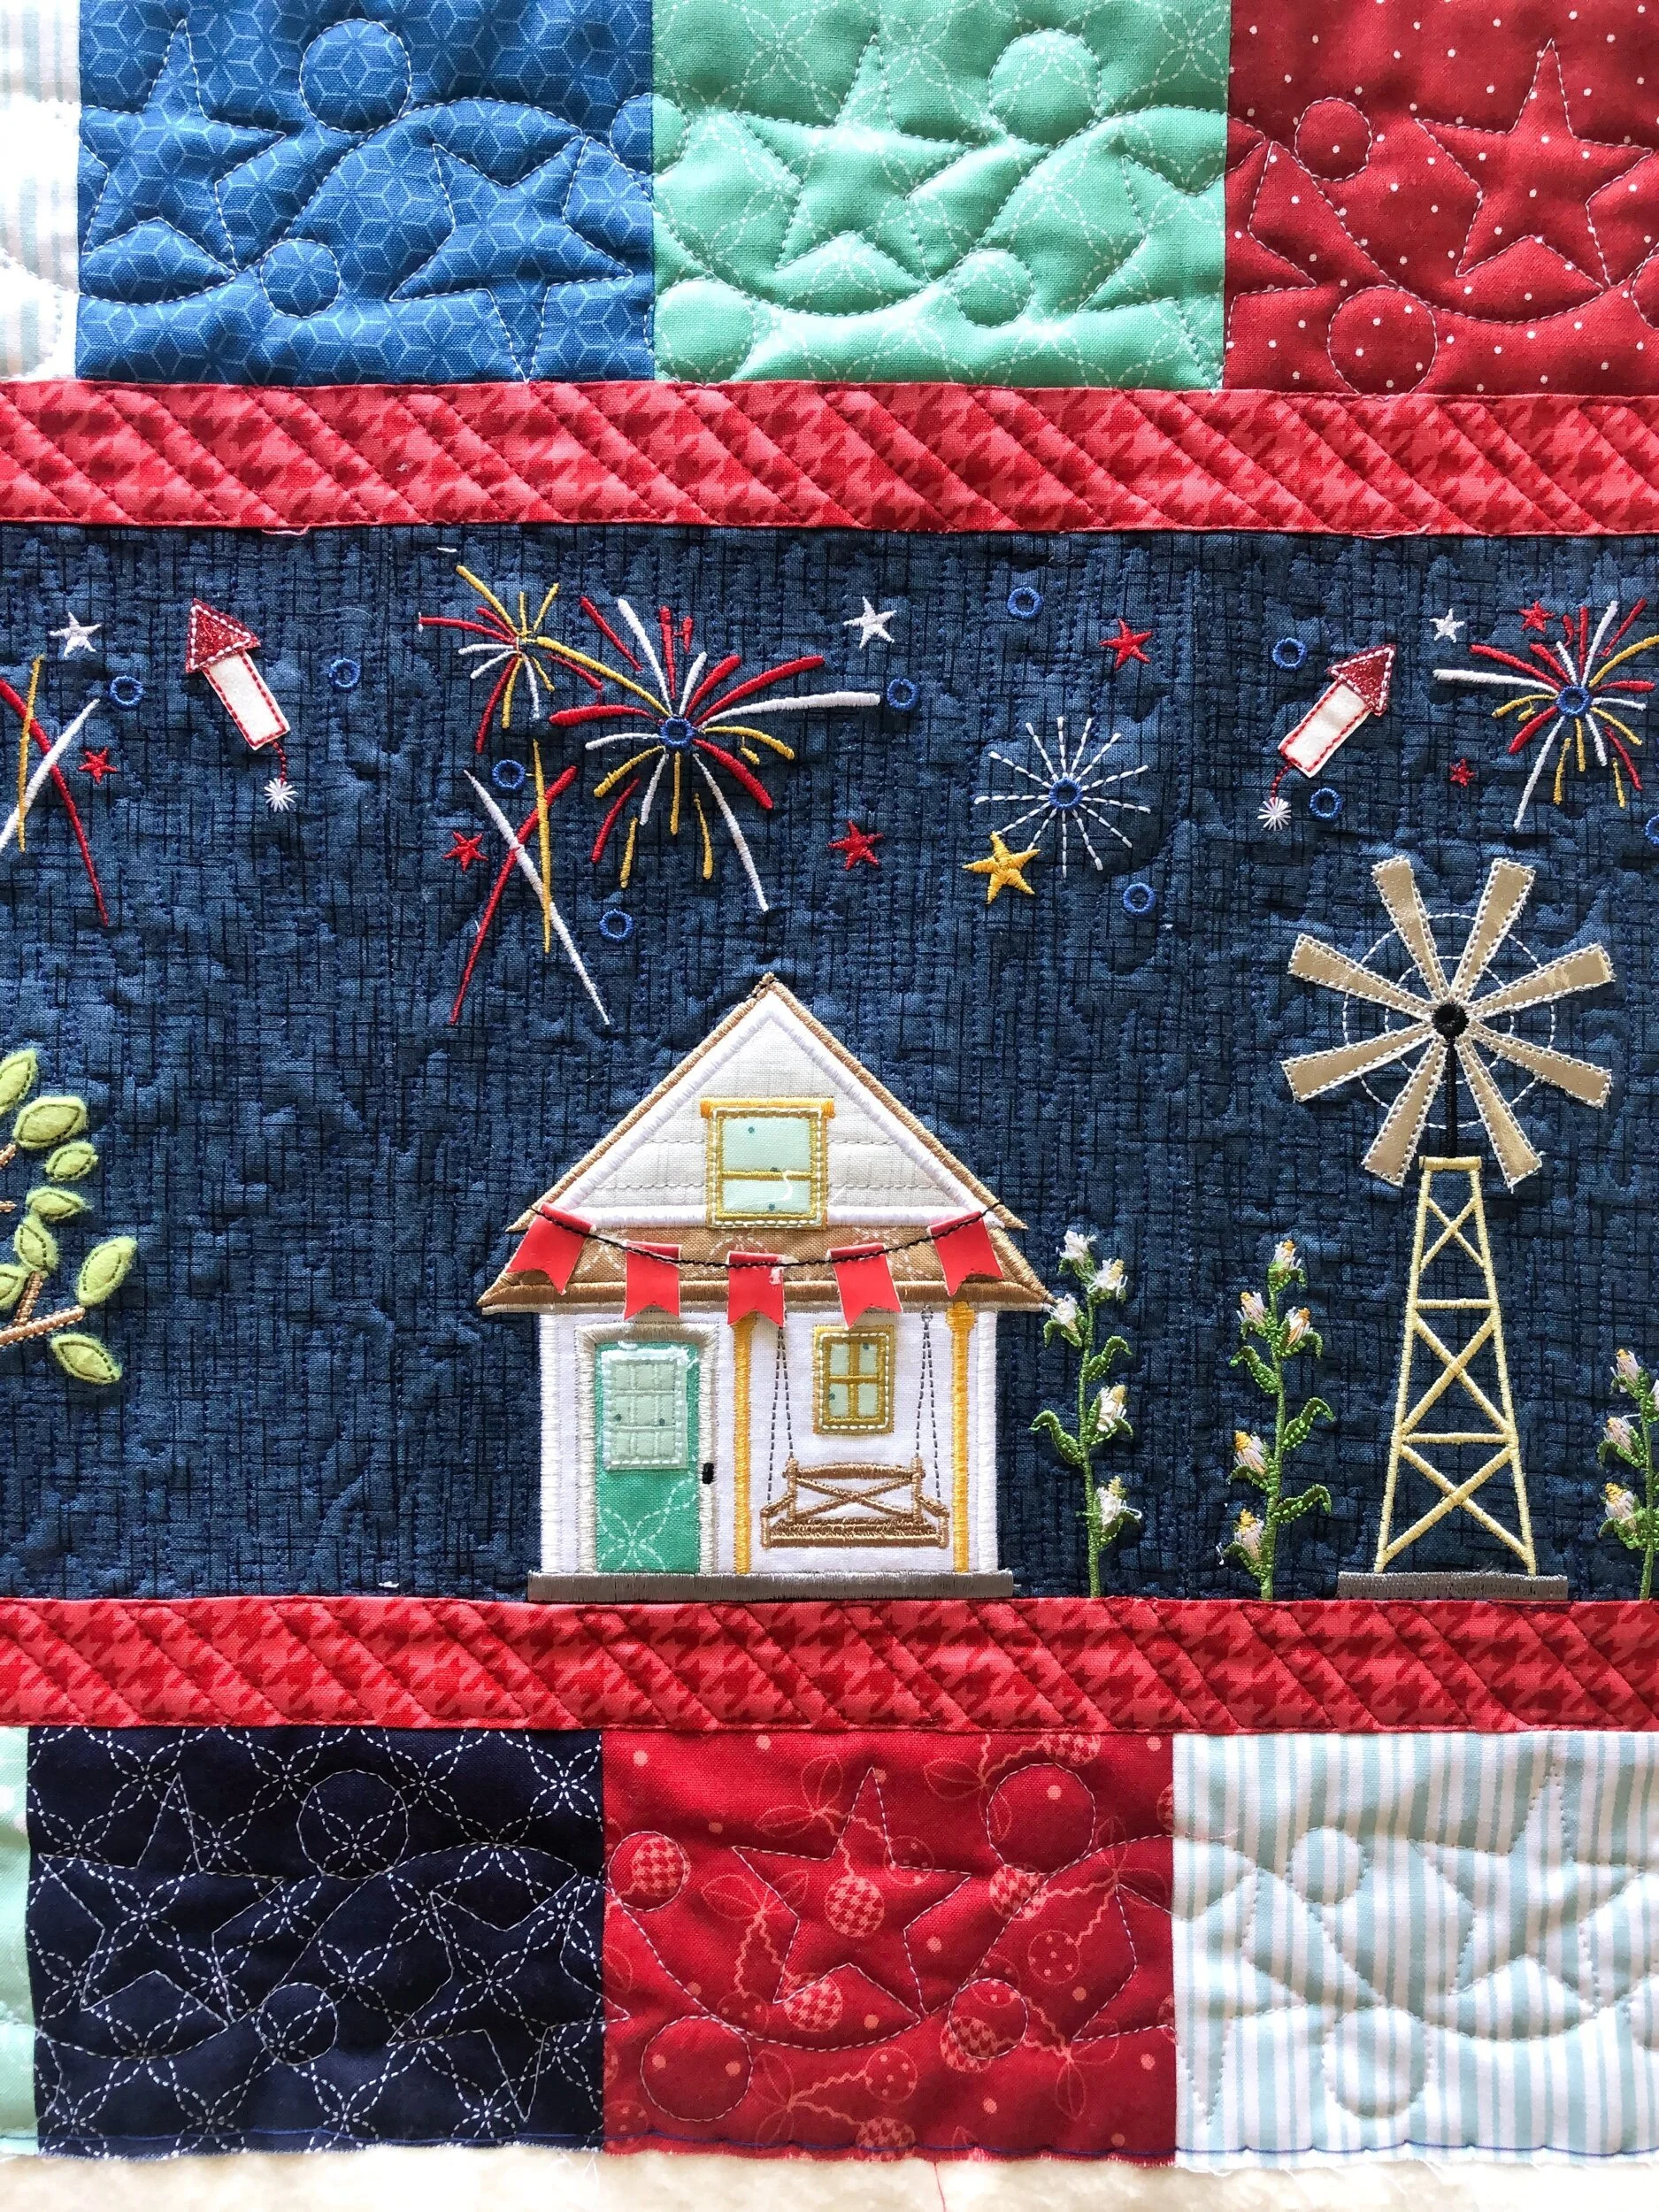
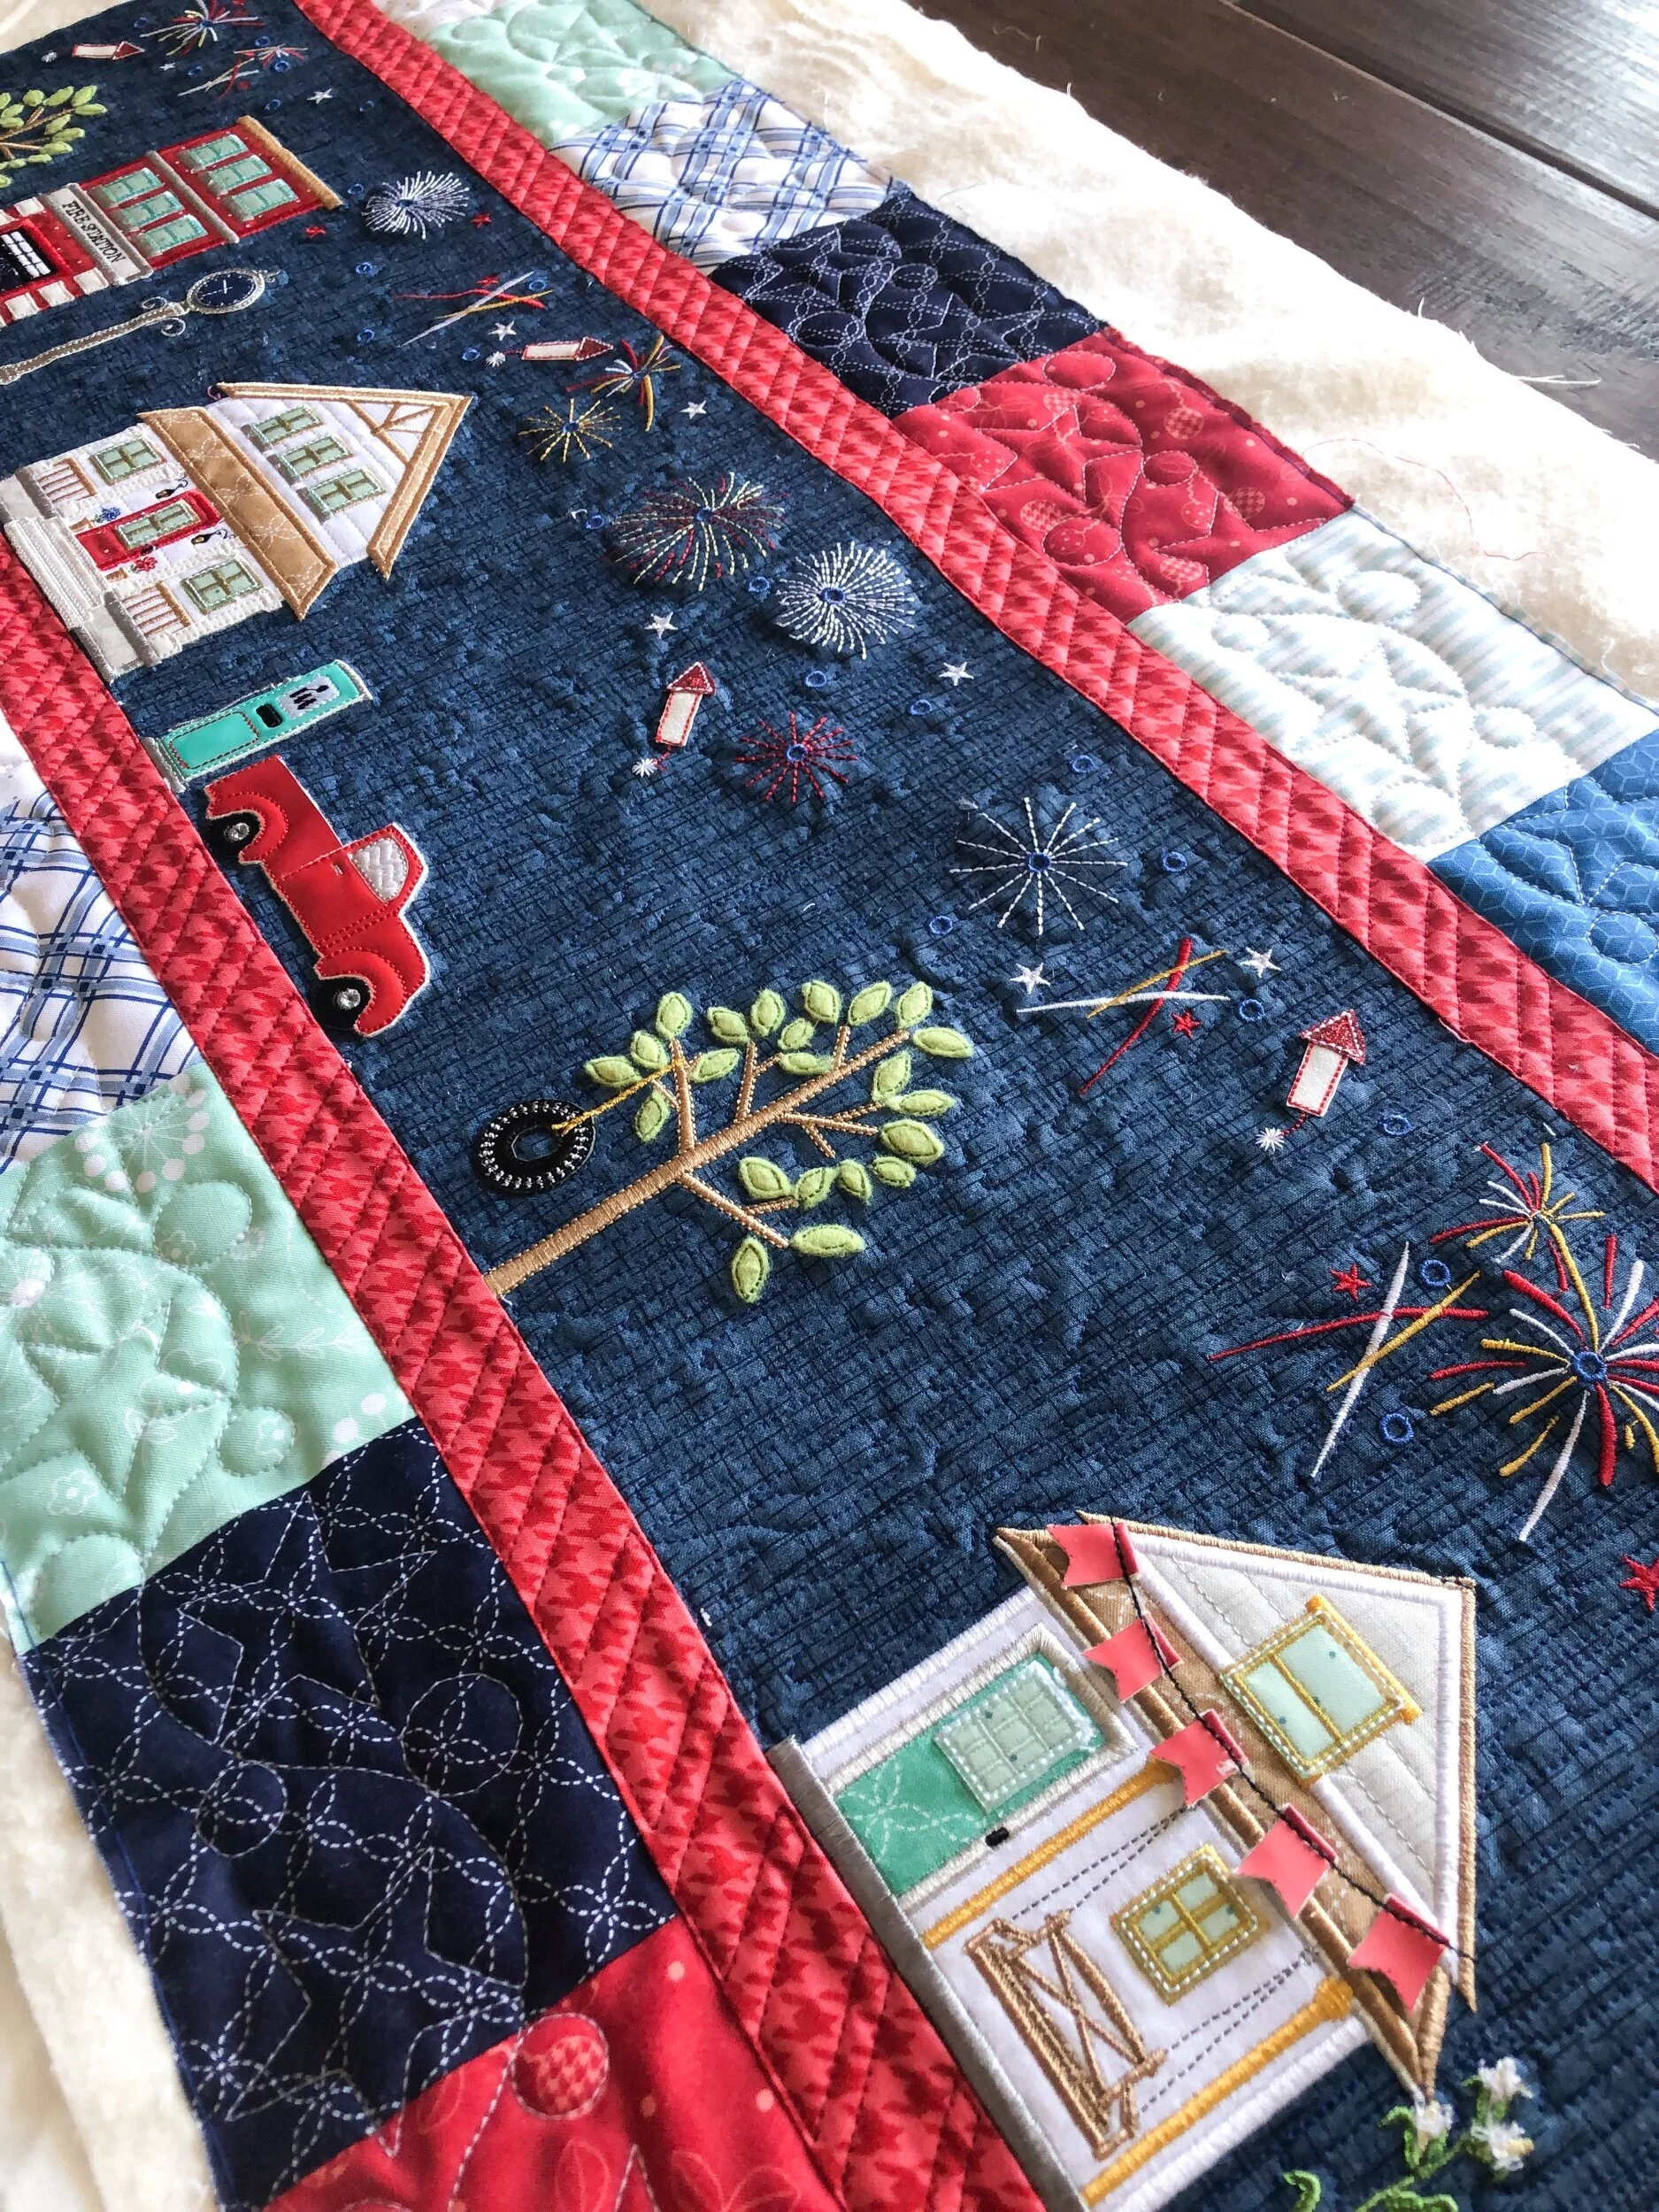
Sherry’s Main Street Celebration bench pillow
Hello!!
Now that it’s memorial weekend in America, summer is here…at least it is here. I’m actually headed out to weed in the garden. Our plants are already starting to grow.
With summer comes lots of long warm days, and here cool nights. I love it!! Also, fireworks are often part of those celebrations which is why this bench pillow that Sherry made is soooo fun!!
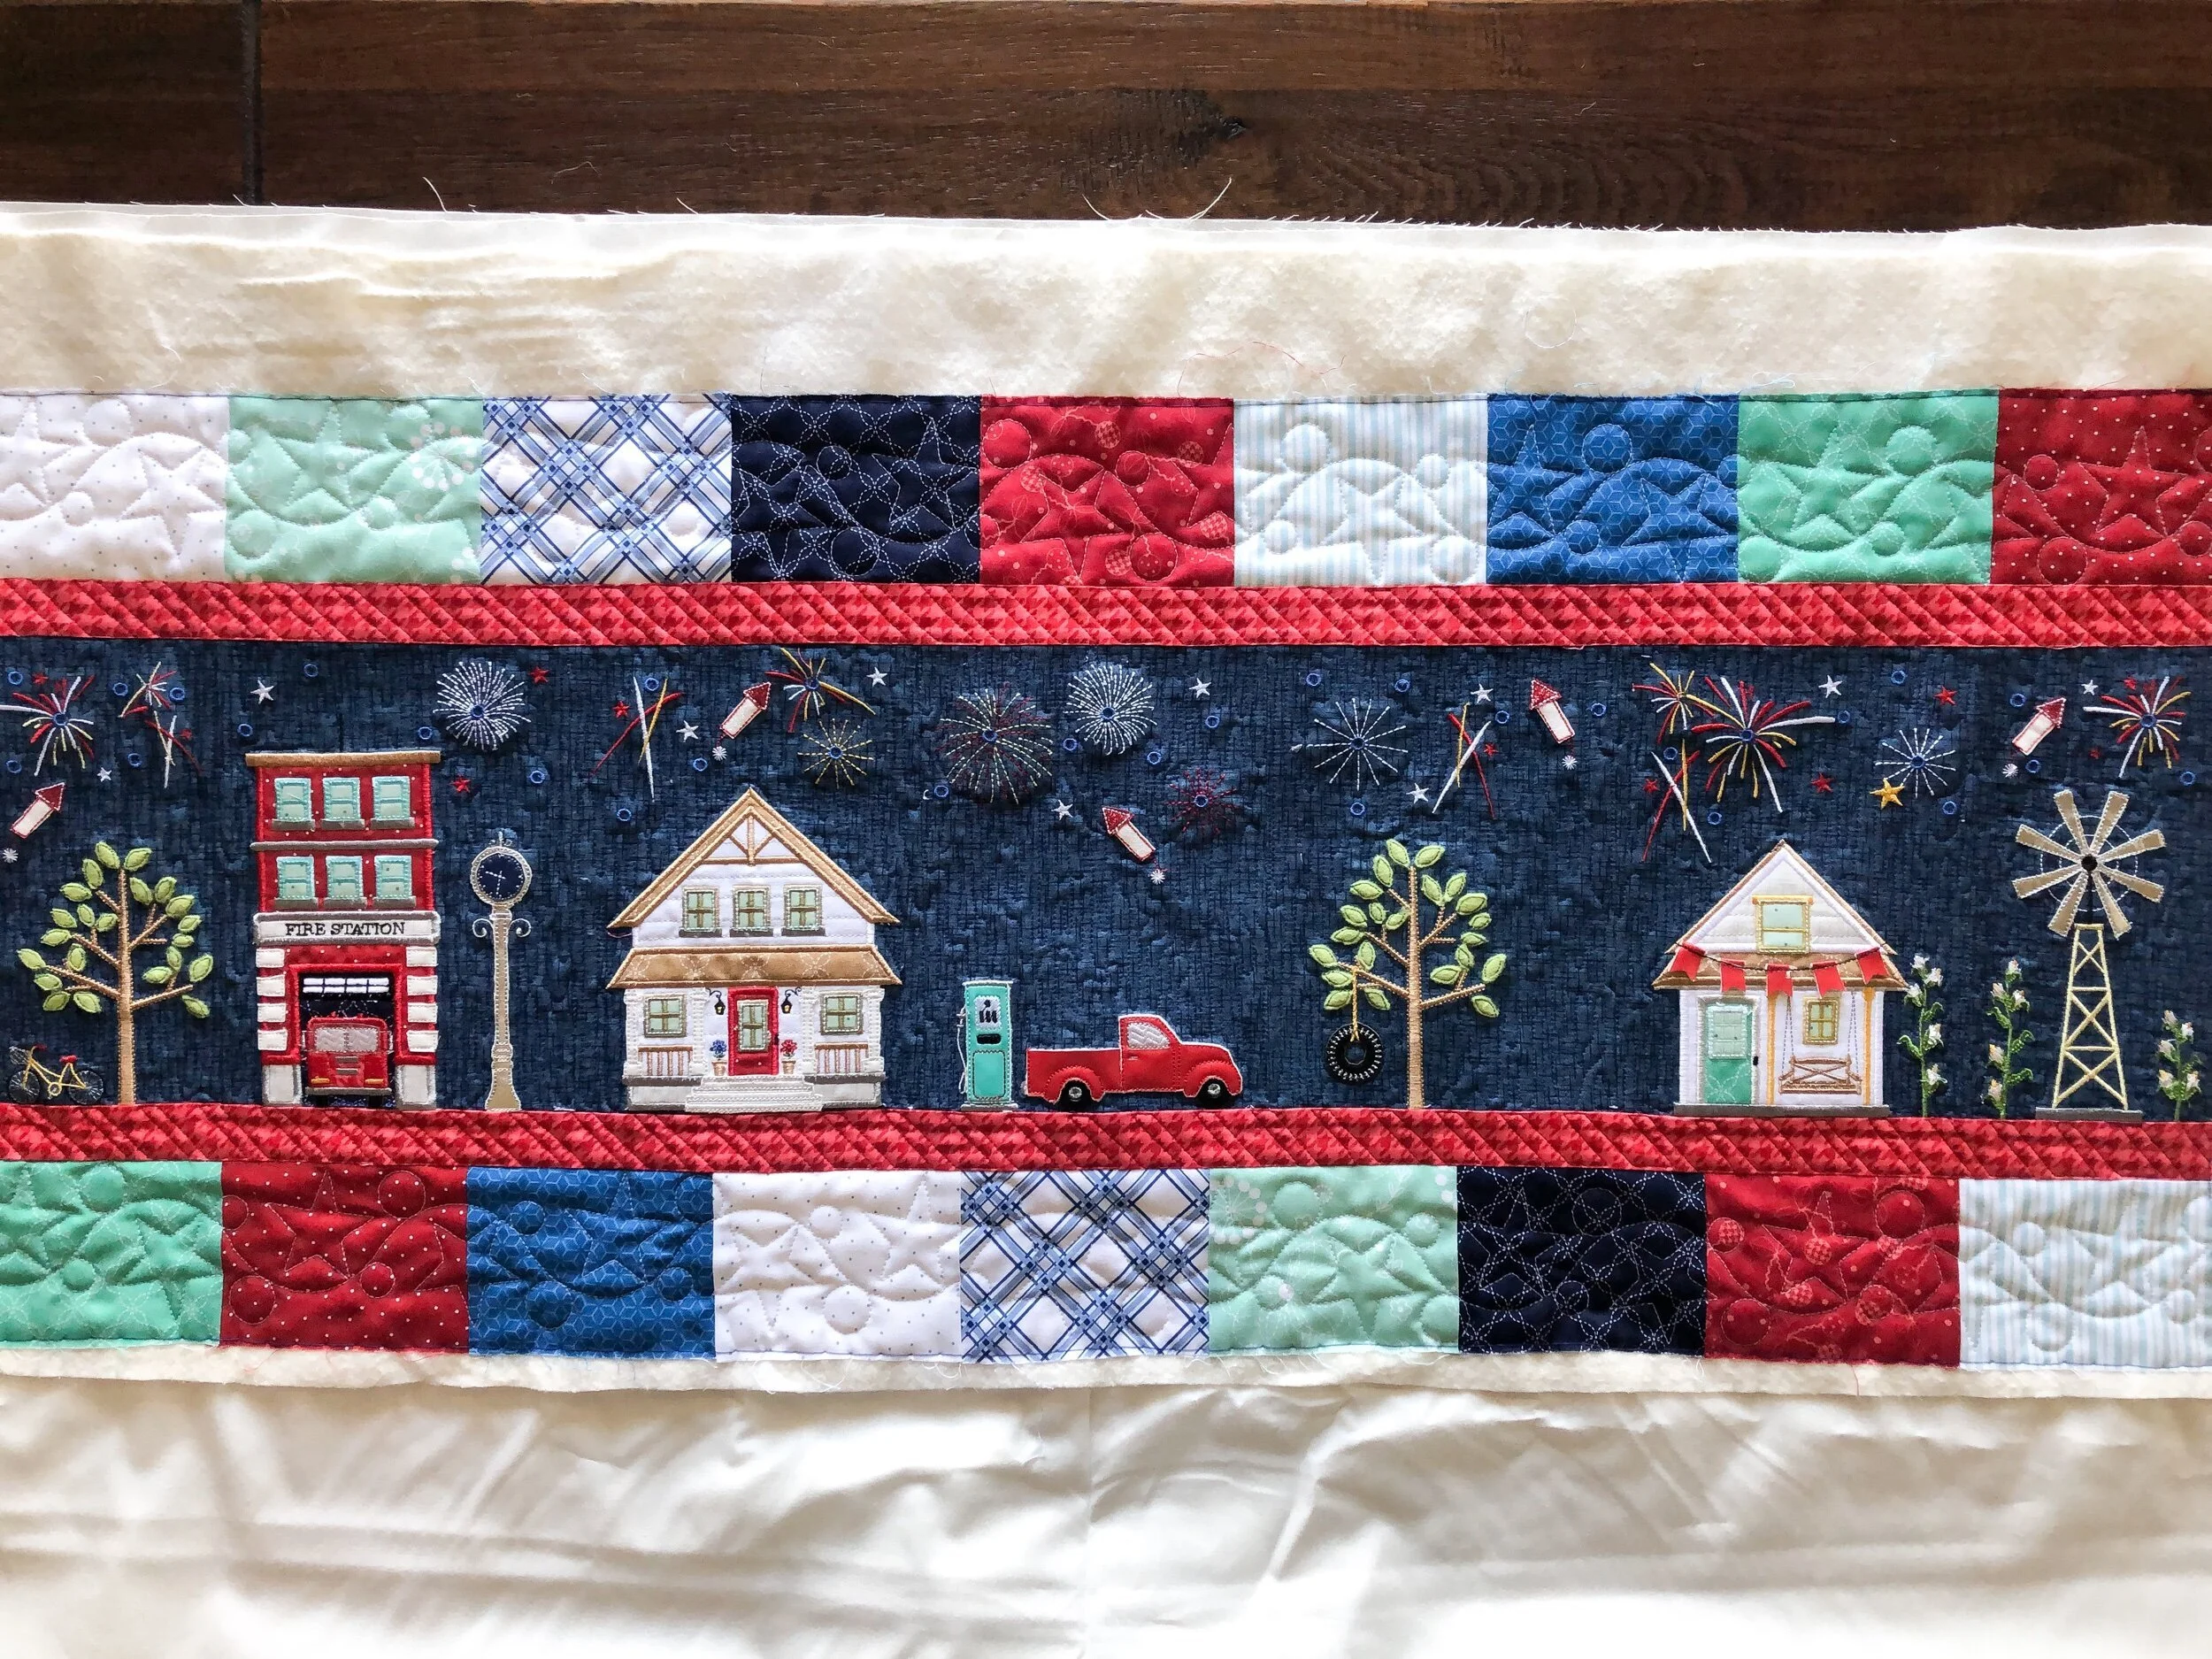
The name is Main Street Celebration and the pattern is by Kimberbell. Kim’s sister Kris sells kits for this and all of her designs. The patterns are for either machine embroidered appliqué or regular appliqué. This link will take you to all the things My Girlfriends Quilt Shoppe carries. As with all of Kim’s designs, embellishments are added after its quilted.
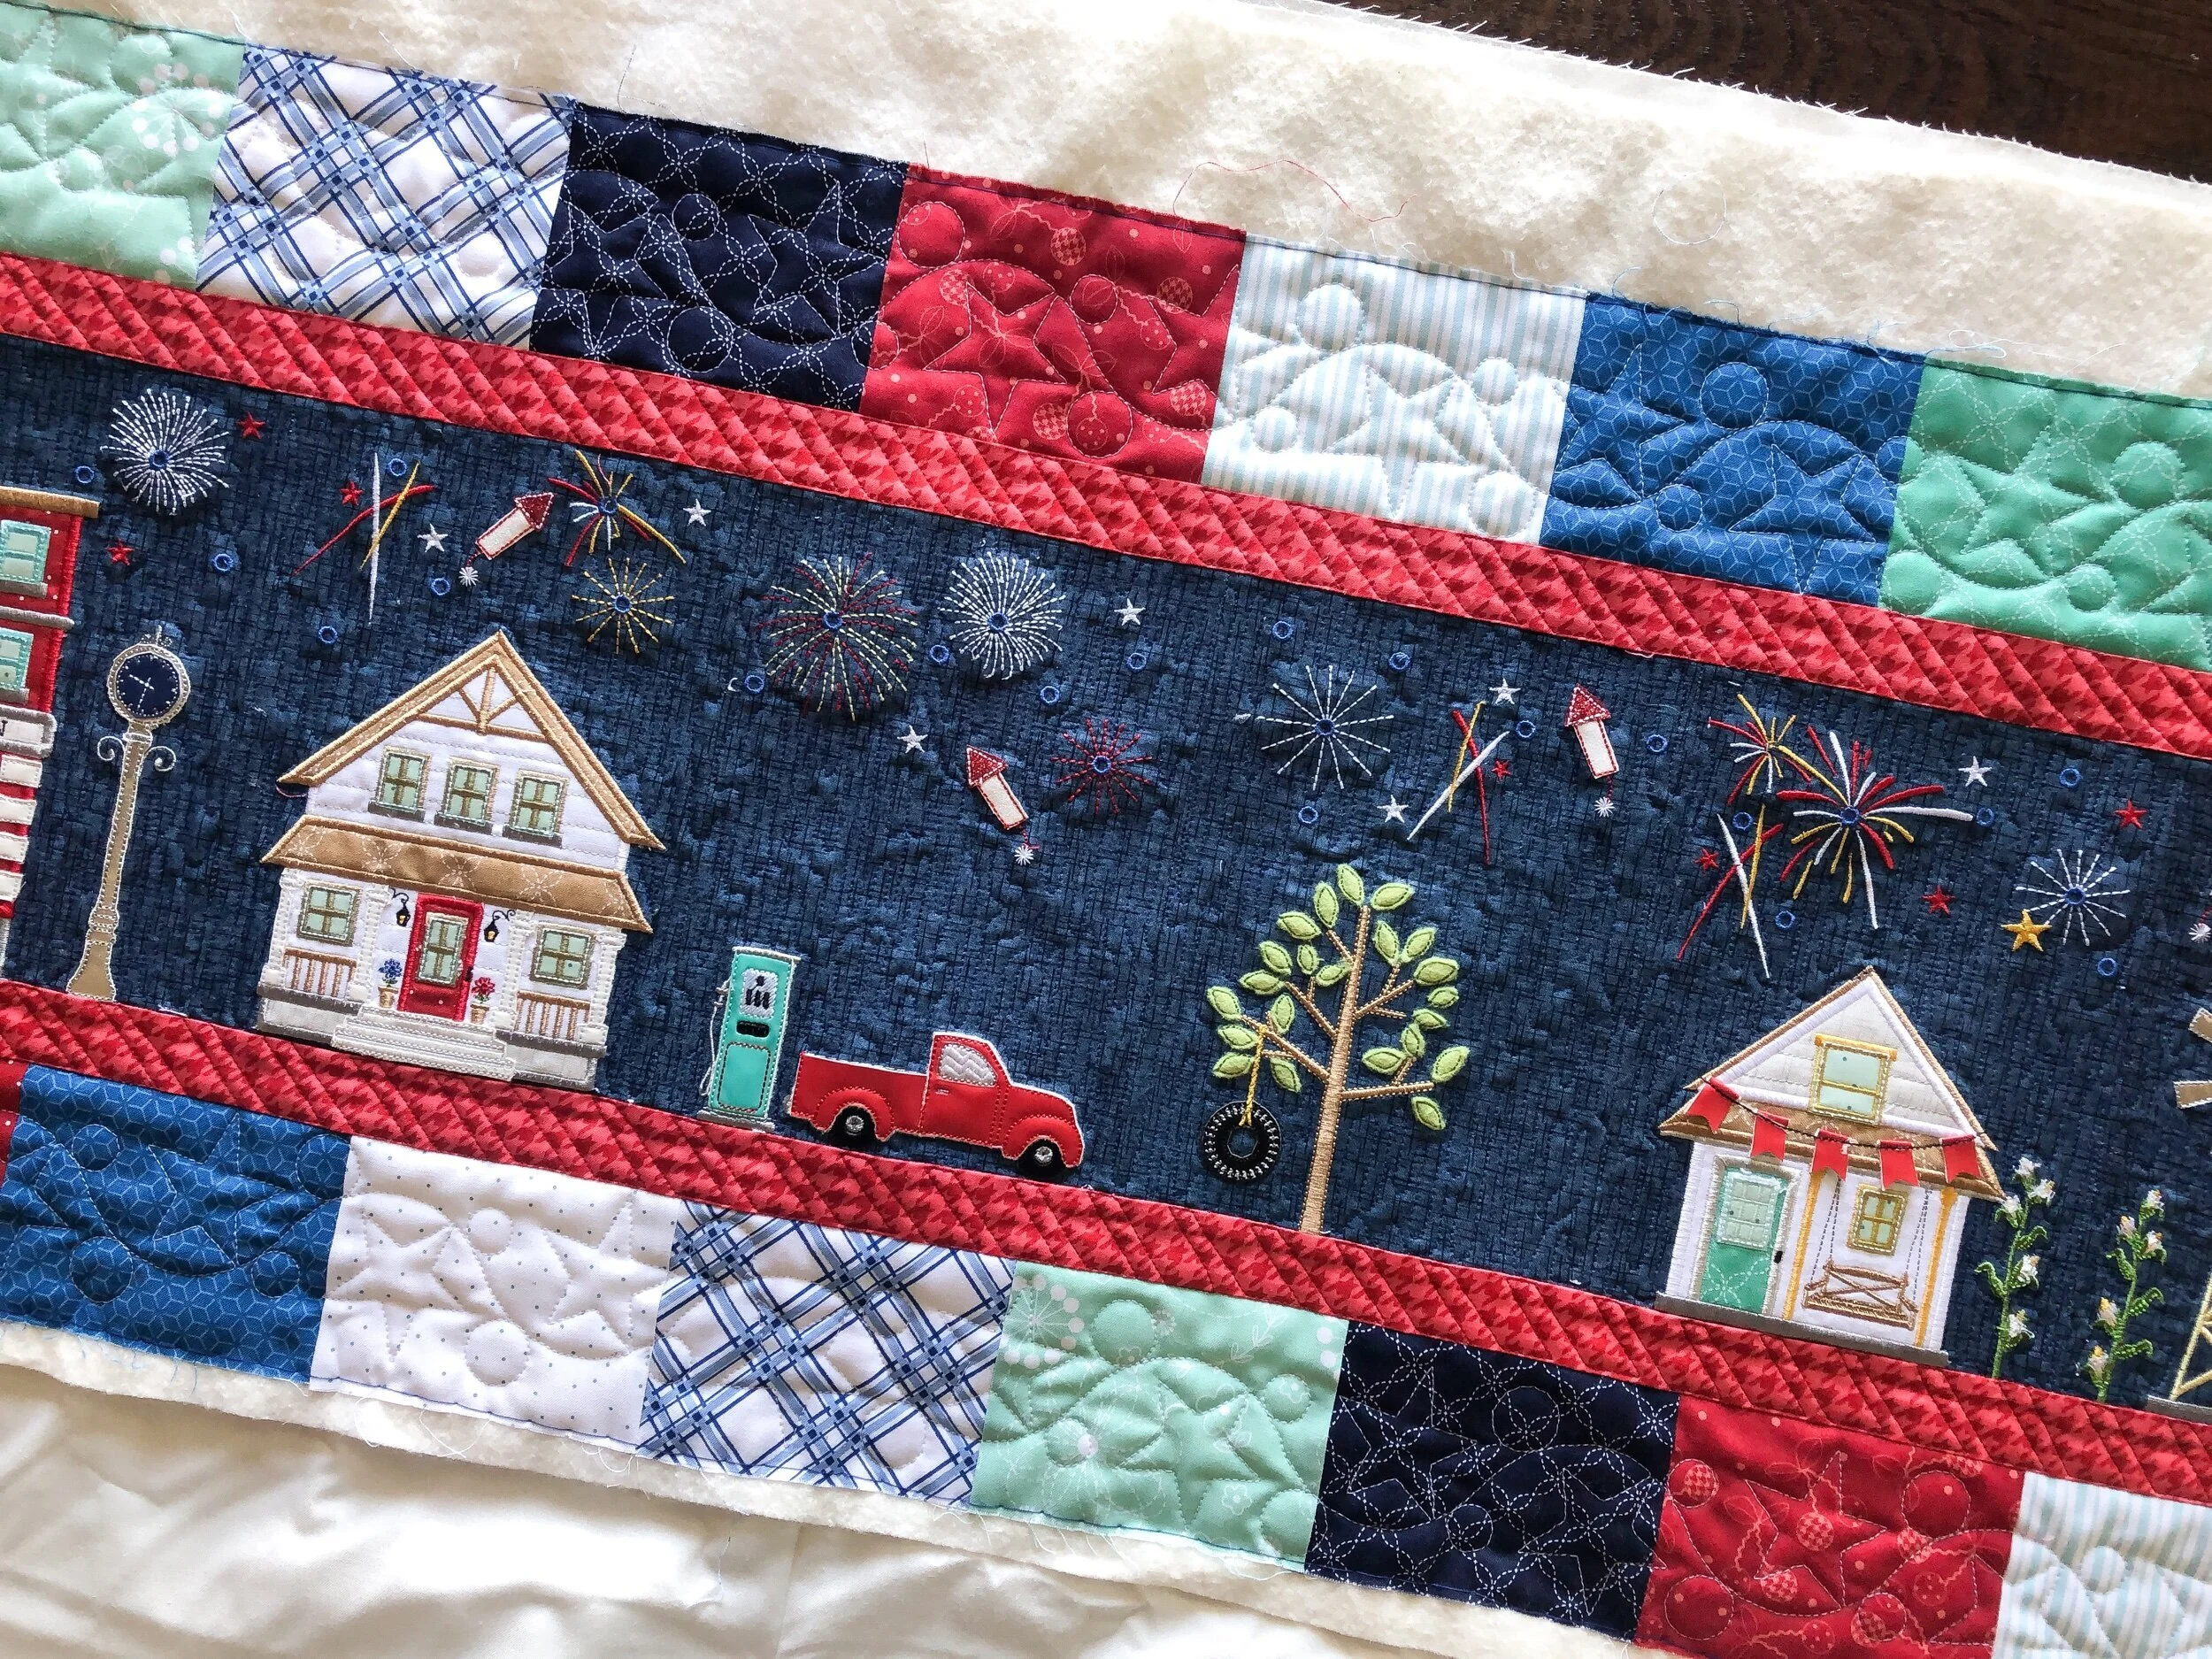
I kept the quilting simple. I used Patricia Ritter’s Rock n Roll Starz for the top and bottom border. It’s available at Urban Elementz. https://www.urbanelementz.com/rock-n-roll-starz-petite.html
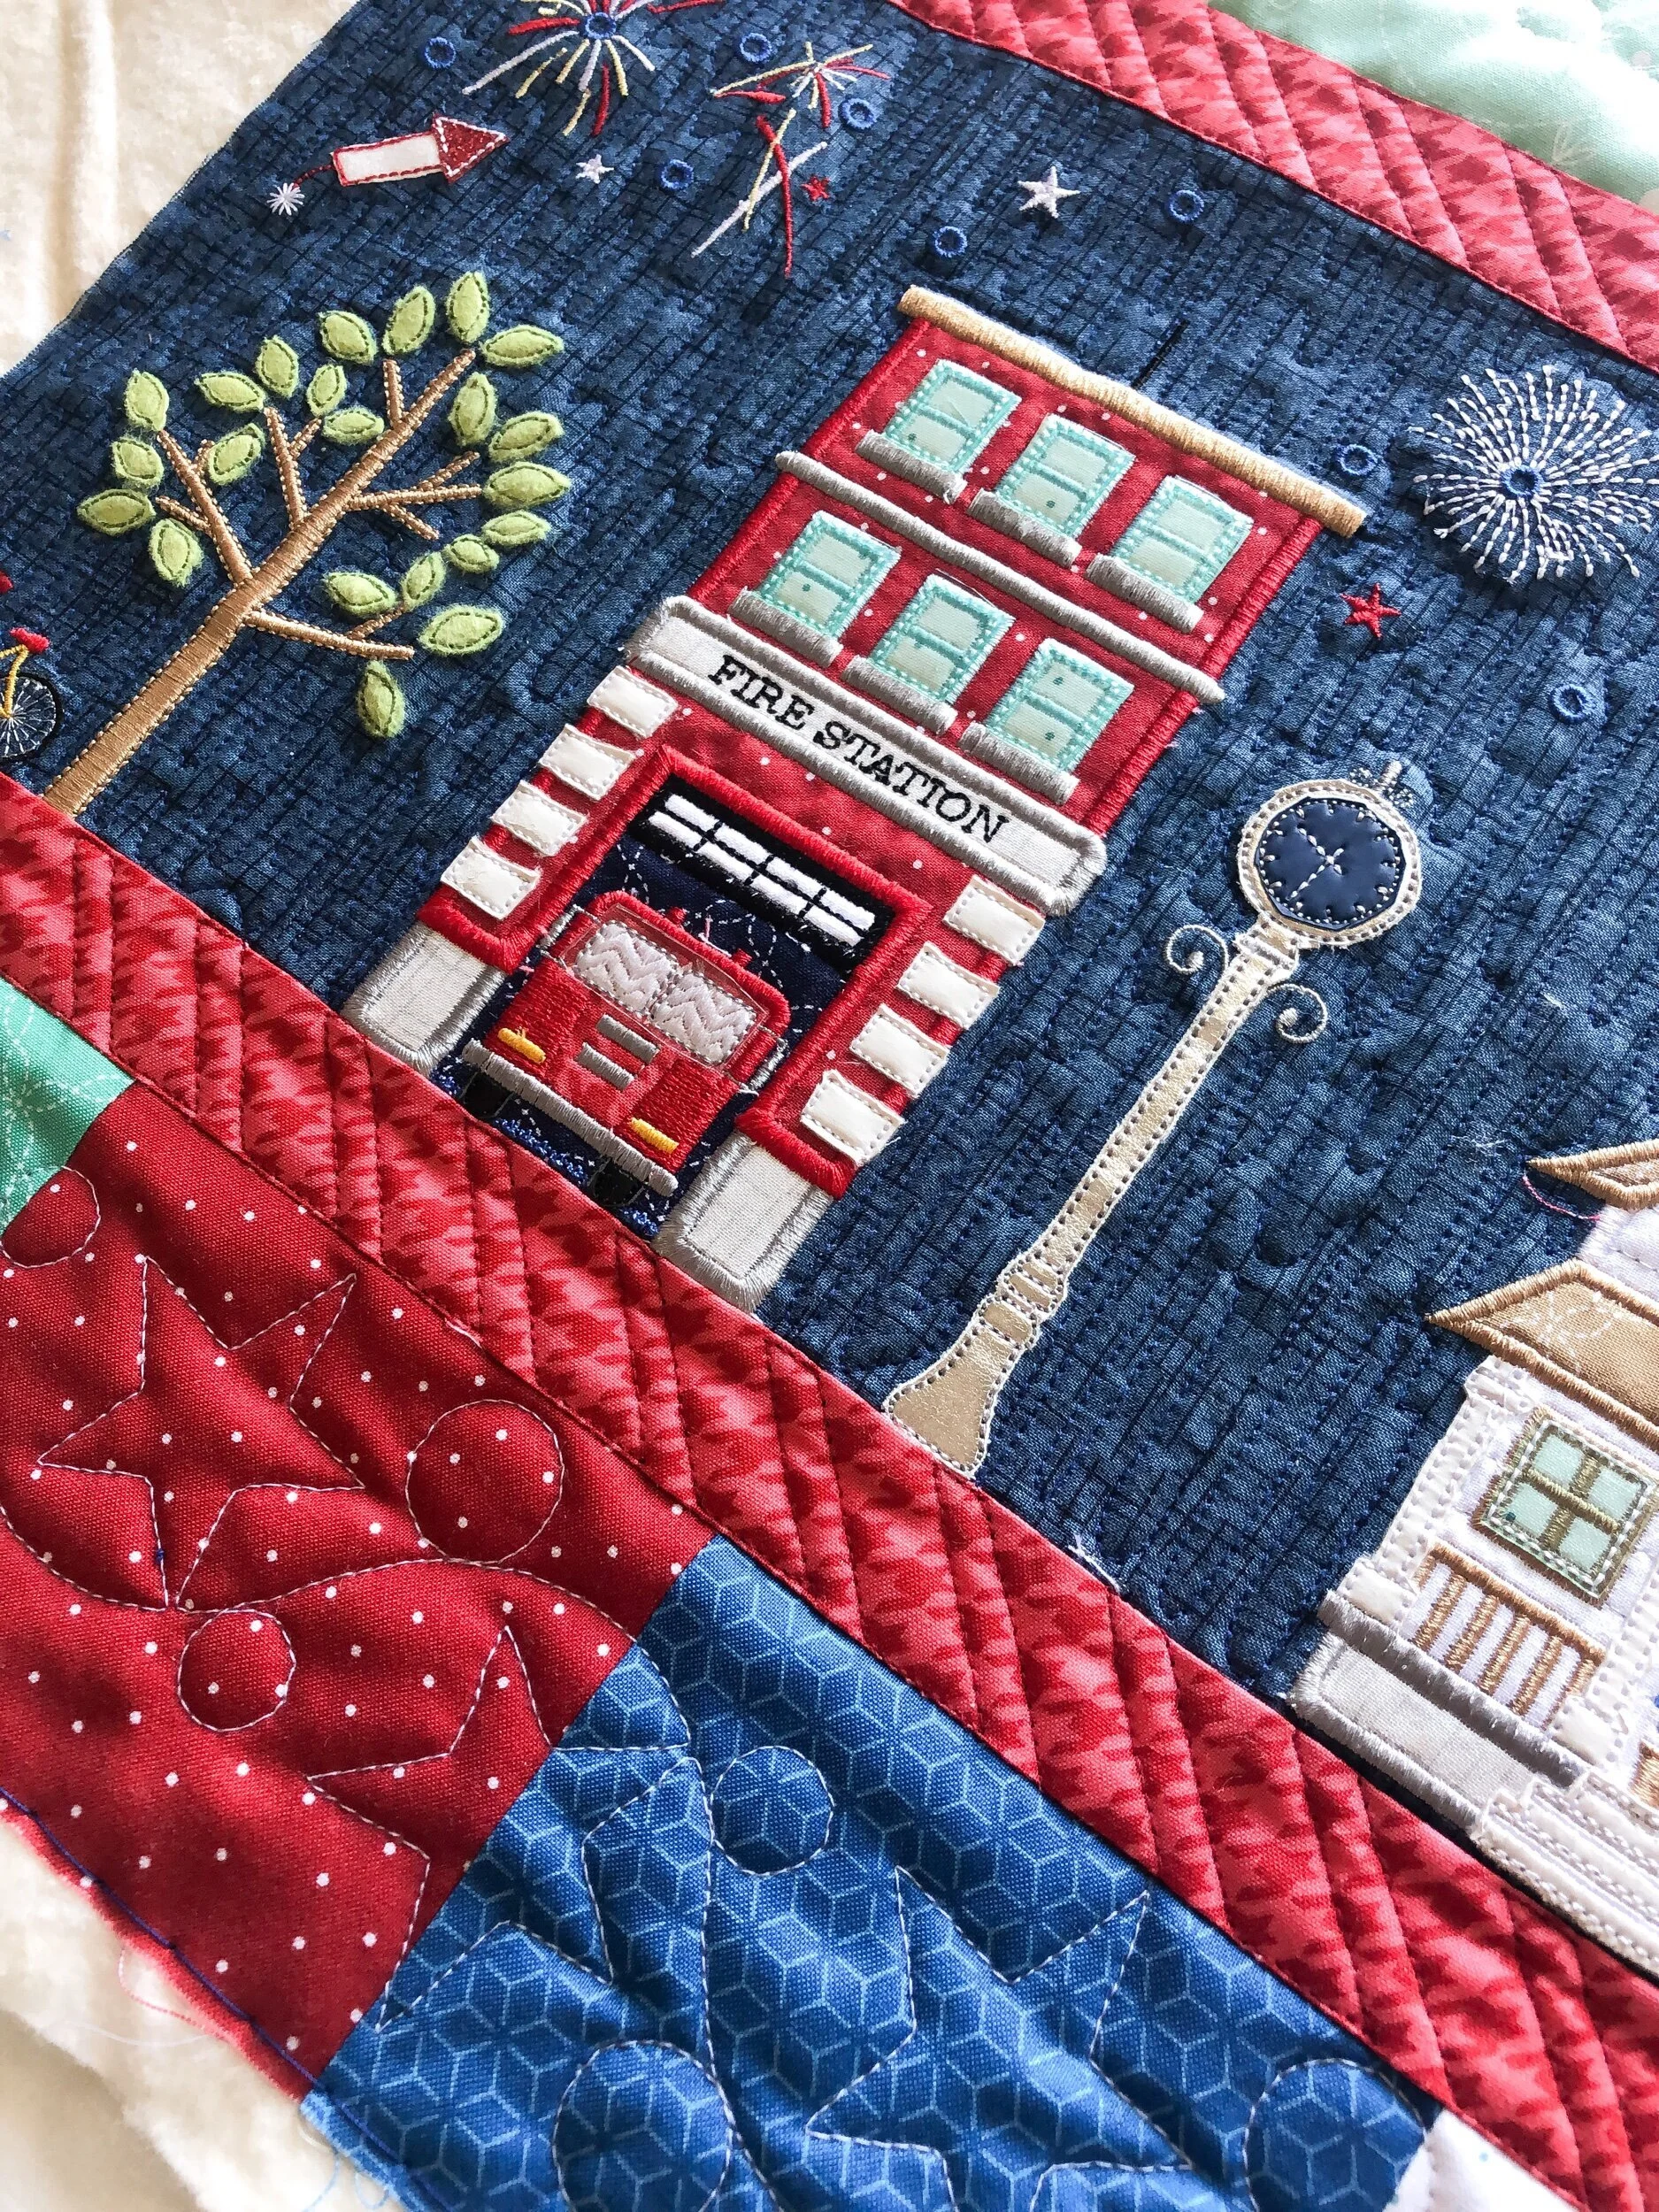
I used navy thread and quilted a up and down freehand line, and then 1/4” pinstripe lines in the inner border using a Edge ruler from Linda at The Quilted Pineapple. I didn’t quilt anything in the appliqué because some of its already quilted, and it’s also a little thick because of the embroidery.
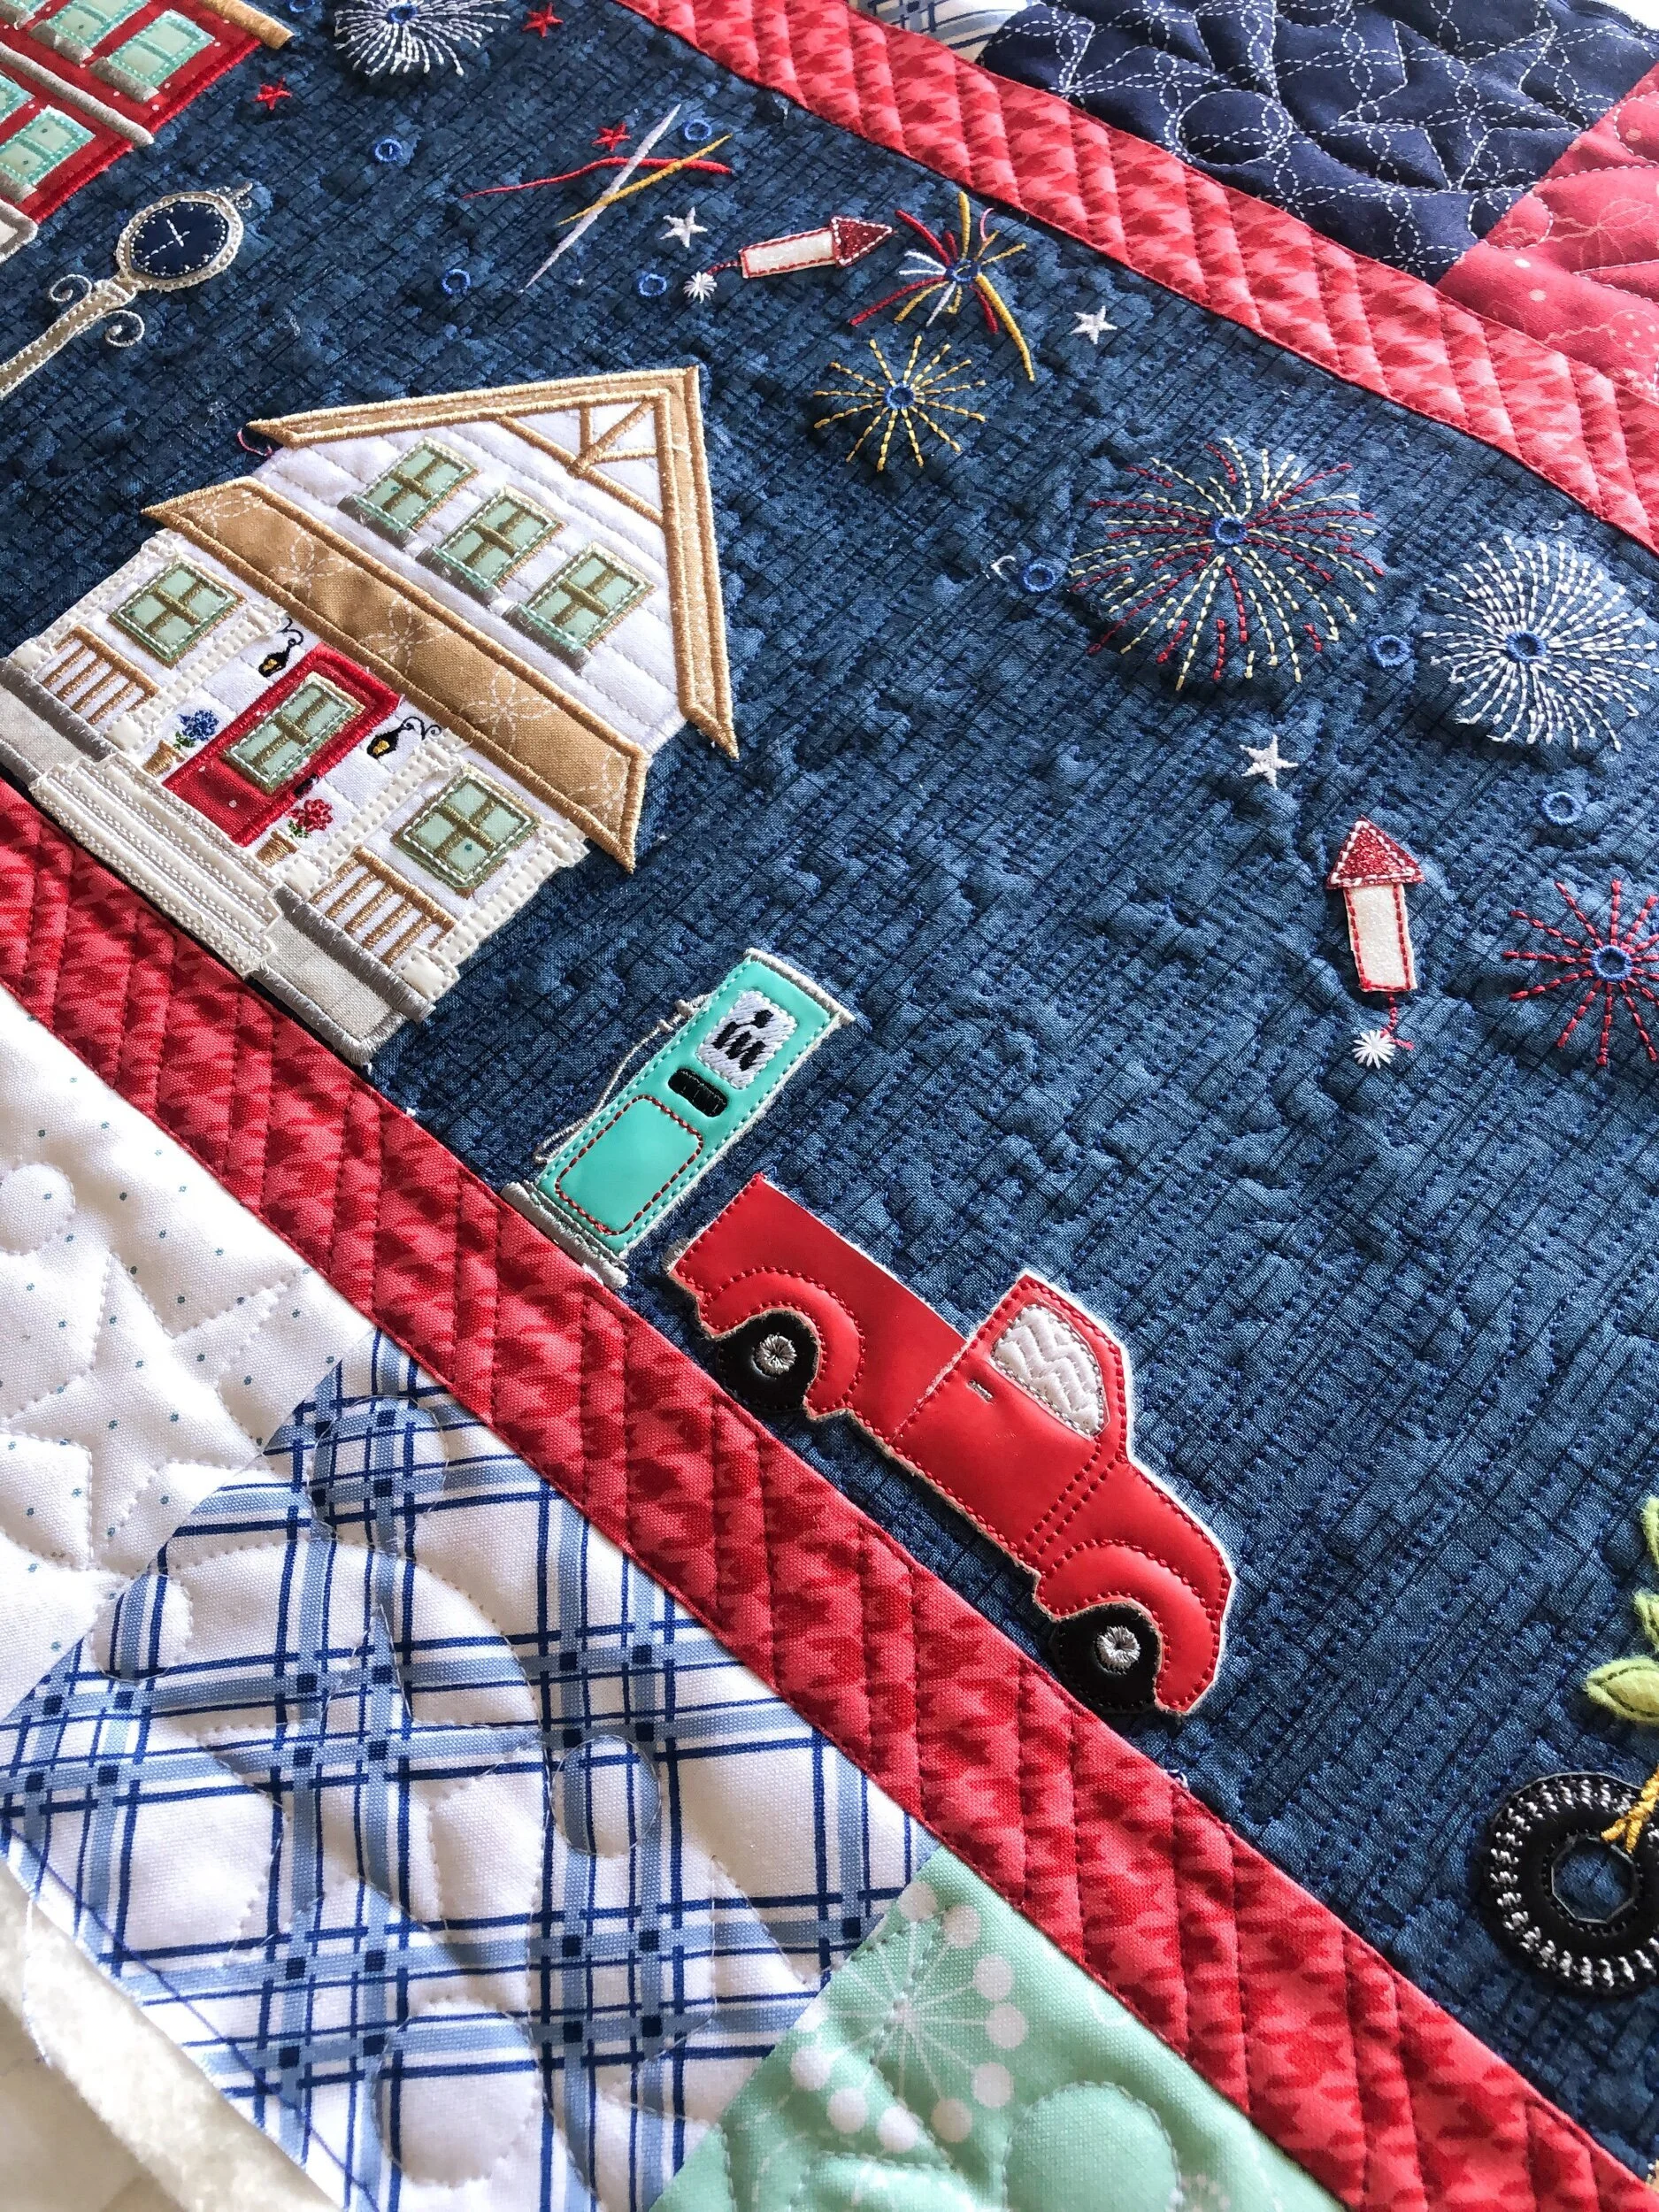
I used a scrap of my favorite 8020 cotton poly blend batting from Winline. I also highly recommend to my clients when it comes to pillows, use a cheap muslin for the backing. No need to use a nice fabric.
Happy summer or winter to you…depending on where you are!! -Leisha
Quilt Samples for Laser Cut Quilts
Hello….
happy almost weekend!! Summer is on its way around here, especially with school almost out until fall. I love summer, and hope it doesn’t fly by too fast.
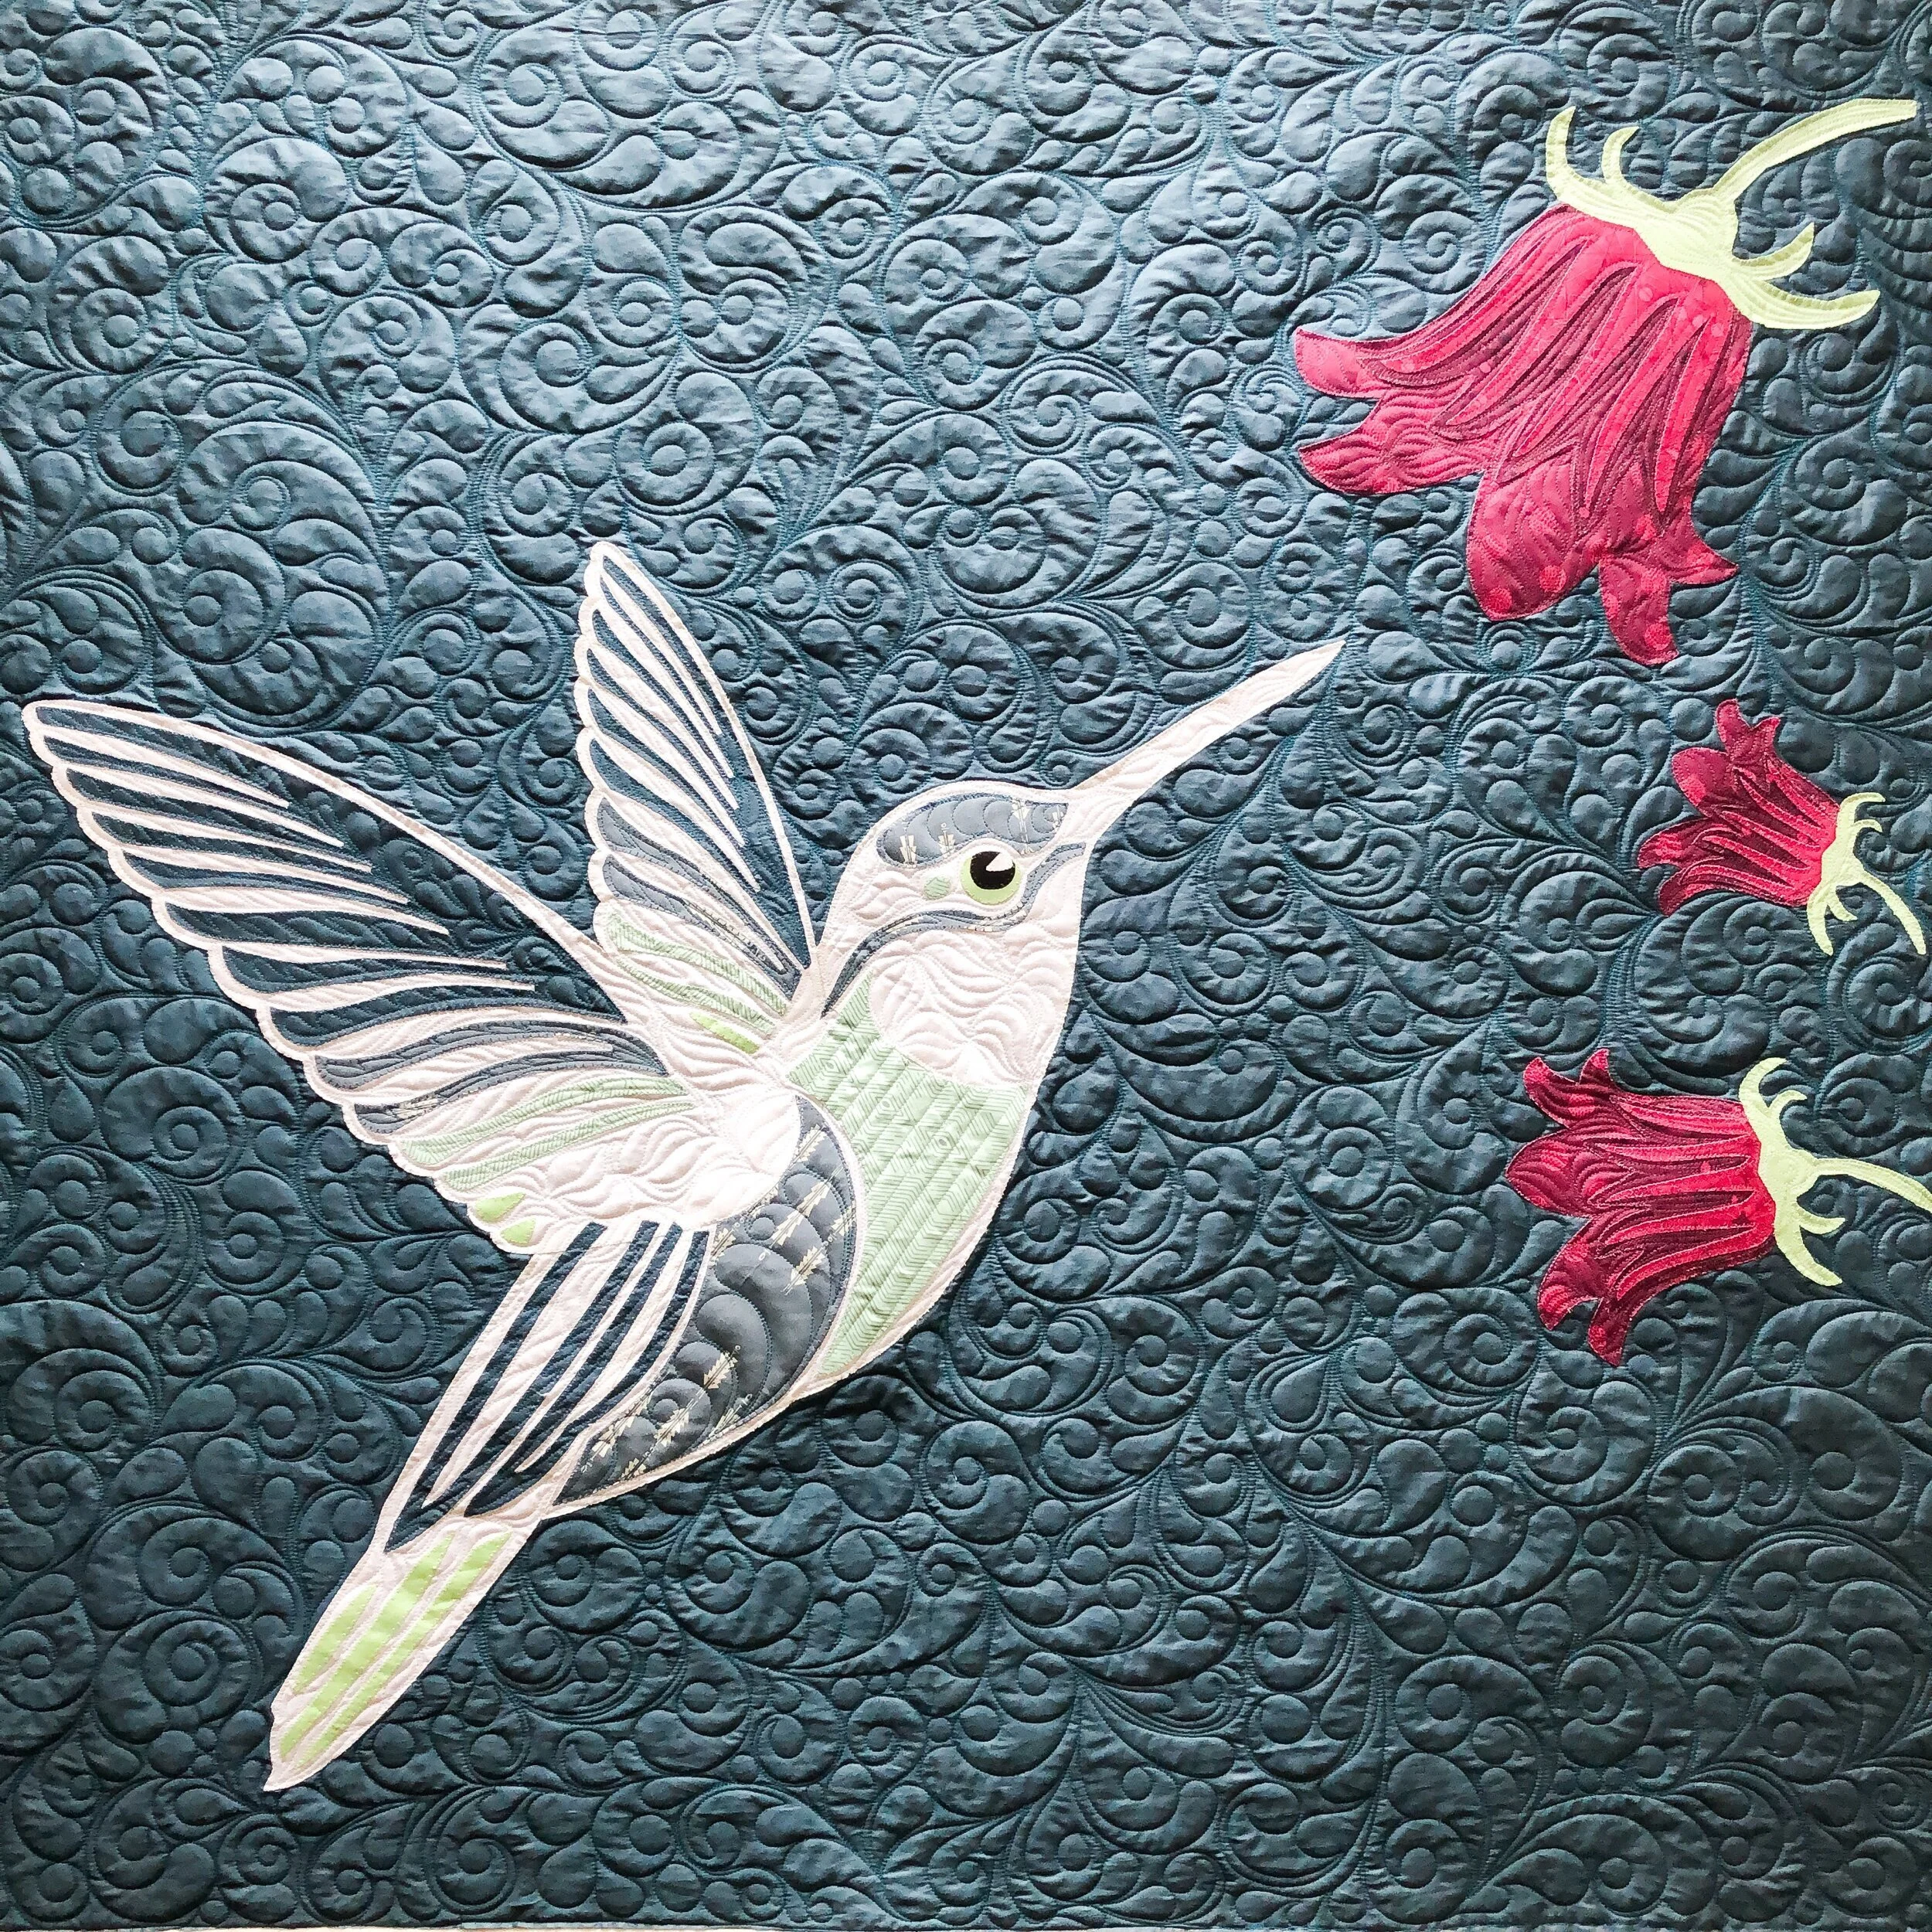
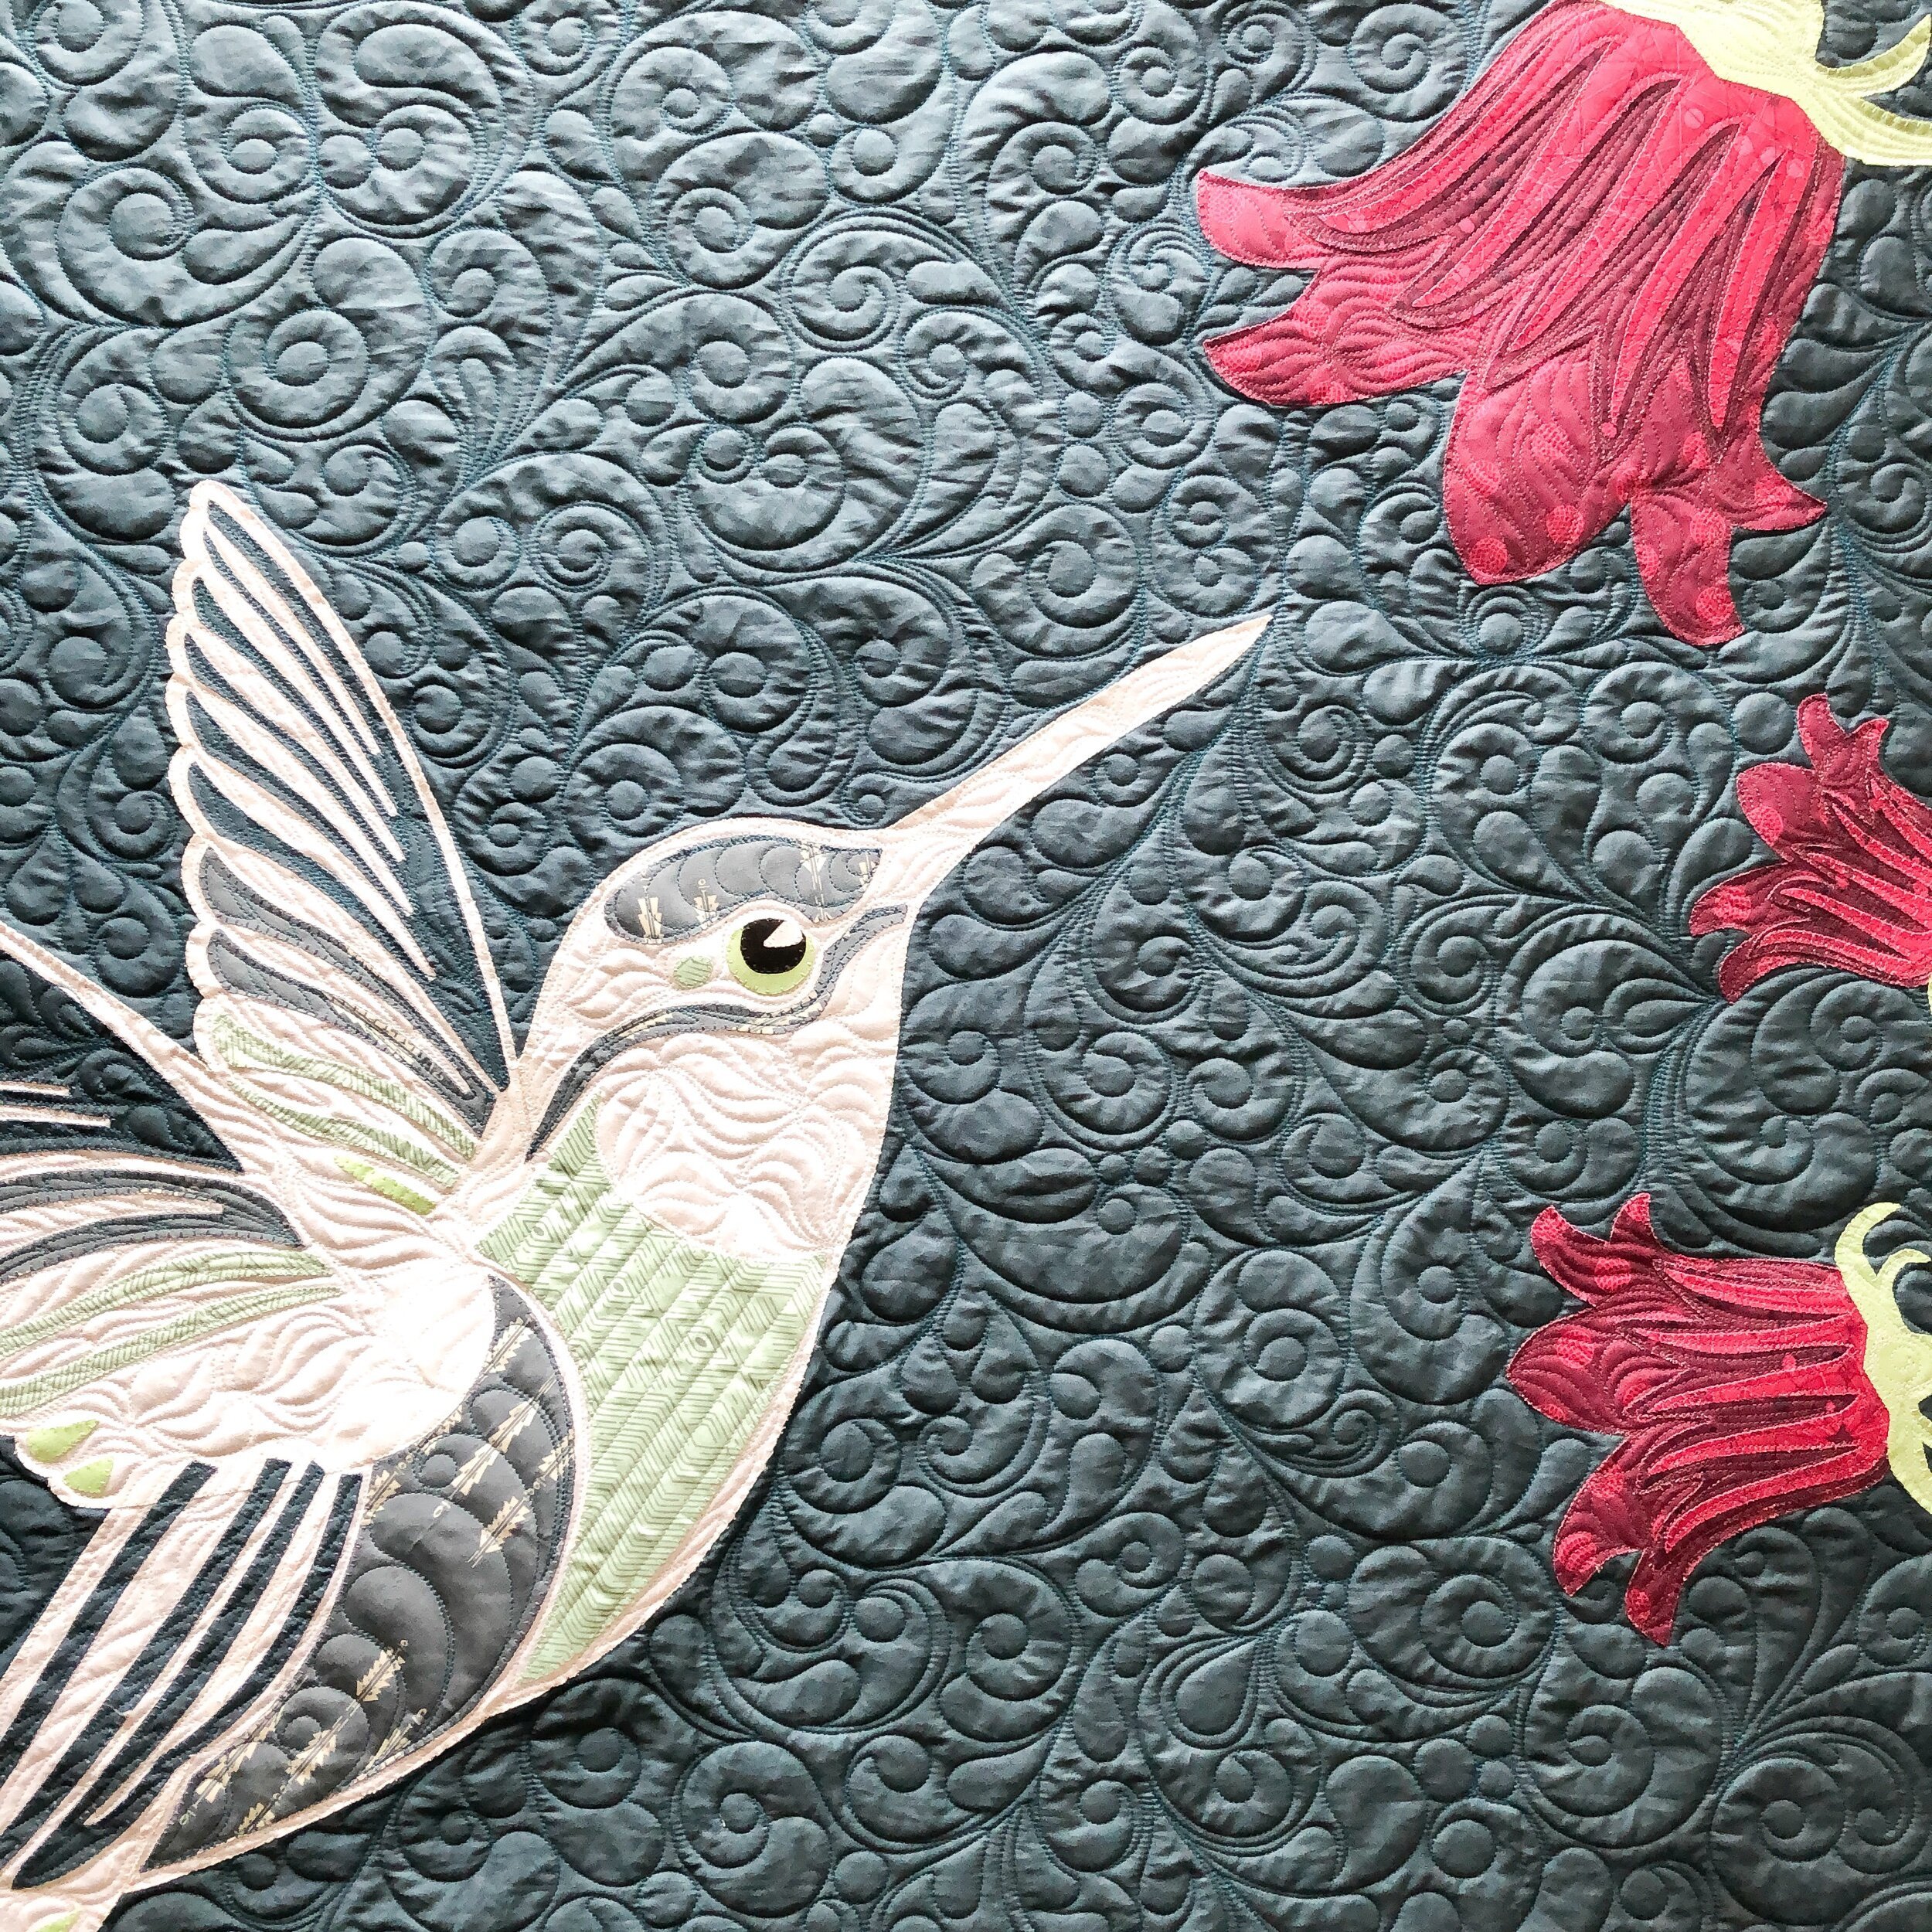
I’ve quilted some samples like these in the past for Laser Cut Quilts, but this time I think they did new color ways. They have a variety of quilt kits. Check out their website. https://lasercutquilts.com/shop
Laser Cut Quilts also created their own interfacing, called Flexi Fuse. It’s a dream to quilt through. The machine needle breezes even through multiple layers of fabric backed with the Flexi Fuse. Their kits are all laser cut and backed with Flexi Fuse.
This is called Hummingbird by Madi Hastings from Laser Cut Quilts. I quilted a variety of lines, feathers, and my freehand grassy texture in the bird and flowers. The background is my swirly feather, also done freehand. It’s actually on sale right now at Flexi Fuse.

I use a cream Omni thread from Superior Threads, and a coordinating thread for the backing. I used 8020 cotton poly blend batting from Winline, for both the quilt and the runner.
Another look at the swirly feather, this is a fun design for backgrounds, filler, and borders.
This is the first Hummingbird quilt I quilted for Madi. Check out that blog post for details on that one.
This runner is called Wild Warmth and the kit is also on sale. I quilted a mixture of pebbles and swirls, with tear drop shape swirls in the sun’s rays, lines in the stripes and ribbon candy in the brown sashing. It’s all about great texture when freemotion or freehand quilting. I used a white Omni thread from Superior Threads.
Thanks for stopping on by…happy almost summer! -Leisha
Sherry’s Snowy Quilt
This really is such a cute quilt!!! Pictures do not do it justice!
I used a cream Omni thread from Superior Threads and Winline’s 8020 cotton poly blend batting.
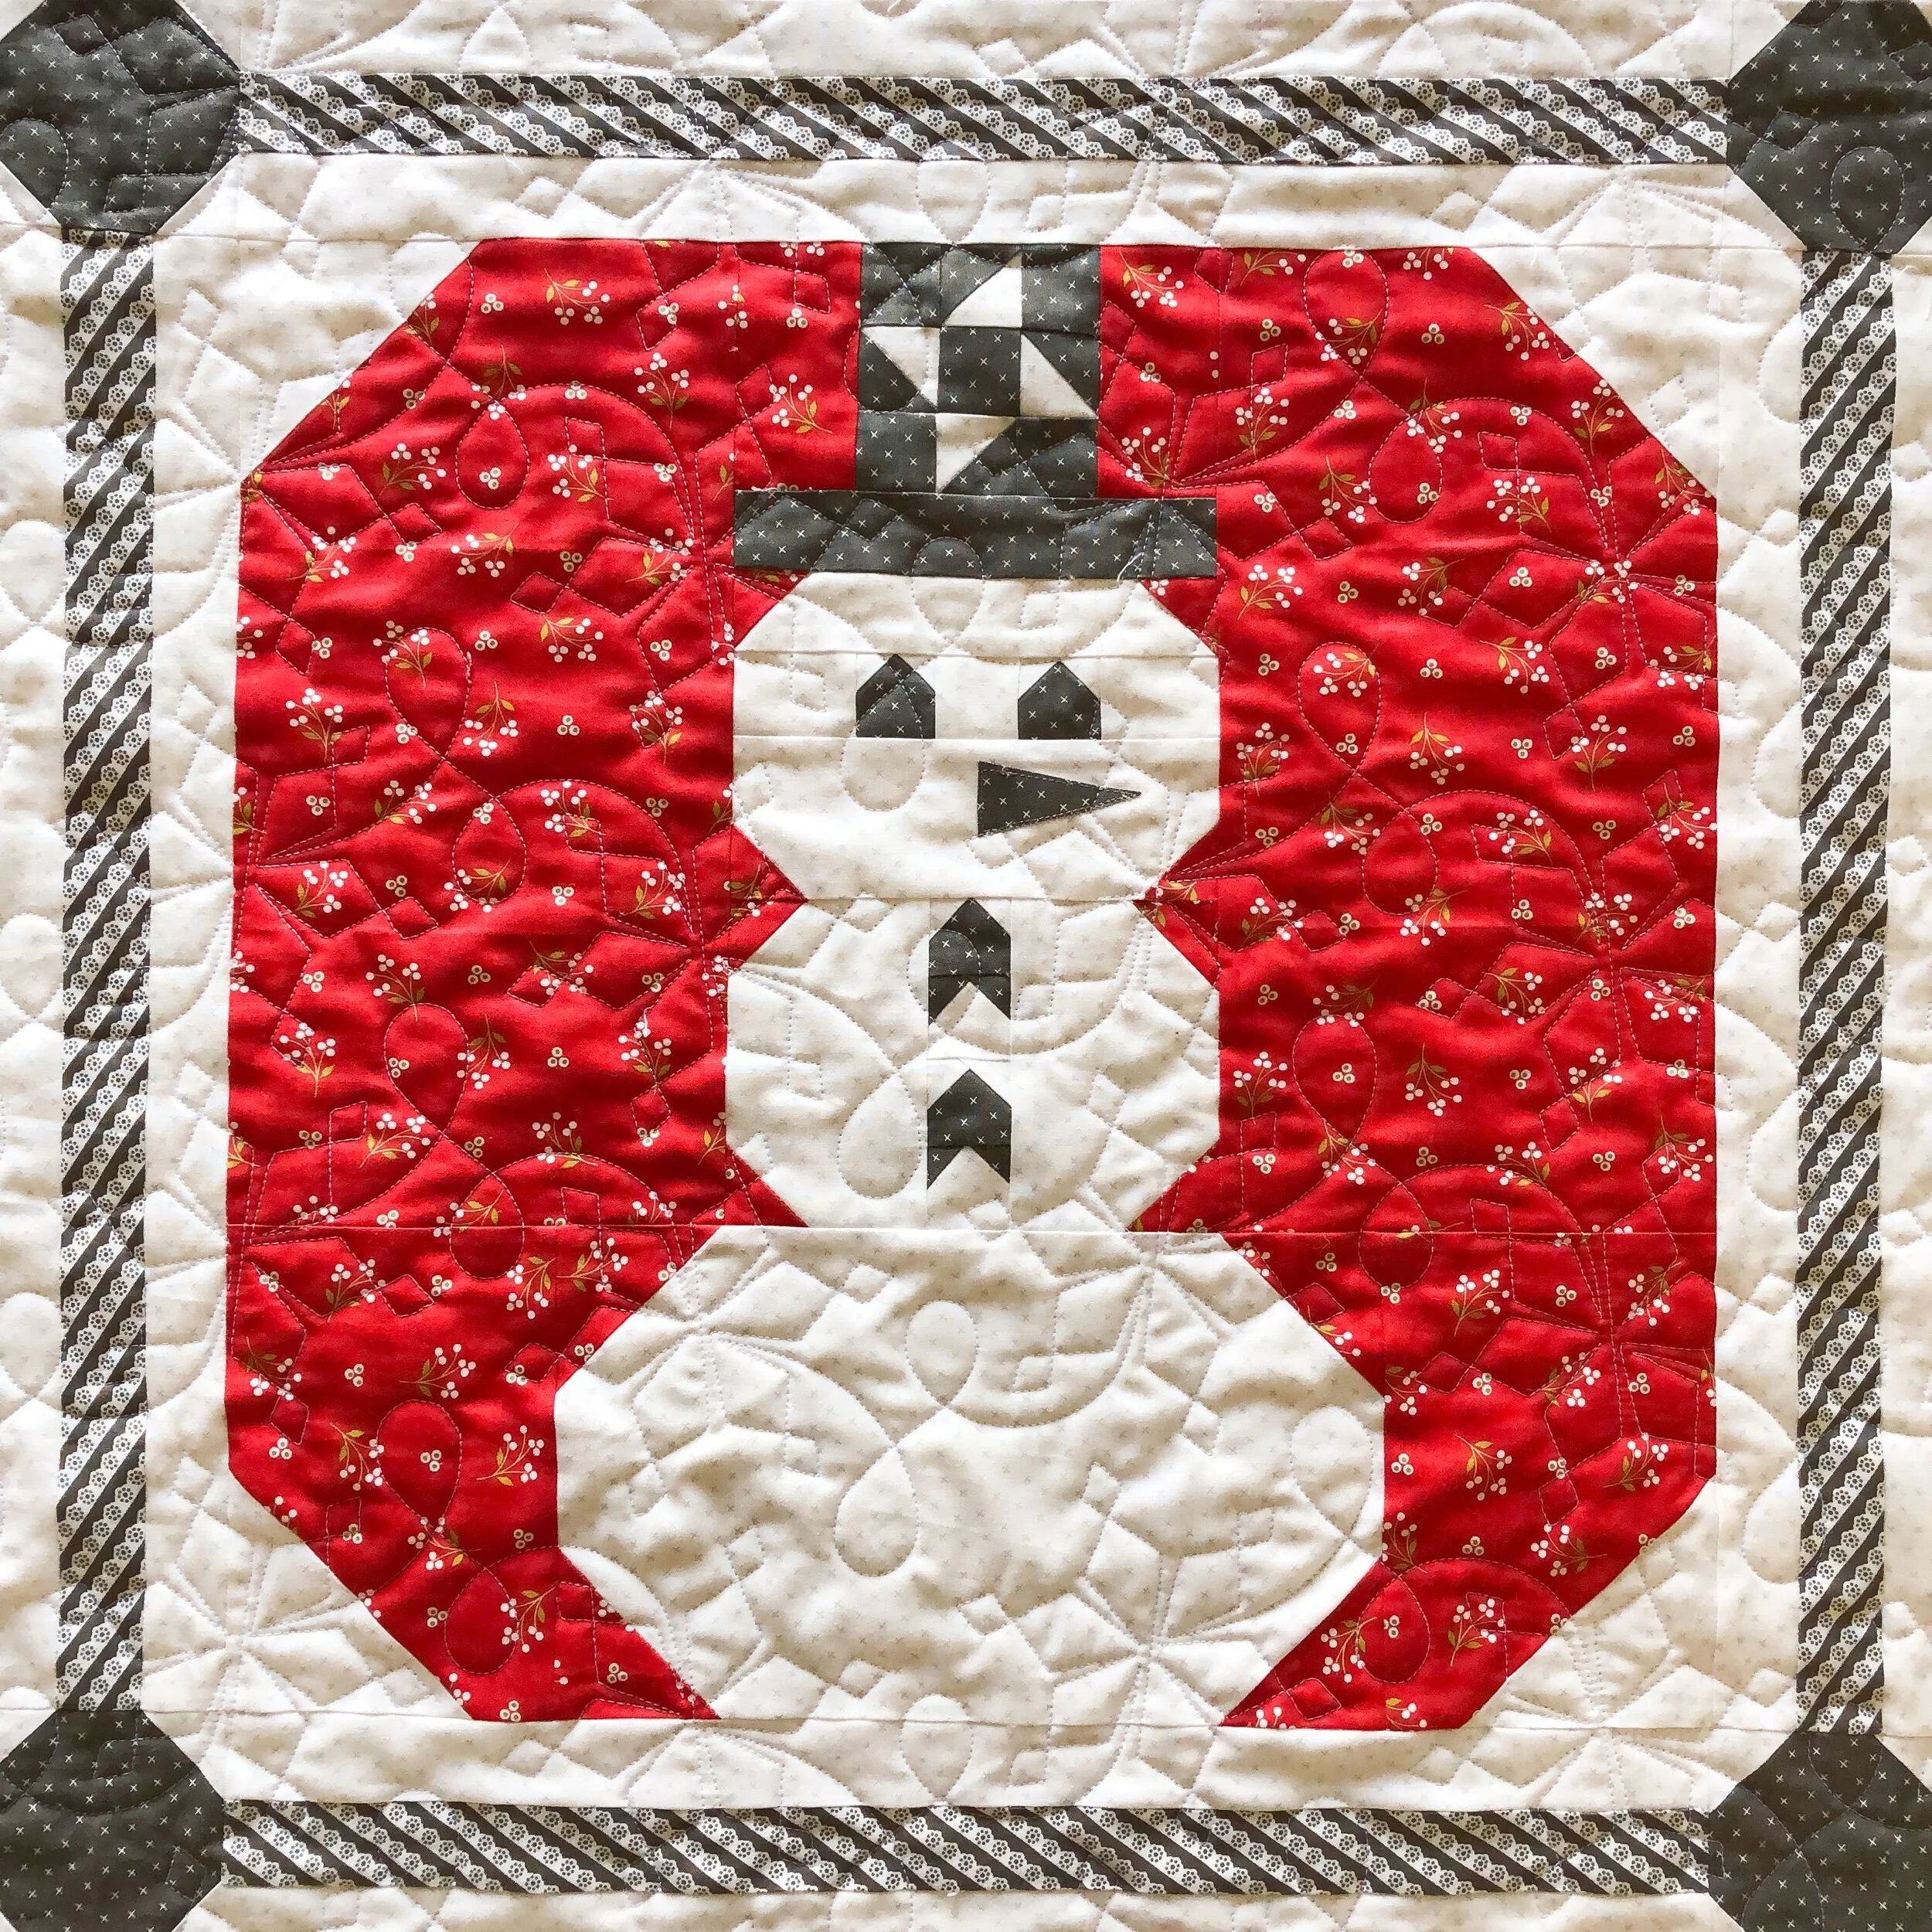
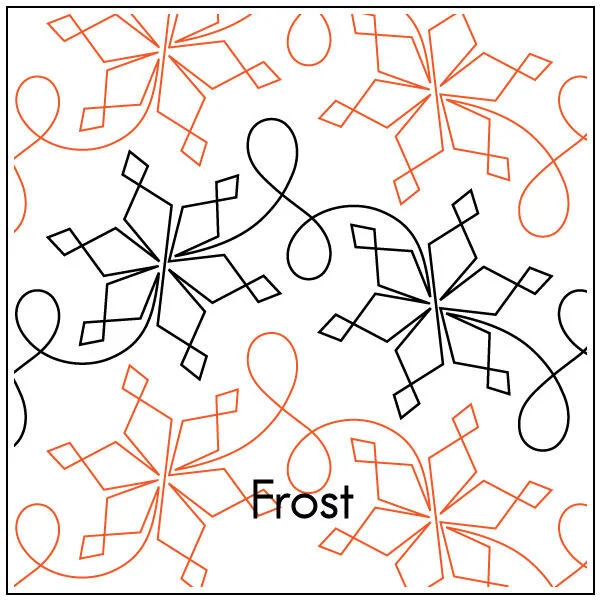
I chose Patricia Ritter and my Frost©️ quilting design for the quilting. It’s available at Urban Elementz. It’s my favorite wintery design to use on a quilt!!
Here is a good look at Frost on the background and sashing.

I love all the cute details on the snowman…sooo cute!

The great thing about this quilt, it can be out during Christmas time and then into the winter months.
That was short and sweet!! I hope you have a great week! Thank you for stopping by. • Leisha
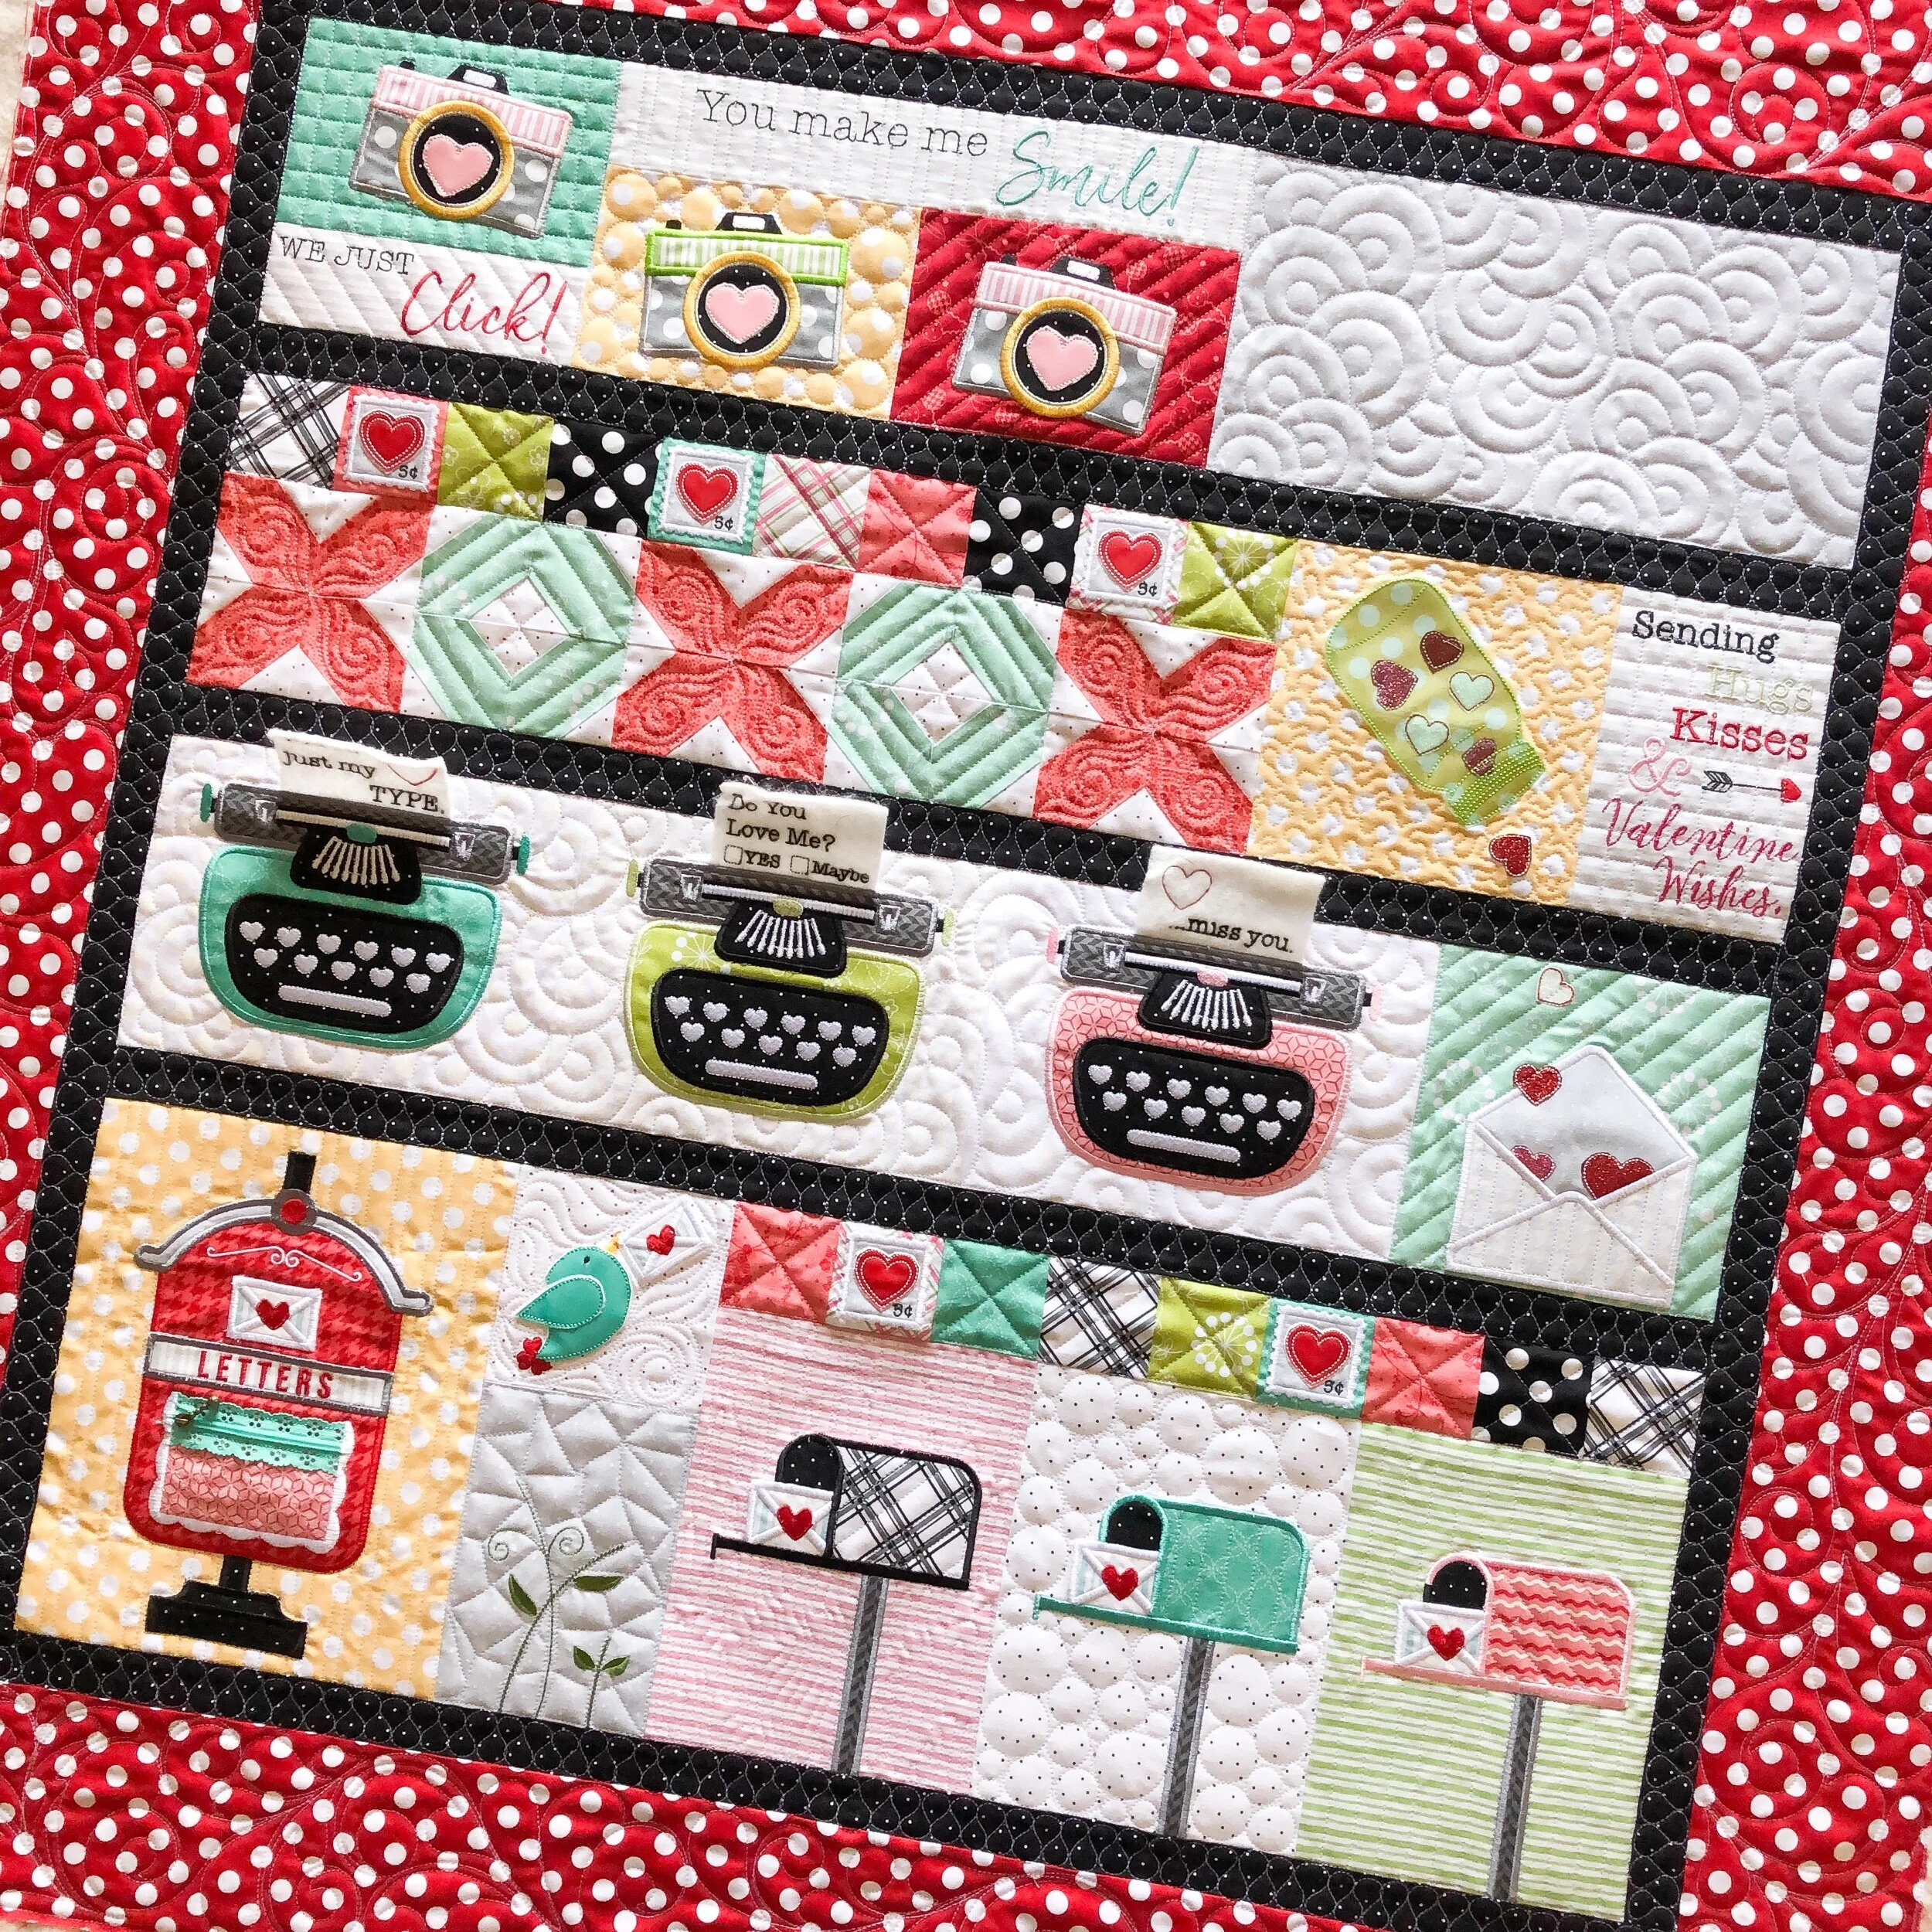
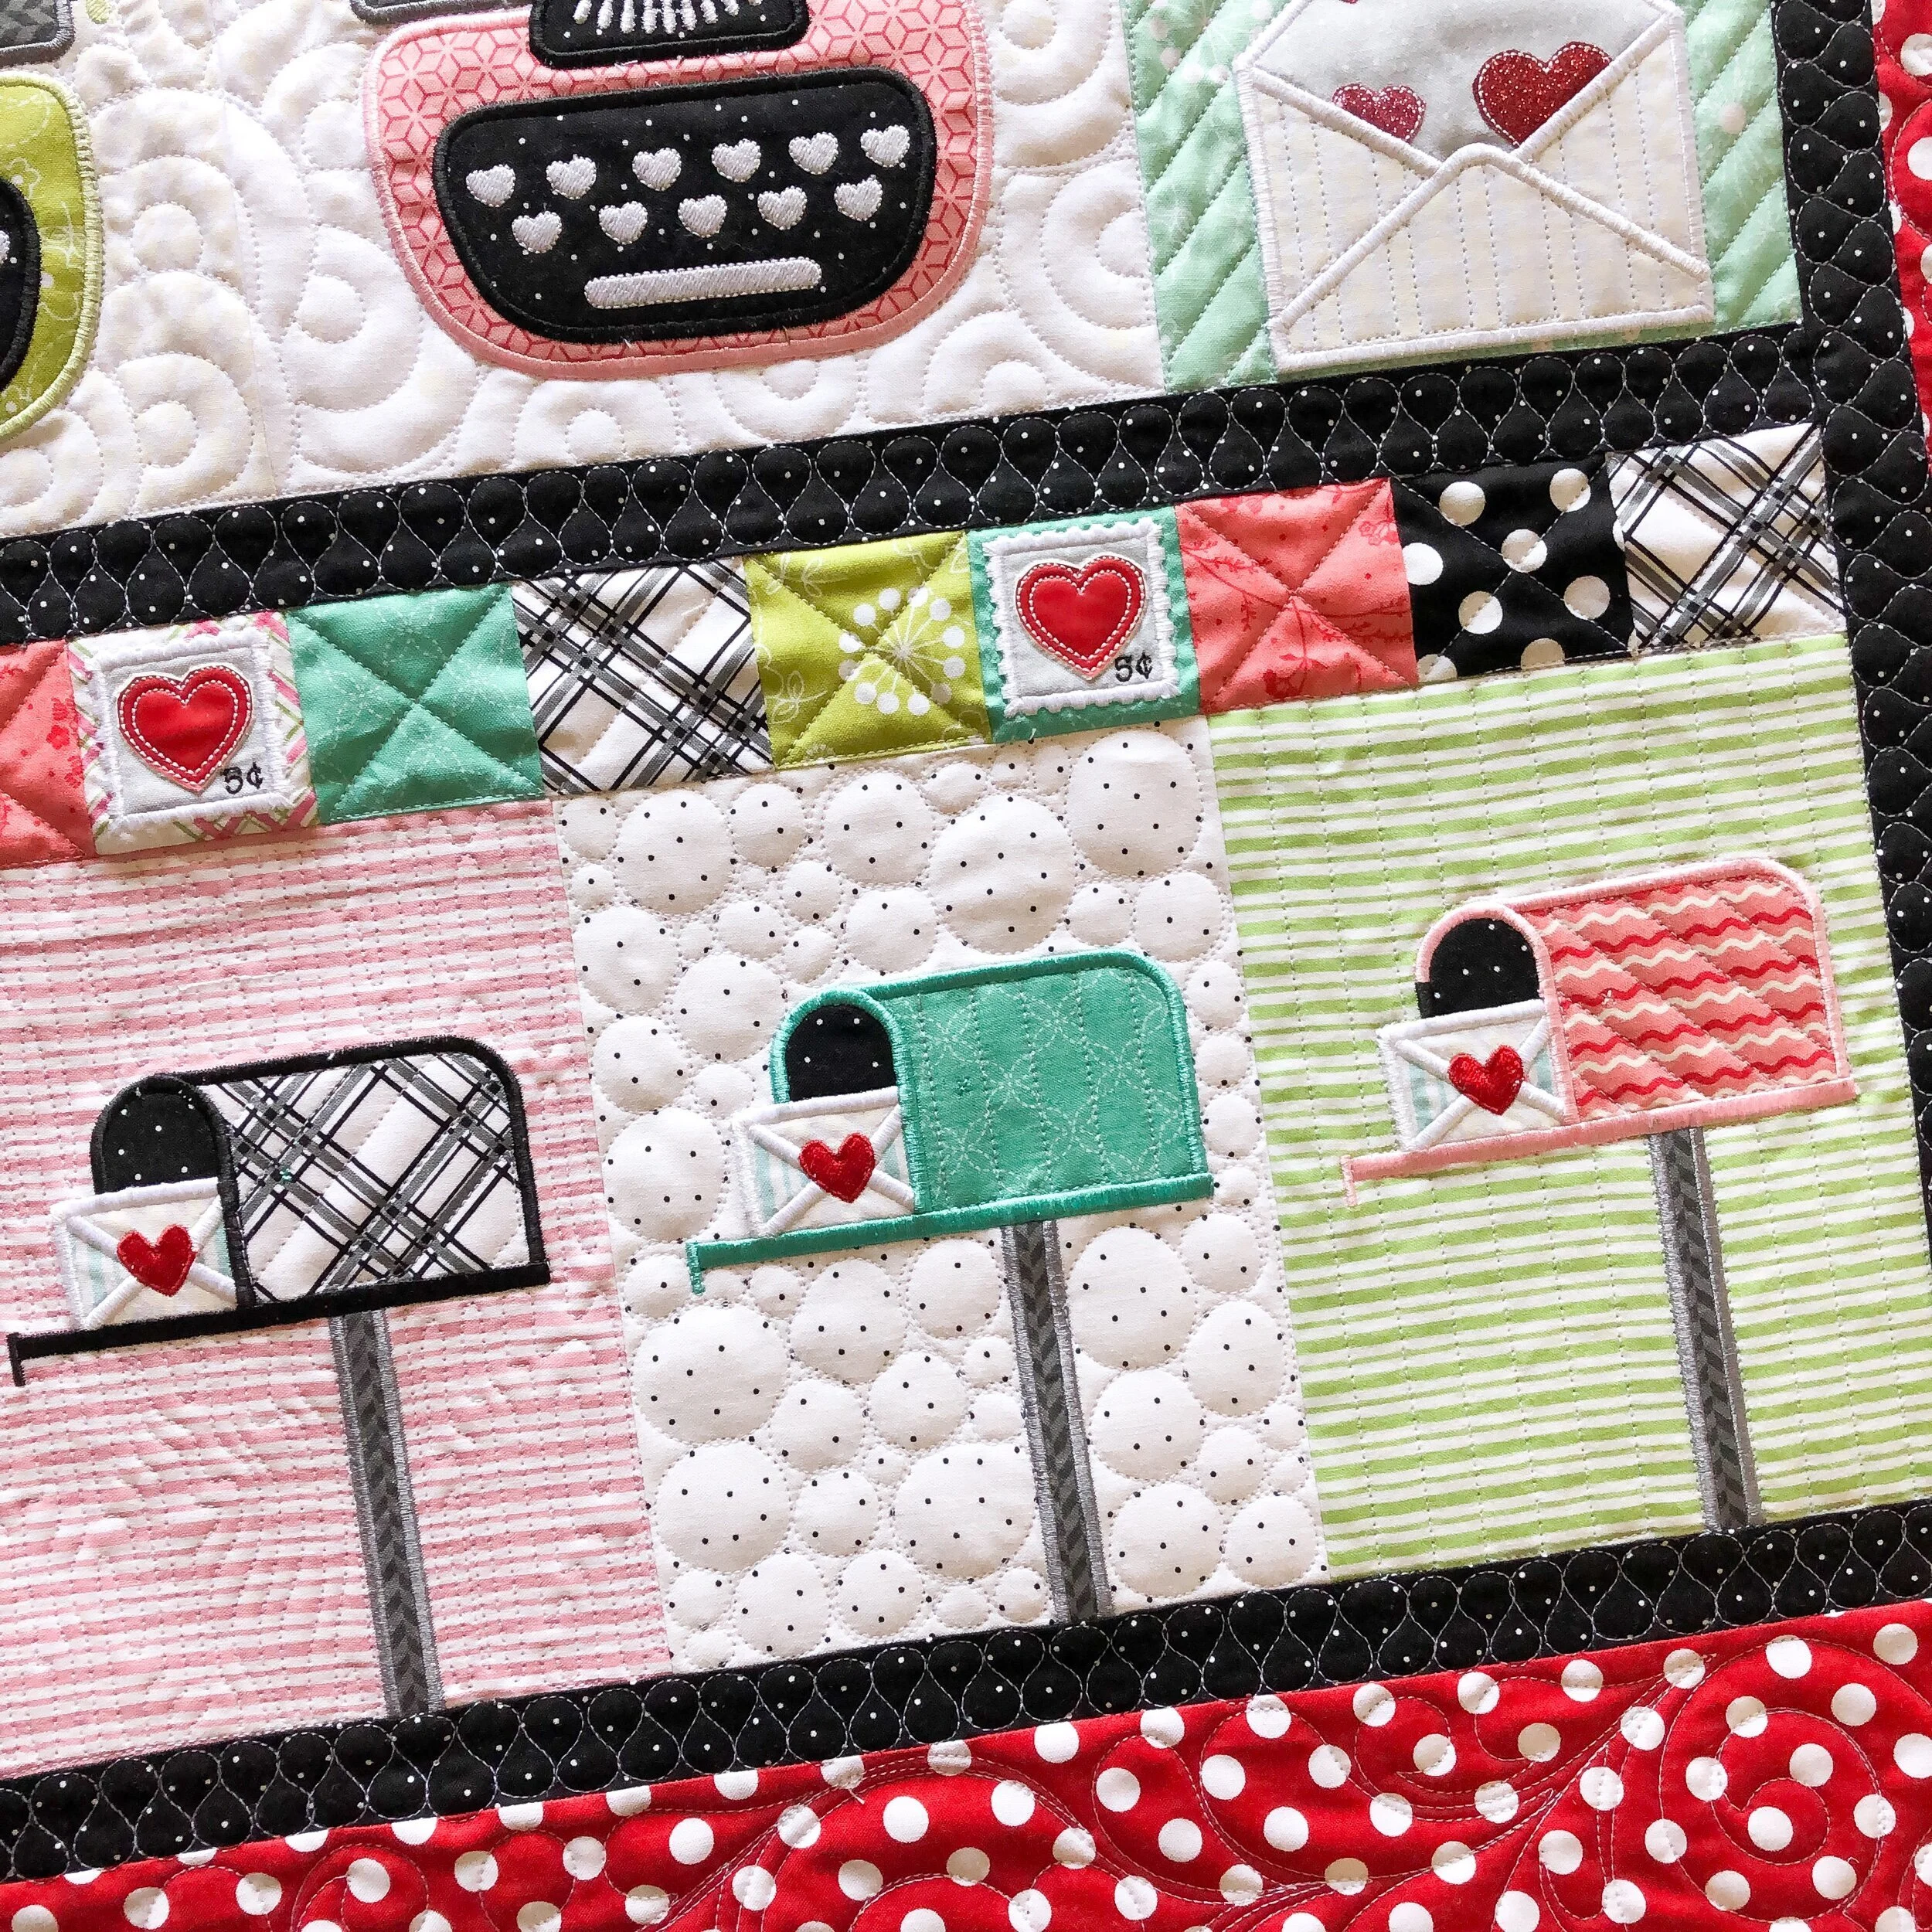
Sherry’s Love Notes wall hanging
Hello there!!
I hope you’ve had a good week! Life has been busy busy, so I haven’t kept blogging. Hopefully I can keep up with it.
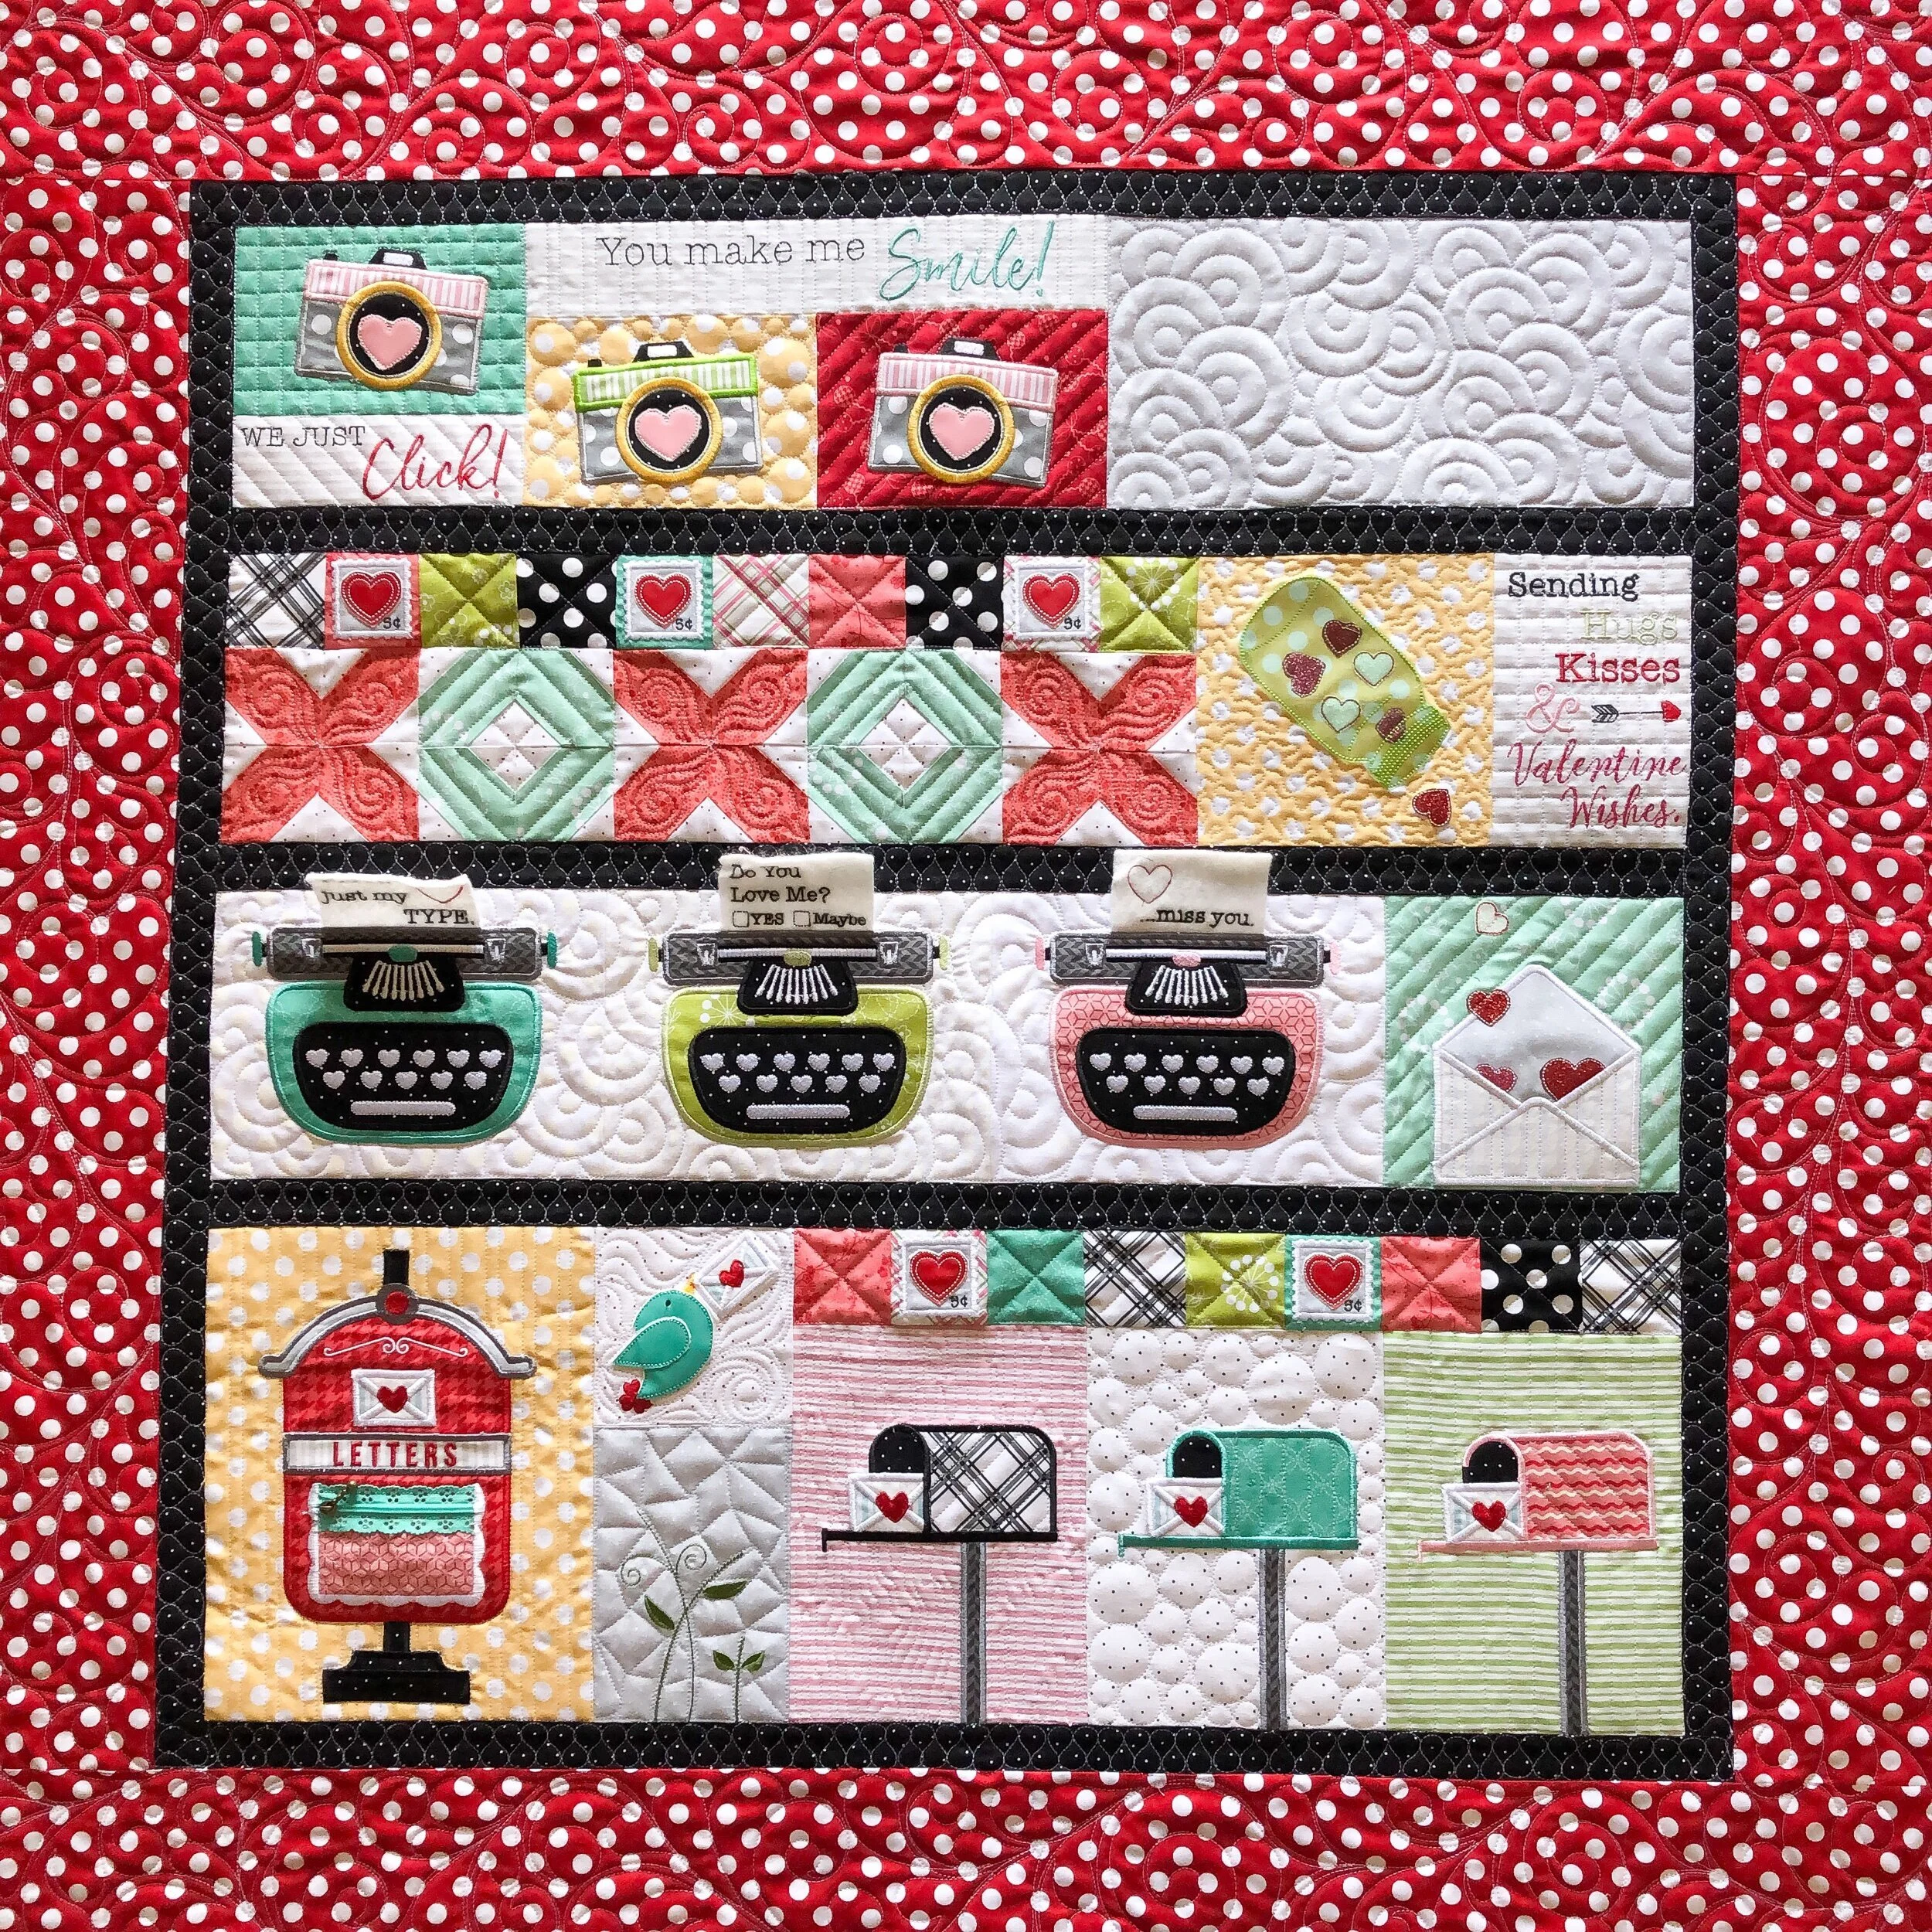
These wall hangings are a perfect small size, and Kim has created a variety of different wall hangings for just about every holiday and season there is. If you love appliqué, check out her designs. https://kimberbell.com
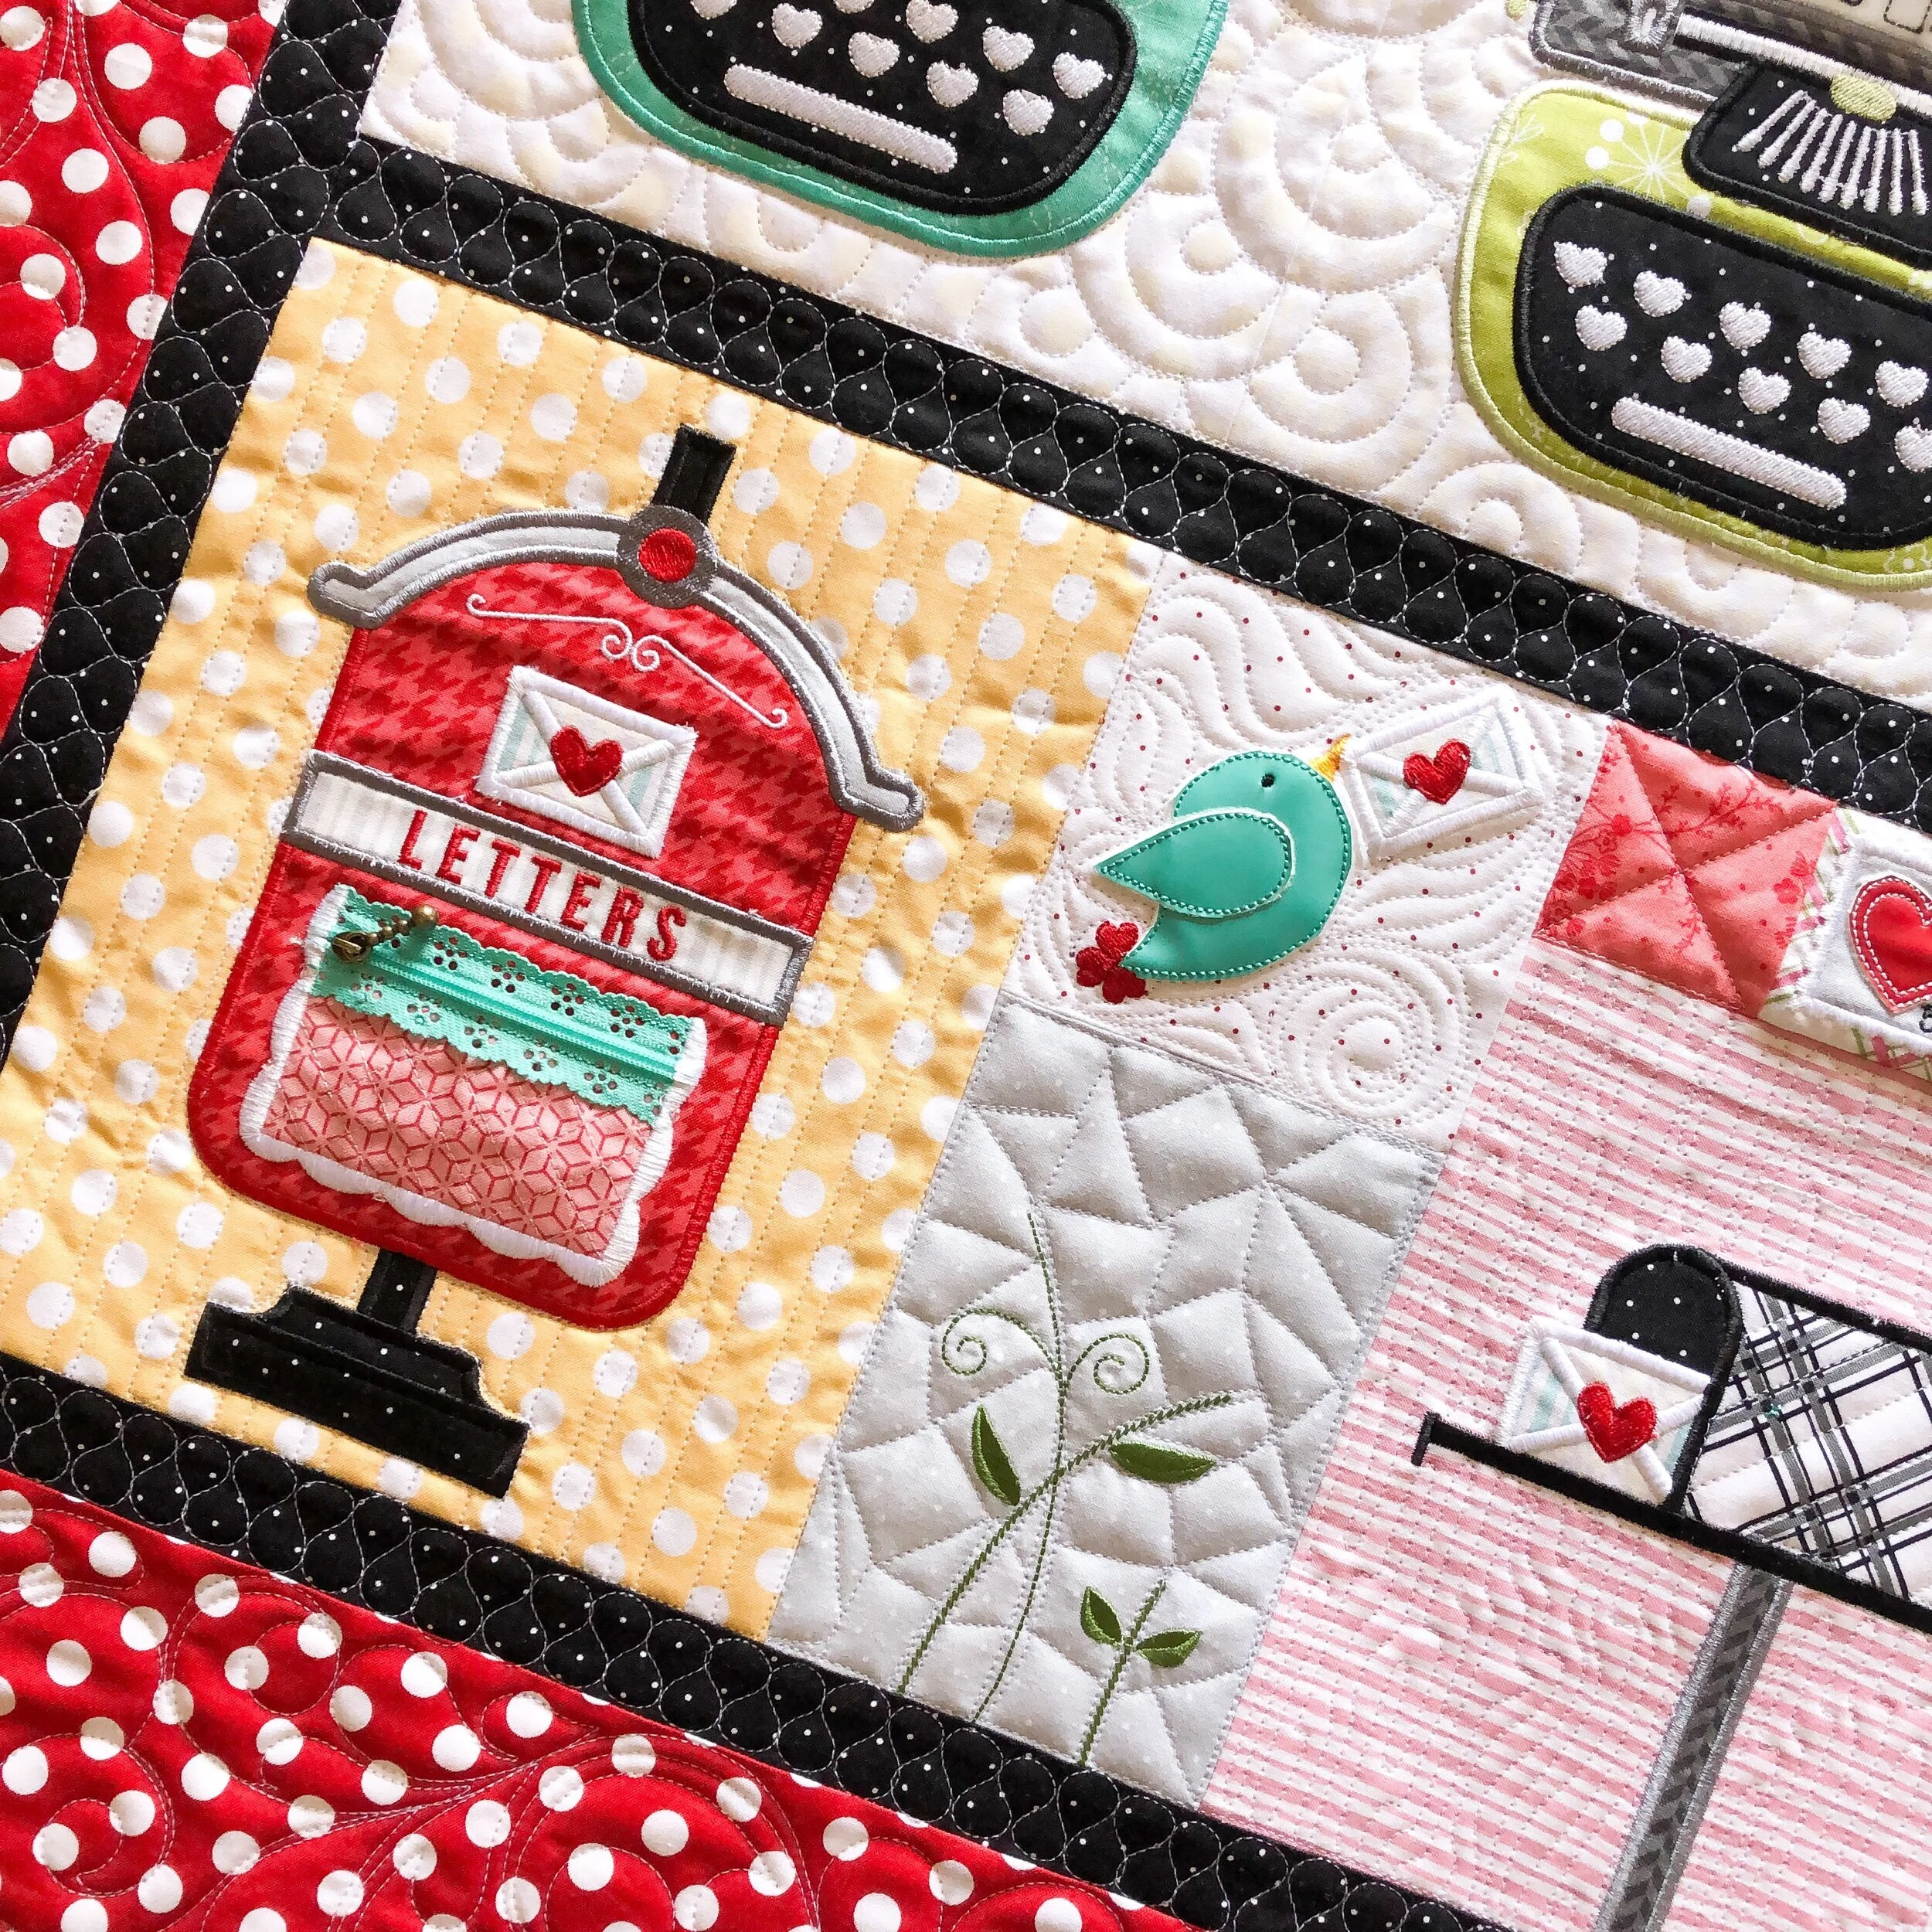
I did a lot of fun different quilting textures. Pinstripes, crackle, wood grain, overlapping circles, ribbon candy, stripes, pebbles, and more. These quilts are great for a variety of different quilting textures.
I used a white Omni thread from Superior Threads, and my favorite 8020 cotton poly blend batting from Winline.
Kim has a bunch of embellishments that are added to her wall hangings after they are quilted, which go in some of the empty spaces.
I used Edge rulers from Linda at The Quilted Pineapple for all of the straight lines.
A close up on some of the details…of course pictures don’t do quilts justice.
I quilted a freehand swirly feather in the borders.
Thanks for coming on by!! I also appreciate everyone who bought designs during the sale…thank you so much for your support!! I’m excited to see which quilts you put my designs on. If you post pictures on Instagram, tag me @leishakaye I’d love to share them. Thank you!! •Leisha
Spring Quilting Design Sale
Hello….
I hope you’re having a great morning. I just wanted to quickly let you know that we are having a 30% off sale on all quilting designs in our shop until Monday May 17th. There is no code necessary. There are several new fun designs!! Go check them out!
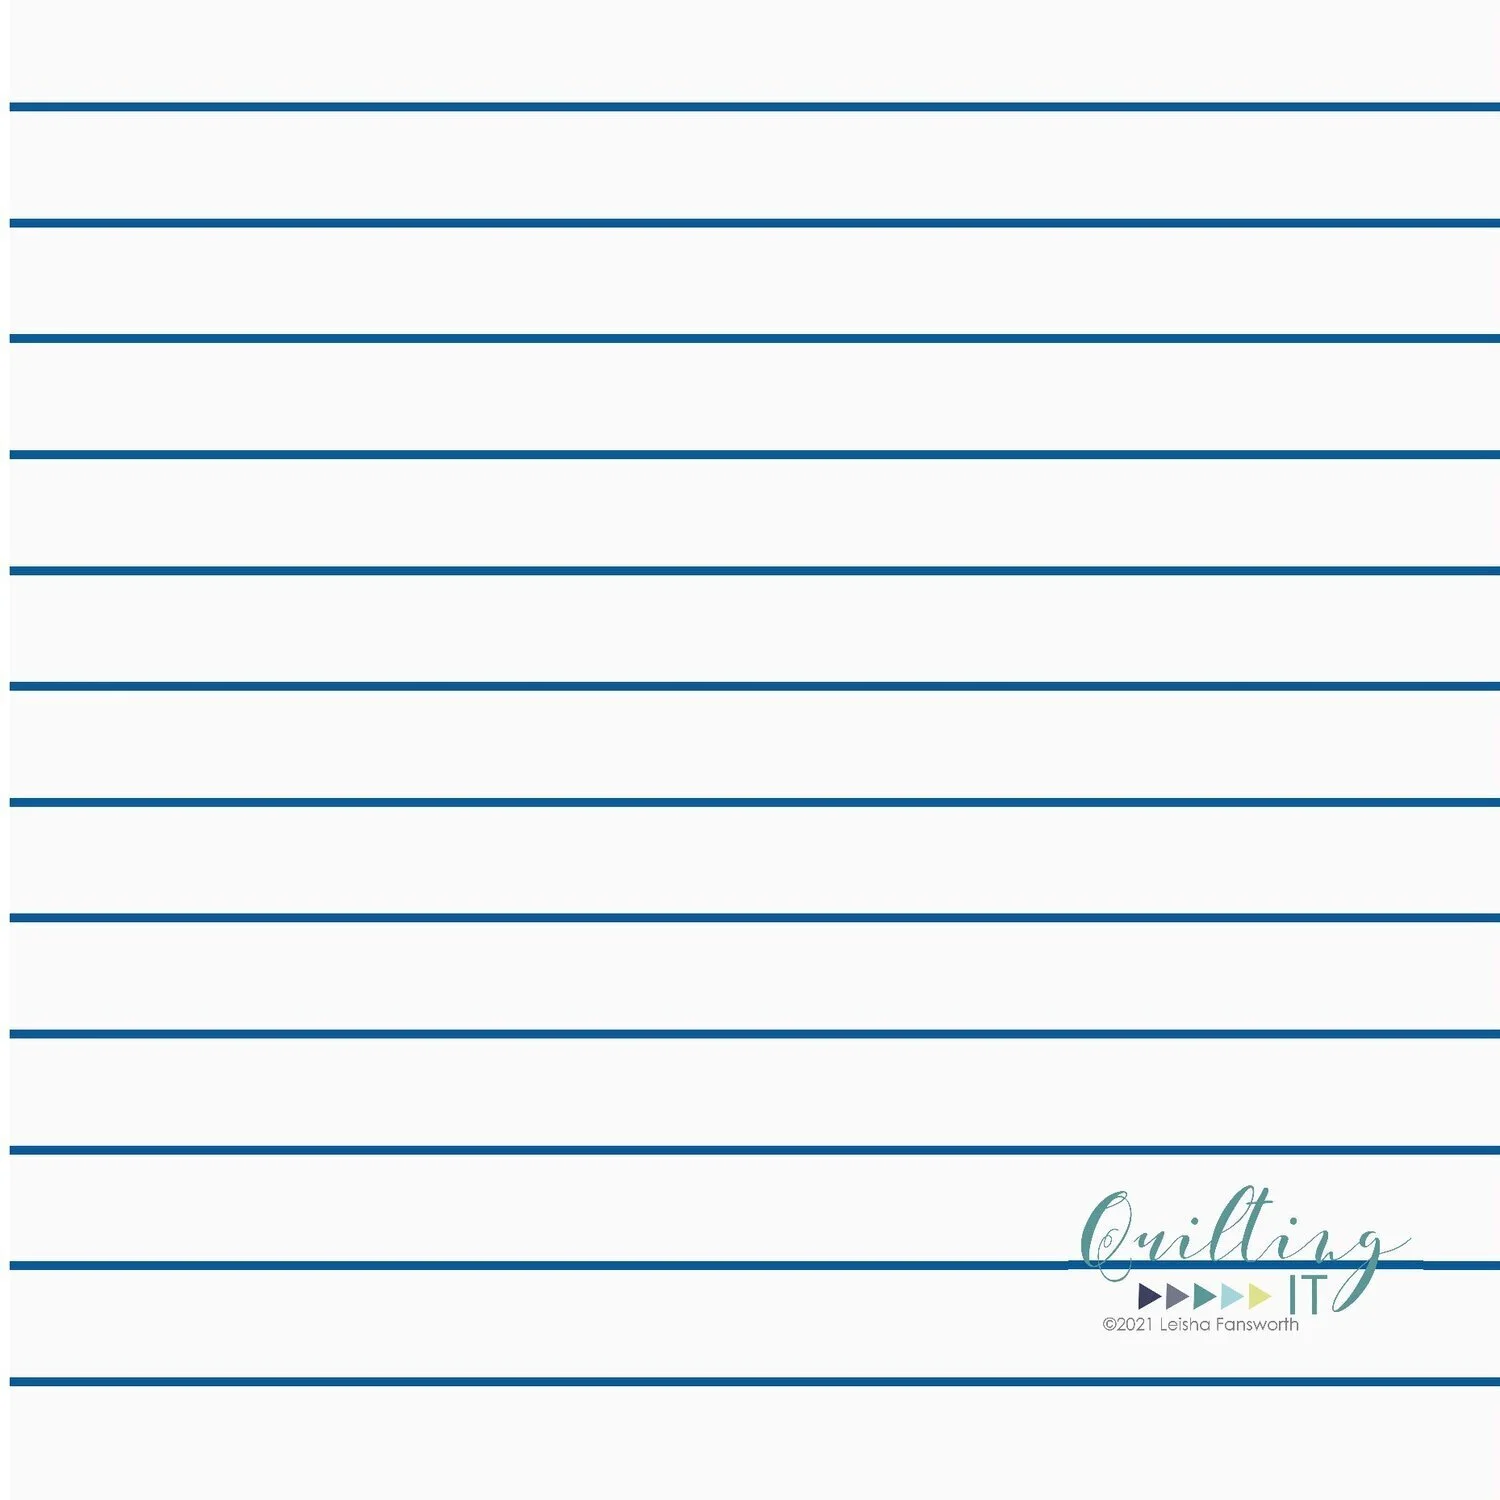
I also finally listed my four different Lined designs. If you follow me on Instagram you may have seen me quilting a client quilt with the Lined 1/2” design. I’ll do a separate post about the quilt info another time, but I’ll add a picture below for now.

My Lined designs are a simple line going back and forth from edge to edge, with a certain space between each line. So, the Lined 1” design has 1” spacing between the lines, the Lined 1/2” (which is pictured above) has 1/2” between the lines, and the same goes for the Lined 1/4” and the Lined 3/4”. They are all available in my shop. I’ll bundle them and offer them at a discount as well, in case you don’t want to figure out the math for a specific measurement. I personally wouldn’t quilt more than an inch separation between the lines. I did once before at a clients request, and it didn’t love it.
Designs like these can be tricky in dealing with thread breaks. The thread typically breaks 3-5 times each line that is quilted from right to left, on my machine. I have listed a few tips that help me cut back on a ton of those thread breaks. I had around 6-8 thread breaks on the whole section with the quilt above, which is a vast improvement. I turn my needle to 5:30, slow my machine down one or two speeds, and spray my Omni cone of thread with distilled water…keeping it damp until I was done quilting. I also heard that Glide thread helps tremendously.
The designs must be set at the height I’ve listed in the description of the design, to get the proper spacing between the lines. The width should be set at the width of your quilt or boundary. If you don’t, you’ll have the design setup like the picture below. There should be no vertical lines. I use a Gammill Statler, and on the Statler there is a “maintain aspect” box that is checked during design setup. You’ll actually want to uncheck that, so you can change the width of the design. After you change the width of the design to the width of the boundary, the vertical lines will disappear. Essentially, you only want one motif per section…like pictured above.

This is a funny image to me…but I wanted to make sure those who chose to use this design knew this is not how it should look.
Thank you for being here…happy spring/fall to you! -Leisha