

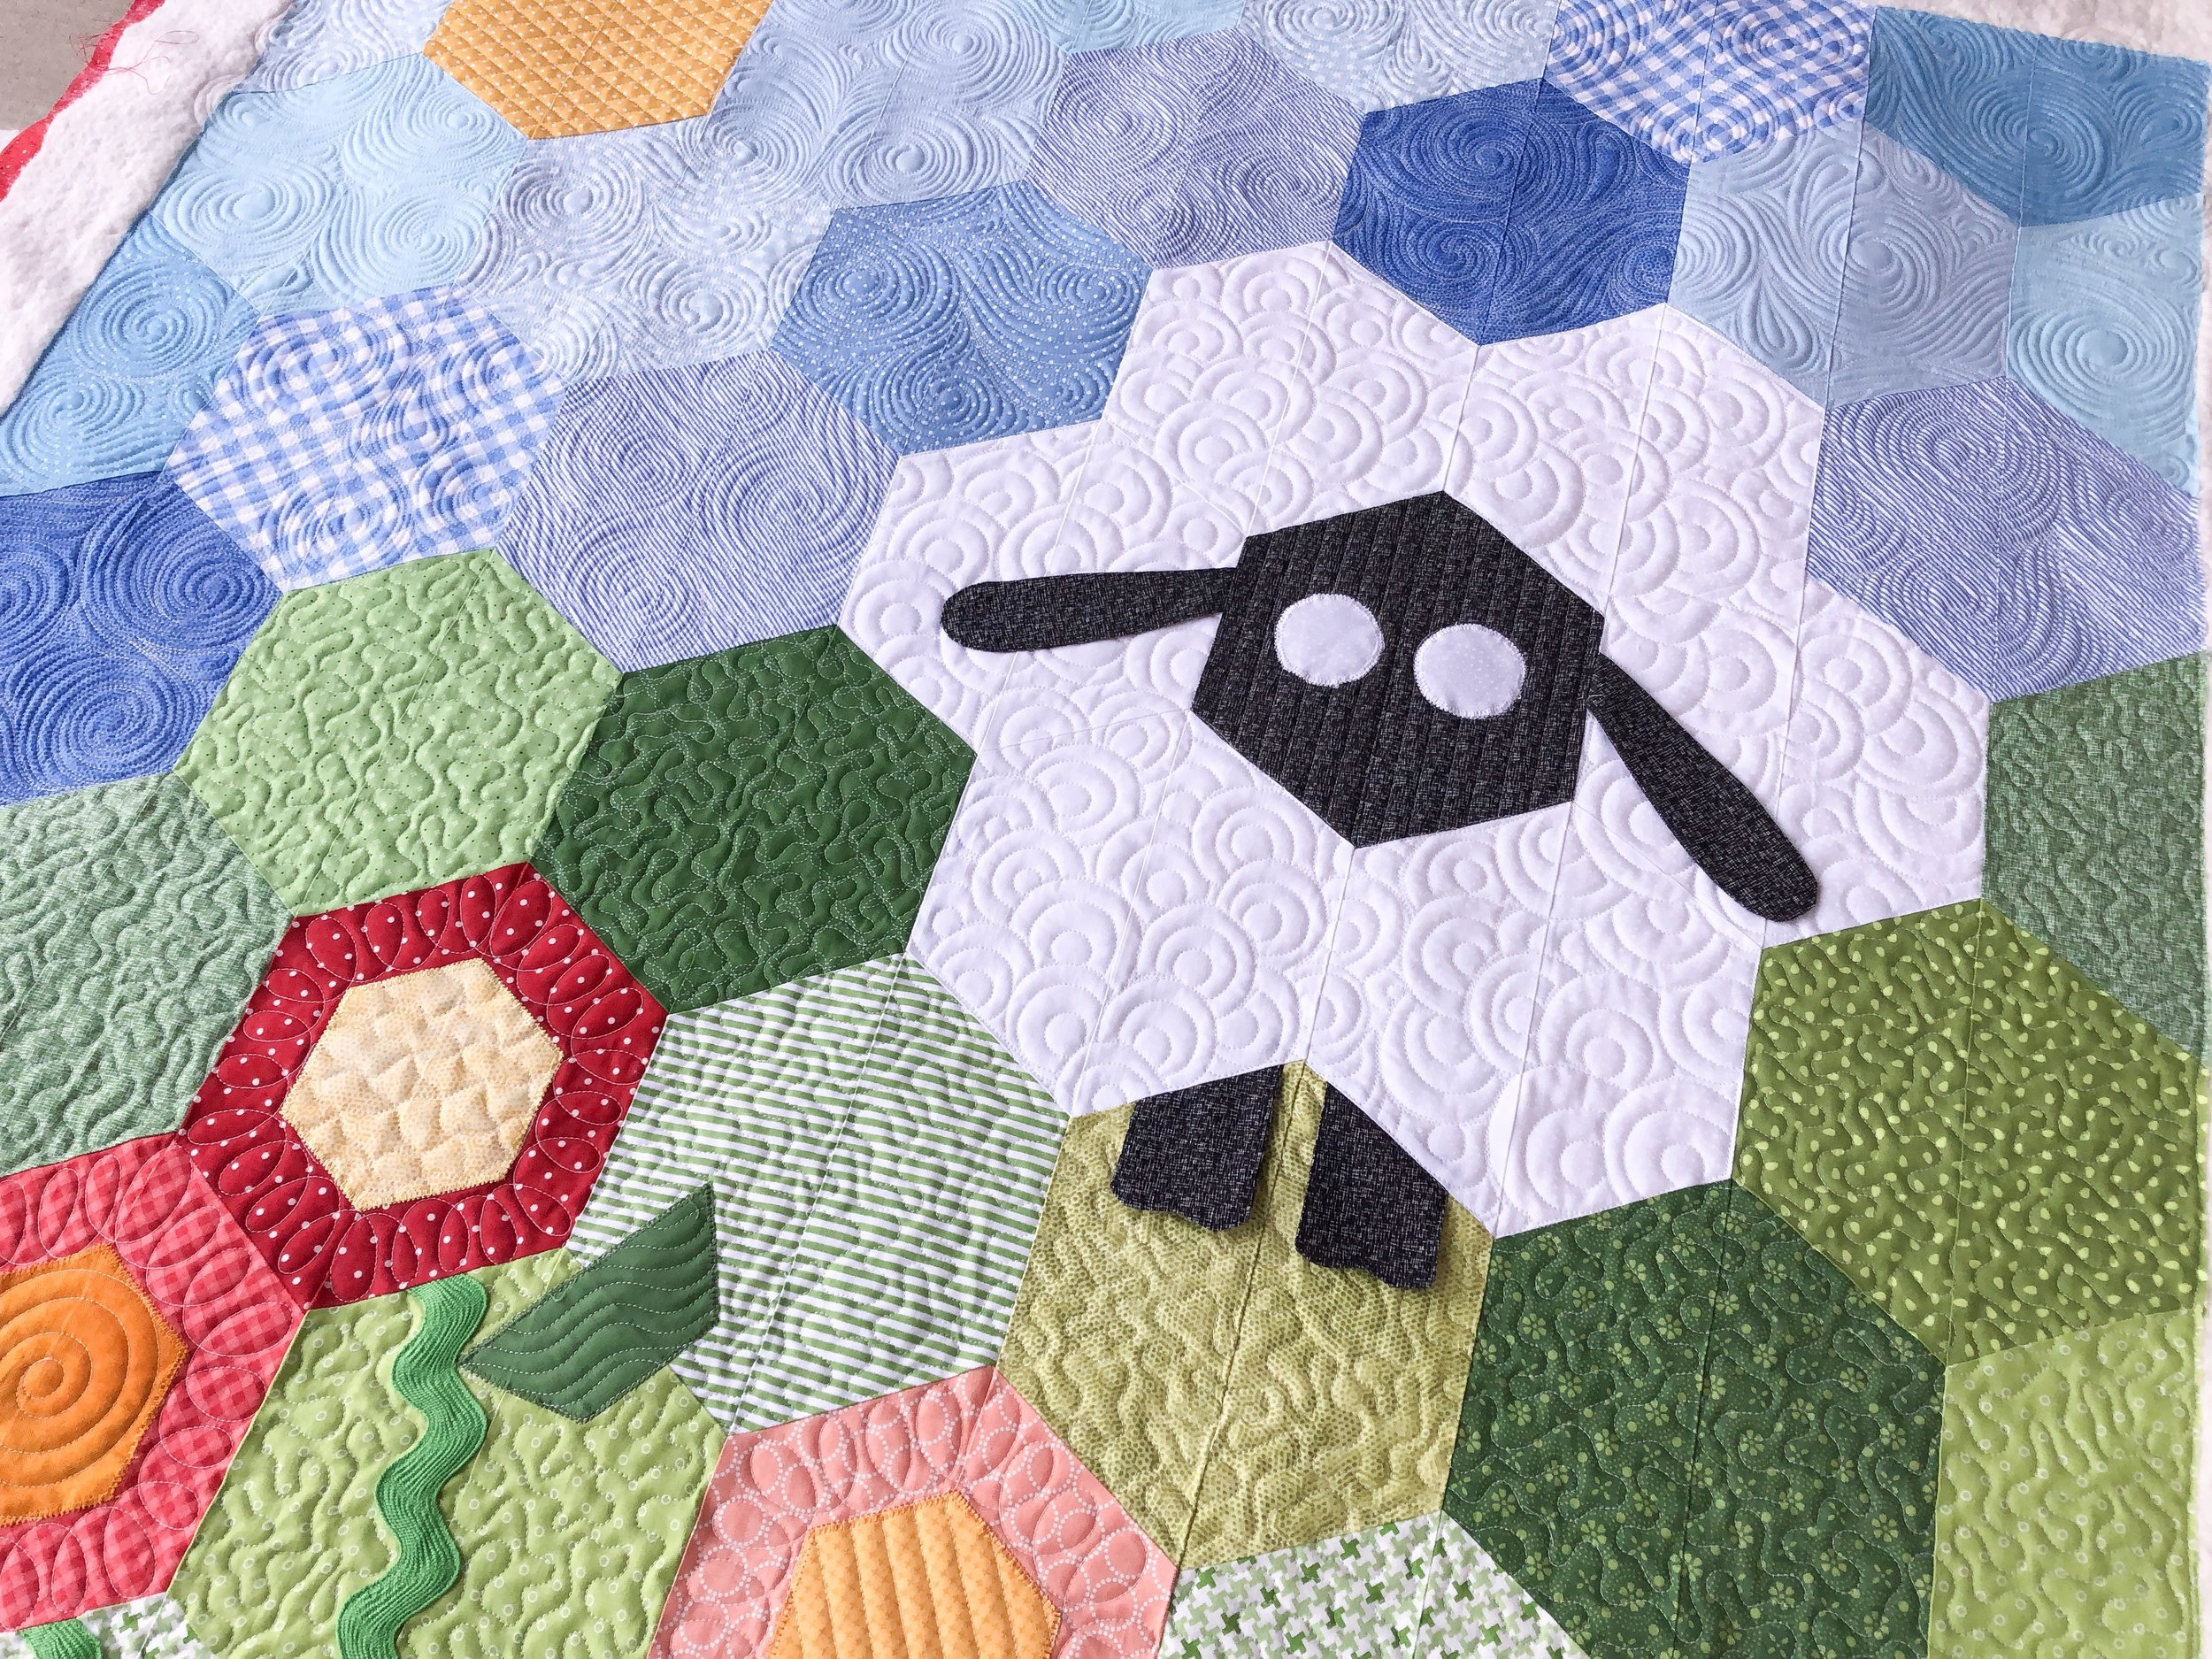
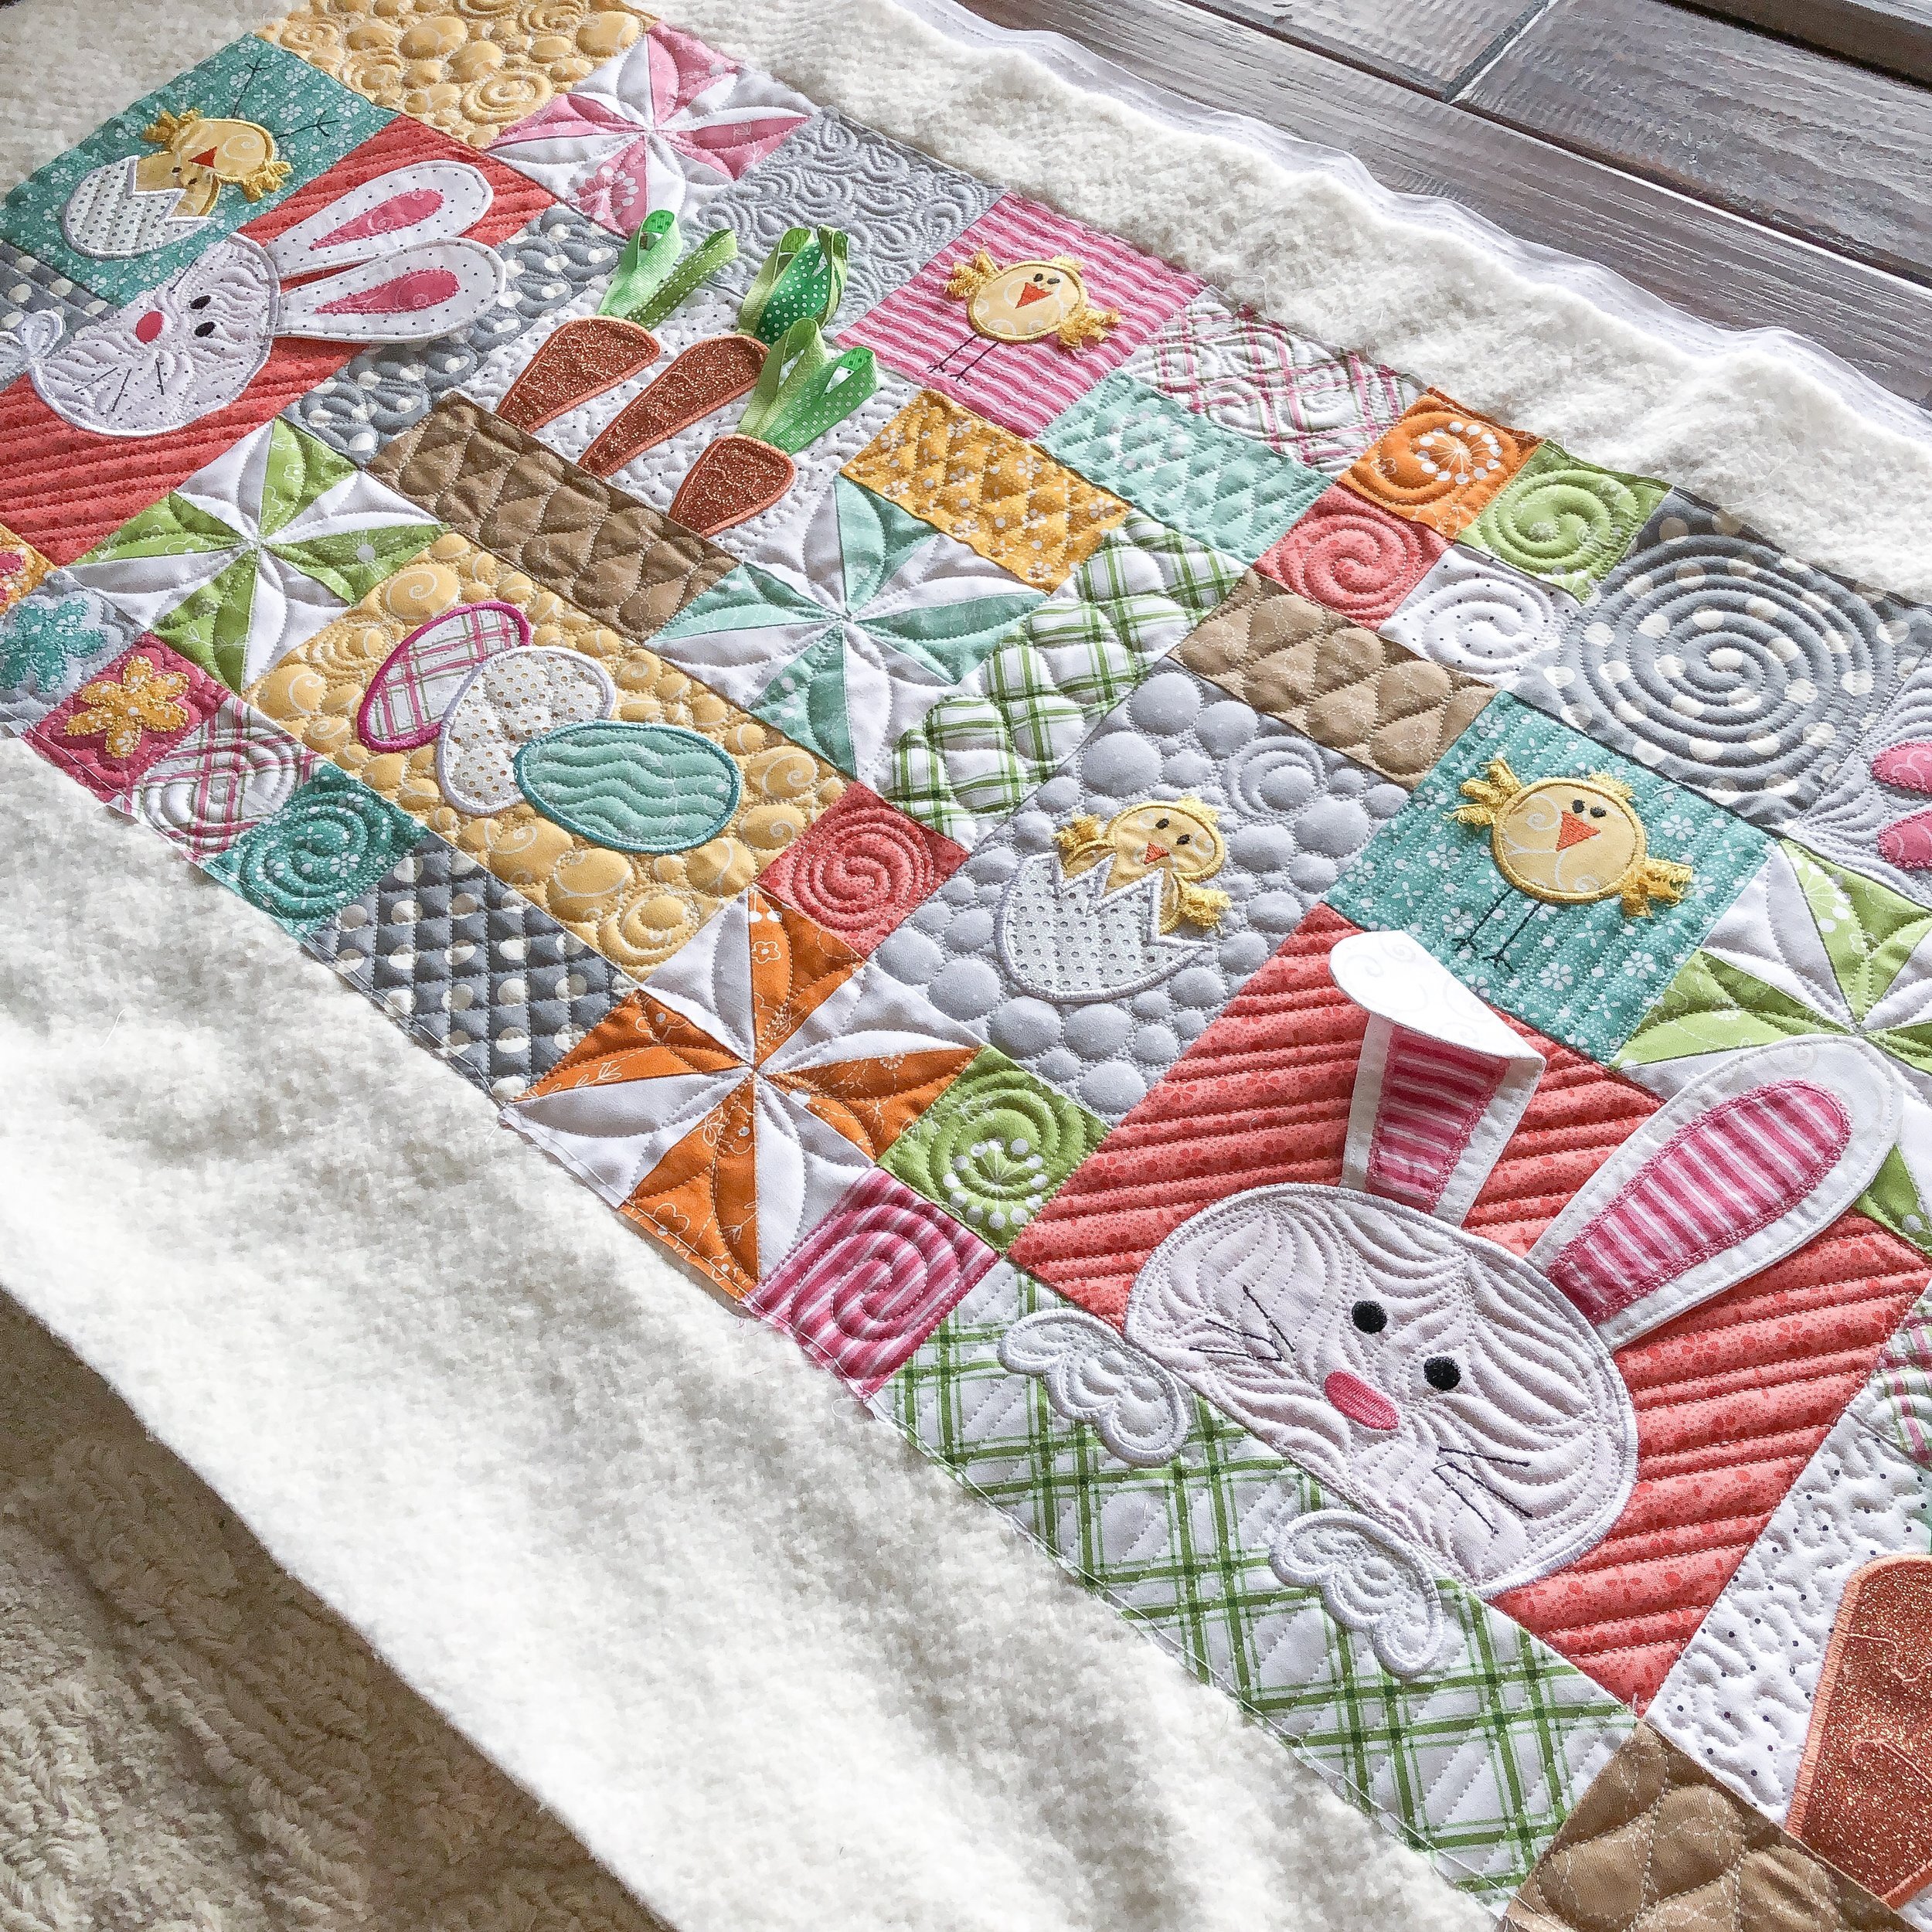
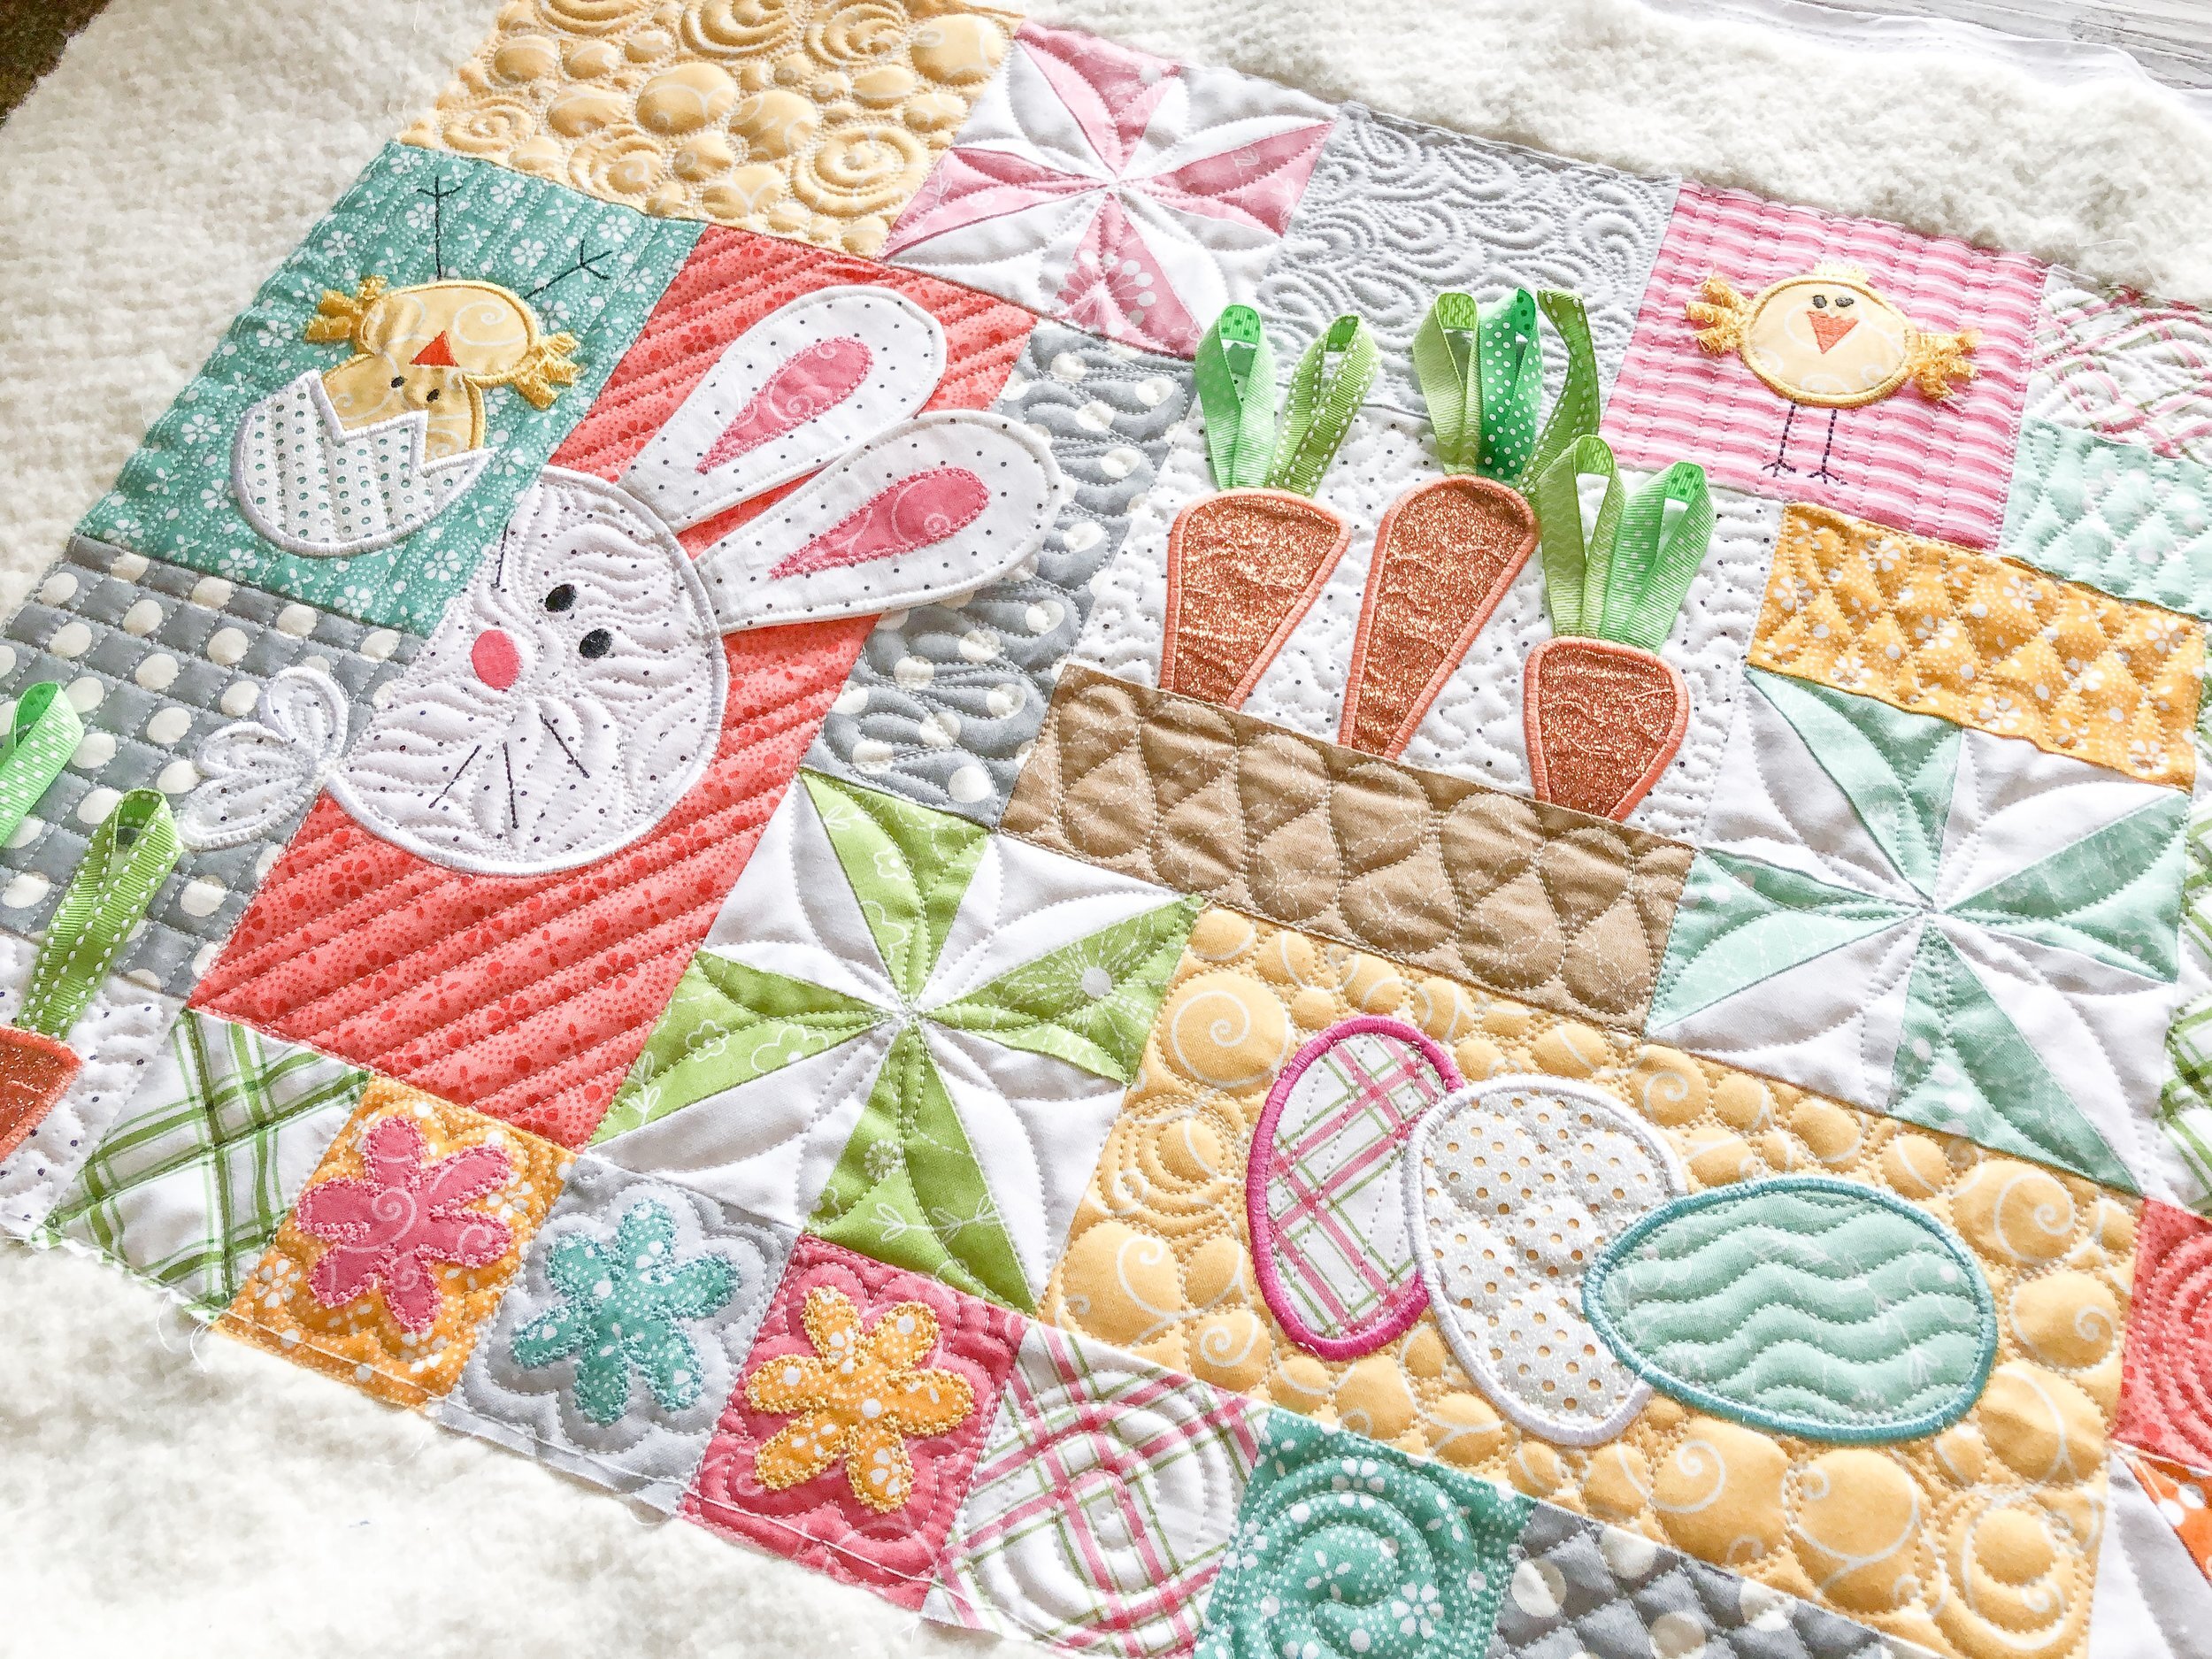
Kathy’s “Sheep Shape” Quilt
Kathy made this for her soon to be grand daughter. It turned out so sweet!!! This super cute Sheep Shape quilt pattern is by Deonn Stott from Quiltscapades and it’s available in the Quiltmaker Magazine in the May-June 2014 issue and Quiltermaker’s Readers Favorites 2015.

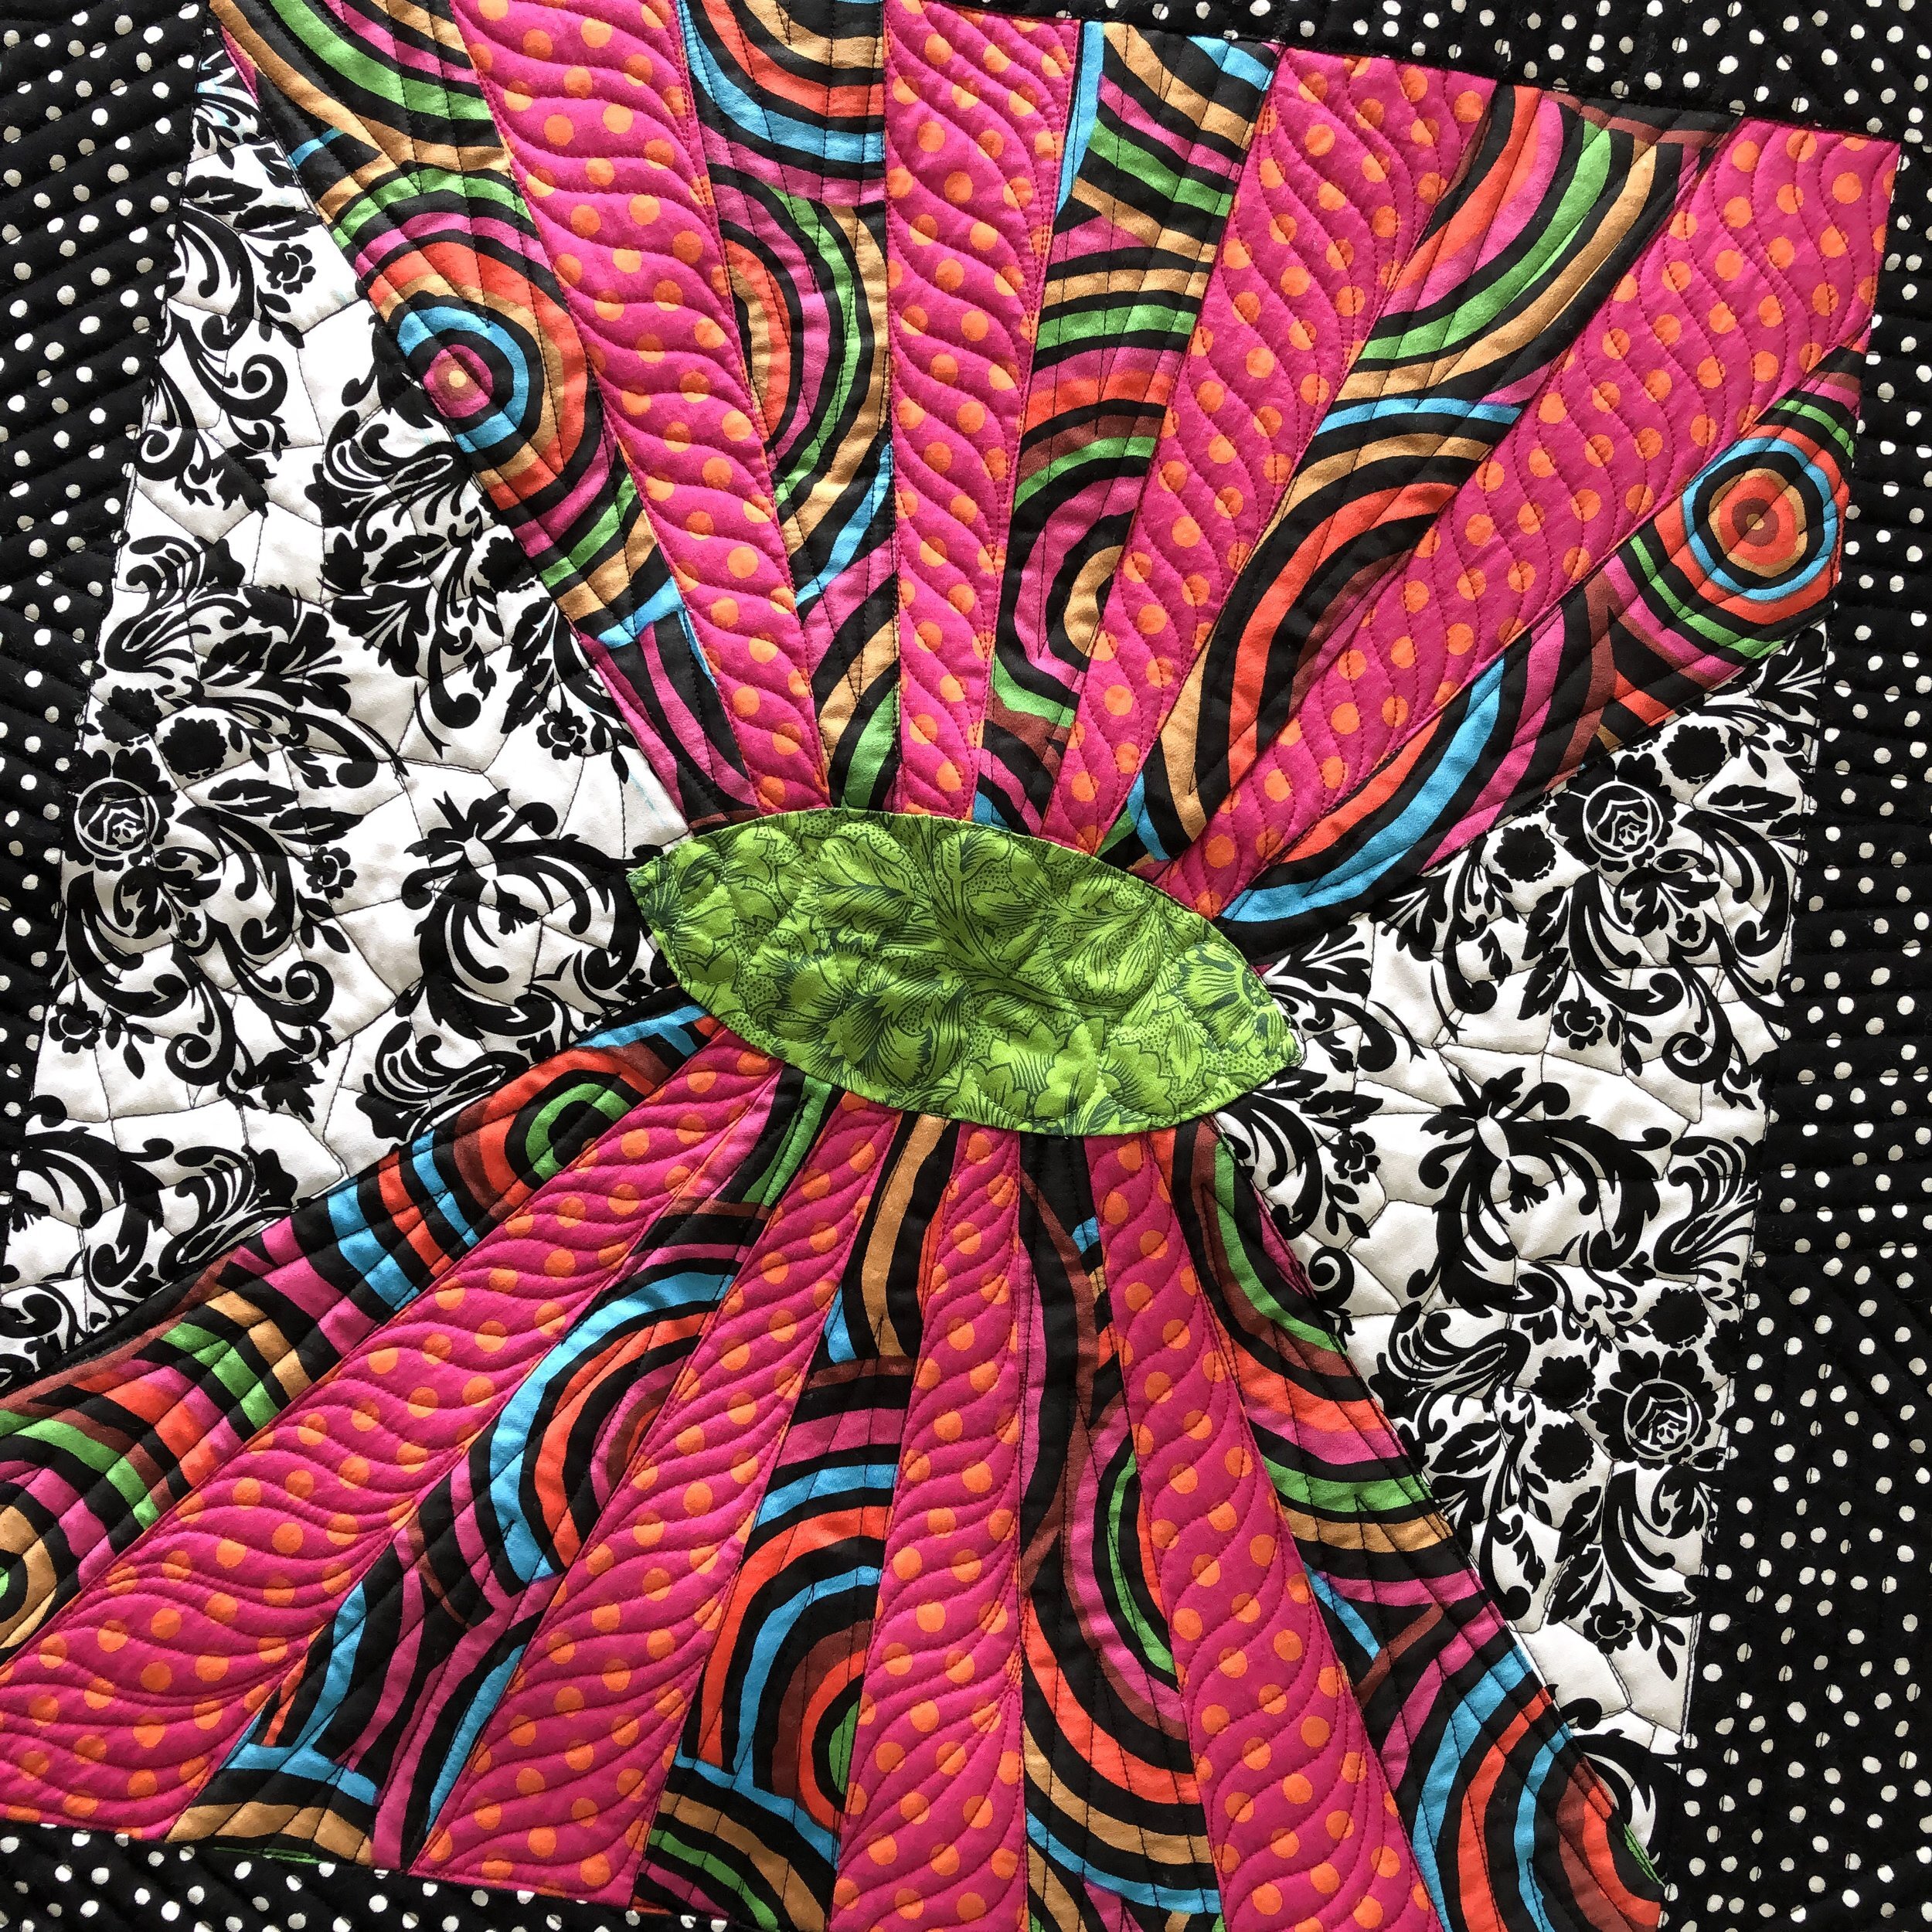
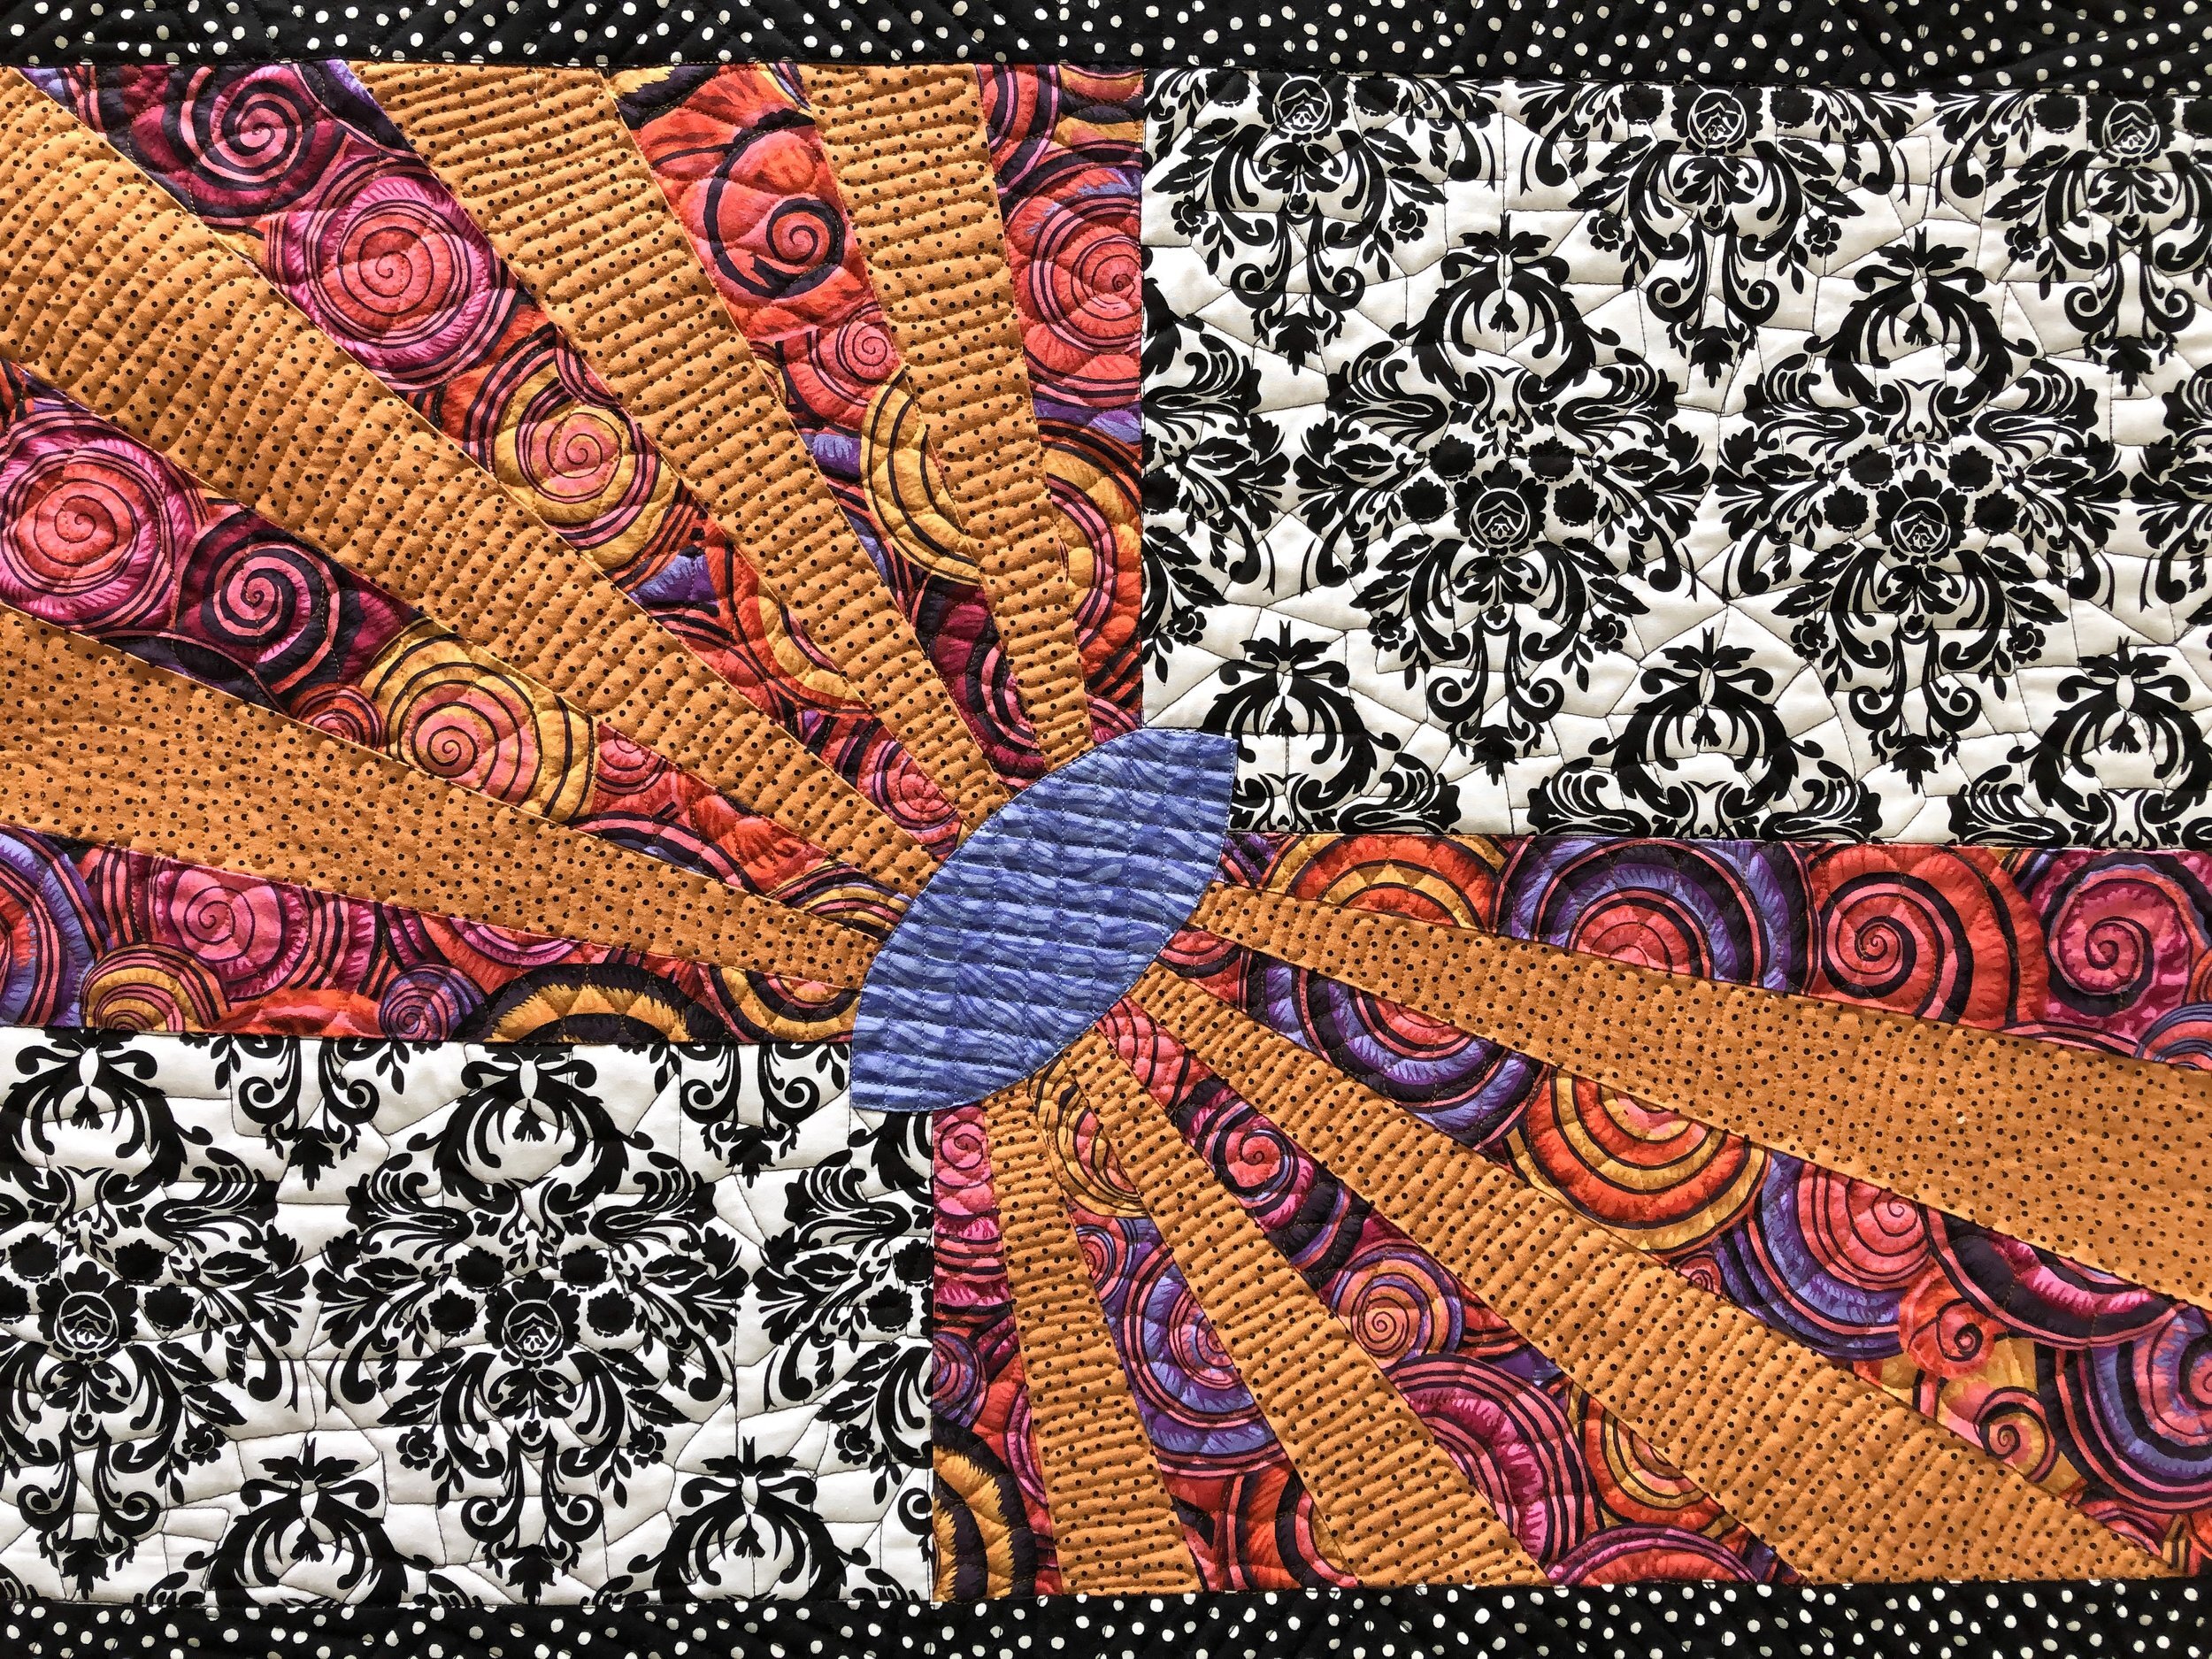
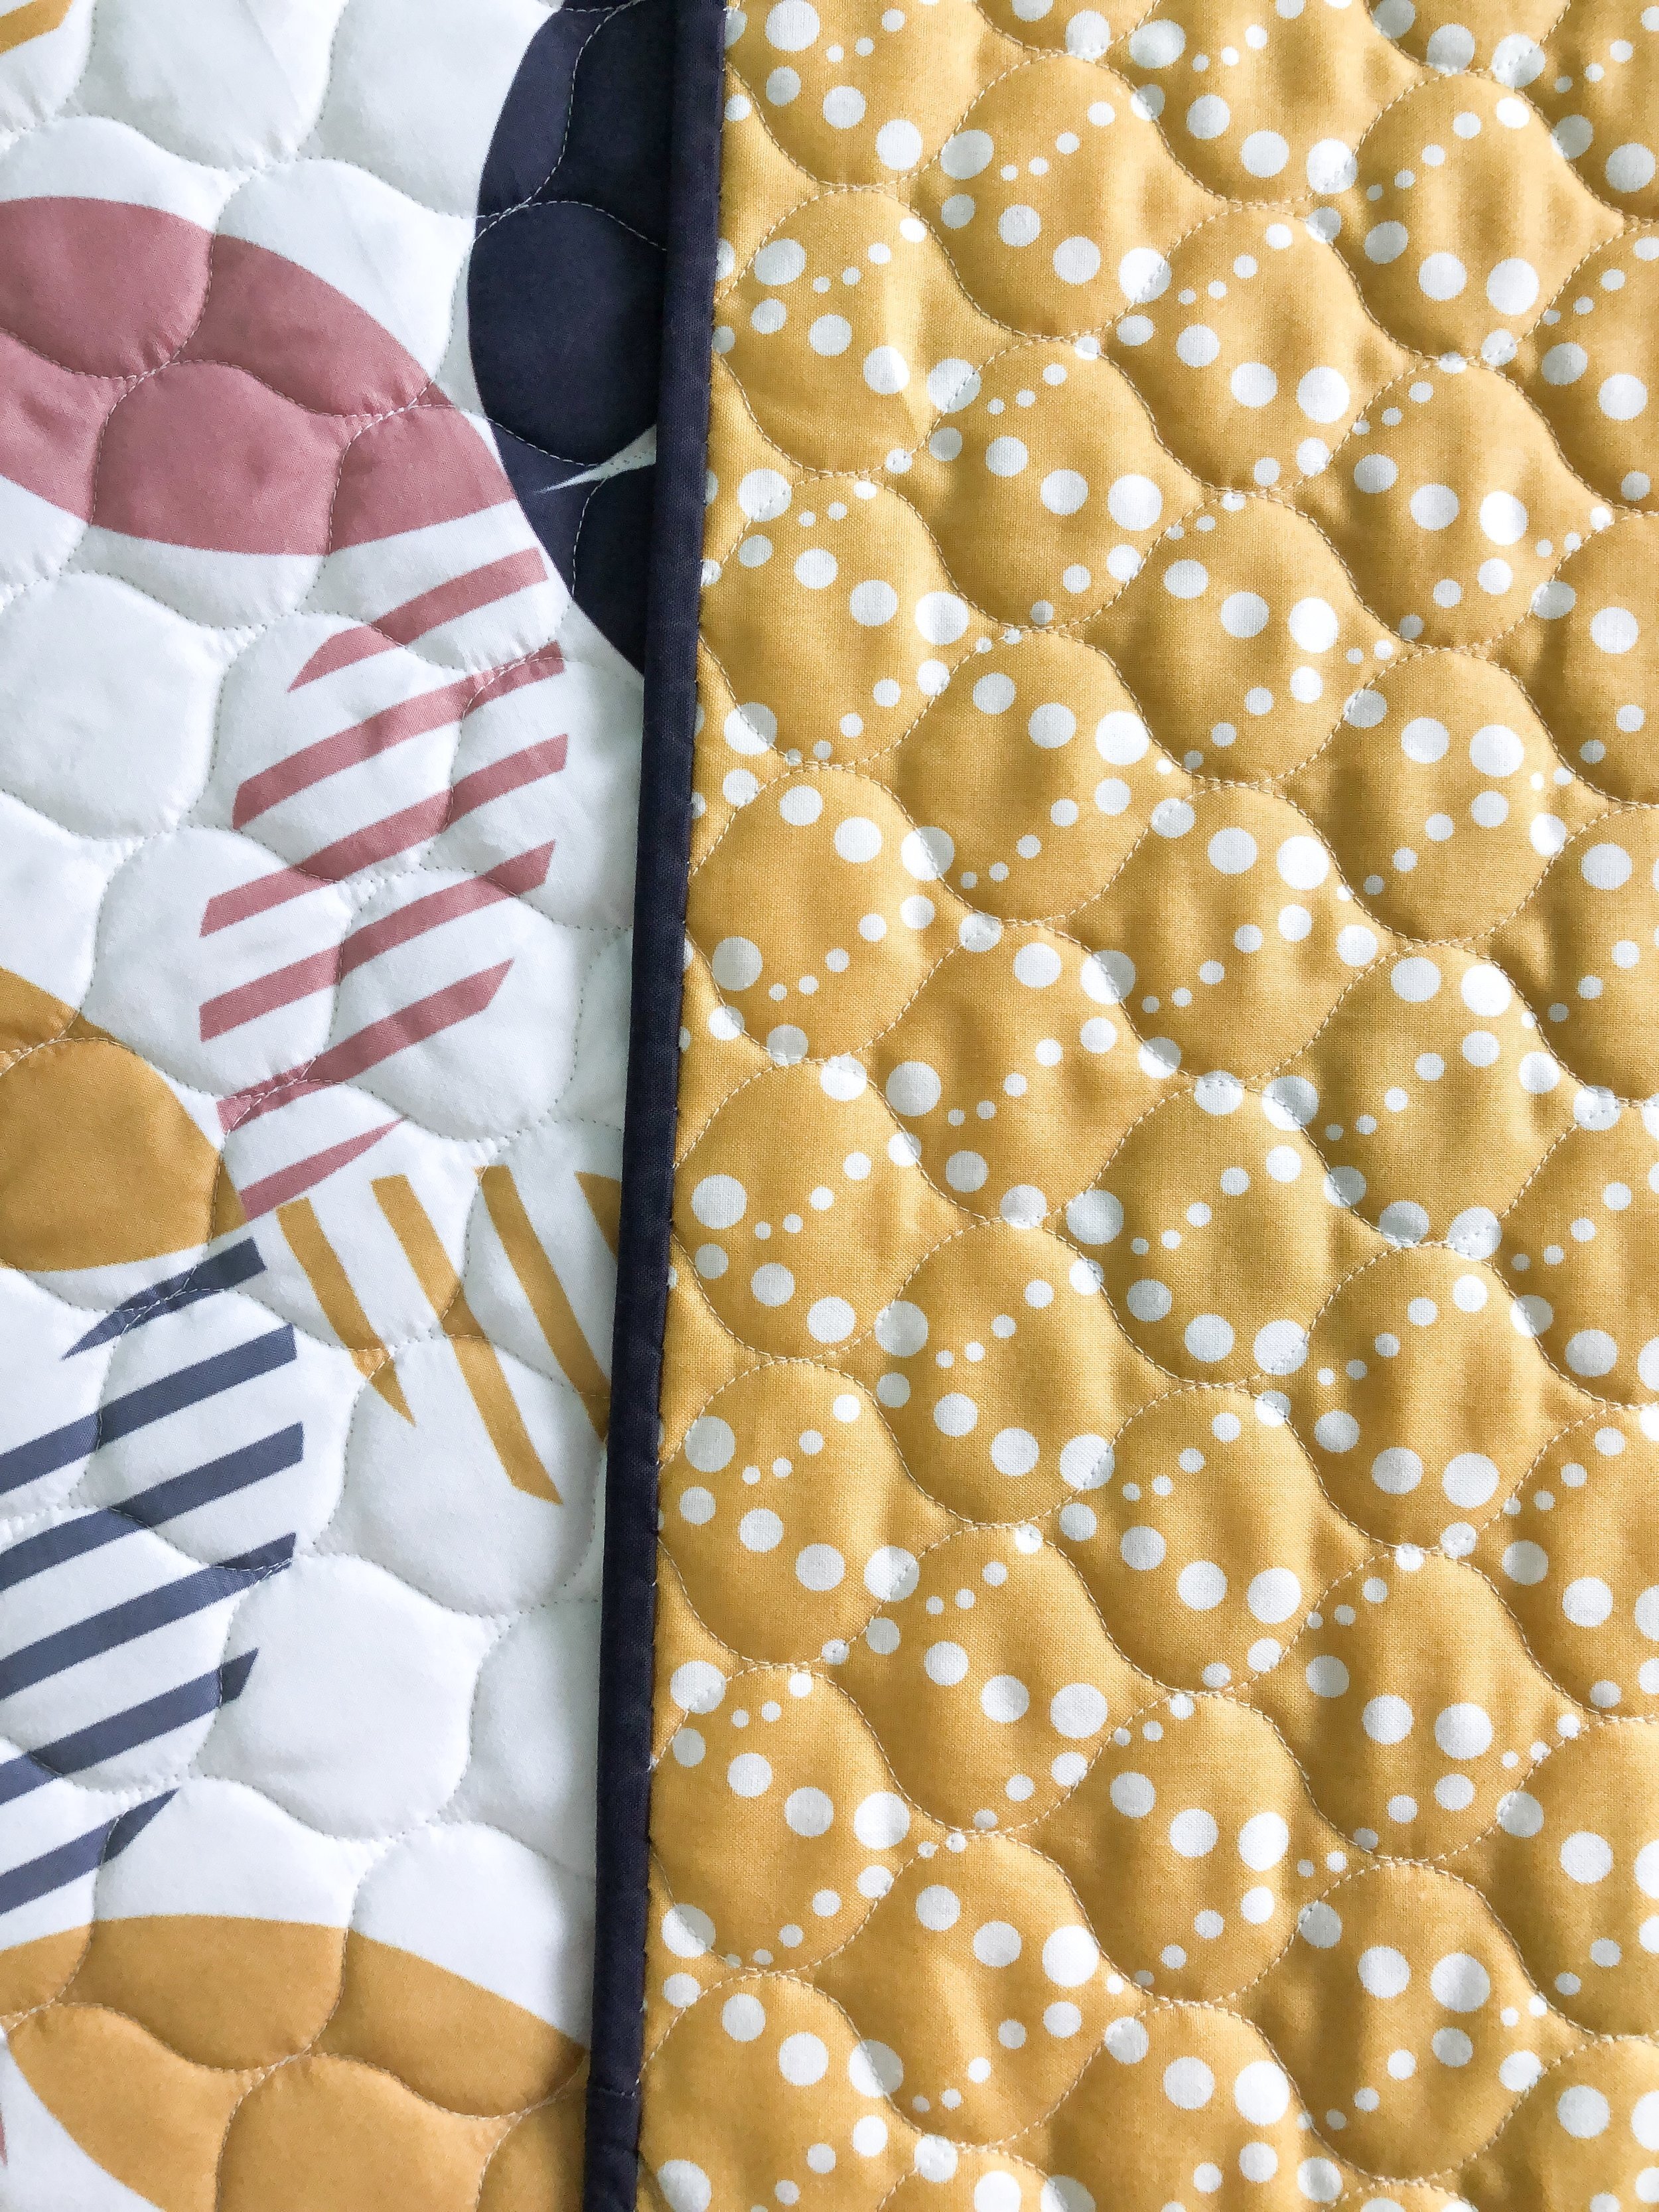
Because the blocks on this quilt are all the hexagon shape, it’s was important to quilt different textures for each of the specific parts of the quilt. Wind for the sky, overlapping circles for the sheep’s body, and stippling for the grass. So, I thought it would be great to video each of them. Even the stippling. It was the first thing I learned as a machine quilter in 2005, and is still just as notable as it was back then. I know every quilters skill level is different, so for some the swirly design will be what you take away from this post, while others will enjoy trying out the overlapping circle design, and some are wanting to work on their basic quilting skills. Where ever you are, join in the fun! You just might enjoy all three.

First I’d like to share this fun overlapping design. It’s done freehand, as shown in the video. I will say, each video is relatively short, and you may learn something from each one. I do share a few quilting tips for each design. This overlapping circles design adds such an awesome texture and dimension to anything it’s quilted on.
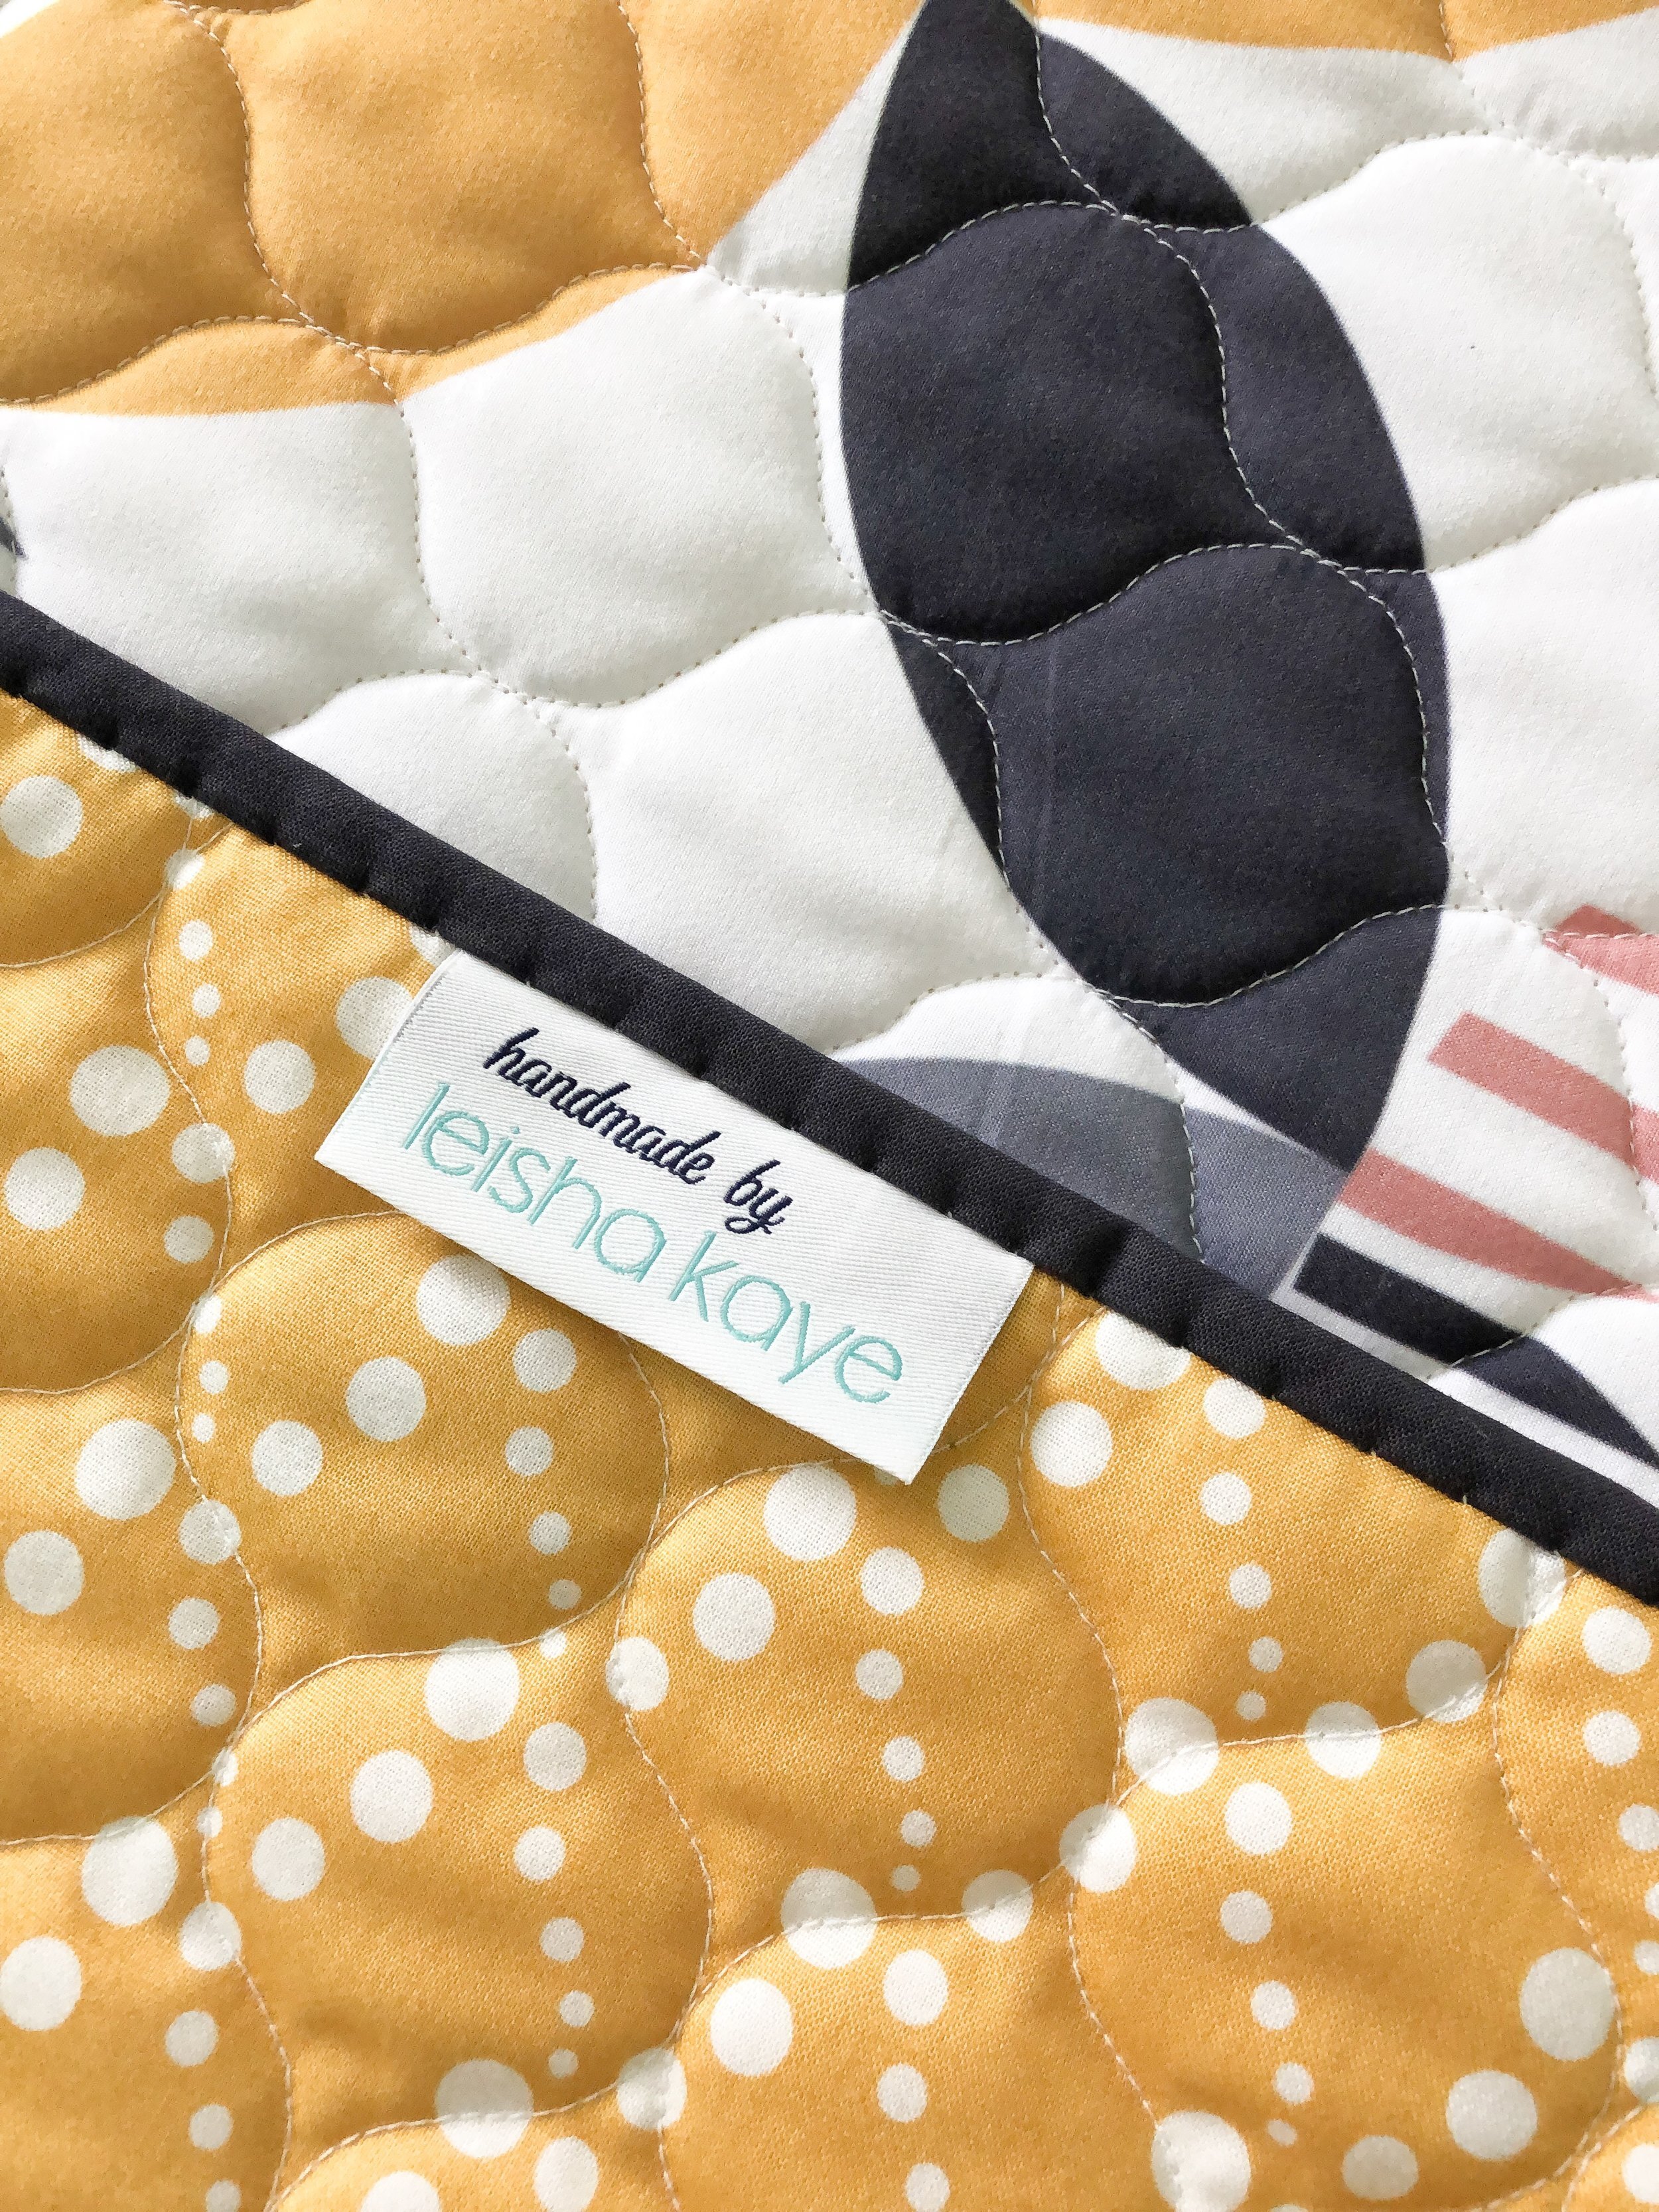
For the face of the lamb, I quilted 1/2” lines using an Edge ruler from Linda at www.thequiltedpineapple.com I also used the Edge ruler to quilt the diamond grid on the sun.

Let talk wind!! Have you ever tried quilting it before? It’s fun, but can be difficult to fill in below the previous row. Watch the video below, and if you feel like you need a little practice before quilting it on a quilt, doodle. If you’re new to quilting, doodling helps you with figuring out how to quilt a design out. It’s also important to think about where you’re going next, so you don’t quilt yourself into a corner...which I talk more about in my stippling video.
I used a white 30 tex A&E Perma Core thread, and my favorite 8020 cotton poly blend batting from Winline.

I just love the motion of that swirly wind!

Okay, so I have some great tips on how to achieve a great stipple. This is also the perfect design to get you going if you haven’t done any freehand machine quilting. I talk about spacing, avoiding the dog bone look, and looking/thinking ahead...that certainly keeps you out of a corner, and ensures that you don’t leave spots unquilted. Give it a listen, and see if you learn anything new. For more machine quilting videos, head on over to my YouTube channel at: https://www.youtube.com/user/QuiltingIt
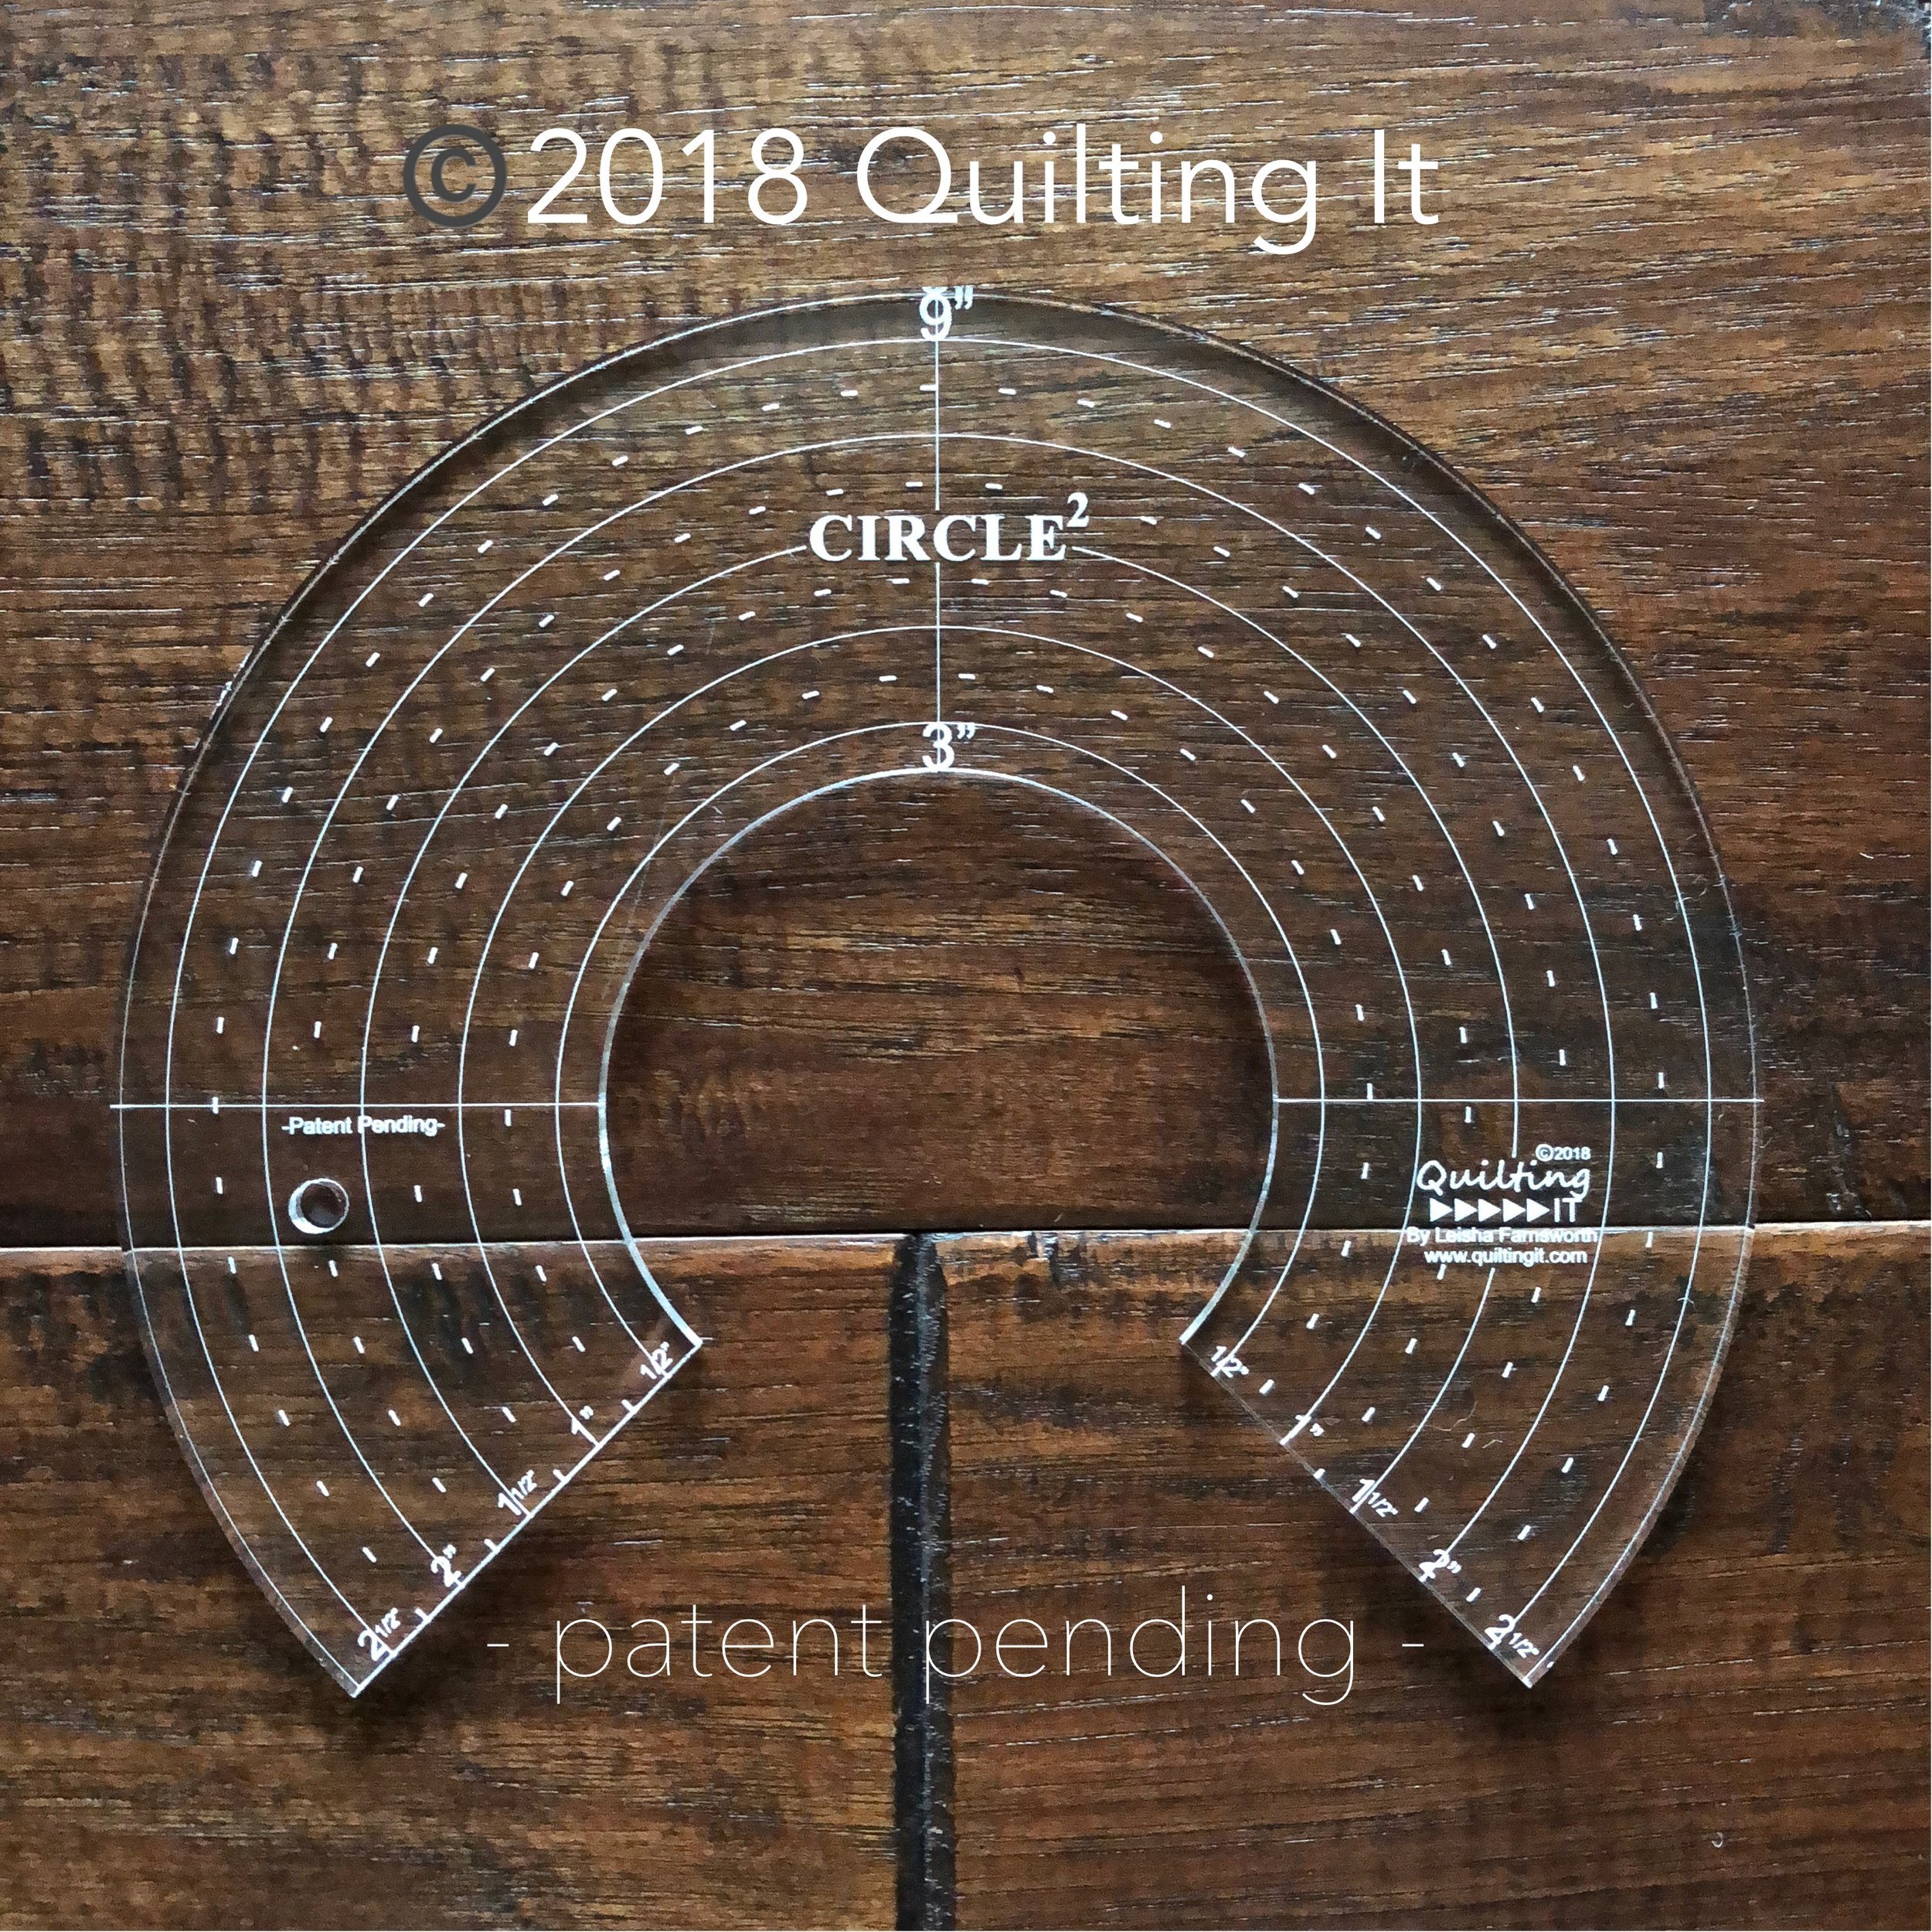
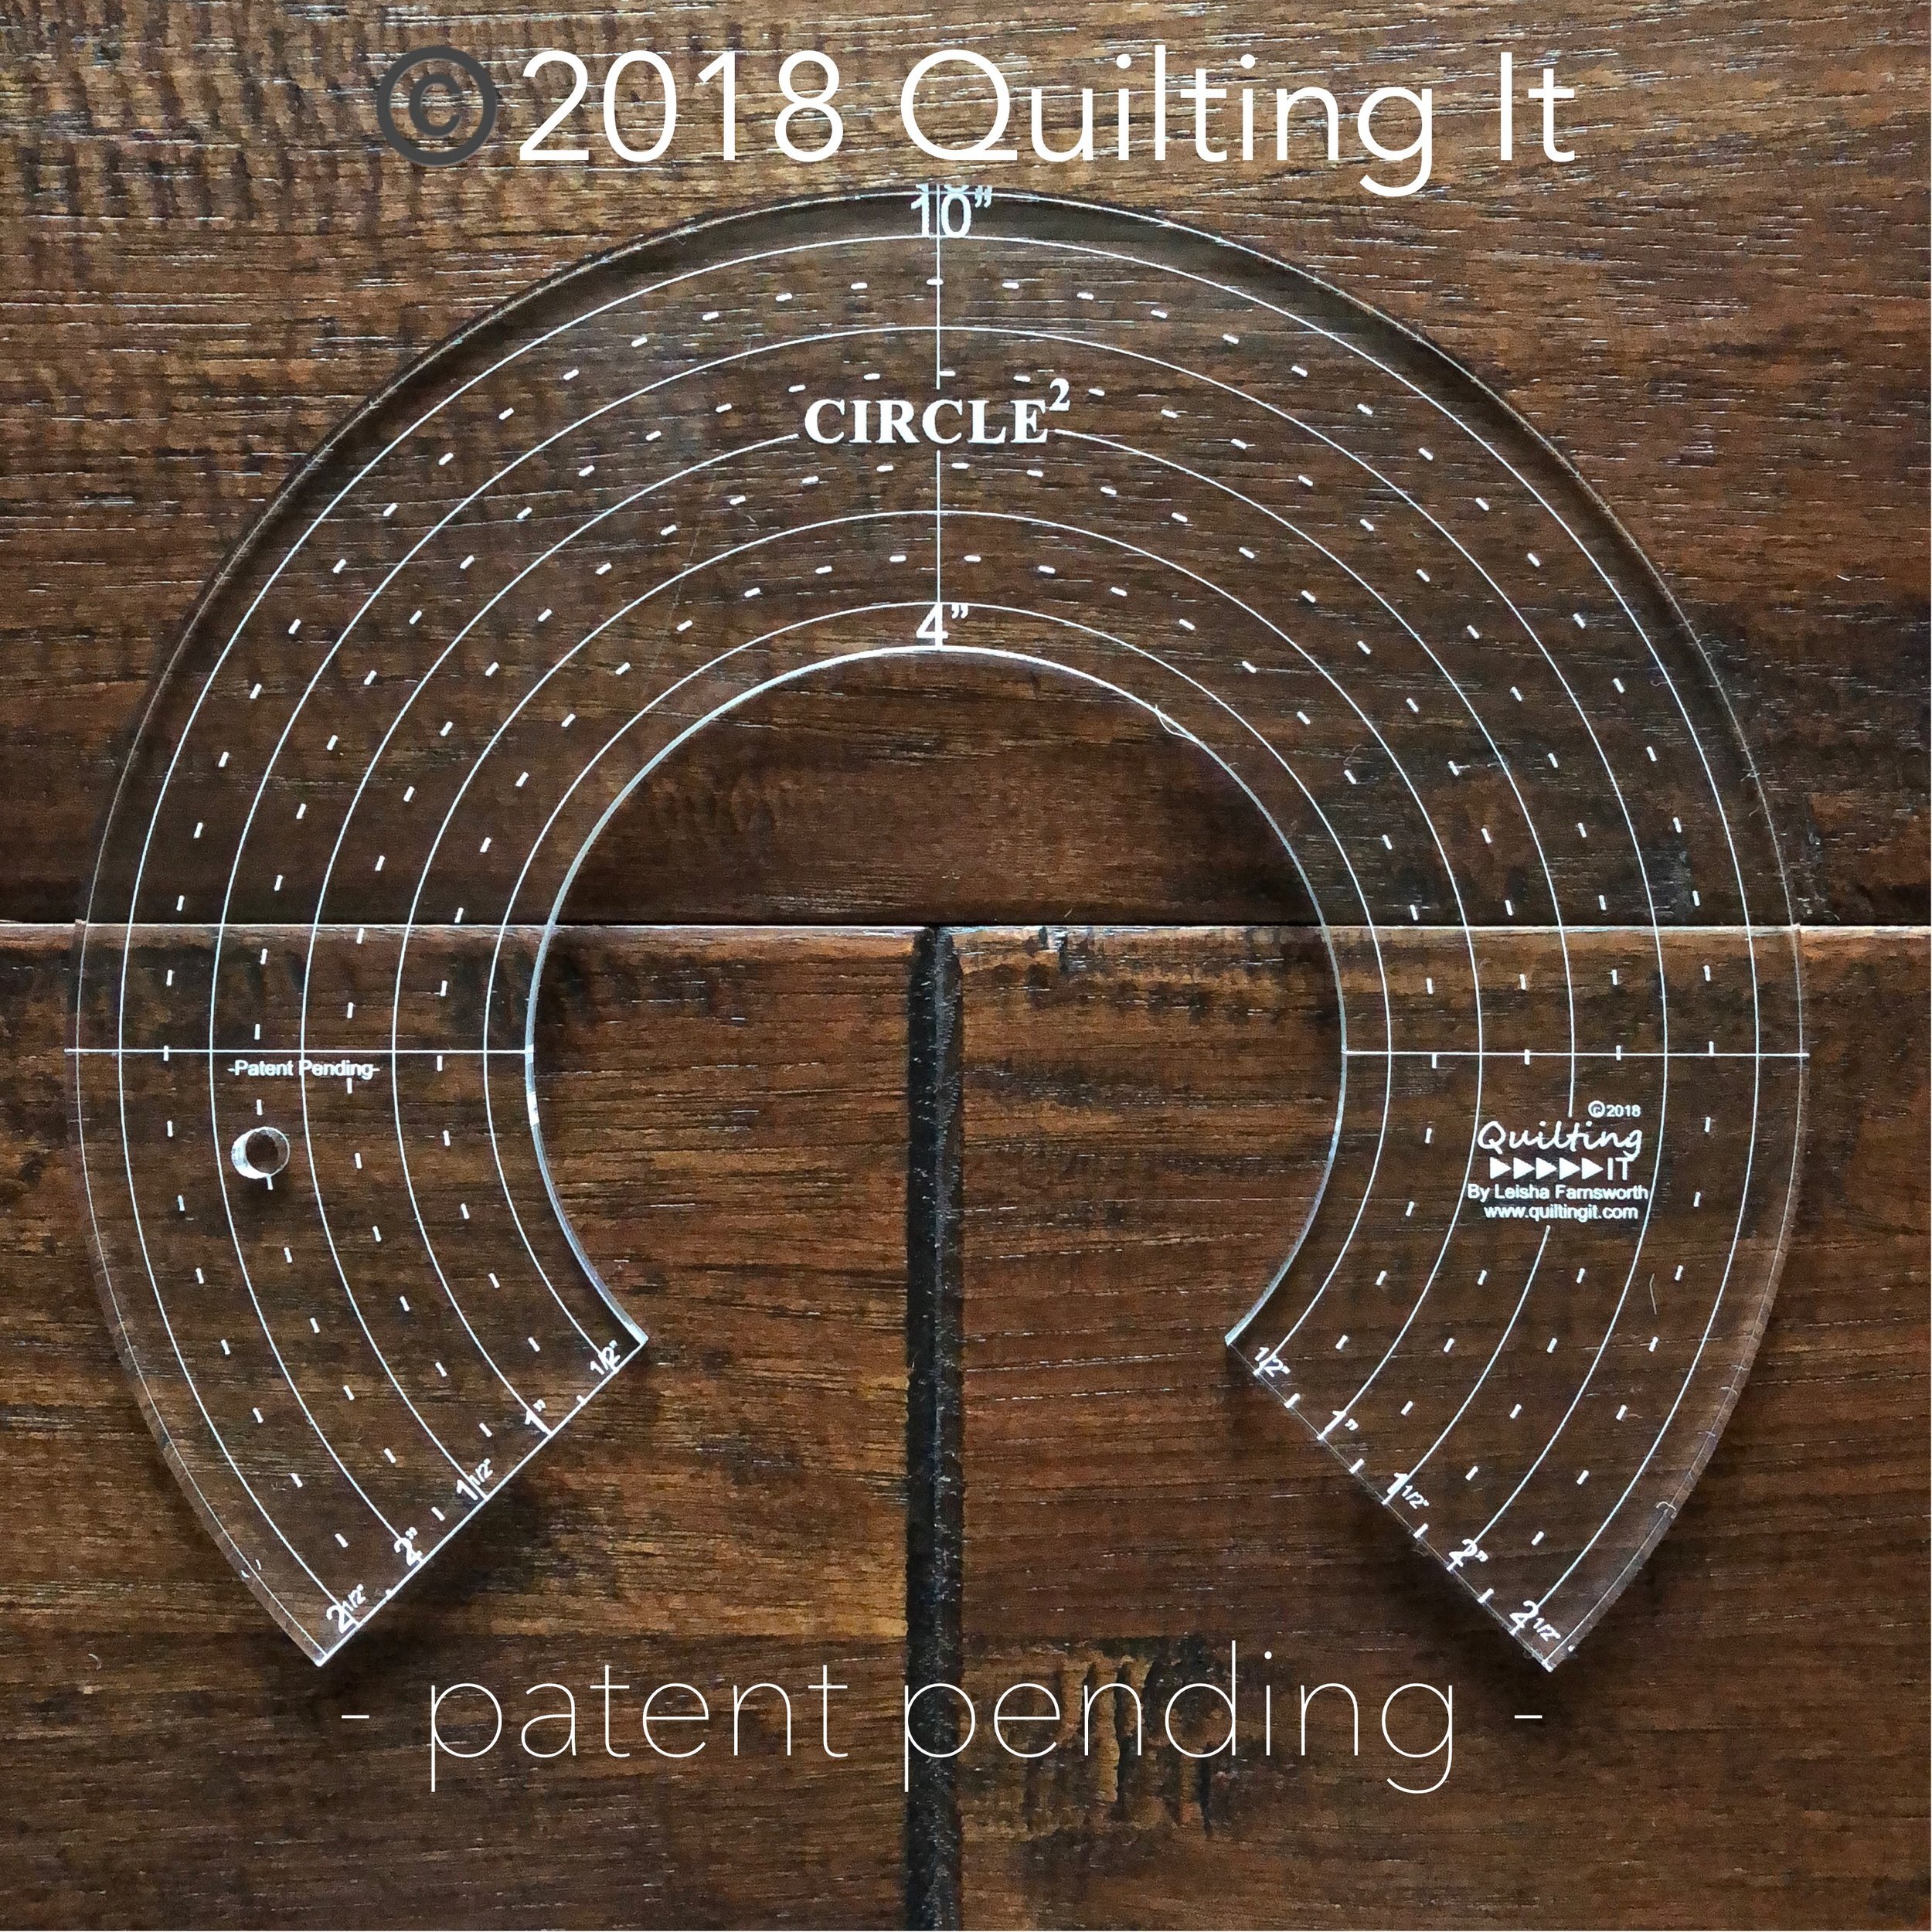
Just wanted to remind you quickly about the 10% off sale, I’m having right now on my Circle2 machine quilting circle ruler set, until Monday it midnight. Enter “THANKYOU10” at checkout. They come in a set of 6, and range in size from 2” circles to 13”. They can be used on a longarm machine and a sewing machine with a quilting foot. They are a 1/4” thick and 2.5” wide, so they are easy to hold while quilting. Just this week I used the 9” and the 13” rulers, also used the 3” and 4” circles on the Easter Pillow fronts from the previous post. Because of the need for a variety of sizes and the versatility of having a set, this is a great addition to your machine quilting. They are available in clear and green, at https://www.quiltingit.com/shop?category=Rulers
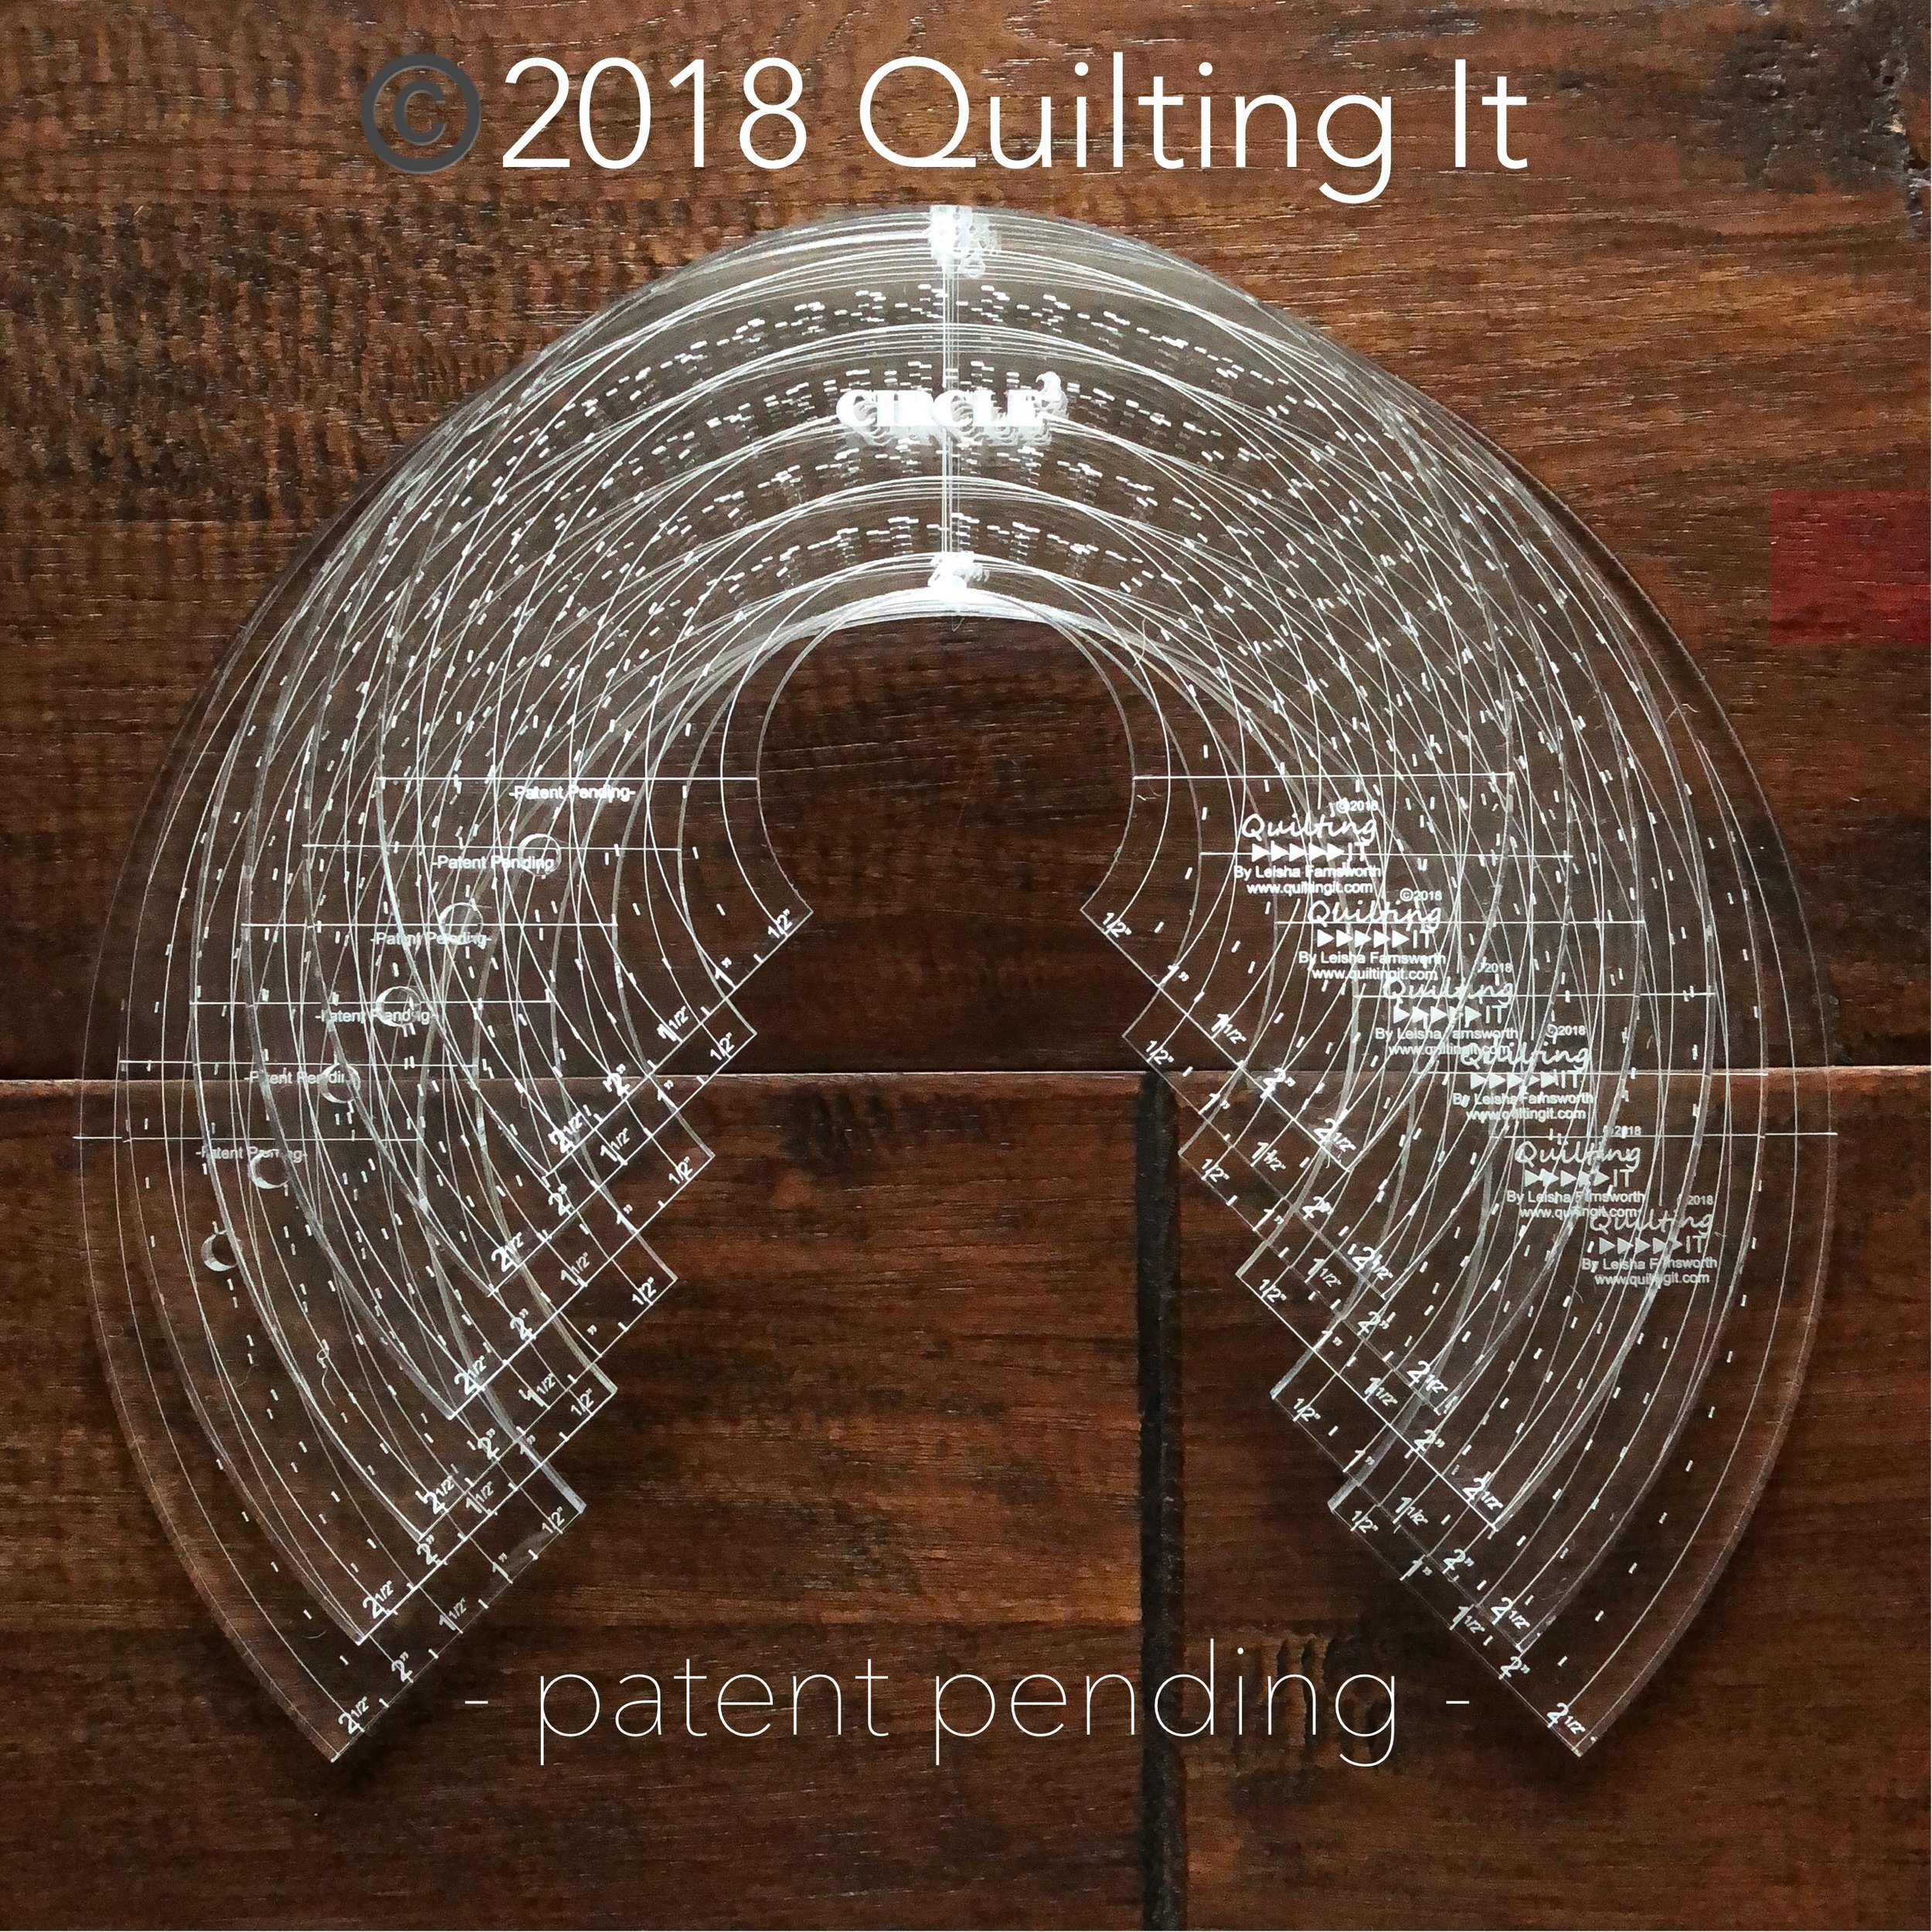
They come with excellent lines and measurements.
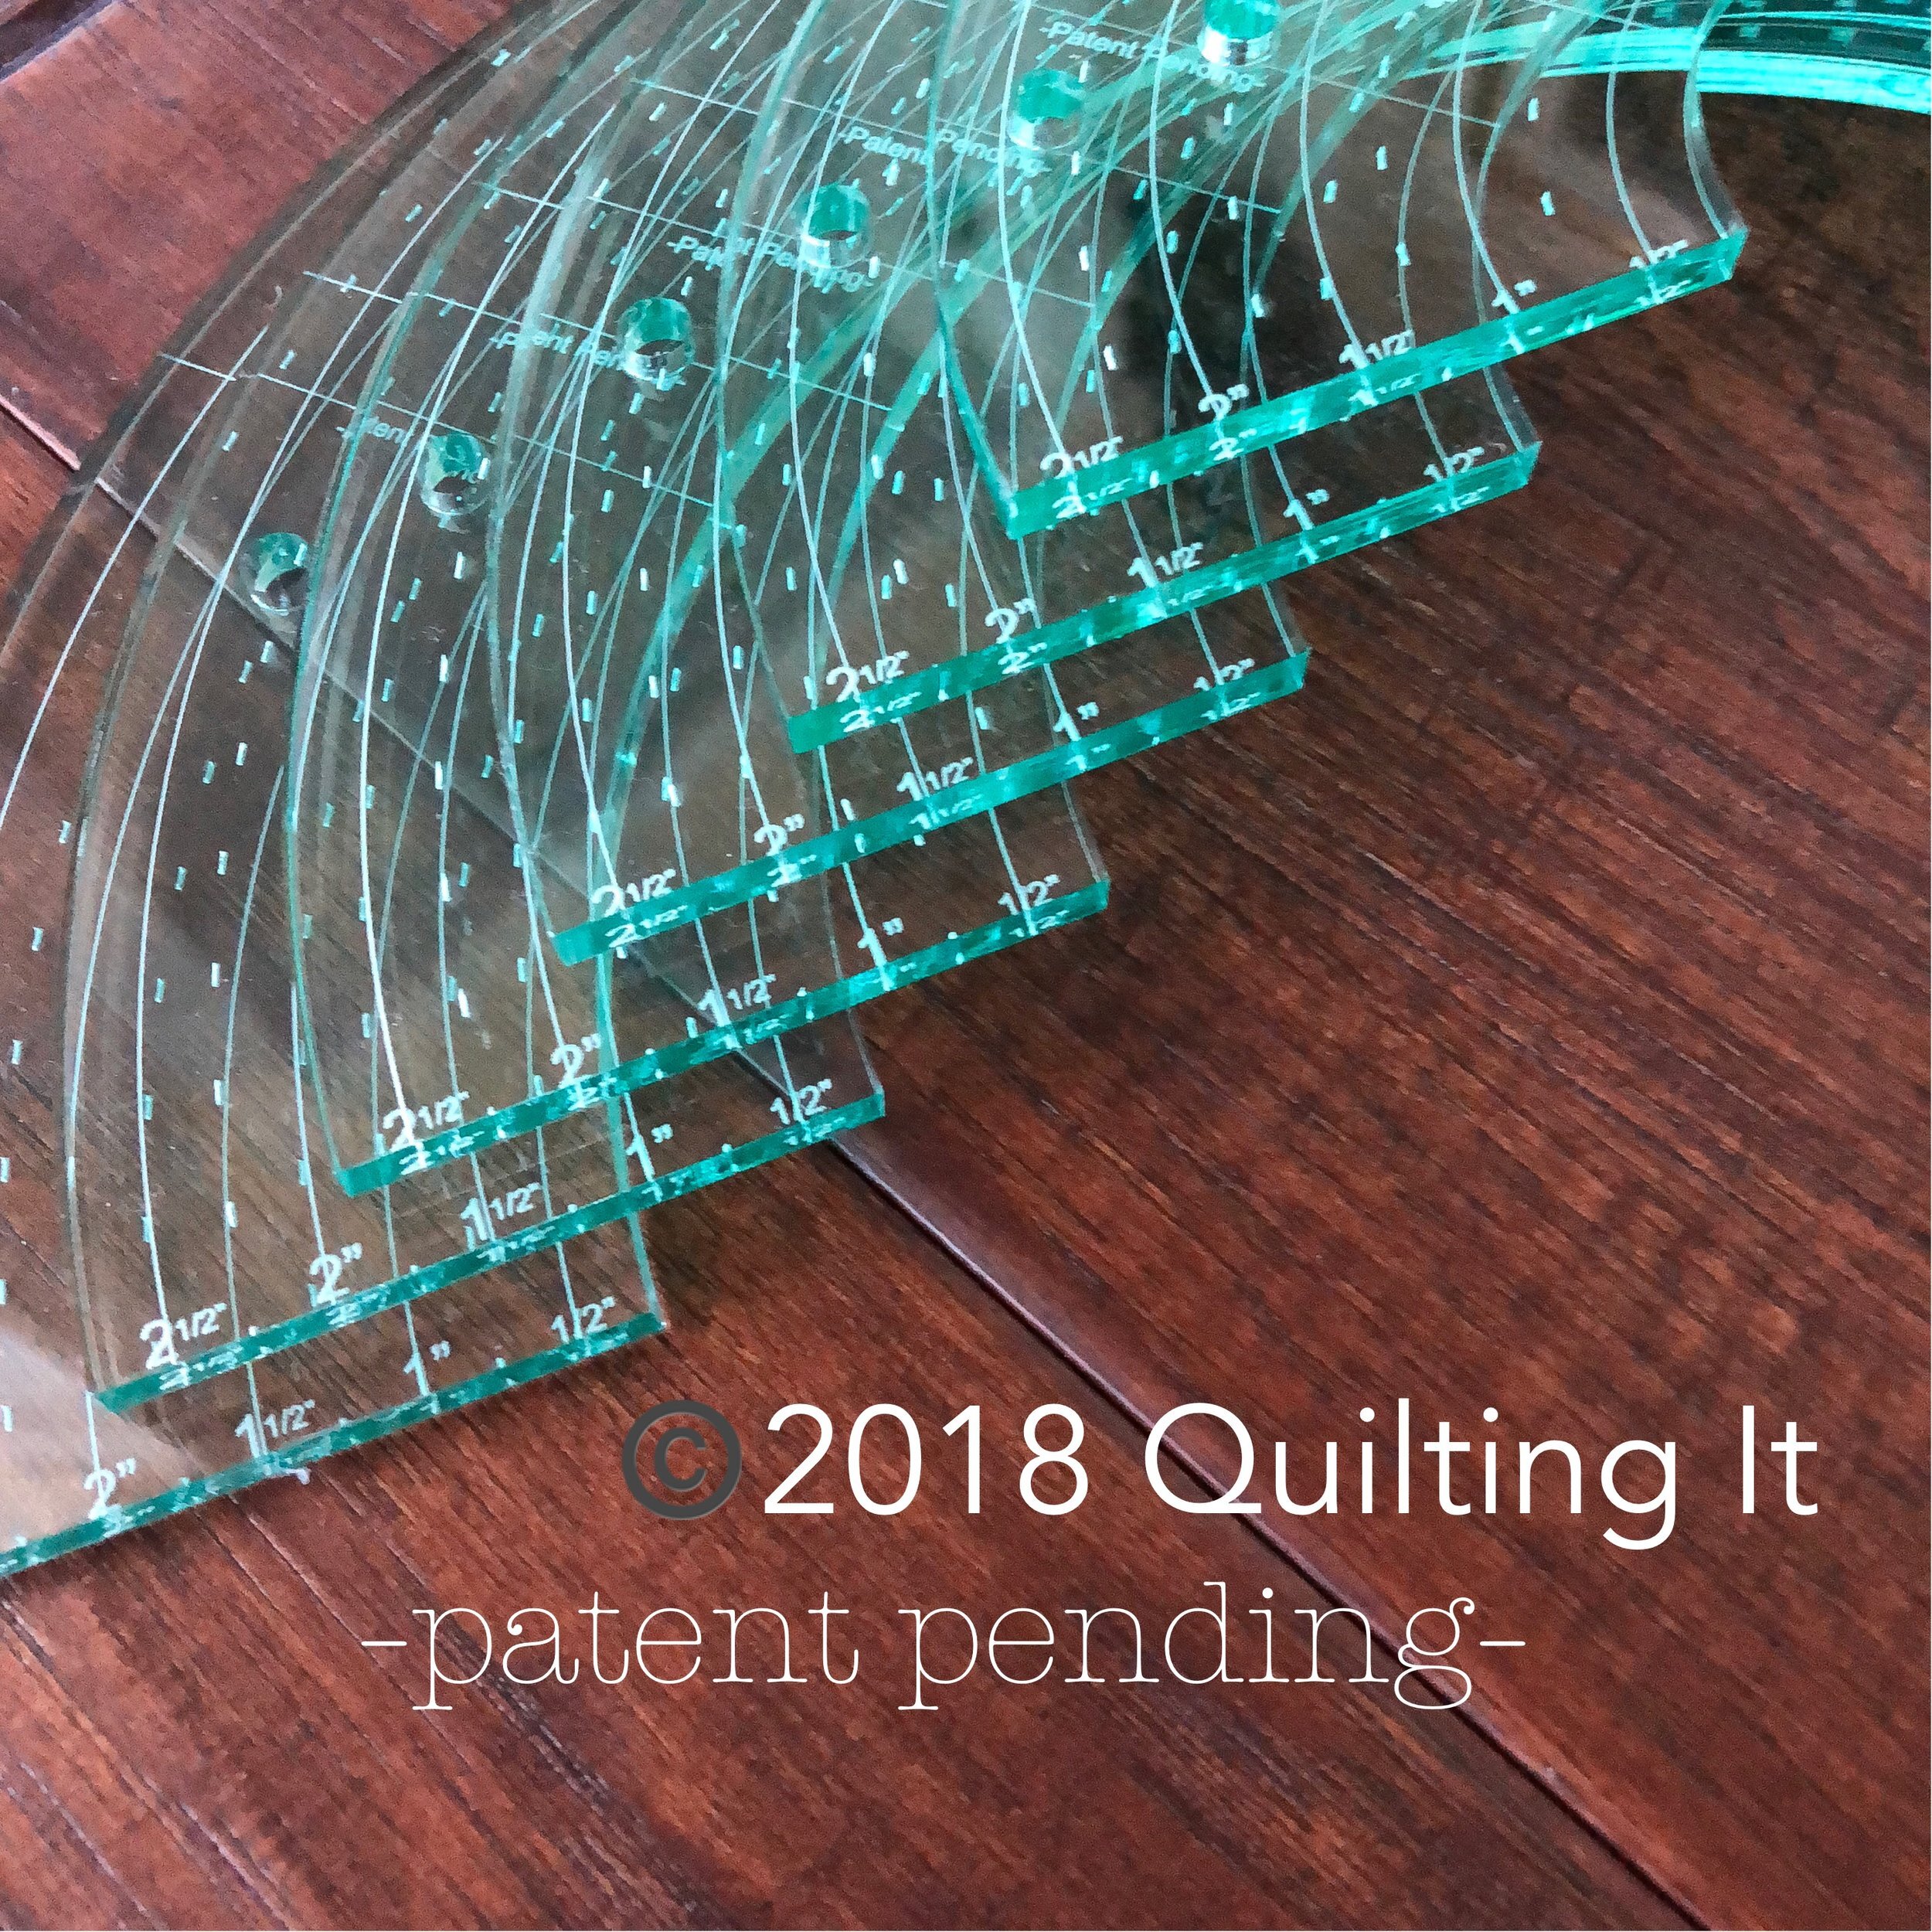
The unique thing about these rulers, besides the 3/4ths of a circle design and having 2 different sizes of circles in one ruler, is the correct circle measurement. Correct meaning, when you use the 13” circle ruler below with a 1/4” hopping foot (quilting foot), your going to quilt a 13” circle...not a 13.5”. The set of circles that I used for many years, gave me half sized circles, which can be frustrating when you’re wanting an exact size. The key is that the hopping foot adds 1/4” all the way around the circle, which ends up add a 1/2” to the circle size. Because I took that into consideration when designing this ruler set, you’ll get the correct sizes for each circle. I love using them every chance I get, and hope you’ll enjoy using them, too!

Here is a look at one of my rulers in action!
Thank you for stopping by, and happy quilting!!
- Leisha

Sherry’s Adorable Easter Pillows
Sherry has me quilt a few of these bench pillow fronts, and they turned out so cute!! The pattern is by Kimberbell Designs, and she has a digitized version if you do machine embroidery.
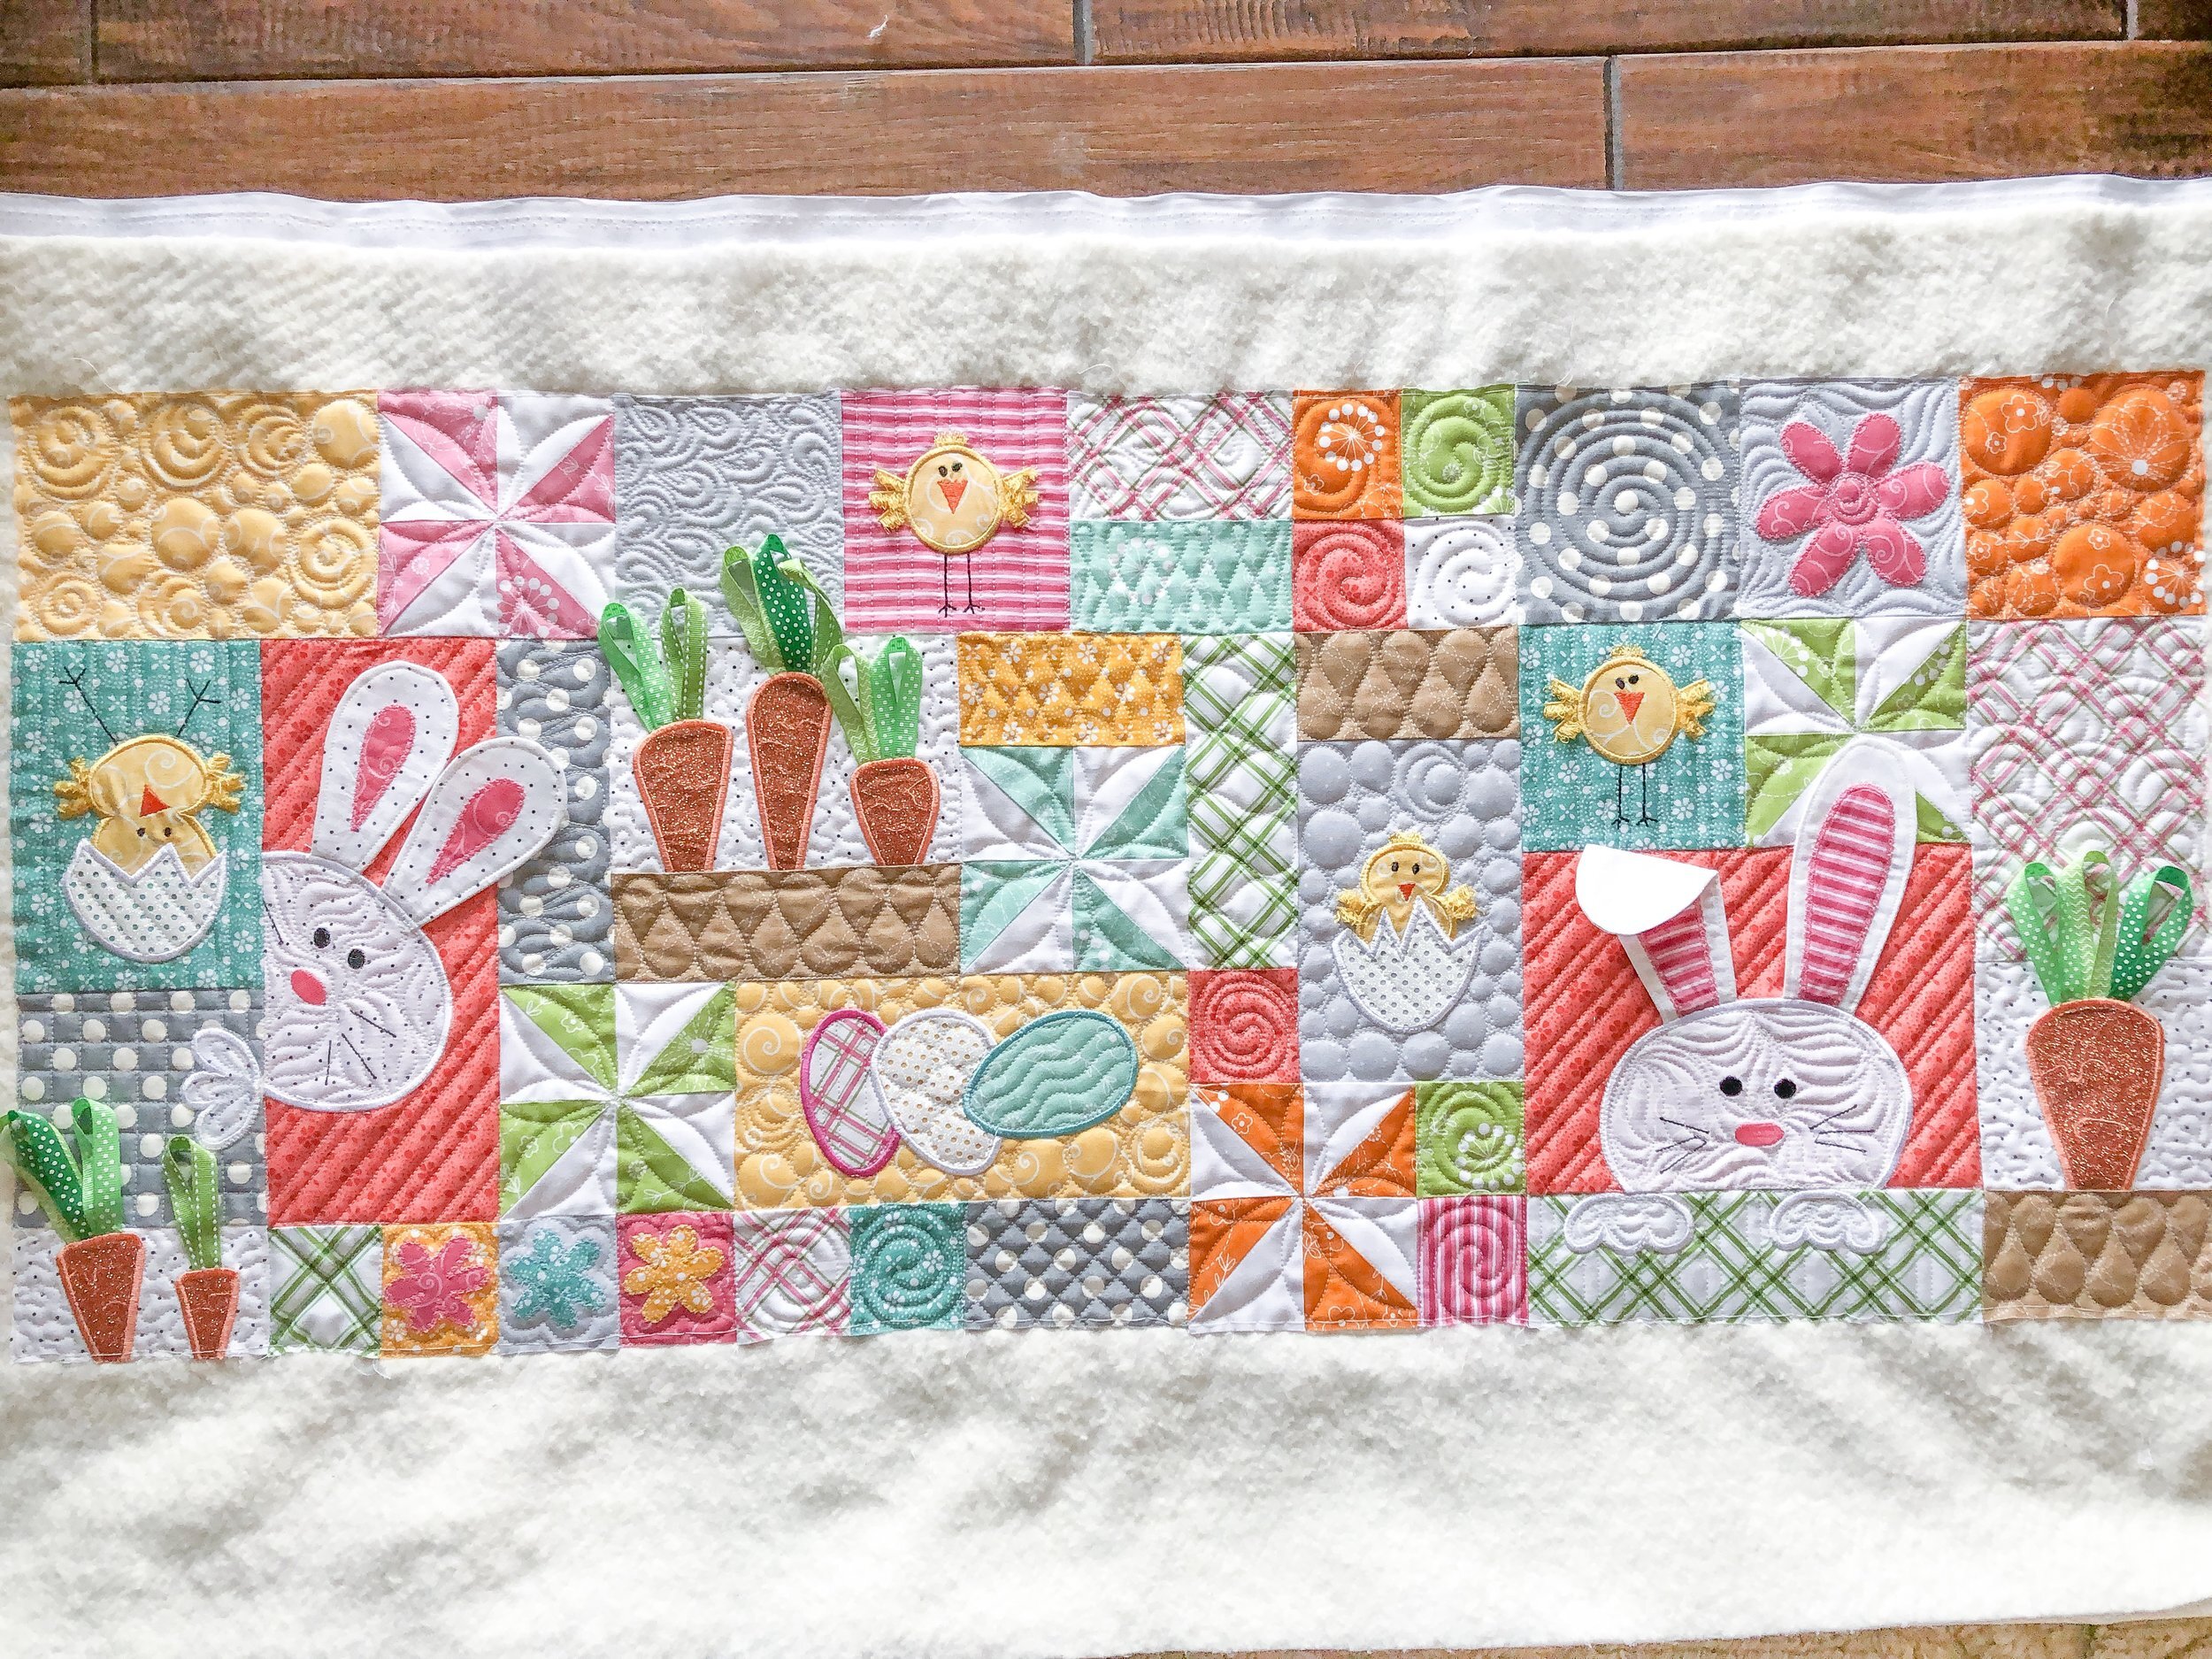
It’s so fun to add all these fun little details to these bench pillows.
I used white 30 Tex A&E Perma Core thread and 8020 cotton poly blend batting from Winline.
See that flower quilted on the green windmill block??? I quilted that using my 3” and 4” Circle2™ rulers.
My Circle2™ rulers can be used on a longarm and sewing machine (with a quilting foot). The circles range in size from 2” to 13”. They come in green or clear, and are made in America with high quality acrylic. AND right now they are 10% off, use code “THANKYOU10” at checkout. https://www.quiltingit.com/shop?category=Rulers
I also used Linda from https://thequiltedpineapple.bigcartel.com/ Edge rulers to quilt the lines throughout.
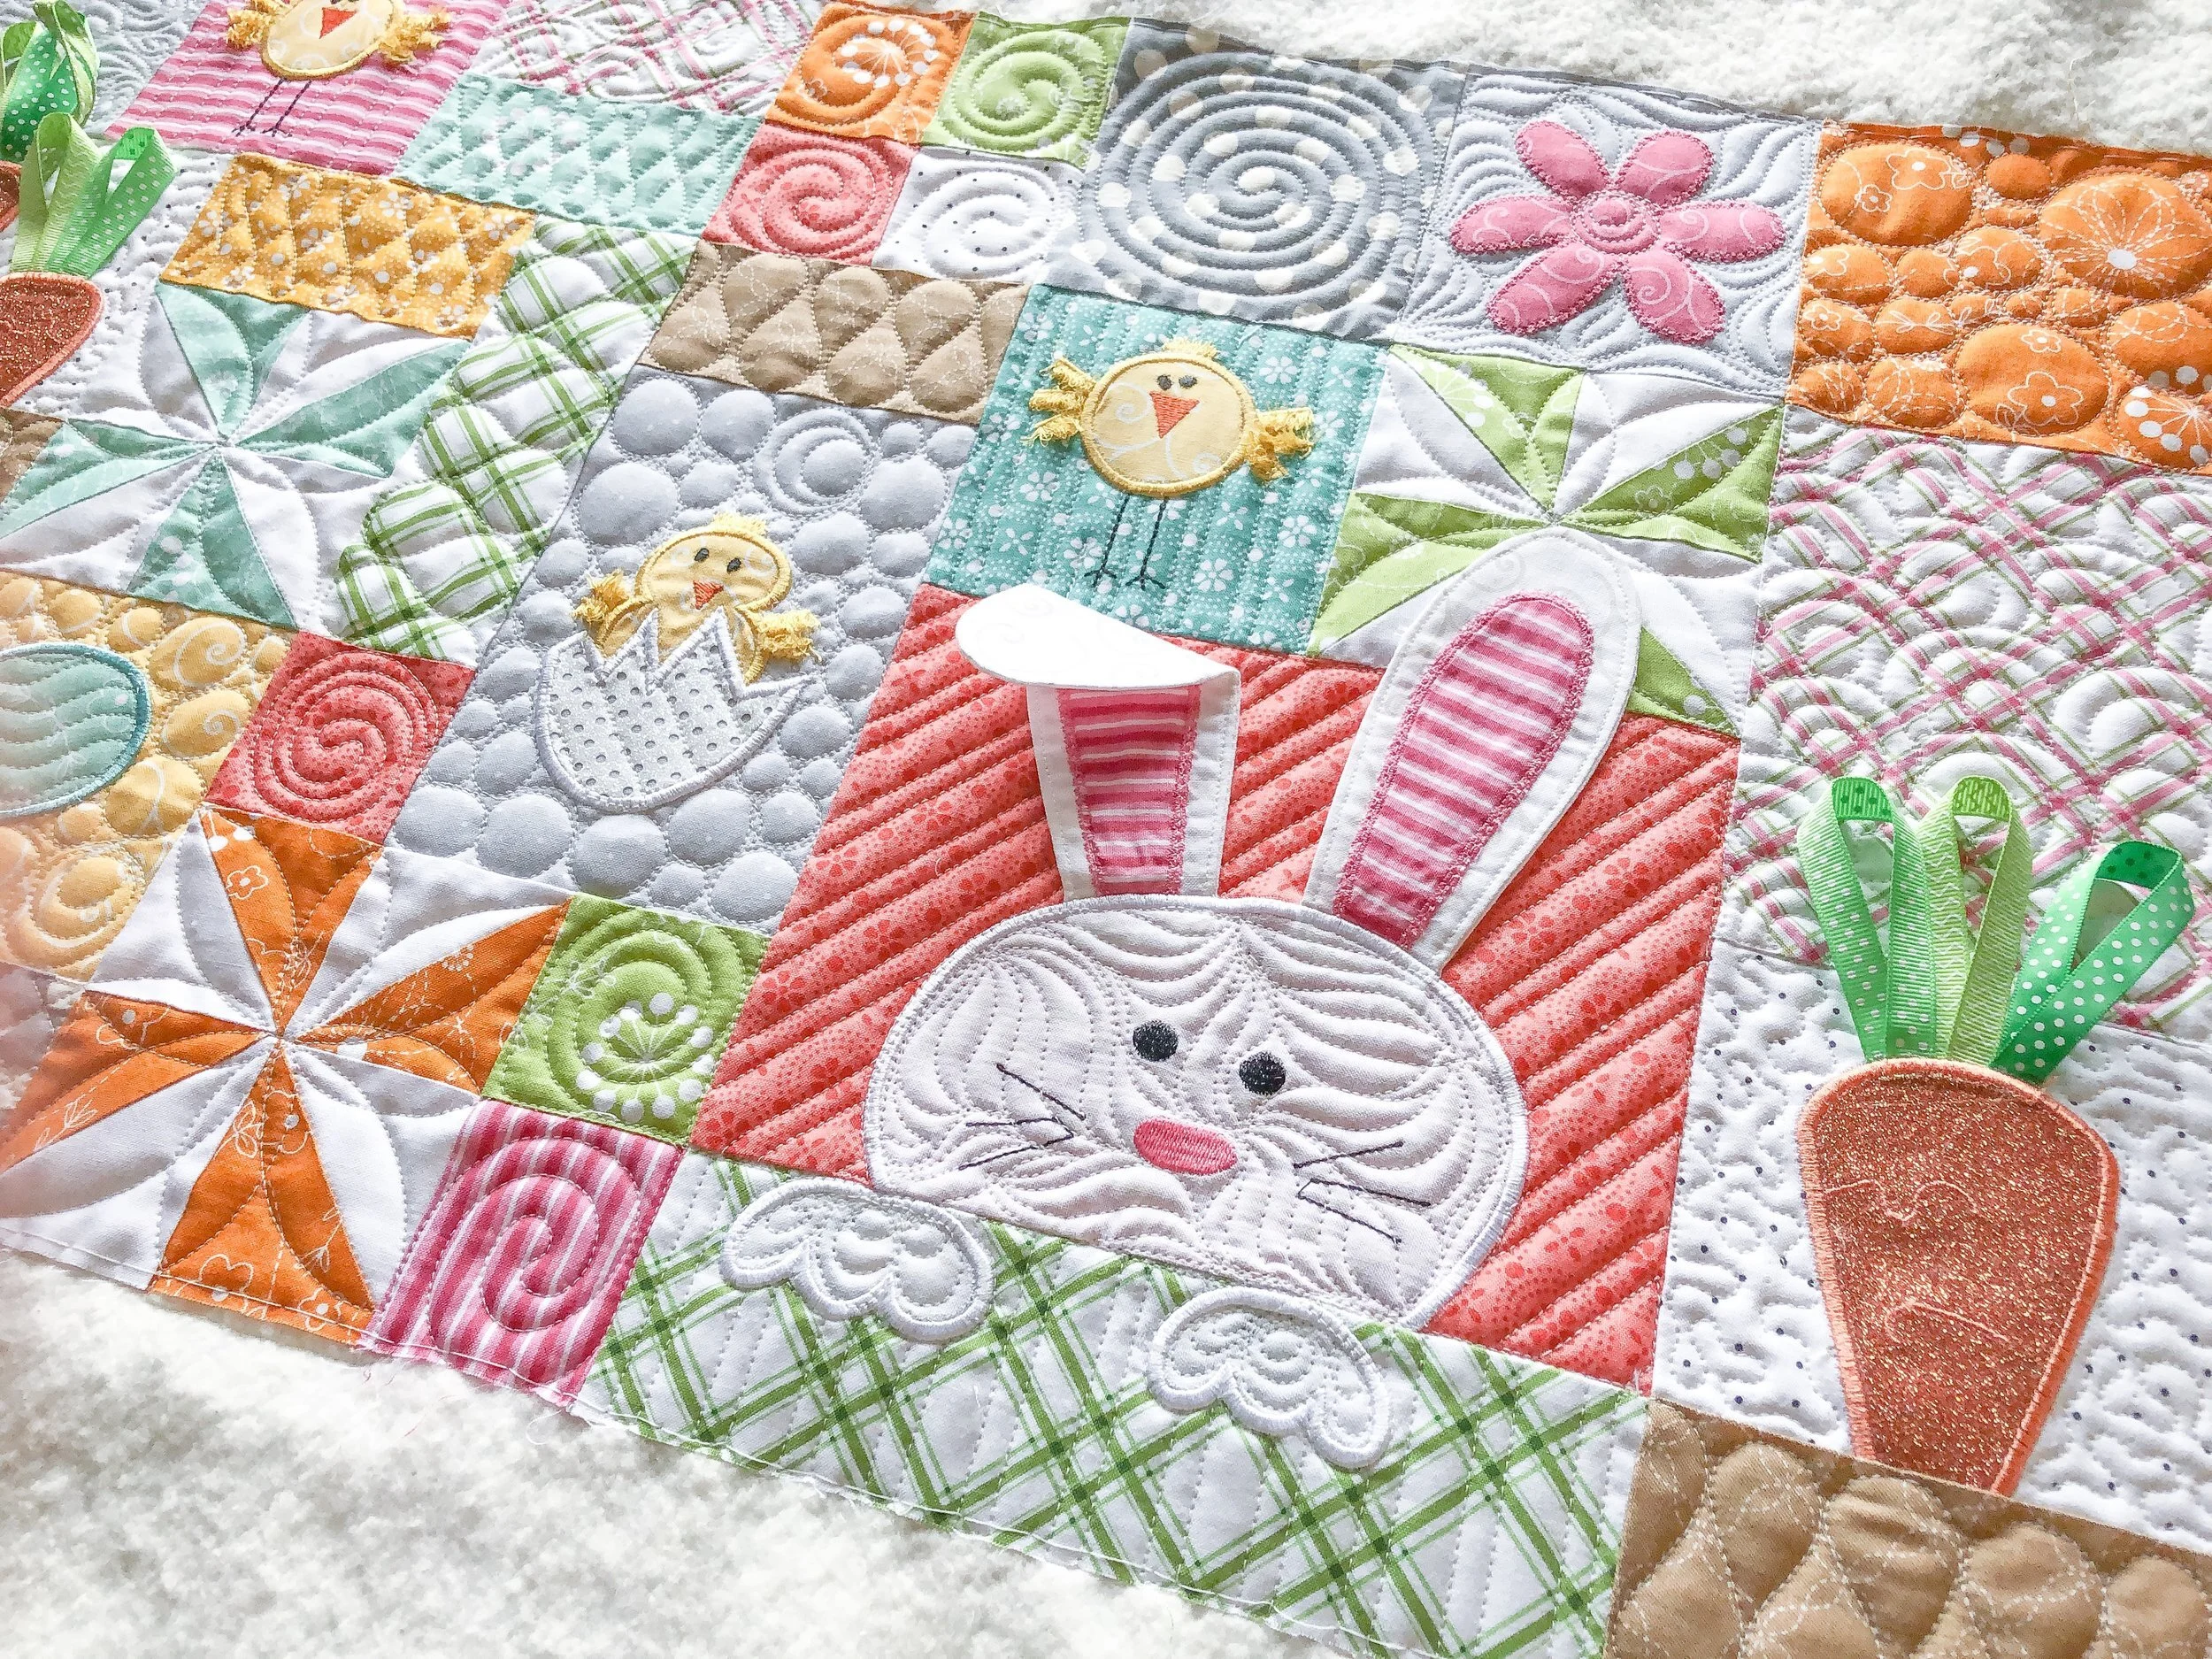
I love all the details...from the fabrics, to the embellishments, to the colors...it helps the quilting pop!

This overlapping circle design is something I just started quilting recently...and it’s so fun to do. I actually have a large quilt to do soon, and it will be the entire background filler. So excited!! Below is a video of me freehand quilting this design.
I will blog about this lamb quilt soon.

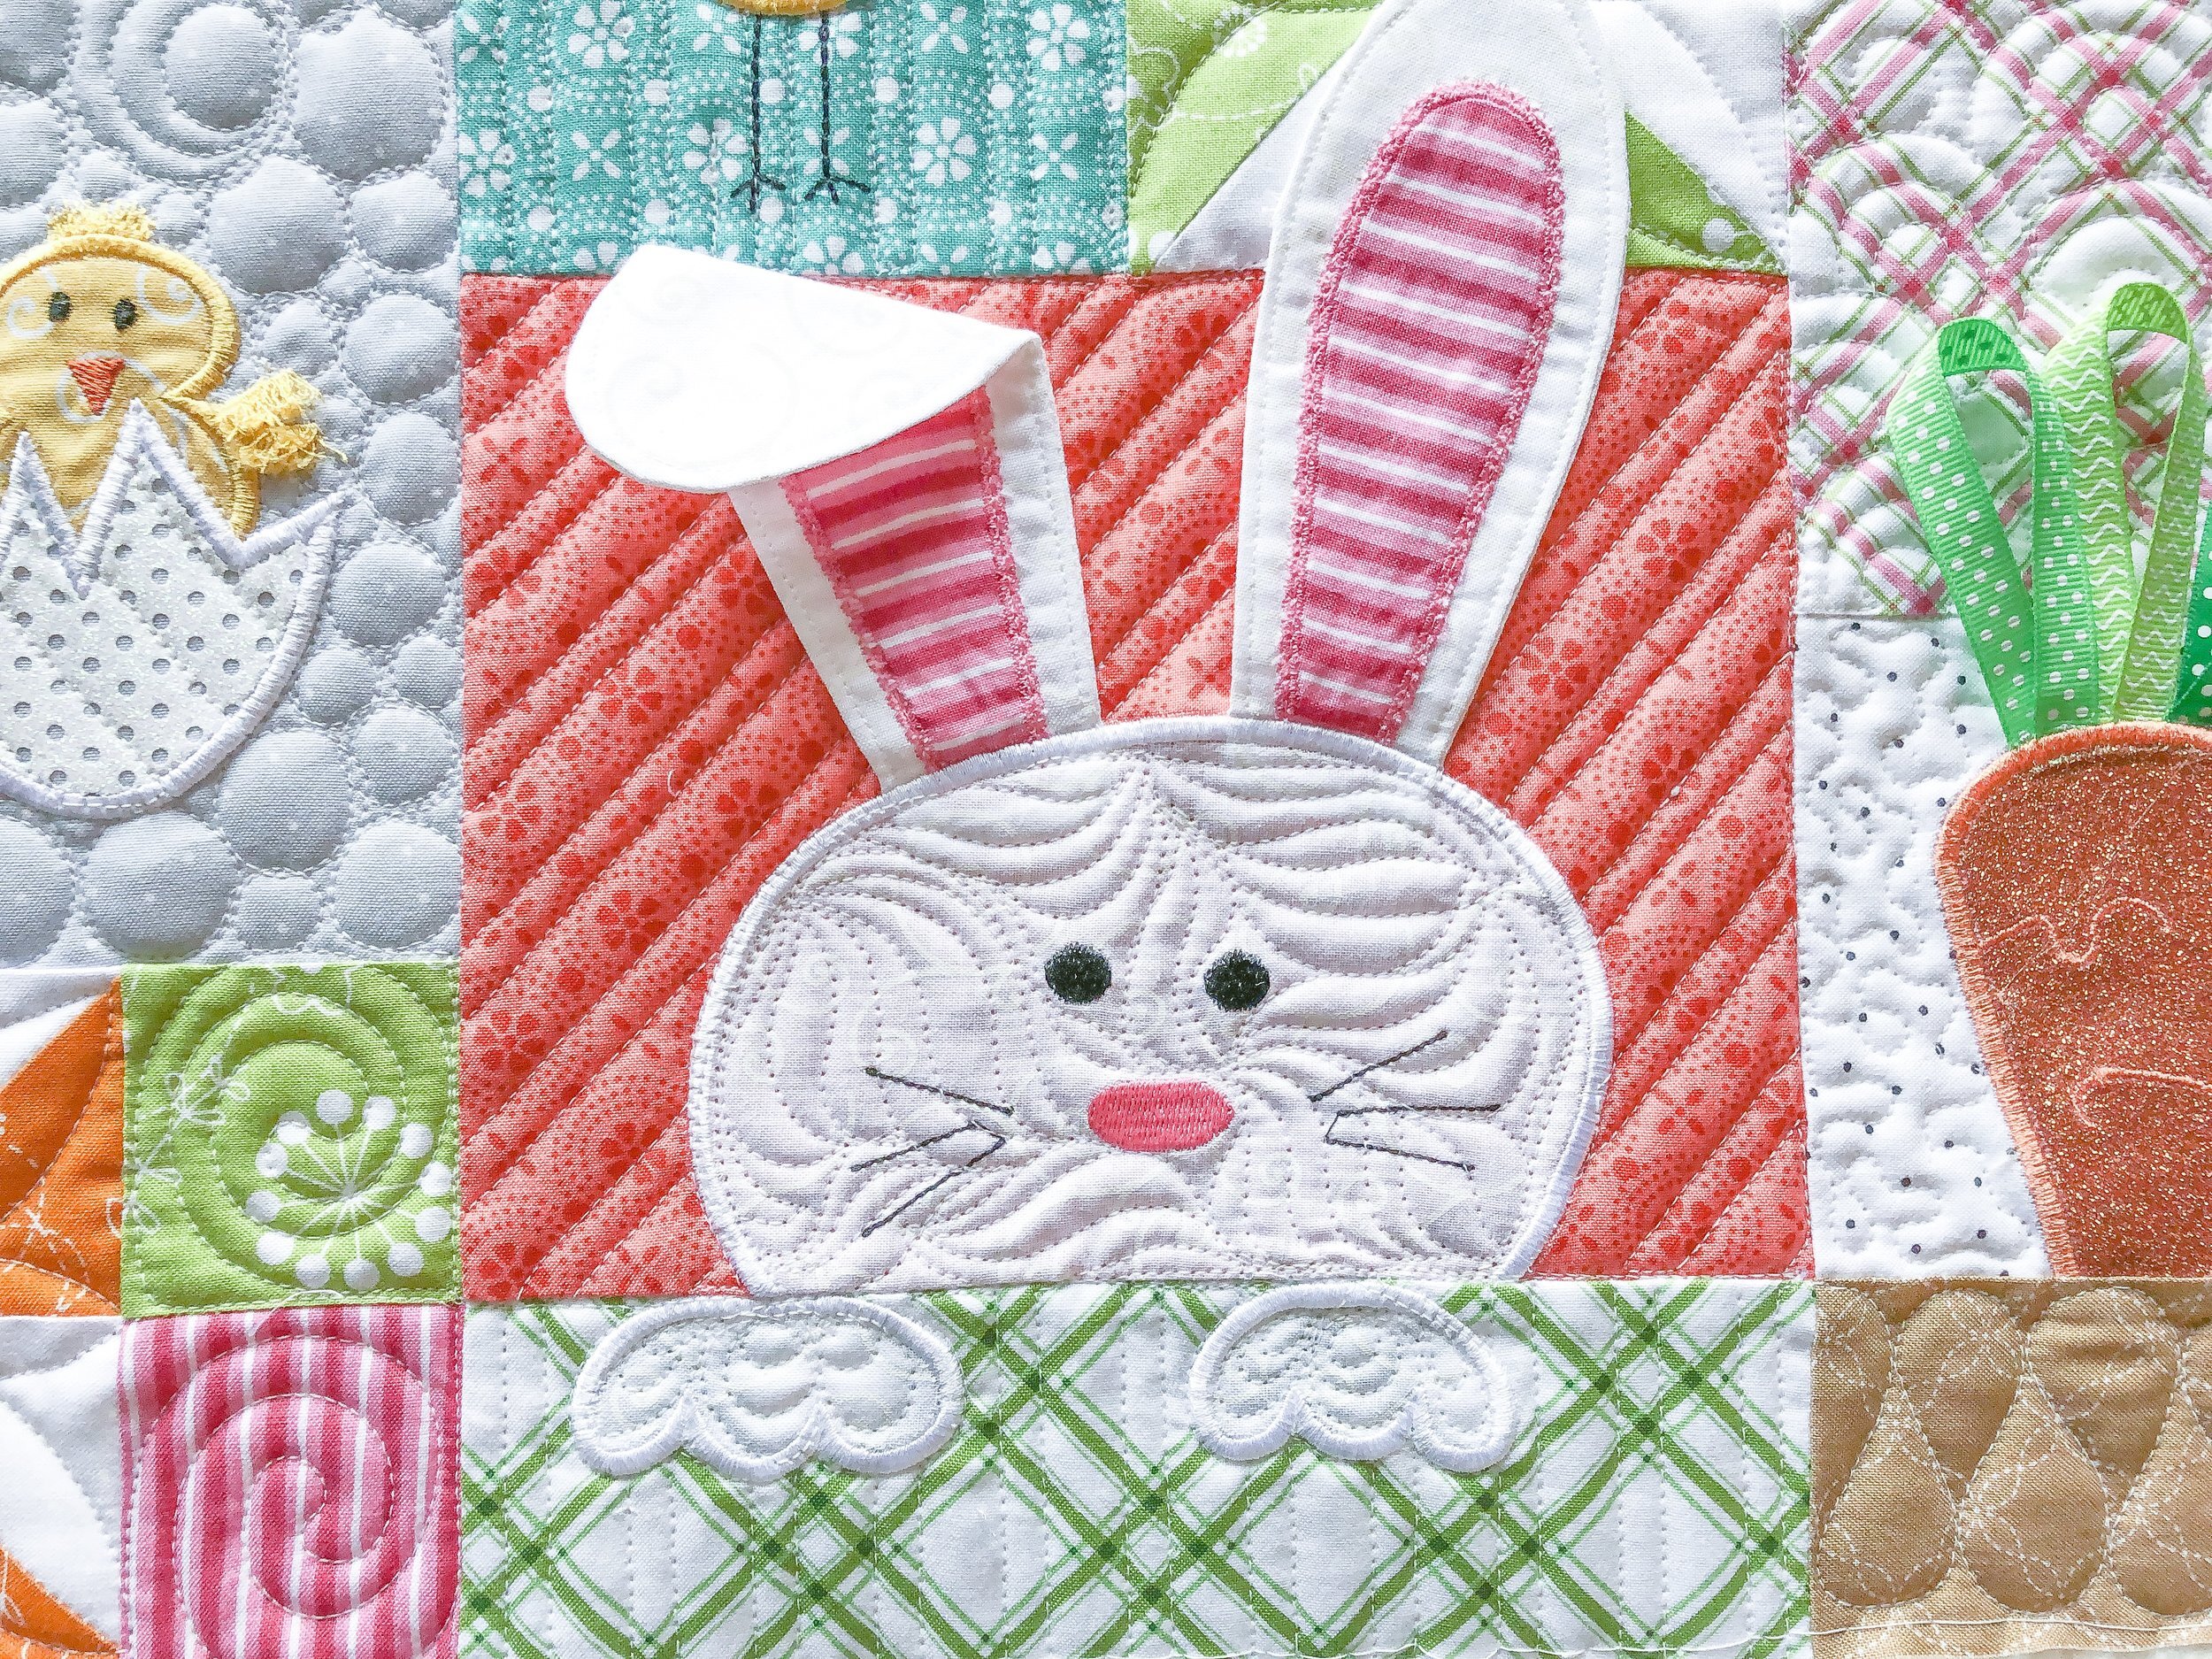
Okay, so how cute is mr. bunny??? I wanted to add some fur looking texture to his face. Check out the video below to see how to quilt this freehand grassy design.
I love how forgiving this design is, and it works on a variety of different quilts. Here are a couple of quilts I’ve quilted it on recently: behind Little Boy Blue - https://www.quiltingit.com/blog/2019/1/1/beckys-nursery-rhyme-quilt?rq=Becky and behind a couple of umbrellas on this fun quilt - https://www.quiltingit.com/blog/2018/11/17/cindys-raincheck-quilt-including-28-different-background-quilting-designs?rq=Raincheck
The great thing about starting to see Easter projects...spring is coming!!! Yay!!
Hoppy quilting!! - Leisha

Thank you!! + 10% off
I often feel sooo lucky that I get to do what I do. I appreciate all the amazing support I’ve gotten over the years.
Last week I shared a giveaway I was having, for a set of my Circle2™ machine quilting circle rulers, and I feel so grateful for all the support that I received. All the amazing comments, and so many willing to support my YouTube channel. I wanted to pass along to you a 10% off discount for my rulers, now until next Monday the 4th, as a thank you for all your kindness. Use coupon code “THANKYOU10” at checkout!! They are available in my shop: https://www.quiltingit.com/shop?category=Rulers

They are available in both green and clear. These rulers come in a set of 6 ranging in size from 2” to 13”, and are made with 1/4” thick high quality acrylic.
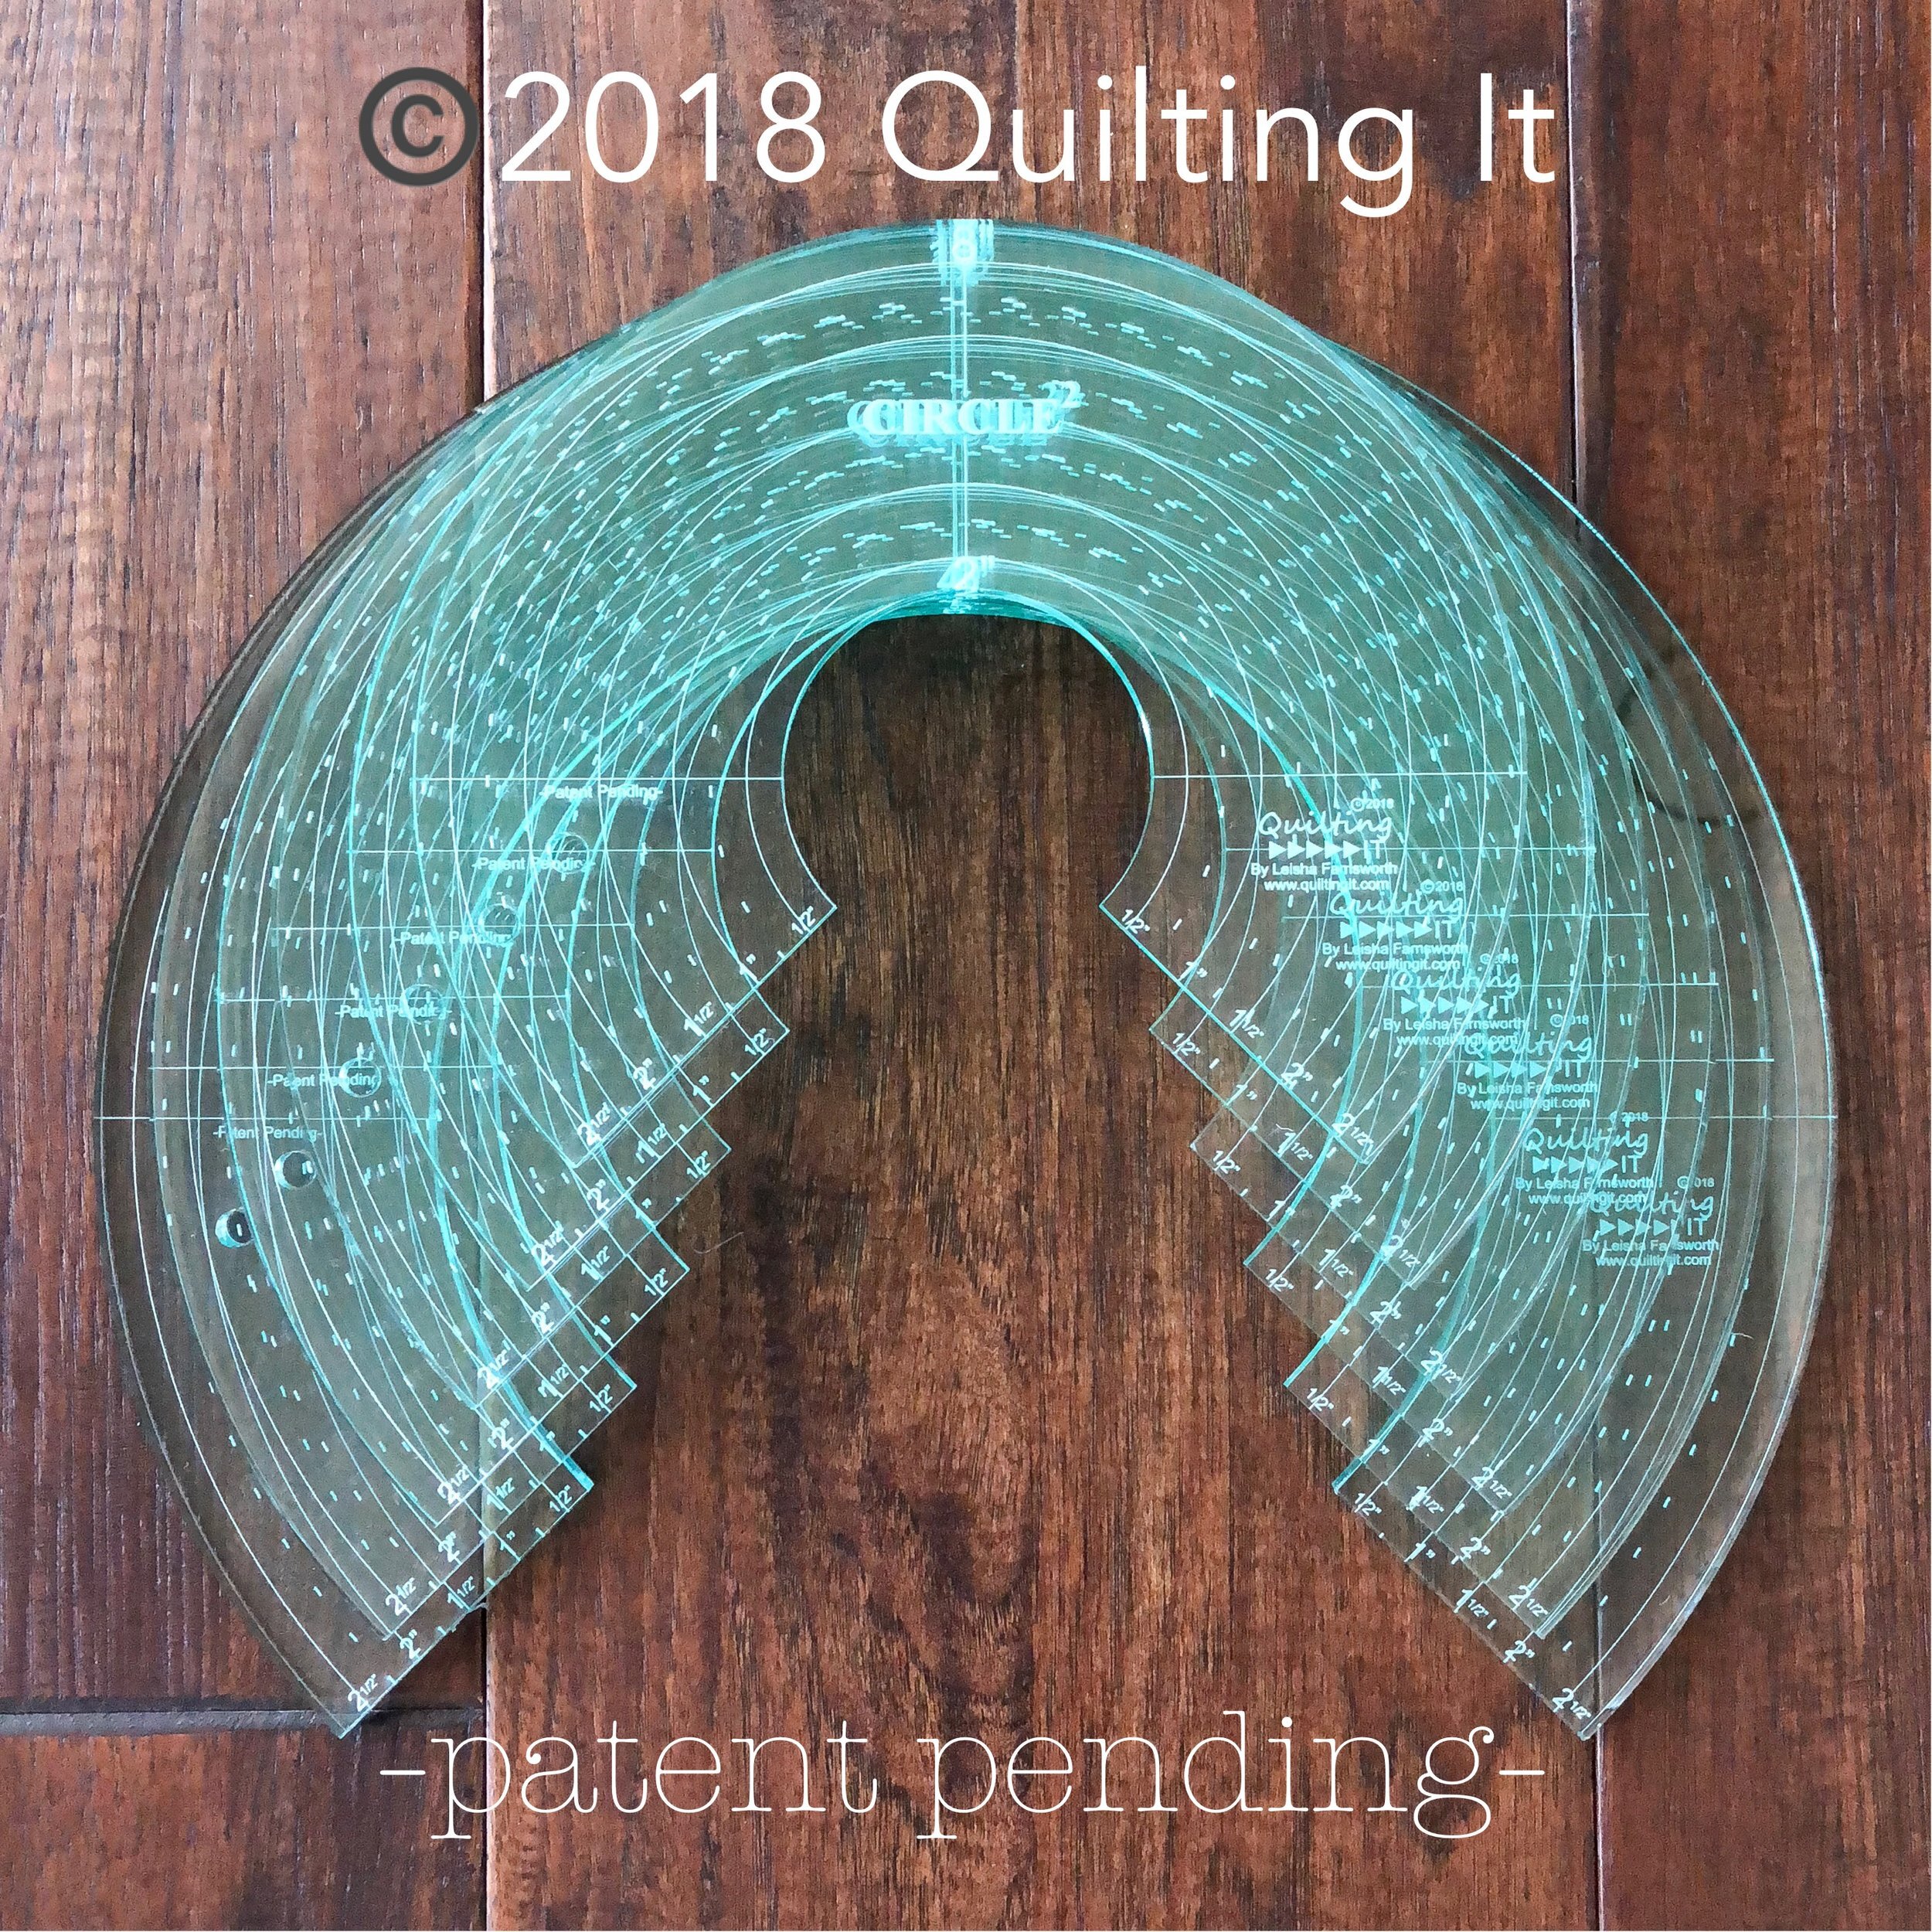
There are measurements along the straight edges on both sides, and are 2.5” wide so they are easier to hold while quilting.

These rulers are called Circle2™ (circle squared), because you get two sizes of circles in one ruler. They are also designed with the hopping foot in mind. For instance, if you were to use the inside 4” circle on the ruler below, to quilt a circle. The circle would end up being 4”. Not 4.5”. So, you’re getting the correct size of ruler. The 3/4th of a circle design helps you quilt more of the circle, yet still have two sizes of circles in one ruler. Which is awesome, because having less rulers is great!! As quilters we have so many things to help us quilt, cutting out half the amount of rulers to have on hand...is awesome.

Here is another blog post about these rulers:
This is also a great intro video, on all the different curves that you can get with just a few of the rulers in this set.
I share a great continuous quilting design in this video. We all want custom quilting to go faster right.
- Thank you again for all of your support!! -Leisha

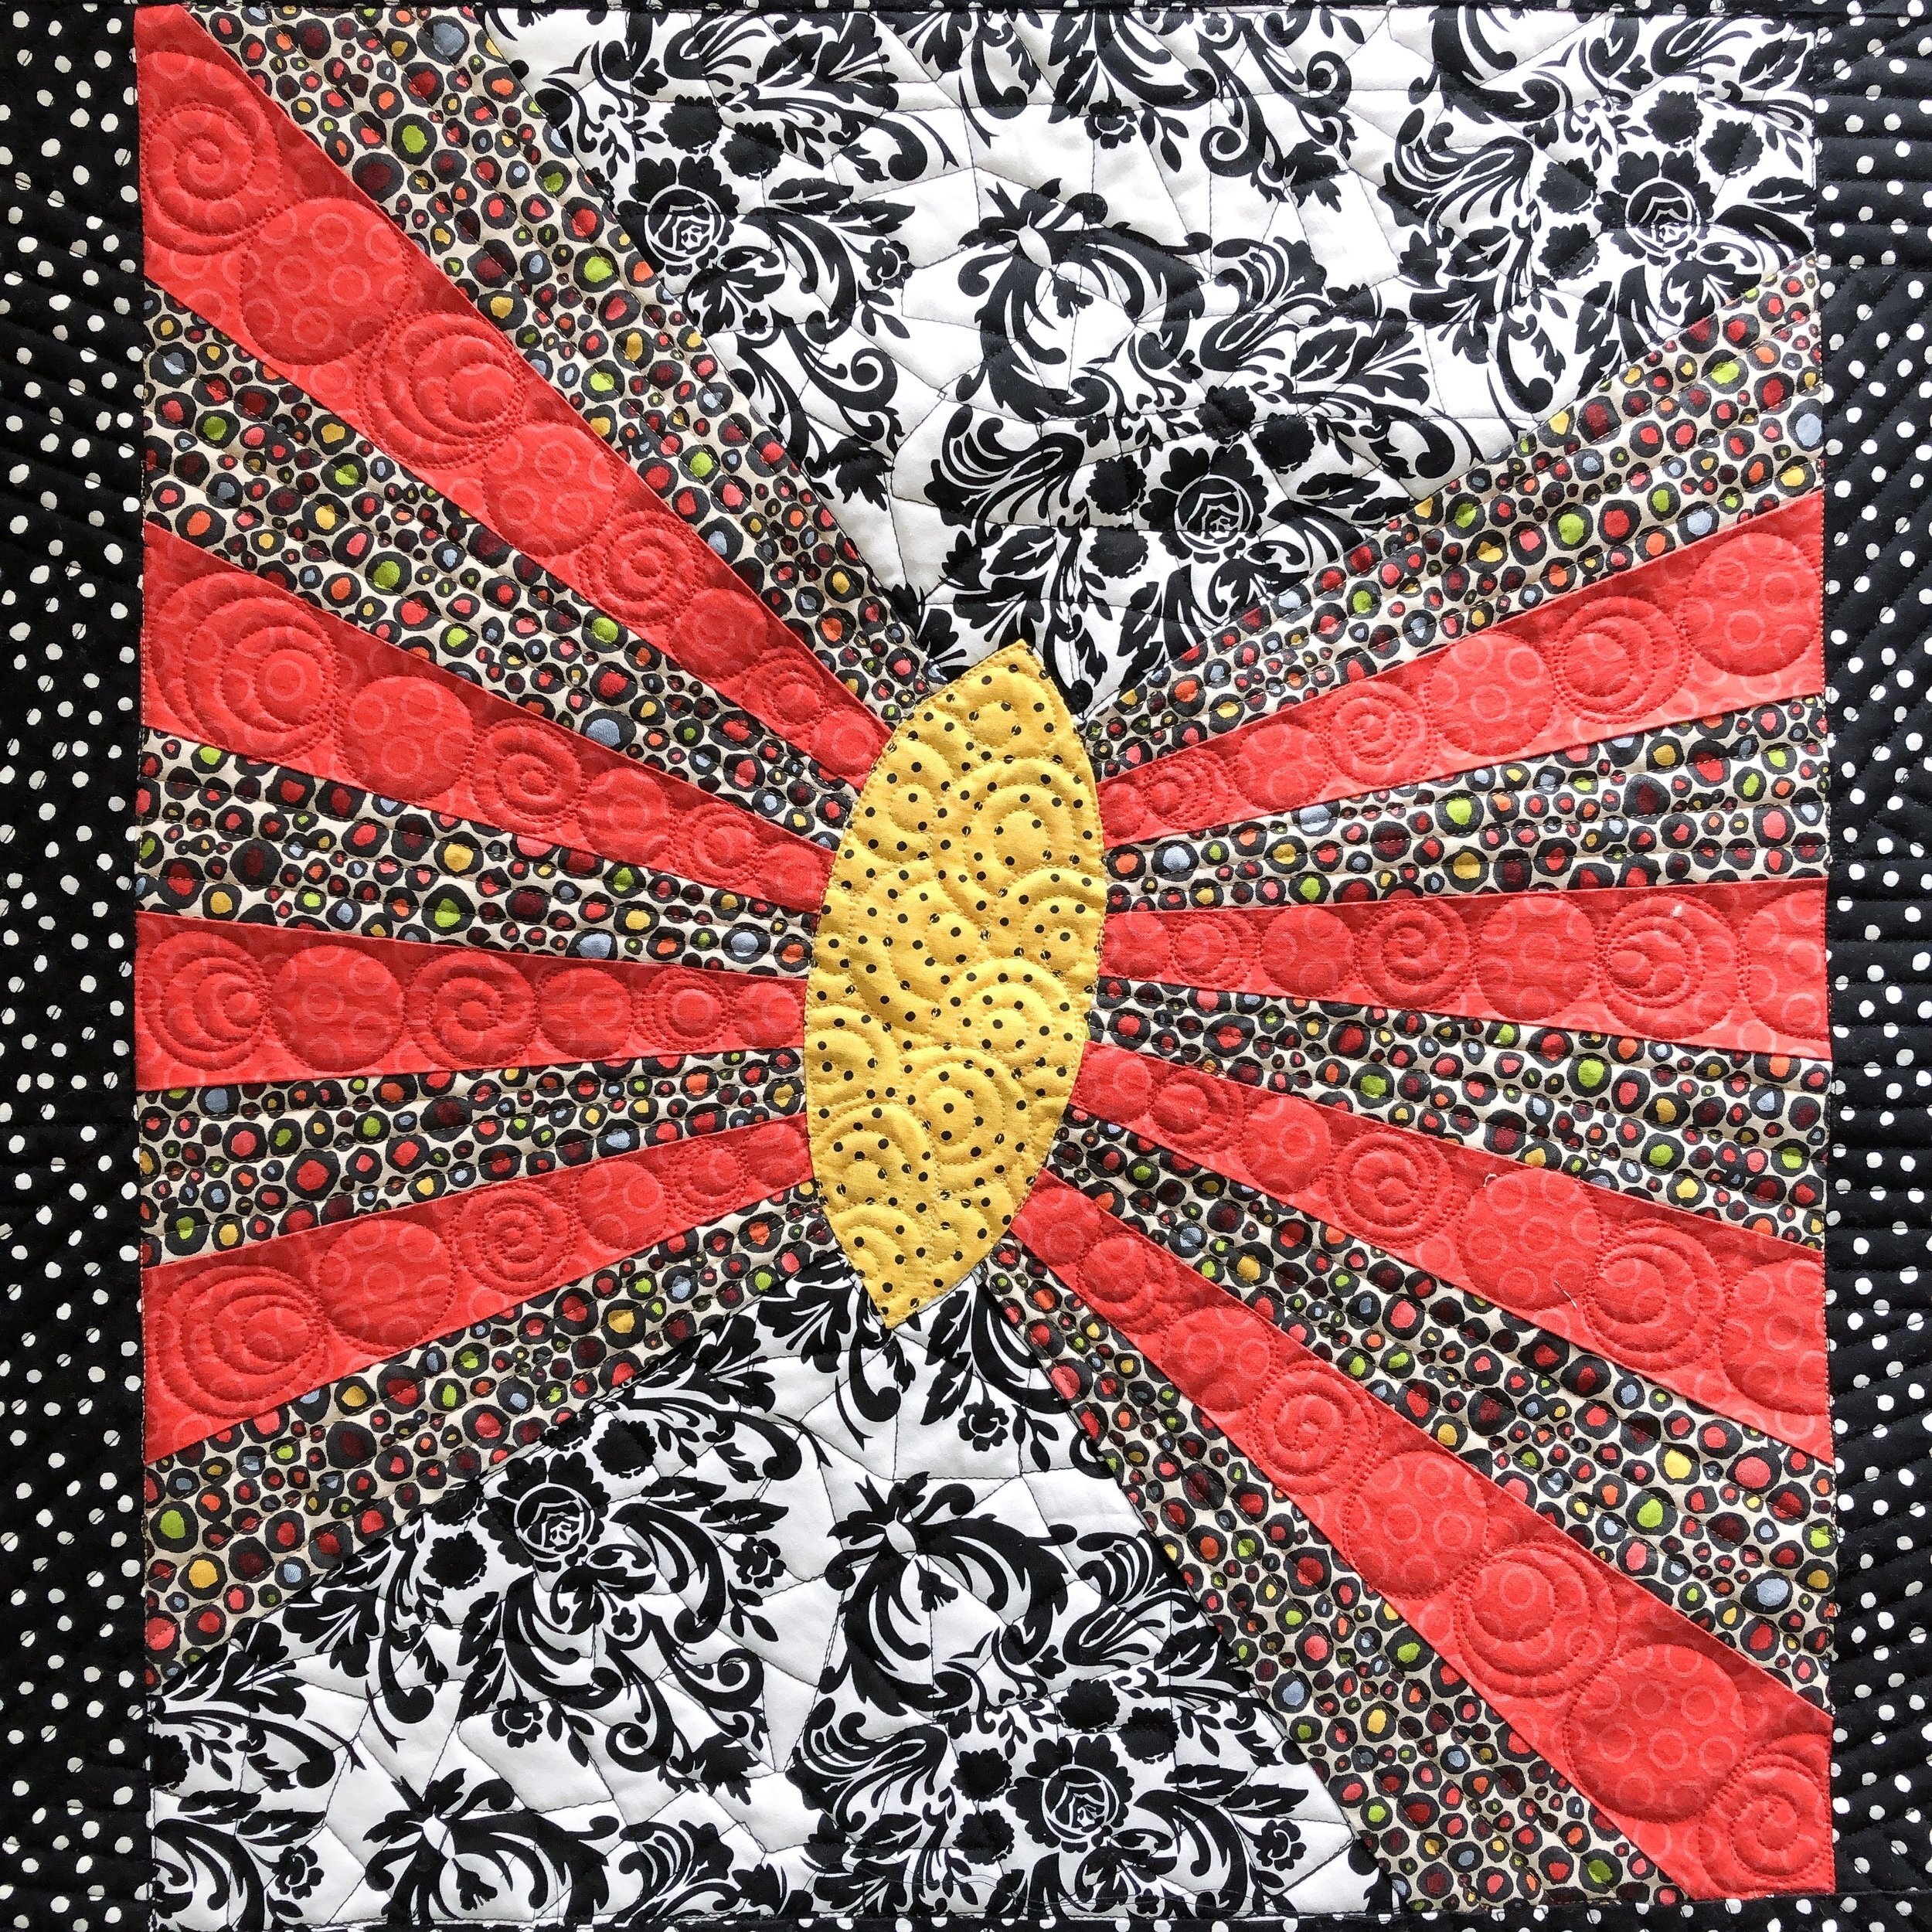
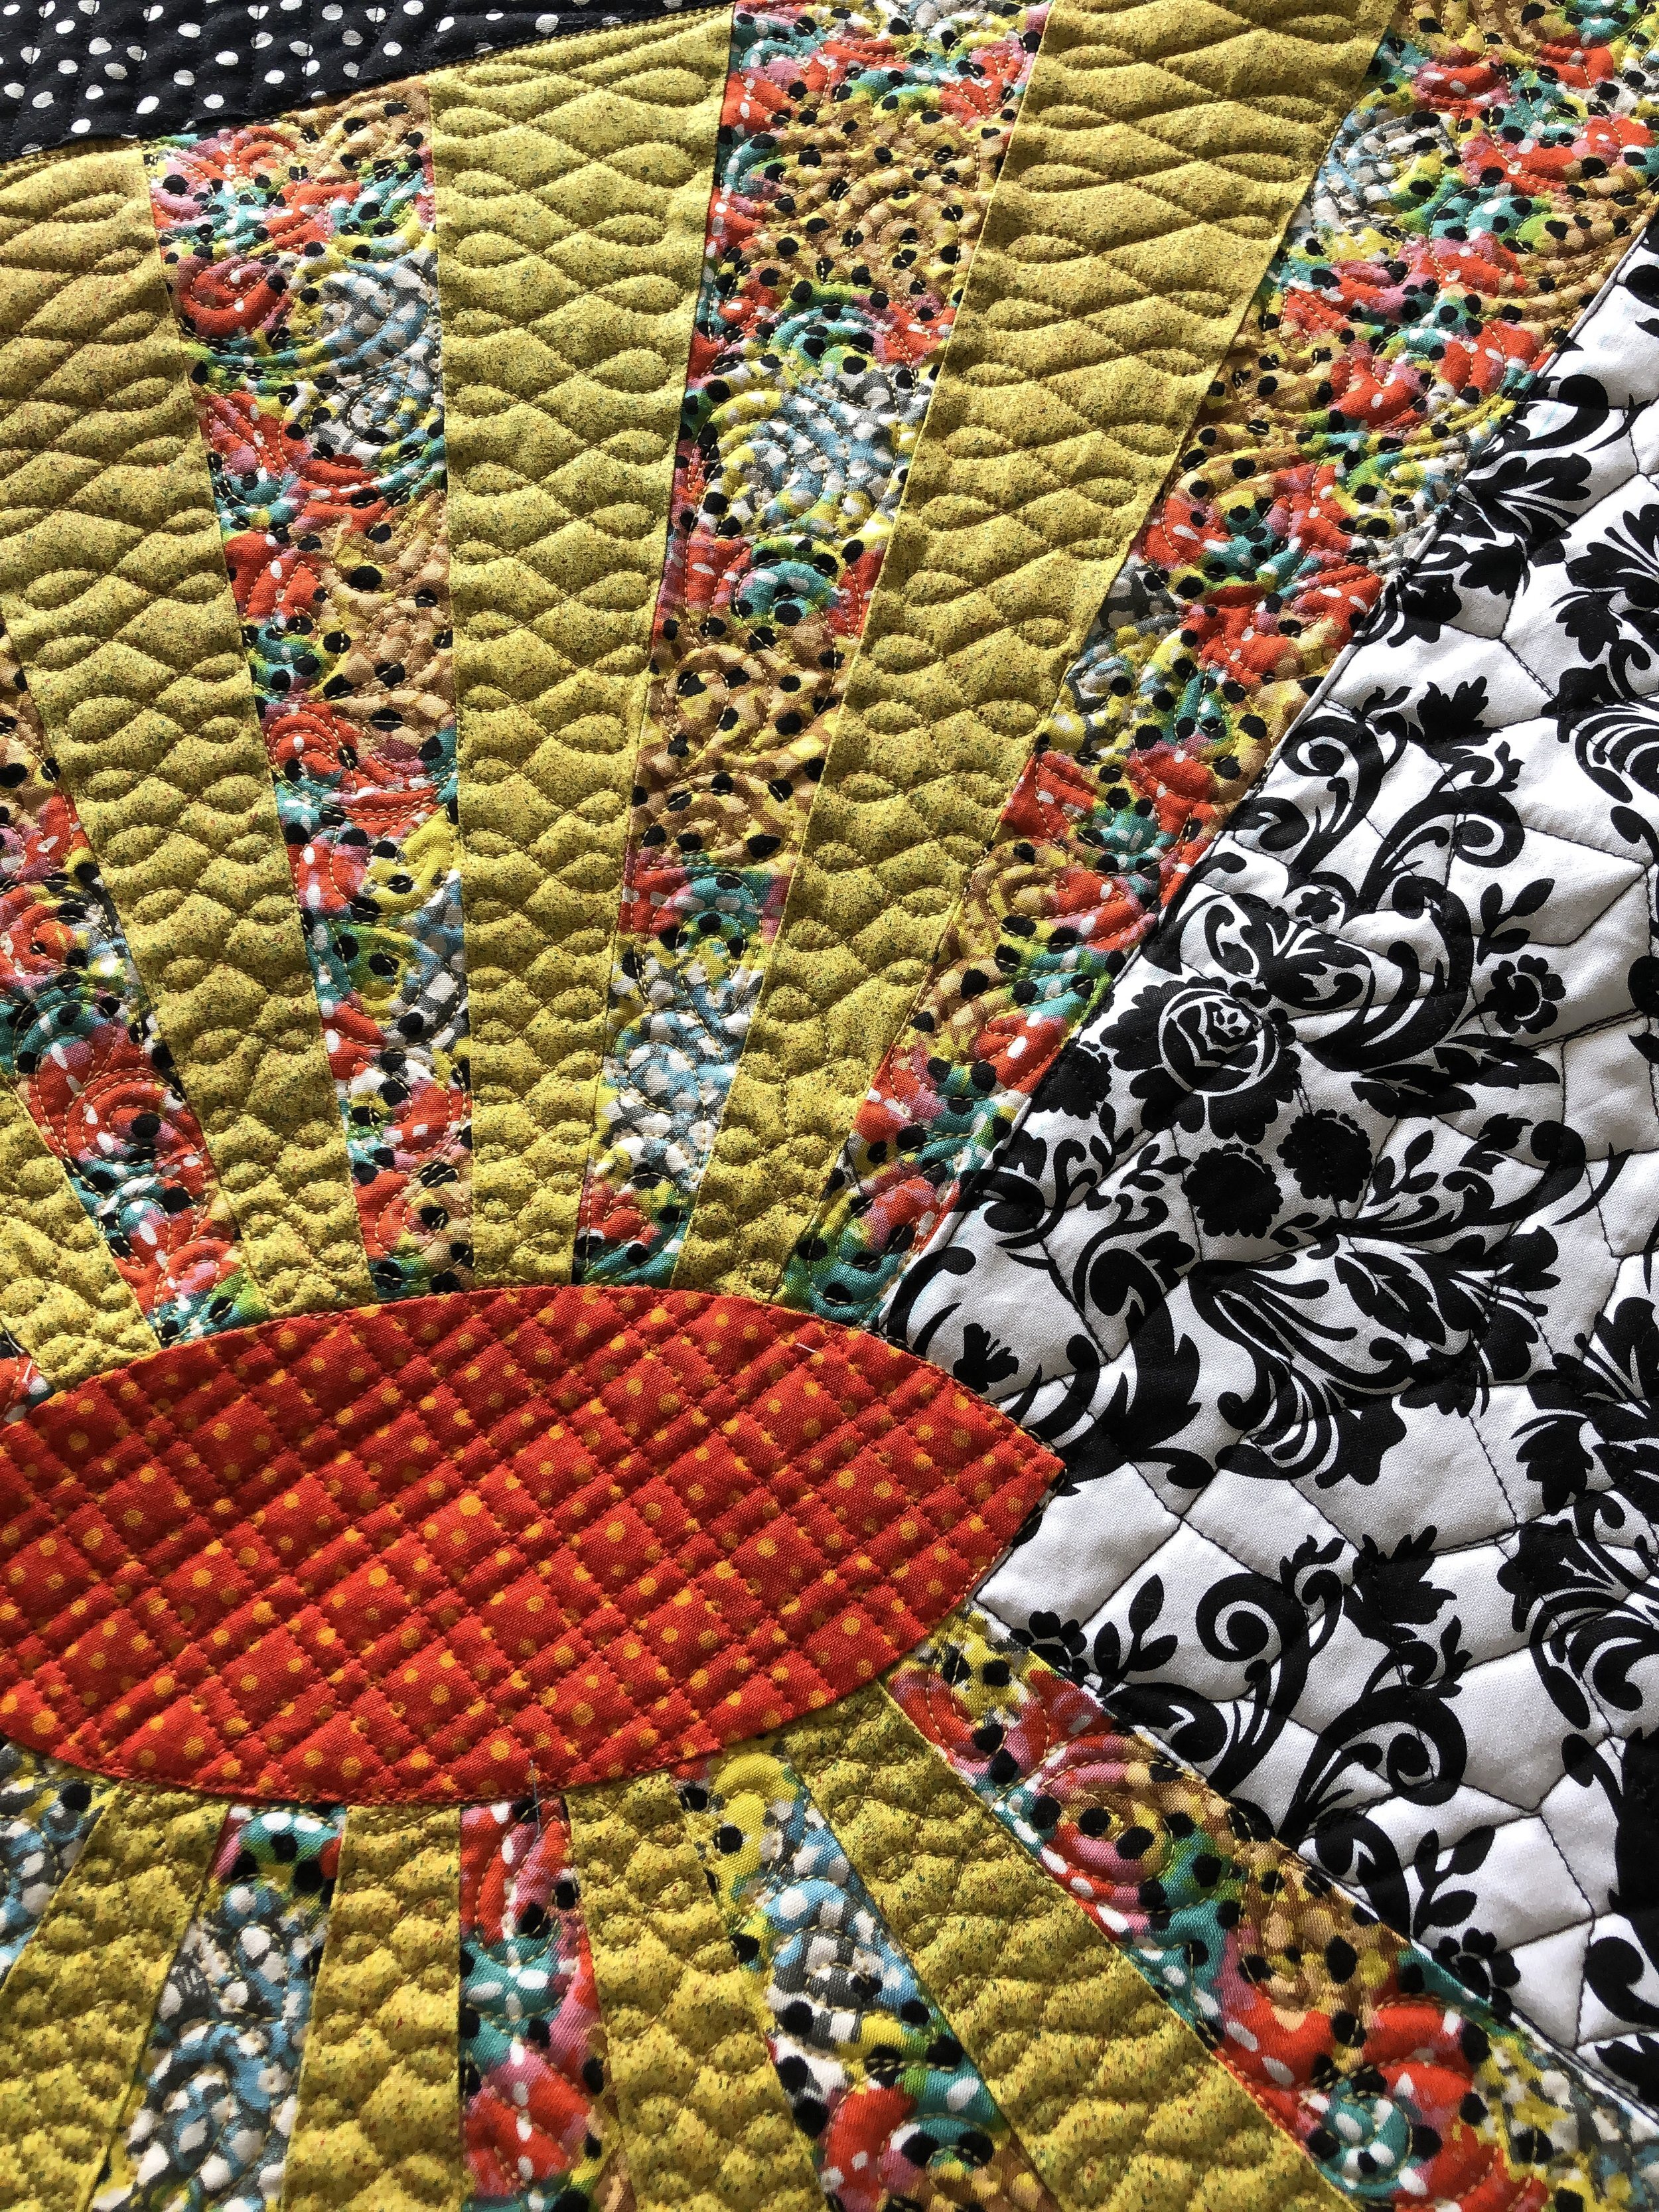
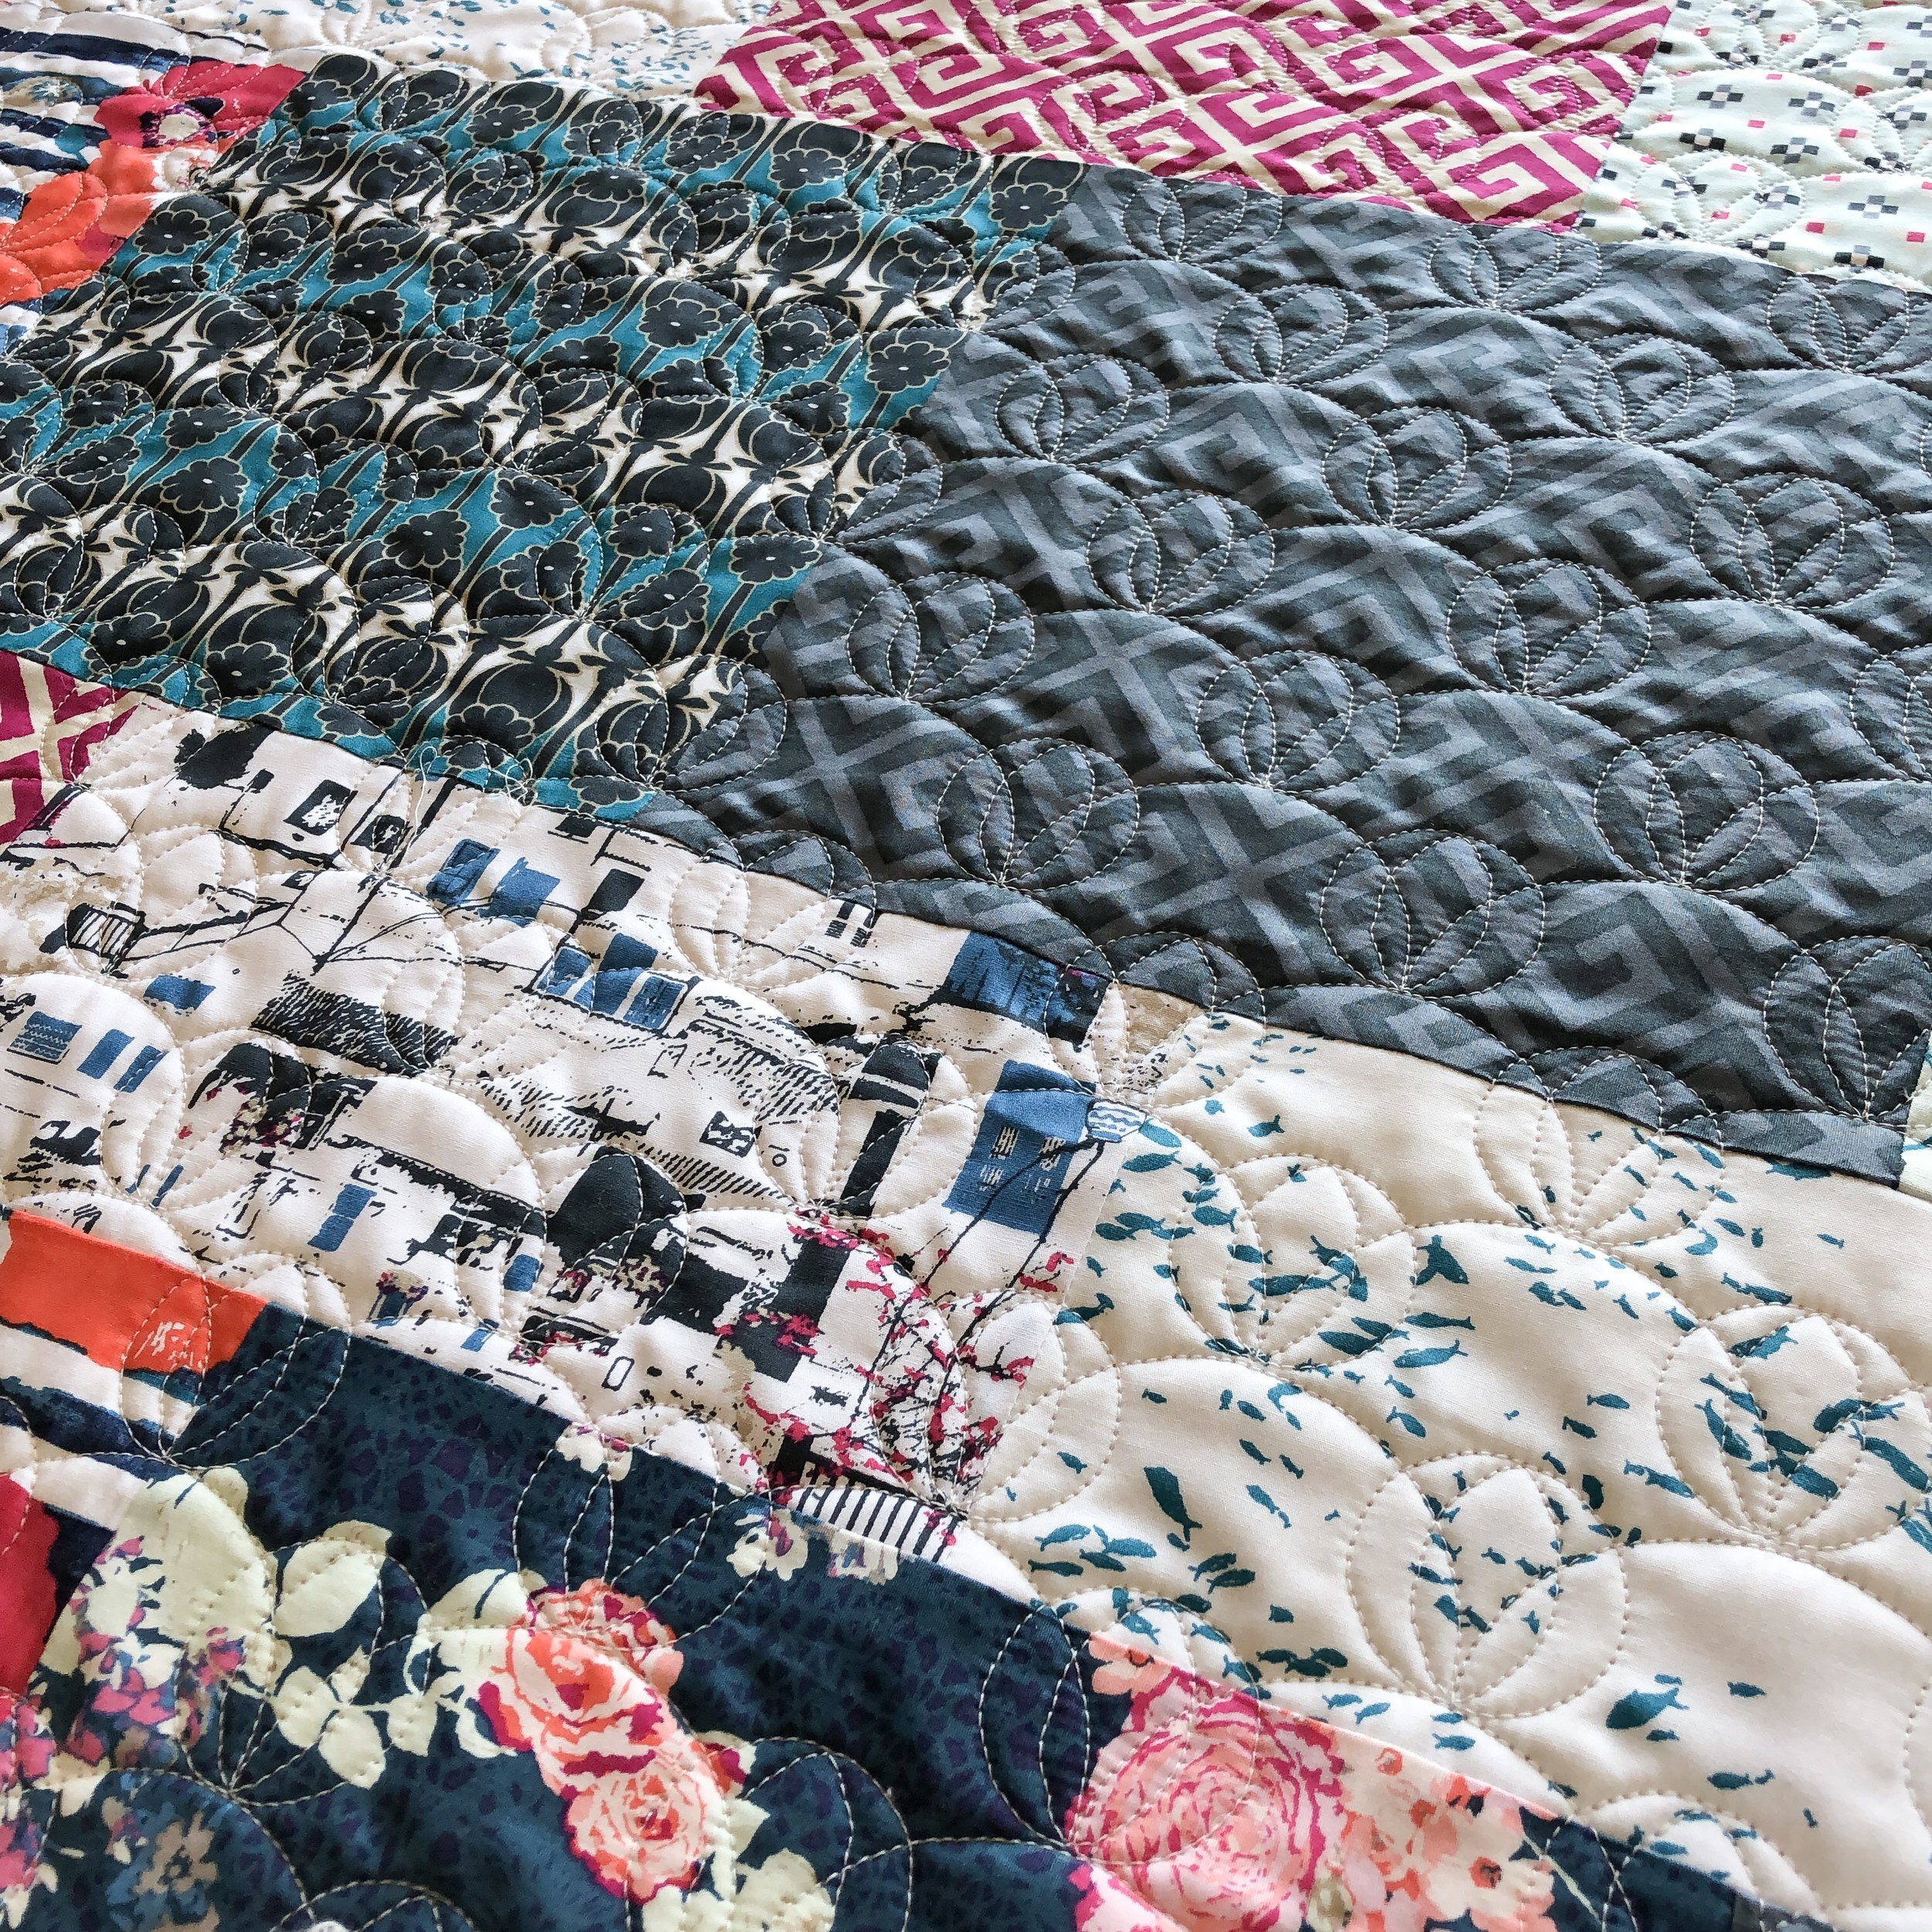
Loranne’s Butterfly Quilt
Loranne made this amazing quilt from a picture she saw of a similar quilt. This post includes several pictures and a fun way to quilt that big black border...video included.

Those colors pop against the black and white!!
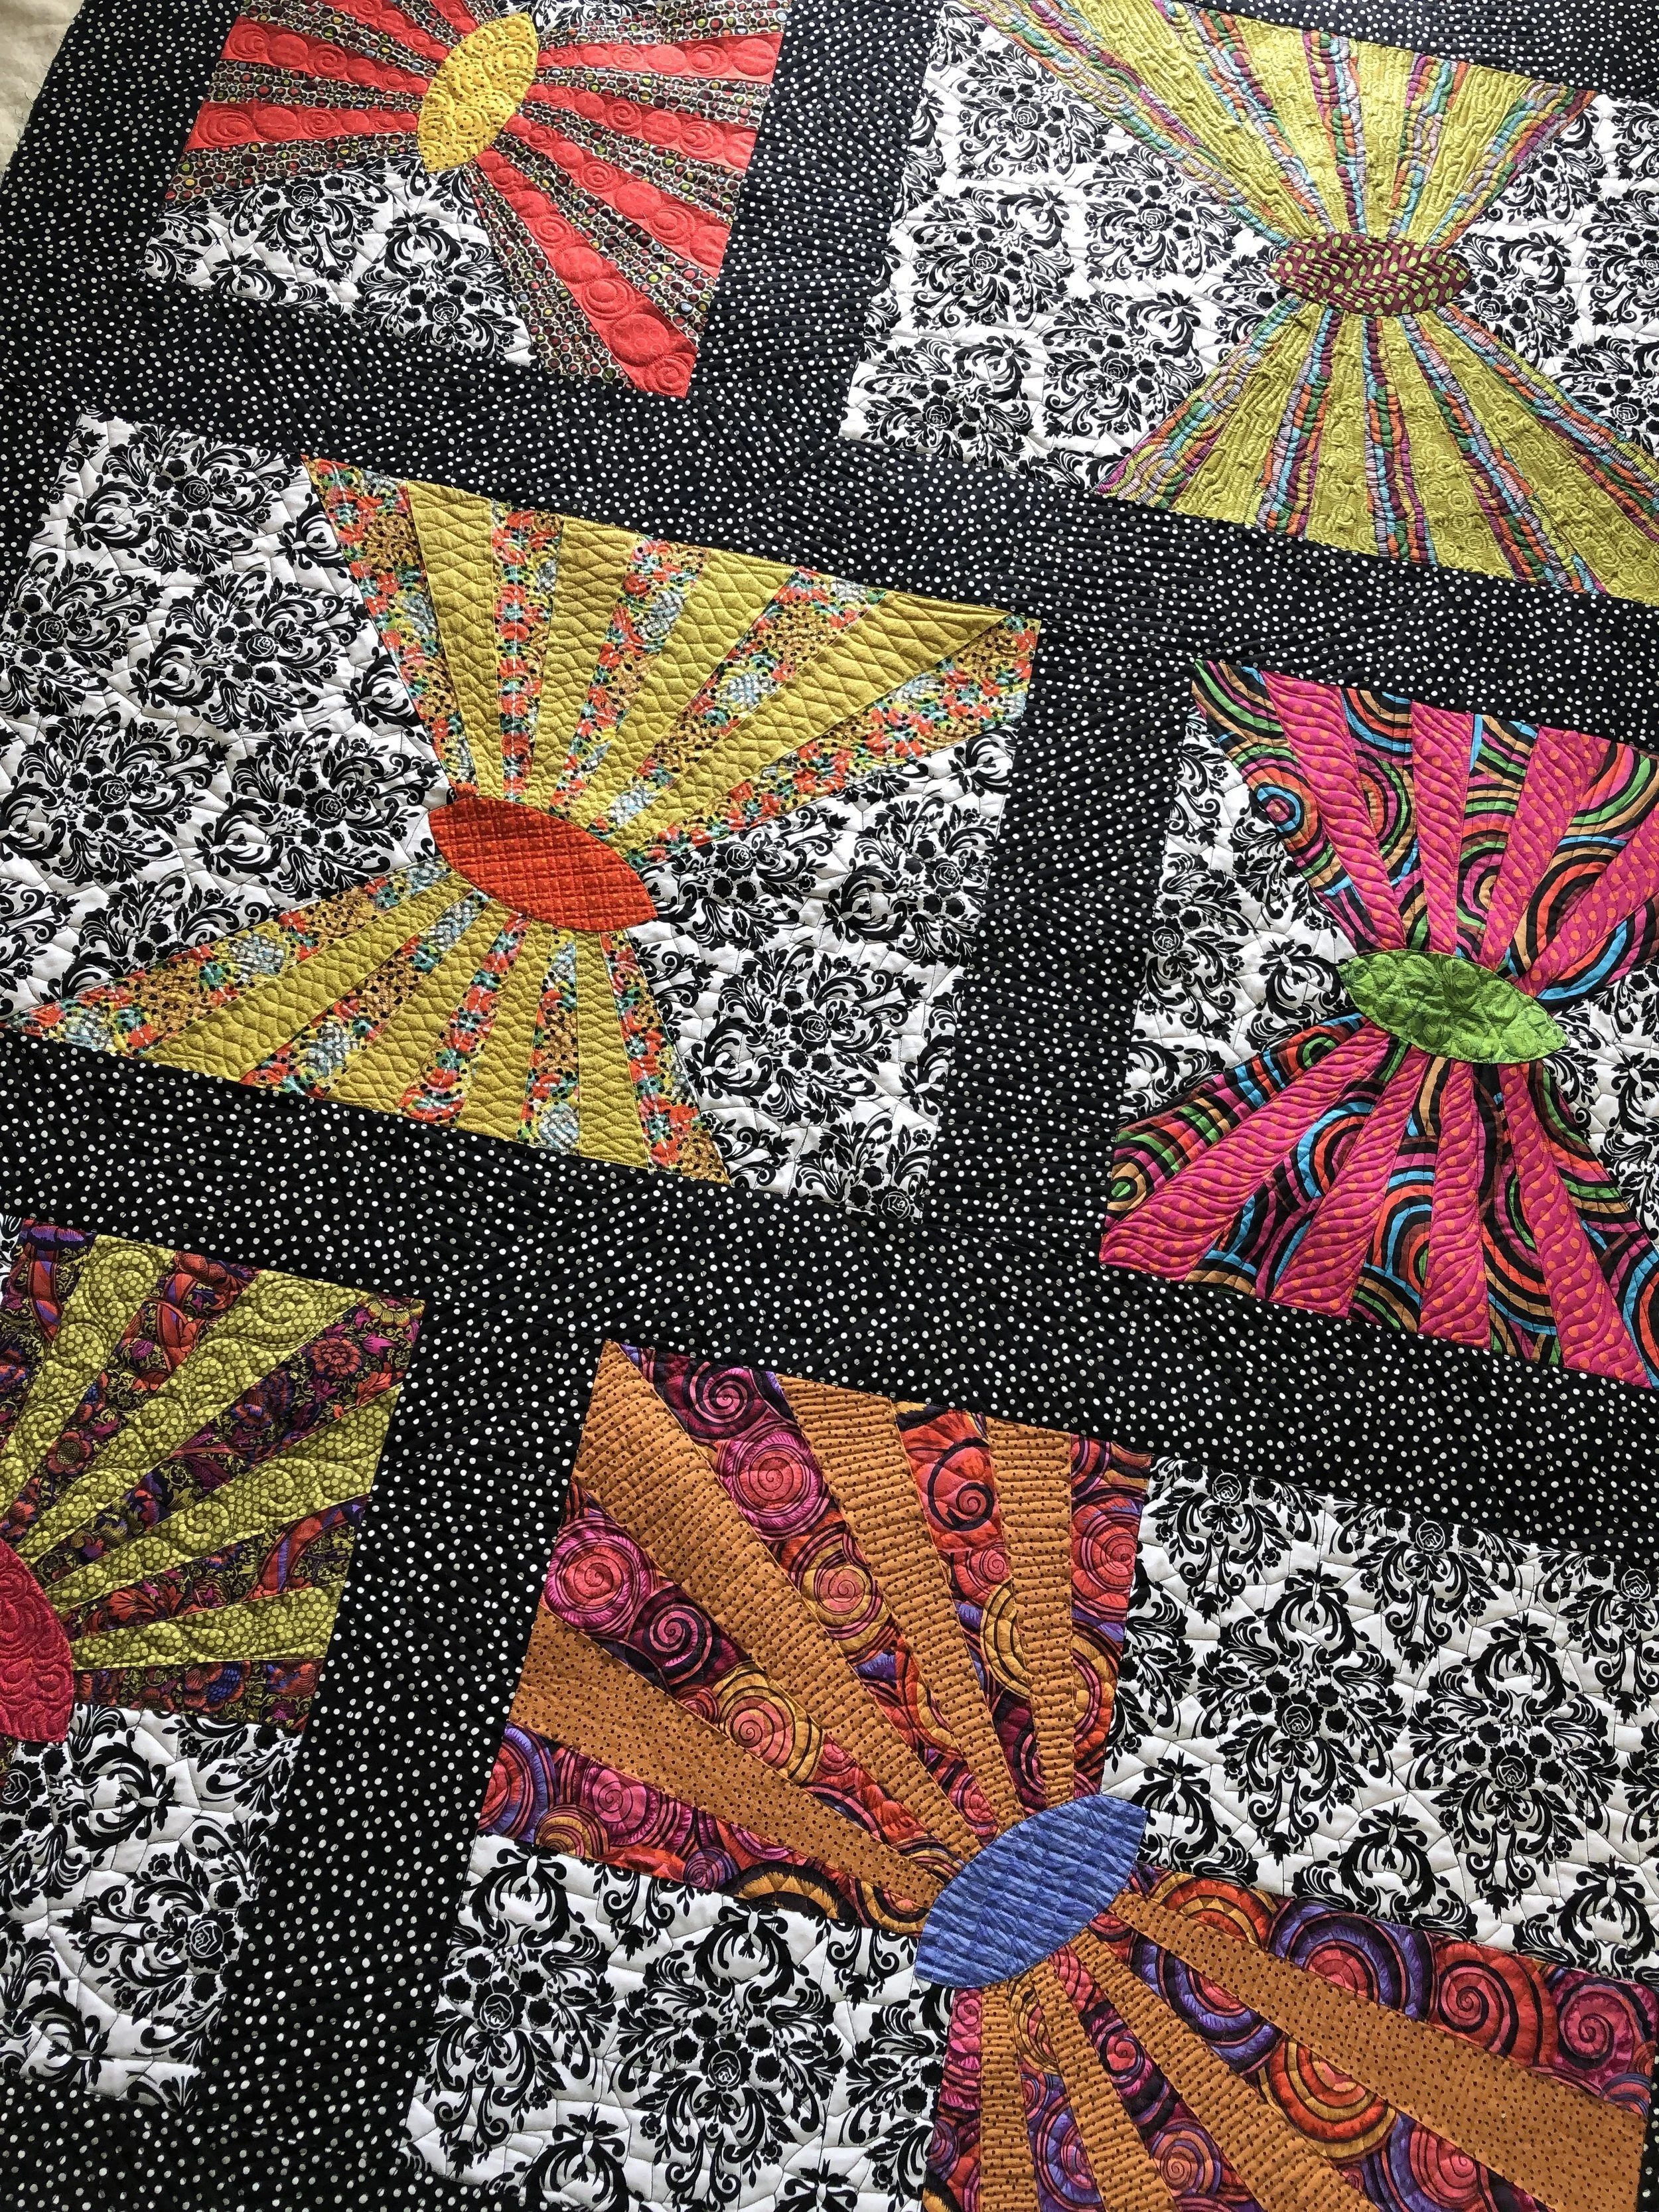
Here is the first close up on this black sashing/border. It was so much fun to quilt, now I just want to quilt it over and over again...especially on one of my own!

I apologize that my camera mount is shaky, but I decided to still share this, because I share with you step by step how to do this design, and why I do it the way I do. Enjoy!!
Also, side note: I’ve almost met 1000 subscribers on my YouTube channel, which means I’m giving away a clear set of my Circle2 machine quilting ruler sets. Go to my Instagram and check out what you need to do to enter... click on this link: https://www.instagram.com/p/Bt4PmNHnSaT/?utm_source=ig_share_sheet&igshid=l1cz7xocsdem
My favorite straight rulers are from Linda at The Quilted Pineapple. Follow this link below to her shop:https://thequiltedpineapple.bigcartel.com/

Look at all of those awesome angles!!! Sorry, I just love this design. If you’re a quilter, you know it can be hard to fill a big border with quilting...that’s why this is just perfect. Plus, that texture is just fabulous!
Here are the butterflies. I tried to add variety to show off the amazing lines on these butterfly blocks. I quilted lines in the tan dotted fabric, and circles...swirls...and circle ripples in the red. The yellow center has some overlapping circles. Those are also so fun to quilt. I’m actually going to do them on a quilt I’m going to quilt today, that has a sheep on it. So excited!!
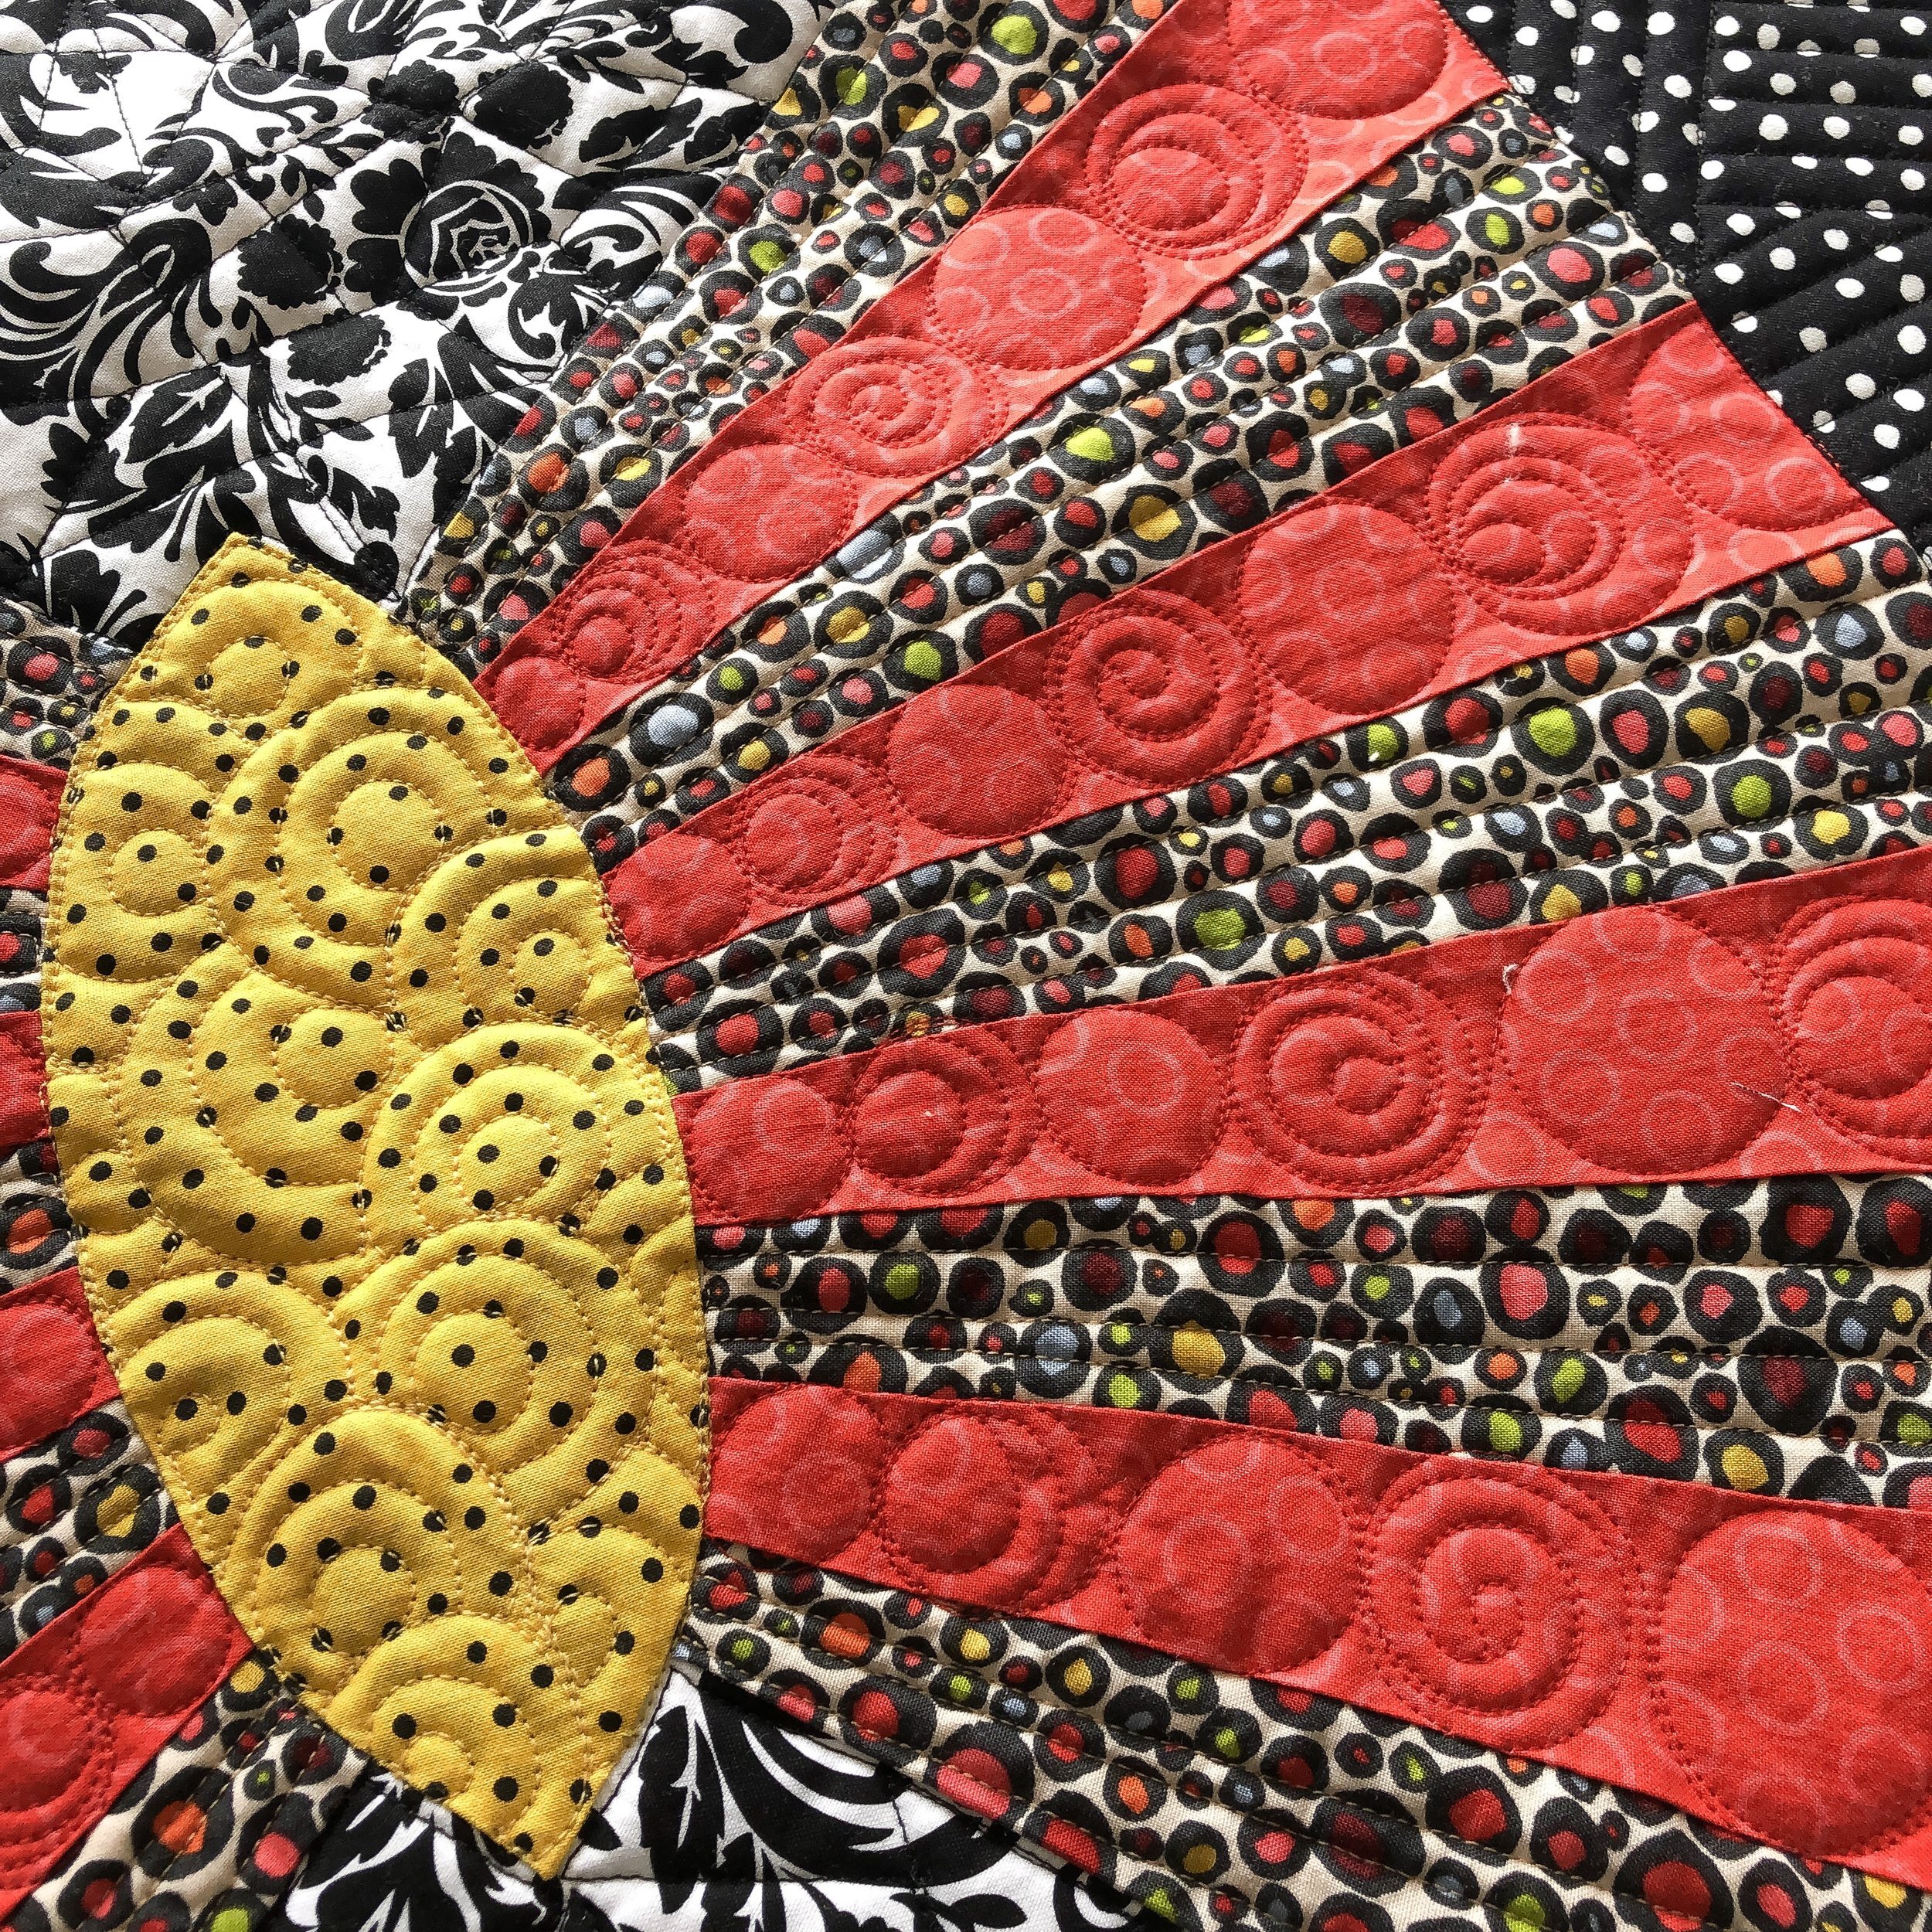
I used 11 different colors of thread. Black for the borders and background, and coordinating threads on the rest of the fabrics. I also used my favorite 8020 cotton poly Winline batting.
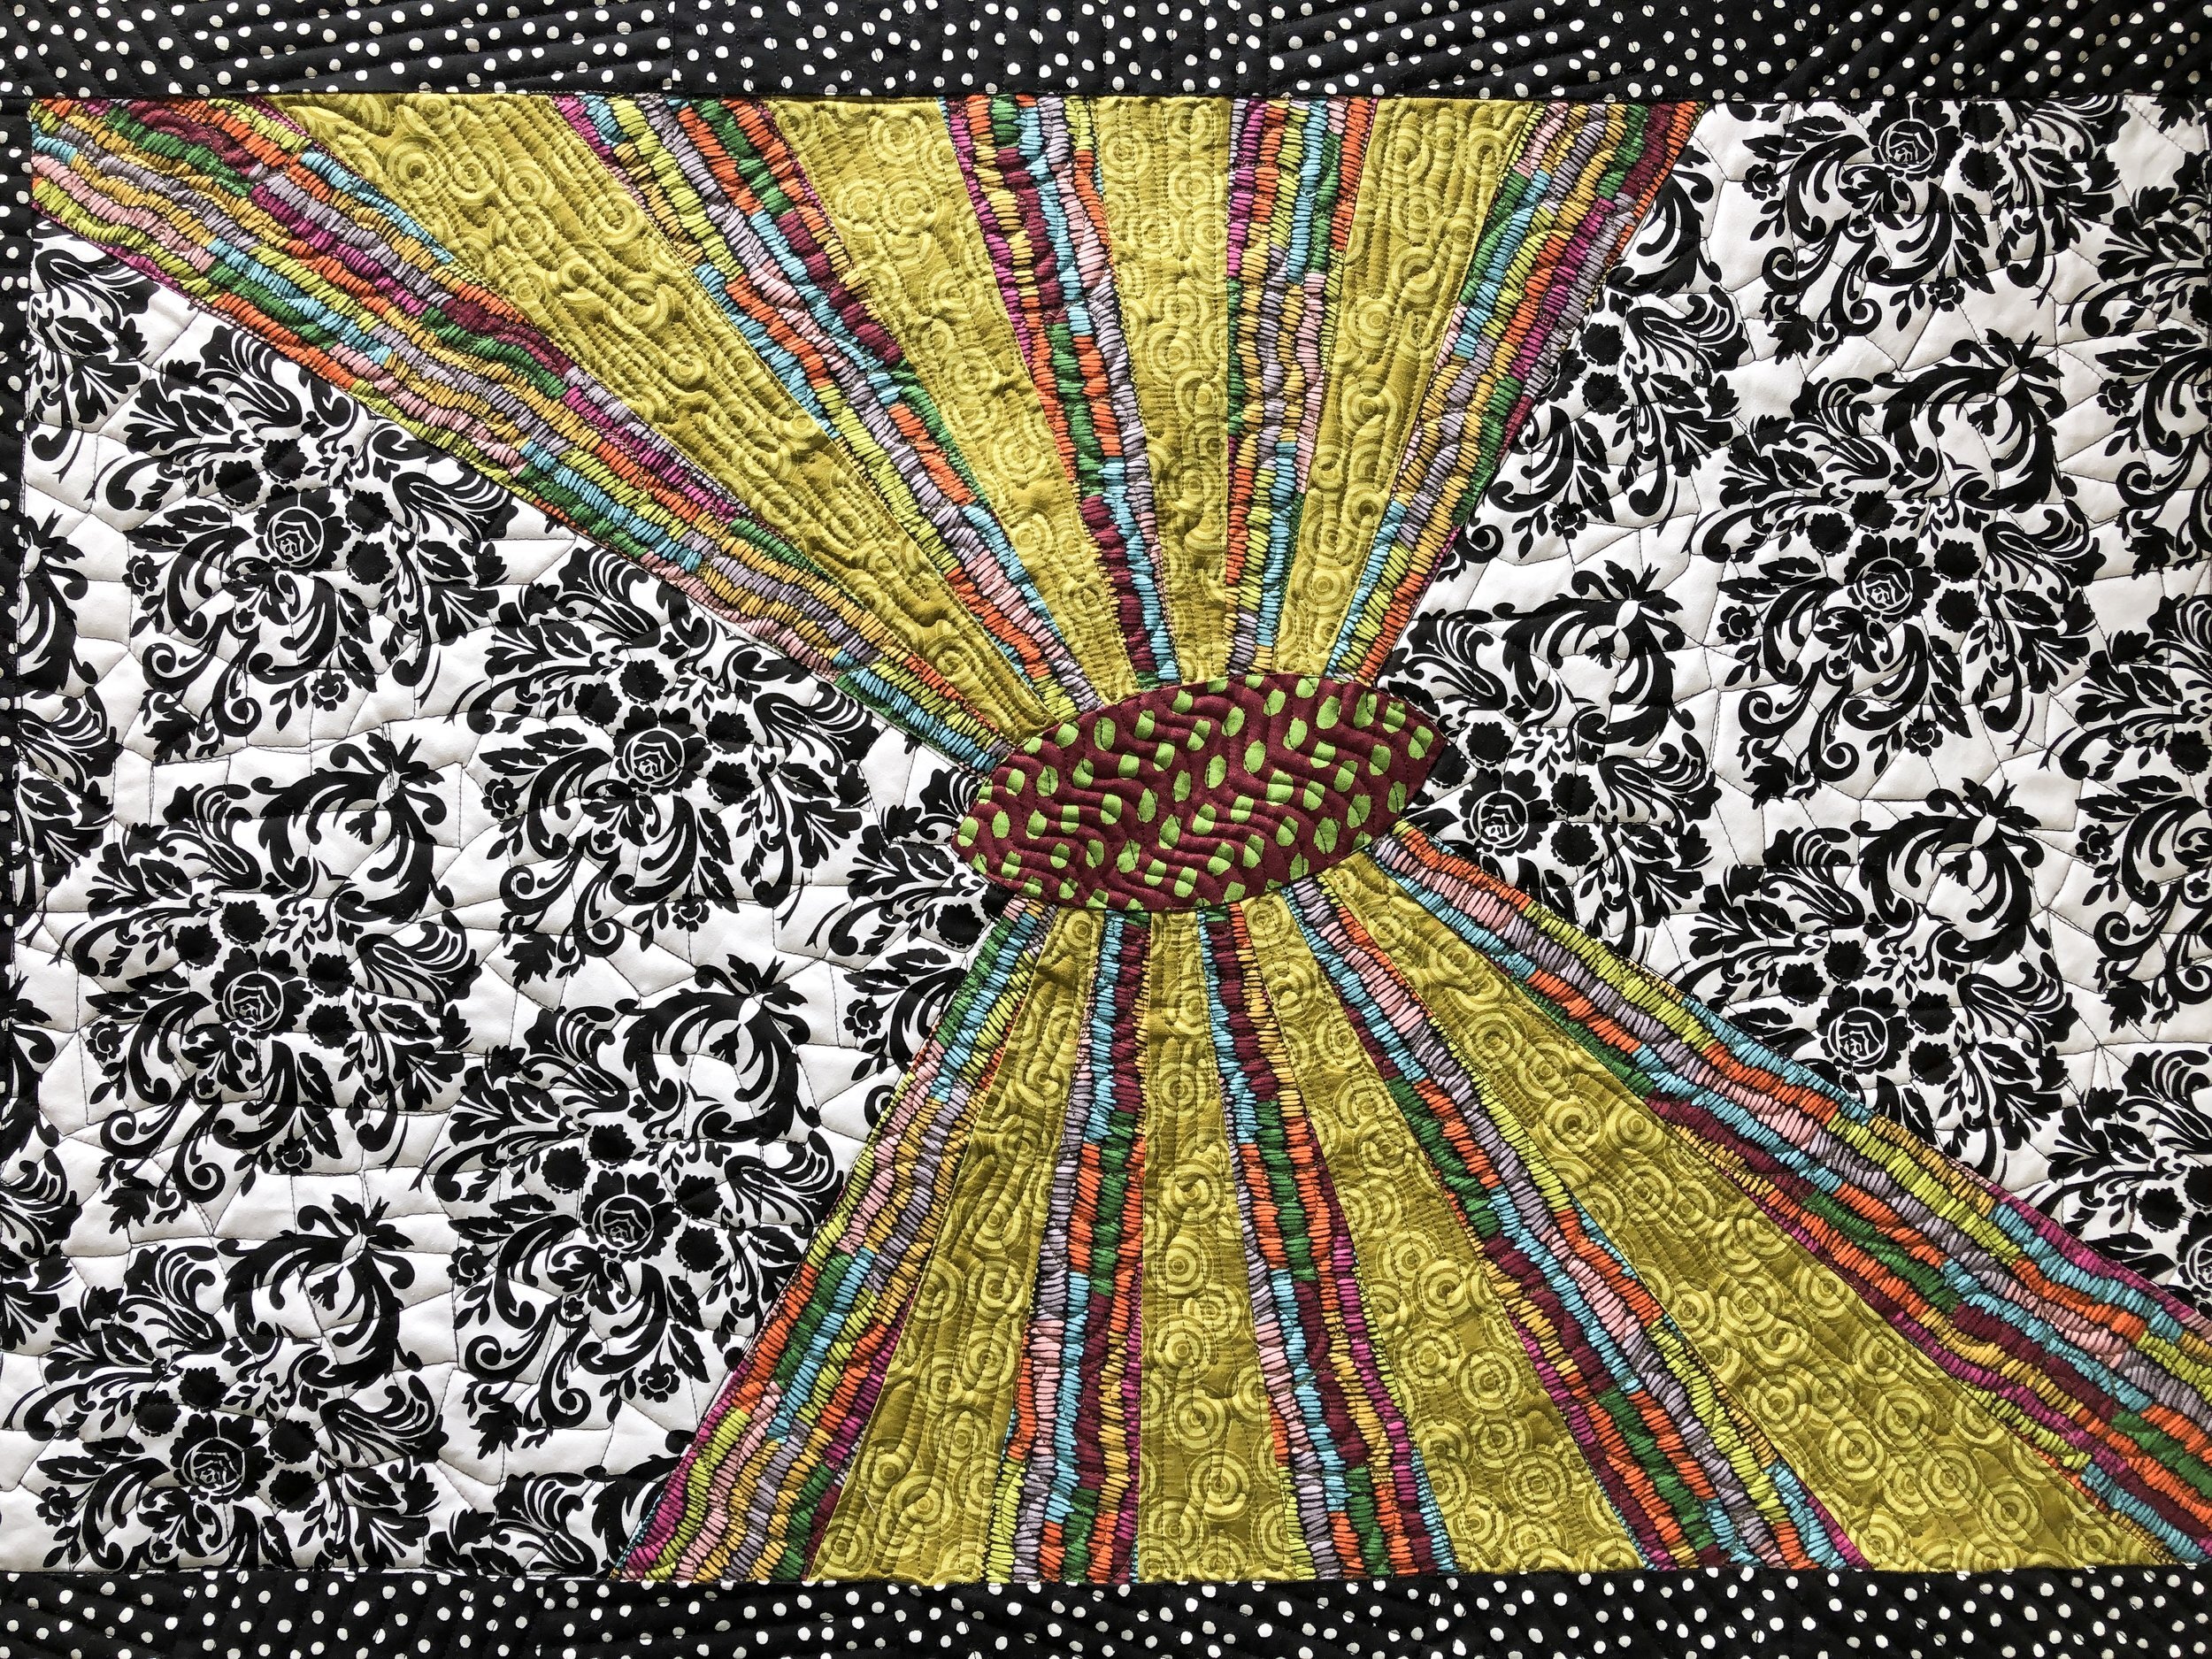
There are those overlapping circles again, with a wood’ish kind of design in the green, with wavy lines for the body of the butterfly.

I wanted to keep the quilting simple in the background, because of the busy damask fabric, so I did a freehand crackle. There is a short video on my YouTube channel, of me doing the crackle design: https://youtu.be/9RiOuB2xFJc

Twists, arcs, and a 1/2” plaid grid add some fun textures to this particular butterfly.
There is a great shot above, of the crackle in the background.
V’s, wavy lines, and ribbon candy add just the right amount personality to this one. I don’t have a picture of the back fabric, but it is the black circle fabric between the pink stripes. It’s a pretty perfect choice for this quilt.

I just love how the light is picking up all these quilting textures. When the threads blend so perfectly, I never know how great the pictures will turn out.

Ovals, feathered swirls, and arcs are a fun combination of texture on this butterfly.

With all the variety of designs, which I didn’t want to repeat, it can seem like it’s too much. But let the quilt pattern and fabrics speak to you/inspire you. Then everything will tie together and flow beautifully. It may even tie the fabrics together better.
1/2” lines, back and forth lines, with some ribbon candy to soften up the quilting.

Loranne also made these two pillow shams. I wanted to keep them simple, the quilt is the real focal point.

Also...a quick note: it’s a huge time saver, and not to mention save your back from pinning on another quilt back, I suggest using only one backing when what you’re quilting is the same size. Quilt the first pillow than roll the backing, and attach the second...and quilt. Boom, both the shams are quilted.

Lines, lines, lines. Softened up with some overlapping circles and wood grain.
I’m going to see if I can manage to video me quilting that fun overlapping circle design. Subscribe to my YouTube channel to not miss it. www.youtube.com/user/QuiltingIt

Thank you so much!! This quilting community is amazing. Not only do I get so much support and encouragement, but I have some who are willing to go above and beyond to help me grow and celebrate my successes with me. Thank you!!
- Leisha

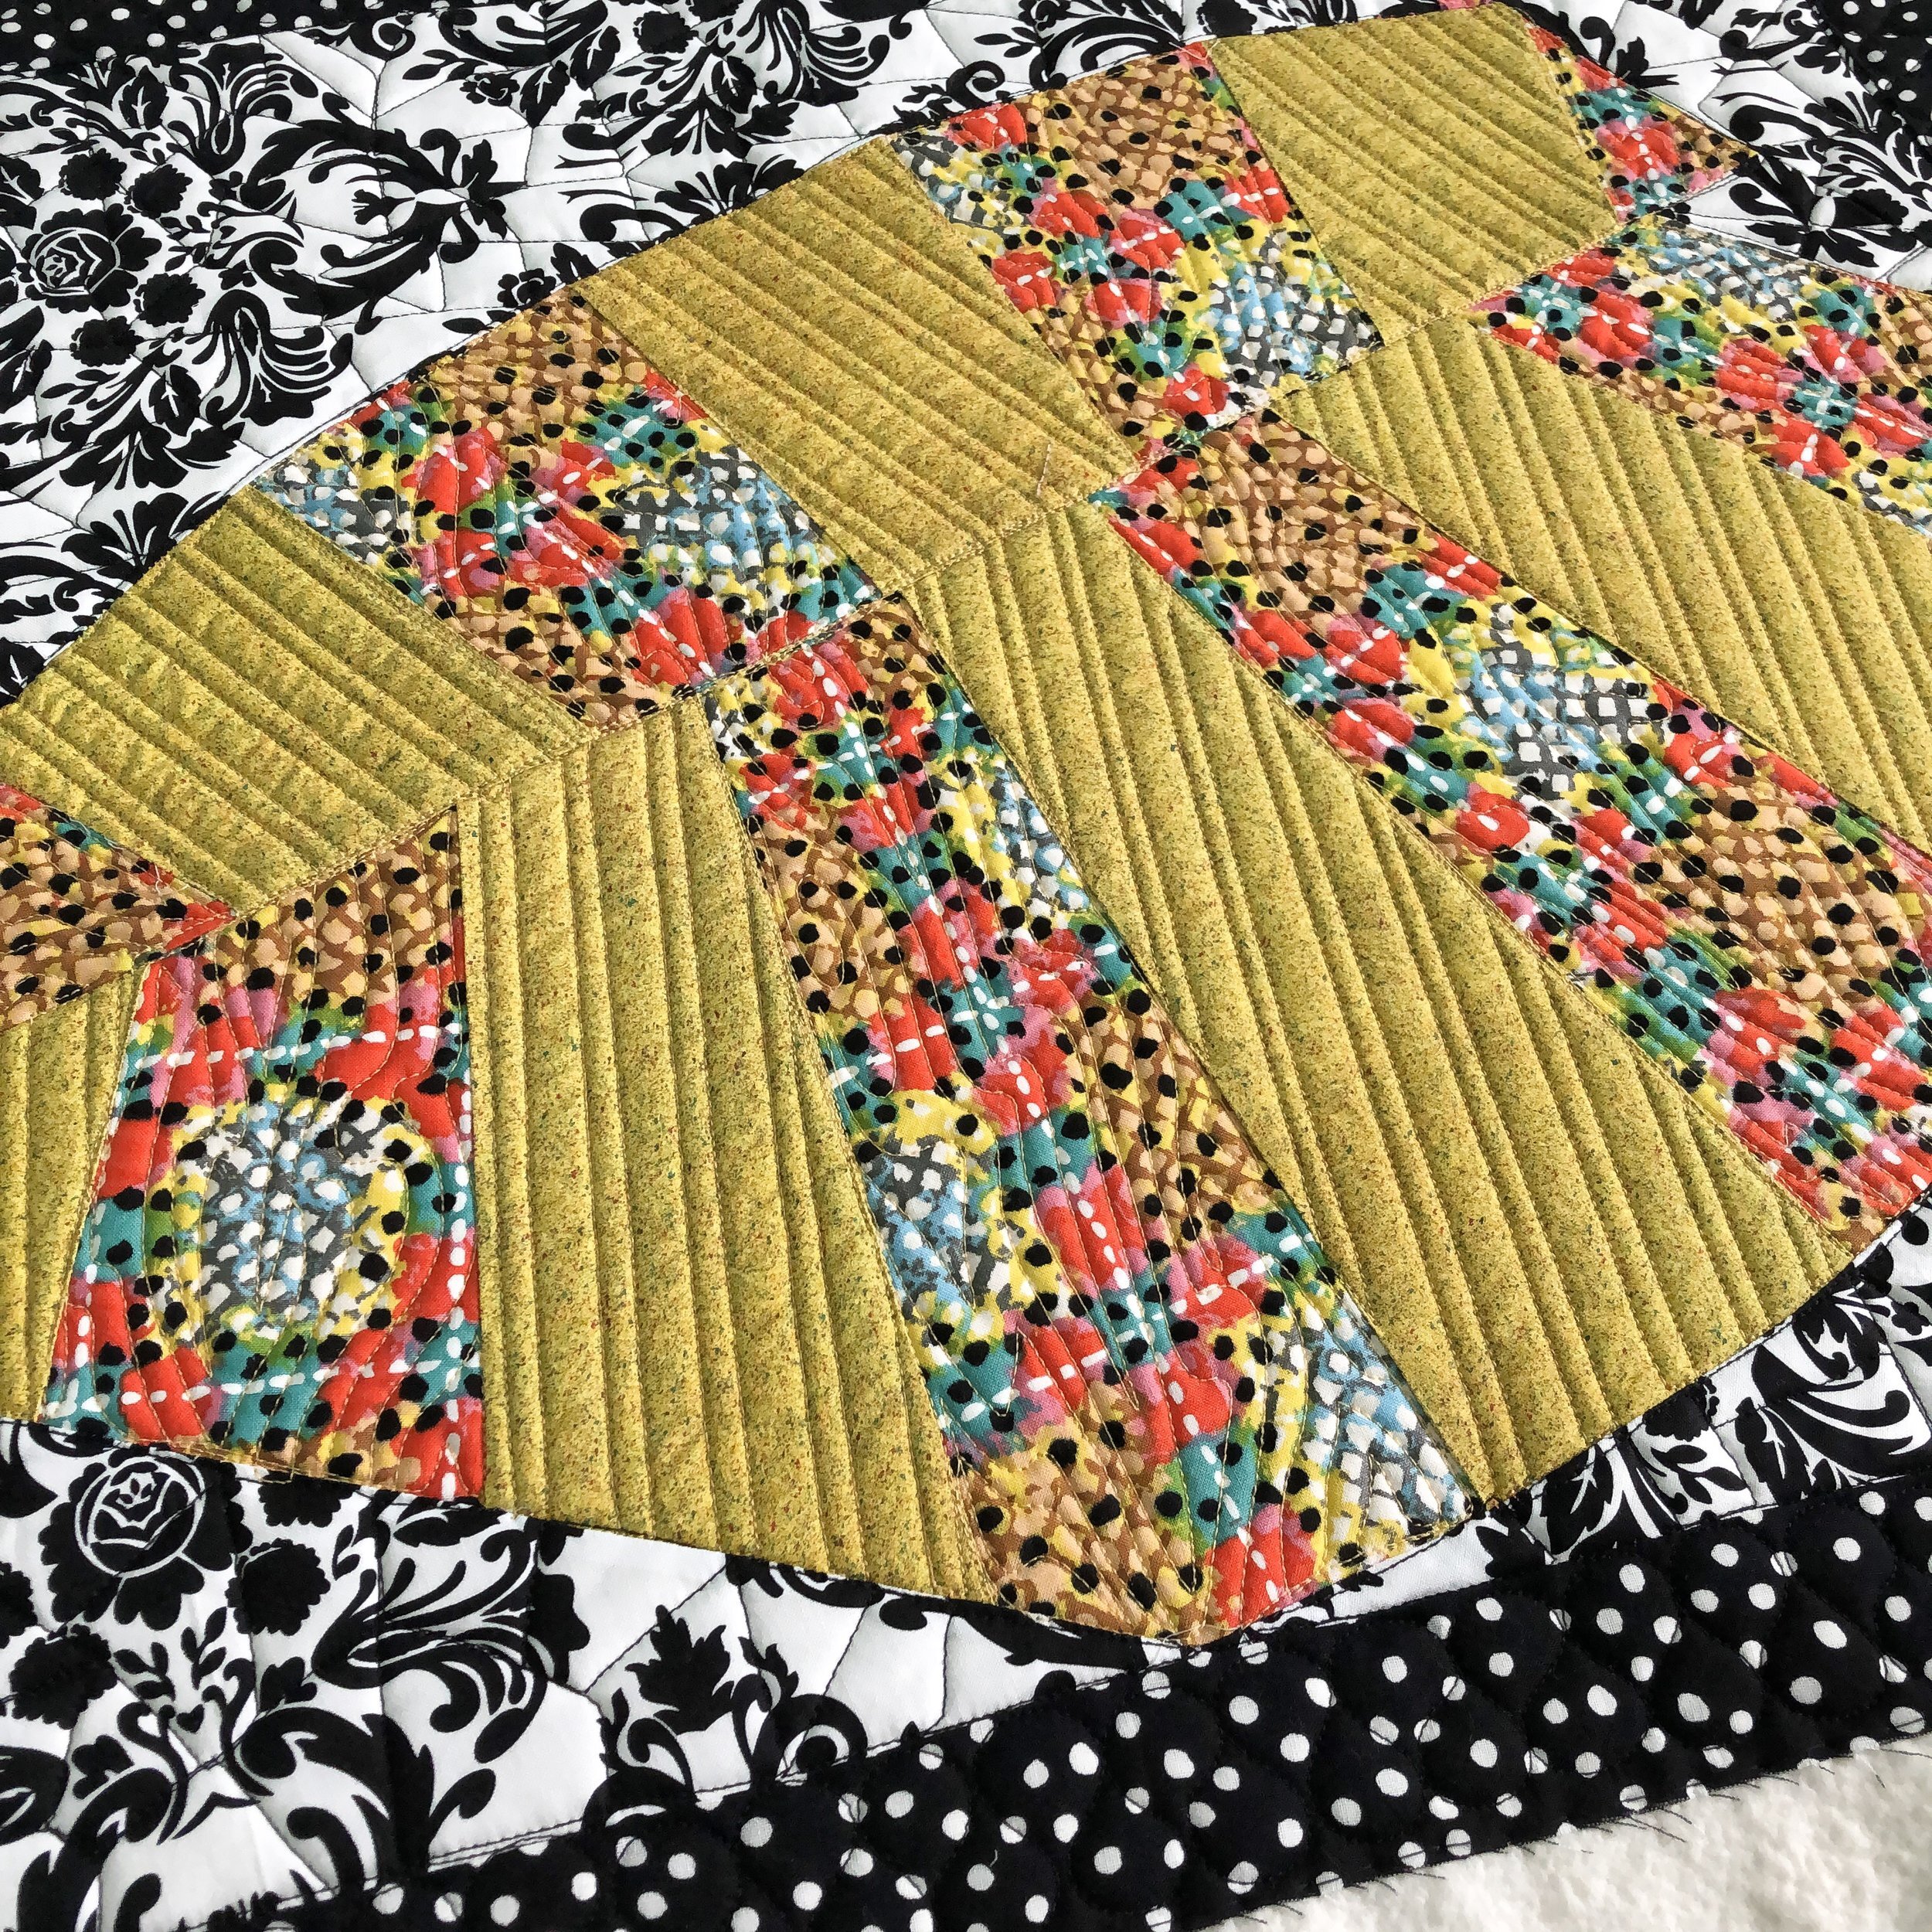
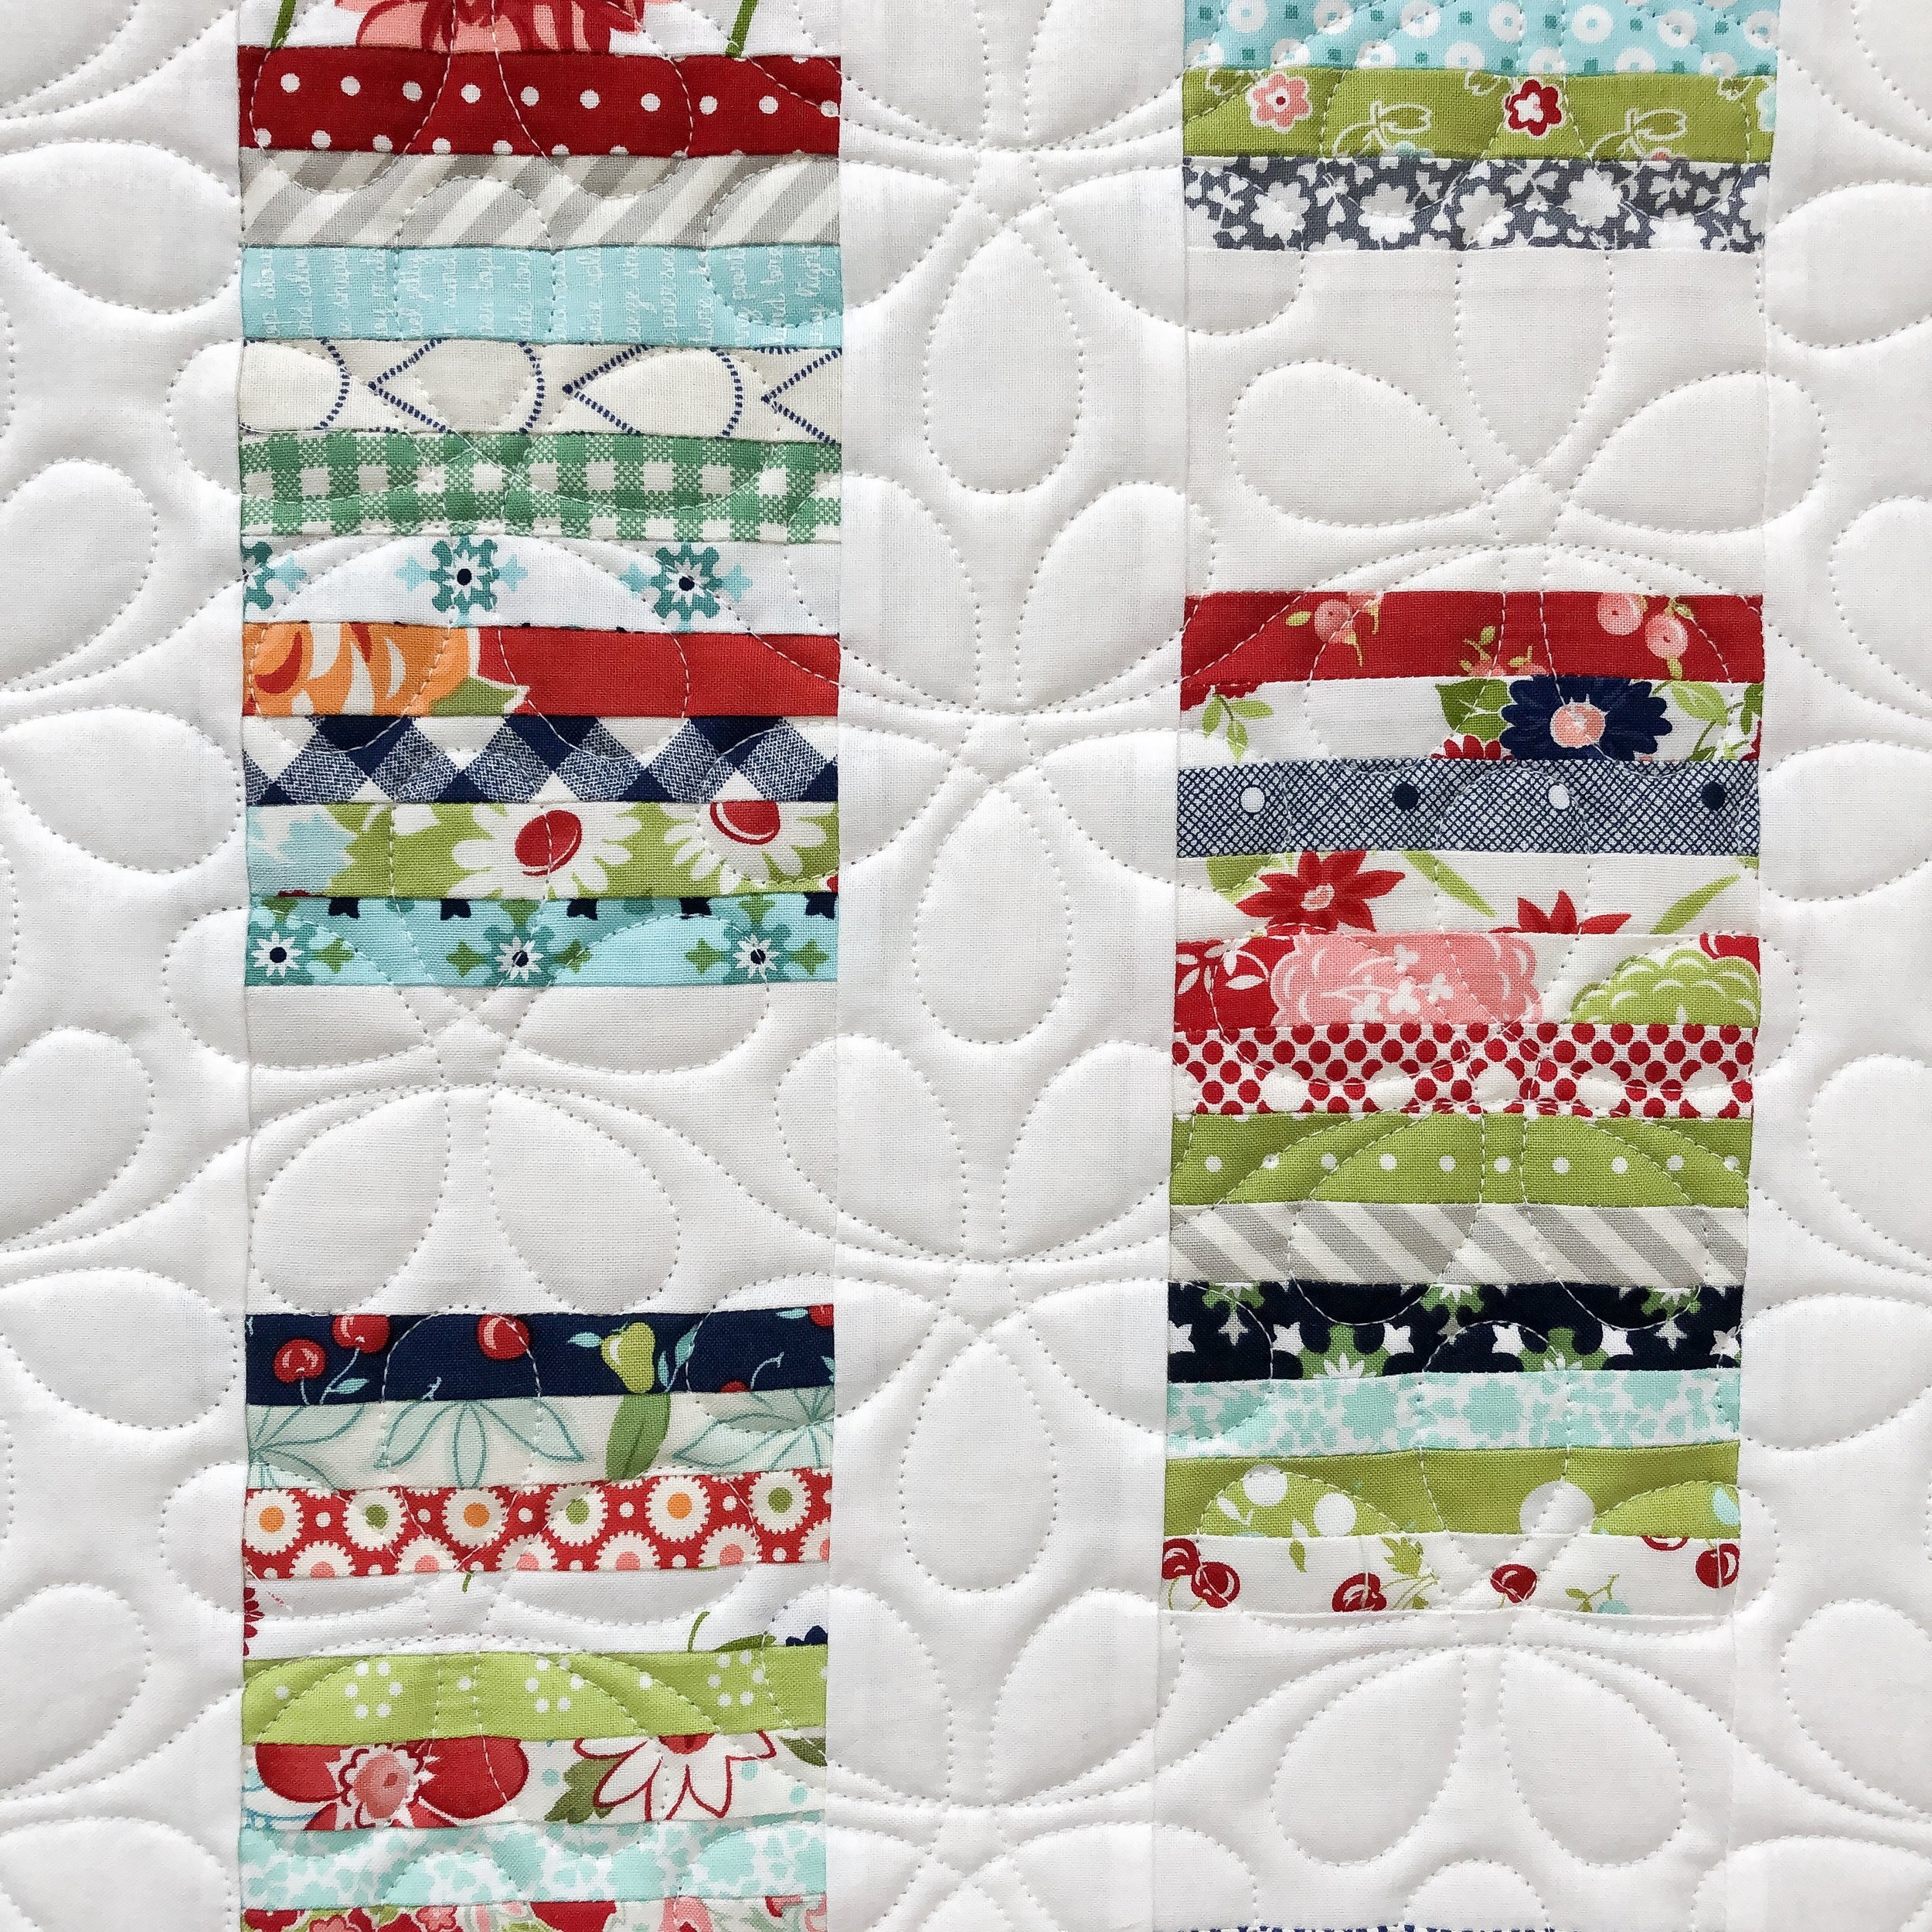
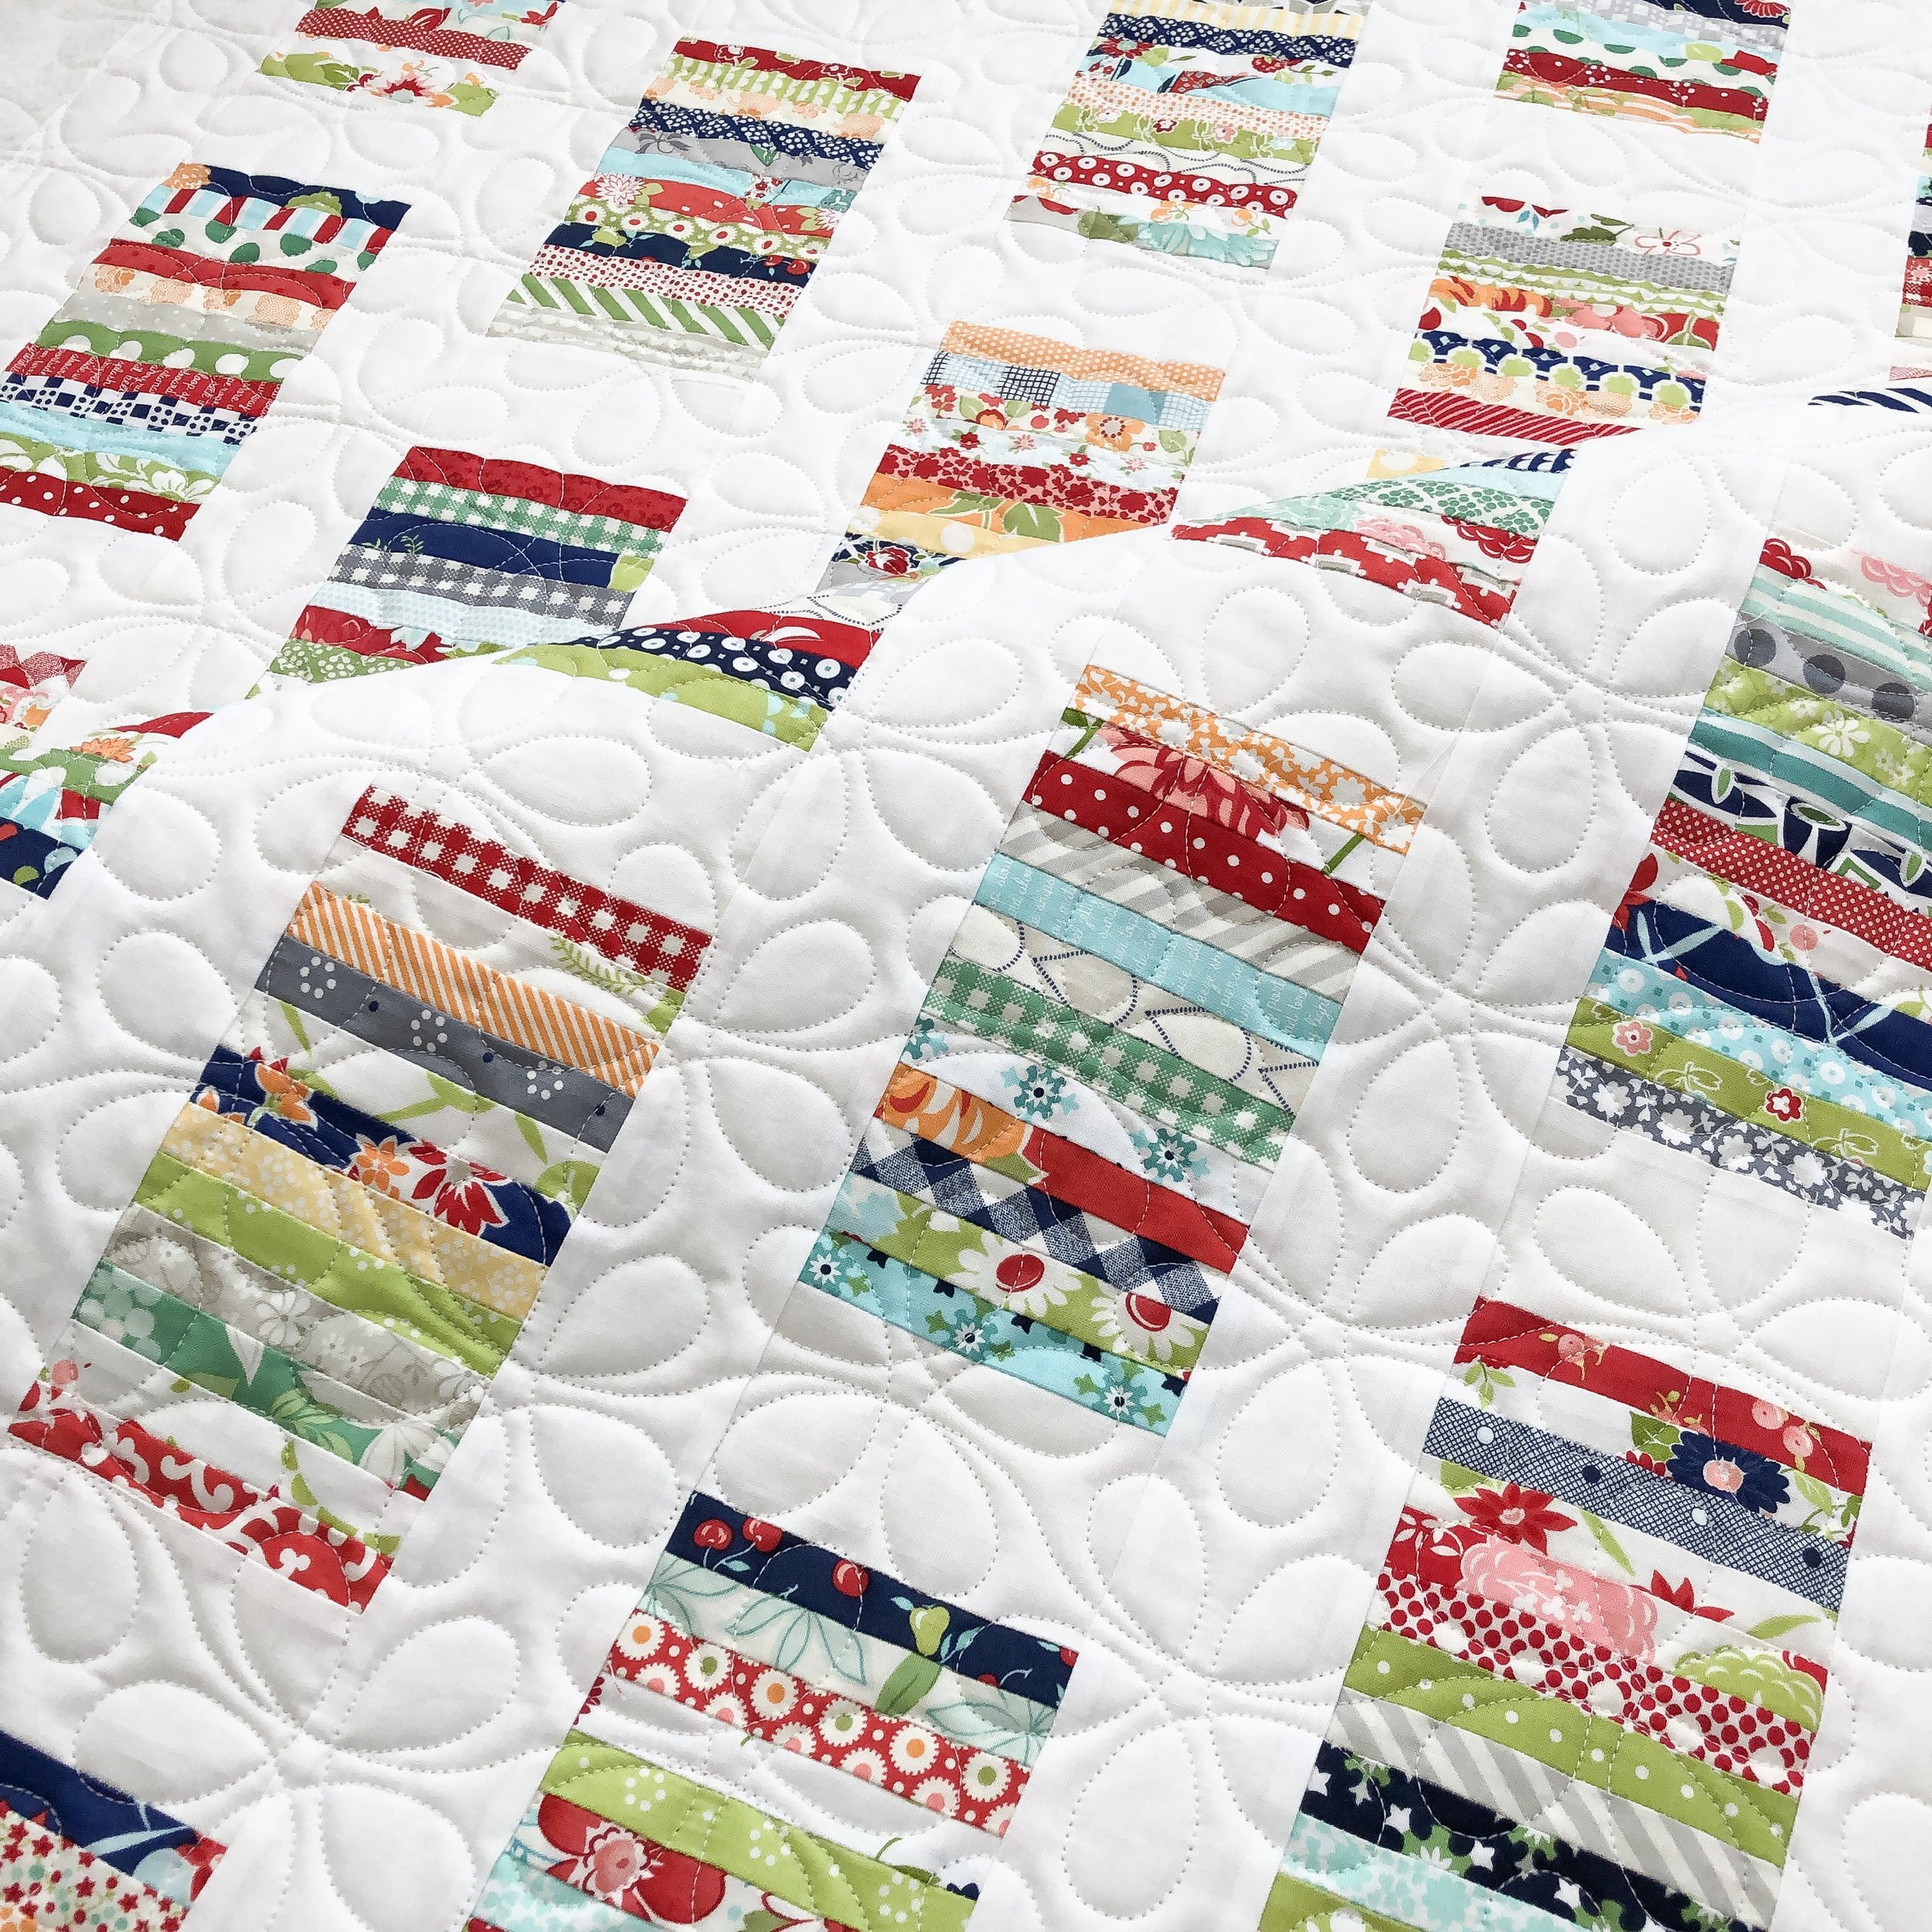
Simple Strip Block Quilt
My mom made this sweet strip quilt for my new niece, Lucy! I had leftover 1” strips, that I cut off of charm squares for the quilt that I’ve been working on for awhile. So she sewed the 1” strips together in sections, and added sashing. All of the fabrics, except for the background, are from several of Bonnie and Camille’s fabric lines.

Isn’t that just so fun...all those bright colors and prints.
My mom chose the Flower Child design by Apricot Moon Designs and it’s available at: https://www.urbanelementz.com/flower-child.html I cant remember the height that I quilted this one, I’m guessing between 4”-5”.
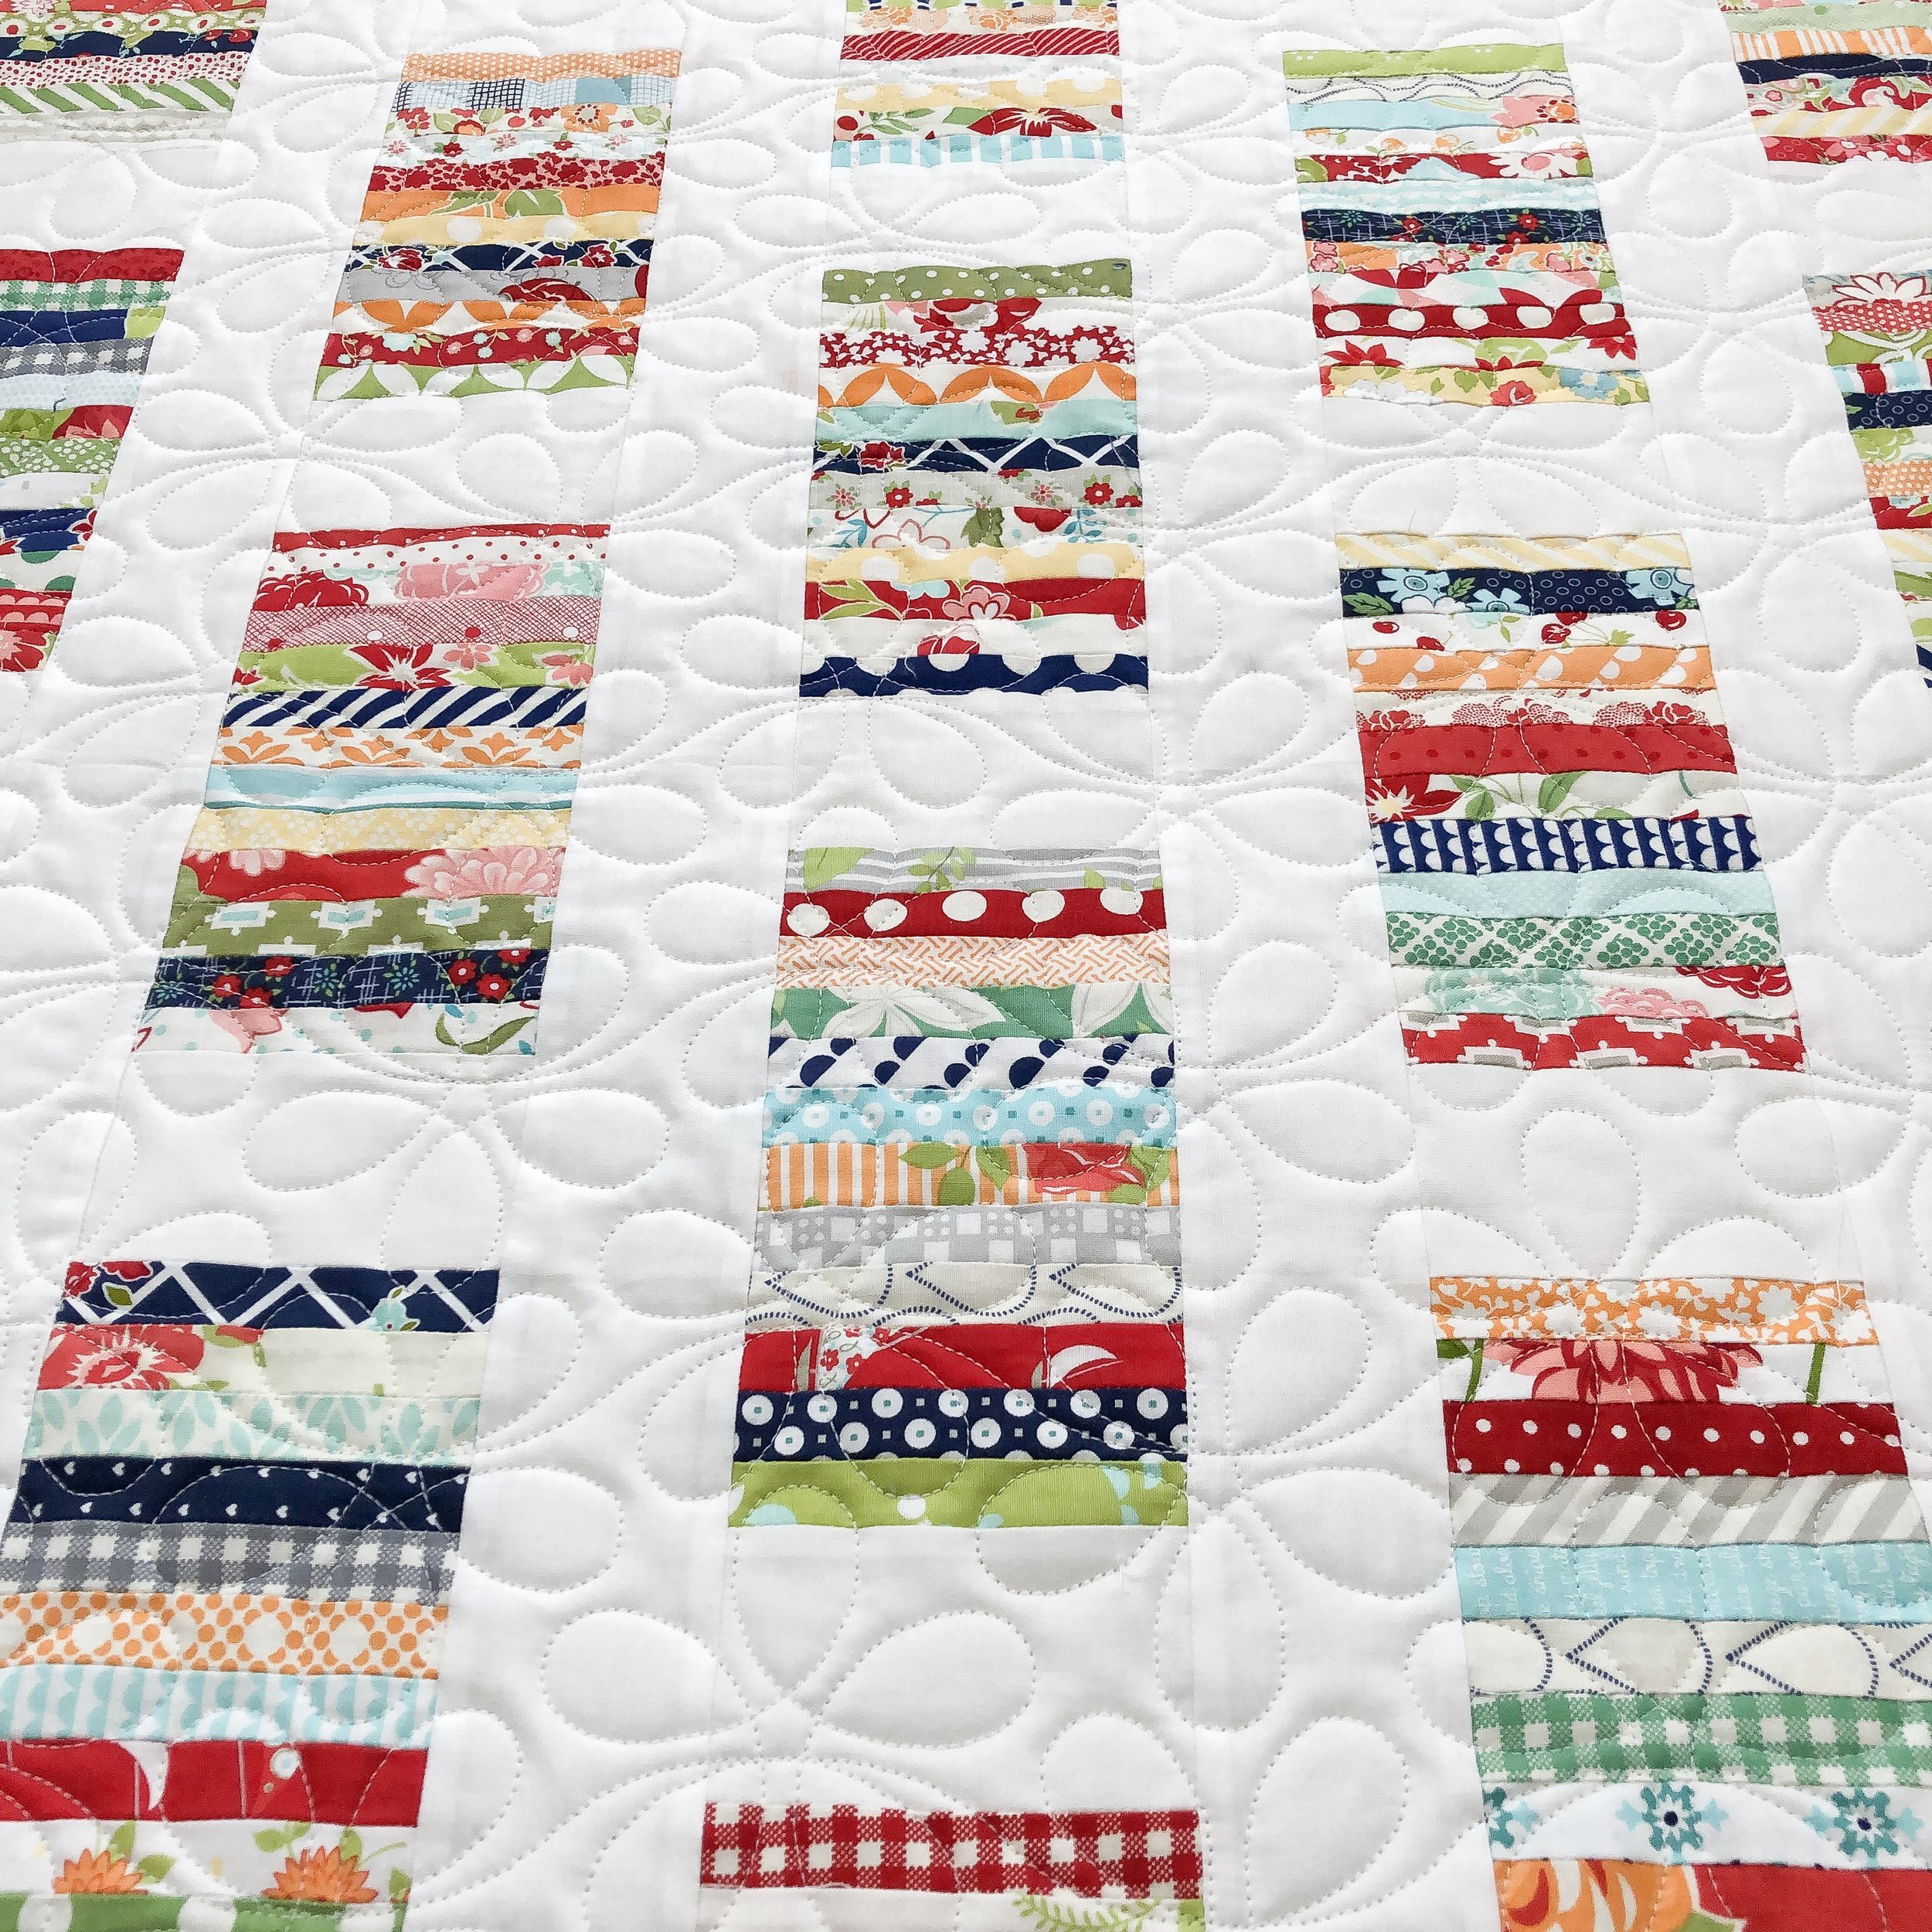
I used white 30 tex A&E Perma Core thread and Winline’s 8020 cotton poly blend batting.
This bright happy quilt has me dreaming of spring. Plus it’s even more wonderful to know this one is for our sweet Lucy!!
Have a great weekend!! What projects have you been working on???
- Leisha

HUGE GIVEAWAY!!!
Yes...I’m giving away a set of my clear Circle2™ machine quilting circle rulers...go to my Instagram post here to see how to enter: https://www.instagram.com/p/Bt4PmNHnSaT/?utm_source=ig_share_sheet&igshid=616rtzbt8xp5

This is a set of 6 high quality rulers, ranging from 2” to 13” circles. For more info on these rulers go to this post: https://www.quiltingit.com/blog/2018/10/10/introducing-my-circle2-longarm-circle-ruler-set?rq=Circle2
My Circle2™ rulers are only available in my shop. They come in high quality green or clear 1/4” acrylic, and are American made.
Go to: https://www.quiltingit.com/shop?category=Rulers
All details, including when the giveaway is over, is in my Instagram post.
Thank you!!! - Leisha

Monica’s Layer Cake Lemonade quilt!!
Monica from @sewnbylovey on Instagram, made this quilt for her sister. The pattern is called Layer Cake Lemonade, free from the Fat Quarter Shop. The fabric is from Art Gallery and is by Katarina Roccella from her Skopelos Sea line.
This is the perfect quilt pattern to show off all of your favorite fabric prints.
I asked Monica to look at my quilting options on my website, and she close a few. I recommend my Lotus design from all her choices. I think it’s a great pairing with the fabrics she chose. Lotus’ are extra special to Monica and her sister, which makes this even more wonderful for this quilt.
Lotus can be found on my website here: https://www.quiltingit.com/shop/lotus
I recommend quilting this design around a height of 1.5”, which will put the width around 3.75”...depending on the boundary you set, that width and height could differ. It seems small for the height, but the width when it comes to a clamshell type design is more important.

Love how sweet this design looks on this quilt!! And that plus fabric ((above)) is my favorite.

Monica sent one of her favorite batting’s...I think it was an 8020 and I used 30 tex Antique Cream A&E Perma Core thread.

These beautiful flowery fabrics make me soooo excited for spring. Right now I’m listening to the snow melting off the roof...such a wonderful sound!!
- have a great weekend! Leisha

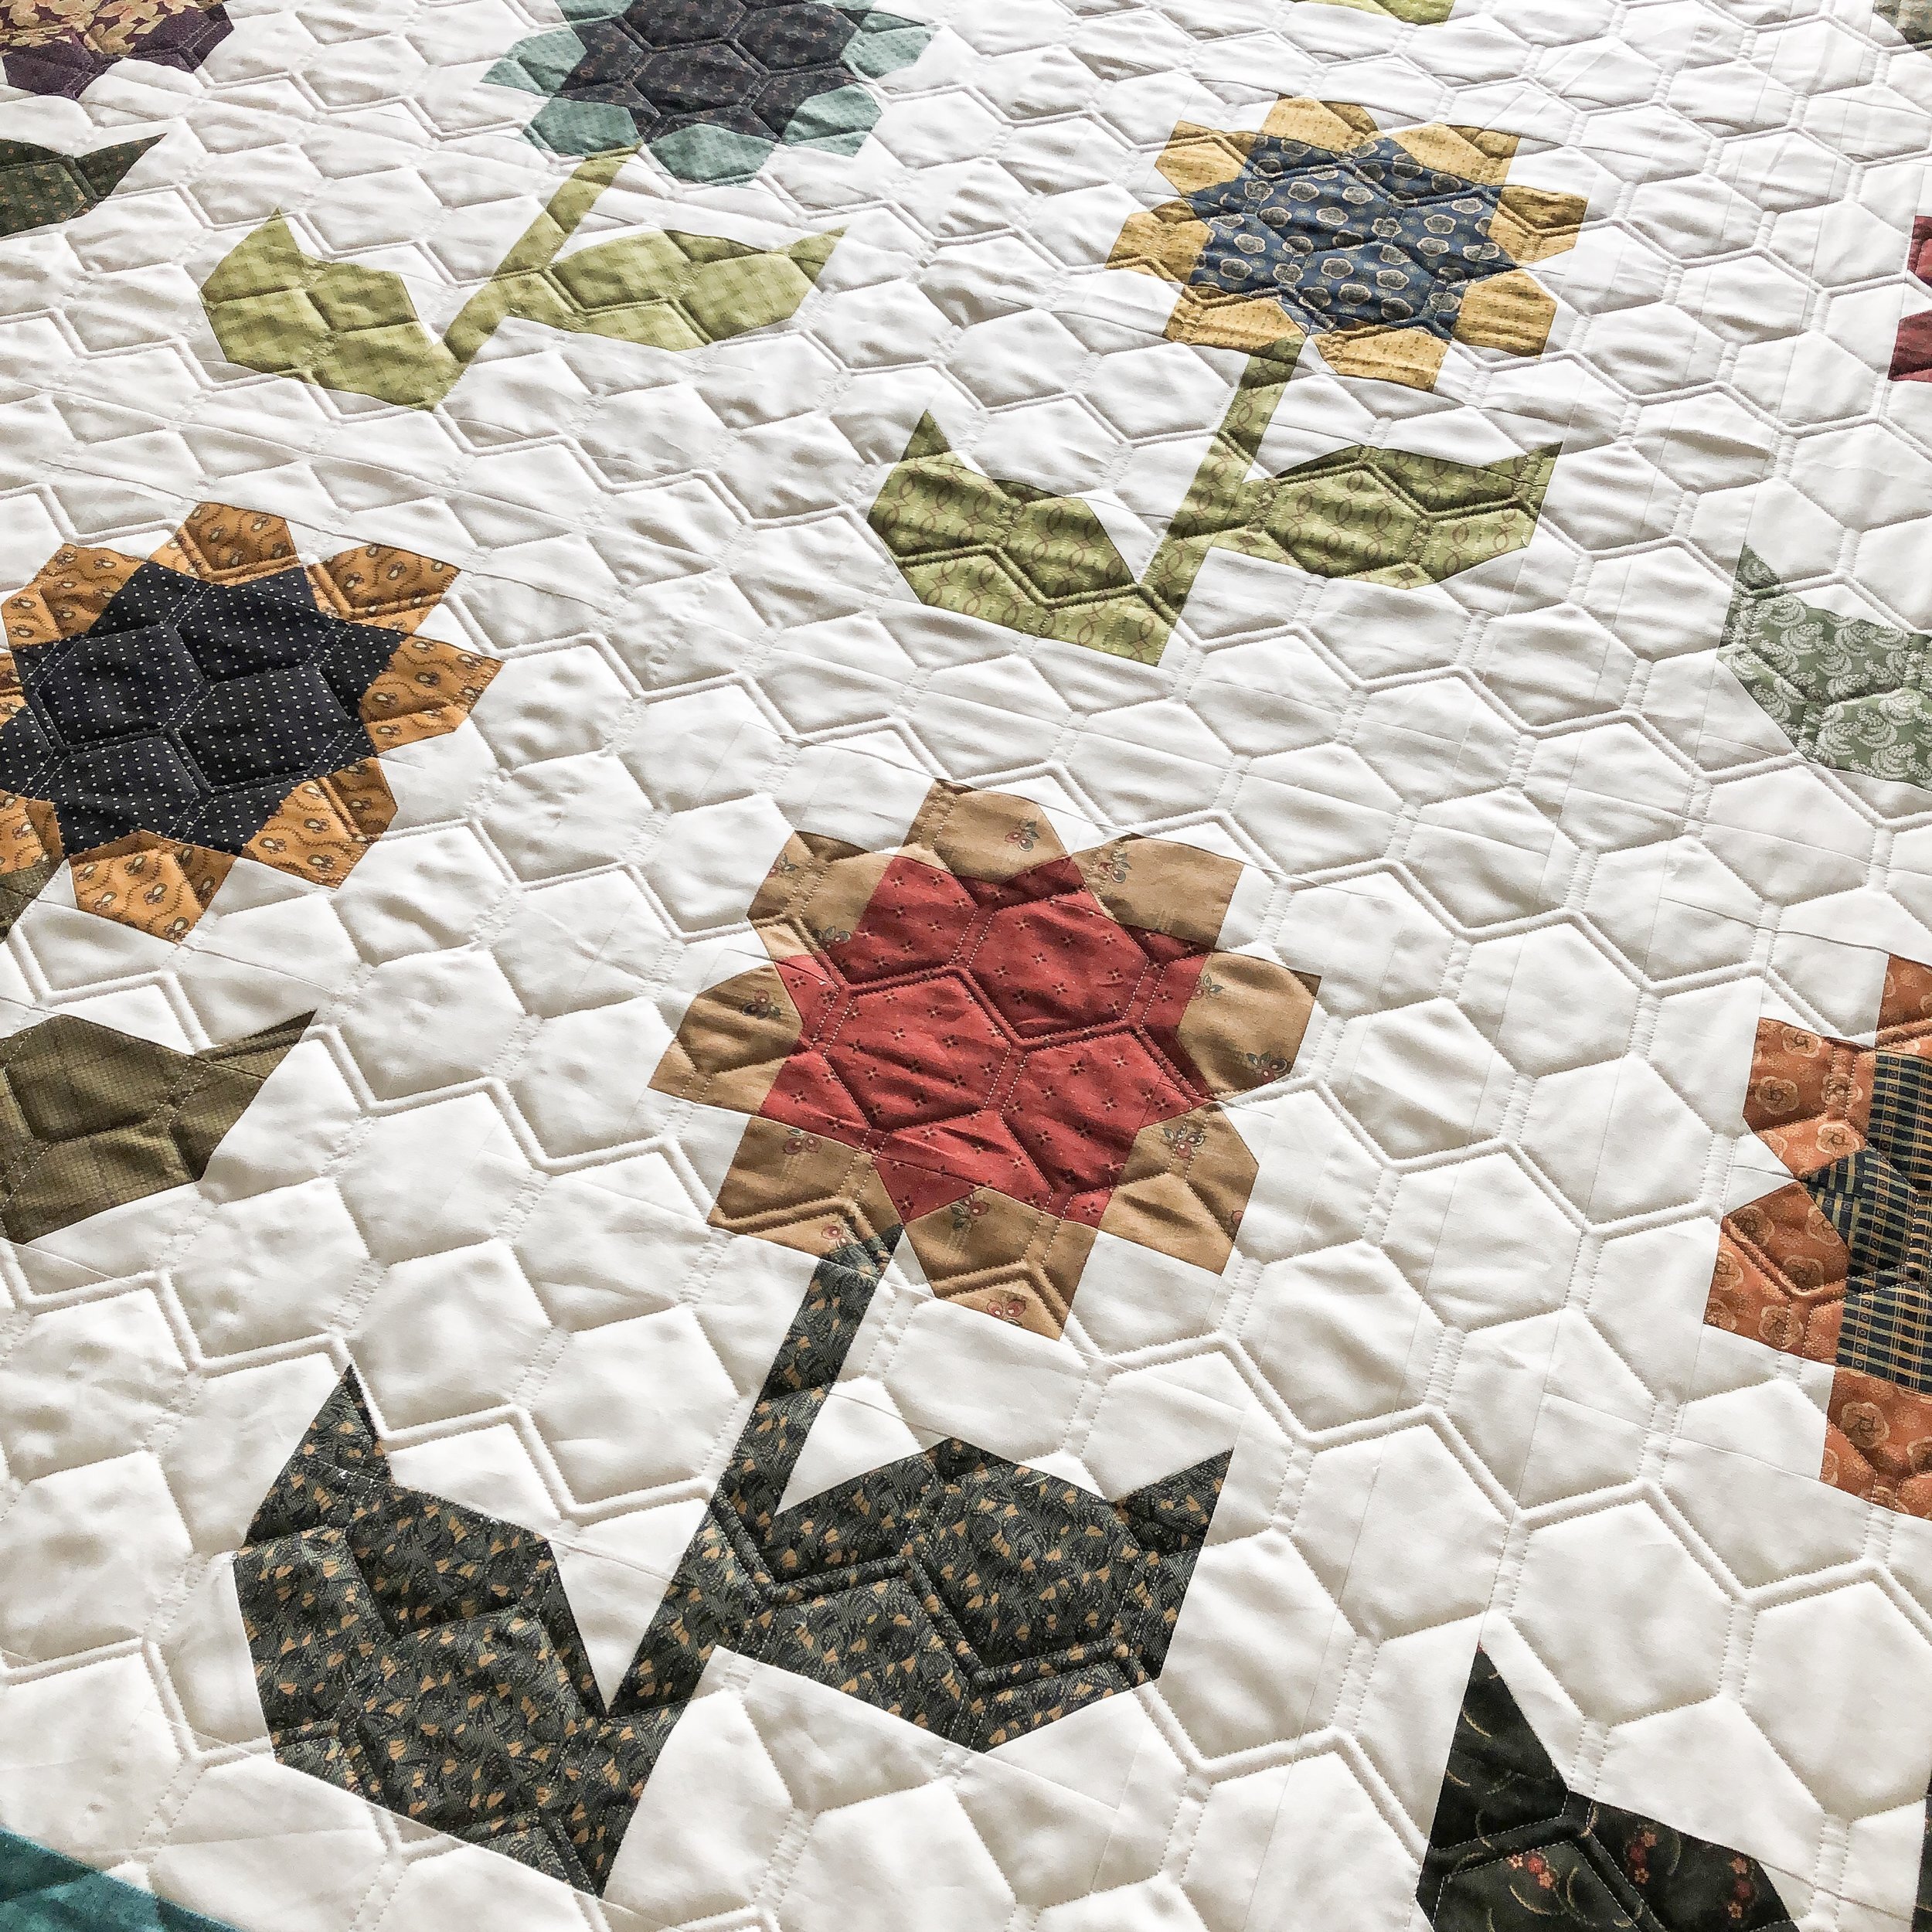
Sherry’s Cottage Blossom Quilt!!
This beautiful quilt is Cottage Blossoms by Vanessa from Lella Boutique. These beautiful fabrics were put together in a kit by My Girlfriend’s Quilt Shoppe in Logan Utah. For details or more info on that, google them and give them a call.

Sherry made this for her future daughter in-law. She said it came together pretty fast.

I decided to use a digital machine quilting pantograph, that I bought recently from Urban Elementz. It’s called Hexies by Patricia Ritter and is available here: https://www.urbanelementz.com/hexies.html

I love the texture this design created. I decided to do it pretty big, so it fits with the scale of the flower blocks. I quilted it at a 5.75” height, for the design. Something a lot smaller, would have been too small.
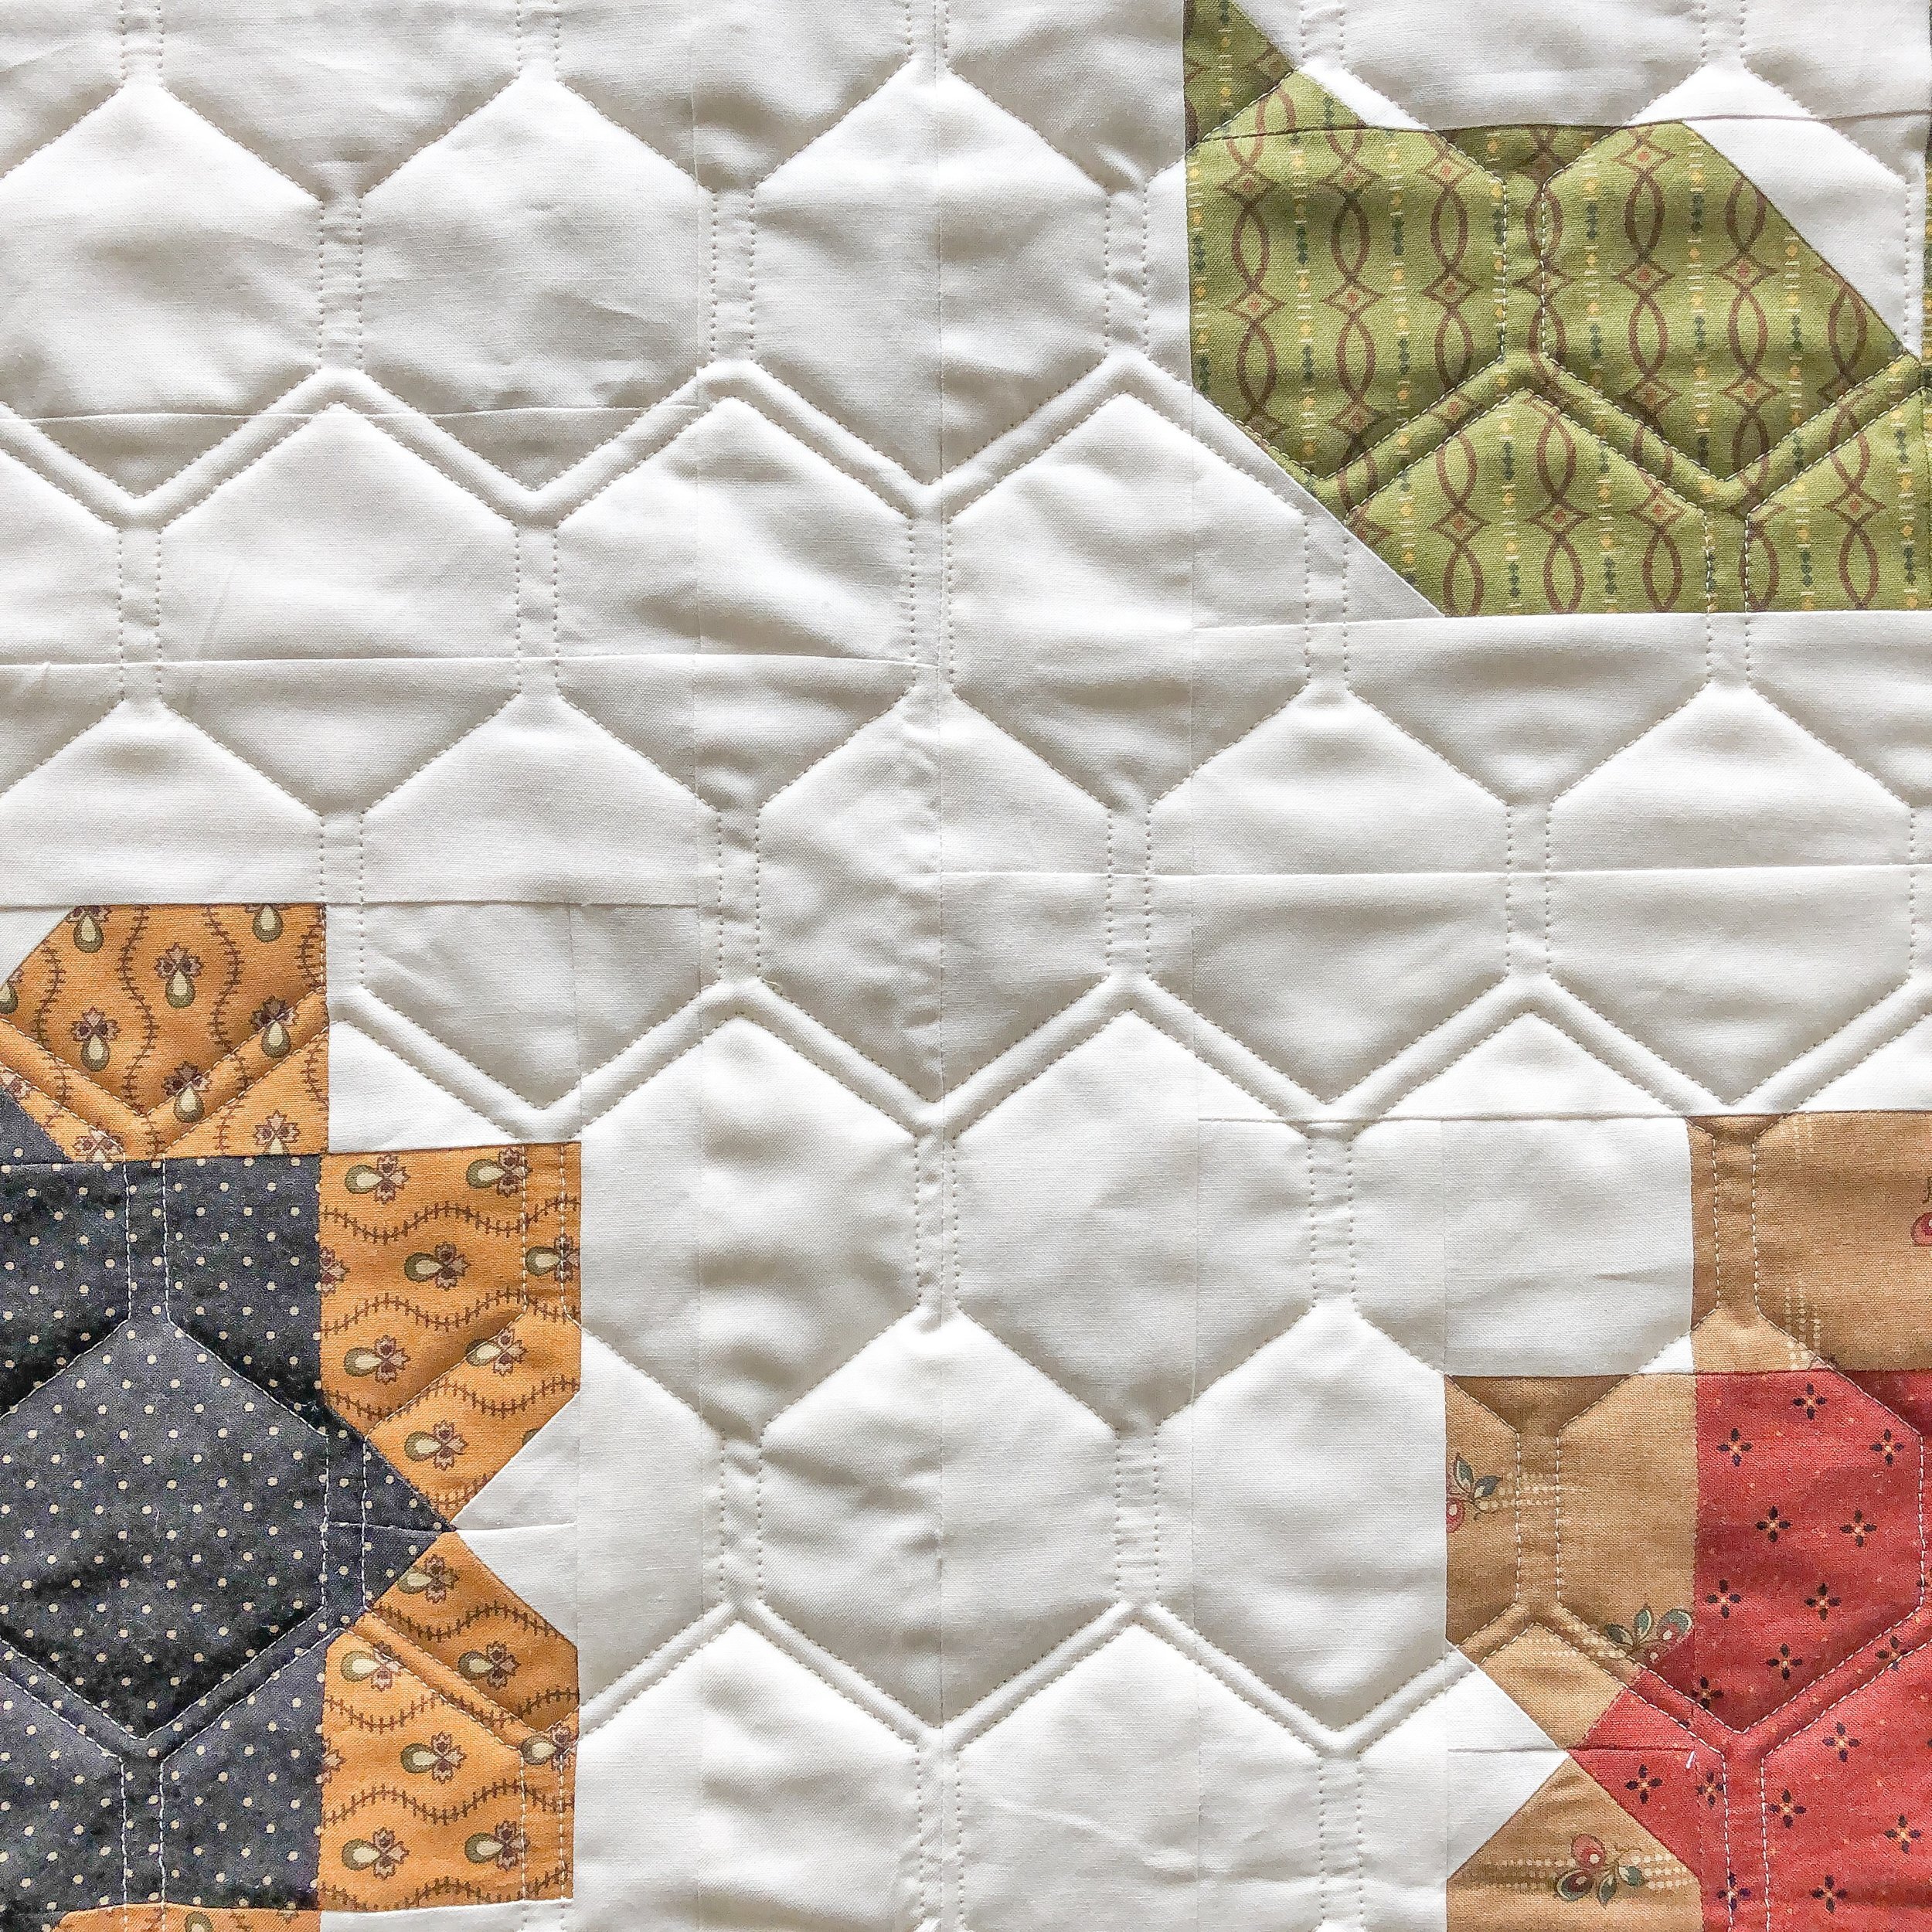
I used a 30 tex Antique Cream A&E Perma Core thread, and my favorite Winline 8020 cotton poly batting.
Ya know, some designs were just made perfect for certain quilts, this is one of those!!
Hope you’re have a great Monday!!! Happy quilting!
- Leisha

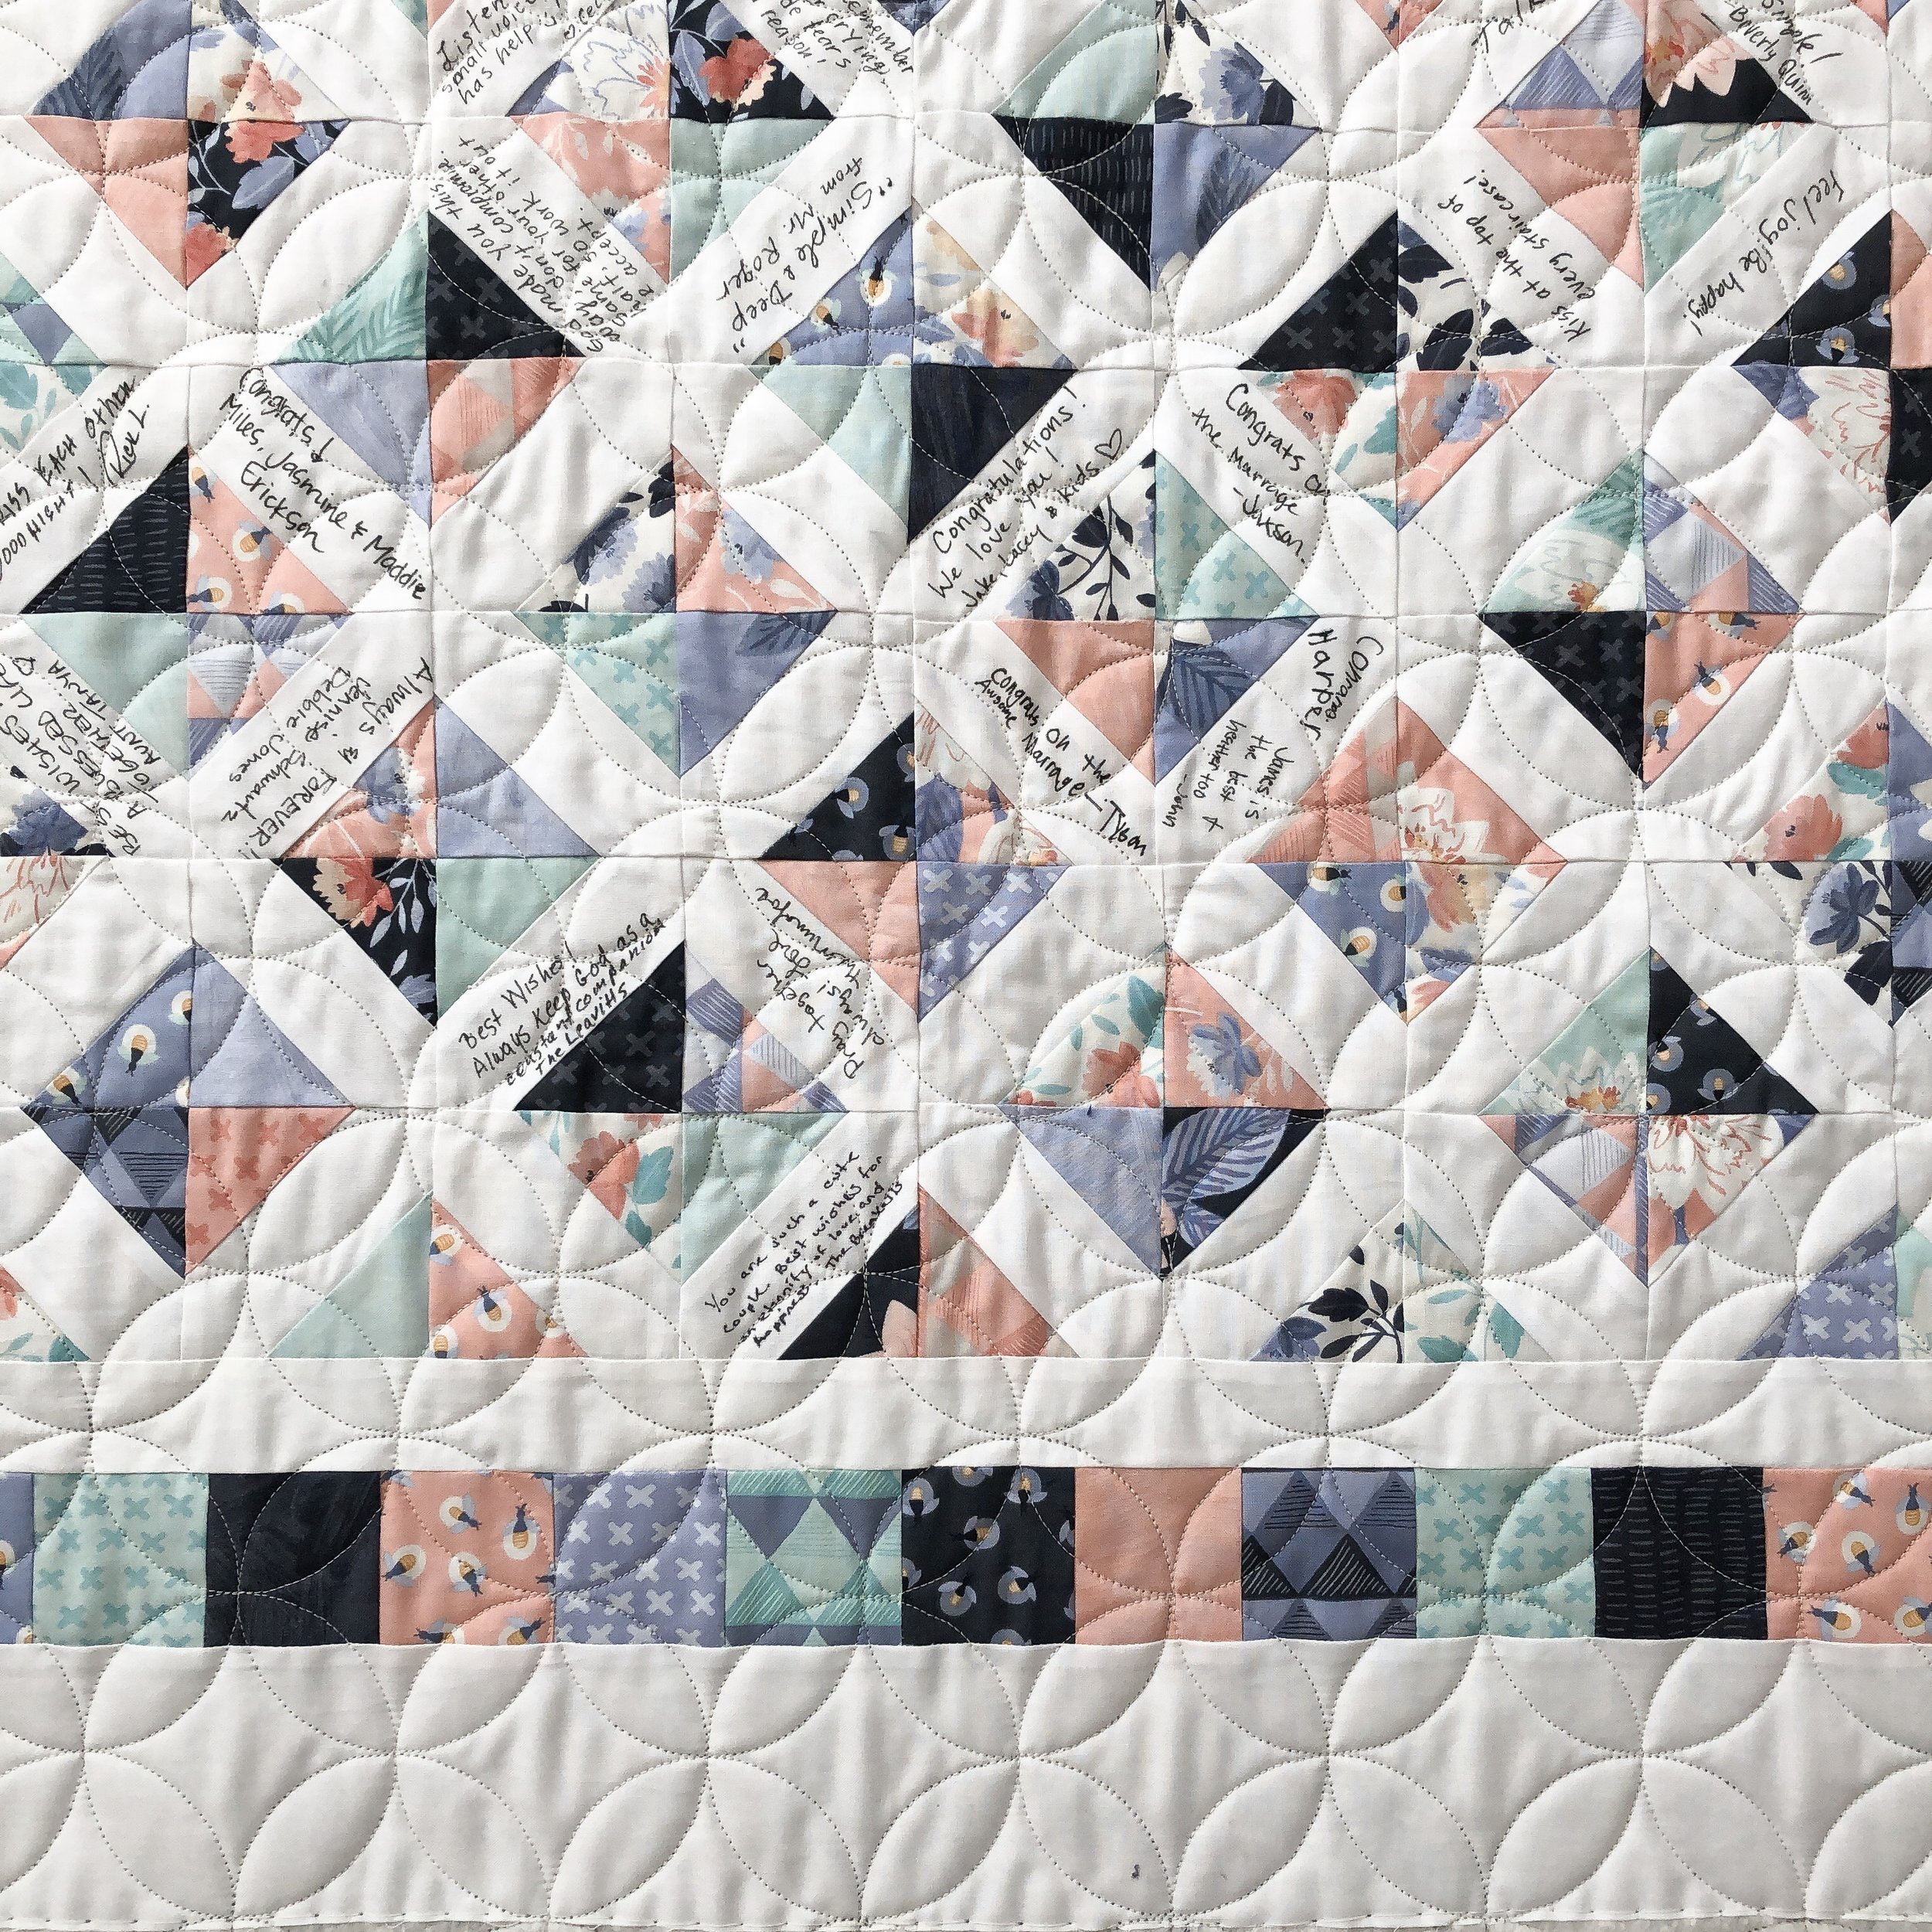
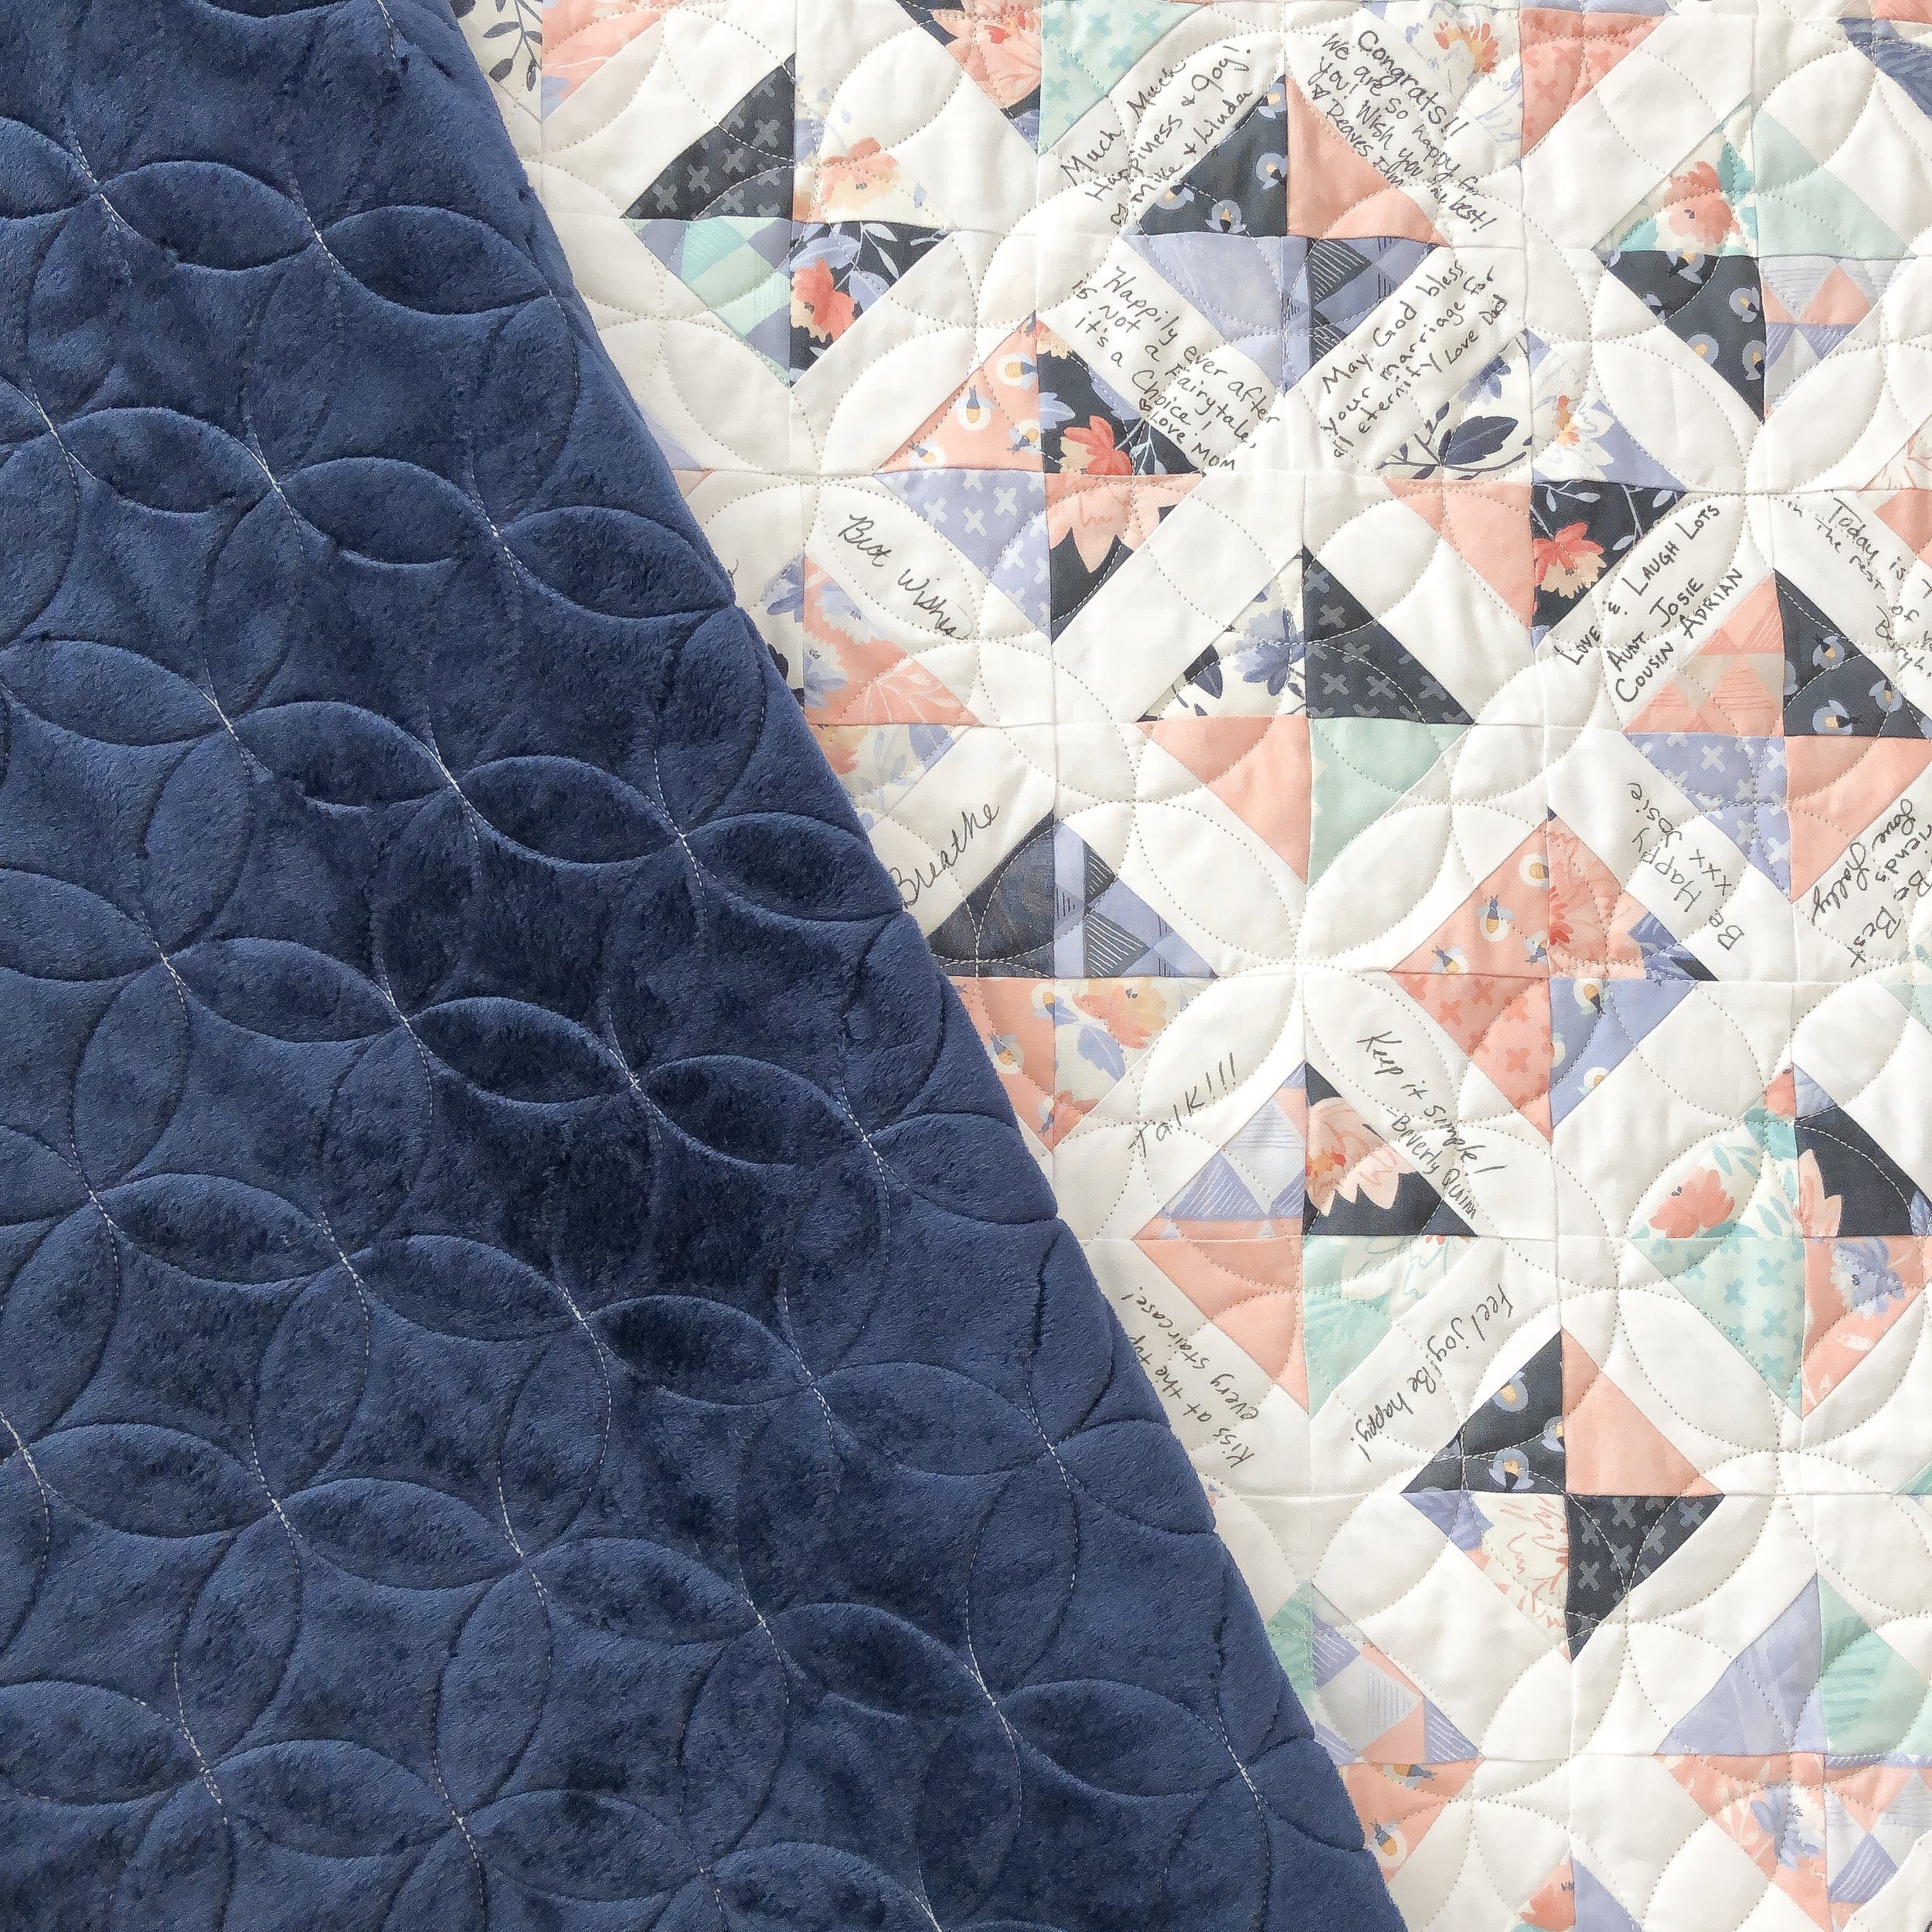
Chris’ Wedding Signature Quilt
Chris made this beautiful quilt for her daughter and son in-law, who got married last fall.
She used a block from a sampler quilt, that she’s done in the past. This is one of the most beautiful signature quilts that I’ve seen!!
These soft pretty colors, were her daughters wedding colors.
I used my favorite Winline 8020 cotton poly blend batting and Dyed Natural 30 tex A&E Perma Core thread. A hint of cream, was the prefect thread color, to blend so nicely.
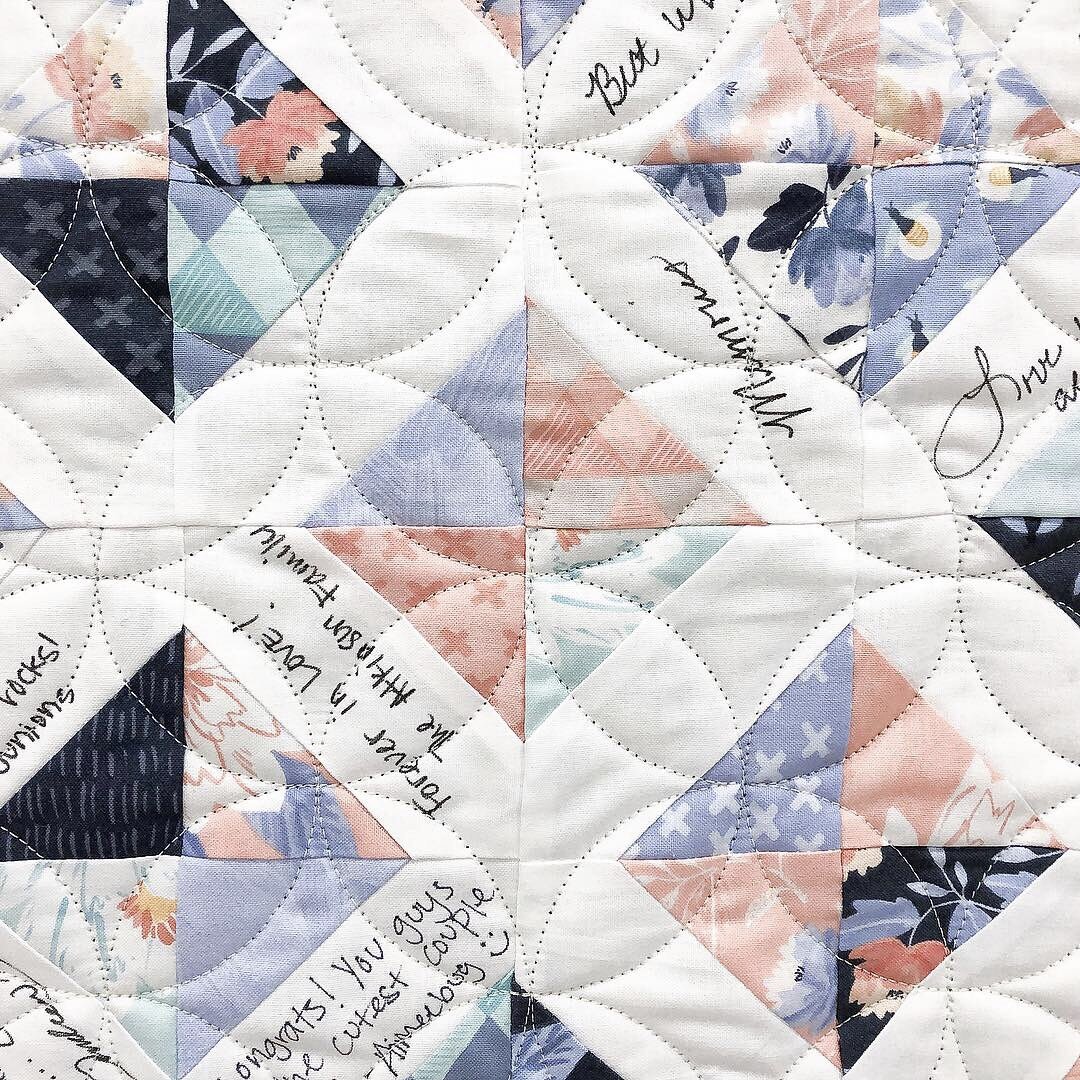
Chris picked Marci Gore’s Orange Peel design for the quilting. It’s a great design, quilting out an entire row all at once. Lines up pretty great. Sometimes there are spots here or there, that don’t...so I have a couple quick tips, in the video below, on how to deal with designs that don’t line up the best when computerized quilting. While you’re there please subscribe to my YouTube channel here: https://www.youtube.com/user/QuiltingIt
Sometimes it’s the little tips that make everything look this beautiful...I love this design.
Yes. That is navy minky/cuddle on the backing from Shannon Fabrics. It comes in 90” wide...you have no idea how grateful I am as a quilter, that they offer this length. I certainly quilt a lot less pieces minky, which makes me sooo happy!
thanks for stopping by!!! Have a great weekend.
- Leisha

New machine quilting designs...
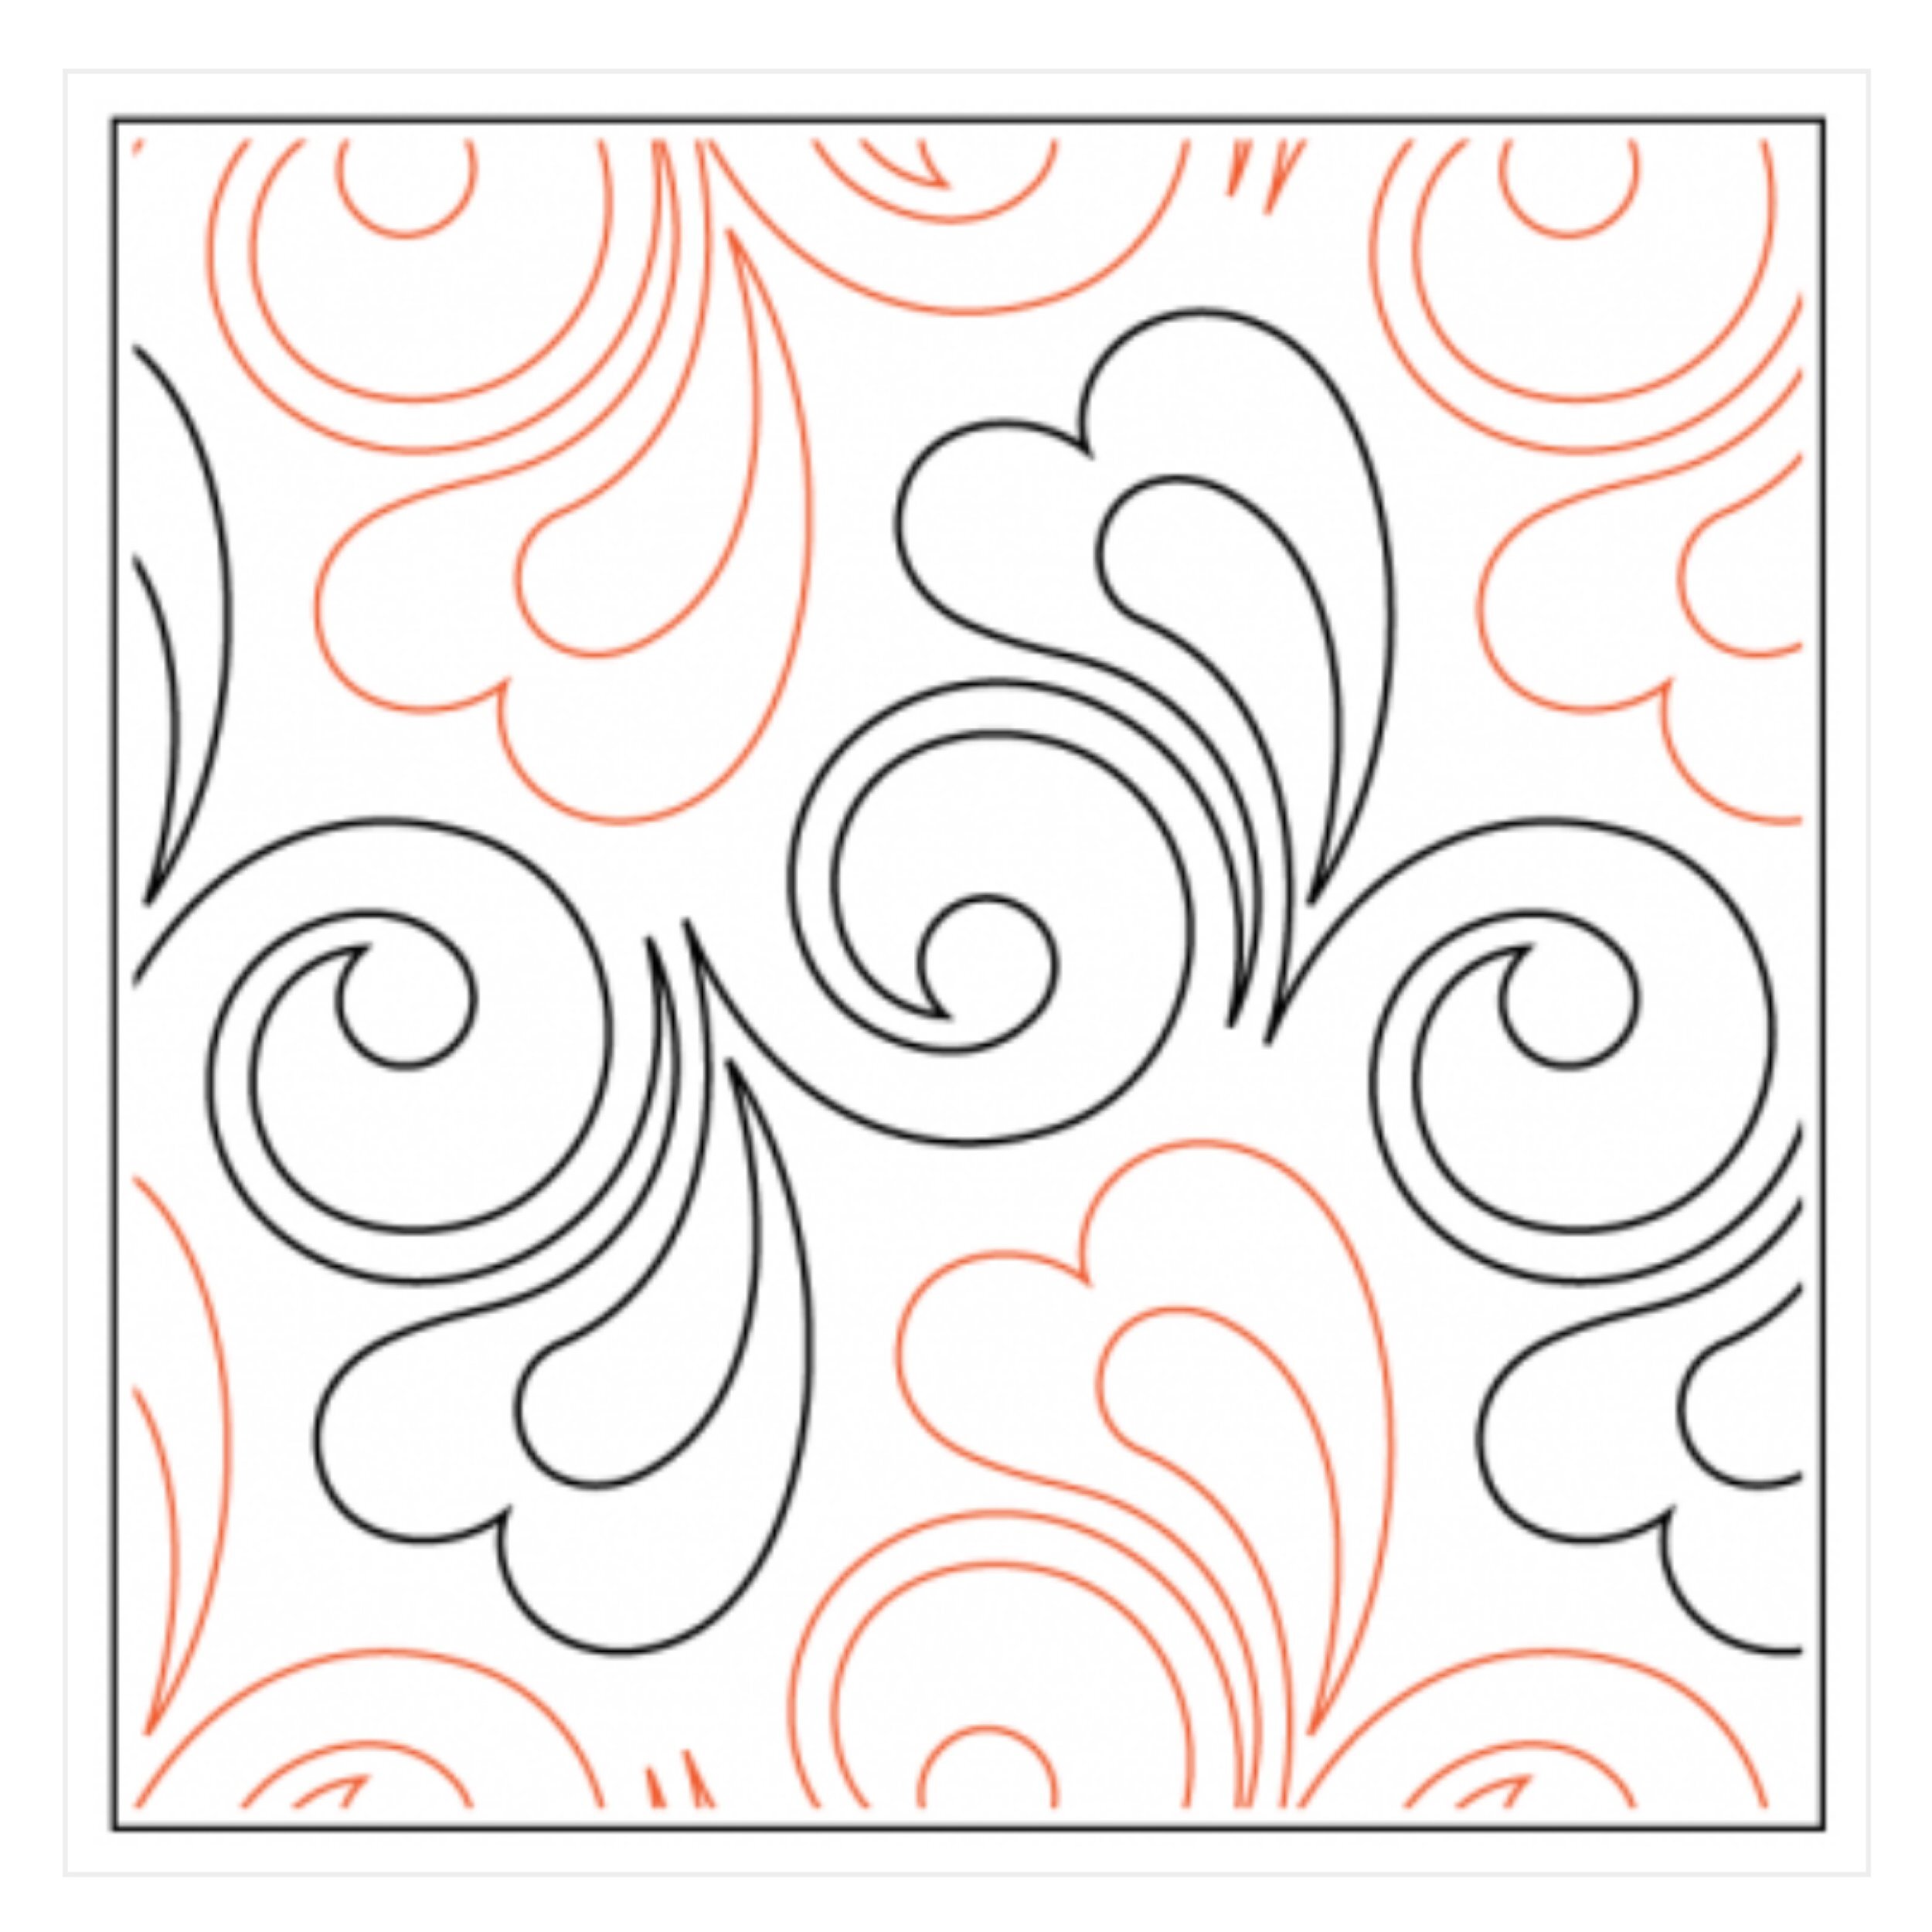
Recently Patricia Ritter and I released these two designs, Breeze©️ and Orchard©️. I shared them on Instagram and Facebook, but I haven’t shared them here. Both are available in paper and digital formats.
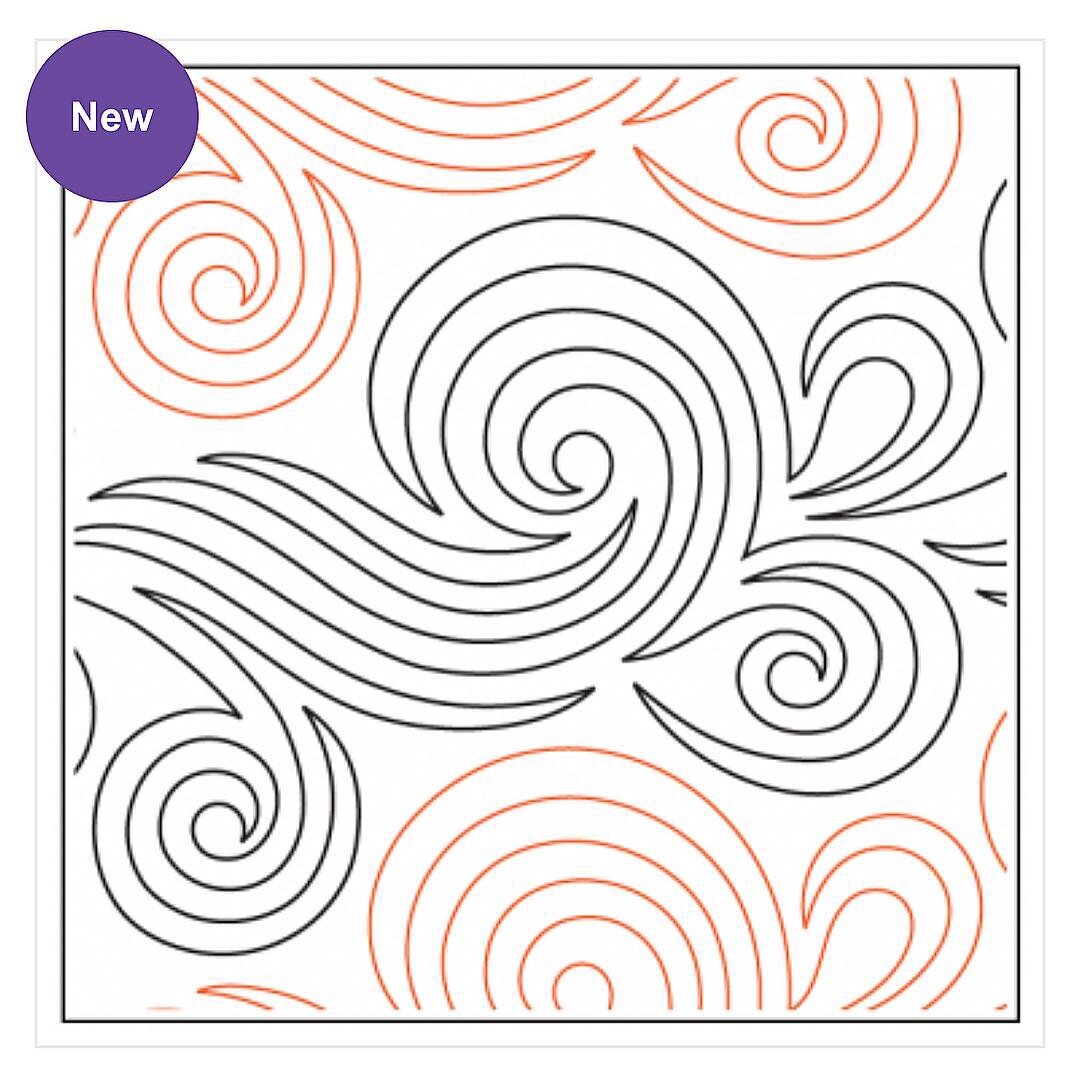
This is Breeze and it’s available at https://www.urbanelementz.com/breeze.html
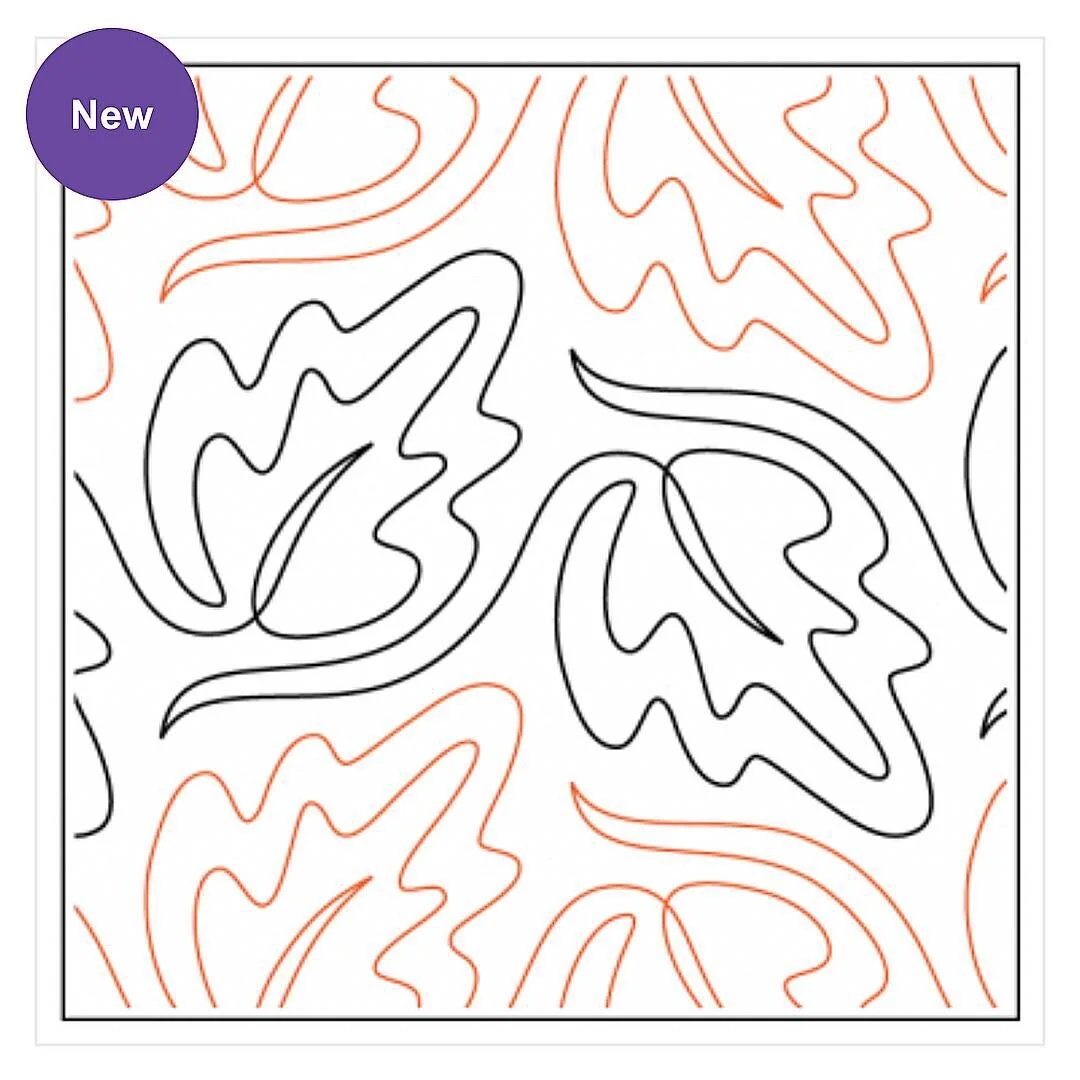
This fun leaf design...looks as though the leaves are blowing in the breeze. Haha!! This is called Orchard, and is available at https://www.urbanelementz.com/orchard.html
To check out all my designs that are available at Urban Elementz go to: https://www.urbanelementz.com/catalogsearch/result/?cat=0&q=Leisha+Farnsworth
We have a wide variety of designs, from flowers...to feathers...to stockings...to geometric...a snowflake...and so much more. This time of year a favorite is Cupid©️ - https://www.urbanelementz.com/cupid.html
And, of course...an all time favorite...Marmalade©️ - https://www.urbanelementz.com/marmalade.html

If you’re familiar with my designs...which one is your favorite?!?!?!! Comment below.
thanks for following along. I’m quilting, and getting behind in blogging. Excited to share with you some of the fun quilting I’ve been doing.
Until then...happy quilting!
- Leisha
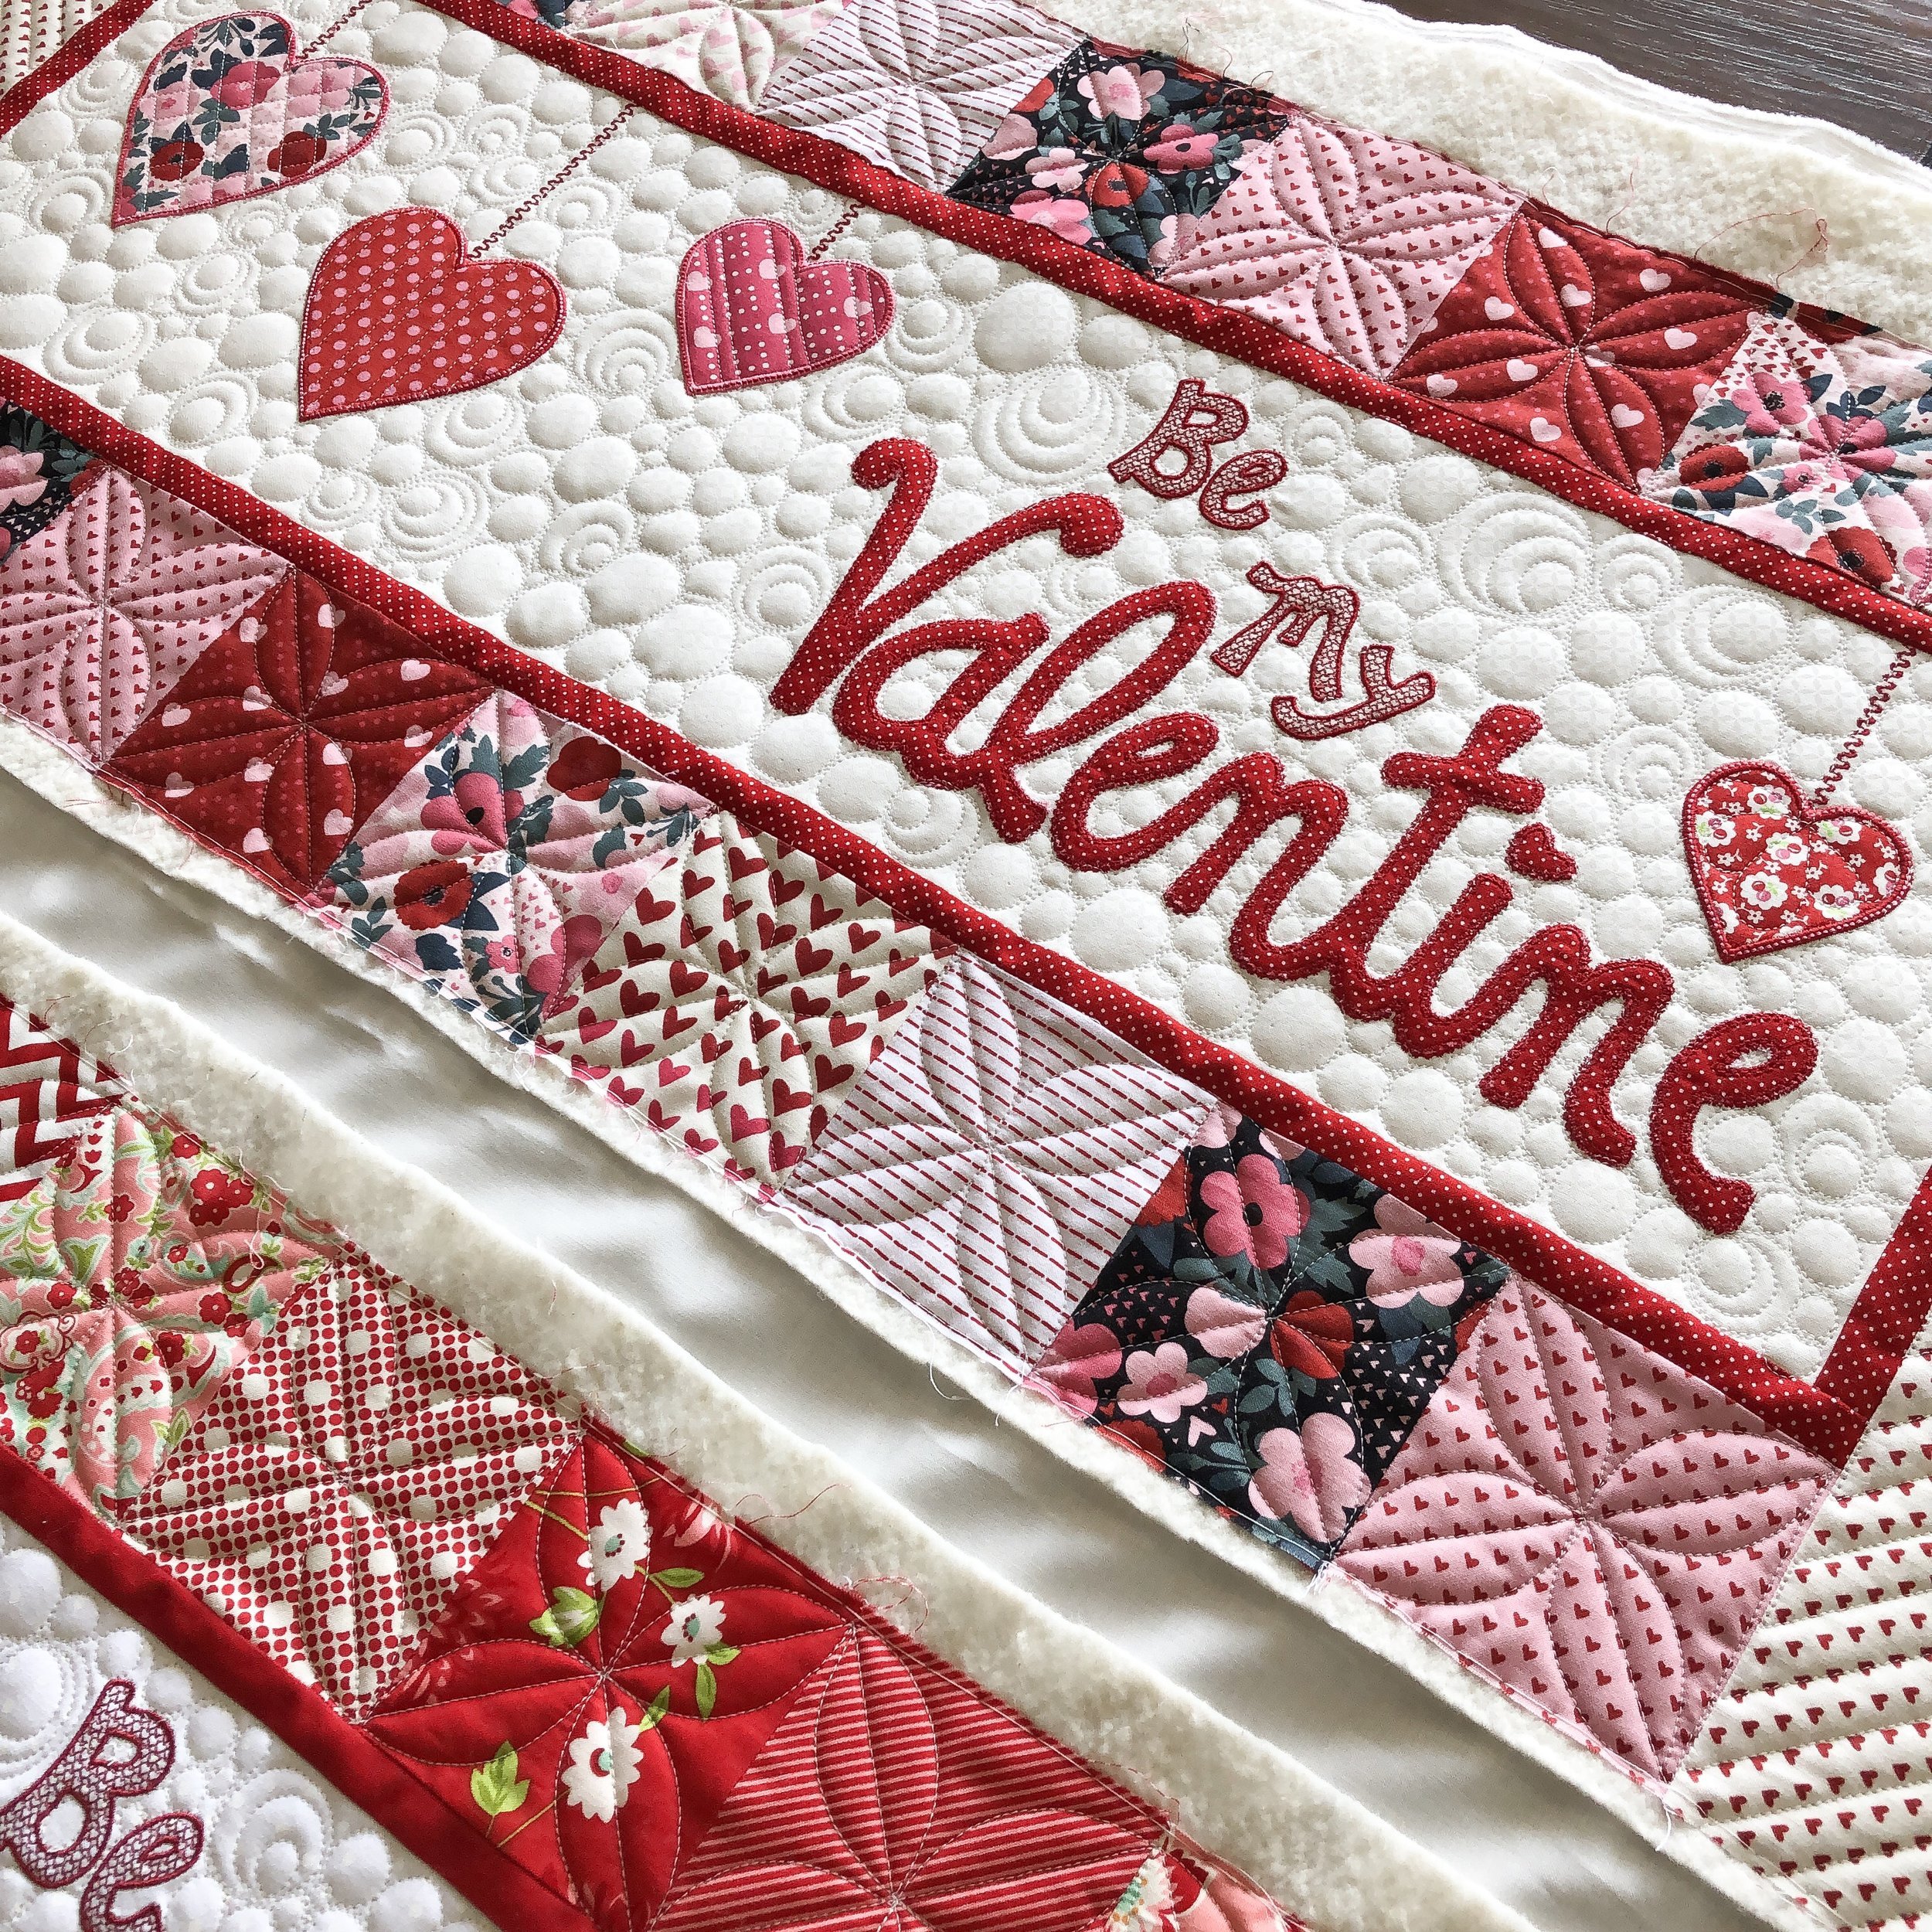
Hearts...hearts...hearts!
I have tons of pictures and videos to share in this post... it’s all about love!! Not just valentine’s... but all the quilty textures!! 💗
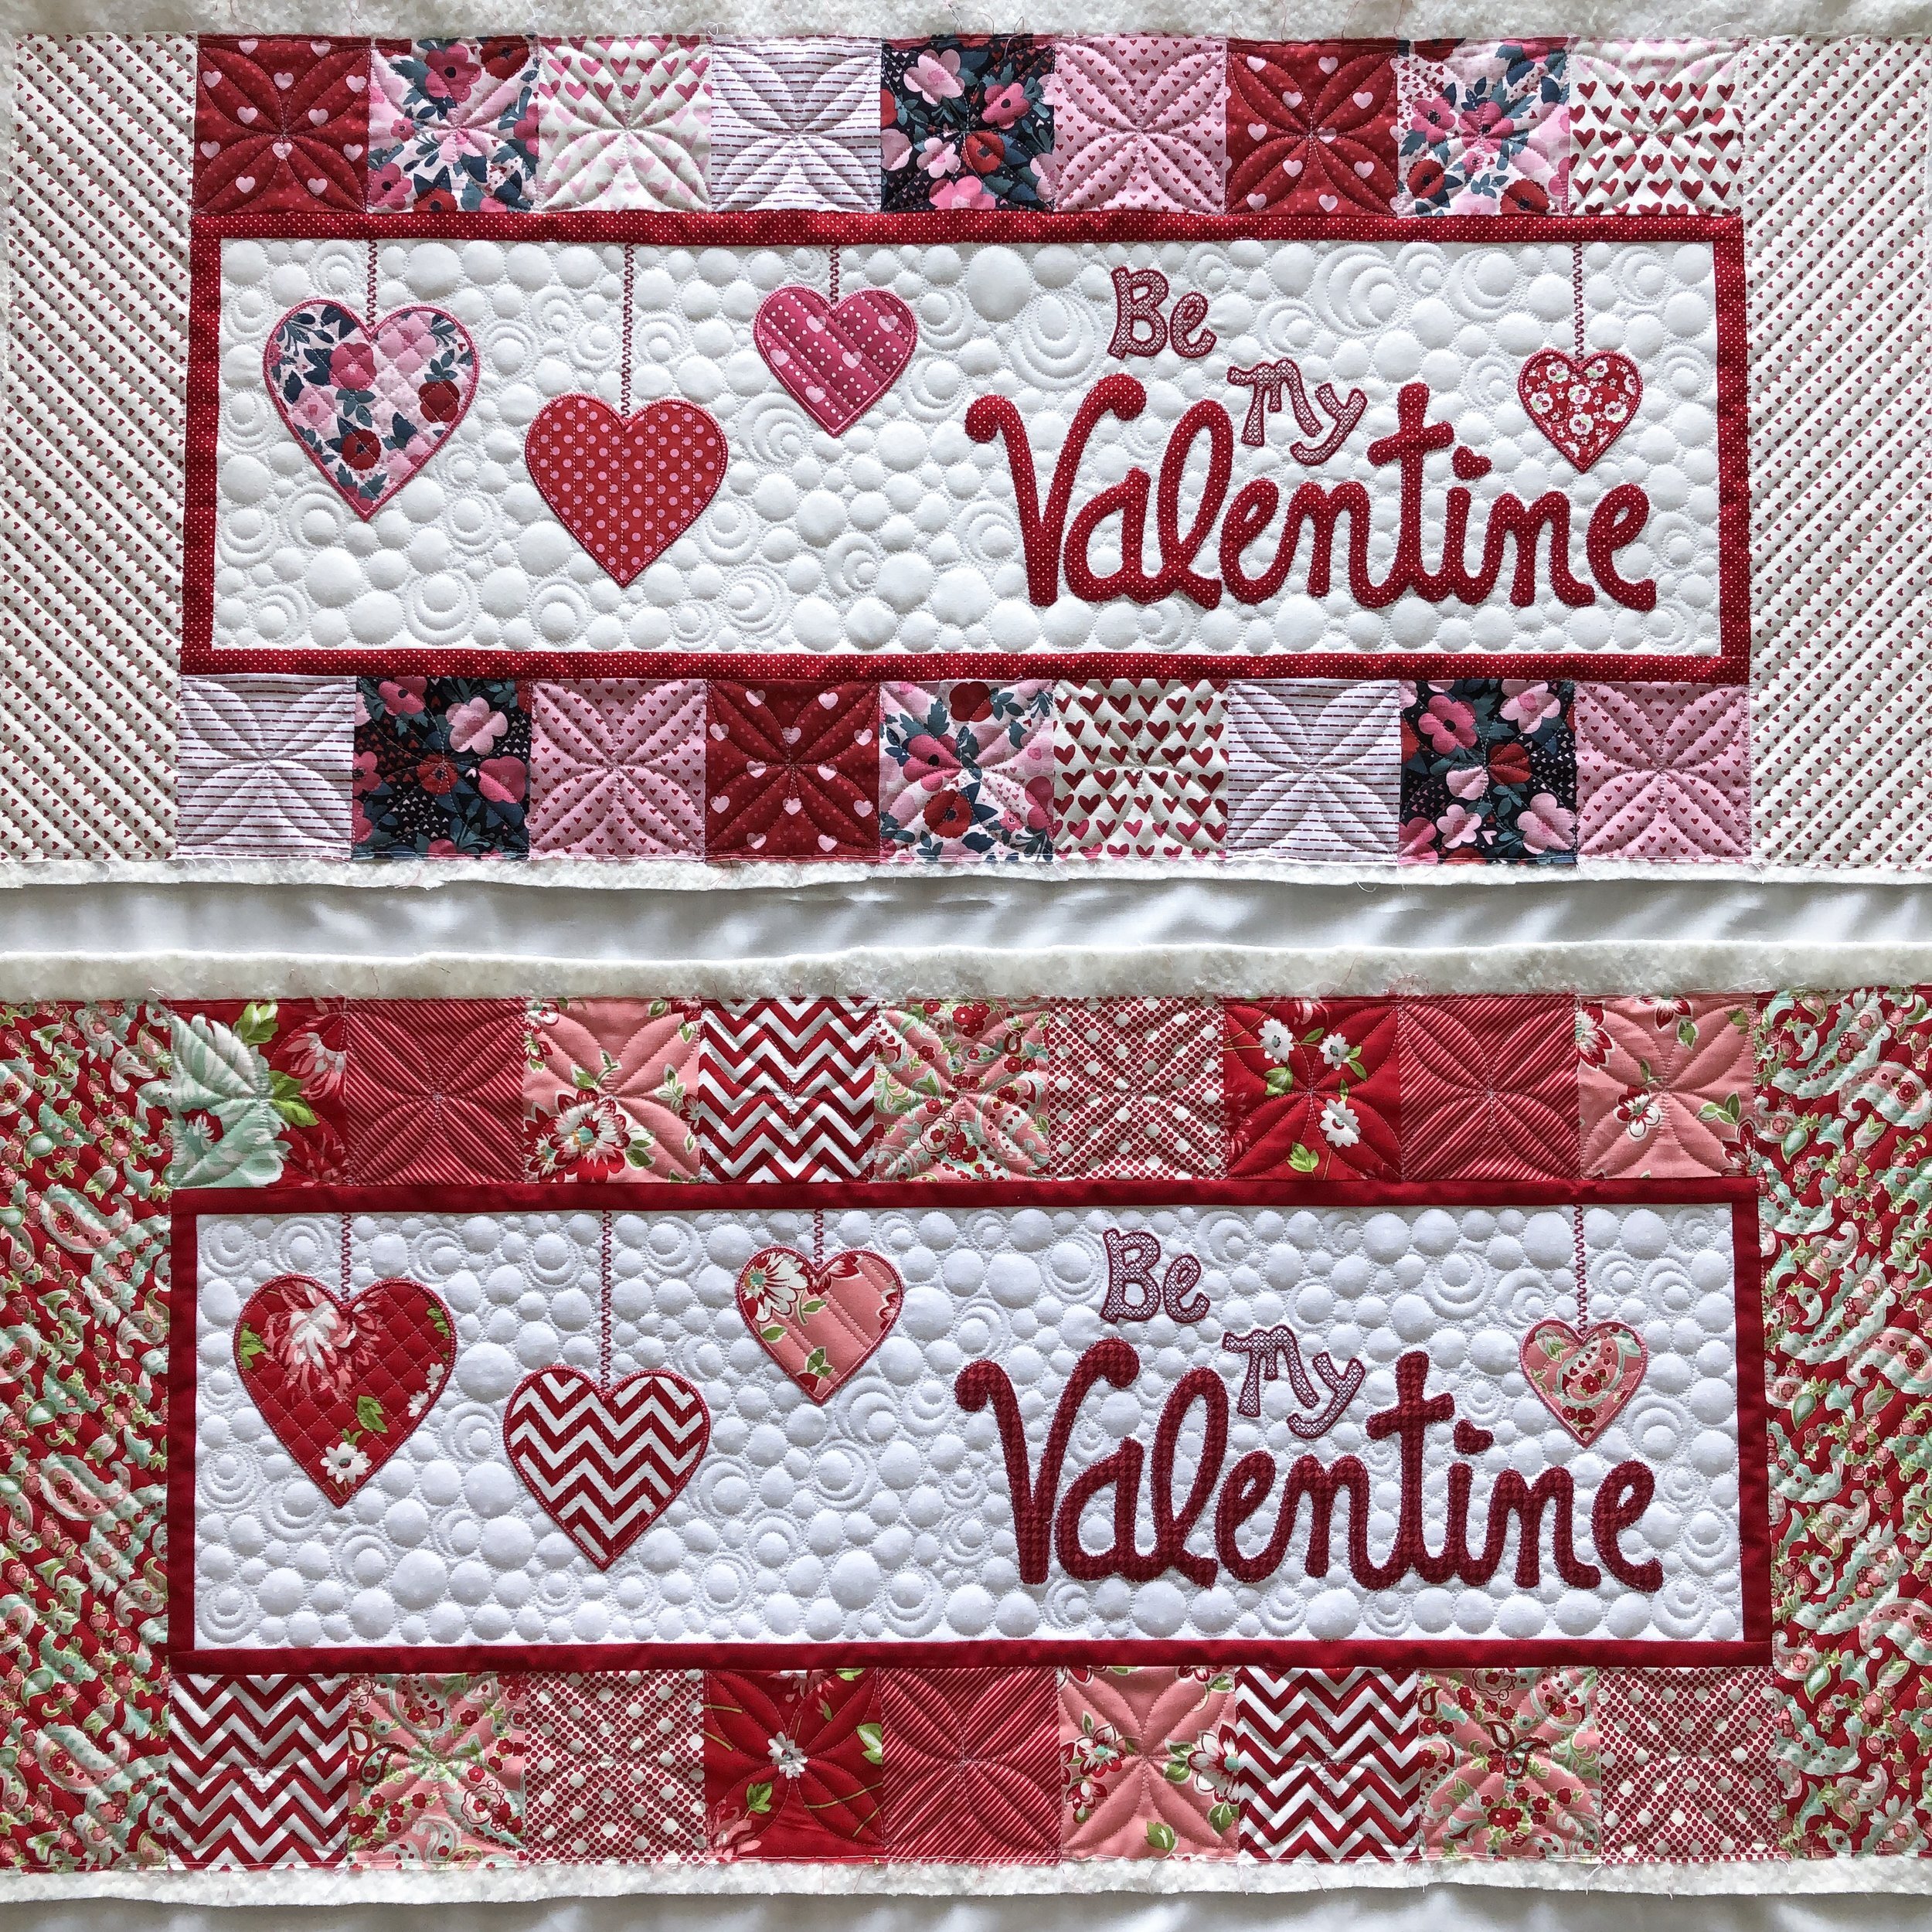
These bench pillows were made by Sherry...she made 4, so we double up two using the width of the fabric from selvage to selvage. I baste the first one onto the fabric, then quilt...roll, and baste the second one onto the fabric and quilt. It’s so slick, and saves so much time when doing multiples...to use one backing. The pattern for these bench pillows is by Kimberbell Designs.
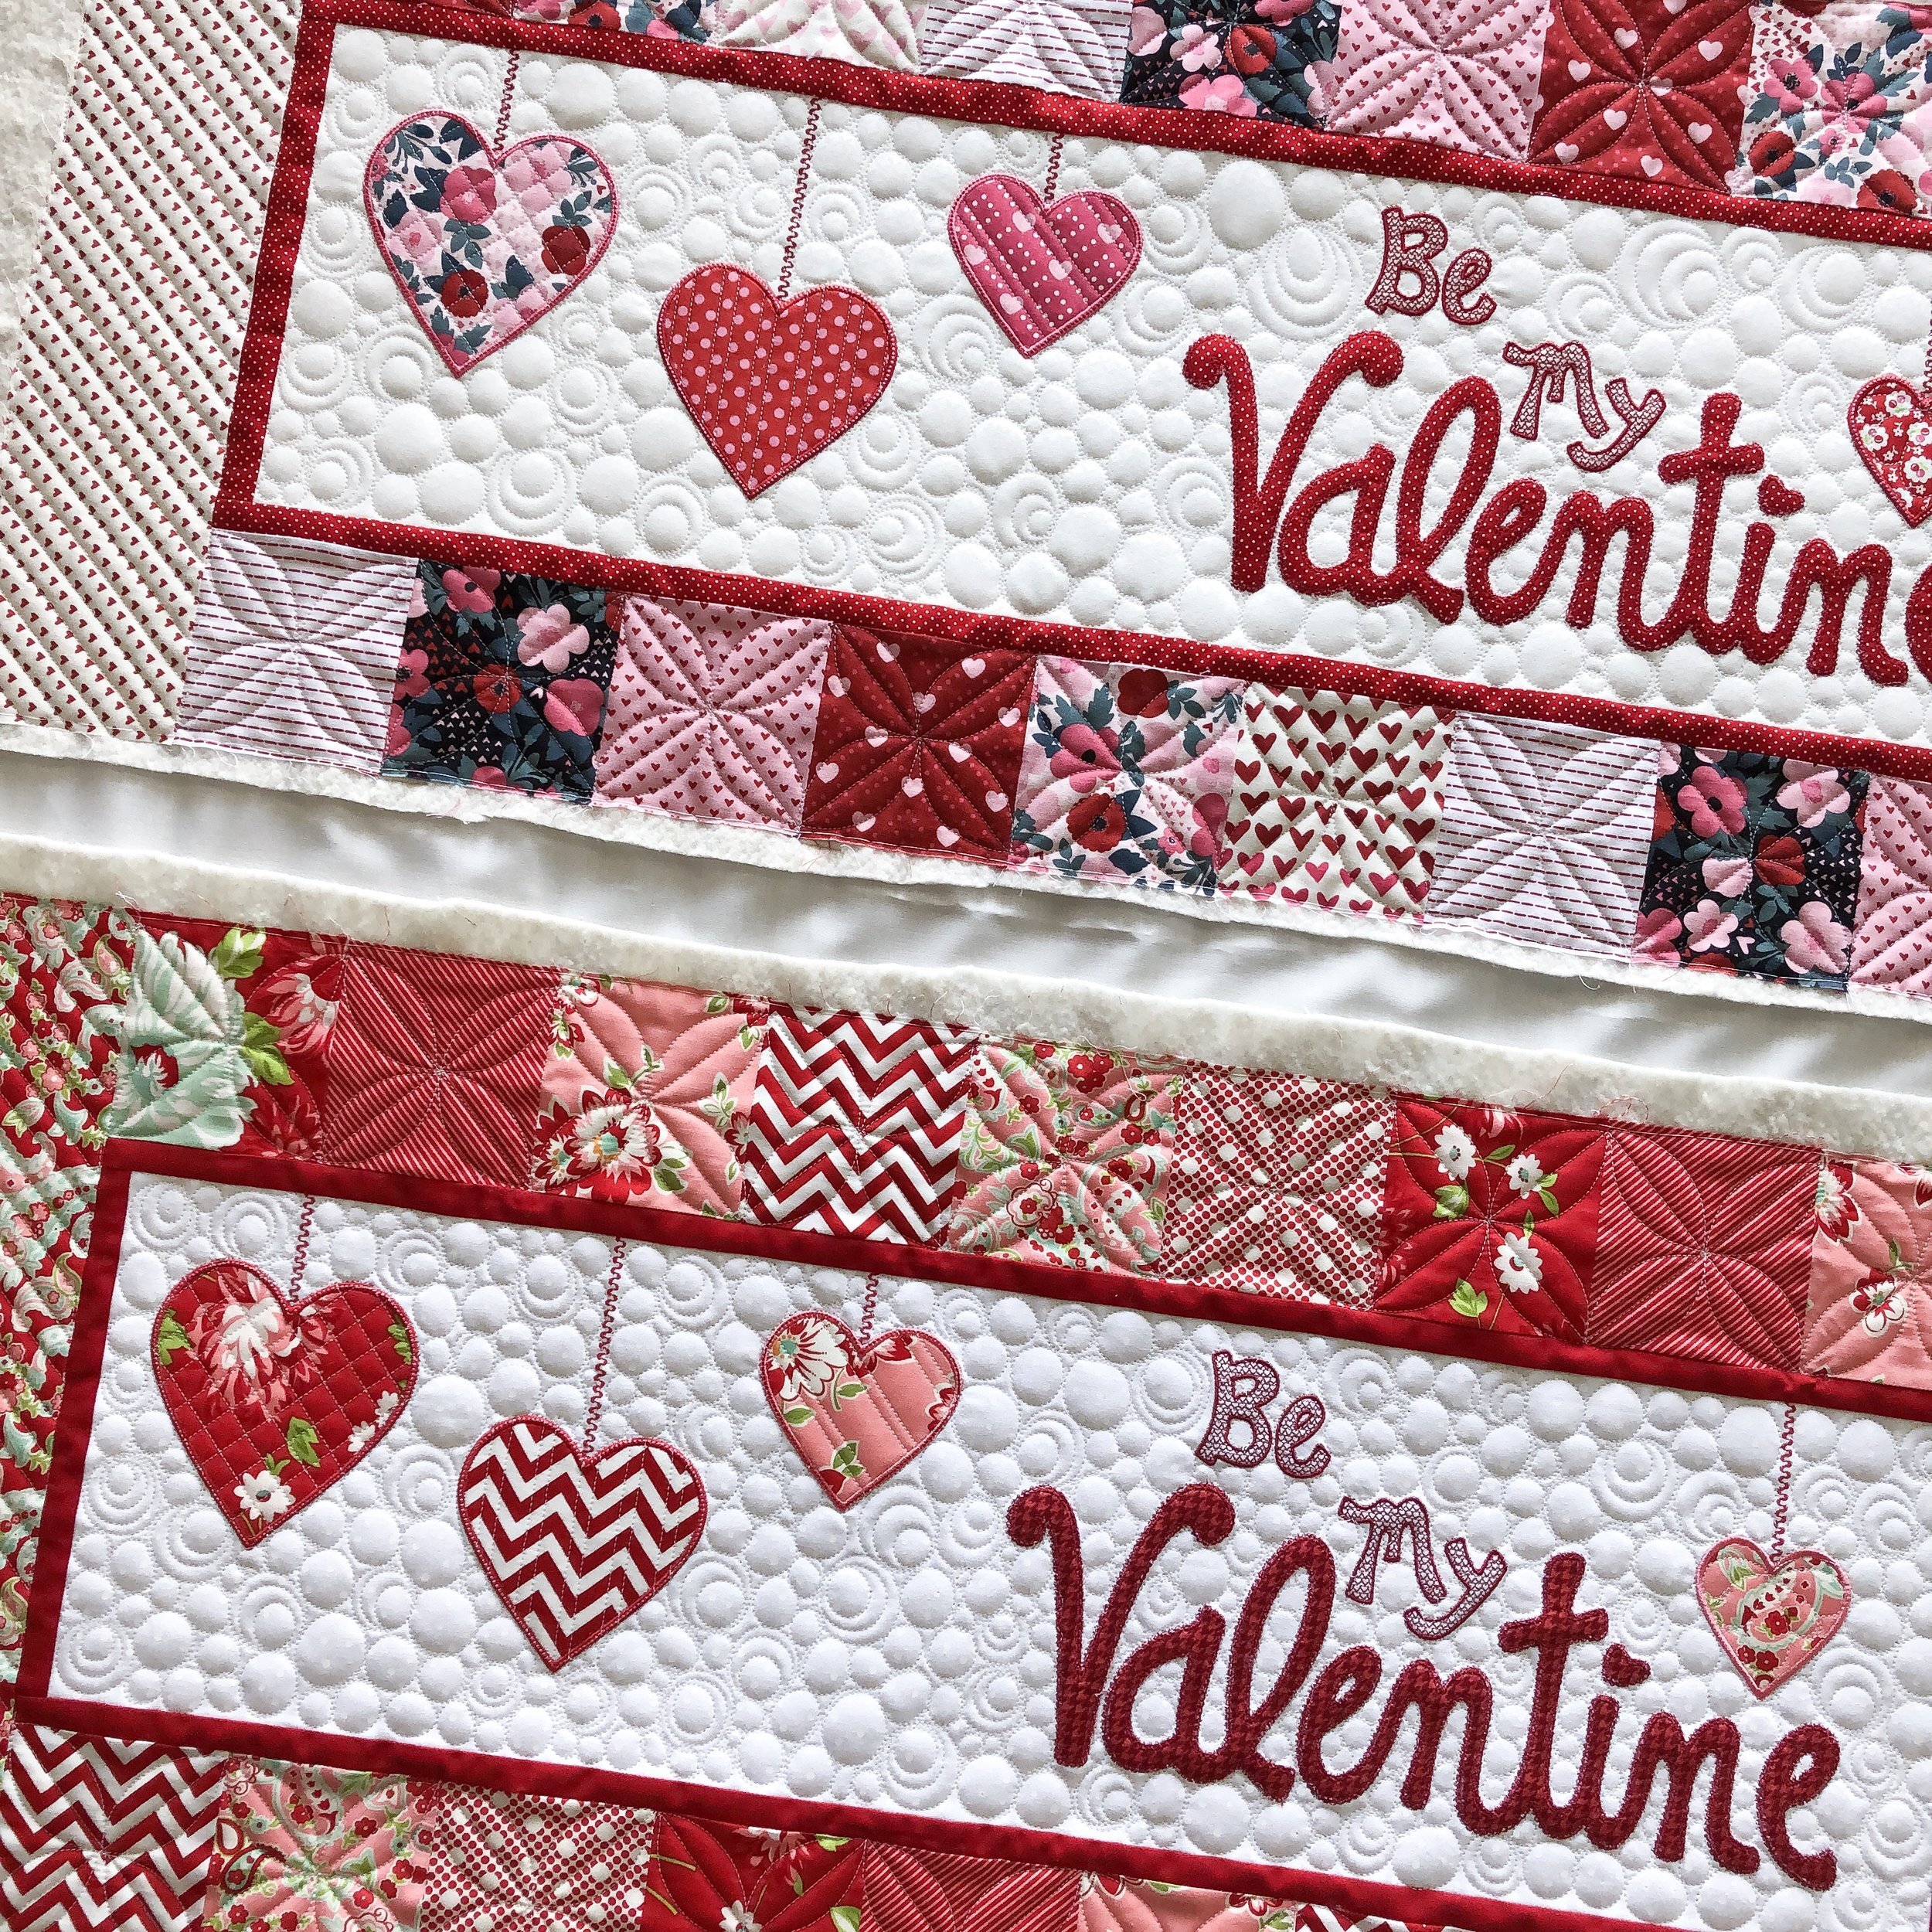
I love creating a variety of textures, so I’m sharing lots of pictures so you can catch all those fun textures.

I love the hard lines in the hearts with the softness of the pebbles in the background. I used one of Linda from www.thequiltedpineapple.com green Edge rulers to quilt the lines in the squares along the border, and inside these hearts. Her straight rulers are my favorite!!
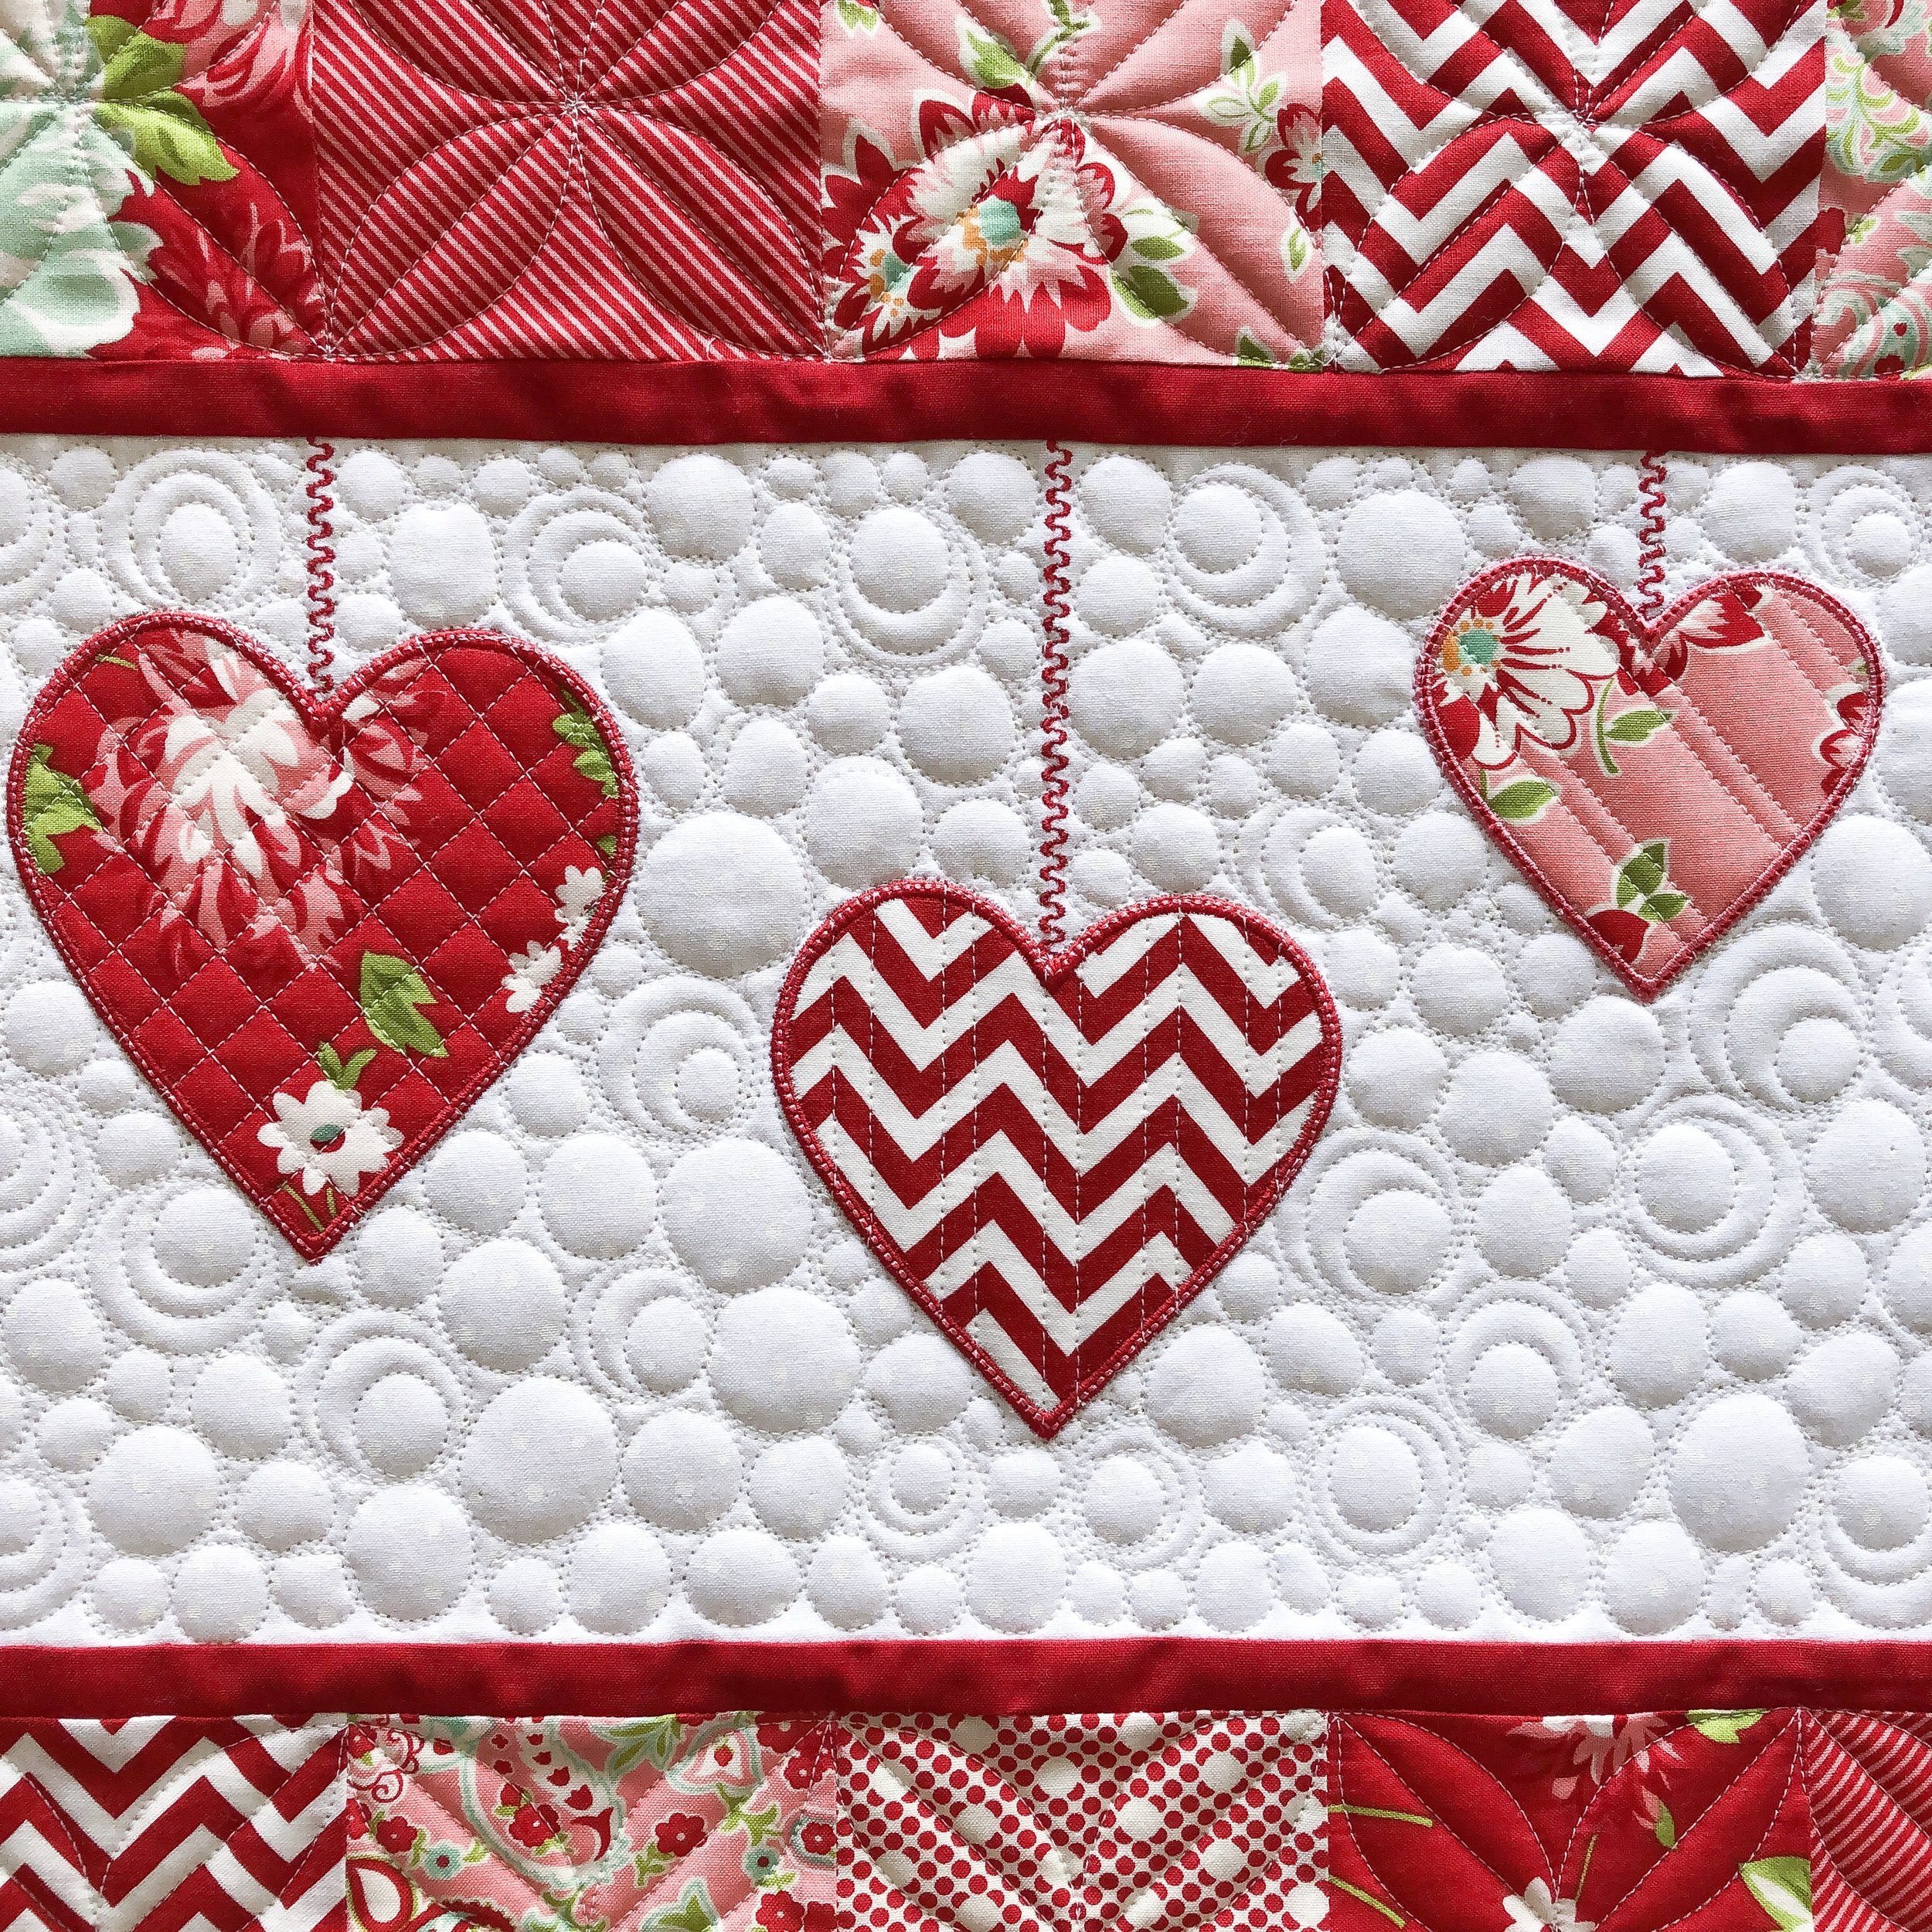
Awhile back I had some requests to video me quilting some of my freehand or freemotion designs. Below is a video of this fun to quilt pebble design. Adding the circle inside the other circles, adds interest to the design and more texture to the background.
I used a white 30 tex A&E Perma Core thread and 8020 cotton poly blend batting from Winline, on all of these bench pillows.

I love adding a simple orange peel to the border on this pillow front.

Below is a video of me quilting the orange peel curves continuously with one of my Circle2™ rulers...the 3”/9” ruler. Sorry my camera mount shakes while filming this one.
I have these rulers available in a set of 6....in both clear: https://www.quiltingit.com/shop/circle2-longarm-ruler-set-clear-acrylic
and in green: https://www.quiltingit.com/shop/circle2-longarm-ruler-set-green-acrylic
For more information about my rulers go to: https://www.quiltingit.com/blog/2018/10/10/introducing-my-circle2-longarm-circle-ruler-set

I also have my rulers individually listed... here is the clear 3”/9”: https://www.quiltingit.com/shop/circle2-longarm-28-ruler-clear-acrylic-lm6md
Check my shop for all the other sizes: https://www.quiltingit.com/shop/
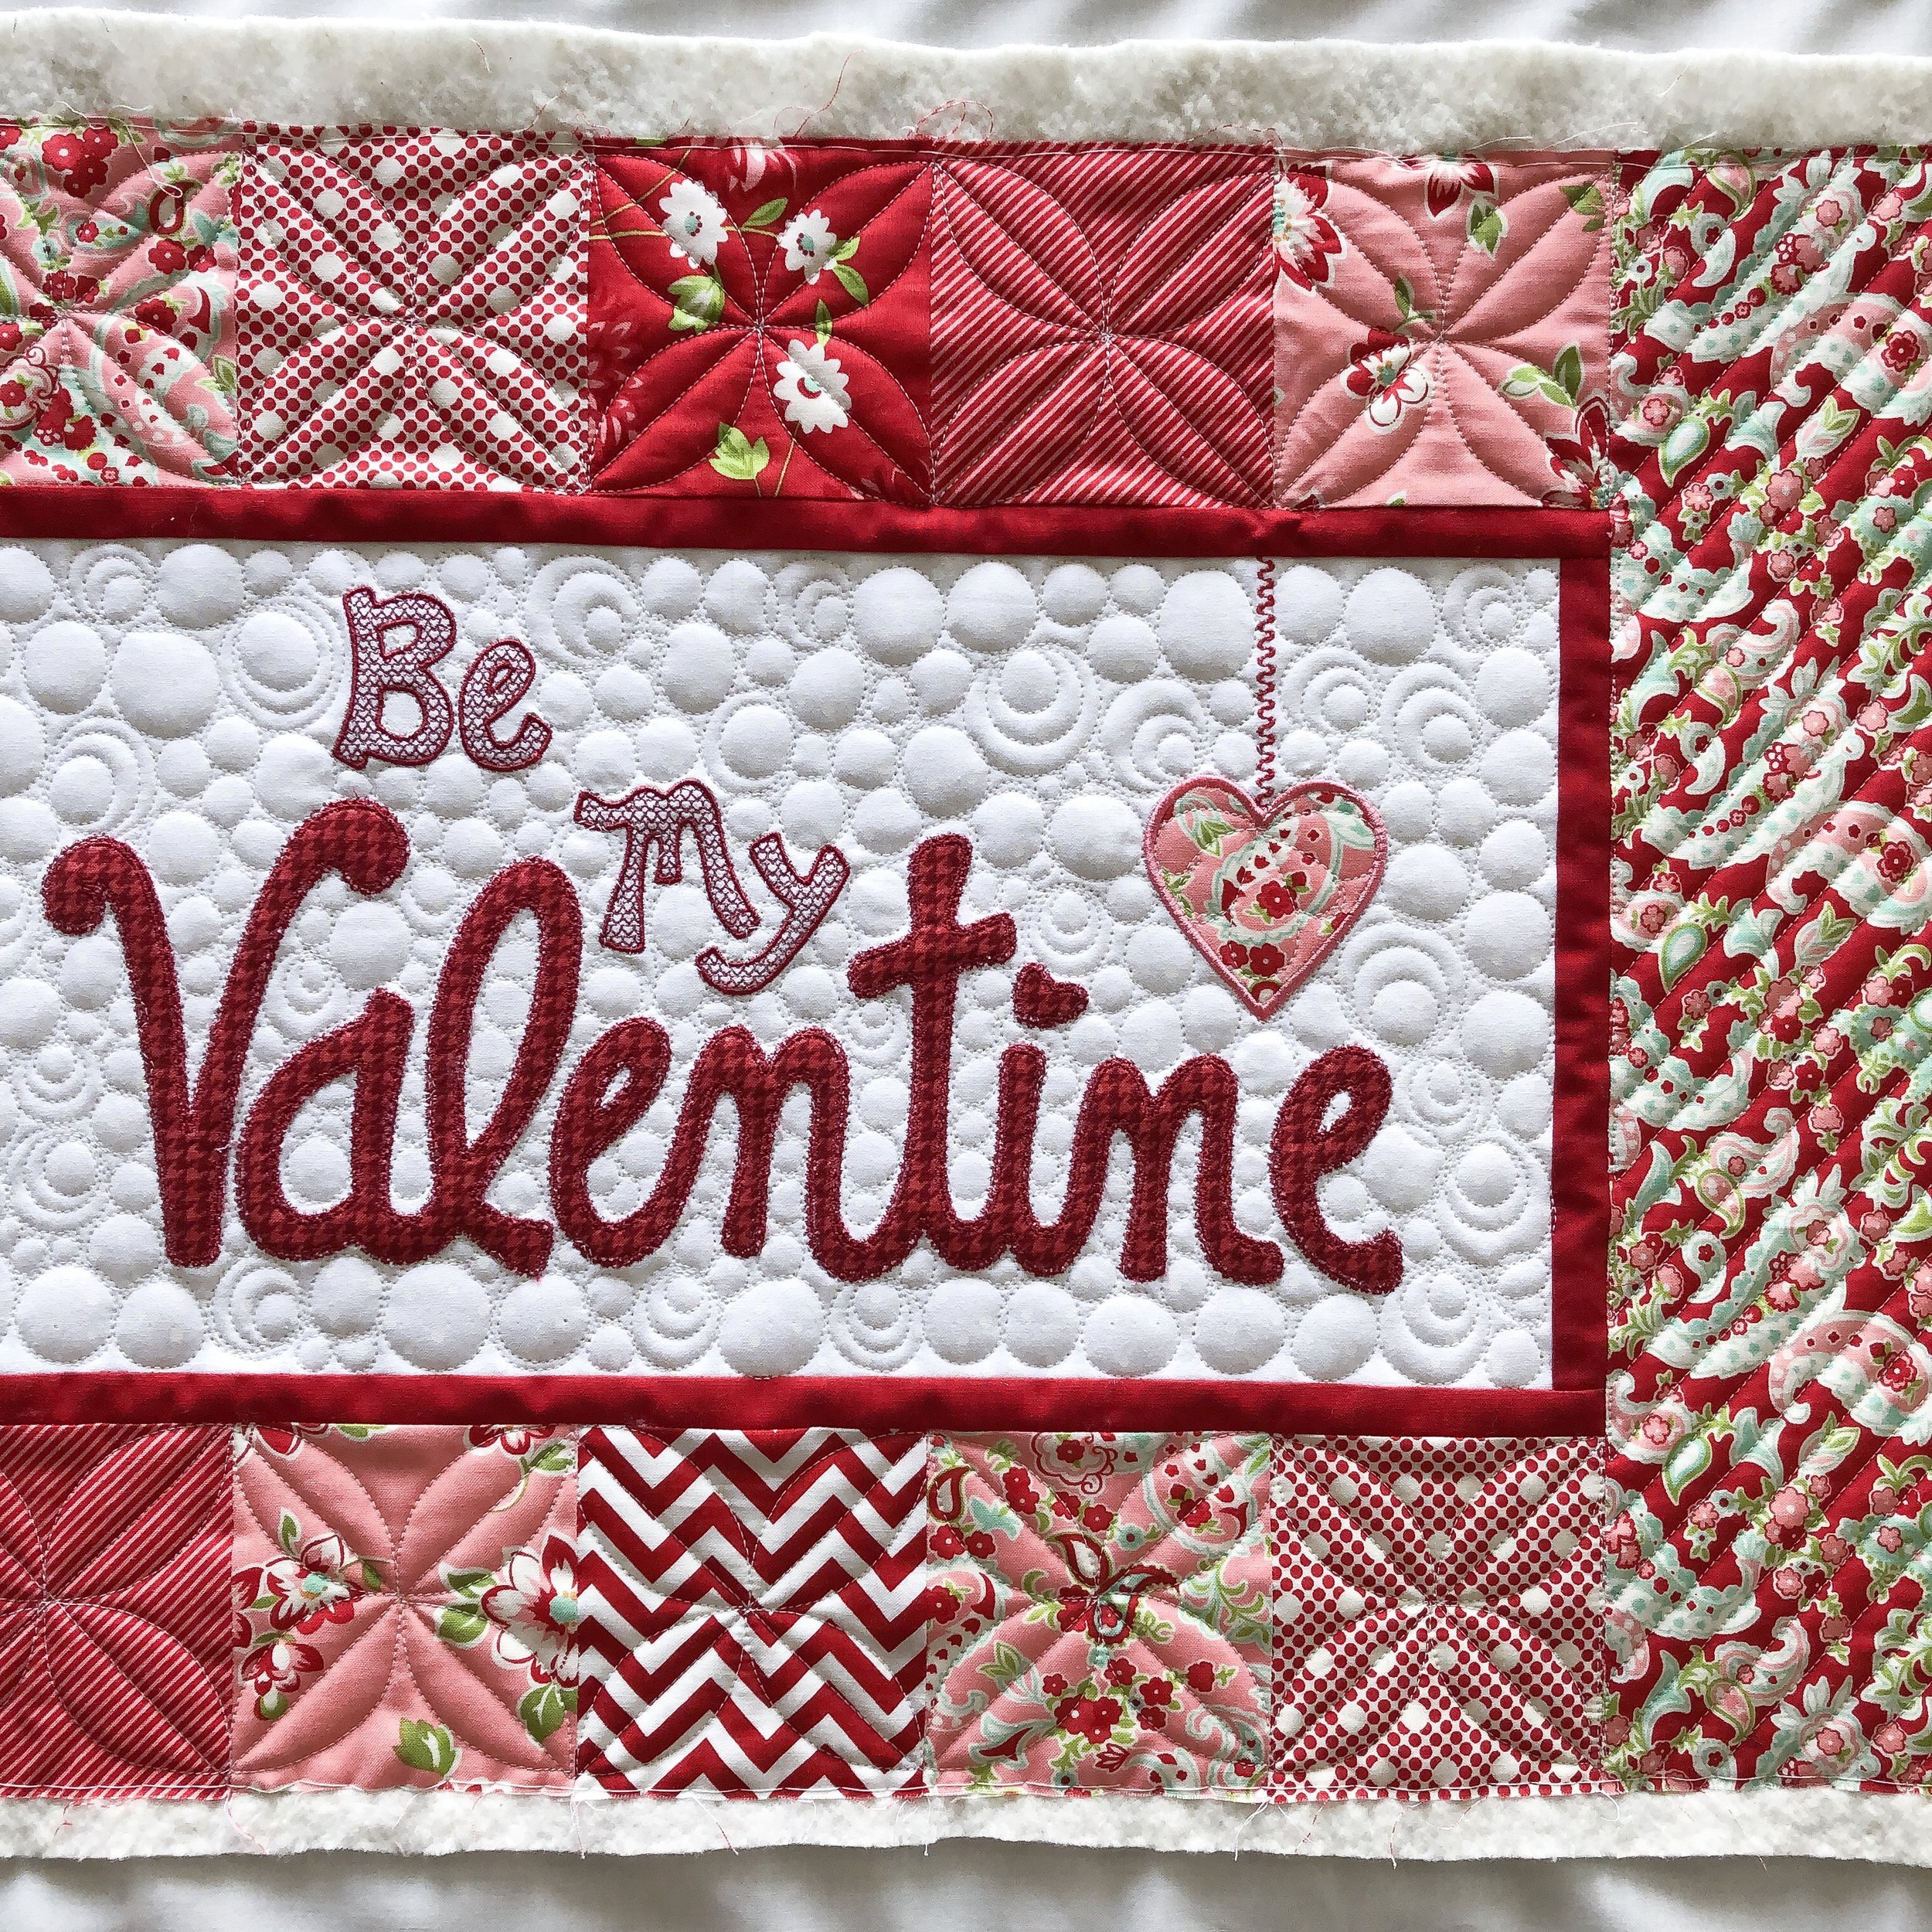
I also quilted a 1/2” diagonal lines along the vertical border on each side, using Linda’s Edge ruler.

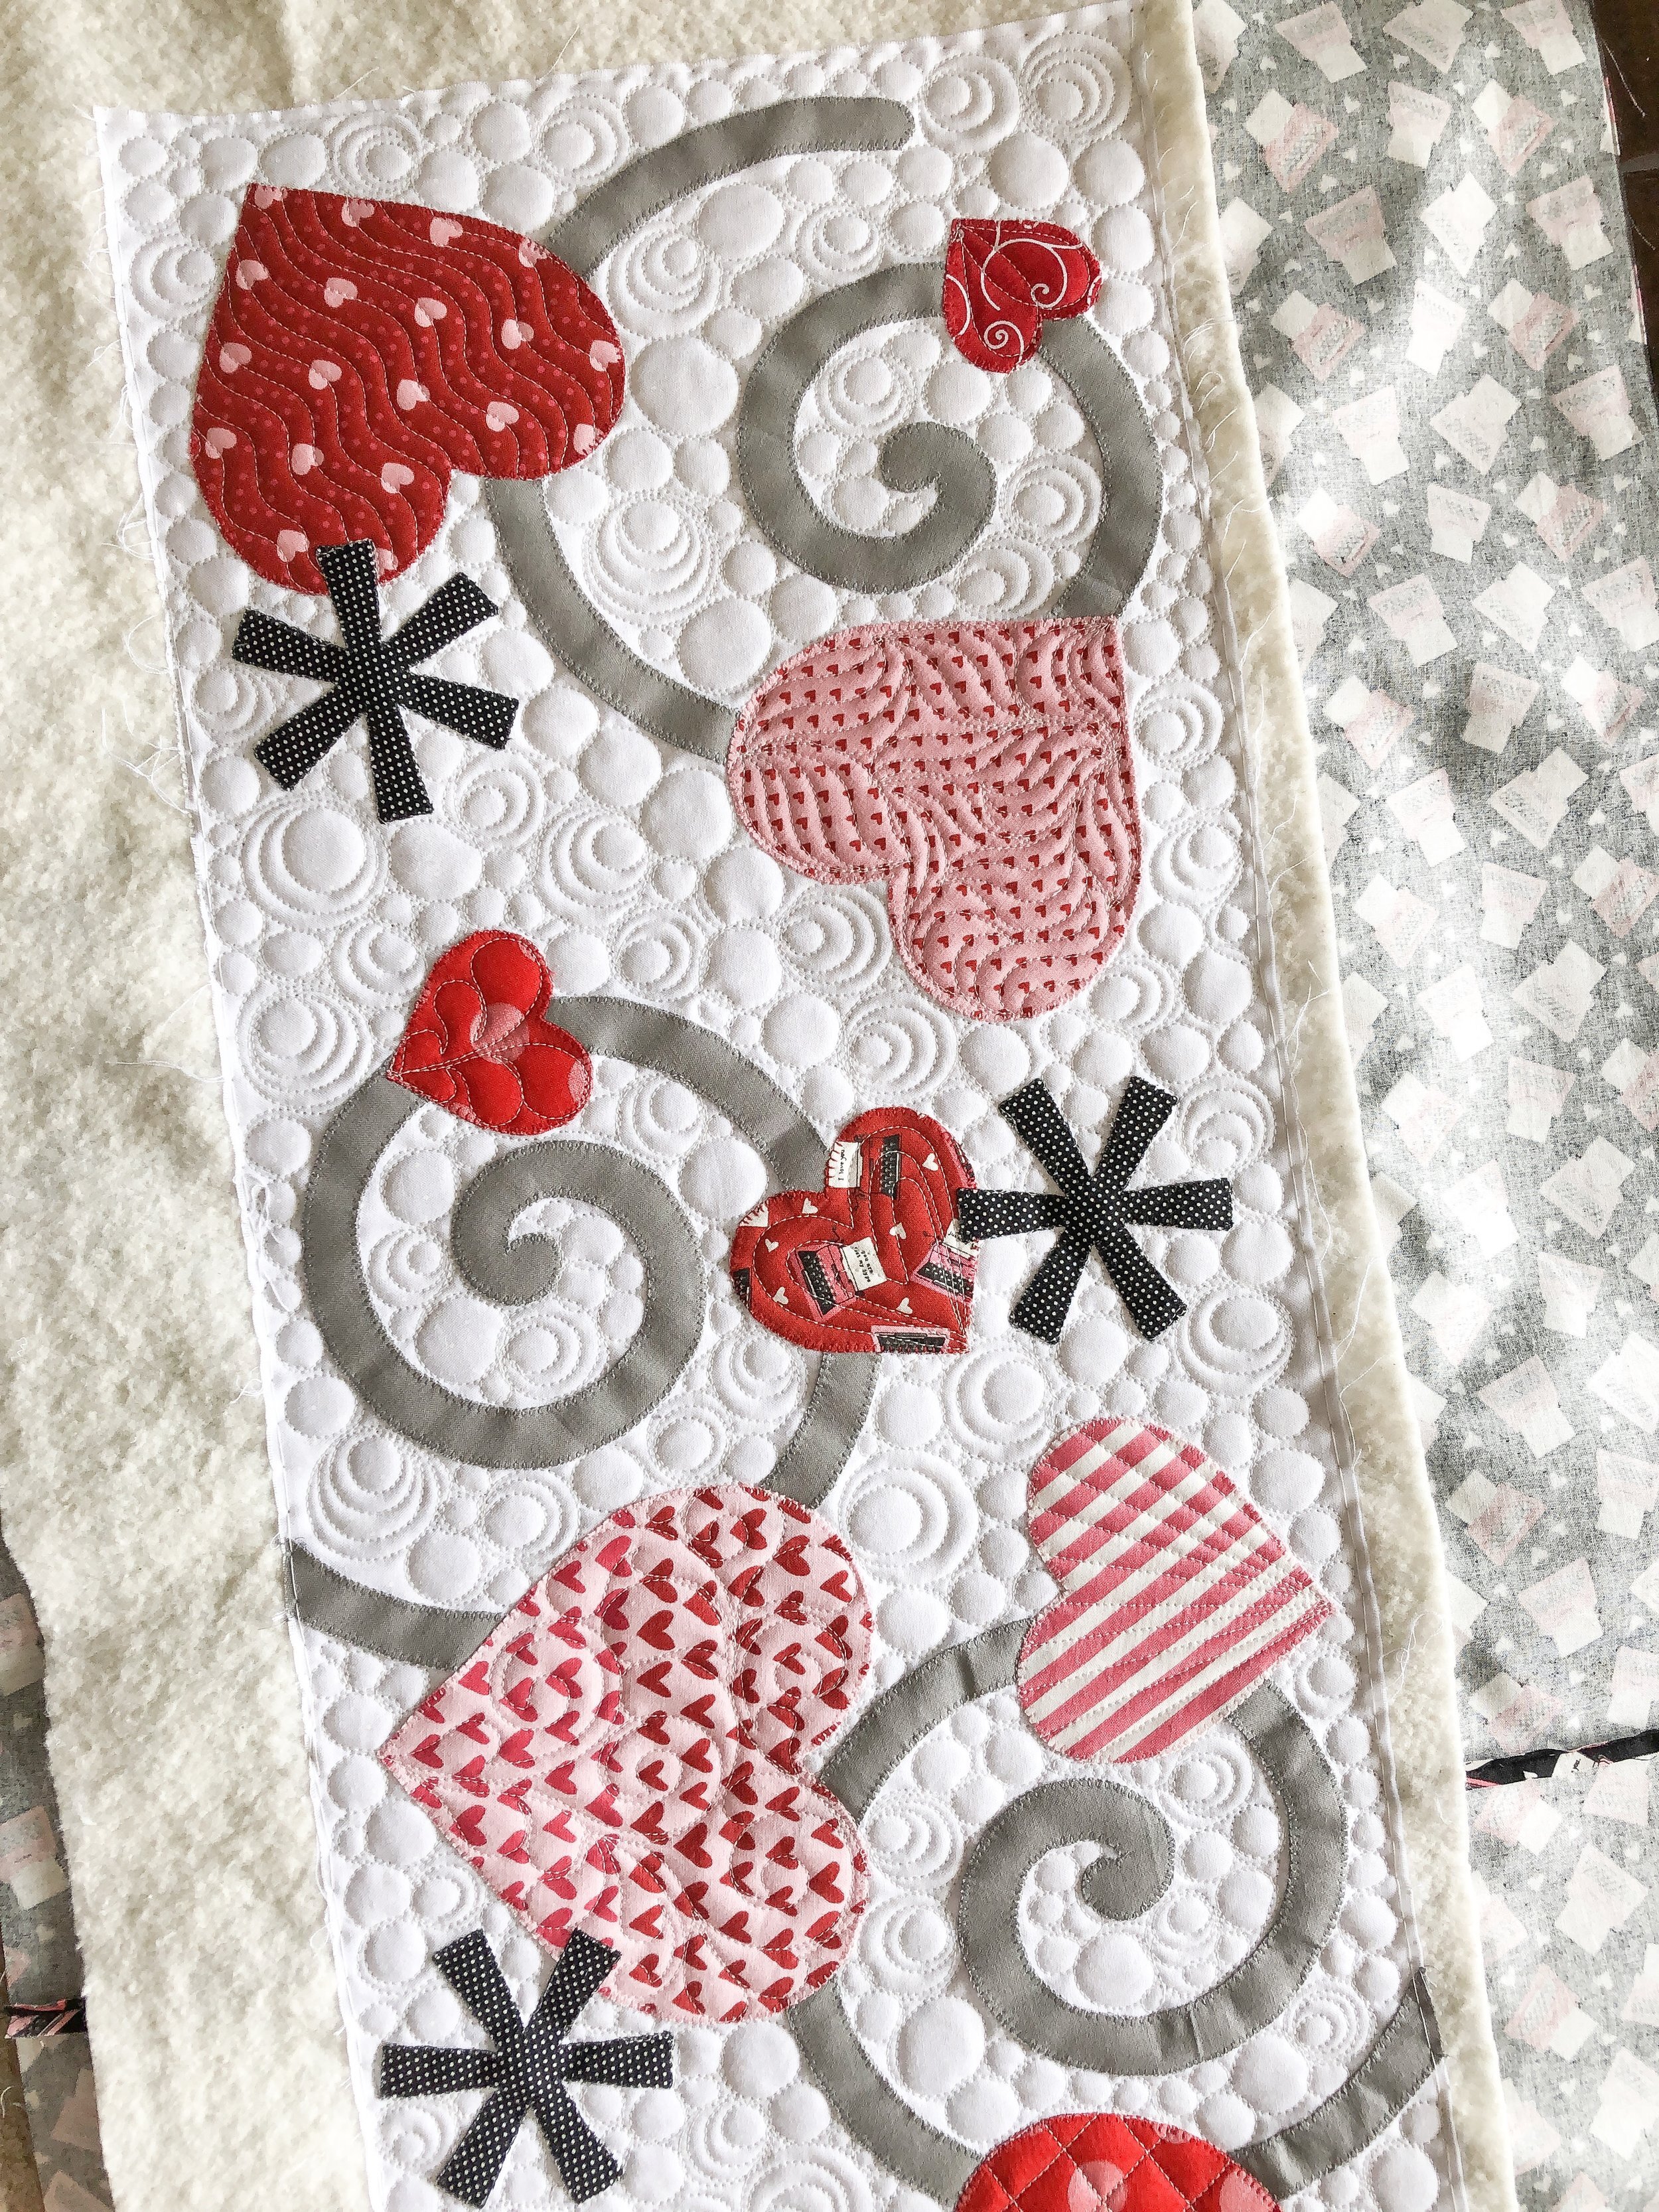
Sherry also made a couple of these super cute table runners!
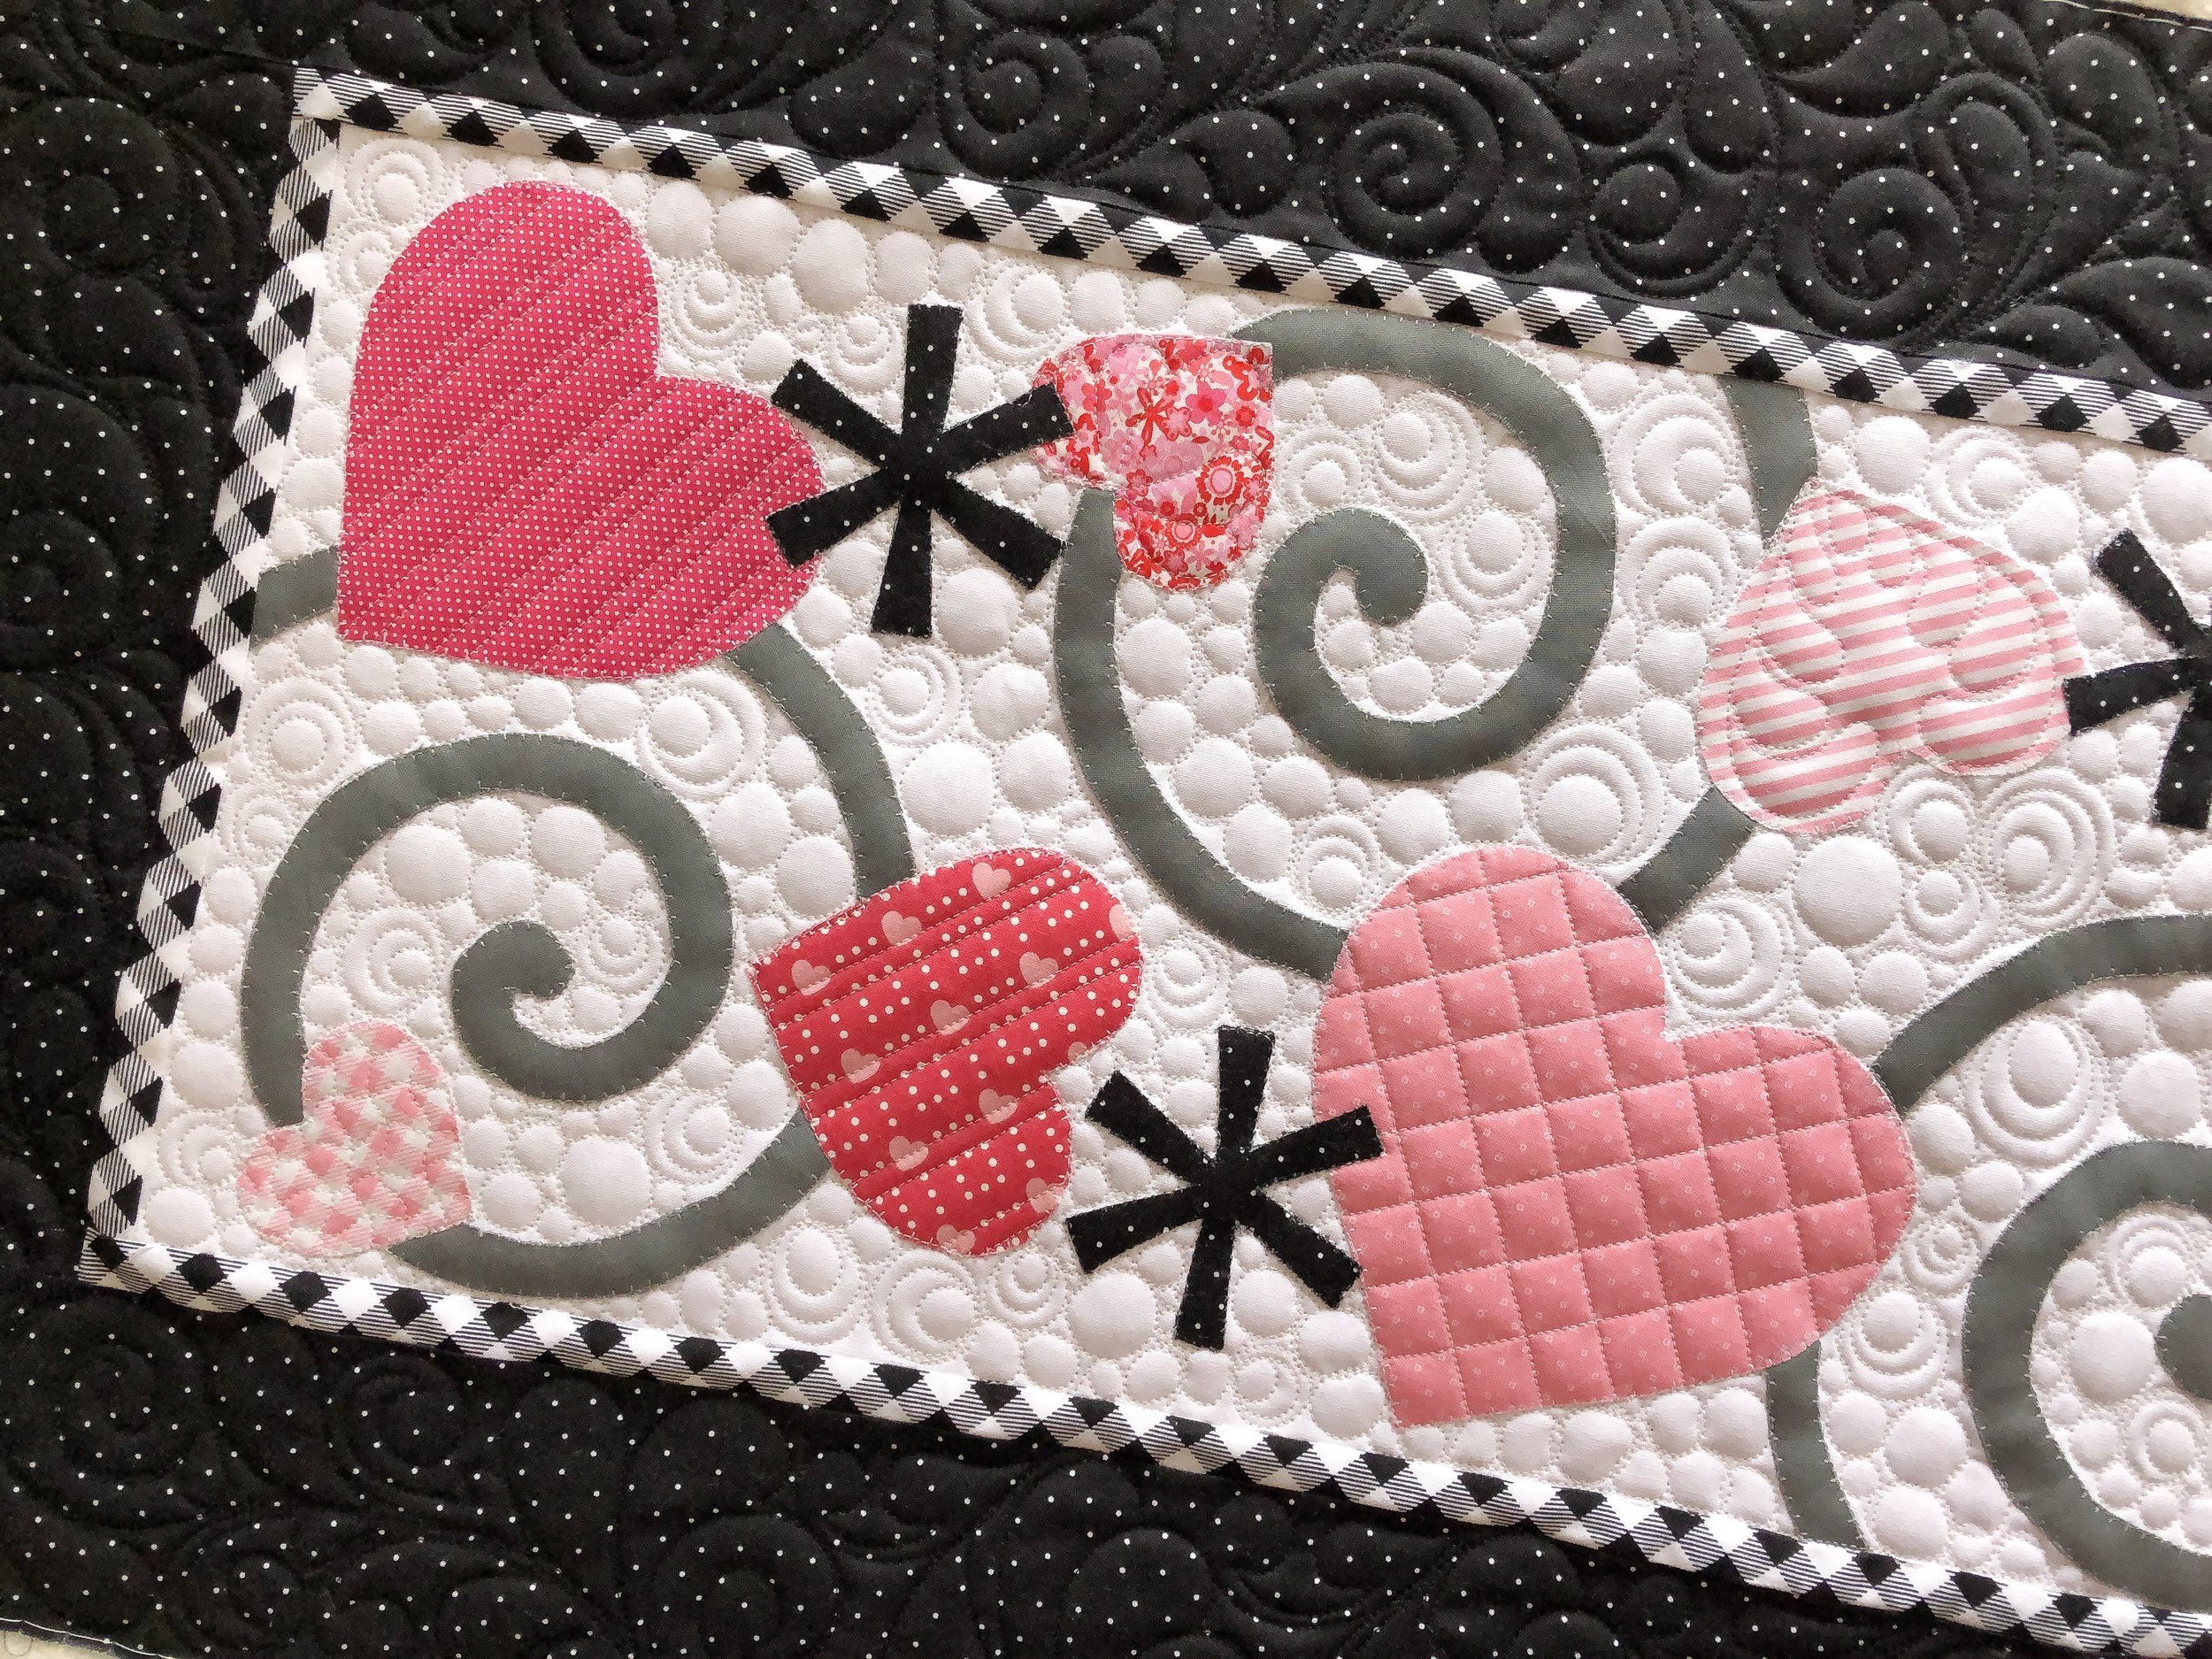
The pattern is by Cynthia Muir from “Ahhh Quilting” .

Once again, I wanted lots of fun texture...the background, inside each heart...and the border. I also used 30 tex A&E Perma Core thread white thread on these...as well as their black thread for the border.
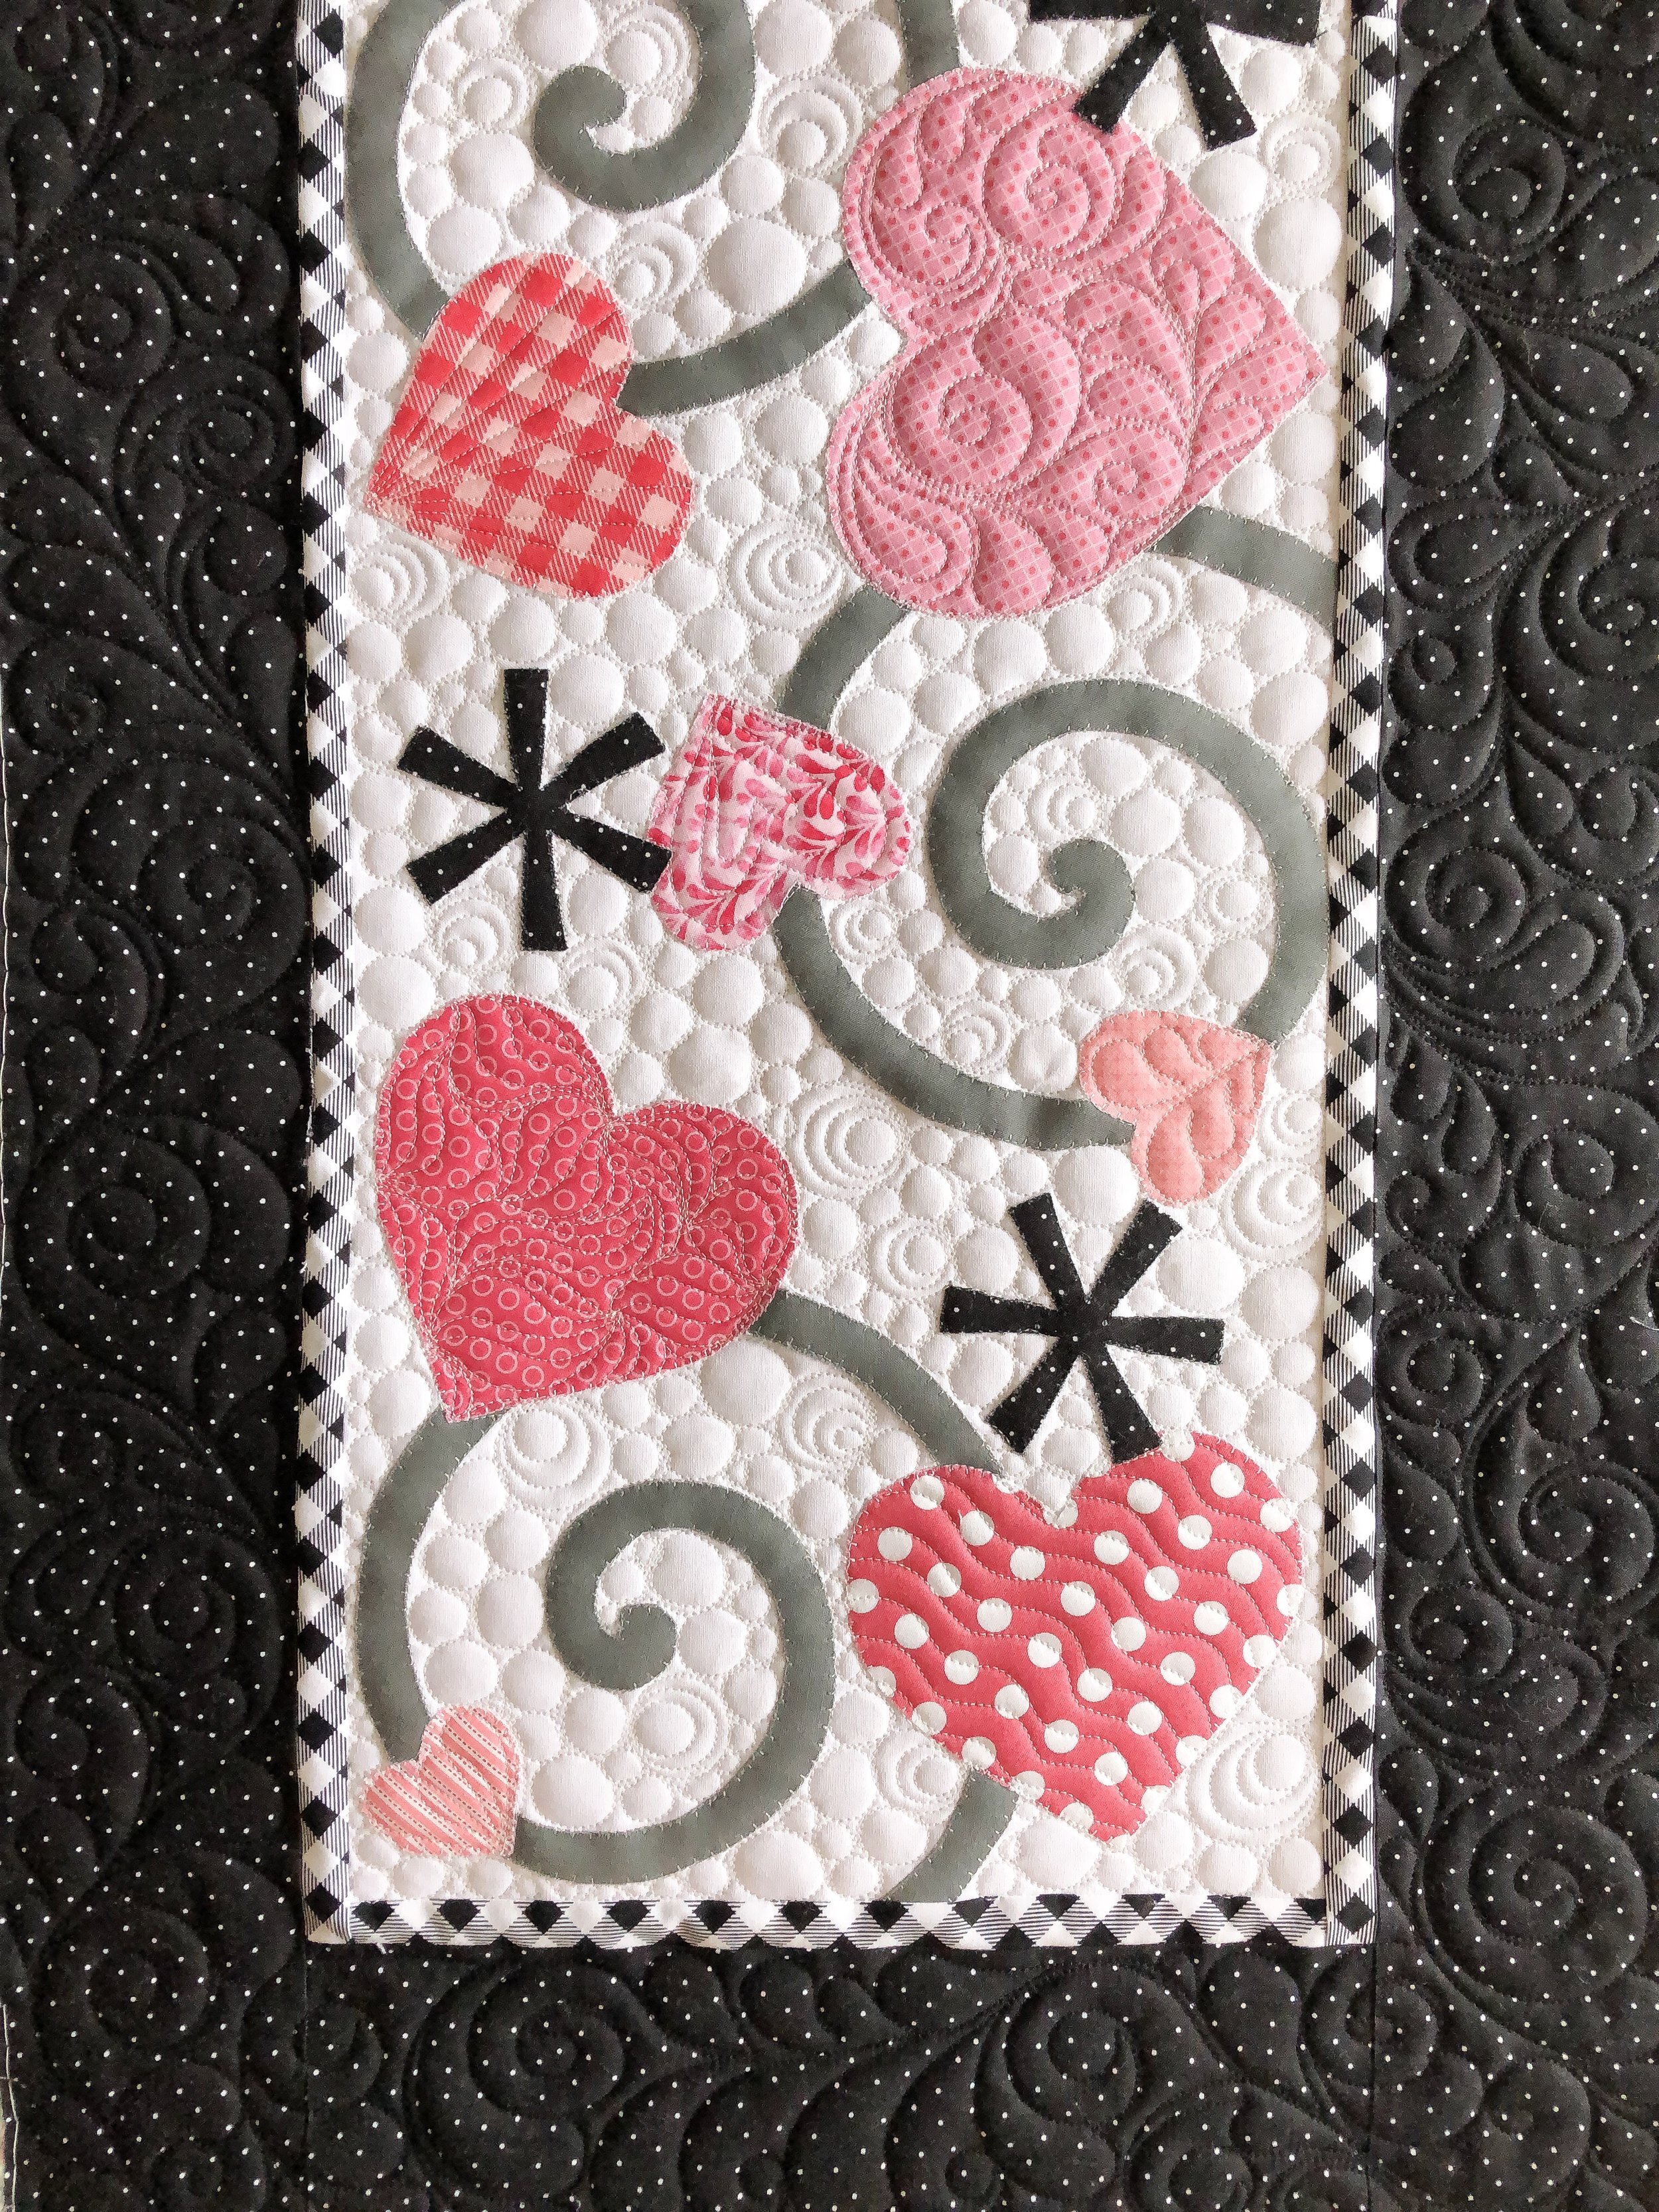
Below is a video of me quilting the border. This lovely design is great inside appliqué...as pictured in the biggest polka dot heart above, to a border...like what I videoed below, to even an entire quilt. I’ve quilted this design on so many quilts, it just adds such a fancy touch. To see more quilting videos, head on over to my YouTube channel and subscribe: https://www.youtube.com/user/QuiltingIt
I hope you’ll try this design when you quilt sometime!!

I just love how the light picks up all that quilting!!
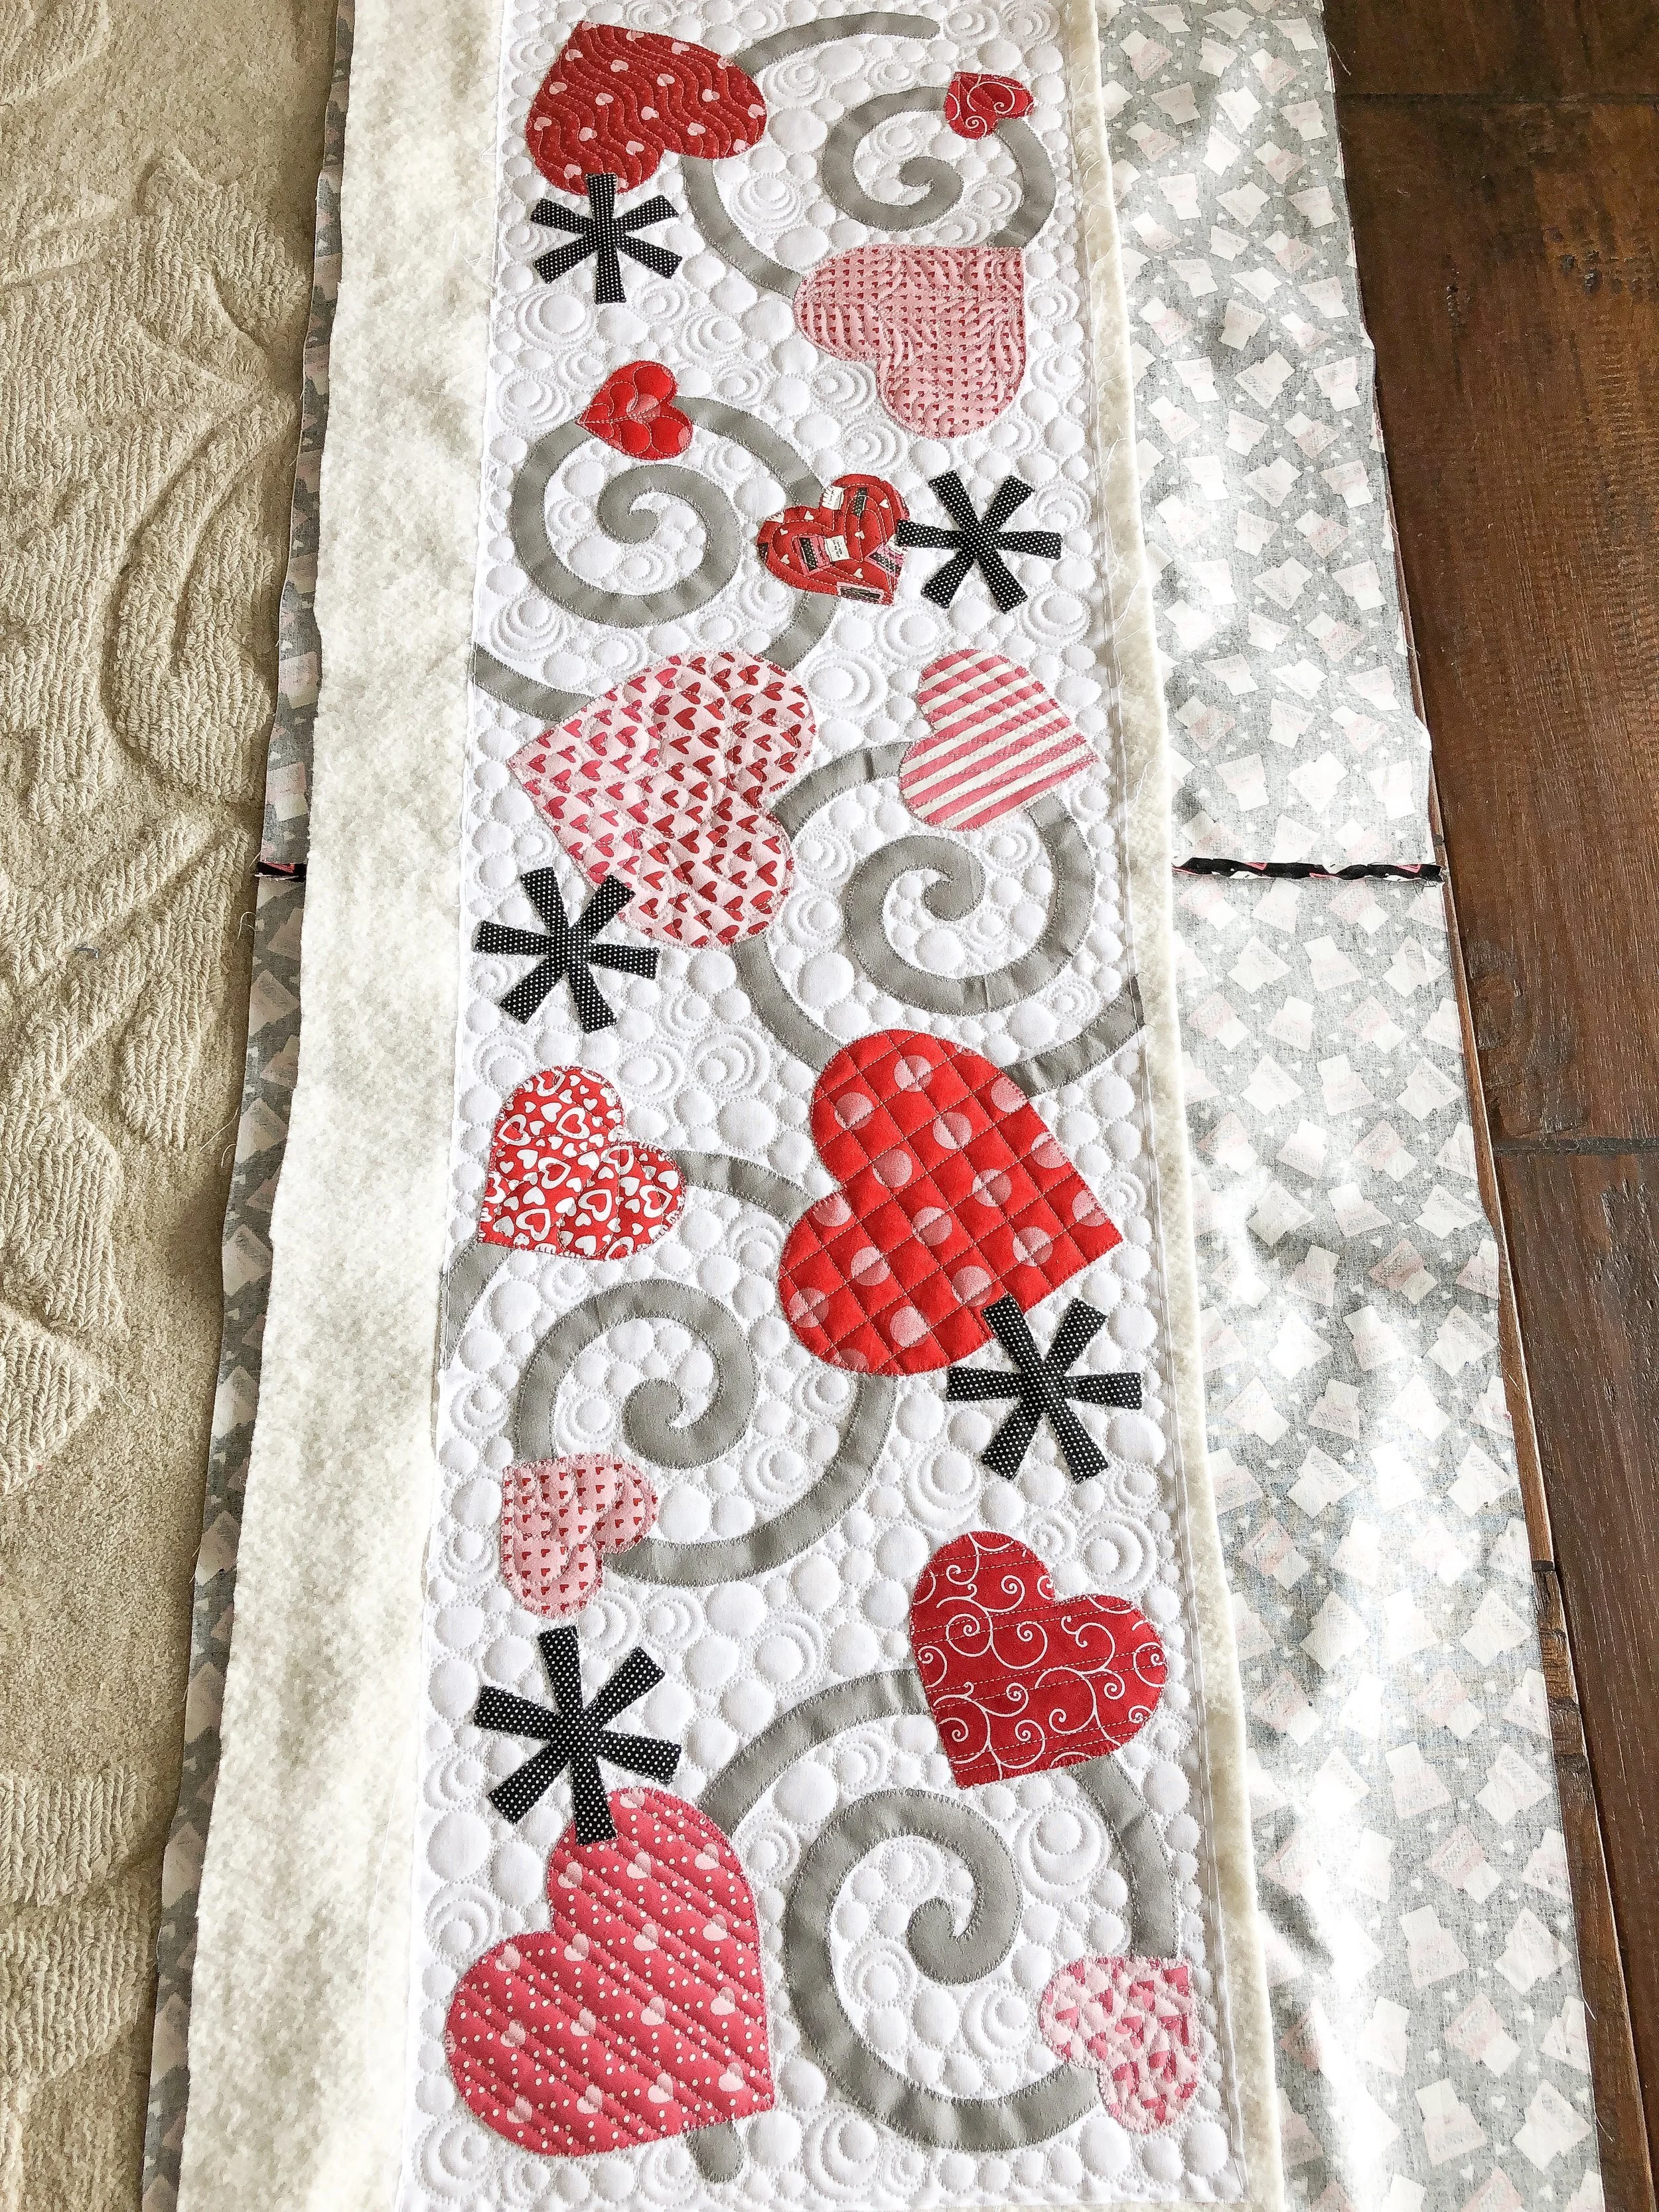
Funny thing...two of my clients were making these, and brought them the same time. This one without borders, was made by Barbara. I quilted it the same as the ones I did for Sherry.
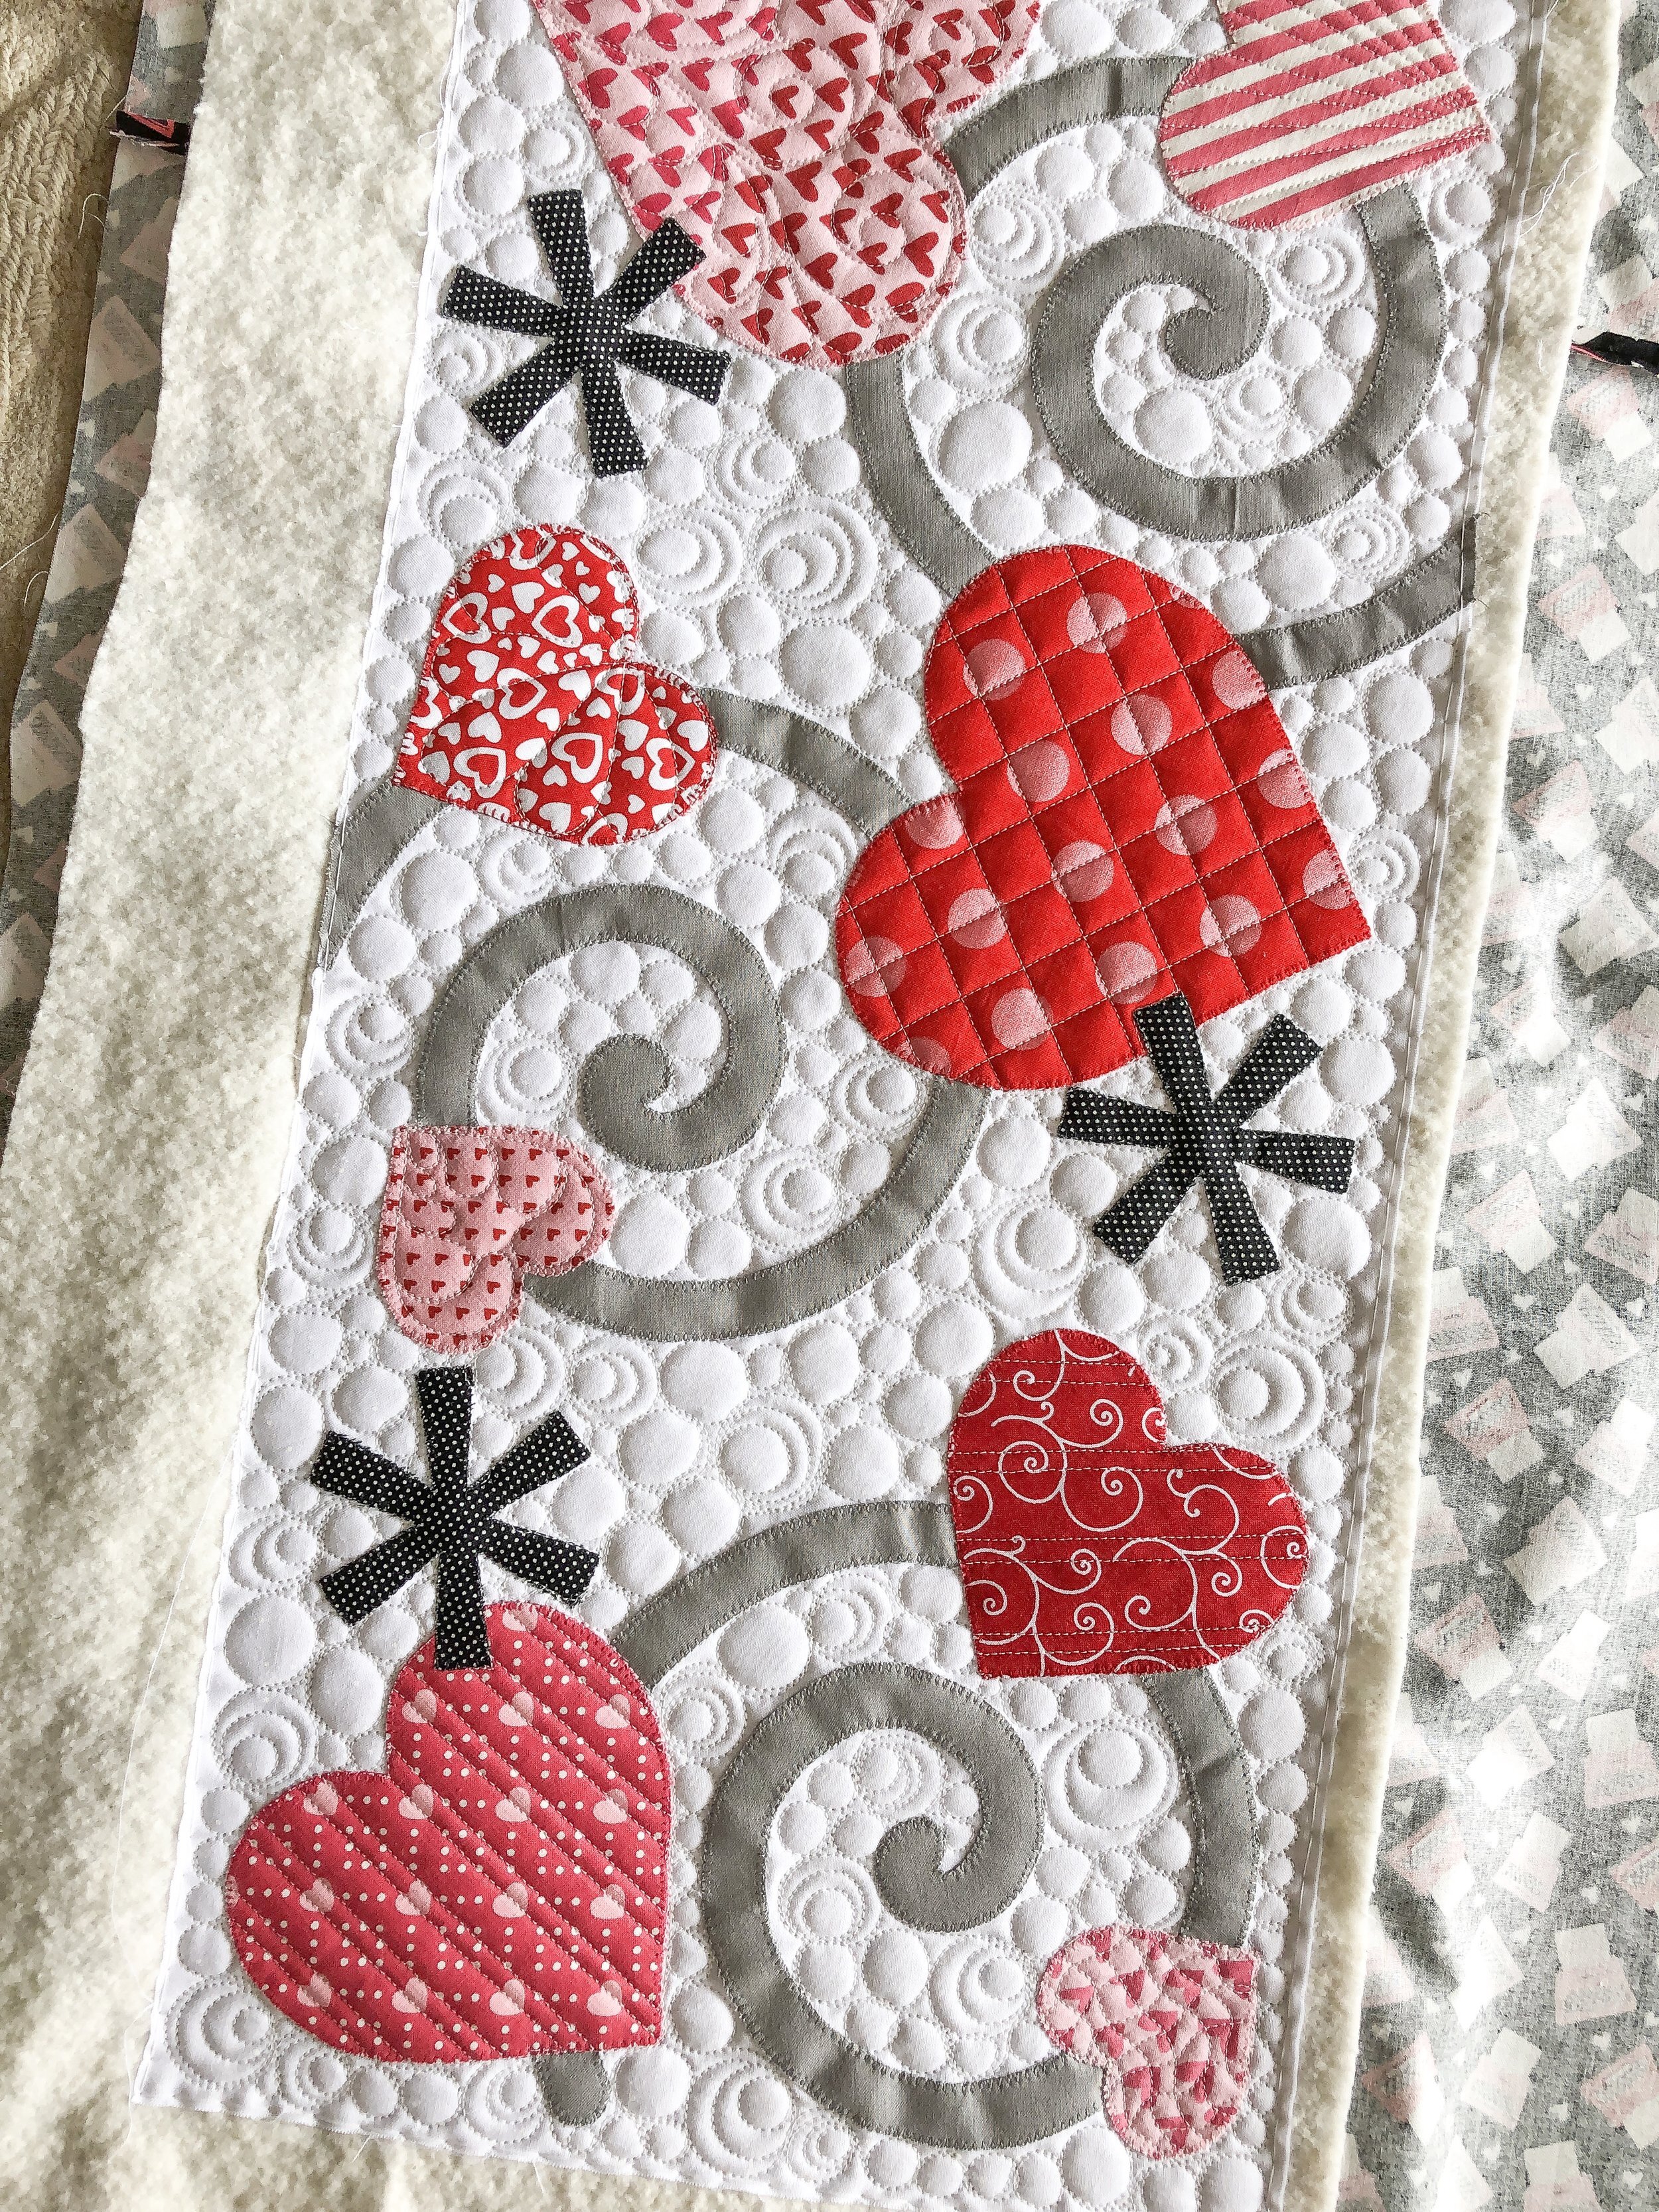
It’s so awesome to know what I can quilt something like...because I’ve done it once or twice before.
Thank you for being here, and letting me share all this quilty goodness with you!! Hope that you have a great week!
- Leisha
Barbara’s Quilts!!!
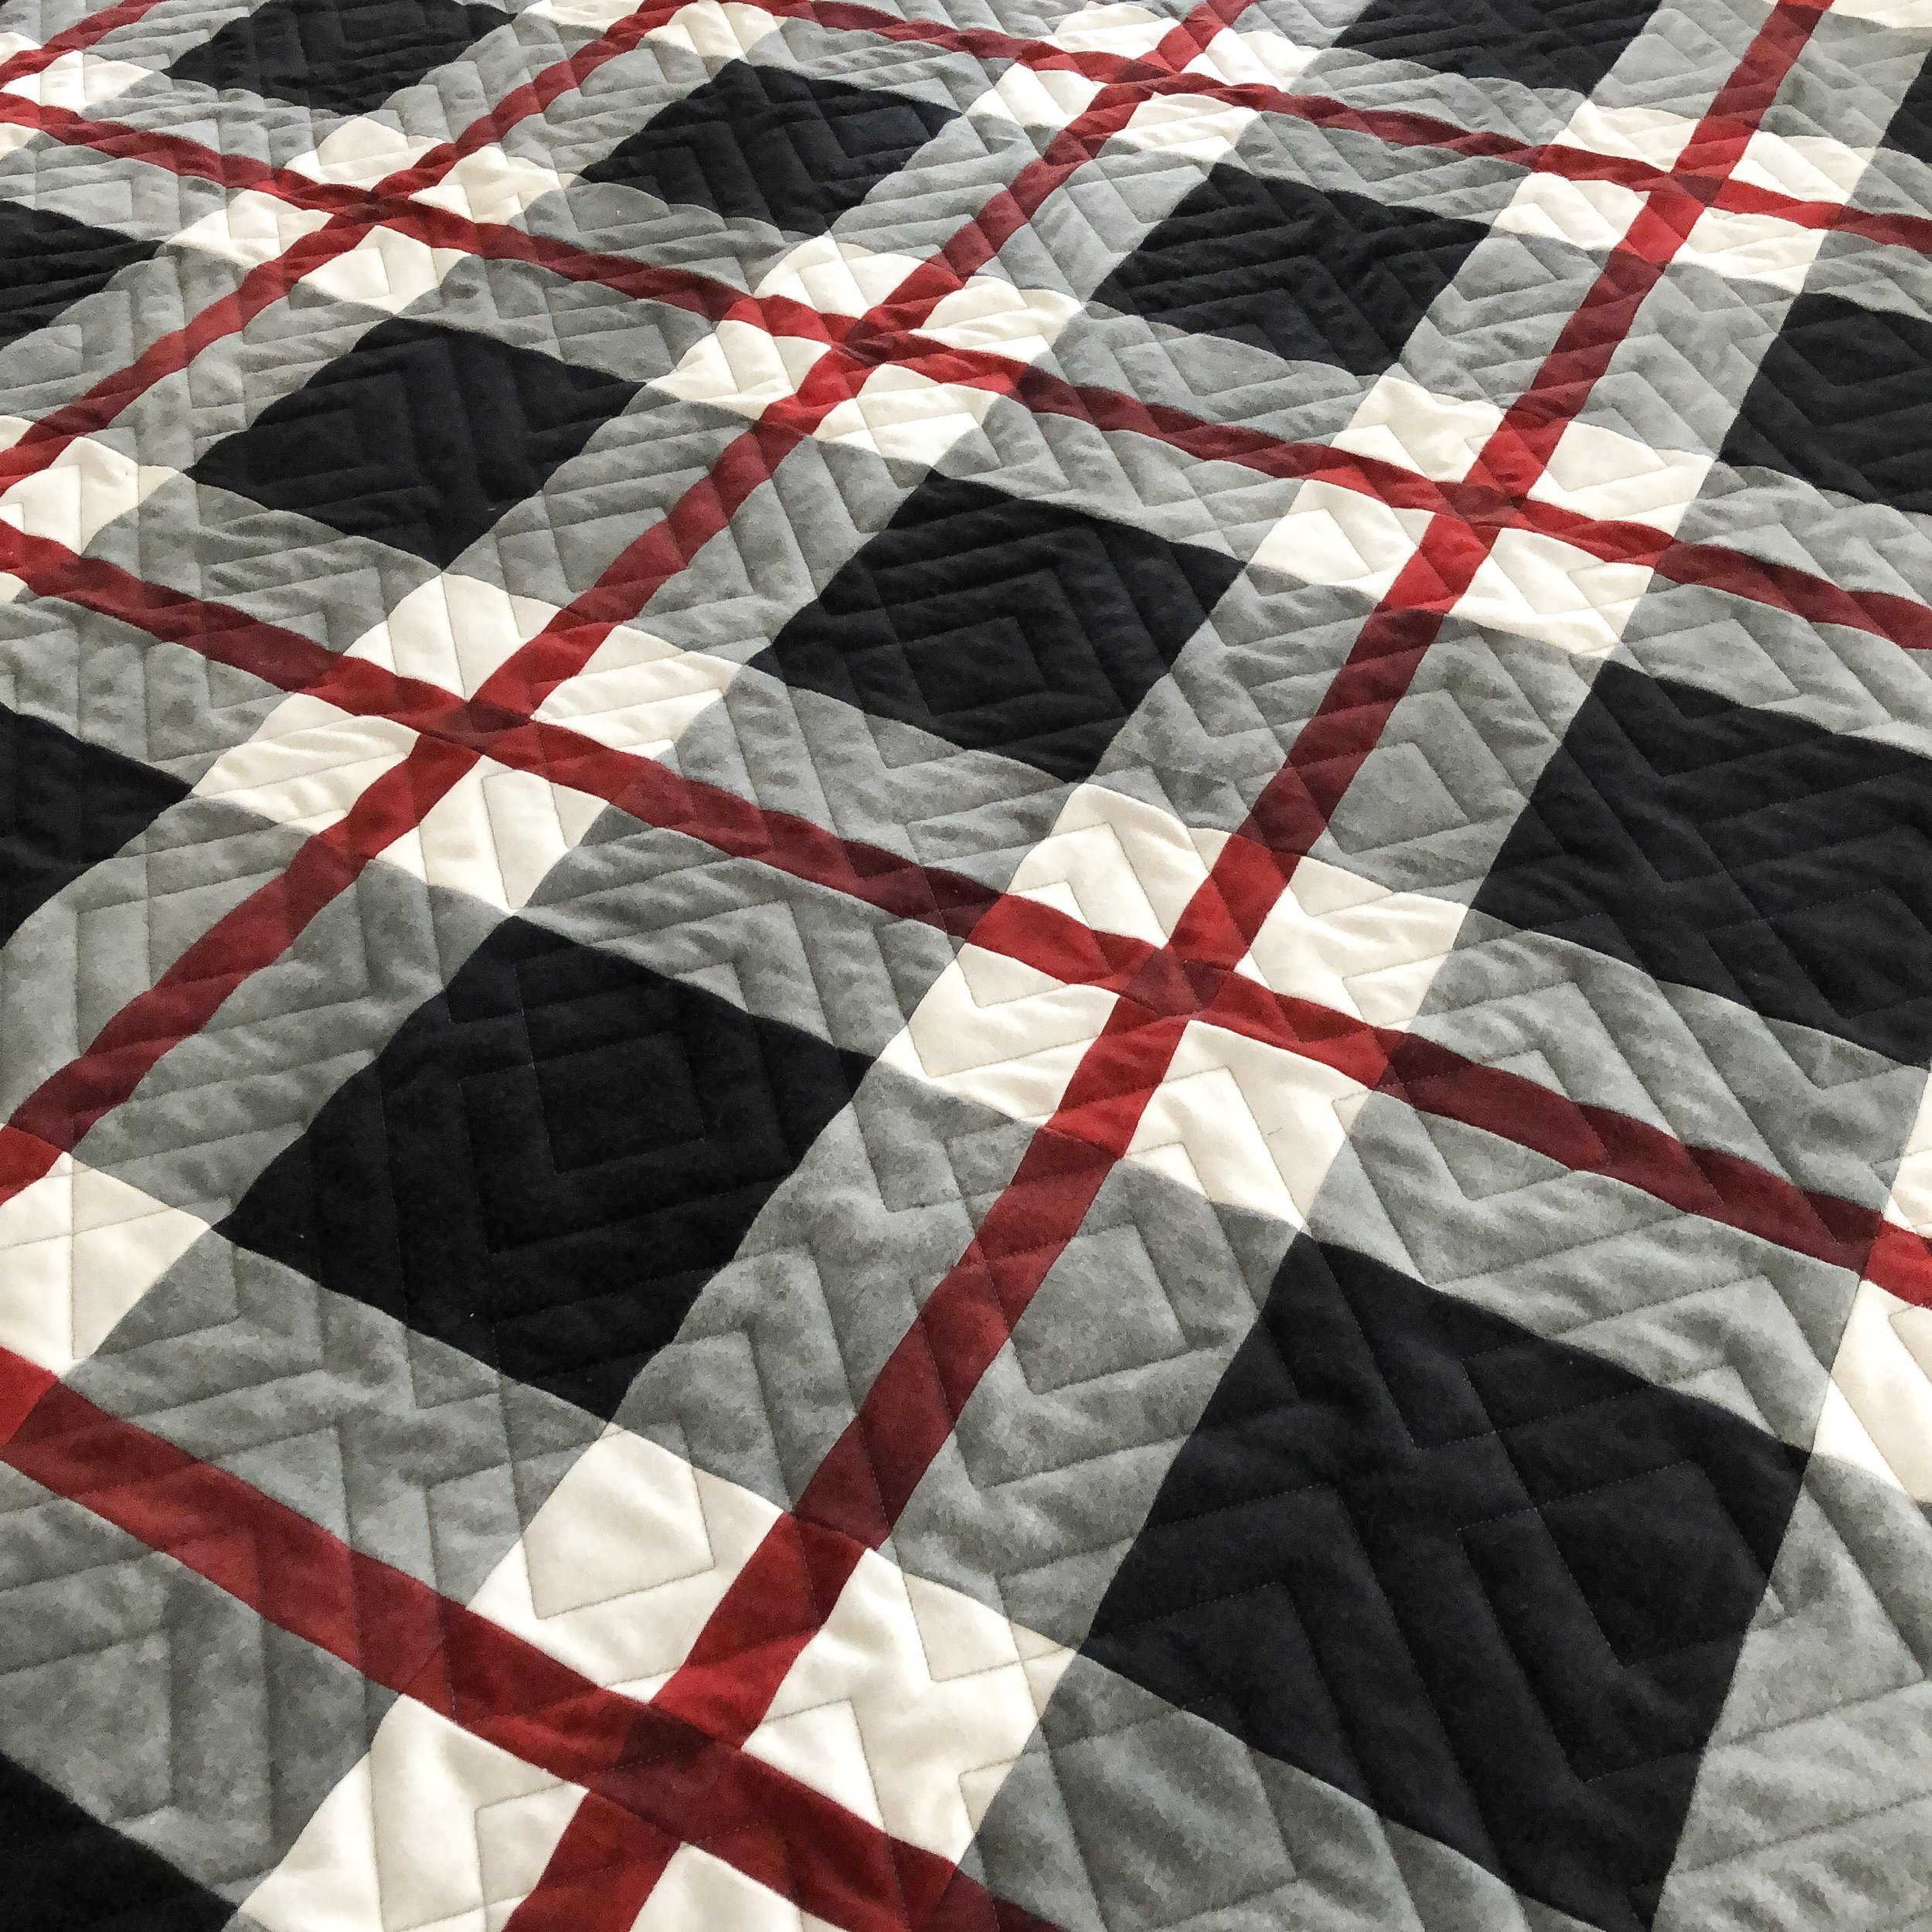
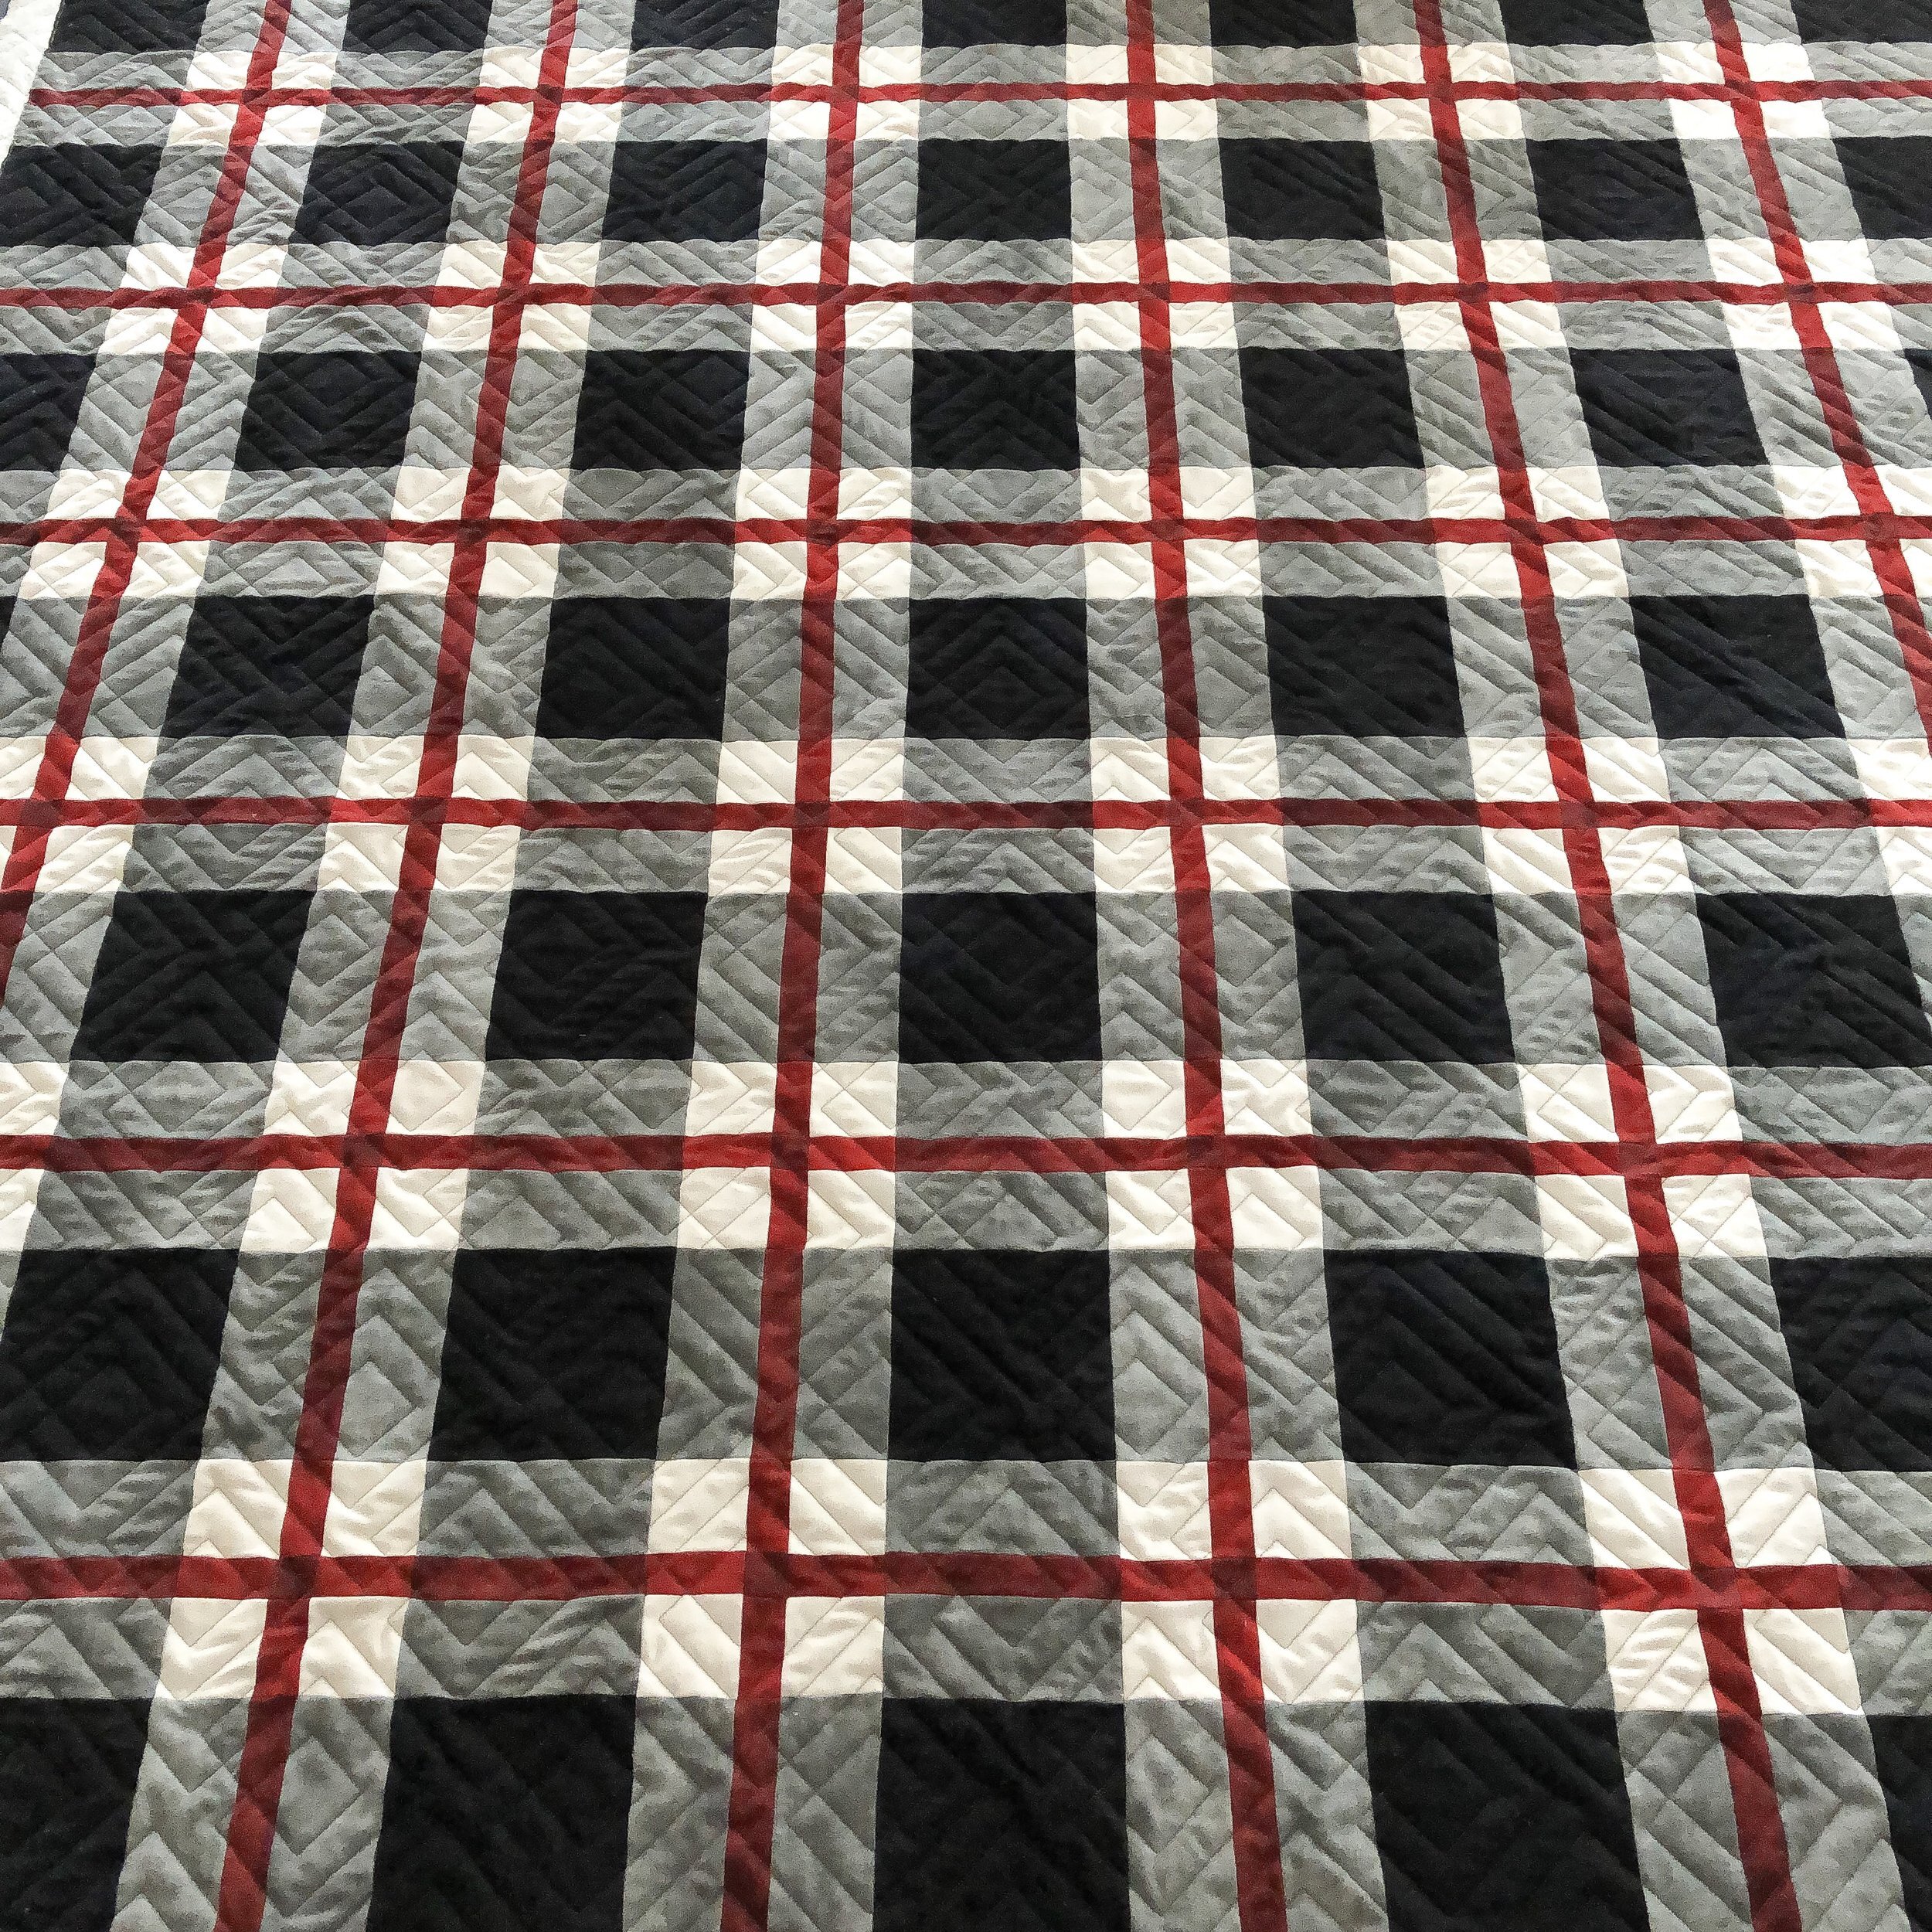
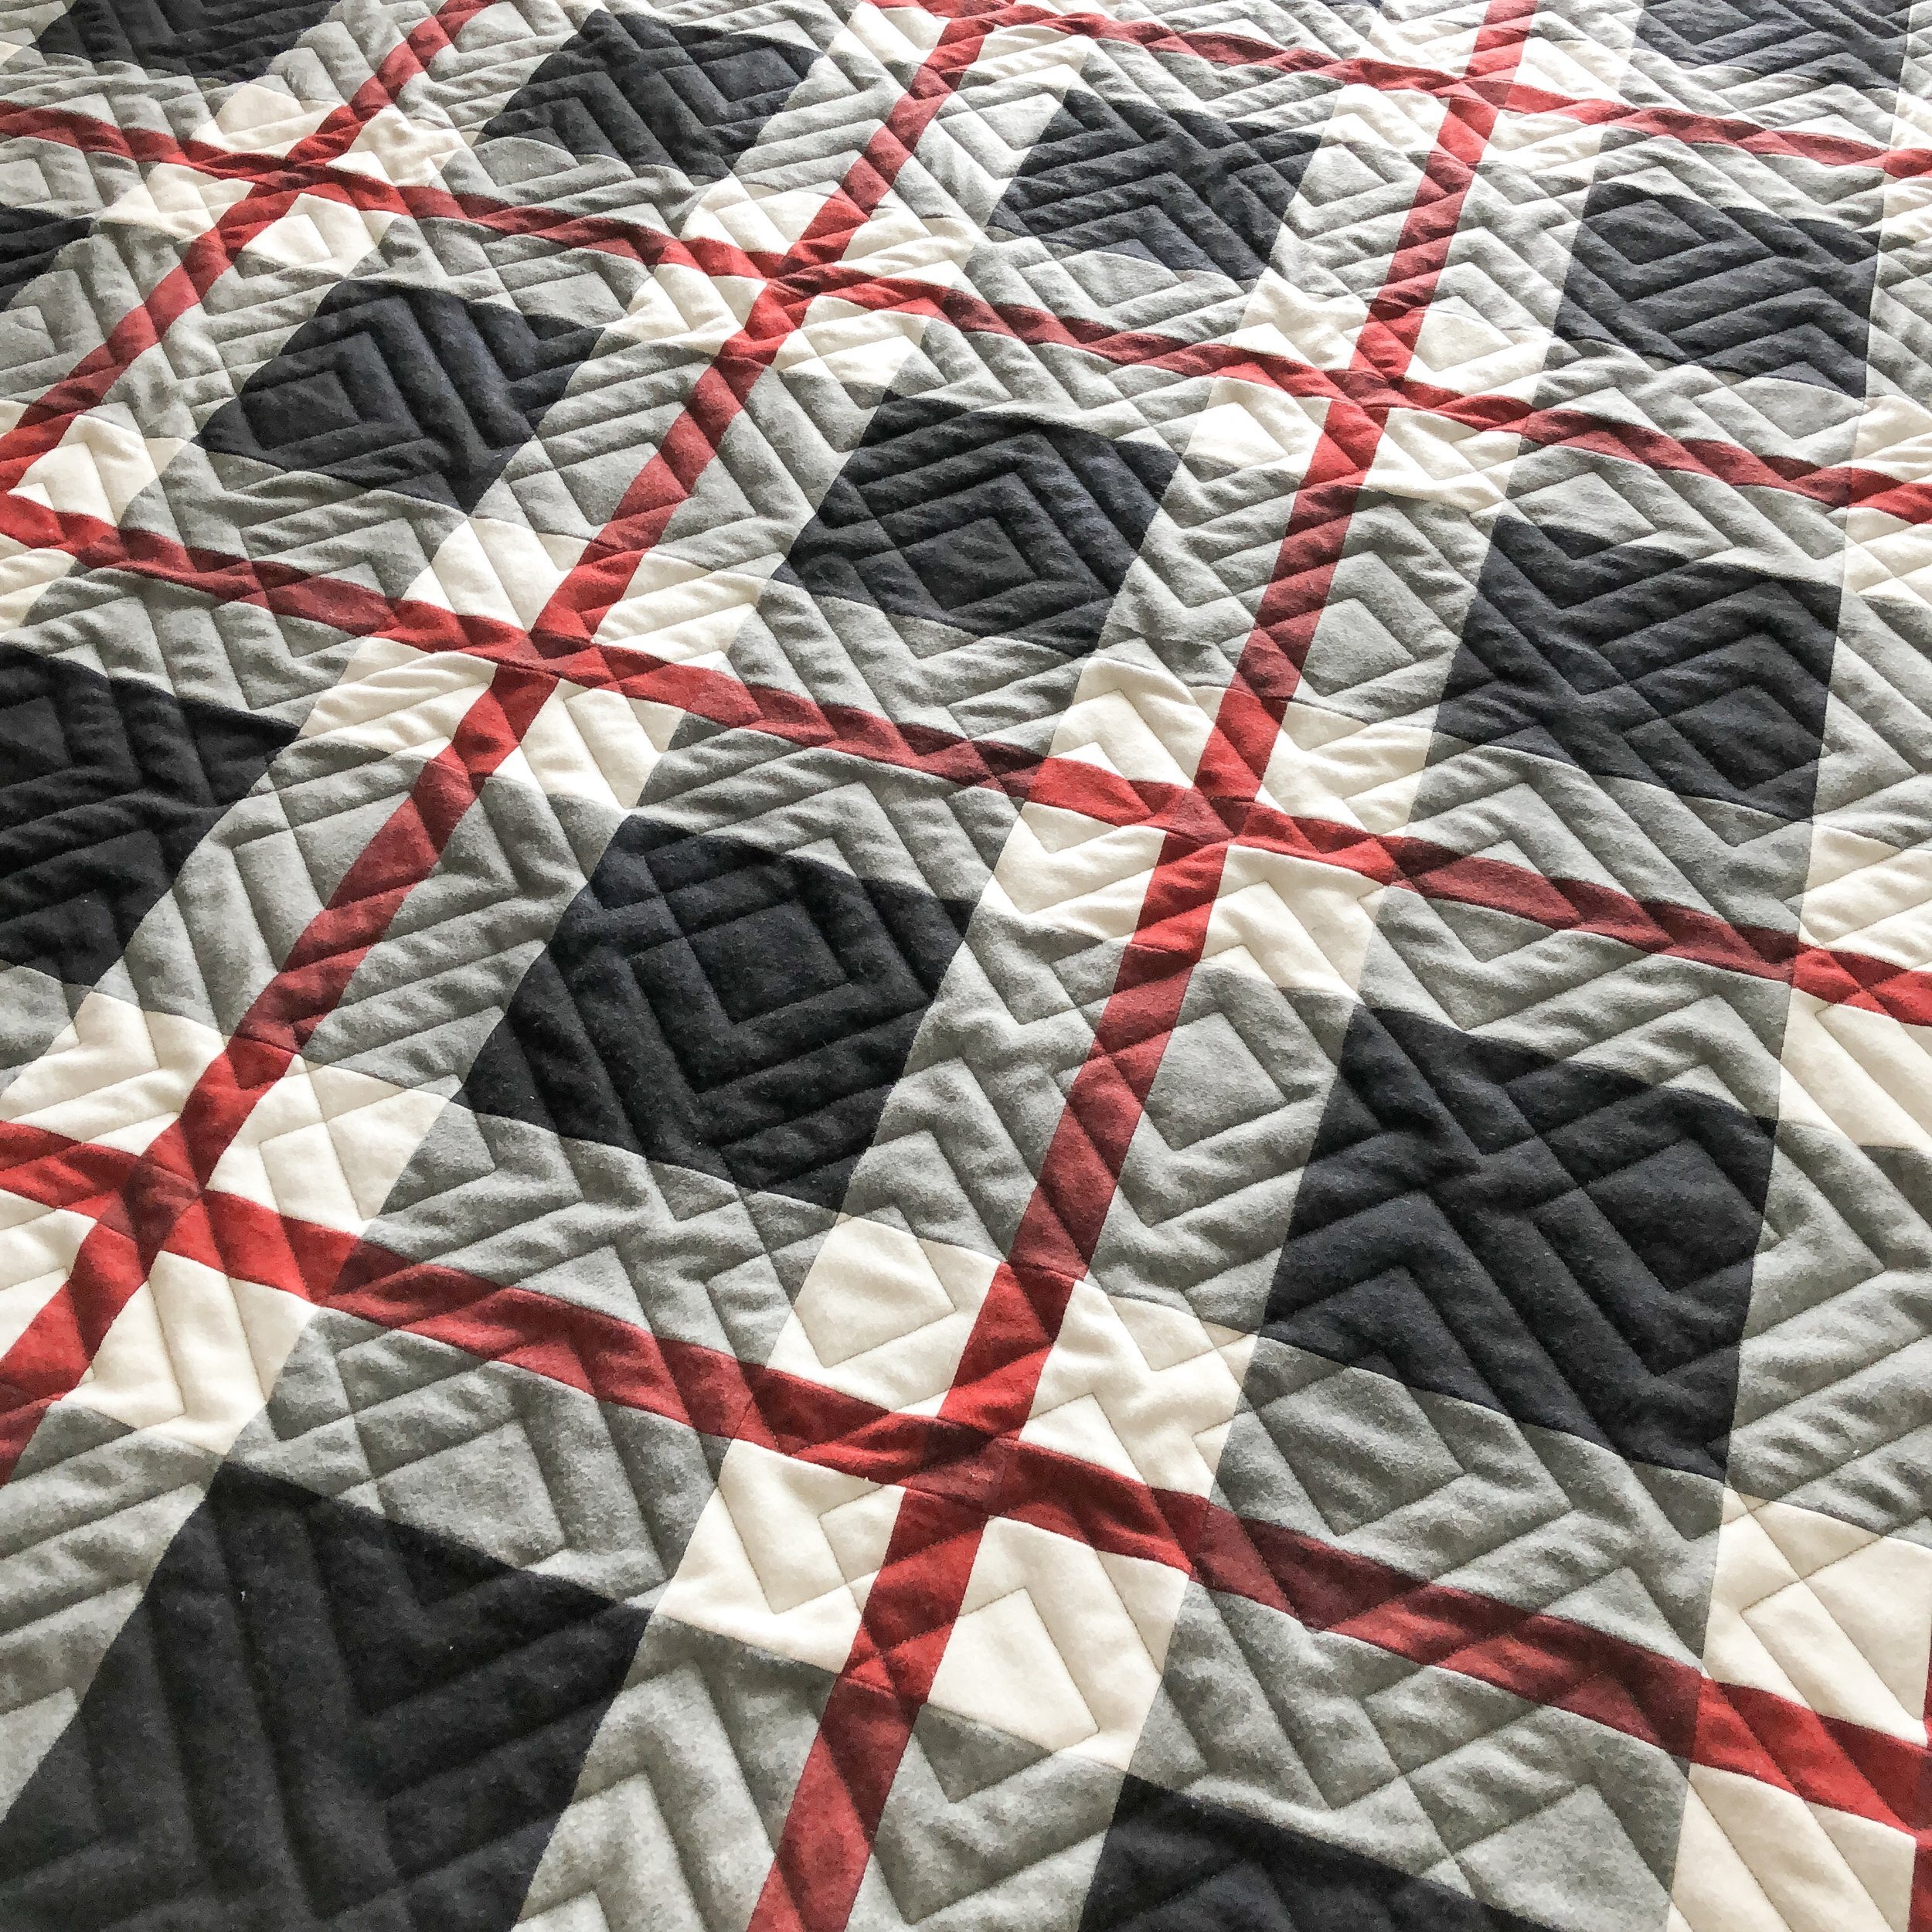
Barbara made both of these amazing quilts!! This first quilt pattern is by Bonnie Sullivan and is called Color Wash. Its such a cool quilt!! The front is made up of flannels.
I know for some computerized quilting doesn’t seem a worthwhile thing to blog about, however...for me, this is my quilting design and I love seeing it on a variety of quilts. Which is why I keep blogging all sorts of quilts with this Squared design on it. To share it’s versatility. Also, it’s a great way to see new quilt patterns, that you haven’t seen before, and how they were quilted. I do hope you find these blog posts enjoyable and helpful!!

I thought my Squared©️ design would look awesome on this plaid quilt!!! Love how it turned out. Squared is available on my website at: https://www.quiltingit.com/shop/squared (in several different digital formats) or at Urban Elementz: https://www.urbanelementz.com/squared.html (available in paper and digital formats).
I can’t quite remember what size I quilted this design, but if I remember right it was between 5”-6” in height. I did the quilting design size larger than I normally do because of the size of the large quilt blocks, but also most importantly because the back is minky. I don’t love overquilted minky backings...otherwise they lose some of the coziness.

I used an 8020 cotton poly blend batting and an Oxford gray color of 30 Tex A&E Perma Core thread, to quilt it. I typically don’t like thread when it is darker than some of the fabrics. But this gray oxford color blended perfectly on the black, red, gray, and white fabrics. Plus the minky backing was gray as well.
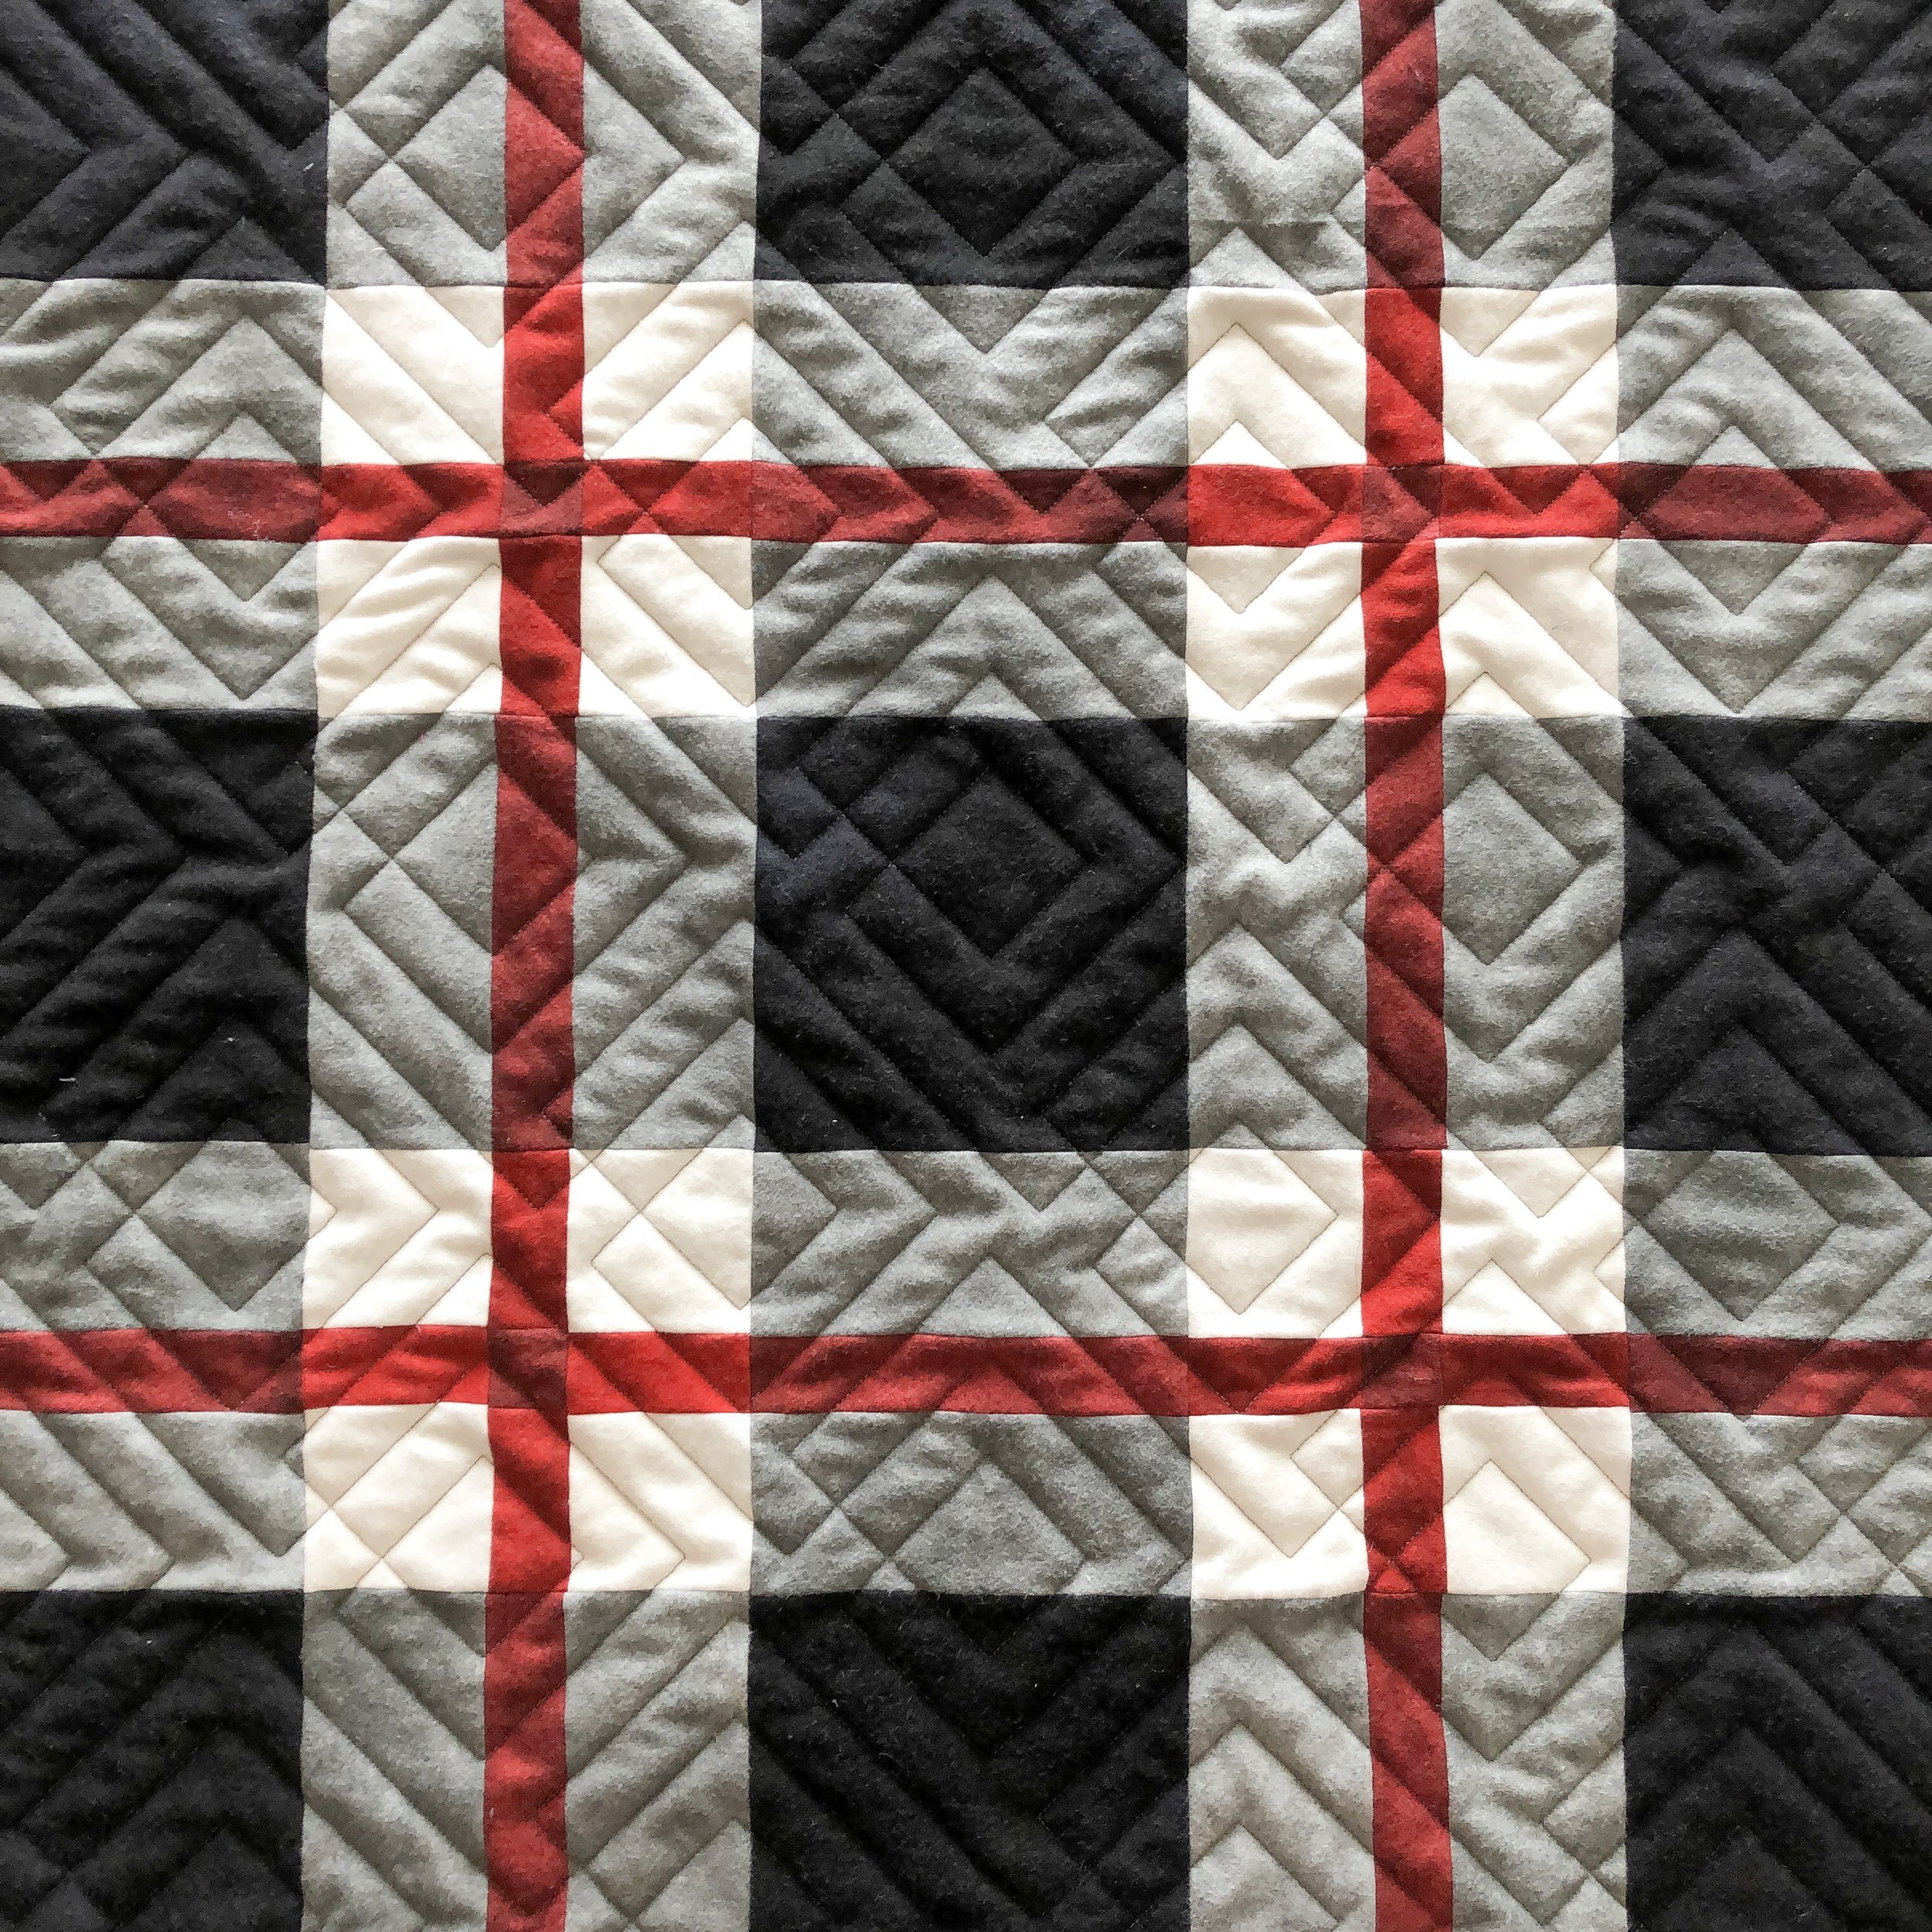
I just can’t get over how awesome the texture is on this quilt, the diagonal of the quilting design with the square plaid, is just an awesome combination.
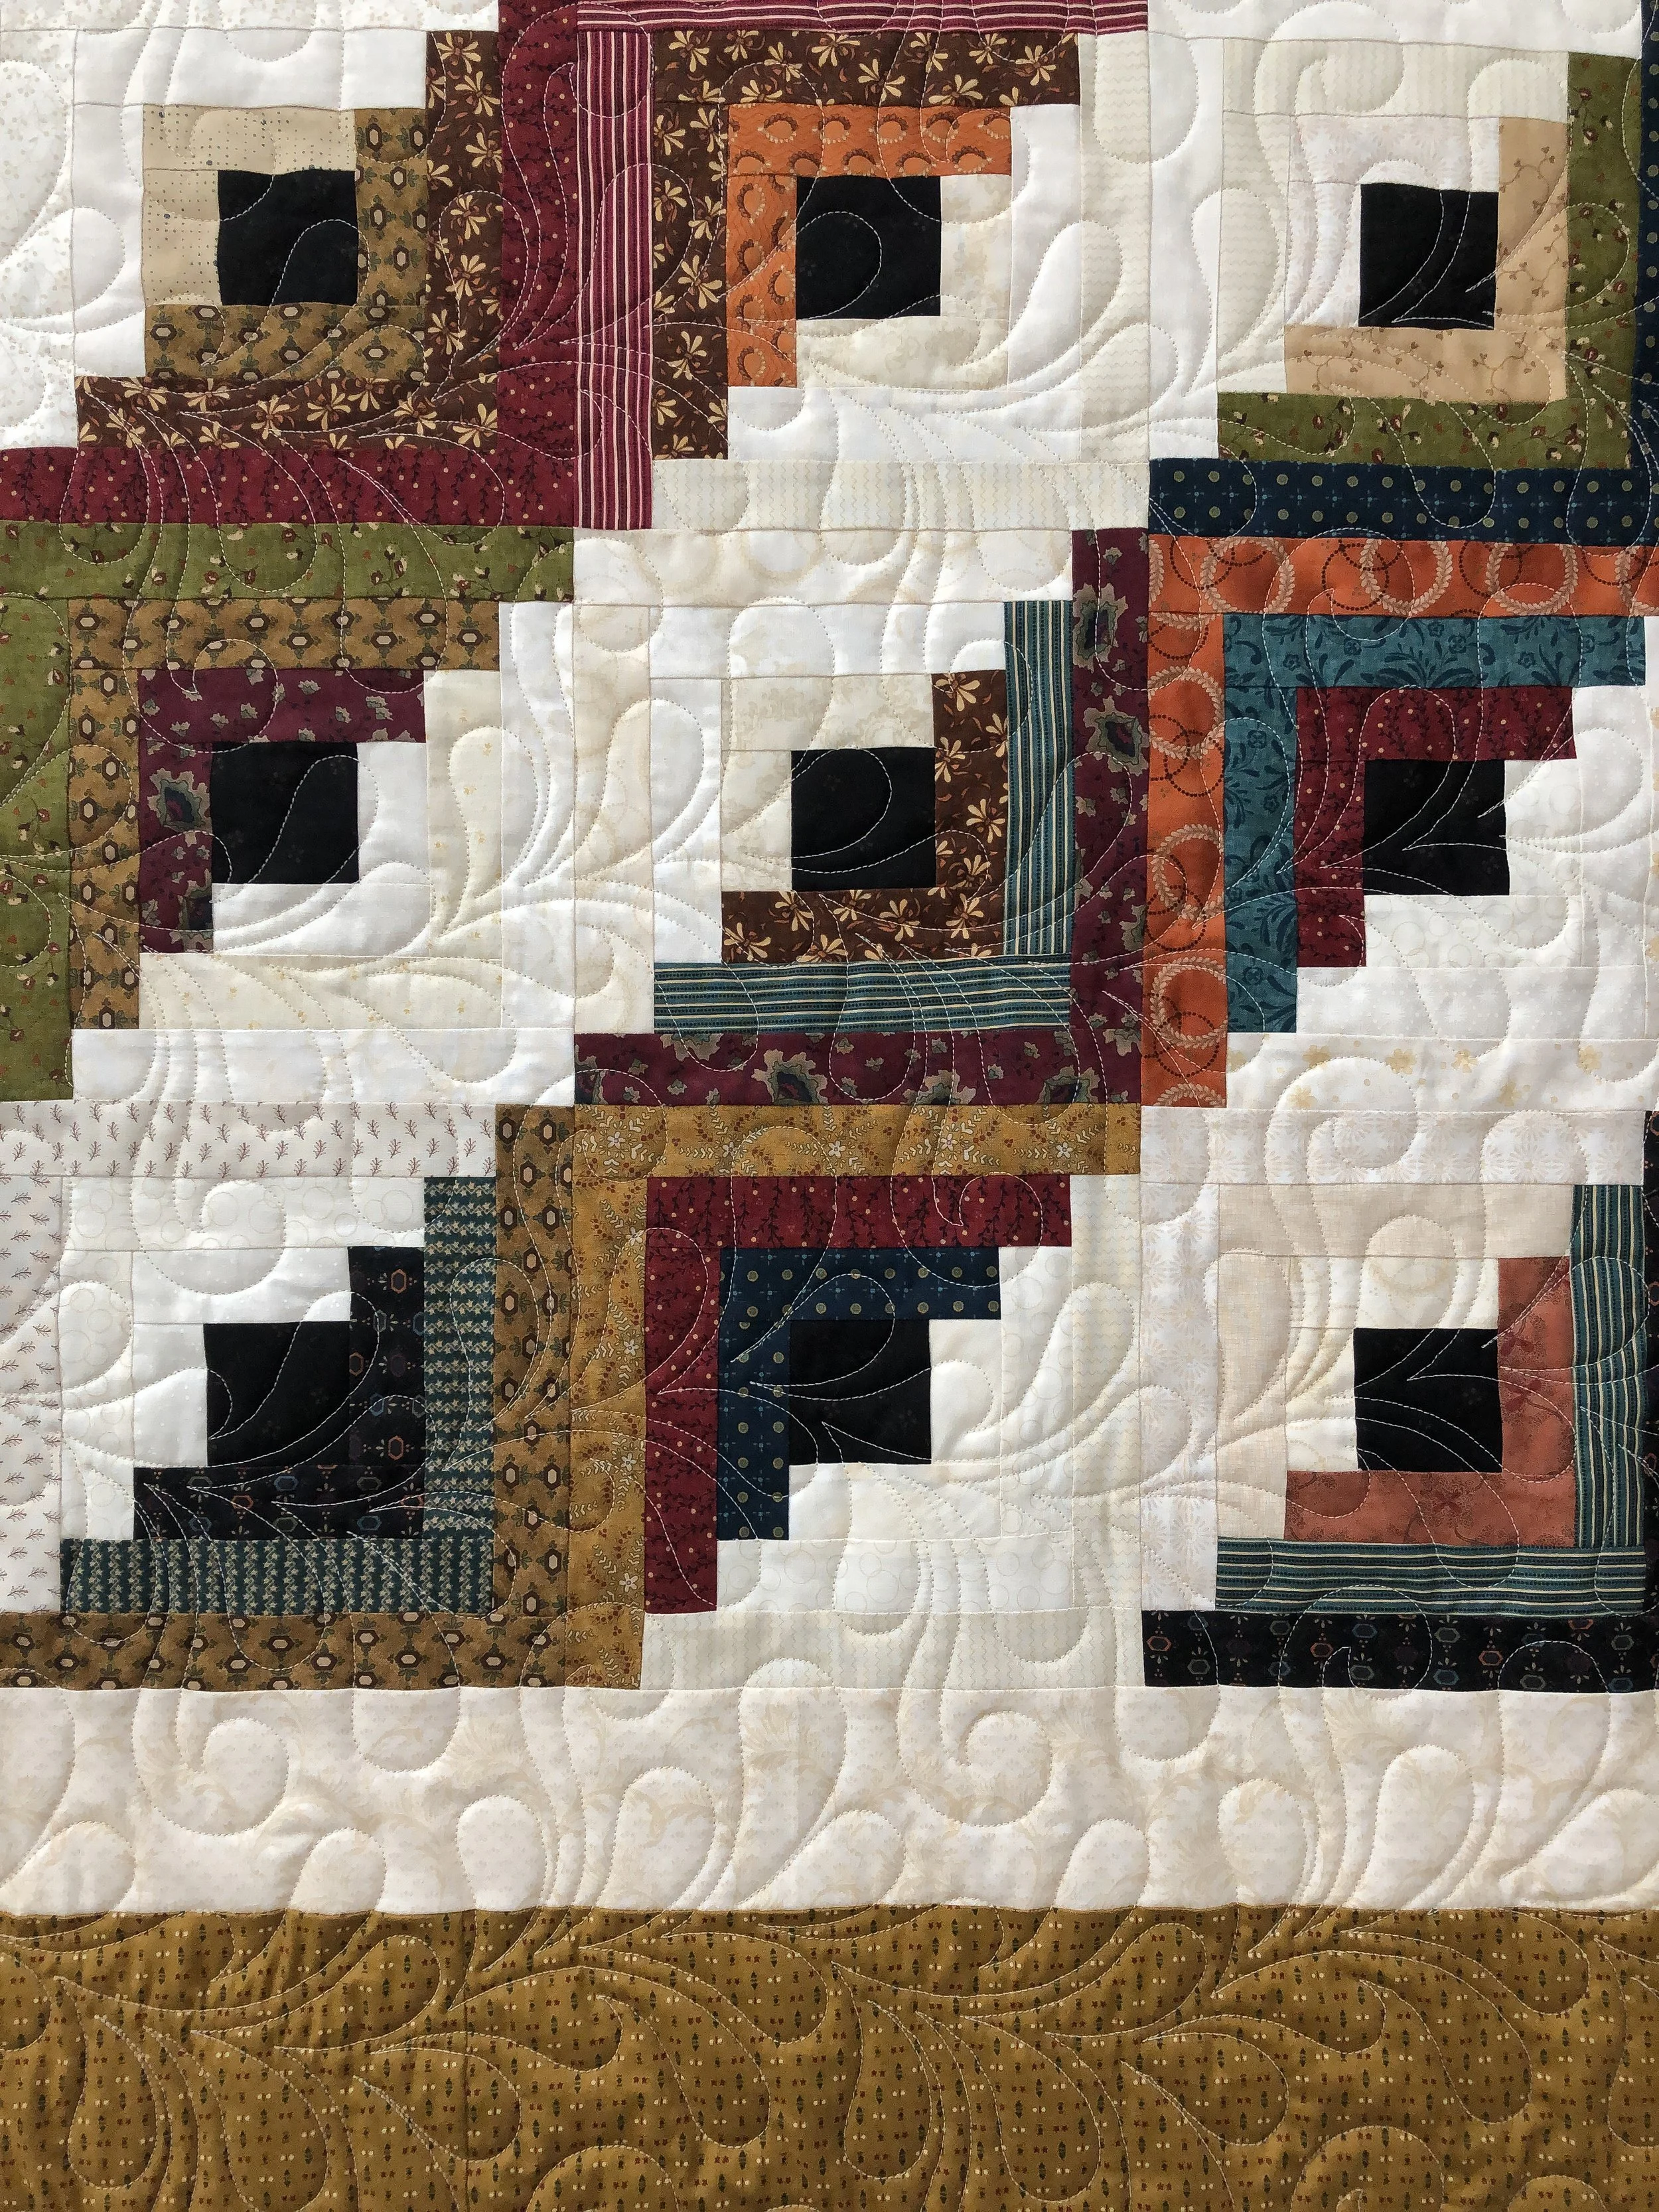
Isnt this traditional Log Cabin quilt stunning?!?!!! I love the black centers, they pop right off the quilt and make it look soooo striking.

I love the movement of this quilting design across the quilt!!
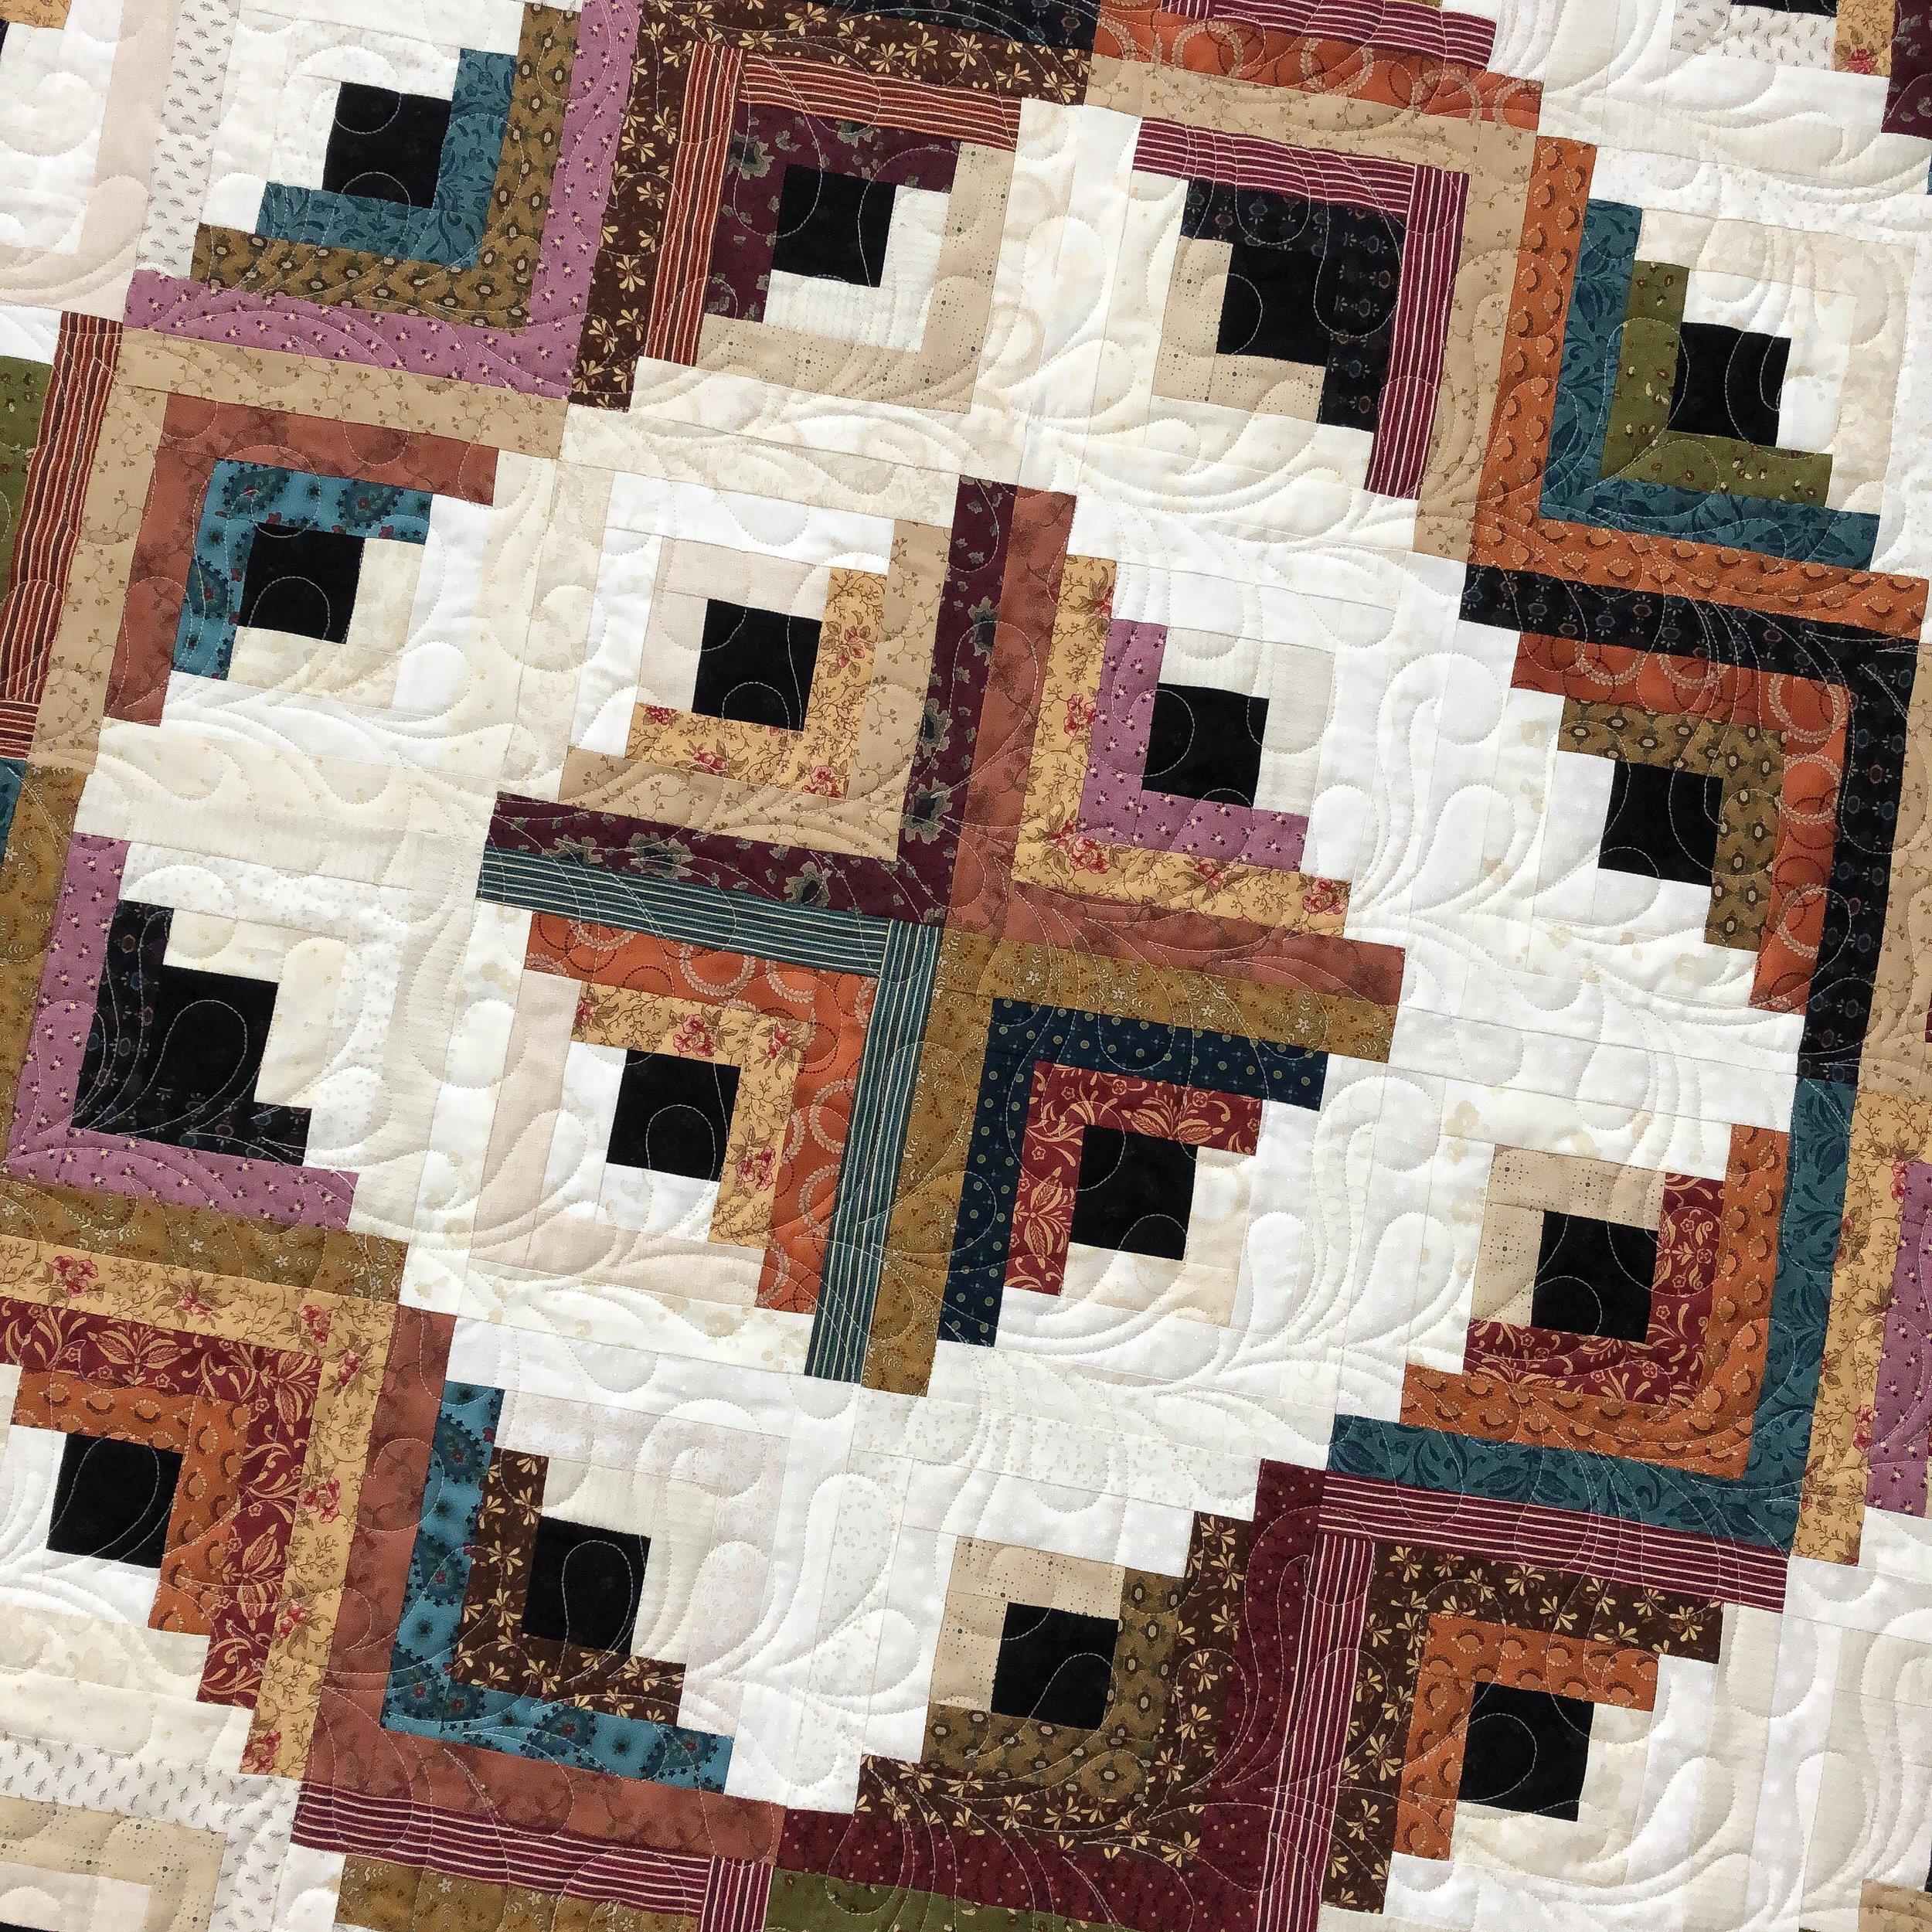
This lovely quilting design is one of Patricia Ritter and my designs, it’s called “Viola”©️ and is available at Urban Elementz: https://www.urbanelementz.com/viola.html the great thing about this design, it comes with a variety of different blocks and even a petite version this edge to edge design. To see all the variations of this design, head over to: https://www.urbanelementz.com/catalogsearch/result/?cat=0&q=Viola

This design has such a fresh take on the traditional quilting feather. If you notice on the quilt, as well as the picture above, the individual feather petals are spread apart more, also some variety in the design...that you don’t see in traditional feathers. I don’t know if you’ve noticed or not, but Urban Elementz has a suggested size on their website. I did go a little smaller, and set this design up a little less than 9” in height. The height of a design consists of the highest and lowest points of the motif.
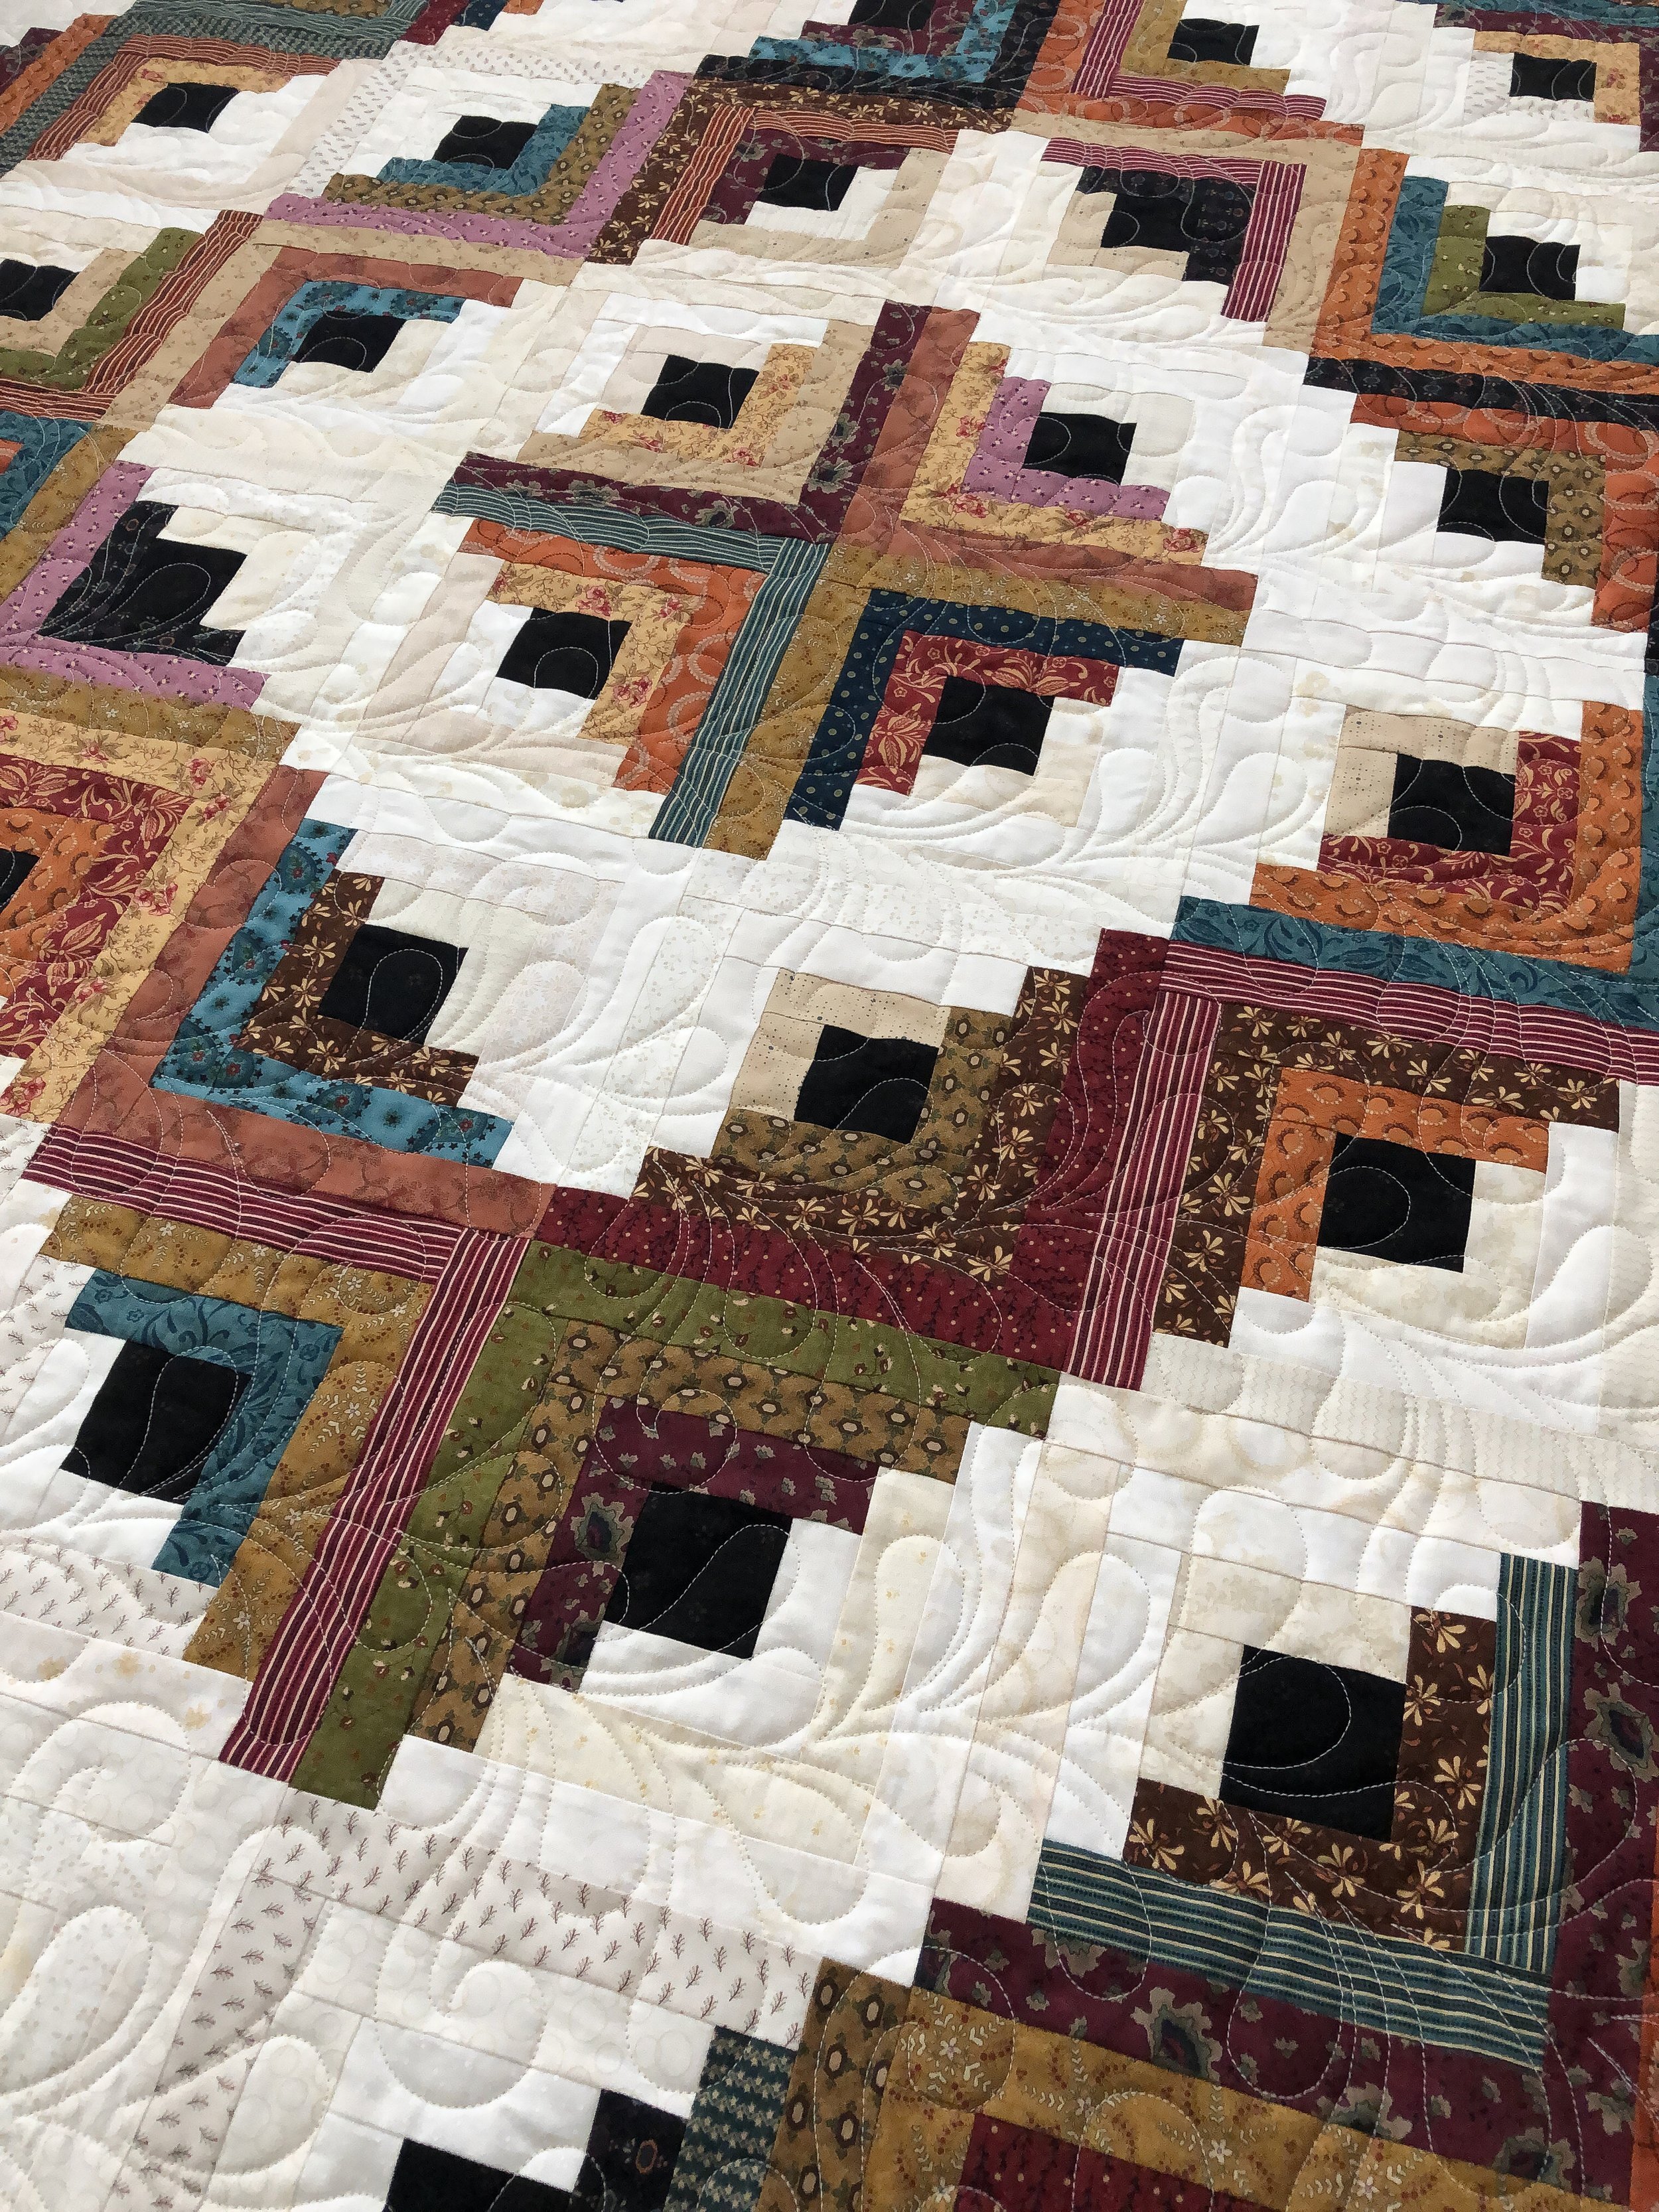
I love a good close up picture on a quilt...showing the fabrics, which helped me choose this design for this quilt, and to see that beautiful quilting texture.
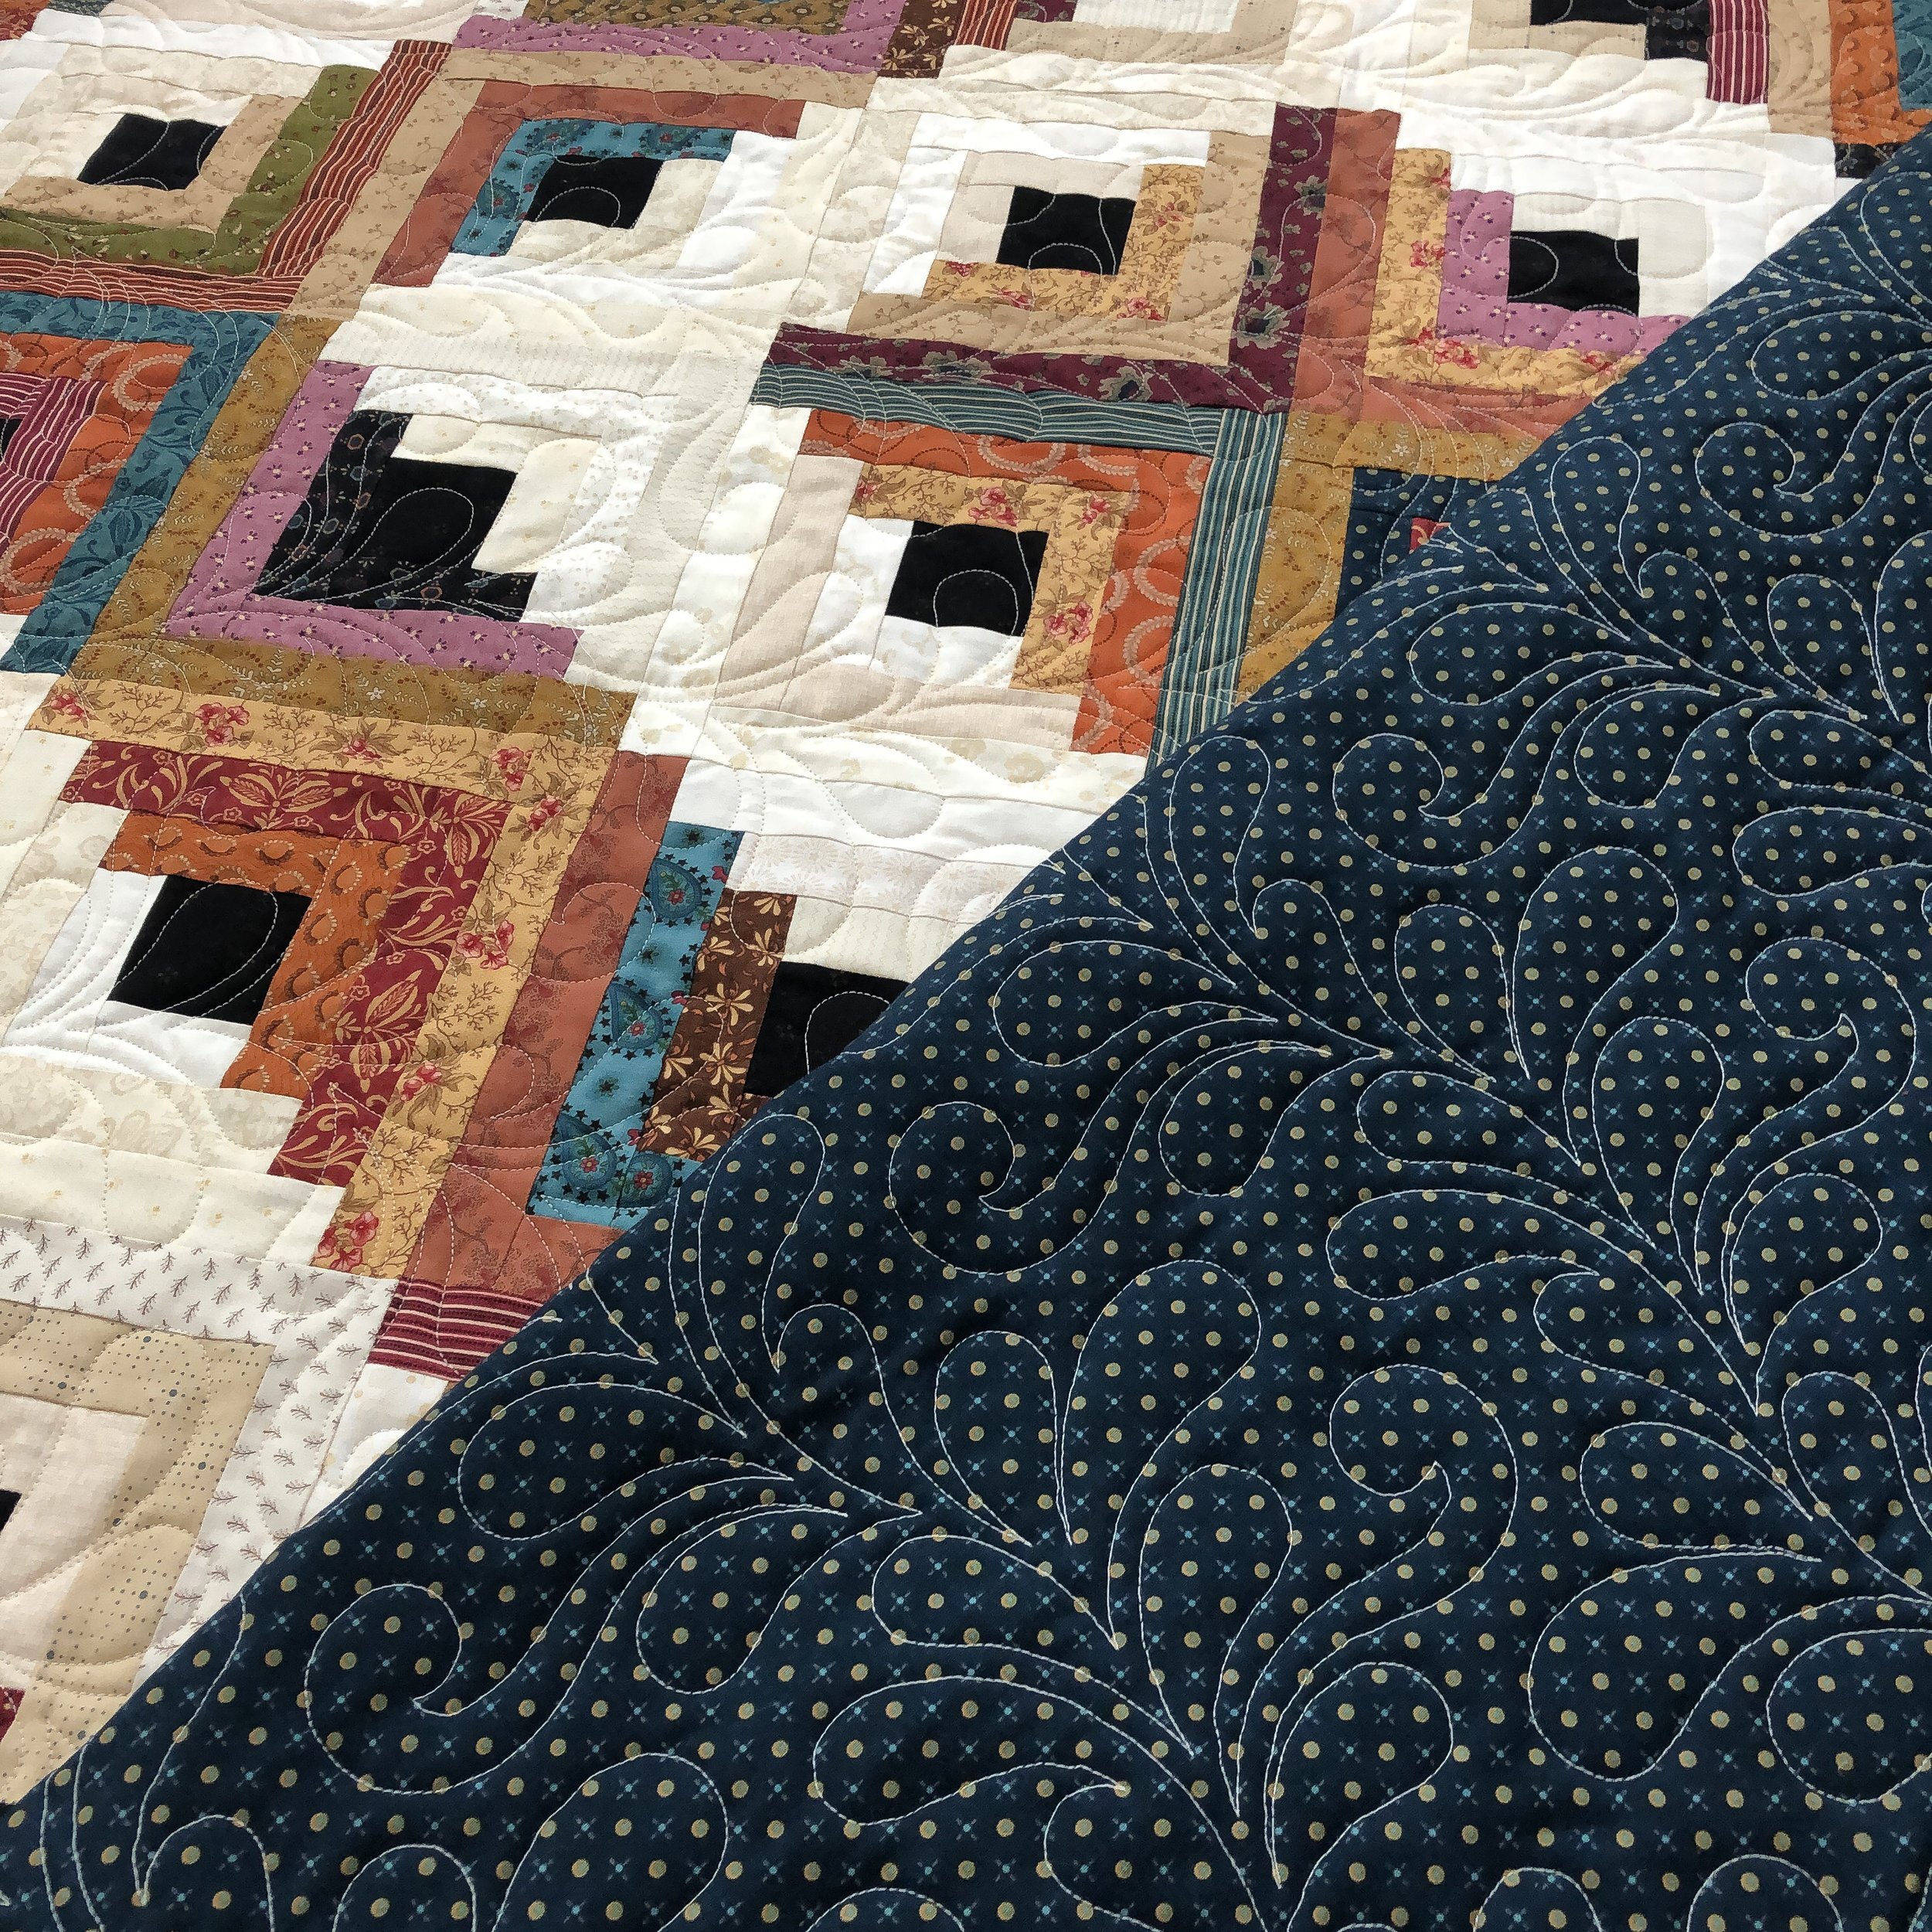
Thought I’d even share a little of the quilt backing, with that beautiful feathery vine.
Thanks for coming by!!
I had a recent request to have my blog made audible for those who have a hard time seeing/reading. There is a audio button at the top left of each blog post, and in several other parts on my website. I’m not sure if the audio button will be an option in my emails, if not go directly to my posts by clicking the link at the bottom of the email that says “read in browser”. It will take you to the blog post on my website.
Please let me know if you have any questions.
Happy quilting!! - Leisha

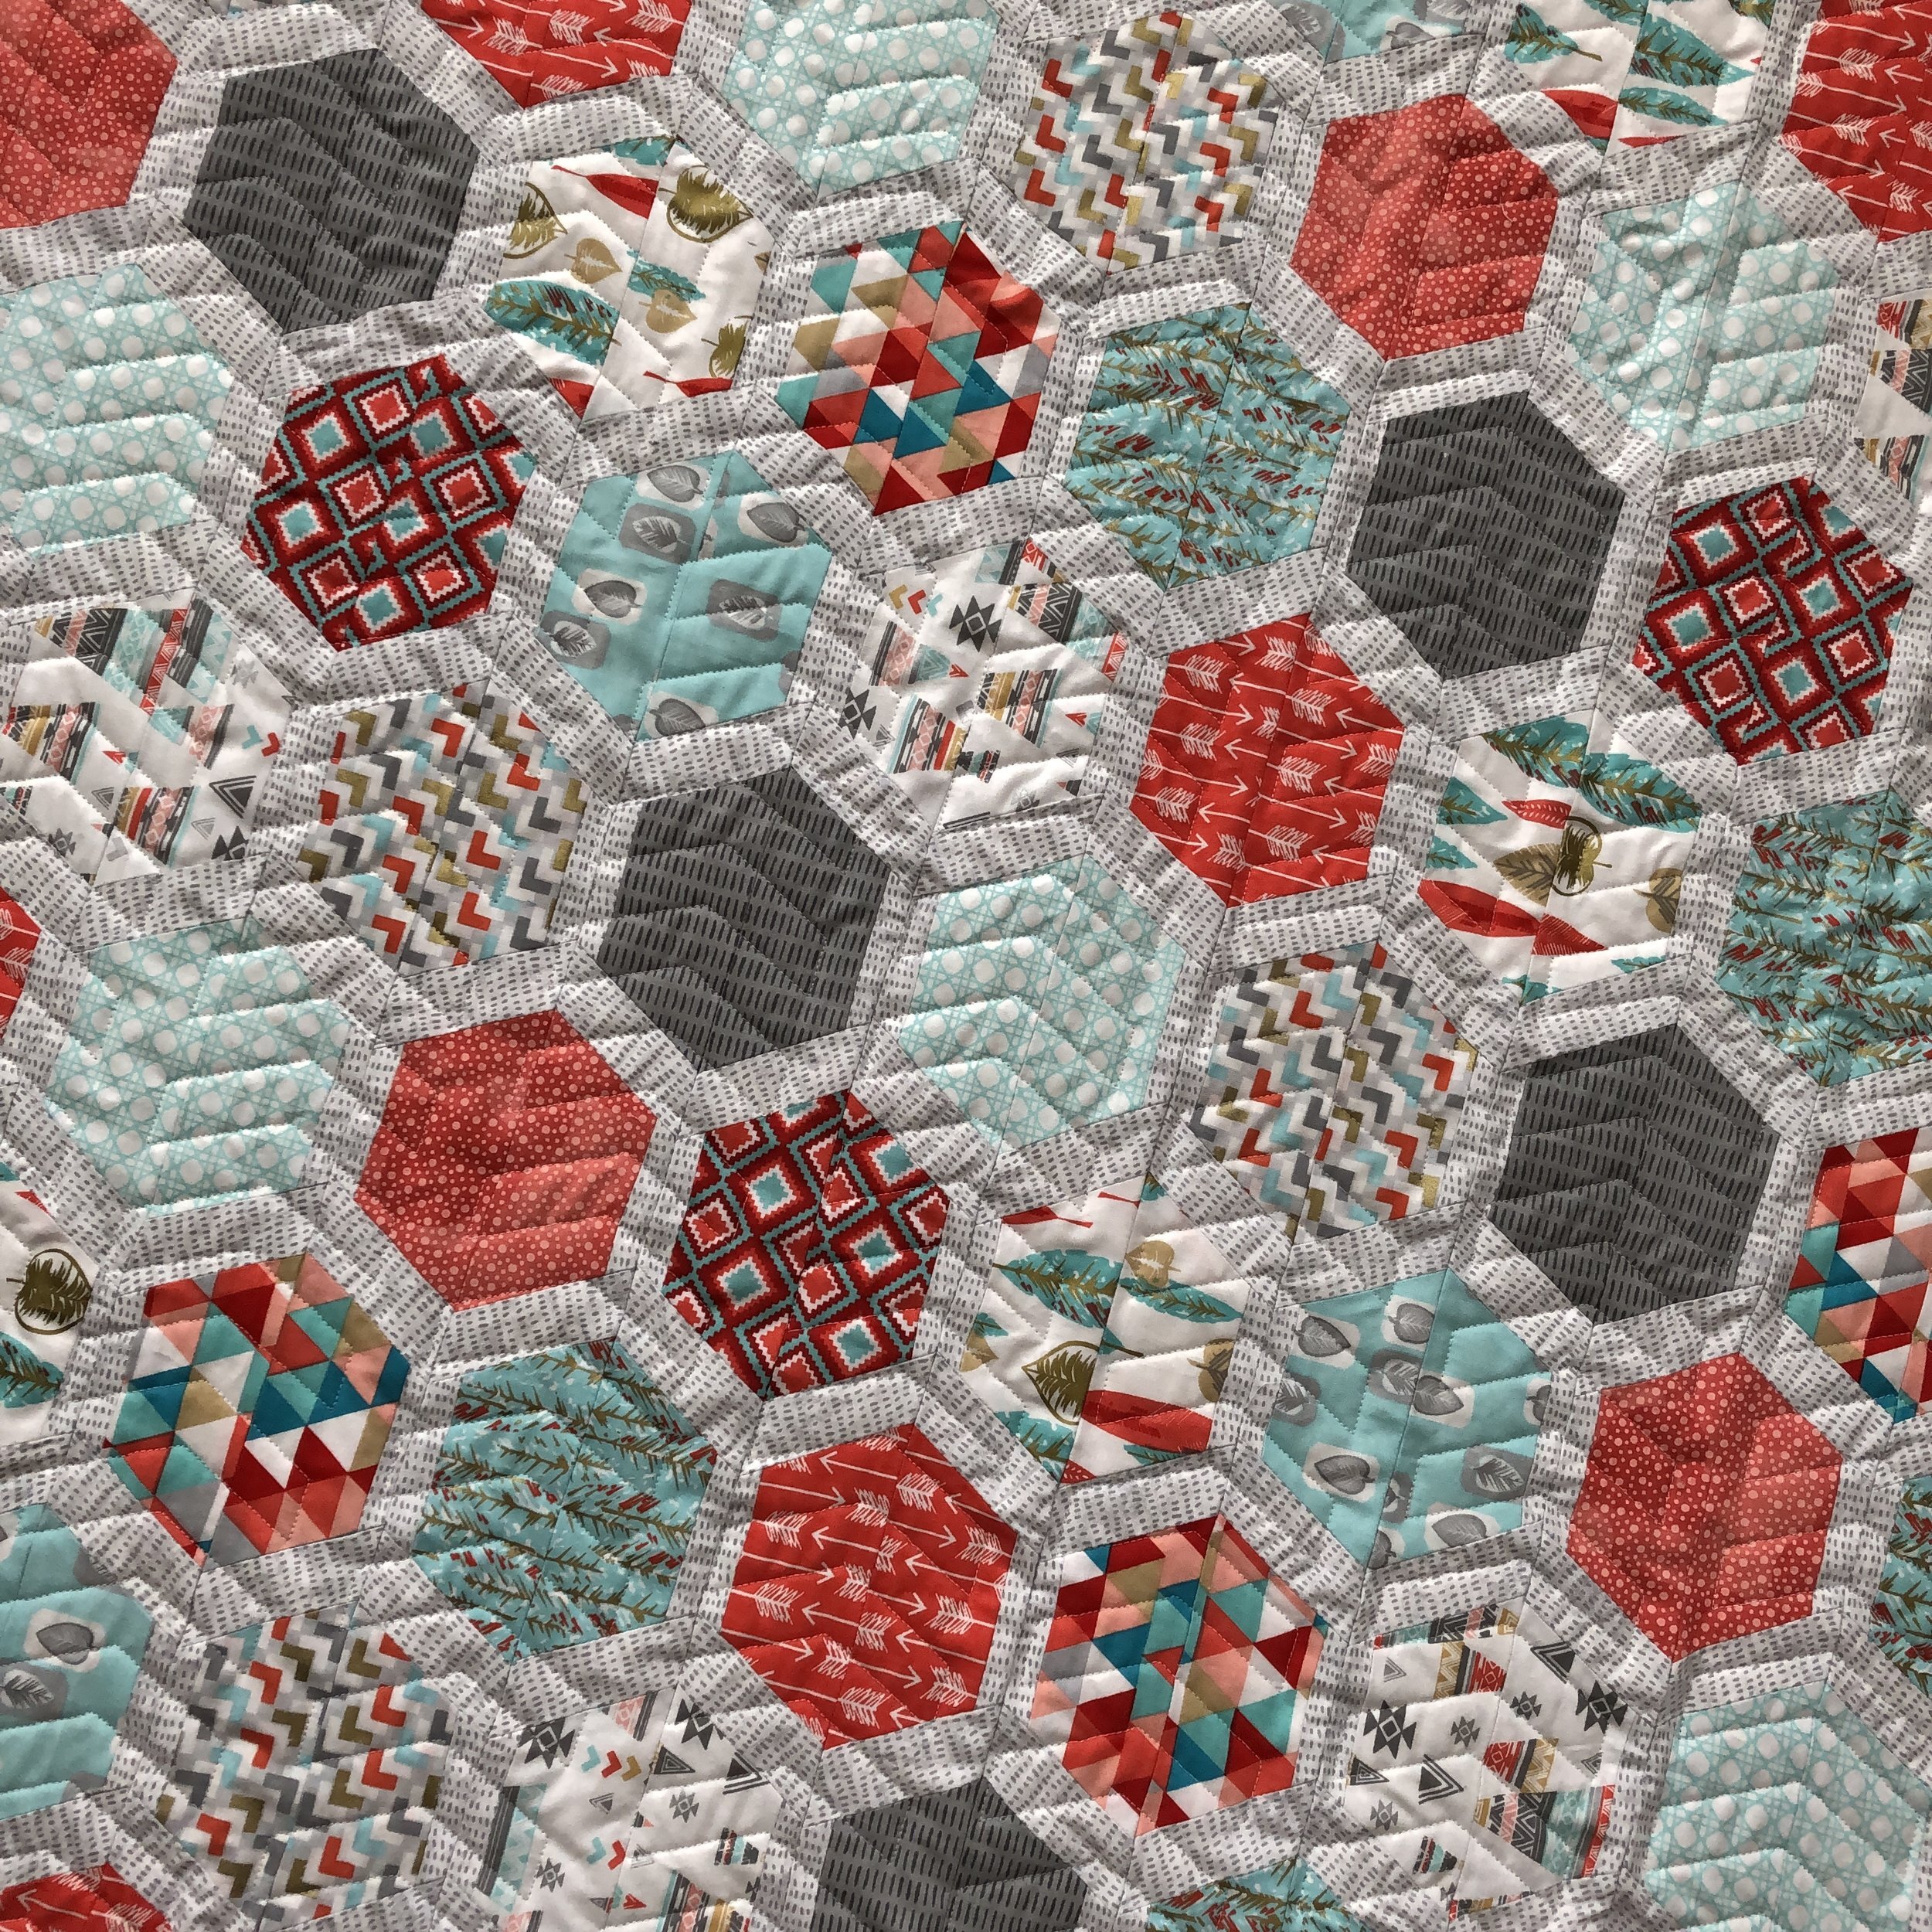
Courtney ‘s Hexie quilt!
Isn’t this quilt so amazing!!! This is Courtney’s first quilt...I’m impressed. Now I want to make one...it’s a jelly roll friendly quilt, too...more details on that in a minute. First, I think we ought to pause in amazement....
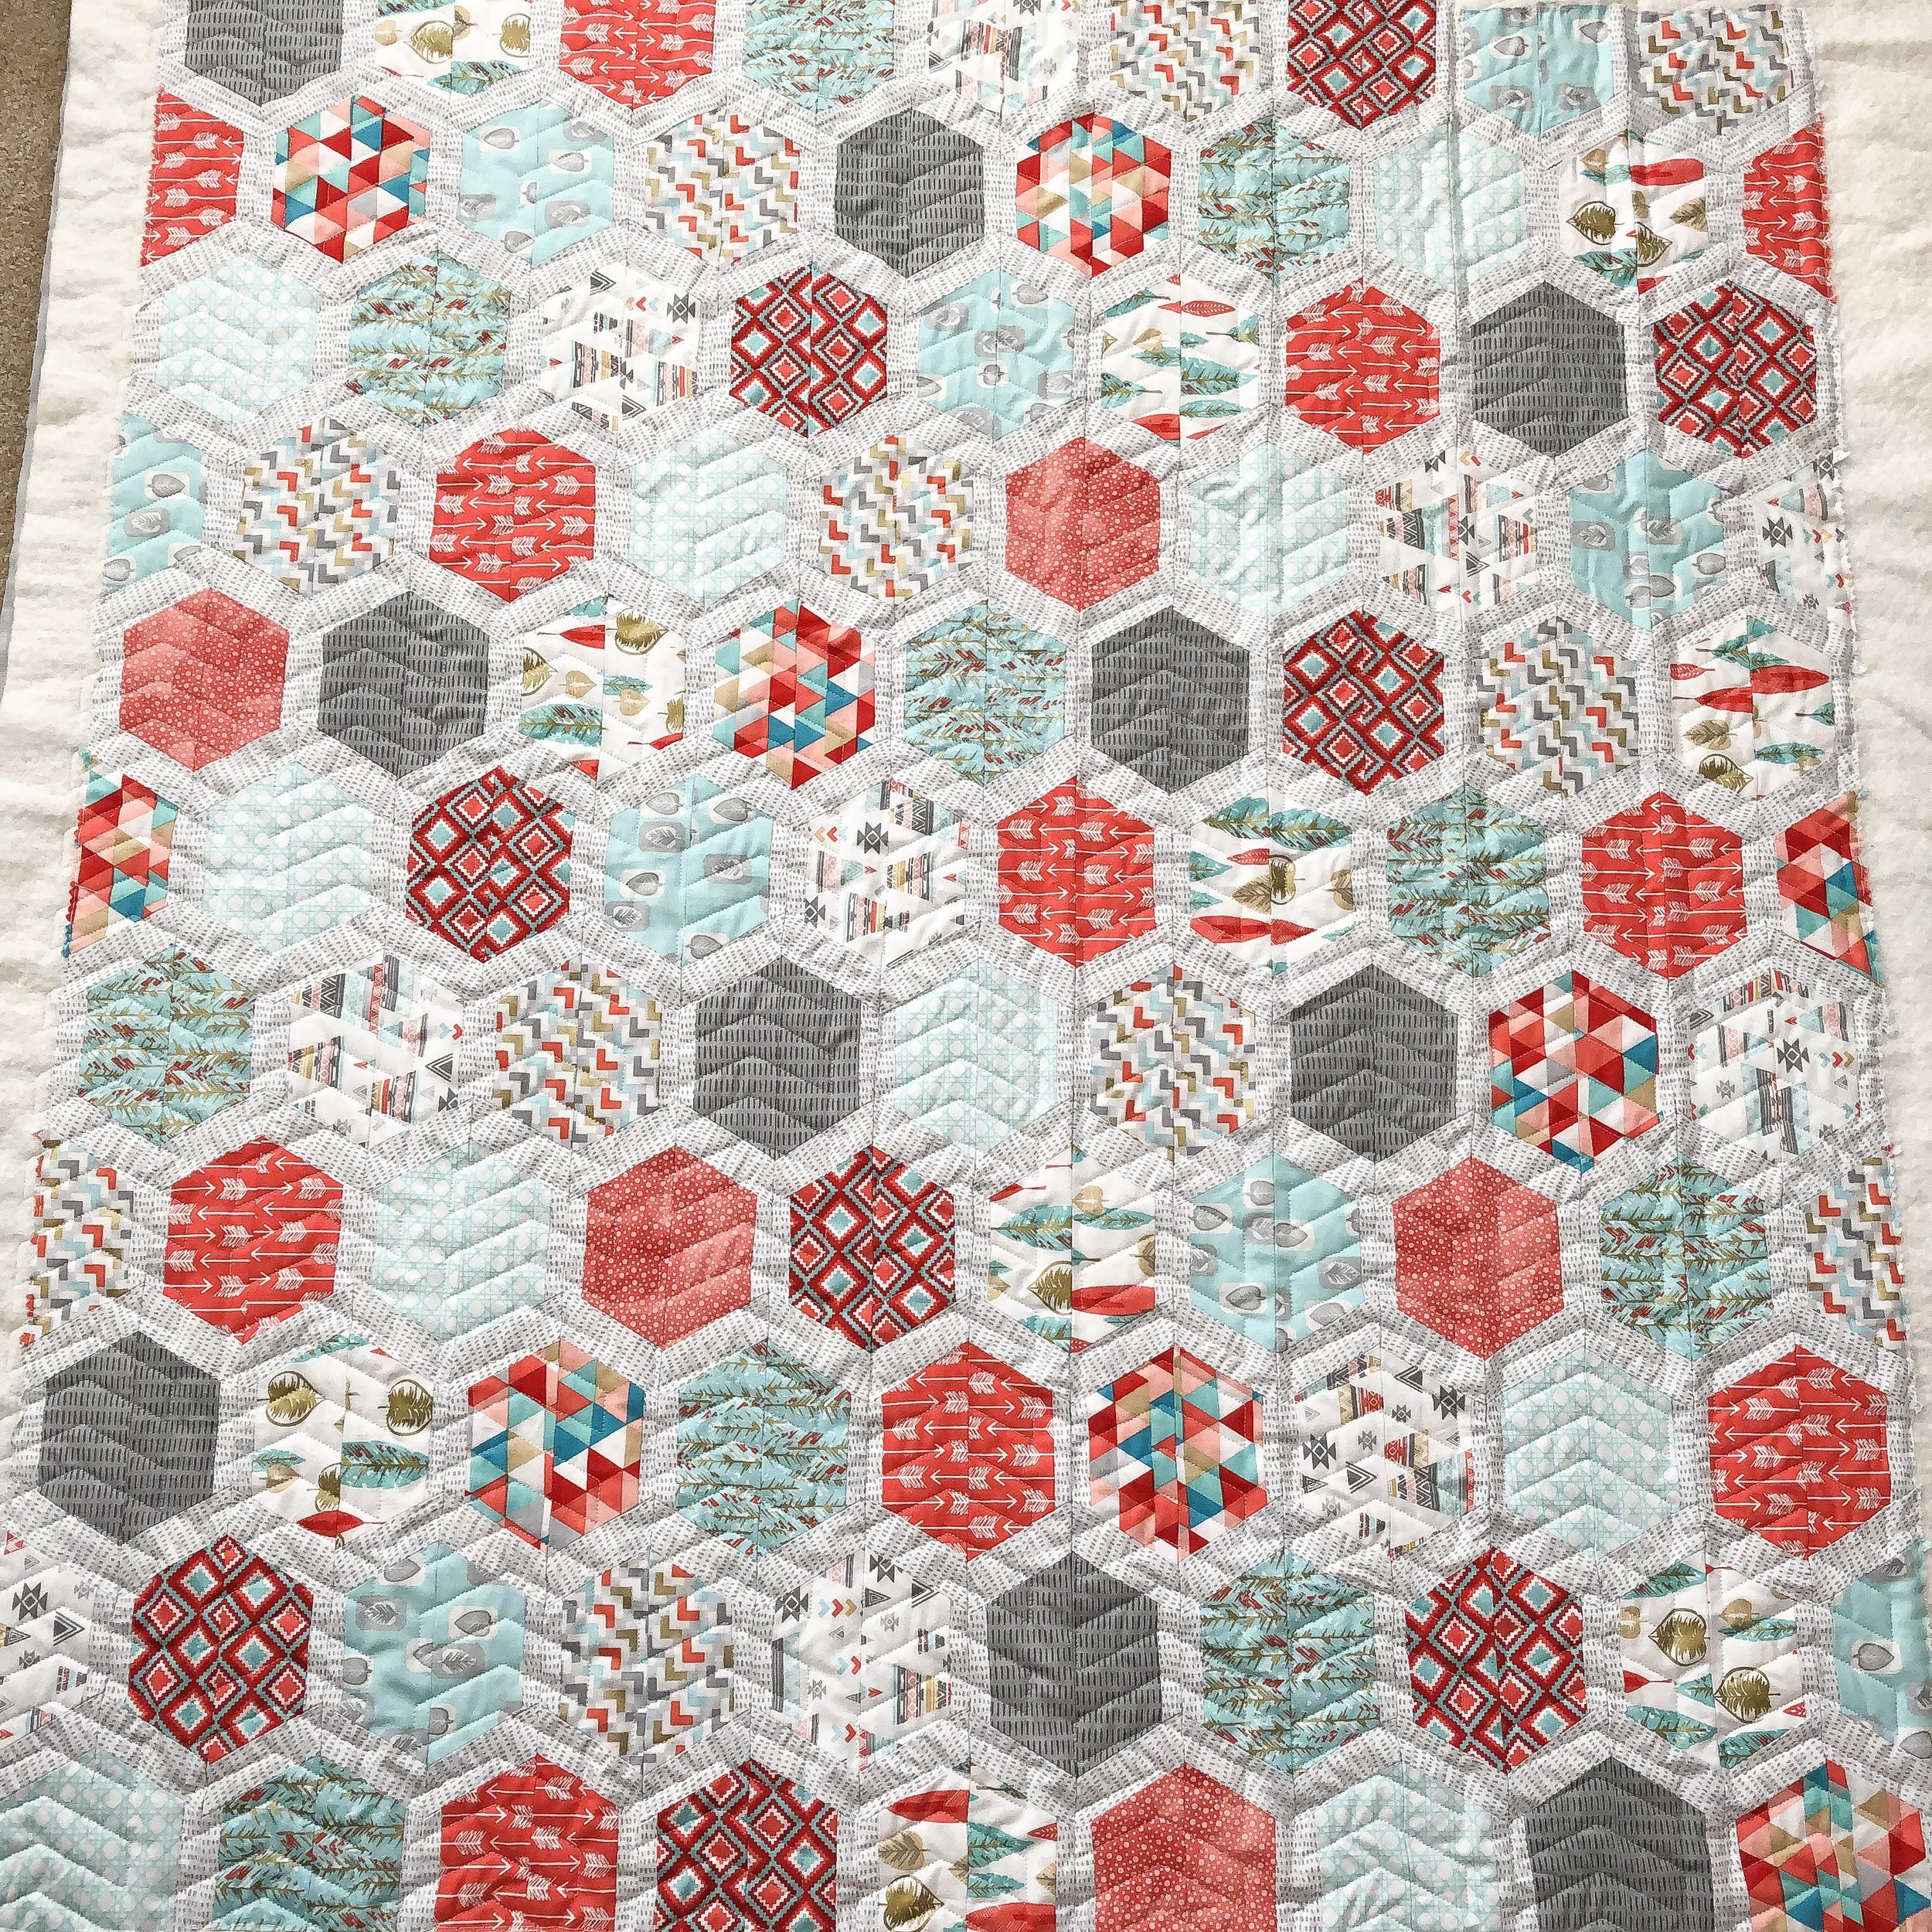
When I saw this quilt, I knew it was one of Emily Dennis’ brilliant patterns...no Y seams either. Emily’s patterns can be found on her website quiltylove.com and she has some pretty amazing ones. My Ombré Gems quilt, that I recently quilted and blogged about...is one of hers. She’s awesome!! She loves her patterns to be precut friendly. It’s hard to find great jelly roll patterns...she has quite a few. This particular quilt is called Hexie Framed quilt, and can be found...right here... http://www.quiltylove.com/introducing-hexie-framed-quilt-pattern/
For the quilting I used Patricia Ritter and my Arrowhead©️ digital quilting design. I quilted the design at 3 7/8” height for this particular quilt, because that’s a great scale for these cute hexie blocks. Arrowhead is available at... https://www.urbanelementz.com/arrowhead.html

I suggested this pattern to her because of all the fun southwest looking fabrics...I think the angles of the Arrowhead design just flatter all the work she put into this quilt.

I used 8020 cotton poly blend Winline batting, and white 30 tex poly wrapped poly Perma Core A&E thread.

A quick tip...I use the Lightroom app, and it’s free in the apple store. It should be available on Android too. Anyways, I use this app to get these fabulous colored and sharpened pictures. Sometimes pictures are just horrible and nothing can really help them. It’s all about light!! I try and get great, well lit pictures, but at this time of year it’s just hard with the overcast wintery sky. I use the sharpening and exposure features the most. Sometimes I’ll change the color, too. I take my photos and a lot of my videos on my iPhone X... it’s handy, I use Lightroom, and then my photos are ready to blog and share.
This picture is the original, and the edited picture is posted above, can you see how amazing this app is? It’s free...what are you waiting for. You’re welcome!!
I hope if you’re in the part of the world that it’s cold/rainy/and snowy...that you’re enjoying some extra sewing time. For those who are enjoying warm temps and sunshine...enjoy every minute! Here’s to hoping for warm days and plenty of sunshine for us all!!
- Leisha

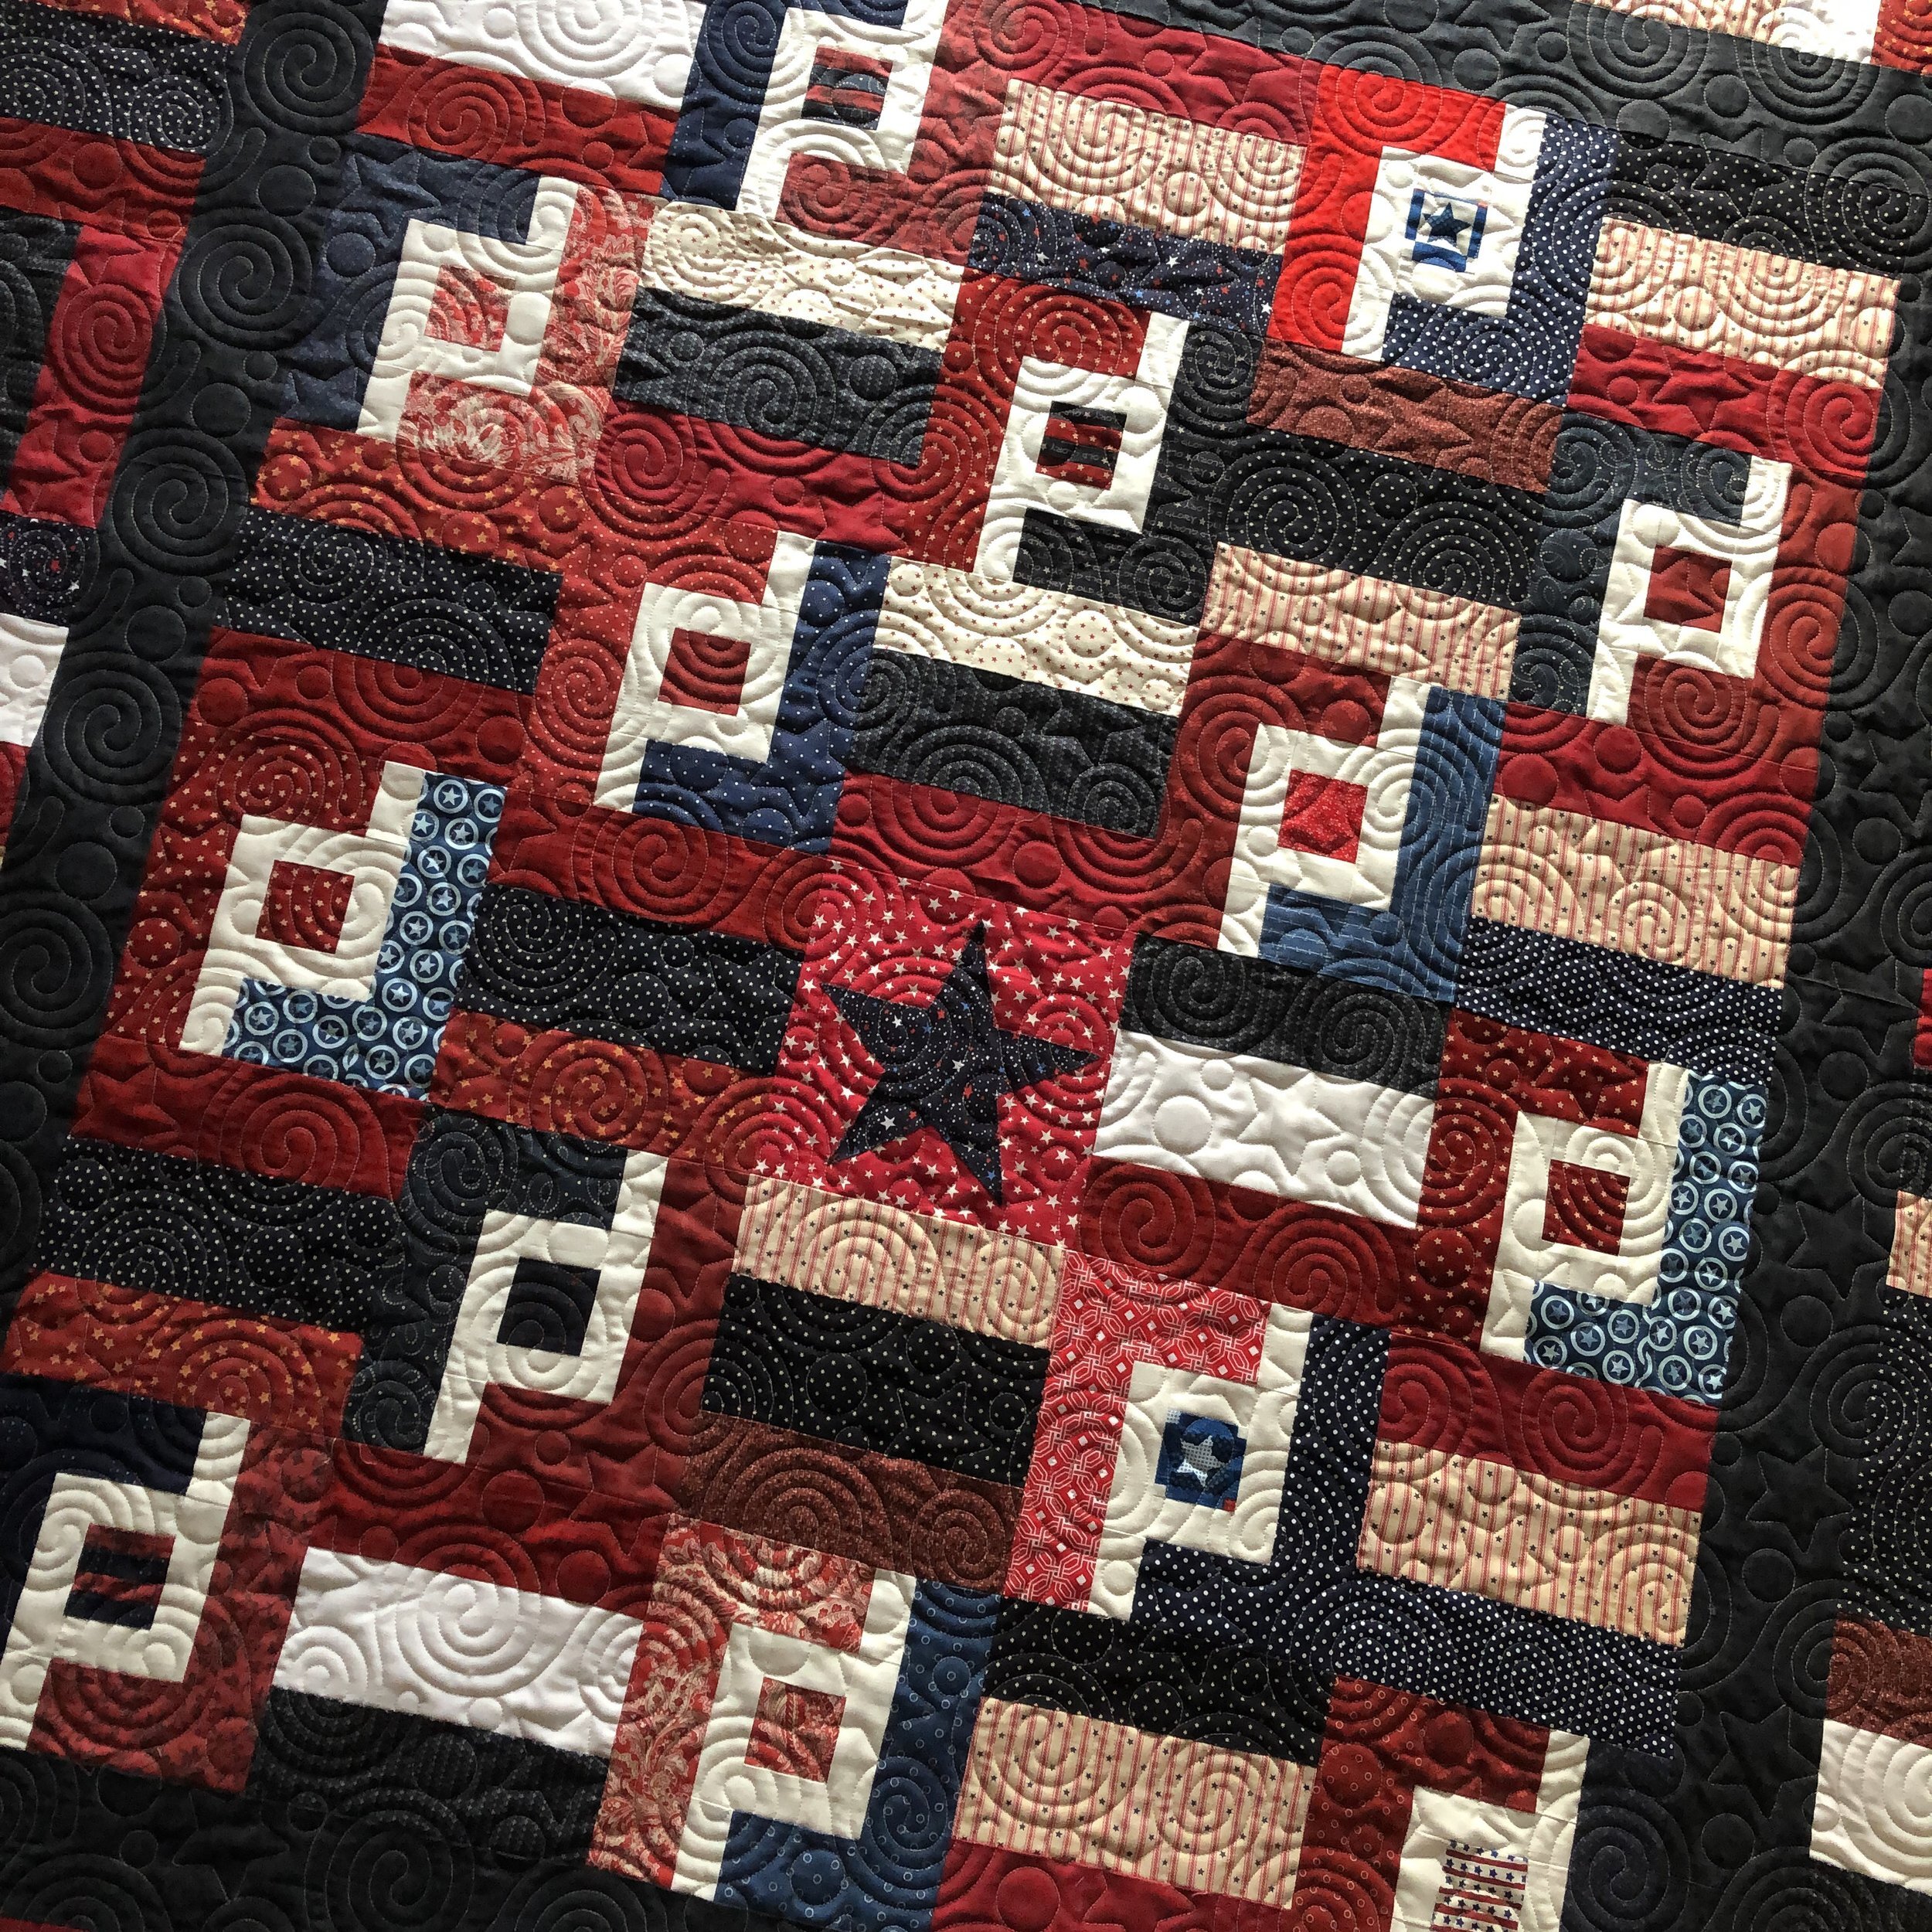
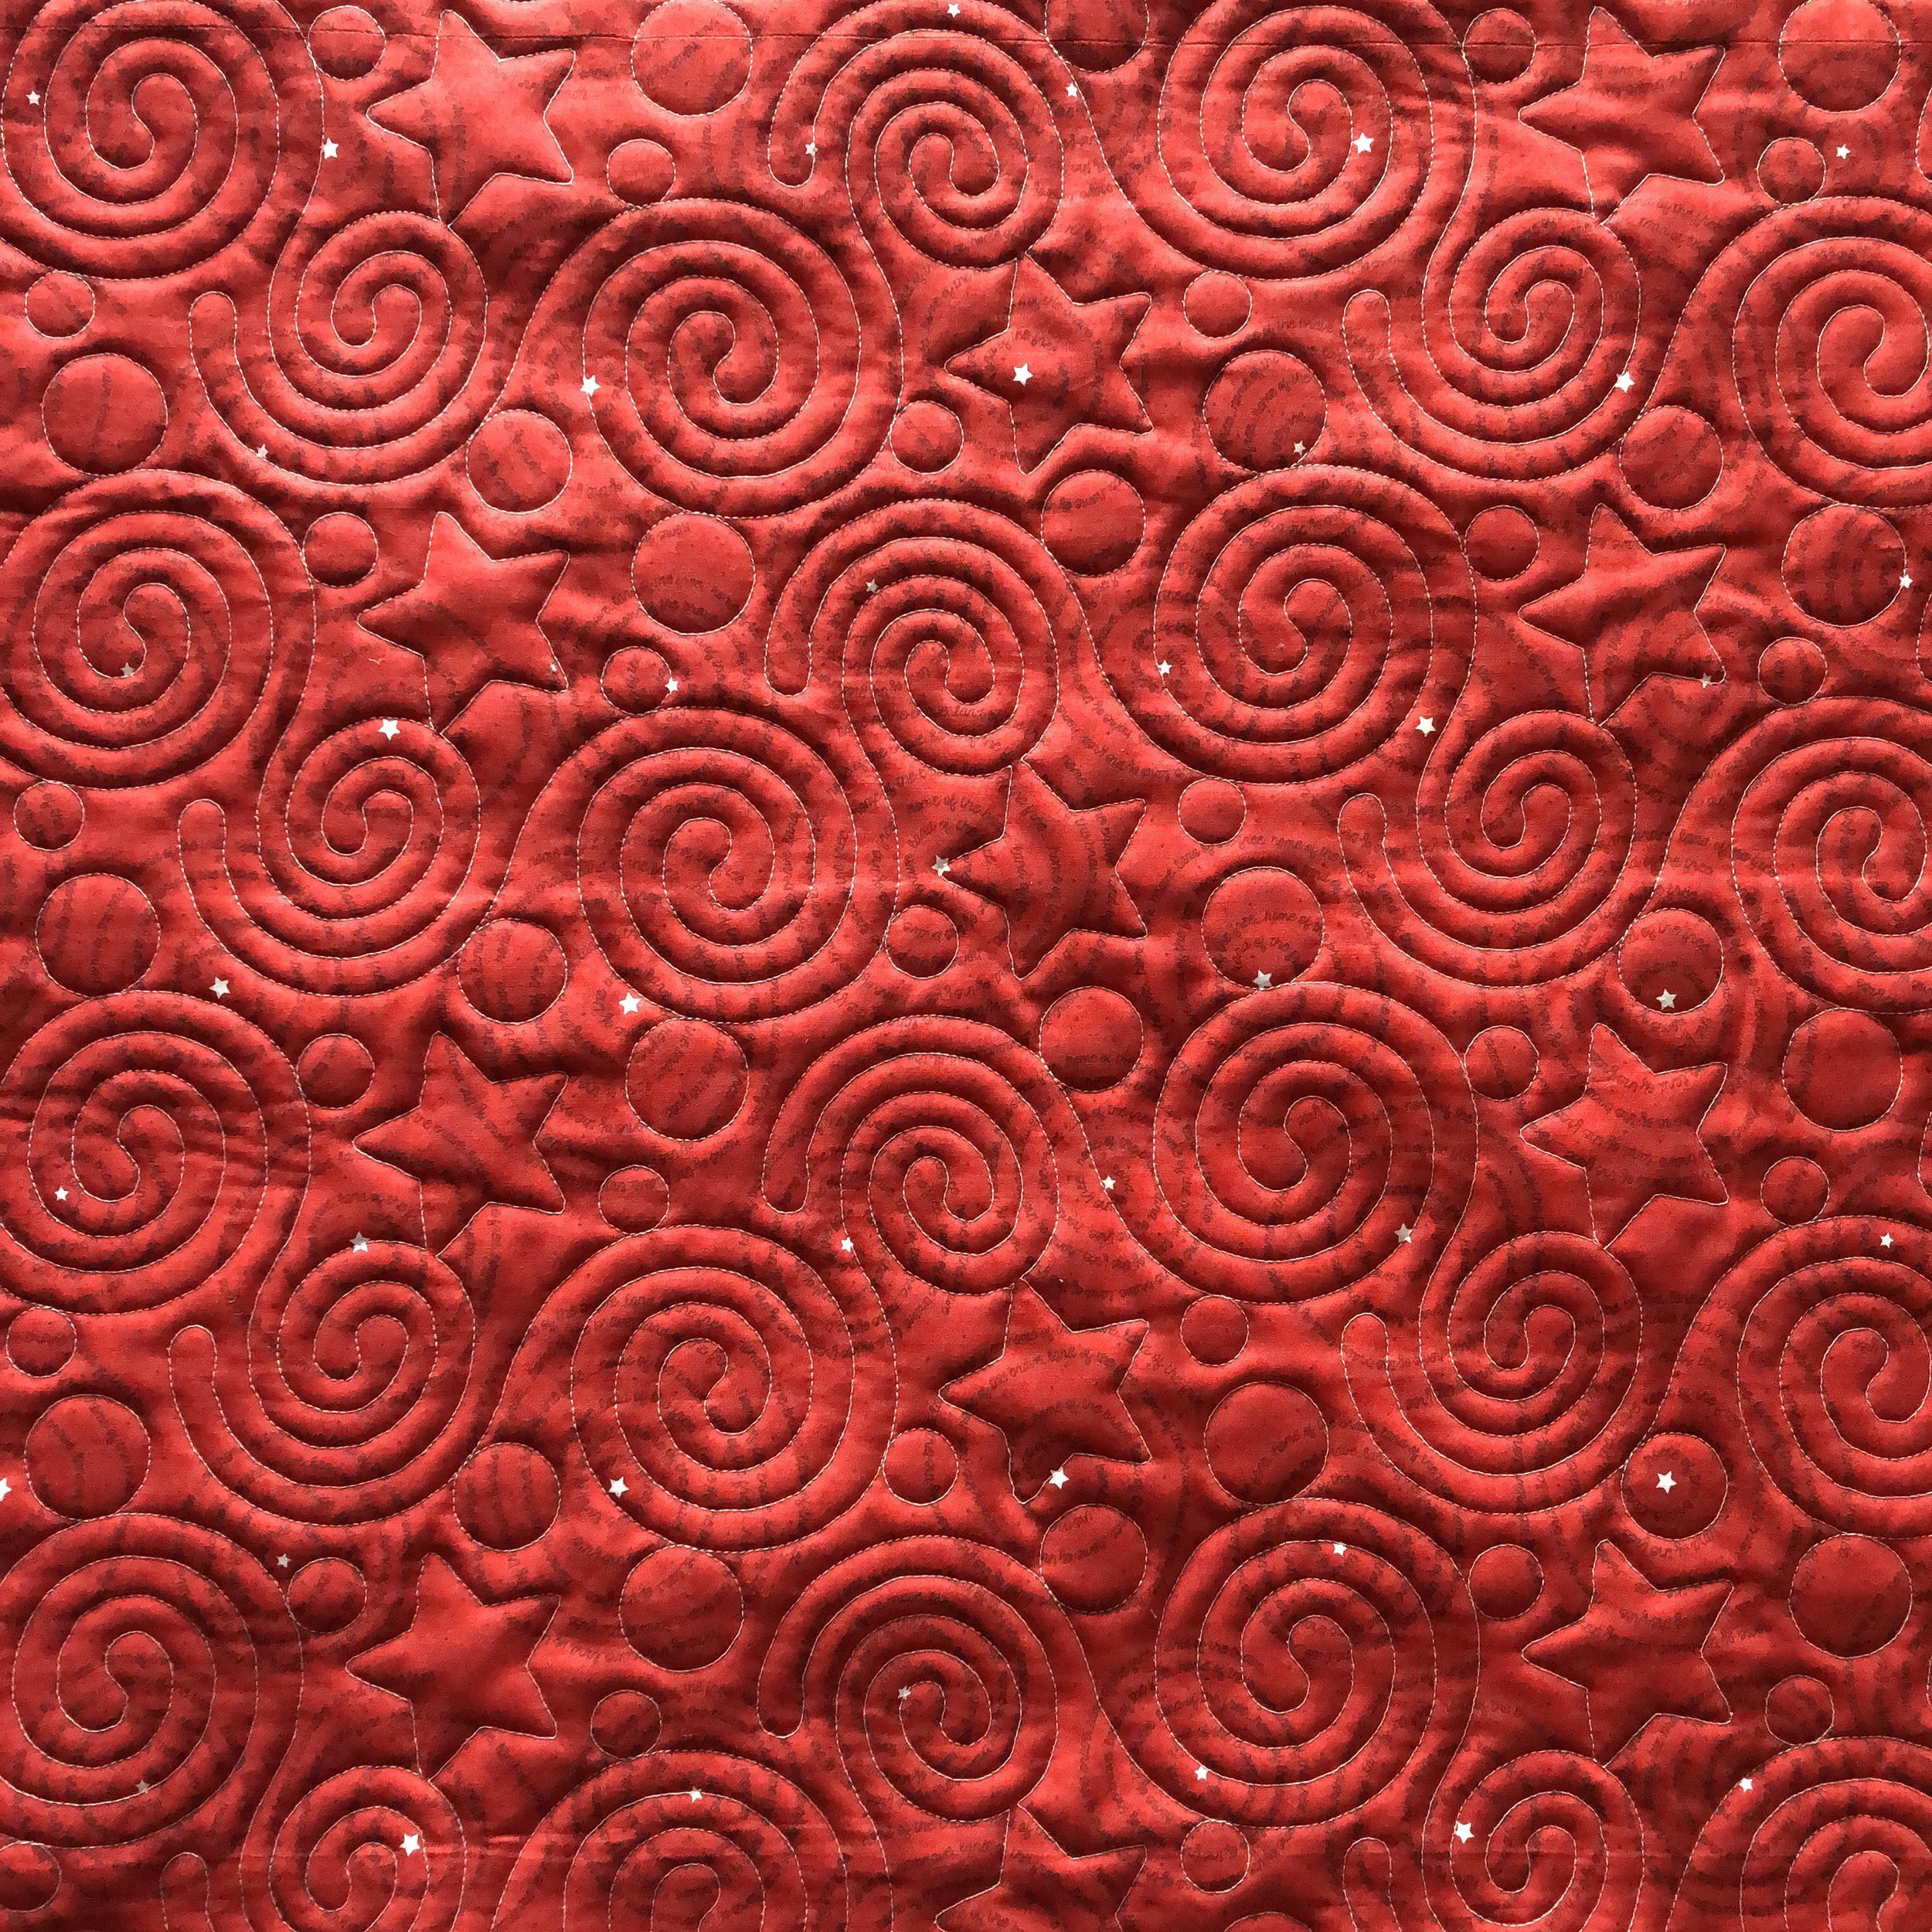
Quilt of Valor
Recently I visited a quilt guild in my area, and they mentioned in their announcements that they were going to try and make as many Quilts if Valor, that they could. I learned last night they made 5 in one day. That’s awesome!! This is one of them.
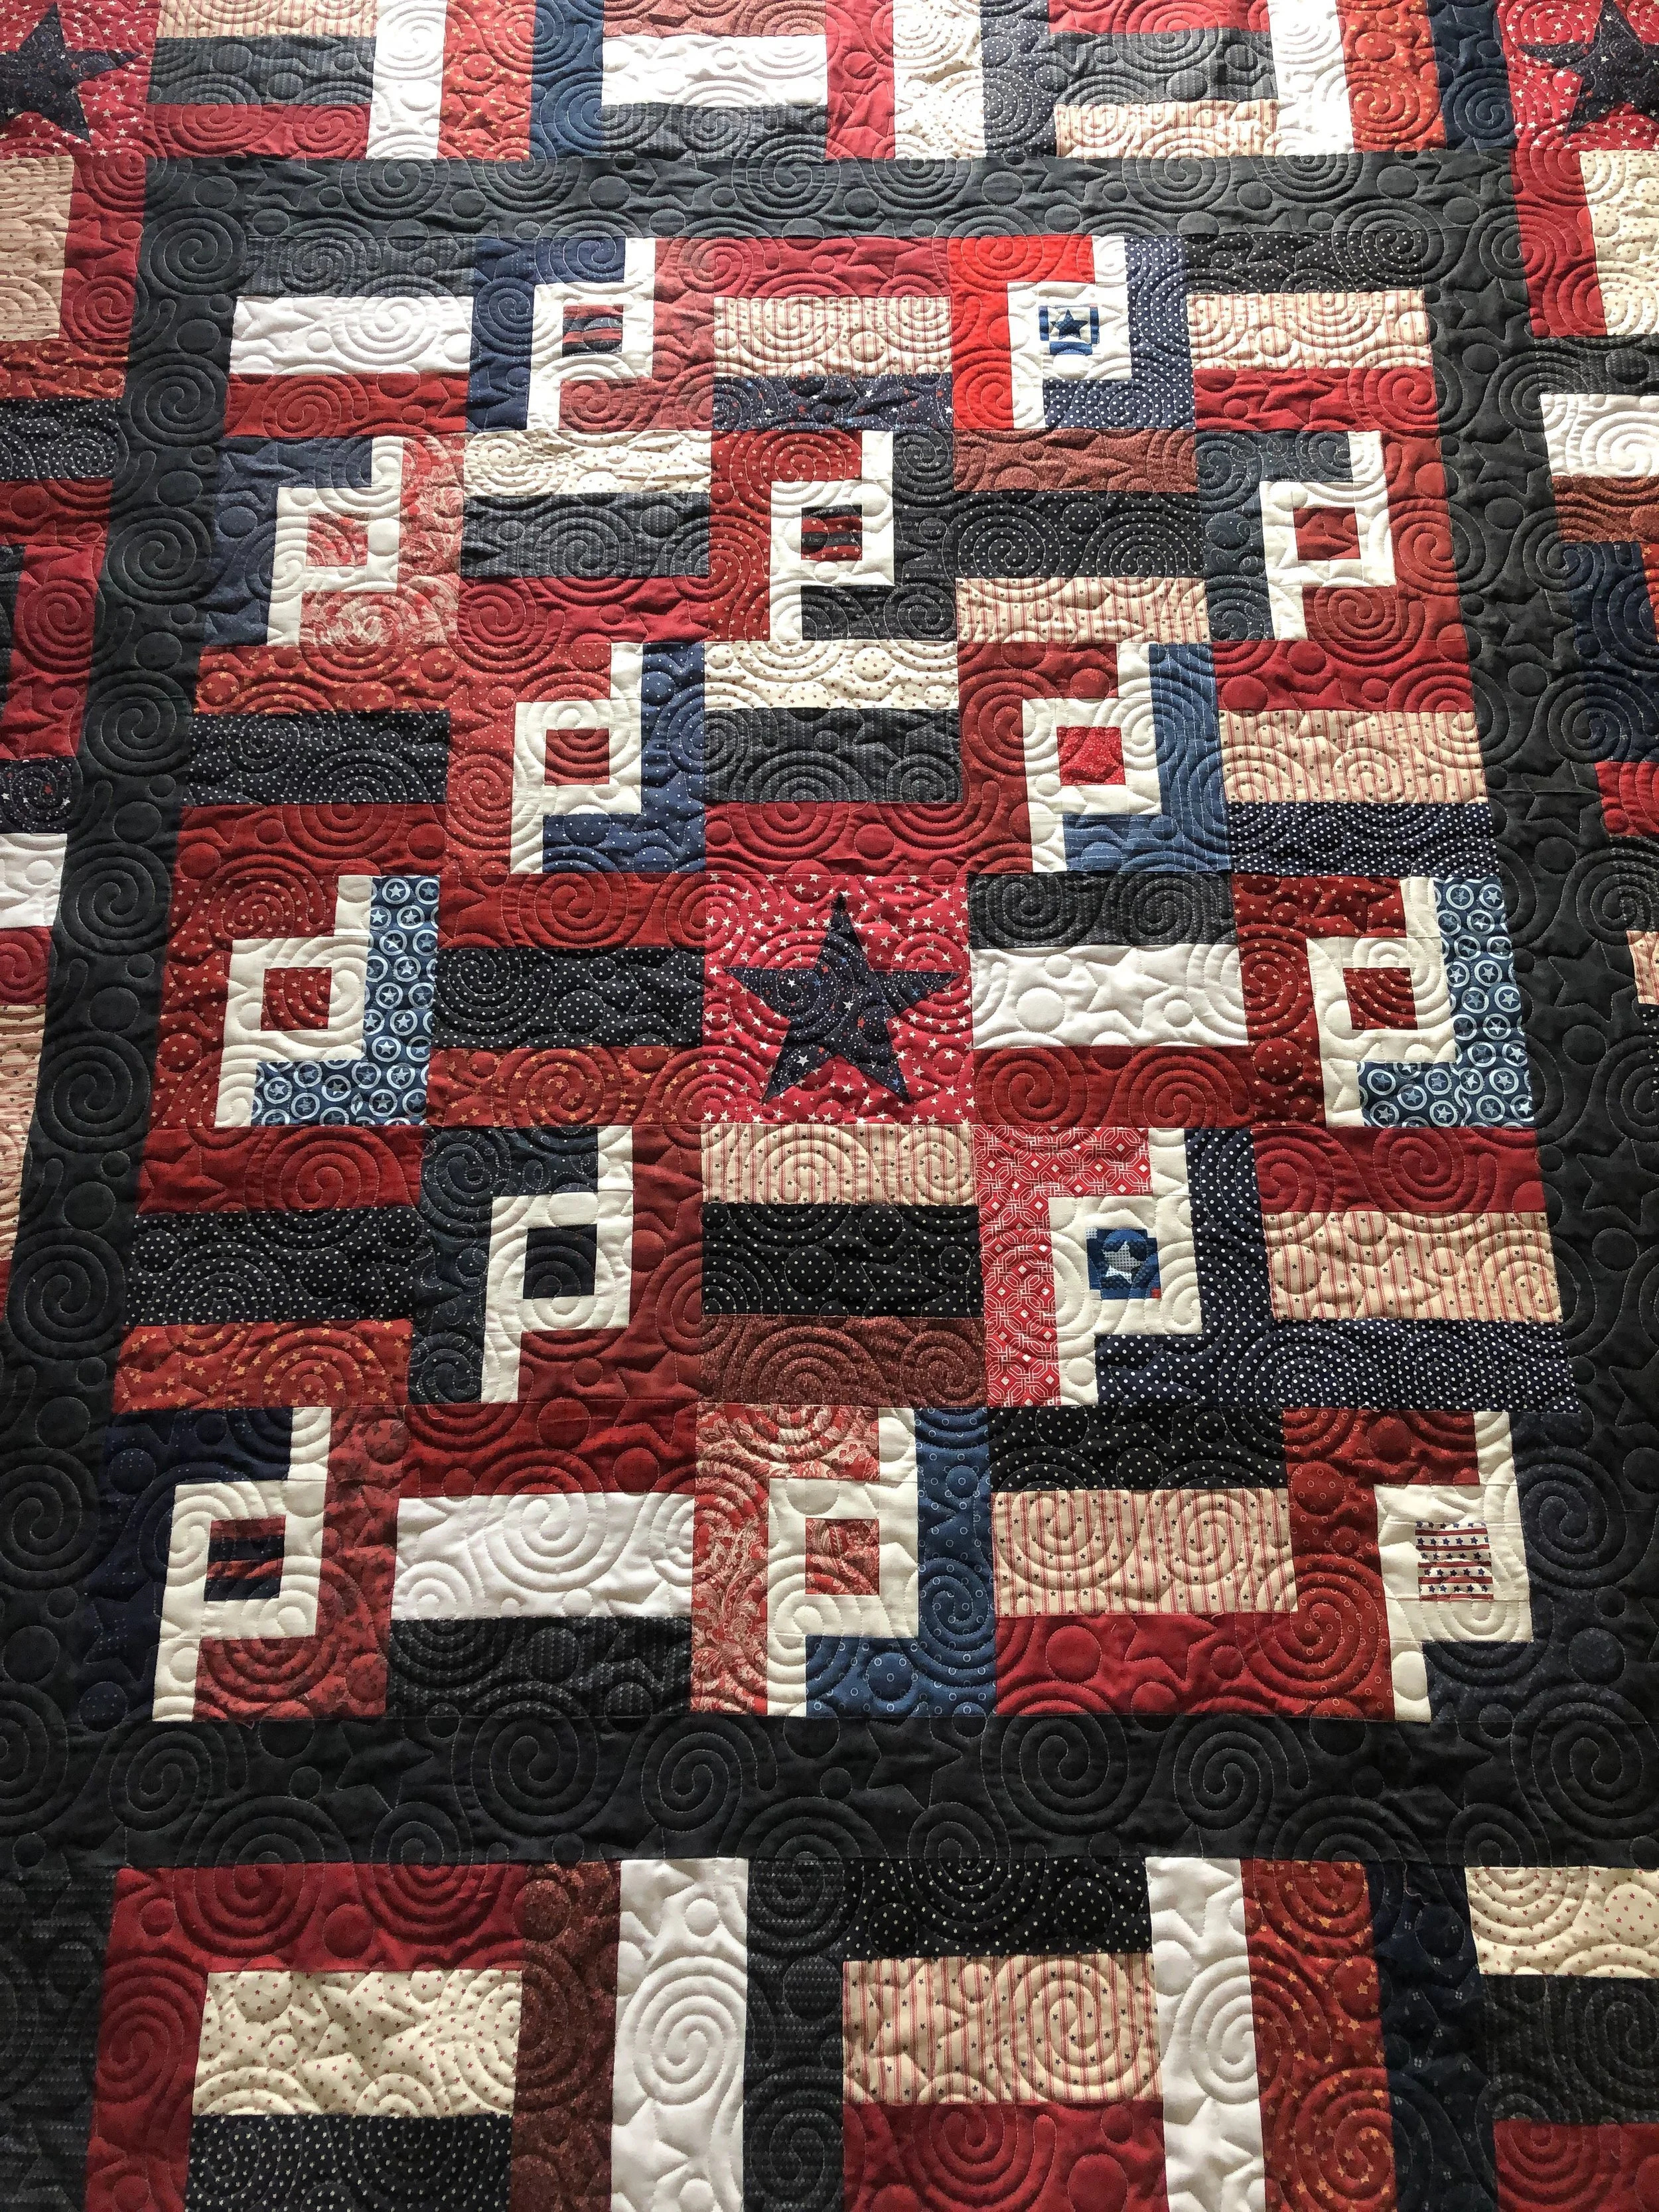
My dad served 30 years in the military and my brother served as well, he was even deployed. So, I love to quilt one of these a year...knowing they will go to someone who fought for our freedoms. For those of you who aren’t sure what a quilt of valor is click here and read more about it: https://www.qovf.org/make-a-qov/

I chose to use Patricia Ritter and my Liberty quilting design, to quilt it. I love how it turned out!!! Liberty©️ Is available in paper, digital, self print and design boards... go here: https://www.urbanelementz.com/liberty.html
This design is a take on our Marmalade©️ design.

I used my favorite 8020 cotton poly Winline batting and 30 tex Dyed Natural A&E Perma Core thread.
The quilting texture looks awesome!!

Here is a better view of this design on this backing!!
Thank you for stopping by!! Happy quilting!!
I’m off to quilt something that is getting published in a magazine...excited to share, someday.
- Leisha

Quilting Fabric
Also before Christmas, my sister wanted me to quilt some fabric, so she could make her and my brother in-law some stockings. She didn’t get around to making any before Christmas because of all the fun parties they were going to. Even though I don’t have a stocking to share, I want to show you this amazing quilty texture on this Bells Solid the 97 or 98 fabric. She had me quilt 3 yards, for future kiddos...then their stockings will match. The backside is the super cute trees from Zen Chic’s White Christmas line...with the gold tree randomly throughout. (See last picture) These fabrics were found at https://www.etsy.com/shop/sistersandquilters or https://www.sistersandquilters.com/
They chose my Starlight©️ design for the quilting. It’s available in my shop at in several different digital formats: https://www.quiltingit.com/shop/starlight or at Urban Elementz: https://www.urbanelementz.com/leisha-s-starlight.html
I quilted this design at 3” high. which is definitely great for what my sister wants.
I used Antique Cream 30 tex Perma Core thread from A&E and 8020 cotton poly blend batting. Because of the fold creases that can happen with 8020, I rolled this up until she makes her stockings.
When my sister finishes their stockings, I’ll be sure to share. Another reason I’ve wanted to share this, I’ve always wanted a quilted bedspread...just solid fabric. Even more so now. So, now I just need to decide on a design to quilt out.
hope you have some fun projects going on!! Happy Quilting!
- Leisha

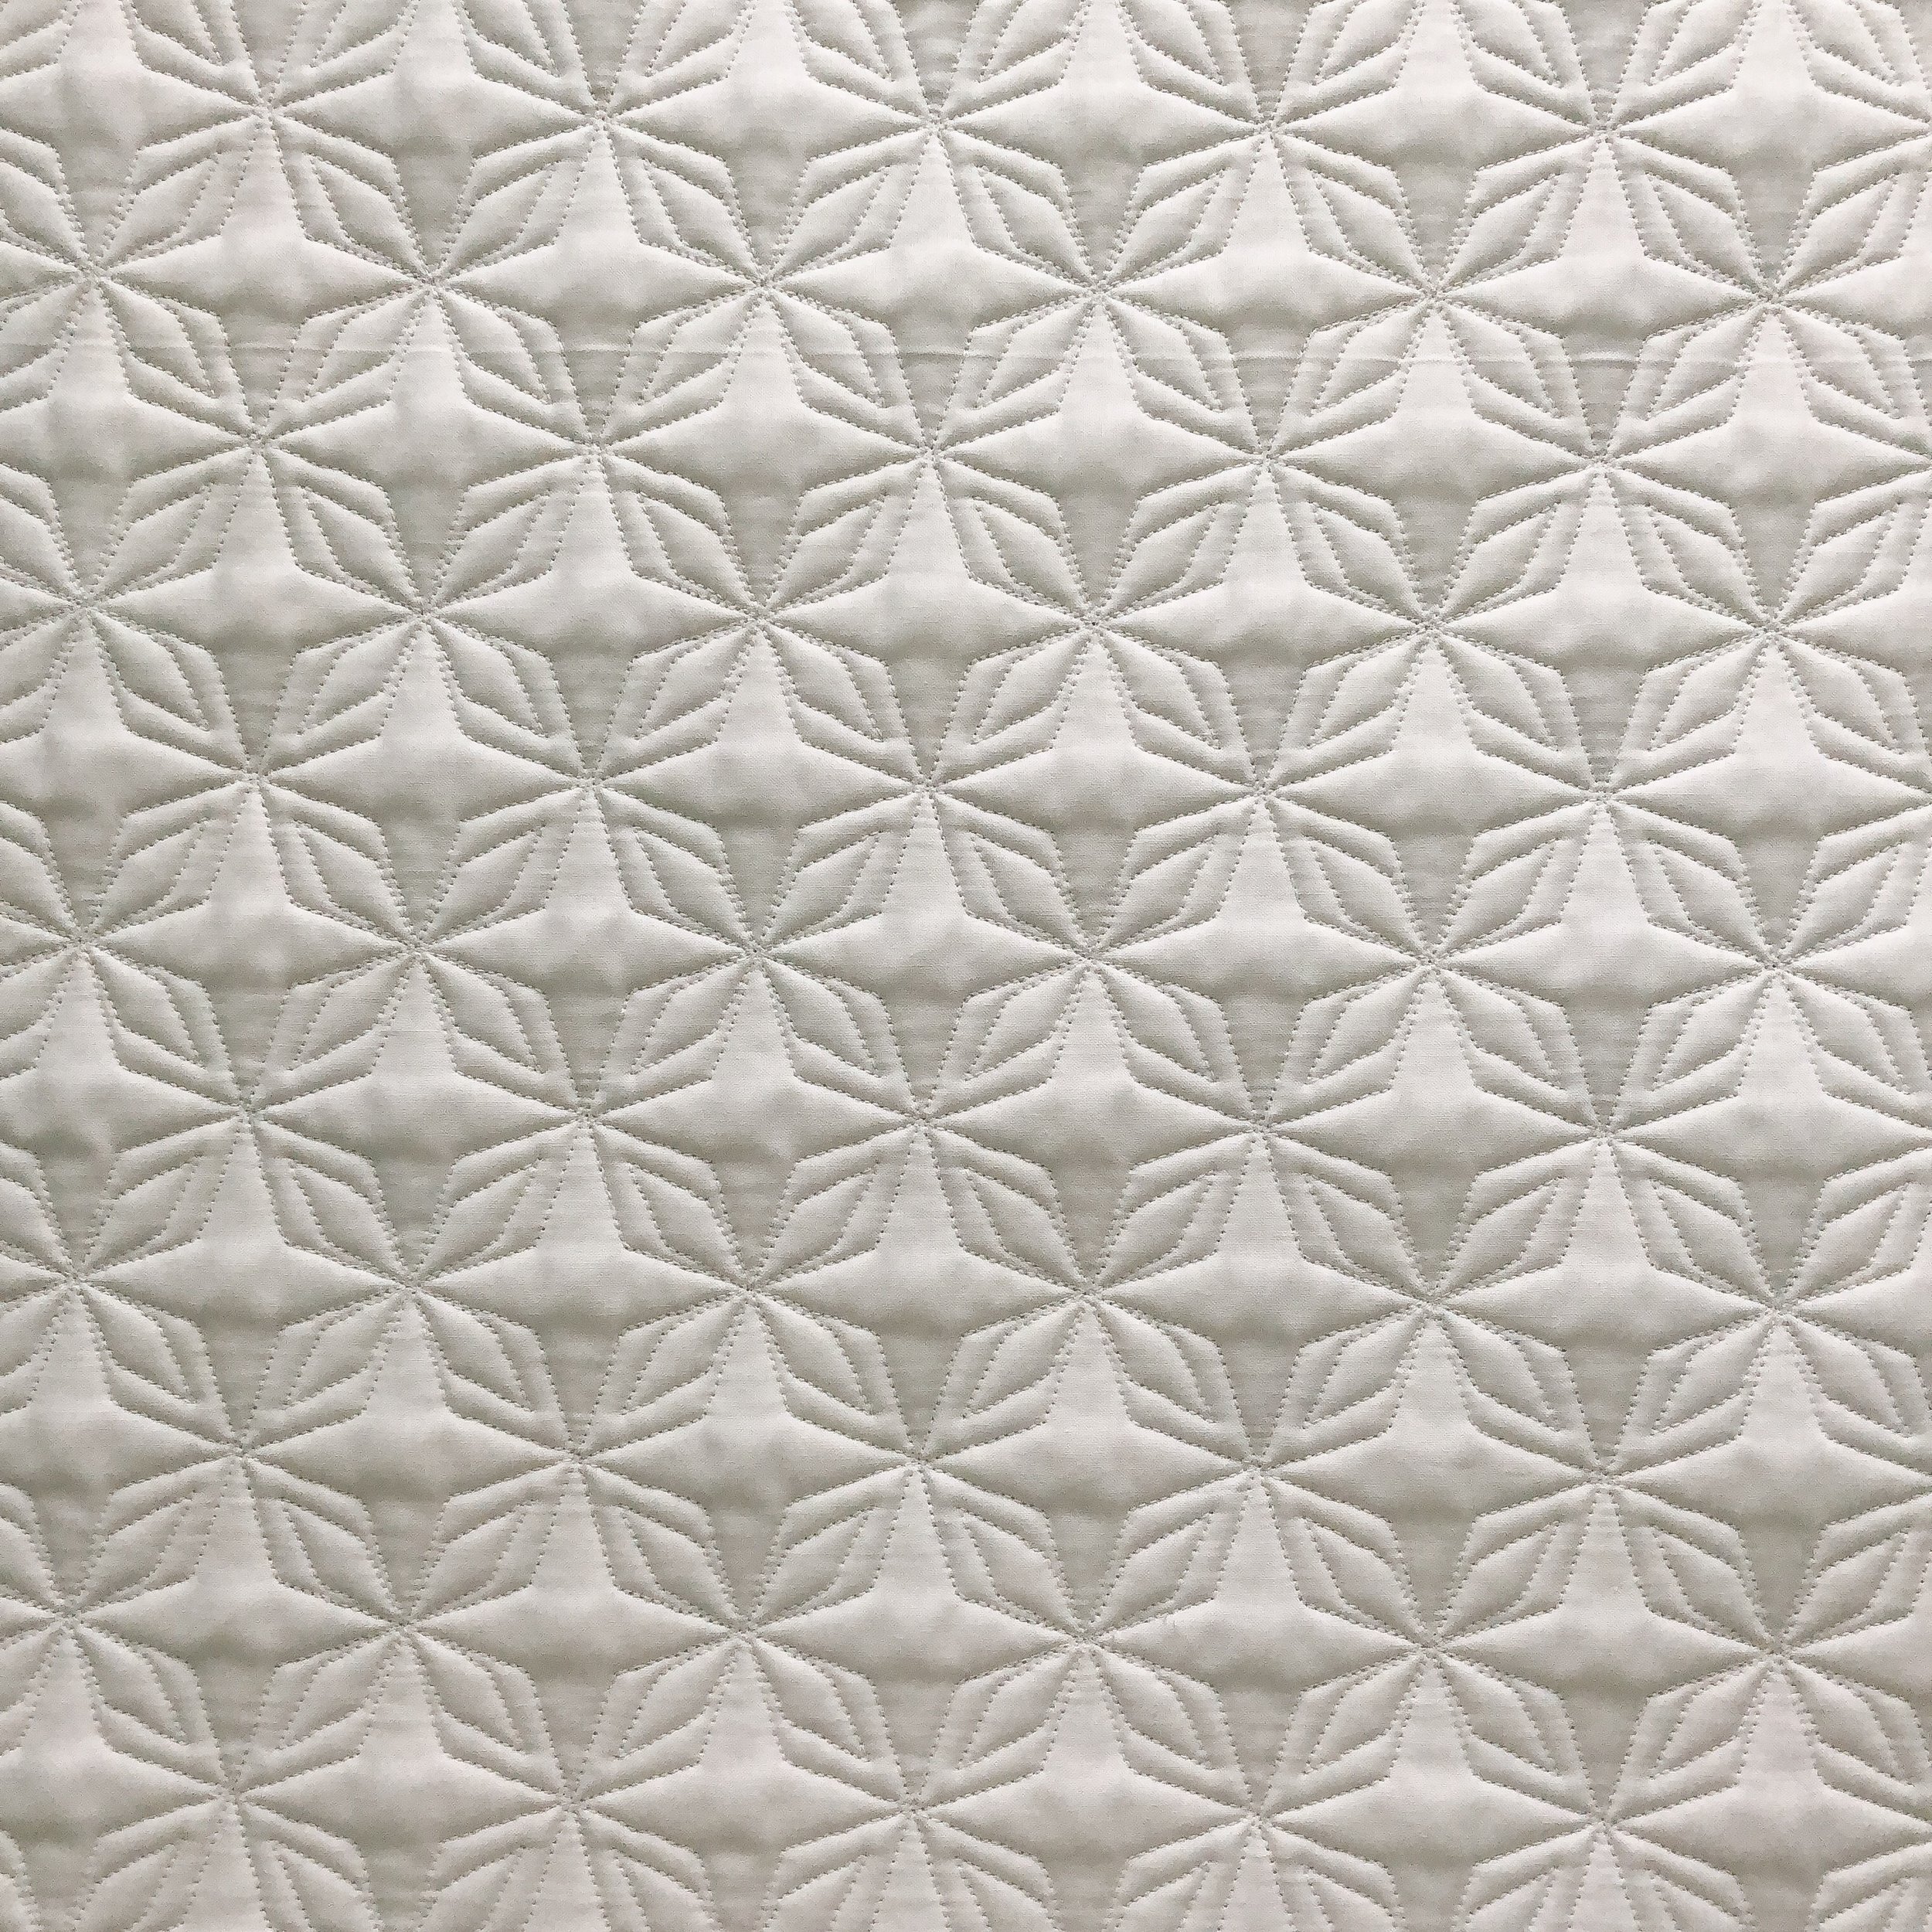
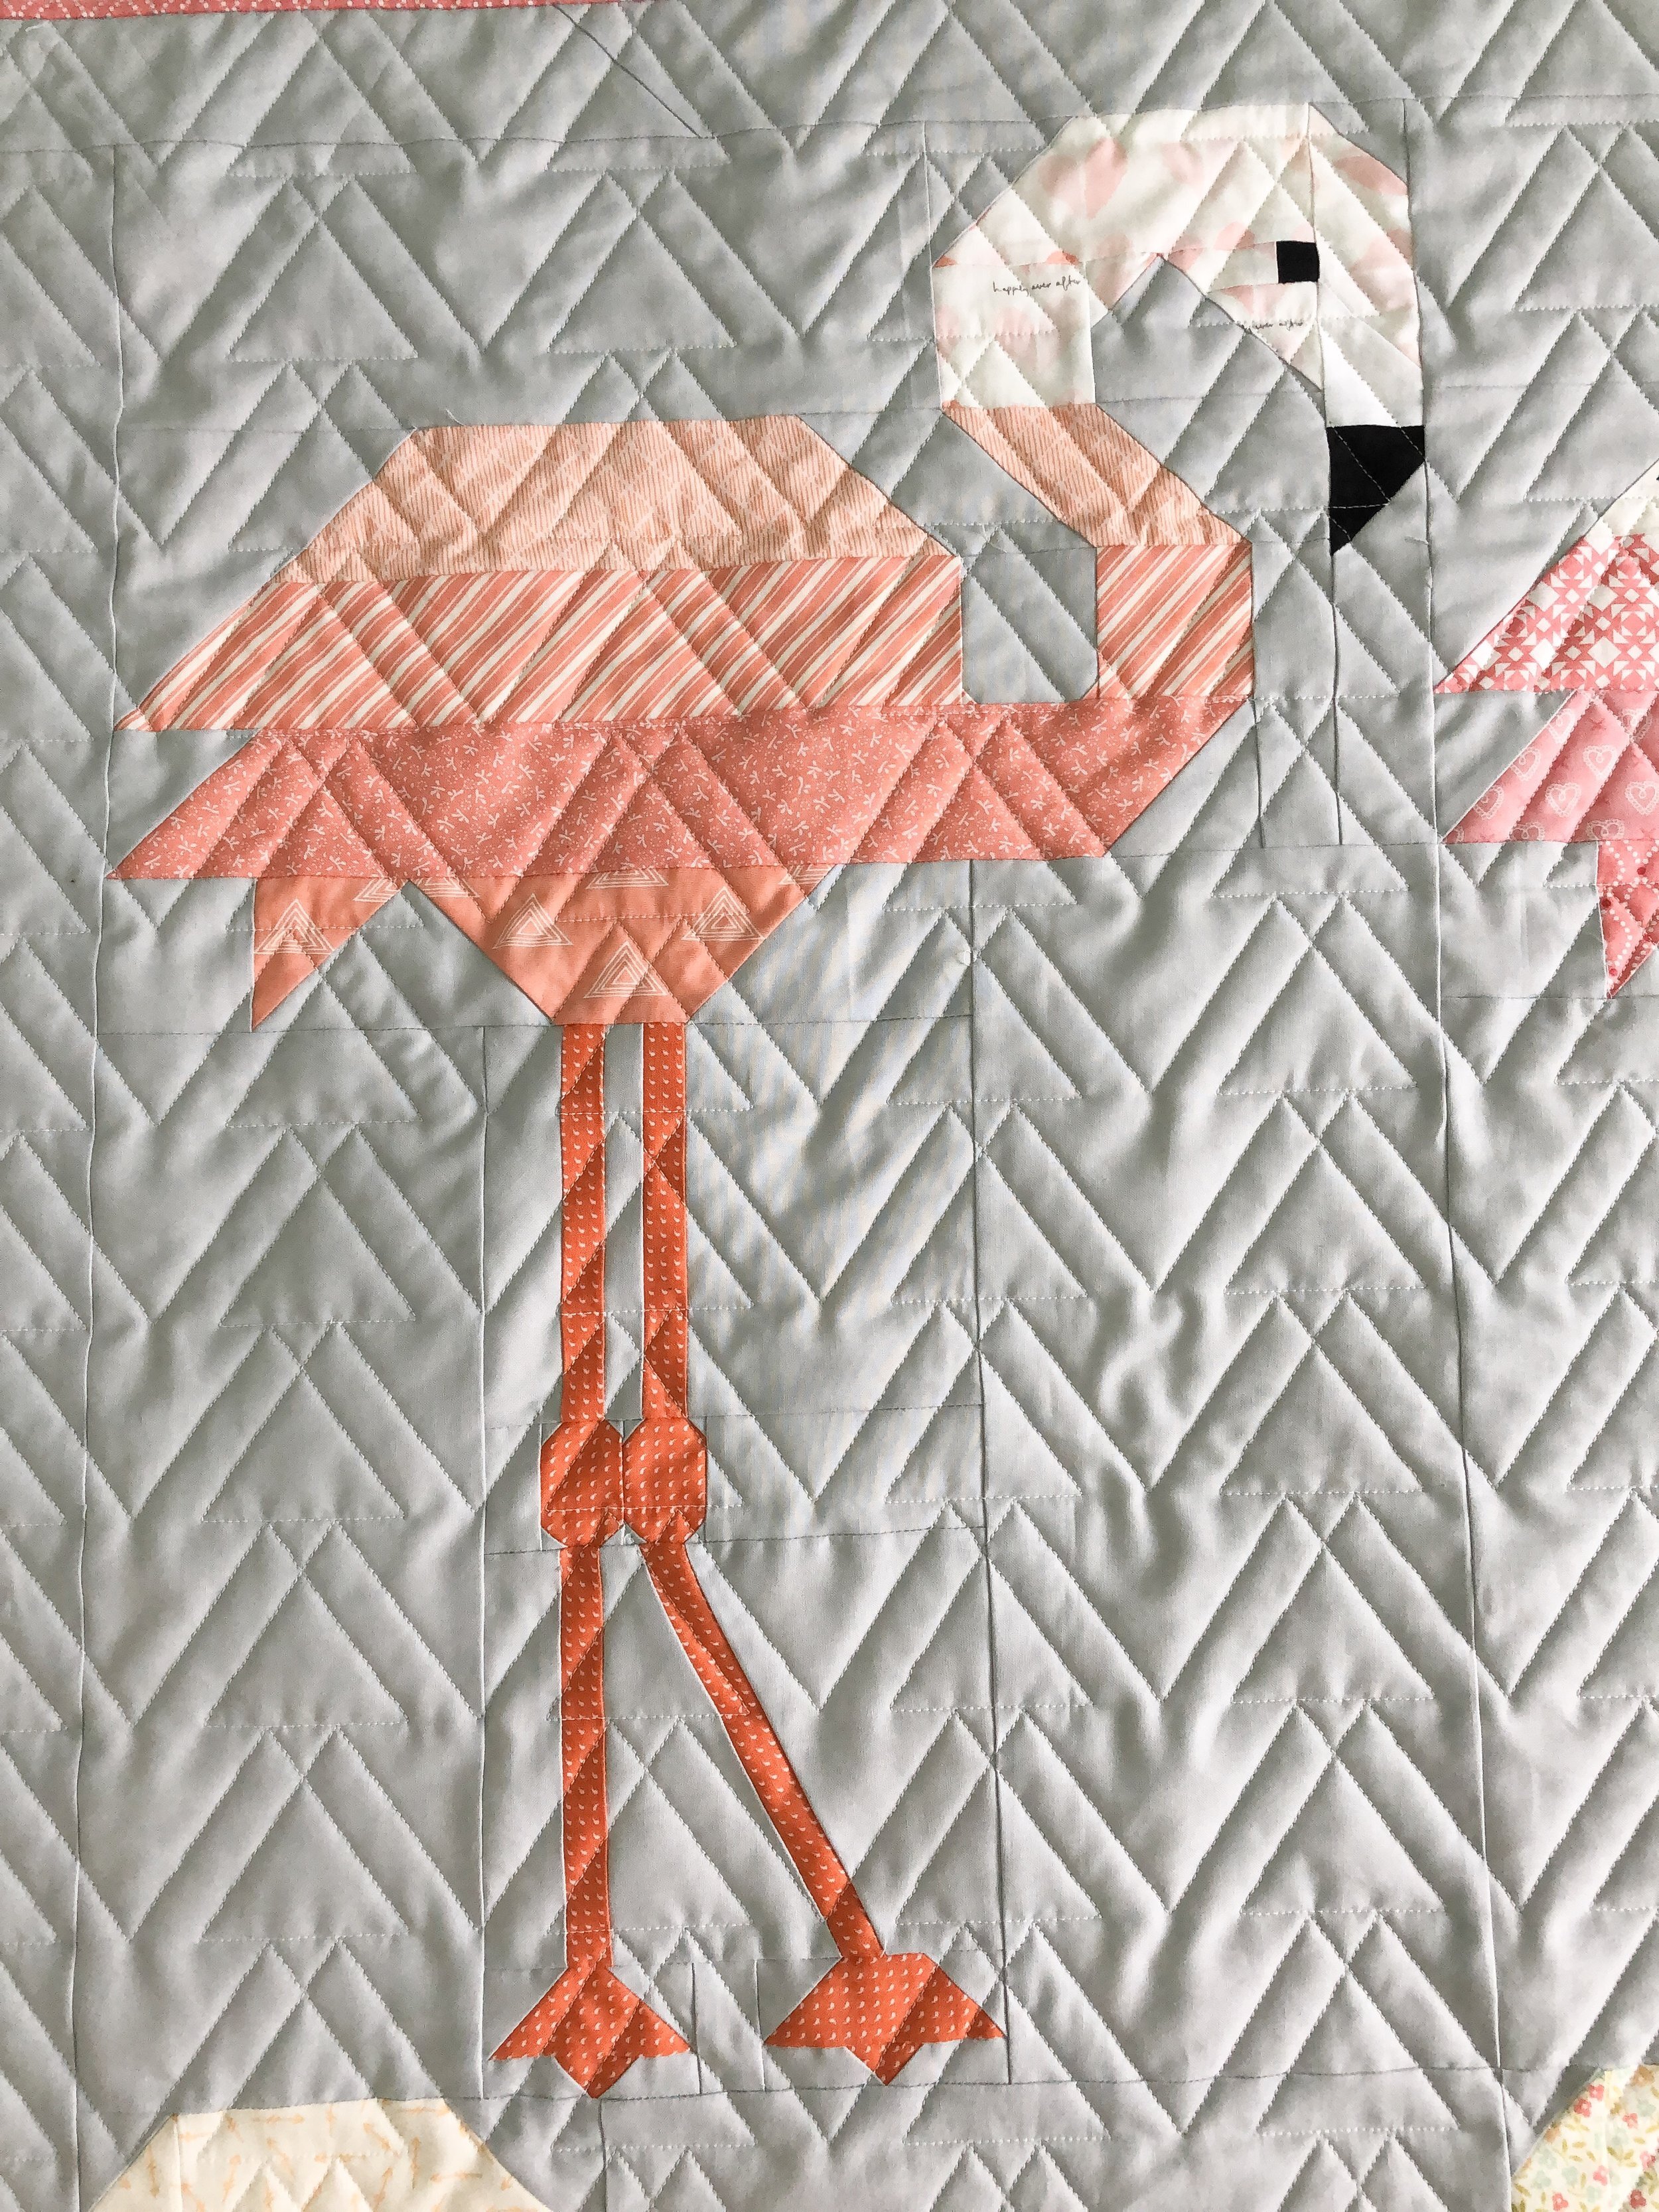
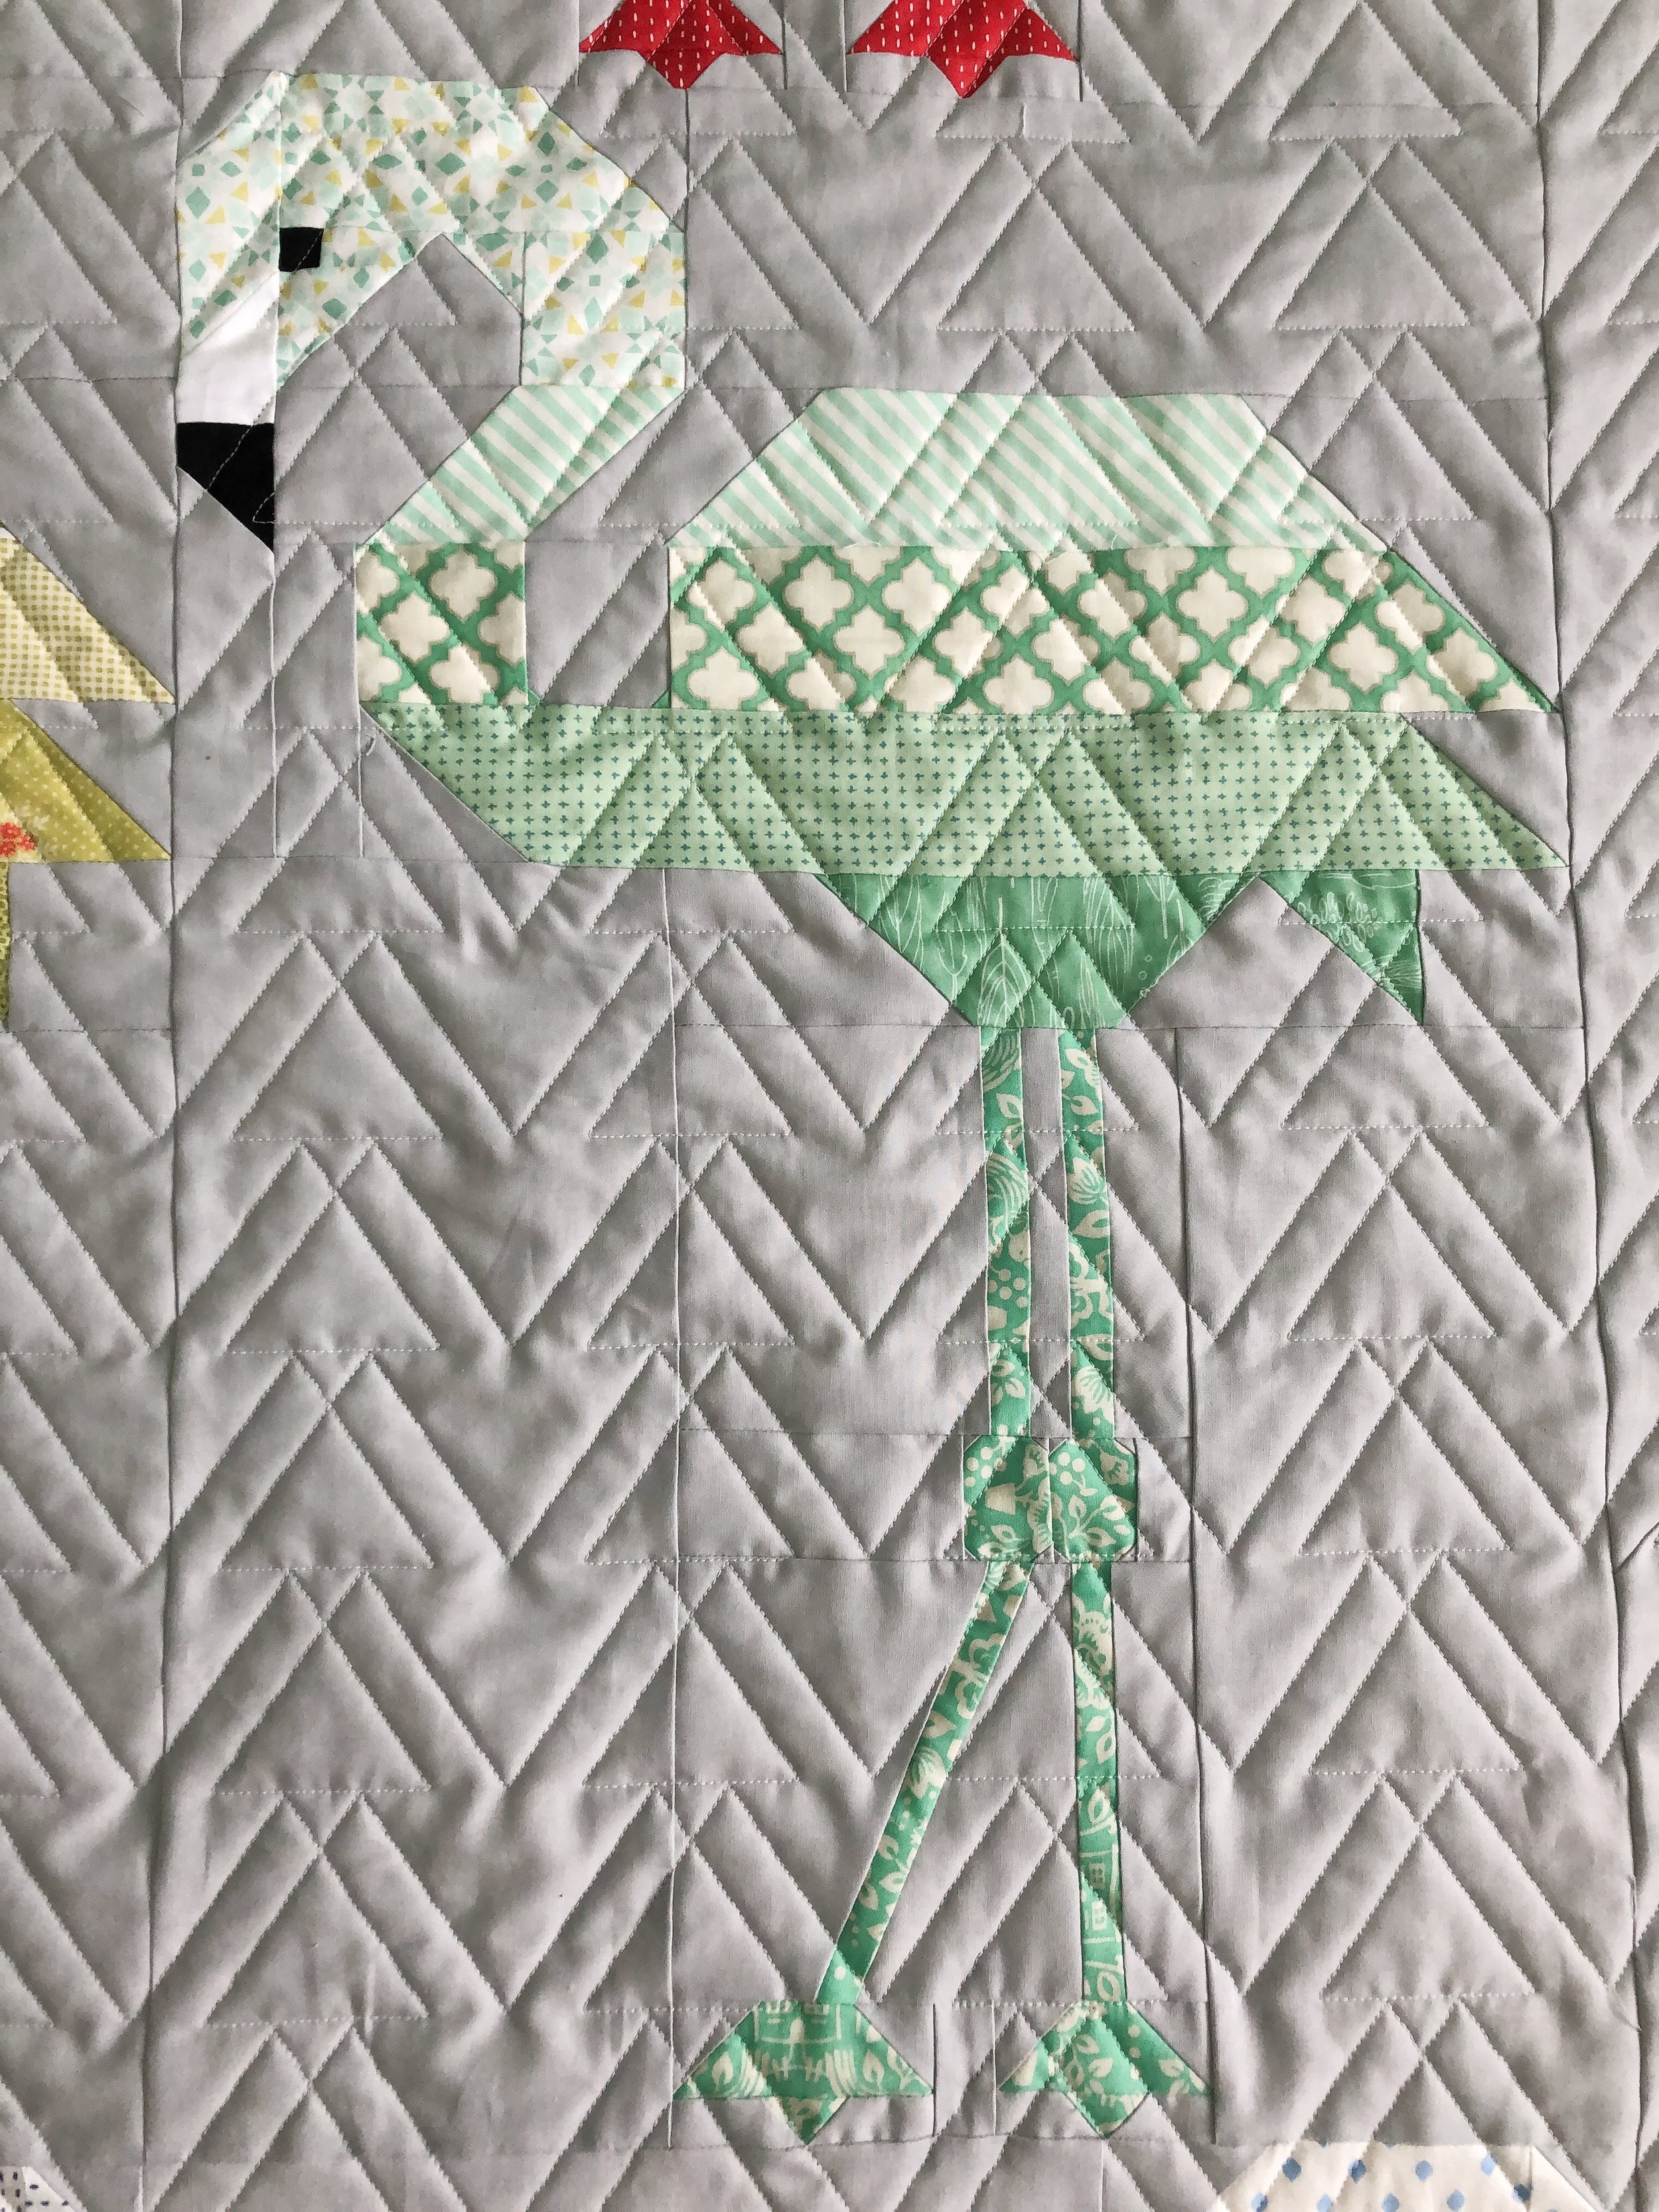
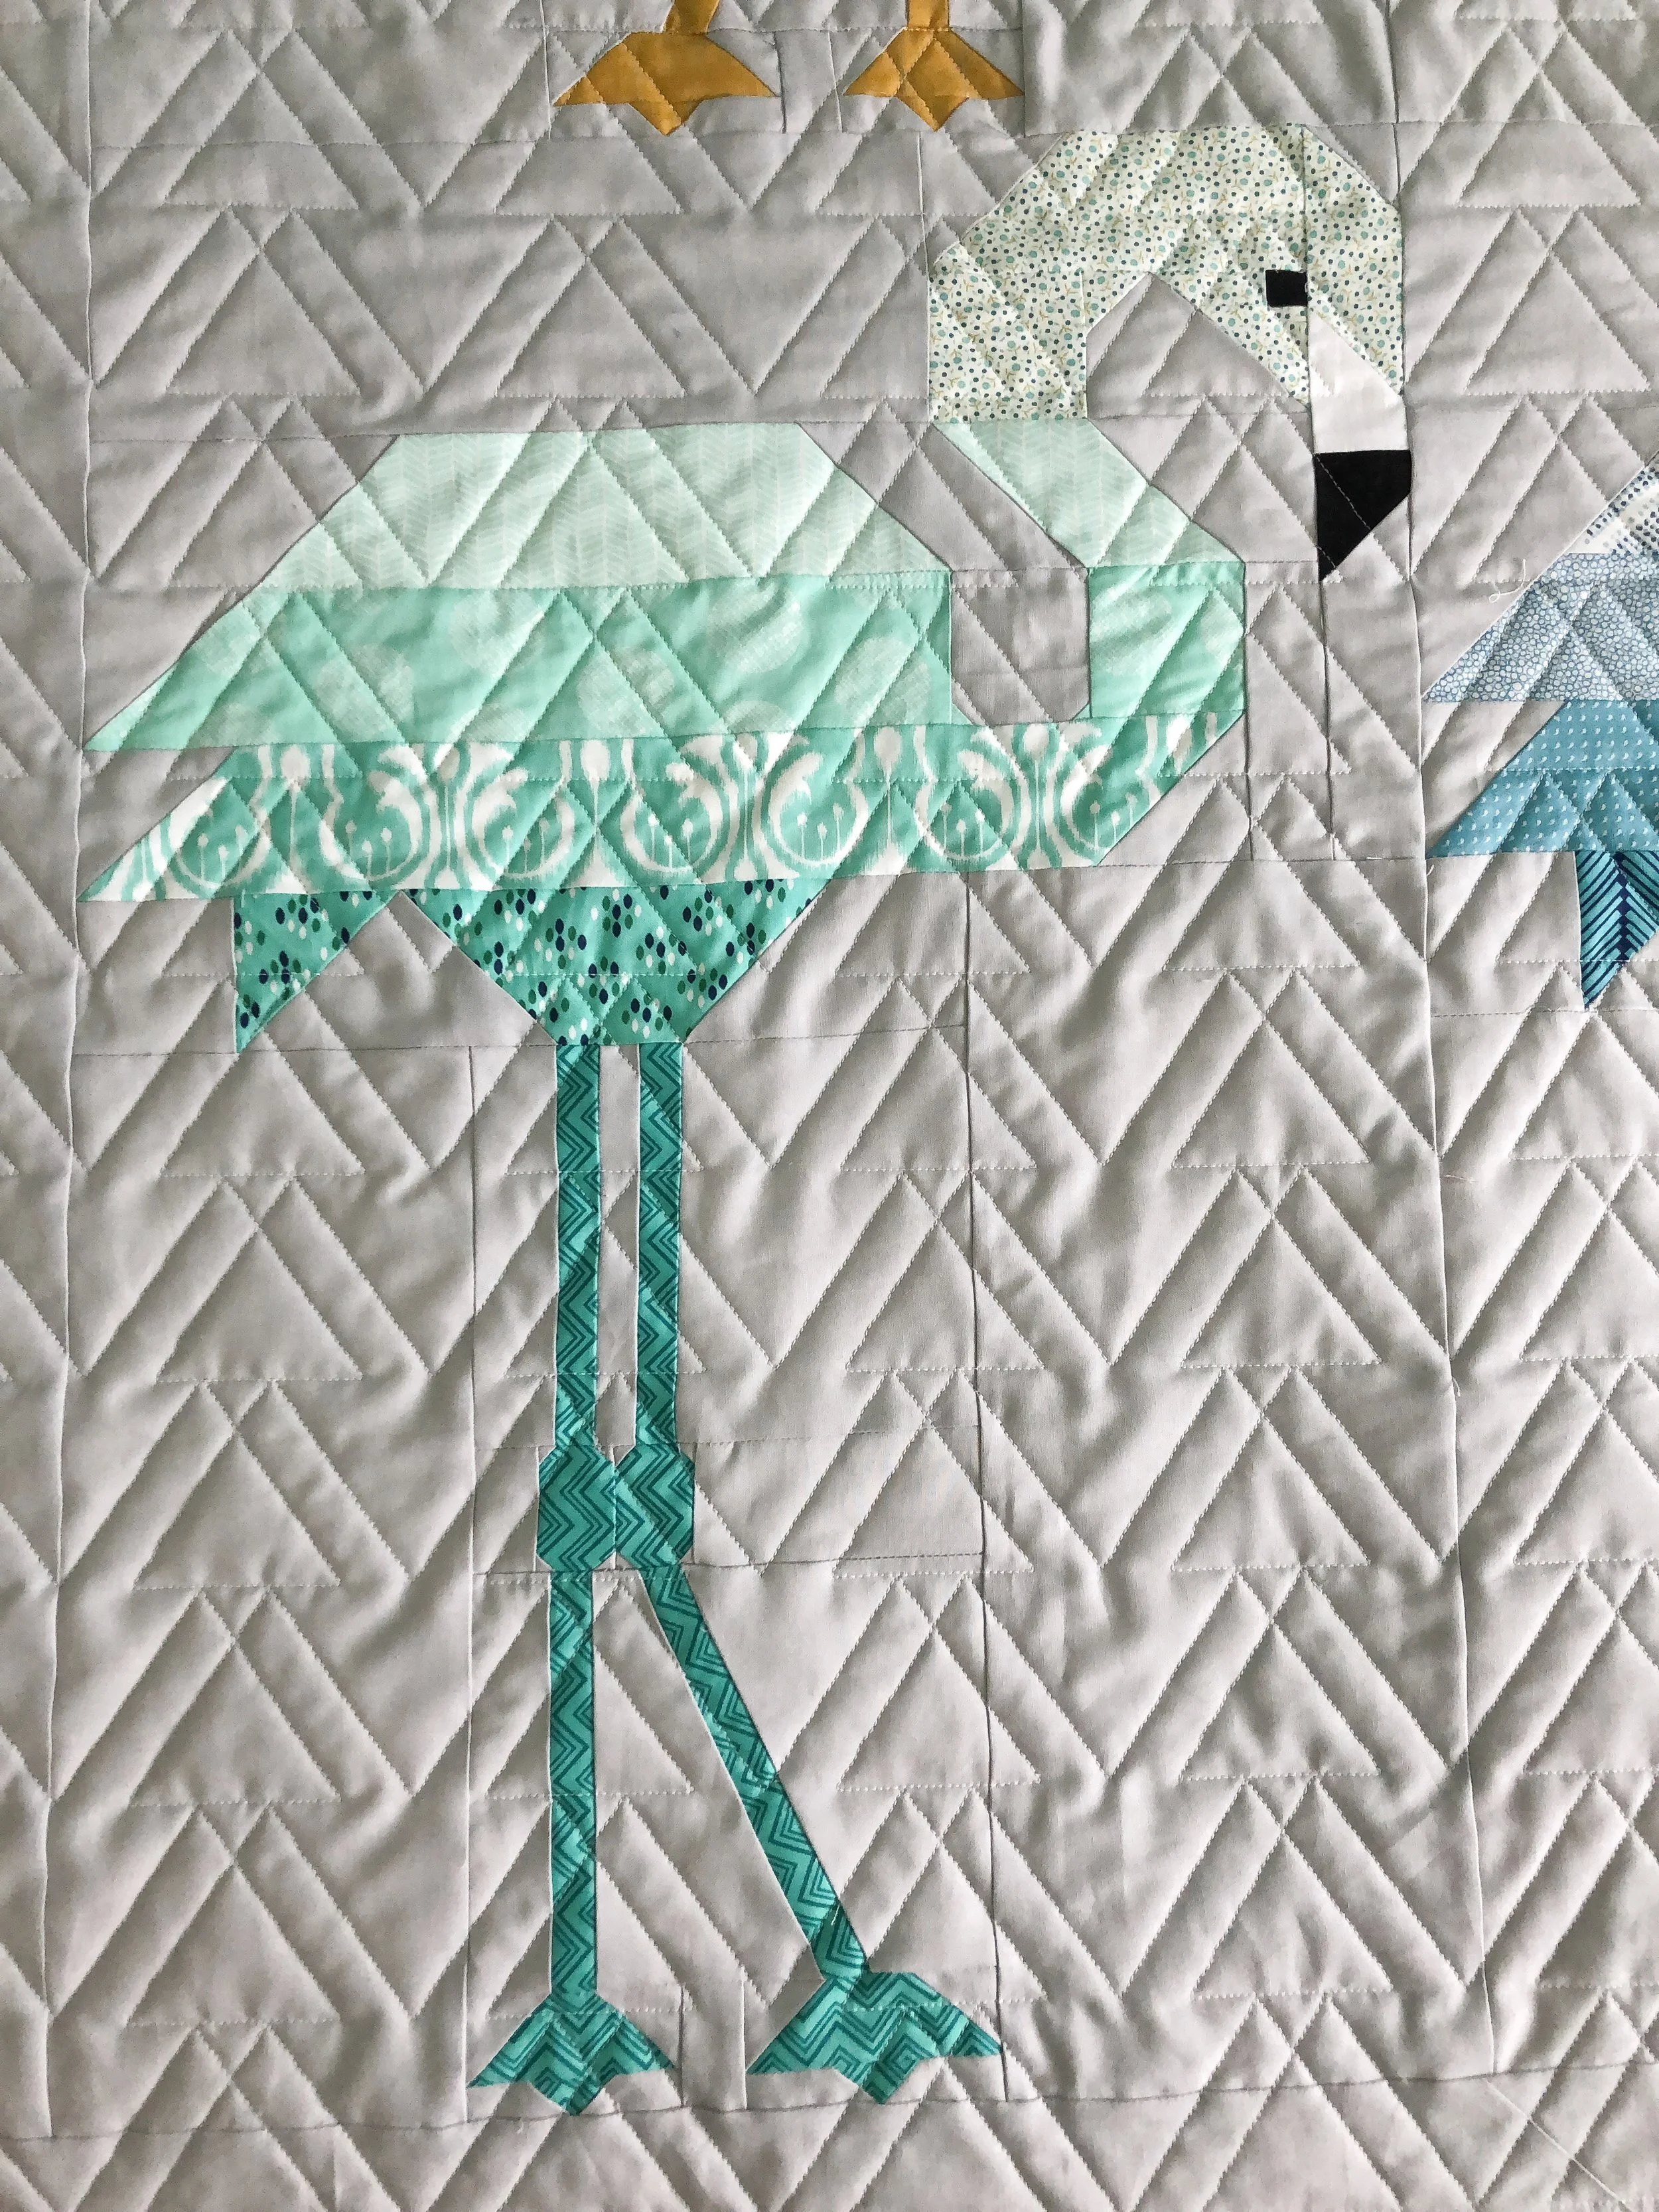
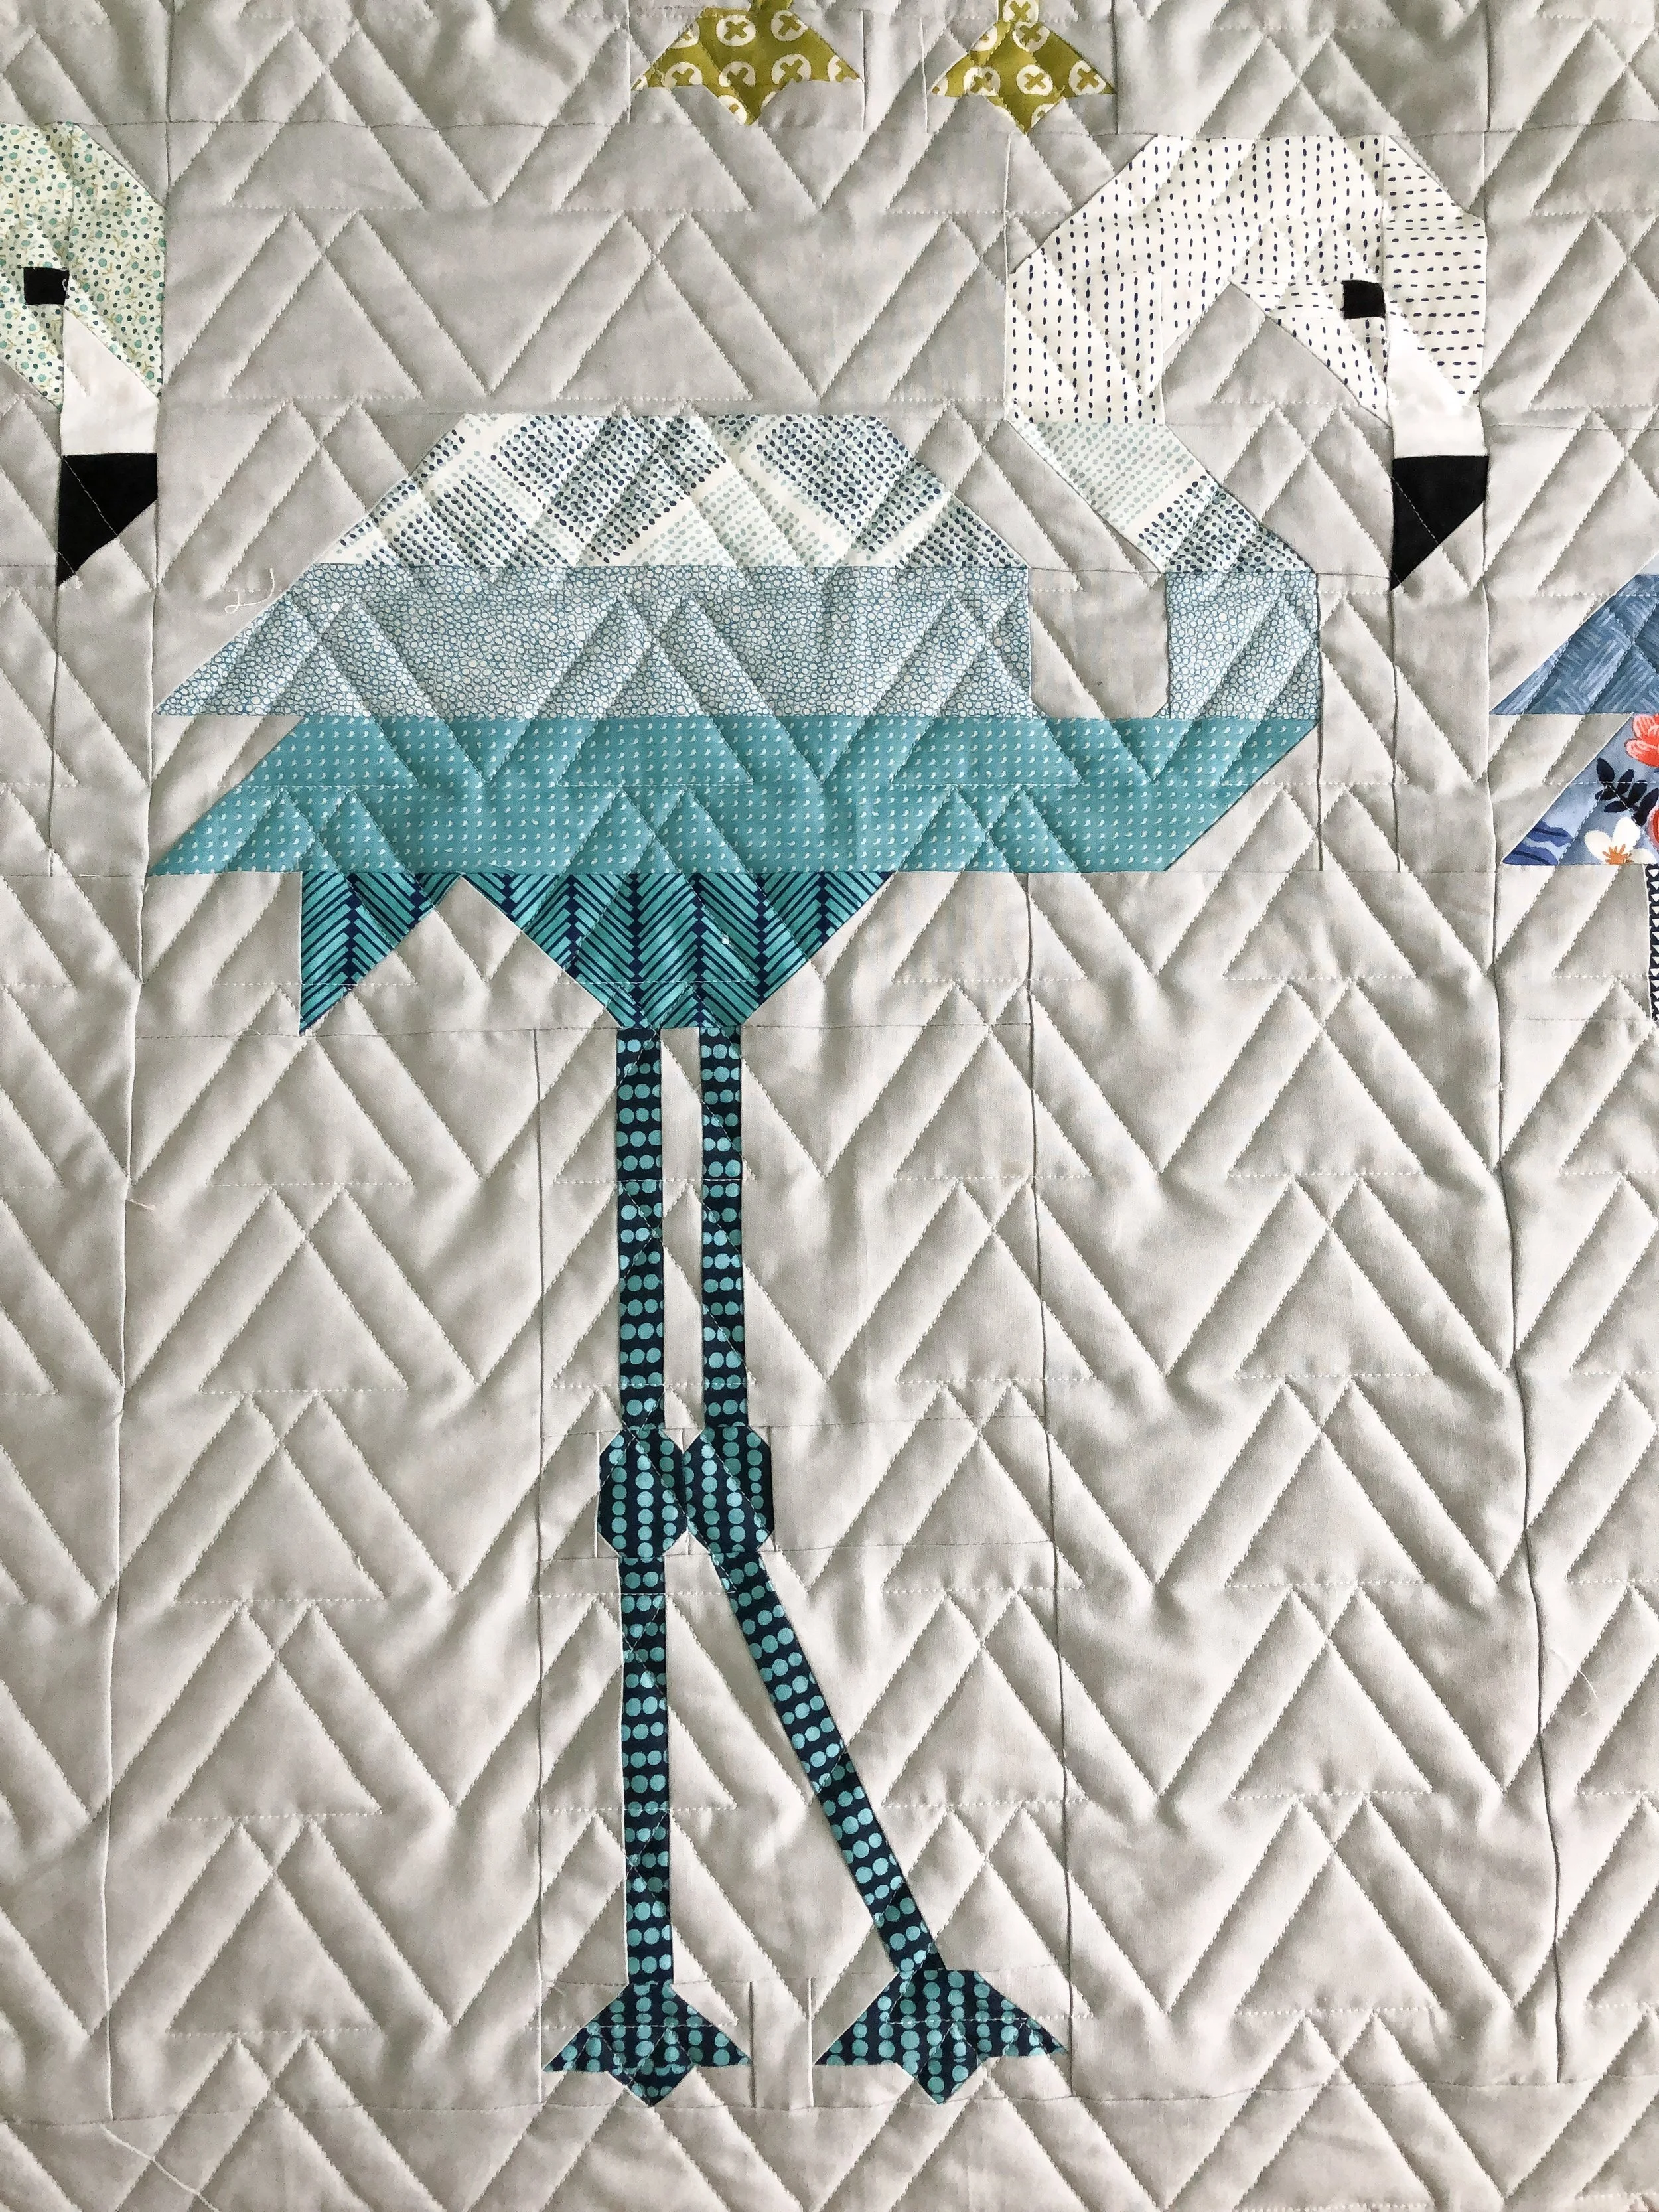
Florence Flamingo and her friends...
My mom made this quilt for my sister and brother in-law, for their wedding quilt. They have a slight obsession with Flamingo’s!!!
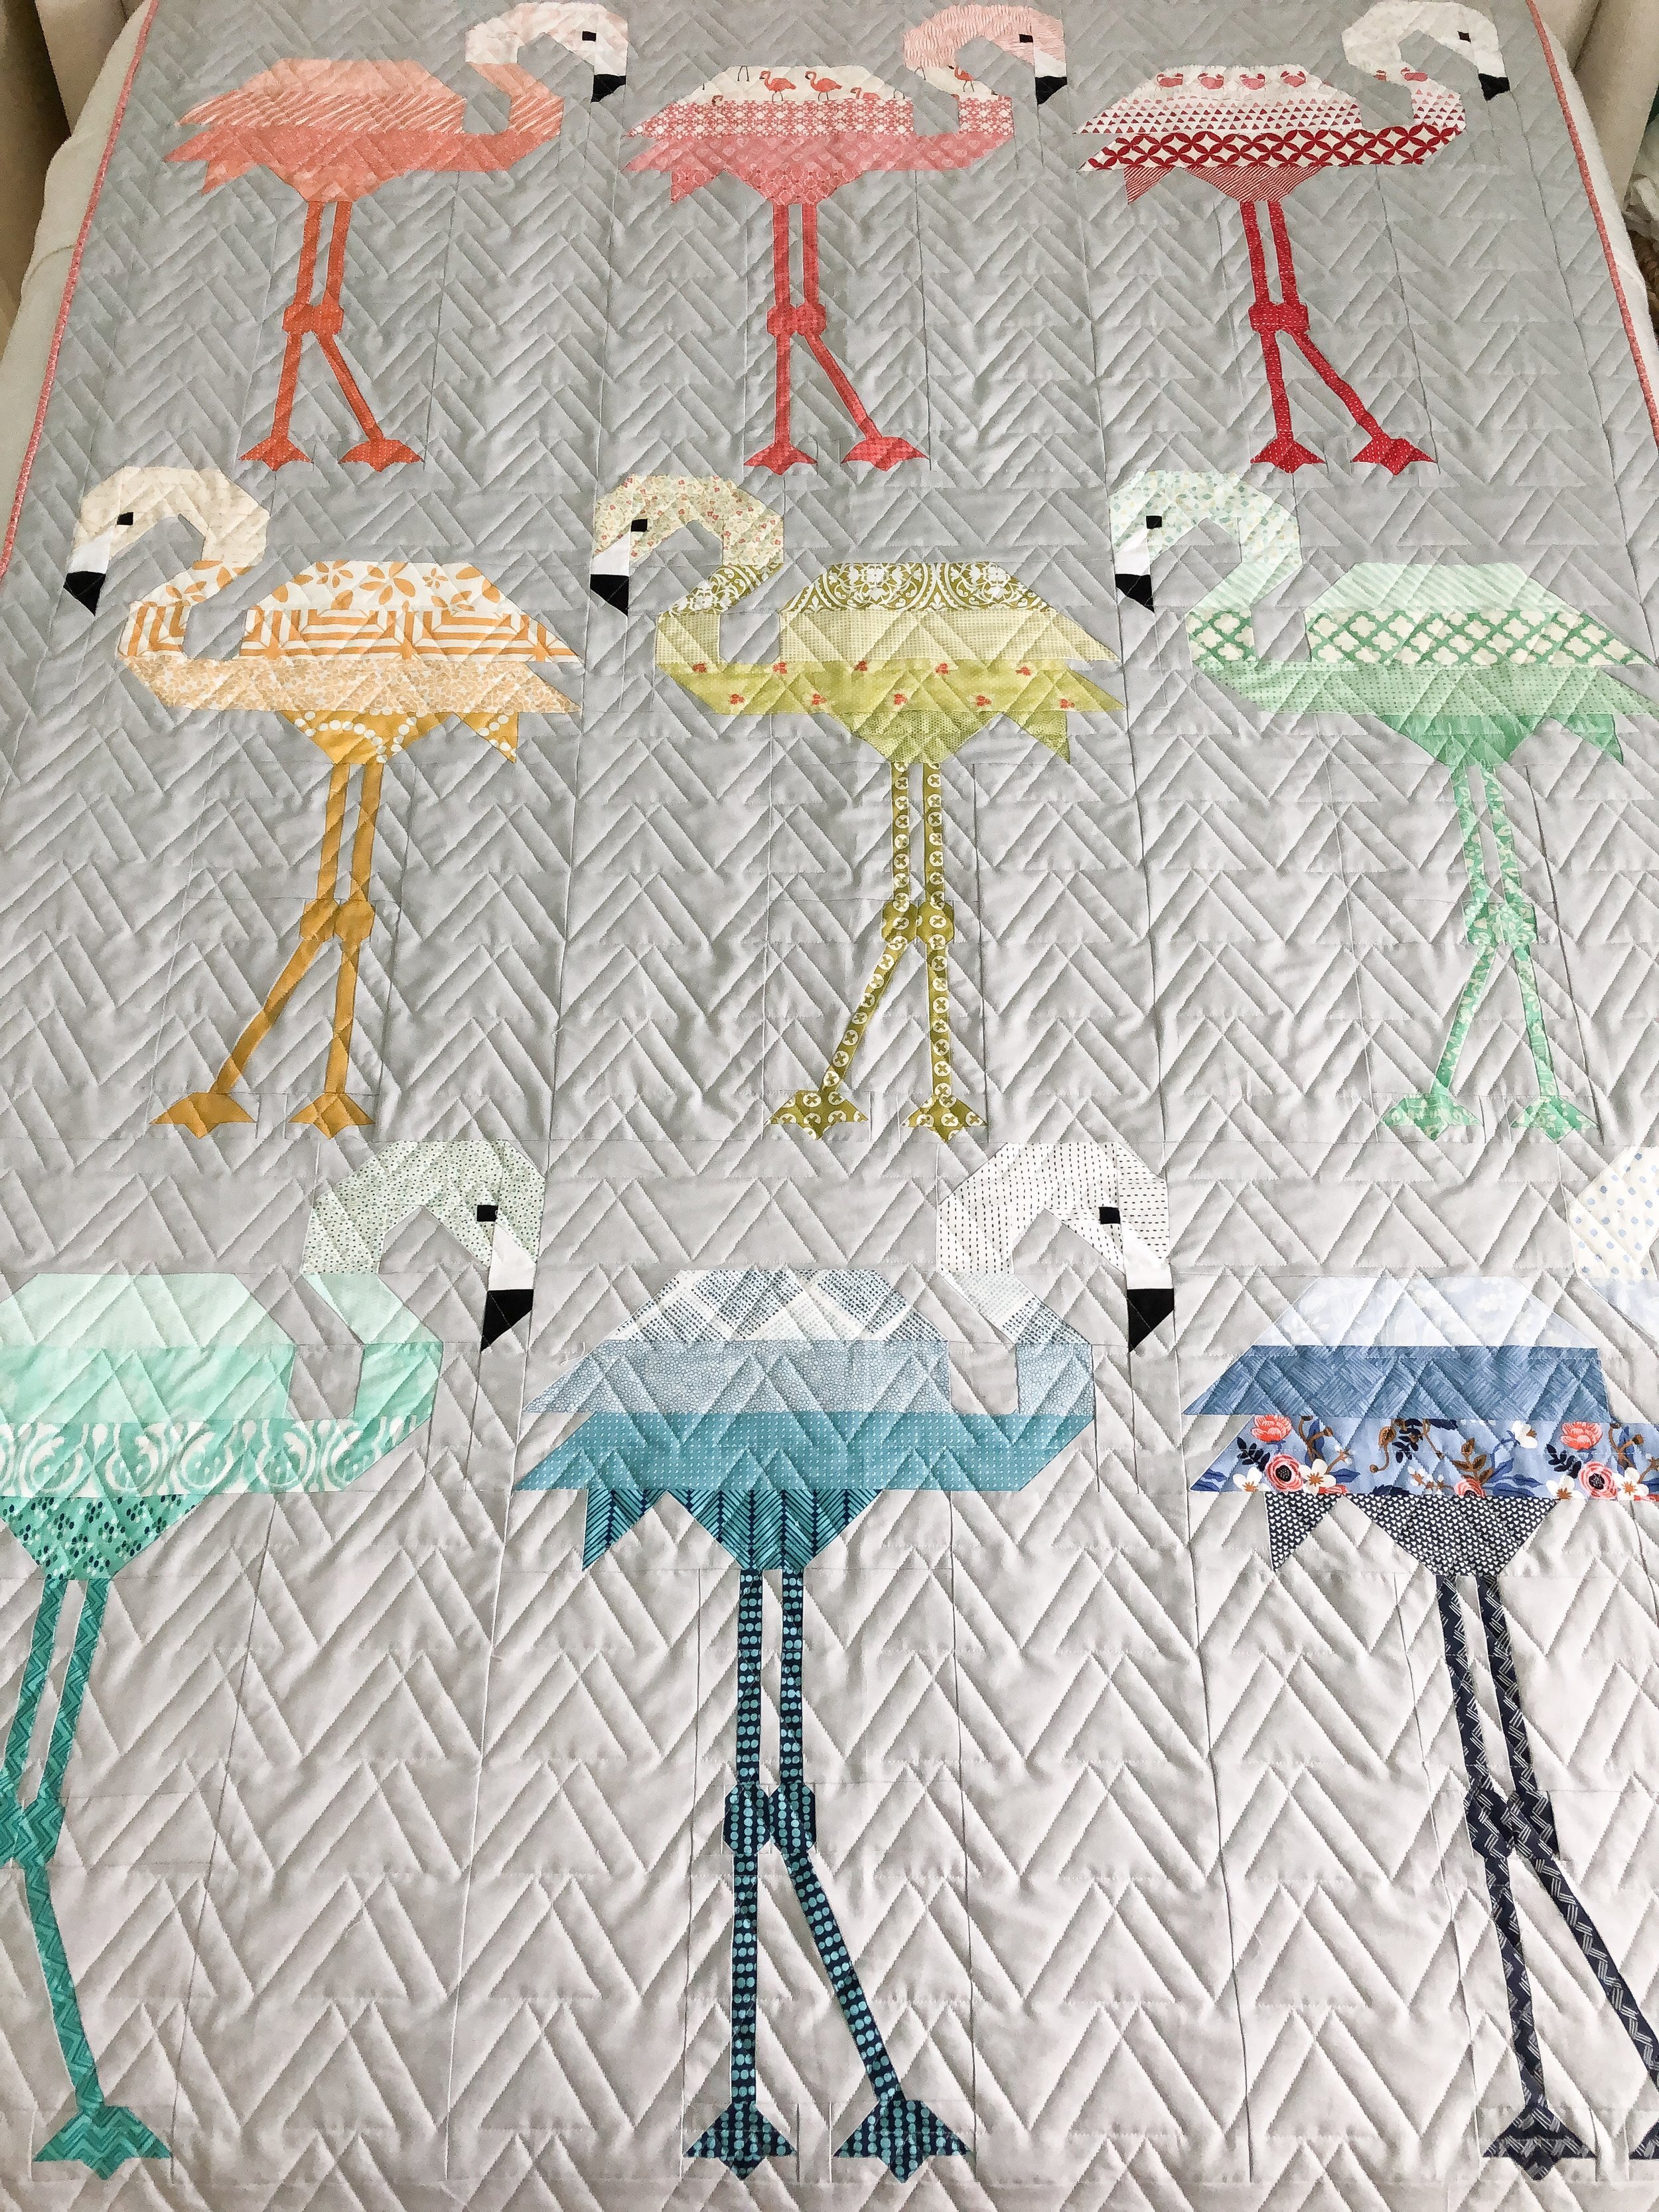
My mom and aunt own a fabric store online, https://www.etsy.com/shop/sistersandquilters or https://www.sistersandquilters.com/ they have a great selection of a wide variety of fabrics, as you can see. This pattern is available in their shop, it’s called Florence Flamingo and is by Elizabeth Hartman. I love it!! The ombré look to each flamingo is so much fun.
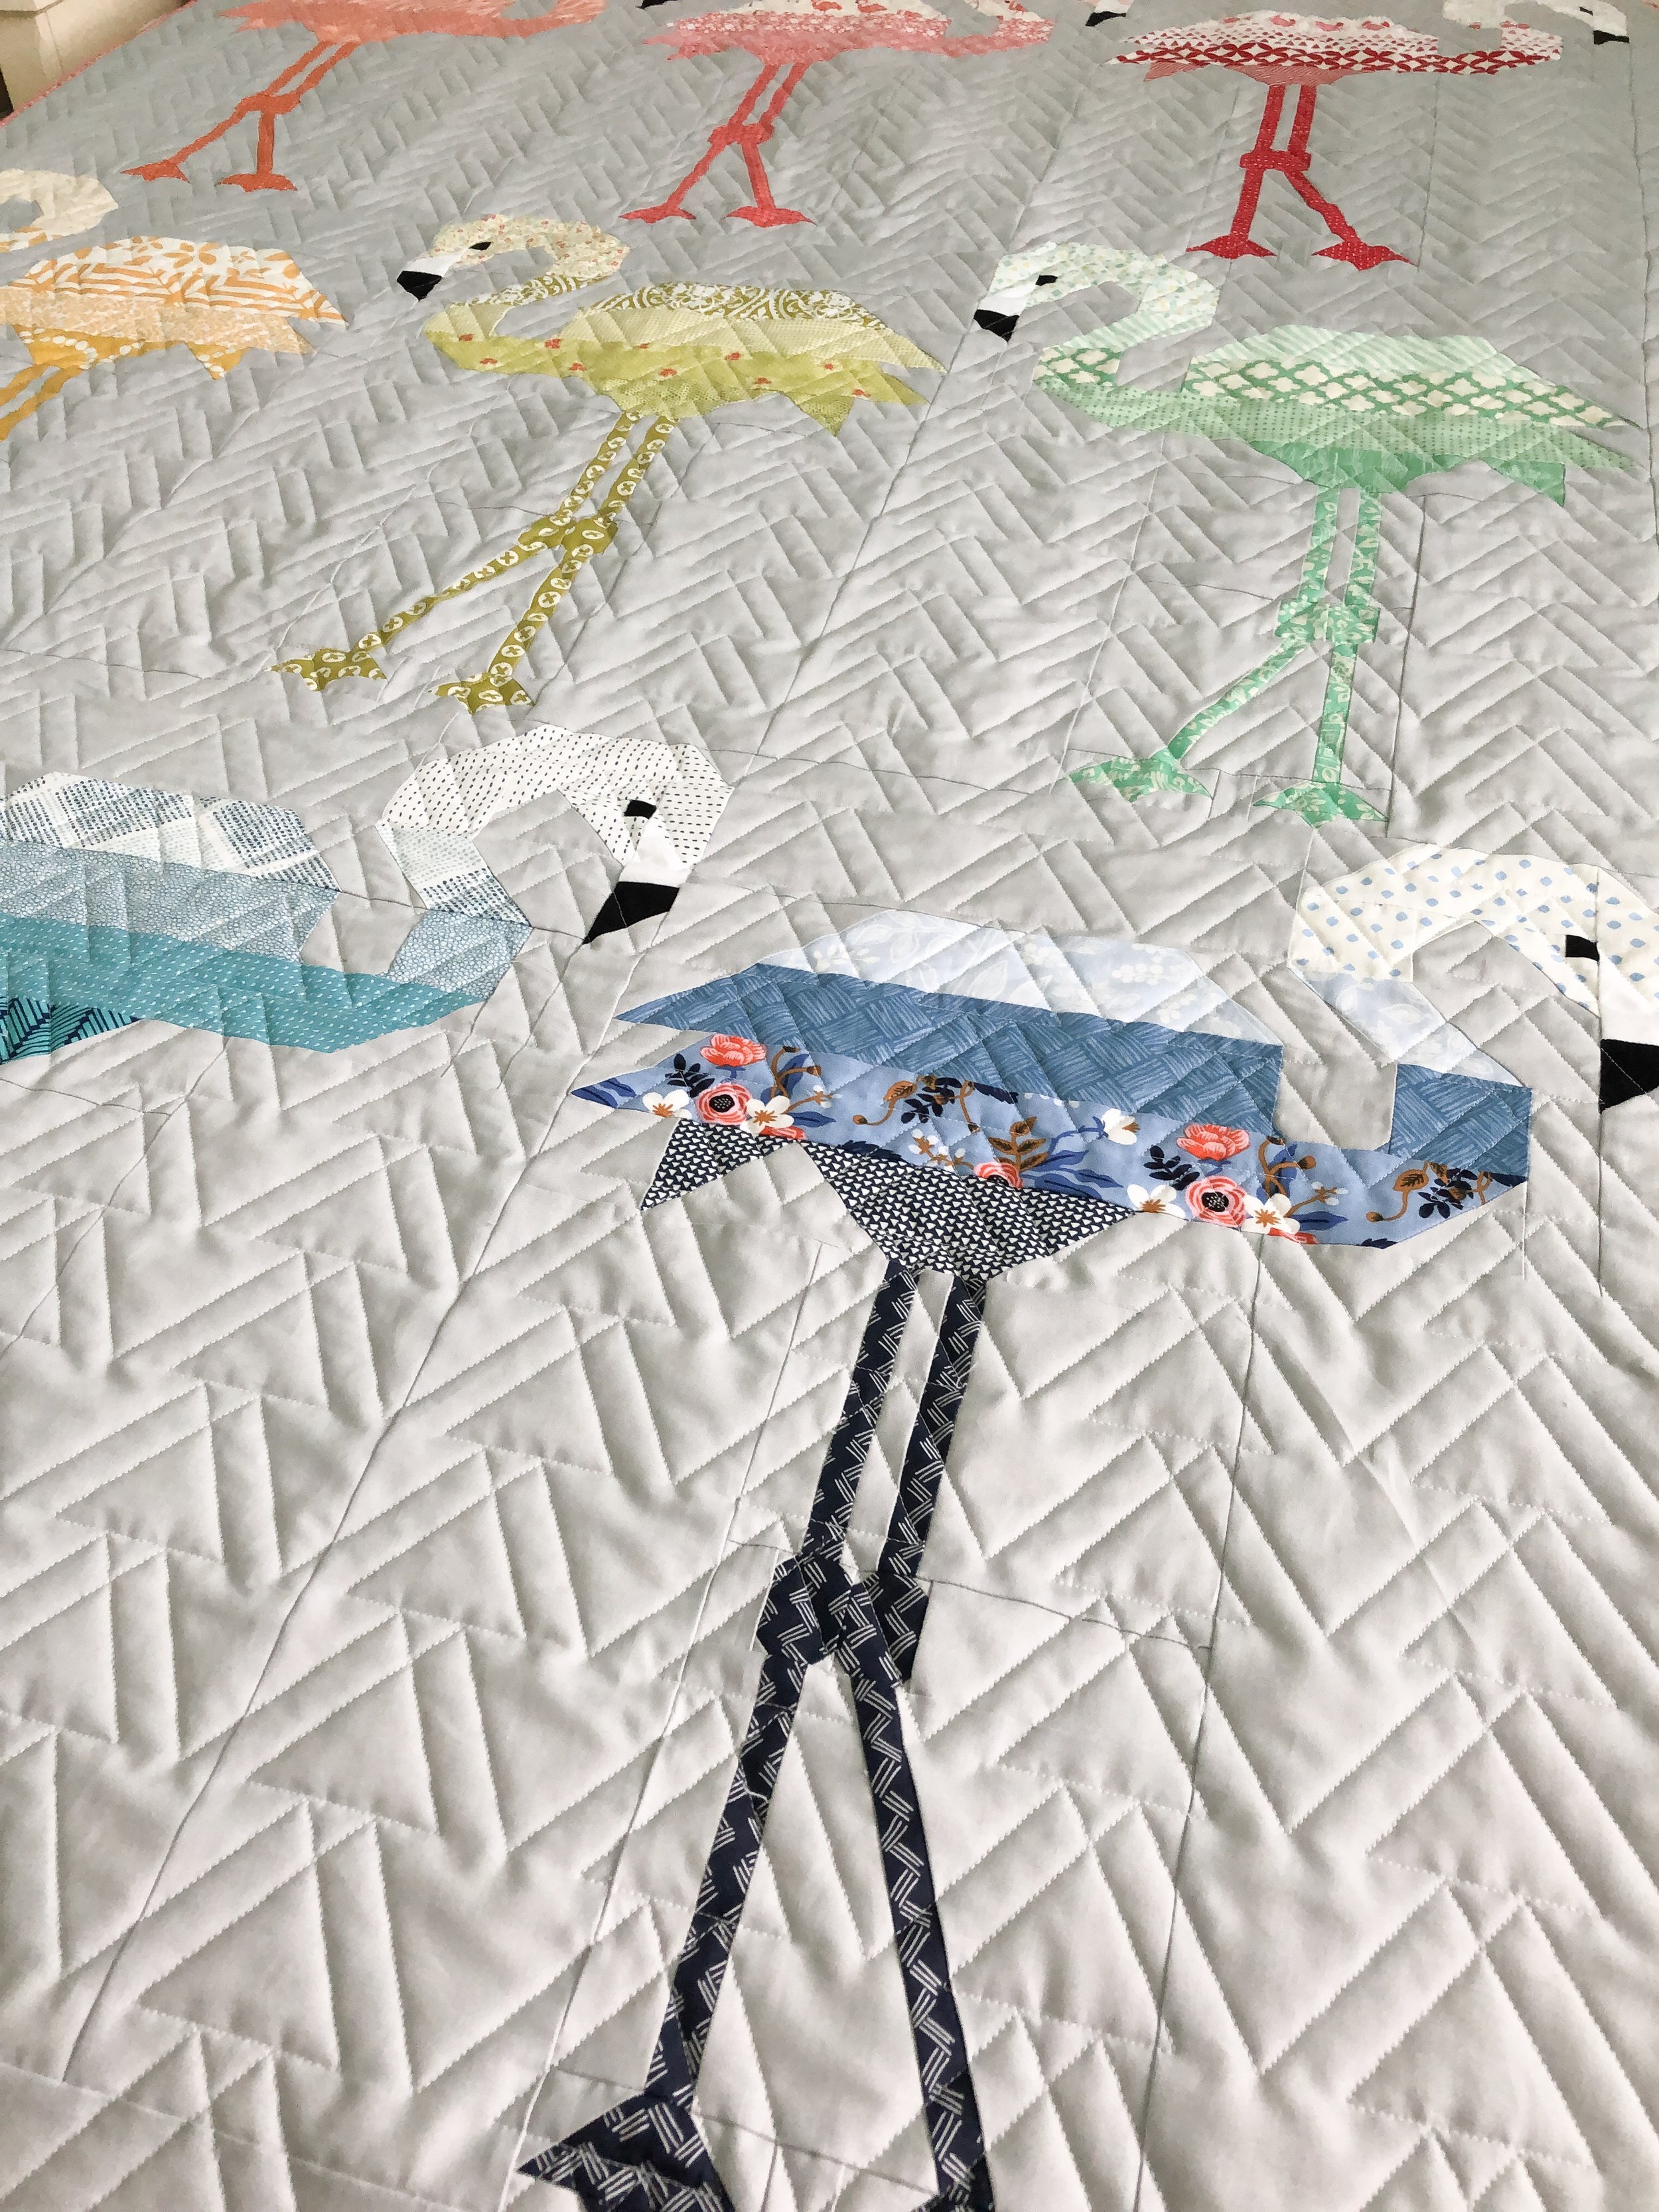
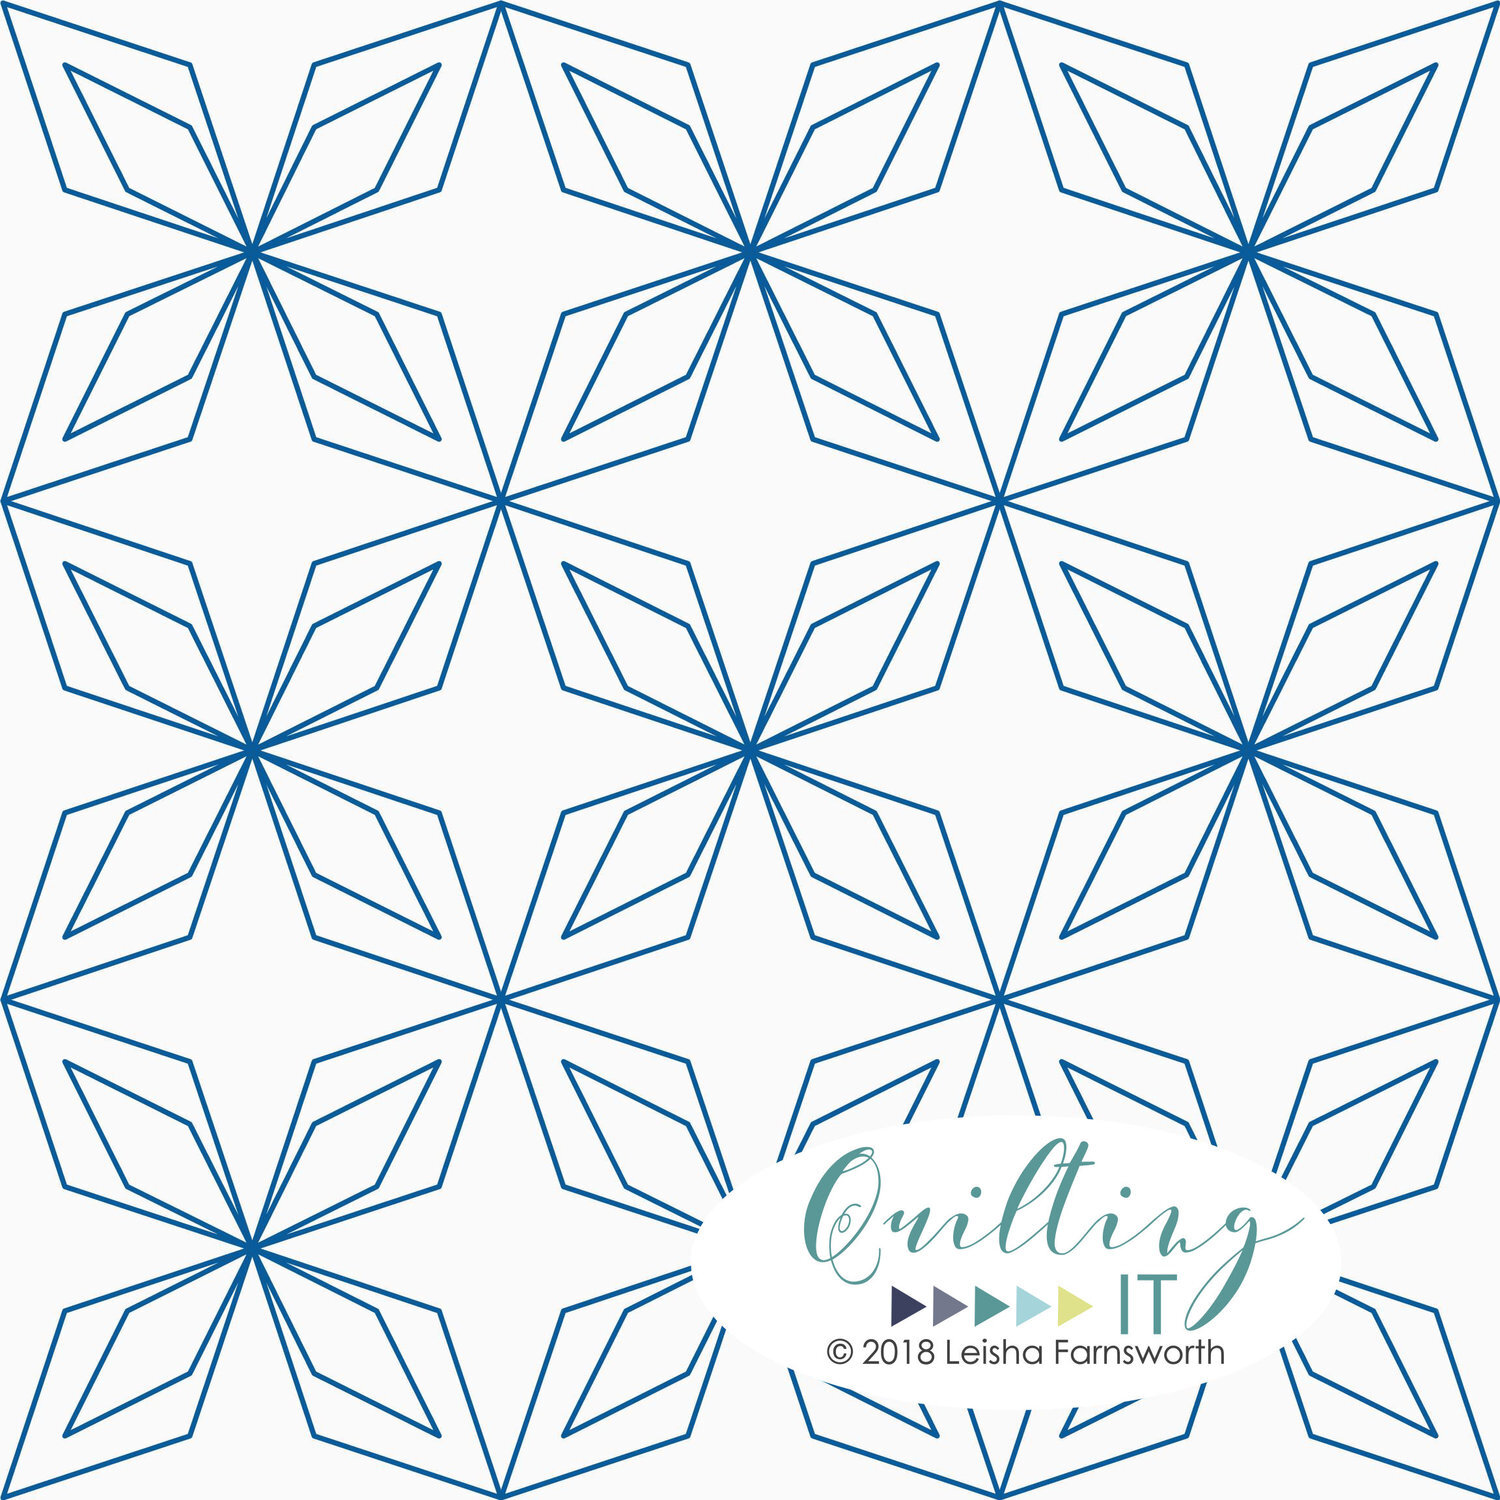
I gave my sister and brother in-law quilte a few designs to choose from, for the quilting...they chose my “The Climb”©️ design, which is only available at: https://www.quiltingit.com/shop/the-climb
I quilted this design at 2.5” height. That seems small, but it’s the most perfect size. Especially with all the negative space in the design. I love it with these fabrics and the flamingos.
So...let me introduce you to Florence Flamingos friends, yes...we named them. Haha! Not only do we want to remember their names, but I want to show you a close up on all the fun fabrics they picked for this quilt... note...these names are random and were chosen over a facetime call with my other sister and brother in-law...you know, as a gift or added personal touch to this quilt. Haha!
In all seriousness as you scroll through these pictures, notice the trianglular theme in the fabrics, which makes the quilting very fitting.
This is Guyus...

This is Francene, isn’t she lovely!

Crabby, fitting for sure.

Gaquille, perfect spelling by my bro in-law...

Gringo...
Dalas, aka Salad (they are reversible I learned)
Aquafina...she’s quite possibly my favorite!
Steven (inside joke between the bro in-laws...from some funny video)

Shaniqua
...have you ever had fun naming your animal quilts???

I used my favorite Winline 8020 cotton poly blend batting, and 30 tex poly wrapped poly Perma Core A&E thread. I bound it in the pink, because it’s just like the pretty pink flamingo legs, plus that pop of color is fun!!
This was the last quilt I quilted before Christmas!!! Love how it turned out.
- Leisha

Honest Fabric
During fall 2018 International Quilt Market, Karlee Porter...Renowned Longarm Machine Quilter and creator of Graffiti Quilting...announced that she started a fabric company. Not just any fabric company, but a one of a kind, custom printed quilt top company. She has a three fold mission, to give you great quilt tops that are fair trade, eco friendly, and USA made. Go to https://www.honestfabric.com/ to check it out. I thought it was an amazing idea!! I’ve quilted several quilts that are custom printed onto fabric...some of you may be shocked which ones they are...but to be fair to those I quilted for, I won’t tell you which ones. My point, you wouldn’t know the difference. Not everything would be easy or possible to piece. AND, if you’re like me...you don’t love appliqué, yet you love the quilt. So...with Karlee’s debut of Honest Fabric, she decided to do a giveaway. To win you had to tag someone in the comments, and you both had to be following Honest Fabric on Instagram. So...of course I entered, and tagged some quilty friends who I knew would love one, too! And guess what!!!! I WON! I hardly ever win anything. My quilty friend Molly from Molly Lovely Threads was the lucky person that I tagged. Yay!! Thanks Karlee for such an awesome giveaway!!!
So, I was talking to Molly about which design she was going to choose, and she told me her sister Bonny Steele was designing some designs. I saw this yummy striped orange peel in the most wonderful colors, and knew this is what I wanted to pick! This design is available right here... https://www.honestfabric.com/shop/modern-orange-peel-2/
Now let me tell you about this fabric... Karlee said it will be printed on the most soft colorfast polyester fabric, and that’s the absolute truth! I’ve quilted polyester before...not my favorite, but this fabric is seriously so soft and yummy.

To make this quilt even better...I used Hobbs wool batting in it...oh the texture is fabulous!!! The first time that I’ve used only wool in one of my quilts...love love love it!! I’ve used wool for other people’s quilts, or done a double batting in some of my own quilts...never just wool. Now, I may need to do it in every quilt. Haha!! I used a white 30 tex Perma Core A&E thread. I quilt on a Gammill 22” longarm machine, with a Statler. (Computer)
Funny thing... the quilt top is polyester, the backing/binding fabrics are cotton, the batting is wool, and the thread is poly wrapped poly. Lots of different kinds of materials, and yet it turned out this beautiful!!

This quilting design is one of Patricia Ritter and my oldie but goodies... it’s called Bubble Wrap Double Take and is available at https://www.urbanelementz.com/bubble-wrap-double-take.html
This design is so versatile, and it’s available in paper...digital formats...self print...design board...and tear away. All at Urban Elementz.
When I use digital designs, I’m going to try and remember to share the height of the design. I quilted this design at a 1” height. Because each row is only half of the design, it’s a great size.
So, why did I pick this design? I wanted something fresh, modern, curvy like the backing fabric and orange peels on the quilt top...but really, the underlining reason I pick any particular design for a quilt, it’s harmonious. This design fits well with the fabrics and designs, yet doesn’t take away from or compete with the quilt itself. Quilting should always enhance a quilt, not fight for attention. That is my major rule of thumb. What is going to look great now, and still look great in 10...20...30 years. Quilts are treasures and last forever, I think the quilting should too.
I found my perfect backing fabric and binding at https://www.etsy.com/shop/sistersandquilters or https://www.sistersandquilters.com/ Same shop, they just have an Etsy as well as a .com
And...if you read my long post about my Ombré Gems quilt, then you saw my quilt tags. I LOVE THESE!! Custom Labels 4 U made them for me... I got tons for a great price! https://www.customlabels4u.com/
If you want to change it up and order a custom printed quilt top, I highly recommend it!! I look forward to getting more. In fact there are a few that I’ve been eyeing. It’s nice to have something done and ready to quilt. Plus, if you haven’t already taken a look, Karlee has some amazing artists and designers with such an incredible variety. There is something for everyone!!
Happy Quilting!!
- Leisha
Thanks to you!!!
I just wanted to thank each of YOU for being here with me!! I’m constantly blown away by the incredible support that I’ve been given with everything I’ve designed over the years!! First my machine quilting... my designs with Patricia Ritter from urbanelementz.com ...to my circle machine quilting ruler set (Circle2™) ...to my own digital designs ...to teaching machine quilting classes!! I’m so grateful for all the support I’ve gotten over the years, especially this past year. 2018 was professionally the best year I’ve had. I didn’t quilt as many quilts as I have in years past, but I got to reach outside of what I normally do, and design things that I’ve wanted to do for awhile and teach machine quilting classes. I have some exciting new things in the works...I’m so excited to share with you! But until then... a very grateful thank you to you, from me!! Here is to 2019!!! Let’s make it another great one.
- Leisha
For details about this quilt, check previous post here: https://www.quiltingit.com/blog/2019/1/3/my-ombr-gems-quilt
For more about my designs and rulers, go to: https://www.quiltingit.com/shop/

Quilting Tutorials
Hello friends!!
I’ve had some requests for some freehand quilting tutorials. I’m going to do them as I have the opportunity to quilt designs on my clients quilts. I’m also hoping to keep them short, like this one. If there is anything you’d like me to video as I quilt, let me know. Check out my recent blog posts to see if there is anything you’d like me to video: https://www.quiltingit.com/blog/2019/1/1/beckys-nursery-rhyme-quilt and https://www.quiltingit.com/blog/2018/11/17/cindys-raincheck-quilt-including-28-different-background-quilting-designs
If you’d like to subscribe to my YouTube channel, I would appreciate it!! Go to: https://www.youtube.com/user/QuiltingIt
Thanks for following along in my quilting journey!!
happy quilting! - Leisha

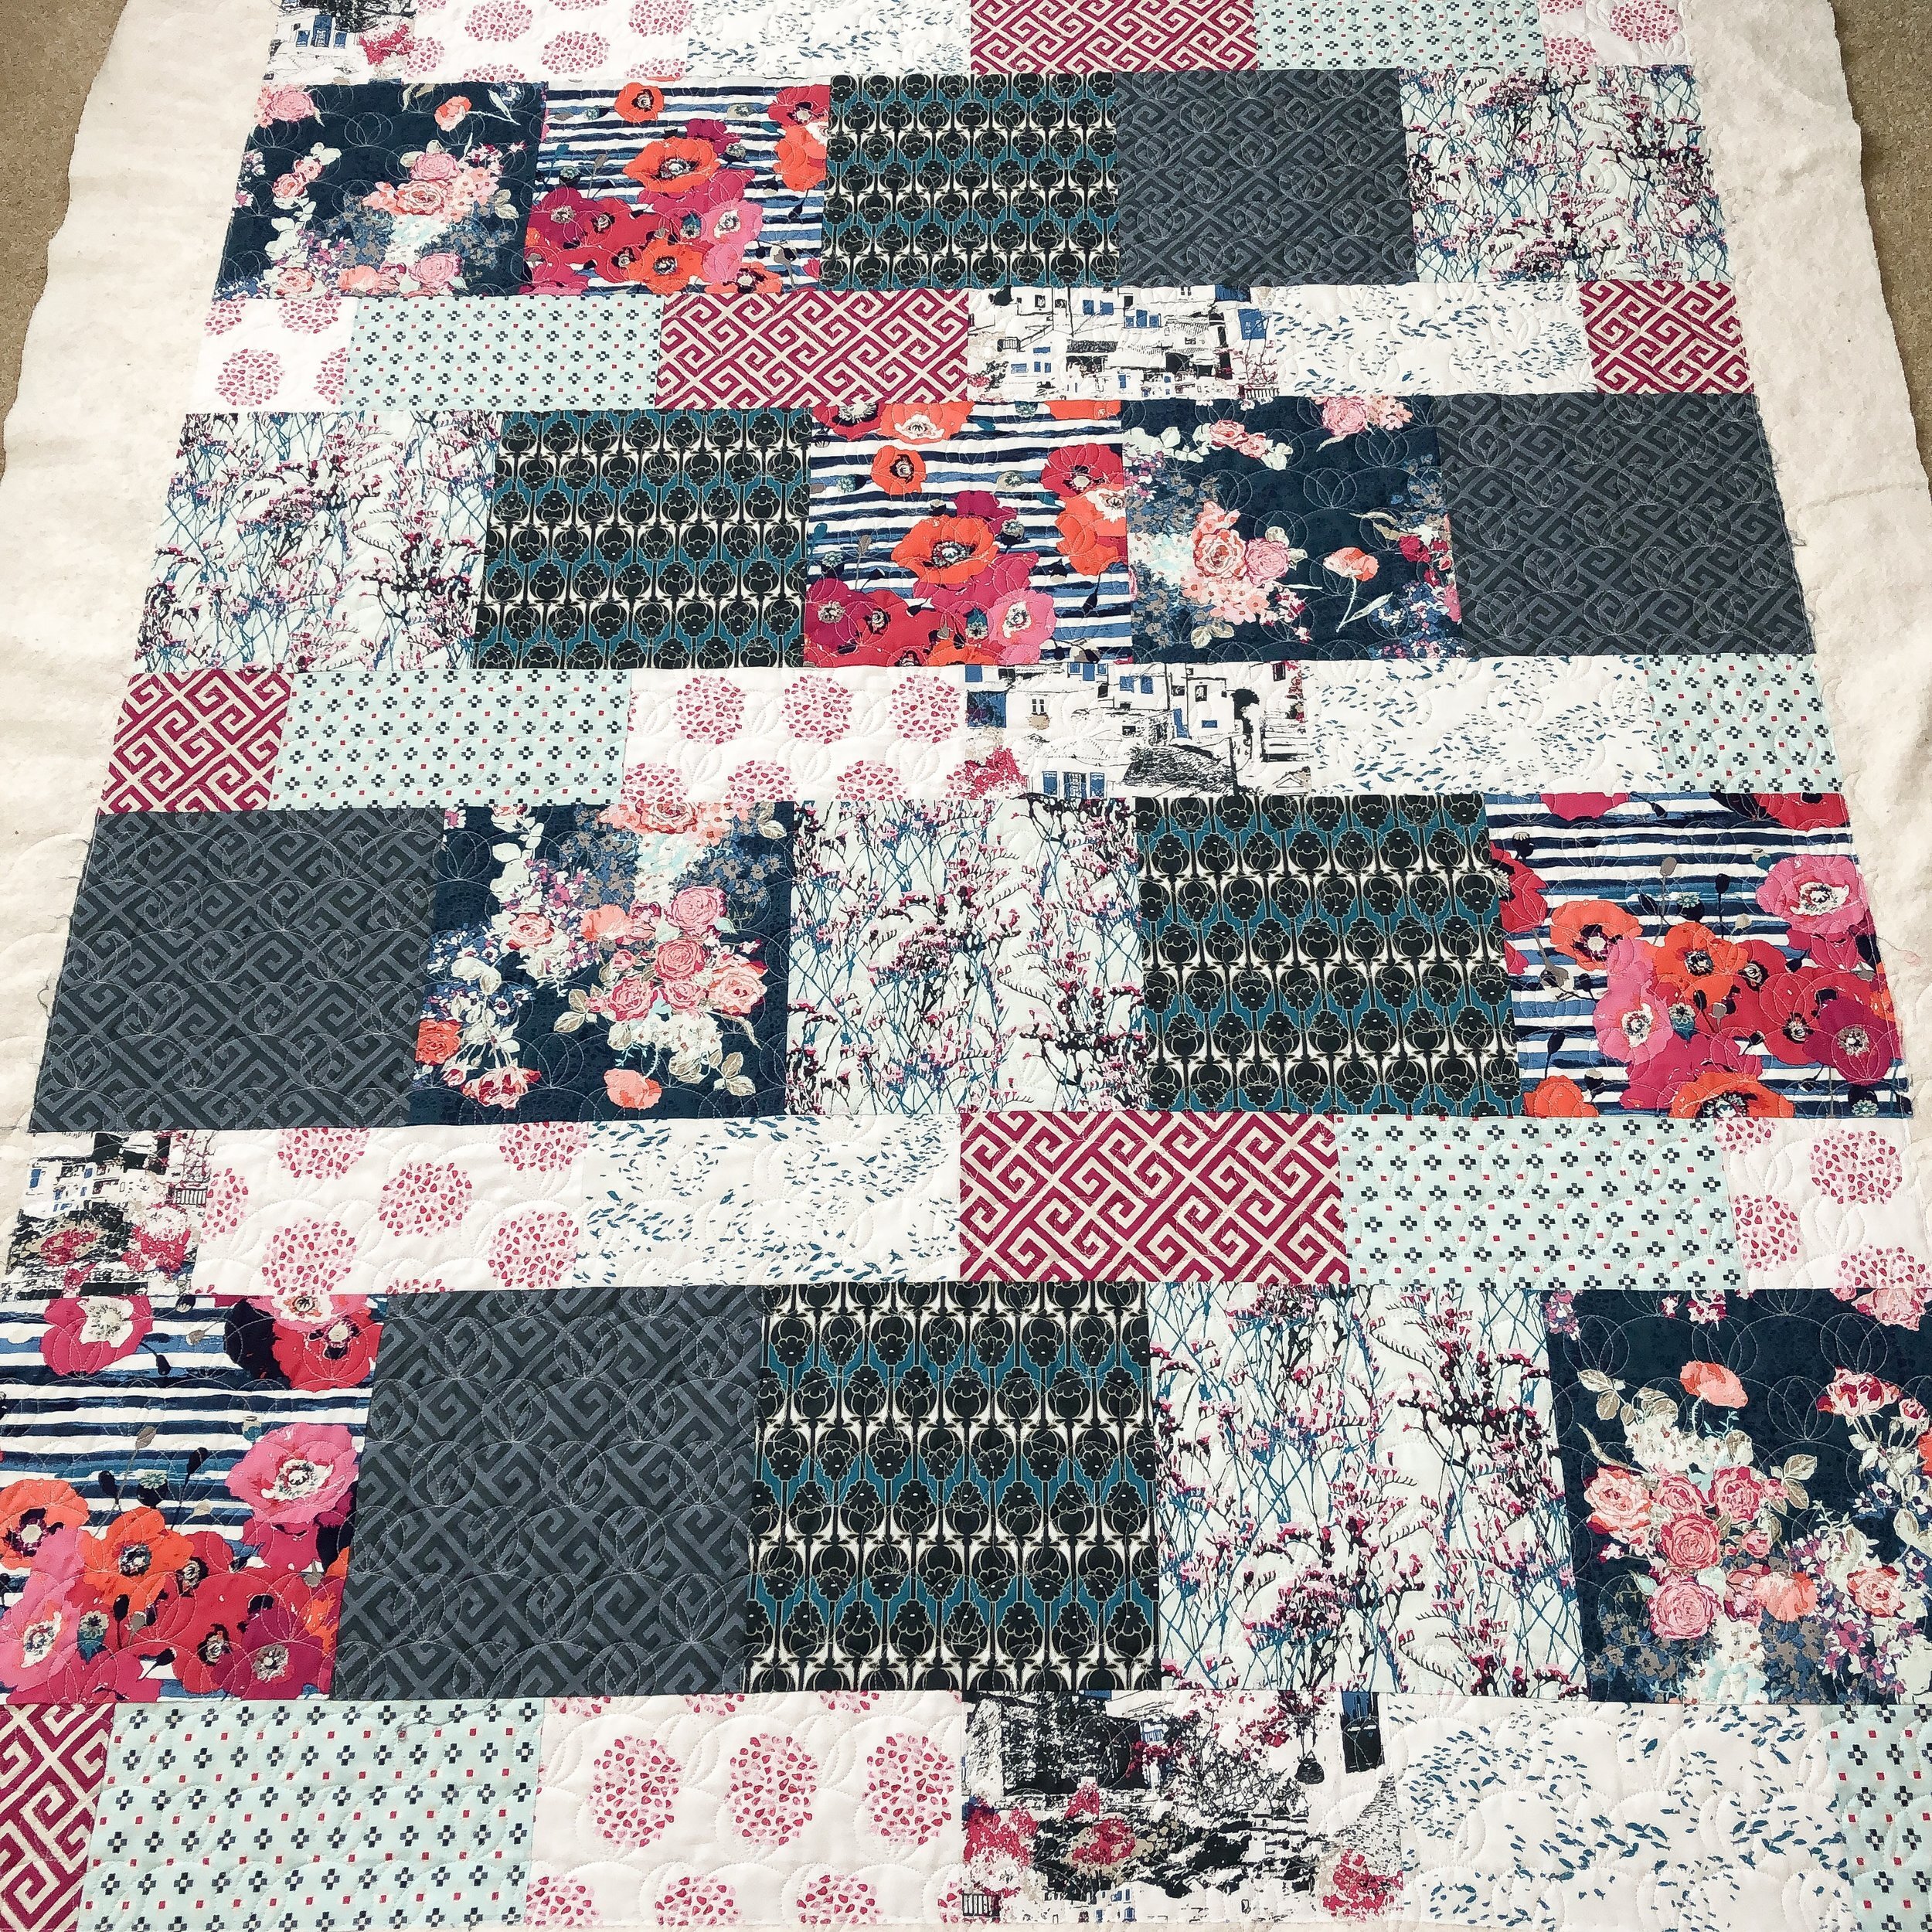
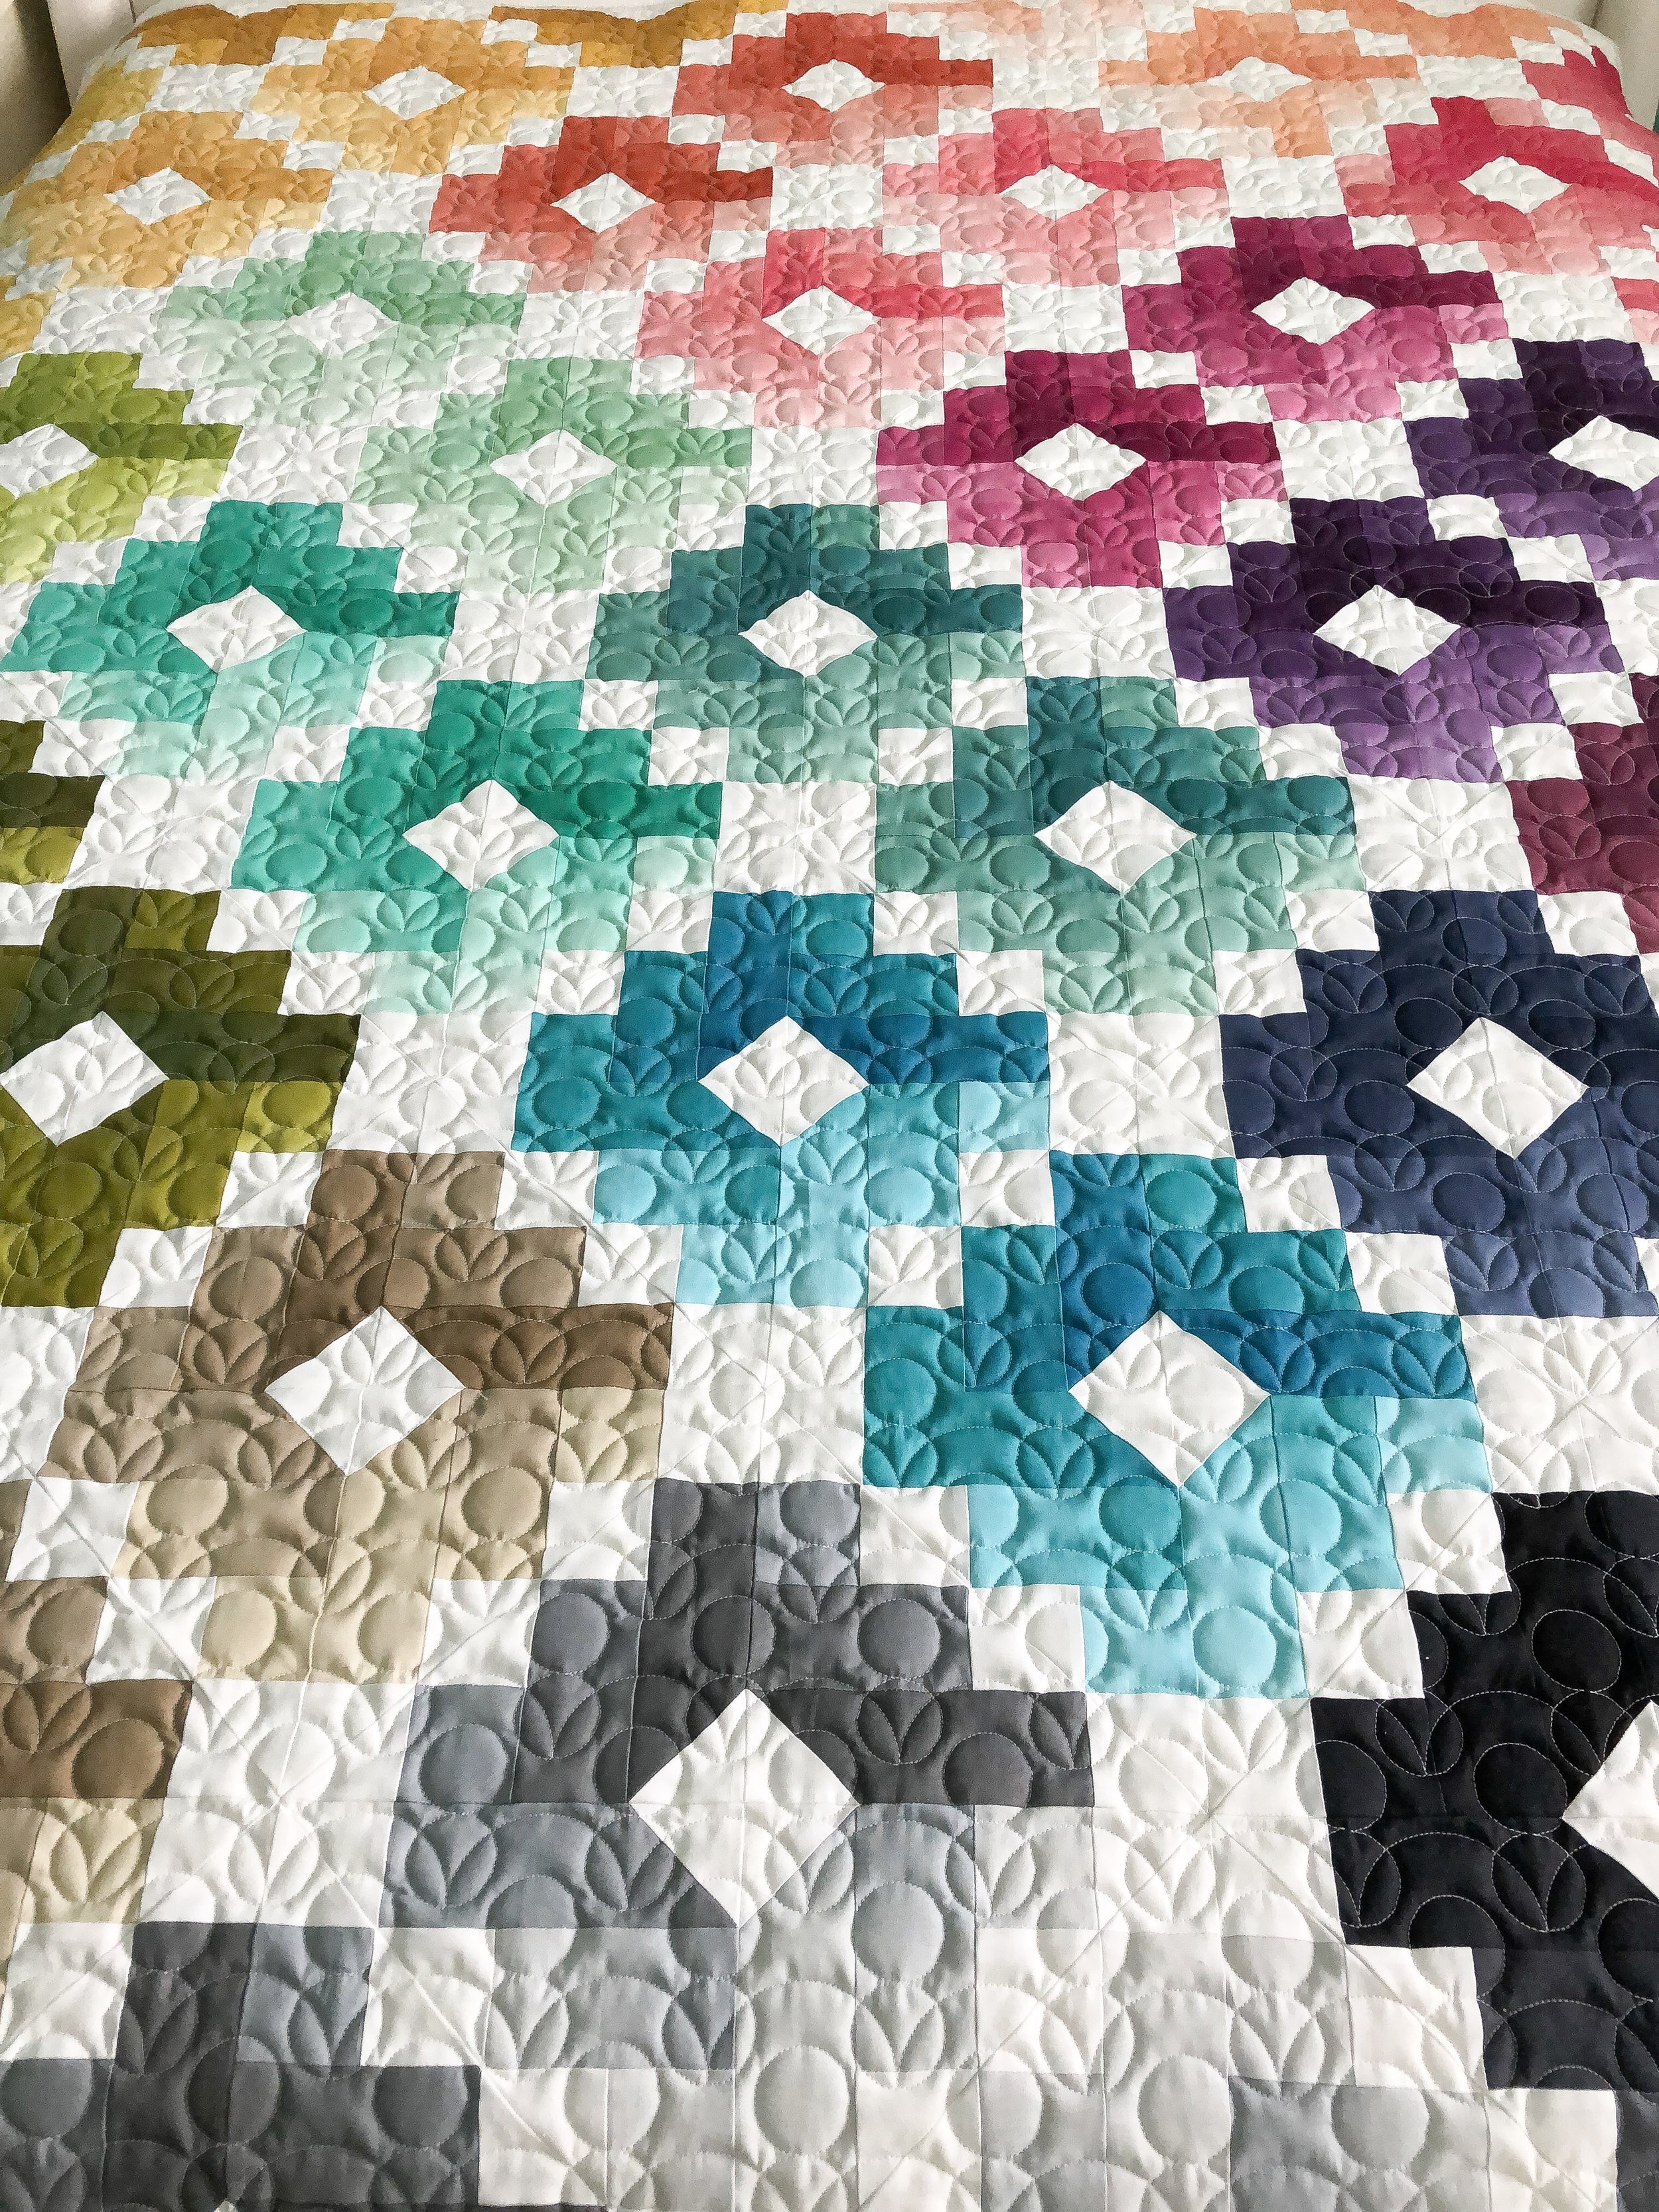
My Ombré Gems quilt!!!
This is one of two quilts that I started and finished last year. I quilted tons of quilts, however I don’t sew a ton of quilts, because I sew so slow. I try and enjoy the process. I’m thrilled to share with you my Ombré Gems quilt!!! You have no idea how excited I am about this quilt. I loved this pattern the first time I saw it from Emily Dennis... go here to get the pattern: https://quiltyloveshop.com/collections/featured-products/products/ombre-gems-pdf-quilt-pattern
I got all the fabrics from https://www.sistersandquilters.com/ my favorite online fabric store!!! Or they have an etsy... https://www.etsy.com/shop/sistersandquilters
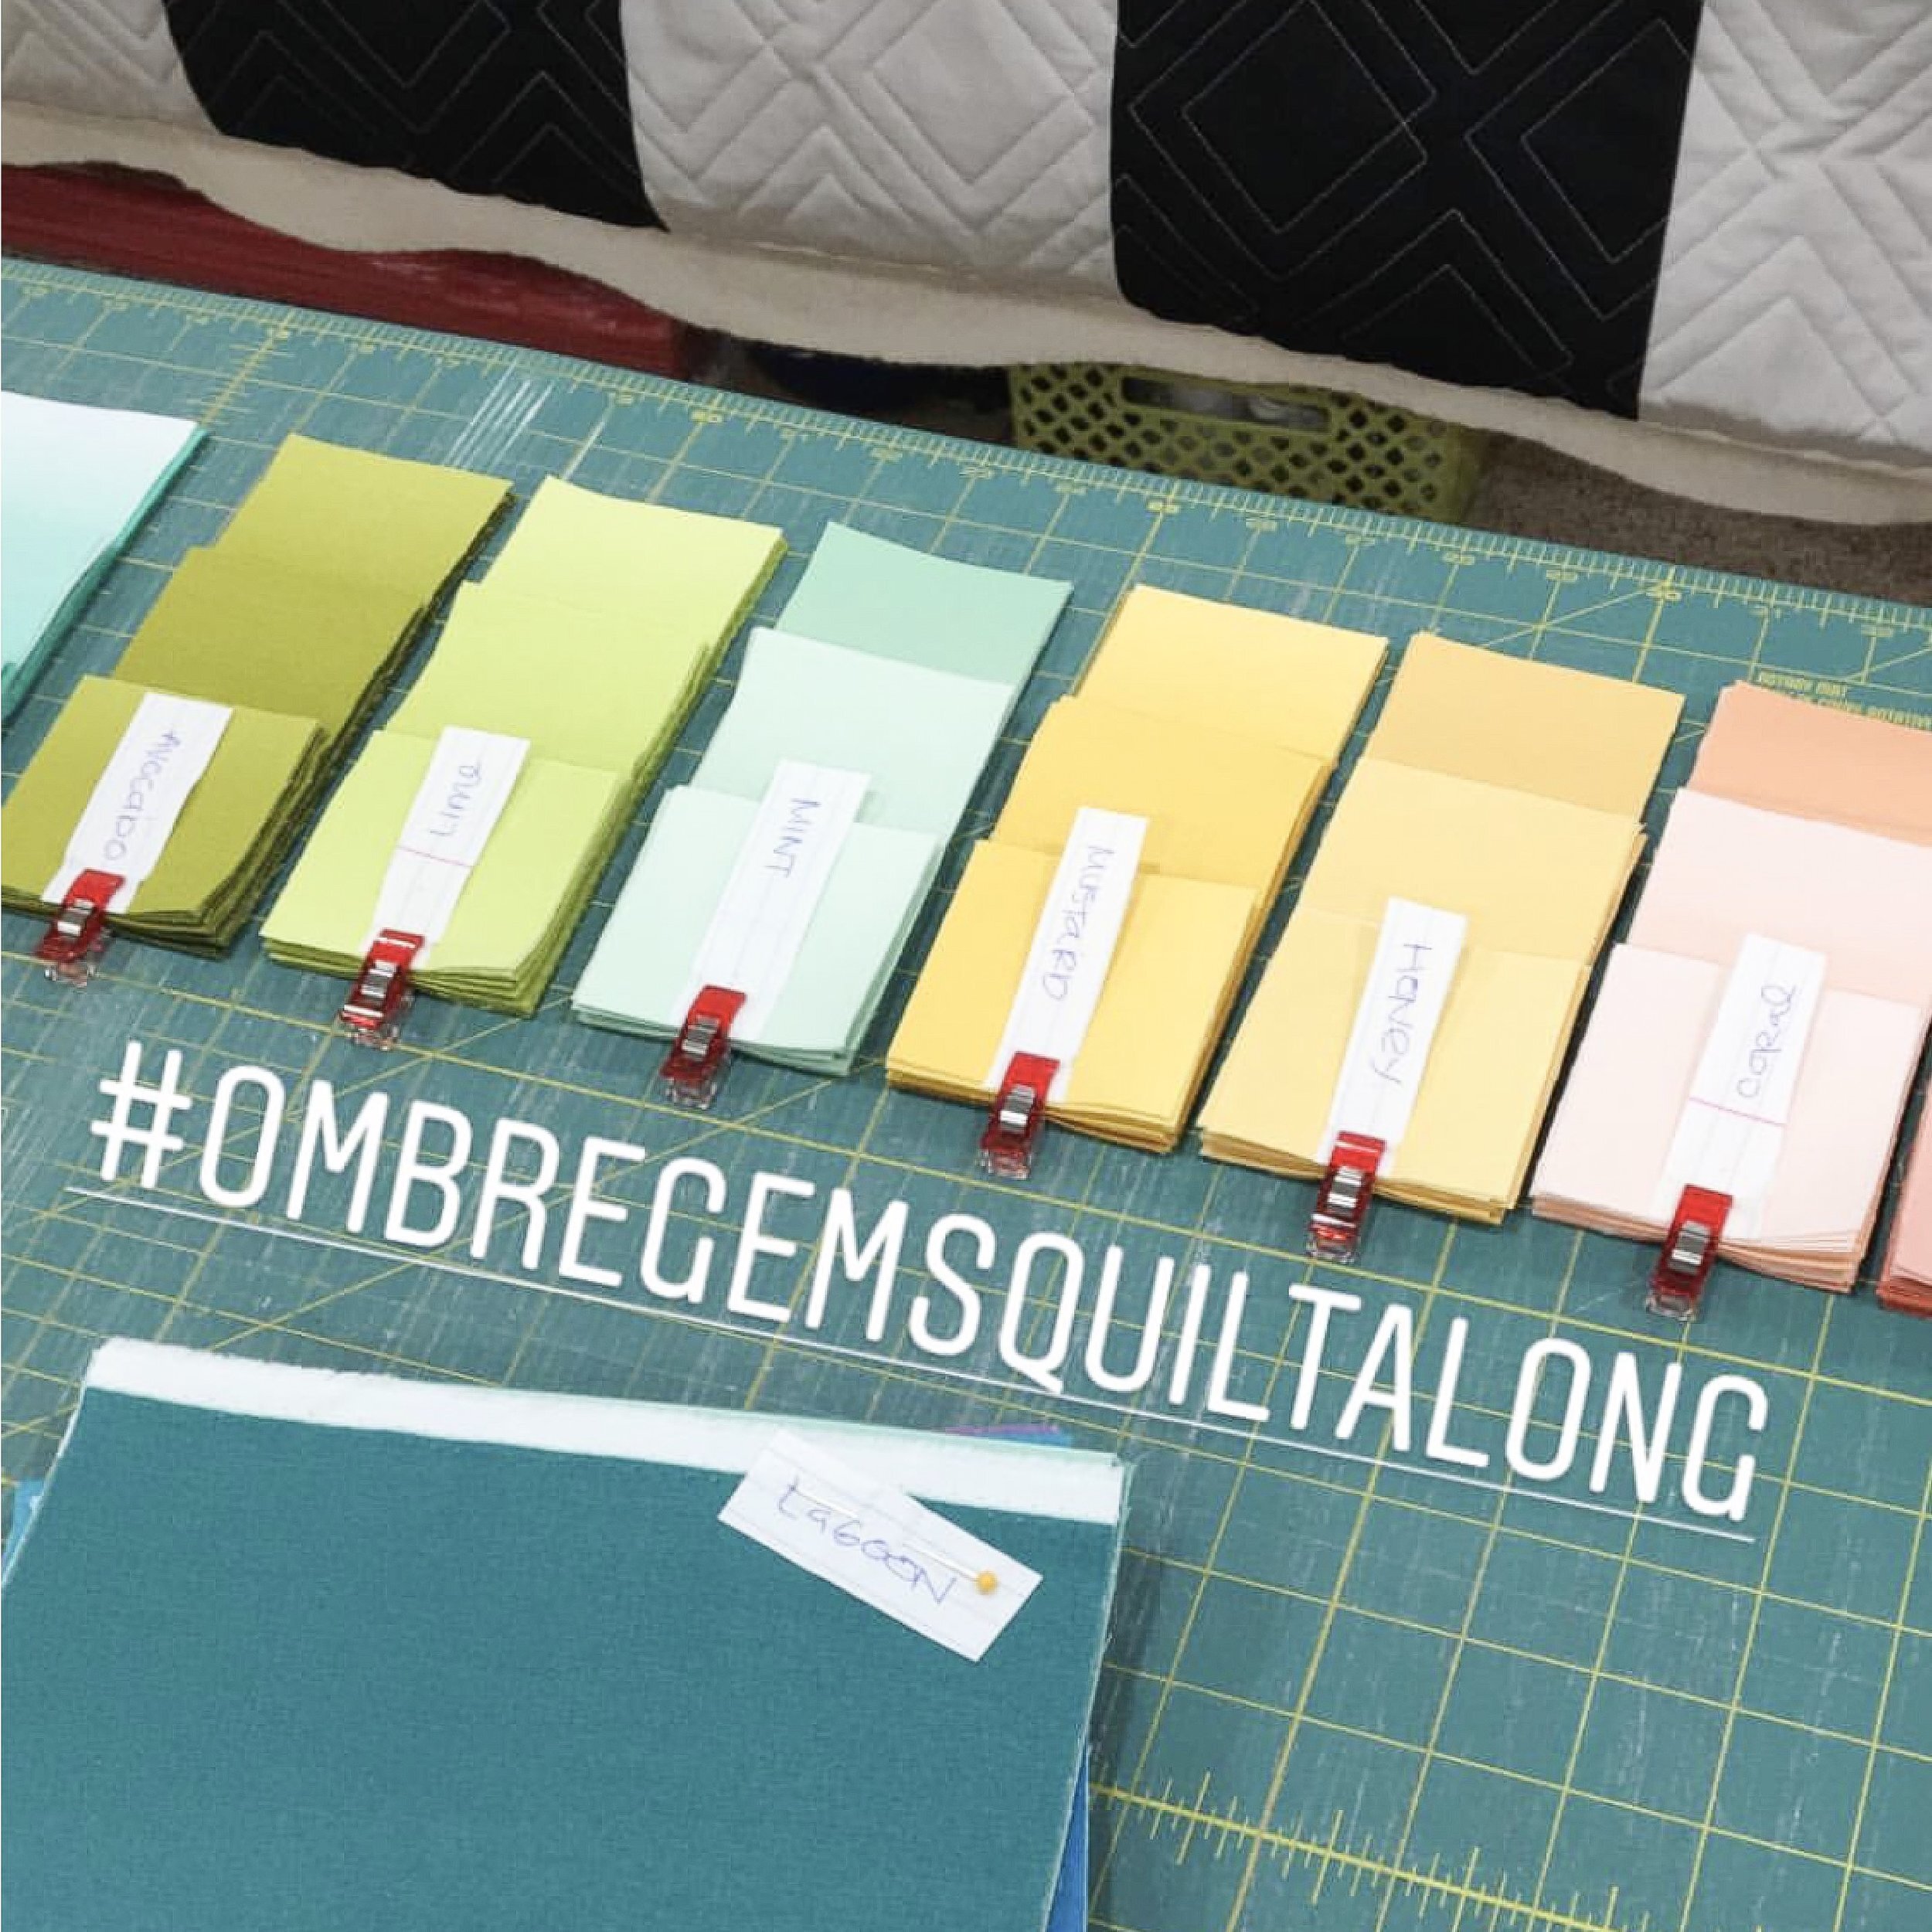
So, beginning of last year Emily said she was going to do another Ombré Gems sew along, and I totally jumped right in, even though I had a ton of work stuff going on at that moment and didn’t know how I was going to fit it in. I started and loved it sooo much! One thing that really helped is to have the blocks precut and clipped together, with the color name written on paper. Once you cut off the selvages, it’s hard to know what some of those colors are. It was the first time I had used Vanessa Christensen’s Ombré fabrics, so I was wondering how I was going to get that great fade from light to dark in my blocks. No worries, Emily shows you exactly what to do to cut the right piece in the right spot, so you can have awesome blocks, too. Like I mentioned above, the fabrics are by Vanessa Christensen from V and Co by Moda Fabrics.
The little red clips I’m using are called Wonder Clips, they are a life saver in so many ways. The bottoms are flat so it’s easy to sew until you get to the clip, then of course you can’t sew over it like a pin. They are great for binding, English paper piecing, sewing bags or zipper pouches and trying to keep all those layers together, and of course for keeping all your pieces together. The best price I’ve found is amazon, and yes...you’ll want the 50 pack. click here: https://www.amazon.com/Clover-Wonder-Clips-Red-50-Pack-x/dp/B004ZKPX8A/ref=mp_s_a_1_4?ie=UTF8&qid=1546708234&sr=8-4&pi=AC_SX236_SY340_QL65&keywords=wonder+clips&dpPl=1&dpID=51fJgM4kdRL&ref=plSrch
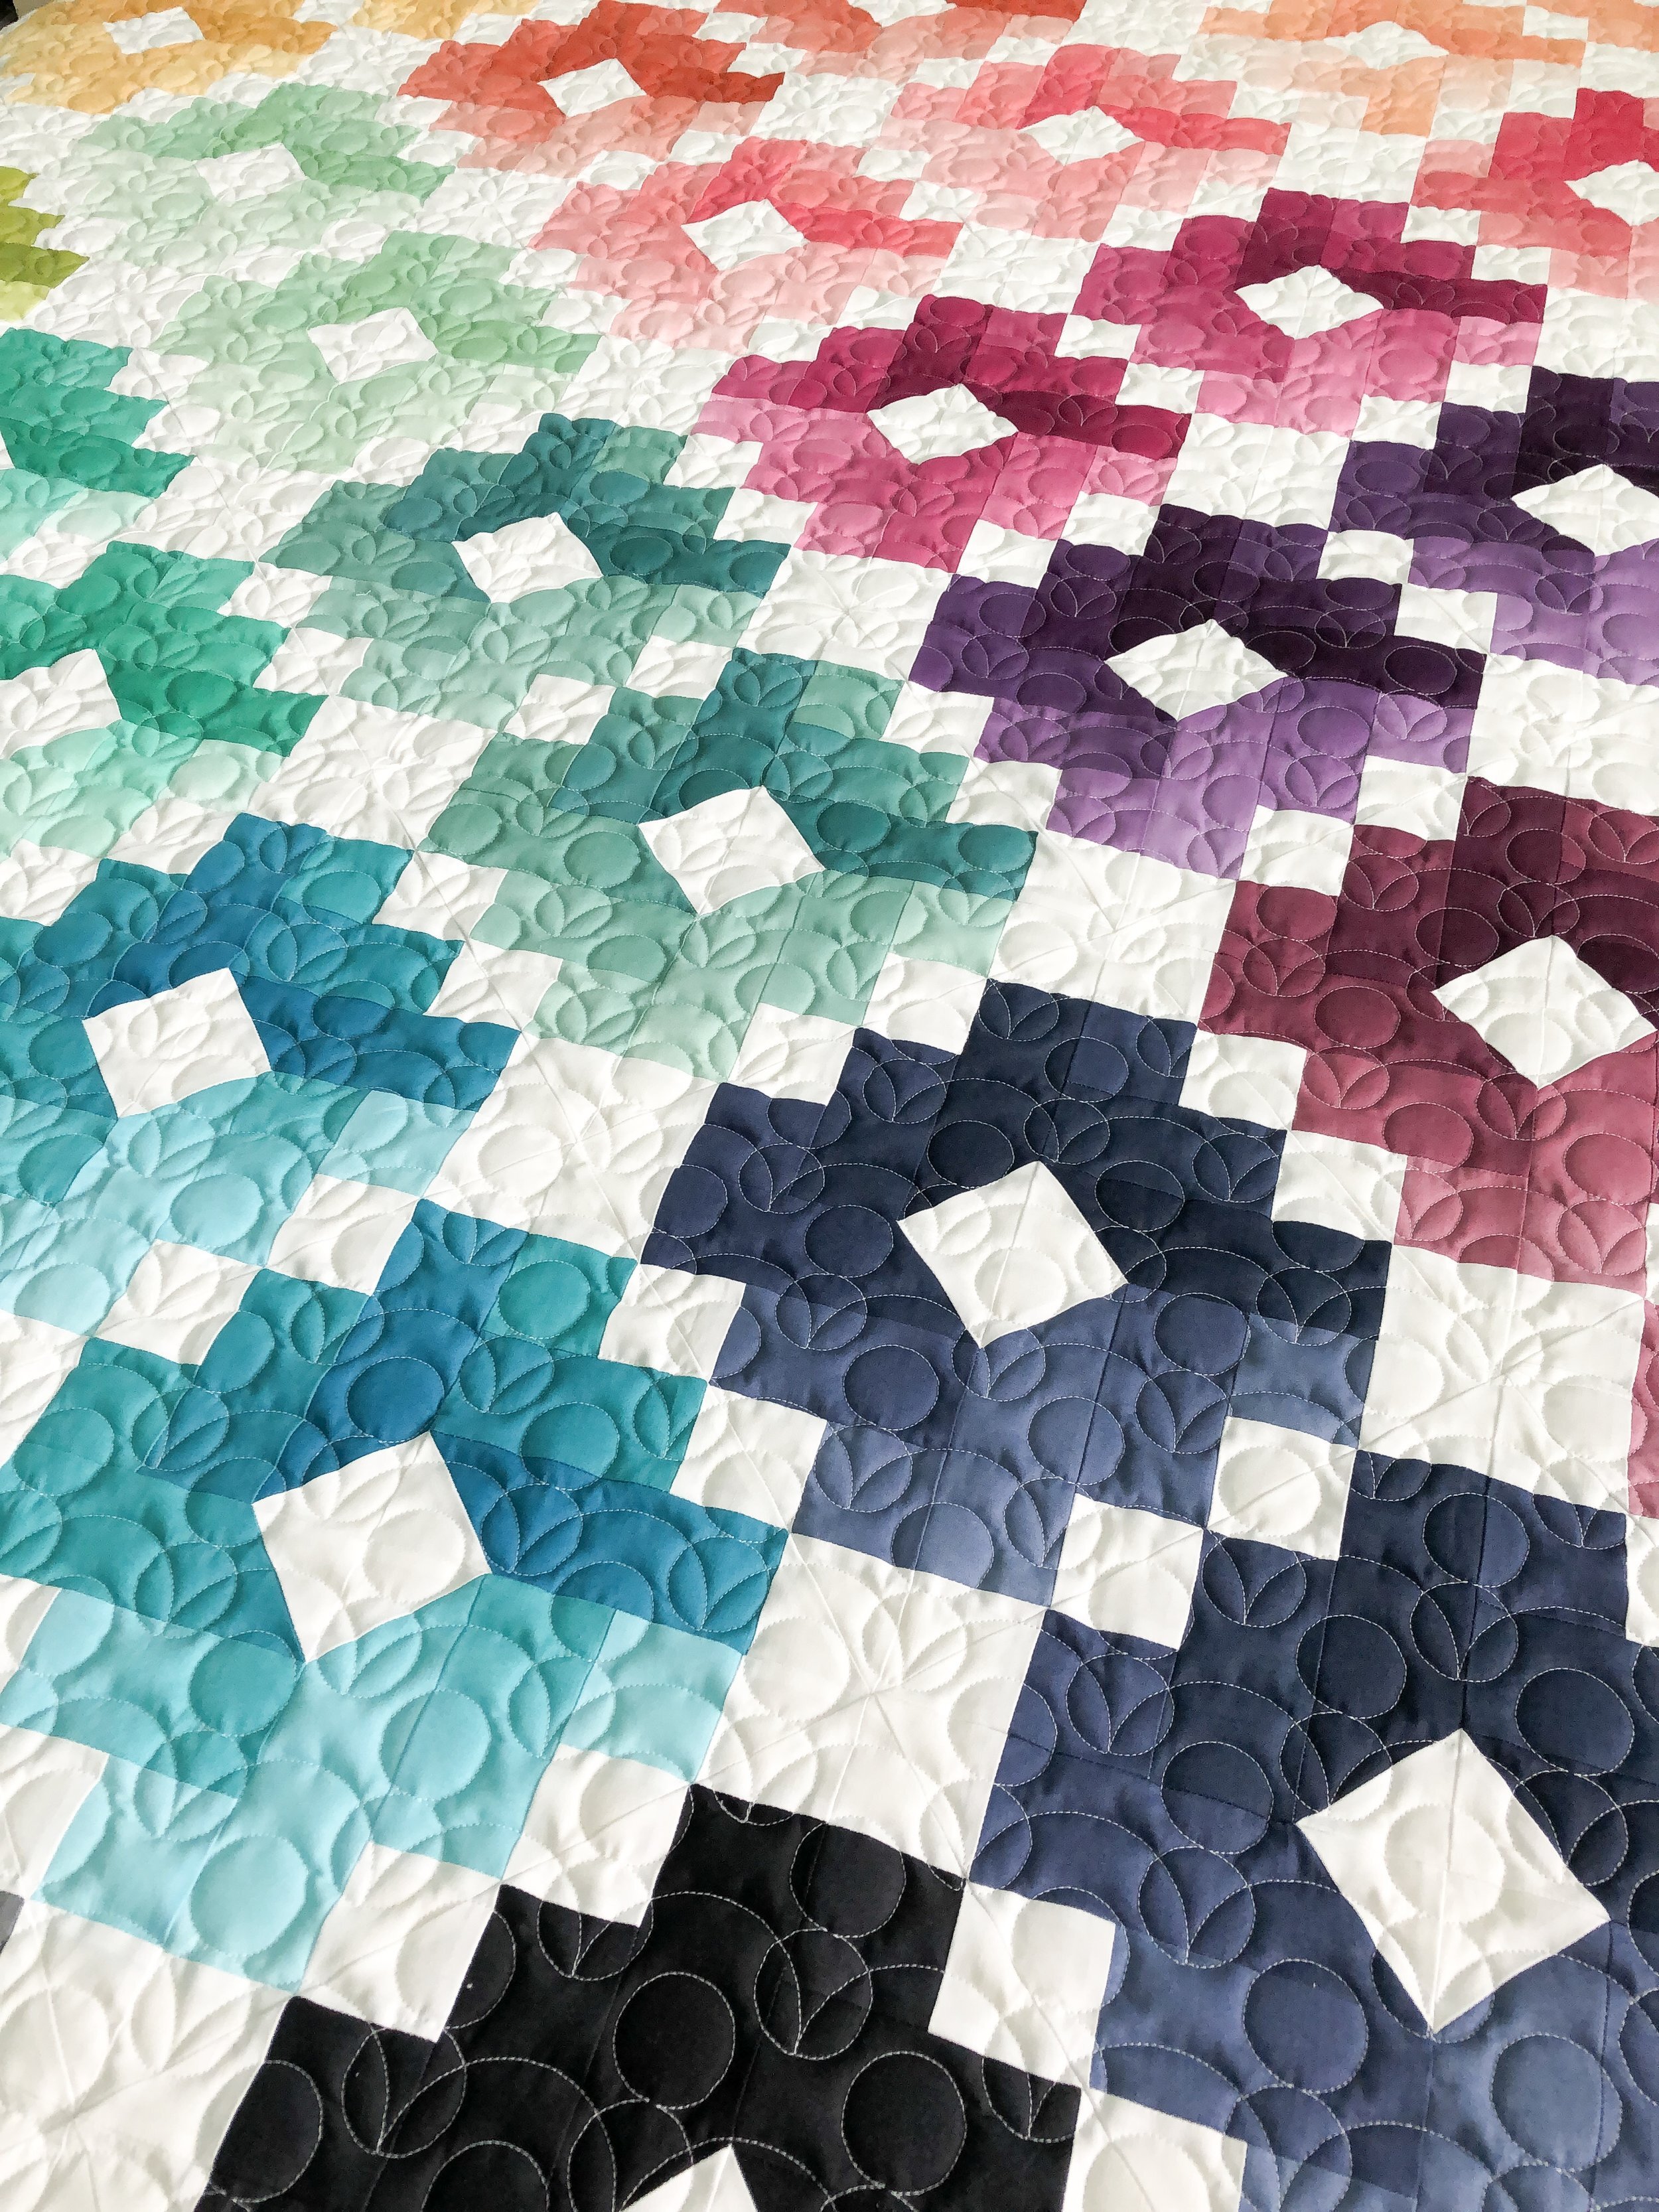
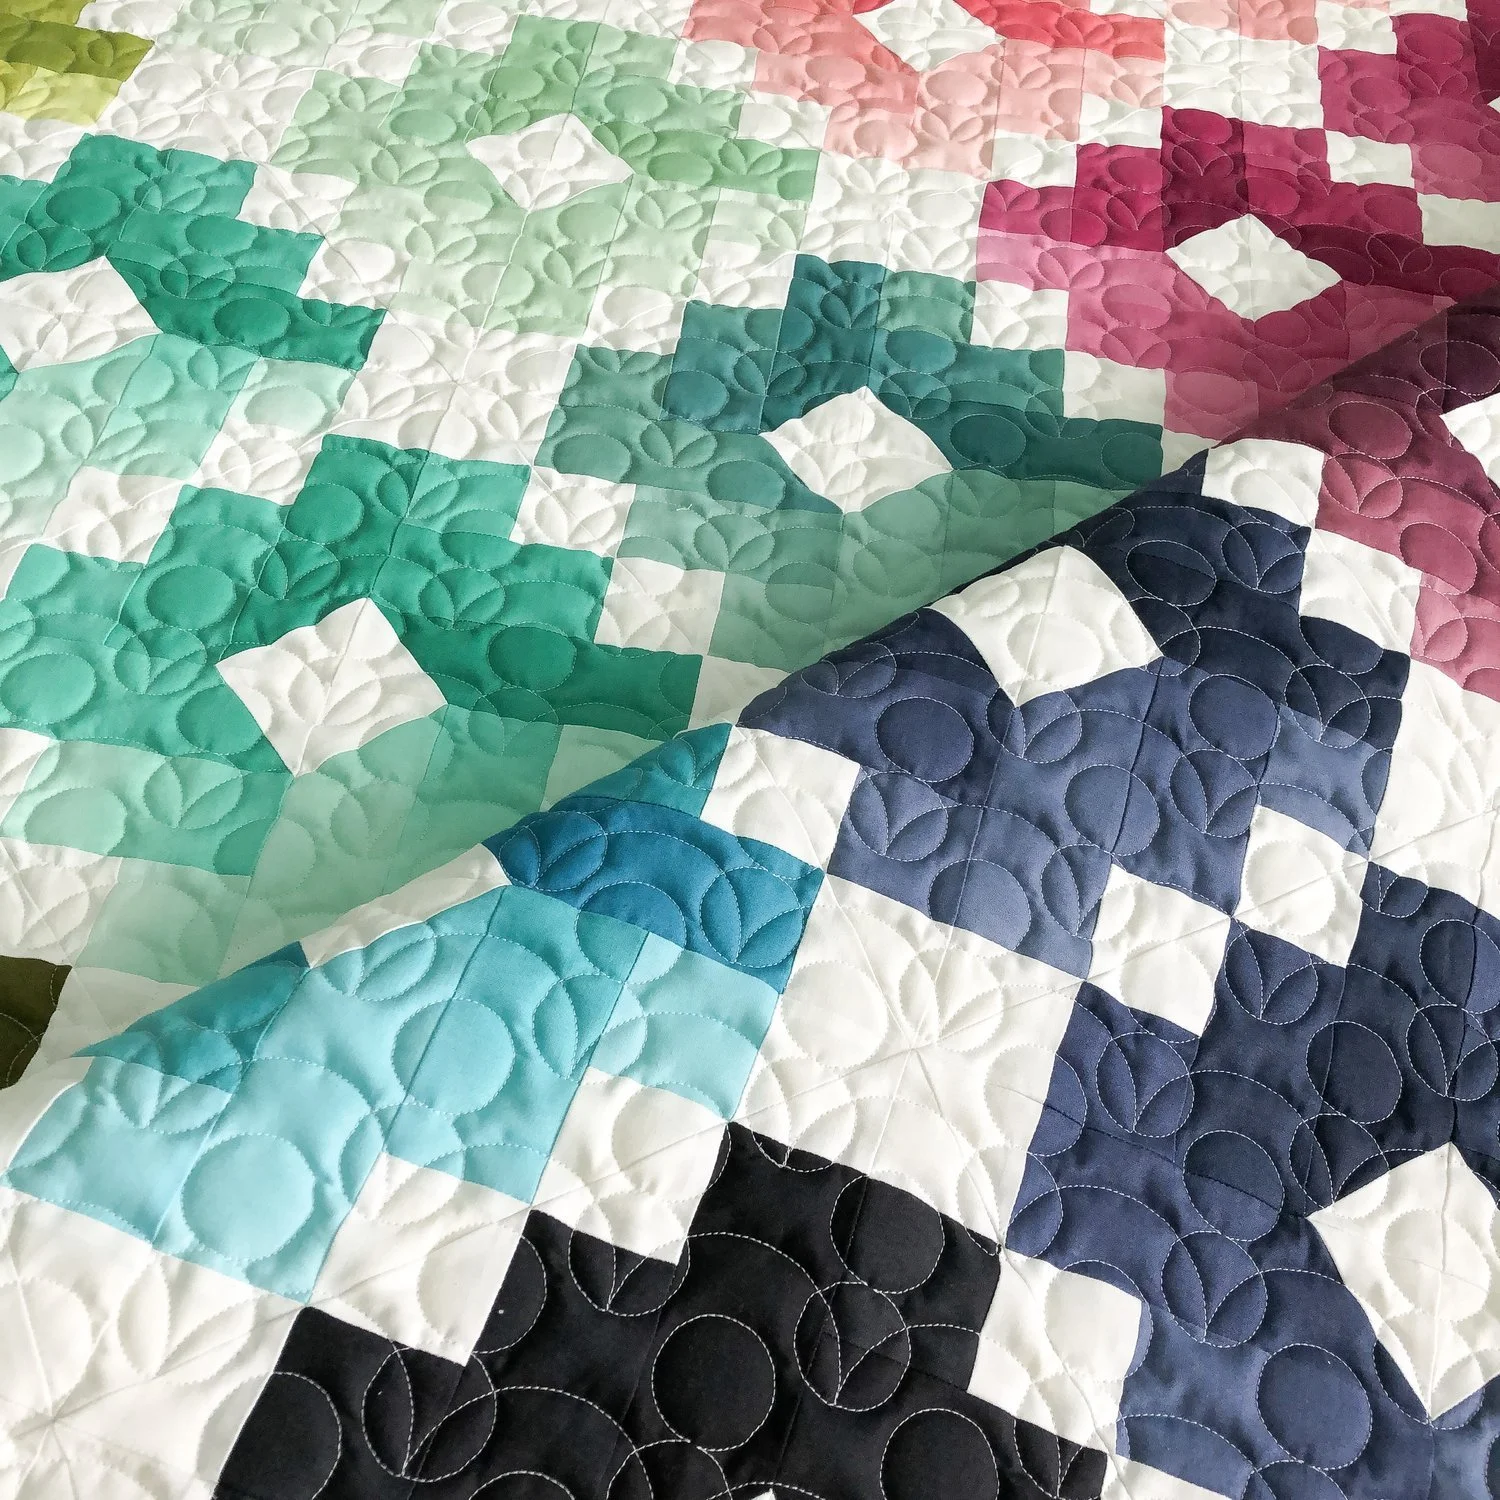
I finished this quilt in May, and thought I knew what I wanted to quilt on it. In the mean time, I had client quilts to quilt. Come December, when I was about done quilting for clients, I counted how many quilts I had quilted for the year and I was a few short from doing the same amount last year. So I looked in my closet and my beautiful Ombré Gems was sitting there. The dilemma, I had no idea what I should quilt on it. Seriously went back and forth soooo many times. I even did an Instagram poll in my stories with three options. The funny thing, I was totally going to quilt a triangle design on it. I actually started to and it was too big, so I unpicked it. Thankfully I only had two triangles quilted. I decided to do and poll and sleep on it. The triangles were a definite no...haha! Actually there were some who voted for all three designs. I know that any one of them would have looked great. But since I LOVED this quilt, I wanted to LOVE the quilting too, and not just quilt it to quilt it and then regret what I did later on. So, I eliminated the triangle design as an option. Which left me with my Squared©️ Or Beaded Clam©️ design. Squared won the poll hands down, and I was sooo close to quilting it. I even spent a few hours thinking out loud, just trying to decide. My mom was listening...haha! I actually decided to do Squared, and then changed my mind. Let me tell you a few reasons why. I wanted to first and foremost soften up the quilt. This quilt is beautiful and has a lot of hard lines, and I knew my Beaded Clam design would be great at softening it up. Second, I have two other quilts that I really want to do, and they both need to have Squared quilted on them. I love my Squared design, but I want to use a variety of my designs on my quilts, instead of using the same one over and over. I also, quilted Beaded Clam on a client quilt back in August, right after I released it, and I really wanted it on one of my own quilts. Now, I just hoped I was going to LOVE it as much as I LOVE the quilt. And, I do!! So much!!! You may be wondering why I went into great detail telling you about my thought process. The funny thing, most times I can look at a quilt and know exactly what to quilt on it. Especially if it’s an edge to edge design. I usually draw inspiration from the fabrics or the quilt pattern. The hard thing about this particular quilt, it’s all solid fabric...well except for the backing fabric. (Look for it below) Which is another reason I chose this design. I quilted this design at a height of 3”, and that is a perfect size.

Here is a look at my Beaded Clam©️ design, not to be confused with my Beaded Clam Take Two. Beaded Clamb is available only in my shop at: https://www.quiltingit.com/shop/beaded-clam-1
Urban Elementz picked up my Beaded Clam Take Two design, and it’s available in paper and several different digital formats...if you’re a paper pantograph quilter check that out. https://www.urbanelementz.com/beaded-clam.html
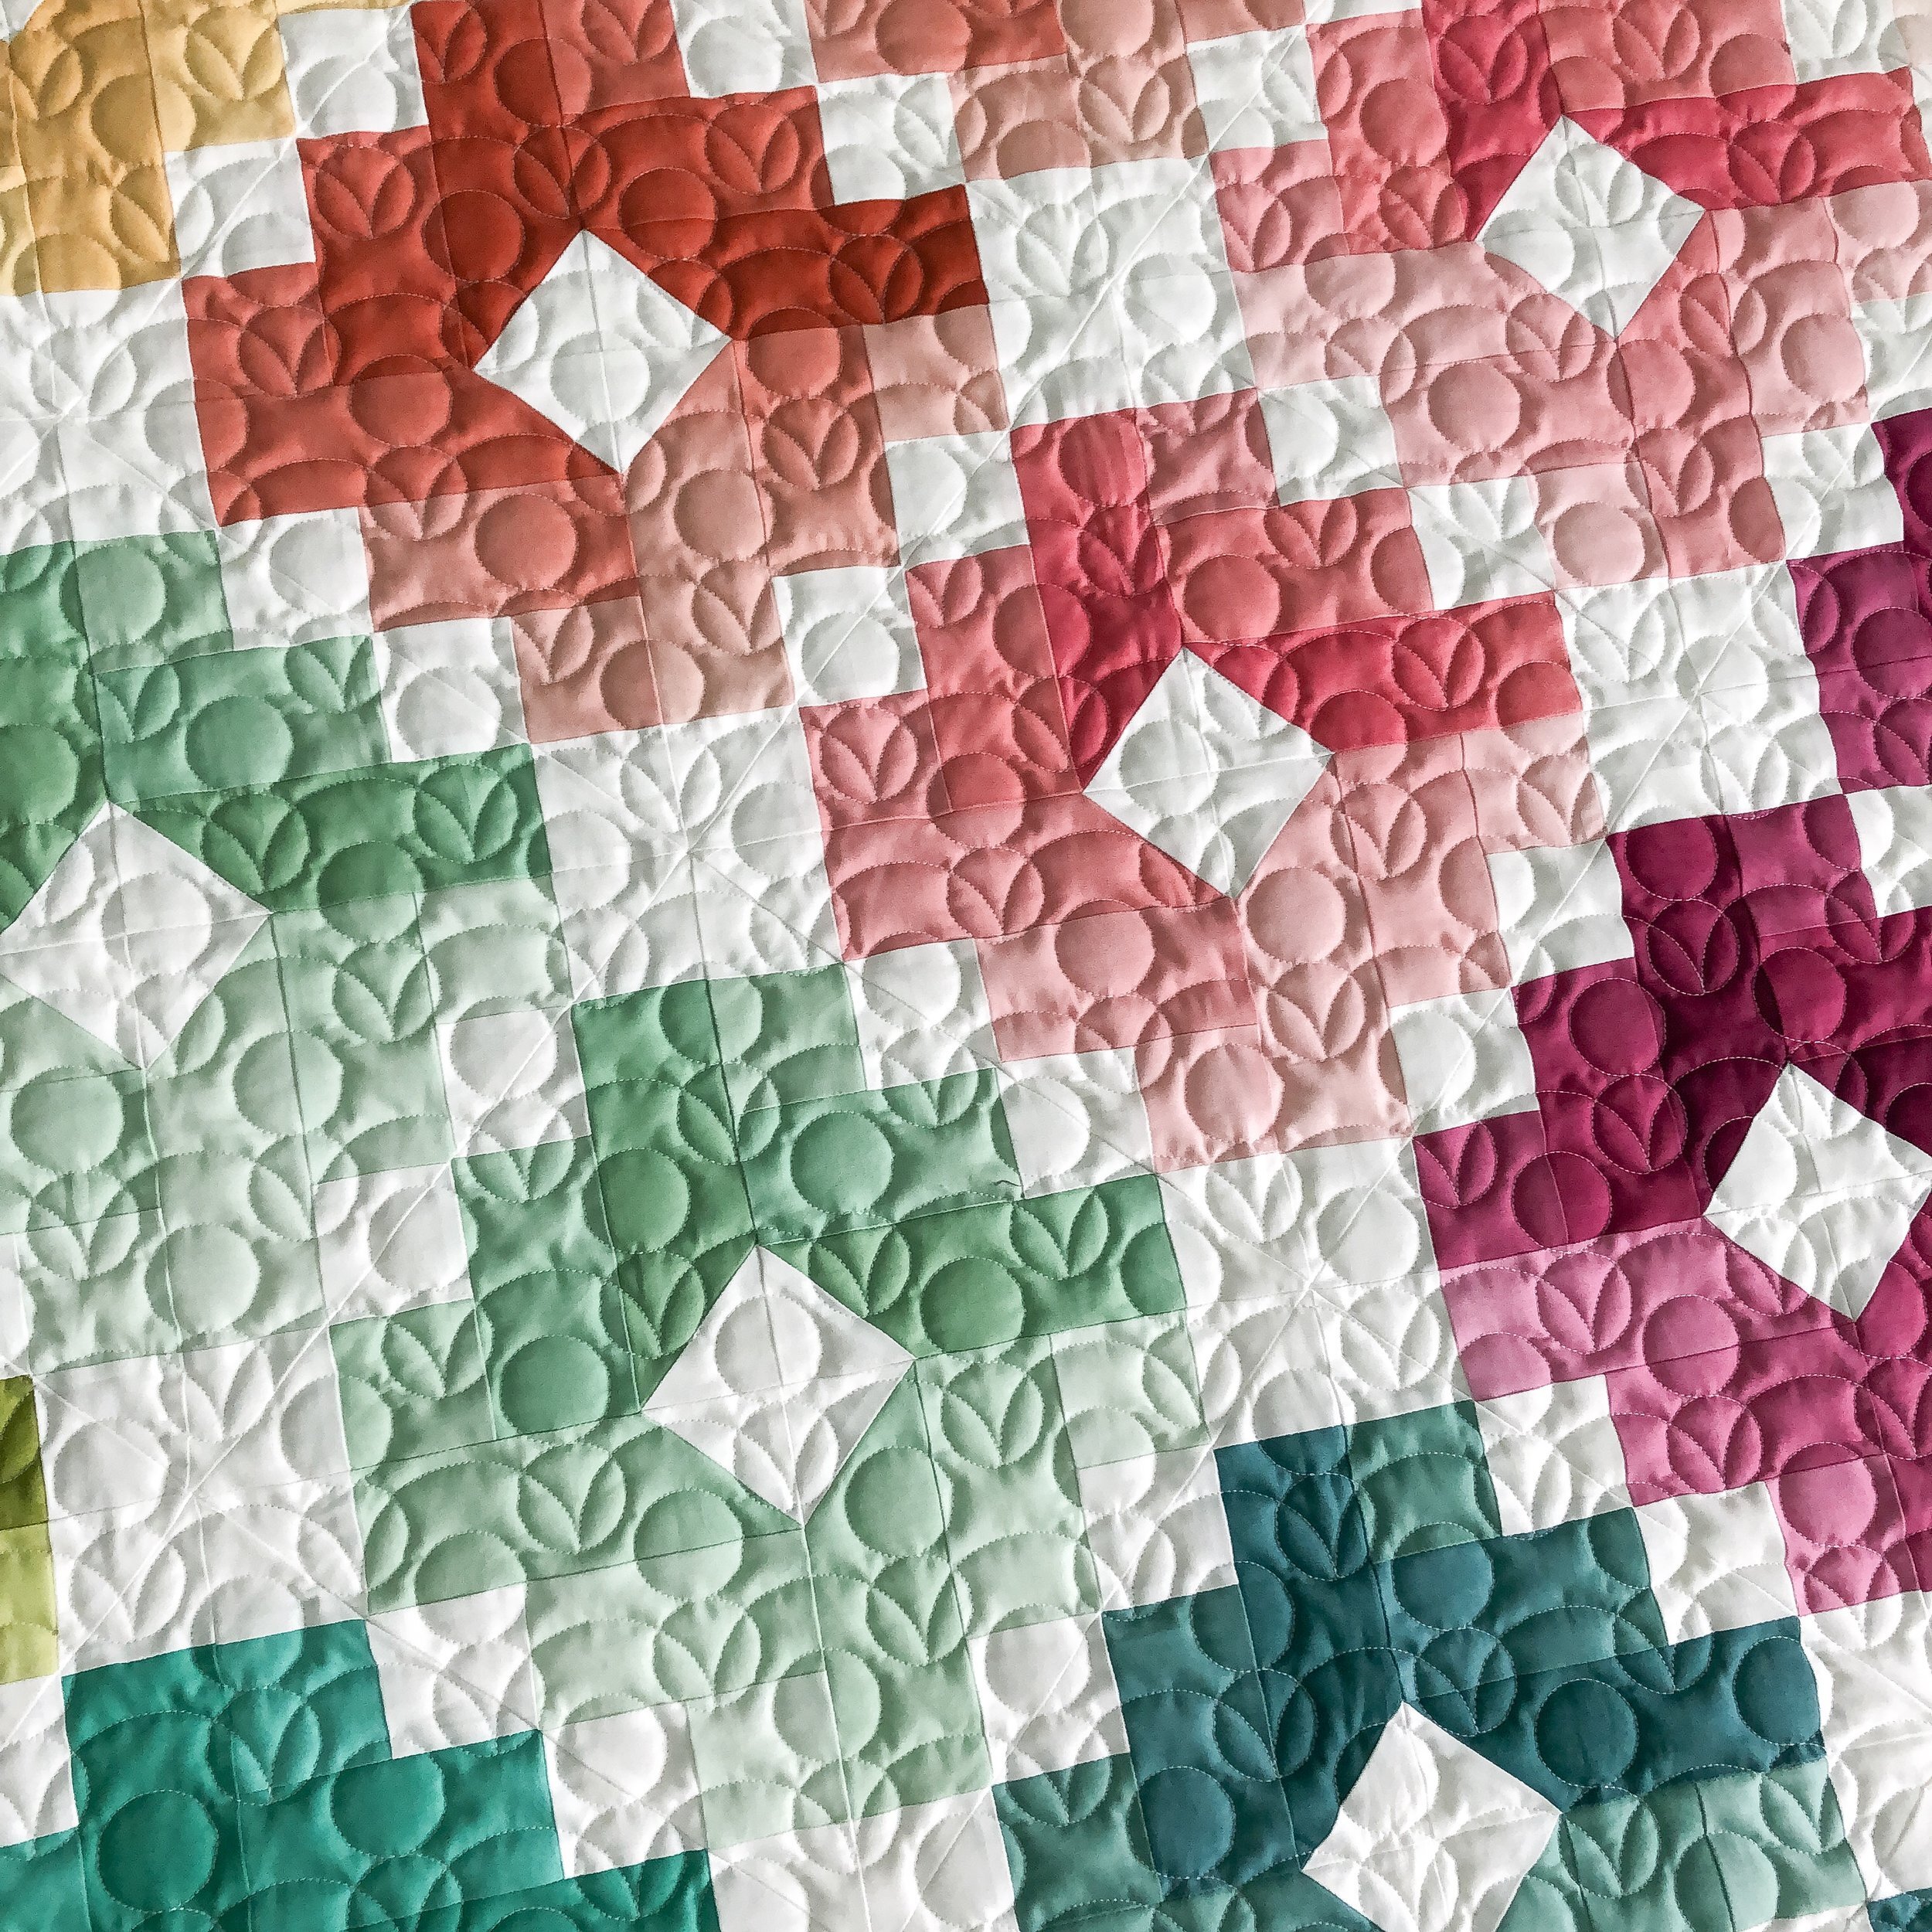
These aqua, pink, magenta, greens, and red...are my favorite combination of color on this quilt!!
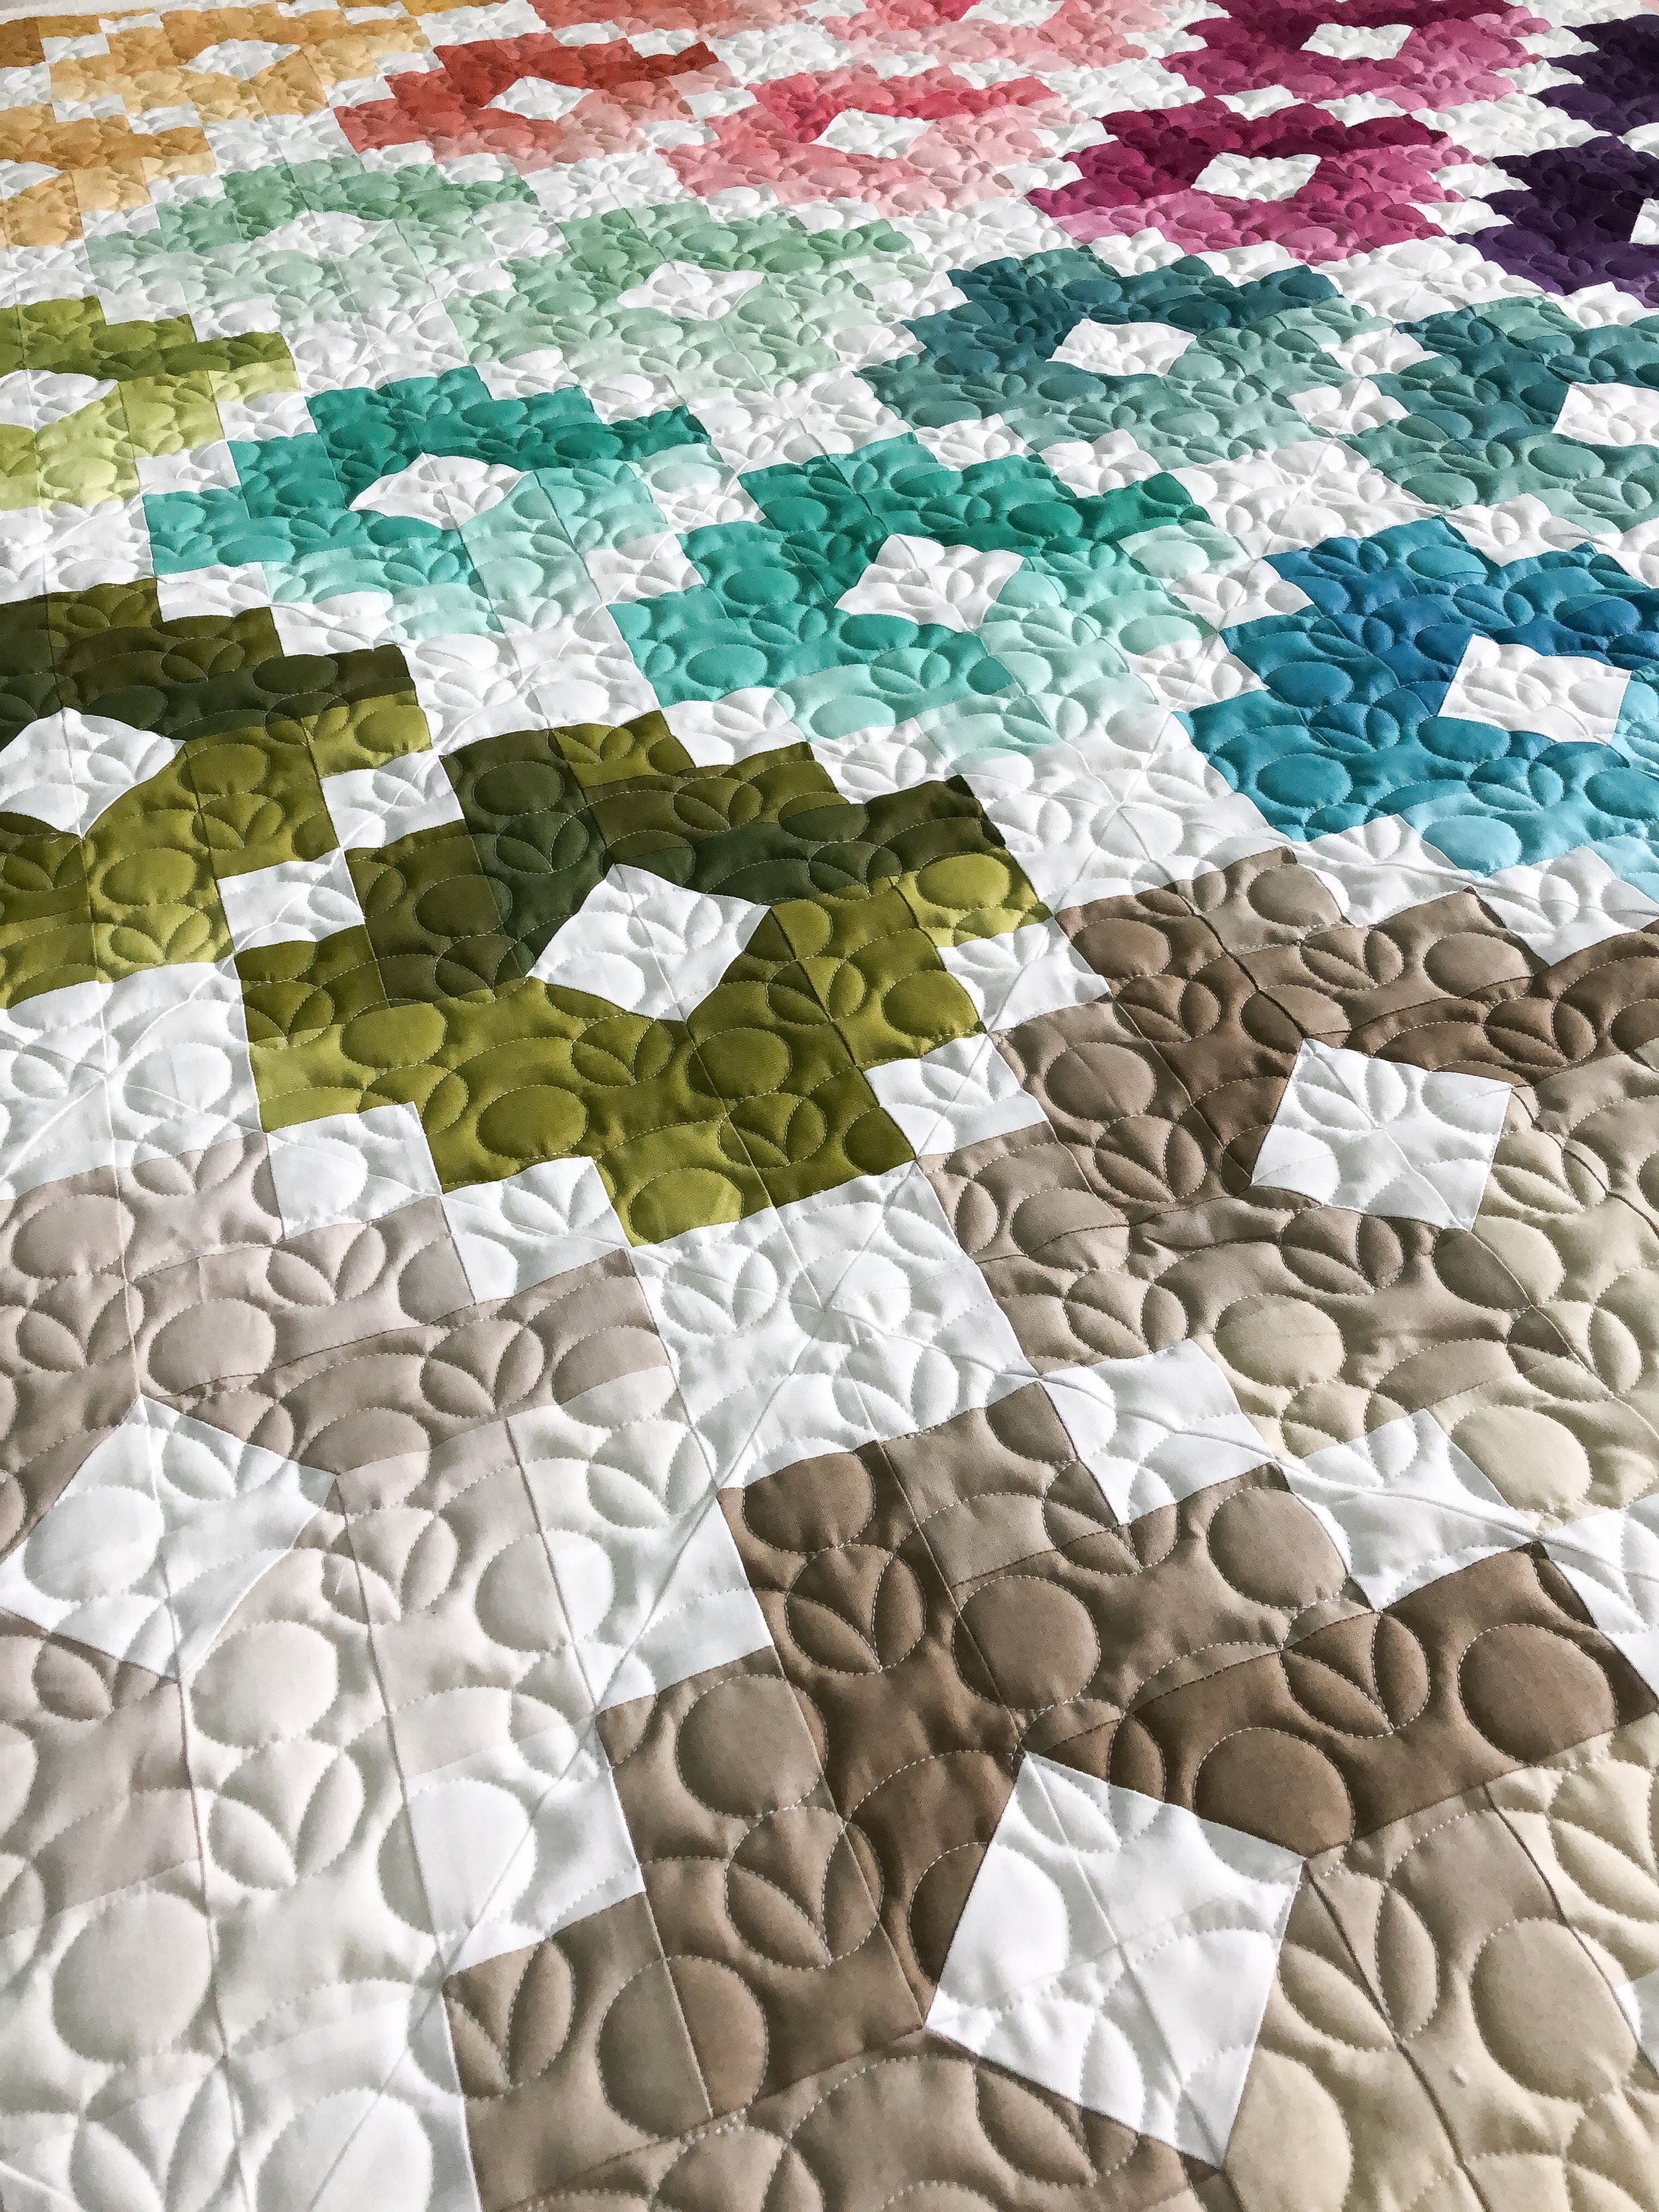
Look at all that awesome quilty texture!!! Love love love it!! To create this texture I actually used two layers of batting. I’ve done that before on a few of my custom quilts and on a client quilt...but never on a quilt I was going to just do an edge to edge quilting design on. The base layer is my favorite 8020 cotton poly blend batting from Winline out of Ogden Utah. Then on top of that I used a layer of Hobbs wool. I tell you, this combo is heavenly!!! I haven’t had any problems with the batting bunching or anything weird, but as I roll I check to make sure everything is still flat and straight. Especially when quilting a quilt that is pieced on the bias. Sometimes batting likes to bunch on me, with blocks sewn on point...I don’t know why, when I’m advancing the quilt on the machine. The reasoning behind using two layers of batting, is to add extra loft and help the quilting POP! I actually rubbed my hand on this quilt dozens of times to feel the texture. Haha! I used a white 30 tex poly wrapped poly Perma Core A&E thread.

I’ve been sleeping with this on top of my bedspread, and it’s been so cozy and warm in the freezing northern Utah winter we are having.

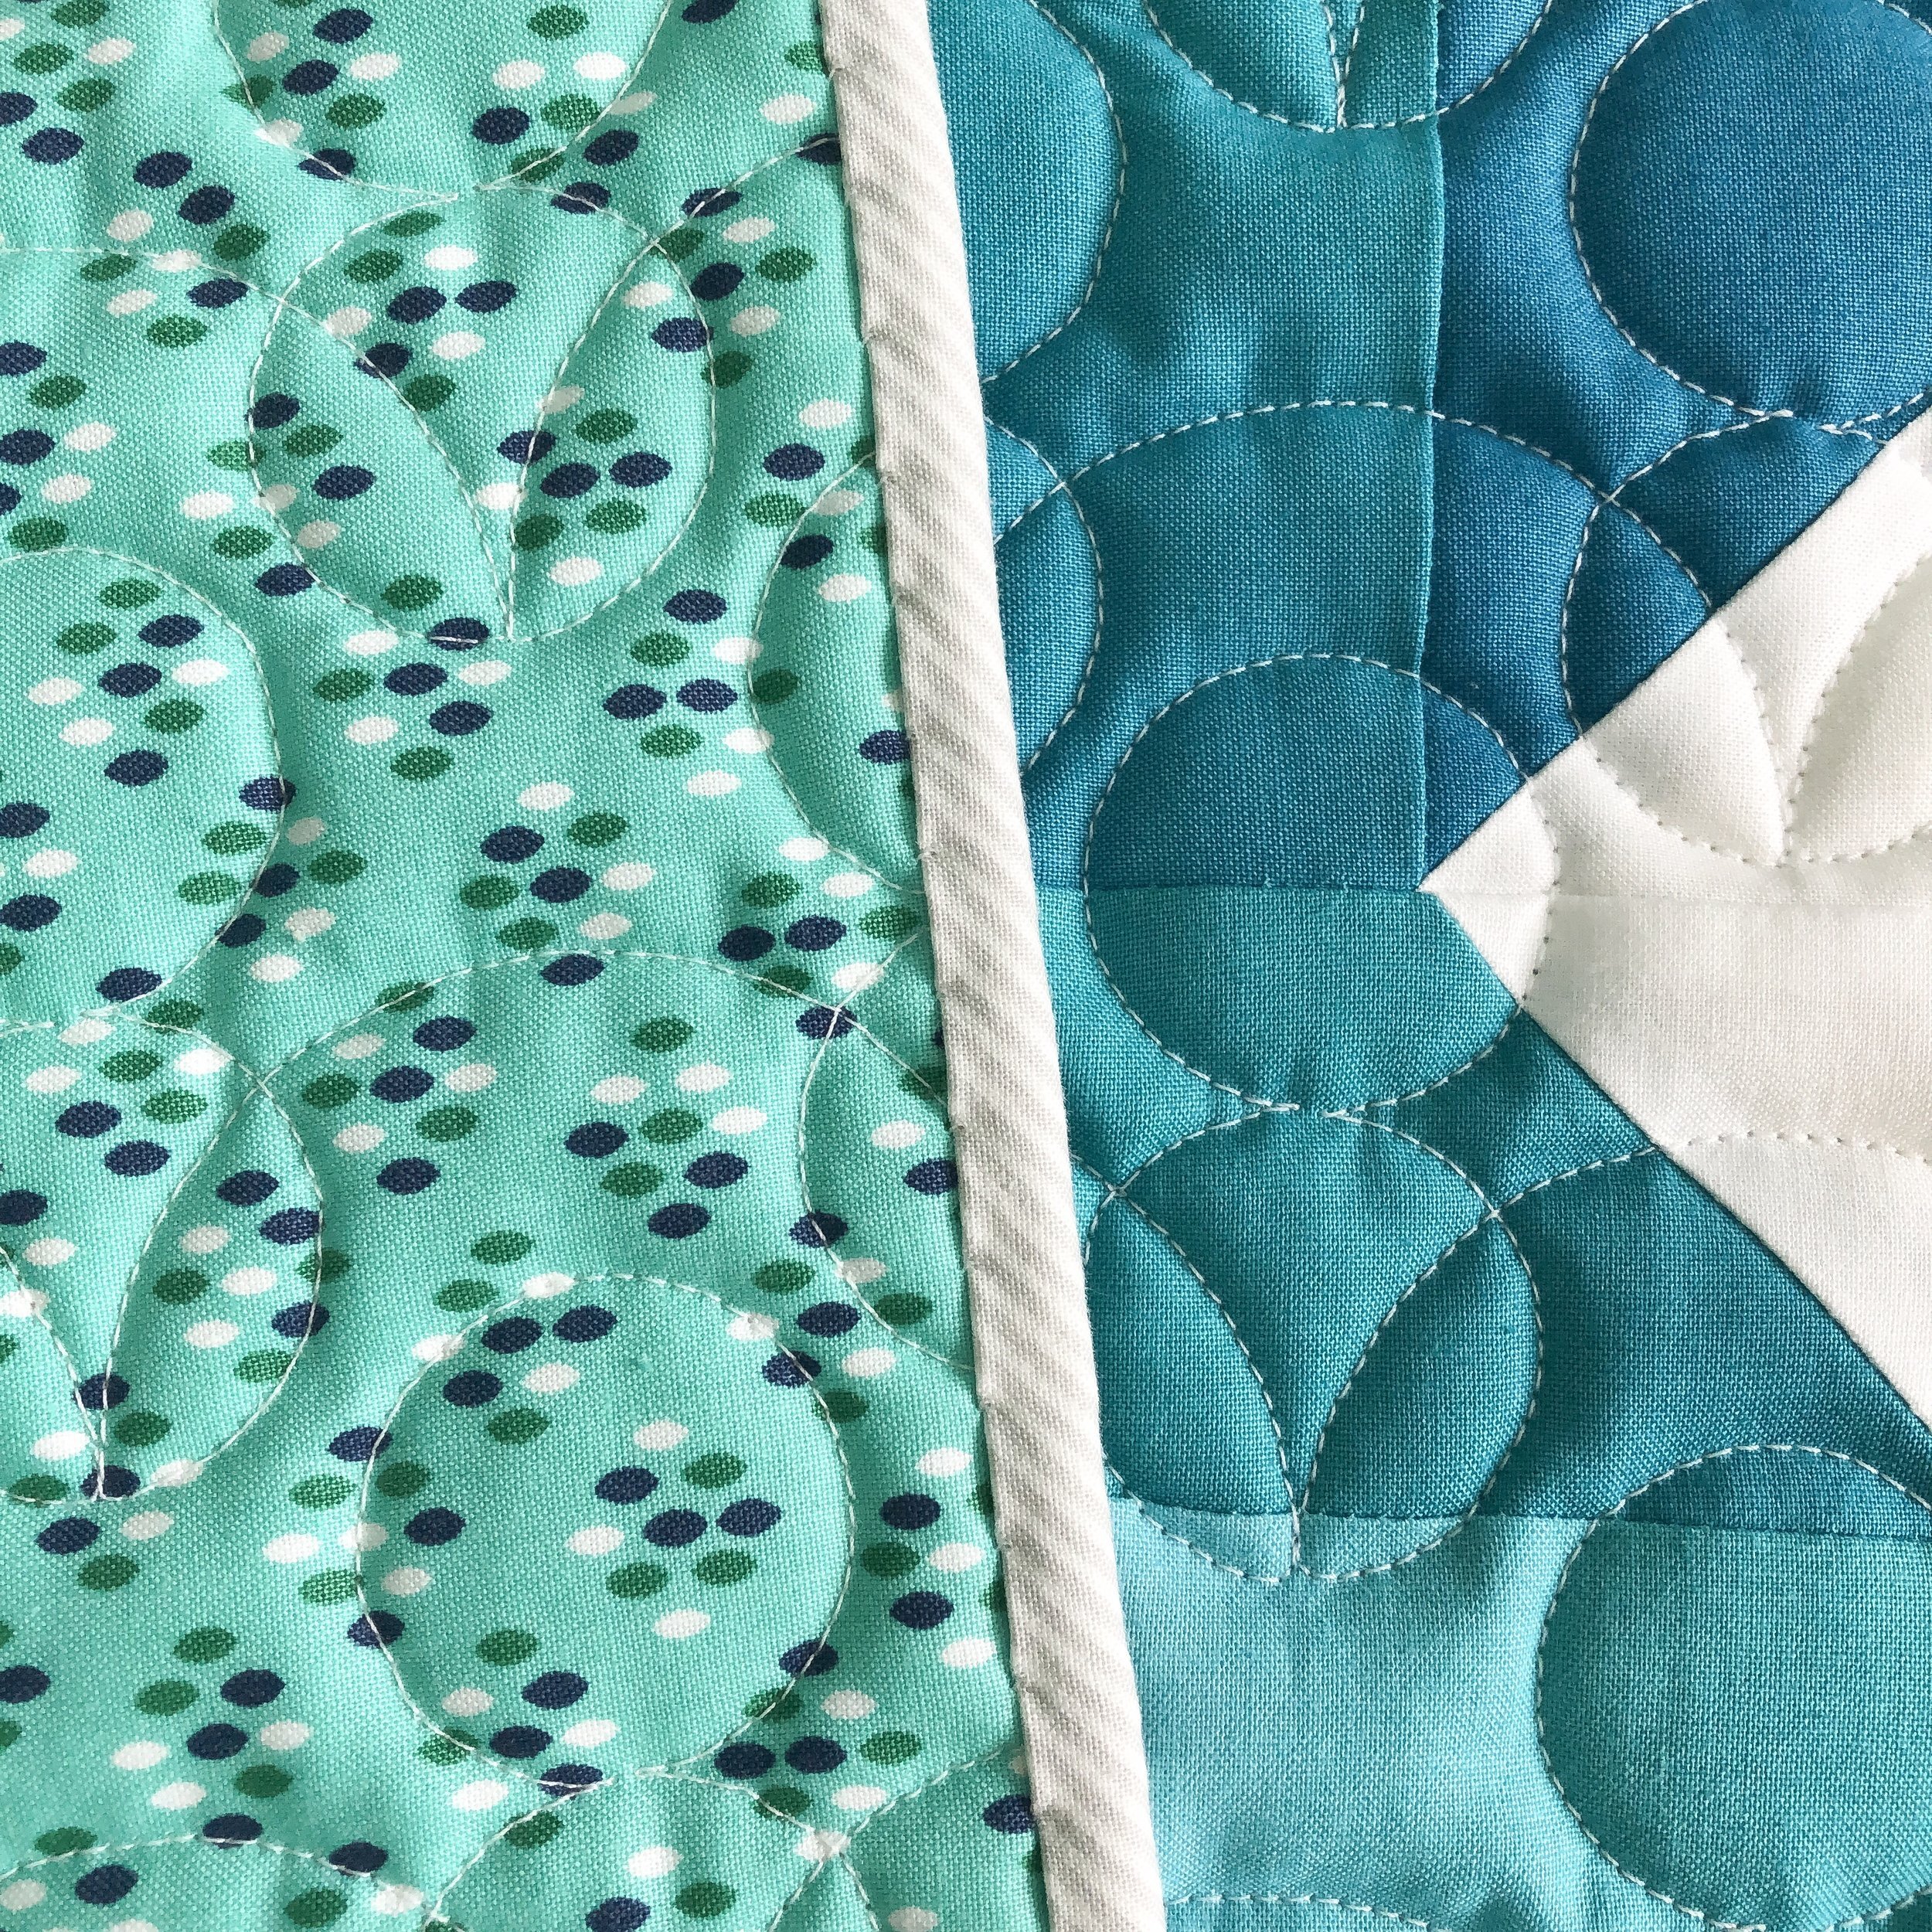
See...here is the backing fabric!! Does it make a little more sense why I wanted to quilt this design on this quilt??? The dots have a rounded top and bottom mimicing the scallop in the quilting. I think they pair nicely together. This quilting may not be your favorite, that’s okay. I also love this grayish bias pinstripe for the binding. It’s a Bonnie and Camille basic by Moda. The backing fabric is from one of Vanessa Christensen’s old fabric lines, Color Me Happy by Moda.
This is also my first quilt that I was able to put my custom made label on!! I love these!! Of course I went for Navy/Aqua, with white...they are my favorite color combo! So many of my quilts have navy and aqua in them, so I thought it would complement them nicely. I also love the clean simple look and the cute font they did my name in.
Custom Labels 4 U, did them for me. They are awesome to work with, and I got a ton of labels for a great price!! Here is their website... https://www.customlabels4u.com/mobile/custom-woven-labels.htm
If any of you are wanting more specifics about my labels...size, fonts, colors... comment below, and I can dig up the emails with all the details. I had these made awhile ago, so I can’t remember everything off the top of my head.

Thanks for following along and reading my story!! When I was teaching my longarm quilting classes, deciding on which patterns to quilt, was something they all wanted to learn more about. So, I hope you learned a little something about the process I use. I definitely want to include the “why I chose this design” in my posts, in hopes that can help those of you who are new to quilting.
Hope you’re having a great day!! Happy quilting!!
- Leisha